

sWaP smart Watch and Phone User Manual

user guide
smart Watch and Phone


smart Watch and Phone
Contents
Welcome to your sWaP™ watch 2
Getting started 4
Inserting your SIM card 4
Fitting the battery 5
Removing the battery 5
Charging the battery 6
Switching on and off 7
Using the stylus 7
The clock face 8
Menu map 9
Making and receiving calls 10
Call history 11
Using the wired earphones 11
Using the Bluetooth headset 12
Your Phone book (Contacts) 14
Adding a new entry 14
Copying entries 15
Finding an entry 15
Messages 17
Writing an SMS message 17
Reading an SMS message 18
SMS message settings 19
Writing an MMS message 20
Reading an MMS message 22
Voice mail server 23
Media 24
Camera 24
Photo album 26
Video recorder 27
Video player 28
Audio player 29
Sound recorder 32
FM radio 33
WAP 34
Settings 37
Pen Calibration 38
Organizer 38
File manager 44
Themes 44
Stopwatch 45
User Profiles 46
Phone Setup 47
Call Setup 49
Network Setup 51
Security Setup 51
Restore Factory Settings 53
USB link to your computer 53
Important safety information 55
2
Welcome to your sWaP™ watch
A revolutionary step forward in wrist-top
communication and so much more.
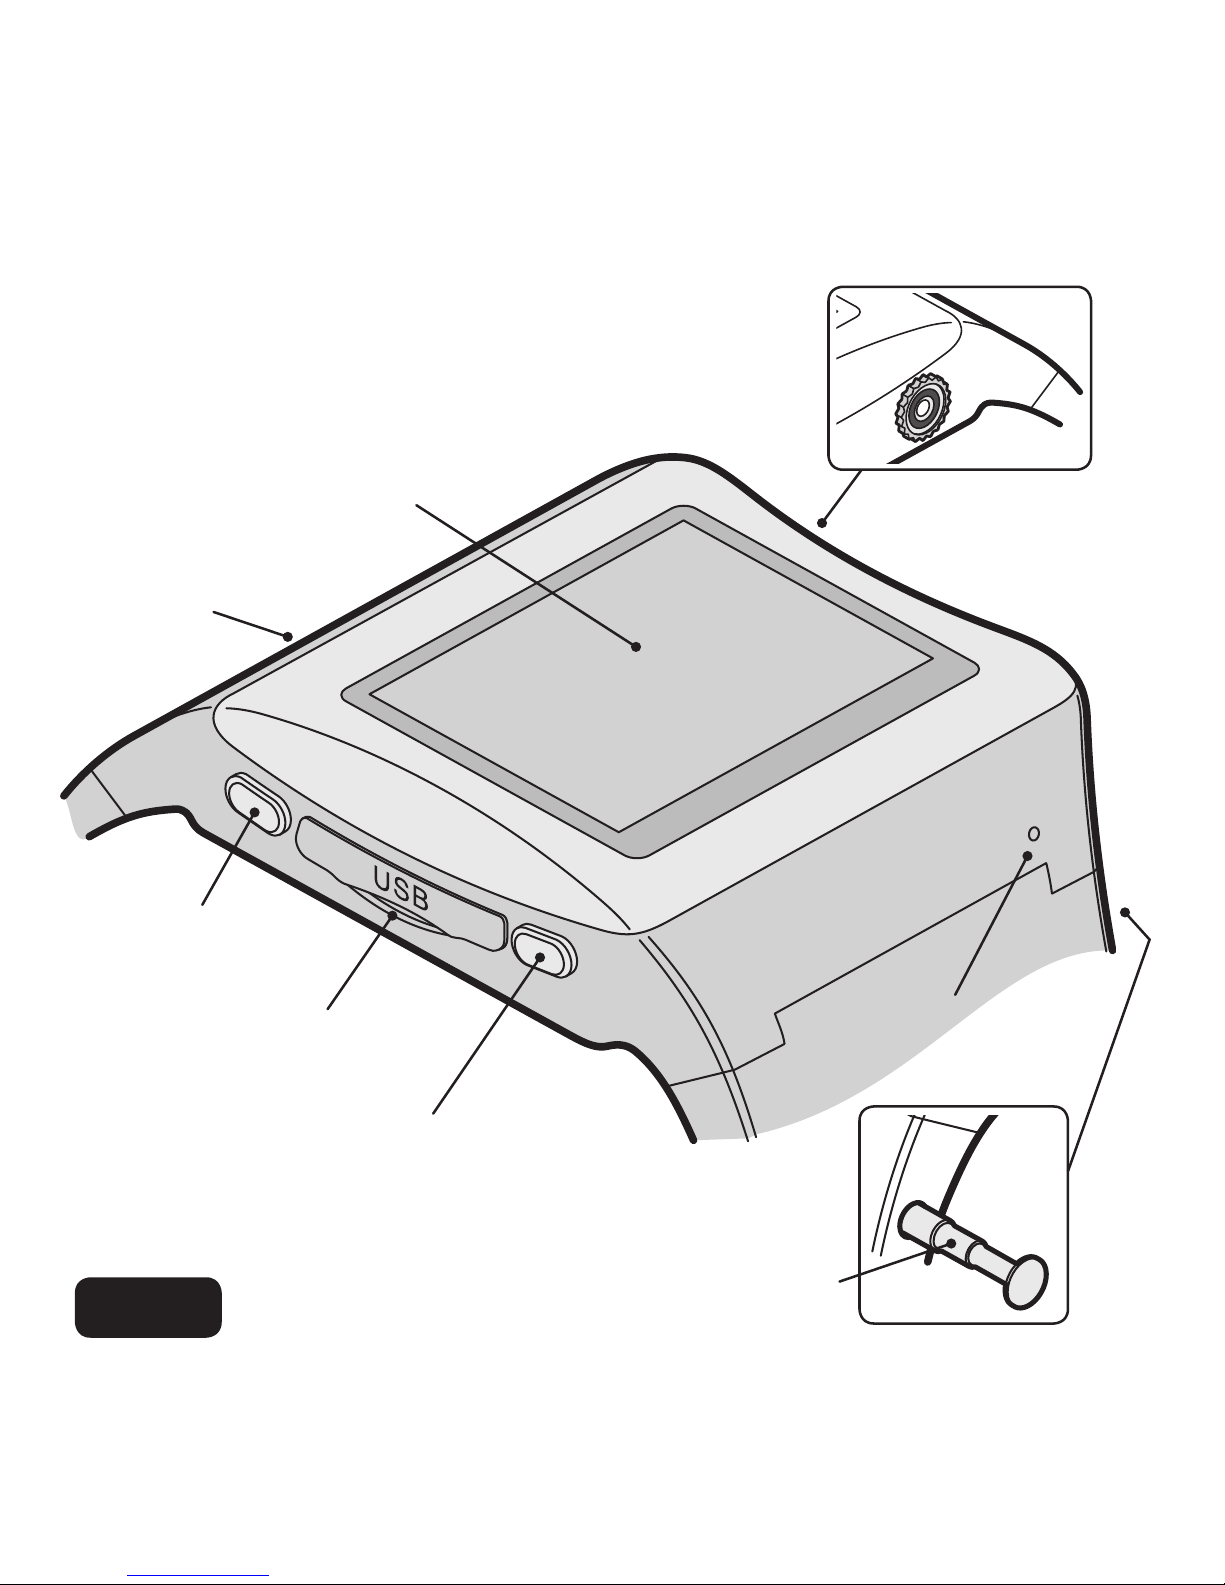
1.46” high resolution
touch screen
Speaker
Microphone
High resolution
camera
USB port with
protective cover
Upper button:
Power on/off or exit
Lower button:
Menu or select. Press & hold
for voice activation
Compact stylus
stored in the strap
Active

3
Lower button:
Menu or select. Press & hold
for voice activation
Signature
1.46” high resolution
touch screen
Speaker
Microphone
High resolution
camera
USB port with
protective sliding cover
Upper button:
Power on/off or exit
Compact stylus
stored in the
shoulder
Please take a moment to read
the important safety instructions
located at the rear of this guide.
4
Getting started
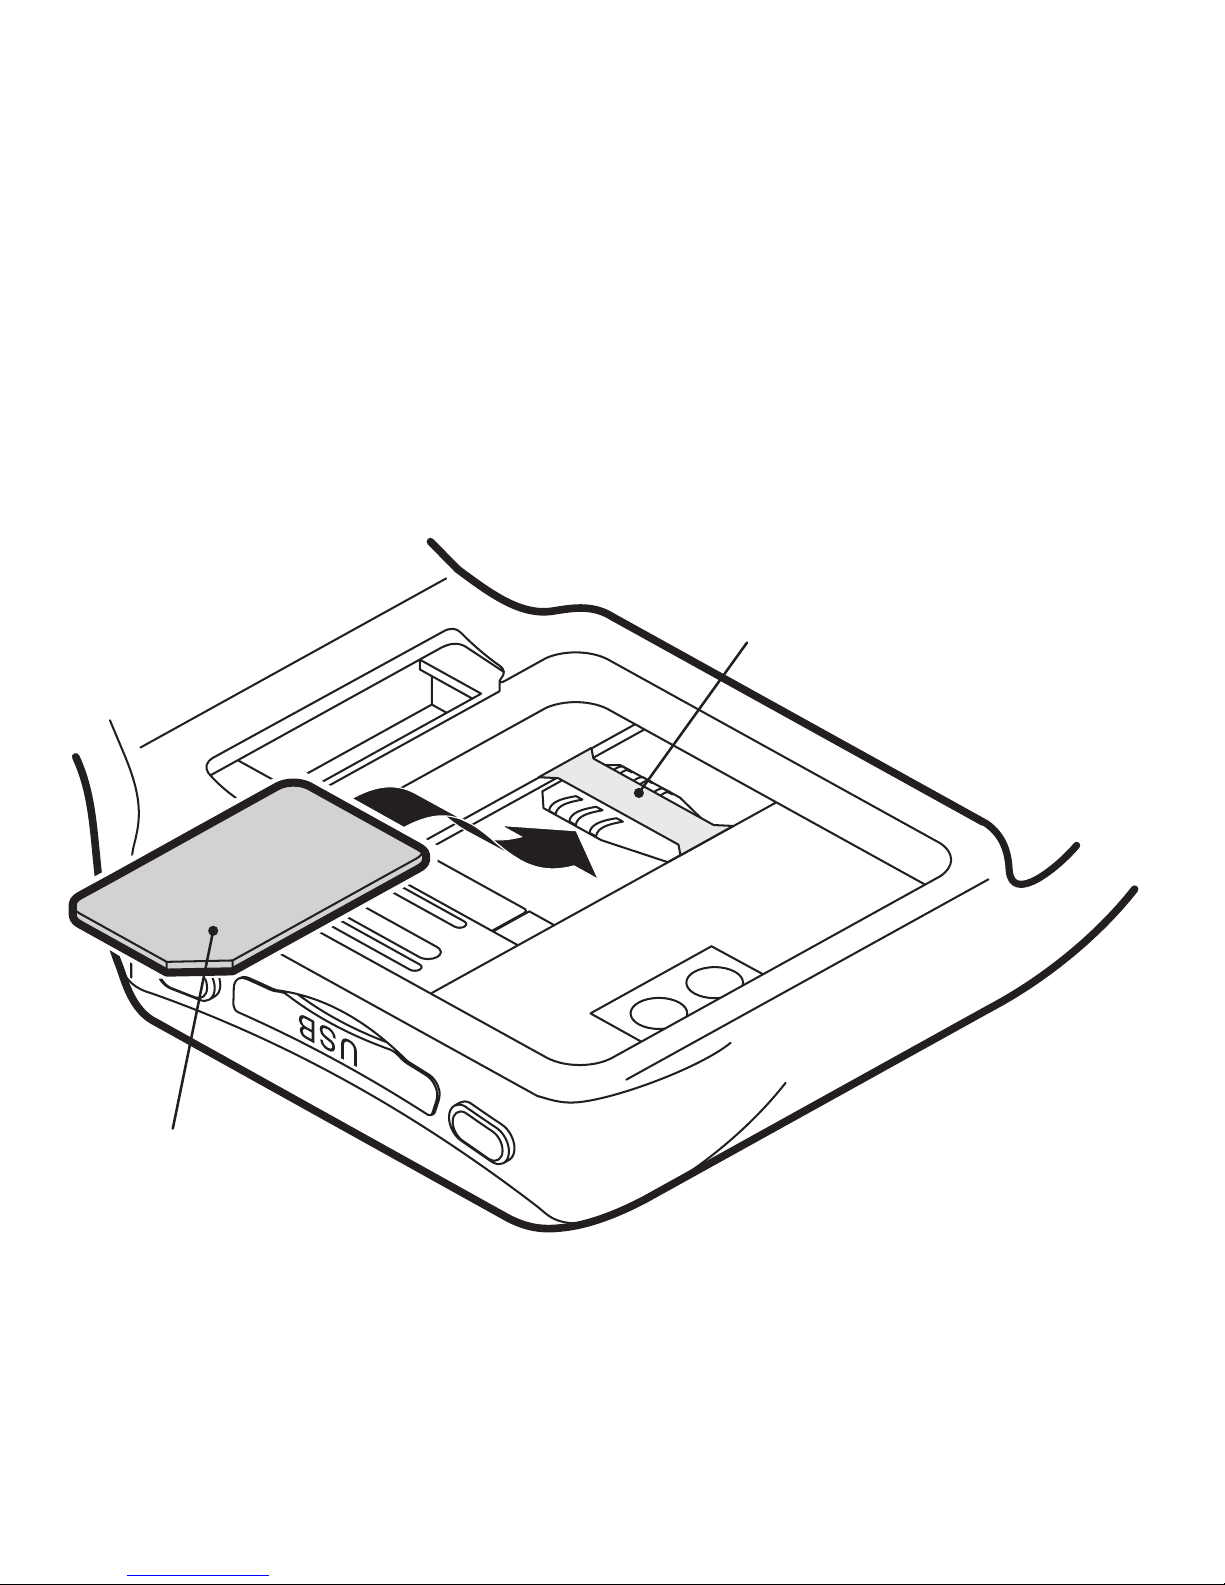
Inserting your SIM card
Slide your SIM card, with its gold contacts downwards, underneath the thin
steel retaining strap. The notched end
of the SIM card must be facing towards
the USB port.
If the battery is already fitted, see the
next page.
Note: Avoid touching the gold contacts
of your SIM card.
Steel retaining strap
SIM card with
contacts down
and notch facing
the USB port
The Active model is
shown. The procedure
for the Signature
model is identical.
5
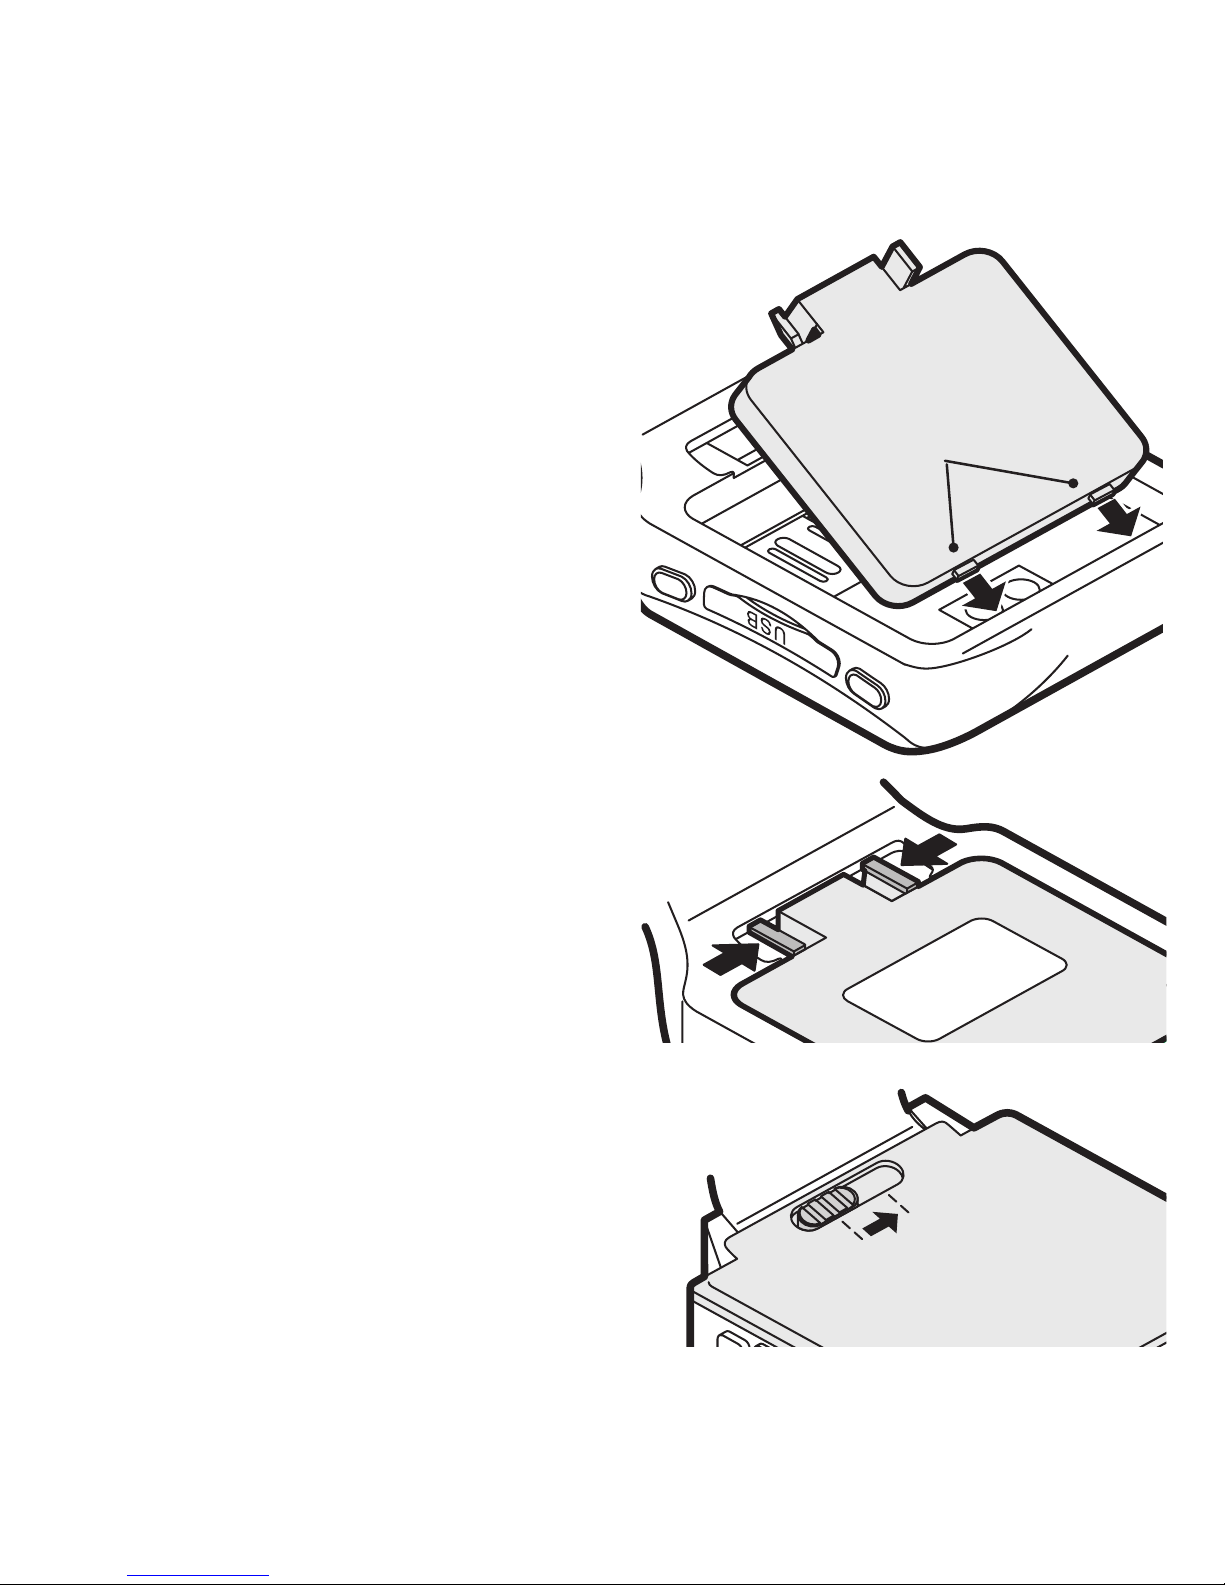
Fitting the battery
1 Insert the tab(s) at the end of the
battery into the corresponding slot(s)
of your sWaP watch body. Ensure that
the two gold battery contacts align
with the two round gold contacts
within the body recess.
2 Press the other end of the battery
down. On the Active, the battery
should click into place. On the
Signature, slide the locking catch
across to secure the battery.
Battery locating tabs
(Signature has one)
On the Signature, slide across the
locking catch and raise that end of
the battery.
Removing the battery
On the Active, carefully squeeze
together the two locking catches and
raise that end of the battery.
LOCK
O
PE
N
6
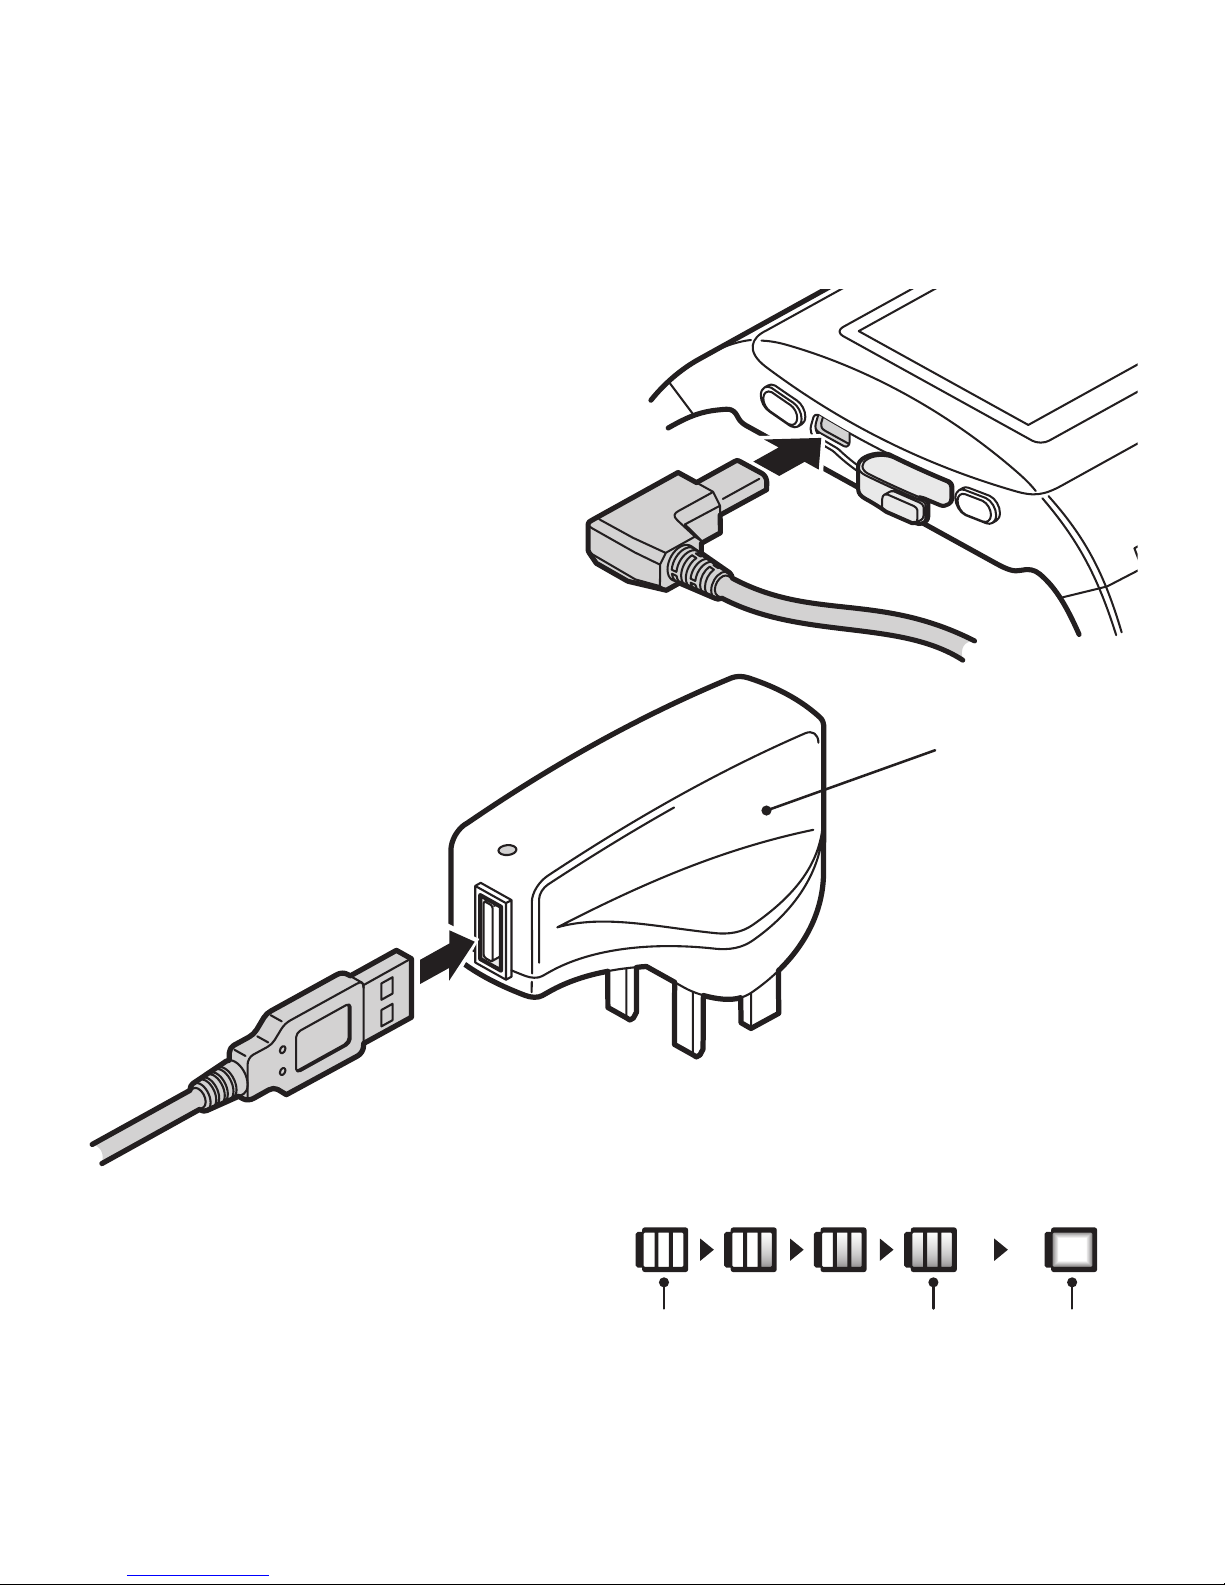
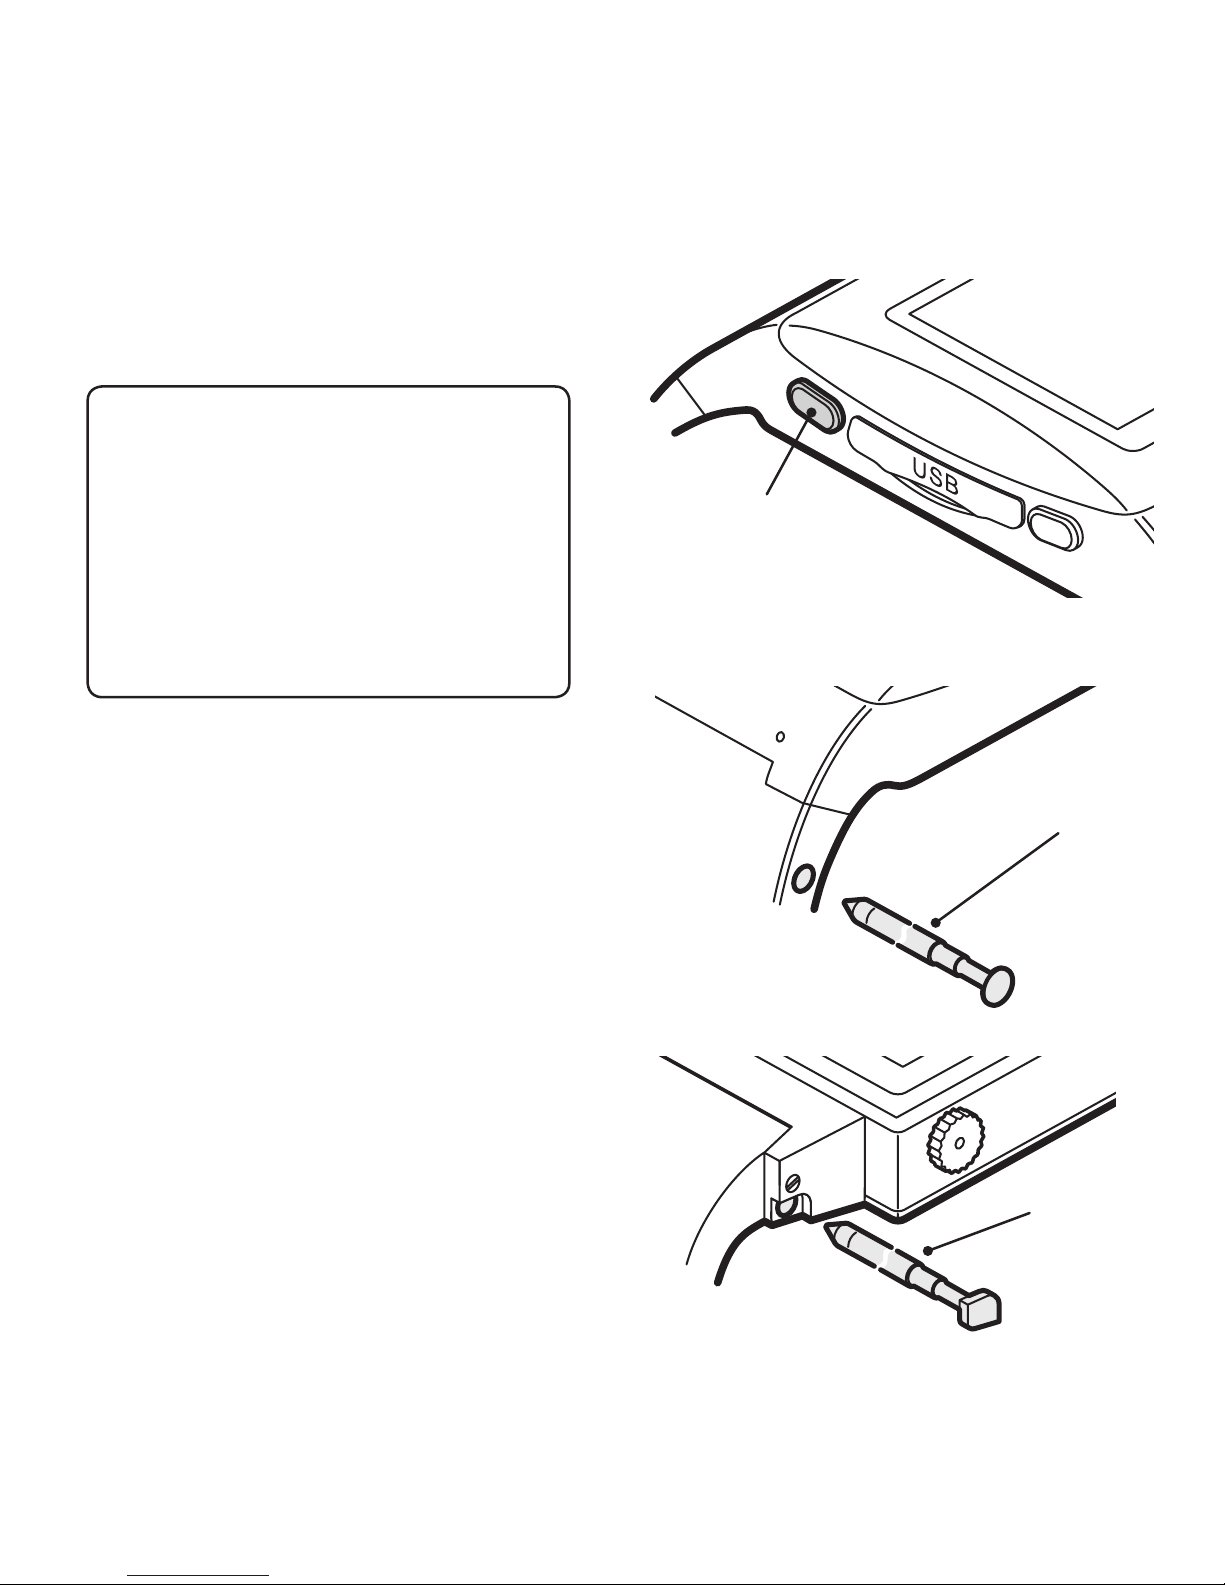
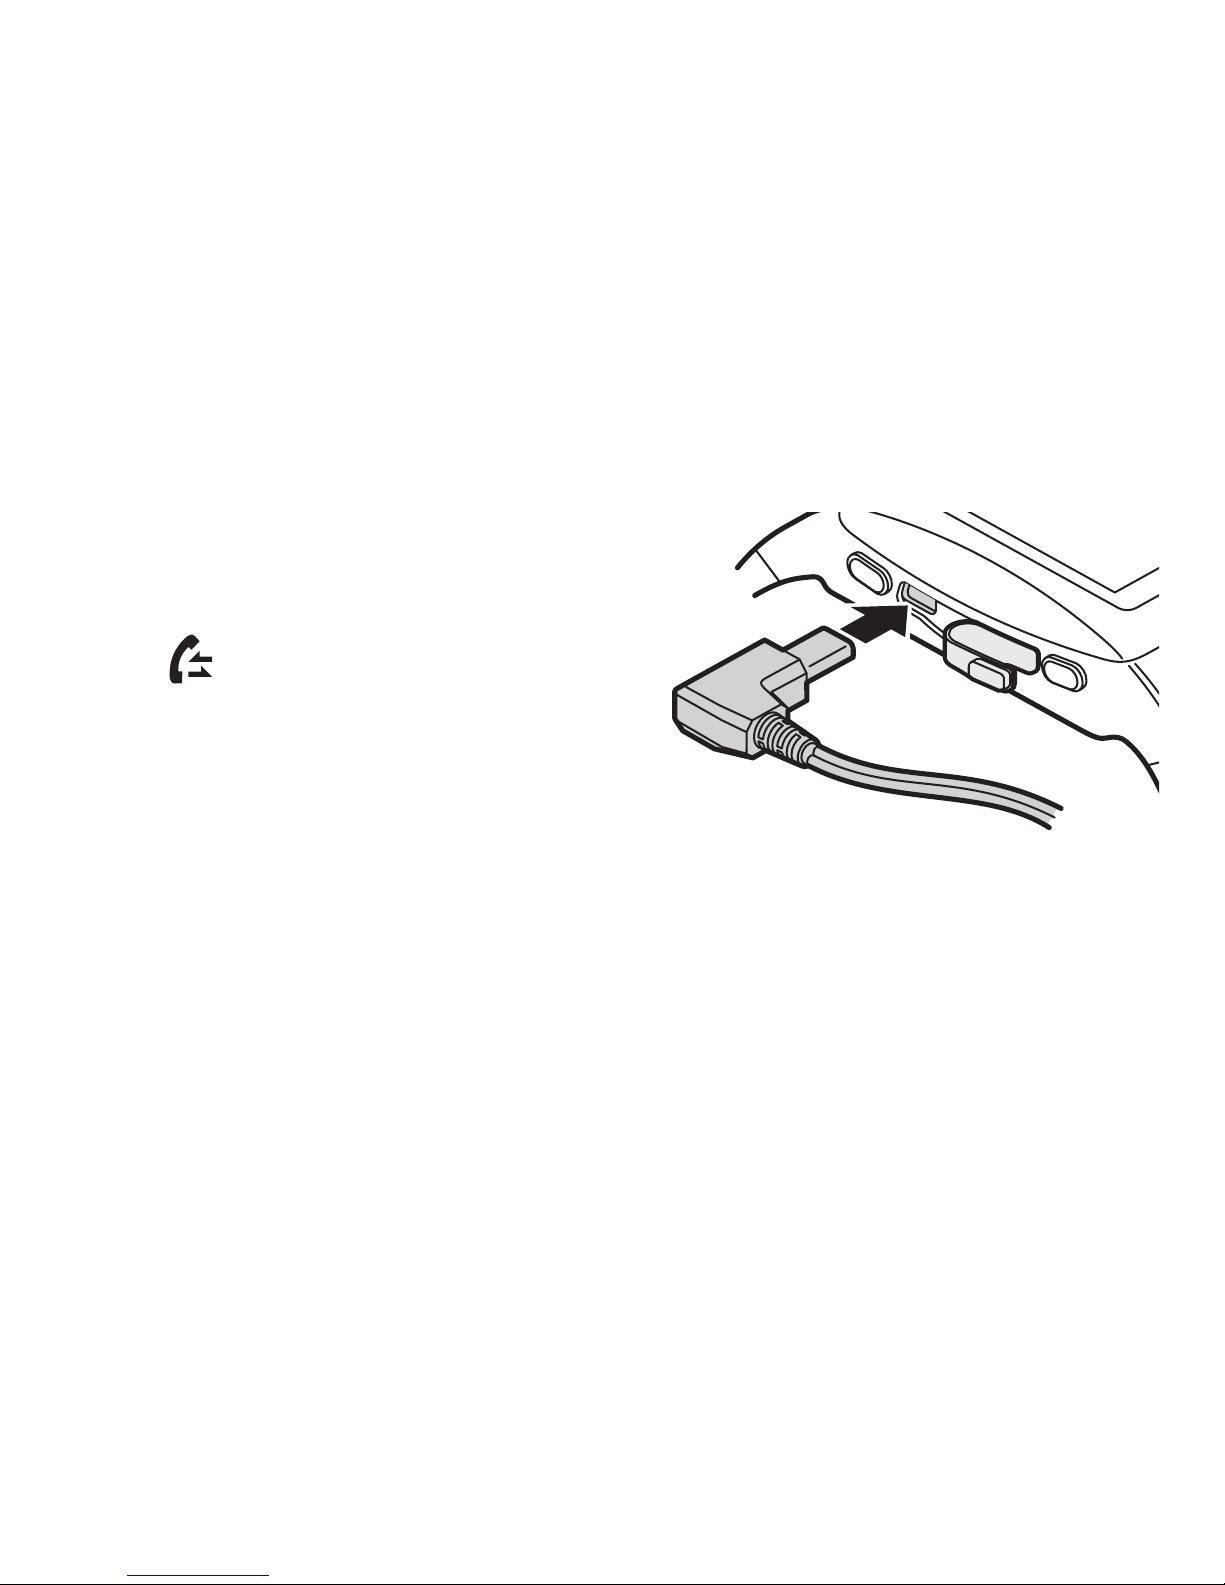
Charging the battery
You can charge the battery either via
your computer’s USB port or from the
supplied mains power adapter.
1 Peel back/slide open the protective
cover from the USB port.
2 Carefully insert the right-angle plug
of the supplied USB cable into the
socket.
3 The other end of the cable has a
standard USB plug which you can
attach to your computer or
directly to the supplied
mains power adapter.
If switched on, the sWaP will show
charge status symbols in the top right
corner of the screen:
Mains
power
adapter
Ensure that the battery is
fully charged before using your
sWaP watch for the first time.
Empty Full Charging
7
Switching on and off
Press and hold the upper button until
the screen responds, then release.
Upper button:
press and hold to
switch on and off
Using the stylus
The stylus is a compact telescopic pointer
with which you can select items more
accurately on the touch screen. It is
stored within the strap on Active models
and within the shoulder (where the strap
joins the body) on Signature models.
Active
stylus
Signature
stylus
Flight mode is available to switch
off all communication aspects of
your sWaP watch to let you use
other features without infringing
‘no mobile’ rules in certain areas.
Please see User Profiles on page
46 for details.
8
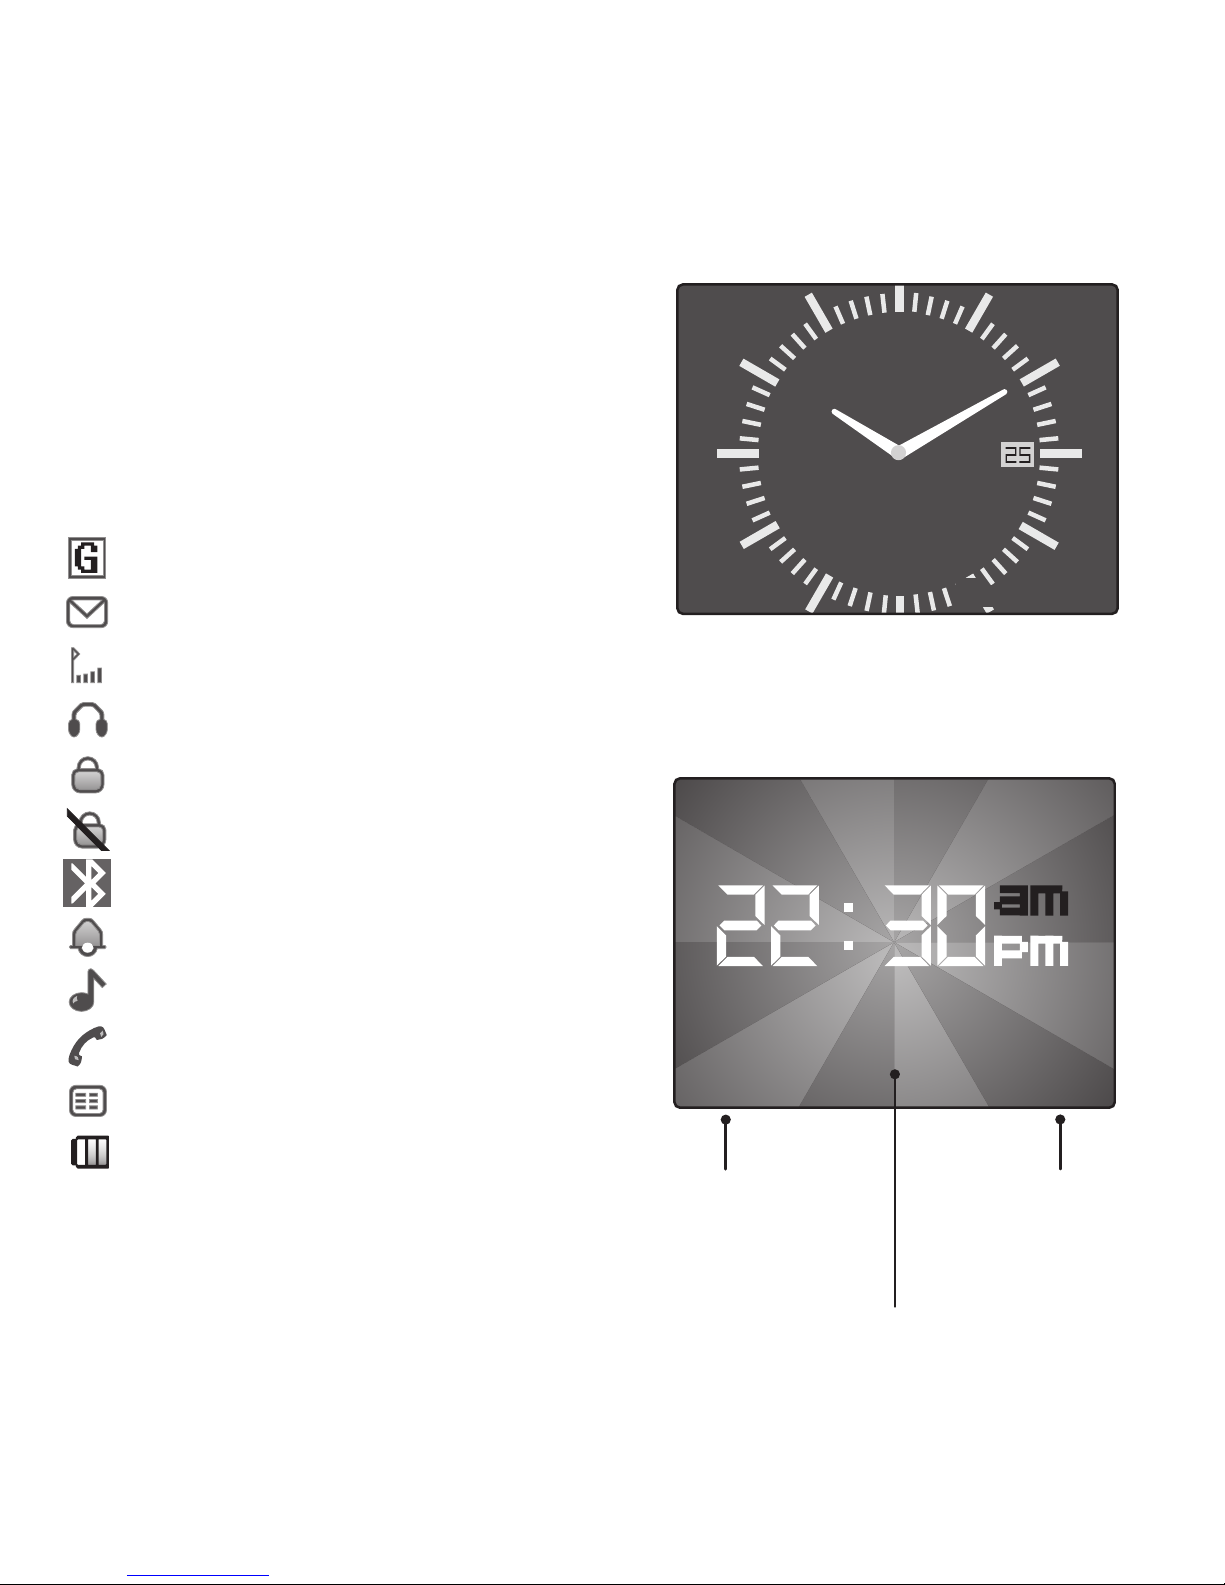
The clock face
When your sWaP watch is not engaged
in other activities, it will display a clock
face (analog or digital) overlaid with the
current network name plus selectable
options (in the two lower corners) and
numerous status icons:
GPRS data connection available
Incoming message received
Signal level (0 to 4 bars)
Earphones attached
Auto keypad lock is off
Auto keypad lock is on
Bluetooth function enabled
Alarm set
Common mode
Missed call
Messaging memory full
Battery charge status
From the clock face, you can access the
Menu, view your Phone book (Contacts)
or make a call (tap and hold anywhere).
See also Phone Setup > Swipe Function.
s aW P
Analog clock face
Digital clock face
Tap here to
access the
menu
Tap here to
access your
Phone book
Name of the current network
9
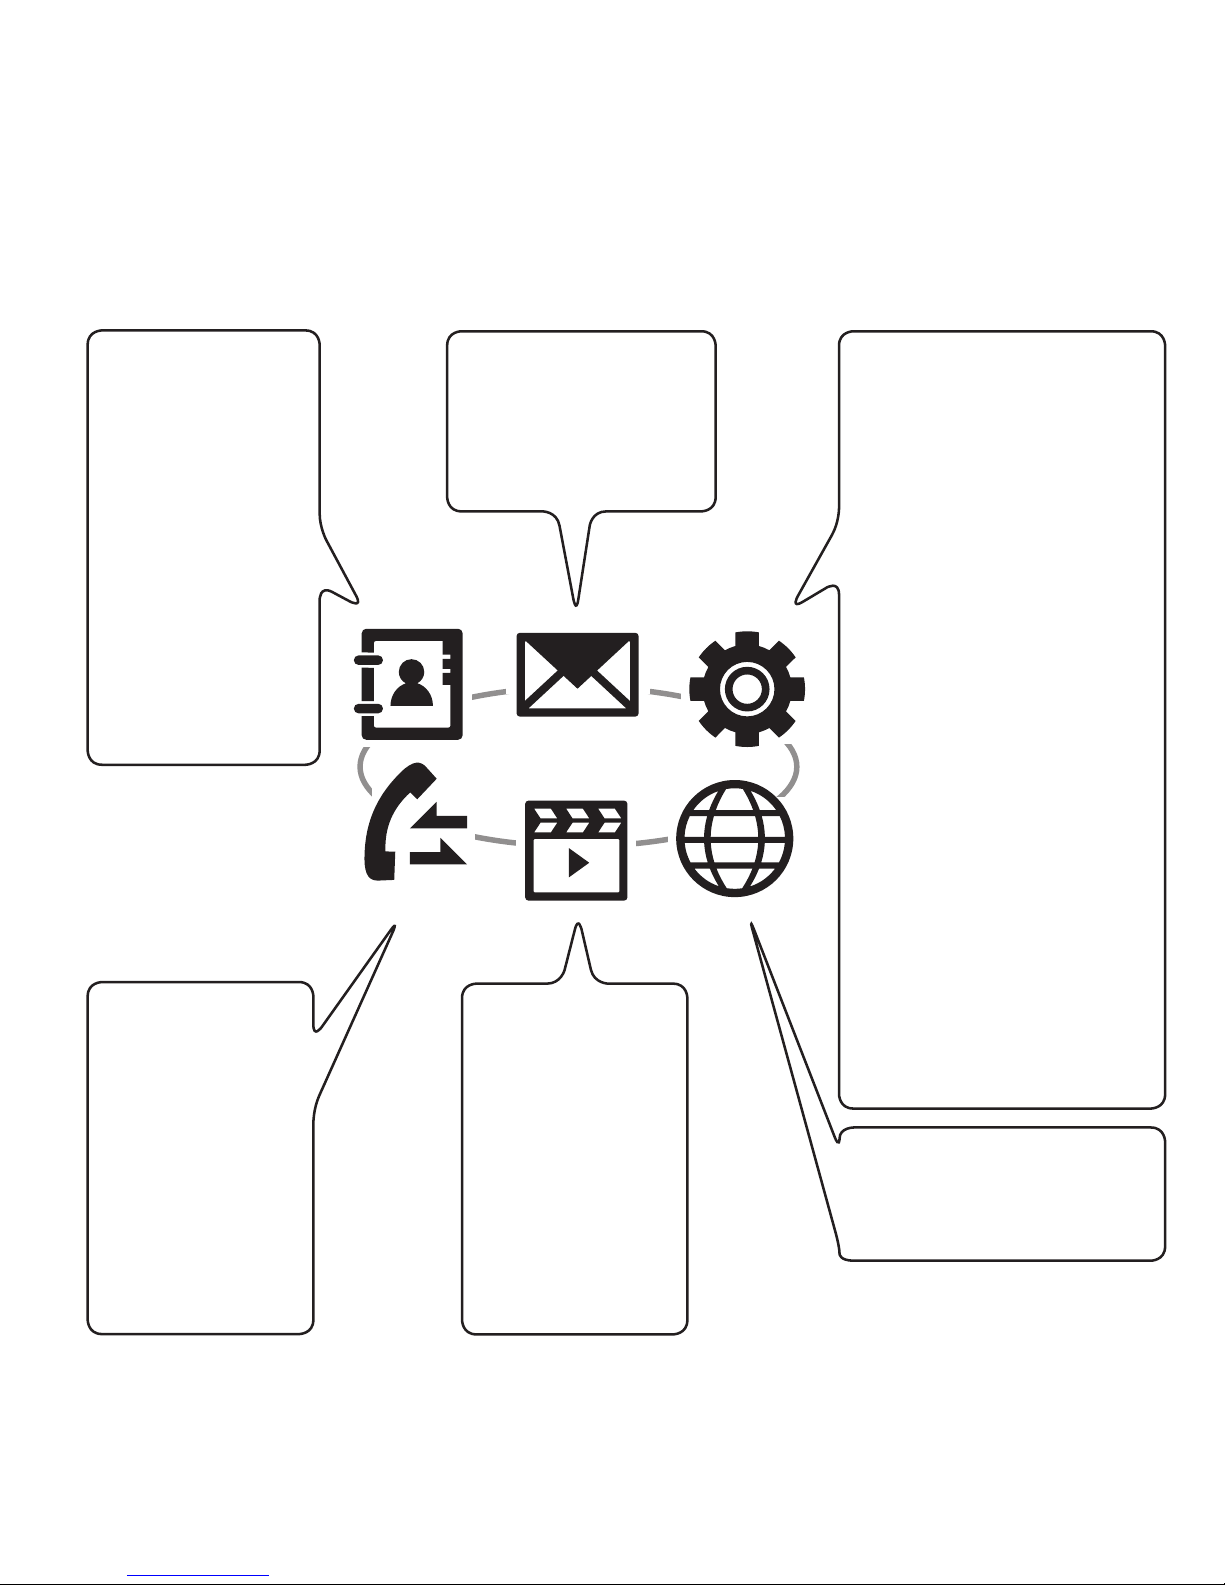
Menu map
Tap the Menu option (or press the lower button) and then choose one of six icons:
SETTINGS
Pen Calibration
Organizer
Calendar
To Do List
Alarm
World Clock
Calculator
Bluetooth
File Manager
Themes
Stopwatch
User Profiles
Phone Setup
Call Setup
Network Setup
Security Setup
Restore Factory Settings
MEDIA
Camera
Photo Album
Video Recorder
Video Player
Audio Player
Sound Recorder
FM Radio
WAP
WAP
Data Account
CALL LOG
Missed Calls
Dialed Calls
Received Calls
Delete Call Log
Call Time
SMS Counter
GPRS Counter
MESSAGES
SMS
MMS
Voice Mail Server
CONTACTS
Search Entry
Add Entry
Copy All
Delete
Caller Group
Extra Number
Settings
Caller Picture
Caller Ring Tone
Press the upper button to exit from
the menu and return to the clock face.
10
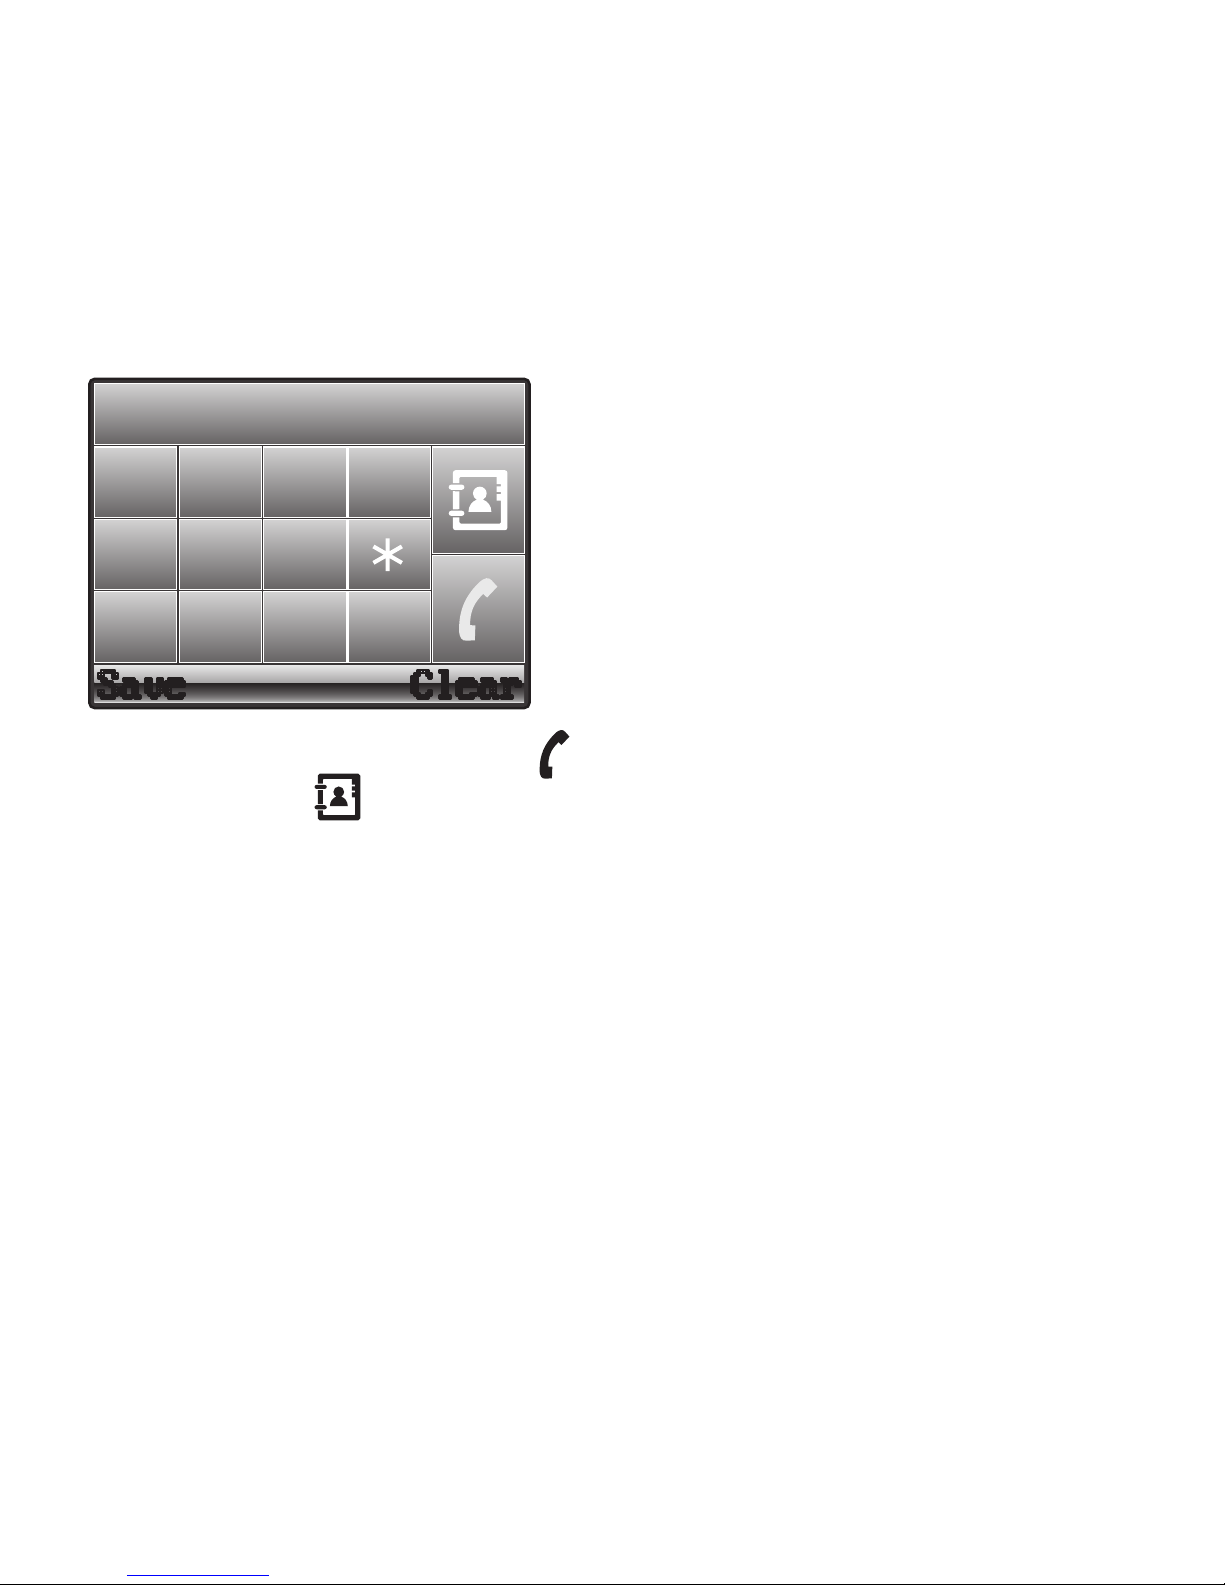
Dialing a call
1 From clock face, tap and hold the screen
for 2 seconds to show the dial page:
3
6
9
2
5
8
1
4
7
0
#
2 Tap the phone number and then tap
Alternatively, tap to access your
Phone book.
Answering a call
• When the call alert sounds, tap
Answer in the lower left corner of
the screen or press the lower button.
Alternatively, to reject the call, tap
Reject in the lower right corner.
Voice activation
• From the clock face, press and hold
the lower button, and then say either
“CALL xyz” or “FIND xyz”, where xyz
is a Phone book contact name.
Ending a call
• Press the upper button or tap Option
in the lower left corner & then tap End.
In-call options
During a call you can access a number
of features by tapping Option:
• Hold - Place the call on hold*
• End - End the current call
• Volume ctrl - Adjust speaker volume
• Phone Book - Access your Phone Book
• New Call - Dial a new number*
• Message - Access your messages
• Sound Recorder - Record the call
• Mute - Switch off the microphone
• DTMF - Switch keypad tones on/off
• Connect Lost BT Headset -
Attempt to reconnect with the headset
In the call screen, you can also:
• Tap KB to re-display the numeric
keypad. The DTMF option (above)
controls whether tones are sent out.
• Tap H-Free to turn up speaker volume.
Tap H-Held to return to quiet mode.
*
Network support required.
11
Call history
Your sWaP watch maintains records of
all incoming, outgoing and missed calls
as well as text message quantities and
data usage. You can use these records
to make calls, populate your Phone book
and/or keep track of your call charges.
1 From the clock face, tap Menu or
press the lower button.
2 Tap (twice, if necessary) to view
the Call history options:
• Missed Calls
• Dialed Calls
• Received Calls
• Delete Call Log
• Call Time
• SMS Counter
• GPRS Counter
Select the required item to view a list of
related options or details.
Using the wired earphones
The supplied earphones and microphone
can be used to listen to music/videos/FM
radio as well as making and taking calls.
1 Peel back/open the protective cover
from the USB port.
2 Insert the right-angle plug of the
earphones into the USB socket.
The small button on the microphone pod
can be used to answer* and terminate
calls.
*
Within the Headset profile, if the
Answer Mode option is set to
Auto, then calls will be answered
immediately - you can alter this. See
the Settings section for details.
12
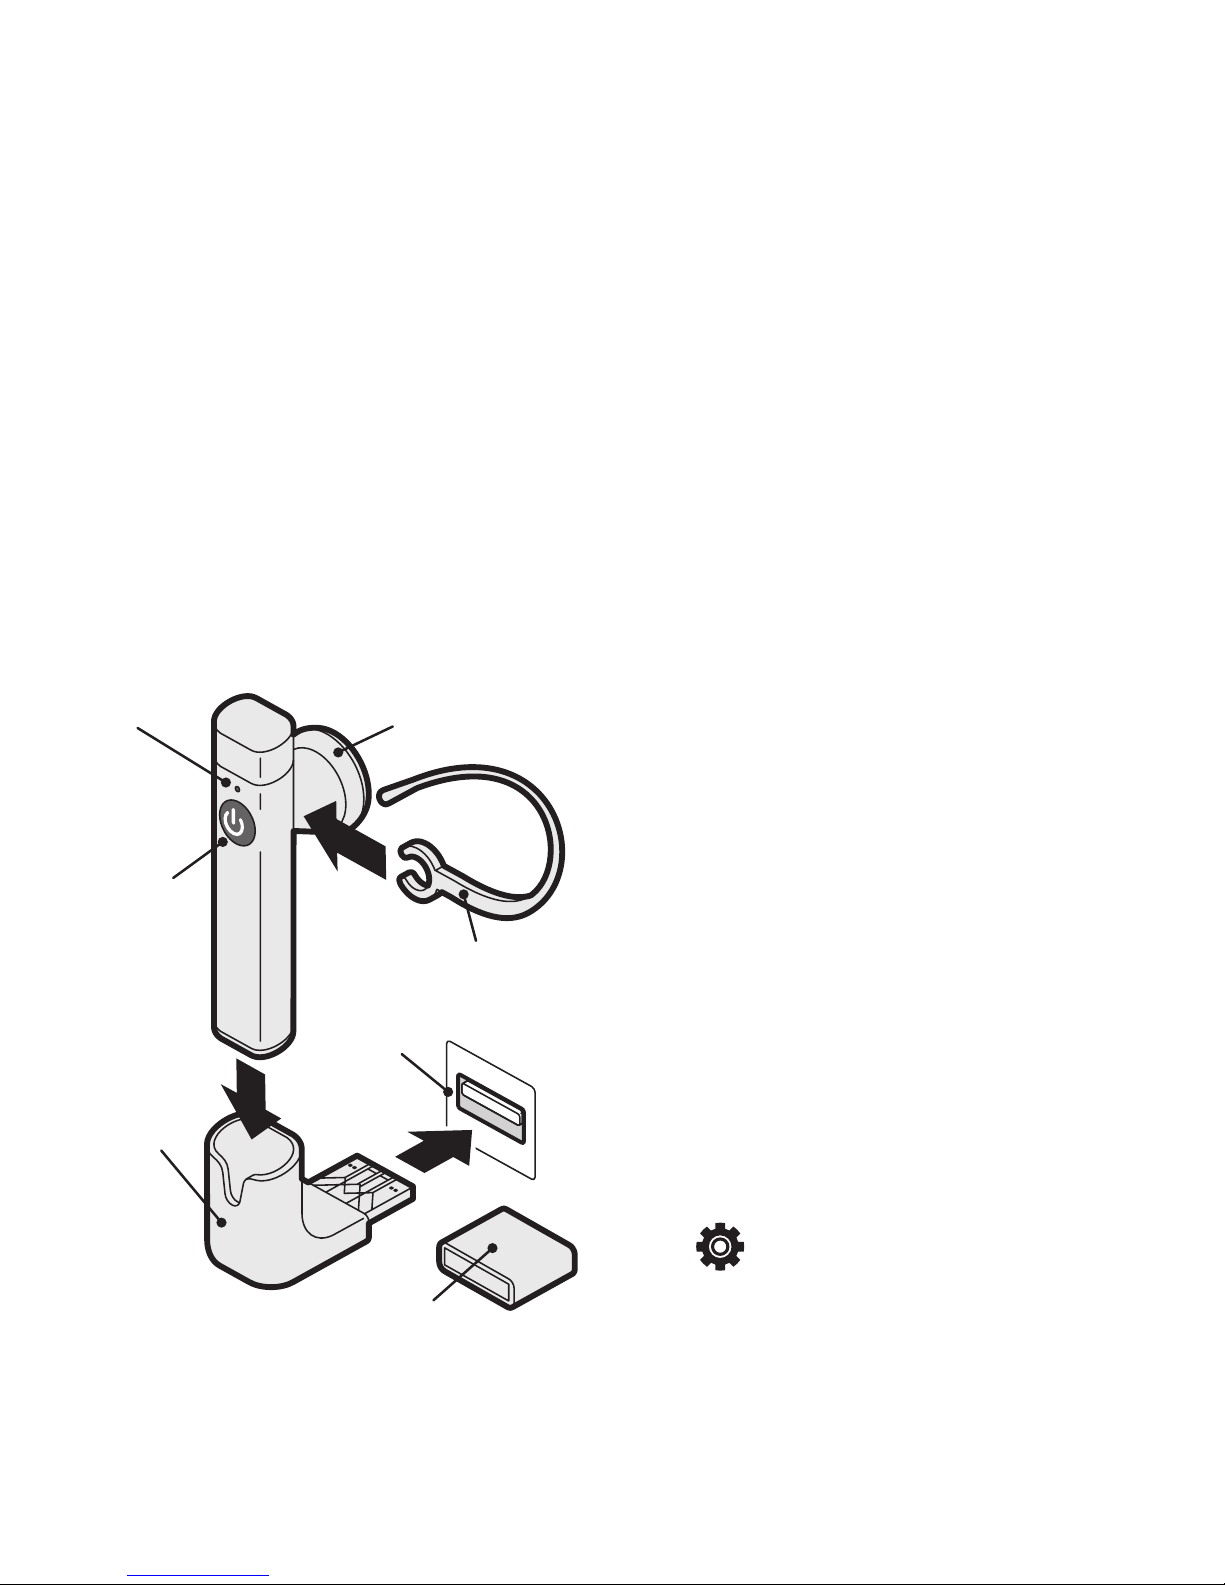
Using the Bluetooth headset
The supplied Bluetooth headset allows
you to hear and speak discretely without
need for wires. See also the Settings
section for more Bluetooth information.
Charging the headset
Charge the headset from a standard
USB port. It needs two hours for a full
charge. The indicator shows red while
charging and goes out once completed.
Turning the headset on and off
Press and hold the button until the indicator responds. As it switches on, you
will see four blue flashes. As it switches
off, you will see four red flashes. When
it is on, the indicator will flash blue once
every three seconds (if unpaired) or once
every twelve seconds when paired with
your sWaP watch. Once paired, the two
devices will always re-locate each other.
Pairing your sWaP and headset
Before they will work together, you need
to form a pairing bond between them.
This needs to be done only once.
1 Ensure that the headset is initially
switched off. Press and hold its button
for roughly eight seconds (ignore the
initial blue flashes) until the indicator
flashes red and blue, then release.
2 On your sWaP watch, from the clock
face, tap Menu or press the lower
button.
3 Tap (twice, if necessary).
Button:
power
and
control
Earpiece
Charging
base
Connector
cover
Indicator
Ear hook
USB
port

13
4 Tap Organizer, scroll down and then
tap Bluetooth.
5 Tap Search Bluetooth Device. If
asked, tap Yes to switch on Bluetooth
power.
Providing the headset is in range
(within ten metres), the sWaP watch
should find it and automatically
show its name: sWaP, within the
Discovered Device page.
6 Tap Bond. You will be asked to enter
a passcode.
7 Tap 0000 and tap Ok.
8 When asked, tap Yes.
The headset and your sWaP watch will
now be paired.
To swap between sWaP and headset
During a call, you can change between
the headset and the sWaP watch
speaker.
• Tap Option and then tap Swap
Bluetooth Voice Path. Do the same
to swap back again.
Answering and ending calls
When an incoming call is received, the
headset earpiece will give a ringing tone
(as well as your sWaP watch). You can
use the headset button to control calls:
• To answer: Press and release the
button.
• To end: Press and release the button.
• To redial the last dialled number: Press
and release the headset button twice.
Unpairing your sWaP and headset
When you no longer want to use them
together, you can break the bond.
1 From the clock face, tap Menu or
press the lower button.
2 Tap (twice, if necessary).
3 Tap Organizer, scroll down and then
tap Bluetooth.
4 Tap My Devices and then tap the
sWaP entry.
5 Tap Delete and then tap Yes to
remove the pairing bond.

14
Your Phone book (Contacts)
Your Phone book is where you store all
of your contact details for quick access
and rapid dialling.
There are two main ways to enter your
Phone book (Contacts):
• From the clock face, tap Contacts.
The list of Phone book contact entries
will be shown.
or
• From the clock face, tap Menu or
press the lower button. Then tap
(twice, if necessary).
The main Phone book menu will be
shown.
Adding a new entry
To add a new entry you need to enter
the Phone book via the Menu:
1 From the clock face, tap Menu or
press the lower button.
2 Tap (twice, if necessary).
3 Tap Add Entry.
4 Choose where to store the entry: Tap
either To SIM or To Phone. The latter
uses the sWaP watch memory and
allows more details to be stored.
5 Use the labelled information fields to
enter the relevant details about your
contact. See the note on the left.
For contacts stored within the sWaP
watch memory, you can associate an
image and/or a particular ring tone to
each person. You can also collect your
contacts into groups, such as Friends,
Family, Business, etc. These options
are located lower down in the list of
information fields.
Note: When adding new entries, for best
results with voice activation, store all
contact names with the first character
in capitals followed by lower case
characters.

15
Copying entries
You can copy all of the contacts from
your SIM card to the sWaP watch
memory and vice versa.
1 From the clock face, tap Menu or
press the lower button.
2 Tap (twice, if necessary).
3 Tap Copy All.
4 Tap either From SIM or From Phone
as appropriate.
Importing contacts from
another phone
The simplest way to import contacts is
to use your SIM card as a carrier.
1 Fit your SIM card into the other
phone.
2 Copy the contacts from the phone
memory to the SIM card.
3 Fit your SIM card into your sWaP
watch.
4 Use the Copying entries procedure
(above) to transfer the contacts across
to your sWaP watch memory.
Finding an entry
You can find entries in two main ways:
By scrolling through the list of contacts;
or by entering one or more characters of
the name to make a search.
Finding an entry by scrolling:
1 From the clock face, tap Contacts.
2 Tap the up or down arrows to scroll
through the list.
3 When the required entry is high-
lighted, tap to dial or tap Option
to send a message or edit the entry.
Finding an entry by searching:
1 From the clock face, tap Menu or
press the lower button.
2 Tap (twice, if necessary).
3 Tap Search Entry.
4 Enter one or more characters of the
name and then tap Done.
5 When the required entry is high-
lighted, tap to dial or tap Option
to send a message or edit the entry.

16
Other Phone book options
There are numerous other things that
you can do within your Phone book.
Here are just a few:
• Voice activation: From the clock face,
press and hold the lower button, and
then say either “CALL xyz” or “FIND
xyz”, where xyz is a contact name.
• Send SMS or MMS messages to a
contact by starting from the Phone
book. Enter the Phone book via
Contacts (Options: Send SMS or Send
MMS).
• Duplicate an entry and then edit the
copy to simplify the creation of similar
entries. Enter the Phone book via
Contacts (Options: Duplicate).
• Edit characteristics for your caller
groups or create new caller groups in
which to collect your contacts. These
groups are particular useful when you
need to regularly send messages to
more than one person. Enter Phone
book via the menu (Option: Caller
Group).
• Delete entries individually or clear
the entire SIM card or sWaP watch
memory. Enter Phone book via the
menu (Option: Delete).
• Check how much memory space you
have remaining. Enter Phone book via
the menu (Option: Settings > Memory
Status).
• Choose which memory you prefer to
use to store contacts: SIM or Phone.
Enter Phone book via the menu
(Option: Settings > Preferred Storage).
• Create a vCard containing your
contact details which you can easily
send to other people, rather like an
electronic business card. You can
send your vCard either via SMS or
MMS messaging, Bluetooth link or
as a file that can be downloaded to
a computer via the USB cable. Enter
Phone book via the menu (Option:
Settings > My vCard).
17
Messages
Your sWaP watch enables you to stay
in contact using two different kinds of
messages. SMS is the method supported
by all mobile phones which allows text
plus certain small media attachments to
be sent and received. MMS is the newer
format that allows you to send and
receive larger photos, video clips and
sound recordings, in addition to text.
When an incoming message is received,
your sWaP watch will alert you and display the sender’s number* or their name
if they are listed in your Phone book. The
clock face will also show the icon
until you have read the message.
• Tap Read to go straight to the
message immediately.
or
• From the clock face, tap Menu or
press the lower button. Tap
(twice, if necessary). Then tap either
SMS or MMS and then tap Inbox.
* Subject to availability.
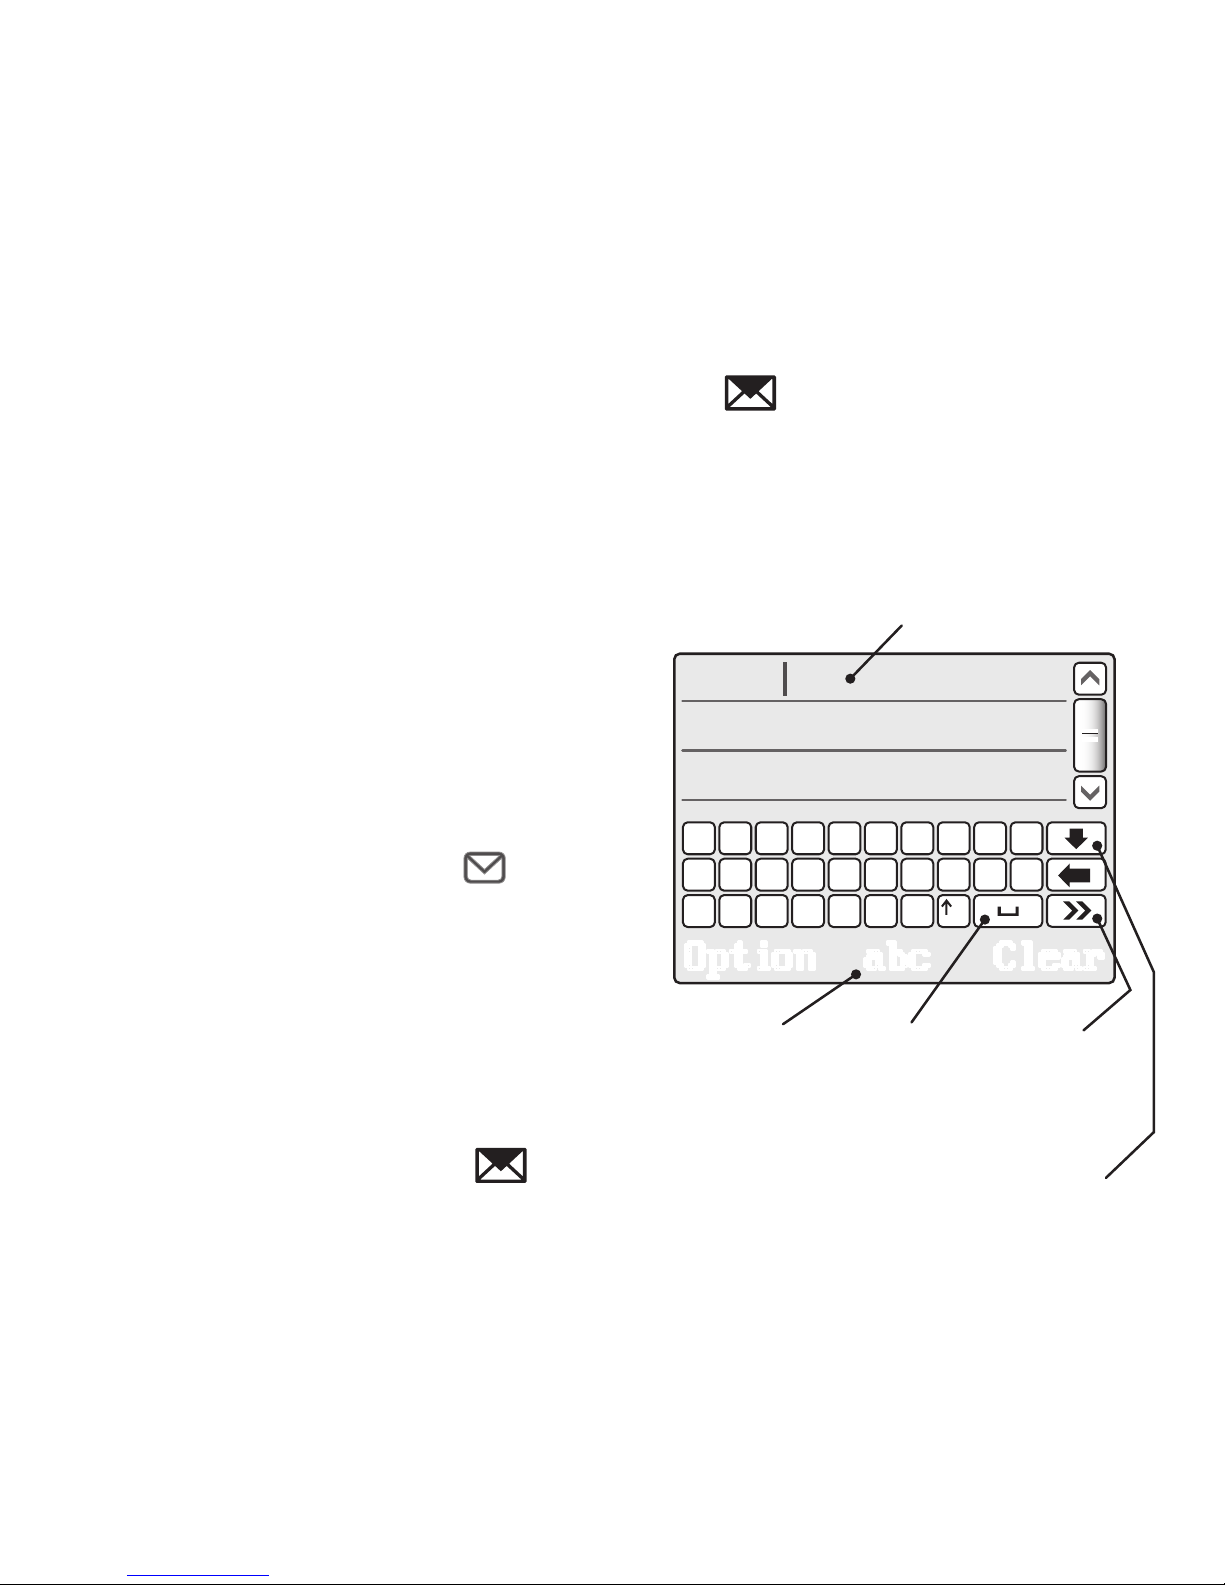
Writing an SMS message
1 From the clock face, tap Menu or
press the lower button.
2 Tap (twice, if necessary).
3 Tap SMS, then Compose Message.
4 Use the characters within the editor
page to tap out your message:
Message display area
Change
between
upper
and lower
case plus
numeric
characters
Show
other
characters
Space
bar
Show/hide
punctuation
characters
continued
 Loading...