

Swann Communications SWWHDINTCAM Users Manual

CAMERA PLACEMENT DISCOVER MORE
迅捷PDF编辑器迅捷PDF编辑器迅捷PDF编辑器
迅捷PDF编辑器
Because the camera is completely wire-free, you'll have a
lot of flexibility with where you place it.
The camera's flat base allows you to put it on a table, shelf,
or anywhere with a flat surface.
The camera also comes with a separate magnetic stand
which can be mounted to a wall with either the included 3M
Command™ adhesive strips or screws and wall plugs. The
stand will hold the camera in place at almost any angle.
If you choose to hang the magnetic stand on
the wall, simply follow the instructions on the
supplied mounting template which will help
you to correctly mark and drill positions for
the screw holes.
This quick start guide provides the information you need to
get started. To learn more about using the SAFE by Swann
mobile app, download the SAFE by Swann App Guide from
our Support Center at: support.swann.com
NEED HELP?
USA & Canada 1800 627 2799
UK & Europe 0808 168 9031
Australia 1800 788 210
New Zealand 0800 479 266
tech@swann.com
support.swann.com
FCC Statement
This equipment has been tested and found to comply with the limits for Class B digital device, pursuant
to part 15 of the FCC Rules. These limits are designed to provide reasonable protection against harmful
interference in a residential installation. This equipment generates, uses and can radiate radio
frequency energy and, if not installed and used in accordance with the instructions, may cause harmful
interference to radio communications. However, there is no guarantee that interference will not occur
in a particular installation. If this equipment does cause harmful interference to radio or television
reception, which can be determined by turning the equipment off and on, the user is encouraged to try
to correct the interference by one or more of the following measures:
• Reorient or relocate the receiving antenna
• Increase the separation between the equipment and the receiver
• Connect the equipment into an outlet on a circuit different from that to which the receiver is connected
• Consult the dealer or an experienced radio/TV technician for help
This device complies with Part 15 of the FCC Rules. Operation is subject to the following two conditions:
(1) this device may not cause harmful interference, and (2) this device must accept any interference
received, including interference that may cause undesired operation.
FCC RF Radiation Exposure Statement Caution: To maintain compliance with the FCC’s RF exposure
guidelines, place the product at least 20cm from nearby persons.
WARNING: Modifications not approved by the party responsible for compliance could void user’s
authority to operate the equipment.
Frequency Range: 2.4GHz ISM Band; 5.0 GHz ISM Band
CE Output Power: 2412-2472MHz<16dBm;5150-5350MHz<13dBm;5470-5725MHz<13dBm
© Swann Communications 2017
QSGINTCAMVER1E
Smart Security Camera
Wire-Free HD Video Camera
QUICK START GUIDE
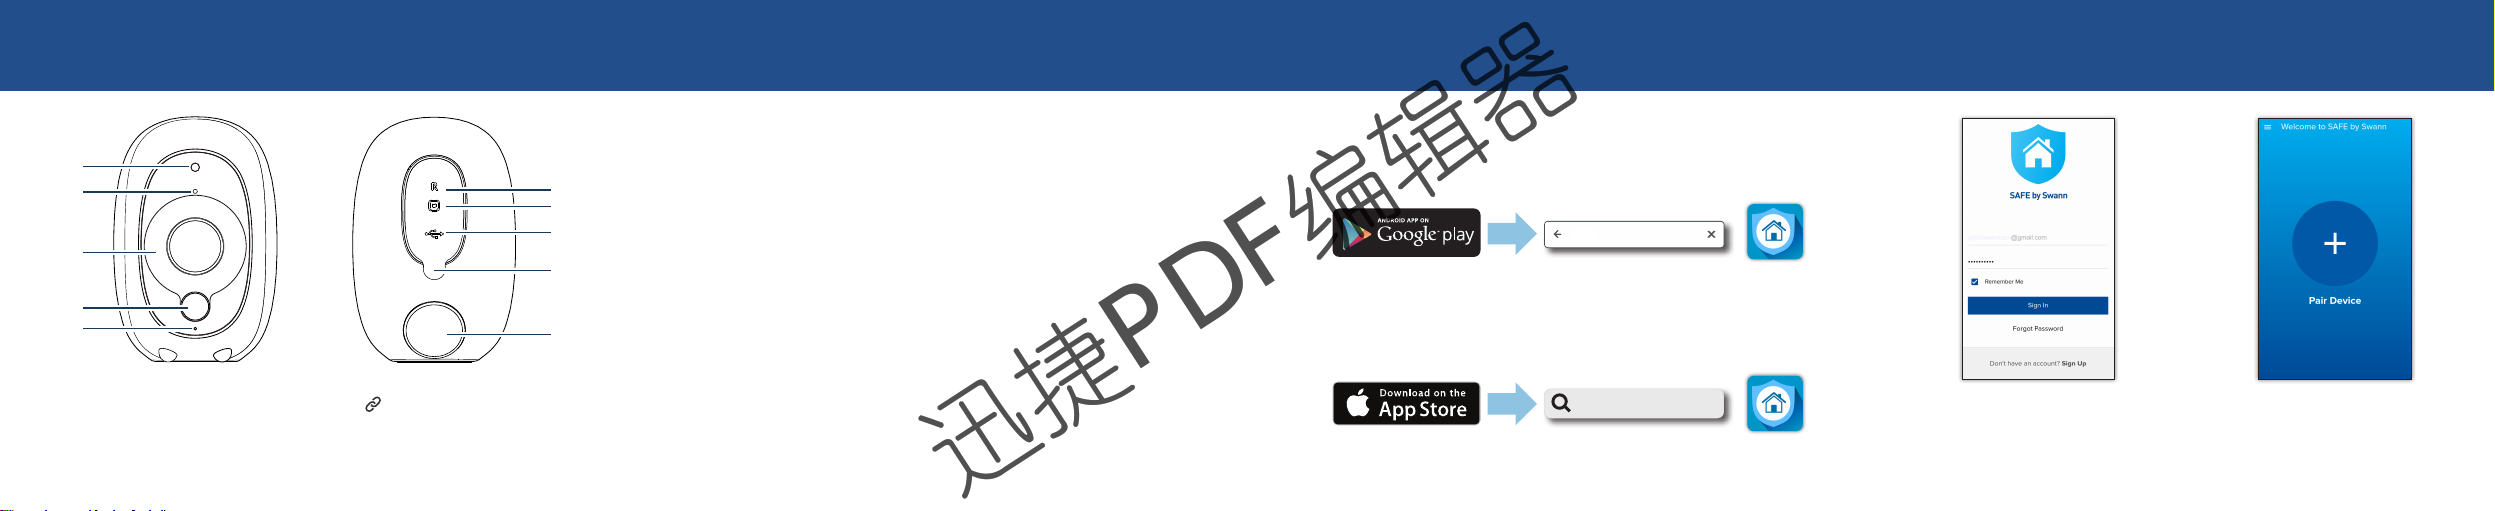
CAMERA OVERVIEW CHARGE THE CAMERA GET THE APP FIRST TIME SETUP
SAFE by Swann
迅捷PDF编辑器
迅捷PDF编辑器
迅捷PDF编辑器
迅捷PDF编辑器
Before using the camera for the first time, fully
1
2
3
4
5
1 Night detection sensor
2 Microphone
3 Infrared LEDs for night vision
4 Passive infrared motion sensor
5 LED indicator
6 Reset pinhole button
7 Pairing button
8 USB charging port
9 Port cover
10 Magnetic mount holder
6
7
8
9
10
charge it using the included USB cable.
1 Open the port cover on the back of the camera.
2 Plug the smaller end of the USB cable into the
3 A full charge takes about 6 hours using a
USB charging port on the camera, and the larger
end into a USB wall charger (DC5V 2.1A power
output recommended for faster charging).
recommended DC5V 2.1A USB wall charger.
• If you have an Android smartphone, download and
install the latest version of the SAFE by Swann app
from the Google Play Store.
• If you have an Apple iPhone, download and install
the latest version of the SAFE by Swann app from
the Apple App Store.
SAFE by Swann
Open the SAFE by Swann app.
Create an account or sign in if
you already have an account.
Tap Pair Device and follow
the on-screen instructions to
set up Wi-Fi and register the
camera to your account.
 Loading...