

Page 1

MMATAKB190914E
ENGLISH
INSTRUCTION MANUAL
EN
Micro Attack
RC Helicopter
EXTREME FUN FOR EVERYONE
Page 2
2
3
• Keep han ds, hair and loos e clothing away f rom the
rotors w hen the power s witch is tur ned on.
• Alway s lift off f rom a flat sur face. Neve r hold the
flying h elicopter in y our hand when li fting off.
• Stay away from electrical hazards.
• Keep you r helicopter w ithin line of si ght - if line of
sight to the c ontroller is los t, you may lose cont rol
of the helicopter.
• Turn off the c ontroller an d helicopter w hen not in
use.
• Read and ob ey all warn ings and safet y guidelin es
in this manual.
• The supp lied USB char ger is specific ally designe d
to charg e the LiPo batt ery. Never us e other
charging equipment.
• The heli copter is not int ended for use b y children
under fou rteen (14) year s old. Adult s upervis ion is
requir ed at all times .
• Regula rly examine fo r any damage to th e plugs,
enclos ure, rotors an d other par ts. Replac e any
damage d or loose par ts before at tempting to fly.
CHOKING HAZARD - Small
part s, keep out of reach of small
children.
DANGER - Never ins ert sharp
object s, pins or screws into the
helicopter
as this may puncture
the intern al battery.
WARNING - Do NOT fly near eyes
or face.
CAUTION - Do NOT touch
the running rotors or fly over
someone’s head.
• Contro ller requir es 6 x 1.5V AA a lkaline bat teries
(not included).
• Installing/Replacing batterie s must be undertaken
by a compet ent adult.
• Do not mix n ew and old bat teries or ty pes of
batteries (i.e. alkaline/standard).
• Prompt ly remove exh austed bat teries. Ba ttery
leakage and corrosion can damage the controller.
• Dispose of used batteries responsibly.
! !
! !
The helicop ter is equipped w ith a Lithium P olymer
batter y. This batte ry type is li ght and power ful as their
chemis try is bas ed on lithium, a l ight and extr emely
vola tile met al. The ba ttery mus t be dispose d of
responsibly.
• Never co mpletely exha ust the batt ery. When th e
helico pter start s to lose powe r, turn it off and
charge i t as soon as pra cticable.
• Never charge battery unattended.
• Charge b attery in a n isolated, c ontrolled
environment. Keep far away from flammable
materials.
• Do not exp ose to direc t sunlight ; there is a ri sk that
the batt ery may over heat, ignit e and/or explo de.
• Do not dis assemble, m odify, heat , or short cir cuit.
• Do not subj ect it to stro ng impacts .
• Do not all ow the batter y to get wet.
• Only char ge the batt ery wit h the supplie d chargin g
equipment. Using other charging equipment will
void you r warrant y, may damage th e battery a nd
poses a r isk of fire or ex plosion.
• In the unli kely event of lea kage or explo sion, use
sand or a chemical fire extinguisher to extinguish
the batteries.
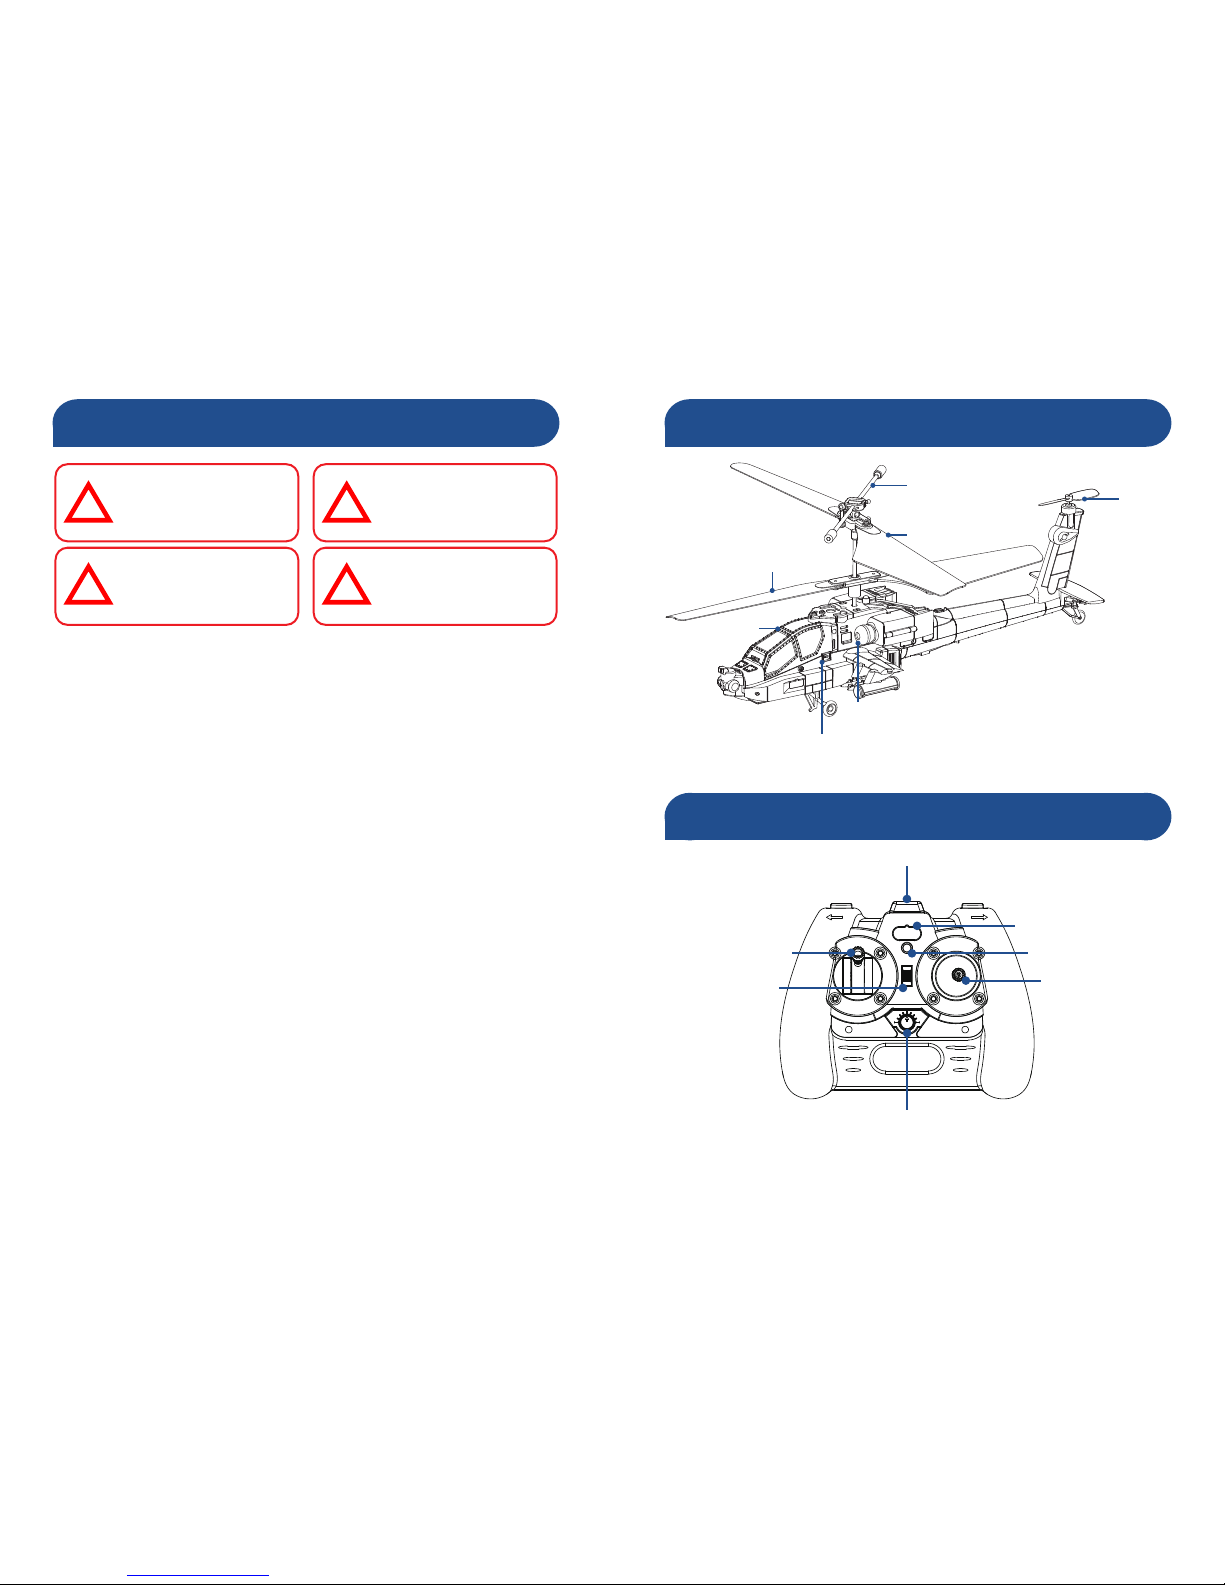
Safety Precautions
Battery Safet y Information
LiPo Battery Information
Getting to know your Micro Attack
Getting to know your Controller
Lower Rotors
Power Switch
Charging Socket
Light
Upper Rotor s
Balance Bars
Tai l Rot or
IR LEDs
IR Band Sel ector
Power LED
Control Stick
Rotational Trim
Throttle Stick
Power Switch
Page 3
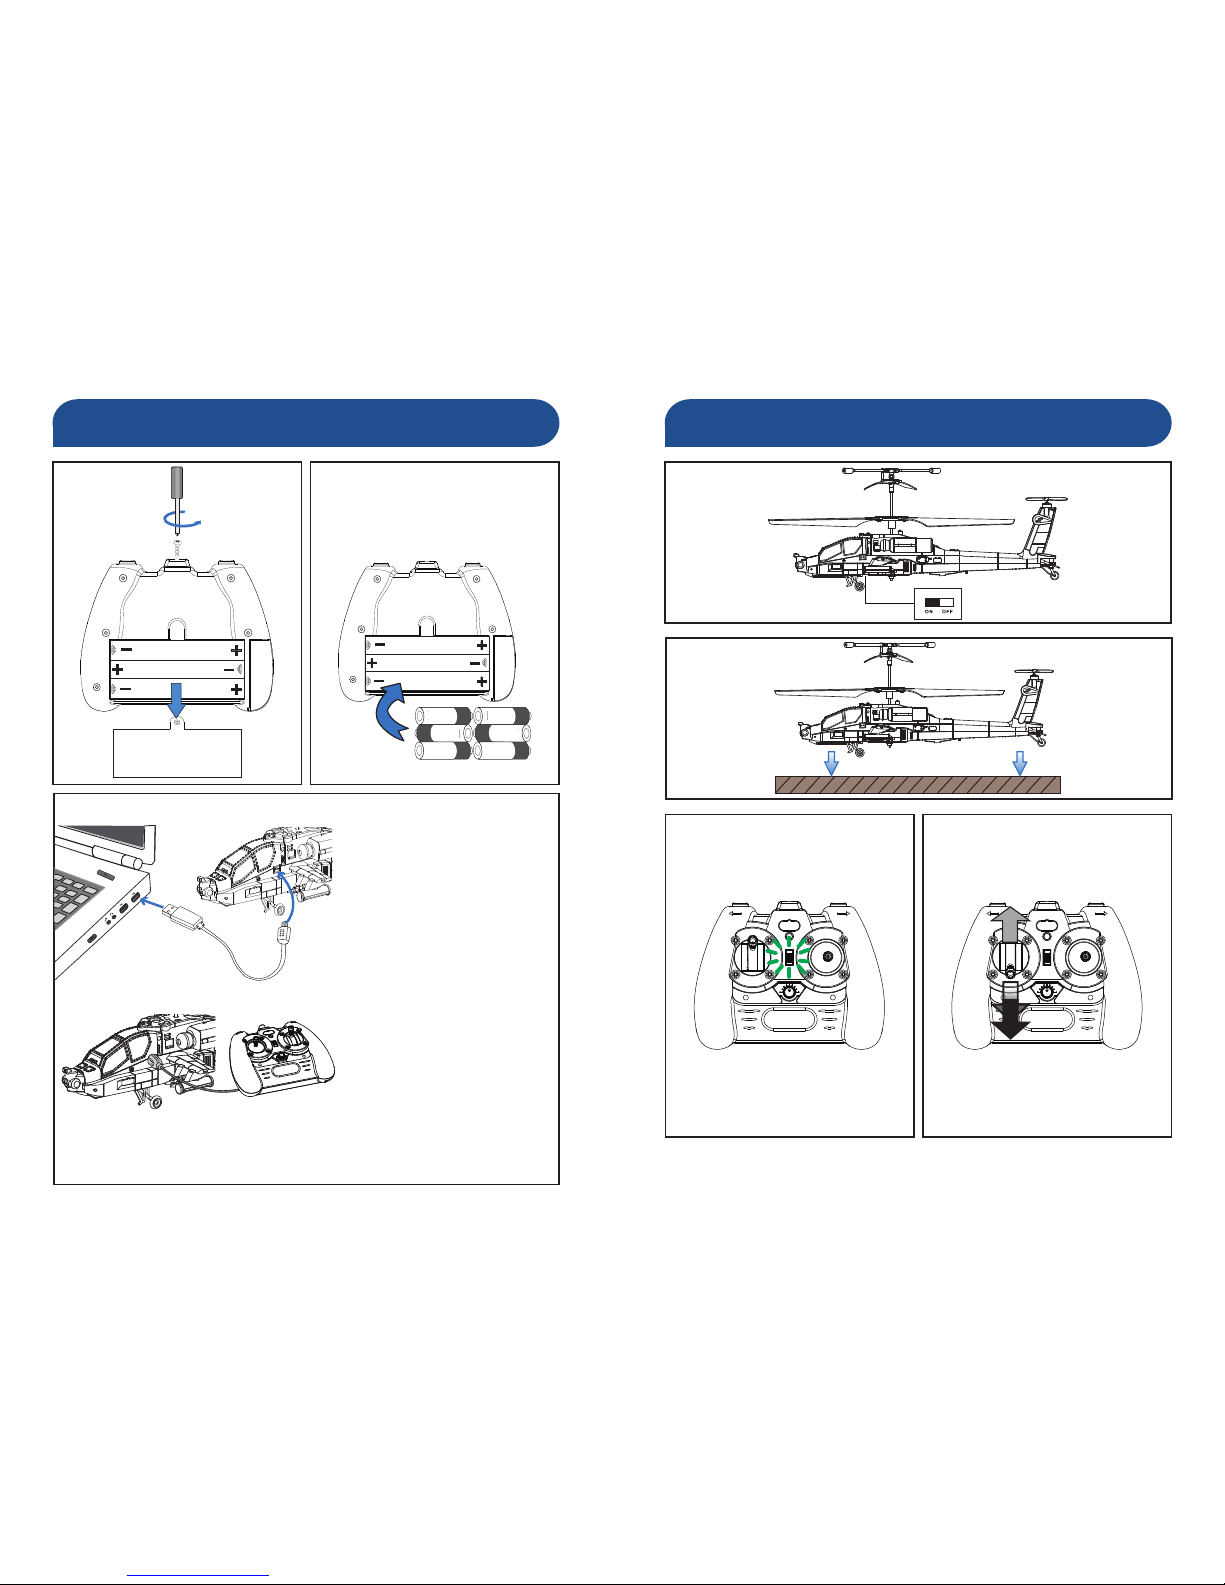
4
5
Stable, level sur face
Preparing for Flight
1 2
3
HDMI
OR
• Before the helicopter can be charged,
it must be s witched off - m ake sure the
ON/OFF s witch is in the OFF p osition.
• If charging with the computer, make
sure it is tu rned on.
• The charging plug only fits into the
helicopt er one way. Do not force it i n.
• You’ll know the helicopter is fully
charged o nce the red indic ator light
glows on the USB connector. Promptly
remove the charging plug once
charging is complete.
• Char ge time varie s depending on
the helicopter’s battery conditions. It
typic ally takes 45 to 6 0 minutes to fully
charge fr om empty.
• It may take longer to char ge the
helicopter with the controller. This
method relies on the controller’s
remaining battery power capacity.
• You do not have to fully charge the
helicopter to fly. Shorter c harge time
will re sult in reduced fly ing time.
Open the charging lead compartment lo cated on the
underside of the remote control and extend the lead to
charge.
Preparing for Flight
4
5
6 7
Select a frequency u sing the band selector
switch . Push the throt tle stick down and
aim the controller’s IR transmitter at the
helicopter. Move the throttle stick up then
down aga in. Pairing is now c omplete.
Page 4
6
7
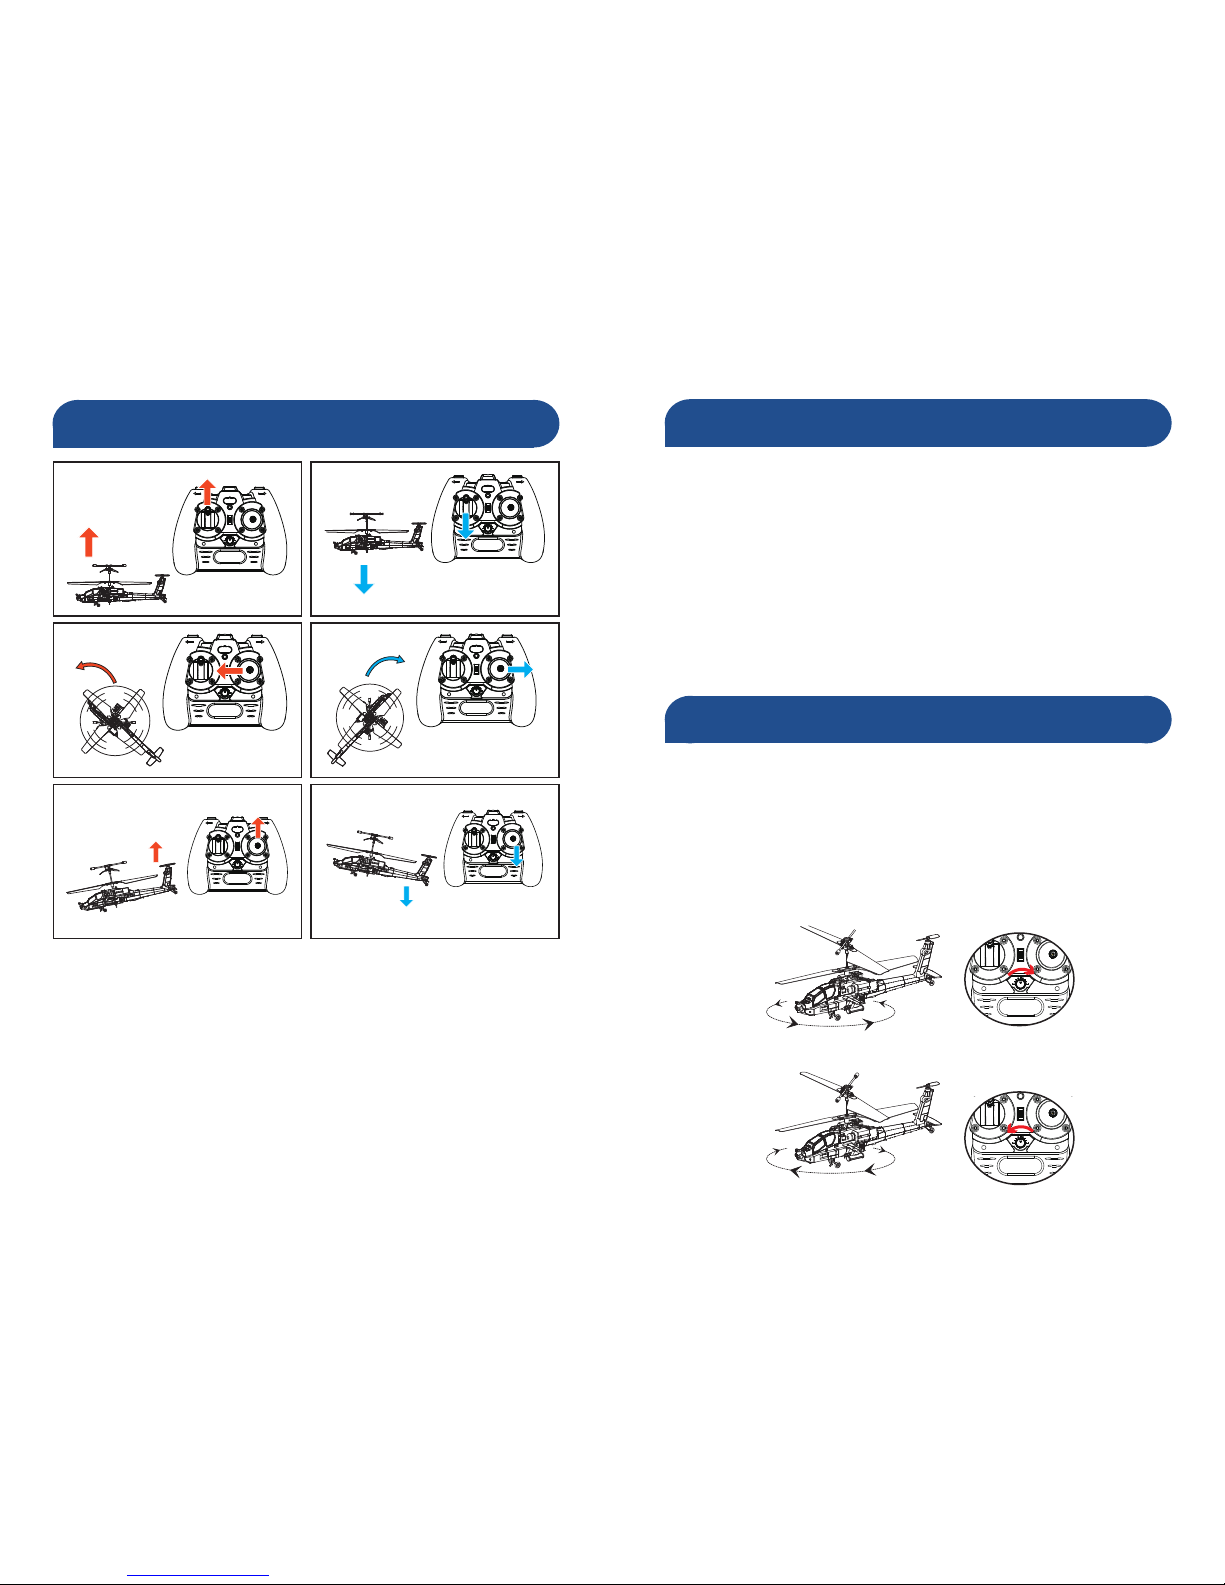
Controlling your Micro Attack
UP Down
Rotate Left Rotate Right
Forward Backwards
Moving Up & D own: The he licopter mov es up and down b y varyi ng the speed of i ts main rotor s (those tw o
big things t hat spin). You can contr ol how fast the se spin by using t he left stick on t he controller. Pushi ng
the stick up w ill increase the throttle. To get good results, be gentle and subtle. Small adjustments
made slow ly and carefully ar e the best way to get the helicopter to fly w ell. Be careful w hen easing off
the throt tle – if the helicopte r stalls it’l l fall, and might n ot be able to recover i n time, even if you jam t he
throttl e back on.
Forwa rd & Backward s: The right stick on th e controller af fects the helicopter’s direction, kind of like
the right s tick on a video game co ntroller. Pushing the ri ght stick up will pitc h the helicopter for wards.
Whils t pitched in this wa y, the main rotors wil l push the helicopt er along forw ards. The oppo site is also
true – mov ing the right stic k down will pitch th e helicopter back wards and move i t in reverse.
Rotate: To rotate the hel icopter, move the right stick to either si de. This will c ause the main rotors to
change their speeds, causing the body of the helicopter to spin on the spot. By using the right stick at
different angles and positions, you c an design and execute some graceful, arcing turns. On the other
hand, quic k thrusts of the s tick in differe nt directions c an create some uni que tricks or stu nts. Pract ice
makes per fect!
Controlling your Micro Attack
This helicopter features counter-rotating coaxial rotors (a fancy w ay of saying t wo rotors which spin in
opposite d irections). If yo u’re any kind of e xpert on helico pters, you’ll kno w that this is not the same w ay
that full-s cale helicopter s are usually ma de – they’ve got a uni- directional m ain rotors with a v ertical tai l
rotor. We think that thi s coaxial design w orks best for the se scale model s because:
• It’s more stable than a si ngle rotor. Because the ro tors move in opposi te directions, th e helicopter
has less of a t endency to spin the oth er way.
• It is way easier to set up . There are only tw o trim settings to ge t right, as oppose d to the three trim
settings that are required for the more conventional helicopter design.
• More rotors mean mo re lift, whic h means an easier to fly an d more manoeuvr able helicopter.
However, because the tail rotor is horizontal rather than vertical, the helicopter has a tendency to ascend
whilst moving for wards, and descend whilst reversing. This isn’t really a problem if you ease off on the
throttle whilst moving forw ard and increase the throttle whilst moving backw ards. You’ll get a feel for
it prett y quick.
Adjusting the Trim Control
Trim (Rotation): If y ou find that the helicopter is turning slowly lef t or right when you’re not using the
right sti ck on the controlle r, then you’ll n eed to adjust the tr im. The trim knob i s located in the centr e of
the contro ller, between and jus t below the primar y sticks.
You’ll probably have to do this every couple of flights, but it only takes a moment. Basically, the trim
‘fine -tunes’ the speed of th e rotor blades, a nd will help keep the h elicopter flyin g straight.
If the heli copter is rotati ng clockwi se (it’s turning r ight from the im aginary mi niature pilot’s per spectiv e)
then rotate the trim knob counter-clockwise.
If the helicopter is rotating counter-clockwise (turning left from the imaginary miniature pilot’s
perspe ctive) then rota te the trim knob cloc kwise.
Page 5

8
Wind: Basically, these are (approximately) 1/40th
scale helicopters. Full sized helicopters can’t fly in
high winds – and neither can the models. If a full
sized helicopter has difficulty overcoming 50mph
winds, then the model will have the same difficulty
with 1~2 mph winds (i.e. 1/40th as much). There’s
nothing that can be done about this, it’s just physics.
Air conditioning: Hot air rises and cool air falls
– this creates movement in the air, leading to an
effect called “wind shear”. Basically, this is when
there’s a column of hot air going up next to cold air
going down. Many full-scale aircraft accidents have
been caused by wind shear. Air conditioners create
heaps of wind shear. If the helicopter flies through
wind shear, it will seem to suddenly fly up or down
(depending on the direction of the wind shear).
The Ground Effect: When the helicopter is near the
ground, the air it pushes down with its rotor has
nowhere to go – the ground is in the way. Some of
this air bounces back, this pushes the helicopter
up. When the helicopter is near the ground, it will
get slightly more lift than it normally would. This is
something to keep in mind when landing.
The Ceiling Effect: Conversely to the ground effect,
when you fly too close to a ceiling, a small pocket of
low pressure is created above the helicopter, and it
will be sucked upwards. This could be bad – if you hit
the ceiling, the helicopter will stall, fall and possibly
be damaged.
Places to Fly: Because high winds can be a problem,
we recommend flying indoors. However, you really
do need a bit of space to get the most out of the
helicopter. Some places which are good for flight
include large garages (whilst the car’s not parked
there), indoor sports areas, aircraft hangars, secret
underground submarine pens and so on (though why
you’d fly a toy helicopter in your secret underground
submarine pen is beyond us). Or a large lounge room
with delicate items stashed somewhere out of the
way - whatever you’ve got.
This device complies with part 15 of the FCC Rules. Operation is subject to the following two conditions:
(1) This device may not cause harmful interference, and
(2) This device must accept any interference received, including interference that may cause undesired
operation.
Warning: Modifications not approved by the party responsible for compliance could void user’s authority to
operate the equipment.
All Countries E-mail: tech@swann.com
Telephone Helpdesk
USA Toll Free 1-800-627-2799
USA Parts & Warranty 1-800-627-2799
(M-F, 9am-5pm US PT)
AUSTRALIA 1300 138 324
NEW ZEALAND Toll Free 0800 479 266
UK 0203 027 0979
FLYING GUIDE
FCC COMPLIANCE INFORMATION STATEMENT(FOR U.S.A.)
TECHNICAL SUPPORT DETAILS
 Loading...