

Page 1
1
THC190210T
SR361-THC
www.swannsecurity.com
™
™
Advanced security made easy
English - Français - Español
ThumbCam™
DVR-415
Operating Instructions
Instructions d’utilisation
Instrucciones de Uso
Page 2

222
English
FCC Verification:
NOTE: This equipment has been tested and found to comply with the limits for
Class B digital device, pursuant to part 15 of the FCC Rules. These limits are designed to provide reasonable protection against harmful interference in a residential installation. This equipment generates, uses and can radiate radio frequency
energy and, if not installed and used in accordance with the instructions, may
cause harmful interference to radio or television reception, which can be determined by turning the equipment off and on, the user is encouraged to try to correct the interference by one or more of the following measures:
· Reorient or relocate the receiving antenna
· Increase the separation between the equipment and the receiver
· Connect the equipment into an outlet on a circuit different from that to which
the receiver is connected
· Consult the dealer or an experienced radio/TV technician for help
IMPORTANT NOTE: Prohibition against eavesdropping
Except for the operations of law enforcement officers conducted under lawful
authority, no person shall use, either directly or indirectly, a device operated pursuant to the provisions of this Part for the purpose of overhearing or recording the
private conversations of others unless such use is authorized by all of the parties
engaging in the conversation.
WARNING: Modifications not approved by the party responsible for compliance
could void user’s authority to operate the equipment.
IMPORTANT SAFETY INSTRUCTIONS:
· Make sure product is fixed correctly and stable if fastened in place
· Do not operate if wires and terminals are exposed
2
Page 3
3
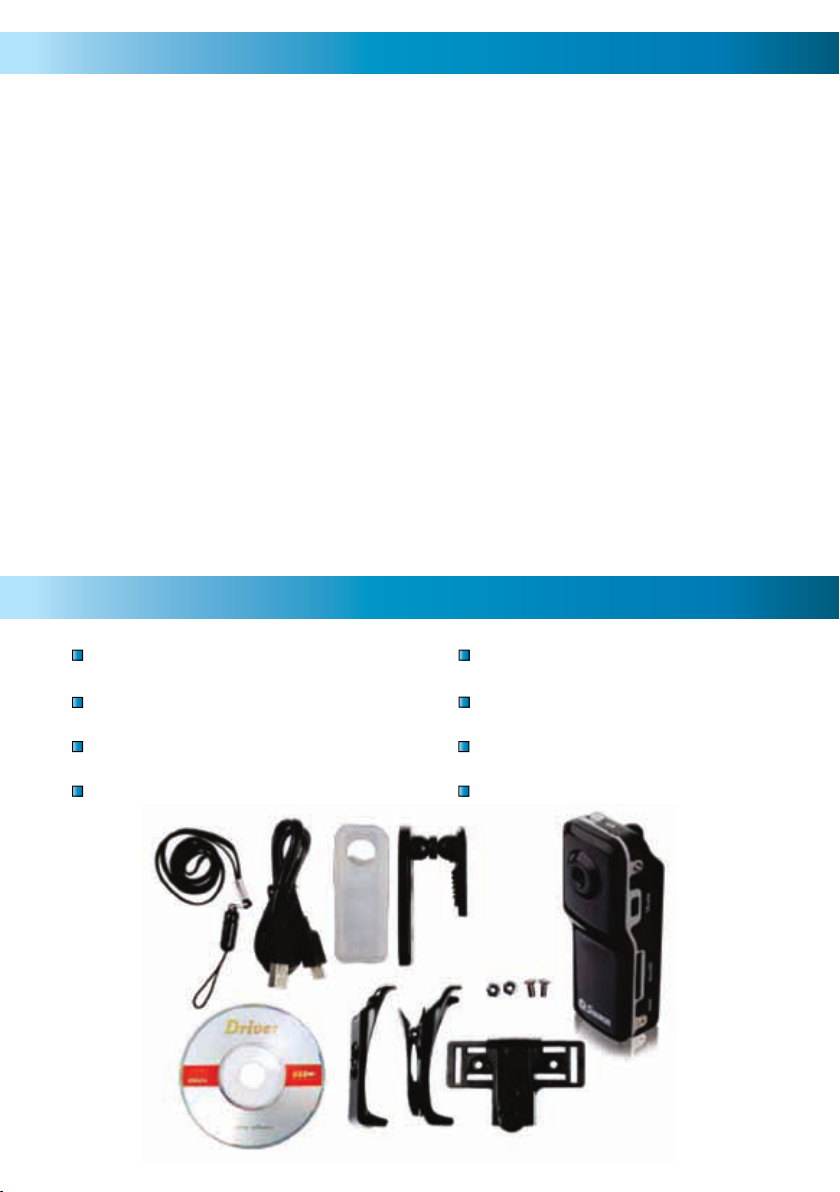
ThumbCam Video Recorder
Belt/Pocket Clip
Wall Mount Clip
Pivot Clip
Lanyard
Latex Dust Cover
USB 2.0 Cable
Mini-CD (Drivers)
Table of Contents
Package Contents
Before You Begin 2
Package Contents 3
Overview 4
Before Using the ThumbCam 5
Layout 6
Operating the ThumbCam 8
Shooting Video 9
Mounting the ThumbCam 10
Setting the Time & Date 11
Connecting to your PC 12
Using the ThumbCam as a PC Camera 13
Shooting Guide 14
Troubleshooting & Technical Specifications 15
Helpdesk / Technical Support & Warranty Information Rear Cover
3
Page 4

444
Overview
Congratulations on your purchase of the ThumbCam, a miniature self-contained
digital video recorder which, as the name suggests, is the size of a thumb. With
an included rechargeable lithium-ion battery which will give up to sixty minutes of
recording time and recording video directly to microSD card, the ThumbCam is a
convenient and adaptable camera/recorder, with as many applications as you can
imagine for it.
The ThumbCam is an ideal solution for a temporary security camera, recording family
and social events, covert surveillance (be sure it’s legal!) or sports photography. The
ThumbCam also features audio-triggered recording, great for situations where the
camera needs to operate autonomously - great if you want the ThumbCam to
serve as a short-term surveillance camera.
Combine all these features with multiple mounting options and included belt/
pocket clip and lanyard, the ThumbCam is a versatile camera which can be worn
or mounted just about anywhere.
IMPORTANT - A Note Regarding Law
As noted on the inside cover in the ‘Prohibition Against Eavesdropping’ section,
the use of covert recording equipment is illegal in many countries and localities.
In some areas, the law only relates to public spaces, whilst in others it extends to
private spaces also. The laws regarding remote video recording and audio recording
can differ as well.
The ThumbCam is used on the condition that users research the law as it applies to
them in their locality. Make sure you know the law and thoroughly follow it whilst
using the ThumbCam or any other recording device. If the legality of recording is
at all ambiguous, we strongly suggest obtaining the express permission of your
subjects to do so.
Page 5

5
Before Using the ThumbCam
The ThumbCam has a built-in lithium ion battery (the same sort of battery as most
mobile phones use, only smaller). We charge them up before we send them out –
however, due to time in transit, you’ll need to top it up before using it.
To charge the ThumbCam:
Locate the mini-USB port on the base of the 1. ThumbCam.
Using the supplied USB-A to Mini-USB-A cable, attach the 2. ThumbCam to a
spare USB port on your computer, or to a stand-alone USB charger.
Whilst charging, the both blue LED and the red LED will stay on.3.
The ThumbCam requires 3 ~ 4 hours to achieve a full charge. It is important, 4.
particularly the first charge, to leave the ThumbCam charging for the full
duration - not doing so can have a negative impact on the performance of
the battery.
General Guidelines
These are just a couple of points to keep in mind whilst using the ThumbCam:
Do not point the • ThumbCam towards exceedingly bright light sources such as the
sun, high-powered headlights or stadium lights. The bright light may damage the
image sensor, either leaving a permanent ‘shadow’ on your videos where the light
source has damaged the sensor, or rendering the sensor completely inoperable.
Avoid adverse weather conditions. Excessive heat (direct or ambient) and •
moisture (such as rain or humidity) will cause the ThumbCam to behave
erratically or not work at all. Acute exposure to these elements may permanently
damage the ThumbCam.
Do not dispose of in fire. Lithium-ion batteries can, when exposed to significant •
heat, explode quite dramatically.
The small lens on the • ThumbCam can be difficult to clean. Avoid dusty or dirty
environments.
If the lens does become dirty, clean with cleaning alcohol and/or a specialized •
lens cleaning cloth (these are available from all good camera stores).
Follow proper disposal guidelines in your locality if you intend to dispose of •
the ThumbCam. Many localities have strict guidelines as to the disposal of
electronic items, particularly those with built-on rechargeable batteries.
Page 6
6666
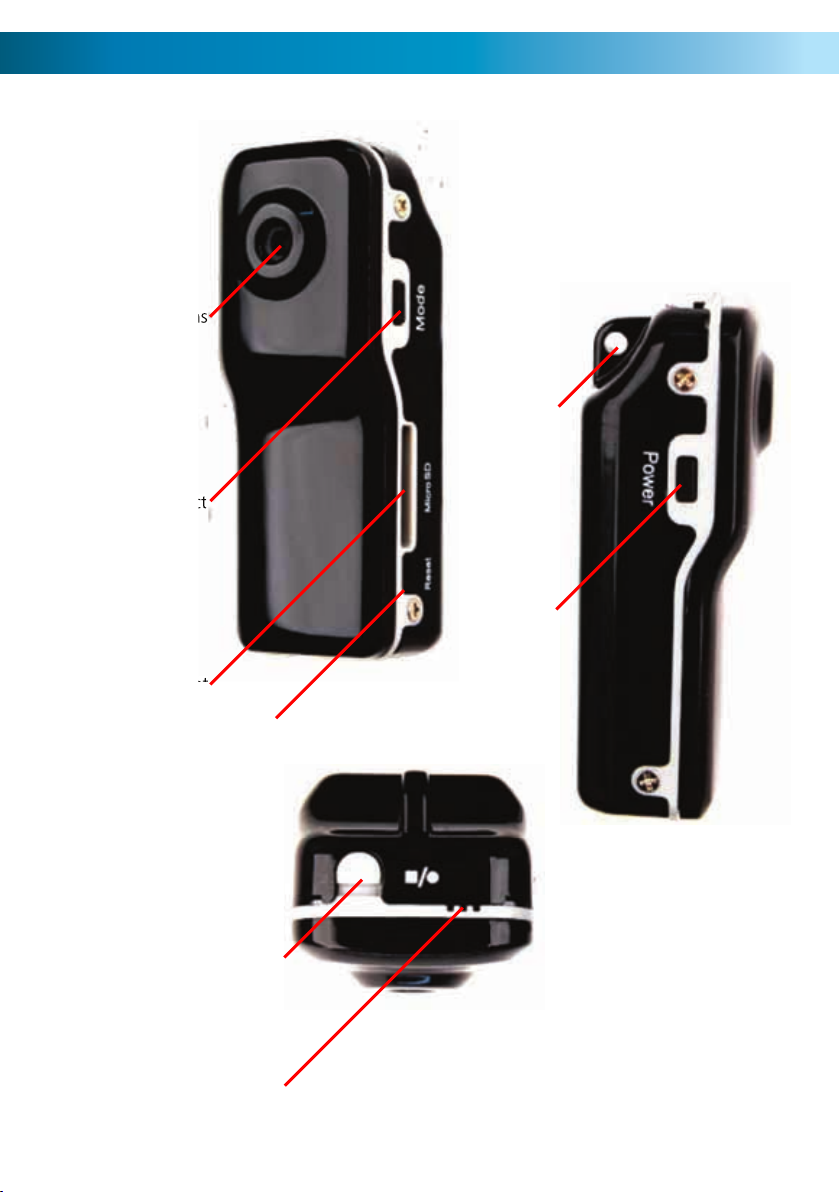
Record / Stop
Microphone / LEDs
Lens
Mode Select
MicroSD Card Slot
Reset Button
Power
Lanyard Clip
Layout
Page 7

7
Lens: The business-end of the camera, used to focus light on to the image sensor.
For best results, ensure the lens is clean and free from debris.
Mode Select: Changes the recording mode of the camera.
MicroSD Card Slot: The slot for inserting the microSD card which the ThumbCam
records to. To insert a card, simply push it into the slot. To remove it, push it in
again, and it will ‘pop’ right out.
Reset Button: Used to quickly return the ThumbCam to it’s initial booted state.
This is typically used only if the ThumbCam freezes and needs to be reset.
Lanyard Clip: Used to attach the included lanyard. Alternately, it could be used to
attach the ThumbCam to just about anything - such as a key-chain or similar.
Power: Press to turn the ThumbCam on and off. Do not turn off the ThumbCam
whilst recording, or immediately after recording.
Record/Stop: Starts and stops the ThumbCam recordings.
Microphone: The device which records sound. If these holes are blocked, then the
range and quality of the audio recording will be significantly reduced.
LEDs: Small colored lights which will indicate the current state and function of the
ThumbCam. There are two LEDs, one red and one blue. In bright light (such as
sunlight) these might be difficult to see.
7
Page 8

888
Operating the ThumbCam
To turn the ThumbCam ON:
Press and hold the Power Button for approximately one second. •
The blue and red LEDs will come on. When the red LED turns off and the blue •
LED stays on, this indicates that the ThumbCam is now ready to record.
To turn the ThumbCam OFF:
Press the Power Button for approximately one second. •
Do NOT turn the • ThumbCam off whilst recording video, or immediately
after recording video.
The • ThumbCam needs several seconds after stopping a recording to write the
video the microSD card – turning the ThumbCam off during the writing to card
process will corrupt the data, and render the video file unusable.
Low Power & Automatic Shutdown:
When the ThumbCam’s battery starts to run low, it will automatically shut itself
down. If it is currently recording a video, it will stop recording and finalize writing
the video file to the microSD card before turning itself off. Recharge the battery
fully before turning the ThumbCam on again.
The ThumbCam will also automatically shut itself down when about to run out of
recording space on its microSD card. To fix this, replace the microSD card with a
fresh (or, at least, not full) one, or connect the ThumbCam to a PC and clear data
off the card by cutting and pasting it, or simply deleting it.
Resetting the ThumbCam:
Occasionally, particularly during long periods of constant use, the ThumbCam may
freeze and stop working correctly. If this happens, the ThumbCam needs to be
reset.
To reset the ThumbCam:
Locate the Reset button, located immediately below the microSD card slot.•
Using a thin (not sharp!) object such as an unfolded paper clip or hair pin, •
press and hold the Reset button for approximately one second.
Wait whilst the • ThumbCam resets. The procedure is the same as when it is first
turned on.
Once the • ThumbCam has been reset, you’ll need to set the Time and Date
again (see page 11).
Page 9

9
Shooting Video
Recording video is the main function of the ThumbCam. To do so:
Turn the • ThumbCam on.
Wait several seconds for the • ThumbCam to properly initialize.
When the red LED goes out and blue LED is on, the • ThumbCam is ready to record.
Press the Record/Stop button to begin recording video.•
Whilst video is being recorded, the blue LED will stay on and the red LED will •
ash slowly.
To stop the recording, press the Record/Stop button again. The red LED will •
ash quickly whilst video data is being saved.
Important Notes:
When you stop a recording, it takes several seconds for the • ThumbCam to
write video data to the microSD card. If the Record/Stop button is pressed
again or the power is turned off whilst the ThumbCam is writing data to the
microSD card then the video data will be corrupted, resulting in either an
corrupt file (which is bad) or a corrupt file structure on the SD card (which is
worse). If the former happens, the video quality will be greatly reduced, if the
file works at all. If the later happens, you might need to reformat the SD card,
and risk losing all the data on it.
See the Shooting Guide (page 14) for more information about recording.•
Sound-Activated Recording:
The ThumbCam can be configured to operate as a sound-activated recording
device. This makes the ThumbCam a great solution for a set-and-forget recording
device. The internal battery will last for more than 10 hours of standby time if
nothing triggers the ThumbCam to record.
Soft sounds (for example, softer than a person speaking in a loud voice approximately
3ft/1m away) may not trigger the ThumbCam to record.
To engage Sound-Activated Recording Mode:
Turn the • ThumbCam on in the usual way.
Wait until the red LED goes out, and the • ThumbCam is in standby.
Press the Mode button.•
The blue LED will stay on, and the red LED will ash slowly to indicate that the •
ThumbCam is in sound-activated recording mode.
While armed in this mode, a moderate to loud sound will trigger the • ThumbCam
to record.
Once triggered to record, the • ThumbCam will continue recording for a
minimum of two minutes, or longer if the sound continues.
To deactivated sound-activated recording mode, simply press the mode •
button. Once the red LED goes out, sound-activated recording mode has been
deactivated.
Page 10

101010
Mounting the ThumbCam
We’ve included a number of options for you to mount the ThumbCam, whether you
want to use it as a personal video recorder, a PC camera, a short-term surveillance
camera, or whatever other uses you might imagine for it!
Lanyard
Using the lanyard is pretty straight forward, and a great way to make sure you
never lose the ThumbCam - it’ll be round your neck!
Attach the clip on the end of the lanyard to the small tab on the top of the •
ThumbCam.
Sling the lanyard around your neck.•
For best results, hold the • ThumbCam steady whilst you’re shooting video -
leaving it on the lanyard will result in a very random, frenetic video which will
rarely capture what you want. Then again, this might be exactly the effect
you’re after - if so, go for it!
Belt/Pocket Clip (or Silicon Sleeve)
Insert the • ThumbCam into the clip.
The four corners of the clasp will lock into position on the four corners of the •
ThumbCam.
The • ThumbCam can now be clipped onto a belt, pocket, collar, or any other
location which offers suitable support for the clip.
To remove the • ThumbCam from the clip, hold it in the middle and twist gently.
The clip is easiest to remove one corner at a time.
The silicon sleeve works in a similar manner, and has a loop on the back to •
attach to a belt or similar. The differences are primarily that a) the silicon sleeve
is more delicate, and could tear if mistreated and b) the silicon sleeve will offer
some degree of protection from dust and moisture.
Wall/Ceiling Mounting Options
The ThumbCam comes with two options for permanent mounting, a permanent
clip and a clip-to-wall mounting. If you want to use the ThumbCam with the belt/
pocket clip, use the free-pivot mounting that the clip can attach to. To mount the
ThumbCam only, use the standard wall clip.
The free-pivot clip (used with the belt/pocket clip) is magnetic, and can be •
attached easily to any suitable surface. This is handy for mounting the clip onto
a refrigerator, PC case, or similar metallic surface. For permanent installation,
use the screw holes.
The standard wall clip needs to be screwed, glued or taped into place. Screws •
are typically the most resilient mounting option.
Page 11

11
Setting the Time & Date
You can setup the ThumbCam to print the date and time that a recording was
taken directly onto the video, like a watermark. To enable this function, you’ll just
need to set the time and date - the ThumbCam will keep track of it from there.
To set the Date and Time:
Open • Notepad. It’s usually located in the Accessories folder in the Start Menu
(assuming you’re using Microsoft Windows®). If you don’t have Notepad, any
plain text editor will work fine (but not a word processor, and these do not
create plain .txt files).
Write out the date and time. Leave a single space (i.e. press the spacebar once •
before pressing enter or return: represented by “_”) after each line.
Enter the date and time in the following format:•
[date]_
YYYY/MM/DD_
HH:_MM:_SS_ (where “_” indicates a blank space)
So, if it was thirty-three minutes past nine in the morning on the fourth of
December 2009, then the file would read:
[date]_
2009/12/04_
09:_33:_00_ (where “_” indicates a blank space)
Save this file, naming it “tag.txt”.•
Copy this file to the microSD card.•
With the microSD card already inserted into • ThumbCam, turn the
ThumbCam ON.
The • ThumbCam will read the text in the file, and update it’s internal clock to
match the date and time as set by you.
Notes:
The date and time will be updated to the • ThumbCam’s internal clock when it
is turned on. Before this, the time will not be updated to ‘keep up’ with realtime. Thus, if you set the time accurately in the tag.txt file and copy it to the
microSD card, but then leave it an hour before turning on the RemoteCam,
the time stored in the RemoteCam will be one hour behind.
You may need to reset the time (i.e. go through this procedure again) if the •
internal battery in the RemoteCam is completely drained of charge, or if you’ve
pressed the Reset button (which clears the memory of the ThumbCam.)
Page 12

121212
Connecting to your PC
You can read the data on the microSD card in the ThumbCam by connecting
the ThumbCam to your computer.
To do this:
Locate the mini-USB plug on the bottom of the • ThumbCam.
Find a spare USB port on your computer.…•
For maximum speed, find a free USB 2.0 port on your computer, and avoid •
using USB extension cables or hubs.
Connect the spare USB port on your computer to the mini-USB port on the •
ThumbCam using the supplied USB 2.0 cable.
The • ThumbCam will be detected as a USB storage device, and can be accessed
in the same way as you would any other USB ash drive.
The video recordings are stored as an AVI files in folders called • 100MEDIA,
101MEDIA, 102MEDIA, and so on.
If you have any difficulty playing any the recordings from the ThumbCam, we
recommend using a different video player. We suggest VLC Player - this program
is available free for a wide variety of computer platforms and operating systems,
and plays just about anything.
It’s available from: http://www.videolan.org/vlc
About AVI Files:
AVI is a popular video format, which is highly compatible with most computers
and computer-like devices (such as recent mobile phones and even video game
consoles). AVI is an acronym for Audio Video Interleave, and has been a popular
video ‘container’ for many years. The term ‘container’ means that it is a type of
file which holds video data, rather than specifying exactly what kind of video data
it should hold.
Page 13

13
Using the ThumbCam as a PC Camera
You can also connect the ThumbCam to your computer and use it as a PC camera.
A typical use of this feature would be to use the ThumbCam as a webcam for
Internet chat programs.
To use the ThumbCam as a PC camera, first install the driver:
Insert the CD-ROM into your computer.•
Locate the file on the CD-ROM called: “SPCA1528_V2220_M…Setup.exe”•
Run this file, follow further on-screen prompts.•
You may be asked to confirm your choice to run this file, or be warned that •
this driver is “not digitally signed”. This is normal: choose to continue running
and installing the driver.
Depending on the version of your operating system, you may need to be an •
administrator to install software and/or drivers.
Once the installation is complete, you will now have an icon on the desktop •
labelled “AMCAP”.
To Connect the ThumbCam in PC Camera Mode:
Connect the • ThumbCam to your computer via the USB 2.0 cable as normal.
If you have not already done so, turn the • ThumbCam on.
Wait until your computer has detected the • ThumbCam as a removable USB
Mass Storage Device.
Press the Mode button. This will instruct the • ThumbCam to act as a USB PC
Camera.
Double-click the AMCAP icon on your desktop. Once the program runs, you’ll •
be able to use the ThumbCam as a PC camera.
System Requirements for Webcam Functions:
Interface Type USB 2.0
Processor Pentium IV or above
RAM 1GB or greater
Video Card Intel 945 or greater
Hard Drive Space Minimum 1GB free
Operating System(s) Microsoft Windows XP
Microsoft Windows Vista
Microsoft Windows 7
The drivers for the webcam functions are not compatible with Mac-based systems.
Windows is a trademark of Microsoft Corporation in the United States and other countries.
Mac is a registered trademark in the United States and other countries.
®
®
®
Page 14

141414
Shooting Guide
Framing:
The ThumbCam has a fixed lens (a vari-focal lens would, simply, not fit) – so the
size of subjects in your shots depends only on how close to the subject you hold
the camera.
Typically, about 3 feet (1m) is about right if filming a shot of someone’s face – •
this way, their face will occupy approximate half the vertical space in frame.
To get a whole person in frame (assuming they’re approximately six feet tall) •
then you’ll need to be about 10ft (3m) away from them.
Focus:
The • ThumbCam has a fixed focus lens, which means you’ll never need to
adjust focus.
The wide angled fixed lens will achieve focus within approximately 30cm (1½ •
ft) from the lens, varying slightly depending on the amount of available light.
It will hold focus to infinity.
Basically, keep everything more than two feet from the lens, and you’ll have •
no worries!
Exposure:
The ThumbCam will adjust exposure automatically, varying its gain setting
autonomously, reacting to the amount of available light. There are a couple of
things to bear in mind, however:
Shooting a dark subject in front of a bright background can cause the auto-•
exposure feature of the ThumbCam to become confused, and drop the
exposure down so that the background is correctly exposed whilst the subject
becomes a silhouette. Avoid brightly lit backgrounds, unless you want this
effect.
To decrease exposure, the • ThumbCam shortens its electronic shutter speed,
thus exposing each frame for a shorter time. This means that you’ll get better
high-speed photographic performance in bright light – useful for shooting fast
events, like sports.
On the other hand, in low-light, each frame needs to be exposed longer to get •
enough light into the (very small) lens. This can be effect can be minor (such as
shooting in a shopping mall or a stadium under lights) or particularly serious
(in situations such as shooting under a street lamp).
The image quality, depth of field and exposure range will all improve •
dramatically as more light is available.
Tips & Tricks: Photography is an art - there is no right or wrong way to shoot.
Practise really does make perfect - or, at least, better. The best way to get better
results is just to keep using the ThumbCam. Besides, it’s not like you’ll be wasting
film; just clean off the microSD card now and then, and you’ll be set!
Page 15

15
Troubleshooting
Problem: I’ve recorded videos, but the microSD card seems to be blank.
Solution: Chances are that this problem is caused by turning the ThumbCam off
before the video files have been properly saved to the microSD card. Always use
the Rec/Pause button to stop recordings and waiting until the red LED has gone
out before turning the ThumbCam off.
Problem: The ThumbCam won’t turn on.
Solution: The most likely culprit is the battery. Check out the instructions on page
4 regarding charging the battery. Try completely charging the battery. When doing
so, avoid using a USB hub - some USB hubs will not provide a full 5V to attached
devices and thus will not charge the battery properly. You can also charge the
ThumbCam from a stand-alone USB charger.
Problem: My videos and pictures seem blurry.
Solution: If the lens becomes dirty, this can cause the ThumbCam’s videos to be
distorted, soft and blurred. Clean the lens using a dedicated lens cleaning cloth
and lens cleaning solution (typically a type of cleaning alcohol).
Problem: My videos seem too shaky.
Solutions: As a general rule, this usually indicates that the mount you’ve used
for the camera (or arm, if you’re shooting hand-held) needs to be more stable.
Generally, this will occur if you use the lanyard or belt/pocket clip whilst recording
video, and are moving or travelling in a vehicle which is moving. Generally, you’ll
achieve the best results holding the ThumbCam with both hands in front of you,
resting your elbows on your torso. That way, your body and both arms form a kind
of rudimentary tripod, greatly steadying your videos.
Technical Specifications
Video
Video Format AVI
Resolution 720 x 480
Video Size Variable
Audio
Microphone Yes (built in)
Audio Range 3m (typical)
Recording
Recording Mode Manual /
Voice Activated
Frame Rate 30fps
Storage Type MicroSD Card
Storage Capacity Up to 8GB
Storage Time 10min/GB
(avg. > 10,000kbps)
General
Battery Type Rechargeable
Lithium-Ion
Record Time per Charge 60 mins
Charging Method USB
Dimensions 2.2” x 0.8” x 0.8”
50mm x 30mm x 30mm
15
Page 16

161616
Français
Vérification FCC
Note : Cet équipement a été testé et est en conformité avec les limites édictées dans
le paragraphe 15 des Règlementations FCC, relatif aux équipements numériques
de classe B. Ces limites ont été définies dans le but de fournir une protection raisonnable contre les interférences néfastes dans les installations résidentielles. Cet
équipement génère, utilise et peut irradier des énergies de fréquences radio et,
s’il n’est pas installé dans le respect des instructions fournies, peut provoquer des
interférences auprès des appareils de réception radio-télévisée. Ces dernières peuvent être déterminées en allumant et éteignant l’équipement installe. L’utilisateur
est incité à essayer, si besoin est, de corriger les interférences à l’aides des mesures
suivantes :
- Réorienter ou déplacer l’antenne réceptrice.
Augmenter l’espace entre l’équipement et le récepteur
- Brancher l’équipement sur une prise ou un circuit différents de celui auquel le
récepteur est connecté.
- Consulter le revendeur ou un technicien radio/télévision expérimenté.
Ces appareils sont conformes au paragraphe 15 des normes FCC. Leur opération
est sujette aux deux conditions suivantes :
(1) ces appareils ne doivent pas provoquer d’interférence dangereuse, et
(2) ces appareils doivent accepter toute inteférence reçue, y compris les interférences pouvant entraîner un fonctionnement non désiré.
NOTE IMPORTANTE Protection contre les écoutes illégales
Exepté dans le cadre d’opérations d’applications de la loi conduites par les autorités
compétentes, il est strictement interdit d’utiliser le matéreil fourni afin d’écouter
ou d’enregistrer illégalement des conversations privées au-delà des strictes limites
édictées par les personnes engagées dans lesdites conversations.
ATTENTION : Toute modification non approuvée par la partie responsable de la
mise en conformité de l’appareil peut annuler les autorisations ou droits d’utilisation
de l’équipement.
Page 17

17
Enregistreur vidéo ThumbCam
Pince de ceinture/de poche
Pince de fixation murale
Pince à pivot
Dragonne de sécurité
Capot anti-poussière en latex
Câble USB 2.0
Mini-CD (Pilotes)
Table of Contents
Contenu de l’emballage
Avant de commencer 16
Contenu de l’emballage 17
Description 18
Avant d’utiliser le ThumbCam 19
Schéma 20
Utilisation du ThumbCam 22
Prise de vue d’une vidéo 23
Montage du ThumbCam 24
Réglage de l’heure et de la date 25
Connexion à votre PC 26
Utilisation du ThumbCam comme caméra pour PC 27
Guide de prise de vue 28
Dépannage et spécifications techniques 29
Support technique et informations de garantie 30
Service d’assistance 31
Page 18

181818
Description
Félicitations pour votre achat du ThumbCam, un enregistreur numérique miniature
complet et fonctionnel qui, comme son nom l’indique, a la taille d’un pouce. Avec
une pile lithium-ion rechargeable incluse qui vous offrira jusqu’à soixante minute
de temps d’enregistrement et vous permettra de faire un enregistrement vidéo
directement sur une carte micro SD, le ThumbCam est une caméra/un enregistreur
pratique et polyvalent, avec autant d’applications que vous pouvez imaginer.
Le ThumbCam est une solution idéale pour une utilisation comme caméra de
sécurité temporaire (assurez vous que c’est légal !) ou des photos sportives. Le
ThumbCam offre aussi l’enregistrement déclenché par un signal audio, très utile si
vous voulez utiliser le ThumbCam comme caméra de surveillance à court terme.
Associez toutes ces spécifications avec des multiples options de montage et la
pince de ceinture/de poche et la dragonne de sécurité, le ThumbCam est une
caméra versatile qui peut être portée sur soi ou montée pratiquement partout.
IMPORTANT – Remarque concernant la législation
Comme indiqué sur la couverture intérieure dans la section ‘Interdiction de la
mise sur écoute‘, l’utilisation de matériel d’enregistrement secret est illégal dans
plusieurs pays et localités. Dans certaines zones, cette loi ne s’applique qu’aux
espaces publics, alors que dans d’autres elle s’applique également aux espaces
privés. Les lois concernant les enregistrements vidéo et audio peuvent également
différer.
Le ThumbCam peut être utilisé à la condition que les utilisateurs fassent des
recherches sur la législation applicable à eux dans leur localité. Assurez-vous que vous
connaissez la loi et que vous la suivez à la lettre lorsque vous utilisez le RemoteCam
ou tout autre dispositif d’enregistrement. Si la légalité de l’enregistrement est
ambiguë, nous vous conseillons vivement d’obtenir la permission expresse des
personnes avant de les enregistrer.
Page 19

19
Avant d’utiliser le ThumbCam
Le ThumbCam a une pile lithium ion intégrée (la même sorte de pile que la
plupart des téléphones portables utilisent, mais plus petite). Nous les chargeons
complètement avant de les expédier – cependant, en raison de la durée du
transport, vous devrez encore le charger avant de l’utiliser.
Pour charger le ThumbCam:
Repérez le port mini-USB sur le côté du ThumbCam.1.
En utilisant le câble USB-A à Mini-USB-A fourni, connectez le ThumbCam à un 2.
port USB disponible de votre ordinateur, ou à un chargeur USB autonome.
Durant le chargement la DEL bleue clignotera et la DEL rouge restera 3.
allumée.
Il faut 3 à 4 heures pour que le ThumbCam soit complètement chargée. Il est 4.
important de le laisser connecté pour toute la durée du chargement, surtout
pendant le premier chargement- si vous ne le faites pas vous risquez un impact
négatif sur la performance de la pile.
Consignes générales d’utilisation
Voici quelques remarques à garder à l’esprit lorsque vous utilisez le ThumbCam:
Ne dirigez pas le ThumbCam vers des sources de lumière extrêmement fortes •
telles que le soleil, les phares très puissants ou les lumières de stade. La lumière
brillante pourrait endommager le capteur, laissant une ‘ombre’ permanente
sur vos enregistrements vidéos à l’endroit ou la source de lumière à abîmé le
capteur, ou rendant le capteur complètement inutilisable.
Évitez les conditions météorologiques défavorables. La chaleur excessive (directe •
ou ambiante) et la moisissure (telle que la pluie ou l’humidité) entraîneront un
fonctionnement erratique de la ThumbCam ou un disfonctionnement total.
Ne vous en débarrassez pas dans le feu. Si on les expose à une chaleur •
importante, les piles lithium-ion peuvent exploser très violemment.
La petite lentille du ThumbCam peut être difficile à nettoyer. Évitez les endroits •
poussiéreux et sales.
Si la lentille se salit, nettoyez-la avec de l’alcool spécial de nettoyage et/ou un •
tissu réservé au nettoyage des lentilles (ceux-ci sont disponible dans les bons
magasins vidéo).
Suivez les consignes appropriées de destruction de votre localité si vous avez •
l’intention de disposer du RemoteCam. Plusieurs localités ont des consignes
strictes en ce qui concerne la destruction des appareils électroniques, en
particulier ceux qui ont des piles rechargeables intégrées.
Page 20

20202020
Enregistrement / Arrêt
Microphone / DELs
Lentille
Mode Sélection
Fente de la carte
micro SD
Bouton Réinitialiser
Marche
Pince de la
dragonne de
sécurité
Schéma
Page 21

21
Lentille: La partie fonctionnelle de la caméra, utilisée pour fixer la lumière sur le
capteur d’image. Pour les meilleurs résultats, assurez-vous que la lentille est propre
et exempte de fragments.
Mode Sélection: Change le mode d’enregistrement de la caméra.
Fente de la carte micro SD: La fente où on insère la carte micro SD sur laquelle le
ThumbCam enregistre. Pour insérer une carte, il suffit de la pousser dans la fente.
Pour l’enlever, poussez-la encore vers l’intérieur, et elle ressortira immédiatement.
Bouton Réinitialiser: Utilisé pour ramener le ThumbCam à son état initial au
démarrage. Il est habituellement utilisé uniquement si le ThumbCam est bloqué et
doit être réinitialisé.
Pince de la dragonne de sécurité: Utilisée pour connecter la dragonne de sécurité
fournie. Alternativement, vous pouvez l’utiliser pour connecter le ThumbCam à ce
que vous voulez – comme porte-clés ou quelque chose de similaire.
Marche: Appuyez pour mettre le ThumbCam en marche ou l’éteindre. N’éteignez
pas le ThumbCam pendant l’enregistrement ni immédiatement après avoir
enregistré.
Enregistrement/Arrêt: Lance et arrête l’enregistrement du ThumbCam.
Microphone: Le dispositif qui enregistre le son. Si cette ouverture est couverte,
la portée et la qualité de l’enregistrement audio sera réduite de manière
importante.
DELs: Des petites lumières colorées qui indiqueront l’état actuel et le fonctionnement
du ThumbCam. Il y en a deux, une rouge et une bleue, et dans un endroit éclairé
(comme en plein soleil) elles peuvent être difficiles à voir.
21
Page 22

222222
Utilisation du ThumbCam
Pour mettre le ThumbCam en MARCHE:
Appuyez et maintenez le bouton Marche pendant environ une seconde. •
Les DELs bleue et rouge s’allumeront. Lorsque la DEL rouge est éteinte et que •
la bleue reste allumée, cela indique que le ThumbCam est prêt à enregistrer.
Pour éteindre le ThumbCam:
Appuyez et maintenez le bouton Marche pendant environ une seconde. •
N’éteignez pas le ThumbCam pendant l’enregistrement d’une vidéo ni •
immédiatement après avoir enregistré une vidéo.
The ThumbCam nécessite plusieurs secondes après l’arrêt de l’enregistrement •
pour graver la vidéo sur la carte micro SD – éteindre le ThumbCam pendant
le processus de gravure sur la carte corrompra les données et rendra le fichier
vidéo inutilisable.
Charge faible & Arrêt automatique :
Lorsque la pile du ThumbCam commence à être faible, il s’éteindra automatiquement.
S’il est en cours d’enregistrement d’une vidéo, il cessera d’enregistrer et finalisera
l’écriture du fichier vidéo sur la carte micro SD avant de d’éteindre. Rechargez
complètement la pile avant de rallumer le ThumbCam.
Le ThumbCam s’éteindra aussi automatiquement si la carte micro SD est presque
pleine. Pour arranger cela, remplacez la carte micro SD par une nouvelle carte (ou
une carte qui n’est pas pleine), ou connectez le ThumbCam à un PC et effacez les
données de la carte en coupant et en collant, ou simplement en les effaçant.
Réinitialisation du ThumbCam:
Occasionnellement, surtout pendant de longues périodes d’utilisation constante,
le ThumbCam peut être bloqué et peut cesser de fonctionner correctement. Si cela
se produit, le ThumbCam doit être réinitialisé.
Pour réinitialiser le ThumbCam:
Repérez le bouton Réinitialiser, situé juste en-dessous la fente de la carte micro •
SD.
Un utilisant un objet fin (pas pointu!) tel qu’un trombone déplié ou une épingle •
à cheveux, appuyez et maintenez le bouton Réinitialiser pendant environ une
seconde.
Attendez pendant que le ThumbCam se réinitialise. La procédure est la même •
que la première fois qu’on l’allume.
Une fois que vous avez réinitialisé le ThumbCam, vous devrez à nouveau régler •
l’Heure et la Date (voir page 11).
Page 23

23
Filmer une vidéo
Enregistrer une vidéo c’est la fonction principale du ThumbCam. Pour le faire:
Mettez le ThumbCam en marche.•
Attendez quelques secondes pour que le ThumbCam to soit correctement initialisé.•
Lorsque la DEL rouge s’éteint et que la bleue est allumée, le ThumbCam est prêt •
à enregistrer.
Appuyez sur le bouton Enregistrement/Arrêt pour commencer à enregistrer la vidéo.•
Pendant l’enregistrement de la vidéo, la DEL bleue restera allumée et la DEL rouge •
clignotera lentement.
Pour arrêter l’enregistrement, appuyez une fois de plus sur le bouton •
Enregistrement/Arrêt. La DEL rouge jaune clignotera rapidement pendant la
sauvegarde des données vidéo.
Remarques importantes:
Lorsque vous arrêtez un enregistrement, il faut plusieurs secondes pour que le •
ThumbCam grave les données de la vidéo sur la carte micro SD. Si le bouton
Enregistrement/Arrêt est de nouveau appuyé ou que le bouton Marche est
éteint pendant que le ThumbCam grave les données sur la carte micro SD
alors les données de la vidéo peuvent être corrompues, ce qui aura pour
conséquence un fichier corrompu (ce qui est mauvais) ou structure de fichier
corrompue sur la carte micro SD (ce qui est pire). Si ce dernier événement se
produit, vous serez peut-être obligé de reformater la carte SD, et vous risquerez
de perdre toutes les données qui y sont enregistrées.
Consultez le Guide de prise de vue (page 11) pour plus d’informations.•
Enregistrement déclenché par le bruit:
Le ThumbCam peut être configuré pour fonctionner comme appareil
d’enregistrement déclenché par le bruit. Cela fait du ThumbCam une excellente
solution d’enregistrement que vous réglez et que vous oubliez. La pile interne dure
plus de 10 heures en veille si rien de déclenche l’enregistrement.
Des bruits doux (par exemple, plus doux qu’une personne qui parle avec une voix
forte à environ 1 m/ 3ft) peuvent ne pas déclencher l’enregistrement.
Pour activer le mode Enregistrement déclenché par le bruit:
Mettez le ThumbCam en marche comme d’habitude. •
Attendez que la DEL rouge s’éteigne, et que le ThumbCam soit en veille.•
Appuyez le bouton Mode.•
La DEL bleue restera allumée, et la rouge clignotera lentement indiquant que •
le ThumbCam est en mode d’enregistrement déclenché par le bruit.
Lorsqu’il est dans ce mode, les bruits de modérés à forts déclencheront •
l’enregistrement.
Une fois activé, le ThumbCam continuera à enregistrement pendant deux •
minutes au minimum, ou plus longtemps si le bruit continue.
Pour désactiver le mode enregistrement déclenché par le bruit, appuyez •
simplement le bouton mode. Une fois que la DEL rouge s’éteint, le mode
enregistrement déclenché par le bruit aura été désactivé.
Page 24

242424
Montage du ThumbCam
Nous avons inclus un certain nombre d’options pour monter le ThumbCam,
que vous vouliez l’utiliser comme enregistreur vidéo, ou comme caméra de PC,
comme caméra de surveillance à court terme, ou pour tout autre usage que vous
imaginez!
Dragonne
L’utilisation de la dragonne est assez simple, et une excellente manière de vous
assurer que vous ne perdrez jamais le ThumbCam – il sera autour de votre cou!
Attachez la pince qui se trouve à l’extrémité de la dragonne à la petite •
languette au-dessus du ThumbCam.
Mettez la dragonne en écharpe autour de votre cou.•
Pour les meilleurs résultats, tenez le ThumbCam stable pendant que vous •
filmez la vidéo – si vous le laisser pendre sur la dragonne vous aurez une
vidéo très incohérente, frénétique qui ne capturera que rarement ce que vous
voulez. Ceci dit, c’est peut-être exactement l’effet que vous vous recherchez
– si c’est le cas, allez-y!
Pince de ceinture/de poche (ou étui en silicone)
Insérer le ThumbCam dans la pince.•
Les quatre coins du fermoir se fermeront sur les quatre coins du ThumbCam.•
Le ThumbCam peut maintenant être accroché à la ceinture, à la poche, au col, •
ou à tout autre endroit ou on peut accrocher la pince.
Pour enlever le ThumbCam de la pince tenez la vers le milieu et tournez-la •
doucement. La pince est plus facile à enlever si on décroche un coin à la
fois.
L’étui en silicone fonctionne de manière similaire, et à une boucle à l’arrière •
pour l’accrocher sur la ceinture ou à un endroit similaire. Les différences
principales sont a) l’étui en silicone est plus délicat, et peut se déchirer si on
le manipule avec force et b) l’étui en silicone offrira une certaine protection
contre la poussière et la moisissure.
Options de montage sur le Mur/Plafond
Le ThumbCam vient avec deux options de montage permanent, une pince
permanente et un montage sur le mur avec une pince. Si vous voulez utiliser le
ThumbCam avec la pince de pivot ceinture/ de poche, utilisez le montage à l’aide
du pivot libre sur lequel la pince peut s’accrocher. Pour monter uniquement le
ThumbCam, utilisez la pince standard pour le mur.
La pince du pivot libre (utilisée avec la pince de ceinture/ de poche) est •
magnétique et peut-être accrochée facilement à toute surface adaptée. C’est
pratique pour monter la pince sur un réfrigérateur, un PC, ou une surface
métallique similaire. Pour une installation permanent, utilisez des trous de vis.
La pince standard pour le mur devra être vissée, collée ou apposée à l’aide •
d’un adhésif. Les vis sont habituellement l’option la plus résistante.
Page 25

25
Réglage de la date et de l’heure
Vous pouvez régler le ThumbCam pour qu’il imprime la date et l’heure auxquelles
l’enregistrement a été effectué, directement sur la vidéo, comme un filigrane.
Pour activer cette fonction, vous devrez simplement régler l’heure et la date – le
ThumbCam conservera une trace de ce réglage.
Pour régler la date et l’heure:
Ouvrir Notepad. Il est habituellement situé dans le dossier Accessoires dans le •
Menu Démarrer (en supposant que vous utilisez Microsoft Windows®). Si vous
n’avez pas Notepad, n’importe quel éditeur de texte fonctionnera bien (mais
pas un logiciel de traitement de texte, car ceux-ci ne créent pas de fichiers
textes simples .txt).
Écrivez la date et l’heure. Laissez un seul espace (c.-à-d. appuyez la barre •
d’espace une fois avant d’appuyer entrée ou retour : représenté par “_”) après
chaque ligne.
Écrivez la date et l’heure sous le format suivant:•
[date]_
AAAA/MM/DD_
HH:_MM:_SS_ (et “_” indique un espace vide)
Donc, s’il est neuf heures trente-trois le quatre décembre 2009, le fichier
indiquera:
[date]_
2009/12/04_
09:_33:_00_ (et “_” indique un espace vide)
Sauvegarder ce fichier sous le nom “tag.txt”.•
•
Copier ce fichier sur la carte micro SD.•
Avec la carte micro SD déjà insérée dans le ThumbCam, mettez le •
ThumbCam en MARCHE.
Le ThumbCam lira le texte dans le fichier, et actualisera son horloge interne •
pour qu’elle reète l’heure et la date réglée par vous.
Remarques:
La date et l’heure seront actualisées sur l’horloge interne du ThumbCam •
lorsqu’il est allumé. Avant cela, l’heure ne sera pas actualisée pour se régler
sur la vraie heure. Donc, si vous réglez l’heure avec précision dans le fichier
tag.txt et copiez-le vers la carte micro SD, mais laissez le dedans pendant une
heure avant d’allumer le ThumbCam, l’heure enregistrée dans le ThumbCam
sera une heure en retard.
Vous aurez peut-être besoin de réinitialiser l’heure (c.-à-d. refaire cette •
procédure) si la pile interne du RemoteCam est complètement déchargée, ou
si vous réinitialisez le RemoteCam en appuyant le bouton Réinitialiser.
Page 26

262626
Connexion à votre PC
Vous pouvez lire les informations sur la carte micro SD sur le ThumbCam en le
connectant à votre ordinateur.
Pour cela:
LRepérez la prise mini-USB en bas du ThumbCam.•
Trouvez un port USB disponible sur votre ordinateur …•
Pour une vitesse maximale, utilisez un port USB 2.0 sur votre ordinateur, et •
éviter d’utiliser des câbles d’extension ou les concentrateurs.
Connectez le port USB disponible de votre ordinateur avec le port mini-USB •
du ThumbCam en utilisant le câble USB 2.0 fourni.
Le ThumbCam sera détecté comme périphérique de mémoire USB, et vous •
pourrez y accéder de la même manière que vous le feriez pour tout autre
lecteur ash USB.
Les enregistrements vidéo seront stockés sous forme de fichier AVI dans •
des fichiers classés chronologiquement et appelés 100MEDIA, 101MEDIA,
102MEDIA et ainsi de suite.
Si vous rencontrez des difficultés lorsque vous voulez lire des enregistrements
faits avec le ThumbCam, nous vous conseillons vivement d’utiliser un lecteur
vidéo différent. Nous suggérons le lecteur VLC – ce programme est disponible
gratuitement pour divers types de plateformes d’ordinateur et de systèmes
d’exploitation, et il lit presque tout.
Il est disponible sur: http://www.videolan.org/vlc
À propos des fichiers AVI:
Le format AVI est un format vidéo populaire, qui est largement compatible avec la
plupart des ordinateurs et des appareils de type ordinateurs (tels que les téléphones
portables et même les consoles de jeux vidéo). AVI est un acronyme pour Audio
Vidéo Interleave, et a été le ‘conteneur’ vidéo populaire pendant plusieurs années.
Le terme ‘conteneur’ signifie que le type de fichier qui contient les données vidéo,
plutôt que de spécifier exactement quel type de données vidéo il doit contenir.
Page 27

27
Utilisation du ThumbCam comme caméra de PC
Vous pouvez aussi connecter le ThumbCam à votre ordinateur et l’utiliser comme
caméra de PC. Une utilisation habituelle de cette fonction est d’utiliser le ThumbCam
comme webcam pour des programmes de chat sur internet.
Pour utiliser le ThumbCam comme caméra de PC, installez d’abord le pilote:
Insérez le CD-ROM dans l’ordinateur.•
Repérez ce fichier sur le CD-ROM appelé: “SPCA1528_V2220_M…Setup.•
exe”
Exécutez ce fichier, ensuite suivez les instructions à l’écran.•
Un message vous demandant de confirmer votre choix d’exécuter ce •
fichier peut apparaître, ou un avertissement que le pilote n’est pas “signé
numériquement”. C’est normal: choisissez de continuer à exécuter le fichier
et à installer le pilote.
Selon la version de votre systeme d’exploitation, il se pourrait que vous deviez •
être administrateur pour installer le logiciel et/ou les pilotes.
Une fois l’installation terminée, vous aurez maintenant une icône sur le bureau •
appelé “AMCAP”.
Pour connecter le ThumbCam au PC en mode caméra:
Connectez le ThumbCam à votre ordinateur via le câble USB 2.0 comme •
d’habitude.
Si vous ne l’avez pas encore fait, mettez le ThumbCam en marche.•
Attendez que votre ordinateur détecte le ThumbCam comme périphérique •
amovible de mémoire de masse USB.
Appuyez sur bouton Mode. Cela transmettra au ThumbCam l’ordre d’agir •
comme caméra USB pour PC.
Double-cliquez sur l’icone AMCAP sur votre bureau. Une fois que le programme •
fonctionne, vous pourrez utiliser le ThumbCam comme caméra de PC.
Configuration requise pour les fonctions Webcam:
Type d’interface USB 2.0
Processeur Pentium IV ou plus
RAM 1Go ou plus
Carte vidéo Intel 945 ou plus
Espace disque dur 1 Go minimum de libre
Systeme (s) d’exploitation Microsoft Windows XP®
Microsoft Windows Vista®
Microsoft Windows 7®
Les pilotes des fonctions webcam ne sont pas compatibles avec les systèmes Mac.
Windows est une marque déposée de Microsoft Corporation aux États-Unis et dans d’autres pays.
Mac est une marque déposée aux United States et dans d’autres pays.
Page 28

282828
Guide de prise de vue
Cadrage:
Le ThumbCam a une lentille fixe (une lentille vari-focale ne suffirait simplement
pas) – donc la taille des sujets de vos photos dépend uniquement de la proximité
du sujet avec la caméra.
Habituellement, une distance d’1 m environ (3 feet) est à peu près convenable •
pour capturer le visage d’une personne – ainsi, le visage occupera environ la
moitié de l’espace vertical du cadre.
Pour capturer une personne entièrement dans le cadre (en supposant qu’elle •
mesure environ 1m83) alors vous devrez être environ à 3 m (10ft) de la
personne.
Mise au point:
Le ThumbCam a une lentille fixe, ce qui signifie que vous n’avez jamais à •
ajuster le réglage pour la mise au point.
La lentille fixe grand angle fera une bonne mise des sujets à environ 30cm (1½ •
ft) de la lentille, et cela varie légèrement selon la quantité de lumière qui est
disponible.
La mise au point durera éternellement. •
En gros, capturez des sujets à plus de 3,6 m de la lentille et tout ira bien!•
Exposition:
Le ThumbCam ajustera l’exposition automatiquement, modifiant son réglage de
gain automatiquement, réagissant à la quantité de lumière disponible. Ceci dit, il y
a quelques deux ou trois choses à garder à l’esprit.
Photographiez un sujet sombre devant un arrière-plan brillant peut désorienter •
la fonction d’exposition automatique du RemoteCam, et réduire l’exposition
pour que l’arrière-plan ait l’exposition appropriée pendant que le sujet devient
une silhouette. Évitez des fonds très éclairés, sauf si vous désirez avoir cet
effet.
Pour diminuer l’exposition, le RemoteCam réduit la vitesse de son obturateur •
électronique, réduisant ainsi la durée d’exposition de chaque cadre. Cela
signifie que vous obtiendrez une performance photographique à grande
vitesse de meilleure qualité dans une lumière très vive – utile pour filmer des
événements rapide tels que les manifestations sportives.
D’autre part, dans une lumière faible, chaque cadre doit être exposée plus •
longtemps pour qu’il y ait assez de lumière dans une (très petite) lentille. Cet
effet peut être mineur (par exemple si vous photographiez dans un centre
commercial ou dans un stade sous les lumières) ou très important (par exemple
si vous photographiez sous un lampadaire).
La qualité de l’image, la profondeur de champ et la plage d’exposition •
s’amélioreront de manière importante à mesure que la lumière augmente.
Conseils & astuces: La photographie est un art – il n’y a pas de bonne ou de
mauvaise manière de faire une photo. C’est vraiment en pratiquant qu’on s’améliore.
La meilleure façon d’obtenir de meilleurs résultats est d’utiliser le ThumbCam le
plus souvent possible. De plus, vous ne gaspillez pas de pellicule; il suffit d’effacer
les vieilles données de la carte micro SD de temps en temps, et vous serez prêt!
Page 29

29
Dépannage
Problème: J’ai enregistré mes vidéos, mais la carte micro SD semble être vide.
Solution: Il est probable que ce problème soit causé quand vous éteignez le
ThumbCam avant que les fichiers vidéo n’aient été sauvegardés correctement sur
la carte micro SD. Utilisez toujours le bouton Enregistrement/Pause pour arrêter
l’enregistrement et attendez que la DEL rouge se rallume avant d’éteindre le
ThumbCam.
Problem: Le ThumbCam ne s’allume pas.
Solution: Le coupable est probablement la pile. Vérifiez les instructions sur la page
4 relatives au chargement de la pile. Essayez de charger la pile complètement.
En le faisant, évitez d’utiliser le concentrateur USB – certains concentrateurs
USB n’offrent pas vraiment 5V aux appareils connectés et par conséquent, ils ne
chargent pas correctement la pile. Vous pouvez aussi charger le ThumbCam en
utilisant un chargeur USB autonome.
Problem: Mes vidéos et mes photos semblent oues.
Solution: Si la lentille se salit ou est encombrée, cela peut déformer, affaiblir et/
ou brouiller les vidéos du ThumbCam. Nettoyez la lentille avec un tissu et une
solution réservés au nettoyage des lentilles (habituellement de l’alcool spécial de
nettoyage).
Problem: Mes vidéos sont trop tremblantes.
Solutions: En règle générale, cela indique que le support utilisé pour la caméra
(ou votre bras, si vous l’utilisez en le tenant dans votre main) doit être plus stable.
Généralement, cela se produira si vous utilisez la dragonne ou la pince de ceinture/
de poche lorsque vous enregistrez une vidéo, et que vous bougez ou vous voyagez
dans un véhicule en mouvement. Généralement, vous obtiendrez les meilleurs
résultats en tenant le RemoteCam avec les deux mains devant vous, en appuyant
vos coudes sur votre torse. De cette façon, votre corps et vos deux bras forment un
trépied rudimentaire, ce qui stabilise énormément vos vidéos.
Spécifications Techniques
Vidéo
Format vidéo AVI
Résolution 720 x 480
Taille des fichiers vidéo Variable
Audio
Microphone Yes (built in)
Audio Range 3m (typical)
Enregistrement
Modes d’enregistrement Manuel /
Voix active
D’image par seconde 30
Type de mémoire MicroSD Card
Quantité de mémoire Jusqu’à 8 Go
Temps d’enregistrement 10min/Go
(avg. > 10,000kbps)
Généralités
Battery Type Rechargeable
Lithium-Ion
Temps d’enregistrement par Charge 60 mins
Chargement via le port USB
Dimensions 2.2” x 0.8” x 0.8”
50mm x 30mm x 30mm
29
Page 30

303030
Information sur la Garantie
Swann Communications
USA Inc.
12636 Clark Street
Santa Fe Springs CA
90670
USA
Swann Communications garantit ce produit contre tout défaut de fabrication et contre
tout défaut matériel pour une période de un (1) an à compter de la date d’achat.
Vous devez présenter votre reçu comme preuve de la date d’achat pour valider votre
garantie. Toute unité défectueuse sera réparée gratuitement (pièces et main d’œuvre)
ou remplacée, à la discrétion de Swann. L’utilisateur final est responsable de tous les frais
de port qu’implique l’envoi du produit au centre de réparation de Swann. L’utilisateur
est responsable de tous les frais de port si l’envoi doit être effectué en provenance ou
à destination de tout pays hors du pays d’origine.
La présente garantie ne couvre pas tous les dégâts consécutifs à un mauvais usage du
produit. Tous les coûts associés à la prise en charge ce produit ou à son usage sont
dans ce cas de la responsabilité de l’utilisateur. Cette garantie s’applique à l’acheteur
original du produit et ne peut être transférée à une tierce partie. Toute modification
non autorisée de tout élément, u toute preuve de mauvaise utilisation de cet appareil
annulera l’ensemble des garanties.
Certains pays n’autorisent pas les limitations de certaines exclusions de la présente
garantie. Les réglementations et lois locales priment.
Swann Communications
PTY. LTD. Building 4, 650
Church Street,
Richmond, Victoria 3121
Australia
Swann Communications LTD.
Stag Gates House
63/64 The Avenue
SO171XS
United Kingdom
Page 31

31
Aide / Support Technique
Swann. L’aide est ici!
Félicitation pour votre achat. Si à n’importe quel moment ce produit ne fonctionne
pas quand vous le branchez pour la première fois ou si vous vous rencontrez un
problème, ne le rapportez pas au magasin !
Sans frais États-Unis:
1-800-627-2799
(Dim, 14h00- 22h00 Heure du Pacifique)
(Lun-Jeu, 6h00-10h00 Heure du Pacifique)
(Ven, 6h00-14h00 Heure du Pacifique)
Échanges et Réparations États-Unis:
1-800-627-2799 (option 1)
(Lun-Ven, 9h00-17h00 Heure du Pacifique)
Il peut y avoir de légères variations saisonnières concernant les heures
Europe
0203 027 0979
Lun.-Ven., 10h-19h CET
Assistance technique disponible en anglais seulement.
© Swann Communications 2009
Page 32

323232
Español
Cumplimiento con normas de la FCC:
NOTA: Este equipo ha sido probado y cumple con las disposiciones impuestas para
los equipos digitales de clase B, de acuerdo con el aparte 15 de las normas de la
FCC. Estas disposiciones se dan con la intención de proporcionar una protección
razonable, contra las interferencias perjudiciales en instalaciones residenciales. Este
equipo genera, utiliza y puede irradiar energía en forma de frecuencias de radio,
y si no se instala de acuerdo con las indicaciones, puede causar interferencias perjudiciales en la recepción de señales de radio o televisión, las cuales pueden ser
detectadas encendiendo y apagando sucesivamente el equipo. Se invita al usuario
a tratar de corregir dichas interferencias siguiendo una o más de las siguientes
medidas:
• Volveraorientarocambiardesitiolaantenareceptora;
• Incrementarladistanciaexistenteentreelequipoyelreceptor;
• Conectarelequipoenuntomacorrientediferentealqueseencuentra
conectado el receptor;
• Paraobtenerayuda,consultealdistribuidoroauntécnicoespecializado
en radio y TV.
NOTA IMPORTANTE: Prohibición contra la interceptación de llamadas.
Con excepción de las operaciones llevadas a cabo por las fuerzas de la ley bajo
autorización oficial, ninguna persona podrá utilizar directa o indirectamente, un
dispositivo que sea operado de acuerdo con las disposiciones de este aparte, con
el propósito de escuchar o grabar conversaciones privadas de terceras personas, a
menos que tal uso sea aprobado por todas las partes que estén involucradas en la
conversación.
ADVERTENCIA: Cualquier modificación no aprobada por la parte responsable
del funcionamiento del equipo, puede invalidar la autorización de operación del
equipo por parte del usuario.
Page 33

33
Video Grabadora ThumbCam
Clip para Cinturón/Bolsillo
Clip para Montaje en Pared
Clip de Pivote
Cordón
Cubierta de Látex contra Polvo
Cable USB 2.0
Mini-CD (Controladores)
Índice
Contenido del Paquete
Antes de Que Comience 32
Contenido del Paquete 33
Vista general 34
Antes de Usar la ThumbCam 35
Diseño 36
Operando la ThumbCam 38
Tomando Video 39
Montando la ThumbCam 40
Ajustando la Fecha y Hora 41
Conectando a su PC 42
Usando la ThumbCam como una Cámara de PC 43
Guía para Tomas 44
Resolviendo Problemas y Especificaciones Técnicas 45
Información de Garantía 46
Soporte Técnico 47
Page 34

343434
Vista general
Felicidades por comprar la ThumbCam, una grabadora de video digital miniatura
auto-contenida que, como lo sugiere su nombre, es del tamaño de un pulgar. Con
una batería de ion litio recargable incluida que le dará hasta sesenta minutos de
grabación y grabando video directamente a una tarjeta microSD, la ThumbCam
es una cámara/grabadora conveniente y adaptable, con tantas aplicaciones como
pueda imaginar.
La ThumbCam es una solución ideal para una cámara de seguridad temporal,
grabar eventos familiares y sociales, vigilancia encubierta (¡asegúrese que sea legal!)
o para fotografía deportiva. La ThumCam también cuenta con grabación activada
por audio, ideal para situaciones donde la cámara funcionar autónomamente,
genial si quiere que la ThumbCam funcione como una cámara de vigilancia a corto
plazo.
Combine todas estas características con múltiples opciones de montaje y con el
clip para cinturón/bolsillo y cordón incluidos, la ThumbCam es una cámara versátil
que puede portarse o montarse casi donde sea.
IMPORTANTE – Una Nota Respecto a la Ley
Como se marca en la cubierta interior en la sección de “Prohibición de Intromisión
en Conversaciones”, el uso de equipo de grabación encubierto es ilegal en muchos
países y localidades. En algunas áreas, la ley sólo se relaciona a espacios públicos,
mientras que en otras se extiende también a espacios privados. Las leyes respecto
a la grabación de audio y video remota pueden variar también.
La ThumbCam se usa bajo la condición que usted, el usuario investigue la ley
que aplica en su localidad. Asegúrese de conocer la ley y seguirla al pie de la
letra mientras usa la ThumbCam o cualquier otro dispositivo de grabación. Si
la legalidad de la grabación es ambigua, le sugerimos que obtenga un permiso
expreso de las personas captadas.
Page 35

35
Antes de Usar la ThumbCam
La ThumbCam tiene una batería de ion litio integrada (del mismo tipo de batería que
la mayoría de los teléfonos celulares usan, sólo que más pequeña). Las cargamos
antes de enviarlas, sin embargo, debido al tiempo de tránsito, necesitará rellenarla
antes de su uso.
Para cargar la ThumbCam:
Localice el puerto mini-USB en la base de la ThumbCam.1.
Usando el cable USB-A a Mini-USB-A provisto, conecte la ThumbCam a un 2.
puerto USB libre en su computadora, o a un cargador USB independiente.
Mientras recarga, tanto el LED azul como el rojo permanecerán encendidos.3.
La ThumbCam toma de 3 a 4 horas para alcanzar la recarga completa. Es 4.
importante, particularmente en la primer recarga, dejar que la ThumbCam
recargue completamente, el no hacerlo puede tener un impacto en el
desempeño de la batería.
Lineamientos Generales
Estos son sólo unos cuantos puntos a tomar en cuenta cuando use la ThumbCam:
No apunte la ThumbCam hacia fuentes de luz extremadamente brillantes tales •
como el sol, luces altas o luces de estadio. La luz brillante puede dañar el
sensor de imagen, ya sea dejando una “sombra” permanente en sus videos
donde la fuente de luz daño el sensor, o dejando el sensor completamente
inoperable.
Evite condiciones climáticas adversas. El calor (directo o de ambiente) y la •
humedad excesiva (como lluvia o humedad del ambiente) causarán que la
ThumbCam se comporte erráticamente o no funcione. La exposición aguda a
estos elementos puede dañar permanentemente la ThumbCam.
No deseche al fuego. Las baterías de ion litio puede, cuando se expone a un •
calor significativo, explotar dramáticamente.
El lente pequeño en la ThumbCam puede ser difíciles de limpiar. Evite ambientes •
con polvo o sucios.
Si el lente llega a ensuciarse, límpielo con alcohol para limpieza y/o una tela •
de limpieza especial para lentes (éstas están disponibles en todas las buenas
tiendas de cámaras).
Siga los lineamientos para desechos en su localidad si quiere desechar la •
ThumbCam. Muchas localidades tienen lineamientos estrictos respecto al
desecho de artículos electrónicos, particularmente los que tienen baterías
recargables integradas.
Page 36

36363636
Grabar / Detener
Micrófono / LEDs
Lente
Selección de Modo
Ranura para
Tarjeta MicroSD
Botón para Reestablecer
Encendido
Clip de Cordón
Diseño
Page 37

37
Lente: El extremo importante de la cámara, usado para enfocar luz dentro del
sensor de imagen. Para obtener los mejores resultados, asegúrese que el lente esté
limpio y libre de basuras.
Selección de Modo: Cambia el modo de grabación de la cámara.
Ranura para Tarjeta MicroSD: Es la ranura para insertar la tarjeta microSD en la
que graba la ThumbCam. Para insertar una tarjeta, simplemente empújela dentro
de la ranura. Para removerla, presiónela de nuevo, y se botará de la ranura.
Botón para Reestablecer: Úselo para regresar rápidamente la ThumbCam a su
estado de arranque inicial. Esto se usa típicamente sólo si la ThumbCam se congela
y se necesita reestablecer.
Clip de Cordón: Usado para unir el cordón incluido. Alternativamente, puede
usarse para unir la ThumbCam a casi cualquier cosa, como a un llavero o similar.
Encendido: Presione para encender y apagar la ThumbCam. No apague la
ThumbCam mientras graba, o inmediatamente después de grabar.
Grabar / Detener: Inicia y detiene la grabación de la ThumbCam.
Micrófono: El dispositivo que graba el sonido. Si se bloquean estos hoyos, entonces
el rango y calidad de la grabación de audio se reducirá significativamente.
LEDs: Luces pequeñas de color que indicarán el estado actual y función de la
ThumbCam. Hay dos LEDs, uno rojo y uno azul. Pude que sea difícil de verlos bajo
la luz brillante (como la luz solar).
37
Page 38

383838
Operando la ThumbCam
Para ENCENDER la ThumbCam:
Presione y mantenga presionado el Botón de Encendido por aproximadamente •
un segundo.
Los LEDs azul y rojo se encenderán. Cuando se apaga el LED rojo y el LED azul •
permaneces encendido, esto indica que la ThumbCam está lista para grabar.
Para APAGAR la ThumbCam:
Presione el botón de Encendido por aproximadamente un segundo. •
NO apague la ThumbCam mientras graba video, o inmediatamente después •
de grabar video.
La ThumbCam necesita varios segundos después de detener una grabación •
para grabar el video en la tarjeta microSD, el apagar la ThumbCam durante
el proceso de escritura en la tarjeta corromperá la información y hará que el
video sea inutilizable.
Batería Baja y Apagado Automático:
Cuando la batería de la ThumbCam se comienza a agotar, ésta se apagará
automáticamente. Si en esos momentos está grabando un video, dejará de grabar
y finalizará escribiendo el archivo de video a la tarjeta microSD antes de que
se apague. Recargue la batería completamente antes de encender de nuevo la
ThumbCam.
La ThumbCam se apagará automáticamente cuando esté por agotarse el espacio
para grabar en la tarjeta microSD. Para arreglar esto, reemplace la tarjeta microSD
con una nueva (o, al menos, no llena), o conecte la ThumbCam a una PC y elimine
la información de la tarjeta cortándola y pegándola o simplemente borrándola.
Reestableciendo la ThumbCam:
Ocasionalmente, particularmente durante largos periodos de uso constante, la
ThumbCam se puede congelar y dejar de funcionar correctamente. Si esto ocurre,
la ThumbCam necesita reestablecerse.
Para reestablecer la ThumbCam:
Localice el botón Reestablecer, localizado inmediatamente debajo de la ranura •
para tarjeta microSD.
Usando un objeto delgado (¡no afilado!) como un clip desdoblado o un incaíble, •
presione y mantenga presionado el botón Reestablecer por aproximadamente
un segundo.
Espere mientras la ThumbCam se reestablece. El procedimiento es el mismo •
como si la encendiera por primera vez.
Una vez que se ha reestablecido la ThumbCam, necesitará ajustar la Fecha y •
Hora de nuevo (vea la página 11).
Page 39

39
Tomando Video
El grabar video es la función principal de la ThumbCam. Para hacer esto:
Encienda la ThumbCam.•
Espere varios segundos para que la ThumbCam inicie adecuadamente.•
Cuando se apaga el LED rojo y el LED azul está encendido, la ThumbCam está lista •
para grabar.
Presione el botón Grabar / Detener para comenzar a grabar un video.•
Mientras se graba el video, el LED azul permanecerá encendido y el LED rojo •
parpadeará lentamente.
Para detener la grabación, presione el botón Grabar/Detener de nuevo. El LED rojo •
parpadeará rápidamente mientras la información de video se esté guardando.
Notas Importantes:
Cuando detiene una grabación, toma varios segundos para que la ThumbCam •
escriba la información de video en la tarjeta microSD. Si el botón Grabar/
Detener se presiona de nuevo o se apaga la ThumbCam mientras escribe
información en la tarjeta microSD entonces la información de video puede
corromperse, resultando ya sea en un archivo corrupto o una estructura de
archivos corrupta en la tarjeta microSD. Si esto ocurre, la calidad del video se
reducirá enormemente, si es que el archivo llega a funcionar. Si esto ocurre,
puede que necesite reformatear la tarjeta SD, y corra el riesgo de perder toda
la información en ella.
Vea la Guía para Tomas (página 14) para más información sobre grabación.•
Grabación Activada por Sonido:
La ThumbCam puede configurarse para poerar como un dispositivo de grabación
activado por sonido. Esto hace de la ThumbCam una solución ideal para un
dispositivo de grabación para dejarlo trabajar solo. La batería interna durará por
más de 10 horas de tiempo en espera si nada activa la ThumbCam para grabar.
Los sonidos suaves (por ejemplo, más suave que una persona hablando con voz
alta a aproximadamente 3 pies / 1 m de distancia) puede no activar la ThumbCam
para grabar.
Para hacer funcionar el Modo de Grabación Activado por Sonido:
Encienda la ThumbCam de la manera habitual. •
Espere hasta que el LED rojo se apague, y que la ThumbCam esté en espera.•
Presione el botón de Modo.•
El LED azul permanecerá encendido y el LED rojo parpadeará lentamente para •
indicar que al ThumbCam está en modo de grabación activado por sonido.
Mientras que esté en este modo, un sonido fuerte moderado activará la •
ThumbCam para grabar.
Una vez activada para grabar, la ThumbCam continuará grabando por un •
mínimo de dos minutos, o más tiempo si el sonido continúa.
Para desactivar el modo de grabación activado por sonido, simplemente •
presione el botón de modo. Una vez que el LED rojo se apague, el modo de
grabación activado por sonido se habrá desactivado.
Page 40

404040
Montando la ThumbCam
¡Hemos incluido un número de opciones para montar la ThumbCam, ya sea que
quiera usarla como una grabadora de video personal, una cámara de PC, una
cámara de vigilancia de corto plazo, o cualquier otro uso que pueda imaginar!
Cordón
Usar el cordón es muy sencillo, y una forma genial de asegurarse de nunca perder
la ThumbCam, ¡estará alrededor de su cuello!
Sujete el clip en el extremo del cordón a la pequeña pestaña en la parte •
superior de la ThumbCam.
Pase el cordón alrededor de su cuello.•
Para mejores resultados, sostenga la ThumbCam firmemente mientras toma •
el video, el dejarla en el cordón resultará en un video aleatorio y frenético
que raramente tome lo que quiere. De nuevo, este puede ser exactamente el
efecto que busca, así que, ¡adelante!
Clip para Cinturo/Bolsillo (o Cubierta de Silicón)
Inserte la ThumbCam en el clip.•
Las cuatro esquinas del broche se bloquearán en posición en las cuatro esquinas •
de la ThumbCam.
La ThumbCam ahora puede sujetarse a un cinturón, bolsillo, collar o cualquier •
otro lugar que ofrezca un soporte adecuado para el clip.
Para remover la ThumbCam del clip, sosténgala por el medio y gire suavemente. •
El clip se remueve más fácilmente una esquina a la vez.
La cubierta de silicón funciona de una manera similar, y tiene un rizo en la •
parte posterior para sujetar a un cinturón o algo similar. Las diferencias son
principalmente que a) la cubierta de silicón es más delicada, y puede romperse
si se le da un mal trato y b) la cubierta de silicón ofrece un cierto grado de
protección contra el polvo y la humedad.
Opciones para Montaje en Pared/Techo
La ThumbCam viene con dos opciones para un montaje permanente, un clip
permanente y un montaje clip a pared. Si quiere usar la ThumbCam con el clip
para cinturón/bolsillo, use el montaje de pivote libre al que se puede sujetar el clip.
Para montar la ThumbCam solamente, use el clip de pared estándar.
El clip de pivote libre (usado con el clip para cinturón/bolsillo) es magnético, y •
puede sujetarse fácilmente a cualquier superficie adecuada. Esto es útil para
montar el clip a un refrigerador, cubierta de PC o superficie metálica similar.
Para una instalación permanente, use los hoyos para tornillos.
El clip para pared estándar necesita ser atornillado o pegado con cinta o •
pegamento en su lugar. Los tornillos son típicamente la opción de montaje
más resistente.
Page 41

41
Ajustando la Fecha y Hora
Puede ajustar la ThumbCam para imprimir directamente en el video la fecha y hora
en la que se tomó una grabación, como una marca de agua. Para habilitar esta
función, sólo necesita ajustar la fecha y hora, la ThumbCam mantendrá el registro
a partir de ahí.
Para ajustar la Fecha y Hora:
Abra el Notepad. Usualmente se localiza en la carpeta de Accesorios en el •
Menú de Inicio (asumiendo que está usando Microsoft Windows®). Si no
tiene Notepad, cualquier editor de texto sencillo trabajará bien (pero no un
procesador de palabras, y estos no crean archivos .txt simples).
Escriba la fecha y hora. Deje un espacio sencillo (es decir, presione la barra •
espaciadora una vez antes de presionar enter o intro: Representado por un
“_”) después de cada línea.
Ingrese la fecha y hora en el siguiente formato:•
[date]_
AAAA/MM/DD_
HH:_MM:_SS_ (donde “_” indica un espacio en blanco)
Así que, si son las nueve con treinta minutos de la mañana el día cuatro de
diciembre de 2009, entonces el archivo diría:
[date]_
2009/12/04_
09:_33:_00_ (donde “_” indica un espacio en blanco)
Guarde este archivo, nombrándolo “tag.txt”.•
Copie este archivo a la tarjeta microSD.•
Con la tarjeta microSD ya insertada en la ThumbCam, encienda la •
ThumbCam.
La ThumbCam leerá el texto en el archivo, y actualiza su reloj interno para •
ajustarse a la fecha y hora que usted ajustó.
Notas:
La fecha y hora se actualiza con el reloj interno de la ThumbCam cuando se •
enciende. Antes de esto, la fecha no se actualizará con el tiempo real. Por lo
tanto, si ajusta la hora con precisión en el archivo settime.txt y lo copia a la
tarjeta microSD, pero la deja una hora antes de encender la ThumbCam, la
hora almacenada en la ThumbCam estará una hora atrasada.
Puede que necesite reestablecer la hora (es decir, pasar por el proceso de nuevo) •
si la batería interna en la ThumbCam se agota completamente, o si presionó el
botón para Reestablecer (lo que limpia la memoria de la ThumbCam).
Page 42

424242
Conectando a su PC
Puede leer la información en la tarjeta microSD en la ThumbCam conectando la
ThumbCam a la computadora.
Para hacer esto:
Localice el enchufe mini-USB en la parte inferior de la ThumbCam.•
Busque un puerto USB libre en su computadora…•
Para una máxima velocidad, busque un puerto USB 2.0 libre en su computadora, •
y evite usar cables de extensión USB o concentradores.
Conecte el puerto USB libre en su computadora al puerto mini-USB en la •
ThumbCam usando el cable USB 2.0 provisto.
La ThumbCam será detectada como un dispositivo de almacenaje USB, y puede •
accederse de la misma forma como lo haría con cualquier unidad ash USB.
Las grabaciones de video se almacenan como archivos AVI en carpetas llamadas •
100MEDIA, 101MEDIA, 102MEDIA y así sucesivamente.
Si tiene alguna dificultad reproduciendo cualquiera de las grabaciones de la
ThumbCam, recomendamos usar un reproductor de video diferente. Sugerimos
el VLC Player, este programa está disponible gratuito para una amplia variedad
de plataformas computacionales y sistemas operativos, y reproduce casi cualquier
cosa.
Está disponible en: http://www.videolan.org/vlc
Sobre los Archivos AVI:
AVI es un formato de video popular, que es altamente compatible con la mayoría
de las computadoras y aparatos similares a las computadoras (como los celulares
recientes e incluso las consolas de videojuegos). AVI es un acrónimo en inglés
para Entrelazado Audio Video y ha sido un “contenedor” de video popular por
muchos años. El término “contenedor” significa que es un tipo de archivo que
retiene información de video, en lugar de especificar exactamente que tipo de
información de video debe retener.
Page 43

43
Usando la ThumbCam como una Cámara de PC
También puede conectar la ThumbCam a su computadora y usarla como una
cámara para PC. Un uso típico de esta característica sería el usar la ThumbCam
como una webcam para programas de chat por Internet.
Para usar la ThumbCam como una cámara de PC, primero instale el controlador:
Inserte el CD-ROM en su computadora.•
Localice el archivo en el CD-ROM llamado: “SPCA1528_V2220_M…Setup.•
exe”
Ejecute este archivo, siga las instrucciones en pantalla.•
Se le puede pedir que confirme su elección para ejecutar este archivo, o ser •
advertido que este controlador “no está firmado digitalmente”. Esto es
normal: Escoja continuar ejecutando e instalando el controlador.
Dependiendo de la versión de su sistema operativo, puede necesitar ser un •
administrador para instalar software y/o controladores.
Una vez que termine la instalación, ahora tendrá un ícono en el escritorio •
etiquetado “AMCAP”.
Para Conectar la ThumbCam en Modo de Cámara para PC:
Conecte la ThumbCam a su computadora vía el cable USB 2.0 como es •
normal.
Si no lo ha hecho aún, encienda la ThumbCam.•
Espere hasta que su computadora haya detectado la ThumbCam como un •
Dispositivo de Almacenaje Masivo USB.
Presione el botón de Modo. Esto instruirá a la ThumbCam a actuar como una •
Cámara USB para PC.
De doble clic en el ícono AMCAP en su escritorio. Una vez que empiece a •
ejecutarse el programa, podrá usar la ThumbCam como una cámara para PC.
Requerimientos de Sistema para las Funciones de Webcam:
Tipo de Interfase USB 2.0
Procesador Pentium IV o superior
RAM 1GB o superior
Tarjeta de Video Intel 945 o superior
Espacio en Disco Duro Mínimo 1GB libre
Sistema(s) Operativo(s) Microsoft Windows XP®
Microsoft Windows Vista®
Microsoft Windows 7®
Los controladores para las funciones de la webcam no son compatibles con sistemas Mac.
Windows es una marca registrada de Microsoft Corporation en los Estados Unidos y otros países.
Mac es una marca registrada en los Estados Unidos y otros países.
Page 44

444444
Guía para Tomas
Encuadrando:
La ThumbCam tiene un lente fijo (un lente con enfoque variable simplemente no
cabría), así que el tamaño del objetivo en sus tomas depende sólo de qué tan cerca
tenga la cámara del objetivo.
Típicamente, 3 pies (1m) es lo correcto si toma el rostro de alguien, de esta forma, •
su rostro ocupará aproximadamente la mitad del espacio vertical en el cuadro.
Para que una persona completa entre a cuadro (asumiendo que sea de •
aproximadamente seis pies de altura o 1.83 metros) entonces necesitará estar
a aproximadamente 10 pies (3m) de la persona.
Enfoque:
La ThumbCam tiene un lente de enfoque fijo, lo que significa que nunca •
necesitará enfocar.
El lente fijo de ángulo amplio quedará enfocado a aproximadamente 30cm •
(1 pie) del lente, variando ligeramente dependiendo de la cantidad de luz
disponible. Mantendrá el enfoque hasta infinito.
¡Básicamente, mantenga todo a más de dos pies del lente y no tendrá nada •
de que preocuparse!
Exposición:
La ThumbCam ajustará la exposición automáticamente, variando su ajuste de
ganancia automáticamente, reaccionando a la cantidad de luz disponible. Sin
embargo, hay un par de cosas a tomar en cuenta:
El tomar un objetivo oscuro frente a un fondo brillante puede causar que •
la característica de auto-exposición de la ThumbCam se confunda, y baja la
exposición de manera que el fondo se exponga correctamente mientras que
el objetivo se vuelve una silueta. Evite fondos brillantemente iluminados, a
menos que quiera este efecto.
Para disminuir la exposición, la ThumbCam acorta su velocidad de obturador •
electrónico, y por lo tanto exponiendo cada cuadro por un periodo de tiempo
más corto. Esto significa que obtendrá un mejor desempeño fotográfico de alta
velocidad con luz brillante, útil para tomar eventos rápidos, como deportes.
Por otro lado, a baja luz, cada cuadro necesita más exposición para obtener •
suficiente luz en el (muy pequeño) lente. Este efecto puede ser menor
(tal como hacer tomas en un centro comercial o un estado bajo las luces)
o particularmente serio (en situaciones tales como hacer tomas bajo una
luminaria de la calle).
La calidad de la imagen, profundidad de campo y rango de exposición •
mejorarán dramáticamente entre más luz haya disponible.
Consejos y Trucos: La fotografía es un arte, no hay una forma correcta o incorrecta
para hacer tomas. La práctica verdaderamente hace al maestro, o al menos, lo
mejora. La mejor forma de obtener los mejores resultados es sólo mantenerse
usando la ThumbCam. ¡Además, en realidad no está desperdiciando rollo, sólo
borre de vez en cuando la tarjeta microSD, y estará listo!
Page 45

45
Resolviendo Problemas
Problema: He grabado videos, pero la tarjeta microSD parece estar vacía.
Solución: Probablemente este problema sea causado por apagar la ThumbCam
antes de que los archivos de video se hayan guardado adecuadamente en la tarjeta
microSD. Siempre use el botón Grabar/Pausar para detener las grabaciones y
espere hasta que el LED rojo se haya apagado antes de apagar la ThumbCam.
Problema: La ThumbCam no se enciende.
Solución: El más probable culpable es la batería. Revise las instrucciones en la
página 4 respecto a la recarga de la batería. Intente cargar completamente la batería.
Cuando lo haga, evite usar un concentrador de USB, algunos concentradores USB
no proveerán una carga completa de 5V a los dispositivos conectados y por lo
tanto no cargarán la batería adecuadamente. También puede cargar la ThumbCam
con un cargador USB independiente.
Problema: Mis videos y fotos parecen borrosos.
Solución: Si el lente se ensucia, esto puede causar que los videos de la ThumbCam se
distorsionen, suavicen y/o sena borrosos. Limpie el lente usando un paño especial para
limpiar lentes y solución para limpiar lentes (típicamente un de alcohol para limpiar).
Problema: Mis videos se ven muy movidos.
Solución: Como regla general, esto indica usualmente que el soporte que usó para
la cámara (o el brazo, si la toma se hace con la cámara en mano) necesita ser más
estable. Generalmente, esto ocurre si usa el cordón o el clip para cinturón/bolsillo
mientras graba video, y está moviéndose o viajando en un vehículo. Generalmente,
logrará los mejores resultados sosteniendo la ThumbCam con ambas manos frente
a usted, descansando sus codos en su torso. De esa manera, su cuerpo y ambos
brazos forman una especie de trípode rudimentario, estabilizando enormemente
sus videos.
Especificaciones técnicas
Video
Formato de vídeo AVI
Número de Pixeles 720 x 480
Video Size Variable
Audio
Micrófono Sí (recogido)
Rango de audio 3m (típico)
Grabación
Modo de grabación Manual /
Activado por voz
Imágenes por segundo 30
Tipo de memoria MicroSD Card
La capacidad de memoria Hasta 8GB
El tiempo de almacenamiento 10min/GB
(avg. > 10,000kbps)
General
Tipo de batería Rechargeable
Lithium-Ion
Tiempo de grabación por carga 60 mins
Método de carga USB
Dimensiones 2.2” x 0.8” x 0.8”
50mm x 30mm x 30mm
45
Page 46

464646
Información sobre la garantía
Swann Communications
USA Inc.
12636 Clark Street
Santa Fe Springs CA
90670
USA
Swann Communications garantiza este producto por defectos de fabricación y material,
por un período de un (1) año a partir de la fecha original de compra. Usted deberá
presentar su recibo como prueba de la fecha de compra para validar la garantía.
Cualquier unidad que se compruebe defectuosa durante el período antes citado será
reparada sin cobrar los repuestos o la mano de obra, o será sustituida, a discreción
exclusiva de Swann. La reparación o sustitución se garantizará por noventa días o por el
período que falte de la garantía original de un año, el que resulte más largo de los dos.
El usuario final asume los costos de fletes incurrido para enviar el producto a los centros
de reparación de Swann. El usuario final se responsabiliza de los costos de envío en que
incurran cuando envía desde y hacia cualquier país distinto al país de origen. La garantía
no cubre daños accidentales, circunstanciales o que resulten del uso o la imposibilidad
de utilizar este producto. Cualquier costo asociado con la adaptación o remoción
de este producto por parte de un vendedor o de otra persona, o cualquier costo
asociado con el uso del mismo son responsabilidad del usuario final. Esta garantía aplica
exclusivamente al comprador original del producto, y no es transferible a terceros.
Swann Communications
PTY. LTD. Building 4, 650
Church Street,
Richmond, Victoria 3121
Australia
Swann Communications LTD.
Stag Gates House
63/64 The Avenue
SO171XS
United Kingdom
Si el usuario final o un tercero hacen modificaciones no autorizadas a cualquier
componente o si hay evidencia de mal uso o abuso del dispositivo, se anularán todas
las garantías.
Page 47

47
Centro de asistencia técnica
Soporte Técnico Swann
Todos los países Correo Electrónico: tech@swannsecurity.com
Atención Telefónica al Usuario
ESTADOS UNIDOS Sin costo
1800-627-2799
(Dom, 2pm-10pm HP EE.UU.Lun-Juev, 6am-10pm, HP EE.UU.
Viern, 6am-2pm HP EE.UU.)
ESTADOS UNIDOS Cambios & Devoluciones
1800-627-2799 (Opción 1)
(Lun-Viern, 9am-5pm HP EE.UU.)
EUROPE
0203 027 0979
De lunes a viernes, 10am-7pm
Asistencia técnica disponible en Inglés solamente.
© Swann Communications 2009
Page 48

Helpdesk / Technical Support Details
Swann Technical Support
All Countries E-mail: tech@swannsecurity.com
Telephone Helpdesk
USA toll free
1-800-627-2799
(Su, 2pm-10pm US PT)
(M-Th, 6am-10pm US PT)
(F 6am-2pm US PT)
USA Exchange & Repairs
1-800-627-2799 (Option 1)
(M-F, 9am-5pm US PT)
See http://www.worldtimeserver.com for information on time zones and the
current time in Melbourne, Australia compared to your local time.
AUSTRALIA toll free
1300 138 324
(M 9am-5pm AUS ET)
(Tu-F 1am-5pm AUS ET)
(Sa 1am-9am AUS ET)
NEW ZEALAND toll free
0800 479 266
INTERNATIONAL
+61 3 8412 4610
Warranty Information
Swann Communications
USA Inc.
12636 Clark Street
Santa Fe Springs CA
90670
USA
Swann Communications warrants this product against defects in workmanship and material
for a period of one (1) year from it’s original purchase date. You must present your receipt
as proof of date of purchase for warranty validation. Any unit which proves defective during
the stated period will be repaired without charge for parts or labour or replaced at the sole
discretion of Swann. The end user is responsible for all freight charges incurred to send the
product to Swann’s repair centres. The end user is responsible for all shipping costs incurred
when shipping from and to any country other than the country of origin.
The warranty does not cover any incidental, accidental or consequential damages arising
from the use of or the inability to use this product. Any costs associated with the fitting or
removal of this product by a tradesman or other person or any other costs associated with
its use are the responsibility of the end user. This warranty applies to the original purchaser
of the product only and is not transferable to any third party. Unauthorized end user or
third party modifications to any component or evidence of misuse or abuse of the device will
render all warranties void.
By law some countries do not allow limitations on certain exclusions in this warranty. Where
applicable by local laws, regulations and legal rights will take precedence.
Swann Communications
PTY. LTD. Building 4, 650
Church Street,
Richmond, Victoria 3121
Australia
Swann Communications LTD.
Stag Gates House
63/64 The Avenue
SO171XS
United Kingdom
484848
© Swann Communications 2009
 Loading...