

Page 1

1
English
English
Solar Panel
Panneau Solaire
Placa Solar
Solarmodul
Pannello Solare
Instruction Manual
Manuel d’instructions
Benutzerhandbuch
Manual de instrucciones
Manuale Operativo
EN
FR
DE
ES
IT
Page 2
2
English
English
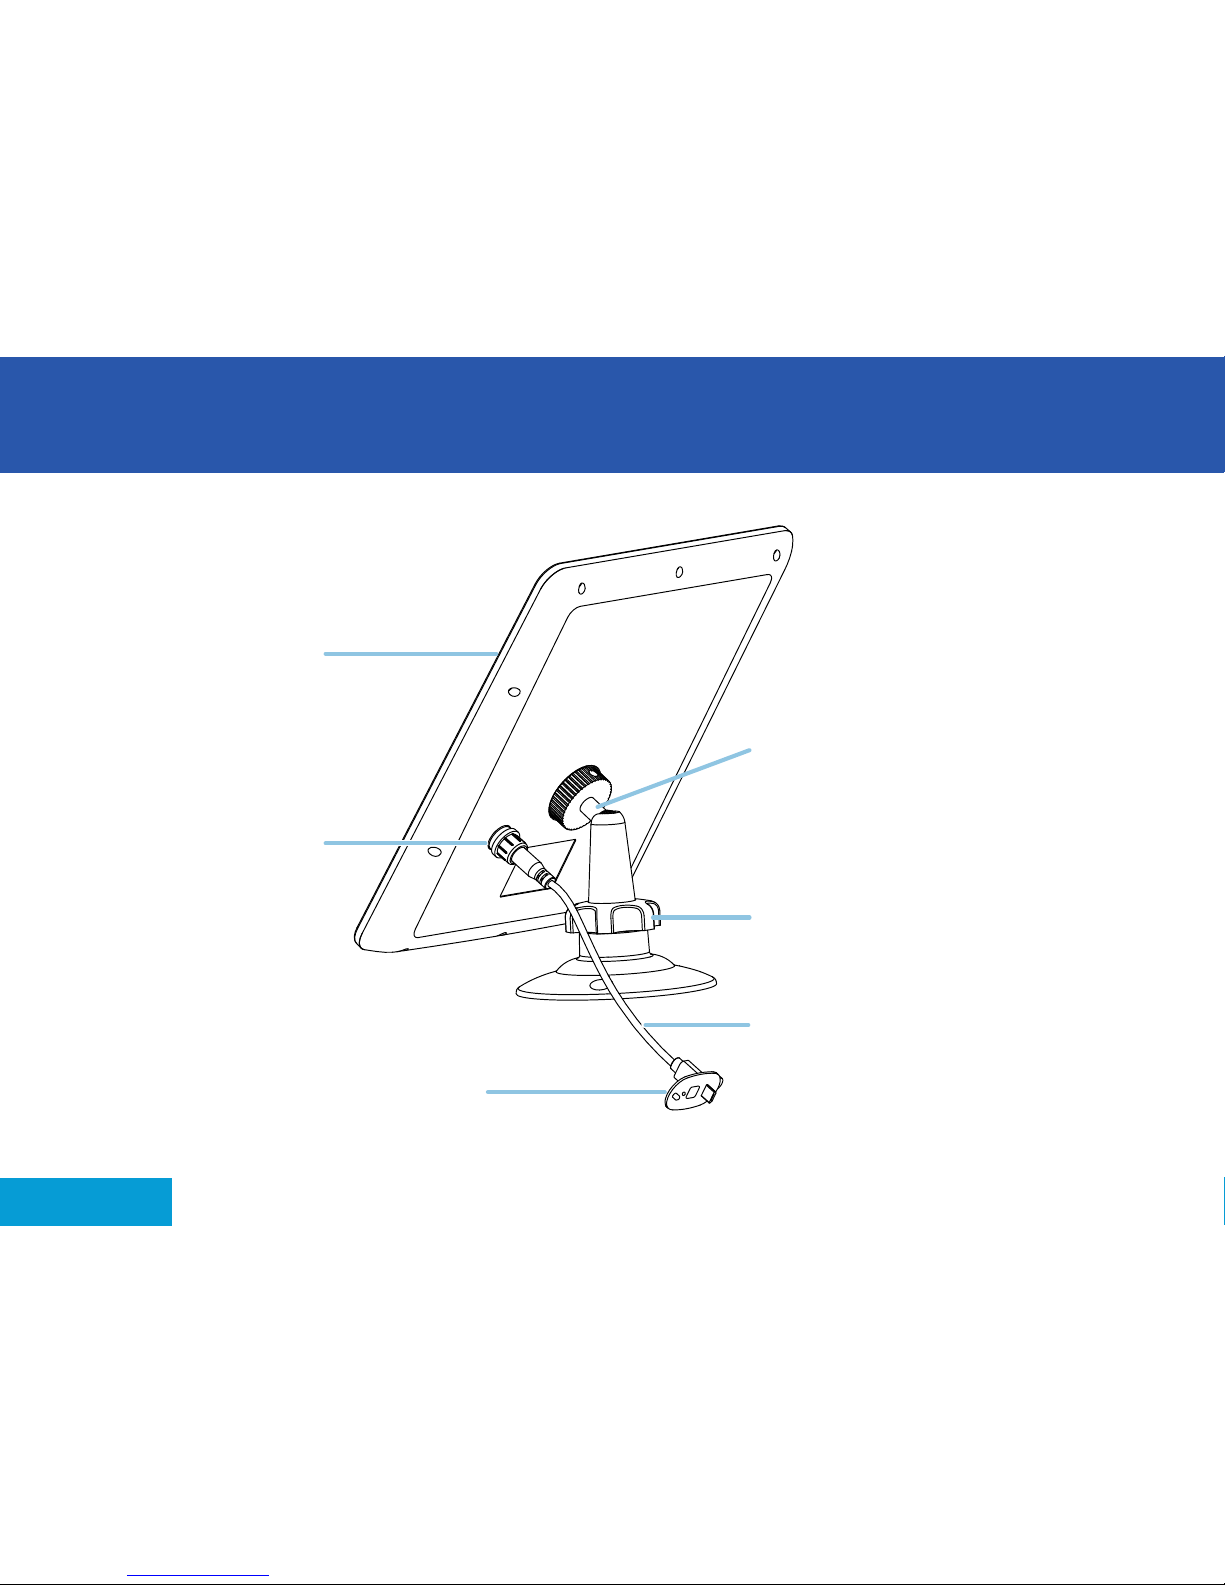
Overview
Solar panel
Replacement
camera port cover
With USB connector cutout
Solar port
Swivel head mount with
solar panel screw thread
Easily adjust the solar panel angle
to maximize sunlight exposure
Locking nut
Secures the swivel head mount assembly
USB charging cable
For connecting the solar panel to
your Swann Smart Security camera
Page 3

3
English
English
Before you begin
• The solar panel requires full, direct sunlight to charge your camera. Grey skies, rainy
days, and other inclement weather conditions may hinder the ability of the solar
panel to generate power.
• For best results, the solar panel should be tilted towards the sun. The optimum
angle varies throughout the year, depending on the season and your geographical
location. As a general rule, the solar panel should be facing the equator (i.e., in the
northern hemisphere, solar panel faces south; in the southern hemisphere, solar
panel faces north).
• Preferably mount the solar panel somewhere that receives plenty of sunlight,
between 10am and 3pm, to fully sustain your camera’s power needs all year round.
Avoid placing in a shady area. Shading from trees and buildings will substantially
reduce the power output of the solar panel.
• The solar panel is designed to provide a “trickle charge,” topping up and maintaining
the camera’s battery charge level based upon the amount of sunlight received daily.
If, during the day, the solar panel does not receive enough sunlight (e.g., cloudy
weather), it may not sufficiently charge your camera and replenish any usage.
• Periodically clean the solar panel with a soft cloth and warm water. Keep the solar
panel surface clear of leaves and debris for optimum performance.
Page 4

4
English
English
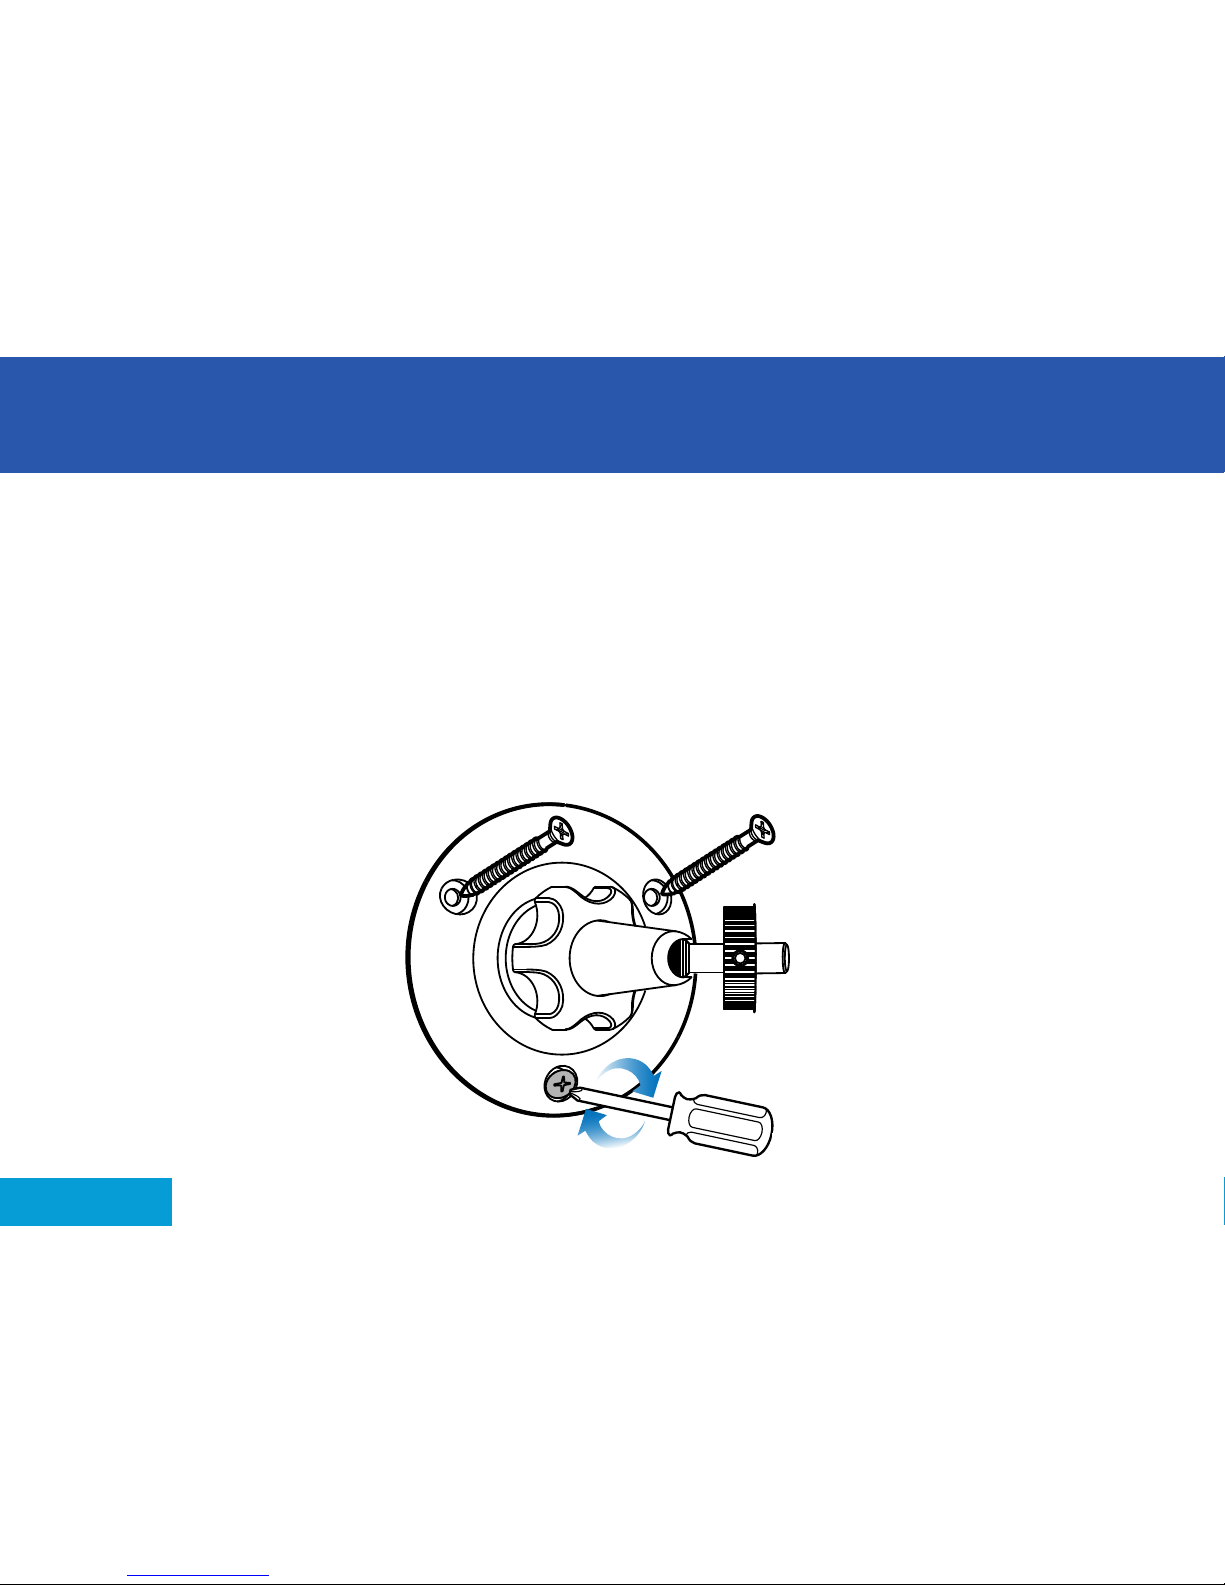
Installing the Solar Panel
1. Attach the mounting bracket to a solid surface with the supplied screws. Make sure
to allow enough charging cable to reach your camera from the mounting location of
the solar panel.
If mounting to a wooden surface, screw the mounting bracket directly to the surface.
If mounting to a masonry surface (bricks, concrete, or stucco), drill three holes
using a 8mm (5/16”) drill bit and insert the supplied wall plugs into holes. Then secure
the mounting bracket to the surface with supplied screws.
Page 5
5
English
English
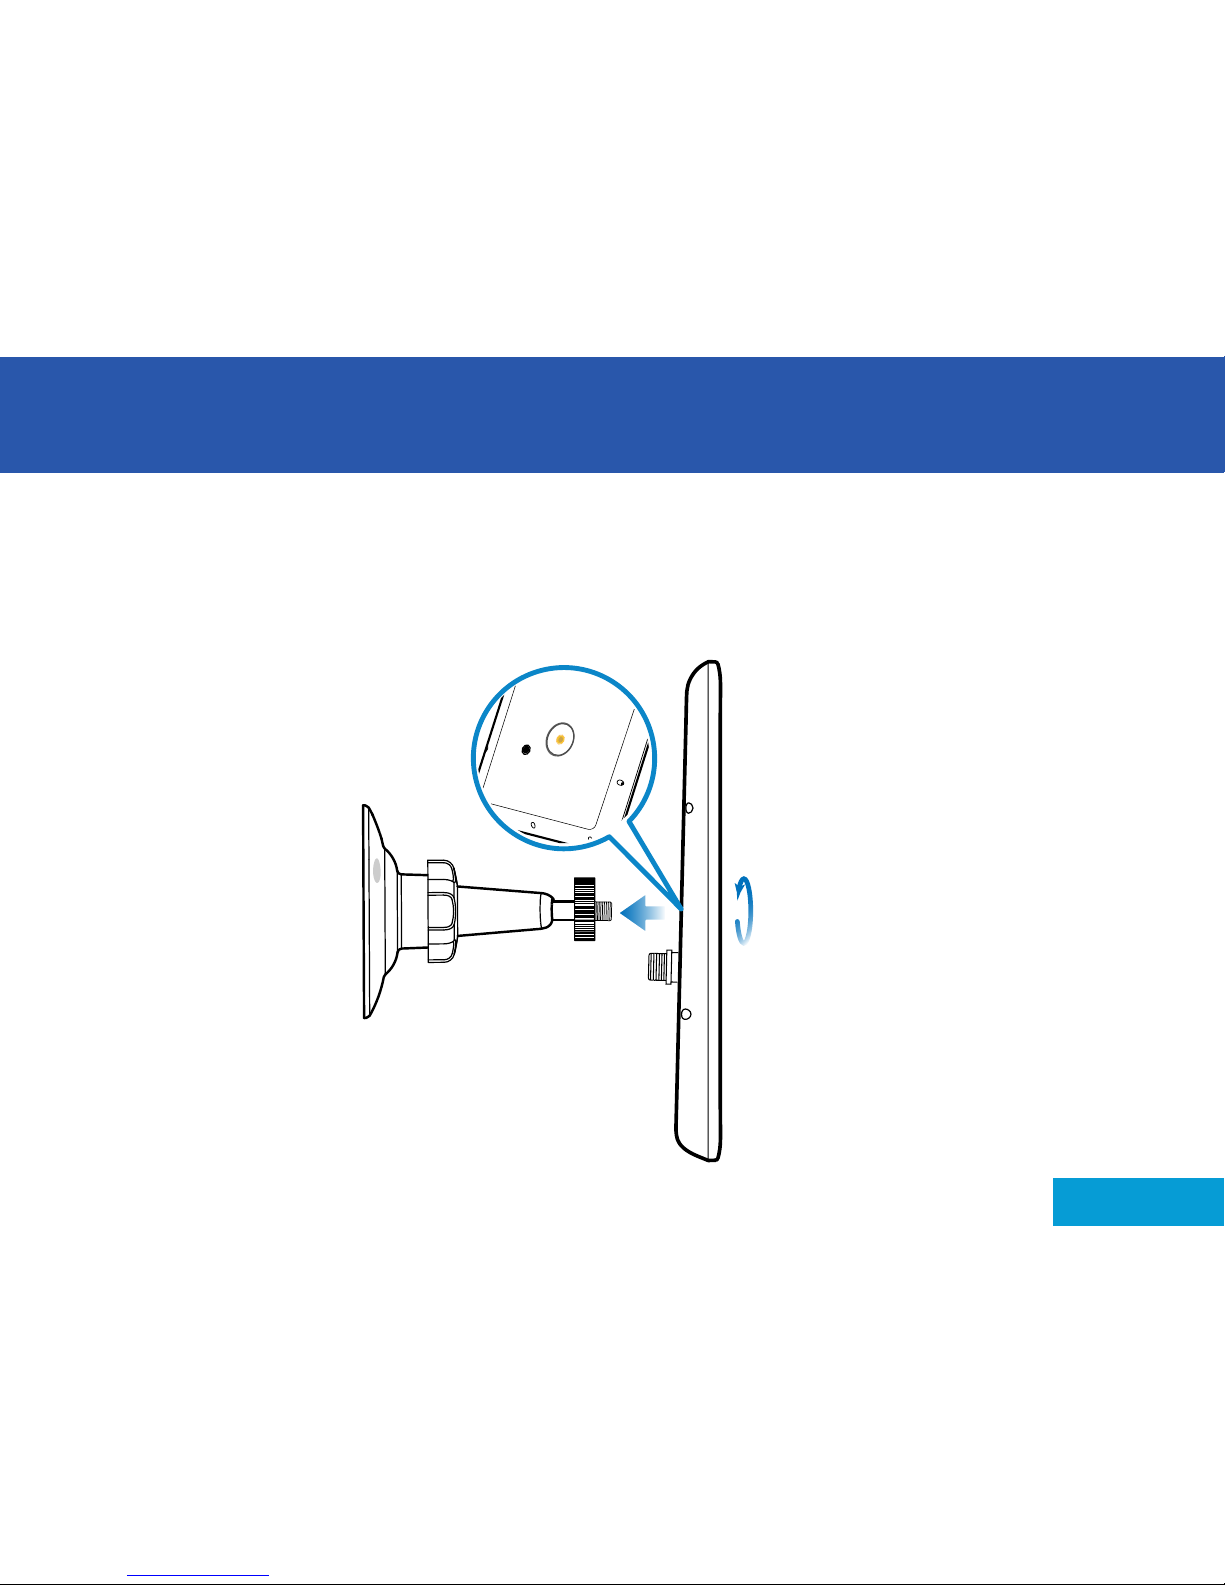
Installing the Solar Panel
2. Attach the solar panel to the mounting bracket.
Align the solar panel with the threaded screw on the swivel head mount, and then
screw in the solar panel until it is secured tightly.
Page 6
6
English
English
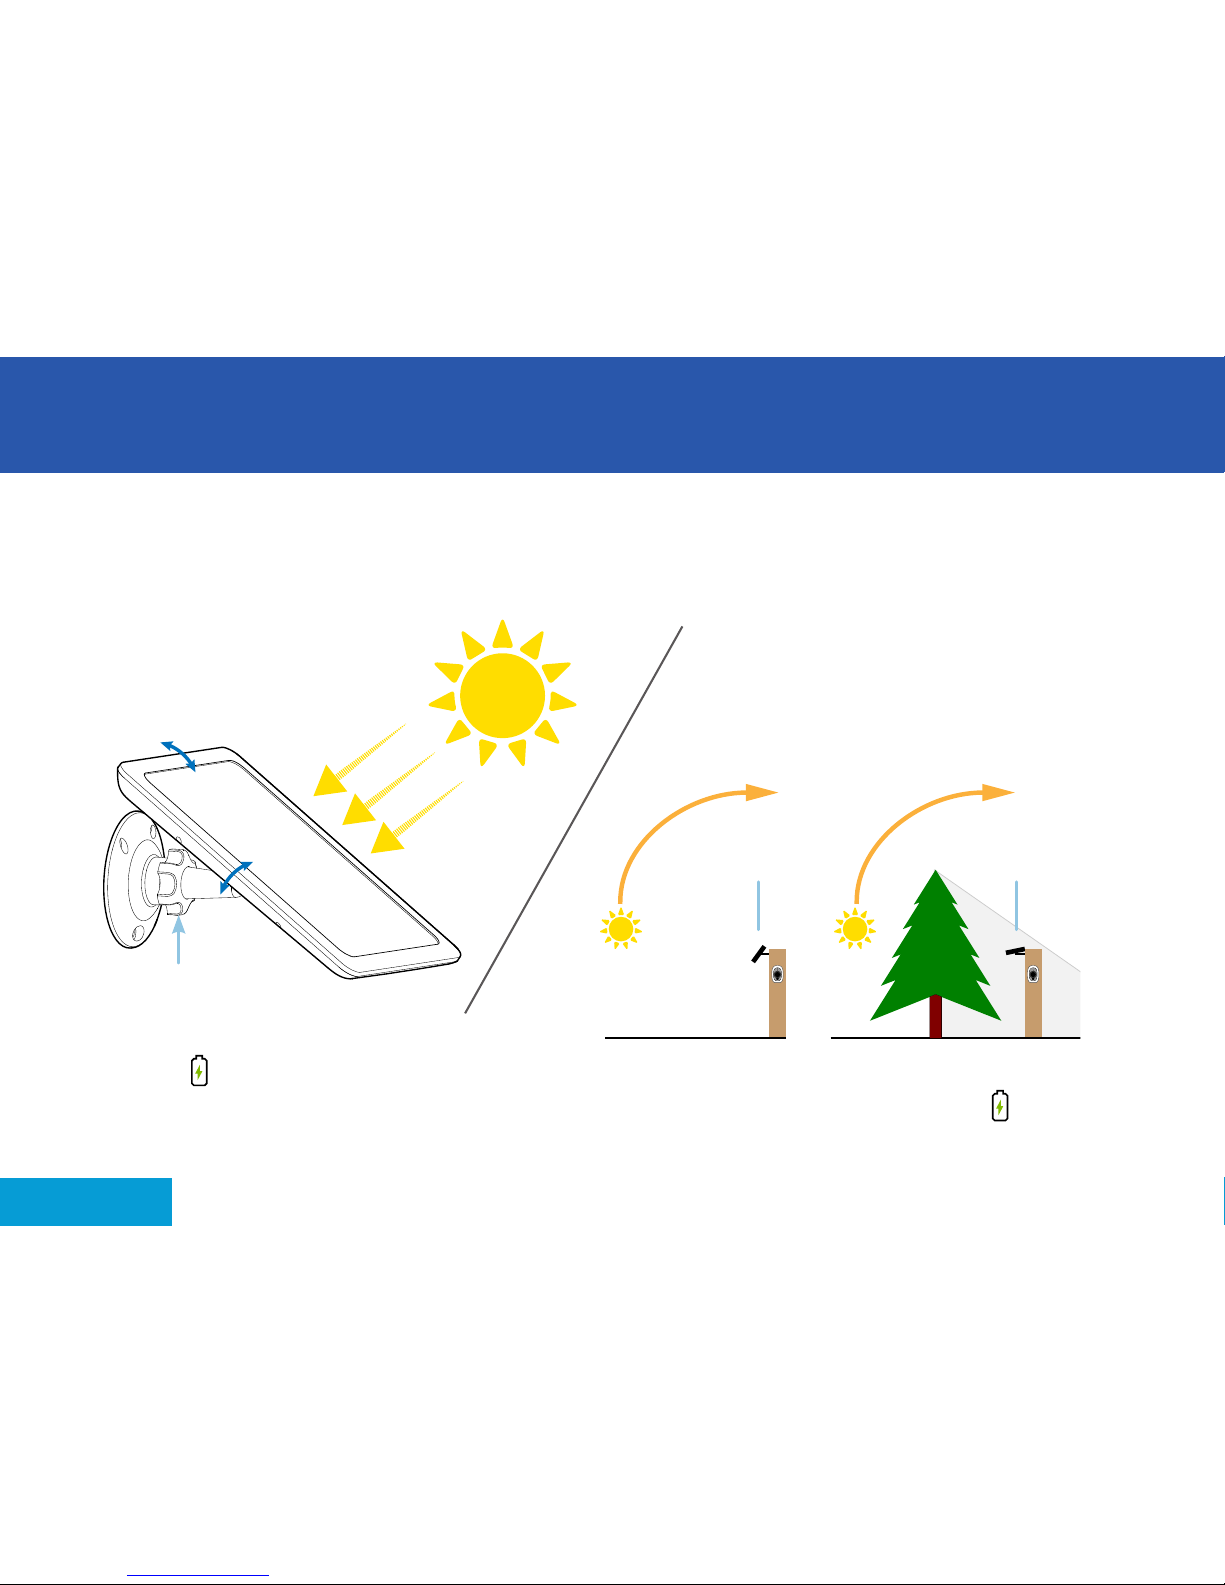
Installing the Solar Panel
3. The solar panel produces power only when it is exposed to sunlight. To generate
the most power and achieve best charging performance, tilt the solar panel
towards the sun, away from cover and shade.
PEAK HOURS
~10AM-3PM
Solar Panel
GOOD NOT OPTIMAL
Solar Panel
Make sure locking nut is
tightened after adjusting tilt
TIP The battery charging icon is displayed in the app when your camera is actively being
charged. If your camera is plugged into the solar panel, but there is no sunlight, the battery
charging icon will not be displayed.
Performance is directly related to the
amount and strength of sunlight received
Page 7
7
English
English
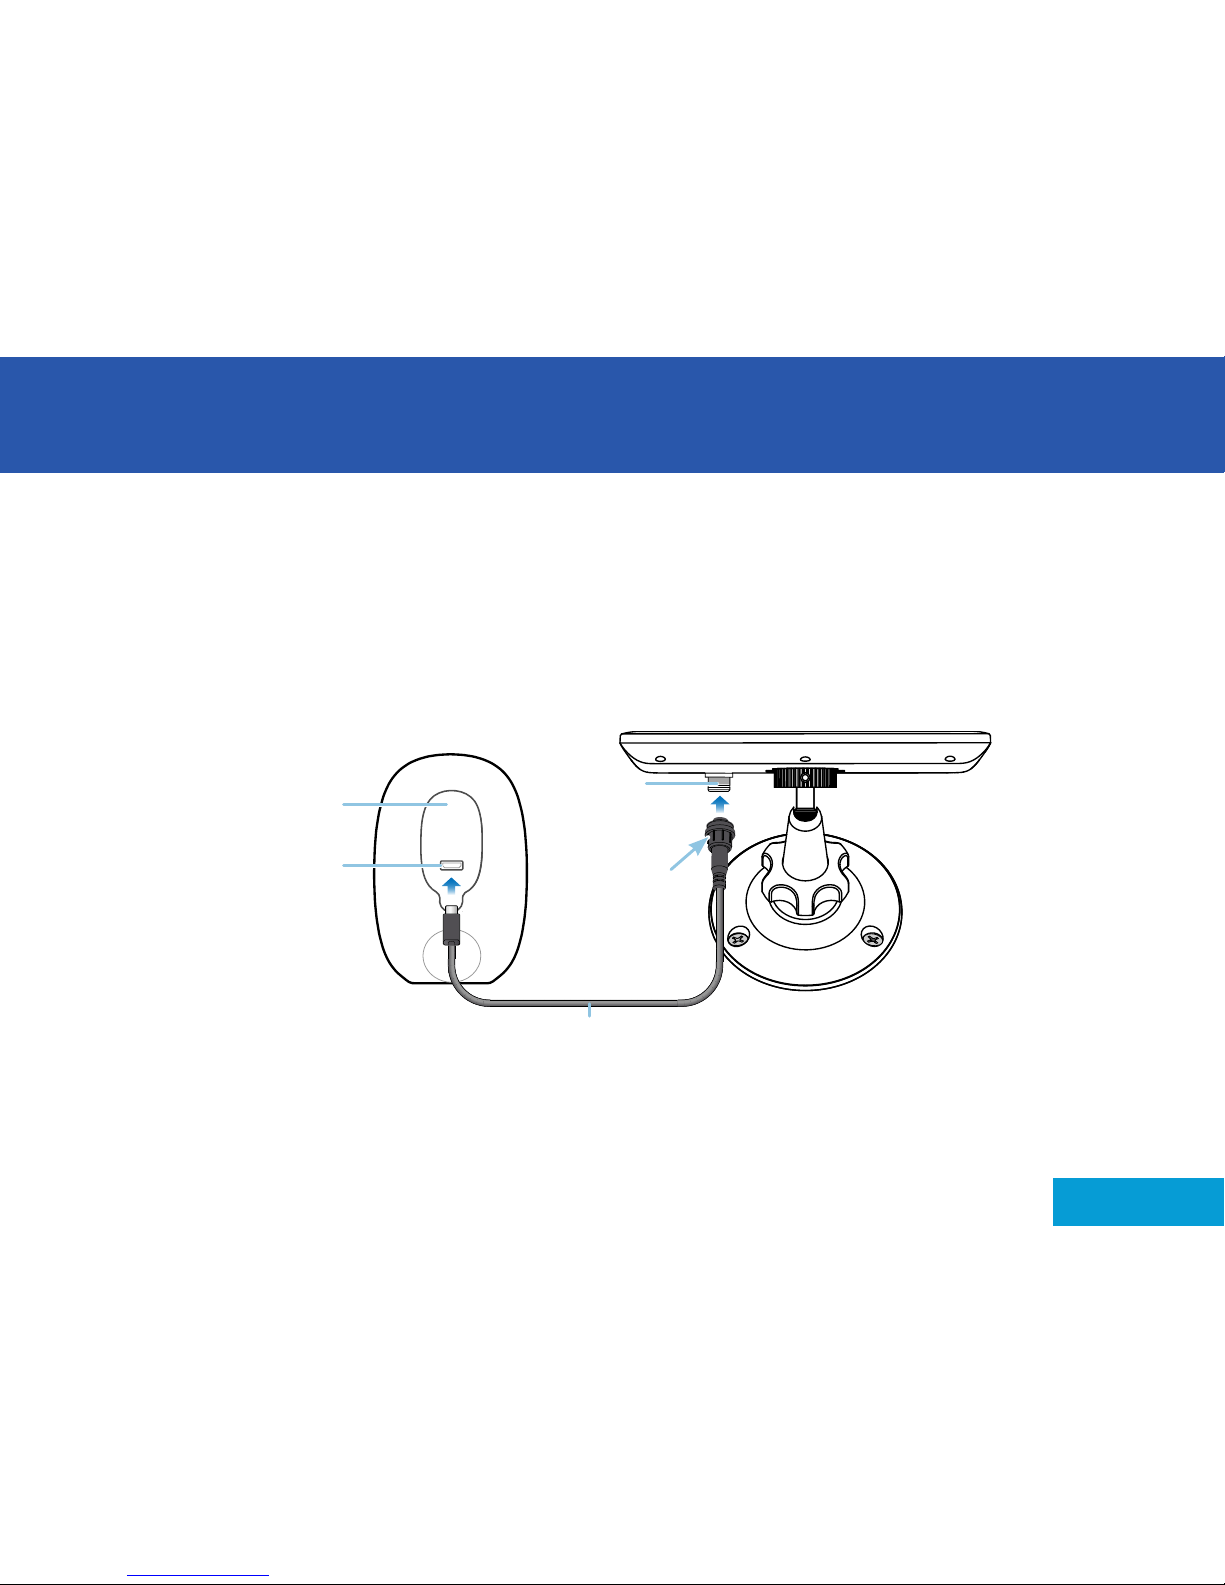
Installing the Solar Panel
4. Connect the solar panel to your camera.
First, pull out the port cover on the back of your camera and replace with the
supplied port cover which has a USB connector cutout (a spare port cover is
included). Make sure the port cover is sealed properly; it should fit flush without
gaps. Then, using the supplied USB charging cable, connect the round end to the
solar panel and the micro USB end to your camera.
Replacement
port cover
Tighten cap to
secure connector
Micro USB port
Solar port
USB charging cable
TIP Give your camera a full charge via your regular USB charger before connecting it to the solar
panel. Please note that when your camera is 100% fully charged, the battery charging icon will
not be displayed in the app. To check your camera’s charging status and battery level at any
time, see CAMERA SETTINGS > ABOUT > CHARGE STATE and BATTERY.
Page 8

8
English
Français
Aperçu
Panneau solaire
Cache de rechange du port de
la caméra
Avec découpe du connecteur USB
Port solaire
Support de la tête pivotante avec
filetage pour panneau solaire
Ajustez facilement l'angle du panneau
solaire afin de maximiser l'exposition à la
lumière du soleil
Écrou de blocage
Fixe l'ensemble de montage
de la tête pivotante
Câble de chargement USB
Pour connecter le panneau solaire à
votre caméra Swann Smart Security
Page 9

9
English
Français
Avant de vous lancer
• Le panneau solaire nécessite une lumière solaire directe et complète pour charger
votre caméra. Le ciel gris, les jours pluvieux et d'autres conditions météorologiques
défavorables peuvent nuire à la capacité du panneau solaire à produire de l'électricité.
• Pour de meilleurs résultats, le panneau solaire devra être orienté vers le soleil. L'angle
optimal varie tout au long de l'année, selon les saisons et votre emplacement. En
règle générale, le panneau solaire devra être orienté vers l'équateur (c.-à-d., dans
l'hémisphère nord, le panneau solaire est orienté vers le sud et dans l'hémisphère
sud, le panneau solaire est orienté vers le nord).
• Installez le panneau solaire de préférence dans un endroit qui reçoit beaucoup de
lumière du soleil, entre 10 h et 15 h, pour subvenir pleinement aux besoins en énergie
de votre caméra toute l’année. Évitez de placer dans une zone ombragée. L’ombre
des arbres et des bâtiments réduira considérablement la puissance de sortie du
panneau solaire.
• Le panneau solaire est conçu pour fournir une « charge d’entretien », complétant et
maintenant le niveau de charge de la batterie de la caméra en fonction de la quantité
de lumière solaire reçue quotidiennement. Si le niveau d’ensoleillement est faible
(par exemple en cas de temps nuageux), il peut ne pas être suffisant pour charger
votre caméra.
• Nettoyez régulièrement le panneau solaire avec un chiffon doux et de l'eau chaude.
Gardez la surface du panneau solaire à l'écart des feuilles et des débris pour une
performance optimale.
Page 10
10
English
Français
Installation du panneau solaire
1. Vissez le support de montage sur une surface solid à l’aide des vis fournies.
Assurez-vous que vous disposez d’une longueur de câble de chargement
suffisante pour atteindre votre caméra à partir du panneau solaire.
En cas de montage sur une surface en bois,Vissez le support de montage
directement sur la surface.
Si montage sur une surface de maçonnerie (briques, béton ou stuc), percez trois
trous à l'aide d'un foret de 8 mm (5/16 po) et insérez les chevilles fournies dans les
trous. Fixez ensuite le support de montage à la surface en utilisant les vis fournies.
Page 11

11
English
Français
Installation du panneau solaire
2. Fixez le panneau solaire sur le support de montage.
Alignez le panneau solaire avec la vis filetée sur le support de la tête pivotante, puis
vissez le panneau solaire jusqu'à ce qu'il soit fermement fixé.
Page 12

12
English
Français
Installation du panneau solaire
3. Le panneau solaire produit de l'énergie uniquement lorsqu'il est exposé à
la lumière du soleil. Pour générer le maximum de puissance et atteindre les
meilleures performances de charge, inclinez le panneau solaire vers le soleil,
loin de la couverture et de l'ombre.
HEURES DE POINTE
~ 10 heures-15 heures
Panneau solaire
BIEN NON OPTIMAL
Panneau solaire
Conseil Vous verrez l' icône de charge de la batterie dans l'application lorsque votre caméra
est en cours de charge. Si votre caméra est branchée sur le panneau solaire, mais qu'il n'y a
pas de lumière solaire, l' icône de charge de la batterie ne sera pas affiché.
La performance est directement liée à la
quantité et à la force de la lumière du soleil
qui est reçue
S’assurer que l’écrou de
blocage est serré après
ajustement de l’inclinaison
Page 13

13
English
Français
Installation du panneau solaire
4. Connectez le panneau solaire à votre caméra.
Tout d'abord, retirez le cache du port de votre caméra et remplacez-le par le cache
du port fourni qui comporte une découpe du connecteur USB (un cache de port de
rechange est inclus). Assurez-vous que le cache du port est correctement scellé; il
devrait être au même niveau, sans jeu. Puis, à l'aide du câble de chargement USB
fourni, connectez l'extrémité ronde au panneau solaire et l'extrémité du micro-USB à
votre caméra.
Serrez le capuchon pour fixer
le connecteur
Cache de rechange
pour port
Port micro USB
Port solaire
Câble de chargement USB
Conseil Rechargez complètement votre caméra via votre chargeur USB habituel avant de la
connecter au panneau solaire. Veuillez noter que l’icône de chargement de la batterie ne s’affiche
pas dans l’application quand votre caméra est 100% chargée. Pour consulter l’état de chargement
de votre caméra lorsque cette dernière est connectée au panneau solaire, rendez-vous dans la
section A PROPOS - ÉTAT DE CHARGEMENT et BATTERIE.
Page 14

14
English
Español
Resumen
Placa solar
Repuesto de la tapa de la toma
de la cámara
Con imagen de conector USB
Toma de placa solar
Soporte de cabezal giratorio con
tornillo roscado para placa solar
Ajuste fácilmente la orientación de
la placa solar para maximizar su
exposición a la luz solar
Tuerca de bloqueo
Fija el soporte de cabezal giratorio
Cable de carga USB
Para conectar la placa solar a su
cámara de seguridad inteligente Swann
Page 15

15
English
Español
Antes de empezar
• La placa solar necesita recibir luz directa del sol para cargar su cámara. Cuando el cielo
está nublado, llueve o hace mal tiempo la placa solar podría no generar electricidad.
• Para unos mejores resultados, la placa solar debe estar orientada hacia el sol. La
orientación óptima varía a lo largo del año, en función de las estaciones y de su
ubicación. Por regla general, la placa solar debe estar orientada hacia el Ecuador (en
el hemisferio norte, la placa solar estaría orientada hacia el sur; en el hemisferio sur, la
placa solar estaría orientada hacia el norte).
• Para satisfacer las necesidades de energía de su cámara durante todo el año, es
preferible instalar la placa solar en un lugar donde pueda recibir mucha luz solar entre
las 10 am y las 3 pm. Evite instalarla en una zona sombreada. Las sombras de árboles
y edificios reducirán en gran medida la electricidad generada por la placa solar.
• La placa solar está diseñada para proporcionar una “carga lenta”, cargando y
manteniendo el nivel de batería de la cámara en función de la cantidad de luz solar
recibida a diario. Si durante el día la placa solar no recibe suficiente luz (por ejemplo,
cuando está nublado), podría no suministrar suficiente electricidad a la cámara para
recargarla después de su uso.
• Cada cierto tiempo, limpie la placa solar con un trapo suave y agua tibia. Para un
funcionamiento óptimo, mantenga la superficie de la placa solar libre de hojas y
residuos.
Page 16

16
English
Español
Instalación de la placa solar
1. Fije el soporte de montaje a una superficie sólida con los tornillos suministrados.
Asegúrese de que exista suficiente cable de carga desde la cámara hasta la
ubicación del soporte de la placa solar.
Si va a instalarlo en una superficie de madera, atornille el soporte de montaje
directamente sobre la superficie.
Si va a instalarlo en una superficie de mampostería (ladrillos, cemento o
estuco), taladre tres orificios con una broca de 8 mm (5/16'') e introduzca los
tacos suministrados en los mismos. A continuación, fije el soporte de montaje a la
superficie con los tornillos suministrados.
Page 17

17
English
Español
Instalación de la placa solar
2. Fije la placa solar al soporte de montaje.
Alinee la placa solar con el tornillo roscado del soporte de cabezal giratorio y atornille
la placa solar hasta que esté bien sujeta.
Page 18

18
English
Español
Instalación de la placa solar
3. La placa solar únicamente produce electricidad cuando está expuesta a la luz
solar. Con el fin de generar una cantidad óptima de electricidad y conseguir
una mejor carga, incline la placa solar hacia el sol y no la coloque en lugares
cubiertos o sombreados.
HORAS PUNTA
~10 AM - 3 PM
Placa solar
BUENA NO ÓPTIMA
Placa solar
Consejo Verá el icono de carga de la batería en la aplicación cuando su cámara se esté
cargando. Si su cámara está conectada a la placa solar pero no hay luz solar, el icono de
carga de la batería no se visualizará.
El funcionamiento de la placa solar está
directamente relacionado con la cantidad y
la intensidad de la luz recibida
Asegúrese de que la tuerca
de bloqueo esté apretada
después de ajustar la
inclinación
Page 19

19
English
Español
Instalación de la placa solar
4. Conecte la placa solar a su cámara.
En primer lugar, extraiga la tapa de la toma de su cámara y cámbiela por la tapa
suministrada, en la que aparece la imagen de un conector USB (se incluye una tapa
de repuesto). Asegúrese de que la tapa de la toma está bien ajustada: debería encajar
sin dejar ningún hueco. A continuación, utilizando el cable de carga USB suministrado,
conecte el extremo redondo a la placa solar y el extremo micro-USB a su cámara.
Apriete el tapón
para bloquear el
conector
Repuesto de la tapa de
la toma
Puerto micro-USB
Toma de
placa solar
Cable de carga USB
Consenjo Cargue su cámara completamente con un cargador USB normal antes de conectarla a la
placa solar. Tenga en cuenta que cuando la cámara está 100% cargada no se visualiza el icono de
carga de batería en la aplicación. Para comprobar el estado de la carga de su cámara cuando está
conectada a la placa solar, consulte ACERCA DE - ESTADO DE CARGA y BATERÍA en la pantalla
de configuración de la cámara.
Page 20

20
English
Deutsch
Übersicht
Solarmodul
Ersatzabdeckung für
Kameraanschluss
Mit Aussparung für USB-Anschluss
Solaranschluss
Schwenkkopfhalterung mit
Schraubengewinde für Solarmodul
Einfache Anpassung des Solarmodulwinkels
für maximale Sonneneinstrahlung
Sicherungsmutter
Fixiert die Schwenkkopfhalterung
USB-Ladekabel
Verbinden des Solarmoduls mit Ihrer
Swann Smart Security Camera
Page 21

21
English
Deutsch
Bevor Sie beginnen
• Das Solarmodul benötigt volles, direktes Sonnenlicht für das Laden der Kamera.
Grauer Himmel, Regentage und andere unfreundliche Wettebedingungen können
das Solarmodul daran hindern, Strom zu erzeugen.
• Für optimale Ergebnisse muss das Solarmodul gegen die Sonne gerichtet werden.
Der optimale Winkel ist von der Jahreszeit und von Ihrem Standort abhängig. Als
allgemeine Regel gilt: Das Solarmodul muss zur Äquatorseite gerichtet sein (auf
der Nordhalbkugel ist das Solarmodul nach Süden und auf der Südhalbkugel nach
Norden gerichtet).
• Befestigen Sie das Solarmodul in einer Position mit hoher Sonneneinstrahlung
zwischen 10.00 Uhr und 15.00 Uhr, um so den Energiebedarf Ihrer Kamera das
ganze Jahr über decken zu können. Vermeiden Sie die Platzierung in schattigen
Bereichen. Der Schatten von Bäumen und Gebäuden reduziert die Ausgangsleistung
des Solarmoduls erheblich.
• Das Solarmodul ist so konzipiert, eine “Erhaltungsladung” für das Aufladen und
Aufrechterhalten des Batterieladestands der Kamerabatterie entsprechend der
täglich empfangenen Sonnenlichtmenge bereitzustellen. Empfängt das Solarmoduls
während des Tages nicht ausreichend Sonnenlicht (z. B. bei Bewölkung), kann die
Kamera unter Umständen nicht ausreichend geladen bzw. wieder aufgefüllt werden.
• Reinigen Sie das Solarmodul regelmäßig mit einem weichen Lappen und warmem
Wasser. Entfernen Sie eventuell vorhandene Blätter und Ablagerungen, um eine
optimale Leistung sicherzustellen.
Page 22

22
English
Deutsch
Installation des Solarmoduls
1. Befestigen Sie die Halterung mit den mitgelieferten Schrauben auf einer
festen Oberfläche. Achten Sie darauf, dass die Länge des Ladekabels von der
Befestigungsposition des Solarmoduls bis zur Kamera ausreichend ist.
Bei Befestigung auf einer Holzoberfläche, verschrauben Sie die Halterung direkt mit
der Oberfläche.
Bei Befestigung auf Mauerwerk (Ziegel, Beton oder Stuck), bohren Sie mit einem
8 mm-Bohrer drei Löcher und stecken die mitgelieferten Dübel in die Löcher.
Verschrauben Sie dann die Halterung mithilfe der enthaltenen Schrauben mit der
Oberfläche.
Page 23

23
English
Deutsch
Installation des Solarmoduls
2. Befestigen Sie das Solarmodul auf der Halterung.
Richten Sie das Solarmodul mit der Gewindeschraube auf der Schwenkkopfhalterung
aus und dann das Solarmodul fest anschrauben.
Page 24

24
English
Deutsch
Installation des Solarmoduls
3. Das Solarmodul erzeugt nur dann Strom, wenn es dem Sonnenlicht ausgesetzt
wird. Für optimale Leistung und Ladeleistung kippen Sie das Solarmodul in
Richtung Sonne, frei von Abdeckungen und Schatten.
SPITZENZEITEN
~10.00-15.00 Uhr
Solarmodul
Gut NICHT OPTIMAL
Solarmodul
Tipp Die Batterieladeanzeige wird in der App angezeigt, sobald die Kamera aktiv geladen
wird. Ist Ihre Kamera an das Solarmodul angeschlossen, aber es scheint keine Sonne, wird
die Batterieladeanzeige nicht angezeigt.
Die Leistung ist direkt von der Menge und
Stärke des einfallenden Sonnenlichts abhängig
Sicherstellen, dass die
Sicherungsmutter nach
dem Einstellen der Neigung
festgezogen ist
Page 25

25
English
Deutsch
Installation des Solarmoduls
4. Verbinden Sie das Solarmodul mit Ihrer Kamera.
Ziehen Sie zuerst die Anschlussabdeckung Ihrer Kamera heraus und ersetzen Sie
sie mit der bereitgestellten Anschlussabdeckung mit einer Aussparung für den
USB-Anschluss (eine Ersatzabdeckung ist enthalten). Achten Sie darauf, dass die
Anschlussabdeckung ordnungsgemäß verschlossen ist. Sie sollte bündig und
spaltfrei anliegen. Nehmen Sie dann das mitgelieferte USB-Ladekabel und verbinden
Sie das runde Ende mit dem Solarmodul und das Micro-USB-Ende mit Ihrer Kamera.
Kappe zur
Fixierung des
Anschlusses fest
anziehen
Ersatzabdeckung für
Anschluss
Micro-USB-Anschluss
Solaranschluss
USB-Ladekabel
Tipp Laden Sie Ihre Kamera mit dem regulären USB-Ladegerät auf, bevor Sie es an das Solarmodul
anschließen. Bitte beachten: Ist die Kamera zu 100 % geladen, wird das Batterieladesymbol in der App
nicht angezeigt. Um den Ladestatus Ihrer Kamera bei angeschlossenem Solarmodul zu überprüfen,
öffnen Sie INFO - LADESTATUS und BATTERIE im Einstellungsbildschirm der Kamera.
Page 26

26
English
Italiano
Descrizione
Pannello solare
Coperchio della porta della
videocamera di ricambio
Con il dispositivo di interruzione del
connettore USB
Porta solare
Attacco a testa girevole con
filettatura del pannello solare
Regola facilmente l'angolazione del
pannello solare per massimizzare
l'esposizione alla luce solare
Dado di bloccaggio
Blocca il gruppo di supporto
della testa girevole
Cavo di ricarica USB
Per collegare il pannello solare alla
videocamera di sicurezza Swann Smart
Page 27

27
English
Italiano
Prima di iniziare
• Il pannello solare richiede la piena luce solare diretta per caricare la videocamera. Cieli
grigi, giornate piovose e altre condizioni meteorologiche avverse possono ostacolare la
capacità del pannello solare di generare energia.
• Per ottenere i migliori risultati, il pannello solare dovrebbe essere inclinato verso il sole.
L’angolo ottimale varia durante l’anno, a seconda delle stagioni e della posizione. Come
regola generale, il pannello solare deve essere rivolto verso l’equatore (cioè nell’emisfero
settentrionale, un pannello solare è rivolto a sud, nell’emisfero meridionale il pannello
solare è rivolto a nord).
• Preferibilmente, montare il pannello solare in un luogo che riceve molta luce solare, tra
le 10:00 e le 15:00, per sostenere pienamente le esigenze di alimentazione della tua
videocamera per tutto l’anno. Evitare di collocare il pannello solare in un’area ombreggiata.
L’ombra degli alberi ed edifici ridurrà sostanzialmente la produzione del pannelli solari.
• Il pannello solare è progettato per fornire una “carica di compensazione”, carica completa
e mantenere il livello di carica della batteria della videocamera in base alla quantità di luce
solare ricevuta ogni giorno. Se durante il giorno il pannello solare non riceve abbastanza
luce solare (ad esempio, tempo nuvoloso), potrebbe non caricare sufficientemente la
videocamera e sistemare di nuovo l’utilizzo.
• Pulire periodicamente il pannello solare con un panno morbido e acqua calda. Mantenere
la superficie del pannello solare libera da foglie e detriti per prestazioni ottimali.
Page 28

28
English
Italiano
Installazione del pannello solare
1. Fissare la staffa di montaggio ad una superficie stabile con le viti fornite.
Lasciare cavo di ricarica a sufficienza fino alla videocamera dalla posizione di
montaggio del pannello solare.
In caso di montaggio su una superficie di legno, avvitare la staffa di montaggio
direttamente sulla superficie.
In caso di montaggio su una superficie in muratura (mattoni, cemento o stucco),
praticare tre fori con una punta da 8 mm (5/16¨) e inserire i tasselli in dotazione nei
fori. Quindi fissare la staffa di montaggio alla superficie con le viti fornite.
Page 29

29
English
Italiano
Installazione del pannello solare
2. Attaccare il pannello solare alla staffa di montaggio.
Allineare il pannello solare con la vite filettata sul supporto girevole, quindi avvitare il
pannello solare fino a fissarlo saldamente.
Page 30

30
English
Italiano
Installazione del pannello solare
3. Il pannello solare produce energia solo quando è esposto alla luce solare.
Per generare la massima potenza e ottenere le migliori prestazioni di ricarica,
inclinare il pannello solare verso il sole, lontano da copertura e ombra.
ORE DI PUNTA
~10AM-3PM
Pannello solare
Buono Non Ottimale
Pannello solare
Consiglio Vedrai l'icona di carica della batteria nell'app quando la videocamera viene
caricata attivamente. Se la tua videocamera è collegata al pannello solare, ma non c’è luce
solare, l'icona di carica della batteria non verrà visualizzato.
Le prestazioni sono direttamente correlate
alla quantità e alla forza della luce solare
ricevuta
Assicurarsi che il dado di
bloccaggio sia serrato dopo la
regolazione dell’inclinazione
Page 31

31
English
Italiano
Installazione del pannello solare
4. Collegare il pannello solare alla videocamera.
Innanzitutto, estrarre il coperchio della porta della videocamera e sostituirlo con
il coperchio della porta in dotazione dotato di un connettore USB (è incluso un
coperchio della porta di ricambio). Assicurarsi che il coperchio della porta sia
sigillato correttamente; dovrebbe adattarsi a filo senza lacune. Quindi, utilizzando il
cavo di ricarica USB in dotazione, collegare l'estremità rotonda al pannello solare e
l'estremità micro-USB alla videocamera.
Consiglio Caricare completamente la videocamera tramite il classico caricatore USB prima di
collegarla al pannello solare. Se la videocamera è completamente carica al 100%, l'icona di
ricarica della batteria non viene visualizzata nell'applicazione. Per verificare lo stato di carica
della videocamera se collegata al pannello solare, vedere INFORMAZIONI - STATO DI CARICA e
BATTERIA sulla schermata delle impostazioni della videocamera.
Stringere il
cappuccio
per fissare il
connettore
Coperchio della porta
di ricambio
Porta micro USB
Porta solare
Cavo di ricarica USB
Page 32

32
English
English
VISIT SUPPORT.SWANN.COM FOR MORE INFORMATION
VISITEZ-NOUS SUR SUPPORT.SWANN.COM POUR PLUS D’INFORMATIONS
VISITE SUPPORT.SWANN.COM SI DESEA MÁS INFORMACIÓN
BESUCHEN SIE UNS AUF SUPPORT.SWANN.COM FÜR WEITERE INFORMATIONEN
VISITACI SU SUPPORT.SWANN.COM PER MAGGIORI INFORMAZIONI
Product Registration
Enregistrement du produit
Registro del producto
Produktregistrierung
Registrazione del prodotto
Product Guides
Guides de produits
Guías de producto
Produkthandbücher
Guide al prodotto
Customer Support
Assistance à la clientèle
Atención al cliente
Kunden-Support
Servizio di Assistenza ai Clienti
Support Community
Communauté d’assistance
Comunidad de soporte
Support-Community
Comunità di supporto
© Swann Communications 2018
MSOLARPANELVER1
tech@swann.com
 Loading...