

Page 1

Floodlight
Security System
QUICK START GUIDE
English
Page 2

IMPORTANT SAFETY INSTRUCTIONS
• All electrical connections and wiring of this product must be carried out by a licensed electrician in
accordance with local and national wiring rules (e.g., AS/NZS 3000 Electrical Installations). Check
with local authorities for applicable requirements.
• The product must be mounted on a flat vertical surface capable of supporting the full weight of the
product.
• Ensure the voltage marked on the product is the same as the electrical power supply to be used.
• Do not connect to a dimmer switch or timer.
• Always turn off electricity at the main circuit breaker or fuse box before installation. Failing to do so
could result in serious injury, electrical shock, and/or risk of fire.
• Do not rely on wall switch alone to turn off the power.
• Do not open or disassemble the product. There are no user-serviceable parts inside.
Englis
2
h
Page 3
PREINSTALL ATION CHECK
WIFI COVERAGE AVAILABILITY
• Before you begin the installation of the product, it is important that you confirm the availability of
Wi-Fi as well as the signal level at the desired installation location.
• Note that Wi-Fi quality can vary significantly at different locations around the home due to
environmental factors such as home construction type and wireless interference from other
electronic devices.
TO CHECK WIFI COVERAGE
1 Connect your phone to the 2.4GHz Wi-Fi network band of your wireless router.
Note: The Swann Floodlight Security System will only connect to a 2.4GHz network.
2 Place your phone where you are planning to install the floodlight unit. If you have Wi-Fi connection
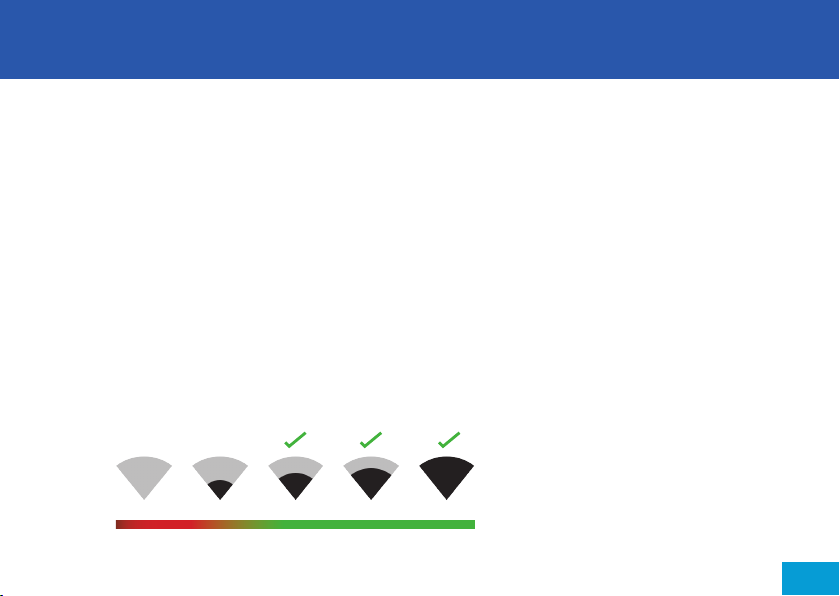
on your phone, the camera will also likely be able to obtain Wi-Fi connection. Check the Wi-Fi icon
on your phone. We recommend a minimum of 1 bar showing on your phone’s Wi-Fi icon as shown
below. Further testing should be performed if the Wi-Fi signal strength is only 1 bar.
!X
0 1
2 3 4
ExcellentGoodFairPoorNo connection
Number of bars indicate
Wi-Fi signal strength
English
3
Page 4

PREINSTALL ATION CHECK
3 To avoid any potential Wi-Fi connection issues later, try playing a video on a media streaming
service app, for example, YouTube™ or Netflix™, through your phone. If possible, temporarily pause
activities like online gaming and video streaming on other devices connected to your network
while you perform testing, as this can affect the connection speed and quality.
4 If you don't experience any video streaming issues (buffering, stuttering, etc), you can proceed with
the installation of the product. There are also Wi-Fi surveying and speed tools available online
that enable you to analyze and measure the quality of your Wi-Fi connection including download
and upload speeds (a minimum 1 Mbps internet upload speed is recommended for optimal video
streaming). For more information, visit support.swann.com.
5 If you still have any concerns about your Wi-Fi coverage, consult a licensed electrician on
connecting the Floodlight wiring to a temporary plug and running an extension cord to a wall
outlet so you can power the camera onsite to test Wi-Fi pairing and stream live feed directly via
the SAFE by Swann app. For camera pairing instructions, see step 10 on page 9.
WIFI WEAK OR OUT OF RANGE
• If you're getting a weak Wi-Fi signal or you can’t connect to Wi-Fi at all on your phone at the
installation site, we recommend moving your router closer, installing a Wi-Fi extender (which can
help improve signal reception) or selecting another location.
• Do not proceed with the installation of this product until you have thoroughly tested and
confirmed availability of reliable Wi-Fi connection at the desired location.
Englis
4
h
Page 5

GET THE APP
GET THE APP
1 Download the latest version of the SAFE by Swann app from the Apple App Store® or Google
Play™ Store on your iOS or Android device. Simply search for "SAFE by Swann".
2 Open the app, create your SAFE by Swann account, and sign in. You will need to activate your
account by confirming the email sent to the email account you provided before you can sign in.
English
5
Page 6

INSTALLATION EXAMPLE DIAGRAM
Junction Box
Englis
6
Terminal Block
Cable Clamp
Cable
Grommet
Reset Button
Floodlight wiring
Brown
Blue
Green/Yellow
Resetting the Camera
Open the port cover on the back of the camera. Press and hold the Reset button for 10 seconds.
Camera LED Indicator Guide
Blinking Blue Wi-Fi Pairing Mode Solid Red Live streaming/Motion recording
Fast Blinking Blue Connecting to Wi-Fi Blinking Purple Low Wi-Fi signal
(Active)
(Neutral)
(Earth)
Locking Collar
Infrared LEDs
h
Adjustment KnobLocking NutFoam Gasket
Washer
Cap
Microphone
Night Detection Sensor
LED Indicator
Speaker (Siren)
True Detect™
Passive Infrared (PIR)
Motion Sensor
Page 7

INSTALLATION INSTRUCTIONS
This unit is designed to be mounted on a standard wiring junction box and requires
connection to a 100-240VAC power supply. For optimum results, install the unit at least
2.4m (8ft) above the ground.
Read ”IMPORTANT SAFETY INSTRUCTIONS” and ”PREINSTALLATION CHECK”, and make
sure the installation site is Wi-Fi ready before installing the unit.
INSTALLATION AND WIRING MUST BE CARRIED OUT BY A LICENSED ELECTRICIAN.
IMPORTANT! TURN POWER OFF AT CIRCUIT BREAKER OR FUSE BOX.
When installing the unit refer to the Installation Example Diagram on page 6.
1 Cut a small entry hole in the cable grommet enabling the electrical supply cable to
enter the provided junction box. Make sure the supply cable coming from the wall is
long enough to route through the cable grommet to the terminal block.
2 Attach the junction box securely to the wall using the appropriate fixings for the wall
type.
3 Peel the backing off the adhesive foam gasket and stick it to the back of the floodlight
unit.
English
7
Page 8

INSTALLATION INSTRUCTIONS
INSTALLATION INSTRUCTIONS
4 Unscrew the cable clamp from the junction box. Connect the active, neutral, and earth
wires to the terminal block in the junction box as marked according to the connection
diagram below.
Make sure each wire is firmly screwed to its corresponding terminal.
Live
L
Brown Floodlight Wire
Green/Yellow Floodlight Wire
Blue Floodlight Wire
Terminal Block
Brown (Active Supply Wire)
Earth
Green/Yellow (Earth Supply Wire)
Neutral
N
Blue (Neutral Supply Wire)
5 Fasten the electrical supply cable to the junction box using the cable clamp. Screw the
cable clamp down tightly.
6 Place the floodlight unit (make sure the “UP” arrow on the back is pointing up) against
the junction box, aligning the center mounting holes and lock it securely with the
provided long mounting screw and washer.
7 Insert the provided screw cap firmly into the center mounting hole on the floodlight
unit.
Englis
8
h
Page 9

INSTALLATION INSTRUCTIONS
8 Apply silicone weather sealant (not included) around the back of the junction box and
mounting surface for moisture seal. Installation is complete. Remove the protective
film from the camera.
9 Turn the electricity back on and allow the camera to power up. This can take up to a
minute.
When the camera starts blinking blue, it is ready to be paired with your Wi-Fi network.
10 Pair the camera and test for correct operation. From the SAFE by Swann app, select
Pair Camera > Swann Floodlight Camera and follow the on-screen instructions to
complete the camera setup.
TIP If you have a light switch that controls the floodlight unit, remember not to turn
off the switch as this will also turn off the camera. The camera needs to be powered at
all times to stay connected to your Wi-Fi. Put a sticker label on the light switch so that
people know not to turn it off.
For more details on using your Swann Floodlight security system such as live
streaming, activity recording and playback, and camera configuration including
floodlight and siren settings, see the SAFE by Swann manual which is available via the
SAFE by Swann app menu.
English
9
Page 10

TIPS
TIPS
Angle Adjustments
To adjust the direction of the lamps and the camera, loosen the corresponding adjustment knob or locking nut/collar.
Motion Detection
• The camera's motion sensor is more sensitive to
the movement of heat across the coverage area
and less sensitive to movement directly towards
or away from it.
• Position the camera tilted downwards so that the
likely approach path occurs across the coverage
area (see figure on right). When walking directly
towards or away from the motion sensor the
Englis
10
detection range will be reduced. Note that
detection range may also alter with changes in
ambient temperature.
h
Less
sensitive
More
sensitive
Page 11

SUPPORT
Want more information?
We're here to help! Visit our Support Center at support.swann.com. You can register your product for
dedicated technical support, download guides, find answers to commonly asked questions, and more.
You can also email us at any time via: tech@swann.com
My Setup Notes
Wi-Fi Router Information
Wi-Fi Network Name (2.4 GHz SSID):
Wi-Fi Security Key/Password:
Wi-Fi Extender Information (if any)
Wi-Fi Network Name (2.4 GHz SSID):
Wi-Fi Security Key/Password:
Internet Speed Test:
(case-sensitive)
(case-sensitive)
DOWNLOAD UPLOAD
Mbps
Mbps
English
11
Page 12

Model: SWWHD-FLOCAM
Input: 100-240V, 1.0A, 50/60Hz, 30W
Weather resistance: IP65
The light source of this luminaire is not replaceable; when the light source reaches its end of life the whole luminaire shall be replaced.
FCC Statement
This equipm ent has been te sted and foun d to comply with the limits for Cl ass B di gita l device, pu rsuant to part 15 of th e FCC Rules.
Thes e limits are d esig ned to provide reason able protection again st har mful inter ference in a residential inst allation . This e quipment
gener ates, uses and can radi ate ra dio fr eque ncy energ y and, if not ins talled and used in accordance w ith the instructions, may
cause harmful interferen ce to ra dio communi cations. H owever, ther e is no guarantee that inter ference will not o ccur in a par ticular
installation. If this equipment does ca use ha rmful inter ference to r adio or telev ision reception , whic h can be deter mined by tur ning
the equ ipment off and on, the user is encoura ged to try to correct th e inter ference by o ne or mo re of the followin g meas ures:
• Reorient or r eloc ate the recei ving antenn a • Incr ease the sep aration betwe en the equipm ent and the receiv er • Con nect the
equip ment into an out let on a circuit dif fere nt fro m that to w hich the receiver is connected • Consult th e dealer or an exper ienced
radi o/ TV technician for help. This device complie s with Par t 15 of the FCC Rules. Oper ation is subj ect to the fol lowing two conditio ns:
(1) this device may not cause harmful interference, and (2) this device must accept any interference received, including interference
that ma y caus e undesired oper ation.
FCC RF Radiat ion Expos ure St ateme nt Caution: To maintain compliance with the FCC’s RF exp osur e guidelines, place the pro duct at
least 20cm from n earby per sons. The devic e must n ot be co -loc ated or oper ating in conjunction wi th any other antenna or tran smit ter.
WARNING: Changes or modific ations to this unit not expr essly appr oved by the part y respons ible for comp liance coul d void the user’s
autho rity to ope rate the equipment.
Recy clin g
This product bears the selective sor ting symbol for waste electrical and electronic equipment (WEEE) should not be disposed with
other household w aste s throughout the EU. This means that this product m ust be handl ed pur suant to European Direc tive 2012/19/EU
in order to be re cycled or d ismantled to minimize its impact on th e environm ent.
QSGWHDFLOCAMAUVER1
Englis
12
h
© Swann Communications 2019
 Loading...