

Swann SWN-SWWHD-PTCAM-AU Quick Start Manual
Security Made Smarter
NEED HELP?
Quick Start Guide
1080p Pan & Tilt
Wi-Fi Camera
Limited Warranty Terms & Conditions
Swann Communications warrants this product against defects in workmanship and material for a period of one (1) year
from its original purchase date. You must present your receipt as proof of date of purchase for warranty validation. Any
unit which proves defective during the stated period will be repaired without charge for parts or labour or replaced at
the sole discretion of Swann. The end user is responsible for all freight charges incurred to send the product to Swann’s
repair centres. The end user is responsible for all shipping costs incurred when shipping from and to any country other
than the country of origin.
The warranty does not cover any incidental, accidental or consequential damages arising from the use of or the
inability to use this product. Any costs associated with the fitting or removal of this product by a tradesman or other
person or any other costs associated with its use are the responsibility of the end user. This warranty applies to the
original purchaser of the product only and is not transferable to any third party. Unauthorized end user or third party
modifications to any component or evidence of misuse or abuse of the device will render all warranties void.
By law some countries do not allow limitations on certain exclusions in this warranty. Where applicable by local laws,
regulations and legal rights will take precedence.
For Australia: Our goods come with guarantees which cannot be excluded under Australian Consumer Law. You are
entitled to a replacement or refund for a major failure and for compensation for any other reasonably foreseeable loss
or damage. You are also entitled to have the goods repaired or replaced if the goods fail to be of acceptable quality and
the failure does not amount to major failure.
FCC Notice
This device complies with part 15 of the FCC Rules. Operation is subject to the following two conditions: (1) This device
may not cause harmful interference, and (2) This device must accept any interference received, including interference
that may cause undesired operation.
USA & Canada 1800 627 2799 Australia 1800 788 210
UK & Europe 0808 168 9031 New Zealand 0800 479 266
tech@swann.com
support.swann.com
QSGPTCAMVER1E | © Swann Communications 2017
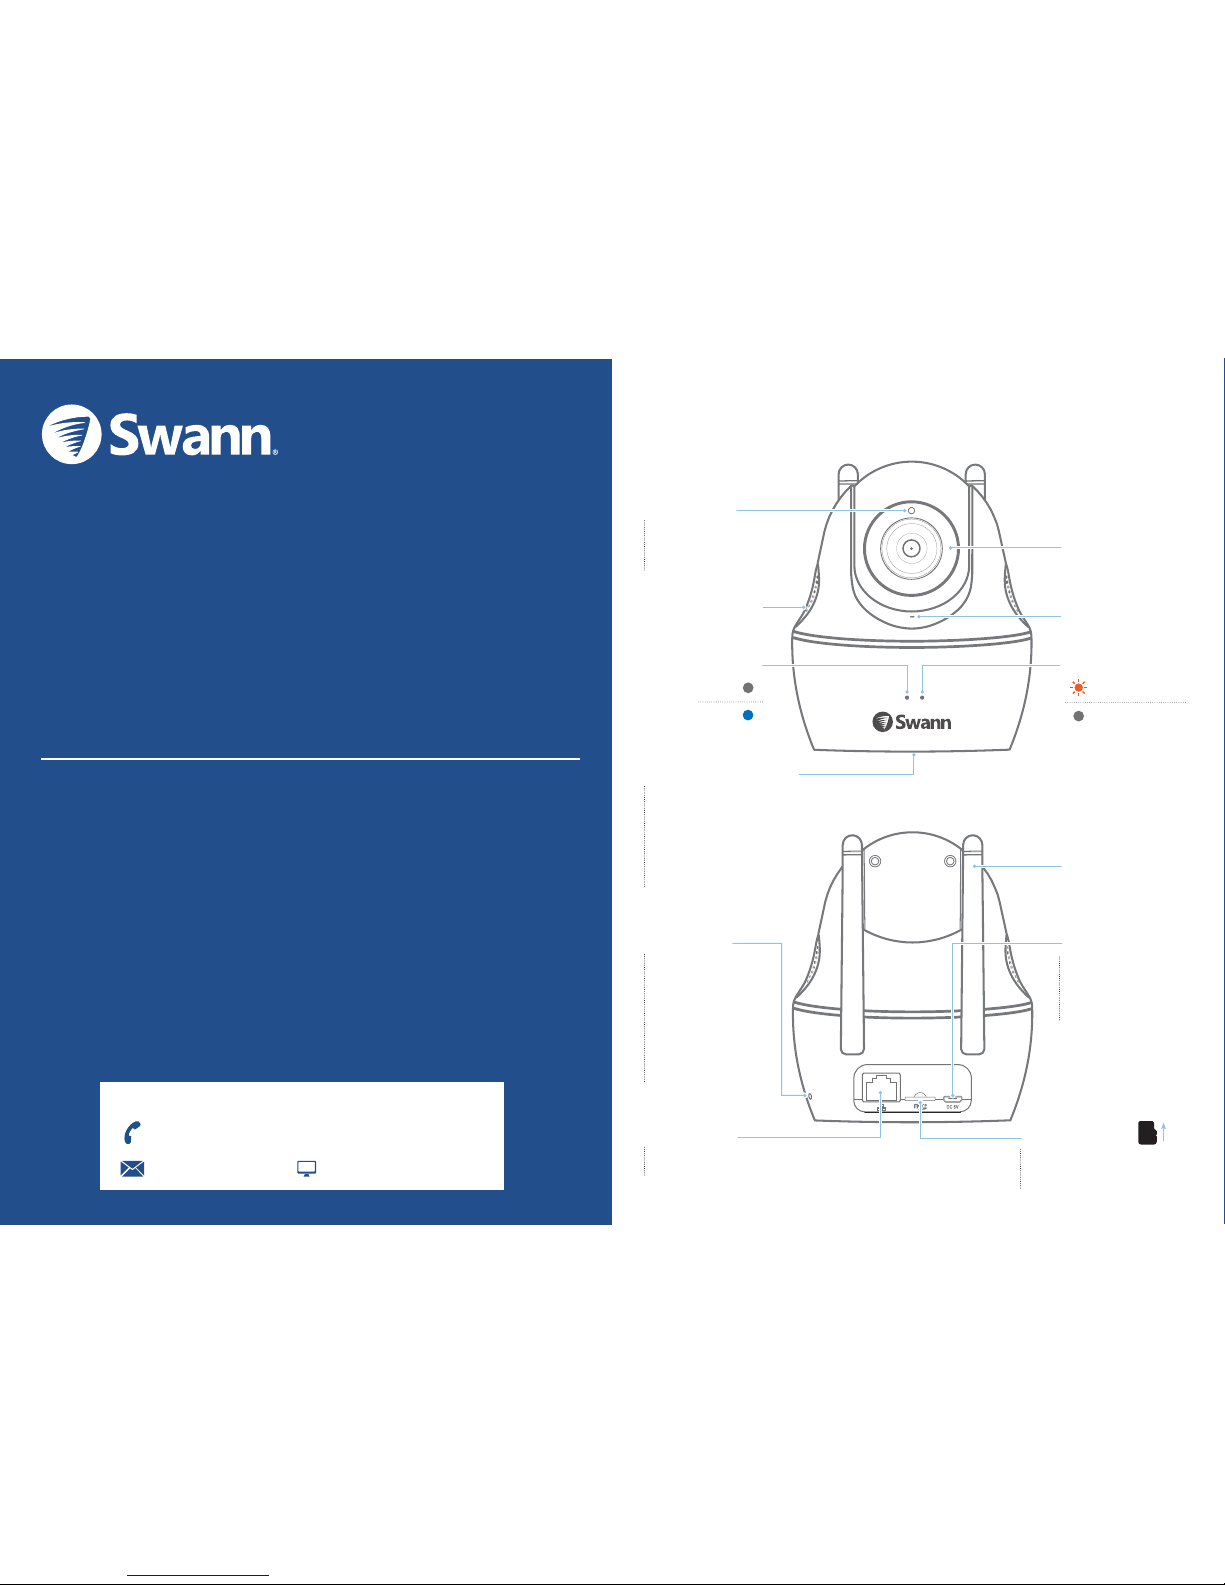
Light Sensor
Detect s ambient light
and turn s on the infrare d
LEDS fo r night vision, if
necessary
Speaker
Ethernet Port
Used for w ired
connection/setup
Reset Button
Hold for 10 s econds
to perf orm a factor y
reset . This will rebo ot
the came ra and clear
all set tings to factor y
defaults, including
previ ously configur ed
Wi-Fi s ettings, so y ou
can set up y our camera
again, if n eeded
USB Power Port
Restarting your camera
can sometimes quickly
resolve a problem—just
disconnect the USB cable,
and then plug it back in
MicroSD Card Slot
Never miss the moment—Put in a
microSD card to record and save
motion-activated events
Power LED
Threaded
Mounting Hole (Bottom)
Prefer to m ount your camer a?
Just at tach the include d
mountin g bracket to the wa ll,
then line t he threaded ho le on
the bott om of the camera up
with the t hreaded stud o n the
mounting bracket and tighten
the knob to s ecure the came ra
Connected state
ON
Unconnected state
OFF
Wi-Fi LED
Microphone
Infrared LEDS
Dual-Band
Wi-Fi Antenna
Getting to know your Pan & Tilt Wi-Fi Camera
Please open the Wi-Fi settings
option on your smartphone and
connect to your camera’s network
........................................................................
..................................................................
....................................................
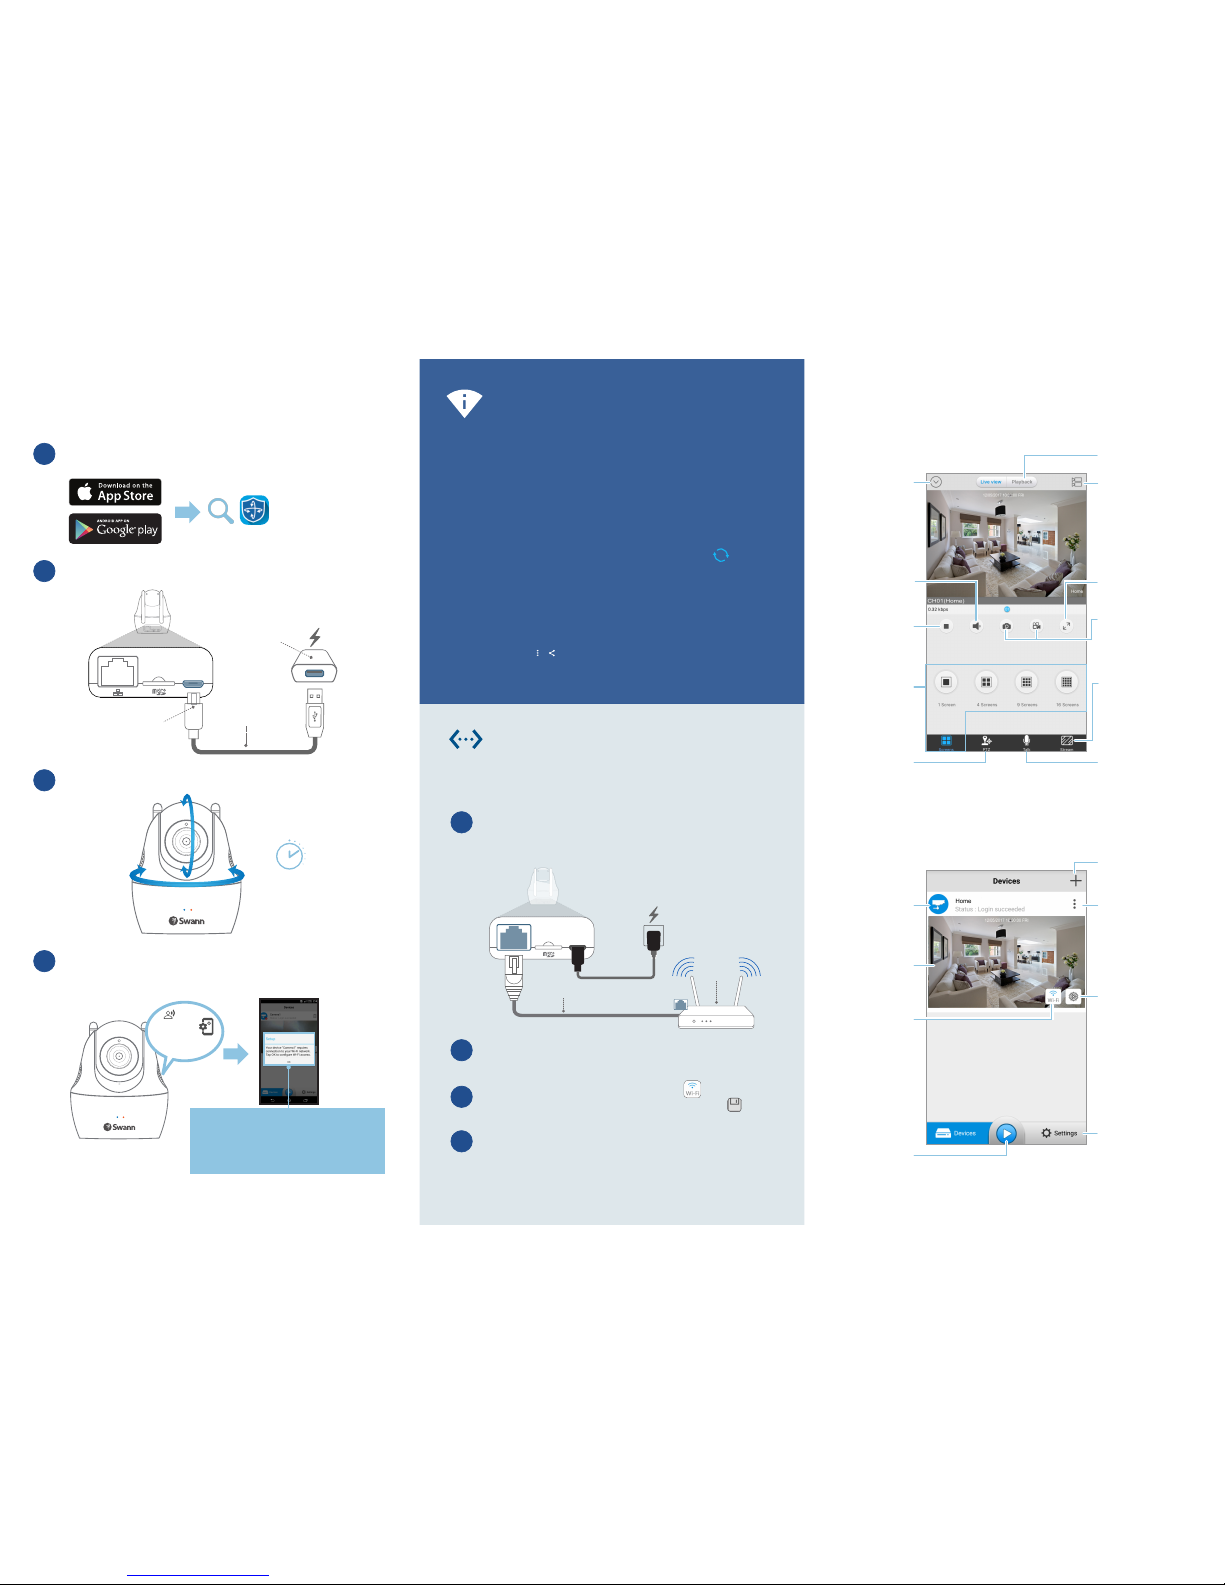
Quick start: Setup via Wi-Fi Quick start: AlwaysSafe App
Live View screen
Devices screen
Alternative setup
via Ethernet connection
Tips & tricks
Download and inst all the latest version of the AlwaysS afe app from
the Apple App Store or G oogle Play Store on your smartphone.
Connect the camer a to your Wi-Fi router using the included
Ethernet cable, and if you ha ve not already done so, connect
the camera to power. Note: You will not hear instr uctions
from the camera when it detects the Ethernet connection.
Make sure your smartphon e is connected to the same Wi-Fi
router as the camera, th en open the AlwaysSafe app. The app
will automatically detec t and add the camera.
From the preview window of the camera, tap , then choose a
Wi-Fi network for the camera to join. Make sure to tap at the
top right to save the camera’s new Wi-Fi settings.
You can now unplug the Ethernet cable and move the camera to
the desired location—as long as it is within range of your Wi-Fi
router, the camera will automatically reconnect. Or you can also
continue using the Ethernet connection—it can often provide
a faster and more reliable internet connection but camera
placement will be limited by the length of the Ethernet cable.
Connect the camer a to the power adapter using the included USB
cable, then plug the power a dapter into a power outlet.
The camera wil l begin rotating as part of its star tup sequence.
Once ready, the camera go es into Wi-Fi configuration mode and
talks you through the set up process. Listen carefully and follow t he
voice prompts to complete the setup of t he camera.
If, for any reason, you’re having trouble jo ining the camera to your
Wi-Fi netwo rk wirelessly, try using Ethernet instea d to configure the
camera’s initial Wi-Fi settings.
Setting up your camer a is quick and easy. Just follow these simple steps.
1
1
2
3
4
2
3
4
“AlwaysSafe”
Power Adapter
Micro-USB Connector
USB Cable
Ethernet Cable
Wi-Fi
Router
Wait ~30s
• If you have problem s setting up the camera w ith the app, try turning of f
“Mobile Data” or “Cel lular Data” on your smartp hone first. This will p revent
your smartph one from automatically sw itching to cellular data for in ternet
connection onc e it detects the SWANN_ xxx networ k has no internet access.
• The camera supports both 2.4GHz and 5GHz Wi-Fi networks. Try
experimenting with both bands to see which one gives you better performance.
As a general rule, the 5GHz band has a shorter range but is great for high
bandwidth activities like online video streaming. The 2.4GHz band is better for
long range but is more prone to interference from other wireless devices.
• If your home Wi-F i network does not imme diately appear in the list of
available W i-Fi networks dur ing the in-app setup, simply tap to scan
again and refres h the list.
• Create a passw ord for the camera when pr ompted by the app. (Please note
the username of th e camera is “admin”.) Password prote ction is designed to
prevent someon e from accessing your camer a on another device.
• Want to securely share access to your camera with family members? We’ve
made it easy—simply install the AlwaysSafe app on their smartphone, open
the app, then tap + and scan the QR code you are sharing on your smartphone
(tap Camera Menu > ). The app will automatically pick up your camera. To
log into your camera, provide your camera’s password (one-time process).
From here on, your camera can be viewed at anytime from their smartphone
as long as there is internet access.
LAN
HEADS-UP!
Open the AlwaysSafe app when prompted,
then wait for the app to detect the camera,
and tap OK once the setup box appears on
the screen to continue with the setup.
Tap to stop or start live view
Preview window.
Tap to start live view
Tap to hear or mute the sound
Multi-camera window
options
Tip: Only one camera can
be displayed at a time if
streaming in “Clear” quality
Tap to use the talk function
Tip: It’s not unusual to hear audio
feedback (echo, high-pitched
noise)—the camera’s mic is
very sensitive (so you don’t miss
hearing anything!) Try plugging
in your earphones for a better
experience!
Tap to share camera, edit
camera name & login
password, or delete camera.
Tip: Deleting the camera
does not remove the camera
from your Wi-Fi network. If
your smartphone is on the
same network, the app will
automatically detect and add the
camera again
Access app s ettings and vi ew
general information
Tip: Want to learn mo re about
using the AlwaysSafe app?
Download the AlwaysSafe App
Guide from our Su pport Center
at: support.swann.com
Select and view multiple
camera streams simultaneously
Tap for a landscape (fullscreen)
display of the live view
Search and playback events
recorded on the MicroSD card
Manually add a camera using
the QR code scan method
Tap to capture a photo or record
a video during live view
Tip: Captured photos/videos are
saved to the internal memory of
your smartphone. Look for the
AlwaysSafe folder
Tap to change the quality of
the video stream between
Fluent (smoother movement)
and Clear (higher quality)
Check or change the
current Wi-Fi connection
Tip: Setting up the camera
using Ethernet? Once the
camera is detected, tap this
to configure Wi-Fi settings
Manage cam era settings a nd
features su ch as date & time,
camera pa ssword, mot ion
detection sensitivity, email
notifications, and more
Tip: For the Email Al erts feature
to work properly, you may need
to review your em ail account
settings (e.g., Gm ail) and give
permission for the app to use
your email accou nt so it can
send out alerts
Tap to pan & tilt camera
Tip: For continuous
movement, drag and hold
joystick in desired direction
Tap to return to the
Devices screen
Camera name and
connection status
Quickly start live view of the
last watched camera
Note: The camera’s Wi-Fi con figuration mode times out in 10 minutes.
Simply restar t the camera if you need more time to set it up.
 Loading...