

Page 1
EN
INSTRUCTION MANUAL
Doorphone Video
Intercom
HOME SERIES
with Colour 4.3”
LCD Monitor
Page 2

1
1) LCD Screen - This is where you view your visitor
that the intercom camera sees.
2) Monitor - Touch this button to view what the in-
tercom camera sees. Touch again to turn off the
LCD screen.
3) Door Unlock - If you have an electronic lock con-
nected to the LCD screen, you can unlock the door
by touching this button.
4) Gate Unlock - If you have an electronic gate con-
nected to the LCD screen, you can unlock the gate
by touching this button.
5) Talk - Touch this button to activate the intercom
so you can speak to your visitor after the doorbell
has been pressed. The LCD monitor and intercom
will remain active for two minutes. Touch again to
turn off the LCD screen.
6) Microphone - Speak into the microphone to
communicate with your visitor.
Getting to know your LCD Screen (Front)
2 3 4 5
6
1
Page 3
2
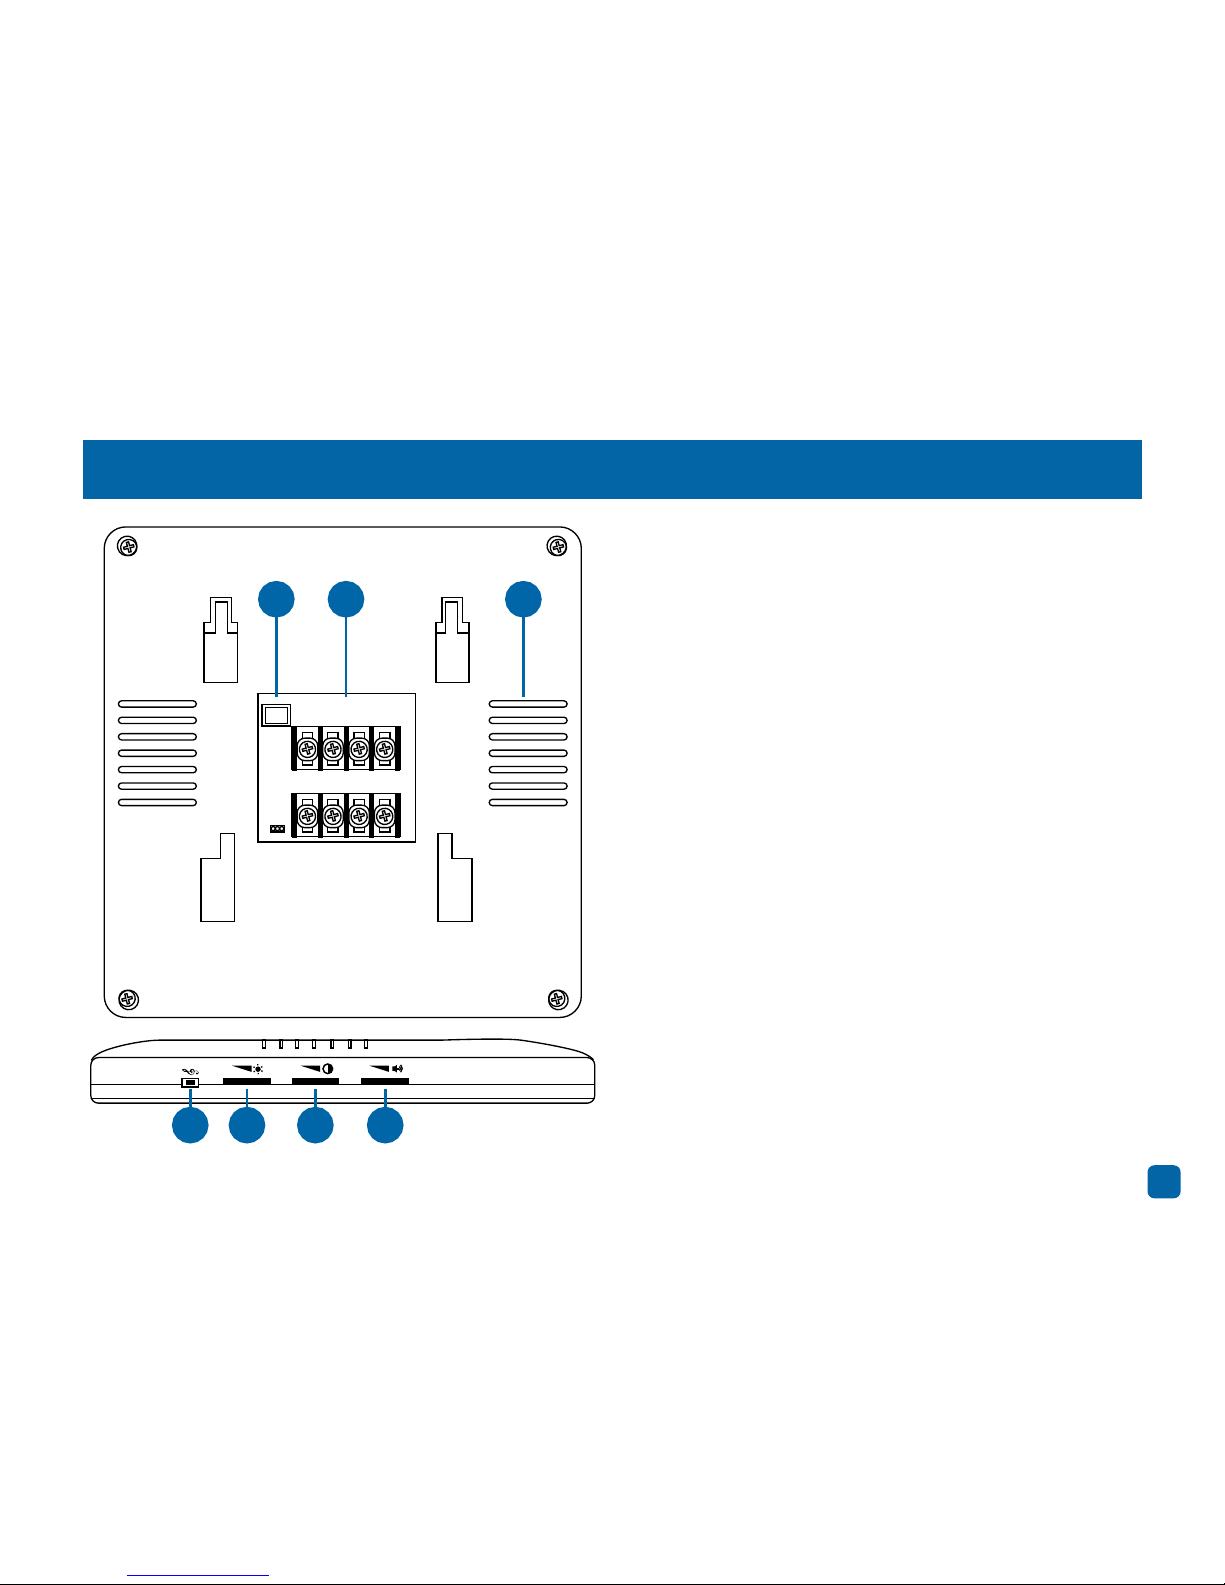
Getting to know your LCD Screen (Back & Side)
7) Power Input (DC 12V) - Connect the provided
power adapter here.
8) Wiring Terminal - Using the provided cable,
connect the intercom camera to terminals 1 to 4.
An optional electronic lock can be connected to
terminals 5 and 6 and an electronic gate can be
connected to terminals 7 and 8.
9) Speaker - This where you hear your visitor
speak to you from the intercom camera
10) Melody Selection - Press this button to select
a different melody.
11) Brightness - This will adjust the brightness of
the image seen on the LCD screen.
12) Colour - This will adjust the colour level of the
image seen on the LCD screen.
13) Volume - This will adjust the speaker volume.
Turn counter-clockwise to decrease the volume
and clockwise to increase the volume.
1 2 3 4
5 6 7 8
-
+
7 8 9
10 11 12 13
Page 4

3
Getting to know your Intercom Camera (Front & Back)
14) Microphone - This is where your visitors speak
to you.
15) Camera Lens - This is where the image of your
visitor is captured.
16) Infrared LEDs - This allows the camera to see
your visitors at night. The image will appear in
black and white on the LCD screen.
17) Doorbell - Press this to ring the doorbell.
18) Speaker – This is where your visitor hears you
speak to them from the LCD screen.
19) Wiring Terminal - Connect the provided cable
to the corresponding terminal connections.
14
15
16
17
18
19
Before commencing installation, make sure
both devices are not mounted near electrical wires, including wires that might be located behind a wall. If you are unsure at all,
please ask a professional to check first.
Page 5

4
Installing the LCD Screen and Intercom Camera
1) The LCD screen and the intercom camera can
be mounted to almost any vertical surface. The
ideal mounting height is approximately 4.7 to
5.2ft/145 to 160cm from the ground. Use a 0.39inch/10mm drill bit and drill a hole in the wall at
the location where you will be mounting the LCD
screen and the intercom camera.
2) Use the supplied cable to connect the LCD
monitor to the intercom camera. On one end are
U-shaped connections. This connects to the wiring terminal at the rear of the LCD screen (terminals 1 to 4).
3) Feed the other end of the cable through the
hole until it reaches the other side where the intercom camera will be installed. Leave some of
the cable free so the U-shaped connections can
connect to the LCD screen.
4) Place the LCD screen mounting bracket over
the hole (flat side with the square shaped hock
pointing up) and use the provided screws (2 x
1.18inch/3cm) to secure it to the wall. If you are
mounting to a masonry wall such as brick or
stone, use the provided plug to keep the screw
firmly in place.
5) Connect the U-shaped connections to termi-
nals 1 to 4 by sliding the connection under each
screw and washer terminal. The colour on each
cable is for guidance only. It doesn’t matter which
colour is connected to each terminal. You just
need to make sure the same coloured wire is
connected to the same terminal on the intercom
camera, for example – blue wire connected to terminal 1 on the LCD screen also connects to terminal 1 on the intercom camera. Use a Phillips head
screwdriver to tighten each terminal (be careful
not to over tighten).
Page 6

5
Installing the LCD Screen and Intercom Camera (cont.)
6) Connect the provided power adapter to the DC
12V connection at the rear of the LCD screen then
connect the power connection to a spare wall
socket. The buttons at the front of the LCD screen
will illuminate.
7) Place the LCD screen onto the mounting brack-
et. Line up the four hooks on the mounting bracket with the grooves at the rear of the LCD screen
then slide it down to secure it onto the mounting
bracket. Remove the protective plastic sheet after
mounting.
8) You’re now ready to connect and mount the
intercom camera. Place the intercom camera
mounting bracket over the hole and use the provided screws (3 x 1.57inch/4cm) to secure it to the
wall. If you are mounting to a masonry wall such
as brick or stone, use the provided plug to keep
the screw firmly in place.
9) Connect the four wires to the corresponding
wiring terminal at the rear of the intercom camera. Use a small flathead screwdriver to push in
the button atop each terminal and release when
the wire has been inserted. Remember, that terminal 1 on the LCD screen also connects to terminal 1 on the intercom camera, and so on.
10) Before securing the intercom camera, press
the doorbell to test. A melody should play and an
image should appear on the LCD screen. Press
the TALK button to test the intercom feature.
11) Slide in the intercom camera to the mounting
bracket top-edge first to ensure the notches fit
into the guide holes at the top.
12) Remove the silicon cap located at the bottom
and use the provided screw (1 x 0.39inch/1cm)
to secure the intercom camera to the mounting
bracket. Replace the silicon cap when finished.
Page 7

6
When your visitor presses the doorbell – A melo-
dy will play and an image of your visitor will appear
on-screen.
1) MONITOR – Touch and release the MONITOR
button to view an image from the intercom camera. The LCD screen will turn off after 40 seconds
or you can touch again to turn it off.
2) DOOR UNLOCK - If you have an electronic lock
connected to the LCD screen, you can unlock the
door by touching this button.
3) GATE UNLOCK - If you have an electronic gate
connected to the LCD screen, you can unlock the
gate by touching this button.
4) TALK - Touch and release the TALK button to
talk to your visitor. When finished, touch again to
turn off the LCD screen. If unattended, the melody
will play three times then the LCD screen will turn
off after 50 seconds.
Using the Doorphone Video Intercom
5
1 2 3 4
Page 8

Limited Warranty - Terms & Conditions
Swann Communications warrants this product
against defects in workmanship and material for
a period of one (1) year from its original purchase
date. You must present your receipt as proof of
purchase for warranty validation. Any unit which
proves defective during the stated period will
be repaired without charge for parts or labour
or replaced at the sole discretion of Swann. The
end user is responsible for all freight charges incurred to send the product to Swann’s repair centres. The end user is responsible for all shipping
costs incurred when shipping from and to any
country other than the country of origin.
The warranty does not cover any incidental, accidental or consequential damages arising from
the use of or the inability to use this product. Any
costs associated with the fitting or removal of this
product by a tradesman or other person or any
other costs associated with its use are the responsibility of the end user. This warranty applies
to the original purchaser of the product only and
is not transferable to any third party. Unauthorized end user or third party modifications to any
component will render all warranties void. By law
some countries do not allow limitations on certain
exclusions in this warranty. Where applicable by
local laws, regulations and legal rights will take
precedence.
For Australia: Our goods come with guarantees
which cannot be excluded under Australian Consumer Law. You are entitled to a replacement
or refund for a major failure and for compensation for any other reasonably foreseeable loss or
damage. You are also entitled to have the goods
repaired or replaced if the goods fail to be of acceptable quality.
7
Page 9

FCC Verification
8
This equipment has been tested and found to comply with the limits for Class B digital device, pursuant to part 15 of the FCC Rules. These limits are designed to provide reasonable protection against
harmful interference in a residential installation. This equipment generates, uses and can radiate radio
frequency energy and, if not installed and used in accordance with the instructions, may cause harmful
interference to radio or television reception, which can be determined by turning the equipment off and
on, the user is encouraged to try to correct the interference by one or more of the following measures:
• Reorient or relocate the receiving antenna
• Increase the separation between the equipment and the receiver
• Connect the equipment into an outlet on a circuit different from that to which the receiver is connected
• Consult the dealer or an experienced radio/TV technician for help
These devices comply with part 15 of the FCC Rules. Operation is subject to the following two conditions:
(1) These devices may not cause harmful interference.
(2) These devices must accept any interference received, including interference that may cause undesired operation.
Page 10

MDP875C050515E | © Swann 2015
Helpdesk/Technical Support
Technical Support E-mail: tech@swann.com
Telephone Helpdesk
USA Toll Free 1-800-627-2799
USA Parts & Warranty 1-800-627-2799
(M-F, 9am-5pm US PT)
AUSTRALIA 1800 788 210
NEW ZEALAND Toll Free 0800 479 266
UK 0203 027 0979
 Loading...