

Page 1
User Manual
SW248-8LM
SW-A-LCD8
Page 2

T able of Contents
1.Precautions
2.Accessories
3.Appearance
4.Remote Controll operation
5.Basic Operation Methods
6.Menu Operation
6.1 Picture
6.2 Option
6.3 Clock
6.4
6.5 Preset
System
7.Before you request repairs
8.Technical Parameters
1
3
4
5
7
9
9
9
10
11
12
13
14
Page 3
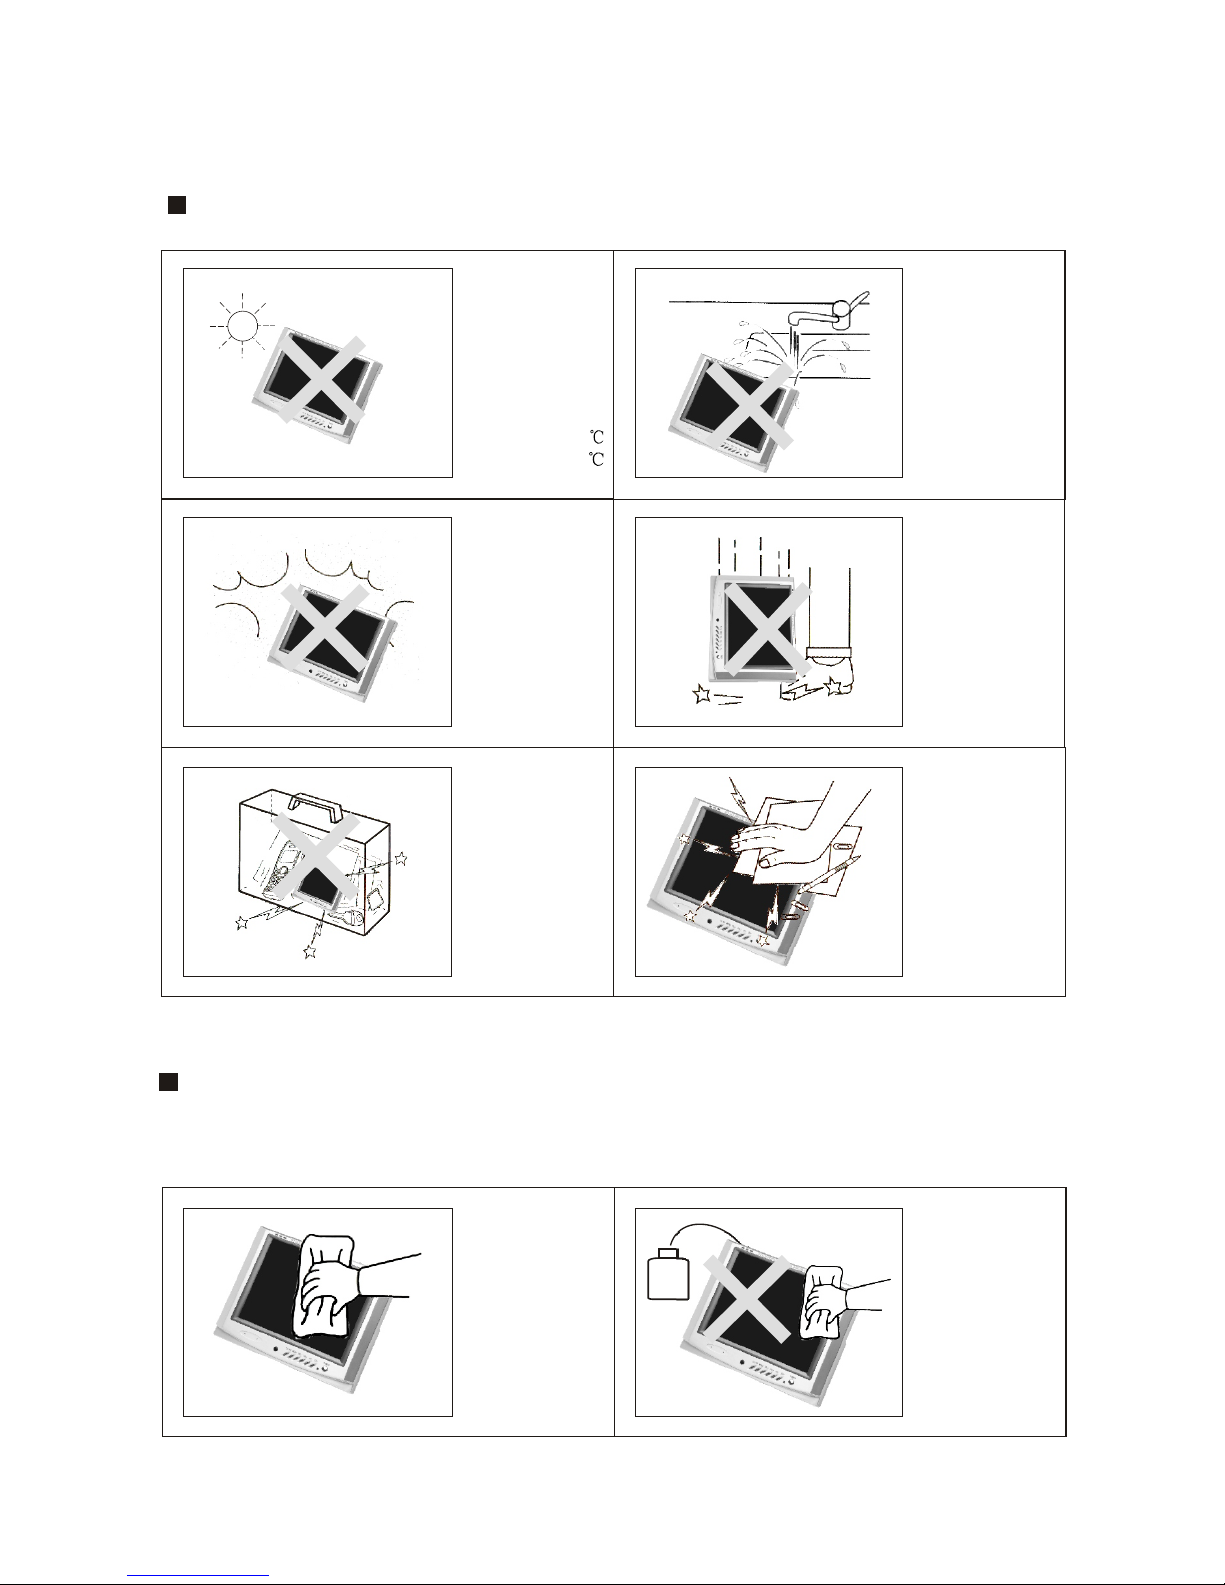
1. Precautions
Storage and Keeping
Maintenance
Please disconnect all wires before you start cleaning this machine.
Ensure monitor is
not stored or
operated in
temperatures
exceeding set
limits.
Storage: 20 ~ 60
Operating: 0 ~40
Never use this
monitor near
bathtubs,
washbasins,
kitchens etc......, or
places with open
water (swimming
pool etc...), damp
basements or
similar places.
Never operate
the monitor in
environments
with large
amounts of
moisture, dust,
or oil smole.
Never place
monitor in
containers with
other loose
objects. Doing
so can damage
the monitor due
due to collision.
A v oi d dropping
or impacting the
monitor.
Never u s e sharp
objects on o r
around the
monitor.
P l ea se w ip e
the monitor cover,
display screen,
and buttons with
soft cloth dipped
witha light
detergent
solution.
Never wipe this
monitor with
abrasive cloths,
strong detergent
powder, alchol,
benzene etc...,
various
propellants or
chemical cleaning
solutions.
-1-
Alcohol
Page 4
Special Notice
!
1. Only the included AC adapter and the automobile adapter (12V) are to
be used.
2. For the sake of safety, when you do not intend to use the display, please
un-plug the AC adapter or automobile adapter.
Earphone Operation Precautions
1. Please do not have your headphone / earphone to too high volume,
otherwise it may lead to inconvenience or danger to yourself and
other People.
2. When using open-designed earphone, please keep the volume down
to a reasonable level for the confort of those around you.
3. If you begin to display systoms of tinnitus, immidiately tune down the
volume or stop using this monitor.
4. Extended use of headphones / earphone is not recommanded. Doing
so can result in hearing damage.
A few highlights or dark spots may occur on the LCD screen, it is a very
common phenomenon to the active matrix, display technology, and
does not necessarily mean there is a defect or fault. Never try to open
this monitor yourself. In case of any fault or failure, please turn o the
display at once, and notify our company or the corresponding dealer.
This display is made up of many precise electronic components. Any
disassembly or modication may lead to damage to broken components.
-2-
! WARNING !
Page 5
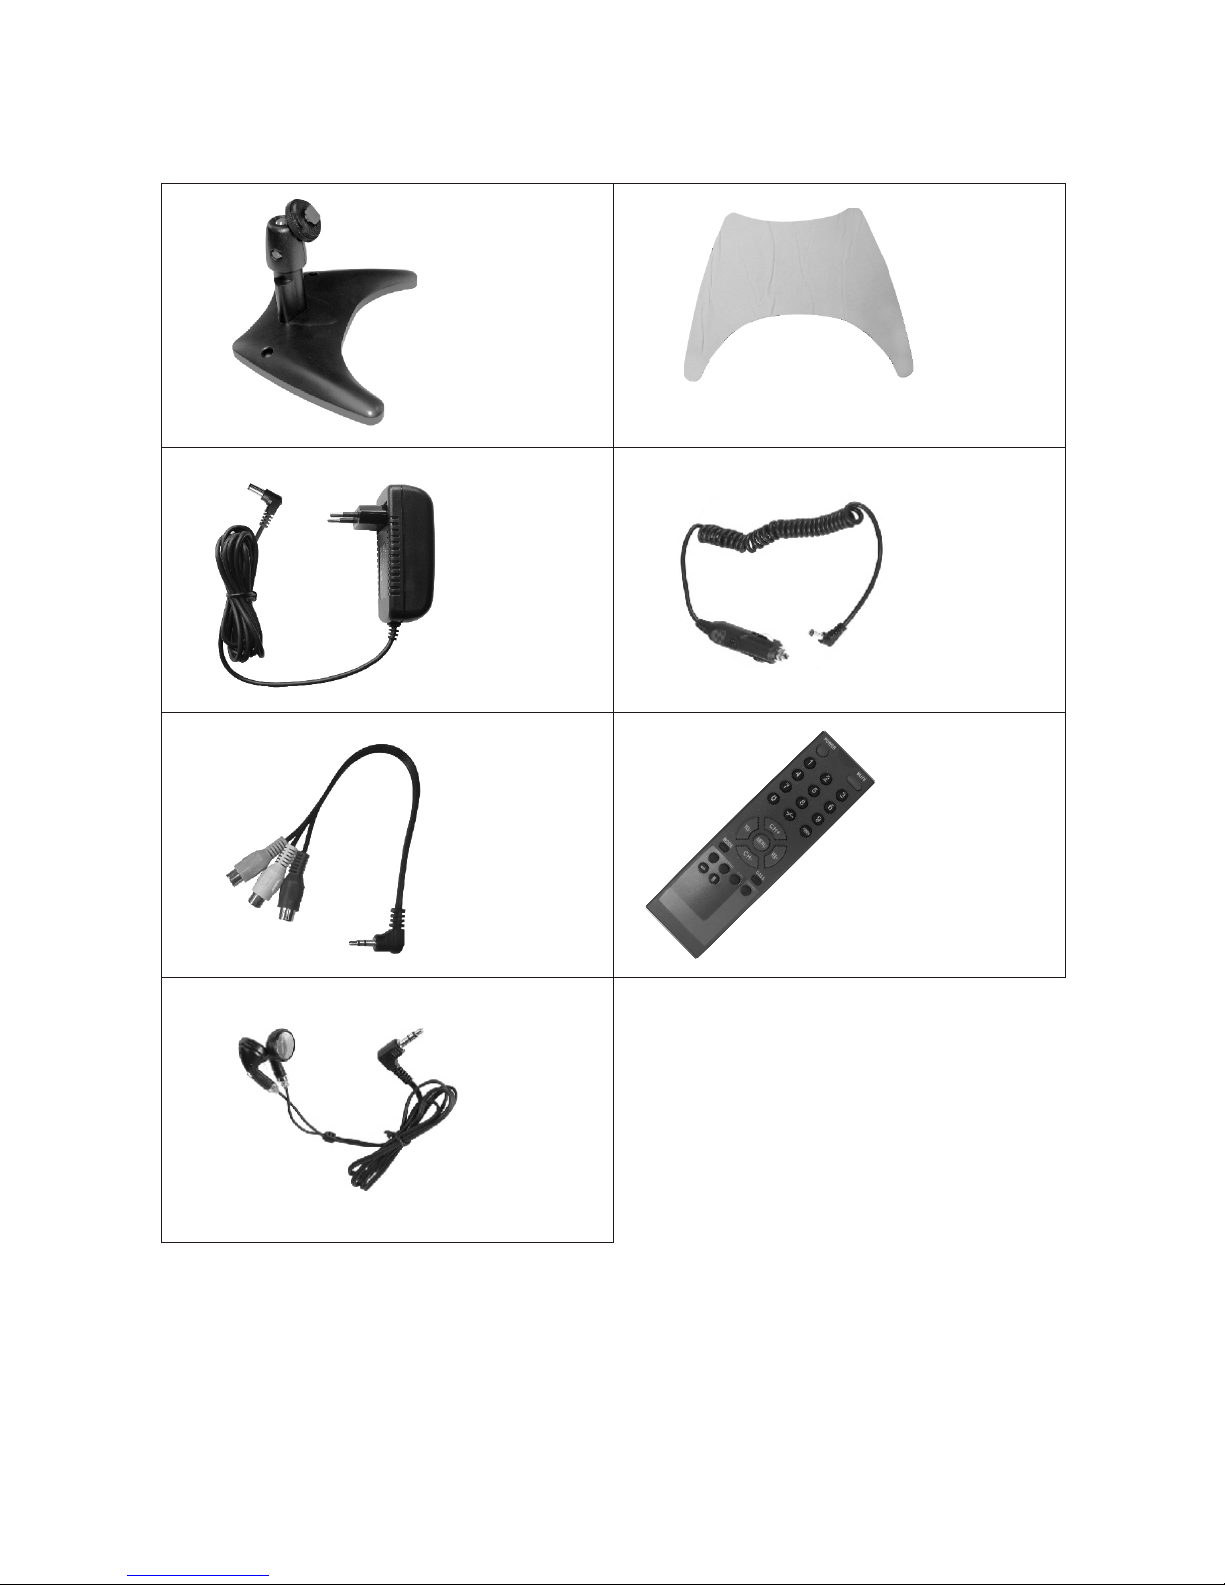
2 . Accessories
Base support
AC adapter
Earphone
Double-side adhesive
tape for base support
Car adapter
-3-
Remote Control
AV Signal Cable
Page 6
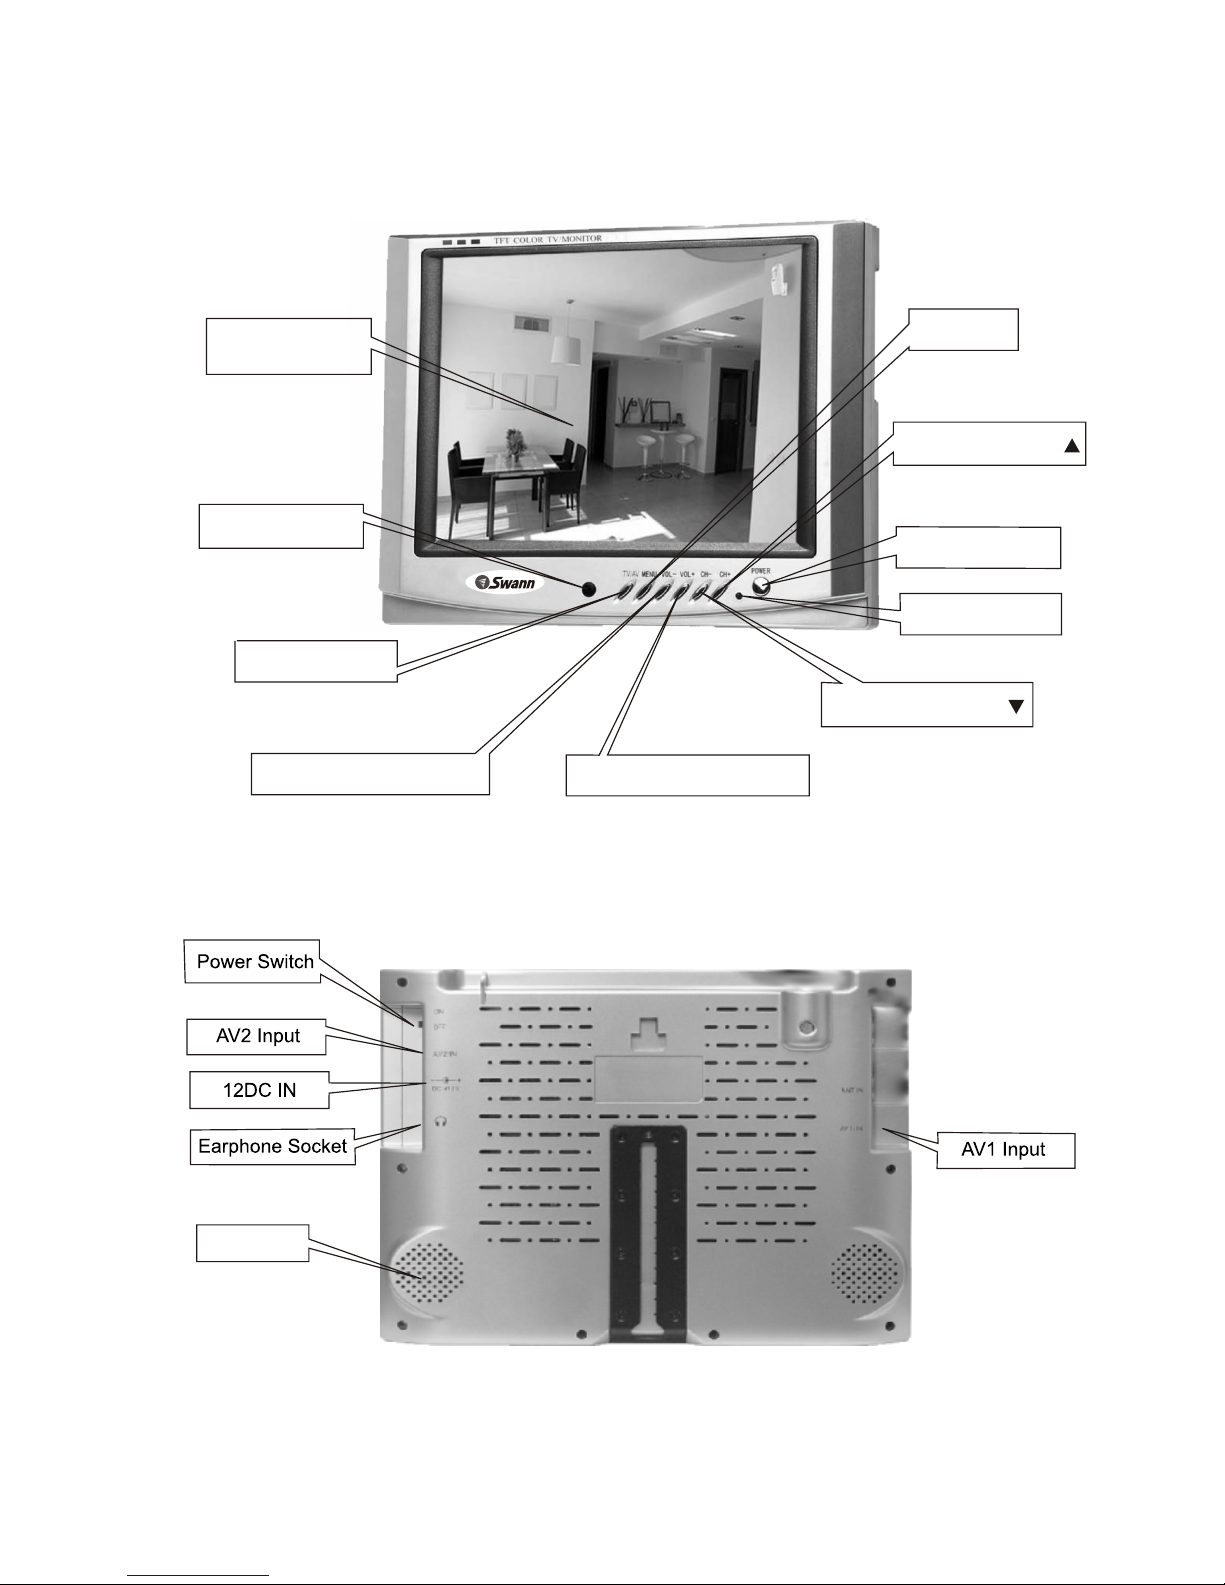
3. Appearance
Channel +/selection
Power ON/OFF
Power indicator
Channel - /selection
Menu
Volume-/ selection -
Volume +/ selection+
TFT-LCD screen
Remote receiving
window
AV / TV Shift
Loudspeaker
-4-
(TV Tuner Optional)
Page 7

4. Remote Controller Operation
Mute
Channel Selection
Timer
Channel keys
Channel Shift
Horizontal
Power ON/OFF
Exit Game
Menu
Call
Return
Language
Calendar
AV / TV Shift
Vertical
Caution
!
1. Please align the remote control with the infrared-receiving
window on monitor in operation.
2.
Never mishandle, drop, saturate, or disassemble the remote
control.
.
3. Never press any button continuously and swiftly. Operation interval is at
least 2 seconds.
4.Press Power to turn on the machine before pressing CH+, Ch-
for channel selection. (TV Tuner Optional)
Channel keys (digit keys 0-9 and -/--): there are 0~255 in total of 256
channels available on the remote control for your option by the 11 buttons
of 0-9 and -/-- on the remote control. when the channel is a one-digit gure,
just press the corresponding digit key. If the channel is a two-digit gure, you
should press -/-- rst to show -- on the display screen before further pressing
the corresponding digit keys. (TV Tuner Optional)
-5-
(TV Tuner Optional)
Volume Adjust
Display Mode
Page 8

CH /
Pr ess C H , the number of T V c hannel increases.
Pr ess C H , the number of T V c hannel decreases.
VO L - / + (Volume adjust)
Pr ess VO L - , th e volume of TV se t decreases.
Pr ess V OL + , the volume of TV se t increases.
M OD E ( M ode):
By pressing this button, users can alternate between ve picture modes
of Standard, Soft, Vivid, Light and Personal.
PO W ER (P ower swi tch):
Press this button is to turn o the monitor, Press it again is to turn on
the machine. Pr ess this button in game status is to exi t game.
M EN U( Menu button):P(ress this button to display the following ve
submenu s: PICTURE, OPTION, CLOCK , SYSTEM and PRESET.
M UT E ( M ute):
Press this button to mute sound competely, press it again or VOL+ / VOL-
to resume normal sound.
CA LL ( Call) :
Press this button to display the character of program currently
watching.
TI M ER :
Tim e se tup of sleep o, i t is used to set the time off within 120 minutes.
LA NG :
Press this button to switch between eight languages of English, Russian,
Chinese, Italian, Spanish, Portuguese, German and Arabic.
CA LE :
Press this button to show Year, Month, Day and Week. Press CH- / CH+ to
adjust the Year, press VOL- / VOL+ to adjust the Month.
(AV / TV shift):
TV Tuner optional for this model.
Press this button to switch between AV the input channel and TV channels.
Pr ess this button can return to previous channel, press it again
returns
to
current channel.
: Press this button to ip the picture horizontally, press is again to
resume image.
: Press this button to ip the picture vertically, press it again to resume
image.
-6-
(Channel Selection): TV Tuner optional for this model.
(Return): TV Tuner optional for this model.
AV:
Page 9

5. Basic Operation Methods
Basic interface connection
5.1 Installation Method of Base Support:
Align the screw bolts of base support with
the hardware pieces on bottom rear of the
monitor cover, rotate in clockwise direction
till the monitor is xed on the support.
5.2 Connection Method of Power Supply:
Align the power plug of the AC adapter
with the socket jack marked with DC 12V
on the machine cover.
5.3 Connection Method of External
Antenna Conversion Line:
Align one end of the attached antenna
cord with the antenna jack on monitor
and connect the other end with the plug
of the external antenna.
-7-
(TV Tuner optional for this model)
(TV Tuner Optional
for this model)
Page 10

5.4 Connection Method of Earphone:
Align the earphone plug with the earphone
jack on the monitor, and just push in.
Caution
!
If earphone is used, the sound only transmit through the earphone, no
sound will ouput from the monitor.
Caution
!
5.5 Connection
Method of AV Input:
Insert the AV Signal Cable into
the AV Input Sockets, then plug
in your camera video signal into
the AV Signal Cable.
Basic operation methods of TV set:
1. Connect with power supply and turn
on the power switch.
2. Pull out telescopic antenna.
3. Press Channel Selection to choose the desired channel.
4. Tune the TV signal and adjust the sound volume of the TV.
Volume
decreases
Power ON/OFF
Change in the
order of 3, 2, 1,
Change in the
order of 1, 2, 3,
Volume
increases
AV / TV Shift
Remote
receiving
window
Power
indicator
Menu
-8-
(TV Tuner optional for this model)
Page 11

6. Menu Operation
Press MENU to display options as follows:
PICTURE
SYSTEM
OPTION
CLOCK
PRESET
Picture
Contrast
Bright
Color
Sharp
80
80
60
50
CH / CH Select VOL + / VOL - : Adjust
6.1 Picture
Contrast, Bright, Color, Sharp and TINT displays on the screen
as illustrated below:
Press CH+ or CH- to select the item contrast. Press VOL+ or VOL- to adjust
analog quantity of Contrast. Press CH+ or CH- in turn to select Bright, Color
and Sharp, and can also adjust the analog quantity of Bright, Color and Sharp.
The TINT option will only be displayed when the TV is in NTSC
mode.
6.2 Option
Language,Calendar and Game displays on the screen as illustrated
below:
Press CH- or CH+ to select Language:
80
Select
Adjust
Option
Language
Calendar
Game
English
Select
Adjust
Note:
CH / CH Select VOL + / VOL - : Adjust
-9-
Page 12

Then press VOL- or VOL+ to select a language between English,
German, French, Spanish, Italian, and Russian.
Press CH- or CH+ to select the item Game, press VOL- or VOL+ to enter
Game.
Press VOL+ to move right, VOL- to move left, CH- to move down, CH+ to
rotate, press Power to exit the game.
CLOCK
Time
On-time
O-time
CH-time
Attention
Position
Time,On-time,O-time,Attention,CH-time and Position displays on
the screen illustrated as blow:
6.3 C L O C K
- - : - -
- - : - -
- - : - -
- - : - -
- - : - -
Select
Adjust
VOL-Adjust hour VOL+ Adjust minute CH- / CH+ Select items to
be setup Press VOL-/VOL+ to set up clock, then press CH- / CH+
to choose ON Time.
-10-
Notes:
Before adjusting other items, time must be set first. And setup On
Time for all items is 24 hours at the most.
Press VOL-/VOL+ setup ON Time, press CH-/CH+ to choose CH- Time.
Upon setup, press CH-/CH+ again to choose Position, and press
VOL-/VOL+ to adjust till the channel number of desired program, and
then you can save your desired program*
Press VOL- or VOL+ adjust calendar, then press CH- / CH+ adjust year,
press VOL- / VOL+ adjust month.
Press CH- or CH+ to select the item Calendar.
Page 13

Color System, Sound System, Blue back,Horizontal, and Vertical
displays on the screen as illustrated below:
6.4 System
System
Color System
Sound System
Vertical
Horizontal
AUTO
6.5M
Select
Adjust
Blue back ON
-11-
Notes: 1. Notes on Sound System: 5.5M means B/G, 6.0M stands for
I, and 6.5M is D/K(L), please set the Sound System at local
one.
2. In case with picture while without sound or with noise,
please check the Sound System for correct setup rst.
Press CH - /CH + to select Color system:
Then press VOL- or VOL+ to revolve the screen in the order of
PAL , NTSC or PAL, SECAM. Please choose carefully this system
correctly. Otherwise, it may cause visual errors or inferior color.
CH- / CH+ to select, VOL + / VOL - to Adjust
Then press VOL+, the Sound System displays in the order of DK, I, BG, L.
Press CH- or CH+ to select the item Blue back:
CH- / CH+ to Select, VOL + / VOL - to Adjust
Press CH- or CH+ to select the item Horizontal:
Press VOL - / VOL + can realize horizontal ip, press again to resume
the picture.
Press CH- or CH+ to select the item Vertical:
Press VOL - / VOL + can realize vertical ip, press again to resume
the picture.
Page 14

Position, Remember, Band, Swap, Fine, Search, and Auto Search
will display on the screen as illustrated below:
6.5 Preset
-12-
Press CH- / CH+ to select Remember.
Preset
Position
Remember
Band
Swap
Fine
Search
Auto search
1
ON
V-L
1
Select
Adjust
Press VOL- or VOL+ to choose ON under the item Remember, it then
displays this channel upon changing program. In O, it doesn't display the
Channel Number.
Press CH - / CH + to select Auto Search:
( TV Tuner optional for this model)
Preset
Position
Remember
Band
Swap
Fine
Search
Auto search
1
ON
V-L
1
Select
Adjust
Press VOL- or VOL+ to start Auto Search, and put into automatic
memory and storage upon completion of Auto Search. Choose
channel in order of V-L→V-H→UHF, and return to Program No. 0
upon completion.
Page 15

-13-
7. Before you request repairs
Issues below do not necessarily mean a failure of the monitor.
Please try the following solutions before you request a repair.
Phenomena
Possible Causes
No picture, no sound
No image
No sound
Dark picture
Achromatic or
ashing color
Upside down or
lateral inverted
picture
Improper connection with AC adapter or car
adapter. Use of unauthorized power supply.
Power Switch is on OFF position.
Check the correct Channel is selected.
Automatically set up the Receiving
Channel again. Any new location is
subject to re-setup of channels.
Ensure the sound is turned up and the
Sound System is correct. Check the
earphone plugged in. Whether ERASE
functions under too weak signal.
Whether brightness and contrast adjusted
correctly; Whether environment
temperature too low.
Whether color adjusted well, possible error in
color settings, poor signal strength.
Improperly adjusted Horizontal or Vertical
in the remote control.
Page 16

-14-
8. T echnical Parameters
Product Name: LCD Color monitor
Display Device: Color TFT -LCD
Sound System: DK; I; BG; L; M
Screen Size: 8 inches
Audio Output: 0.3W (Max)
Loudspeaker: two 32mm round loud speakers
Connecting T erminal: Earphone jack, Audio / Video (AV) input jack,
External power supply jack.
Applicable Power Supply: Two options:
1.AC Power supply AC adapter
2.Automobile storage battery (12V) Automobile adapter
Power Consumption: about 10W
Outer Dimension: W 222mm H 172mm T 41mm
Weight: about 765g
Resolution: 1440 (H) 468 (V)
Response Speed (ms): R: 10 / F:20
Visible Angle: U: 40 / D: 60 R / L : 60
2
Brightness: 300cd/m
Contrast: 350:1
Page 17

-15-
!
Warning
This operation instruction is only intended for reference. No further notice
is available to any modication of all information contained therein. Due to
continuing improvements, the features and design are subject to change
without notice.
No repairable components exist in the machine. Do not try to
dismantle or alter the monitor, the high voltage in the monitor
may result in injury or death. Maintenance and adjustment of the
monitor is subject to professionals only.
!
Notes
 Loading...