

Page 1
CAPTURE
ACCIDENTS &
INCIDENTS ON
THE ROAD
TR ACK EX ACT
MOV EMENTS &
LOCATIONS
FULL
HD
EN
Instruction Manual
READ ME
FIRST
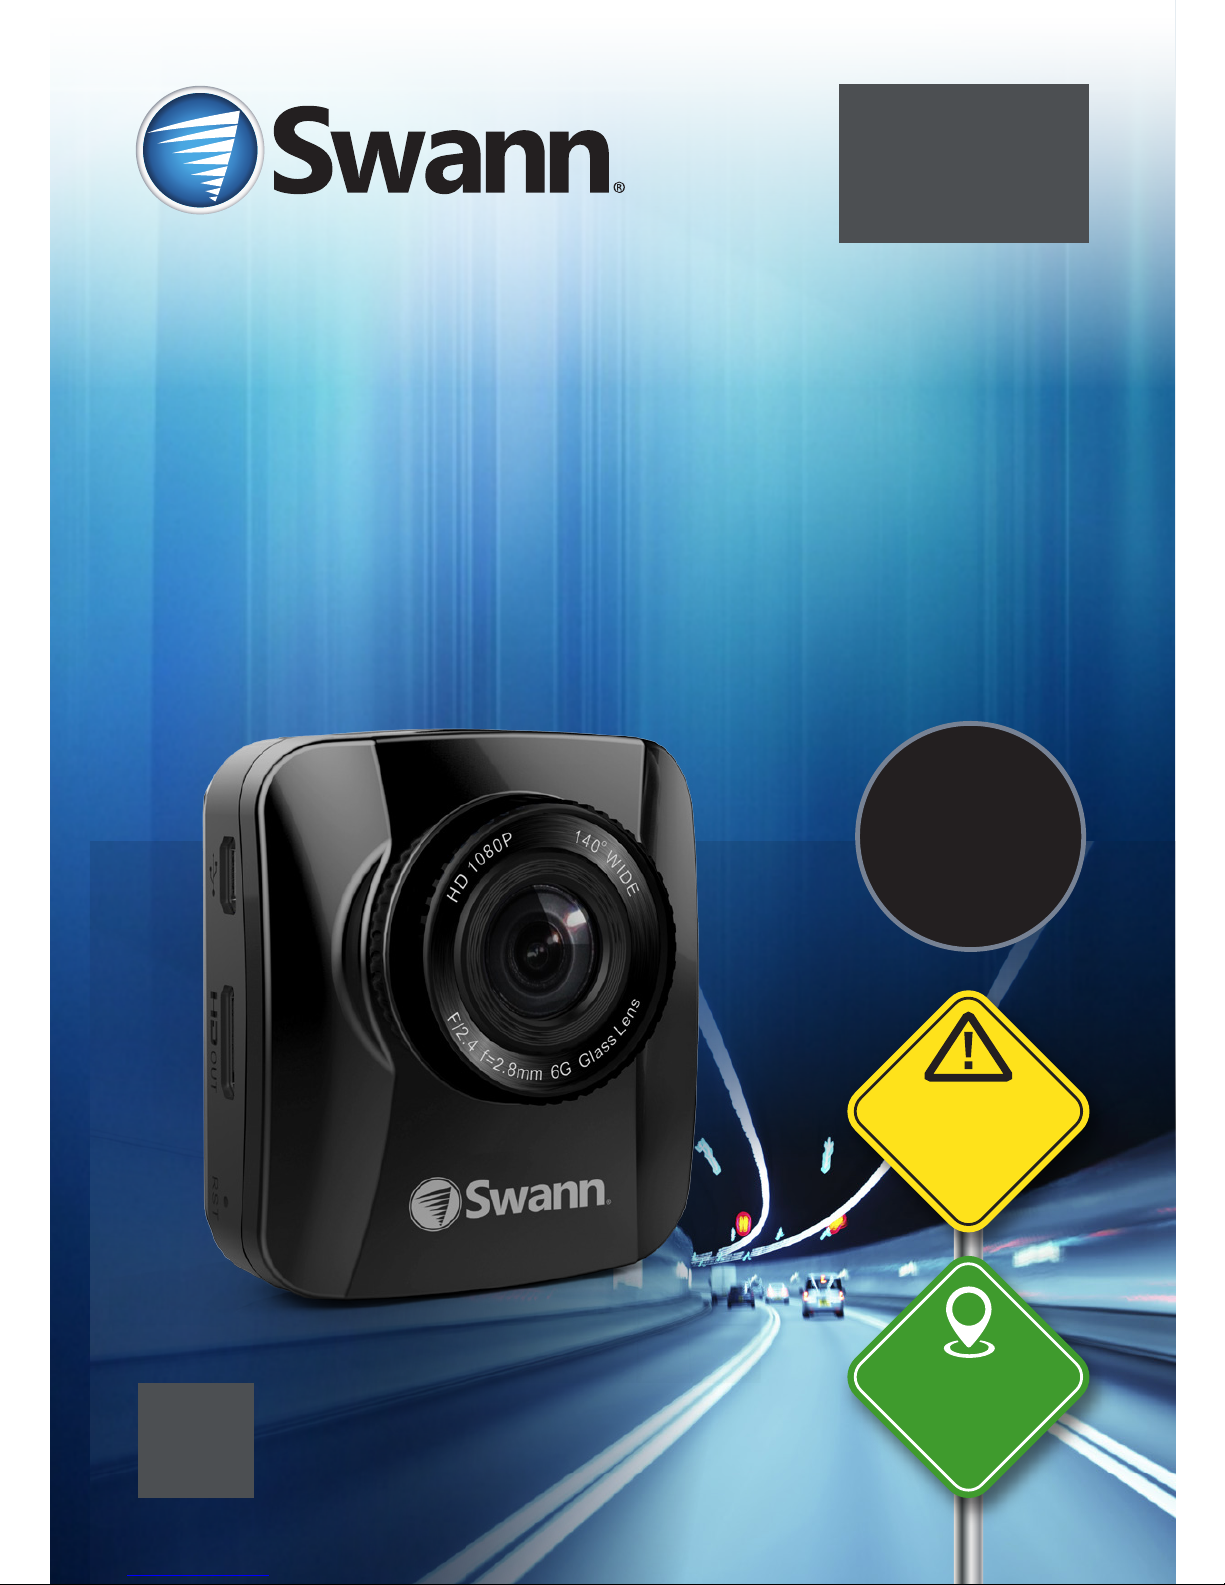
Navigator HD
Dash Camera
Portable Vehicle Recorder with GPS Tracking
Page 2

About this Manual
FCC Statement
Disposal and Recycling Information
The content in this manual is for information purposes only and is subject to
change without notice. While every effort is made to ensure that this manual
is accurate and complete at the time of printing, no liability is assumed for
any errors and omissions that may have occurred. As we’re constantly making
improvements to our products, firmware, software and user manuals, we reserve
the right to change the information without prior notice. For the latest version of
this user manual, please visit: www.swann.com
This equipment has been tested and found to comply with the limits for Class B
digital device, pursuant to part 15 of the FCC Rules. These limits are designed
to provide reasonable protection against harmful interference in a residential
installation. This equipment generates, uses and can radiate radio frequency
energy and, if not installed and used in accordance with the instructions, may
cause harmful interference to radio or television reception, which can be
determined by turning the equipment off and on, the user is encouraged to try to
correct the interference by one or more of the following measures:
• Reorient or relocate the receiving antenna
• Increase the separation between the equipment and the receiver
• Connect the equipment into an outlet on a circuit different from that to
which the receiver is connected
• Consult the dealer or an experienced radio/TV technician for help
This device complies with part 15 of the FCC Rules. Operation is subject to the
following two conditions: (1) This device may not cause harmful interference, and
(2) This device must accept any interference received, including interference that
may cause undesired operation.
FCC Caution: Any changes or modifications not expressly approved by the
party responsible for compliance could void the user's authority to operate this
equipment.
This symbol on the product or on the packaging indicates that this can
not be disposed of as a household waste. You must dispose of your waste
equipment and/or battery by handling it over to the applicable take-back
scheme for the recycling of electrical and electronic equipment and/or
battery. For more information about recycling of this equipment and/or
battery, please contact your city office, the shop where you purchased
the equipment or your household waste disposal service. The recycling
of materials will help to conserve natural resources and ensure that it is
recycled in a manner that protects human health and environment.
2
Page 3

CE Regulatory Notice
Important Safety Notice
This equipment complies with the requirements set out in the Council Directives
on the Approximation of the Laws of the Member States relating Electromagnetic
Compatibility of Radio and Telecom device (1995/5/EC); the Low Voltage Directive
(2006/95/EC); the Restriction of The Use of Certain Hazardous Substances
in Electrical And Electronic Equipment Directive (2002/95/EC), Turkish EEE
Directive; the Commission Regulation (EC) No 1275/2008 implementing Directive
2005/32/EC of the European Parliament and of the Council with regard to ecodesign requirements for standby and off mode electric power consumption of
electrical and electronic household and office equipment, and the Directive
2009/125/EC of the European parliament and of the council establishing a
framework for the setting of eco-design requirements for energy-related
products.
• Use the authorized charger only.
• Never attempt to disassemble or repair of this device. Doing so may
damage the device, cause electric shock and void your warranty.
• Never short-circuit the battery.
• Set up time and date accurately before you use this device.
• Exposing the device to open flames can cause explosion.
• Due to local laws and vehicles safety considerations, do not manually
operate the device while driving.
• The results of GPS positioning are only for reference, and should not
affect the actual driving situation. This feature cannot ensure the location
accuracy.
• GPS location accuracy may differ depending on weather and location such
as high buildings, tunnels, undergrounds, or forests. GPS satellite signals
cannot pass through solid materials (except glass). Tinted window may
affect the performance of the GPS satellite reception.
• The values displayed in this system, such as speed, position, and the
distance warning to the speed camera set points, may be inaccurate due to
the influence of surrounding environment. They are for your reference only.
• Swann is NOT responsible for the loss of any data/content during operation.
3
Page 4

4
GETTING STARTED
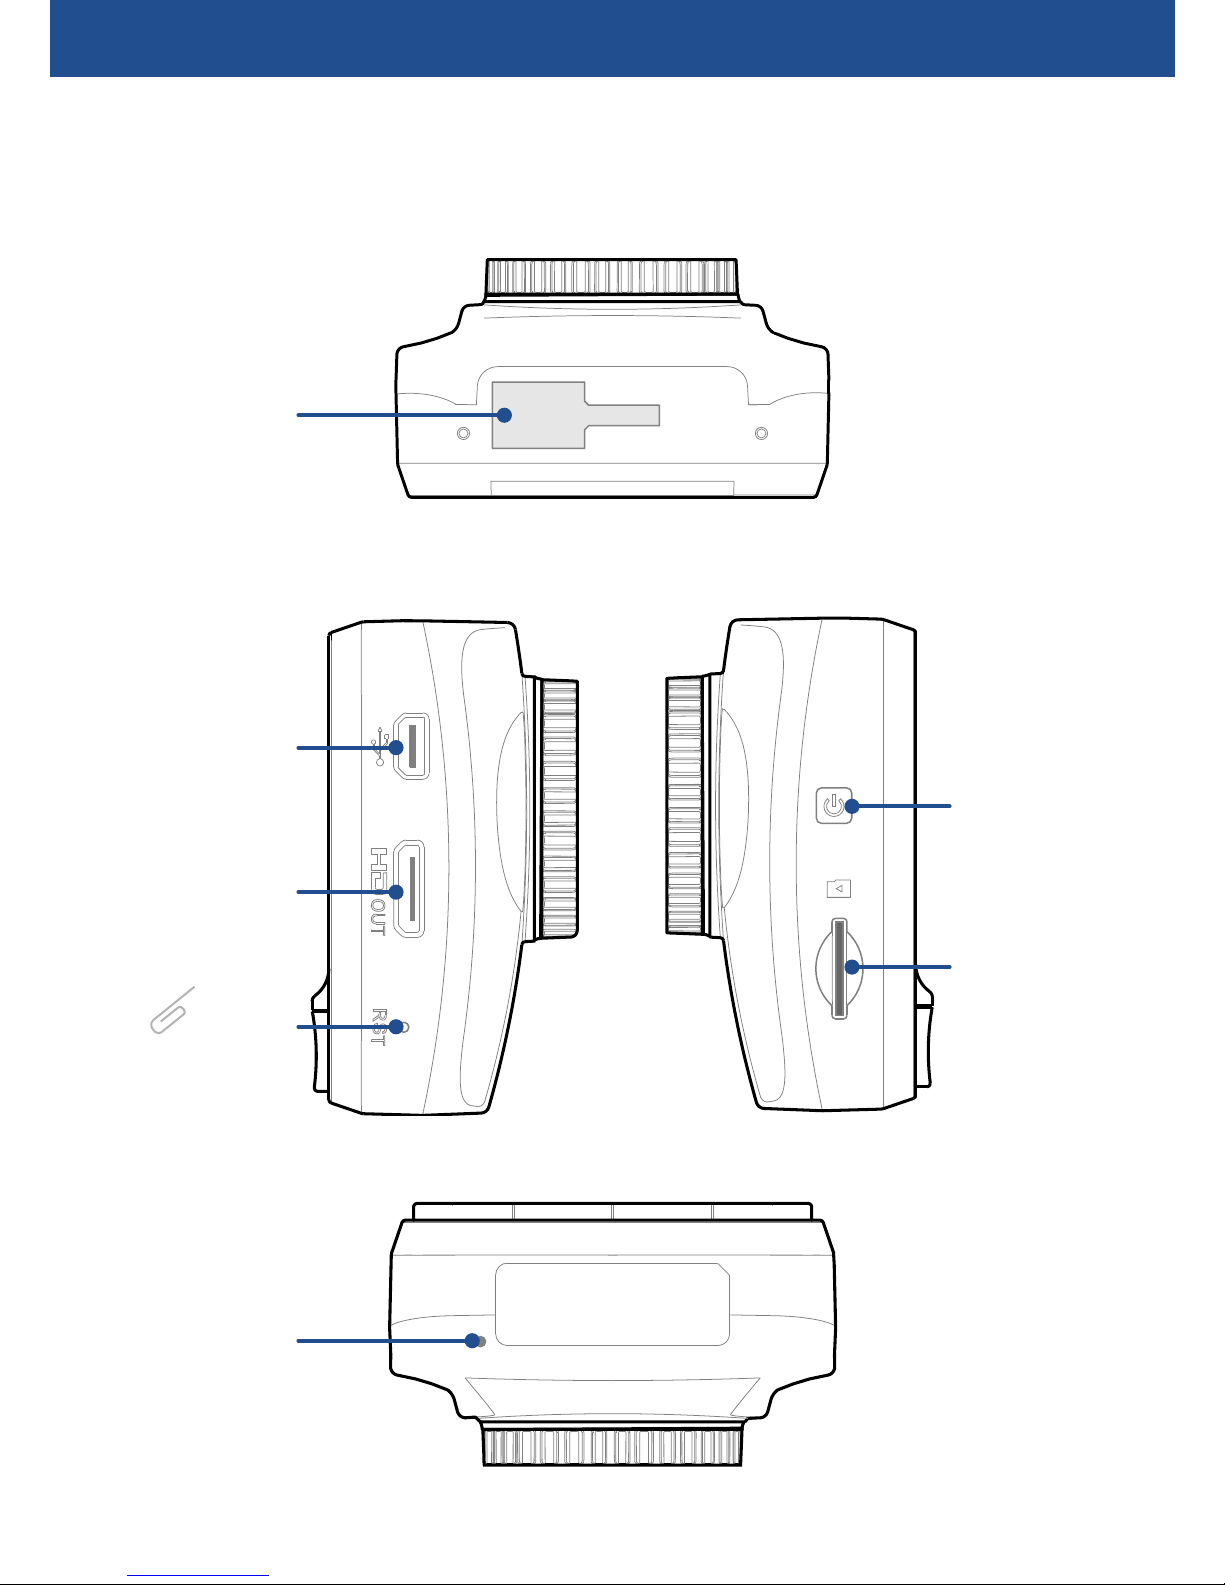
Camera Lens
LED Indicator
Function Buttons
Use these buttons to perform
operations corresponding to the icons
displayed on the bottom of the screen
Speaker
Display
Camera Overview
Yellow = charging
Red = recording
Page 5
5
Power
Button
microSD
Card Slot
Mini USB
Port
Bracket Slot
Microphone
Mini HDMI
Port
Reboot
Button
GETTING STARTED
Page 6
6
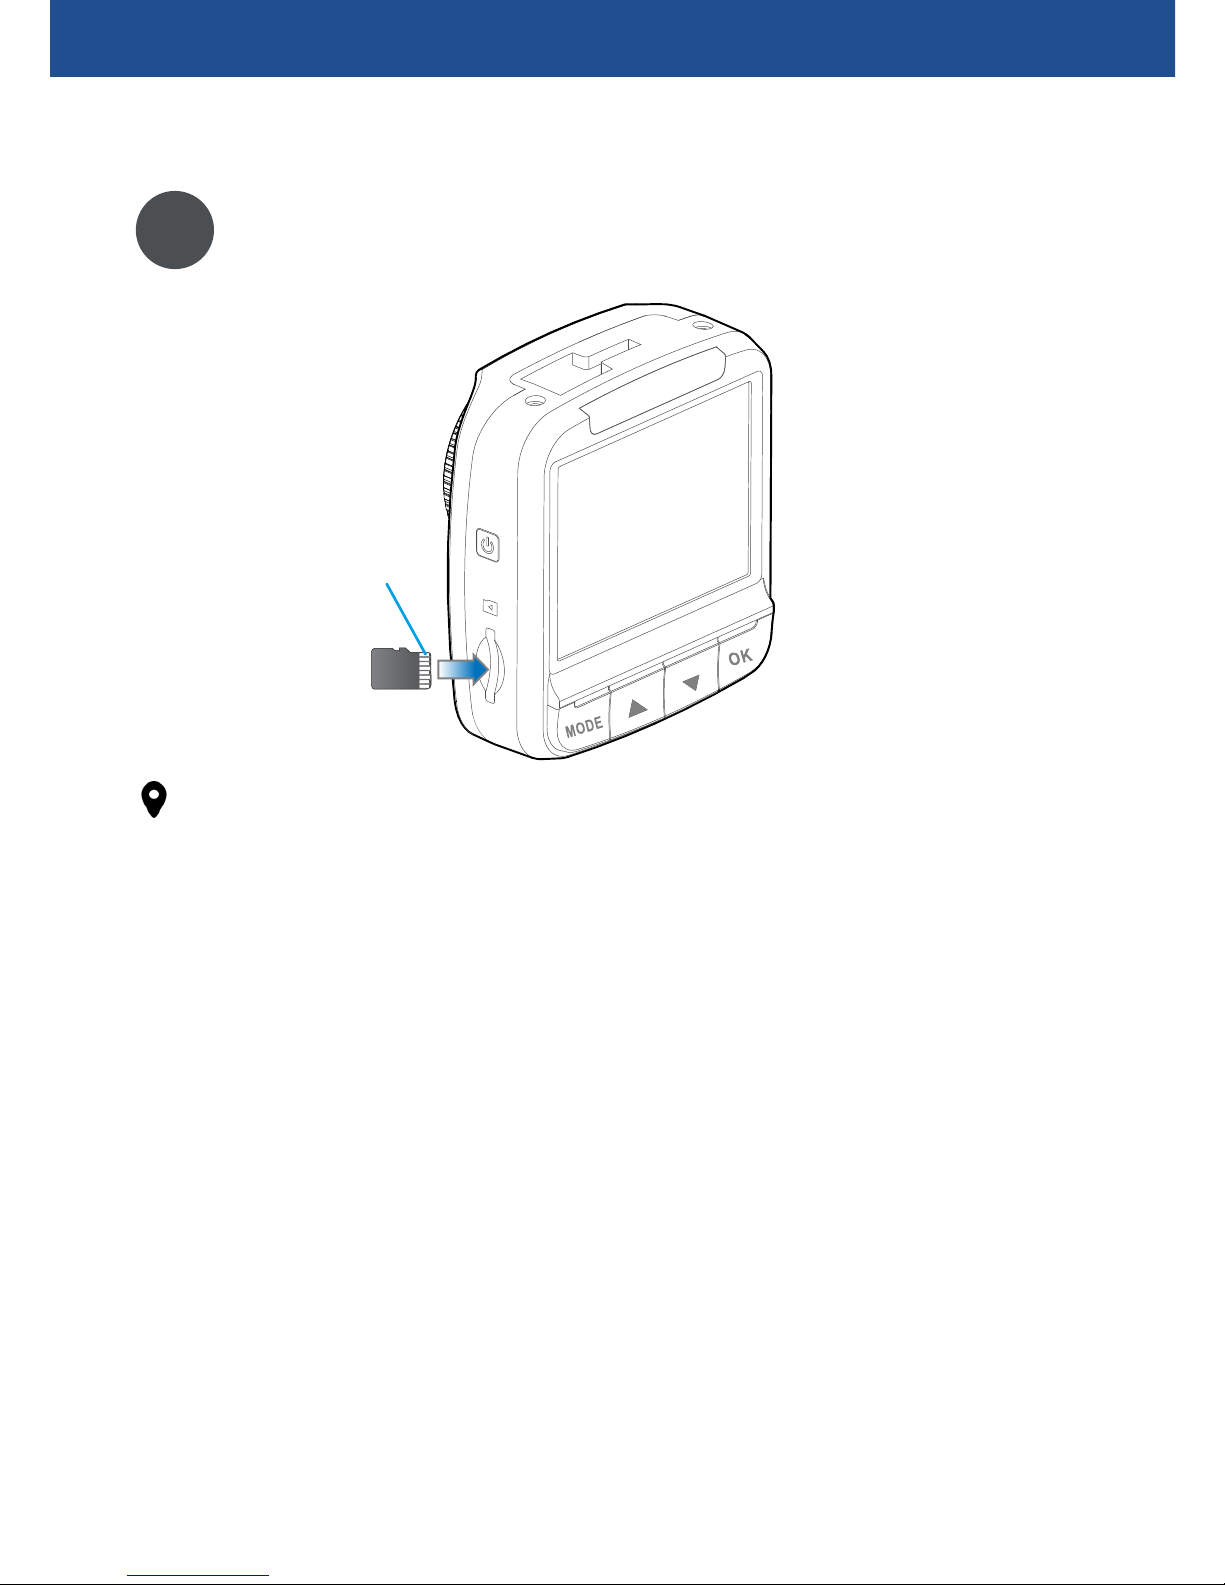
Insert a microSD memory card
1
Contacts
Notes
• Do not remove or insert the microSD card when your camera
is powered on. This may damage the card.
• Your camera supports microSD cards of up to 32GB in
capacity. To ensure smooth performance and plenty of room
for recording long journeys, we recommend using a memory
card rated class 6 or above, with at least 8GB in capacity.
• We do not guarantee compatibility with microSD cards from
all manufacturers. Only use good quality microSD cards
from reliable sources.
• You should format the microSD card before first using it with
your camera. Go to Settings screen > Device tab > Format
Card.
• When you format a microSD card, all data on the card is
permanently deleted. Be sure to copy all data you want to
keep to another storage device before formatting the card.
Camera Setup
GETTING STARTED
Page 7
7
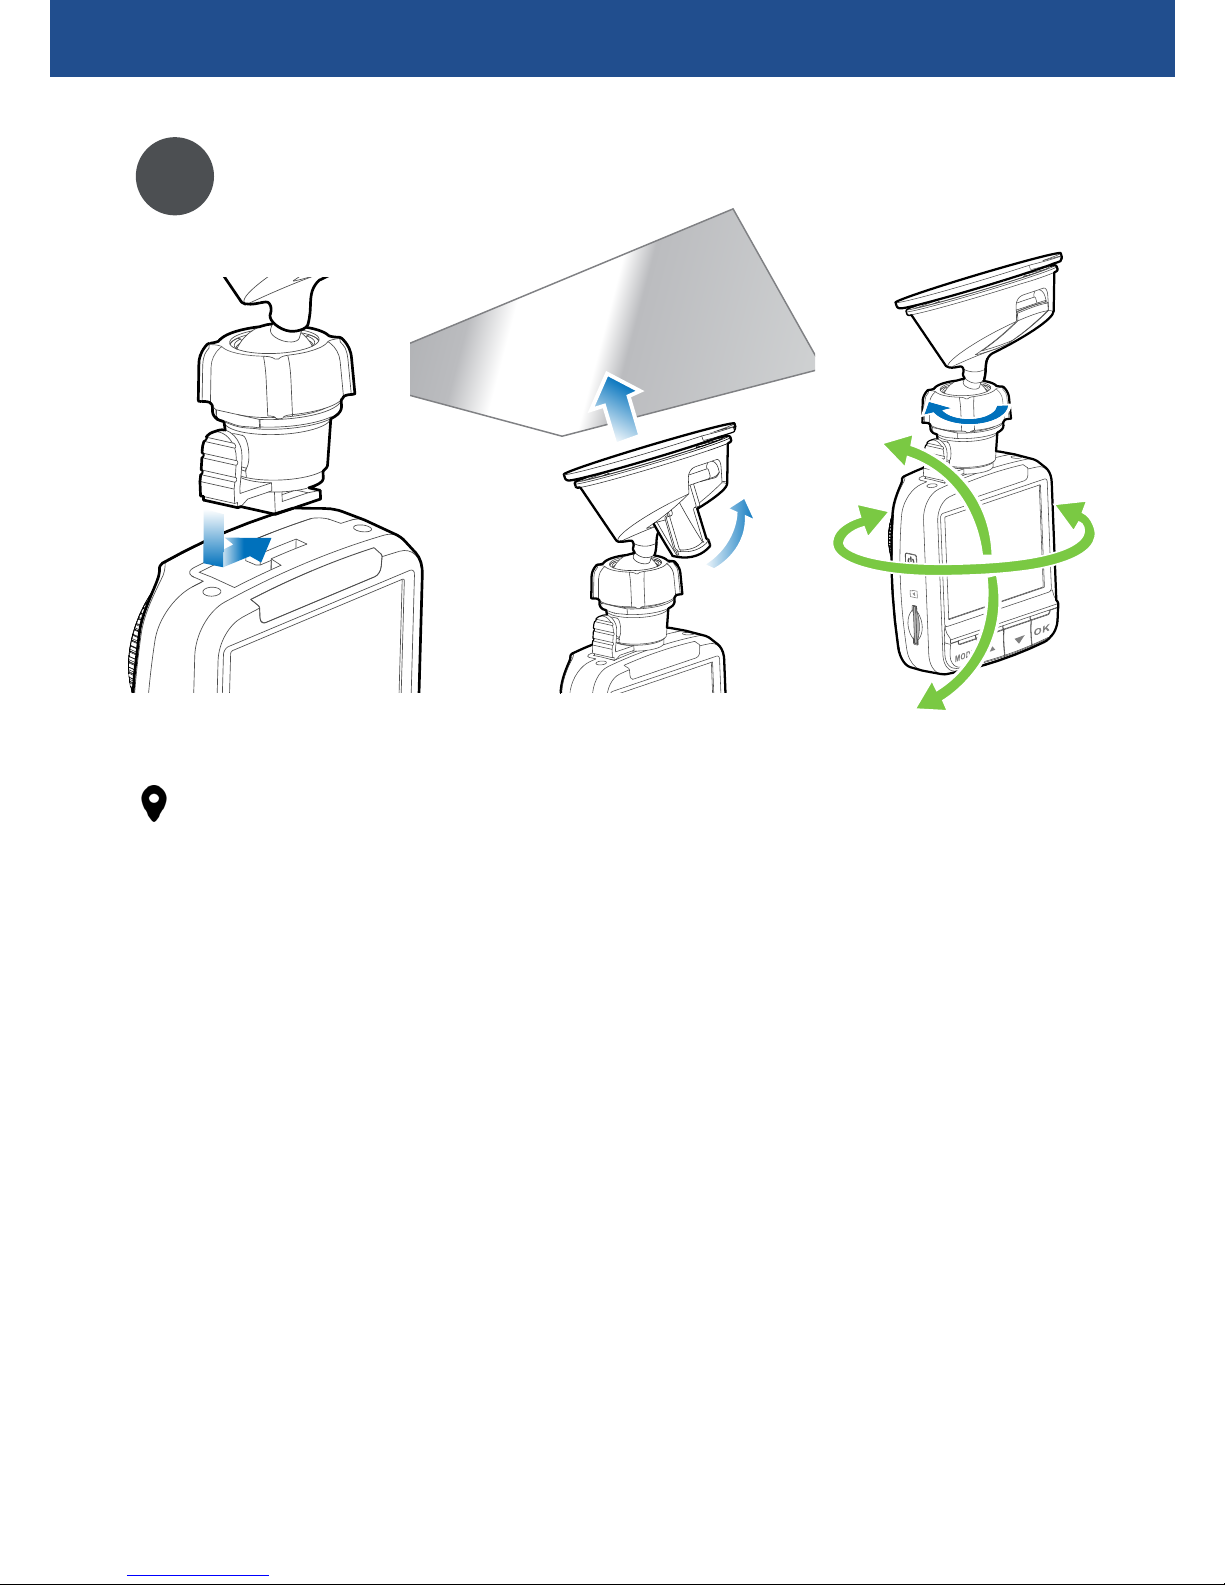
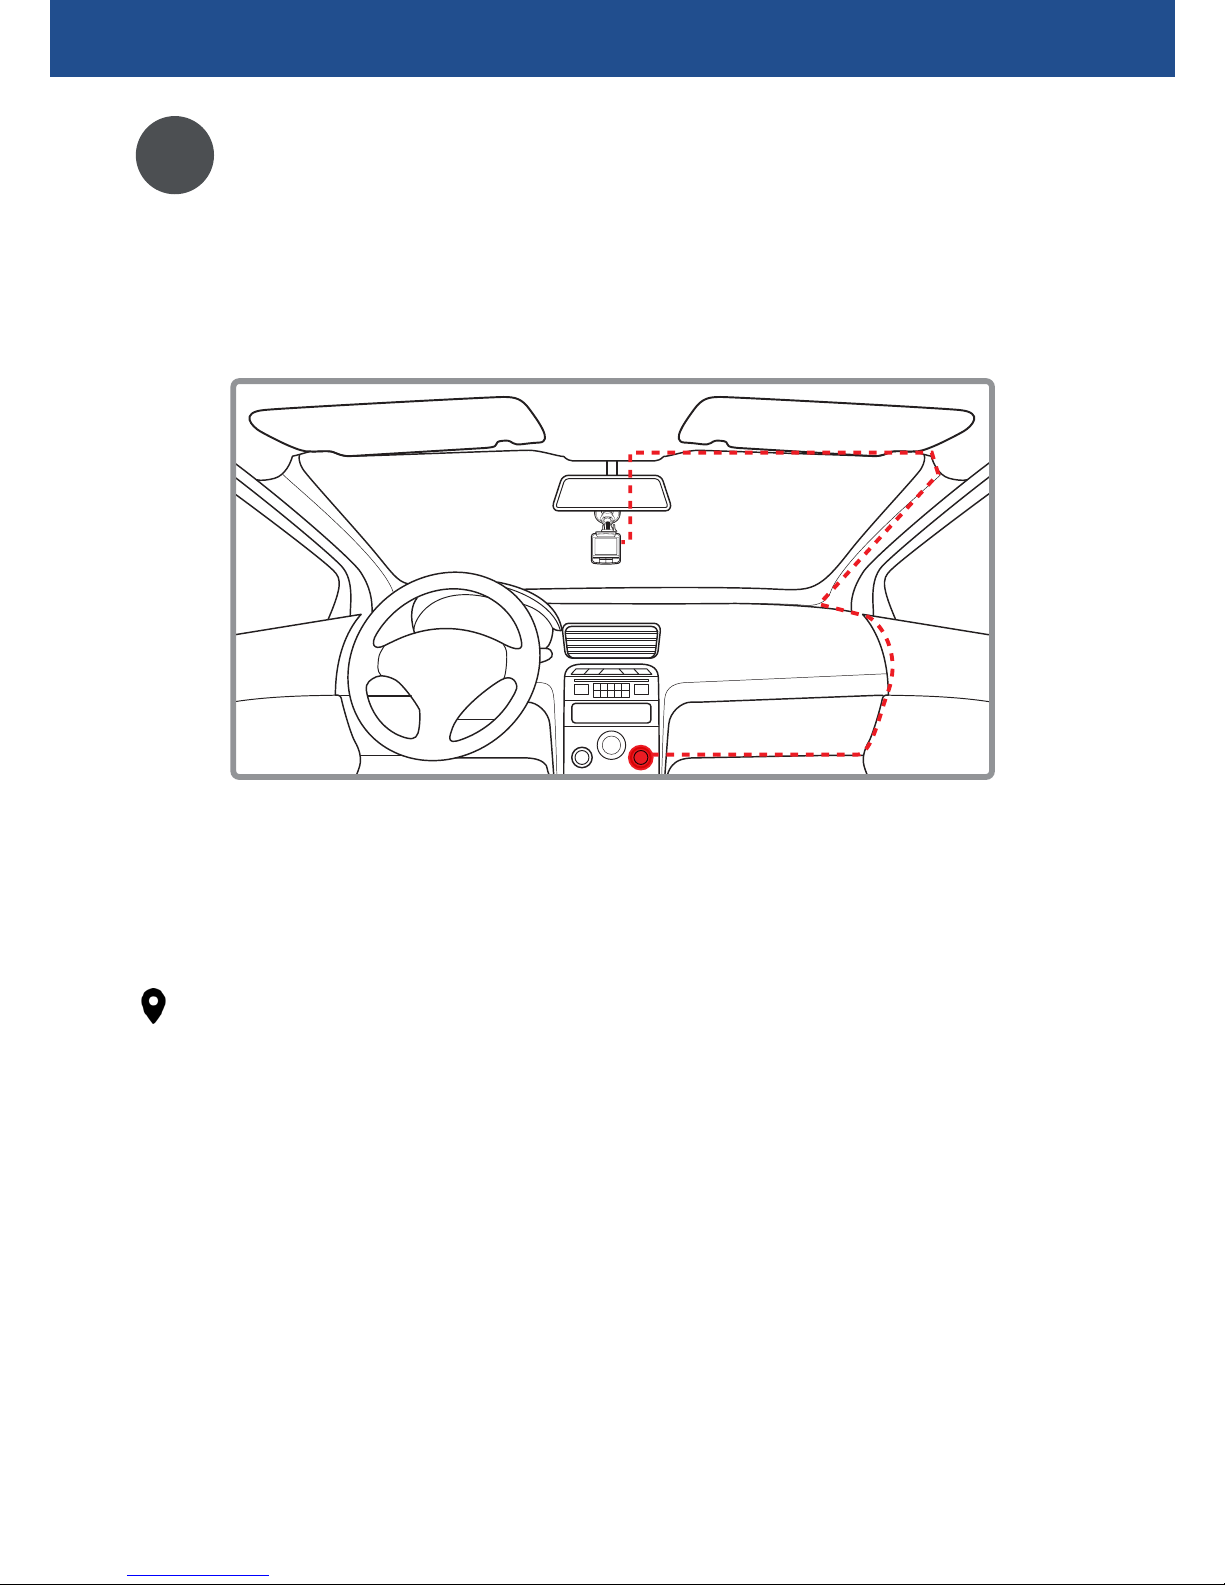
Mount to vehicle
2
Notes
• To obtain the best open-field view, install your camera above
the center of the dashboard near the rear-view mirror.
• Never install the camera in a location that will block your
view of the road, interfere with the mirror or controls, or
obstruct the airbag.
• Clean the windshield area where you will be mounting your
camera with an alcohol/cleaning wipe before attaching the
suction cup mount.
• Be sure to peel off the protective film from the suction cup.
• Do not touch the camera lens with your fingers. Finger
grease may be left on the lens and will result in unclear
videos or snapshots. Clean the lens on a regular basis.
• When adjusting viewing angle, aim your camera slightly
towards the ground with less sky in view to reduce lens glare
when your vehicle is facing the sun.
Getting Started
GETTING STARTED
Page 8
8
Connect to power
3
Plug the USB power adapter into the cigarette lighter socket
in your vehicle, and then connect to the mini USB port on
your camera using the 4 meter USB charging cable.
Your camera turns on and off automatically with the start
and stop of your vehicle engine. See "Using your camera:
Turning on and off" on page 9.
Notes
• Some newer vehicles are equipped with accessory USB
power ports. If your vehicle has one available, you can
also use this to directly connect your camera with the USB
charging cable.
• Use cable clips (not included) to secure the USB charging
cable and keep it neatly tucked out of the way.
GETTING STARTED
Page 9

9
USING YOUR CAMERA
• Starting the engine will automatically turn on your camera
that is connected via the USB power adapter / port in your
vehicle.
• Your camera goes into Video mode and starts recording
immediately after it powers up. See "Video Mode" on page
10.
• Once you have reached your destination and the engine
stops, your camera will automatically save the recording
to the memory card and turn off after 10 seconds.
• Your camera can also be manually powered using its
built-in rechargeable battery. When your camera is not
connected to any power source, press the Power button to
turn it on. To manually turn the camera off, press and hold
the Power button for 2 seconds.
• Be sure to fully charge your camera first if you plan to
bring it out without the power supply. Your camera is
capable of recording up to approximately 15 minutes of HD
video on a fully charged battery.
Notes
• Before using your camera for the first time, be sure to set
the date and time. Go to Settings screen > Device tab >
Clock Settings. Having the correct date and time ensure
recorded events are properly time stamped for evidence.
Turning on and off
Page 10

10
• By default, your camera runs in loop recording mode
whereby it continuously records video clips in 5 minute
intervals and automatically overwrites the oldest, nonprotected video files for new recordings when the memory
card is full. The icon in the status bar indicates that
continuous loop recording mode is enabled.
• You can change the duration of each video clip or even
turn off loop recording completely. Go to Settings screen >
Video tab > Movie Clip Time.
• The
REC
icon appears in the status bar and the LED
indicator above the display turns solid red while recording
is in progress.
Video Mode
Recording videos
The Video Mode screen
The status bar at the top of
the screen instantly provides
you with information about
video resolution, available
recording time, GPS
connectivity, active features,
and memory card & battery
status.
USING YOUR CAMERA
Your camera automatically starts capturing HD (High-Definition)
quality videos onces it powers up in your vehicle.
Page 11

11
• You can take a snapshot without interrupting the video
recording by pressing . You can view your snapshots on
the Photo Album screen in Photo mode - see page 14.
• You can manually stop an ongoing recording by pressing
. Check the time label icon in the status bar to see how
much recording time is available based on the current
video quality setting. To start a new recording, press .
• Motion Detection recording is available when your car
is parked. For more information on how to enable this
feature, see "Motion Detection" on page 19.
Protecting videos
• If you have just captured something important on the
camera and want to protect the relevant video clips, simply
press . The icon appears in the status bar. Your
camera locks the previous and current video clips of the
ongoing recording so they do not get overwritten.
• Your camera can also automatically detect collisions and
hard brakings using its integrated G-sensor, and activate
the function. To enable the G-sensor feature, go to
Settings screen > Video tab > Protect Level and select the
sensitivity level.
Audio recording
• By default, ambient sounds are recorded through the
camera's built-in microphone. You can turn off audio
recording by pressing . The icon appears in the status
bar when audio recording is disabled.
GPS connection
• The GPS icon turns green once a fix on your location is
established. The GPS works best when it has a clear view
of the sky to receive signals from the satelites.
USING YOUR CAMERA
Page 12

12
Viewing and managing videos
When your camera is on standby, press to display the Video
Playback screen. Thumbnails for your video clip recordings are
shown on the screen.
• To browse and select video clips, press or . Protected
video clips are displayed with the icon and have the
label "SOS" appended to the filename.
• To play a video clip, press . During playback, you can
adjust the volume by pressing or , and pause the
video by pressing .
• To manage your video clips, first select a video clip and
then press and hold until the File Management screen
appears. Press OK to access the menu. You can do the
following from the File Management menu:
USING YOUR CAMERA
To...
Delete the
selected video clip
Choose Delete One and press OK.
Protected video clips cannot be deleted.
Remove file protection from the video
clip first.
Delete all video
clips currently on
the memory card
Choose Delete All, press OK and then
confirm your choice by choosing Yes.
A notification is displayed if the
memory card contains any protected
clip. The notification will remain on the
screen until all unprotected clips have
been deleted. This can take up to a
minute.
Page 13

13
USING YOUR CAMERA
To...
Protect the
selected video
clip
Choose Protect One and press OK. The
icon appears on the selected video
clip thumbnail.
Protect all video
clips currently on
the memory card
Choose Protect All, press OK and
confirm your choice by choosing Yes.
The icon appears on all video clip
thumbnails.
Unprotect the
selected video
clip
Choose Unprotect One and press
OK. The icon is removed from the
selected video clip thumbnail.
Unprotect all
video clips
currently on the
memory card
Choose Unprotect All, press OK and
confirm your choice by choosing Yes.
The icon is removed from all the
video clip thumbnails.
• To return to the Video mode screen, press .
Note
• Deleted videos cannot be recovered. Copy important videos
to a computer or other storage device before deleting. See
"Connecting to a computer" on page 16.
Page 14

14
Photo Mode
Taking photos
To take a photo, simply press .
Viewing and managing photos
• To browse and view photos (you can also view photos taken
during a video recording), press . This displays the
Photo Album screen.
• To manage your photos, first select a photo and then press
and hold until the File Management screen appears.
Press OK to access the menu. You can do the following
from the File Management menu:
The Photo Mode screen
Icons tell you about picture
resolution, number of images
remaining and memory card &
battery status.
In addition to HD video recording, you can use your camera to
capture super clear photos wherever you go.
USING YOUR CAMERA
When your camera is on standby, press to toggle to
Photo mode.
Page 15

15
To...
Delete the
selected photo
Choose Delete One and press OK.
Protected photos cannot be deleted.
Remove file protection from the photo first.
Delete all photos
currently on the
memory card
Choose Delete All, press OK and
confirm your choice by choosing Yes.
A notification is displayed if the memory
card contains any protected photo. The
notification will remain on the screen
until all unprotected photos have been
deleted. This can take up to a minute.
Protect the
selected photo
Choose Protect One and press OK. The
icon appears on the selected photo
thumbnail.
Protect all photos
currently on the
memory card
Choose Protect All, press OK and
confirm your choice by choosing Yes.
The icon appears on all photo
thumbnails.
Unprotect the
selected photo
Choose Unprotect One and press
OK. The icon is removed from the
selected photo thumbnail.
Unprotect all
photos currently
on the memory
card
Choose Unprotect All, press OK and
confirm your choice by choosing Yes.
The icon is removed from all the
photo thumbnails.
Note
• Deleted photos cannot be recovered. Copy important photos
to a computer or other storage device before deleting. See
"Connecting to a computer" on page 16.
• To return to the Photo mode screen, press .
USING YOUR CAMERA
Page 16

16
USING YOUR CAMERA
Connecting to a computer
Connecting to a TV
You can transfer your HD video recordings and photos on the
memory card to a computer. Use the short USB data cable
included with your camera to make the connection.
You can see your HD video recordings and photos on your HD
TV or monitor. Simply connect a compatible HDMI cable (not
included) from the HDMI port on your camera to the HDMI port
on your TV.
Notes
• The first time you use a USB connection, your computer will
install the appropriate USB drivers.
• The USB icon appears on the camera display once your
camera has successfully connected to your computer via the
USB data cable.
• Once connected, you can also use the Navigator GPS
software (see "Navigator GPS" on page 22) on your
computer to view your recordings and review any captured
GPS information.
Note
• Use a cable with a mini HDMI connector on one end for the
camera, and a standard HDMI connector on the other end
for your TV.
Page 17

17
CAMERA SETTINGS
You can customize video, photo and other various camera
settings via the Settings screen.
Press (when your camera is on standby) until the Settings
screen appears.
The Settings screen
Device settings
Video/Photo settings
The Settings screen is organized under two menu tabs:
• Video/Photo
• Device
Press or to select the menu you want to access, and then
press OK.
Page 18

18
Video/Photo Settings
The Video Settings menu contains the following options:
Options
Movie Mode Select the resolution of the video
recordings.
Still Image Size Select the resolution of the captured
photos. The higher the resolution, the
more detailed the captured photo.
Note: Higher resolution photos take up
more memory storage.
Exposure Change the exposure value to improve
image brightness in low light conditions.
Movie Clip Time Set the length of each video clip in loop
recording mode.
LCD Rotate Flip the camera display vertically. This is
useful if you intend to mount the camera
upside down.
Protect Level Customize the sensitivity level of the
G-sensor to automatically detect sudden
impact and activate the (Lock)
function to protect important video clips
from being overwritten. By default, the
G-sensor is disabled (Off).
Time Zone Select Select your time zone to automatically
receive accurate local time once GPS
connection is established.
CAMERA SETTINGS
Page 19

19
Options
Motion Detection Select the motion detection sensitivity
to enable the camera's motion detection
feature. This feature is handy when you
want to keep your vehicle protected when
it's parked.
To start Motion Detection recording,
simply press and hold the OK button when
your camera is on standby in Video mode
until a 10-second countdown is initiated
on the screen. After the countdown ends,
the icon appears in the status bar.
Your camera will automatically record a
30-second video clip each time it detects
movement.
Note: For longer camera battery life,
we recommend enabling the LCD Power
Save setting in conjunction with Motion
Detection.
To end Motion Detection recording,
simply press and hold the OK button for 3
seconds. The icon disappears from the
status bar.
Stamp Speed Off Select the maximum speed limit to
automatically hide GPS speed and location
coordinates from the recording when this
speed limit has been exceeded.
CAMERA SETTINGS
Page 20

20
Device Settings
The Device Settings menu contains the following options:
Options
Car ID Enter your car license plate number. Your
Car ID will be displayed on the screen.
Driver Fatigue Turn this on to hear an audible warning
after 3 hours of continuous driving.
Car Lamp Open Turn this on to receive a visual and audible
alert to turn on your vehicle headlights
when operating the camera between 5pm
and 7am.
LCD Power Save Select the duration for the display to
automatically turn off after a period of
inactivity. If there is an ongoing recording,
it will continue in the background.
Pressing the Power button turns the
display on again.
Power Off Select the duration for your camera to
automatically shut down after a period of
inactivity.
TV System If you are outputting the camera display to
your TV via the HDMI port, you will need to
select the appropriate video standard (PAL
or NTSC).
Stamp Select whether to embed your Car ID or
the date, or both on the recordings.
CAMERA SETTINGS
Page 21

21
Options
GPS Stamp Select if your GPS position and speed
information is captured along with the
recordings. This is dependent on your
camera acquiring a GPS fix during your
journey.
Clock Settings Set the current date and time.
USB Function Select the appropriate USB mode when
using the USB data cable to connect to
your computer.
MSDC (default) - Lets you use your
camera as a USB mass storage device,
and transfer videos and photos from the
memory card folders to your computer.
PCam - Lets you use your camera as a
webcam.
Format Card Format the microSD memory card that is
inserted in the camera. When you format
a memory card, all files on the card will
be deleted.
Reset Restore camera settings back to factory
default values.
Language Select the menu language.
FW Version The firmware version of the camera is
shown here.
CAMERA SETTINGS
Page 22

22
NAVIGATOR GPS
You can view HD videos recorded on your camera and check
driving routes and speed information on the map using the
Navigator GPS software on your computer.
1. Download the Swann Navigator GPS Setup file from the
Navigator HD Dash Camera product page at:
www.swann.com
2. Double-click the Setup file, and then follow on-screen
instructions to install the Swann Navigator GPS software.
Installing the Navigator GPS software
Getting to know the Navigator GPS screen
1
4
18
3
2
5
6 7 8 9
1413
15 16 17
12
1110
Page 23

23
Before playing any video recordings, it's important that you load
the correct map data so your driving route can be seen on the
Map pane.
1. Click .
2. Under Select Map, choose "Google Maps".
3. Press OK.
1. Video playback pane
2. Video timeline
3. G-sensor chart
4. Video playlist
5. Find and play recordings
6. Capture screenshot from the video
7. Save any selected files to another folder
8. Delete any selected files
9. Configure map and language settings
10. Compass
11. Speed
12. Playback and volume controls
13. Turn on/off Autoplay
14. Save GPS data as a KML file (KML is a file format used
to display geographic data in an Earth browser such as
Google Earth and Google Maps.)
15. Open/Close map pane
16. Open/Close G-sensor chart
17. Function currently not available
18. Map pane
NAVIGATOR GPS
Configuring map data
Page 24

M140DCM150715E
© Swann Communications 2015
Helpdesk / Technical Support Details
Swann Technical Support
All Countries E-mail: tech@swann.com
Telephone Helpdesk
USA 1800 627 2799
USA Parts & Warranty 1800 627 2799
(M-F, 9am-5pm US PT)
AUSTRALIA 1800 788 210
NEW ZEALAND 0800 479 266
UK 0808 168 9031
 Loading...