

Page 1

11
DVR4-950™
4 Channel Digital Video Recorder
plug&playsecurity
™
™
Advanced security made easy
SW341-DNF / SW343-DP2 / SW343-DPM / SW344-DPS
www.swannsecurity.com
SR341-DNF-60010-200709
Operating Instructions
Page 2

22
FCC Verifi cation:
NOTE: This equipment has been tested and found to comply with the limits for
Class B digital device, pursuant to part 15 of the FCC Rules. These limits are designed to provide reasonable protection against harmful interference in a residential installation. This equipment generates, uses and can radiate radio frequency
energy and, if not installed and used in accordance with the instructions, may
cause harmful interference to radio or television reception, which can be determined by turning the equipment off and on, the user is encouraged to try to
correct the interference by one or more of the following measures:
· Reorient or relocate the receiving antenna
· Increase the separation between the equipment and the receiver
· Connect the equipment into an outlet on a circuit different from that to which
the receiver is connected
· Consult the dealer or an experienced radio/TV technician for help
These devices comply with part 15 of the FCC Rules. Operation is subject to the
following two conditions:
(1) These devices may not cause harmful interference, and
(2) These devices must accept any interference received, including interference
that may cause undesired operation.
IMPORTANT NOTE: Prohibition against eavesdropping
Except for the operations of law enforcement offi cers conducted under lawful
authority, no person shall use, either directly or indirectly, a device operated pursuant to the provisions of this Part for the purpose of overhearing or recording the
private conversations of others unless such use is authorized by all of the parties
engaging in the conversation.
WARNING: Modifi cations not approved by the party responsible for compliance
could void user’s authority to operate the equipment.
IMPORTANT SAFETY INSTRUCTIONS:
· Make sure product is fi xed correctly and stable if fastened in place
· Do not operate if wires and terminals are exposed
· Do not cover vents on the side or back of the DVR and allow adequate space for
ventilation
Before You Begin
2323
Warranty Information
Swann Communications warrants this product against defects in workmanship
and material for a period of one (1) year from it’s original purchase date. You must
present your receipt as proof of date of purchase for warranty validation. Any unit
which proves defective during the stated period will be repaired without charge
for parts or labour or replaced at the sole discretion of Swann. The end user is
responsible for all freight charges incurred to send the product to Swann’s repair
centres. The end user is responsible for all shipping costs incurred when shipping
from and to any country other than the country of origin.
The warranty does not cover any incidental, accidental or consequential damages
arising from the use of or the inability to use this product. Any costs associated with
the fi tting or removal of this product by a tradesman or other person or any other
costs associated with its use are the responsibility of the end user. This warranty
applies to the original purchaser of the product only and is not transferable to any
third party. Unauthorized end user or third party modifi cations to any component
or evidence of misuse or abuse of the device will render all warranties void.
By law some countries do not allow limitations on certain exclusions in this warranty.
Where applicable by local laws, regulations and legal rights will take precedence.
Limited Warranty Terms & Conditions
Page 3

33
Contents
Before You Begin 2
Contents 3
Package Contents 4
DVR Layout 5-6
Front Panel & Removable Remote 6
Rear Panel 6
Connections & Installation
Connecting Cameras and Power Adapter 7
Connecting the DVR to a TV Monitor 8
Turning the DVR On/Off and Auto Recovery 8
Menu Operation 9
Accessing and Navigating the Menu System 9
Setting DVR Time 9
Image Display 10
Single Camera View 10
Multi Camera View 10
Camera Menu 11
Record Menu 11-12
Motion Detection Menu 12-13
Screen Menu 13
Audio Menu 14
System Menu 14-15
Time Search 15
Language Menu 16
Exit Menu 16
Starting the DVR With a New Hard Drive 16
Changing the Hard Drive 17
Backing Up Footage to PC 18
Viewing Backup Footage on a PC 19
Using the VVFPlayer software 19
VVFPlayer Interface 19
Extract footage from a larger video clip 20
Exporting an AVI fi le 20
Troubleshooting Guide 21
Technical Specifi cations 22
Warranty Information 23
Technical Support Details Back cover
Page 4

44
Package Contents
DVR4-950™ Unit
Front Panel Remote Control X 2
Operating Instructions
Easy Setup Guide
Power Adapter with Cable
Software CD
RCA Video Cable
BNC to RCA adapters X 4
Security Stickers (4 Pack)
If you are missing any of the components above, contact Swann
Communications for assistance.
2121
Problem: The Power light keeps blinking red.
Solution:
If you have purchased the DVR as part of a kit, make sure the cameras are oper-
ating on a separate Power Adapter. The larger power adapter with higher amps
is designed specifi cally for the DVR.
Problem: The hard drive is not working.
Solution: Ensure the DVR is using the correct Power Adapter supplied. Open
the DVR and ensure the SATA cable is connected to the DVR and Hard Drive.
Problem: The hard drive usage is at 100% and will not record.
Solution: Format the hard drive or set the hard drive to overwrite mode.
Problem: I can only see a blue screen where my camera should be.
Solution: If only 1 camera view is blue, the DVR is not receiving that camera’s
signal. Check that the camera connections on the back of the DVR are secure.
Ensure the camera is plugged in and has power.
Problem: The DVR will not turn on.
Solution: Make sure you are using the correct Power Adapter for the DVR. Try
a second power outlet. Check the connections on the back of the DVR.
Problem: My DVR does not save footage more than a few days old.
Solution: Change the quality settings to Normal, lower the camera frame rates
or enable motion recording to conserve hard drive space.
Problem: I want to format my Hard Drive but I don’t remember the password.
Solution: The default password is “111111”. Swann recommends changing
the default password to prevent tampering or unauthorized use.
Problem: I am using wireless cameras and the DVR keeps beeping and motion
records all the time.
Solution: Analog wireless cameras suffer from interference. The DVR interprets
the change of image as motion and records. Swann recommends the use of wired
cameras or digital wireless cameras such as the ADW-300 for DVR recording.
Problem: I am unable to playback recorded footage.
Solution: Make sure when selecting footage to playback that you have high-
lighted the START time of that footage and not the STOP time
Troubleshooting Guide
Page 5
55
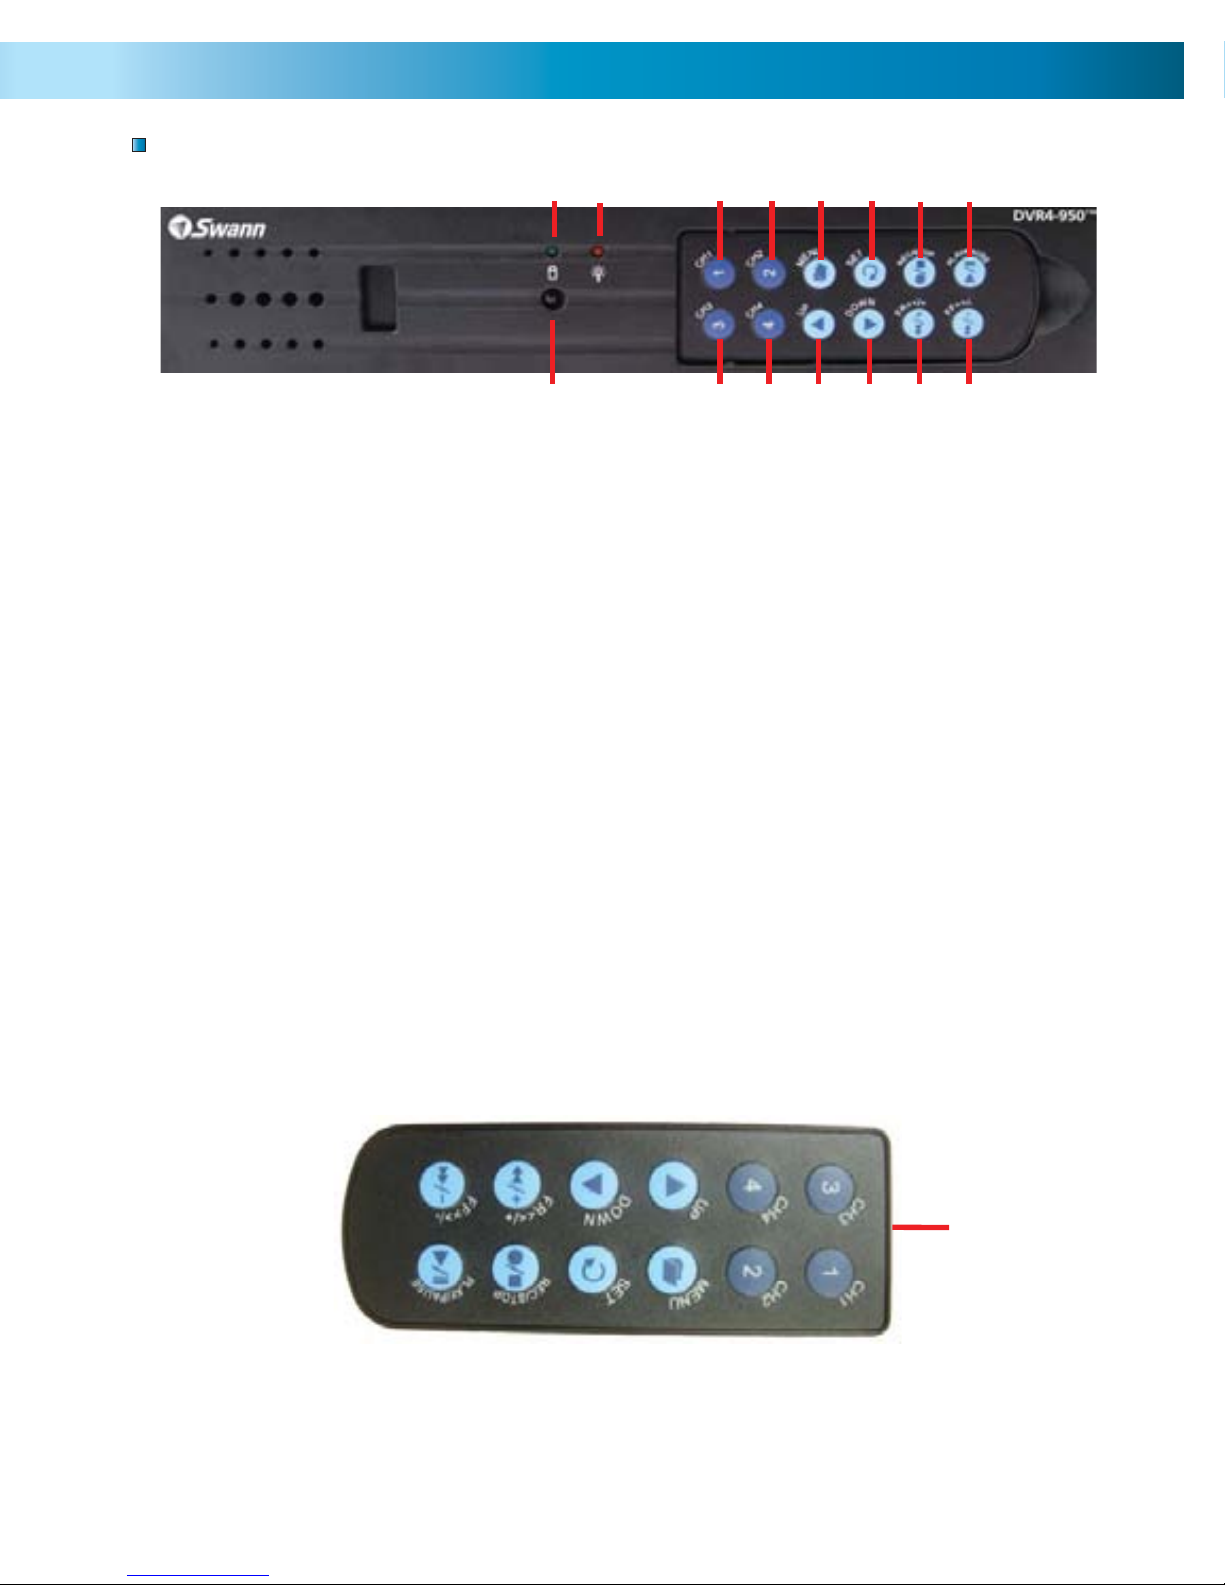
1. Hard Drive Indicator
Lights when hard drive is active (fl ashes when recording,
searching etc.)
2. Power Indicator
Lights on when DVR powered
3. Channel 1 Button
Press to view camera 1 in full
screen / Press again to return to
quad view
4. Channel 2 Button
Press to view camera 2 in full
screen / Press again to return to
quad view
5. Menu Button
Press to select Menu / previous
menu / exit menu
Note: some menu functions
require a password. Default
password is “111111”
6. Set Button
Press to confi rm selection
7. Record/Stop Button
Push to begin or stop recording
Note: will not work if time
or motion record is set.
8. Play/Pause Button
Push to open EVENT LIST,
begin last recording or pause
playback
9. Remote Control Sensor
10. Channel 3 Button
Press to view camera 3 in full
screen / Press again to return to
quad view
11. Channel 4 Button
Press to view camera 4 in full
screen / Press again to return to
quad view
12. Up Arrow
Move cursor up in menus
13. Down Arrow
Move cursor down in menus
14. Rewind Button
Push to rewind playback /
Move cursor left in menus
15. Fast Forward Button
Push to fast forward playback
/ Move cursor right in menus /
Activate AUTO SWITCH function
Note: 3-15 removable front
panel remote
DVR Layout
Front Panel & Removable Remote
1
10 11 12 13
2
345678
9
14 15
The remote control contains a battery that must be activated before use.
Find and remove the clear plastic tab at the bottom of the remote. The
remote will now be ready for use.
Using the Remote Control for the First Time
IR LED
Remove
plastic tab on
this end of
remote.
Page 6
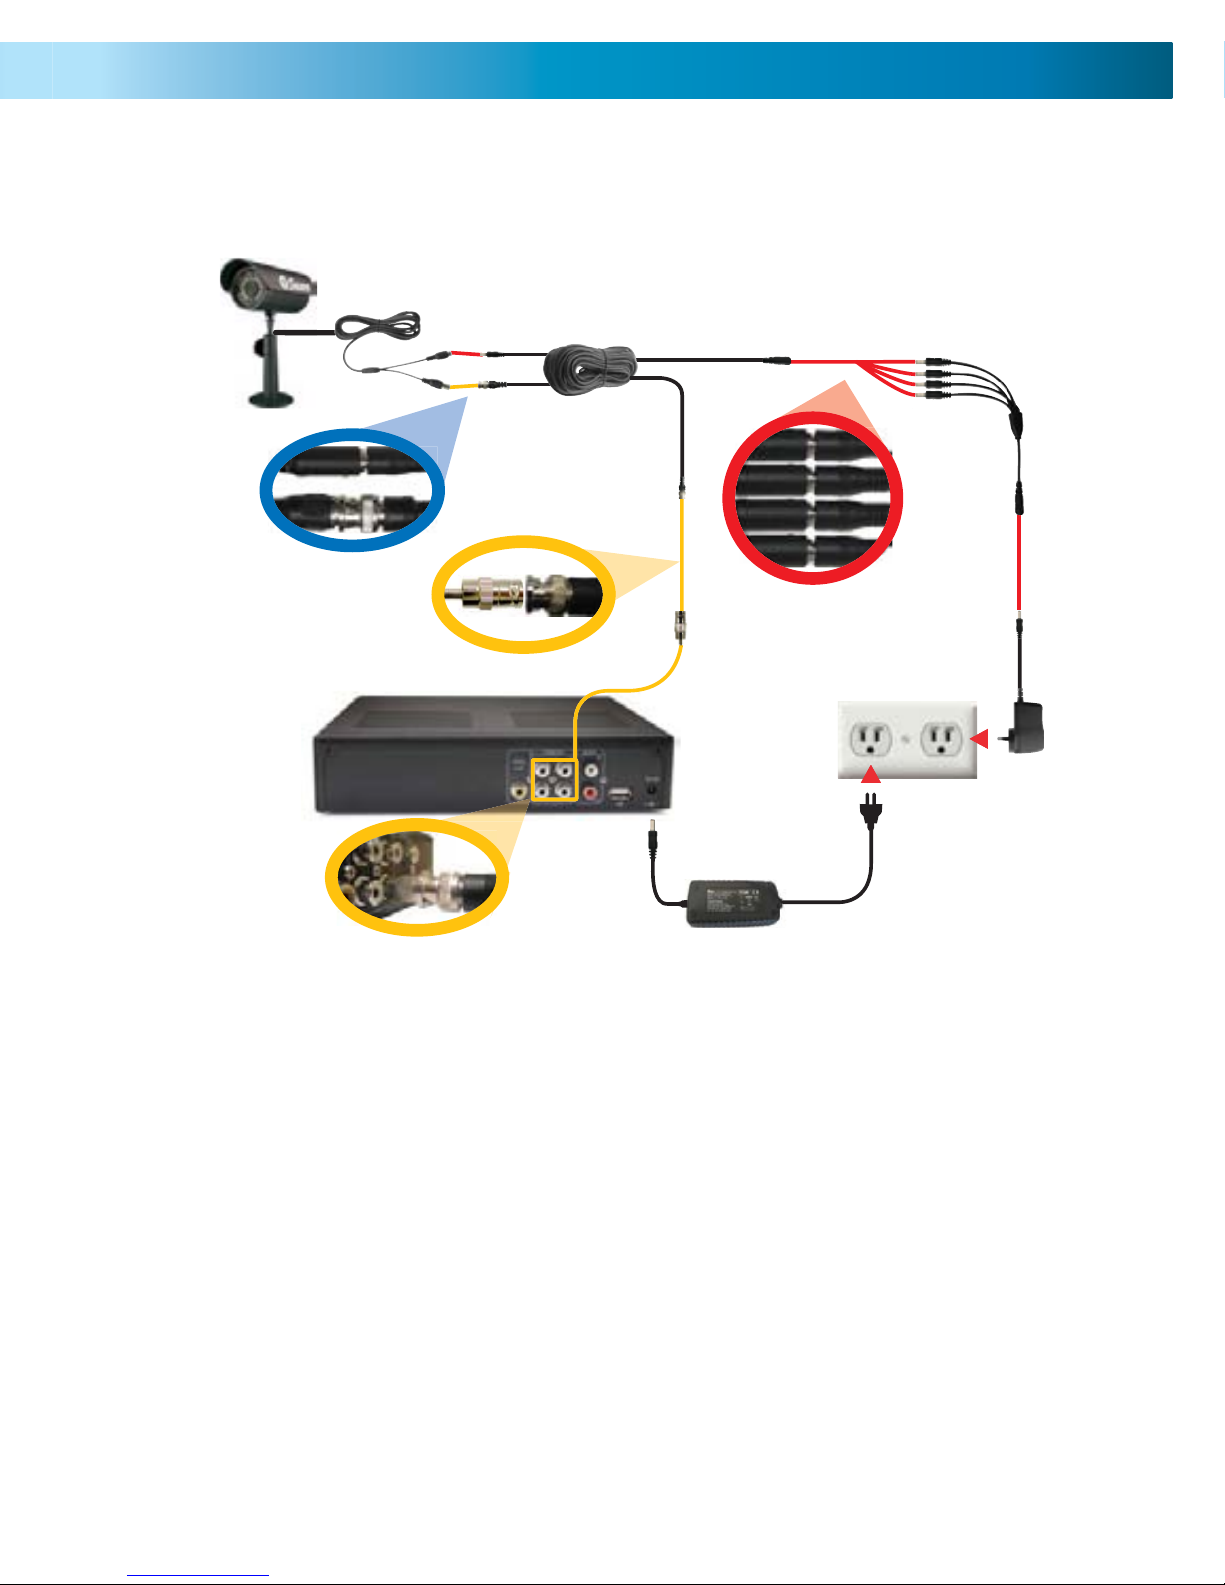
66
1. Video Output
Output to TV
2. Video Input
Inputs for cameras x 4 RCA
3. Audio Input
Input for microphone 1 x RCA
4. Audio Output
Output to speaker 1 x RCA
5. USB Connection
Download backup footage to Flash Drive (not
included)
6. DC 12V Power Input
Power Adapter connection for DC 12V adapter
only
Rear Panel
3
4512
6
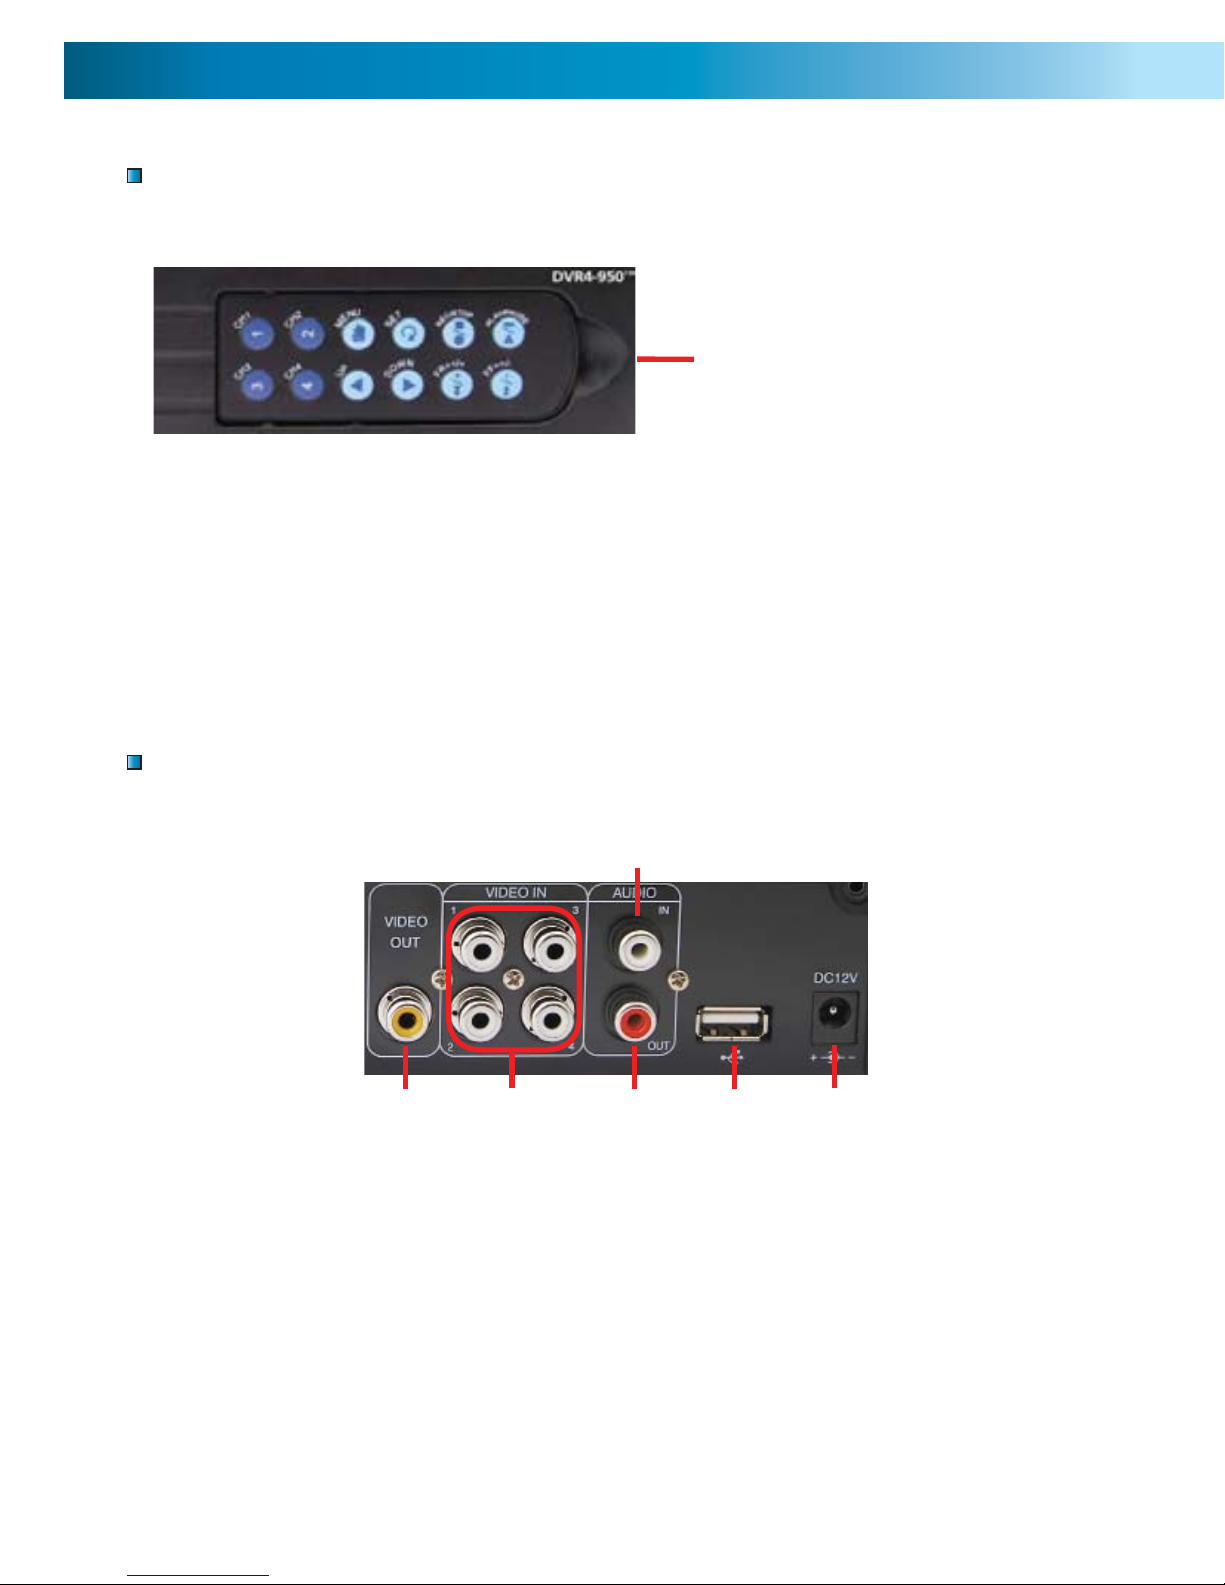
DVR Layout (cont)
Use the indent to
remove the control from
the DVR unit
Removing the Remote Control
Note: To secure the DVR and prevent unauthorised use remove the
remote and store in a secure place.
1919
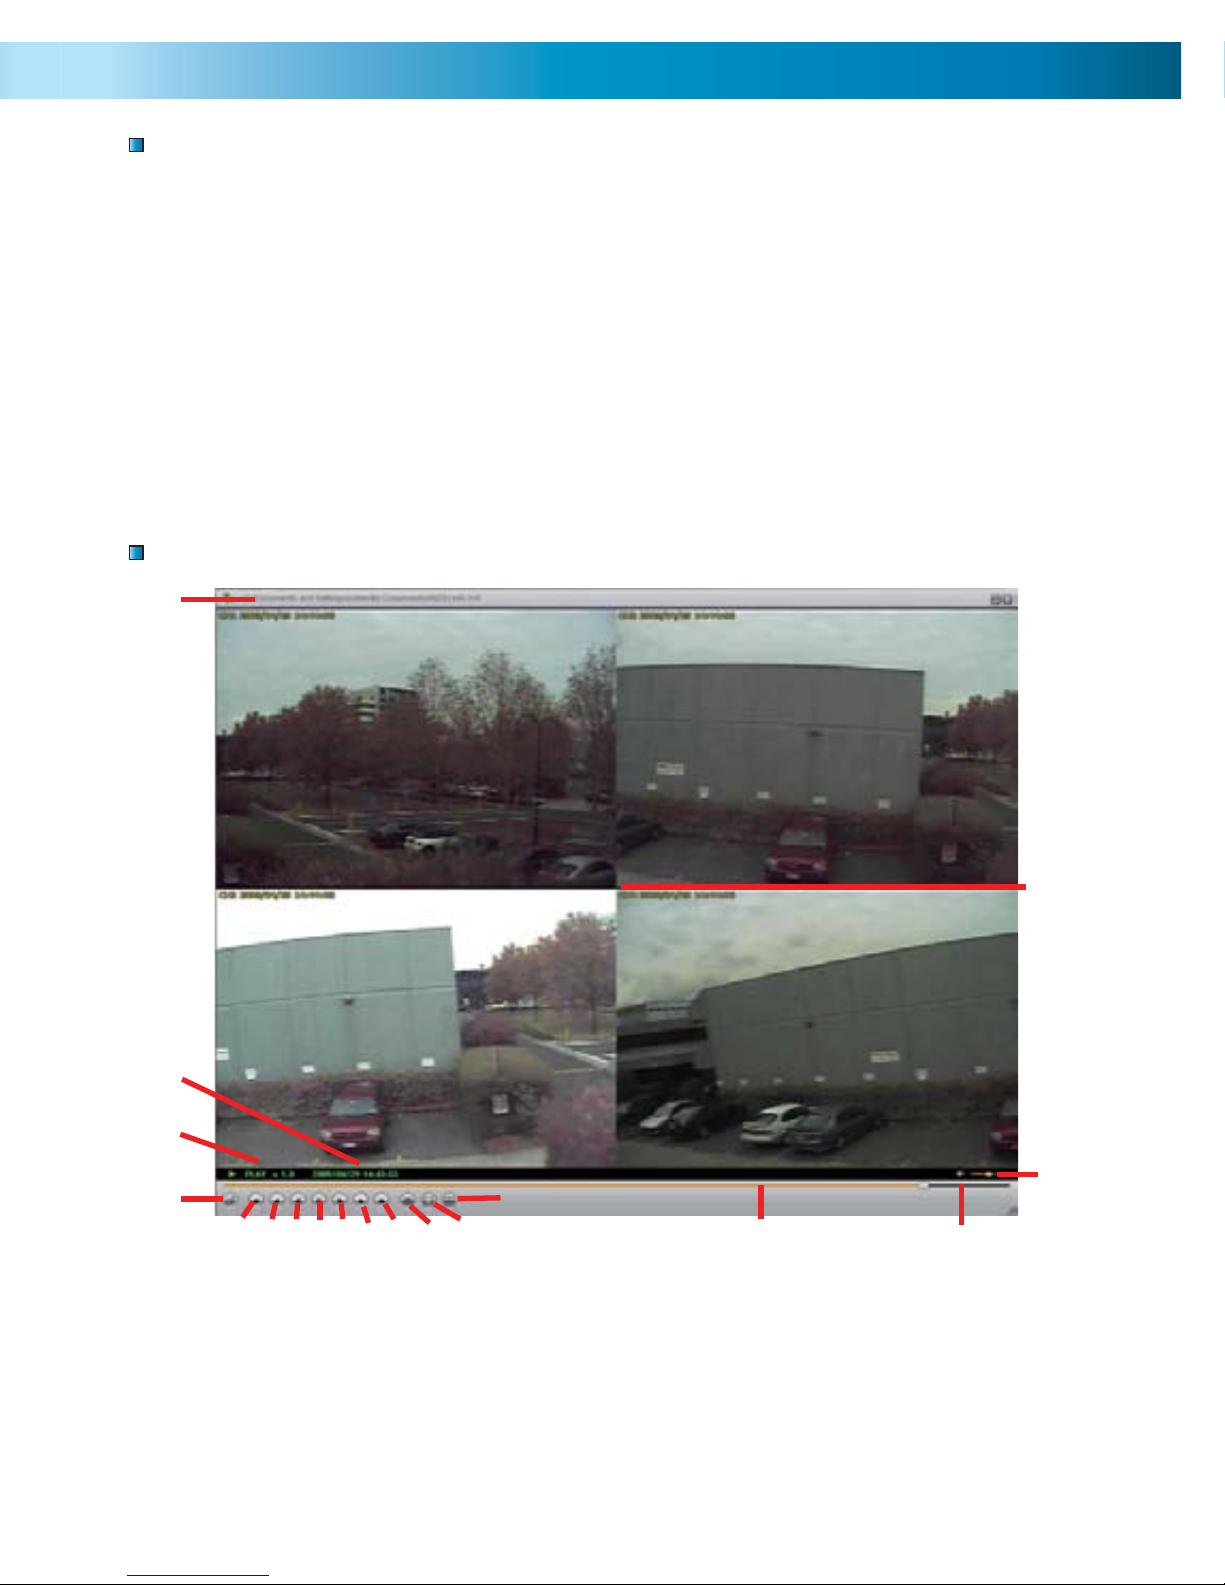
VVFPlayer Interface
View backed up footage from the DVR4-950™ with the included VVFPlayer soft-
ware located on the CD.
1. Put the CD in the CD drive. If it does not open automatically, click START open
MY COMPUTER and Double click the CD drive.
2. Copy the VVFPlayer_V2_6_4B software from the CD to your computer.
3. Double click to open the VVFPlayer software.
4. Click the File Folder (4) to bring up the open screen. Navigate to the video
you want to view and press Open. The backup fi le will have a .VVF extension.
5. Use the controls to view the video footage.
Viewing Backup Footage on a PC
Using the VVFPlayer software
1
2
3
4
1. File name
2. Date & time of recording
3. Current play state
4. Open File
5. Fast Reverse (16x, 32x, 64x)
6. Reverse (1x)
7. Pr
8. Pause
9. Next frame
Page 7
77
Connecting Cameras and Power Adapter
1. Connect the Power and BNC ends of the Security Camera to an
Extension Cable.
2. Connect the BNC end of the Extension Cable to the RCA adapter.
3. Connect the end of the RCA adapter to camera input on the back of the DVR.
4. Connect the power end of the Extension Cable to the Power Splitters.
5. Connect the Power Splitter to the Camera Power Adapter.
6. Plug in the Camera Power Adapter and the DVR Power Adapter to mains
power outlets.
1
2
3
4
5
Cameras and
accessories optional
6
Page 8

88
Connecting the DVR to a TV Monitor
1
2
1. Connect an RCA end of the Video Cable to the Yellow Video
INPUT on the back of the TV Monitor.
2. Connect the other RCA end of the Video Cable to the Video OUTPUT
connection on the back of the DVR.
3. Tune your TV to the correct input channel to view the DVR. Using your TV’s
Remote Control press the Input button until the DVR appears on screen. Most
TVs will label this button as Input, Video, Source, A/V, TV/AV, Line, Channel 0,
etc. If you are unable to view your DVR on your TV contact your TV’s manufacturer for assistance.
Back of TV
Powering the DVR On/Off
To turn on your DVR connect the Power Adapter to the DC 12V input on the
back of the unit. To turn the DVR off unplug the DVR from the wall outlet or
power point.
If the DVR will not be in use for extended periods of time Swann recommends
unplugging the unit.
Auto-Recovery Feature
The DVR4-950™ is equipped with an Auto-Recovery feature. Should a power
outage occur while you are recording the DVR will automatically resume recording once power is restored.
Turning the DVR On/Off and Auto Recovery
1717
6. Replace the Hard Drive and plug in the SATA and the power cable as shown in
step 5.
7. Screw in the hard drive to the bottom of the case as in step 4.
8. Replace the top of the case.
9. Screw in the remaining screws to the sides and back of the DVR as in step 2.
4. Locate the screws below the hard
drive. Secure the hard drive before re-
moving the 4 screws to avoid damaging
the hard drive
IMPORTANT NOTE: The following instructions are for installing or changing the
hard drive. If your DVR4-950™ already has a hard drive pre-installed disregard
these steps.
Installing / Changing a Hard Drive in the DVR4-950™
1. Ensure the DVR4-950™ is unplugged and removed from mains power.
2. Locate and remove the 6 screws 2 on
each side at the front and 2 at the top
on the back. (The bottom screws on the
front do not need to be removed.
Installing or Changing a Hard Drive
Page 9
99
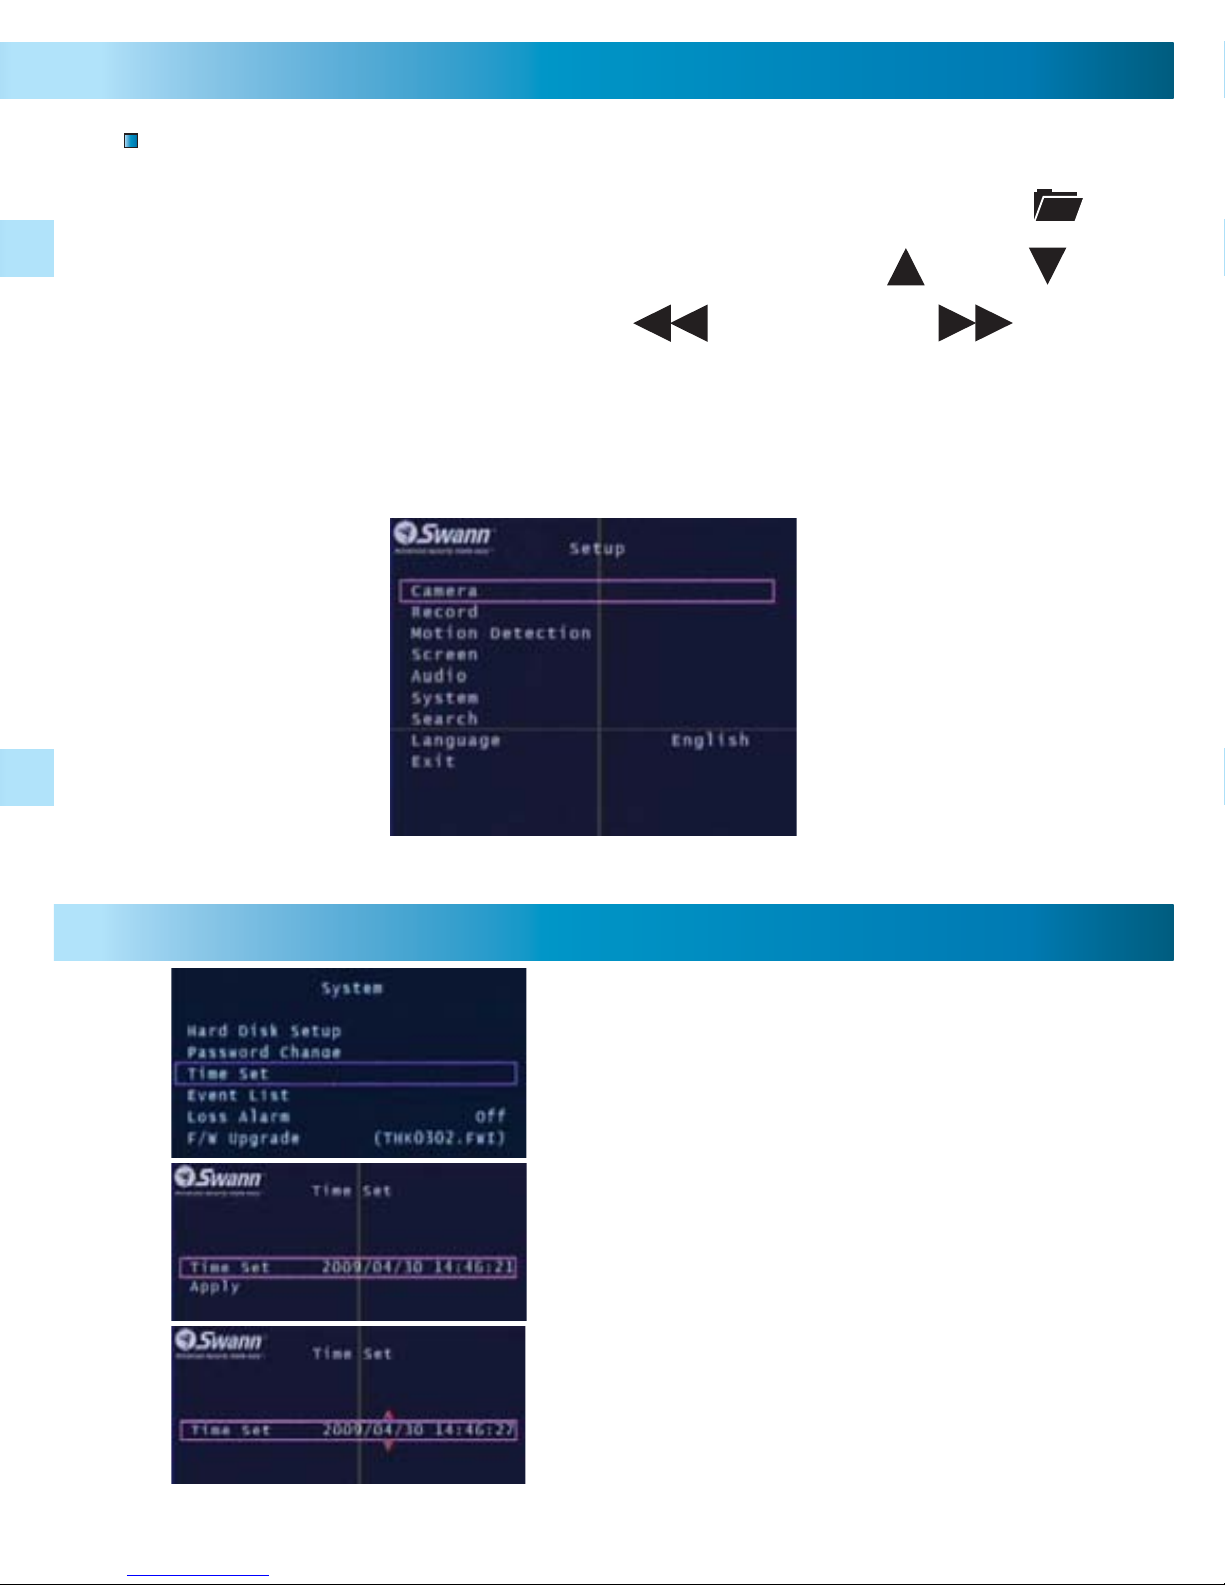
Menu Operation
Accessing and Navigating the Menu System
The main Setup Menu can be accessed by pressing the MENU Button
To navigate the menus press the directional arrow keys UP DOWN
To change selections use the REWIND & FAST FOWARD
buttons
To select the highlighted option press the SET button
To return to the previous menu press the MENU button
Main Setup Menu
Setting DVR Time
To change the DVR time, go into the SYSTEM
menu and select TIME SET.
With TIME SET highlighted press the SET
button to display the selection arrows.
Use the FAST FOWARD & REWIND buttons to
select between the date (year, month, day)
and time (hour, minute, seconds)
Using the UP & DOWN buttons change the
selected option
Page 10
1010
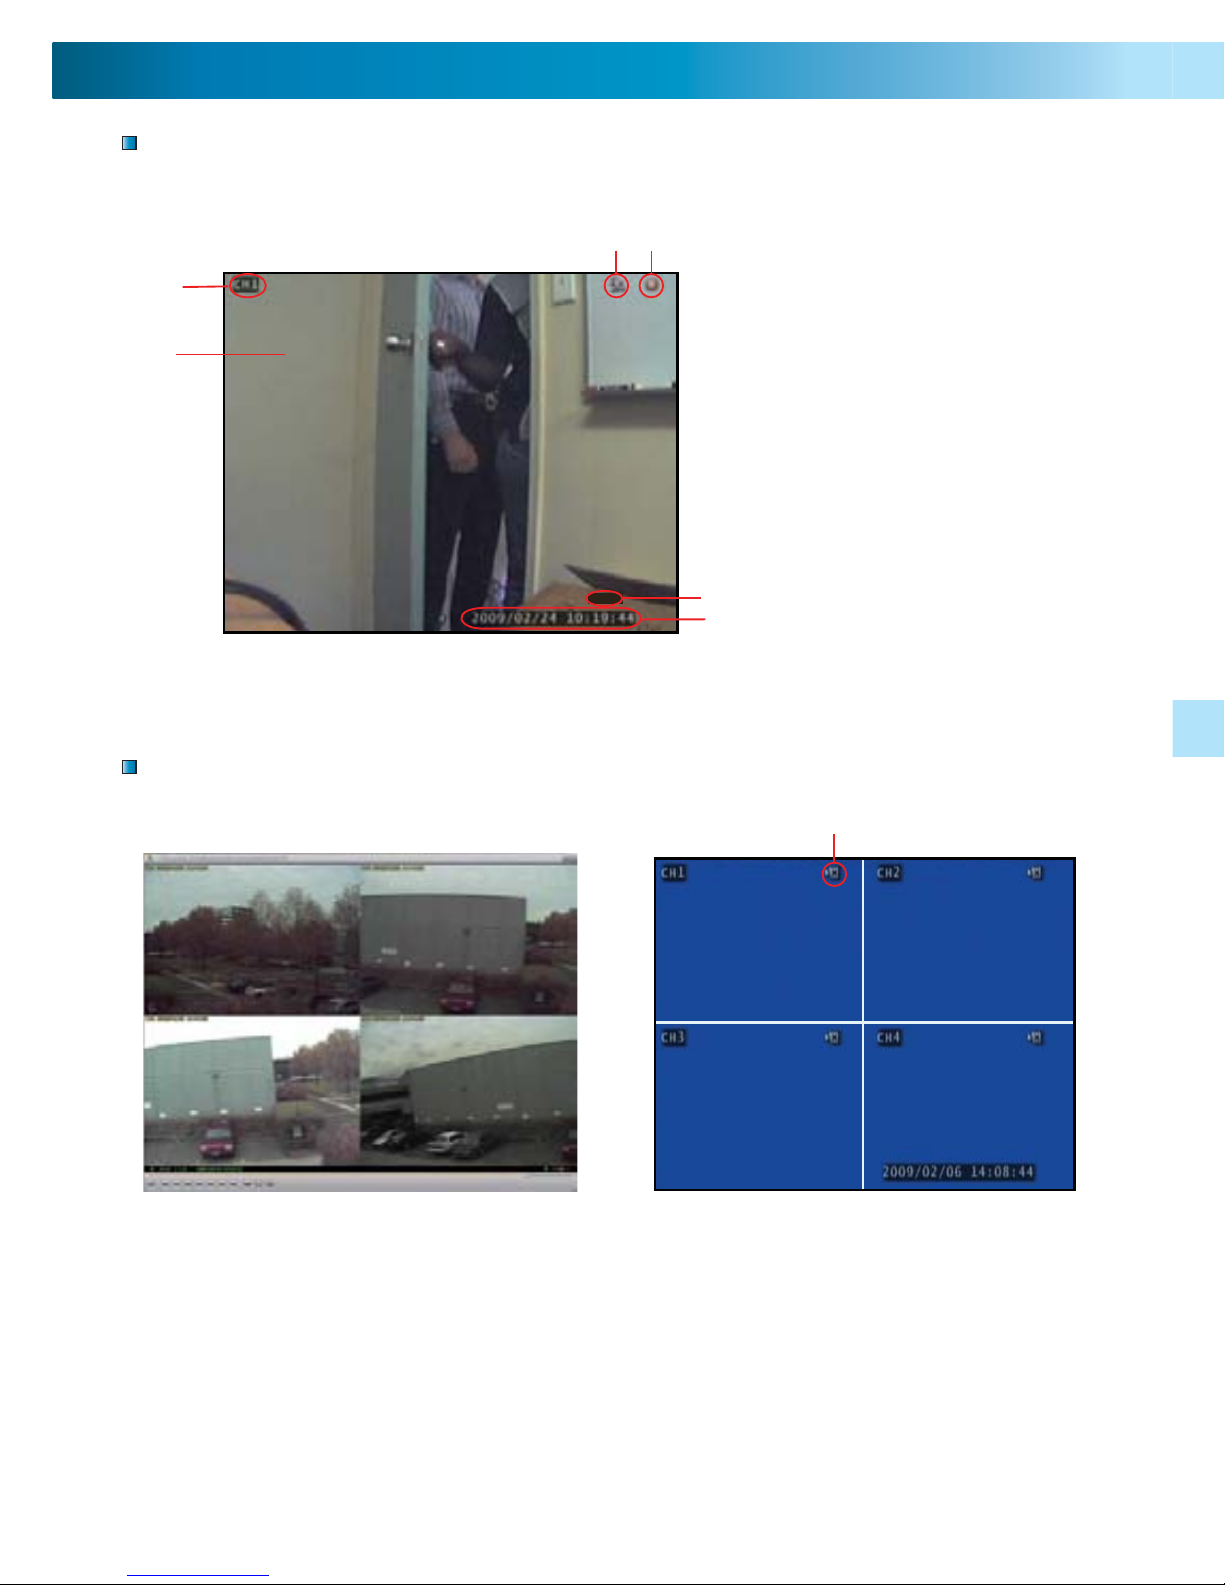
Single Camera View
Multi Camera View
5
6
2
3
1. Current Camera Channel
2. Motion Detection Icon
3. Recording Icon
4. Main Display
5. Current Date & Time
6. Mute Audio
7. No Camera Signal Icon
Multi Camera View with 4 Cameras Multi Camera View with No Cameras
7
MUTE
Image Display
1
4
1515
Loss Alarm: When enabled an audible alarm will sound indicating the DVR has
lost the camera signal or a camera has been unplugged.
F/W Upgrade: Displays the current fi rmware version and allows future
upgrades via a USB Flash Drive. Do not remove the Flash Drive while the fi rm-
ware is updating as it may damage the DVR. Only use updates authorized by
Swann. When complete, remove the Flash Drive and restart the DVR.
Recording
System Menu (cont)
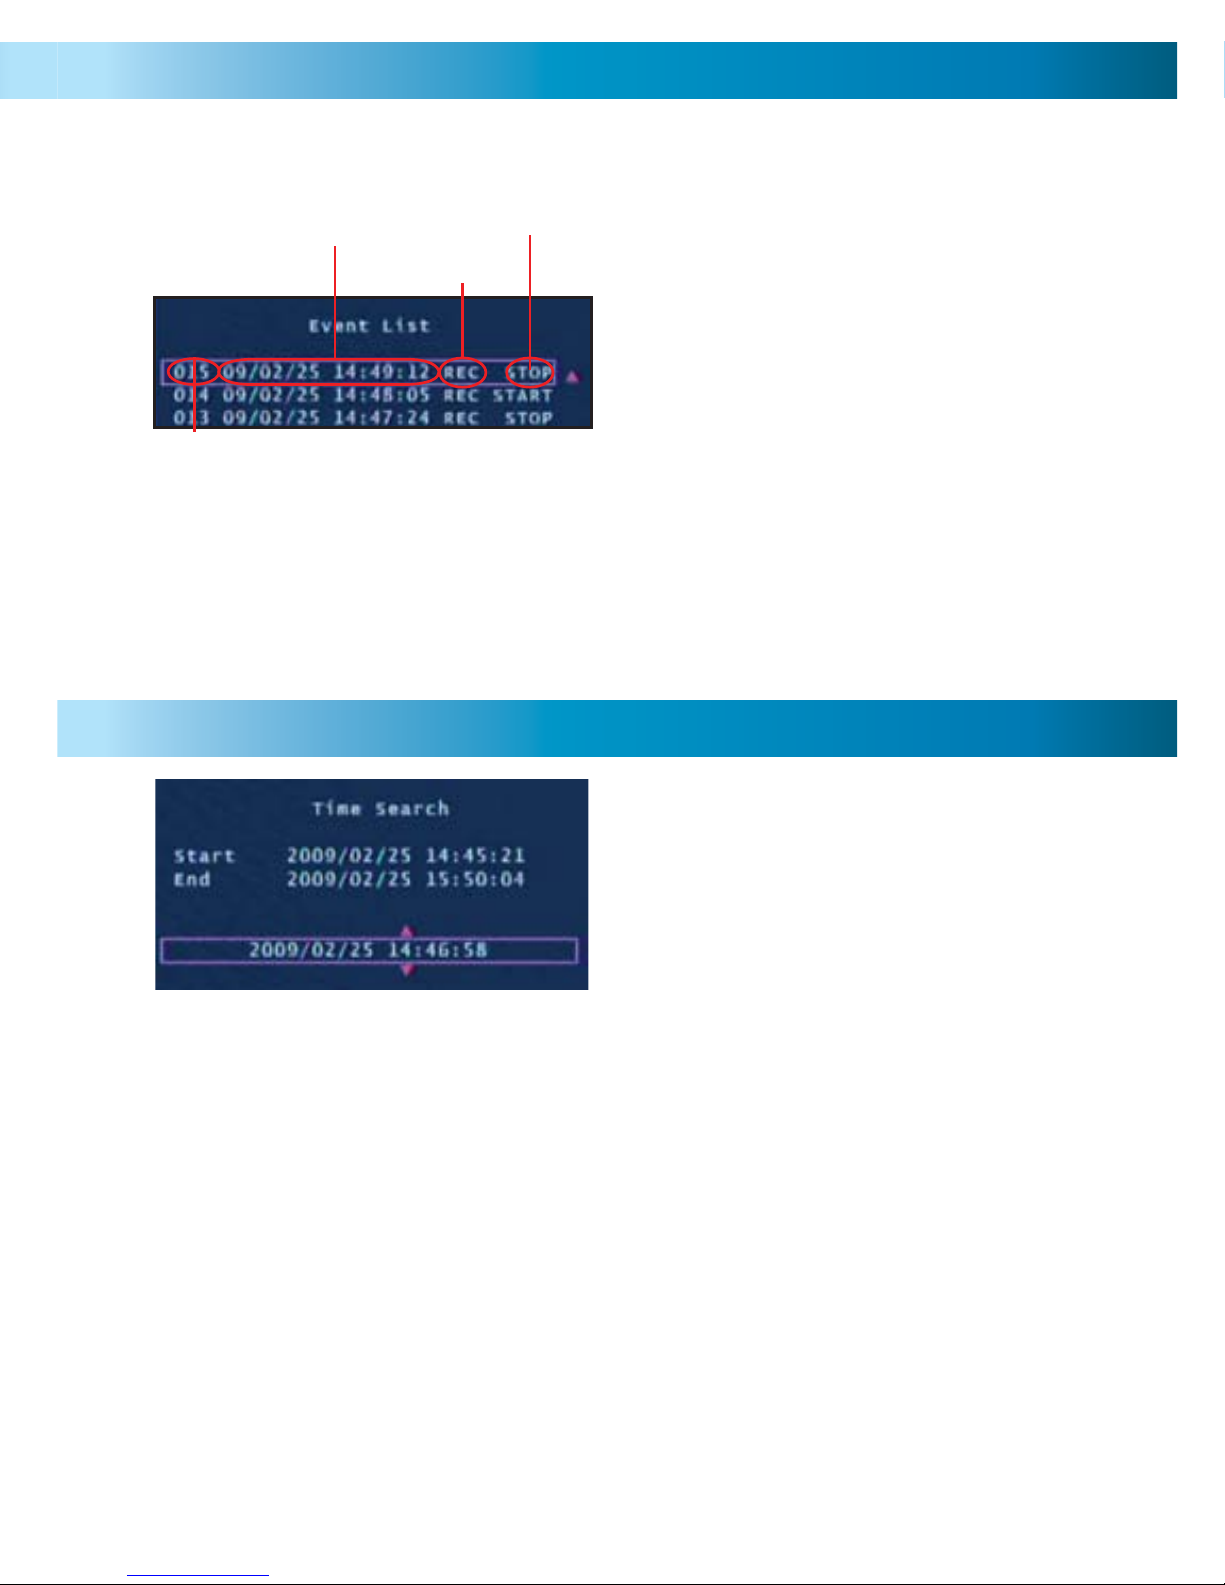
Event List: Displays a list of the last 127 recorded events from the most recent
recording to the oldest. Use the Time Search feature for older events not in list.
Start time: This is the date and time of the oldest recording on the DVR.
Stop time: This is the date and time of the fi nal recording on the DVR.
Enter a time between the Start and End time and press the Play button to view a
recording.
Press the Fast Forward and Rewind buttons to quickly scan through recordings.
Press Fast Forward or Rewind multiple times to speed up playback.
Press the Stop button to exit playback mode.
Time Search
Page 11
1111
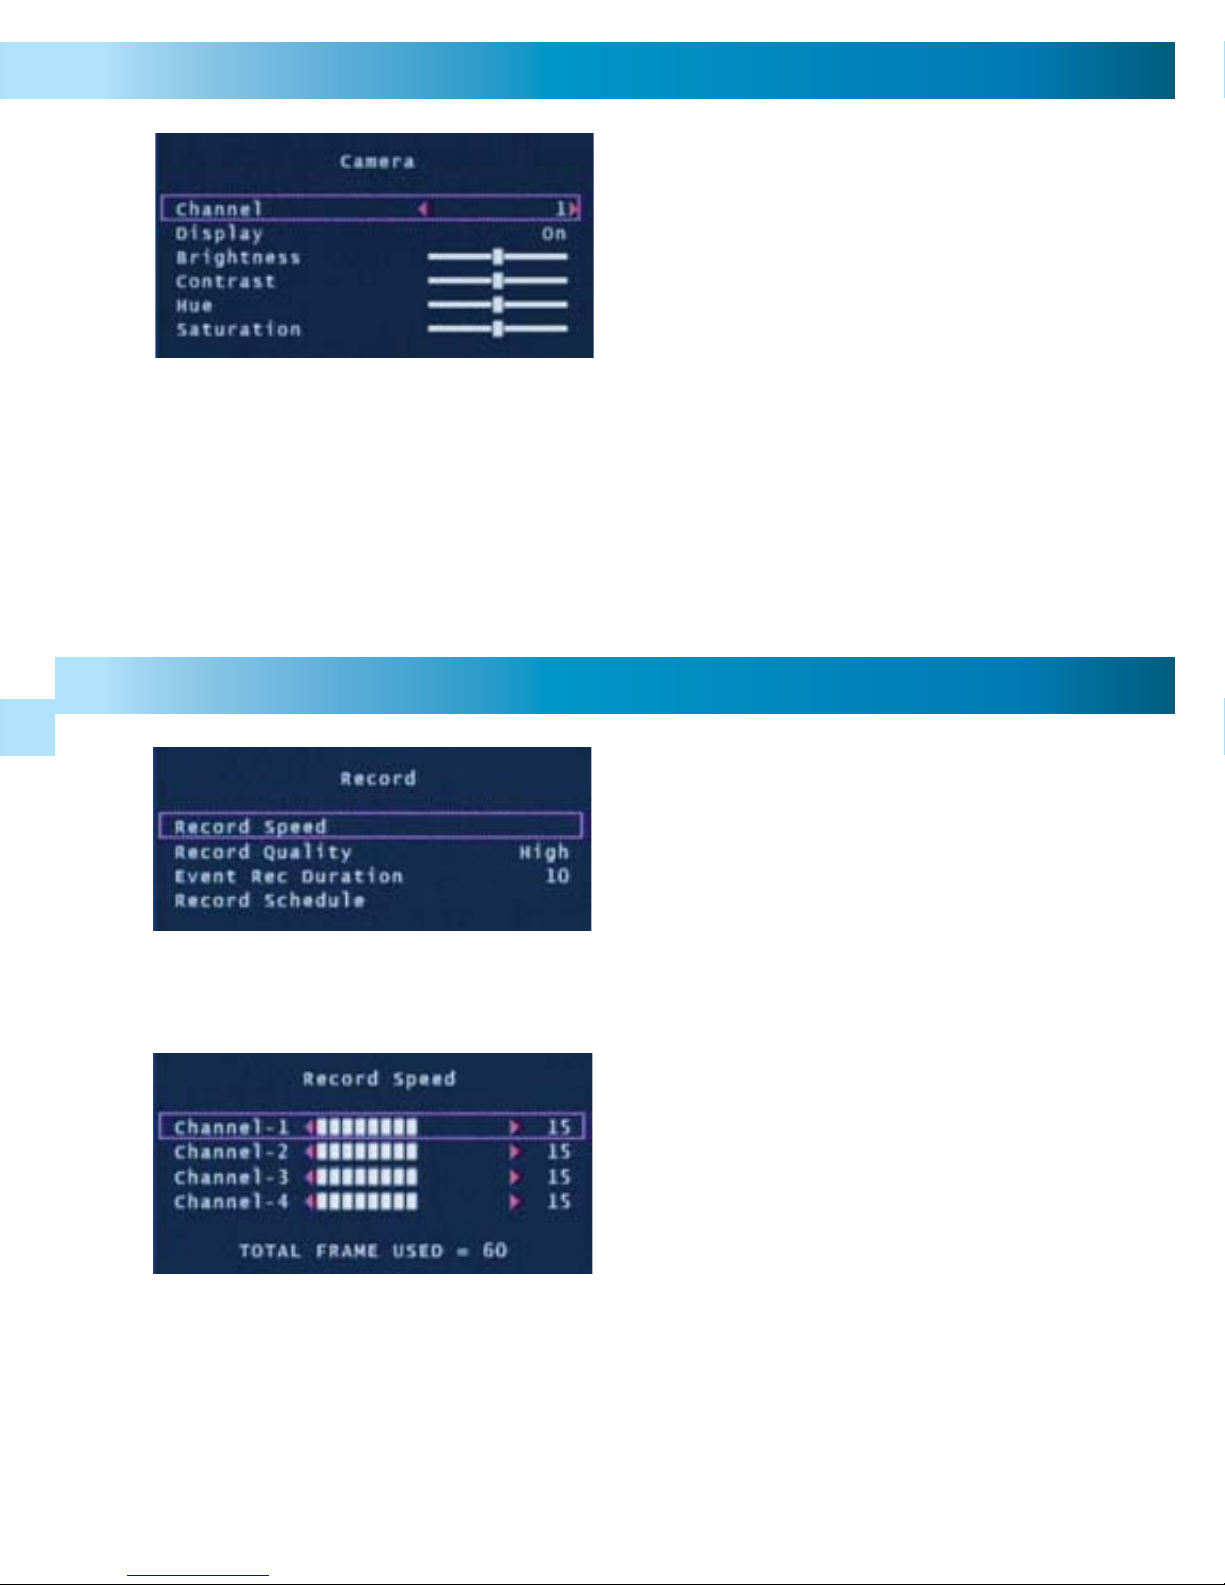
Camera Menu
The Camera menu allows you to
change visual attributes on each of the
camera channels.
Channel: Display the attributes of currently selected camera 1-4.
Display: Turn the selected camera On or Off in the main display.
Brightness, Contrast, Hue, Saturation: Using the UP & DOWN buttons high-
light the display option you want to change. Use the FAST FOWARD button to
increase the settings and the REWIND button to decrease them.
The Record Menu adjusts recording
quality, timers and schedules.
You may individually set the Record
Speed of each camera. The total
number of frames used can not exceed
60 for NTSC systems or 50 for PAL
systems. Setting lower frame rates will
consume less hard drive space.
Record Speed: Set the recording frame rate per camera. Note: higher frame
rates provide smoother recordings but use more hard drive space.
Record Menu
Page 12
1212
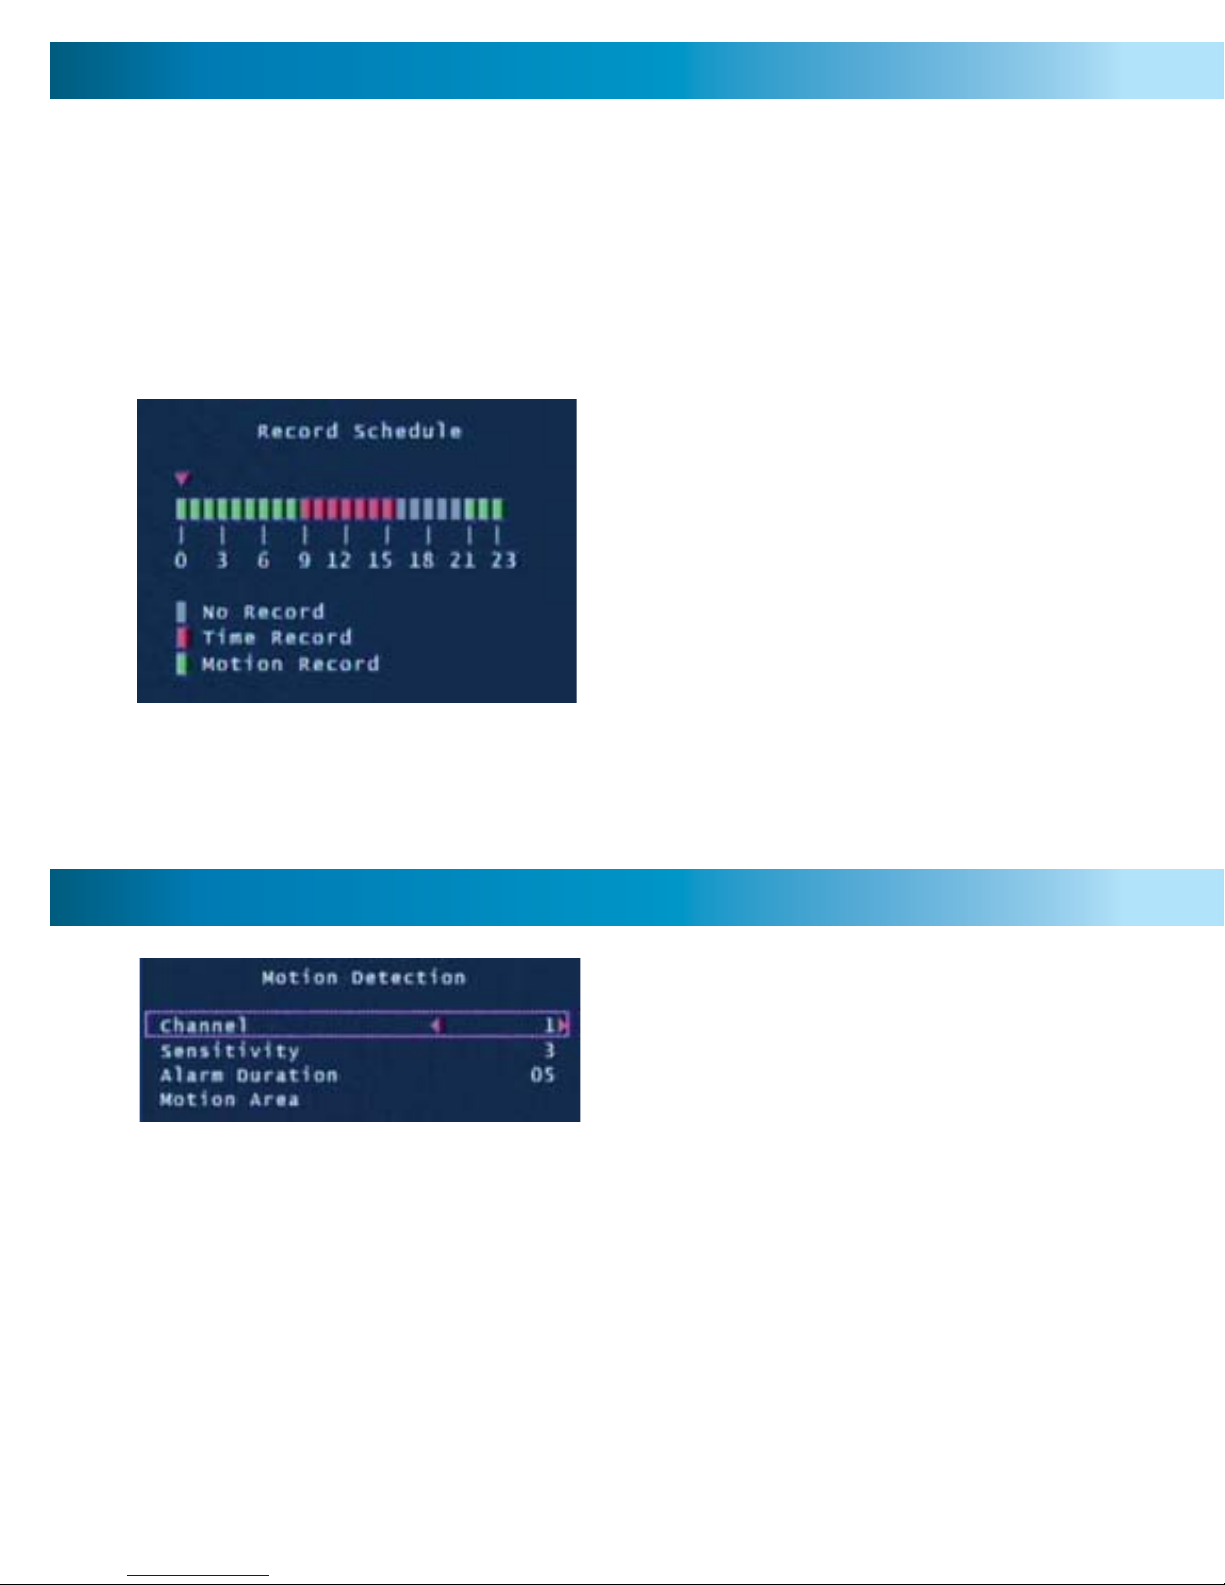
The Record Schedule allows you to set
the recording mode for each hour of the
day based on a 24 hour clock. Use the
left / right keys to move and up / down
keys to change the current selection.
No Record: will not record
Time Record: will record for the entire
hour
Motion Record: will only record when
motion is detected
Important: To enable Motion Recording you must set the hour to Motion
Record (green) AND set the Sensitivity and Motion Area in the Motion
Detection menu.
Record Quality: Set the image quality of the recordings from Normal, High or
Highest. Note: higher image quality settings use more hard drive space.
Event Rec Duration: When Motion Detection is active, Event Rec Duration is
the length of time in seconds the DVR will record after motion stops, from 5, 10,
15, 20, 25 or 30 seconds. Default is set to 10 seconds.
Record Schedule: Set different recording modes depending on the time of day.
Record Menu (cont)
Motion Detection Menu
The Motion Detection menu allows you
to set motion options for each camera.
Note: The DVR detects motion based
on the level of change in the picture.
Channel: Select which camera attributes to change from camera 1-4.
Sensitivity: Set the amount of movement necessary before motion detection
triggers recording. Set from 1 (most sensitive) to 4 (least sensitive), default Off.
Note: this feature must be set from 1-4 to enable motion recording.
Alarm Duration: Set the length of time the alarm will sound when motion is
detected. Set to Off, 5, 10, 15, 20, 25, 30 seconds or Continuous. Note: If the
Alarm Duration is set to Continuous the alarm will continue to sound until this
setting is changed.
1313
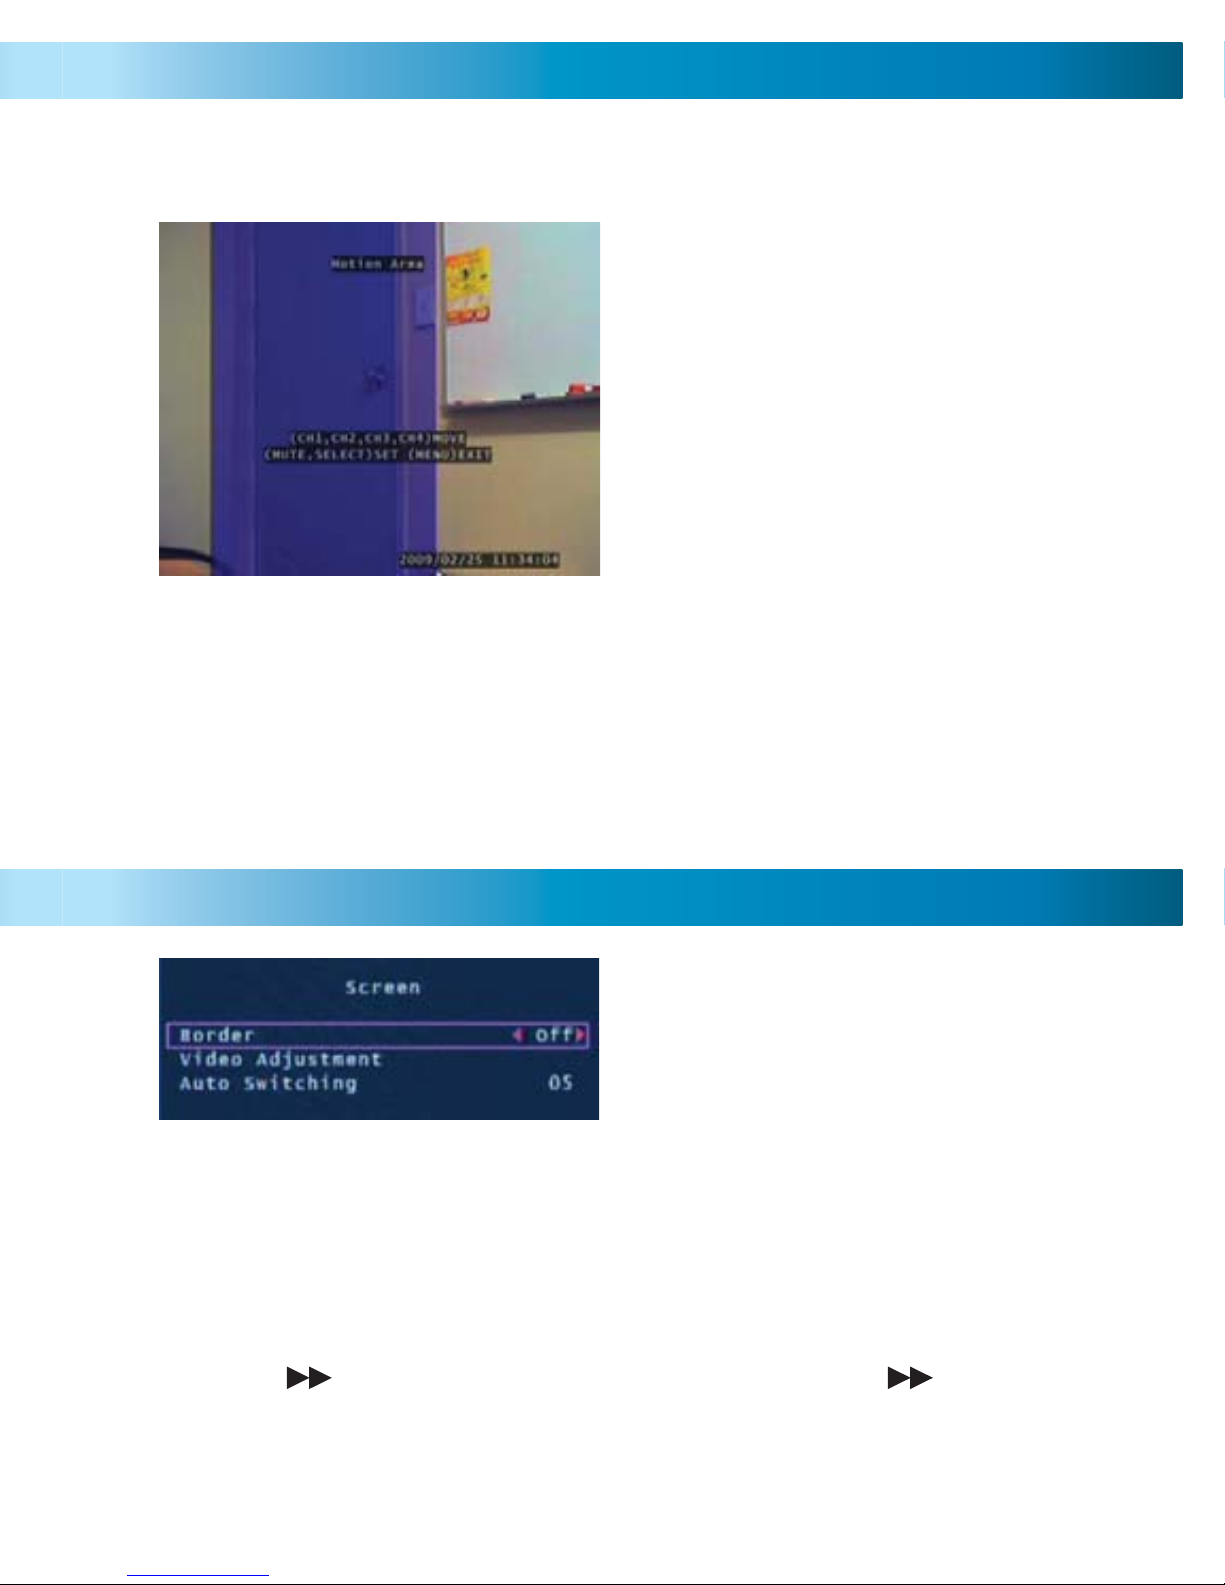
Motion Area: Select the area of the Camera to detect motion. Motion
occurring outside this designated area will not trigger a recording.
This feature is helpful in high traffi c areas where only a small portion of the
screen needs to be monitored for example, looking down a driveway with a busy
road next to it.
Important: To enable Motion Recording you must set the Sensitivity, Motion
Area for each camera AND set Motion Record in the Record Schedule menu.
Border: Applies a border between the cameras in multi camera view.
Video Adjustment: Adjust the display to fi t on your TV monitor.
Auto Switching: When active, in live view mode, the DVR will automatically
switch between camera channels in full screen mode. Set the delay from 1-10
seconds between changes or Off. To activate Auto Switching, press the FAST
FORWARD /- button when viewing your cameras. Press the /- button
again to stop Auto Switching.
Screen Menu
Motion Detection Menu (cont)
Page 13
1313
Motion Area: Select the area of the Camera to detect motion. Motion
occurring outside this designated area will not trigger a recording.
Use the UP, DOWN, REWIND & FAST
FOWARD buttons to move the cursor.
Press the SET button to begin to
draw the motion detection area.
Using the arrow buttons draw your
desired motion area and press the
SET button again once complete.
In the example to the left, the blue
motion box is drawn over the door.
Only motion occurring in this area will
trigger recording i.e. the door opening.
This feature is helpful in high traffi c areas where only a small portion of the
screen needs to be monitored for example, looking down a driveway with a busy
road next to it.
Important: To enable Motion Recording you must set the Sensitivity, Motion
Area for each camera AND set Motion Record in the Record Schedule menu.
The Screen menu adjusts the display of
cameras in the main camera view.
Border: Applies a border between the cameras in multi camera view.
Video Adjustment: Adjust the display to fi t on your TV monitor.
Auto Switching: When active, in live view mode, the DVR will automatically
switch between camera channels in full screen mode. Set the delay from 1-10
seconds between changes or Off. To activate Auto Switching, press the FAST
FORWARD /- button when viewing your cameras. Press the /- button
again to stop Auto Switching.
Screen Menu
Motion Detection Menu (cont)
Page 14
1414
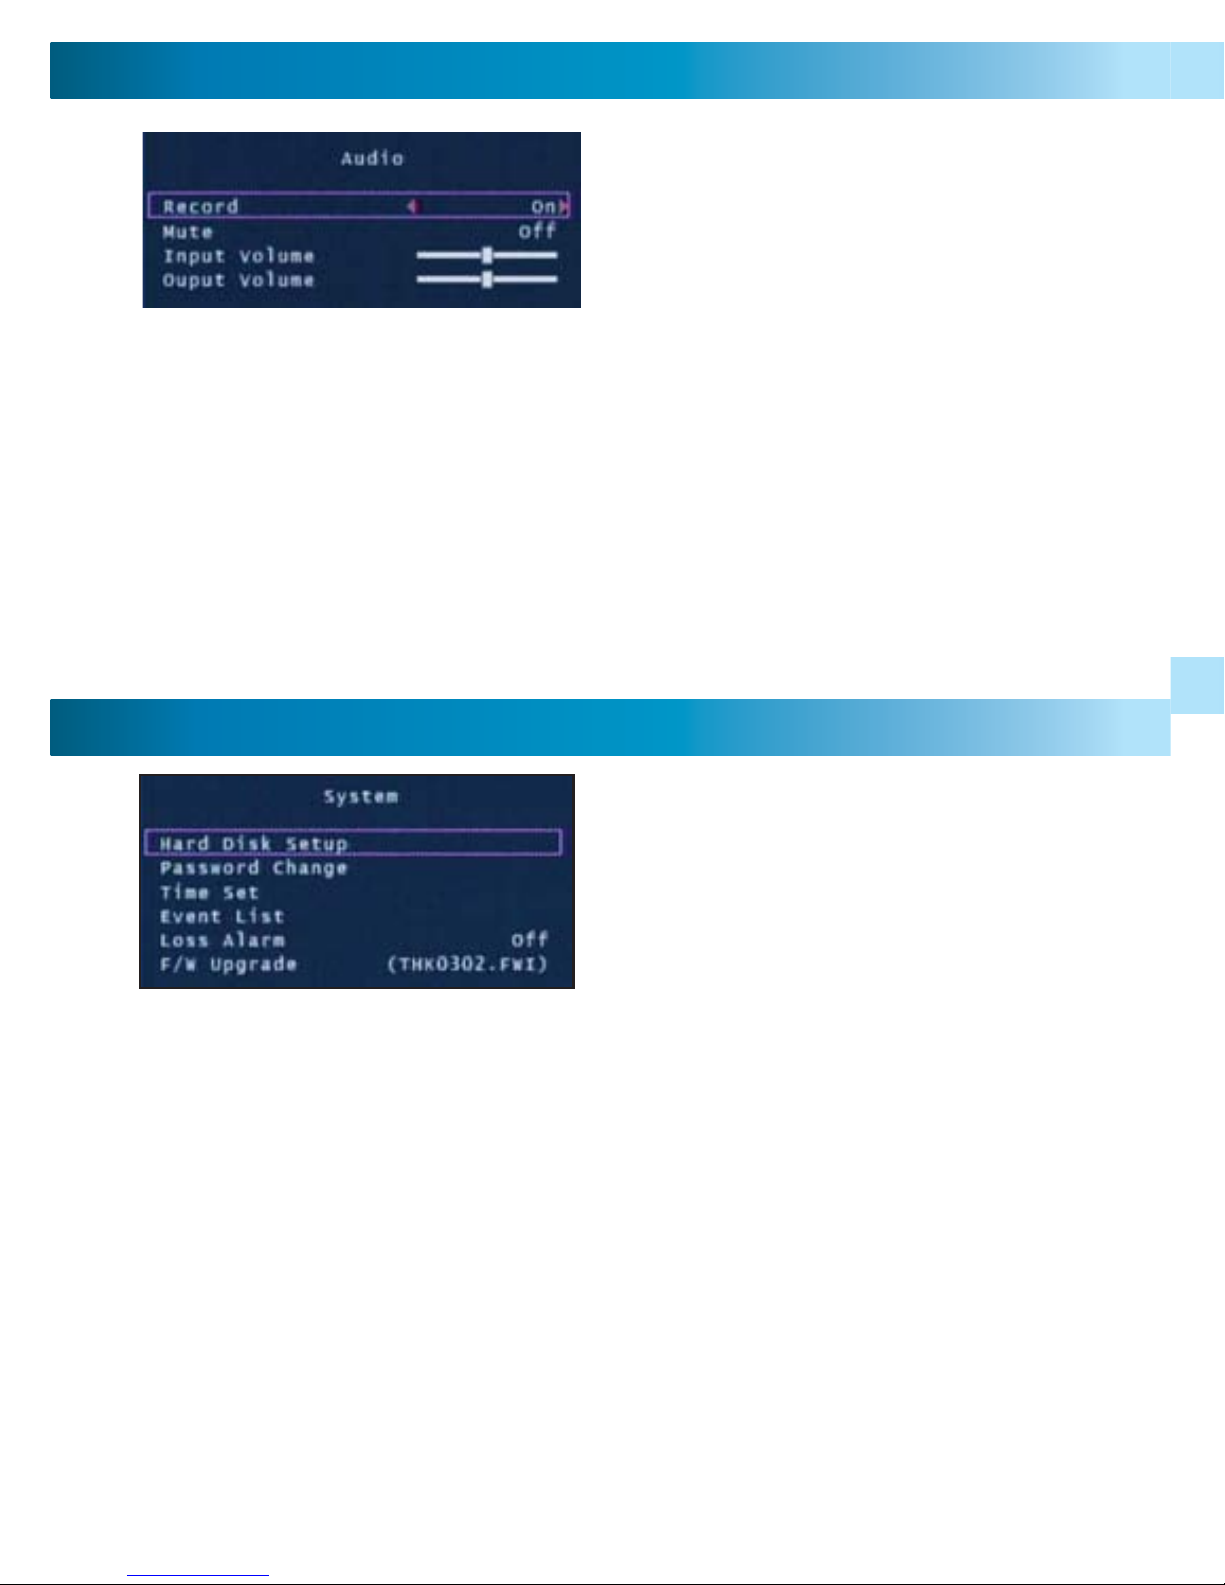
The Audio menu sets the audio
recording and volume options.
Note: You must have a camera with
audio or a powered microphone to
record or monitor audio.
Record: Set to ON to record audio from the Audio Input on the back of the
DVR.
Mute: Turns Audio output on or off when viewing or recording cameras.
Alternatively, press the Mute button to turn Audio on or off while viewing your
cameras.
Input Volume: Move the slider to change the volume of the audio recorded.
Output Volume: Move the slider to change the volume of audio playback.
Audio Menu
System Menu
The System menu provides general
setup options such as hard disk
information, time, date and fi rmware
settings.
Hard Disk Setup: Display information about the installed hard disk including
total size and memory usage.
Overwrite Enable: If activated, when the hard disk is full the DVR will overwrite
the oldest footage automatically. Default: Yes.
Format HDD: This option will permanently delete all data on the hard disk. The
password must be correctly entered to format the hard disk.
Password Change: This option will change the current password. You will be
prompted to enter the current password, the new password and then confi rm
the new password before the change is complete. Note: The default password is
“111111”. If you have lost or forgotten your password contact Swann
Communications Technical Support for assistance.
1111
Camera Menu
Channel: Display the attributes of currently selected camera 1-4.
Display: Turn the selected camera On or Off in the main display.
Brightness, Contrast, Hue, Saturation: Using the UP & DOWN buttons high-
light the display option you want to change. Use the FAST FOWARD button to
increase the settings and the REWIND button to decrease them.
Record Speed: Set the recording frame rate per camera. Note: higher frame
rates provide smoother recordings but use more hard drive space.
Record Menu
Page 15
1515
Use the arrow buttons to select and
playback the highlighted Event. Press
Stop to exit playback mode.
Hint: You can also access the Event
List by pressing the Play button while
viewing your cameras.
Loss Alarm: When enabled an audible alarm will sound indicating the DVR has
lost the camera signal or a camera has been unplugged.
F/W Upgrade: Displays the current fi rmware version and allows future
upgrades via a USB Flash Drive. Do not remove the Flash Drive while the fi rmware is updating as it may damage the DVR. Only use updates authorized by
Swann. When complete, remove the Flash Drive and restart the DVR.
Recording
Number
Date & Time
Recording
Type
Start / Stop
Event
System Menu (cont)
Event List: Displays a list of the last 127 recorded events from the most recent
recording to the oldest. Use the Time Search feature for older events not in list.
Time Search allows you to quickly jump
to a specifi c time and date to view a
recording.
Start time: This is the date and time of the oldest recording on the DVR.
Stop time: This is the date and time of the fi nal recording on the DVR.
Enter a time between the Start and End time and press the Play button to view a
recording.
Press the Fast Forward and Rewind buttons to quickly scan through recordings.
Press Fast Forward or Rewind multiple times to speed up playback.
Press the Stop button to exit playback mode.
Time Search
Page 16
1616
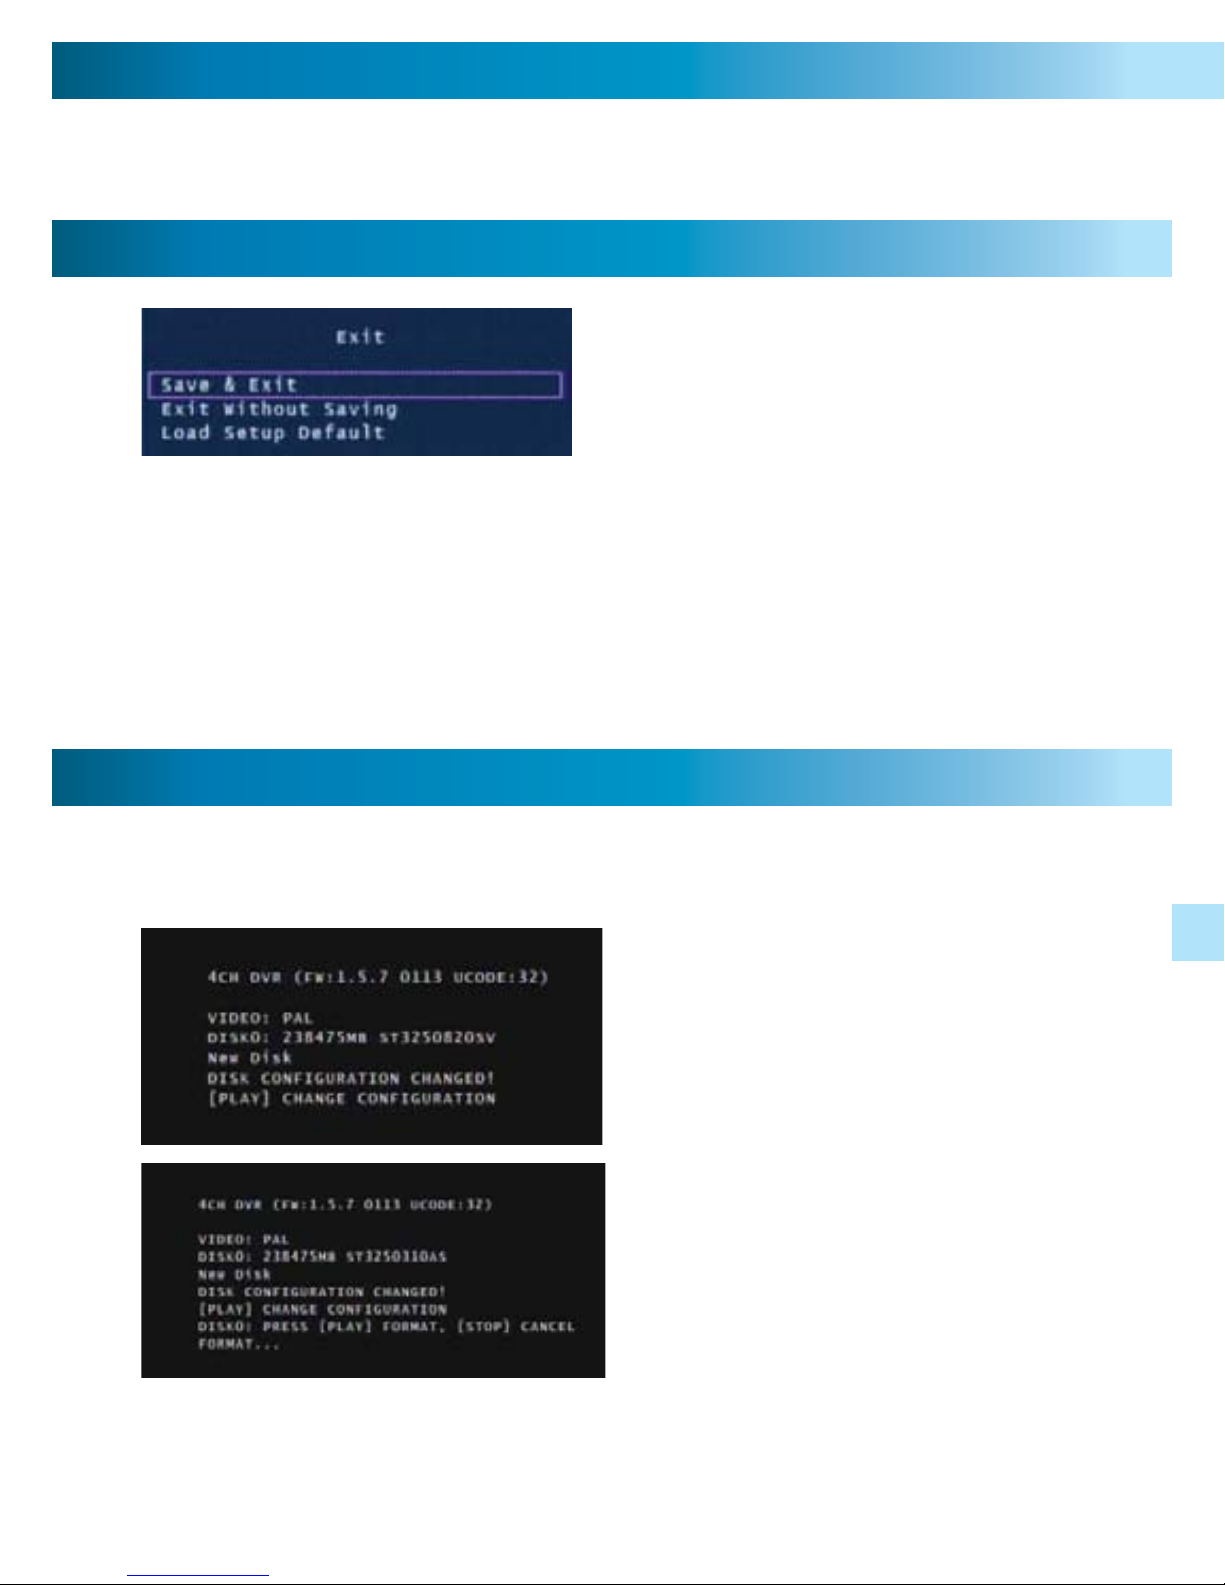
Save, Exit or Load Setup Defaults from the
Exit menu.
Press SET to select the highlighted option.
Save & Exit: Use this option to save all settings that have been changed in the
DVR menus. All changes made will be lost if you do not choose this option.
Exit Without Saving: Select to disregard any changes that have been made
and return to camera view.
Load Setup Default: Reset all settings on the DVR to factory defaults.
Exit Menu
Language
With the Language option selected push the SET button to switch between
English and Chinese.
When starting the DVR4-950™ for the fi rst time or starting the DVR after changing to a new hard drive, the DVR will confi gure the hard drive for use. Follow the
on screen prompts to confi gure the hard drive.
IMPORTANT NOTE: If format is chosen all existing data on the hard drive will
be deleted and unrecoverable.
1. After the DVR recognizes the new
hard drive press PLAY to confi gure for
use.
2. When the hard drive is confi gured
you will be asked to format or cancel.
Press PLAY to confi rm the format.
Starting the DVR With a New Hard Drive
99
Menu Operation
Accessing and Navigating the Menu System
The main Setup Menu can be accessed by pressing the MENU Button
To navigate the menus press the directional arrow keys UP DOWN
To change selections use the REWIND & FAST FOWARD
buttons
To select the highlighted option press the SET button
To return to the previous menu press the MENU button
Setting DVR Time
Page 17

1717
6. Replace the Hard Drive and plug in the SATA and the power cable as shown in
step 5.
7. Screw in the hard drive to the bottom of the case as in step 4.
8. Replace the top of the case.
9. Screw in the remaining screws to the sides and back of the DVR as in step 2.
4. Locate the screws below the hard
drive. Secure the hard drive before removing the 4 screws to avoid damaging
the hard drive
5. Push the metal clip on the SATA
cable (single RED or ORANGE cable)
to unplug the cable from the hard
drive. Unplug the power cable (2
BLACK 1 YELLOW and 1 RED cable)
from the back of the Hard Drive.
Remove
Power Cable
SATA Cable
IMPORTANT NOTE: The following instructions are for installing or changing the
hard drive. If your DVR4-950™ already has a hard drive pre-installed disregard
these steps.
Installing / Changing a Hard Drive in the DVR4-950™
1. Ensure the DVR4-950™ is unplugged and removed from mains power.
2. Locate and remove the 6 screws 2 on
each side at the front and 2 at the top
on the back. (The bottom screws on the
front do not need to be removed.
3. Pull up the top case of the DVR.
Remove
Installing or Changing a Hard Drive
Page 18
1818
Backing Up Footage to PC
The DVR4-950™ has a backup feature via the USB port on the back of the DVR.
The DVR accepts most fl ash drives or thumbdrives. The fl ash drive / thumbdrive must be formatted to the FAT32 fi le system. Please see your fl ash drive’s /
thumbdrive’s instructions regarding formatting. Follow the steps below to backup
footage:
1. Insert a USB fl ash drive / thumbdrive (not included) to the USB port.
2. Press Play to enter playback mode or use the Time Search feature to fi nd a
recording.
3. Pause playback at the start of the footage you would like to backup.
4. Press the Menu / File button to display the USB Backup Mode.
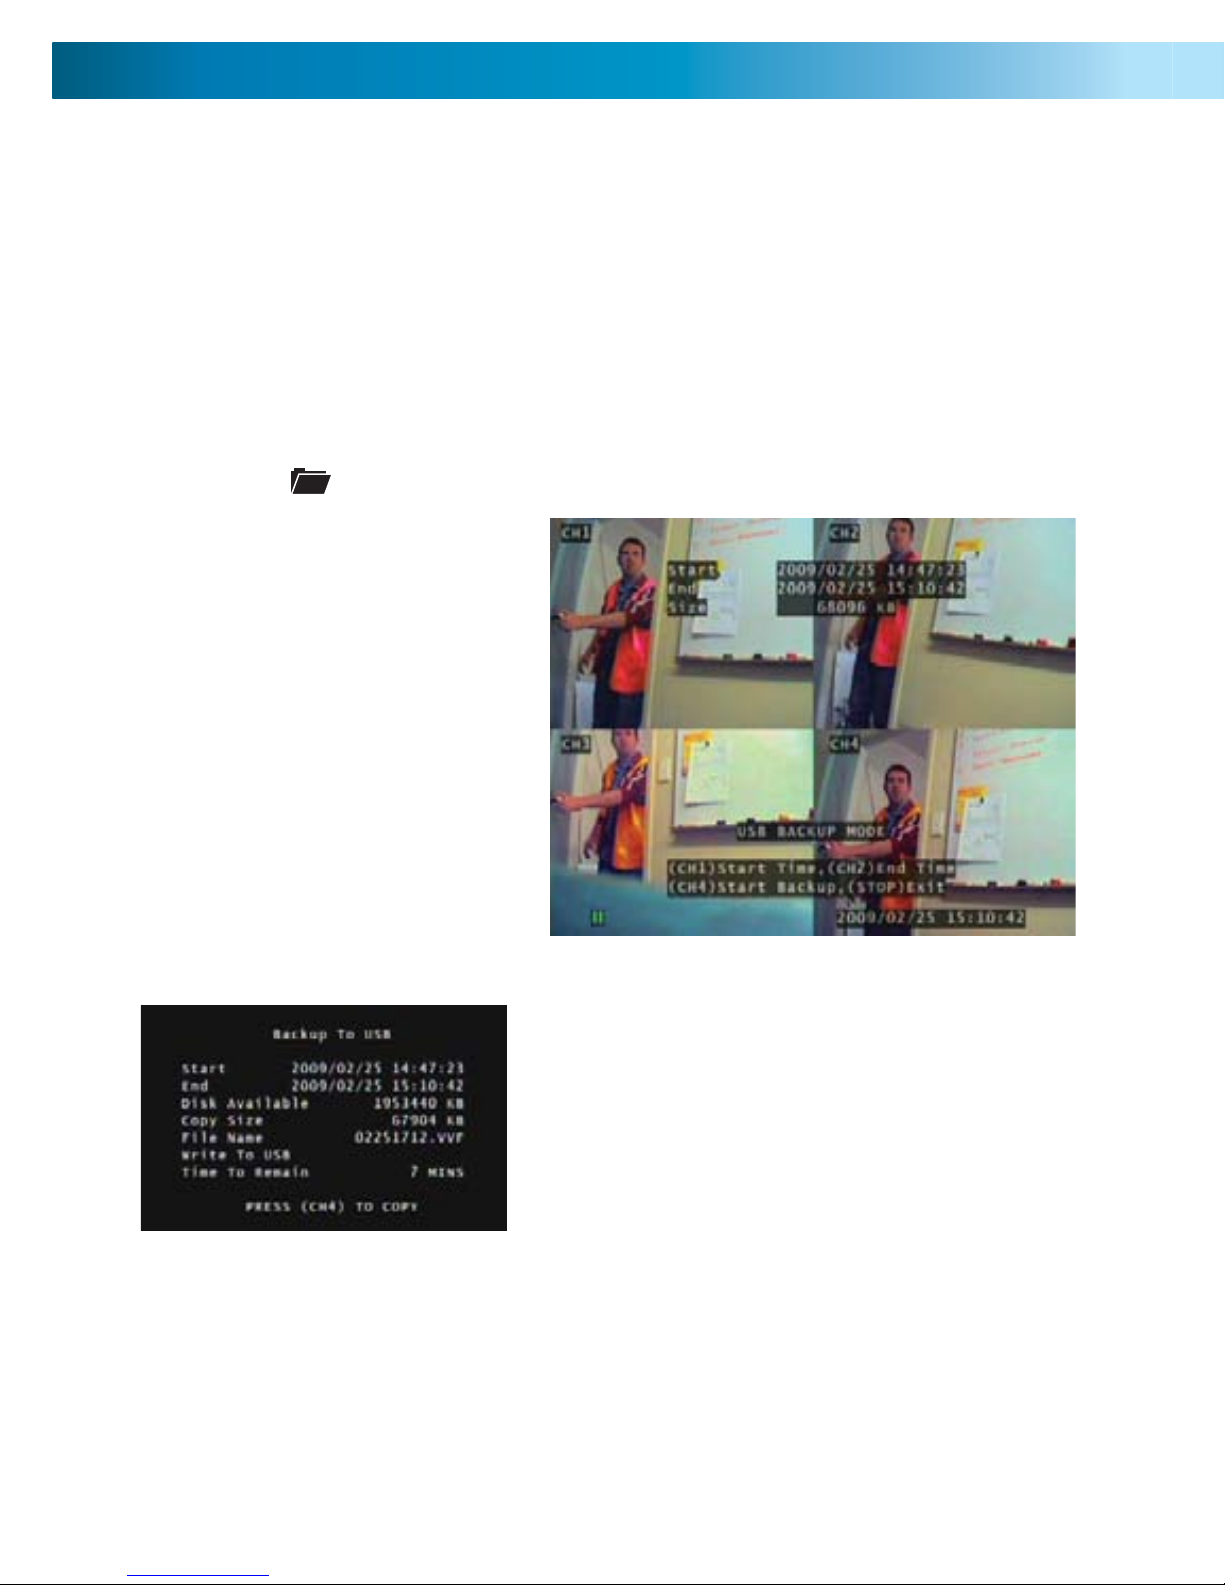
5. Press the CH1 button to
designate the start of a backup
recording.
6. Play and fi nd the end of the
footage you want to backup
and press Pause.
7. Press the CH2 button to
indicate the end of a backup
recording.
8. When you have chosen the
START and END time of the
recording press the CH4 button
to continue.
9. The Backup to USB screen will appear
with details of the USB device inserted, size
requirements and fi le name. Press CH4 to
begin copying.
10. When the backup is complete press the
Stop button and remove the USB device.
NOTE: USB back up can take up to the same amount of time as playing
back the video on screen. Eg. 1 hour play back may take up to 1 hour to
back up.
WARNING: Do not connect the DVR directly to a computer. Do not
remove the USB Flash Drive while the DVR is copying footage. Damage
may occur to attached devices if used improperly.
77
Connecting Cameras and Power Adapter
1. Connect the Power and BNC ends of the Security Camera to an
Extension Cable.
2. Connect the BNC end of the Extension Cable to the RCA adapter.
3. Connect the end of the RCA adapter to camera input on the back of the DVR.
4. Connect the power end of the Extension Cable to the Power Splitters.
5. Connect the Power Splitter to the Camera Power Adapter.
6. Plug in the Camera Power Adapter and the DVR Power Adapter to mains
power outlets.
accessories optional
Page 19
1919
VVFPlayer Interface
View backed up footage from the DVR4-950™ with the included VVFPlayer software located on the CD.
1. Put the CD in the CD drive. If it does not open automatically, click START open
MY COMPUTER and Double click the CD drive.
2. Copy the VVFPlayer_V2_6_4B software from the CD to your computer.
3. Double click to open the VVFPlayer software.
4. Click the File Folder (4) to bring up the open screen. Navigate to the video
you want to view and press Open. The backup fi le will have a .VVF extension.
5. Use the controls to view the video footage.
Viewing Backup Footage on a PC
Using the VVFPlayer software
1
2
3
4
58 1269 1371011 15
16
17
18
14
1. File name
2. Date & time of recording
3. Current play state
4. Open File
5. Fast Reverse (16x, 32x, 64x)
6. Reverse (1x)
7. Pr
evious frame
8. Pause
9. Next frame
10. Play
11. Fast Forward (16x, 32x, 64x)
12. Photo snapshot
13. Single Camera View
14. Split screen view
15. Timeline slider
16. Sound / Mute
17. Volume
18. Camera view
Page 20
2020
Viewing Backup Footage on a PC (cont)
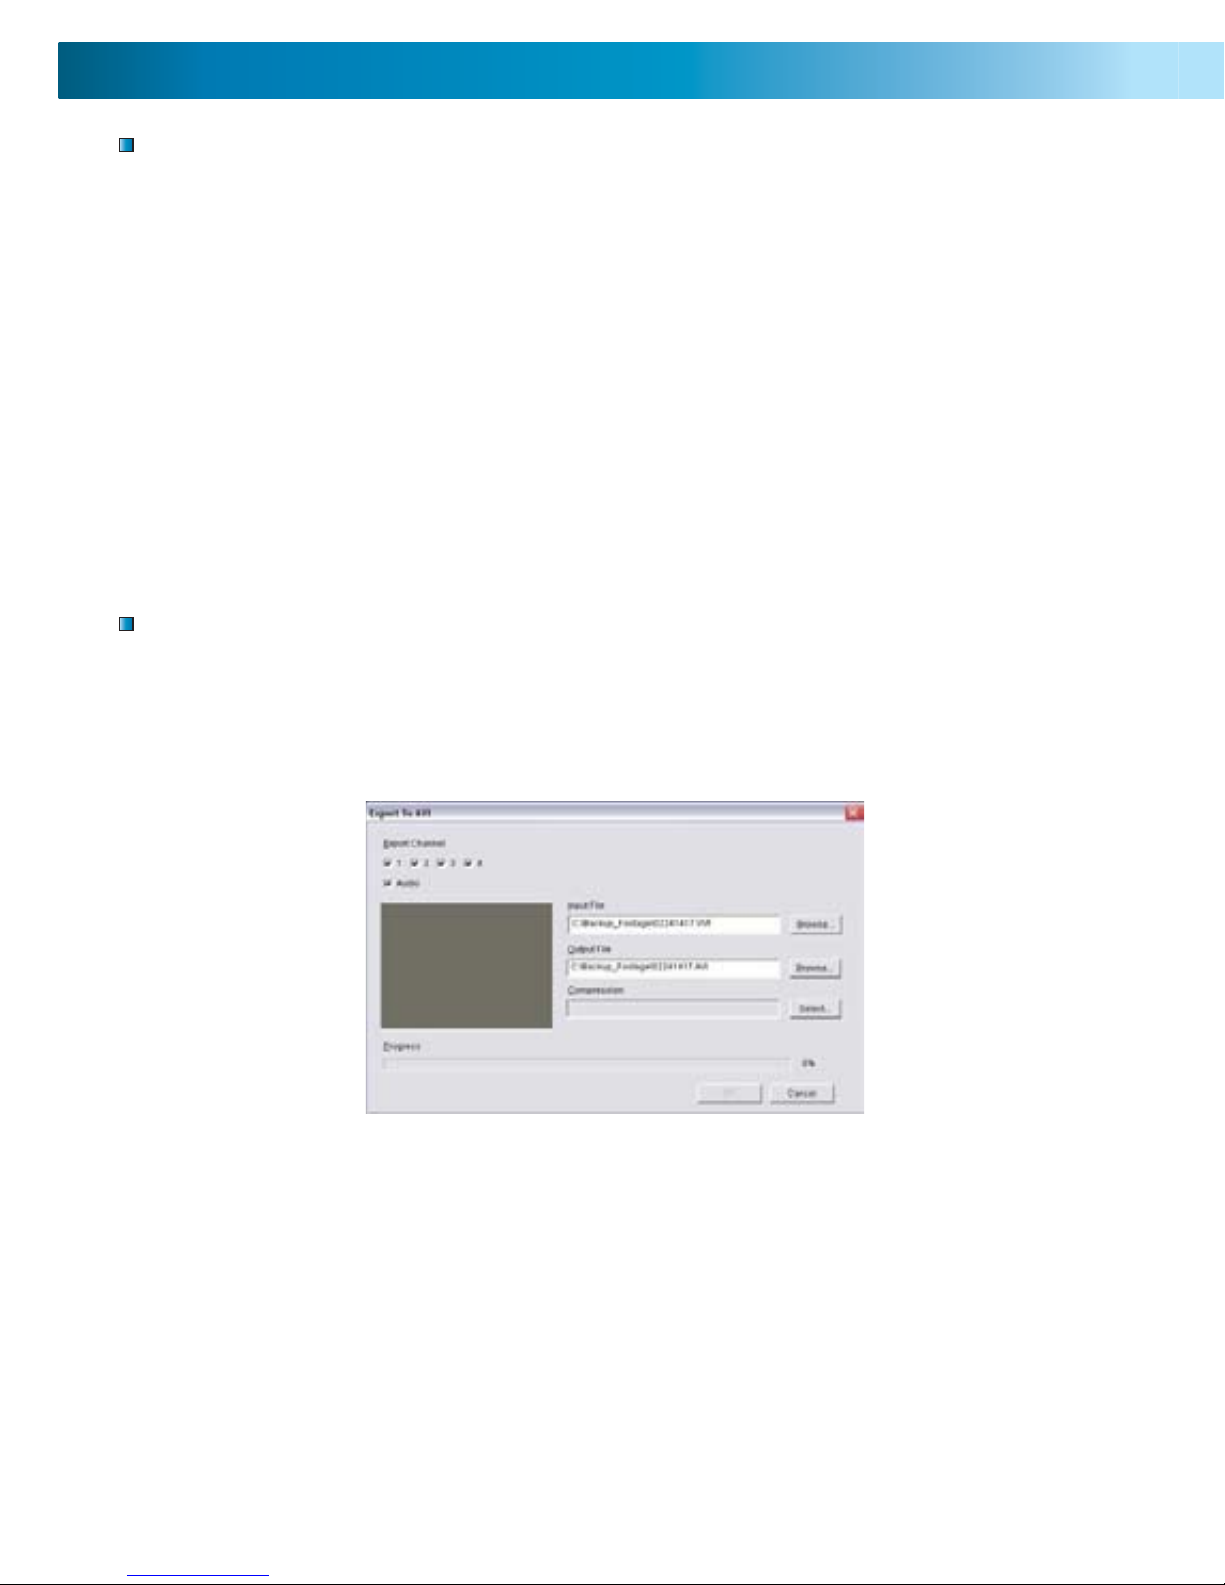
Exporting an AVI fi le
Extract footage from a larger video clip
To view video footage on another computer create an AVI fi le using the built in
export ability.
1. Right-click the main Camera view and click Export > AVI
2. Click “Browse...” next to Input File and select the video you want to convert.
3. Click “Browse...” next to Output File to select a location to export.
4. Choose your preferred compression method by clicking Select... If you are
unsure which method to use, select the default uncompressed mode.
5. Click OK to export the fi le.
6. Playback the fi le in your preferred media player.
When dealing with larger backup fi les it may be necessary to extract smaller clips.
The following describes how to extract footage and export to a new .VVF fi le.
1. Open and play the clip to extract from.
2. Pause the clip where you want to start the extraction.
3. Right-click the camera view and select Capture > Mark In
4. Find and Pause the clip at the end of the extraction.
5. Right-click the camera view and select Capture > Mark Out
6. Right-click the camera view and select Capture > Export and save the fi le
name and location. Note this export is in .VVF format.
55
1. Hard Drive Indicator
Lights when hard drive is ac-
tive (fl ashes when recording,
searching etc.)
2. Power Indicator
Lights on when DVR powered
3. Channel 1 Button
Press to view camera 1 in full
screen / Press again to return to
quad view
4. Channel 2 Button
Press to view camera 2 in full
screen / Press again to return to
quad view
5. Menu Button
Press to select Menu / previous
menu / exit menu
Note: some menu functions
require a password. Default
password is “111111”
DVR Layout
Front Panel & Removable Remote
The remote control contains a battery that must be activated before use.
Find and remove the clear plastic tab at the bottom of the remote. The
remote will now be ready for use.
Using the Remote Control for the First Time
Remove
plastic tab on
this end of
remote.
Page 21

2121
Problem: The Power light keeps blinking red.
Solution:
Ensure you are using the correct Power Adapter provided for the DVR.
If you have purchased the DVR as part of a kit, make sure the cameras are operating on a separate Power Adapter. The larger power adapter with higher amps
is designed specifi cally for the DVR.
Problem: The hard drive is not working.
Solution: Ensure the DVR is using the correct Power Adapter supplied. Open
the DVR and ensure the SATA cable is connected to the DVR and Hard Drive.
Problem: The hard drive usage is at 100% and will not record.
Solution: Format the hard drive or set the hard drive to overwrite mode.
Problem: I can only see a blue screen where my camera should be.
Solution: If only 1 camera view is blue, the DVR is not receiving that camera’s
signal. Check that the camera connections on the back of the DVR are secure.
Ensure the camera is plugged in and has power.
Problem: The DVR will not turn on.
Solution: Make sure you are using the correct Power Adapter for the DVR. Try
a second power outlet. Check the connections on the back of the DVR.
Problem: My DVR does not save footage more than a few days old.
Solution: Change the quality settings to Normal, lower the camera frame rates
or enable motion recording to conserve hard drive space.
Problem: I want to format my Hard Drive but I don’t remember the password.
Solution: The default password is “111111”. Swann recommends changing
the default password to prevent tampering or unauthorized use.
Problem: I am using wireless cameras and the DVR keeps beeping and motion
records all the time.
Solution: Analog wireless cameras suffer from interference. The DVR interprets
the change of image as motion and records. Swann recommends the use of wired
cameras or digital wireless cameras such as the ADW-300 for DVR recording.
Problem: I am unable to playback recorded footage.
Solution: Make sure when selecting footage to playback that you have high-
lighted the START time of that footage and not the STOP time
Troubleshooting Guide
Page 22

2222
Video/Audio
Video Format: NTSC / PAL depending on region
Operating System: Embedded RTOS
Video Input: RCA x 4
Audio Input: RCA x 1, Line-In
Video Output: BNC x 1
Audio Output: RCA x 1, Line-Out
Display and Recording
Display Frame: NTSC: 120 fps (4 × 30 fps)
PAL: 100 fps (4 × 25 fps)
Global Recording Frame Rate: NTSC: Max. 60 fps
PAL: Max. 50 fps
Video Operation Duplex : Record, Playback
Display Resolution: NTSC: 640 x 448
PAL: 640 x 544
Recording Resolution: NTSC: 640x224
PAL: 640x272
Compression Format: Modifi ed MJPEG
Size per frame: Normal: 12K Bytes
High: 15K Bytes
Highest: 20K Bytes
General
HDD Interface: SATA HDD x 1
Backup Method: USB Flash Drive, Thumbdrive (up to 2GB max)
Search Mode: Time/Date, Event
Full Screen: Yes
Motion Detect: Yes
Loss Detect: Yes
Auto Switching: Yes
Buzzer Output: Yes
Brightness Adjust: Yes
Contrast Adjust: Yes
Recovery Mode: Auto Restore Record on power failure
DC Input: DC 12V
Dimensions: 8.9” x 8.2” x 2.1”
225mm X 208mm X 53mm
Weight: 2.8lbs
1.3kg
Technical Specifications
33
Contents
Before You Begin 2
Contents 3
Package Contents 4
DVR Layout 5-6
Front Panel & Removable Remote 6
Rear Panel 6
Connections & Installation
Connecting Cameras and Power Adapter 7
Connecting the DVR to a TV Monitor 8
Turning the DVR On/Off and Auto Recovery 8
Menu Operation 9
Accessing and Navigating the Menu System 9
Setting DVR Time 9
Image Display 10
Single Camera View 10
Multi Camera View 10
Camera Menu 11
Record Menu 11-12
Motion Detection Menu 12-13
Screen Menu 13
Audio Menu 14
System Menu 14-15
Time Search 15
Language Menu 16
Exit Menu 16
Starting the DVR With a New Hard Drive 16
Changing the Hard Drive 17
Backing Up Footage to PC 18
Viewing Backup Footage on a PC 19
Using the VVFPlayer software 19
VVFPlayer Interface 19
Extract footage from a larger video clip 20
Exporting an AVI fi le 20
Troubleshooting Guide 21
Technical Specifi cations 22
Warranty Information 23
Technical Support Details Back cover
Page 23

2323
Warranty Information
Swann Communications warrants this product against defects in workmanship
and material for a period of one (1) year from it’s original purchase date. You must
present your receipt as proof of date of purchase for warranty validation. Any unit
which proves defective during the stated period will be repaired without charge
for parts or labour or replaced at the sole discretion of Swann. The end user is
responsible for all freight charges incurred to send the product to Swann’s repair
centres. The end user is responsible for all shipping costs incurred when shipping
from and to any country other than the country of origin.
The warranty does not cover any incidental, accidental or consequential damages
arising from the use of or the inability to use this product. Any costs associated with
the fi tting or removal of this product by a tradesman or other person or any other
costs associated with its use are the responsibility of the end user. This warranty
applies to the original purchaser of the product only and is not transferable to any
third party. Unauthorized end user or third party modifi cations to any component
or evidence of misuse or abuse of the device will render all warranties void.
By law some countries do not allow limitations on certain exclusions in this warranty.
Where applicable by local laws, regulations and legal rights will take precedence.
Swann Communications USA Inc.
12636 Clark Street
Santa Fe Springs CA 90670
USA
Swann Communications PTY. LTD.
Building 4, 650 Church Street,
Richmond, Victoria 3121
Australia
Limited Warranty Terms & Conditions
Page 24

2424
© Swann Communications 2009
Swann Technical Support
All Countries E-mail: tech@swannsecurity.com
Telephone Helpdesk
See http://www.worldtimeserver.com for information on time zones and the
current time in Melbourne, Australia compared to your local time.
USA toll free
1-800-627-2799
(Su, 2pm-10pm US PT)
(M-Th, 6am-10pm US PT)
(F 6am-2pm US PT)
USA Exchange & Repairs
1-800-627-2799 (option 1)
(M-F, 9am-5pm US PT)
AUSTRALIA toll free
1300 138 324
(M 9am-5pm AUS ET)
(Tu-F 1am-5pm AUS ET)
(Sa 1am-9am AUS ET)
NEW ZEALAND toll free
0800 479 266
INTERNATIONAL
+61 3 8412 4610
11
DVR4-950™
4 Channel Digital Video Recorder
Advanced security made easy
SW341-DNF / SW343-DP2 / SW343-DPM / SW344-DPS
www.swannsecurity.com
SR341-DNF-60010-200709
Page 25

11
DVR4-950™
4 Enregistreur Vidéo Numérique
Operating Instructions
plug&playsecurity
™
™
Advanced security made easy
SW341-DNF / SW343-DP2 / SW343-DPM / SW344-DPS
www.swannsecurity.com
SR341-DNF-60030-200709
Instructions de fonctionnement
Page 26

22
Avant de commencer
Vérifi cation FCC
NOTE: Cet équipement a été testé et est en conformité avec les limites édictées dans
le paragraphe 15 des Règlementations FCC, relatif aux équipements numériques
de classe B. Ces limites ont été défi nies dans le but de fournir une protection raisonnable contre les interférences néfastes dans les installations résidentielles. Cet
équipement génère, utilise et peut irradier des énergies de fréquences radio et,
s’il n’est pas installé dans le respect des instructions fournies, peut provoquer des
interférences auprès des appareils de réception radiotélévisée. Ces dernières peuvent être déterminées en allumant et éteignant l’équipement installe. L’utilisateur
est incité à essayer, si besoin est, de corriger les interférences à l’aides des mesures
suivantes :
- Réorienter ou déplacer l’antenne réceptrice.
Augmenter l’espace entre l’équipement et le récepteur
- Brancher l’équipement sur une prise ou un circuit différents de celui auquel le
récepteur est connecté.
- Consulter le revendeur ou un technicien radio/télévision expérimenté.
IMPORTANT: relative aux écoutes prohibées
Excepté dans le cadre d’opérations d’applications de la loi conduites par les autorités compétentes, il est strictement interdit d’utiliser le matériel fourni afi n d’écouter
ou d’enregistrer illégalement des conversations privées au-delà des strictes limites
édictées par les personnes engagées dans lesdites conversations.
ATTENTION : Toute modifi cation non approuvée par la partie responsable de la
mise en conformité de l’appareil peut annuler les autorisations ou droits d’utilisation
de l’équipement.
INSTRUCTIONS DE SECURITE IMPORTANTES :
Assurez-vous que le produit est correctement fi xé et stable.
Ne pas utiliser si les câbles ou connexions sont exposés
2323
Informations de garantie
Swann Communications garantit ce produit contre tous les défauts de fabrication et de
matériel pour une période d’un (1) an à partir de sa date d’achat initiale. Vous devez
présenter votre ticket de caisse comme preuve d’achat pour valider la garantie. Toute
unité qui se révèlerait défectueuse pendant la période mentionnée sera réparée sans
frais pour les pièces et la main d’oeuvre, ou remplacée à la seule discrétion de Swann.
La réparation ou le remplacement sera garanti soit pour quatre-vingt-dix jours soit pour
le reste de la période initiale de garantie, selon la période la plus longue. L’utilisateur
final est responsable des frais de port subis pour envoyer le produit vers les centres de
réparation de Swann.
L’utilisateur final est responsable pour tous les frais de port et d’expédition subis lors
de l’expédition de ce produit à partir et vers un autre pays que le pays d’origine. La
garantie ne couvre pas les dommages dus à des incidents, des accidents ou résultant
de l’utilisation, ou de l’incapacité d’utiliser ce produit. Tous frais associés de montage
ou de démontage de ce produit par un artisan ou toute autre personne, ou tous les
autres frais associés à son utilisation sont de la responsabilité de l’utilisateur final. Cette
garanties’applique seulement à l’acheteur initial du produit, et n’est pas transférable à
une tierce partie.
Les modifications non-autorisées par l’utilisateur ou toute tierce partie de n’importe
quelle composante ou tout preuves de mauvaise utilisation ou d’abus de l’appareil
annuleront toute garantie.
Page 27

33
Contenu
Avant de commencer 2
Contenu 3
Contenu 4
Mise en place du DVR 5-6
Panneau frontal et Télécommande 6
Panneau arrière 6
Connexions & Installation
Connexion des caméras et de l’adaptateur 7
Connexion du DVR à une télévision 8
Allumage/extinction du DVR et récupération automatique 8
Fonctionnement du menu 9
Menu – accès et navigation 9
Paramétrage de l’heure 9
Vue caméra unique 10
Vue caméras multiples 10
Vue caméras multiples 10
Menu caméra 11
Menu enregistrement 11-12
Menu détection de mouvements 12-13
Ecran du menu 13
Menu audio 14
Menu système 14-15
Recherche heure 15
Menu langues 16
Menu sortie 16
Allumer le DVR avec un nouveau disque dur 16
Changer le disque dur 17
Sauvegarder un enregistrement vers un ordinateur 18
Visionner un enregistrement sauvegardé sur ordinateur 19
Utilisation du logiciel VVFPlayer 19
Interface du logiciel VVFPlayer 19
Extraire un enregistrement d’un clip vidéo 20
Exporter un fi chier au format AVI 20
Guide de résolution des problèmes 21
Spécifi cations techniques 22
Informations de garantie 23
Détails support technique Quatrième
de couverture
Page 28

44
Contenu
Unité DVR4-950™
Télécommande panneau frontal x 2
Instructions
Guide de démarrage rapide
Adaptateur et câble
CD d’installation du logiciel
Câble vidéo RCA
Adaptateurs BNC vers RCA x 4
Autocollants de sécurité (pack de 4)
Si l’un des éléments présentés ci-dessus est manquant, veuillez contacter
Swann Communications.
2121
Problème : Le témoin d’alimentation clignote en rouge.
Solution : Assurez-vous que vous utilisez le bon adaptateur. Si vous avez acheté le DVR
dans le cadre d’u kit, assurez-vous que les caméras sont branchées sur un adaptateur sé-
paré. L’adaptateur le plus volumineux correspond au DVR.
Problème : Le disque dur ne fonctionne pas.
Solution : Assurez-vous que le DVR utilise le bon adaptateur. Ouvrez le DVR et assurez-
vous que le câble SATA est bien branché et relie DVR et disque dur.
Problème : L’utilisation du disque dur indique 100% et ce dernier n’enregistre plus.
Solution : Formatez le disque dur ou paramétrez ce dernier afi n d’autoriser le mode réécri-
ture.
Problème : Je ne vois qu’u écran bleu là où devrait se trouver ma caméra.
Solution : Si seulement une vue caméra est un écran bleu, cela signifi e que le DVR ne reçoit
pas de signal de la caméra. Vérifi ez les connexions de cette dernière à l’arrière de votre DVR.
Vérifi ez que la camera est branchée et allumée.
Problème : Le DVR ne s’allume pas
Solution : Assurez-vous que vous utilisez le bon adaptateur. Essaye une autre prise. Véri-
fi ez les connexions situées à l’arrière du DVR.
Problème : Mon DVR ne sauvegarde que les enregistrements vieux de quelques jours.
Solution : Passez en mode qualité Normal : un nombre d’image par seconde moins élevé
ou une qualité d’image moindre permet d’économiser de l’espace sur votre disque dur.
Problème : Je veux formater mon disque dur mais je ne me souviens plus du mot de
passe.
Solution : Le mot de passe par défaut est « 111111 » Swann vous recommande, pour des
raisons de sécurité, de modifi er ce mot de passe.
Problème : J’utilise des caméras sans fi l, le DVR n’arrête pas de biper et le détecteur de
mouvement enregistre tout le temps.
Solution : Les caméras sans fi l analogiques peuvent subir des interférences. Le DVR inter-
prète le changement d’image comme un mouvement et lance un enregistrement. Swann
vous recommande d’utiliser des caméras câblées ou d’opter pour des caméras ans fi l nu-
mériques telles que le modèle ADW-300 pour l’enregistrement.
Problème : Je ne peux pas lire les séquences enregistrées.
Solution : Assurez-vous, lors du choix de la séquence à lire, que vous avez bien marqué le
DEBUT de cette dernière et non sa FIN.
Guide de résolution des problèmes
Page 29

55
1. Indicateur disque dur
Lumières allumées lorsque le
disque dur est actif (clignotantes
lors des enregistrements, des
recherches etc.)
2. Indicateur alimentation
Lumières allumées lorsque le DVR
est en marche
3. Bouton chaîne 1
Appuyez sur ce bouton pour
visualiser la caméra 1 en mode
plein écran / appuyez à nouveau
pour retourner en vue mosaïque
4. Bouton chaîne 2
Appuyez sur ce bouton pour
visualiser la caméra 2 en mode
plein écran / appuyez à nouveau
pour retourner en vue mosaïque
5. Bouton Menu
Appuyez sur ce bouton pour
sélectionner les options Menu /
menu précédent / quitter
Note : Certaines fonctions
nécessitent un mot de passe. Le
mot de passe par défaut est «
111111 »
6. Bouton Paramétrage
Appuyez sur ce bouton pour
confi rmer votre sélection
7. Bouton enregistrement/arrêt
Appuyez sur ce bouton pour
lancer / arrêter un enregistrement
Note : Ne fonctionnement pas si
l’enregistrement différé ou si le
détecteur de mouvements sont
activés.
8. Bouton lecture / pause
Appuyez pour affi cher la LISTE
DES EVENEMENTS, pour lancer le
dernier enregistrement ou mettre
la lecture en pause
9. Capteur contrôle à distance
10. Bouton chaîne 3
Appuyez sur ce bouton pour
visualiser la caméra 3 en mode
plein écran / appuyez à nouveau
pour retourner en vue mosaïque
11. Bouton chaîne 4
Appuyez sur ce bouton pour
visualiser la caméra 4 en mode
plein écran / appuyez à nouveau
pour retourner en vue mosaïque
12. Flèche haut
Déplace le curseur vers le haut
dans les menus
13. Flèche bas
Déplace le curseur vers le bas
dans les menus
14. Bouton retour rapide
Appuyez sur ce bouton pour
activer le retour rapide durant la
lecture / déplacer le curseur vers
la gauche dans les menus
15. Bouton avance rapide
Appuyez sur ce bouton pour
activer l’avance rapide durant la
lecture / déplacer le curseur vers
la droite dans les menus / activer
la fonction AUTO SWITCH
Note : 3-15 télécommande panneau frontal
Mise en place du DVR
Panneau frontal et Télécommande
1
10 11 12 13
2
345678
9
14 15
La télécommande contient une pile qui doit être active avant la première utilisation. Enlevez la
protection en plastique collée à l’arrière de la télécommande. La télécommande est désormais prête
à être utilisée.
Utiliser la télécommande pour la première fois
LED IR
Enlever la protection plastique située à
l’arrière de la
télécommande
Page 30

66
1. Sortie Vidéo
Sortie vers TV
2. Entrée vidéo
Entrées pour caméras x4 RCA
3. Entrée
Entrée pour microphone 1 x RCA
4. Sortie Audio
Sortie vers haut-parleur 1 x RCA
5. Connexion USB
Transférer un enregistrement de sauvegarde sur
un Flash drive ( non
Inclus)
6. Entrée alimentation DC 12 V
Connexion pour adaptateur 12V uniquement
Panneau arrière
3
4512
6
Mise en place du DVR (Suite)
Utilisez les échancrures
pour ôter la télécommande
de l’unité
Enlever la télécommande
Note : Pour sécuriser votre DVR et prévenir toute utilisation non autorisée, veuillez ôter la télécommande et placez cette dernière dans un
endroit sécurisé.
1919
Interface du logiciel VVFPlayer
Visionnez les enregistrement stockés sur votre DVR4-950™ à l’aide du logiciel VVF situé
sur le CD d’installation.
1. Insérez le CD dans le lecteur. Si ce dernier ne se lance pas automatiquement, appuyez
sur DEMARRER, OSTE DE TRAVAIL et double-cliquez sur l’icone représentant le lecteur CD.
2. Copiez le logiciel VVFPlayer_V2_6_4B sur votre ordinateur.
3. Double-cliquez pour lancer le logiciel VVFPlayer.
4. Cliquez sur le dossier (4) afi n de visualiser l’écran du logiciel. Naviguez jusqu’à la vidéo
que vous souhaitez visualiser et cliquez sur Ouvrir. Le fi chier enregistré possédera une
extension de type .VVF.
5. Utilisez les contrôles pour visualiser la vidéo.
Visionner un enregistrement sauvegardé sur ordinateur
Utilisation du logiciel VVFPlayer
1
2
3
4
1. Nom du fi chier
2. Date & heure de l’enregistrement
3. Etat actuel de lectur
4. Ouvrir fi chier
5. Retour rapide (16x, 32x, 64x)
6. Retour (1x)
7. Image précédente
8. Pause
9. Image suivante
Page 31

77
Connexion des caméras et de l’adaptateur
1. Connectez les câbles d’alimentation et BNC de la caméra de sécurité à un
câble d’extension.
2. Connectez l’extrémité BNC du câble d’extension à l’adaptateur RCA.
3. Connectez l’extrémité de l’adaptateur RCA à l’entrée caméra située à l’arrière
du DVR.
4. Connectez l’extrémité Alimentation du câble d’extension aux coupleurs.
5. Connectez le coupleur à l’adaptateur d’alimentation de la caméra.
6. Branchez l’adaptateur d’alimentation de la caméra et l’adaptateur
1
2
3
4
5
Caméras et accessoires
optionnels
6
Page 32

88
Connexion du DVR à une télévision
1
2
1. Connectez l’extrémité RCA du câble vidéo à l’ENTREE jaune
Située à l’arrière du moniteur / téléviseur.
2. Connectez l’autre extrémité RCA du câble vidéo à la SORTIE jaune
Située à l’arrière du DVR.
3. Branchez votre TV sur la bonne chaîne afi n de pouvoir visualiser le DVR. A
l’aide de la télécommande de votre TV, appuyez sur le bouton ENTREE jusqu’à ce
que les images transmises par votre DVR apparaissent à l’écran. Sur la plupart
des TV, ce bouton est appelé Entrée, Vidéo, Source, A/V, Ligne, Chaîne 0 etc. Si
vous ne parvenez pas à visualiser votre DVR, veuillez contacter le fabriquant de
votre téléviseur pour assistance.
Back of TV
Allumer / Eteindre le DVR
Pour allumer votre DVR, connectez l’adaptateur d’alimentation à l’entrée DC
12V située à l’arrière de l’unité. Pour éteindre le DVR, débranchez le câble
d’alimentation.
Si le DVR n’est pas utilisé pour une période prolongée, Swann vous recommande
de débrancher l’unité.
Option Récupération Automatique
Le DVR4-950™ comporte une option de récupération automatique. Si une coupure de courant survient lors de l’enregistrement, ce dernier reprendra automatiquement une fois le courant rétabli.
Allumage/extinction du DVR et récupération
Arrière de la TV
Arrière de la TV
1717
6. Remplacez le disque dur et branchez les câbles SATA et alimentation comme
présenté dans l’étape 5.
7. Vissez le disque dur à l’arrière du boitier comme présenté dans l’étape 4.
8. Replacez le dessus du boîtier.
9. Replacez les vis restantes sur les côtés et à l’arrière du DVR comme présenté
dans l’étape 2.
4. Situez les vis situées sous le disque
dur. Sécurisez le disque dur avant
d’enlever les 4 vis de manière à éviter
tout dommage.
NOTE IMPORTANTE Les instructions suivantes concernent l’installation
ou le changement du disque dur. Si un disque dur est déjà préinstallé sur
votre DVR4-950™, veuillez ignorer les étapes suivantes.
Installation / Changement d’un Disque Dur sur le DVR4-950™
1. Assurez-vous que le DVR4-950™ est débranché.
2. Situez et enlevez les 6 vis (2 à l’avant,
2 au sommet et 2 à l’arrière). (les vis
situées en bas du panneau avant n’ont
pas à être enlevées).
Changer le disque dur
Page 33

99
Fonctionnement du menu
Menu – accès et navigation
Le menu principal de paramétrage de l’unité peut être ouvert à l’aide du bouton
MENU
Pour naviguer entre les menus, appuyez sur les touches des fl èches directionnelles HAUT et BAS
Pour modifi er les sélections, utilisez les boutons RETOUR RAPIDE et
AVANCE RAPIDE
Pour confi rmer votre sélection, appuyez sur le bouton SET
Pour revenir au menu précédent, appuyez sur le bouton MENU
Paramétrage Menu
Principal
Paramétrage de l’heure
Pour modifi er l’heure du DVR, allez dans
le menu Système et sélectionnez l’option
REGLER HEURE
Une fois l’option REGLER HEURE sélectionnée, appuyez sur SET
afi n d’affi cher les fl èches de sélection.
Utilisez les boutons AVANCE RAPIDE et
RETOUR RAPIDE pour modifi er la date (année, mois, jour) et l’heure (heures, minutes,
secondes)
Page 34

1010
Vue caméra unique
Vue caméras multiples
5
6
2
3
1. Current Camera Channel
2. Motion Detection Icon
3. Recording Icon
4. Main Display
5. Current Date & Time
6. Mute Audio
7. No Camera Signal Icon
Vue multi-caméras avec 4 caméras Vue multi-caméras sans caméra
7
MUTE
Affichage de l’image
1
4
1515
Alarme perte signal: Une fois cette option activée, une alarme audible indiquera que le
DVR ne reçoit plus de signal d’une caméra, ou qu’une caméra a été débranchée.
Mise à jour logicielle: Indique la version actuelle du logiciel et autorise de futures mises
à jour à l’aide d’un Flash Drive USB. N’ôtez pas le Flash Drive lors des mises à jour. Vous
risqueriez d’endommager le DVR. N’installez que les mises à jour autorisées par Swann.
Une fois la mise à jour complète, enlevez le Flash Drive et redémarrez le DVR.
Menu système (suite)
Journal des événements : Affi che la liste des 127 derniers éléments enregistrés, du plus
récent au plus ancien. Utilisez l’option Recherche pour les événements plus anciens non
présents dans la liste.
Date de début : Date et heure de l’enregistrement le plus ancien sur le DVR.
Date de fi n : Date et heure de l’enregistrement le plus récent sur le DVR.
Entrez une date et/ou une heure située entre la date de début et la date de fi n et
appuyez sur le bouton Lecture pour visualiser les enregistrements correspondant.
Appuyez sur les boutons Avance rapide et retour rapide pour passer rapidement
entre les enregistrements. Appuyez à plusieurs reprises sur les boutons avance
rapide et retour rapide pour accélérer la lecture.
Appuyez sur le bouton Arrêt pour quitter le mode lecture.
Recherche heure
Page 35

1111
Menu caméra
Le menu caméra vous permet de
changer les attributs visuels de chacune
des chaînes.
Chaîne: Affi che les attributs des caméras sélectionnées.
Affi chage: Allume ou éteint la caméra sélectionnée dans l’affi chage principal.
Luminosité, contraste, teinte, saturation: A l’aide des boutons UP & DOWN
sélectionnez l’option que vous désirez modifi er. Utilisez le bouton AVANCE
RAPIDE pour augmenter le paramètre sélectionné et le bouton RETOUR RAPIDE
pour le diminuer.
Le menu enregistrement permet
d’ajuster la qualité de l’enregistrement
et les paramètres d’enregistrement
différé.
Vous pouvez paramétrer de manière
individuelle la vitesse d’enregistrement
de chaque caméra. Le nombre total
d’images par secondes ne peut excéder
60 pour les systèmes NTSC ou 50 pour
les systèmes PAL. Un nombre moins
élevé d’images par secondes vous
permettra d’économiser de l’espace
disque.
Vitesse d’enregistrement : Permet de paramétrer le nombre d’image par secondes pour chaque caméra. Note : Un nombre élevé d’images par secondes vous
permet d’obtenir un enregistrement plus fl uide mais nécessite un espace disque
plus important.
Menu enregistrement
Page 36

1212
Le calendrier vous permet de défi nir le mode
d’enregistrement en fonction de chaque
heure de la journée. Utilisez les touches
droite/gauche et haut/bas pour modifi er
votre sélection.
Par d’enregistrement : N’enregistrera pas
Enregistrement Heure : Enregistrera la
totalité de l’heure sélectionnée
Détecteur de mouvement : Ne lancera
un enregistrement que si un mouvement est
détecté.
Important : Pour activer le détecteur de mouvement, vous devez paramétrer
l’heure de démarrage de la fonction détection de mouvement (vert) ET défi nir la
sensibilité et la zone d’enregistrement dans le menu Détecteur de mouvement.
Qualité d’enregistrement: Permet de choisir la qualité de l’enregistrement entre Normal,
Elevée ou Maximale Note: Choisir une image de meilleure qualité entraînera un usage
plus important de l’espace disque.
Durée d’enregistrement événement: Lorsque le détecteur de mouvement est activé,
cette option permet de défi nir, en secondes, la durée d’enregistrement par le DVR : 5, 10,
15, 20 ou 30 secondes. La valeur par défaut est défi nir sur 30 secondes.
Calendrier d’enregistrement : Permet de paramétrer différents modes d’enregistrement
en fonction de l’heure du jour.
Menu enregistrement (suite)
Menu détection de mouvements
Le menu détecteur de mouvement vous
permet de paramétrer les options pour
chaque caméra.
Note : Le DVR détectera les mouvements
en fonction du niveau de changement de
chaque image.
Chaîne: Sélectionnez les attributs de chaque caméra.
Sensibilité: Défi nissez l’intensité du mouvement nécessaire au déclenchement du dé-
tecteur de mouvements. Choisissez une valeur comprise entre 1 (le plus sensible) et 4 (le
moins sensible)> Cette option est désactivée par défaut. Note: Il est nécessaire de choisir
une valeur comprise entre 1 et 4 pour activer le détecteur de mouvement.
Durée de l’alarme : Défi nissez la durée de l’alarme lors d’une détection de mouvement.
Choisissez entre désactivée, 5, 10, 15, 20, 25, 30 secondes ou Continue. Note : Si la
durée de l’alarme est défi nie sur Continue, l’alarme sonnera jusqu’à ce que ce paramètre
ait été modifi é.
1313
Zone de détection: Choisissez la zone de détection de mouvement Les mouve-
ments se produisant en dehors de cette zone désignée ne provoqueront aucun
enregistrement.
Cette fonctionnalité est utile dans les zones de trafi c important où seule une petite zone
de l’écran doit être contrôlée, par exemple lors de la surveillance d’une zone placée près
d’une route fréquentée.
Important: Pour activer cette fonctionnalité, il est nécessaire de para-
métrer Sensibilité et Zone de détection pour chaque caméra ET la fonc-
tion Détection de mouvement dans le menu d’enregistrement programmé.
Bordure : Applique une bordure entre les caméras dans la vue multi-caméras.
Ajustement vidéo : Ajuste l’affi chage afi n d’adapter ce dernier à votre télévi-
sion / moniteur.
Changement Auto : Lorsque ce paramètre est actif, en mode direct, le DVR
passera automatiquement d’une chaîne à l’autre en mode plein écran. Défi nissez
le délai entre 1 et 10 secondes entre chaque changement ou désactivez cette op-
tion. Pour activer le changement automatique, appuyez sur le bouton AVANCE
RAPIDE lors de la diffusion des caméras. Appuyez à nouveau sur le bouton
/- pour arrêter le changement automatique.
Ecran du menu
Menu détection de mouvements (suite)
Page 37

1313
Zone de détection: Choisissez la zone de détection de mouvement Les mouve-
ments se produisant en dehors de cette zone désignée ne provoqueront aucun
enregistrement.
Utilisez les boutons HAUT, BAS, RETOUR
RAPIDE et AVANCE rapide pour naviguer entre les sélections. YR RAPIDE Utilisez les fl èches pour défi nir une zone
de mouvement et appuyez sur le bouton SET pour valider votre sélection.
Dans l’exemple présenté à gauche, la zone
de détection de mouvement est défi nie
sur la porte. Seuls les mouvements détectés dans cette zone seront à l’origine d’un
enregistrement (ex. Ouverture de la porte).
zone seront à l’origine d’un enregistrement (ex. Ouverture de la porte).
Cette fonctionnalité est utile dans les zones de trafi c important où seule une petite zone
de l’écran doit être contrôlée, par exemple lors de la surveillance d’une zone placée près
d’une route fréquentée.
Important: Pour activer cette fonctionnalité, il est nécessaire de paramétrer Sensibilité et Zone de détection pour chaque caméra ET la fonction Détection de mouvement dans le menu d’enregistrement programmé.
Le menu permet d’ajuster l’affi chage
des caméras dans la vue principale.
Bordure : Applique une bordure entre les caméras dans la vue multi-caméras.
Ajustement vidéo : Ajuste l’affi chage afi n d’adapter ce dernier à votre télévi-
sion / moniteur.
Changement Auto : Lorsque ce paramètre est actif, en mode direct, le DVR
passera automatiquement d’une chaîne à l’autre en mode plein écran. Défi nissez
le délai entre 1 et 10 secondes entre chaque changement ou désactivez cette option. Pour activer le changement automatique, appuyez sur le bouton AVANCE
RAPIDE lors de la diffusion des caméras. Appuyez à nouveau sur le bouton
/- pour arrêter le changement automatique.
Ecran du menu
Menu détection de mouvements (suite)
Page 38

1414
Le menu Audio permet de paramétrer
les options d’enregistrement et de
volume.
Note : Vous devez posséder une
caméra équipée d’un microphone pour
utiliser ce menu.
Enregistrement : Paramétrez cette option sur ON au niveau de l’entrée Audio
située à l’arrière du DVR.
Silencieux : Permet d’allumer ou d’éteindre la sortie audio lors de la visualisation ou de l’enregistrement d’images. Vous pouvez, de manière alternative, appuyez sur le bouton Silencieux lors de la visualisation des caméras.
Volume Entrée : Déplacez le curseur pour modifi er le volume enregistré.
Volume de sortie : Déplacez le curseur pour modifi er le volume de lecture.
Menu audio
Menu système
Le menu Système permet de paramétrer les options générales telles
qu’informations relatives au disque dur,
heure, date et paramètres constructeur.
Paramétrage disque dur : Affi che les informations relatives au disque dur installé, dont taille
et utilisation de la mémoire.
Activation réécriture : Si cette option est activée, lors que le disque dur est plein, Le
DVR pourra automatiquement réécrire sur les enregistrements les plus anciens. Valeur par
défaut : Oui
Formater HDD : Cette option supprimera automatiquement toutes les données présentes
sur le disque dur. Il est nécessaire de saisir correctement le mot de passe afi n de formater
le disque dur.
Modifi er le mot de passe : Cette option permet de changer le mot de passe. Il vous sera demandé de saisir le mot de passe actuel, le nouveau mot de passe, et de confi rmer ce dernier.
Note : Le mot de passe par défaut est « 111111 » Si vous avez perdu ou oublié votre mot
de passe, veuillez contacter le Support Technique de Swann Communications.
1111
Menu caméra
Chaîne: Affi che les attributs des caméras sélectionnées.
Affi chage: Allume ou éteint la caméra sélectionnée dans l’affi chage principal.
Luminosité, contraste, teinte, saturation: A l’aide des boutons UP & DOWN
sélectionnez l’option que vous désirez modifi er. Utilisez le bouton AVANCE
RAPIDE pour augmenter le paramètre sélectionné et le bouton RETOUR RAPIDE
pour le diminuer.
Vitesse d’enregistrement : Permet de paramétrer le nombre d’image par sec-
ondes pour chaque caméra. Note : Un nombre élevé d’images par secondes vous
permet d’obtenir un enregistrement plus fl uide mais nécessite un espace disque
plus important.
Menu enregistrement
Page 39

1515
Utilisez les touches fl échées pour sélectionner la lecture et l’a souligné l’événement.
Appuyez sur Stop pour quitter le mode de
lecture.
Conseil: Vous pouvez également accéder à
la Liste des événements en appuyant sur la
touche de lecture pendant la visualisation de
vos caméras.
Alarme perte signal: Une fois cette option activée, une alarme audible indiquera que le
DVR ne reçoit plus de signal d’une caméra, ou qu’une caméra a été débranchée.
Mise à jour logicielle: Indique la version actuelle du logiciel et autorise de futures mises
à jour à l’aide d’un Flash Drive USB. N’ôtez pas le Flash Drive lors des mises à jour. Vous
risqueriez d’endommager le DVR. N’installez que les mises à jour autorisées par Swann.
Une fois la mise à jour complète, enlevez le Flash Drive et redémarrez le DVR.
Numéro
Date & Heure
Type
Démarrer
/ Arrêter
Menu système (suite)
Journal des événements : Affi che la liste des 127 derniers éléments enregistrés, du plus
récent au plus ancien. Utilisez l’option Recherche pour les événements plus anciens non
présents dans la liste.
L’option de recherche vous permet de
passer rapidement d’une date ou d’une
heure à l’autre afi n de visualiser un
enregistrement.
Date de début : Date et heure de l’enregistrement le plus ancien sur le DVR.
Date de fi n : Date et heure de l’enregistrement le plus récent sur le DVR.
Entrez une date et/ou une heure située entre la date de début et la date de fi n et
appuyez sur le bouton Lecture pour visualiser les enregistrements correspondant.
Appuyez sur les boutons Avance rapide et retour rapide pour passer rapidement
entre les enregistrements. Appuyez à plusieurs reprises sur les boutons avance
rapide et retour rapide pour accélérer la lecture.
Appuyez sur le bouton Arrêt pour quitter le mode lecture.
Recherche heure
Page 40

1616
Enregistrer, Fermer ou Charger la valeur
par défauts depuis le menu Quitter.
Appuyez sur SET pour valider les options
choisies.
Enregistrer & Quitter : Cette option vous permet de sauvegarder tous les
changements effectués. Tous les changements effectués seront perdus si
vous ne validez pas cette option.
Quitter sans sauvegarder : Sélectionnez cette option pour quitter ce
menu sans enregistrer les changements effectués, et pour revenir en vue
caméra.
Restaurer les paramètres par défaut : Rétablit tous les paramètres par
Menu sortie
Menu langues
Appuyez sur le bouton SET pour passer d’une langue à l’autre.
Lors du premier démarrage du DVR4-950™ ou du démarrage du DVR après un
changement de disque dur, le DVR confi gurera le disque dur afi n que ce dernier
puisse être utilisé. Suivez les indications affi chées afi n de confi gurer le disque
dur.
NOTE IMPORTANTE Si vous décidez de formater, toutes les données présentes
sur le disque dur seront défi nitivement effacées.
1. Une fois que le DVR a reconnu le
nouveau disque dur, appuyez sur le
bouton LECTURE pour confi gurer
l’utilisation de ce dernier.
2. Une fois le disque dur confi guré,
il vous sera demandé de formater ou
d’annuler le formatage. Appuyez sur
Allumer le DVR avec un nouveau disque dur
99
Fonctionnement du menu
Menu – accès et navigation
Le menu principal de paramétrage de l’unité peut être ouvert à l’aide du bouton
MENU
Pour naviguer entre les menus, appuyez sur les touches des fl èches direction-
nelles HAUT et BAS
Pour modifi er les sélections, utilisez les boutons RETOUR RAPIDE et
AVANCE RAPIDE
Pour confi rmer votre sélection, appuyez sur le bouton SET
Pour revenir au menu précédent, appuyez sur le bouton MENU
Paramétrage de l’heure
Page 41

1717
6. Remplacez le disque dur et branchez les câbles SATA et alimentation comme
présenté dans l’étape 5.
7. Vissez le disque dur à l’arrière du boitier comme présenté dans l’étape 4.
8. Replacez le dessus du boîtier.
9. Replacez les vis restantes sur les côtés et à l’arrière du DVR comme présenté
dans l’étape 2.
4. Situez les vis situées sous le disque
dur. Sécurisez le disque dur avant
d’enlever les 4 vis de manière à éviter
tout dommage.
5. Appuyez sur le clip en métal situé sur le câble SATA (câble ROUGE
ou ORANGE) afi n de débrancher ce
dernier du disque dur. Débranchez
le câble d’alimentation (2 câbles
NOIRS, 1 câble JAUNE et 1 câble
ROUGE) de l’arrière du disque dur.
Enlevez
Le câble
d’alimentation
Câble SATA
NOTE IMPORTANTE Les instructions suivantes concernent l’installation
ou le changement du disque dur. Si un disque dur est déjà préinstallé sur
votre DVR4-950™, veuillez ignorer les étapes suivantes.
Installation / Changement d’un Disque Dur sur le DVR4-950™
1. Assurez-vous que le DVR4-950™ est débranché.
2. Situez et enlevez les 6 vis (2 à l’avant,
2 au sommet et 2 à l’arrière). (les vis
situées en bas du panneau avant n’ont
pas à être enlevées).
3. Ôtez le panneau supérieur du
DVR.
Enlevez
Changer le disque dur
Page 42

1818
Sauvegarder un enregistrement vers un ordinateur
Votre DVR4-950™ vous permet de copier les données enregistrées via le port
USB située à l’arrière de l’appareil. LE DVR accepte la plupart des clés USB ou
fl ash drive. La clé USB doit être formatée au système FAT32. Veuillez consulter les
instructions fournies par le fabriquant de votre clé USB concernant le formatage.
Suivez les étapes ci-dessous pour transférer un enregistrement :
1. Insérez une clé USB (non incluse) dans le port USB de votre DVR
2. Appuyez sur Lecture pour ouvrir le mode lecture ou utilisez la fonction de
recherche pour localiser un enregistrement.
3. Mettez votre enregistrement en payse au début de la séquence que vous
souhaitez transférer.
4. Appuyez sur le bouton Menu/Fichier pour ouvrir le mode Transfert USB.
5. Appuyez sur le bouton CH1 pour
lancer l’enregistrement.
6. Une fois arrivé à la fi n de la
séquence que vous souhaitez transférer, appuyez sur Pause.
7. Appuyez sur le bouton CH2 pour
stopper l’enregistrement.
8. Une fois que vous avez choisi les
points de début et de fi n de votre
enregistrement, appuyez sur le
bouton CH4 pour continuer.
9. L’écran de transfert vers USB apparaîtra
et vous présentera les détails de l’appareil
UBS inséré, l’espace disponible, les étapes à
effectuer si nécessaire et le nom du fi chier.
Appuyez sur CH4 pour lancer la copie.
10. Une fois le transfert terminé, appuyez sur
Stop et enlevez votre appareil USB.
Note : Le transfert vers USB peut nécessiter une durée équivalente à celle
de l’enregistrement. Par ex, la copie d’un enregistrement d’une heure
peut prendre une heure.
ATTENTION : Ne connectez pas directement le DVR à un ordinateur.
N’enlevez pas votre appareil de stockage USB en cours de transfert. Une
mauvaise utilisation des appareils peut être à l’origine de dégâts.
77
Connexion des caméras et de l’adaptateur
1. Connectez les câbles d’alimentation et BNC de la caméra de sécurité à un
câble d’extension.
2. Connectez l’extrémité BNC du câble d’extension à l’adaptateur RCA.
3. Connectez l’extrémité de l’adaptateur RCA à l’entrée caméra située à l’arrière
du DVR.
4. Connectez l’extrémité Alimentation du câble d’extension aux coupleurs.
5. Connectez le coupleur à l’adaptateur d’alimentation de la caméra.
6. Branchez l’adaptateur d’alimentation de la caméra et l’adaptateur
Caméras et accessoires
Page 43

1919
Interface du logiciel VVFPlayer
Visionnez les enregistrement stockés sur votre DVR4-950™ à l’aide du logiciel VVF situé
sur le CD d’installation.
1. Insérez le CD dans le lecteur. Si ce dernier ne se lance pas automatiquement, appuyez
sur DEMARRER, OSTE DE TRAVAIL et double-cliquez sur l’icone représentant le lecteur CD.
2. Copiez le logiciel VVFPlayer_V2_6_4B sur votre ordinateur.
3. Double-cliquez pour lancer le logiciel VVFPlayer.
4. Cliquez sur le dossier (4) afi n de visualiser l’écran du logiciel. Naviguez jusqu’à la vidéo
que vous souhaitez visualiser et cliquez sur Ouvrir. Le fi chier enregistré possédera une
extension de type .VVF.
5. Utilisez les contrôles pour visualiser la vidéo.
Visionner un enregistrement sauvegardé sur ordinateur
Utilisation du logiciel VVFPlayer
1
2
3
4
58 1269 1371011 15
16
17
18
14
1. Nom du fi chier
2. Date & heure de l’enregistrement
3. Etat actuel de lectur
e
4. Ouvrir fi chier
5. Retour rapide (16x, 32x, 64x)
6. Retour (1x)
7. Image précédente
8. Pause
9. Image suivante
10. Lecture
11. Avance rapide (16x, 32x, 64x)
12. Capture Image
13. Vue caméra unique
14. Vue Mosaïque
15. Barre de défi lement
16. Son / Muet
17. Volume
18. Vue Caméra
Page 44

2020
Lorsque vous travaillez sur des fi chiers volumineux, il peut être nécessaire de les
séparer en enregistrements de moindre taille. La partie suivante décrit la ‘méthode permettant d’extraire un enregistrement et de l’exporter vers un nouveau
fi chier .VVF
1. Ouvrez et lancez l’enregistrement à partir duquel vous souhaitez extraire une
séquence.
2. Mettez la séquence en pause à l’endroit où vous souhaitez lancer l’extraction.
3. Faites un clic droit sur la vue caméra et sélectionner Caméra > Marquer début
4. Trouvez et mettez en pause le passage situé à la fi n de l’extraction.
5. Faites un clic droit sur la vue caméra et sélectionner Caméra > Marquer fi n
6. faites un clic droit sur la vue caméra et sélectionnez Capture > Exporter puis
enregistrez le fi chier et son emplacement. Veuillez noter que ce type de manipulation vous permet d’exporter au format .VVF.
Extraire un enregistrement d’un clip vidéo
Exporter un fi chier au format AVI
Extraire un enregistrement d’un clip vidéo
Vous visualiser un enregistrement vidéo sur un autre ordinateur, vous devez créer
un fi chier AVI à l’aide de l’option d’exportation intégrée.
1. Après un clic droit dans la vue caméra principale, cliquez sur Exporter > AVI
2. Cliquez sur « Parcourir » près de Entrée et sélectionnez la vidéo que vous
souhaitez convertir.
3. Cliquez sur « Parcourir... » près de Sortie pour sélectionner un emplacement,
4. Défi nissez votre méthode de compression préférée en cliquant sur Sélectionner. Si vous avez un doute, choisissez la méthode de compression par défaut.
5. Cliquez sur OK.
6. Vous pouvez lire le fi chier dans votre lecteur média favori.
55
1. Indicateur disque dur
Lumières allumées lorsque le
disque dur est actif (clignotantes
lors des enregistrements, des
recherches etc.)
2. Indicateur alimentation
Lumières allumées lorsque le DVR
est en marche
3. Bouton chaîne 1
Appuyez sur ce bouton pour
visualiser la caméra 1 en mode
plein écran / appuyez à nouveau
pour retourner en vue mosaïque
4. Bouton chaîne 2
Appuyez sur ce bouton pour
visualiser la caméra 2 en mode
plein écran / appuyez à nouveau
pour retourner en vue mosaïque
5. Bouton Menu
Appuyez sur ce bouton pour
sélectionner les options Menu /
menu précédent / quitter
Note : Certaines fonctions
nécessitent un mot de passe. Le
Mise en place du DVR
Panneau frontal et Télécommande
La télécommande contient une pile qui doit être active avant la première utilisation. Enlevez la
protection en plastique collée à l’arrière de la télécommande. La télécommande est désormais prête
à être utilisée.
Utiliser la télécommande pour la première fois
Enlever la pro-
tection plas-
tique située à
l’arrière de la
télécommande
Page 45

2121
Problème : Le témoin d’alimentation clignote en rouge.
Solution : Assurez-vous que vous utilisez le bon adaptateur. Si vous avez acheté le DVR
dans le cadre d’u kit, assurez-vous que les caméras sont branchées sur un adaptateur séparé. L’adaptateur le plus volumineux correspond au DVR.
Problème : Le disque dur ne fonctionne pas.
Solution : Assurez-vous que le DVR utilise le bon adaptateur. Ouvrez le DVR et assurez-
vous que le câble SATA est bien branché et relie DVR et disque dur.
Problème : L’utilisation du disque dur indique 100% et ce dernier n’enregistre plus.
Solution : Formatez le disque dur ou paramétrez ce dernier afi n d’autoriser le mode réécri-
ture.
Problème : Je ne vois qu’u écran bleu là où devrait se trouver ma caméra.
Solution : Si seulement une vue caméra est un écran bleu, cela signifi e que le DVR ne reçoit
pas de signal de la caméra. Vérifi ez les connexions de cette dernière à l’arrière de votre DVR.
Vérifi ez que la camera est branchée et allumée.
Problème : Le DVR ne s’allume pas
Solution : Assurez-vous que vous utilisez le bon adaptateur. Essaye une autre prise. Véri-
fi ez les connexions situées à l’arrière du DVR.
Problème : Mon DVR ne sauvegarde que les enregistrements vieux de quelques jours.
Solution : Passez en mode qualité Normal : un nombre d’image par seconde moins élevé
ou une qualité d’image moindre permet d’économiser de l’espace sur votre disque dur.
Problème : Je veux formater mon disque dur mais je ne me souviens plus du mot de
passe.
Solution : Le mot de passe par défaut est « 111111 » Swann vous recommande, pour des
raisons de sécurité, de modifi er ce mot de passe.
Problème : J’utilise des caméras sans fi l, le DVR n’arrête pas de biper et le détecteur de
mouvement enregistre tout le temps.
Solution : Les caméras sans fi l analogiques peuvent subir des interférences. Le DVR interprète le changement d’image comme un mouvement et lance un enregistrement. Swann
vous recommande d’utiliser des caméras câblées ou d’opter pour des caméras ans fi l numériques telles que le modèle ADW-300 pour l’enregistrement.
Problème : Je ne peux pas lire les séquences enregistrées.
Solution : Assurez-vous, lors du choix de la séquence à lire, que vous avez bien marqué le
DEBUT de cette dernière et non sa FIN.
Guide de résolution des problèmes
Page 46

2222
Video/Audio
Format vidéo: NTSC / PAL selon la région
Système d’exploitation: RTOS Incorporé
Entrée vidéo: RCA x 4
Entrée audio: RCA x 1, Ligne-dans
Sortie vidéo: BNC x 1
Sortie audio: RCA x 1, Ligne-dehors
D’affi chage et
d’enregistrement
Affi chage image: NTSC: 120 fps (4 × 30 fps)
PAL: 100 fps (4 × 25 fps)
Global Recording Frame Rate: NTSC: Max. 60 fps
PAL: Max. 50 fps
Video Operation Duplex : Enregistrement, Lecture
Résolution de l’affi chage: NTSC: 640 x 448
PAL: 640 x 544
Résolution d’enregistrement: NTSC: 640x224
PAL: 640x272
Format de compression: MJPEG modifi é
Taille par image: Normal: 12K Octets
Haut: 15K Octets
Plus haut: 20K Octets
Général
HDD Interface: SATA HDD x 1
Méthode de sauvegarde: USB Flash Drive, Thumbdrive (jusqu’à 2 Go
max)
Mode de recherche: Time / Date de l’événement,
Plein écran: Oui
Détection de mouvement: Oui
Perte Détecter: Oui
Commutation automatique: Oui
Buzzer Output: Oui
Réglez la luminosité: Oui
Ajuster le contraste: Oui
Mode du Récupération: Auto Restore Record on power failure
Entrée DC: DC 12V
Dimensions: 8.9” x 8.2” x 2.1”
225mm X 208mm X 53mm
Poids: 2.8lbs1.3kg
Spécifications techniques
33
Contenu
Avant de commencer 2
Contenu 3
Contenu 4
Mise en place du DVR 5-6
Panneau frontal et Télécommande 6
Panneau arrière 6
Connexions & Installation
Connexion des caméras et de l’adaptateur 7
Connexion du DVR à une télévision 8
Allumage/extinction du DVR et récupération automatique 8
Fonctionnement du menu 9
Menu – accès et navigation 9
Paramétrage de l’heure 9
Vue caméra unique 10
Vue caméras multiples 10
Vue caméras multiples 10
Menu caméra 11
Menu enregistrement 11-12
Menu détection de mouvements 12-13
Ecran du menu 13
Menu audio 14
Menu système 14-15
Recherche heure 15
Menu langues 16
Menu sortie 16
Allumer le DVR avec un nouveau disque dur 16
Changer le disque dur 17
Sauvegarder un enregistrement vers un ordinateur 18
Visionner un enregistrement sauvegardé sur ordinateur 19
Utilisation du logiciel VVFPlayer 19
Interface du logiciel VVFPlayer 19
Extraire un enregistrement d’un clip vidéo 20
Exporter un fi chier au format AVI 20
Guide de résolution des problèmes 21
Spécifi cations techniques 22
Informations de garantie 23
Détails support technique Quatrième
Page 47

2323
Informations de garantie
Swann Communications garantit ce produit contre tous les défauts de fabrication et de
matériel pour une période d’un (1) an à partir de sa date d’achat initiale. Vous devez
présenter votre ticket de caisse comme preuve d’achat pour valider la garantie. Toute
unité qui se révèlerait défectueuse pendant la période mentionnée sera réparée sans
frais pour les pièces et la main d’oeuvre, ou remplacée à la seule discrétion de Swann.
La réparation ou le remplacement sera garanti soit pour quatre-vingt-dix jours soit pour
le reste de la période initiale de garantie, selon la période la plus longue. L’utilisateur
final est responsable des frais de port subis pour envoyer le produit vers les centres de
réparation de Swann.
L’utilisateur final est responsable pour tous les frais de port et d’expédition subis lors
de l’expédition de ce produit à partir et vers un autre pays que le pays d’origine. La
garantie ne couvre pas les dommages dus à des incidents, des accidents ou résultant
de l’utilisation, ou de l’incapacité d’utiliser ce produit. Tous frais associés de montage
ou de démontage de ce produit par un artisan ou toute autre personne, ou tous les
autres frais associés à son utilisation sont de la responsabilité de l’utilisateur final. Cette
garanties’applique seulement à l’acheteur initial du produit, et n’est pas transférable à
une tierce partie.
Les modifications non-autorisées par l’utilisateur ou toute tierce partie de n’importe
quelle composante ou tout preuves de mauvaise utilisation ou d’abus de l’appareil
annuleront toute garantie.
Page 48

2424
© Swann Communications 2009
Advanced security made easy™
Aide / Support Technique
Félicitation pour votre achat. Si à n’importe quel moment ce produit ne
fonctionne pas quand vous le branchez pour la première fois ou si vous vous
rencontrez un problème, ne le rapportez pas au magasin !
Utilisez le guide d’installation / Manuel de la boite, ou
Visitez le site www.swannsecurity.com
Pour les FAQ, les astuces de dépannage et plus encore, ou
Contactez notre équipe d’experts du support technique…
Europe eusupport@swannsecurity.com
Etats-Unis tech@swannsecurity.com
Europe
01 57 323 377
Lun.-Ven., 10h-19h CET
Sans frais États-Unis:
1-800-627-2799
(Dim, 14h00- 22h00 Heure du Pacifique)
(Lun-Jeu, 6h00-10h00 Heure du Pacifique)
(Ven, 6h00-14h00 Heure du Pacifique)
Échanges et Réparations États-Unis:
1-800-627-2799 (option 1)
(Lun-Ven, 9h00-17h00 Heure du Pacifique)
Il peut y avoir de légères variations saisonnières concernant les
heures
Swann. L’aide est ici !
11
DVR4-950™
4 Enregistreur Vidéo Numérique
Advanced security made easy
SW341-DNF / SW343-DP2 / SW343-DPM / SW344-DPS
www.swannsecurity.com
SR341-DNF-60030-200709
Page 49

11
DVR4-950™
Grabadora de Video Digital de 4
Canales
Operating Instructions
plug&playsecurity
™
™
Advanced security made easy
SW341-DNF / SW343-DP2 / SW343-DPM / SW344-DPS
www.swannsecurity.com
SR341-DNF-60020-200709
Guía de Instalación
Page 50

22
Antes de Comenzar
Cumplimiento con normas de la FCC:
NOTA: Este equipo ha sido probado y cumple con las disposiciones impuestas
para los equipos digitales de clase B, de acuerdo con el aparte 15 de las normas
de la FCC. Estas disposiciones se dan con la intención de proporcionar una protección razonable, contra las interferencias perjudiciales en instalaciones residenciales. Este equipo genera, utiliza y puede irradiar energía en forma de frecuencias de radio, y si no se instala de acuerdo con las indicaciones, puede causar
interferencias perjudiciales en la recepción de señales de radio o televisión, las
cuales pueden ser detectadas encendiendo y apagando sucesivamente el equipo.
Se invita al usuario a tratar de corregir dichas interferencias siguiendo una o más
de las siguientes medidas:
• Volver a orientar o cambiar de sitio la antena receptora;
• Incrementar la distancia existente entre el equipo y el receptor;
• Conectar el equipo en un tomacorriente diferente al que se encuentra conecta
do el receptor;
• Para obtener ayuda, consulte al distribuidor o a un técnico especializado en
radio y TV.
IMPORTANTE: Prohibición contra la interceptación de llamadas.
Con excepción de las operaciones llevadas a cabo por las fuerzas de la ley bajo
autorización judicial, ninguna persona podrá utilizar directa o indirectamente, un
dispositivo que sea operado de acuerdo con las disposiciones de este aparte, con
el propósito de escuchar o grabar conversaciones privadas de terceras personas,
a menos que tal uso sea aprobado por todas las partes que estén involucradas en
la conversación.
ADVERTENCIA: Cualquier modifi cación no aprobada por la parte responsable
del funcionamiento del equipo, puede invalidar la autorización de operación del
equipo por parte del usuario.
IMPORTANTES INSTRUCCIONES DE SEGURIDAD
· Asegúrese que el equipo esté instalado y asegurado correctamente, cuando esté
colocado en su lugar defi nitivo;
· No manipule el equipo si encuentra los cables y terminales pelados.
2323
Swann Communications garantiza este producto por defectos de fabricación y material,
por un período de un (1) año a partir de la fecha original de compra. Usted deberá
presentar su recibo como prueba de la fecha de compra para validar la garantía.
Cualquier unidad que se compruebe defectuosa durante el período antes citado será
reparada sin cobrar los repuestos o la mano de obra, o será sustituida, a discreción
exclusiva de Swann. La reparación o sustitución se garantizará por noventa días o por el
período que falte de la garantía original de un año, el que resulte más largo de los dos.
El usuario final asume los costos de fletes incurrido para enviar el producto a los centros
de reparación de Swann. El usuario final se responsabiliza de los costos de envío en que
incurran cuando envía desde y hacia cualquier país distinto al país de origen. La garantía
no cubre daños accidentales, circunstanciales o que resulten del uso o la imposibilidad
de utilizar este producto. Cualquier costo asociado con la adaptación o remoción
de este producto por parte de un vendedor o de otra persona, o cualquier costo
asociado con el uso del mismo son responsabilidad del usuario final. Esta garantía aplica
exclusivamente al comprador original del producto, y no es transferible a terceros.
Si el usuario final o un tercero hacen modificaciones no autorizadas a cualquier
componente o si hay evidencia de mal uso o abuso del dispositivo, se anularán todas
las garantías.
Page 51

33
Contenido
Antes de Comenzar 2
Contenido 3
Contenido del Paquete 4
Disposición del DVR 5-6
Panel Frontal y Remoto Removible 6
Panel Posterior 6
Conexiones e Instalación
Conectando las Cámaras y el Adaptador de Corriente 7
Conectando el DVR a n Monitor de TV 8
Encendiendo y Apagando el DVR y Auto Recuperación 8
Funcionamiento del Menú 9
Accediendo y Navegando el Sistema de Menú 9
Ajustando la Hora del DVR 9
Pantalla de Imagen 10
Vista de Cámara Sencilla 10
Vista de Cámara Múltiple 10
Menú de la Cámara 11
Menú de Grabación 11-12
Menú de Detección de Movimiento 12-13
Menú de Pantalla 13
Menú de Audio 14
Menú de Sistema 14-15
Búsqueda por Tiempo 15
Menú de Idioma 16
Menú de Salida 16
Arrancando el DVR con un nuevo Disco Duro 16
Cambiando el Disco Duro 17
Respaldando de Secuencia a una PC 18
Viendo Secuencia respaldada en una PC 19
Usando el Software VVFPlayer 19
Interfase VVFPlayer 19
Extraer secuencia de un videoclip grande 20
Exportando un archivo AVI 20
Guía para Resolver Problemas 21
Especifi caciones Técnicas 22
Información de Garantía 23
Detalles de Soporte Técnico Cubierta
Posterior
Page 52

44
Contenido del Paquete
Unidad DVR4-950™
Control Remoto de Panel Frontal X 2
Instrucciones de Funcionamiento
Guía de Confi guración Fácil
Adaptador de Corriente con Cable
CD con Software
Cable de Video RCA
Adaptadores BNC a RCA X 4
Calcomanías de Seguridad (Paquete de 4)
Si le falta alguno de los componentes anteriores, contacte a Swann Communications por asistencia.
2121
Problema: La luz de Corriente sigue parpadeando.
Solución: Asegúrese que está usando el Adaptador de Corriente correcto provisto con el
DVR. Si ha comprado el DVR como parte de un paquete, asegúrese que las cámaras estén
funcionando con un Adaptador de Corriente por separado. El adaptador de corriente más
grande con un mayor amperaje está diseñado específi camente para el DVR.
Problema: El disco duro no funciona.
Solución: Asegúrese que el DVR está usando el Adaptador de Corriente correcto provisto.
Abra el DVR y asegúrese que el cable SATA esté conectado al DVR y al Disco Duro.
Problema: La utilización del disco duro está al 100% y no graba.
Solución: Formatee el disco duro o ajuste el disco duro en modo de sobrescribir.
Problema: Sólo puedo ver una pantalla azul donde debería de estar mi cámara.
Solución: Si solo 1 vista de cámara está azul, el DVR no está recibiendo la señal de esa
cámara. Revise que las conexiones de la cámara en la parte posterior del DVR estén en
posición. Asegúrese que la cámara esté conectada y tenga corriente.
Problema: El DVR no se enciende.
Solución: Asegúrese que esté usando el Adaptador de Corriente correcto para el DVR. In-
tente una segunda toma de corriente. Revise las conexiones en la parte posterior del DVR.
Problema: Mi DVR no guarda la secuencia de hace no más de dos días.
Solución: Cambie los ajustes de calidad a Normal, baje la velocidad de cuadros de la
cámara o habilite la grabación por movimiento para conservar espacio en disco duro.
Problema: Quiero formatear mi Disco Duro pero no recuerdo mi contraseña.
Solución: La contraseña predeterminada es “111111”. Swann recomienda cambiar la
contraseña predeterminada para prevenir daños o uso no autorizado.
Problema: Estoy usando cámaras inalámbricas y el DVR permanece emitiendo un bip y
graba por movimiento todo el tiempo.
Solución: Las cámaras inalámbricas análogas sufren interferencia. El DVR interpreta el cam-
bio de imagen como movimiento y lo graba. Swann recomienda el uso de cámara con cable
o cámaras inalámbricas digitales tales como la ADW-300 para grabar en DVR.
Problema: No puedo reproducir la secuencia grabada.
Solución: Asegúrese cuando selecciona secuencia a reproducir de que haya resaltado el
tiempo de INICIO de esa secuencia y no el tiempo de PARAR.
Guía para Resolver Problemas
Page 53

55
1. Indicador de Disco Duro
Se ilumina cuando el disco duro
está activo (parpadea cuando
graba, busca, etc.)
2. Indicador de Corriente
Se ilumina cuando tiene corriente
el DVR
3. Botón de Canal 1
Presione para ver la cámara 1
en pantalla completa / Presione
de nuevo para regresar a vista
cuádruple.
4. Botón de Canal 2
Presione para ver la cámara 2
en pantalla completa / Presione
de nuevo para regresar a vista
cuádruple.
5. Botón de Menú
Presione para seleccionar el Menú /
menú previo / menú de salida
Nota: Algunas funciones de menú
requieren contraseña. La contraseña
predeterminada es “111111”.
6. Botón de Ajuste
Presione para confi rmar selección
7. Botón de Grabación/Parar
Presione para comenzar o parar de
grabar.
Nota: No funcionará si se ajusta la
hora o grabación de movimiento.
8. Botón Reproducir/Pausa
Presione para abrir LISTA DE EVENTOS, comenzar la última grabación
o pausar la reproducción.
9. Sensor de Control Remoto
10. Botón de Canal 3
Presione para ver la cámara 3
en pantalla completa / Presione
de nuevo para regresar a vista
cuádruple.
11. Botón de Canal 4
Presione para ver la cámara 4
en pantalla completa / Presione
de nuevo para regresar a vista
cuádruple.
12. Flecha Hacia Arriba
Mueve el cursor hacia arriba en los
menús.
13. Flecha Hacia Abajo
Mueve el cursor hacia abajo en los
menús.
14. Botón de Rebobinado
Presione para rebobinar la reproducción / Mueve el cursor a la
derecha en los menús.
15. Botón de Avance Rápido
Presione para avanzar rápidamente
la reproducción / Mueve el cursor a
la derecha en los menús / Activa la
función CAMBIO AUTOMÁTICO
Nota: 3-15 Remoto removible del
panel frontal
Disposición del DVR
Panel Frontal y Remoto Removible
1
10 11 12 13
2
345678
9
14 15
El control remoto contiene una pila que debe ser activada antes de su uso.
Encuentre y r
emueva la pestaña de plástico transparente en la parte inferior del
control remoto. El control remoto estará ahora listo para usarse.
Usando el Control Remoto por Primera Vez
LED IR
Remueva la
pestaña de
plástico en el
extremo del control remoto.
Page 54

66
1. Salida de Video
Salida a TV
2. Entrada de Video
4 Entradas RCA para cámaras
3. Audio Input
1 Entrada RCA para micrófono
4. Salida de Audio
1 salida RCA para altavoz
5. Conexión USB
Para descargar secuencia respaldada a Unidad
Flash (no incluida).
6. Entrada de Corriente DC de 12V
Conexión de Adaptador de Corriente para
adaptador DC de 12V solamente.
Panel Posterior
3
4512
6
Disposición del DVR (Continuación)
Use la incisión para remove
r
el control de la unidad DVR.
Removiendo el Control Remoto
Nota: Para asegurar el DVR y prevenir un uso no autorizado remueva
el control remoto y almacénelo en un lugar seguro.
1919
Interfase VVFPlayer
Ver secuencia respaldada del DVR4-950™ con el software VVFPlayer localizado
en el CD.
1. Ponga el CD en la unidad de CD. Si no se abre automáticamente, de clic en
INICIO, abra Mi PC y de doble clic en la unidad CD.
2. Copie el software VVFPlayer_V2_6_4B del CD a su computadora.
3. De doble clic para abrir el software VVFPlayer.
4. De clic en la carpeta (4) para traer la pantalla abierta. Navegue al video que
quiere ver y presione Abrir. El archivo respaldado tiene una extensión .VVF.
5. Use los controles vara ver la secuencia de video.
Viendo Secuencia respaldada en una PC
Usando el Software VVFPlayer
1
2
3
4
1. Nombre de Archivo
2. Fecha y hora de grabación
3. Estado de repr
4. Abrir Archivo
5. Rebobinado Rápido (16x, 32x, 64x)
6. Reversa (1x)
7. Cuadro anterior
8. Pausa
9. Cuadro siguiente
Page 55

77
Conectando las Cámaras y el Adaptador de Corriente
1. Conecte los extremos de Corriente y BNC de la Cámara de Seguridad a un
Cable de Extensión.
2. Conecte el extremo BNC del Cable de Extensión al adaptador RCA.
3. Conecte el extremo del adaptador RCA a la entrada de cámara en la parte
posterior del DVR.
4. Conecte el extremo de corriente del Cable de Extensión al Bifurcador de Corriente
5. Conecte el Bifurcador de Corriente al Adaptador de Corriente de la Cámara.
6. Conecte el Adaptador de Corriente de la Cámara y el Adaptador de Corriente
del DVR a la toma de corriente.
1
2
3
4
5
Cámaras y accesorios
opcionales
6
Page 56

88
Conectando el DVR a n Monitor de TV
1
2
1. Conecte el extremo RCA del Cable de Video a la ENTRADA de Video Amarilla
en la parte posterior del Monitor de TV.
2. Conecte el otro extremo RCA del Cable de Video a la conexión de ENTRADA
de Video en la parte posterior del DVR.
3. Ajuste su TV para conectar el canal de entrada correcto para ver el DVR.
Usando del Control Remoto de la TV presione el botón de Entrada hasta que el
DVR aparezca en la pantalla. La mayoría de las televisiones nombrarán este botón
como Entrada, Video, A/V, TV/AV, Línea, Canal 0, etc. Si no puede ver su DVR en
su TV contacte al fabricante de su televisión por asistencia.
Back of TV
Encendiendo/Apagando el DVR
Para encender su DVR conecte el Adaptador de Corriente a la entrada DC de 12V
en la parte posterior de la unidad. Para apagar el DVR desconecte el DVR de la
toma de la pared o punto de corriente.
Si el DVR no se usará por periodos prolongados de tiempo Swann recomienda
desconectar la unidad.
Característica de Auto-Recuperación
El DVR4-950™ está equipado con una característica de Auto-Recuperación. Si
llega a haber una baja de corriente mientras está grabando el DVR continuará
grabando automáticamente una vez que la corriente sea reestablecida.
Encendiendo y Apagando el DVR y Auto Recuperación
Parte Posterior del DVR
Parte Posterior de la TV
1717
6. Vuelva a colocar el Disco Duro y conecte el SATA y el cable de corriente como
se muestra en el paso 5.
7. Atornille del disco duro a la parte inferior de la cubierta como en el paso 4.
8. Vuelva a colocar la parte superior de la cubierta.
9. Atornille los demás tornillos en los lados y parte posterior del DVR como en el
paso 2.
4. Localice los tornillos debajo del disco
duro. Asegure el disco duro antes de
remover los 4 tornillos para evitar dañar
el disco duro.
NOTA IMPORTANTE: Las siguientes instrucciones son para la instalación o
cambio del, disco duro. Si su DVR4-950™ ya tiene un disco duro preinstalado no
tome en cuenta estos pasos.
Instalando / Cambiando un Disco Duro en el DVR4-950™
1. Asegúrese que el DVR4-950™ esté desconectado y removido de la corriente
eléctrica.
2. Localice y remueva los 6 tornillos, 2
en cada lado al frente y 2 arriba en la
parte posterior. (Los botones inferiores
en el frente no necesitan ser removidos.)
Cambiando el Disco Duro
Page 57

99
Funcionamiento del Menú
Accediendo y Navegando el Sistema de Menú
El Menú de Ajuste Principal puede ser accedido presionando el botón de
Menú
Para navegar los menús presione las tecla de fl echas direccionales
ARRIBA y ABAJO
Para cambiar selecciones use los botones REBOBINAR y
AVANCE RÁPIDO
Para seleccionar la opción resaltada presione el botón AJUSTE
Para regresar al menú previo presione el botón MENÚ
Menú Principal
Ajustando la Hora del DVR
Para cambiar la hora del DVR, vaya el menú
de SISTEMA y seleccione AJUSTAR TIEMPO.
Con AJUSTAR TIEMPO resaltado presione el
botón AJUSTAR para mostrar las fl echas de
selección.
Use los botones AVANCE RÁPIDO y REBOBINAR para seleccionar entre la fecha (año, mes,
día) y hora (hora, minutos, segundos)
Usando los botones ARRIBA y ABAJO cambie
la opción seleccionada.
Page 58

1010
Vista de Cámara Sencilla
Vista de Cámara Múltiple
5
6
2
3
1. Canal de Cámara Actual
2. Icono de Detección de Movimiento
3. Icono de Grabación
4. Pantalla Principal
5. Fecha y Hora Actual
6. Enmudecer Audio
7. Icono de No Hay Señal de Cámara
Vista Multi Cámara con 4 Cámaras Vista Multi Cámara Sin Cámaras
7
MUTE
Pantalla de Imagen
1
4
1515
Alarma de Pérdida: Cuando está habilitada una alarma auditiva sonará indicando que el
DVR ha perdido señal de la cámara o una cámara ha sido desconectada.
Actualización de F/W: Muestra la versión de fi rmware actual y permite actualizaciones
vía una Unidad Flash USB. No remueva la Unidad Flash mientras el fi rmware se está
actualizando ya que puede dañar el DVR. Sólo use actualizaciones autorizadas por Swann.
Cuando termine, remueva la Unidad Flash y reinicie el DVR.
Número de
Grabación
Menú de Sistema (Continuación)
Lista de Eventos: Muestra una lista de los últimos 127 eventos grabados de la
grabación más reciente a la más antigua. Use la característica de Búsqueda por
Tiempo para eventos más antiguos que no estén en la lista.
Tiempo de inicio: Esta es la fecha y hora de la grabación más antigua en el DVR.
Tiempo de detención: Esta es la fecha y hora de la última grabación en el DVR.
Ingrese una hora entre el tiempo de Inicio y Final y presione el botón Reproducir
para ver una grabación.
Presione los botones de Avance Rápido y Rebobinar para escanear rápidamente
entre las grabaciones. Presione múltiples veces Avance Rápido o Rebobinar para
acelerar la reproducción.
Búsqueda por Tiempo
Page 59

1111
Menú de la Cámara
El menú de la Cámara le permite cambiar los atributos visuales de cada uno
de los canales de cámara.
Canal: Muestra los atributos de la cámara 1-4 actualmente seleccionada.
Pantalla: Encienda o apague la cámara seleccionada en la pantalla principal.
Brillo, Contraste, Color, Saturación: Usando los botones ARRIBA y ABAJO re-
salte la opción de pantalla que quiere cambiar. Use el botón de AVANCE RÁPIDO
para incrementar los ajustes y el botón de REBOBINAR para disminuirlos.
El Menú de Grabación ajusta la calidad
de grabación, temporizadores y programación.
Puede ajustar individualmente la
Velocidad de Grabación para cada cámara. El número total de cuadros usados no puede exceder 60 para sistemas
NTSC o 50 para sistemas PAL. El ajustar
a una velocidad de cuadros menor
consumirá menos en disco duro.
Velocidad de Grabación: Ajuste la velocidad de cuadros de grabación por cámara. Nota: una mayor cantidad de cuadros provee unas grabaciones más suaves
pero usan más espacio en disco duro.
Menú de Grabación
Page 60

1212
El Horario de Grabación le permite confi gurar
el modo de grabación para cada hora del día
basado en un reloj de 24 horas. Use las teclas
izquierda/derecha para mover y las teclas arriba/abajo para cambiar la selección actual.
No Grabación: no grabará
Grabación por Tiempo: grabará por una hora
entera
Grabación por Movimiento: sólo grabará
cuando se detecte movimiento.
Importante: para habilitar la Grabación por Movimiento debe de confi gurar la
hora para Grabación por Movimiento (verde) Y confi gurar el Área de Sensibilidad
y Movimiento en el menú de Detección de Movimiento.
Calidad de Grabación: Ajuste la calidad de la imagen de las grabaciones a Normal, Alta
o Más Alta. Nota: los ajustas de calidad de imagen mayor usan más espacio en disco duro.
Duración de Grabación de Evento: Cuando la Detección de Movimiento está activa,
la Duración de Grabación del Evento es la longitud de tiempo en segundos que el DVR
grabará después de que se detenga el movimiento, de 5, 10, 15, 20, 25 o 30 segundos.
Predeterminadamente se confi gura a 10 segundos.
Horario de Grabación: Confi gura diferentes modos de grabación dependiendo de la
hora del día.
Menú de Grabación (Continuación)
Menú de Detección de Movimiento
El menú de Detección de Movimiento le
permite confi gurar las opciones de movimiento para cada cámara.
Nota: El DVR detecta movimiento basado
en el nivel de cambio en la imagen.
Canal: Seleccione que atributos de la cámara cambiar de entre las cámaras 1-4.
Sensibilidad: Confi gure la cantidad de movimiento necesario antes de que la detección
de movimiento se active para grabar. Ajuste de 1 (más sensible) a 4 (menos sensible),
predeterminado en apagado. Nota: esta característica se debe de confi gurar de 1-4 para
habilitar la confi guración por movimiento.
Duración de la Alarma: Confi gure la longitud de tiempo que la alarma sonará cuando se
detecte movimiento. Ajuste a Apagado, 5, 10, 15, 20, 25, 30 segundos o continua. Nota:
Si la Duración de Alarma se ajusta a Continua la alarma continuará sonando hasta que
este ajuste sea cambiado.
1313
Área de Movimiento: Seleccione el área de la Cámara para detectar movimien-
to. El movimiento que ocurra fuera del área designada no activará una grabación.
Esta característica es útil en áreas de alto tráfi co donde sólo una pequeña porción
de la pantalla necesita ser monitoreada, por ejemplo, viendo hacia una entrada
de autos con un camino muy transitado junto a ella.
Importante: Para habilitar la Grabación por Movimiento debe de con-
fi gurar la Sensibilidad, Área de Movimiento para cada cámara Y confi gu-
rar la Grabación por Movimiento en el menú de Horario de Grabación.
Borde: Aplica un borde entre las cámaras en la vista multi cámara.
Ajuste de Video: Ajusta la pantalla para ajustarse a su monitor de TV.
Cambio Automático: Cuando está activo, en el modo de vista en vivo, el DVR
cambiará automáticamente entre los canales de cámara en modo de pantalla
completa. Ajuste el retraso de 1 a 10 segundos entre cambios o Apagado. Para
activar el Cambio Automático, presione el botón de AVANCE RÁPIDO cuan-
do esté viendo sus cámaras. Presione el botón /- de nuevo para detener el
Cambio Automático.
Menú de Pantalla
Menú de Detección de Movimiento (cont)
Page 61

1313
Área de Movimiento: Seleccione el área de la Cámara para detectar movimien-
to. El movimiento que ocurra fuera del área designada no activará una grabación.
Use los botones ARRIBA, ABAJO, REBOBINAR
Y AVANCE RÁPIDO para mover el cursor. Presione el botón de AJUSTE para comenzar a
dibujar el área de detección de movimiento.
Usando los botones de fl echa dibuje su área
de movimiento deseada y presione el botón
de AJUSTE una vez que haya terminado.
En el ejemplo de la izquierda, la caja de movimiento azul se dibuja sobre la puerta. Sólo el
movimiento que ocurra en esta área activará la
grabación, es decir, cuando se abra la puerta.
Esta característica es útil en áreas de alto tráfi co donde sólo una pequeña porción
de la pantalla necesita ser monitoreada, por ejemplo, viendo hacia una entrada
de autos con un camino muy transitado junto a ella.
Importante: Para habilitar la Grabación por Movimiento debe de confi gurar la Sensibilidad, Área de Movimiento para cada cámara Y confi gurar la Grabación por Movimiento en el menú de Horario de Grabación.
El menú de Pantalla ajusta lo que
muestran las cámaras en la vista principal de la cámara.
Borde: Aplica un borde entre las cámaras en la vista multi cámara.
Ajuste de Video: Ajusta la pantalla para ajustarse a su monitor de TV.
Cambio Automático: Cuando está activo, en el modo de vista en vivo, el DVR
cambiará automáticamente entre los canales de cámara en modo de pantalla
completa. Ajuste el retraso de 1 a 10 segundos entre cambios o Apagado. Para
activar el Cambio Automático, presione el botón de AVANCE RÁPIDO cuando esté viendo sus cámaras. Presione el botón /- de nuevo para detener el
Cambio Automático.
Menú de Pantalla
Menú de Detección de Movimiento (cont)
Page 62

1414
El menú de Audio ajusta la grabación
de audio y las opciones de volumen.
Nota: Debe de tener una cámara con
audio o un micrófono con corriente
para grabar o monitorear audio.
Grabar: Ajuste a Encendido para grabar audio de la Entrada de Audio en la parte
posterior del DVR.
Enmudecer: Enciende o apaga la salida de Audio cuando vea o grabe las
cámaras. Alternativamente, presione el botón de Enmudecer para encender o
apagar el Audio mientras ve sus cámaras.
Volumen de Entrada: Mueva el deslizador para cambiar el volumen del audio
grabado.
Volumen de Salida: Mueve el deslizador para cambiar el volumen de reproduc-
Menú de Audio
Menú de Sistema
El menú de Sistema provee opciones
de confi guración general tales como
información de disco duro, hora, fecha
y ajuste de fi rmware.
Confi guración de Disco Duro: Muestra información sobre el disco duro instalado incluyendo el tamaño total y uso de memoria.
Habilitar Sobrescribir: Si se activa, cuando el disco duro está lleno, el DVR sobrescribirá automáticamente la secuencia más antigua. Predeterminado: Sí.
Formatear DD: Esta opción borrará permanentemente toda la información en el
disco duro. Se debe ingresar correctamente la contraseña para formatear el disco
duro.
Cambio de Contraseña: Esta opción cambiará la contraseña actual. Se le pedirá
que ingrese la contraseña actual, la nueva contraseña y luego que confi rme
la nueva contraseña antes de que se complete el cambio. Nota: la contraseña
predeterminada es “111111”. Si ha perdido u olvidado su contraseña, contacte a
Soporte Técnico de Swann Communications por asistencia.
1111
Menú de la Cámara
Canal: Muestra los atributos de la cámara 1-4 actualmente seleccionada.
Pantalla: Encienda o apague la cámara seleccionada en la pantalla principal.
Brillo, Contraste, Color, Saturación: Usando los botones ARRIBA y ABAJO re-
salte la opción de pantalla que quiere cambiar. Use el botón de AVANCE RÁPIDO
para incrementar los ajustes y el botón de REBOBINAR para disminuirlos.
Velocidad de Grabación: Ajuste la velocidad de cuadros de grabación por cá-
mara. Nota: una mayor cantidad de cuadros provee unas grabaciones más suaves
pero usan más espacio en disco duro.
Menú de Grabación
Page 63

1515
Utilice los botones de fl echas para seleccionar y reproducir el relieve del evento. Pulse
Detener para salir del modo de reproducción.
Sugerencia: También puede acceder a
la lista de sucesos, pulsando el botón de
reproducción mientras ve sus cámaras.
Alarma de Pérdida: Cuando está habilitada una alarma auditiva sonará indicando que el
DVR ha perdido señal de la cámara o una cámara ha sido desconectada.
Actualización de F/W: Muestra la versión de fi rmware actual y permite actualizaciones
vía una Unidad Flash USB. No remueva la Unidad Flash mientras el fi rmware se está
actualizando ya que puede dañar el DVR. Sólo use actualizaciones autorizadas por Swann.
Cuando termine, remueva la Unidad Flash y reinicie el DVR.
Número de
Grabación
Fecha y Hora
Tipo de
Grabación
Iniciar / Detener
Evento
Menú de Sistema (Continuación)
Lista de Eventos: Muestra una lista de los últimos 127 eventos grabados de la
grabación más reciente a la más antigua. Use la característica de Búsqueda por
Tiempo para eventos más antiguos que no estén en la lista.
Tiempo de búsqueda le permite saltar
rápidamente a una determinada hora y
la fecha para ver una grabación.
Tiempo de inicio: Esta es la fecha y hora de la grabación más antigua en el DVR.
Tiempo de detención: Esta es la fecha y hora de la última grabación en el DVR.
Ingrese una hora entre el tiempo de Inicio y Final y presione el botón Reproducir
para ver una grabación.
Presione los botones de Avance Rápido y Rebobinar para escanear rápidamente
entre las grabaciones. Presione múltiples veces Avance Rápido o Rebobinar para
acelerar la reproducción.
Búsqueda por Tiempo
Page 64

1616
Grabe, Salga o Cargue Ajustes Predeterminados desde el menú de Salida.
Presione AJUSTE para seleccionar la opción resaltada.
Guardar y Salir: Use esta opción para guardar todos los ajustes que se han cambiado en
los menús del DVR. Todos los cambios hechos se perderán si no selecciona esta opción.
Salir sin Guardar: Seleccione para descartar cualquier cambio que se haya hecho y regresar a la vista de la cámara.
Cargar Ajustes Predeterminados: Reestablece todos los ajustes en el DVR a los que
vienen predeterminados de fábrica.
Menú de Salida
Menú de Idioma
Con la opción de Idioma seleccionada presione el botón de AJUSTE para cambiar
entre Inglés y Chino.
Cuando arranque el DVR4-950™ por primera vez o al arrancar el DVR después
de cambiar a un nuevo disco duro, el DVR confi gurará el disco duro para su uso.
Siga las peticiones en pantalla para confi gurar el disco duro.
NOTA IMPORTANTE: Si se escoge formatear, toda la información existente en el
disco duro será borrada y no se podrá recuperar.
1. Después de que el DVR reconoce el
nuevo disco duro presione REPRODUCIR
para confi gurar para su uso.
2. Cuando el disco duro está confi gurado se le preguntará si se formatea o
cancela. Presione REPRODUCIR para
confi rmar el formateo.
Arrancando el DVR con un nuevo Disco
99
Funcionamiento del Menú
Accediendo y Navegando el Sistema de Menú
El Menú de Ajuste Principal puede ser accedido presionando el botón de
Menú
Para navegar los menús presione las tecla de fl echas direccionales
ARRIBA y ABAJO
Para cambiar selecciones use los botones REBOBINAR y
AVANCE RÁPIDO
Para seleccionar la opción resaltada presione el botón AJUSTE
Para regresar al menú previo presione el botón MENÚ
Ajustando la Hora del DVR
Page 65

1717
6. Vuelva a colocar el Disco Duro y conecte el SATA y el cable de corriente como
se muestra en el paso 5.
7. Atornille del disco duro a la parte inferior de la cubierta como en el paso 4.
8. Vuelva a colocar la parte superior de la cubierta.
9. Atornille los demás tornillos en los lados y parte posterior del DVR como en el
paso 2.
4. Localice los tornillos debajo del disco
duro. Asegure el disco duro antes de
remover los 4 tornillos para evitar dañar
el disco duro.
5. Presione el clip de metal en el
cable SATA (cable sencillo ROJO
o NARANJA) para desconectar el
cable del disco duro. Desconecte
el cable de corriente (cable de 2
NEGRO 1 AMARILLO y 1 ROJO) de
la parte posterior del Disco Duro.
Cable de corriente
Cable SATA
NOTA IMPORTANTE: Las siguientes instrucciones son para la instalación o
cambio del, disco duro. Si su DVR4-950™ ya tiene un disco duro preinstalado no
tome en cuenta estos pasos.
Instalando / Cambiando un Disco Duro en el DVR4-950™
1. Asegúrese que el DVR4-950™ esté desconectado y removido de la corriente
eléctrica.
2. Localice y remueva los 6 tornillos, 2
en cada lado al frente y 2 arriba en la
parte posterior. (Los botones inferiores
en el frente no necesitan ser removidos.)
3. Jale hacia arriba la cubierta superior del DVR.
Remueva
Cambiando el Disco Duro
Remueva
Page 66

1818
Respaldando de Secuencia a una PC
El DVR4-950™ tiene una característica de respaldo vía puerto USB en la parte
posterior del DVR. El DVR acepta la mayoría de las unidades fl ash o thumbdrives.
La unidad fl ash / thumbdrive debe ser formateada al sistema de archivos FAT32.
Por favor vea las instrucciones de su unidad fl ash / thumbdrive respecto al formateo. Siga los pasos a continuación para respaldar secuencias:
1. Inserte la unidad fl ash / thumbdrive USB en el puerto USB.
2. Presione Reproducir para ingresar a modo de reproducción o use la característica de Búsqueda de Tiempo para buscar una grabación.
3. Pause la reproducción al inicio de la secuencia que quiere respaldar.
4. Presione el botón de Menú/Archivo para mostrar el Modo de Respaldo USB.
5. Presione el botón CH1 para
designar el inicio de un respaldo
de grabación.
6. Reproduzca y busque el fi nal
de la secuencia que quiere respaldar y presione Pausa.
7. Presione el botón CH2 para
indicar el fi n de un respaldo de
grabación.
8 Cuando ha seleccionado el
tiempo de INICIO y FIN de la
grabación presione el botón
CH4 para continuar.
9. La pantalla de Respaldo a USB aparecerá
con detalles del dispositivo USB insertado,
requerimientos de tamaño y nombre de archivo. Presione CH4 para comenzar a copiar.
10. Cuando se termine el respaldo presione el
botón de Parar y remueva el dispositivo USB.
NOTA: El respaldo en USB puede tomar hasta la misma cantidad de tiempo que
el reproducir el video en la pantalla. Ejemplo, 1 hora de reproducción puede
tomar hasta 1 hora de respaldo.
ADVERTENCIA: No conecte el DVR directamente a una computadora. No
remueva la Unidad Flash USB mientras el DVR está copiando la secuencia. Puede
haber daños a los dispositivos adheridos si se usan inadecuadamente.
77
Conectando las Cámaras y el Adaptador de Corriente
1. Conecte los extremos de Corriente y BNC de la Cámara de Seguridad a un
Cable de Extensión.
2. Conecte el extremo BNC del Cable de Extensión al adaptador RCA.
3. Conecte el extremo del adaptador RCA a la entrada de cámara en la parte
posterior del DVR.
4. Conecte el extremo de corriente del Cable de Extensión al Bifurcador de Cor-
riente
5. Conecte el Bifurcador de Corriente al Adaptador de Corriente de la Cámara.
6. Conecte el Adaptador de Corriente de la Cámara y el Adaptador de Corriente
del DVR a la toma de corriente.
Cámaras y accesorios
Page 67

1919
Interfase VVFPlayer
Ver secuencia respaldada del DVR4-950™ con el software VVFPlayer localizado
en el CD.
1. Ponga el CD en la unidad de CD. Si no se abre automáticamente, de clic en
INICIO, abra Mi PC y de doble clic en la unidad CD.
2. Copie el software VVFPlayer_V2_6_4B del CD a su computadora.
3. De doble clic para abrir el software VVFPlayer.
4. De clic en la carpeta (4) para traer la pantalla abierta. Navegue al video que
quiere ver y presione Abrir. El archivo respaldado tiene una extensión .VVF.
5. Use los controles vara ver la secuencia de video.
Viendo Secuencia respaldada en una PC
Usando el Software VVFPlayer
1
2
3
4
58 1269 1371011 15
16
17
18
14
1. Nombre de Archivo
2. Fecha y hora de grabación
3. Estado de repr
oducción actual
4. Abrir Archivo
5. Rebobinado Rápido (16x, 32x, 64x)
6. Reversa (1x)
7. Cuadro anterior
8. Pausa
9. Cuadro siguiente
10. Reproducir
11. Avance rápido (16x, 32x, 64x)
12. Instantánea
13. Vista de Cámara Sencilla
14. Vista de pantalla dividida
15. Deslizador de tiempo
16. Sonido / Enmudecer
17. Volumen
18. Vista de cámara
Page 68

2020
Viendo Secuencia respaldada en una PC (cont)
Exportando un archivo AVI
Extraer secuencia de un videoclip grande
Para ver la secuencia de video en otra computadora cree un archivo AVI usando
la capacidad integrada para exportar.
1. De clic derecho en la vista de Cámara principal y de clic en Exportar > AVI.
2. De clic en “Navegar…” al lado de Archivo de Entrada y seleccione el video que
quiere convertir.
3. De clic en “Navegar…” al lado de Archivo de Salida para seleccionar una ubicación para exportar.
4. Escoja su método de exportación preferido dando clic en Seleccionar… Si no
está seguro qué método usar, seleccione el modo predeterminado sin comprimir.
5. De clic en OK para exportar el archivo.
6. Reproduzca el archivo en su reproductor de medios preferido.
Cuando trate con archivos de respaldo grandes puede ser necesario extraer clips
más pequeños. Lo siguiente describe como extraer secuencia y exportarla a un
nuevo archivo .VVF.
1. Abra y reproduzca el clip de donde se va a extraer.
2. Pause el clip donde quiere comenzar la extracción.
3. De clic derecho en vista de cámara y seleccione Capturar > Marcar Inicio
4. Busque y Pause el clip al fi nal de la extracción.
5. De clic derecho en vista de cámara y seleccione Capturar > Marcar Fin
6. De cilc derecho en vista de cámara y seleccione Capturar > Exportar y guarde
el nombre de archivo y ubicación. Tome en cuenta que esta exportación es en
formato .VVF.
55
1. Indicador de Disco Duro
Se ilumina cuando el disco duro
está activo (parpadea cuando
graba, busca, etc.)
2. Indicador de Corriente
Se ilumina cuando tiene corriente
el DVR
3. Botón de Canal 1
Presione para ver la cámara 1
en pantalla completa / Presione
de nuevo para regresar a vista
cuádruple.
4. Botón de Canal 2
Presione para ver la cámara 2
en pantalla completa / Presione
de nuevo para regresar a vista
cuádruple.
5. Botón de Menú
Presione para seleccionar el Menú /
menú previo / menú de salida
Nota: Algunas funciones de menú
requieren contraseña. La contraseña
Disposición del DVR
Panel Frontal y Remoto Removible
El control remoto contiene una pila que debe ser activada antes de su uso.
Encuentre y r
control remoto. El control remoto estará ahora listo para usarse.
Usando el Control Remoto por Primera Vez
Remueva la
pestaña de
plástico en el
extremo del con-
trol remoto.
Page 69

2121
Problema: La luz de Corriente sigue parpadeando.
Solución: Asegúrese que está usando el Adaptador de Corriente correcto provisto con el
DVR. Si ha comprado el DVR como parte de un paquete, asegúrese que las cámaras estén
funcionando con un Adaptador de Corriente por separado. El adaptador de corriente más
grande con un mayor amperaje está diseñado específi camente para el DVR.
Problema: El disco duro no funciona.
Solución: Asegúrese que el DVR está usando el Adaptador de Corriente correcto provisto.
Abra el DVR y asegúrese que el cable SATA esté conectado al DVR y al Disco Duro.
Problema: La utilización del disco duro está al 100% y no graba.
Solución: Formatee el disco duro o ajuste el disco duro en modo de sobrescribir.
Problema: Sólo puedo ver una pantalla azul donde debería de estar mi cámara.
Solución: Si solo 1 vista de cámara está azul, el DVR no está recibiendo la señal de esa
cámara. Revise que las conexiones de la cámara en la parte posterior del DVR estén en
posición. Asegúrese que la cámara esté conectada y tenga corriente.
Problema: El DVR no se enciende.
Solución: Asegúrese que esté usando el Adaptador de Corriente correcto para el DVR. In-
tente una segunda toma de corriente. Revise las conexiones en la parte posterior del DVR.
Problema: Mi DVR no guarda la secuencia de hace no más de dos días.
Solución: Cambie los ajustes de calidad a Normal, baje la velocidad de cuadros de la
cámara o habilite la grabación por movimiento para conservar espacio en disco duro.
Problema: Quiero formatear mi Disco Duro pero no recuerdo mi contraseña.
Solución: La contraseña predeterminada es “111111”. Swann recomienda cambiar la
contraseña predeterminada para prevenir daños o uso no autorizado.
Problema: Estoy usando cámaras inalámbricas y el DVR permanece emitiendo un bip y
graba por movimiento todo el tiempo.
Solución: Las cámaras inalámbricas análogas sufren interferencia. El DVR interpreta el cambio de imagen como movimiento y lo graba. Swann recomienda el uso de cámara con cable
o cámaras inalámbricas digitales tales como la ADW-300 para grabar en DVR.
Problema: No puedo reproducir la secuencia grabada.
Solución: Asegúrese cuando selecciona secuencia a reproducir de que haya resaltado el
tiempo de INICIO de esa secuencia y no el tiempo de PARAR.
Guía para Resolver Problemas
Page 70

2222
Vídeo/Audio
Formato de vídeo: NTSC / PAL depende la zona
Sistema operativo (Sistema de Operación en Tiempo Real) SOTR
integrado
Entrada de vídeo RCA x 4
Entrada de audio RCA x 1, Linea-en
Salida de vídeo: BNC x 1
Salida de audio: RCA x 1, Línea-hacia fuera
Despliegue & Grabación
Cuadro de presentación : NTSC: 120 fps (4 × 30 fps)
PAL: 100 fps (4 × 25 fps)
Frecuencia de cuadro de
Grabación NTSC: Max. 60 fps
PAL: Max. 50 fps
Operación del video Grabar,
Resolución de visualización: NTSC: 640 x 448
PAL: 640 x 544
resolución de la grabación: NTSC: 640x224
PAL: 640x272
Formato de compresión: Modifi cado MJPEG
Tamaño de fotograma Normal: 12K Octetos
Bueno: 15K Octetos
Maximo: 20K Octetos
General
Interfaz de HDD: SATA HDD x 1
Método de reserva: Impulsión del fl ash del USB, Thumbdrive (hasta
el máximo 2GB)
Modo de la búsqueda: Tiempo/fecha, acontecimiento
Pantalla completa: Si
El movimiento detectó: Si
Pérdida detectar: Si
Conmutación auto: Si
Salida del zumbador: Si
Brillo ajusta: Si
Contraste ajusta: Si
Modo de recuperación: Auto restaurar el poder grabar en el fracaso
Entrada de C.C. C.C 12V
Dimensóns: 8.9” x 8.2” x 2.1”
225mm X 208mm X 53mm
Peso: 2.8lbs
1.3kg
Especificaciones Técnicas
33
Contenido
Antes de Comenzar 2
Contenido 3
Contenido del Paquete 4
Disposición del DVR 5-6
Panel Frontal y Remoto Removible 6
Panel Posterior 6
Conexiones e Instalación
Conectando las Cámaras y el Adaptador de Corriente 7
Conectando el DVR a n Monitor de TV 8
Encendiendo y Apagando el DVR y Auto Recuperación 8
Funcionamiento del Menú 9
Accediendo y Navegando el Sistema de Menú 9
Ajustando la Hora del DVR 9
Pantalla de Imagen 10
Vista de Cámara Sencilla 10
Vista de Cámara Múltiple 10
Menú de la Cámara 11
Menú de Grabación 11-12
Menú de Detección de Movimiento 12-13
Menú de Pantalla 13
Menú de Audio 14
Menú de Sistema 14-15
Búsqueda por Tiempo 15
Menú de Idioma 16
Menú de Salida 16
Arrancando el DVR con un nuevo Disco Duro 16
Cambiando el Disco Duro 17
Respaldando de Secuencia a una PC 18
Viendo Secuencia respaldada en una PC 19
Usando el Software VVFPlayer 19
Interfase VVFPlayer 19
Extraer secuencia de un videoclip grande 20
Exportando un archivo AVI 20
Guía para Resolver Problemas 21
Especifi caciones Técnicas 22
Información de Garantía 23
Detalles de Soporte Técnico Cubierta
Page 71

2323
Swann Communications USA Inc.
12636 Clark Street
Santa Fe Springs CA 90670
USA
Swann Communications PTY. LTD.
Building 4, 650 Church Street,
Richmond, Victoria 3121
Australia
Información sobre la garantía
Swann Communications garantiza este producto por defectos de fabricación y material,
por un período de un (1) año a partir de la fecha original de compra. Usted deberá
presentar su recibo como prueba de la fecha de compra para validar la garantía.
Cualquier unidad que se compruebe defectuosa durante el período antes citado será
reparada sin cobrar los repuestos o la mano de obra, o será sustituida, a discreción
exclusiva de Swann. La reparación o sustitución se garantizará por noventa días o por el
período que falte de la garantía original de un año, el que resulte más largo de los dos.
El usuario final asume los costos de fletes incurrido para enviar el producto a los centros
de reparación de Swann. El usuario final se responsabiliza de los costos de envío en que
incurran cuando envía desde y hacia cualquier país distinto al país de origen. La garantía
no cubre daños accidentales, circunstanciales o que resulten del uso o la imposibilidad
de utilizar este producto. Cualquier costo asociado con la adaptación o remoción
de este producto por parte de un vendedor o de otra persona, o cualquier costo
asociado con el uso del mismo son responsabilidad del usuario final. Esta garantía aplica
exclusivamente al comprador original del producto, y no es transferible a terceros.
Si el usuario final o un tercero hacen modificaciones no autorizadas a cualquier
componente o si hay evidencia de mal uso o abuso del dispositivo, se anularán todas
las garantías.
Page 72

2424
© Swann Communications 2009
Soporte Técnico Swann
Todos los países Correo Electrónico: tech@swannsecurity.com
Atención Telefónica al Usuario
ESTADOS UNIDOS Sin costo
1800-627-2799
(Dom, 2pm-10pm HP EE.UU.Lun-Juev, 6am-10pm, HP EE.UU.
Viern, 6am-2pm HP EE.UU.)
ESTADOS UNIDOS Cambios & Devoluciones
1800-627-2799 (opción 1)
(Lun-Viern, 9am-5pm HP EE.UU.)
Ver http://www.worldtimeserver.com para obtener información acerca de las
distintas zonas horarias y la hora en Melbourne Australia, comparada con su
hora local.
11
DVR4-950™
Grabadora de Video Digital de 4
Canales
Advanced security made easy
SW341-DNF / SW343-DP2 / SW343-DPM / SW344-DPS
www.swannsecurity.com
SR341-DNF-60020-200709
 Loading...