

Page 1

Spotlight Outdoor Security Camera
Cámara de seguridad para exteriores con foco
Caméra de sécurité extérieure Spotlight
Telecamera di sicurezza per esterno con illuminazione
Überwachungskamera für den Außenbereich
SWIFI-SPOTCAM
EN
Quick Start Guide ES Guía de inicio rápido FR Guide de démarrage rapide
IT
Guida rapida DE Schnellstartanleitung
EN
1
Page 2

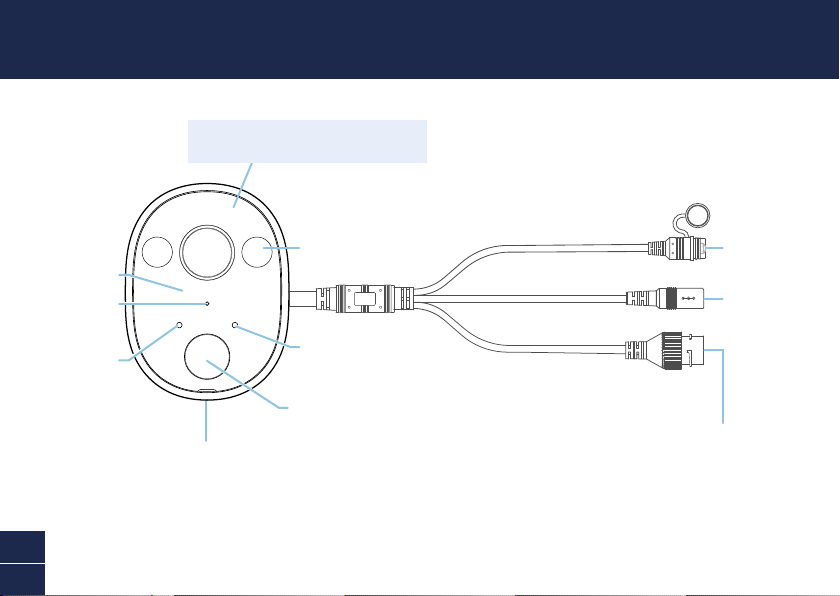
CAMERA OVERVIEW
Remember to remove the protective film from
the front of the camera before use.
Infrared LEDs
(for night vision)
Microphone
Night detection
EN
2
sensor
Speaker
(bottom)
Spotlight
LED indicator
Passive infrared
motion sensor
Reset
button
Power
Connector
Ethernet Connector
(optional wired connection
to your router; camera must
be paired via Wi-Fi first)
Page 3

POWER THE CAMERA
Connect the camera to the power adapter using the power & ethernet cable, then plug the power
adapter to a power outlet, as shown below. Make sure the camera is within range of the Wi-Fi network
to which you want to connect.
Power adapter
To router LAN port (Optional)
Power & Ethernet cable
To camera Ethernet connector (Optional)
EN
3
Page 4
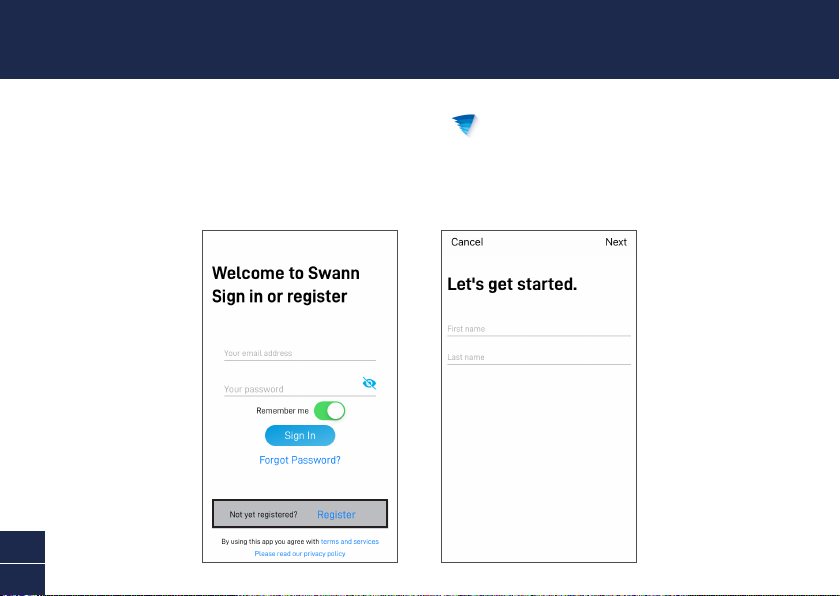
GET THE SWANN SECURITY APP
1 Download the latest version of the Swann Security app from the Apple App Store® or Google
Play™ Store on your iOS or Android device. Simply search for "Swann Security".
2 Open the app and create your Swann Security account. You will need to activate your account by
confirming the email sent to the registered email account before you can sign in.
EN
4
Page 5
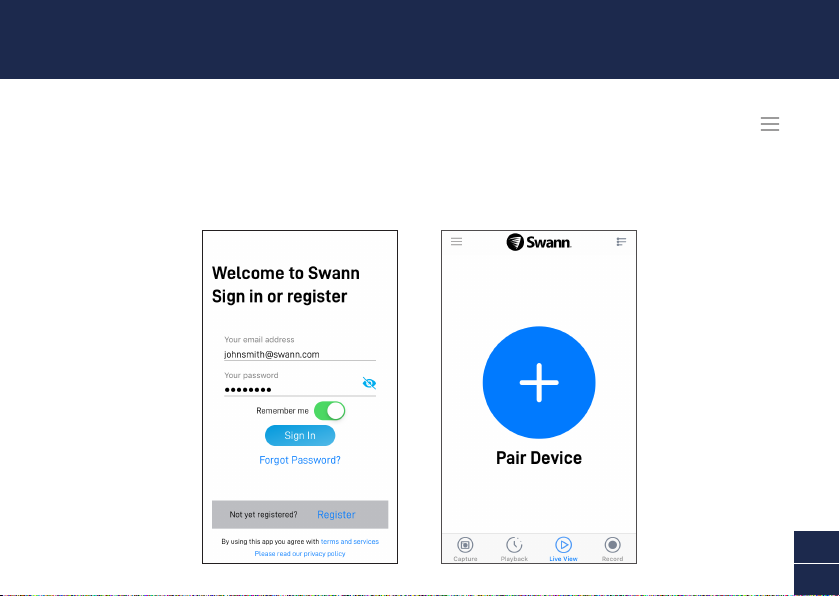
SET UP THE CAMERA
Launch the Swann Security app and sign in. Tap the Pair Device button on the screen (or open Menu
and select Pair Device) and follow the in-app instructions to set up your new camera. Before you begin,
be close to your router or access point and have your Wi-Fi network information (including password)
handy. Please note that the camera can connect to a 2.4GHz Wi-Fi network only.
EN
5
Page 6
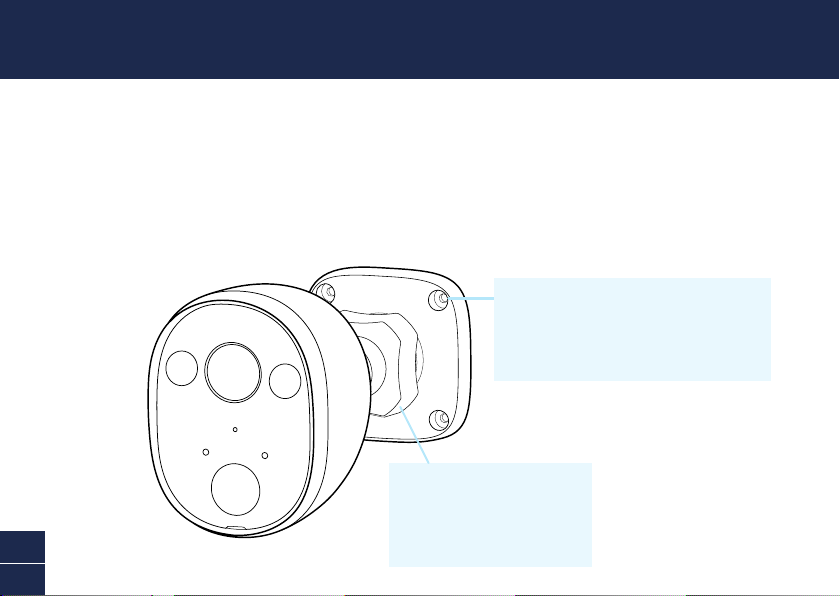
MOUNT THE CAMERA
The camera can be mounted on a flat surface using the included screws (and wall plugs). For best
performance, make sure the camera location has good, reliable Wi-Fi reception available. Using the
app, try streaming live video from the camera there. If you don’t experience any streaming issues
(buffering, etc), you’ve found a good place for your device. As a general rule, the nearer your camera
is to your Wi-Fi router, the better the wireless connection quality. You can boost the Wi-Fi coverage of
your existing network by installing a Wi-Fi range extender.
If mounting to a wooden surface, screw the camera
directly to the surface. If mounting to a masonry
surface (bricks, concrete), insert wall plugs before
screw ing the camera to the surface. Tighten enough
to secure the camera in place.
Adjusting the viewing angle
Loosen the locking ring to pan, tilt and
rotate the camera. Tighten the locking
EN
6
ring back securely to lock the camera’s
position in place after adjustment.
Page 7

TIPS
Motion detection
The camera’s PIR motion sensor detects heat signatures of moving objects. You’ll generally get good
detection results by pointing the camera downwards at an angle where people will be moving across
the coverage area before heading directly towards the camera.
LED indicator guide
The LED light on the front of your camera helps inform you of what is happening with the device.
Solid Red Live streaming / Motion recording
Slow Blinking Blue Wi-Fi Pairing mode
Fast Blinking Blue Connecting to Wi-Fi
Have questions?
We’re here to help! Visit our Support Center at support.swann.com. You can register your product
for dedicated technical support, find answers to commonly asked questions, and more. You can also
email us at any time via: tech@swann.com
EN
7
Page 8
DESCRIPCIÓN DE LA CÁMARA
Recuerde retirar la película de protección de
frente de la cámara antes de usar.
LED infrarrojos
ES
8
(para visión
nocturna)
Micrófono
Sensor de
detección
nocturna
Altavoz
(inferior)
Foco
Indicador LED
Sensor infrarrojo
pasivo de movimiento
Botón de
reinicio
Conector de
corriente
Conector de Ethernet
(conexión cableada
opcional a su enrutador;
la cámara debe vincularse
primero a través de Wi-Fi)
Page 9

ENCIENDA LA CÁMARA
Conecte la cámara al adaptador de corriente usando el cable de corriente y E ethernet cable, luego
enchufe el adaptador de corriente a un tomacorriente, como se muestra a continuación. Verifique que
la cámara se encuentre dentro del rango de la red Wi-Fi a la que desea conectarla.
Adaptador de corriente
Al puerto LAN del enrutador (Opcional)
Cable de corriente y
Ethernet
Al conector de Ethernet de la cámara (Opcional)
ES
9
Page 10
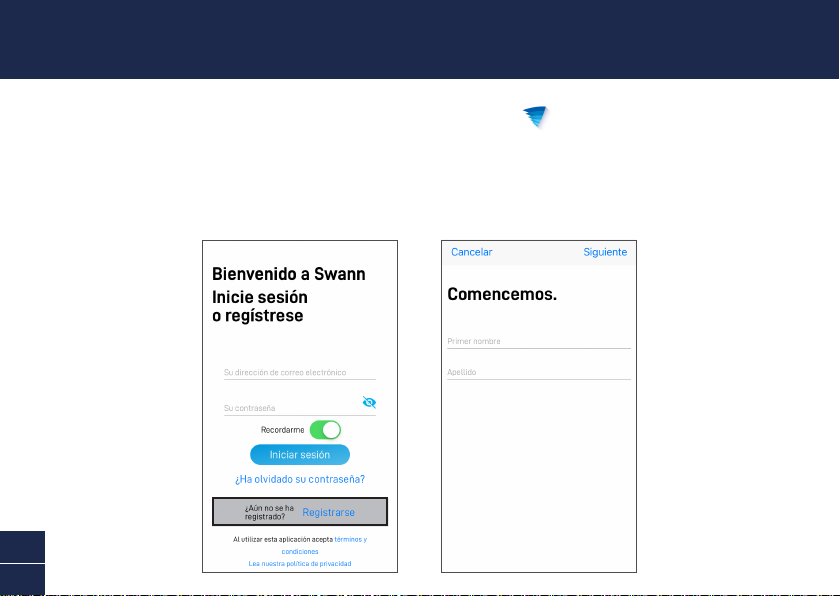
OBTENGA LA APLICACIÓN
SWANN SECURITY
1 Descargue la última versión de la aplicación Swann Security de Apple App Store® o Google
Play™ Store en su dispositivo con iOS o Android. Simplemente busque "Swann Security".
2 Abra la aplicación e cree su cuenta de Swann Security. Deberá activar su cuenta confirmando
el correo electrónico enviado a la cuenta de correo electrónico registrada antes de poder iniciar
sesión.
ES
10
Page 11

CONFIGURE LA CÁMARA
Abra la aplicación Swann Security e inicie sesión. Toque el botón Vincular dispositivo en la pantalla
(o abra el Menú y seleccione Vincular dispositivo) y siga las instrucciones en la aplicación para
configurar su nueva cámara. Antes de comenzar, manténgase cerca de su enrutador o punto de acceso
y conserve la información de su red Wi-Fi (incluida la contraseña) a mano. Tenga en cuenta que la
cámara se puede conectar solo a una red Wi-Fi de 2,4GHz.
ES
11
Page 12

MONTE LA CÁMARA
Monte la cámara en un lugar con recepción buena y confiable de Wi-Fi para garantizar el mejor
desempeño en la transmisión de video. Mediante la aplicación, intente transmitir video en vivo desde
la cámara. Si no experimenta problemas de transmisión (retraso en la carga, etc.), ha encontrado un
buen lugar para su dispositivo. Como regla general, cuanto más cerca está la cámara del enrutador de
Wi-Fi, mejor será la calidad de la conexión inalámbrica. Puede aumentar la cobertura de Wi-Fi de su
red existente mediante la instalación de un extensor de rango de Wi-Fi.
Instalación del soporte
Si se monta sobre una superficie de madera,
atornille el soporte directamente a la superficie.
Si se monta sobre una superficie de mampostería
(ladrillos, concreto), inserte tapones en la pared
antes de atornillar el soporte a la super ficie. Ajuste
lo suficiente para sujetar el soporte en su lugar. Pero
permitiendo el movimiento del soporte.
Ajuste del ángulo de la cámara
Afloje el anillo de bloqueo para mover, inclinar y rotar
la cámara. Ajuste el anillo de bloqueo nuevamente
para bloquear de forma segura la posición de la
ES
12
cámara en su lugar después del ajuste.
Page 13

SUGERENCIAS
Detección de movimiento
El sensor de movimiento PIR de la cámara detecta las firmas de calor de los objetos en movimiento.
En general, obtendrá buenos resultados de detección apuntando la cámara hacia abajo en un ángulo
donde las personas se muevan por el área de cobertura antes de dirigirse directamente hacia la
cámara.
Guía del Indicador LED
La luz LED en el frente de su cámara ayuda a informarle lo que sucede con el dispositivo.
Rojo permanente Transmisión en vivo / Grabación por movimiento
Azul de destello lento Modo de vinculación de Wi-Fi
Azul de destello rápido Conectando a Wi-Fi
¿Alguna pregunta?
¡Estamos aquí para ayudarlo! Visite nuestro Centro de Asistencia en support.swann.com.
Puede registrar su producto para obtener asistencia técnica dedicada, encontrar respuestas a
preguntas frecuentes y más. También puede enviarnos un correo electrónico en cualquier momento a:
tech@swann.com
ES
13
Page 14

PRÉSENTATION GÉNÉRALE DE LA CAMÉRA
N'oubliez pas de retirer le film protecteur de
l'avant de l'appareil avant de l'utiliser.
LED infrarouges
(pour la vision
nocturne)
Microphone
Capteur de
détection de nuit
FR
14
Haut-parleur (bas)
Projecteur
Indicateur LED
Capteur de mouvement
infrarouge passif
Bouton de
réinitialisation
Câble
d'alimentation
Connecteur Ethernet
(connexion filaire optionnelle
à votre routeur; la caméra doit
d'abord être couplée via W i-Fi)
Page 15

ALIMENTATION DE LA CAMÉRA
Connectez la caméra à l'adaptateur secteur à l'aide du câble d'alimentation et Ethernet, puis branchez
l'adaptateur secteur sur une prise secteur, comme indiqué ci-dessous. Assurez-vous que la caméra
est à portée du réseau Wi-Fi auquel vous souhaitez vous connecter.
Adaptateur secteur
Vers le port LAN du routeur (en option)
Câble d'alimentation et
Ethernet
Vers le connecteur Ethernet de la caméra
(en option)
FR
15
Page 16

OBTENTION DE L'APPLICATION
SWANN SECURITY
1 Téléchargez la dernière version de Swann Security depuis l'Apple App Store® ou le Google
Play™ Store sur votre appareil iOS ou Android. Il suffit de rechercher "Swann Security".
2 Ouvrez l'application et créez votre compte Swann Security. Vous devrez activer votre compte en
confirmant l'e-mail envoyé au compte de messagerie enregistré avant de pouvoir vous connecter.
FR
16
Page 17

CONFIGURATION DE LA CAMÉRA
Lancez l’application Swann Security et connectez-vous. Appuyez sur le bouton Associer appareil à
l’écran (ou ouvrez le Menu et sélectionnez Associer appareil) et suivez les instructions fournies avec
l'application pour configurer votre nouvelle caméra. Avant de commencer, approchez-vous de votre
routeur ou de votre point d'accès et notez les informations de votre réseau Wi-Fi (y compris votre mot
de passe). Veuillez noter que la caméra ne peut se connecter qu’à un réseau Wi-Fi à 2,4 GHz.
FR
17
Page 18

INSTALLATION DE LA CAMÉRA
Installez la caméra dans un endroit offrant une réception Wi-Fi fiable et fiable pour garantir les
meilleures performances de streaming vidéo. À l'aide de l'application, essayez de diffuser en continu
des vidéos en direct à partir de la caméra. Si vous ne rencontrez aucun problème de streaming (mise
en mémoire tampon, etc.), vous avez trouvé un emplacement approprié pour votre appareil. En règle
générale, plus votre caméra est proche de votre routeur Wi-Fi, meilleure est la qualité de la connexion
sans fil. Vous pouvez augmenter la couverture Wi-Fi de votre réseau existant en installant une
extension de portée Wi-Fi.
Installation du support
En cas de montage sur une surface en bois, vissez
le support directement sur la surface. En cas de
montage sur une sur face de maçonnerie (briques,
béton), insérez des chevilles avant de visser le
suppor t à la surface. Serrez suffisamment pour
fixer le support en place. Et toujours permettre au
support de se déplacer.
Réglage de l'angle de la caméra
Desserrez la bague de verrouillage pour effectuer un
panoramique, une inclinaison et une rotation de la caméra.
FR
18
Serrez fermement la bague de verrouillage pour verrouiller
la position de la caméra après avoir ajusté sa position.
Page 19

ASTUCES
Détection de mouvement
Le capteur de mouvement PIR de la caméra détecte la chaleur des objets en mouvement. En général,
vous obtiendrez de bons résultats en termes de détection en dirigeant la caméra vers le bas, la pointant
sur un angle où les personnes se déplacent dans sa zone de couverture avant de se diriger directement
vers la caméra.
Guide de l'indicateur LED
La lumière LED située à l'avant de votre caméra vous informe de ce qui se passe avec l'appareil.
Rouge constant Diffusion en direct / Enregistrement de mouvements
Bleu clignotant lent Mode de liaison Wi-Fi
Bleu clignotant rapide Connexion au Wi-Fi
Des questions ?
Nous sommes là pour vous aider! Visitez notre Centre de Support à l'adresse support.swann.com.
Vous pouvez enregistrer votre produit pour un support technique dédié, trouver des réponses aux
questions fréquemment posées, etc. Vous pouvez également nous envoyer un email à tout moment via:
tech@swann.com
FR
19
Page 20

PANORAMICA DELLA TELECAMERA
Ricordarsi di rimuovere la pellicola protet tiva dal
lato anteriore della telecamera prima dell’uso.
LED a infrarossi
(per visione
notturna)
Microfono
Sensore di
rilevamento
del notturno
IT
20
Altoparlante
(inferiore)
Illuminazione
Indicatore a LED
Sensore di rilevamento
del movimento
a raggi infrarossi passivo
Tast o
Ripristino
Connettore
di alimentazione
Connettore Ethernet
(connessione cablata
opzionale al router; la
telecamera deve essere prima
abbinata tramite Wi-Fi)
Page 21

ALIMENTARE LA TELECAMERA
Collegare la telecamera all'alimentatore utilizzando il cavo di alimentazione e Ethernet in dotazione,
quindi collegare l'alimentatore a una presa di corrente, come indicato. Verificate che la telecamera sia
nel raggio della rete Wi-Fi al quale desiderate collegarvi.
Alimentatore
Alla porta LAN del router (opzionale)
Cavo di alimentazione e
Ethernet
Al connettore Ethernet della telecamera
(opzionale)
IT
21
Page 22

OTTENERE L’APP SWANN SECURITY
1 Scaricare la versione più recente dell’app Swann Security dal’Apple App Store® o da Google
Play™ Store sul dispositivo iOS o Android. Basta cercare "Swann Security".
2 Aprire l'app ed creare l'account Swann Security. Prima di poter accedere bisogna attivare
l'account confermando l'email inviata all'account email fornito.
IT
22
Page 23

CONFIGURAZIONE DELLE TELECAMERA
Aprire l’app Swann Security e eseguite l’accesso. Toccate il tasto Abbina dispositivo sullo schermo
(o aprire Menu e selezionare Abbina dispositivo) e seguire le istruzioni dell’app per configurare la
nuova telecamera. Prima di iniziare avvicinarsi al router o punto di accesso e tenere a portata di mano
le informazioni della rete Wi-Fi (inclusa la password). La telecamera può collegarsi solo ad una rete
Wi-Fi 2.4GHz.
IT
23
Page 24

MONTAGGIO DELLA TELECAMERA
Montare la telecamera in un luogo con una ricezione Wi-Fi buona e affidabile per garantire la migliore
prestazione streaming video. Usando l’app, provare a mostrare video dal vivo dalla telecamera.
Laddove non si presentassero problemi di streaming (buffering, ecc.), quello è il luogo perfetto per il
dispositivo. Di norma, quanto più vicina è la telecamera al Wi-Fi router, tanto migliore sarà la qualità di
connessione. È possibile potenziare la copertura Wi-Fi della rete esistente installando un estensore di
portata Wi-Fi.
Installazione della staffa
Se si sta montando la telecamera su una superficie in
legno, avvitare la staf fa direttamente alla super ficie.
Se si sta montando la telecamera su una superficie
in cemento (mattoni, calcestruzzo), inserire i tasselli
a parete prima di avvitare la staffa alla superficie.
Serrare a sufficienza per fissare la staffa.
E consentire comunque un minimo di movimento della
stessa.
Regolazione dell'angolazione della telecamera
Allentare l’anello di blocco per fare una
panoramica, inclinare o ruotare la telecamera.
Serrare di nuovo l’anello di blocco per bloccare la
IT
24
posizione della telecamera dopo la regolazione.
Page 25

SUGGERIMENTI
Rilevamento di movimento
Il sensore di movimento PIR della telecamera rileva le tracce termiche degli oggetti in movimento. In
genere si otterranno buoni risultati di rilevamento puntando la telecamera verso il basso in un angolo
in cui le persone si muovono attraverso l'area di copertura prima di dirigersi direttamente verso la
telecamera.
Guida dell'indicatore LED
La luce LED sul lato anteriore della telecamera informa su cosa accade con il dispositivo.
Rosso fissa Streaming dal vivo / Registrazione in movimento
Blu lampeggiante lento Modalità di abbinamento Wi-Fi
Blu lampeggiante veloce Connessione al Wi-Fi
Hai domande?
Siamo qui per aiutarti! Visita il nostro Centro di supporto su support.swann.com. È possibile registrare
il prodotto per l'assistenza tecnica dedicata, trovare le risposte alle domande più frequenti e altro
ancora. Puoi anche contattarci via email in qualsiasi momento all'indirizzo: tech@swann.com
IT
25
Page 26

KAMERAÜBERSICHT
Entfernen Sie bitte vor Gebrauch die
Schutzfolie auf der Vorderseite der Kamera.
Infrarot-LEDs
(für Nachtsicht)
Mikrofon
Nacht-Bewegungs-
DE
26
sensor
Lautsprecher
(unten)
Spotlight
LED-Anzeige
Passiv-Infrarot
Bewegungssensor
Reset
Tast e
Strom-
anschluss
Ethernetanschluss (optionale
Kabelverbindung zum Router,
Kamera muss zuerst über
WLAN gekoppelt werden)
Page 27

KAMERA MIT STROM VERSORGEN
Verbinden Sie die Kamera mit dem Strom- und Ethernetkabel mit dem Stromadapter und stecken dann
den Stromadapter in eine Steckdose, wie nachstehend gezeigt. Achten Sie darauf, dass sich die Kamera
im Empfangsbereich des WLAN befindet, mit dem Sie sie verbinden wollen.
Netzadapter
An Router-LAN-Anschluss (optional)
Strom- und Ethernet-
kabel
An Kamera-Ethernet-Anschluss (optional)
DE
27
Page 28

INSTALLATION DER SWANN
SECURITY APP
1 Laden Sie die aktuelle Version von der Swann Security App aus dem Apple App Store® oder
Google Play™ Store auf dem iOS- oder Android-Gerät. Suchen Sie einfach nach „Swann Security“.
2 Öffnen Sie die App und erstellen ein Swann Security Konto. Sie müssen vor der Anmeldung Ihr
Konto aktivieren, indem Sie die E-Mail bestätigen, die an die registrierte E-Mail gesendet wurde.
DE
28
Page 29

KAMERA EINRICHTEN
Starten Sie die Swann Security App und melden sichan. Tippen Sie auf die Schaltfläche Gerät
verknüpfen auf dem Bildschirm (oder öffnen Sie das Menü und wählen Gerät verknüpfen) und
befolgen die Anweisungen zum Einrichten der neuen Kamera. Bevor Sie beginnen sollten Sie dicht
an Ihrem Router oder Access Point stehen und die WLAN-Daten zur Hand haben (einschließlich dem
Passwort). Bitte beachten Sie, dass die Kamera nur mit einem 2.4GHz WLAN verbunden werden kann.
DE
29
Page 30

MONTAGE DER KAMERA
Bringen Sie die Kamera an einem Ort mit gutem, zuverlässigem WLAN-Empfang an, um die beste
Leistung für den Videostream zu gewährleisten. Versuchen Sie von dieser Stelel aus mit Hilfe der App,
Live-Video von der Kamera zu streamen. Wenn Sie keine Probleme beim Streamen haben (Pufferung
usw.), haben Sie einen guten Platz für das Gerät gefunden. Allgemein gilt, je näher die Kamera am
WiFi-Router steht, desto besser ist die Qualität der Wireless-Verbindung. Sie können die WiFi-Deckung
des bestehenden Netzwerks verstärken, indem Sie einen WLAN-Extender installieren.
Anbringung der Halterung
Erfolgt die Befestigung auf einer Holzoberfläche,
befestigen Sie die Halterung direkt auf der
Oberfläche. Beim Anbringen auf Mauerwerk (Ziegel,
Beton), benutzen Sie vor dem Anschrauben der
Halterung die Wanddübel. Ausreichend anziehen,
um die Halterung fest angebracht, aber dennoch
beweglich ist.
Anpassung des Kamerawinkels
Lösen Sie den Verschlussring, um die Kamera
zu schwenken, zu neigen und zu drehen.
Ziehen Sie den Verschlussring wieder fest an,
DE
30
um die Kameraposition zu arretieren.
Page 31

TIPPS
Bewegungserkennung
Der PIR-Bewegungsmelder der Kamera erkennt Hitzesignaturen beweglicher Objekte. Sie erhalten im
Allgemeinen gute Erkennungsergebnisse, wenn Sie die Kamera in einem Winkel nach unten einstellen,
wo Leute durch den Deckungsbereich gehen, bevor sie direkt auf die Kamera zugehen.
LED-Anzeigenleitfaden
Die LED-Anzeige vorn an der Kamera informiert Sie über den Zustand des Geräts.
Durchgehend rot Live-Streaming / Bewegungsaufzeichnung
Blinkt langsam blau WLAN-Kopplungsmodus
Blinkt schnell blau WLAN verbinden
Noch Fragen?
Wir helfen Ihnen gerne. Besuchen Sie unser Support-Center auf support.swann.com. Sie können dort
Ihr Produkt registrieren und erhalten so technischen Support, Antworten auf häufig gestellte Fragen
und vieles mehr. Sie können uns auch jederzeit per E-Mail erreichen unter: tech@swann.com
DE
31
Page 32

Input: DC12V 2A
Important Safety Warnings
(1) For pluggable equipment, the socket-outlet shall be installed near the equipment and shall be easily accessible.
(2) The light source of this luminaire is not replaceable; when the light source reaches its end of life the whole
luminaire shall be replaced.
FCC Statement
This equ ipment has b een tes ted and foun d to comply w ith the li mits for C lass B digi tal devi ce, pursu ant to par t
15 of the FC C Rules. Thes e limits are d esigned to p rovide rea sonable pro tection a gainst harm ful interf erence
in a resid ential in stall ation . This equi pment gen erate s, uses an d can radi ate radi o freque ncy ener gy and,
if not ins talle d and used i n accord ance wi th the ins truct ions, ma y cause ha rmful in terfe rence t o radio
communi cations . Howeve r, there is no gua rantee th at inter ference w ill not occu r in a partic ular inst allatio n. If
this equ ipment does c ause harmfu l interfer ence to radio or t elevisio n reception , which can be de termined by
turnin g the equipmen t off and on, the u ser is encour aged to try t o correct the i nterfere nce by one or mor e of
the fol lowing meas ures: • Reori ent or reloca te the recei ving antenn a • Increase th e separati on between t he
equipme nt and the re ceiver • C onnect t he equipmen t into an out let on a cir cuit diff erent fr om that to w hich the
recei ver is conne cted • Con sult the dea ler or an expe rienced r adio/T V technic ian for help .
This de vice comp lies wit h Part 15 of t he FCC Rule s. Opera tion is sub ject to th e follow ing two c onditio ns: (1) this
devic e may not ca use harm ful inte rfere nce, and (2 ) this dev ice must a ccept an y inter ferenc e receiv ed, incl uding
interference that may cause undesired operation.
FCC RF Rad iation Ex posure S tatemen t Caution: To m aintain co mplianc e with the FC C’s RF expos ure guidel ines,
place t he produc t at least 20 cm from nea rby perso ns.
WARNI NG: Modifica tions not app roved by the p arty resp onsible for c ompliance co uld void user ’s authority t o
operate the equipment.
WiFi Frequency:2400~2500MHz,Max RF POWER:18.37dBm
IC Statement
This de vice compl ies with In dustry C anada lic ense-ex empt RSS st andard(s) . Operatio n is subjec t to the foll owing
two co ndition s: (1) this dev ice may no t cause i nterf erence , and (2) thi s device m ust acc ept any int erfe rence,
includ ing inter ference t hat may cau se undesi red opera tion of the d evice.
The dev ice is complian ce with RF fiel d strength li mits, users c an obtain Canad ian informat ion on RF exposur e
and compliance.
This Cl ass B digi tal appa ratus co mplies w ith Can adian ICE S-003 . This equ ipment co mplies w ith IC ra diatio n
expos ure limits s et forth f or an uncont rolled env ironment . This equip ment should b e install ed and opera ted with
minimum di stance 2 0cm betw een the ra diator & yo ur body.
Déclaration IC
Le prés ent appar eil est con forme aux C NR d’Indus trie Cana da applic ables aux a ppareil s radio exem pts de lice nce.
L’exploit ation est a utorisé e aux deux con ditions su ivantes : (1) l ’appareil ne d oit pas prod uire de broui llage, et ( 2)
l’util isateur de l ’apparei l doit accep ter tout br ouillag e radioéle ctriqu e subi, même si l e brouill age est sus ceptibl e
d’en compromettre le fonctionnement.
Le prés ent appa reil est c onfor me de ce mat ériel au x confor mités ou a ux limit es d’int ensit é de champ RF,
les uti lisat eurs peu vent sur l ’expos ition au x radiof réquen ces et la c onform ité d’acqu érir le s inform ations
correspondante.
Cet app areil numériqu e de la clas se B est confor me à la norme NMB- 003 du Canada. D éclaration d ’expos ition
aux radi ations : C et équip ement es t confo rme aux li mites d’ex position aux r ayonne ments IC é tablie s pour un
envir onnement non c ontrôlé. C et équipeme nt doit être i nstallé et u tilisé ave c un minimum de 20 c m de distance
entre l a source de r ayonnem ent et vot re corps.
EN CE marking on this product represents the product is in compliance with all directives that are applicable to it.
See www.swann.com/uk/compliance. Thi s produc t should no t be dispo sed wit h other h ousehol d wast es
throug hout the E U. To preve nt poss ible har m to the env ironment or huma n health f rom unco ntroll ed waste
dispos al, rec ycle it r espon sibly to pr omote th e susta inable r euse of ma terial r esourc es. To ret urn your
used de vice, pl ease us e the ret urn and col lecti on syst ems or con tact th e retai ler wher e the prod uct was
purcha sed. The y can tak e this pro duct for e nviron ment saf e recy cling. | ES La marca CE en este producto
representa que el producto cumple con todas las directivas de aplicación. Ver www.swann.com/uk/compliance. Este
producto no debe arrojarse junto con otros desperdicios domésticos en ningún lugar de los Estados Unidos. Para
evitar posibles daños al medio ambiente o a la salud humana debidos a desechos no controlados de desperdicios,
recíclelo responsablemente para promover la reutilización sostenible de los recursos materiales. Para devolver
su dispositivo usado, utilice los sistemas de devolución recolección, o contacte con el vendedor minorista donde
compró el producto. Ellos pueden llevar este producto al reciclado seguro para el medio ambiente. | FR Le marquage
CE sur ce produit indique que le produit est conforme à toutes les directives qui lui sont applicables. Voir www.
swann.com/uk/compliance. Ce produit ne doit pas être éliminé avec les autres déchets ménagers dans l’UE. Pour
éviter tout risque pour l’environnement ou la santé humaine d’une élimination incontrôlée des déchets, recyclezle de manière responsable afin de promouvoir la réutilisation durable des ressources matérielles. Pour retourner
votre appareil usagé, veuillez utiliser les systèmes de retour et de collecte ou contactez le revendeur chez qui
vous avez acheté le produit. Il pourra reprendre ce produit pour un recyclage sans danger pour l’environnement.
| IT Il simbolo CE su questo prodotto indica che il prodotto è conforme a tutte le direttive applicabili.
Vedi www.swann.com/uk/compliance. Corretto smaltimento del prodotto. Questo simbolo indica che questo prodotto non
deve essere smaltito con altri rifiuti domestici in tutta l’UE. Per evitare possibili danni all’ambiente o alla salute umana
derivanti dallo smaltimento incontrollato dei rifiuti, riciclarlo responsabilmente per promuovere il riutilizzo sostenibile
delle risorse materiali. Per restituire il dispositivo usato, utilizzare i simboli di reso e raccolta o contattare il rivenditore
presso il quale è stato acquistato il prodotto. Possono consegnare questo prodotto presso i centri di riciclaggio
sicuro. | DE Das CE-Zeichen auf diesem Produkt gibt an, dass es allen entsprechenden Bestimmungen entspricht.
Siehe www.swann.com/uk/compliance. Diese Markierung zeigt, dass das Produkt in der EU nicht im Hausmüll entsorgt
werden darf. Um mögliche Umwelt- oder Gesundheitsgefahren durch unkontrollierte Müllentsorgung abzuwenden,
recyceln Sie es verantwortlich, um eine nachhaltige Wiederverwendung der Materialien zu fördern. Um ein benutztes
Gerät zurückzugeben, verwenden Sie bitte die Rückgabe- und Sammelsysteme oder kontaktieren den Händler, von
dem das Produkt erworben wurde. Sie können das Produkt zum umweltfreundlichen Recycling geben.
EN
QSGSWIFISPOTCAMVER15L
© Swann Communications 2019
32
 Loading...