

Page 1
© Swann Communications 2011
Helpdesk / Technical Support Details
Limited Warranty Terms & Conditions
Swann Communications warrants this product against defects in workmanship and material for a period
of one (1) year from it’s original purchase date. You must present your receipt as proof of date of purchase
for warranty validation. Any unit which proves defective during the stated period will be repaired without
charge for parts or labour or replaced at the sole discretion of Swann. The end user is responsible for all
freight charges incurred to send the product to Swann’s repair centres. The end user is responsible for all
shipping costs incurred when shipping from and to any country other than the country of origin.
The warranty does not cover any incidental, accidental or consequential damages arising from the use of
or the inability to use this product. Any costs associated with the tting or removal of this product by a
tradesman or other person or any other costs associated with its use are the responsibility of the end user.
This warranty applies to the original purchaser of the product only and is not transferable to any third
party. Unauthorized end user or third party modi cations to any component or evidence of misuse or
abuse of the device will render all warranties void.
By law some countries do not allow limitations on certain exclusions in this warranty. Where applicable by
local laws, regulations and legal rights will take precedence.
Swann Technical Support
All Countries E-mail: tech@swannsecurity.com
Telephone Helpdesk
USA toll free
1-800-627-2799
(Su, 2pm-10pm US PT)
(M-Th, 6am-10pm US PT)
(F 6am-2pm US PT)
USA Exchange & Repairs
1-800-627-2799 (Option 1)
(M-F, 9am-5pm US PT)
AUSTRALIA toll free
1300 138 324
(M 9am-5pm AUS ET)
(Tu-F 1am-5pm AUS ET)
(Sa 1am-9am AUS ET)
NEW ZEALAND toll free
0800 479 266
UK
0203 027 0979
See http://www.worldtimeserver.com for information on time zones and the
current time in Melbourne, Australia compared to your local time.
FCC Veri cation
This equipment has been tested and found to comply with the limits for Class B digital device, pursuant
to part 15 of the FCC Rules. These limits are designed to provide reasonable protection against harmful
interference in a residential installation. This equipment generates, uses and can radiate radio frequency
energy and, if not installed and used in accordance with the instructions, may cause harmful interference
to radio or television reception, which can be determined by turning the equipment o and on, the user is
encouraged to try to correct the interference by one or more of the following measures:
Reorient or relocate the receiving antenna
Increase the separation between the equipment and the receiver
• Connect the equipment into an outlet on a circuit di erent from that to which the receiver is connected
• Consult the dealer or an experienced radio/TV technician for help
WARNING: Modi cations not approved by the party responsible for compliance could void user’s authority
to operate the equipment.
Sky Eye
MSKYEYE010811E
SWTOY-SKYEYE-US
Page 2
2
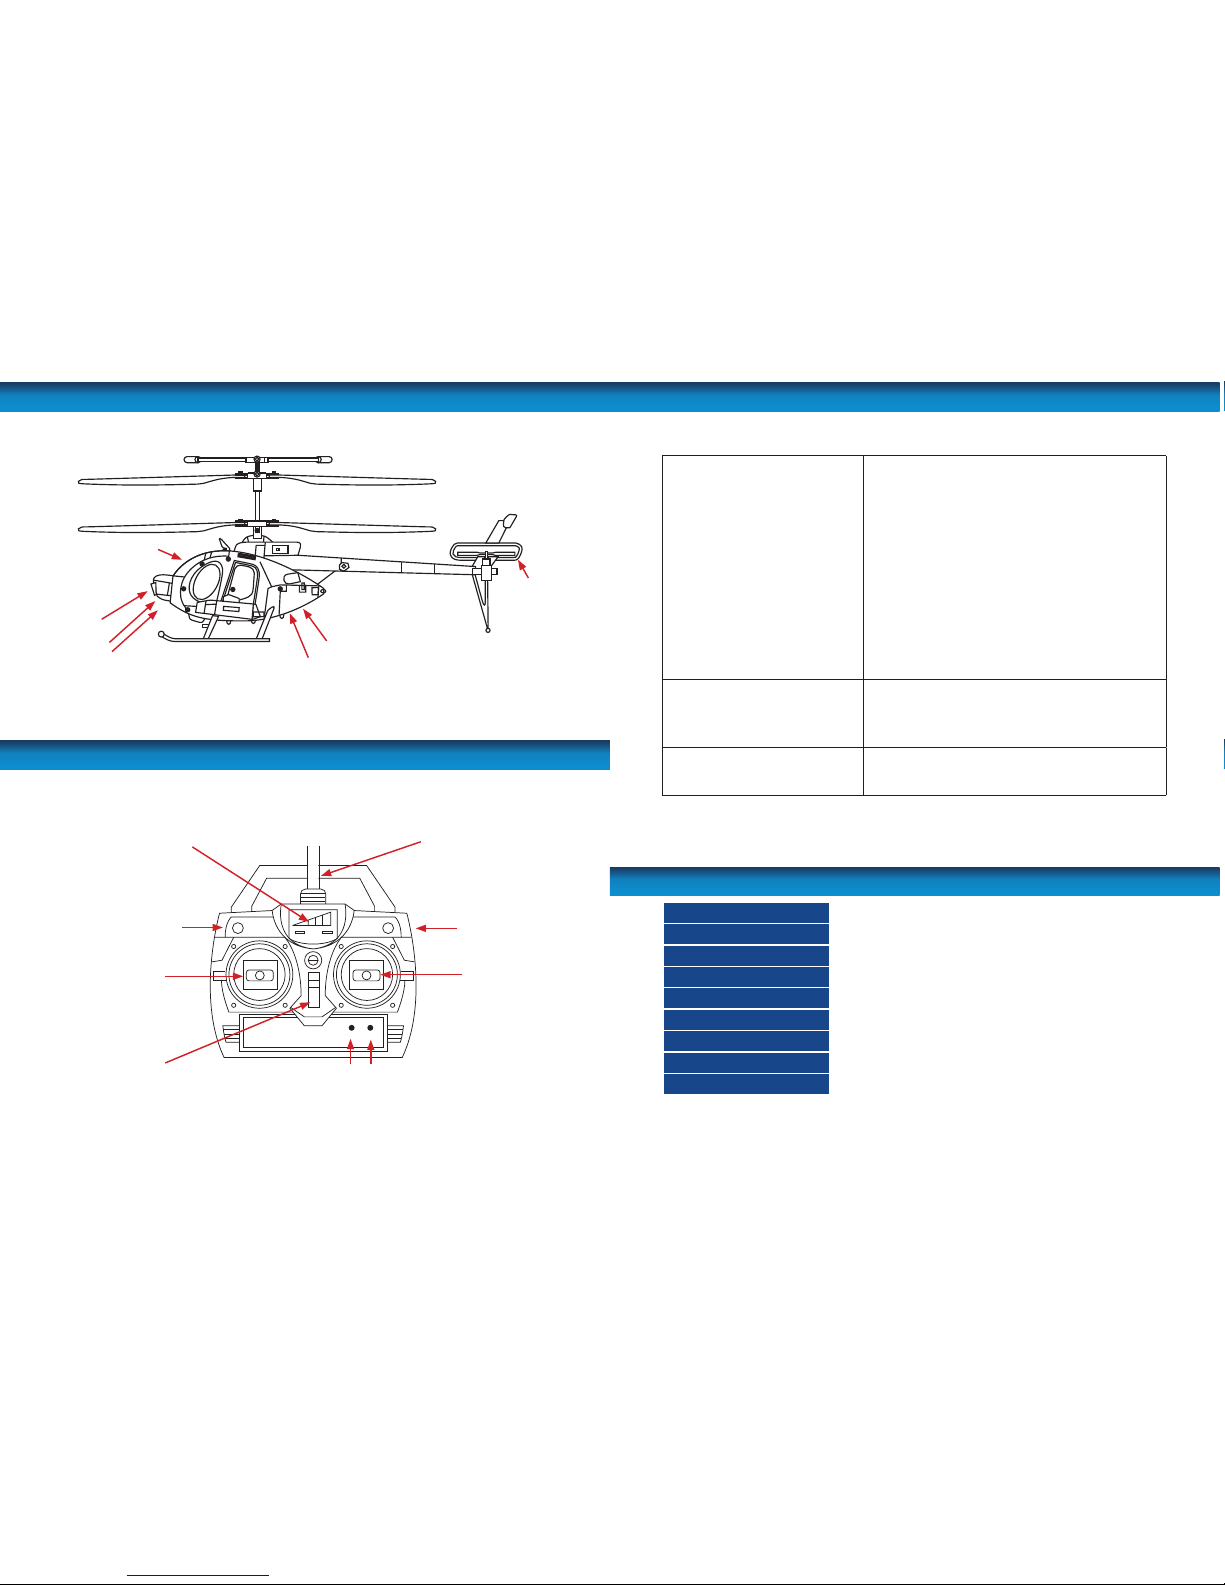
The Helicopter
The Remote Control
Upper Rotors
Lower Rotors
Charging port
Camera
Blue Recording LED
(inside cockpit canopy)
USB port
Reset button
Power ON/OFF
Flight stick
Trim knob
Tail Rotor Speed Control
Antenna mountThrottle indicator light
Video triggerPhoto trigger
Throttle stick
Power switch
Tail rotor
11
Troubleshooting
Cannot control the chopper
• Ensure the controller is switched ON.
• Ensure the helicopter is switched ON.
• Try pairing the remote and the helicopter again.
• Check the batteries in the remote and if needed,
replace with new batteries.
• Ensure the antenna is securely attached to the
remote.
• Ensure the helicopter is fully charged.
• Do not y the helicopter in high winds as this may
make it hard to control.
• Center the trim control and if needed, adjust the
trim again.
Helicopter will not ascend.
• The charge in the helicopter may be too low. You
will need to recharge the helicopter.
• Check that you are providing enough throttle to
lift the chopper.
Helicopter lands too fast
• You are reducing the throttle too fast. Reduce the
throttle gently to get a gradual descent to the
ground and a softer landing.
Main rotor diameter
300mm
Length
375mm
Machine height
160mm
Charging time
Approx. 70-80 minutes
Flying time
Approx. 5-8 minutes
Control distance
Approx. 20-30m / 65ft-98ft
Frequency
27MHz
Battery (helicopter)
DC 3.7V output (800mAh)
Battery (remote control)
AA 1.5V x 6 (not included)
Speci cations
Page 3

10
CHOKING HAZARD: Small parts. NOT for children
under 3 years.
!
Helicopter Battery Warnings:
The helicopter has a built in Lithium Polymer battery. This battery is light and powerful, as its
chemistry is based on lithium, a light and extremely volatile metal.
• The battery pack in the helicopter will become warm if charged for too long and could
become damaged. Do not overcharge the battery in the helicopter.
• Charge battery in an isolated, controlled environment. Keep far away from ammable
materials.
• Never leave the helicopter unattended while charging.
• The battery pack in the helicopter becomes warm after use. We recommend you allow 30
minutes for it cool before re-charging the helicopter.
• Never completely exhaust the battery. When the helicopter starts to lose power, turn it o
and charge it as soon as practicable.
• DO NOT dispose of the batteries in the remote control or the helicopter in re as they may
explode.
• The battery must be disposed of responsibly.
• DO NOT expose to direct sunlight: there is a risk that the battery may overheat, ignite and/
or explode.
• DO NOT disassemble, modify, heat, or short circuit the battery. Don’t place it in re or leave
in hot places or near heat sources.
• DO NOT drop the battery or subject it to strong impacts.
• DO NOT allow the battery to get wet.
• Only charge the battery from the supplied charging equipment. Using other charging
equipment will void your warranty, may damage the battery and poses a risk of re or
explosion.
• Use the battery only in this helicopter, and use only this battery in the helicopter.
• Read these instructions carefully and thoroughly, and obey all guidelines herein.
• In the unlikely event of leakage or explosion, use sand or a chemical re extinguisher to
extinguish the batteries.
If your high school chemistry teacher ever demonstrated what happens when sodium is placed
in water (“bam” is the technical description of the outcome) then you’re somewhat familiar
with how volatile lithium is – except that lithium is lighter (and therefore packs a bigger bang
per gram) than sodium is! Basically, obey all the guidelines and respect the power of lithium!
3
Remote Control parts
Charging the helicopter
Charging the helicopter
Before you can take ight, you need to charge the battery in the helicopter using the supplied
power adaptor. You cannot charge the chopper using the USB connector.
• Ensure the helicopter is turned OFF before attempting to charge it.
If left on, it won’t charge.
• Plug the charging plug into the charging port underneath the helicopter marked “CHA”
and the other end into a mains power outlet.
• The light on the power adaptor will glow RED when charging. It will glow GREEN when the
helicopter is fully charged or when it is not charging.
• It will take 70-80 minutes to charge. Don’t over-charge the helicopter by leaving it
connected to a charger for more than ninety (90) minutes.
Install 6 x AA
Alkaline batteries
remove battery
compartment
Attach antenna
Replace battery
cover
Fitting the antenna to the remote control
• Install the antenna by screwing it in clockwise to the mount at the top of the remote
control.
• Extend the antenna fully when ying the helicopter.
Loading batteries into the Remote Control
1. The battery compartment is located on the rear of the remote control. Using a precision
screwdriver, undo the screw holding the battery compartment cover in place and remove
it to reveal the battery compartment.
2. Inser t 6 AA alkaline batteries into the battery compartment, ensuring each battery
is oriented the correct way for polarity. The correct way is shown inside the battery
compartment and also in the picture below.
3. Replace the battery compartment cover, securing it with the screw removed in step 1.
Note: If the helicopter has trouble lifting o
the ground or does not y as high as normal,
it means the battery is running low and needs
recharging.
Page 4
4
Pairing the remote
Before you can take ight, you need to pair the remote control to the helicopter. Don’t use
multiple helicopters which utilize the same radio frequency control signal simultaneously: the
control signals can interfere with one another, often with surprising results. This helicopter
uses a frequency of 27MHz. Exercise caution around any other RF generating equipment.
1. Make sure you are away from any other helicopters/controllers or that all other units are
OFF.
2. Turn ON the helicopter and the remote control. Place the helicopter on the ground.
3. Push the left stick (throttle) completely forwards to full throttle and then back down to
its starting position.
4. If you gently push the throttle forward again, the helicopter should respond and the
rotors will start spinning. The helicopter will now be paired to that remote control.
Be careful when testing the pairing since once paired, pushing the throttle to full again will
cause the rotor blades to spin at full speed. The helicopter is likely to y o at high speed
causing unexpected and possibly dangerous results.
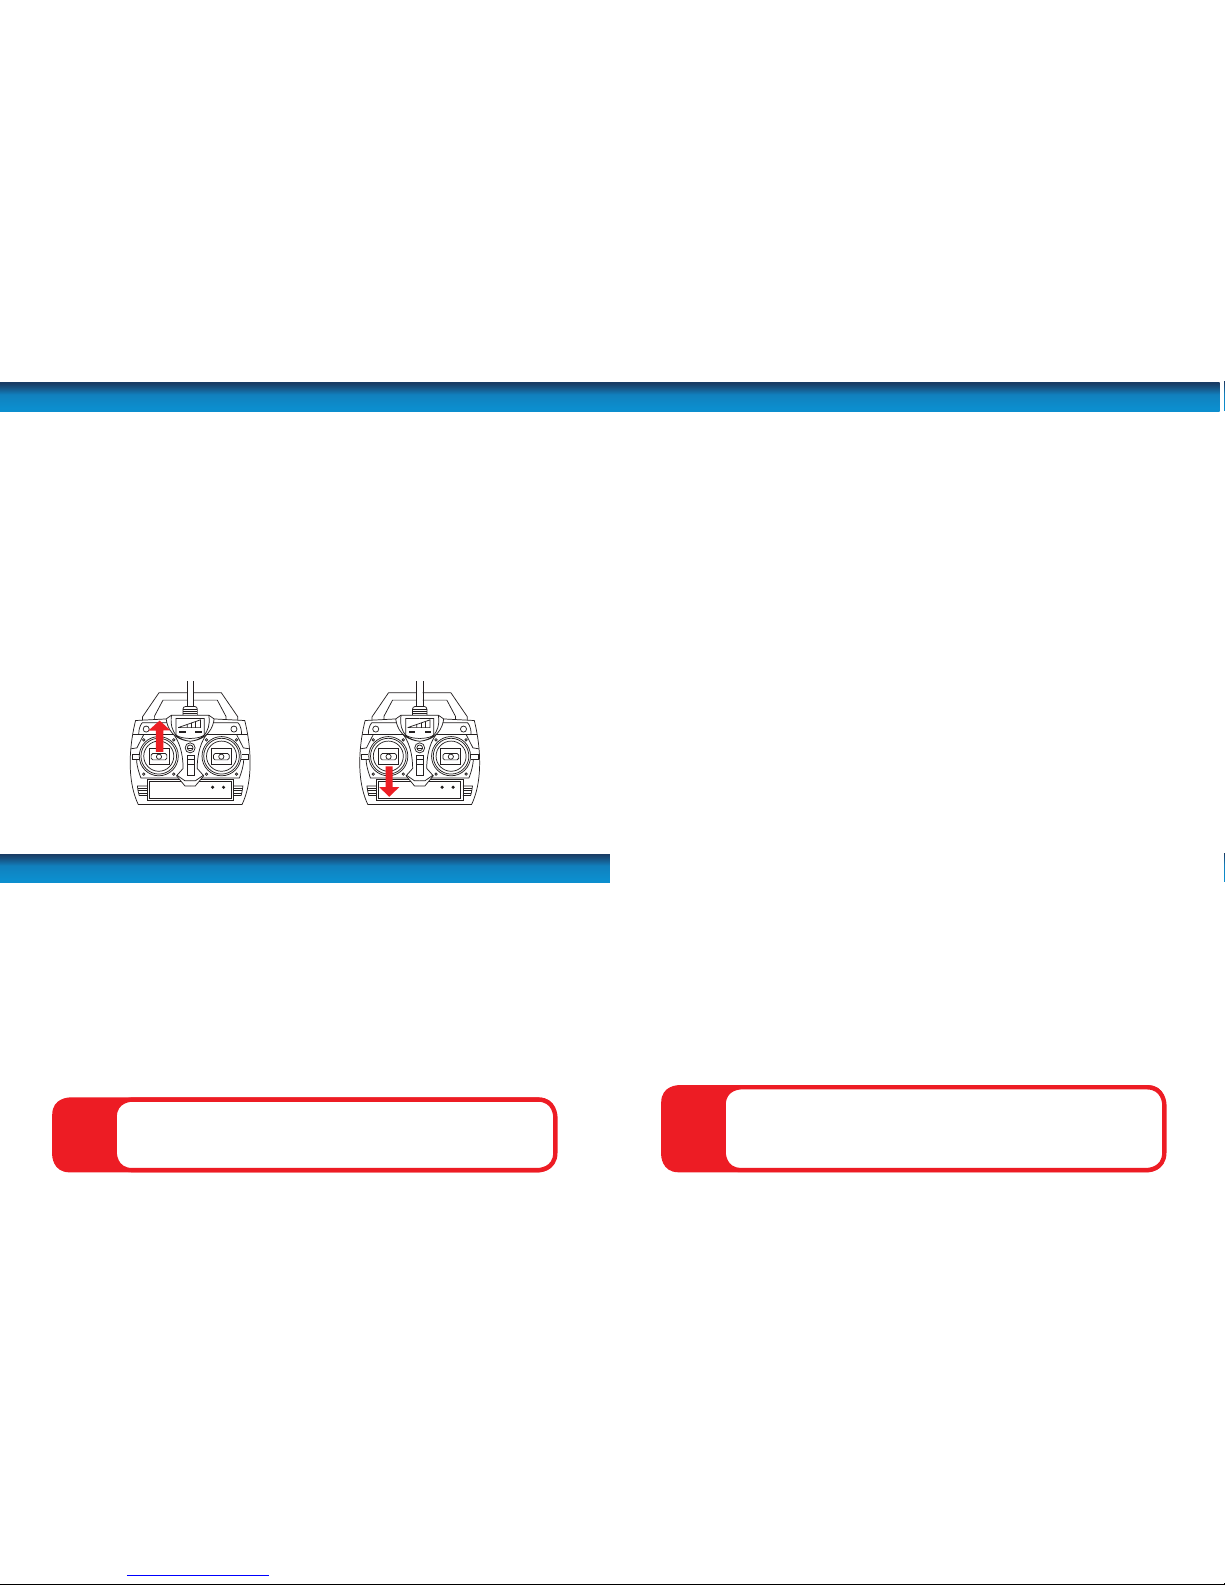
Pairing the remote control
Step 1: Push the throttle up
to full throttle.
Step 2: Pull the throttle
back down to zero throttle.
WARNING: Do NOT y near eyes or face.
!
1. Place the helicopter on the ground with the tail facing away from you. Make sure you are
away from crowds, animals, obstructions or valuables that could break (like that urn with
the ashes in it).
2. Turn ON the helicopter.
3. Make sure the throttle on the controller is at minimum.
4. Extend the antenna fully.
5. Turn on the controller.
6. Pair the controller to the helicopter if not already done.
7. You are now ready to y. Check the guides on the following pages on how to control
your helicopter.
Taking to the Air
9
Warnings
Battery Warnings:
• Requires 6 x 1.5V AA Alkaline batteries (not included).
• Rechargeable batteries are NOT recommended.
• Replacing batteries must be undertaken by a competent adult.
• Follow the polarity diagram ( + / - ) in the battery compartment.
• Promptly remove dead/exhausted batteries from the controller.
• Dispose of used batteries responsibly.
• DO NOT incinerate used batteries.
• DO NOT dispose of batteries in re, as batteries may explode or leak.
• DO NOT mix new and old batteries or types of batteries (i.e. alkaline/standard).
• DO NOT recharge non-rechargeable batteries.
• DO NOT short circuit the supply terminals.
Precautions and Maintenance
• Never y near your face. Keep rotor away from your ngers, hair, eyes and other body parts.
• Always lift o from a at surface.
• Never hold the ying helicopter in your hand when lifting o .
• DO NOT launch helicopter near people or animals.
• Stay away from obstacles and electrical hazards.
• To clean, wipe gently with a damp cloth. Avoid use of solvents, as these can damage the
plastic components.
• Keep the helicopter and remote away from heat sources.
• Do not submerge the helicopter or remote control in water. This will damage the electronic
components, and could pose a severe risk to the built-in battery.
• Turn o controller/charger and helicopter while not in use. Remove batteries from the
controller when not in use.
• Parental guidance is required for younger users.
• Keep your helicopter close and within line of sight – if the line-of-sight to the controller is
lost, you may lose control of the helicopter.
• For best performance, use only fresh Alkaline AA batteries in the controller.
• Read and obey all warnings and safety guidelines in this manual.
• The controller and charger are speci cally designed to charge this helicopter. Never use
any other charging equipment!
Special Notice to Adults:
• The helicopter is NOT intended for use by children under fourteen (14) years old, unless
directly supervised by a competent adult at all times.
• The helicopter must only be used with the supplied controller/charger.
• Regularly examine the helicopter and controller for any damage to the plugs, enclosure,
rotors, battery covers and other parts. In the event of any damage, neither the helicopter
nor controller should be used until the damage is completely repaired.
DANGER: Never insert any sharp objects, pins or
screws into the helicopter as this may puncture the
internal battery!
!
Page 5

8
Flight Tips
Wind: Basically, these are (approximately) 1/40th scale helicopters. Full sized helicopters
can’t y in high winds – and neither can the models. If a full sized helicopter has di culty
overcoming 50mph winds, then the model will have the same di culty with 1~2 mph winds
(i.e. 1/40th as much). There’s nothing that can be done about this, it’s just physics.
Air conditioning: Hot air rises and cool air falls – this creates movement in the air, leading
to an e ec t called “wind shear”. Basically, this is when there’s a column of hot air going up next
to cold air going down. Many full-scale aircraft accidents have been caused by wind shear. Air
conditioners create heaps of wind shear. If the helicopter ies through wind shear, it will seem
to suddenly y up or down (depending on the direction of the wind shear).
The Ground E ect: When the helicopter is near the ground, the air it pushes down with its
rotor has nowhere to go – the ground is in the way. Some of this air bounces back, this pushes
the helicopter up. When the helicopter is near the ground, it will get slightly more lift than it
normally would. This is something to keep in mind when landing.
The Ceiling E ect: Conversely to the ground e ect, when you y too close to a ceiling, a
small pocket of low pressure is created above the helicopter, and it will be sucked upwards.
This could be bad – if you hit the ceiling, the helicopter will stall, fall and possibly be damaged.
Multiple Helicopters: You can’t use more than one helicopter in a space at once, unless
you’re absolutely sure that they use di erent control frequencies. The control frequency of
this helicopter is 27MHz (it’s written on a sticker on the rear of the controller). Attempting to
y multiple helicopters using a single controller is quite dangerous, and can lead to crashes,
accidents, injuries or other very undesirable outcomes.
Places to Fly: Because high winds can be a problem, we recommend ying indoors. However,
you really do need a bit of space to get the most out of the helicopter. Some places which are
good for ight include large garages (whilst the car’s not parked there), indoor sports areas,
aircraft hangars, secret underground submarine pens and so on (though why you’d y a toy
helicopter in your secret underground submarine pen is beyond us). Or a large lounge room
with delicate items stashed somewhere out of the way - whatever you’ve got.
Low Battery: To get the longest possible life from the built-in battery, never completely
discharge it. As soon as the helicopter shows any sign of running low on power (such as
responding slowly or being unable to maintain altitude easily) turn it o and charge it as
soon as practicable. For more information about battery care, see
“Helicopter Battery
Warnings:” on page 10.
5
Control
Forward, Backwards
The ight stick on the controller a ects the
helicopter’s direction.
Forwards: Pushing the right stick up will pitch
the nose of the helicopter down and move the
helicopter forward.
Backwards: Pulling the right stick down will
pitch the nose of the helicopter up and move
the helicopter backwards.
Up/Down (Ascend/Descend)
The height the helicopter ies is controlled
by the throttle which varies the speed of the
spinning rotors.
Ascend: Push the throttle UP gently to
increase the spinning speed of the rotors and
make the helicopter ascend.
Descend: Push the throttle DOWN to reduce
the speed of the spinning rotors and make the
helicopter descend.
To get good results, be gentle and subtle. Small
adjustments made slowly and carefully are the
best way to get the helicopter to y well.
Rotating the helicopter left and right
The rudder can be used to turn the helicopter
to the left or right. When hovering, this will
make it rotate but when the helicopter is in
motion, this can be used to perform tricks like
spiralling to the left or right.
Rotate/Turn Right: To make the helicopter
turn to the right, push the right stick (the
rudder) to the right.
Rotate/Turn Left: To make the helicopter
turn to the left, push the right stick (the rudder)
to the left.
Page 6

6
Control
What is trim (rotation)?
You may nd that the helicopter rotates left or right while hovering, even when you are not
using the right stick on the controller. This rotation is because the two sets of rotor blades
sometimes get out of sync requiring adjustment to the trim.
The trim knob is located in the top right of the controller and ne -tunes the speed of the rotor
blades to keep the helicopter ying straight.
Trim should be checked each time you y the helicopter to make sure the chopper ies straight.
If the helicopter is rotating clockwise, gently
rotate the trim knob counter-clockwise until
the helicopter stops drifting to the right.
While hovering, if the helicopter is rotating
counter-clockwise, gently rotate the trim knob
clockwise until the helicopter stops drifting to
the left.
CAUTION: Do not touch the running rotors. Do not
y above or near someone’s head. Adult supervision is
required at all times.
!
Turn TRIM knob
clockwise...
Turn TRIM knob
anti-clockwise
...if helicopter is
drifting clockwise
...if helicopter is drifting
anti-clockwise
7
Using the onboard camera
Photo and Video Recording
The SkyEye is just that, your eye in the sky. You can record photos and video of your ights
from its onboard camera straight to its internal storage. The camera has up to 480MB of
storage which is more than enough to capture an entire ight in video.
The camera is ready for action as soon as you turn on the helicopter. All you have to do is
trigger a photo or video capture from the remote control.
Memory Full: When you turn on the chopper, if the blue ‘recording’ LED on the chopper
ashes constantly, the internal storage memory is full. You will need to delete or copy the
contents of the memory to a computer. See
“Viewing your photos and video on a
computer” on page 7. The blue LED is located inside the cockpit canopy of the chopper.
Photo recording
• To take a photo, press the PHOTO button on the remote control. The blue LED on the
helicopter will ash once to con rm that a photo has been taken.
Photos are taken at 320x240 resolution in JPG format.
Video recording
• To begin recording VIDEO, press the VIDEO button on the remote control. The blue LED on
the remote will glow while recording. Press the VIDEO button again on the remote to stop
recording. When the le has nished being saved, the blue LED will stop glowing.
Videos are taken in 640x480 resolution in AVI format.
Motion Blur
The helicopter can move fast, sometimes too fast to get good quality images free from blur.
In this case, it may be useful to ick the speed switch in the top left corner from “quick” to
“slow”. Slow reduces the speed of the rear tail rotor and therefore the maximum speed of the
helicopter through the air. This may help the camera to better capture the images without you
needing to focus on controlling your need for speed.
Resetting the helicopter
If you experiencing issues taking photos or video, the chopper may need to be reset. Turn o
your helicopter and remove it from the charger.
Insert a small pointed instrument like a straightened paper clip into the hole next to the USB
port which contains the RESET button and press it down for three seconds.
Viewing your photos and video on a computer
You can connect the helicopter to your PC using the included USB cable to view the photos
or video you have taken. You can also copy or move the images from your chopper to your
computer for editing or later viewing.
• Make sure the chopper is OFF before you connect it to the PC.
• Insert the mini-USB plug into the mini-USB socket on the front of the helicopter.
• Attach the cable to your PC. The helicopter should be recognized as a USB storage device.
• Photos are contained in the folder IMAGE->RECORD.
• Videos are contained in the folder
VIDEO->RECORD.
 Loading...