

Page 1
Steam Generator
Model: SI12010N
Helpline
0871 200 0003
v1.0
SI12010N_IM.indd 1 13/05/2015 16:20
Page 2
2
When using any electrical appliance, basic safety precautions should always be
followed including the following:
• Always ensure that the voltage on the rating label corresponds to the mains
voltage in your home
• Incorrect operation and improper use can damage the appliance and cause
injury to the user.
• This appliance can be used by children aged from 8 years and above if they have
been given supervision or instruction concerning use of the appliance in a safe
way and if they understand the hazards involved. Cleaning and user maintenance
shall not be made by children unless they are older than 8 and supervised. Keep
the appliance and its cord out of reach of children aged less than 8 years.Check
the power cord and plug regularly for any damage. If the cord or the plug is
damaged, it must be replaced by the manufacturer or qualified person in order
to avoid an electrical hazard.
• Do not use the appliance if it has been dropped or damaged in any way. In case of
damage, take the unit in for examination and/or repair by an authorised service
agent.
• Never immerse the unit in water or any other liquid for cleaning purposes.
• Remove the plug from the socket by gripping the plug. Do not pull on the cord to
disconnect the appliance from the mains. Always unplug the unit when not in use,
before cleaning or when adding or removing parts.
• The use of accessory attachments that are not recommended or supplied by the
manufacturer may result in injuries, fire or electric shock.
• Do not let the cord hang over the edge of a table or counter. Ensure that the cord
is not in a position where it can be pulled on inadvertently.
• Do not allow the cord to touch hot surfaces and do not place on or near a hot gas
or electric burner or in a heated oven.
• Do not use the appliance on a gas or electric cooking top or over or near an open
flame.
• Use of an extension cord with this appliance is not recommended. However, if it
is necessary to use an extension lead, ensure that the lead is suited to the power
consumption of the appliance to avoid overheating of extension cord, appliance
or plug point. Do not place the extension cord in a position where it can be pulled
on by children or animals or tripped over.
• This appliance is not suitable for outdoor use. Do not use the appliance for
anything other than its intended use.
IMPORTANT INFORMATION - RETAIN FOR FUTURE USE
SI12010N_IM.indd 2 13/05/2015 16:20
Page 3
3
IMPORTANT INFORMATION - RETAIN FOR FUTURE USE
• Do not carry the appliance by the power cord.
• Do not leave the appliance unattended during use. Always unplug the unit when
not in use or before cleaning.
• Always operate the appliance on a smooth, even, stable surface. Do not place the
unit on a hot surface.
• Ensure that the unit is switched off after use.
• The manufacturer does not accept responsibility for any damage or injury
caused by improper or incorrect use, or for repairs carried out by unauthorised
personnel.
• In case of technical problems, switch off the product and do not attempt to repair
it yourself. Return the appliance to an authorised service facility for examination,
adjustment or repair. Always insist on the use of original spare parts. Failure to
comply with the above mentions precautions and instructions, could affect the
safe operation of this product.
• Your appliance must never be switched on through an external timer or any kind
of separate remote control system
• The water inlet must be closed during use
• Do not open the safety valve while using the appliance or before the water is
completely used up (when the iron stops producing steam indicates that the
tank is empty). To add water, unplug and wait 15 minutes to avoid sudden
temperature changes. Place a cloth over the safety valve and unscrew slowly to
allow any remaining steam/pressure to escape slowly
• Only place the unit complete with base on a stand that is designed to withstand
the weight. Some lightweight ironing boards may be unsuitable. In this case,
place on separate counter top.
Description: Steam Generator
Model: SI12010N
Input Voltage: 220-240V
Frequency: 50/60Hz
Power consumption: 2000-2400 Watts
TECHNICAL DATA
CAUTION: SURFACES BECOME HOT DURING USE
SI12010N_IM.indd 3 13/05/2015 16:20
Page 4
4
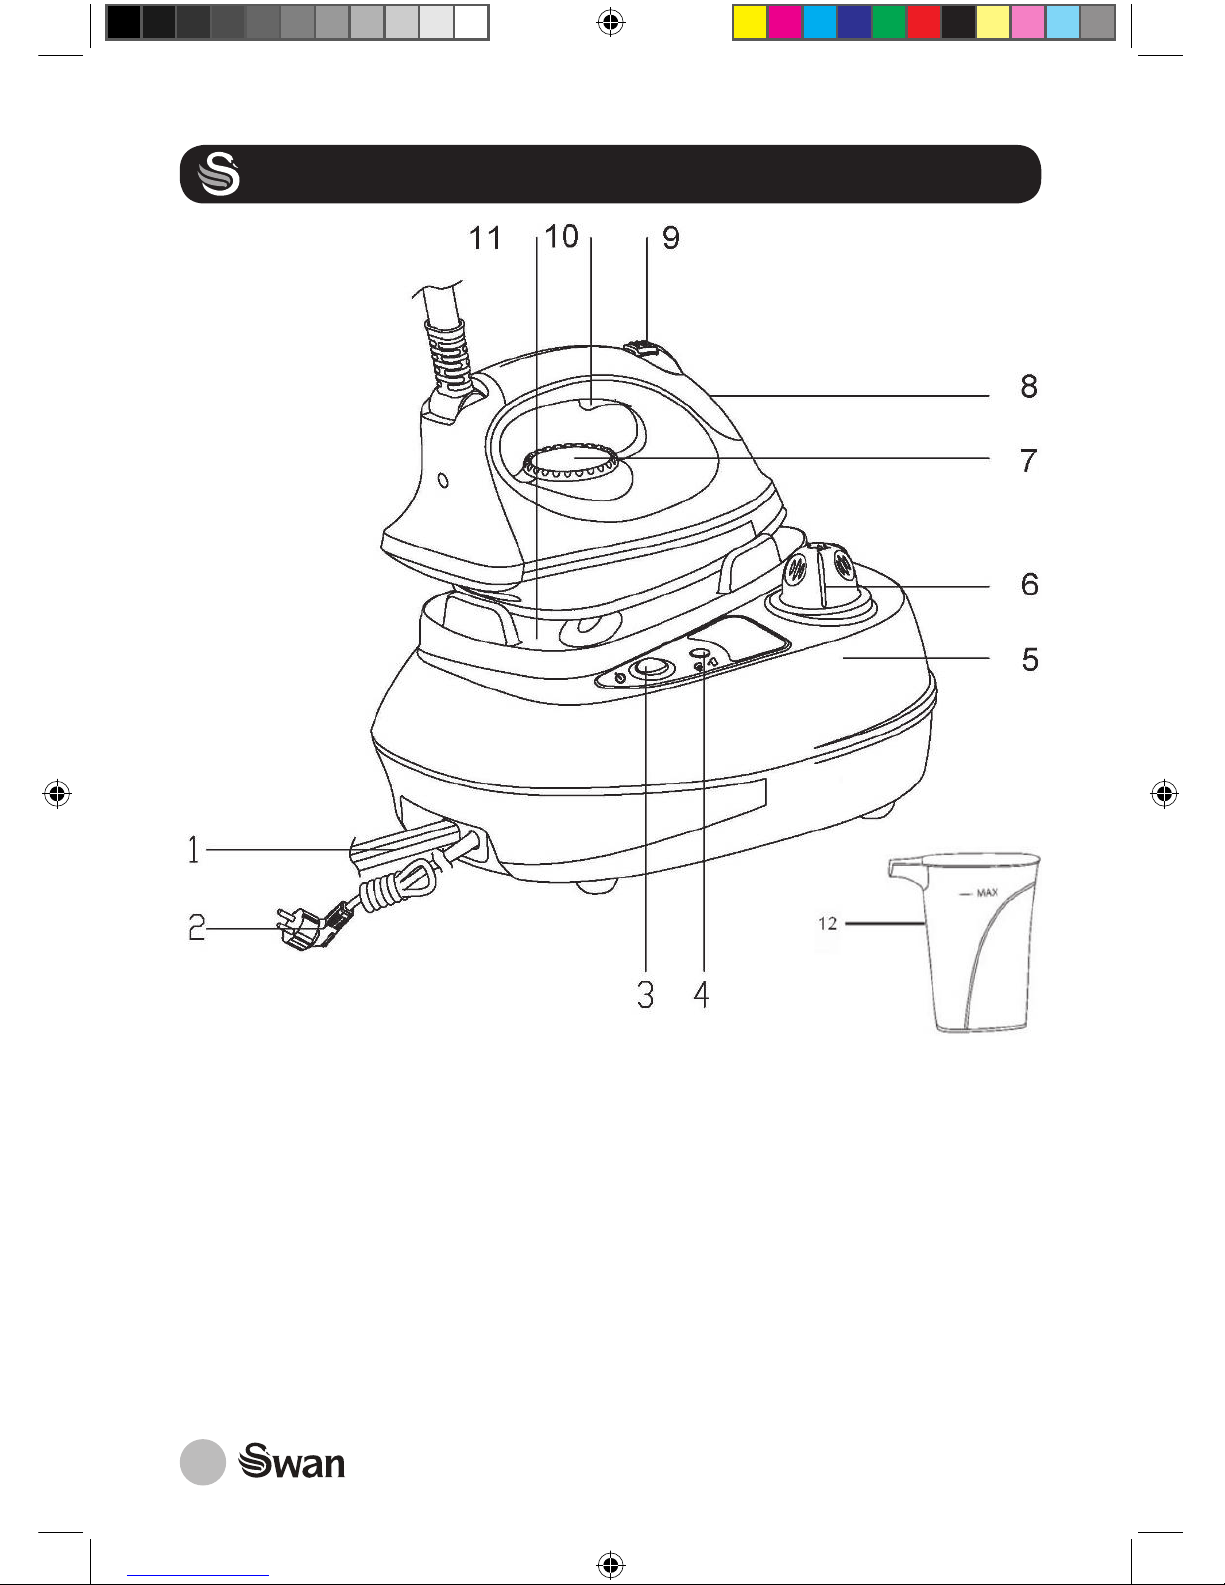
PARTS
1. Steam/cable tube
2. Power cord with plug (British standard plug on this model)
3. power switch on/off button
4. Steam ready / empty water tank indicator light
5. Iron stand
6. Boiler filter cap
7. Iron thermostat control
8. Iron temperature light
9. Steam lock (lock for constant steam function)
10. Steam switch button
11. Isolation plate
12. Filling jug
SI12010N_IM.indd 4 13/05/2015 16:20
Page 5

5
HOW TO USE
Nylon
Synthetic
Acrylic
Acetate
Silk
Wool
Polyester
Rayon
Cotton
Linen
Max
Cotton,
Linen
Synthetic
Wool Silk
Cotton
Steam Ironing Steam Ironing
Dry iron on the
opposite side of
the fabric.
Use a press cloth
and steam iron
on the opposite
side of the fabric
/ / /
PREPARE THE APPLIANCE FOR USE:
Remove all packaging including any soleplate
covers etc.
• Check if the rating indicated in the rating
plate is corresponding to the mains voltage
in your home (220-240V).
• Fully unwind and straighten the power cord
and the supply hose.
• Place the appliance on a stable, level and
horizontal surface like an ironing board.
• Place the iron on the iron rest horizontally.
• Remove the filler cap (6) and fill the base
with water using the filling jug (12). The
base will hold around 500ml of water.
• IMPORTANT: Your warranty does not
cover damage caused by limescale! If
you live in a hard water area, use bottled,
distilled or filtered water. Do not use
perfumed water
• Set the desired temperature (7). Switch on
the power switch (3)
• The pump motor will sound as it
pressurises the hot water/steam tank.
this is normal and will sound for time to
time during ironing.
SI12010N_IM.indd 5 13/05/2015 16:20
Page 6

6
HOW TO USE
CONTROLS
• When used for the first time, the appliance may give off smoke and an odour for
several minutes. This is caused by heating and subsequent drying of the sealers
used in assembling the steam generator and iron. This will only happen one time.
DRY IRONING (Just don’t press the steam button!)
1. Connect the appliance to a suitable socket outlet. Then the heating indicator light
will light up to indicate that the unit has been connected to the power supply.
2. Set temperature control knob to desired position according to above ironing
temperature setting guide or fabric setting chart. Heating indicator (8) light on
the iron unit will turn on to indicate that the soleplate is being heated up. When
heating indicator light turns off, it indicates that desired temperature has been
reached. It is ready for dry ironing. During use, it is normal that heating indicator
light will cycle on and off, which means that the soleplate is automatically keeping
temperature constant. (For every first time use, it should be pre-heated for about
3 minutes to ensure even temperature across the soleplate)
3. After use, put iron unit back on the base unit, turn temperature control knob
to“MIN” and turn off power switch on the control panel.
4. Unplug the appliance from main socket.
5. Note: When changing your temperature setting from higher setting to lower,
do not start ironing immediately since it may burn your fabrics. Please wait until
heating indicator light turns on, and then turn off again.
6. For best results always start with the fabrics that need coolest setting first.
STEAM IRONING
7. Follow the steps above but press the steam button during ironing. The high
pressure system and the constant flow of steam makes ironing much easier!
8. For constant steam, press the steam button then push the Steam Lock switch
forward. This will lock the steam trigger in the ON position.
9. To release the steam lock, press the steam trigger and pull the steam lock
switch back.
10. Always release the steam lock between garments or when putting iron back on
its base.
SI12010N_IM.indd 6 13/05/2015 16:20
Page 7

7
HOW TO USE
FILLING THE BOILER
1. Make sure the supply cord is unplugged from the main socket.
2. Do not open the filler cap while using the appliance or before the water is
completely used up (when the iron stops producing steam indicates that the
tank is empty). To add water, unplug and wait 15 minutes to avoid sudden
temperature changes. Place a cloth over the safety valve and unscrew slowly
to allow any remaining steam/pressure to escape slowly
3. Fill the boiler with water using refill cup. 12)
4. Refit the filler cap fully.
5. After use, put iron unit back on the base unit, turn temperature control knob
to“MIN”and turn off power switch on the control panel.
STEAM IRONING TIPS
1. Before steam ironing, make sure the fabric is suitable for this kind of ironing.
Check the garment label for the correct ironing temperature
2. Sort the garments by ironing temperature with lowest first. This saves time as
the iron takes longer to cool down than it does to heat up.
3. Always unlock the steam button between garments and when not ironing.
VERTICAL STEAM IRONING
• Follow the steam ironing process, and then hold the iron in vertical position about
5cm to 15cm away from the hanging fabrics. Press the steam button, which will
create the steam.
• This feature is especially used for removing creases from hanging clothes and
curtains. Never directsteam toward people or animals
• The room should be ventilated.
• Note: Never block the steam hose.
SI12010N_IM.indd 7 13/05/2015 16:20
Page 8

8
HOW TO USE
EMPTYING AND STORING
• Disconnect the appliance from the mains socket and allow the appliance to cool
down for 60 minutes at least.
• After use, pour out all the remaining water. Take care when removing the filler
cap as described on page 7
• The iron should be placed on the iron rest, and then stored
CLEANING & MAINTENANCE
• Unplug the appliance from the main socket and let the iron completely cool down.
• Clean the iron with a damp cloth.
• Wipe off scale and any other deposits on the soleplate with a damp cloth or non-
abrasive (liquid) cleaner.
• Never clean the appliance under the tap.
• The outside of the base can be cleaned with a soft cloth moistened with a mild
detergent solution
DESCALING
It is very important to descale the iron regularly - especially if you live in a hard water
area! If you notice small flecks of scale coming from the soleplate, it is a sure sign that
the product needs descaling.
A cheap method of descaling is to use 1 part lemon juice to 10 parts water. Add to
tank and run through for about 5 minutes on max steam setting. Empty out the water
and repeat process with clean water.
We highly recommend using bottled water as it is inexpensive and it could be
many years before you need to descale the product. In certain areas of the UK,
the iron can become scaled up after only a few weeks!
Call 0871 200 0003 for more info.
SI12010N_IM.indd 8 13/05/2015 16:20
Page 9

9
We Swan Products Ltd declare that this product conforms to the following product
legislation in accordance with the following directive(s):
• 2004/108/EC The EMC Directive (the Electromagnetic Compatibility Directive).
• 2006/95EC. The LVD Directive (Low Voltage Directive).
• 2011-65-EU. The RoHS directive (Restriction of Hazardous Substances Directive)
• 2009/125/EC Eco Design
DOCUMENTATION
WARRANTY
This product is guaranteed for 2 years from the date of original purchase. If any
defect arises due to faulty materials of workmanship the faulty products must be
returned to the place of purchase. Refunds or replacement is at the discretion of the
store.
The following conditions apply:
• The product must be returned to the retailer with proof of purchase.
• The product must be installed and used in accordance with the instructions
contained in this instruction guide.
• It must be used only for domestic purposes.
• It does not cover wear and tear, damage, misuse or consumable parts.
• Swan Products Ltd has limited liability for incidental or consequential loss or
damage.
• This guarantee is valid in the UK and Eire Only.
SI12010N_IM.indd 9 13/05/2015 16:20
Page 10

10
The wires in the mains lead are coloured in accordance with the following code:
BLUE NEUTRAL
BROWN LIVE
GREEN/YELLOW EARTH
As the colours of the wire in the mains lead of this appliance may not correspond with
the colour markings identifying the terminals on your plug, proceed as follows:
The wire which is coloured BLUE must be connected to the terminal which is marked
with the letter N or coloured black. The wire which is coloured BROWN must be
connected to the terminal which is marked with the letter L or coloured red. The
wire which is coloured GREEN/YELLOW must be connected to the terminal which
is marked with the letter E or (earth symbol) and is coloured GREEN or GREEN/
YELLOW.
WARNING: THIS APPLIANCE MUST BE EARTHED
BS PLUG
DISPOSAL OF UNIT
Appliances bearing the symbol shown here may not be disposed of in
domestic rubbish. You are required to dispose of old electrical and
electronic appliances like this separately. Please visit www.recycle-
more.co.uk or www.recyclenow.co.uk for access to information about the
recycling of electrical items. Please visit www.weeeireland.ie for access to information
about the recycling of electrical items purchased in Ireland. The WEEE directive,
introduced in August 2006, states that all electrical items must be recycled, rather
than taken to landfill. Please arrange to take this appliance to your local Civic Amenity
site for recycling, once it has reached the end of its life.
SI12010N_IM.indd 10 13/05/2015 16:20
Page 11

11
SWAN BRAND HERITAGE
Did you know...
In 1933 most homes were heating their
irons over t he gas r ing or s till putting
hot coal i n them. This Swan i ron was
basically a n element w ith a handle,
which plugged straight into a light bulb
socket. And a t a mere 1 4 s hillings
(70p), it meant many households could
own a prestigious Swan Product.
SI12010N_IM.indd 11 13/05/2015 16:20
Page 12

www.swan-brand.co.uk
Copyright © Swan Products Ltd.
PO Box 3117, Stoke-on-Trent ST4 9GD
Est.1931
We love
what we do
s
2 year
GUARANTEE
we’re proud
of our quality
Scan this QR code
to hear about
our story
Find us on Facebook
*
* on selected products
SI12010N_IM.indd 12 13/05/2015 16:20
 Loading...