

Page 1
1
1080p SDI Cameras
On-Screen Display (OSD)
SHD860,SHD870,SHD875,Varifocal Bullet and Dome
REFERENCE GUIDE
EN
MSDIOSD030713E
Page 2

OSD Reference Guide
1
EN
About the OSD
So - you’ve got one (or more!) of Swann’s range of 1080p SDI cameras, and you
want to use some of the advanced features. Good call! It may seem a little tricky at
first, but it’s pretty easy once you’re up and running.
You can adjust almost any aspect of how the camera captures images. If you’ve got
experience in photography or video-making, then many of the camera’s functions
are things you’ll be familiar with.
If you don’t know much about cameras and optics, don’t worry - there’s nothing you
can do in the OSD which can actually damage the camera. If it does all go wrong,
you can use the Reset to Factory Default option to set everything back to the default/
automatic settings.
OSD Menu Quick Reference
LENS
• DC • MANUAL • VIDEO
EXPOSURE
• SHUTTER • AGC • SENS-UP • BRIGHTNESS
• ACCE • DEFOG • BACKLIGHT
WHITE BAL
• ATW • AWC-SET • INDOOR • OUTDOOR • MANUAL
DAY / NIGHT
• AUTO • COLOR • B/W • EXT
DNR
• 2D DNR • 3D DNR • LEVEL (3D DNR) • SMART DNR
SPECIAL
• CAM TITLE • D-EFFECT • MOTION • PRIVACY
• LANGUAGE • DEFECT • RS485
ADJUST
• SHARPNESS • MONITOR • OSD • LSC • NTSC/PAL
RESET
• FACTORY RESET
EXIT
Page 3
OSD Reference Guide
2
EN
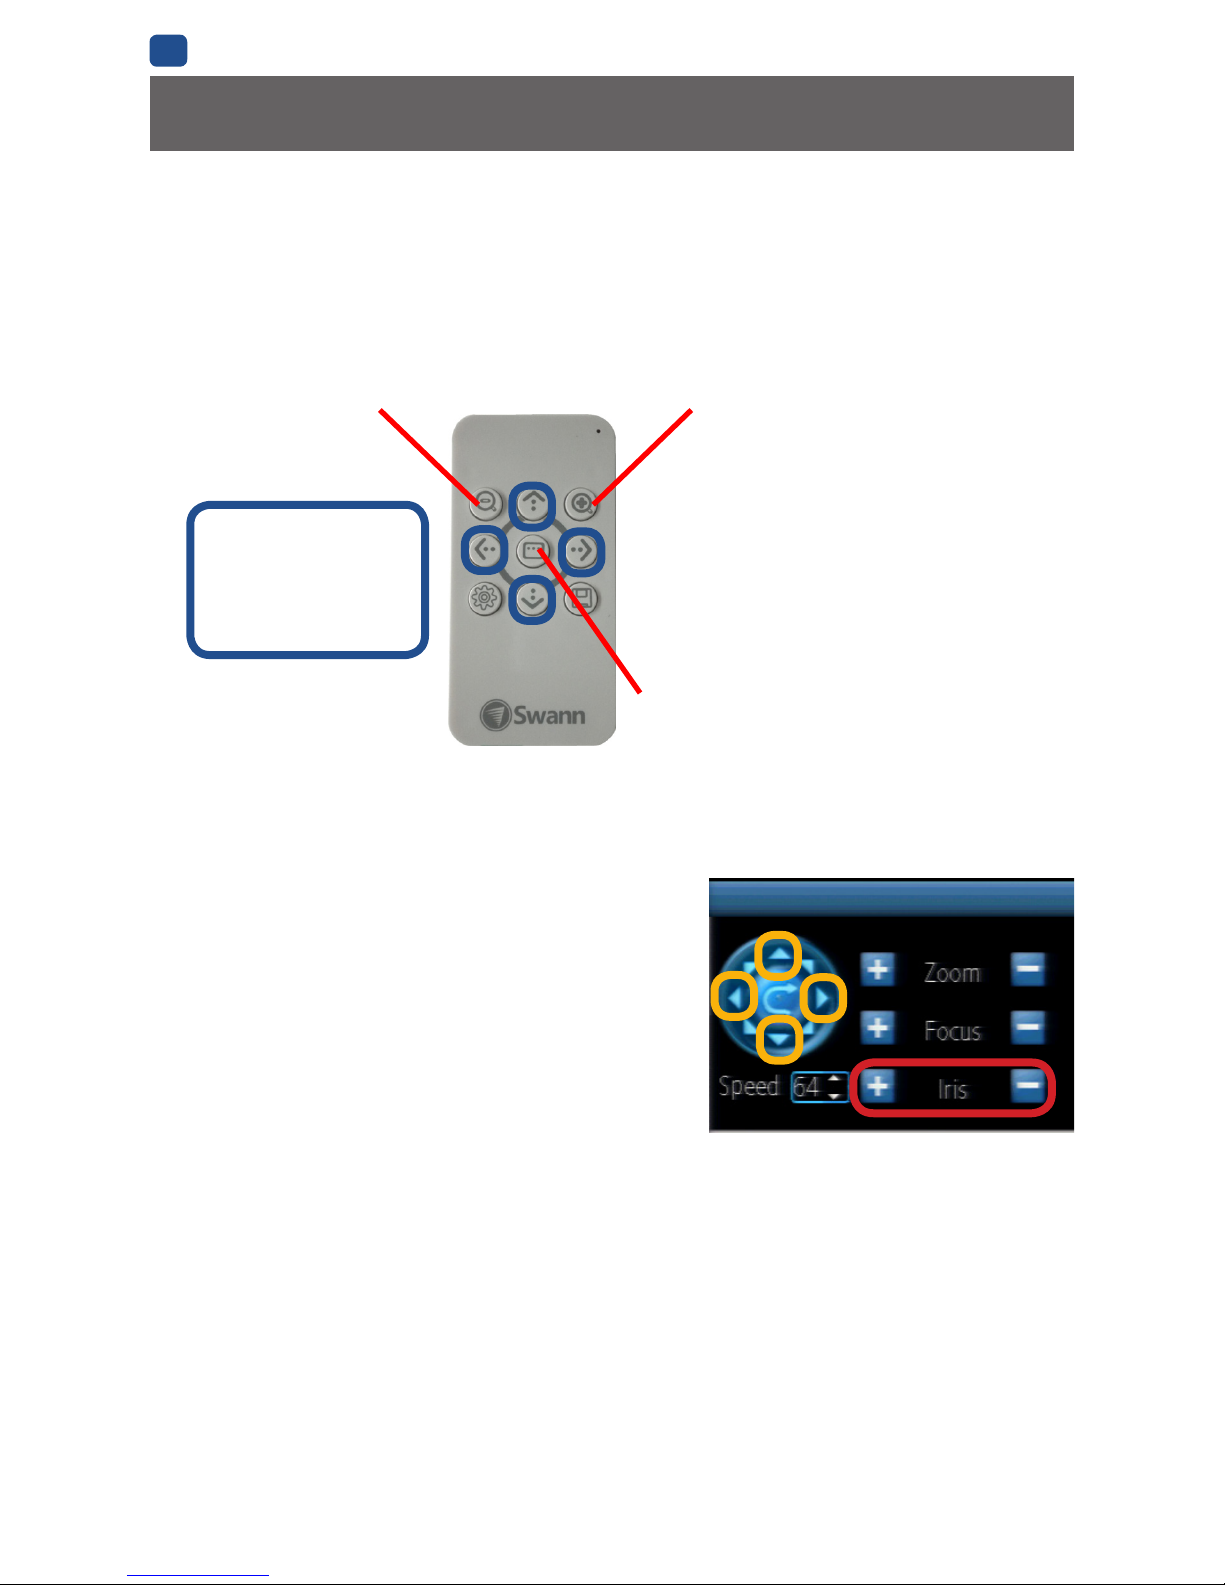
For illustration only. Actual PTZ control panel layout
may vary on your DVR but functions will be the same.
PTZ control panel
IRIS + / - Buttons
Using the OSD
To access the camera’s OSD feature, connect the camera’s RS485 plug either to an OSD
Controller (if supplied) or directly to the RS485 port on the back of the DVR. Refer to your
1080p SDI camera’s documentation for information on how to make the RS485 connection
between camera and OSD controller/DVR.
OSD Controller Guide
Quick Adjust +
OSD Main Menu/Enter
Quick Adjust -
Arrow Buttons
The arrows are used
to navigate through the
main menu.
DVR PTZ Control Panel Guide
• From the DVR, open the PTZ control panel.
• Press the “Iris +” button to display the
camera’s OSD menu, and use the up/
down arrows to navigate and the left/right
arrows to adjust options. If the menu has
a return arrow next to it, select the option
and click “Iris +” to enter the sub-menu. The
currently selected option is the one with the
small right facing arrow next to it.
• To exit the OSD menu, use the up/down arrows to select the EXIT option and
click on “IRIS +” to close the OSD, while in any sub-menu select “Return” and
click “IRIS +” to return to the previous menu level.
Arrow
Buttons
Page 4

OSD Reference Guide
3
EN
OSD Functions
LENS
This camera uses technology that can self-adjust its apperture based on the changing light
conditions . With this function, you can choose between DC, VIDEO and MANUAL modes.
The difference between the modes is really minor - you may notice a very slight difference
in screen brightness - that’s about it! So we suggest you keep the default setting - VIDEO.
EXPOSURE
With this function, you can control the camera’s electronic shutter time (a key factor
controlling exposure) and how the camera handles exposure against various lighting
conditions to maintain a clear image.
Shutter
The default setting is AUTO. If you find that the image is flickering because of different
frequencies on surrounding lighting, select FLK to help reduce flickering. You can also
manually adjust the camera shutter speed. Options range from 1/25 to 1/50000 and x2 to
x60. Generally, the slower the shutter speed the brighter the picture. Faster shutter speeds
tend to be used for capturing fast moving objects to reduce motion blur.
AGC (Automatic Gain Control)
Set the AGC level of the camera (LOW/MIDDLE/HIGH). A higher gain level will result in
brighter images at the cost of noisier images.
SENS-UP
This mode works in conjunction with AGC. If the AGC is set to OFF, the SENS-UP mode will
be disabled.
When enabled, the camera magnifies existing light sources so it can pick up images in low
light conditions. The increased magnification may result in noise and pixelation - this is
normal!
Brightness
Adjust the brightness of the image using the slider.
ACCE
Set the ACCE level of the camera (OFF/LOW/MIDDLE/HIGH). Enables darker areas of an
image to be clearer while retaining the same light level for brighter areas to enhance
overall clarity of images.
Defog
Using this function (OFF/LOW/MIDDLE/HIGH) during poor weather conditions (e.g., foggy,
smog) may help to improve visibility of camera.
Page 5

OSD Reference Guide
4
EN
Backlight
BLC: Fine-tune how the camera responds to backlighting. The camera will try to expose
things in the foreground properly, even if this means that the background will over-expose/
white out.
HSBLC: Place a black mask over extreme highlights in your images. It can be useful to
block out, for example, a bright window during the day or car headlights at night.
WHITE BALANCE
ATW: The default setting, which will attempt to create as neutral a white balance as
possible. Colors tend to be slightly underexposed, but represented quite accurately. The
color of the light will have less of an effect on how the camera perceives color.
AWC➙SE T: With this option you can find the optimal white balance setting for the current
environment where your camera is installed. You’ll need a large, white object (a wad of
clean printer paper is a good option). Hold the white object in the center of the camera’s
view so it fills most of the screen. For best result, try to ensure that the white object is
reflecting the dominant source of light directly into the camera. Then, select AWC➙SET.
INDOOR: This is a pre-programmed setting designed to reproduce the same color
temperatures which would occur under artificial light (indoor) conditions.
OUTDOOR: This is a pre-programmed setting designed to reproduce the same color
temperatures which would occur under sunlight (outdoor) conditions.
MANUAL: This is where you can define a custom white balance by adjusting the Blue and
Red color levels.
DAY & NIGHT
AUTO: The camera will alternate automatically between color during the day or under
artificial lights, and switch to black and white in low light or when the active infrared night
vision is active.
COLOR: The camera will always try to obtain color information, even when there’s little
or no light available. In low-light conditions, the color will be faint, but it will be there
(assuming there’s enough light to see anything). This will reduce image clarity in low-light
conditions.
B/W: The camera will only operate in black and white.
EXT: The camera currently does not support this mode.
OSD Functions
Page 6

OSD Reference Guide
5
EN
OSD Functions
NR
With this function, you can apply the camera’s 2D and 3D digital filtering system to help
obtain low-noise images in low-light conditions.
2D NR (2D Noise Reduction): Apply 2D filtering on noise caused by brightness and image
color.
3D NR (3D Noise Reduction): Apply 3D filtering on noise caused by motion and time
difference. You can also manually adjust the S(start)-Level and E(end)-Level through the
submenu.
• S-LEVEL: How dim the surrounding light conditions should be before starting 3DNR.
• E-LEVEL: How bright the surrounding light conditions should be before stopping
3DNR.
LEVEL: Use the slider to control the amount of NR applied. A high setting can cause
images to lose sharpness in 2DNR mode and objects to show a trailing effect in 3DNR
mode.
SMART NR: Minimize motion blurring caused by fast moving objects.
SPECIAL
CAM TITLE
Display the name of the camera on the image.
D-EFFECT
• FREEZE: Freeze the image that is being displayed.
• MIRROR: Change the orientation of the image: horizontally reversed (MIRROR), upside
down (V-FLIP) or horizontally reversed upside down (ROTATE). Using this mode does
not affect the orientation of text on the screen.
• D-ZOOM: This mode allows you to digitally zoom into an image.
PIP: Display the original sized image in a separate Picture in Picture (PIP) inset
window.
D-ZOOM: Adjust the level of digital zoom up to 64 times.
PAN&TILT: Adjust the position of PIP window on the screen.
DEFAULT: Reset the D-ZOOM settings to its factory default.
• NEG. IMAGE: Display the image in a negative exposed format.
MOTION
You can arm the camera to be able to detect motion.
Note that, if you’re using a Swann DVR with motion detection enabled, then there’s no need
to arm it on the camera as well.
Page 7

OSD Reference Guide
6
EN
OSD Functions
• SELECT: Select the motion detection zone (AREA1, AREA2, AREA3) that you want to
configure. The selected zone will be blinking in a red box.
• DISPLAY: Choose whether to enable motion detection for the selected zone. If enabled,
you can also customize the position and size of the zone.
• SENSITIVITY: Set the sensitivity level for the motion trigger. When Sensitivity level is
high, motion detection can be triggered even by the slightest of movement.
• MOTION VIEW: Choose whether to show motion blocks when the camera detects
motion in the selected zone.
• DEFAULT: Reset Motion settings back to its factory default.
PRIVACY
With this function, you can choose to mask areas that you want to hide on the screen to
protect your privacy. You can mask up to 8 areas using a variety of colors.
• SELECT: Select the privacy mask (AREA1 to AREA8) that you want to configure. Each
privacy mask is already associated with a pre-selected colour which you can change
using the COLOR setting.
• DISPLAY: Choose whether to enable the selected privacy mask. If enabled, you can
also customize the position and size of the privacy mask.
• COLOR: Change the color of the privacy mask.
• DEFAULT: Reset Privacy settings back to its factory default.
LANGUAGE
The OSD is only available in English and Chinese at this time.
DEFECT
Sometimes, the camera’s image sensor may have a certain number of defective pixels,
which could be due to operation conditions responding to light exposure differently than
surrounding pixels. With the Defective Pixel Correction (DPC) function, you can enable the
camera to digitally correct defective pixels using its image signal processor. We suggest
leaving this function unless you know what you’re doing - the default works just fine.
• LIVE DPC: Correct defective pixels in real-time. If Auto is selected, the camera will
automatically correct pixel defects, hence you won’t be able set the Level.
• LEVEL: Set the level of LIVE DPC.
• STATIC DPC: Use this to detect defective pixels while the iris is closed.
• START: Perform STATIC DPC. The camera closes the lens automatically and detects
defective pixels that exceed the specified level.
• LEVEL: Set the level of STATIC DPC.
Page 8

OSD Reference Guide
7
EN
• SENS-UP: Adjust the magnification of existing light sources to make it easier for the
camera to pick up defective pixels. If set too strong, the camera can mistaken regular
noise as defective pixels.
RS485
This function allows you to configure the camera’s RS485 protocol settings - camera ID,
display and baud rate. If you changed the default settings, make sure you take note of the
new values as the information in these settings are required to control the certain camera
features such as the OSD and PTZ when you connect the camera’s RS485 plug to an
external control device (e.g., Swann DVR).
VERSION
The firmware version of the camera.
ADJUST
SHARPNESS: How crisp your images will be. Setting the sharpness too high will make
your pictures look pixelated, like old computer graphics. On the other hand, setting the
sharpness too low will make everything look soft and blurry.
MONITOR: Select the monitor type which is closest to the type you are using. In the Monitor
submenu, you can also manually adjust GAMMA, BLUE GAIN, and RED GAIN levels for the
selected monitor type.
OSD: Configure the way the OSD menu looks - OSD Text Colour and Outline.
LSC (Lens Shading Compensation): Enable to brighten the edges of the camera image.
NTSC/PAL: Select either NTSC or PAL to match with your TV system.
RESET
Reset all OSD menu settings back to their factory default.
EXIT
Select EXIT to automatically SAVE your settings and close the OSD screen.
OSD Functions
Page 9

OSD Reference Guide
8
EN
NOTICE
The information printed in this reference guide is correct at the time of publication. As we’re
constantly making improvements to our products, firmware, software and user manuals,
we reserve the right to change the information without prior notice.
NOTES
Page 10

9
Limited Warranty Terms & Conditions
Swann Communications warrants this product against defects in workmanship and material for a period of one
(1) year from its original purchase date. You must present your receipt as proof of date of purchase for warranty
validation. Any unit which proves defective during the stated period will be repaired without charge for parts or
labour or replaced at the sole discretion of Swann. The end user is responsible for all freight charges incurred
to send the product to Swann’s repair centres. The end user is responsible for all shipping costs incurred when
shipping from and to any country other than the country of origin.
The warranty does not cover any incidental, accidental or consequential damages arising from the use of or
the inability to use this product. Any costs associated with the fitting or removal of this product by a tradesman
or other person or any other costs associated with its use are the responsibility of the end user. This warranty
applies to the original purchaser of the product only and is not transferable to any third party. Unauthorized end
user or third party modifications to any component or evidence of misuse or abuse of the device will render all
warranties void.
By law some countries do not allow limitations on certain exclusions in this warranty. Where applicable by local
laws, regulations and legal rights will take precedence.
For Australia: Our goods come with guarantees which cannot be excluded under Australian Consumer Law.
You are entitled to a replacement or refund for a major failure and for compensation for any other reasonably
foreseeable loss or damage. You are also entitled to have the goods repaired or replaced if the goods fail to be of
acceptable quality and the failure does not amount to major failure.
© Swann Communications 2013
FCC Verification
This equipment has been tested and found to comply with the limits for Class B digital device, pursuant to part
15 of the FCC Rules. These limits are designed to provide reasonable protection against harmful interference
in a residential installation. This equipment generates, uses and can radiate radio frequency energy and, if not
installed and used in accordance with the instructions, may cause harmful interference to radio or television
reception, which can be determined by turning the equipment off and on, the user is encouraged to try to correct
the interference by one or more of the following measures:
• Reorient or relocate the receiving antenna
• Increase the separation between the equipment and the receiver
• Connect the equipment into an outlet on a circuit different from that to which the receiver is connected
• Consult the dealer or an experienced radio/TV technician for help
WARNING: Modifications not approved by the party responsible for compliance could void user’s authority to
operate the equipment.
Helpdesk / Technical Support Details
Swann Technical Support
All Countries E-mail: tech@swann.com
Telephone Helpdesk
USA Toll Free 1-800-627-2799
USA Exchange & Repairs 1-800-627-2799 (Option 1)
(M-F, 9am-5pm US PT)
AUSTRALIA 1300 138 324
NEW ZEALAND Toll Free 0800 479 266
UK 0203 027 0979
 Loading...