

Page 1

28L Mini Kitchen
SCO28
Page 2
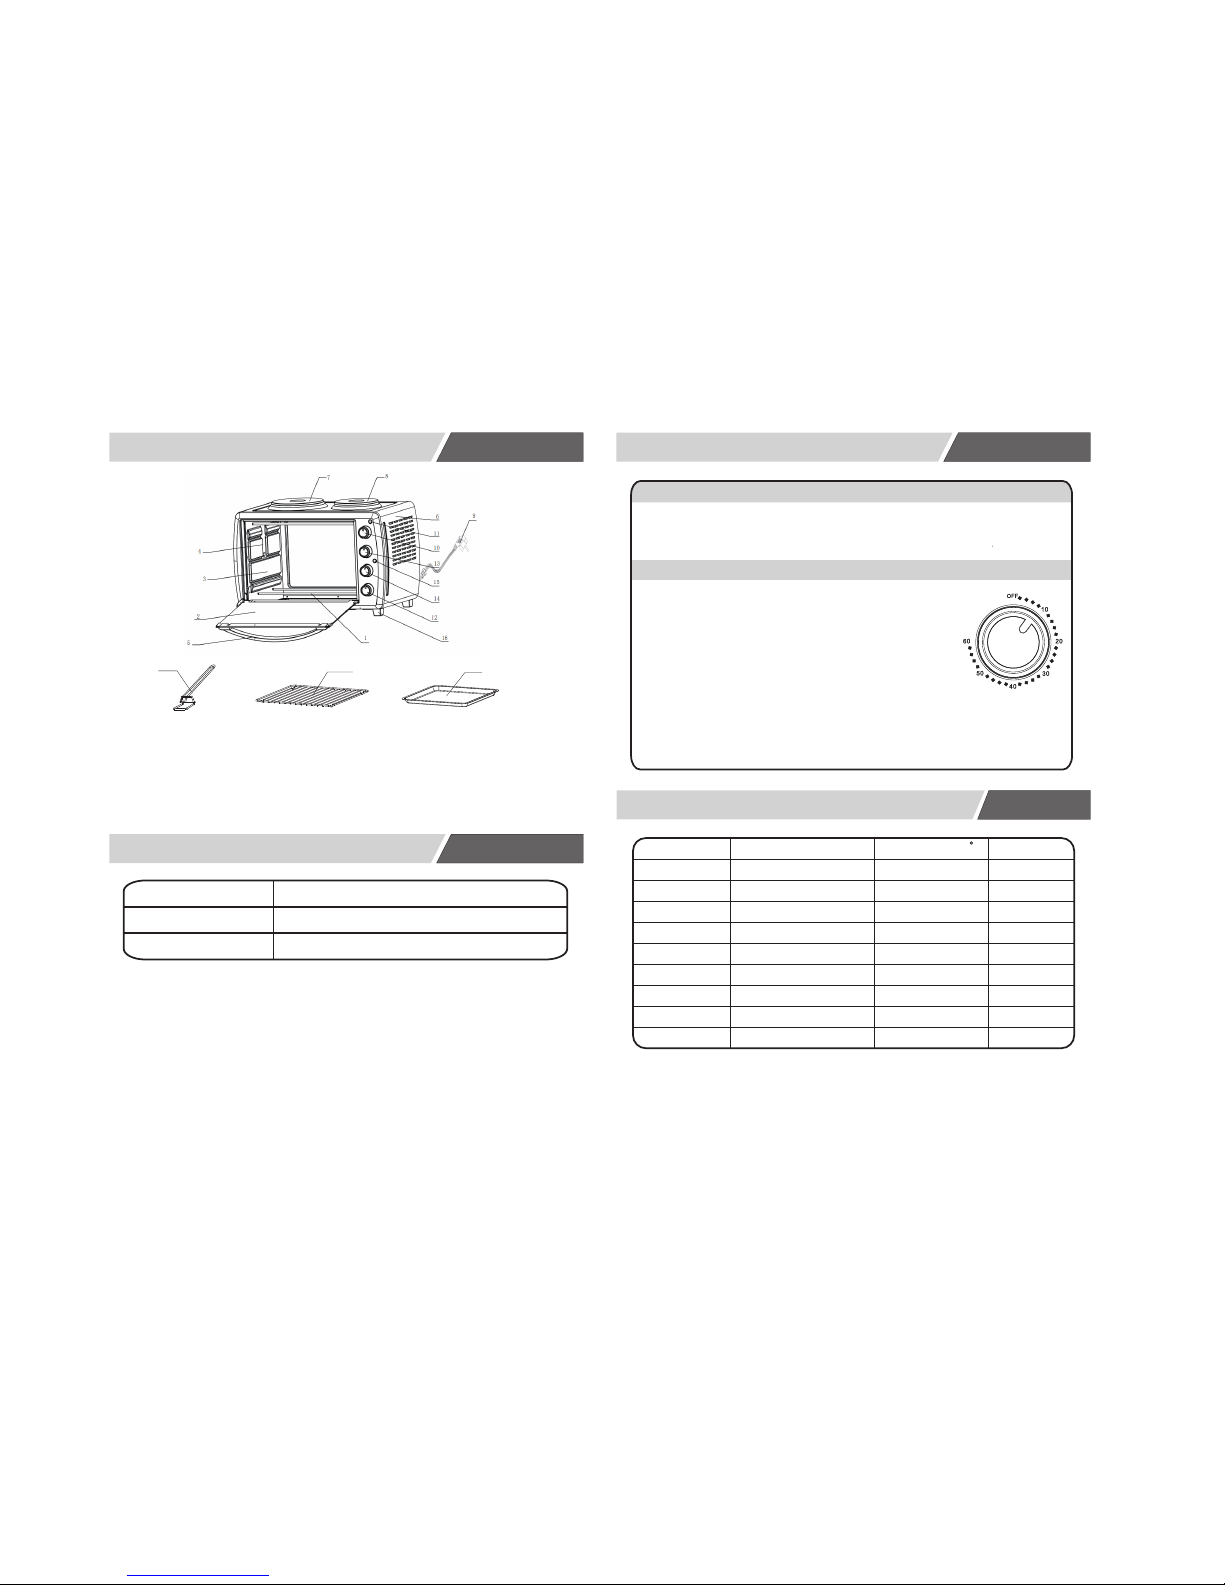
15.Hotplate power
16.Oven feet
17.Tray handle
18.Bake rack
1.Heating element
2.Glass door
3.Inner cavity
4.Rack support
5.Door handle
6.Housing
7.Left hotplate
8.Right hotplate
9.Power cord
10.Thermostat knob
11.Indicator light
12.Timer knob
13.Hotplate knob
14.Swith knob
Model No.
Power supply
Power consume
220-240V 50/60Hz
1500W for oven, 750W for each hotplate, total 3000W
18
17
Name of parts
Specification
1
6
Timer
Select Function according to the dishes you are going to cook.
You can observe whether the heaters are working or not by
observing the front Indicator Light.
1. Set the arrow on the timer knob to the number which
indicat es th e cooking time(mi nutes) according to th
dishes you are going to cook.
2. Set the Timer by turning it clockwise.The oven
will turn off automatically at the end of the
selected t ime and a be ll wil l ring.
When setting the Timer t o less tha n 5 min., turn it
to more than 6 min. and then back to the selected time .
3. The oven can be turned off manually during cooking by turning
th
e Timer counter -clockwise to t he “0” position.
Note:
If the inside of the oven i s dirty, cooking may take slightly
longer than usual.
Heat Operating Switch
How to use
Type o f food
Sandwich
Toast
Hamburger
Fish
Ham
Sausage
Cake
Steak
Chicken
Tim e(min.)
2~3
2~5
3~5
7~10
7~12
8~10
20~30
10~15
30~40
Number or thickness
2-3 pcs
2-4 pcs
2-3 pcs
2 cm
3-4 pcs
1-2 cm
Half c hicken
Temp eratur e( C )
200
250
200
200
200
200~250
150
250
175~200
/
/
Baking Re fer ence Common Food
SCO28
19. Bake tray
19
Page 3

Temperature Control Dial
When unplugging the cord, always
take hold of the plug itself.
Never pull on the cord; doing so
could break the wires inside the
cord.
Always use the Food Fork
when inserting or removing
the Tray. Touch in g th es e
will cause severe burns.
Do not position the unit close to a gas
burner or other source of high
temperature or do not direct an
electric fan, etc., At the unit during use.
Doing so could prevent correct
temperature control.
When hot, do not apply water to
the Glass Window. It may cause
the glass to break.
2
Do not wet the power cord nor handle
the unit with wet hands.
Always unplug the cord after use, or
whenever the unit is to be left unattened.
A malfunction while the plug is inserted
into the outlet could cause a fire.
When cooking oi l-s pla shing dis hes su ch as ro ast ch ick en, it is
recomme nde d to put 2 sheets of aluminu m foils on a tray in
orde r to diminish oil sp las hin g.
Put on e on a tray. The n oil will dri p to a gap between foils.
Cauti ons
5
How to us e
Hot P late Co ntrol
Fun ction S elect ion
Tim er
Set the “Hot Plate Control” by turning
clockwise to select the suitable hot plate
according to the dishes you are going to cook.
Set the “Function Selection” by turning
clockwise to select the suitable heating function.
Upper&Lower Heating
Set the “Ti me r” t o th e nu mb er w hi ch i nd ic at es
the cooking time(minutes).Now,the oven is
working,beware of the HOT sur fa ce ,a nd
DO NOT op en t he g la ss d oo r du ri ng c oo ki ng !
Functional Control
Before using the unit for the first time:
Heat the empty oven.
(1) Insert the tray and baking net.
(2) Set the heater operating switch to “UPPER & LOWER”, set
the temperature control dial to “250℃” and heat the empty
oven for about 10 minutes.
Operating Instructions
Upper Heating
Lower Heating
Note:
The re may be s ome smo ke and a bu rning s mell at f ir st , bu t this
is no t a malfu nctio n.
Set the Temperature Control Dial for the dishes which you are
going to cook.
OFF Right Hot Plate
Left Hot Plate Left & Right Hot Plate
Page 4

If the o ve n is p ositi on ed t o close t o a
wall , th e wa ll will b e bu rn ed or sta in ed
Be sur e th e cu rtain , et c. , Are not in
cont ac t wi th the bo dy.
Do not p ut a ny thing b et we en the
bott om o f th e body an d th e su rface o n
whic h it i s se t; an obj ec t so p laced
coul d be b ur ned.
3
Be car ef ul n ot to bur n yo ur self du ri ng
use or i mm ed iatel y af te r use.
The me ta l pa rts and g la ss w indow o f
the do or b ec ome ext re me ly hot du ri ng
use; b e ca re ful not t o to uc h them wh en
open in g an d closi ng t he d oor.
AC pow er m us t be t ak en f rom a
proper ly -w ir ed o utlet. Inse rt t he p lu g
comple te ly i nt o th e socket; if it i s no t,
it could b ec om e ab no rmally hot.
Do not use a n el ec tr ic l ight outlet .
Neve r co nn ec t mu lt iple plugs to t he
same out le t.
The tra ys a re n ot p er fectl y sq ua re .
Note: B e ca re fu l wh en remo vi ng p ud di ng a nd ot he r ho t li qu id s.
Foo d Tray
Bak ing Net
Foo d Tray and B aking N et
4
Roast Chicken, Hamburg
Steak, Gratin, Sponge
Cake, Almost all other
oven-cooked foods.
Baked Potatoes, Dry
Foods.
For foods which will drip
(boiled fish; etc.)
How to us e
Food Tray and Baking Net
How to use Food Fork
You ca n ad ju st t he Tr ay a t 3
diffe re nt p os it io ns a cc or di ng
to the dishes you want to cook.
For instance, when making
macaroni gratin and you want
to have the top part cooked the
most, use the top or the second
rack support.
For roasting a chicken, use the
third Rack Support.
Rack Supports
Cauti ons
In order to aviod causes of deformation
and damage to the electrical parts, it is
suggested that no heavy objects be
placed on top of the oven, nor glass or
plastic made containers be heated
inside the oven, because the high
temperature will cause deformation or
cracking.
Tempe ratur e Contr ol
Set the “Temperature Control” by turning
clockwise to select the suitable temperature
according to the dishes you are going to cook.
Functional Control
How to us e
 Loading...