

Page 1
VACUUM CLEANER
SC11052
USER INSTRUCTIONS
Page 2

GUARANTEE
This product is guaranteed for 2 years from the date of original purchase.
If any defect arises due to faulty materials or workmanship, the unit will, either
be repaired, replaced or refunded at our discretion.
The following conditions apply:
The product must be returned to the retailer with original proof of
purchase.
The product must be installed and used in accordance with the
instructions contained in this user instruction guide.
It must be used only for domestic purposes.
It does not cover wear and tear, damage, misuse or consumable parts.
The supplier has no responsibility for incidental or consequential loss
or damage.
Valid in the UK & Eire only.
Valid only if purchased from the SDHS Group
Technical Specification:
Power supply: 220V-240V AC. 50Hz
Power Consumption: 1600 W Max
Model number: SC11052
Protection: Class II
SDHS Group
L70 1AB
Box MPRC8
Swan Vacuum Helpline. Please Call 01733 404703
Swan Vacuum Spare Parts. Please Call 01733 404709
Calling from outside the UK Please Call - 00 44 1733 404703
1
Page 3

2
IMPORTANT SAFETY INSTRUCTIONS
READ THIS SECTION TO BE AWARE OF THE RISK OF PERSONAL
INJURY, DAMAGE TO PROPERTY, ELECTRIC SHOCK & FIRE.
1. This appliance is not intended for use by persons (including children) with reduced
physical, sensory or mental capabilities, or lack of experience and knowledge, unless
they have been given supervision or instruction concerning use of the appliances by a
person responsible for their safety.
2. Children should be supervised to ensure they do not play with the appliance.
3. Never vacuum wet surfaces, pick up wet objects or use in wet conditions.
4. Always disconnect the vacuum from the electrical supply before attempting any
servicing or maintenance. Never leave the vacuum unattended when plugged in.
5. Do not vacuum any t hi ng that is burning or smoking, such as ci garettes matches, or hot
ashes.
6. Do not use the vacuum cleaner to pick-up large objects that could damage or cause a
blockage.
7. Do not use the vacuum to pick up builders rubble, sand, plaster dust etc.
8. This vacuum cleaner is for dom esti c use only. Industrial or c omm ercia l use inval idate s
the warranty.
9. Do not use without a dust bag/bin and filter in place.
10. Use extra care when cleaning on stairs.
11. Keep hair, loose clothing, fingers and all parts of the body away from openings and
moving parts.
Safety Alerts:
1. To reduce the risk of electric shock, do not use outdoors or on wet surfaces.
2. Use only as described in this manual.
3. Do not use with a damaged cord or plug.
4. Do not run the vacuum cleaner over the cord. Keep the cord away from heated
surfaces.
5. Do not unplug by pulling on the cord. To unplug, grasp the plug, not the cord.
6. Do not handle the plug or the vacuum cleaner with wet hands.
7. Turn off all controls before unplugging.
This vacuum cleaner is equipped with a plug and a cable, which rolls up automa tically. If
either becomes damaged, a qualified service agent must
repair both the plug and cable.
Page 4
Electrical Safety
Before switching on, make sure that the voltage of your electricity supply is the same as
that indicated on the rating plate. This product is designed to operate on 220 – 240V AC,
50Hz. Connection to any other power source may damage the unit.
This product may be fitted with a non – rewireable plug. If it is necessary to change the
fuse in the plug, the fuse cover must be refitted. If the fuse cover becomes lost or damaged,
the plug must not be used until a suitable replacement obtained.
If the plug has to be changed because it is not suitable for your socket, or becomes
damaged in any way, it should be cut off and an appropriate plug fitted following the
wiring instructions below. This should be carried out by a qualified electrician. The plug
removed must be disposed of safely, as insertion into a 13 Amp socket is likely to cause an
electrical hazard.
IMPORTANT – THIS IS A CLASS II APPLIANCE AND DOES NOT REQUIRE AN
EARTH CONNECTION.
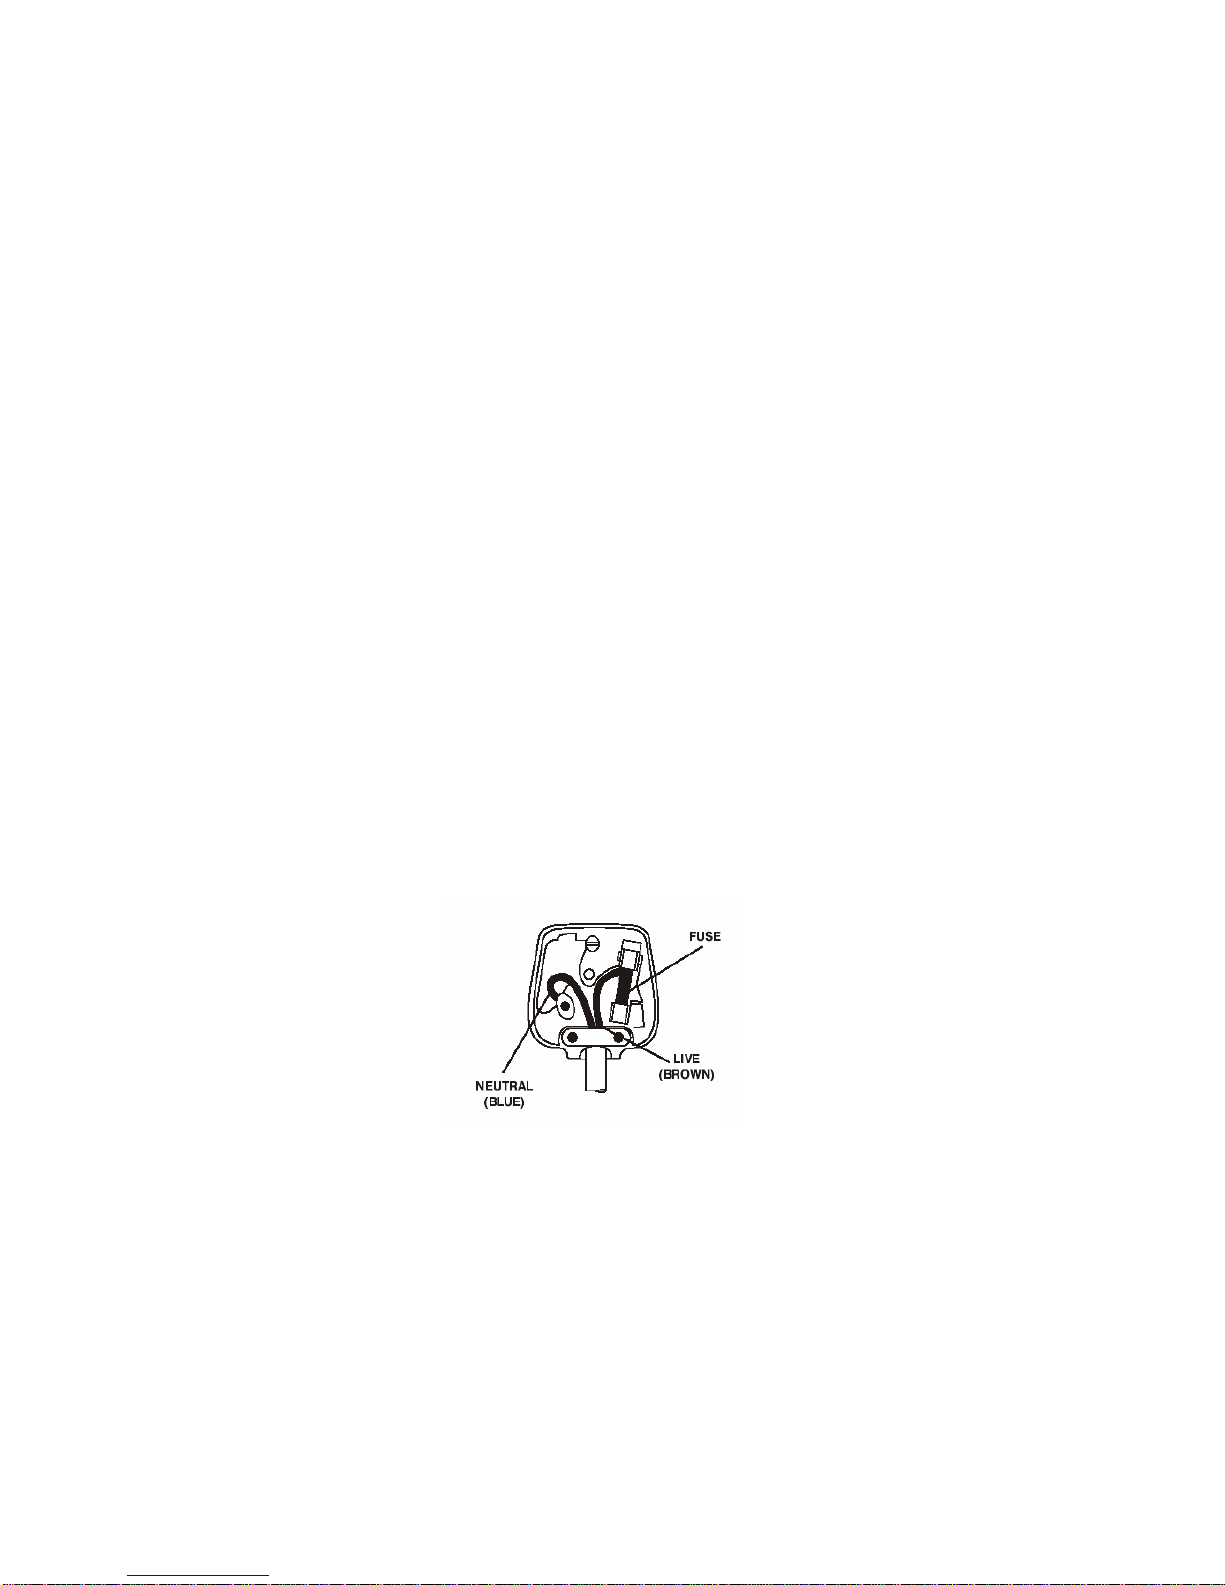
Wiring Instructions
The wires in this mains lead are colored in accordance with the following code:
Blue = Neutral Brown = Live
As the colours of the wires in the mains lead of this appliance may not correspond with the
coloured markings identifying the terminals in your plug, proceed as follows (refer to the
plug wiring diagram).
y The wire which is coloured BLUE must be connected to the terminal which is marked
with the letter N or coloured Black.
y The wire which is coloured BROWN must be connected to the terminal which is
marked with the letter L or coloured Red.
If a 13Amp (BS1363) plug is used, a 13Amp (BS1362) fuse must be fitted, or if any o ther
type of plug is used, a 13Amp fuse must be fitted, eith er in the plug or adaptor, or on the
Distribution Board.
3
Page 5
Description:
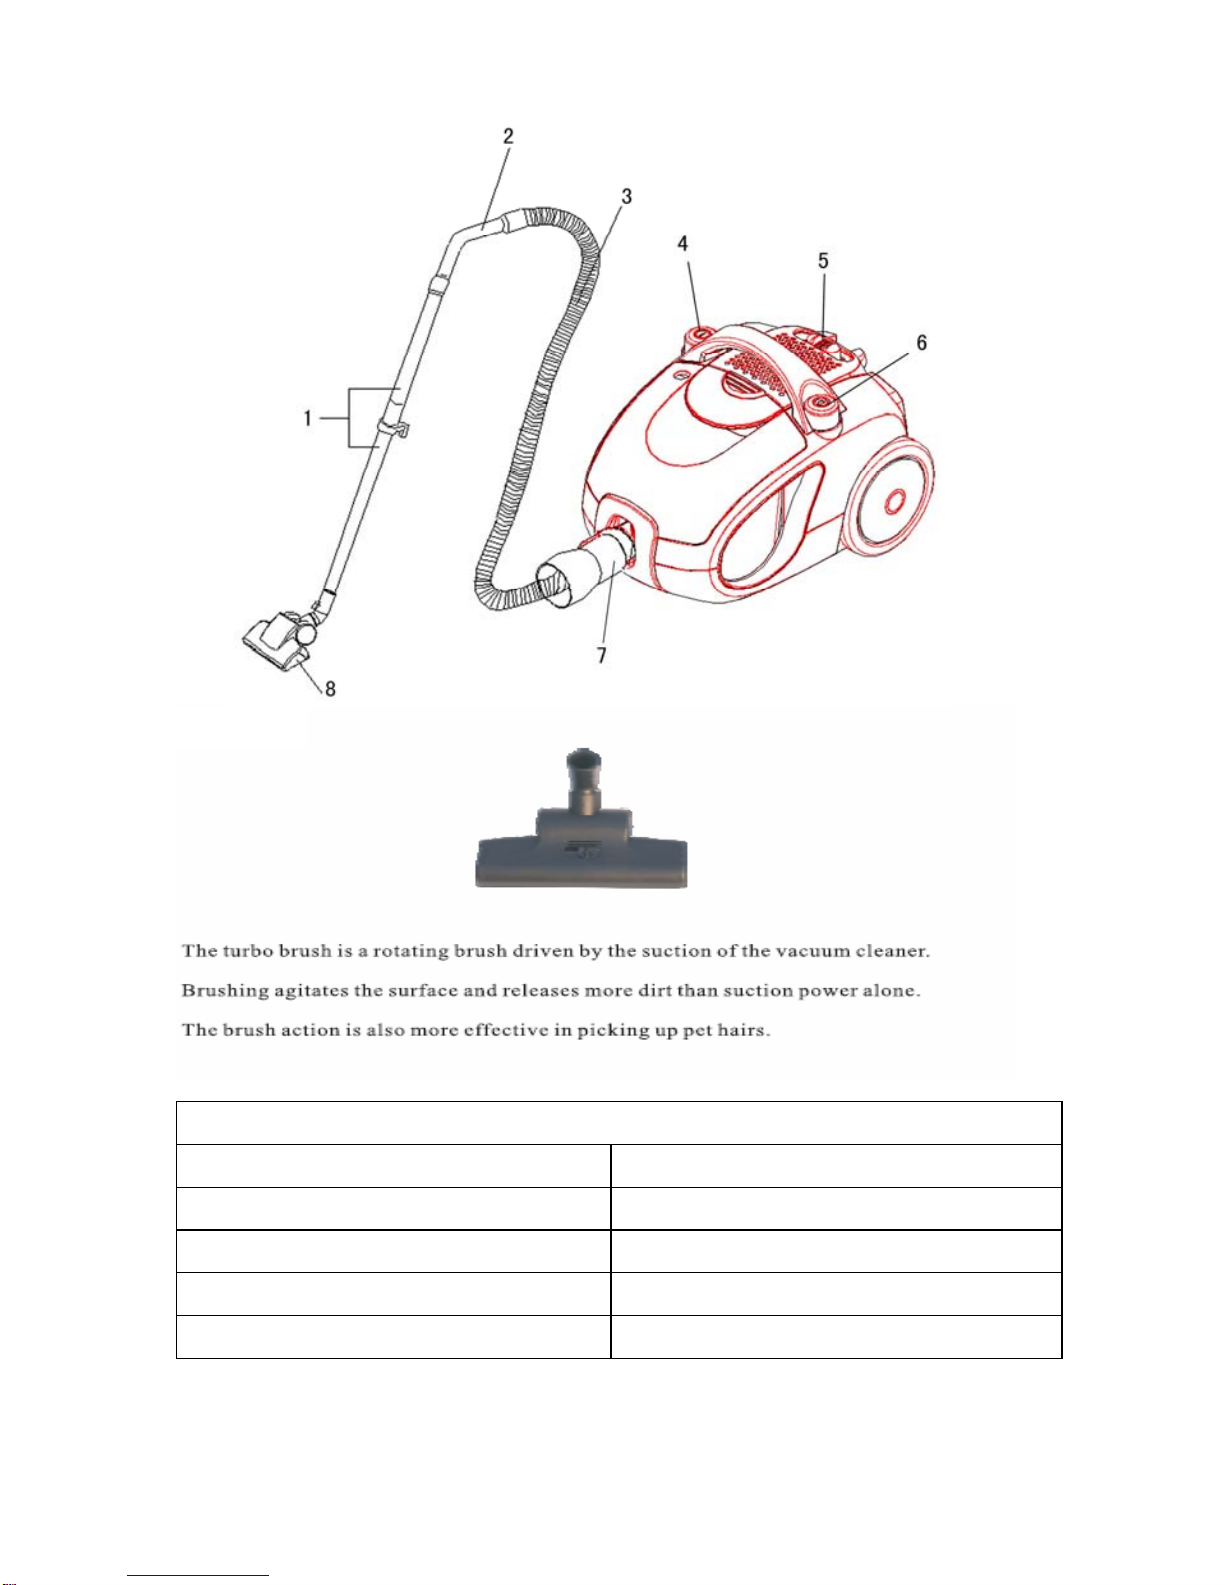
9. Turbo brush
Vacuum Parts Description
1. Extention Tube 6. Cable Rewind Button
2. Handle 7. Hose Inlet
3. Flexible Hose 8. Floor Brush
4. On / Off Switch 9. Turbo Brush
5. Power Slide Regulator
4
Page 6
ASSEMBLY INSTRUCTION:
Always remove the plug from the power socket before fitting or removing
accessories!
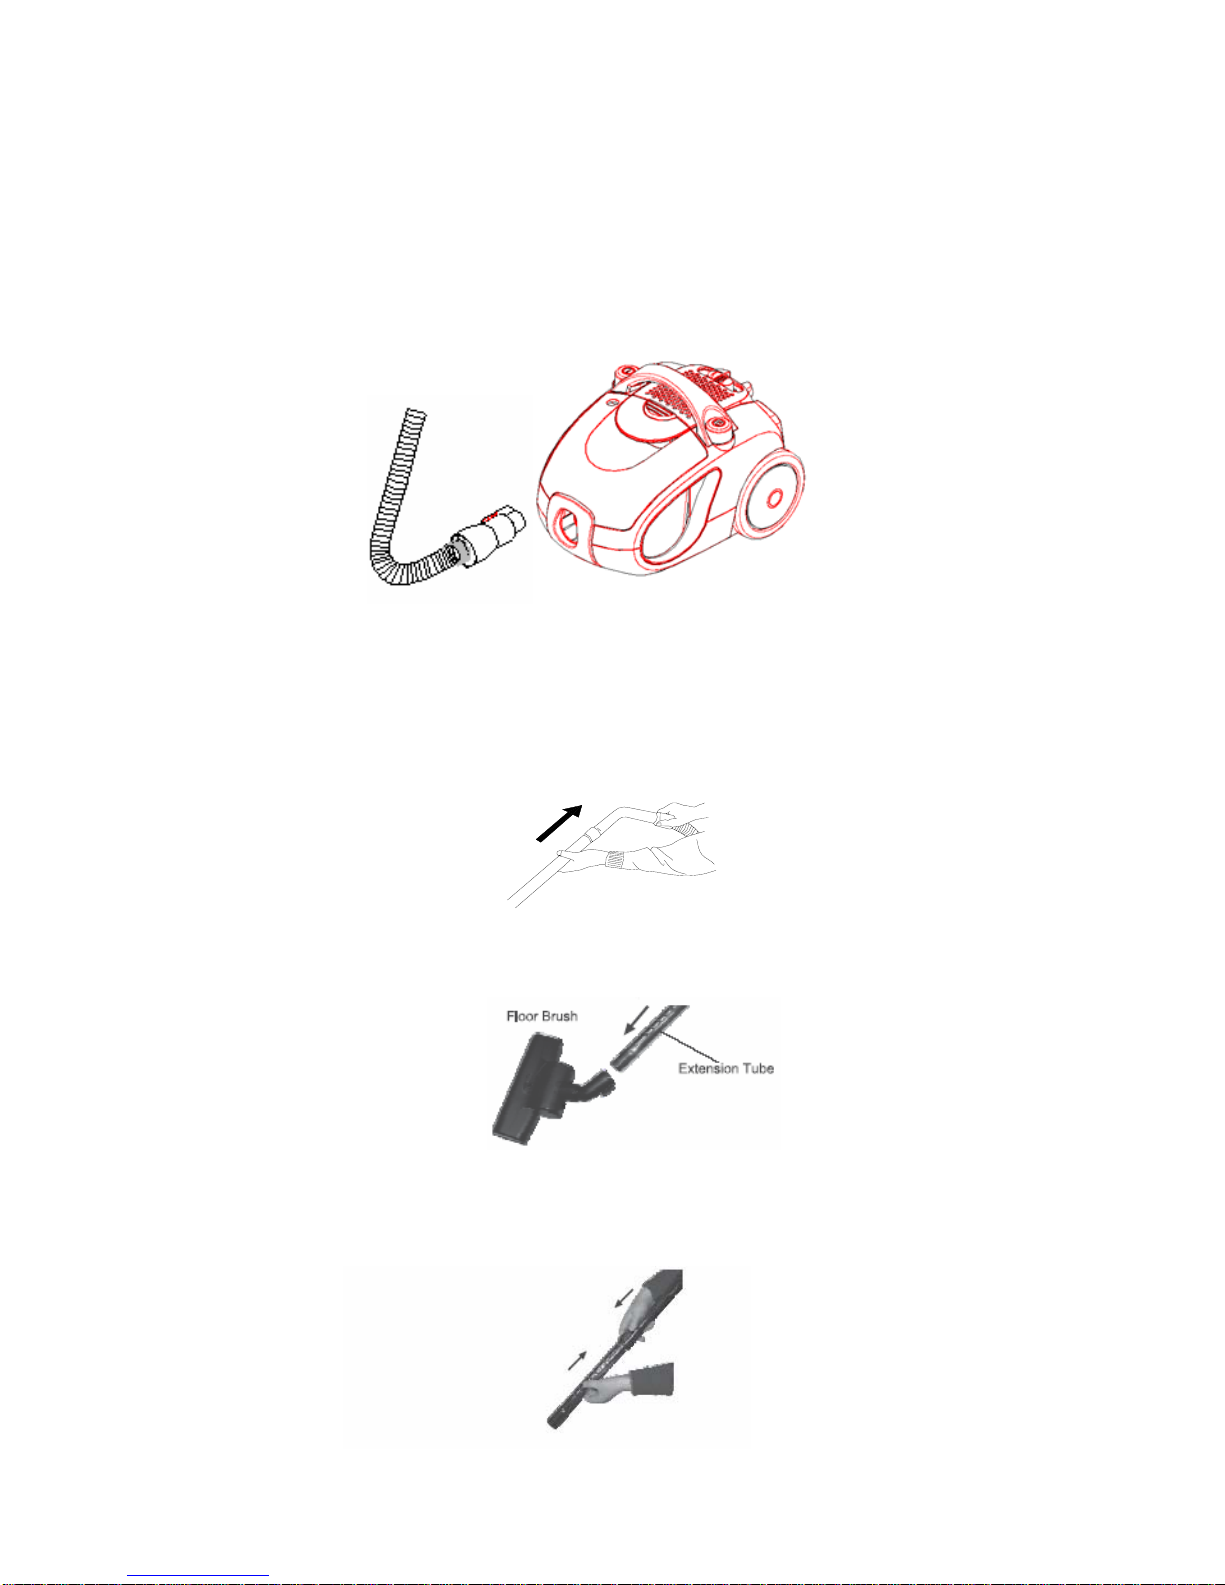
1. Fitting and removing the flexible hose.
Fitting:
Insert the flexible hose into the suction hole. Push until it clicks and locks into
position.
5
Removing:
Press the button to release and pull the hose from the suction inlet.
2. Fitting the extension tubes, floor head and accessories.
a. Fit the extension tube to the hose nozzle.
b. Fit the floor brush or turbo brush to the chrome telescopic tube.
c. The chrome telescopic tube can be extended by pushing the release
button and pulling the tube.
Page 7
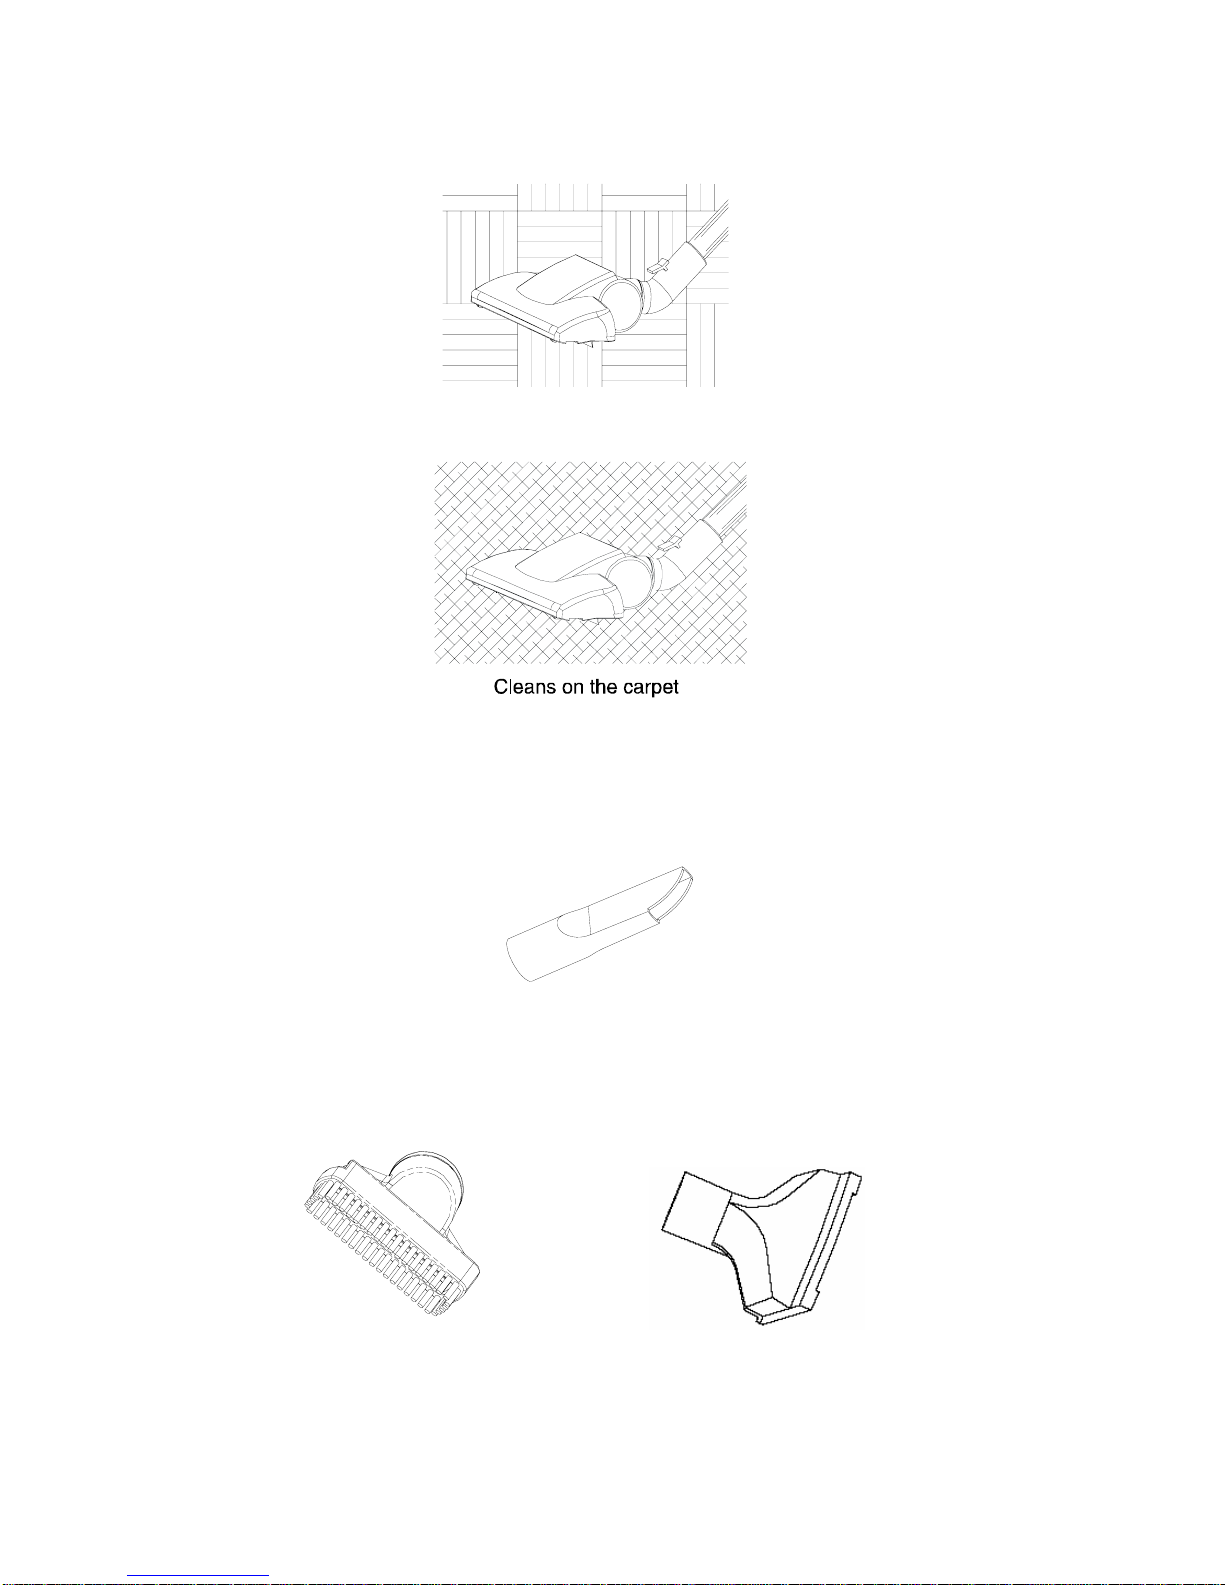
d.
Floor head - ideal for the daily cleaning on carpets and hard floors.
For use on hard floors ensure the floor head bristles are extended.
e.
Crevice tool - for radiators, corners, baseboards and between
cushions.
6
f.
Soft brush and upholstery attachment – ideal for fabrics, picture
frames and cleaning the sofa.
To use the upholstery tool slide the brush head off the attachment.
Brush head fitted Brush head removed
Note: The crevice and soft brush attachments are stored at the rear of the
vacuum.
Page 8
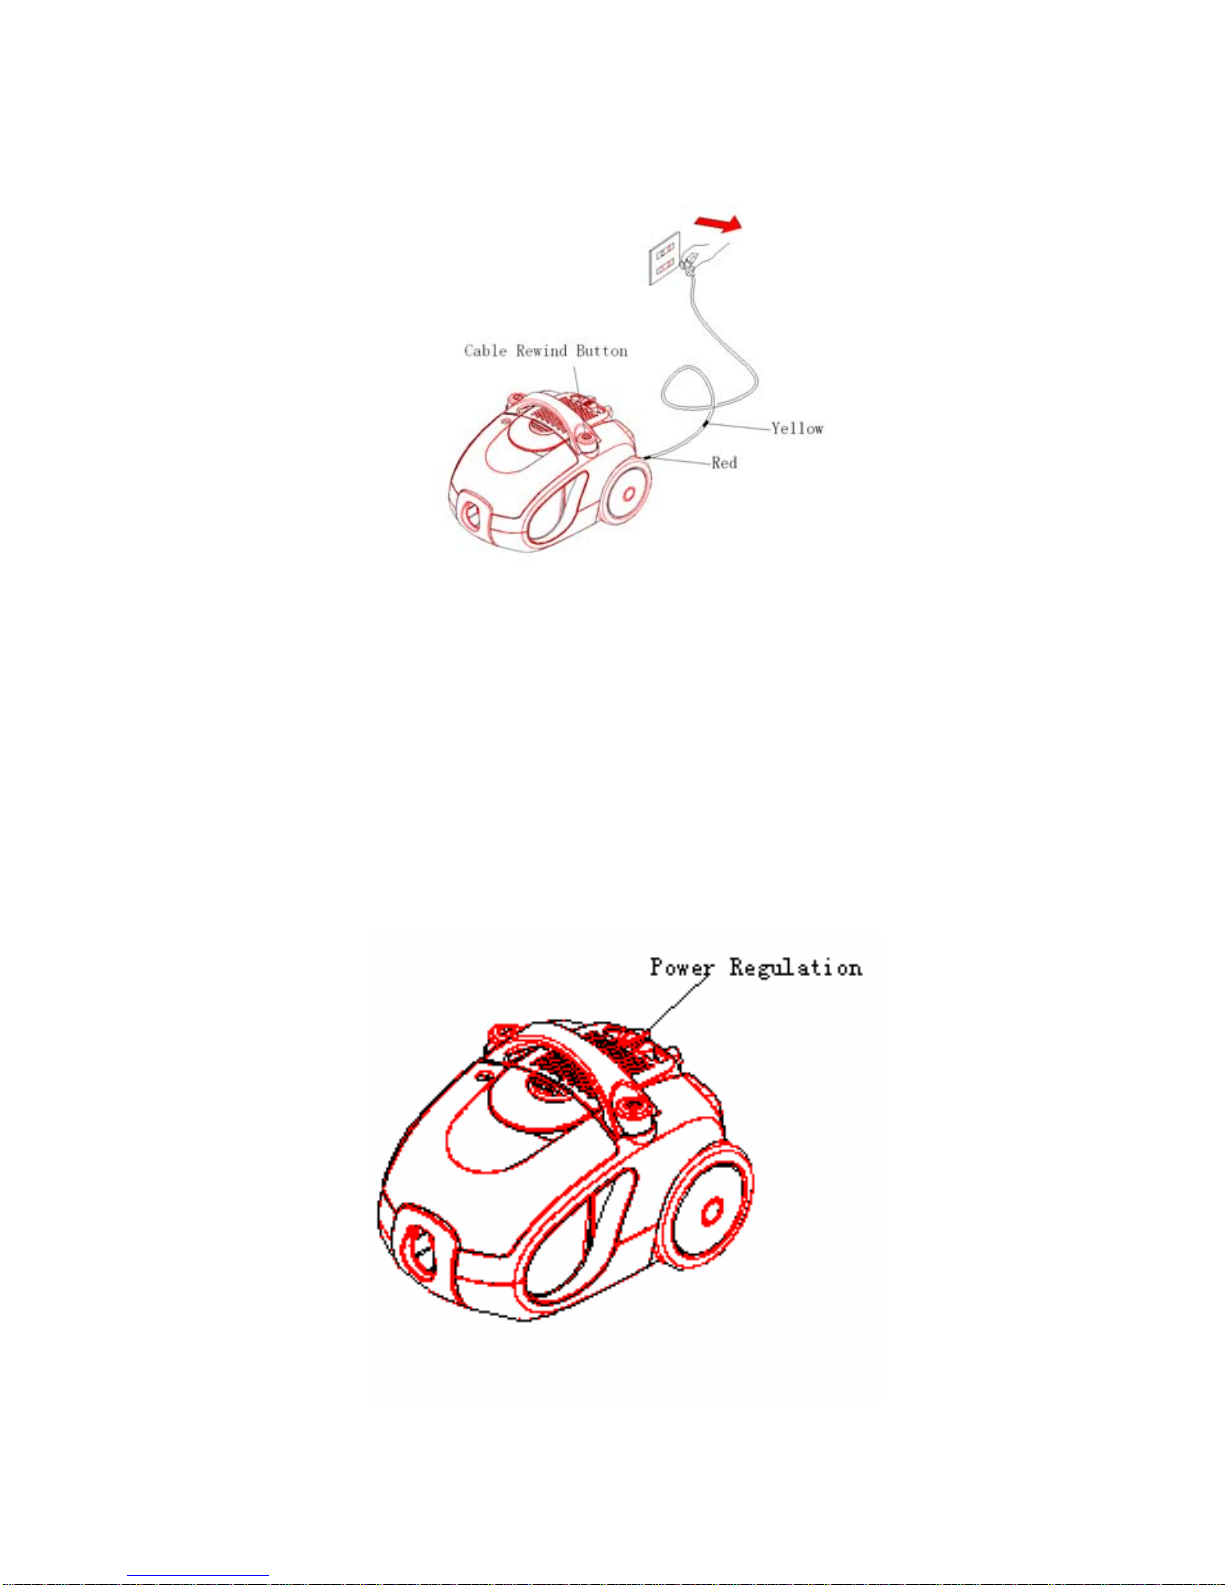
INSTRUCTIONS FOR USE
1. Unwind a sufficient length of cable. A yellow mark on the power cable shows
the ideal cable length. Do not extend the cable beyond the red mark.
2. You should plug the appliance into a 220V-240V SUPPLY ONLY.
**Before connecting to the power source, make sure the dust-bin; filter and
accessories are fitted correctly. Do not operate without dust-bin or filters in place.
3. Press the ON/OFF power switch to start vacuuming.
4. The SC11052 vacuum has a sliding power regulator which allows easier
suction control when vacuuming.
7
Page 9

8
5.
Thermal cut out:
This vacuum is fitted with a thermal cut out device, which protects the
vacuum if the motor should overheat. If the cleaner suddenly stops, please
check the following:
a. Switch off the cleaner and unplug from the power supply.
b. Check the cause of overheating; blocked hose, clogged filter, full
dust-bin etc.
c. Clear the blockage, clean / replace the filter or empty the dust-bin as
necessary.
d. Wait 30 – 60 minutes, the thermal device will reset automatically
Cord Rewind: to rewind the power cord, press the rewind button with one hand
and guide the cord with the other hand to ensure that it doesn’t whip causing
damage.
Swan Vacuum Help-line Call 01733 404703
Swan Vacuum Spare Parts Call 01733 404709
Calling from outside the UK Please Call - 00 44 1733 404703
Page 10
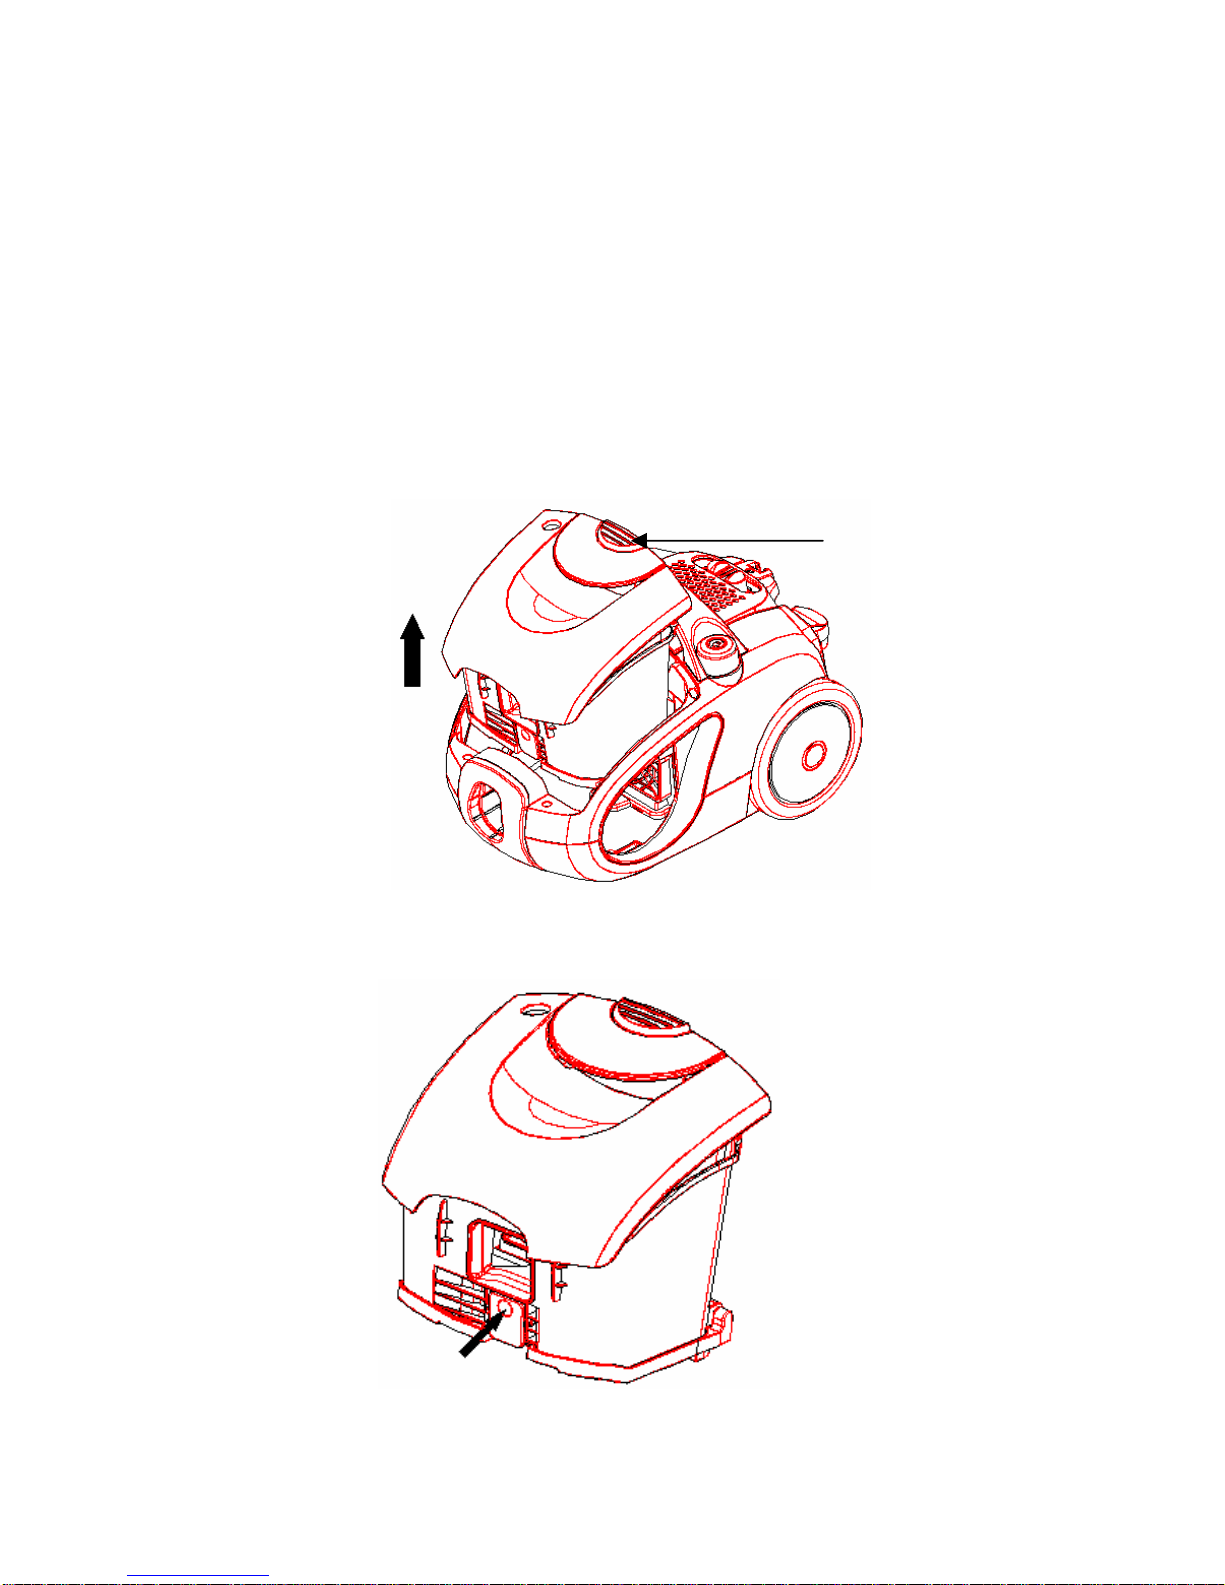
MAINTENANCE
Removing rubbish from the dust-bin
z Always unplug the vacuum before any maintenance.
z Always operate the cleaner with the dust-bin installed.
z The dust-bin must be emptied each time the dust full indicator turns red,
whilst the vacuum is operating at maximum power and the nozzle is
raised from the floor.
1.
Before emptying the dust-bin, remove the hose from the hose inlet.
Dust-bin release
button
2.
Press the release button and lift out the dust-bin.
9
3. Release the dust-bin lock.
Page 11
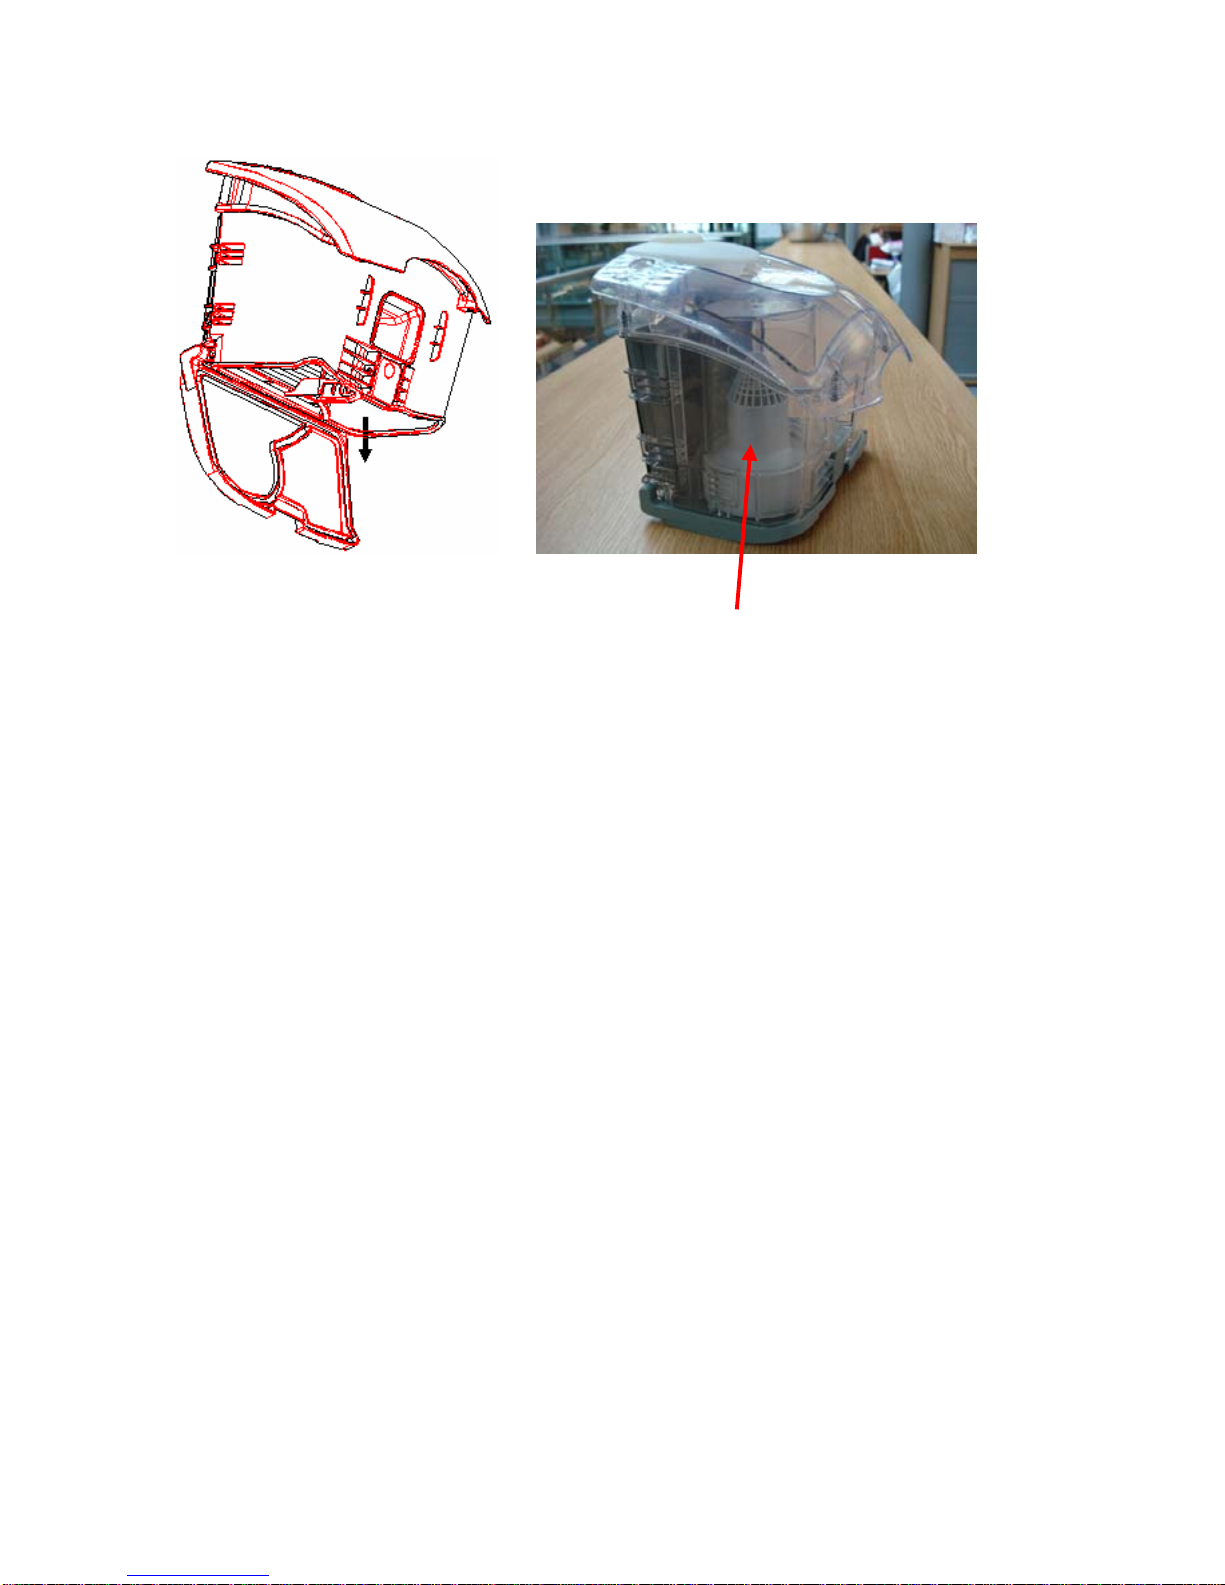
4.
Open the dust-bin trap door and empty the rubbish.
5. Whilst emptying the dust-bin, check the dust cone is clear. The dust cone
can be accessed when the dust-bin trap door is open. Grip the dust cone at its
base and twist anti-clockwise to remove. Brush clean and replace.
Please ensure when refitting, that it is located correctly and that it locks into
position before closing the dust-bin trap door.
6. Replace the dust-bin subassembly and lock back in place.
Cleaning / Changing the Hepa inlet filter and foam filter:
z Both filters should be cleaned at least twice a year or when it becomes
visibly solid. This filter can be washed in clean warm water.
z Always operate the cleaner with the filters installed, otherwise reduced
suction or motor damage may occur.
z
Disconnect from the electrical outlet before cleaning the filters.
z
Do not use a washing machine to wash / rinse the filters.
z Do not use a hair drier to dry it.
z Allow at least 24 hrs to air dry before refitting the filters.
10
Page 12
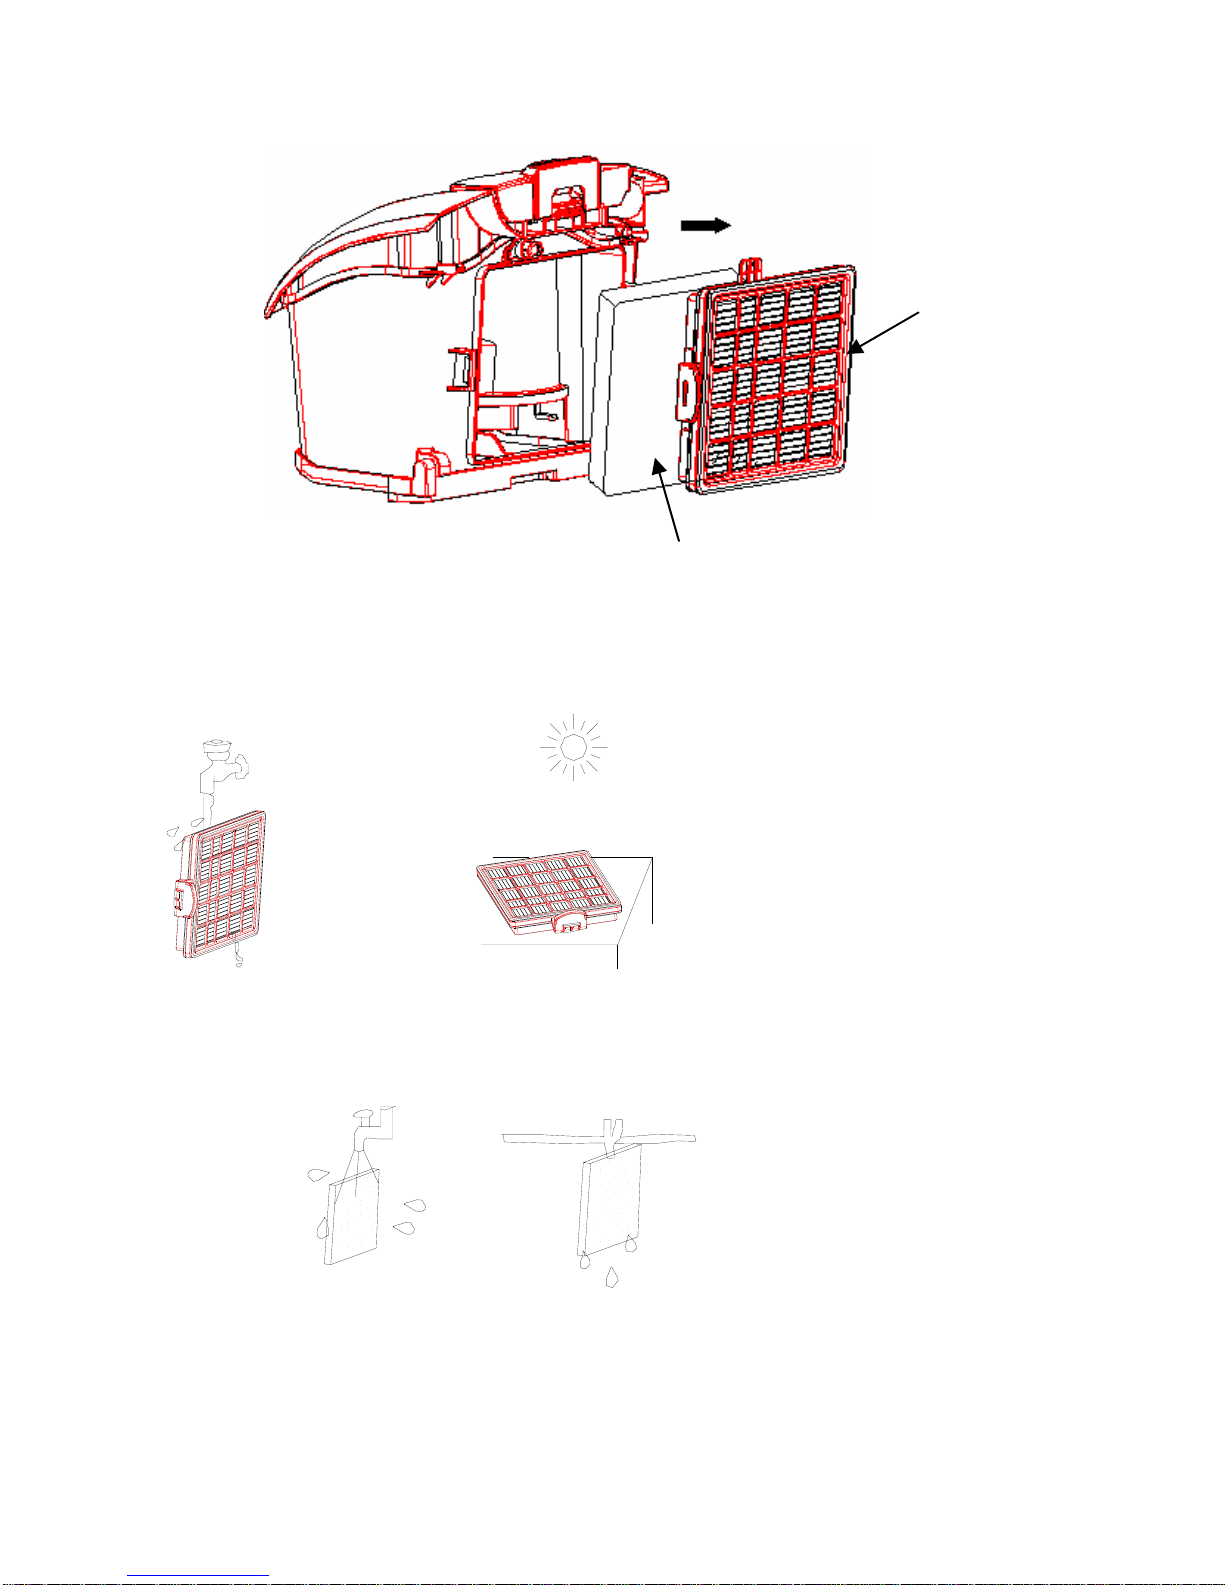
1. Take out the HEPA filter assembly.
.
11
2. Rinse the Hepa filter and bracket in warm water and allow to dry completely
before refitting.
Hepa filter &
bracket
Foam filter
3. Rinse the sponge filter in warm water and allow to dry completely before
refitting.
Page 13
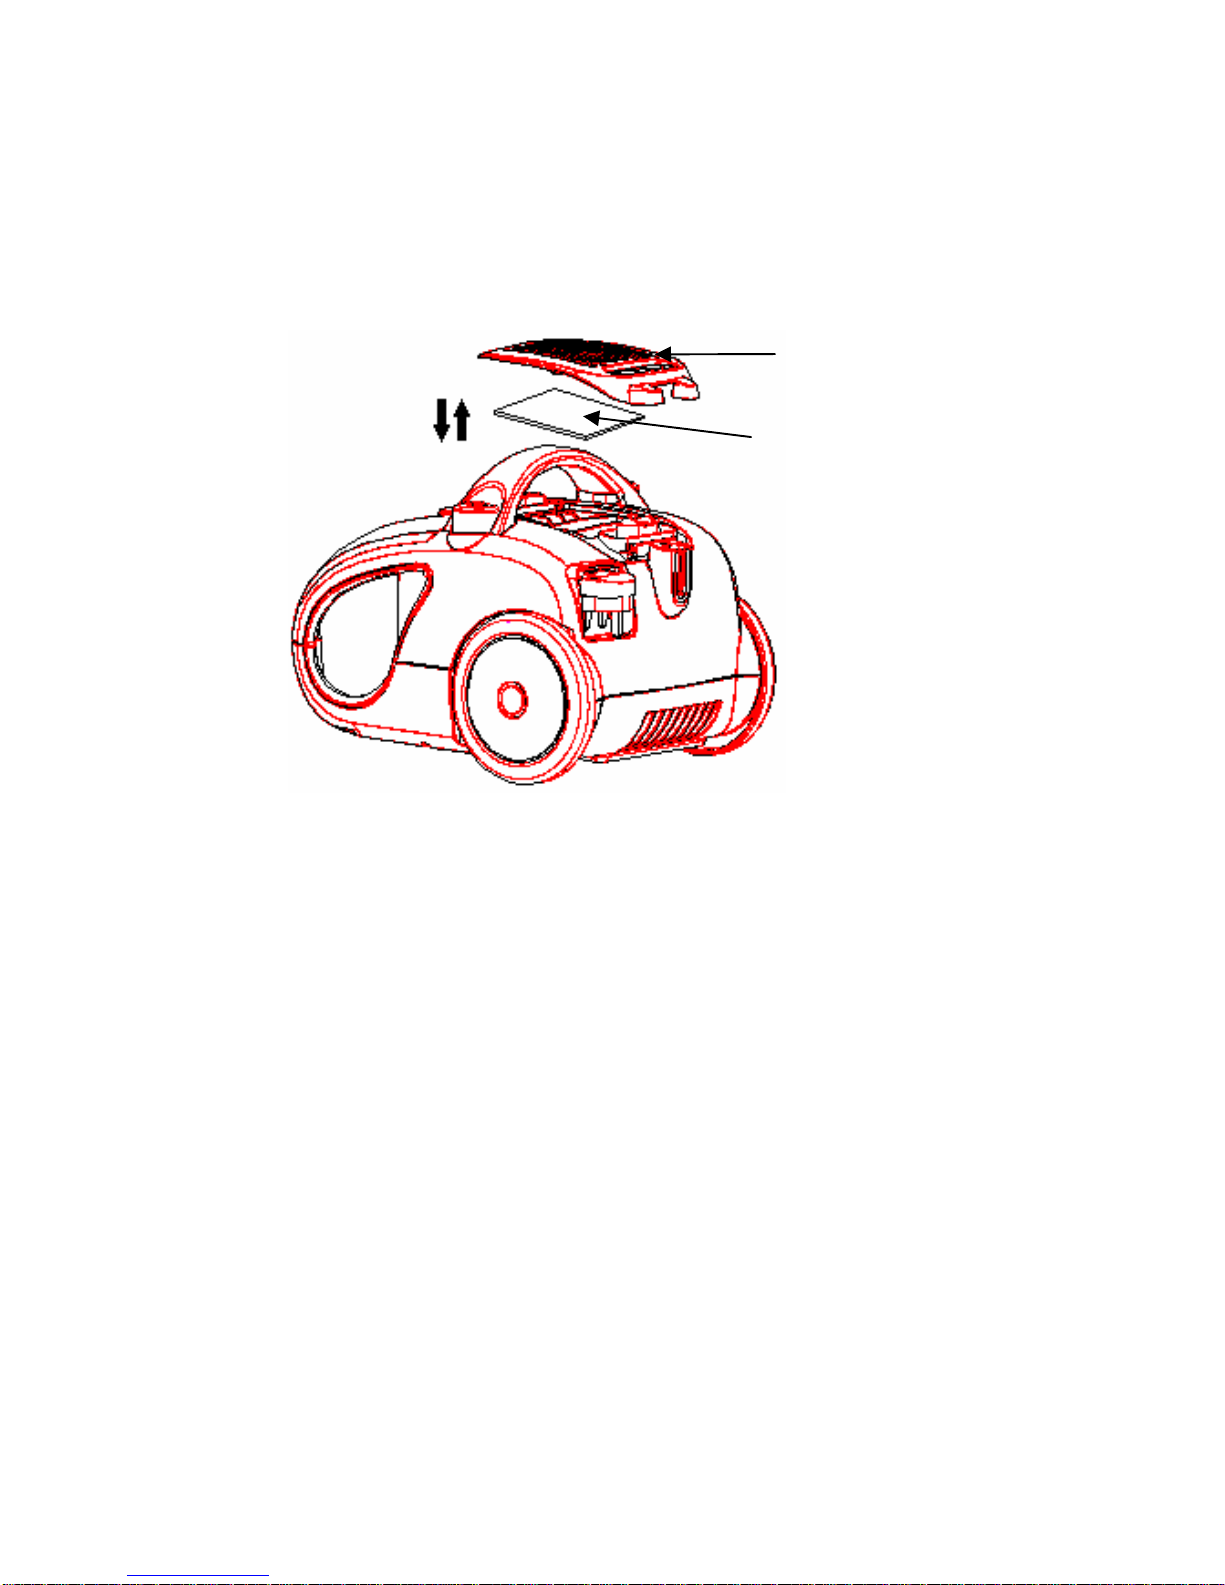
Changing the Anti-microbial Exhaust filter
1. Unclip the exhaust filter cover, doing this will allow access to the filter.
2. With the filter cover removed take out the filter.
3. Replace the filter with a clean new one.
4. Close the cover.
Exhaust filter cover
Exhaust filter
SWAN VACUUM HELP-LINE: PLEASE CALL 01733 404703
SWAN VACUUM SPARE PARTS: PLEASE CALL 01733 404709
Calling from outside the UK Please Call - 00 44 1733 404703
12
Page 14

13
If your appliance should fail, please check the following:
* Make sure the mains plug is correctly fitted in the socket.
* Check the fuse in the plug.
* Try another socket.
* In case the thermal cut out has tripped, allow 30 – 60 minutes for the cutout
device to reset. Please check for blockages in the hose, filters and dust-bag.
Service
● If the vacuum power cord has been damaged in any way, do not use the
vacuum cleaner. The vacuum cleaner must be repaired by a qualified
service agent.
● If you have any technical problems with your vacuum cleaner, please call
the Swan helpline: 01733 404703.
SPARE PARTS LIST
SC11050 /01 Hose & Nozzle
SC11050 /02 Floor Head
SC11050 /03 Chrome telescopic tube
SC11050 /04 Crevice tool
SC11050 /05 Small Brush / Upholstery tool
SC11051 /06 Turbo brush
SC11050 /07
Dust cone (see page 10)
SC11052 /51 Filter Kit
SWAN VACUUM HELP-LINE: PLEASE CALL 01733 404703
SWAN VACUUM SPARE PARTS: PLEASE CALL 01733 404709
Calling from outside the UK Please Call - 00 44 1733 404703
Page 15
WASTE ELECTRICAL RECYCLING
This symbol indicates that this product is classed as Electrical or Electronic
Equipment and should not be disposed of with other household waste.
The Waste Electrical and Electrical Equipment (WEEE) Directive has been
introduced across the European Union:
• to recycle waste electrical products using the best available recovery and
recycling techniques in order to minimise the impact on the environment
• to treat any hazardous substances and
• to avoid increasing landfill.
WEEE product should be disposed of by handing it over at a designated collection
point.
For more information about where you can drop off your waste product for
recycling please contact your local authority.
14
 Loading...