

Page 1
1
PRO-747 / PRO-753
Dome Camera
INSTRUCTION MANUAL
EN
Page 2

1
Limited Warranty Terms & Conditions
Swann Communications warrants this product against defects in workmanship and material for a period of one
(1) year from its original purchase date. You must present your receipt as proof of date of purchase for warranty
validation. Any unit which proves defective during the stated period will be repaired without charge for parts or
labour or replaced at the sole discretion of Swann. The end user is responsible for all freight charges incurred
to send the product to Swann’s repair centres. The end user is responsible for all shipping costs incurred when
shipping from and to any country other than the country of origin.
The warranty does not cover any incidental, accidental or consequential damages arising from the use of or the
inability to use this product. Any costs associated with the fitting or removal of this product by a tradesman or other
person or any other costs associated with its use are the responsibility of the end user. This warranty applies to the
original purchaser of the product only and is not transferable to any third party. Unauthorized end user or third
party modifications to any component or evidence of misuse or abuse of the device will render all warranties void.
By law some countries do not allow limitations on cer tain exclusions in this warranty. Where applicable by local
laws, regulations and legal rights will take precedence.
For Australia: Our goods come with guarantees which cannot be excluded under Australian Consumer Law. You are
entitled to a replacement or refund for a major failure and for compensation for any other reasonably foreseeable
loss or damage. You are also entitled to have the goods repaired or replaced if the goods fail to be of acceptable
quality and the failure does not amount to major failure.
FCC Verification
NOTE: This equipment has been tested and found to comply with the limits for Class B digital device, pursuant to part
15 of the FCC Rules. These limits are designed to provide reasonable protection against harmful interference in a
residential installation. This equipment generates, uses and can radiate radio frequency energy and, if not installed
and used in accordance with the instructions, may cause harmful interference to radio or television reception, which
can be determined by turning the equipment off and on, the user is encouraged to tr y to correct the inter ference by
one or more of the following measures:
• Reorient or relocate the receiving antenna
• Increase the separation between the equipment and the receiver
• Connect the equipment into an outlet on a circuit different from that to which the receiver is connected
• Consult the dealer or an experienced radio/TV technician for help
These devices comply with part 15 of the FCC Rules. Operation is subject to the following two conditions:
• These devices may not cause harmful interference, and
• These devices must accept any interference received, including interference that may cause undesired
operation.
Important Note:
All jurisdictions have specific laws and regulations relating to the use of cameras. Before using any camera for any
purpose, it is the buyer’s responsibility to be aware of all applicable laws and regulations that prohibit or limit the use
of cameras and to comply with the applicable laws and regulations.
WARNING
Modifications not approved by the party responsible for compliance could void user’s authority to
operate the equipment.
IMPORTANT SAFETY INSTRUCTIONS
• Make sure product is fixed correctly and stable if fastened in place.
• Do not operate if wires and terminals are exposed.
FOR BEST RESULTS:
• This is a semi-professional 360º PTZ dome camera, conforming to PELCO P/D standards. To
obtain the best image quality, please use a high quality cable, particularly if the cables required
length exceeds 100ft/35m. For the highest video quality, use a cable with a solid copper inner
conductor and shielded with copper braid.
Before You Begin
Page 3

2
Contents
Quick Reference
Before You Begin 1
Contents 2
Introduction 3
Layout of the Camera 3
Layout of the OSD Controller 4
Installation
Choosing the Location 5
Joining Cables 6
Exposure to Weather 6
Attaching the Mount 6
Mounting the Camera 6
Connection Guide
Connecting the Camera 7
Connecting two RS485 cables 8
Setting up the Camera(s) for use with your DVR 8
Controlling the Camera 9
Advanced Feature: On-Screen Display 10
Troubleshooting 11
Notice 12
Notes 12
Helpdesk / Technical Support Details Rear Cover
Default PTZ Configuration
Command Address: 1
Protocol: Pelco-D
Baud Rate: 9600bps
RS485 Polarity: +A Red Wire
-B Black Wire
Page 4
3
Introduction
Layout of the Camera
C
ongratulations on your purchase of this PRO-747 / PRO-753 Pan, Tilt and Zoom*
(PTZ) Dome Camera! It is an ideal solution for monitoring a large area – a
combination of a high quality CCD image sensor mounted in a contained dome with
the option to pan fully 360º. Nothing will be out of sight for long!
Whether you wish to do this using the full complement of manual controls, or
program a detailed surveillance program for the camera to run, the PRO-747 /
PRO-753 gives you all the options you need to effectively monitor a large range of
locations without the hassle of multiple cameras.
The PRO-747 / PRO-753 comes mounted in a simple and unobtrusive dome, has
great low-light performance and includes a fully functional controller for operating
the camera and adjusting camera settings through the On-Screen Display
advanced feature. While the PRO-747 uses a fixed 6mm lens (so the zoom controls
will have no effect), the PRO-753 is equipped with a powerful 10x optical zoom –
great for getting up close to what you want to see.
3
1
2
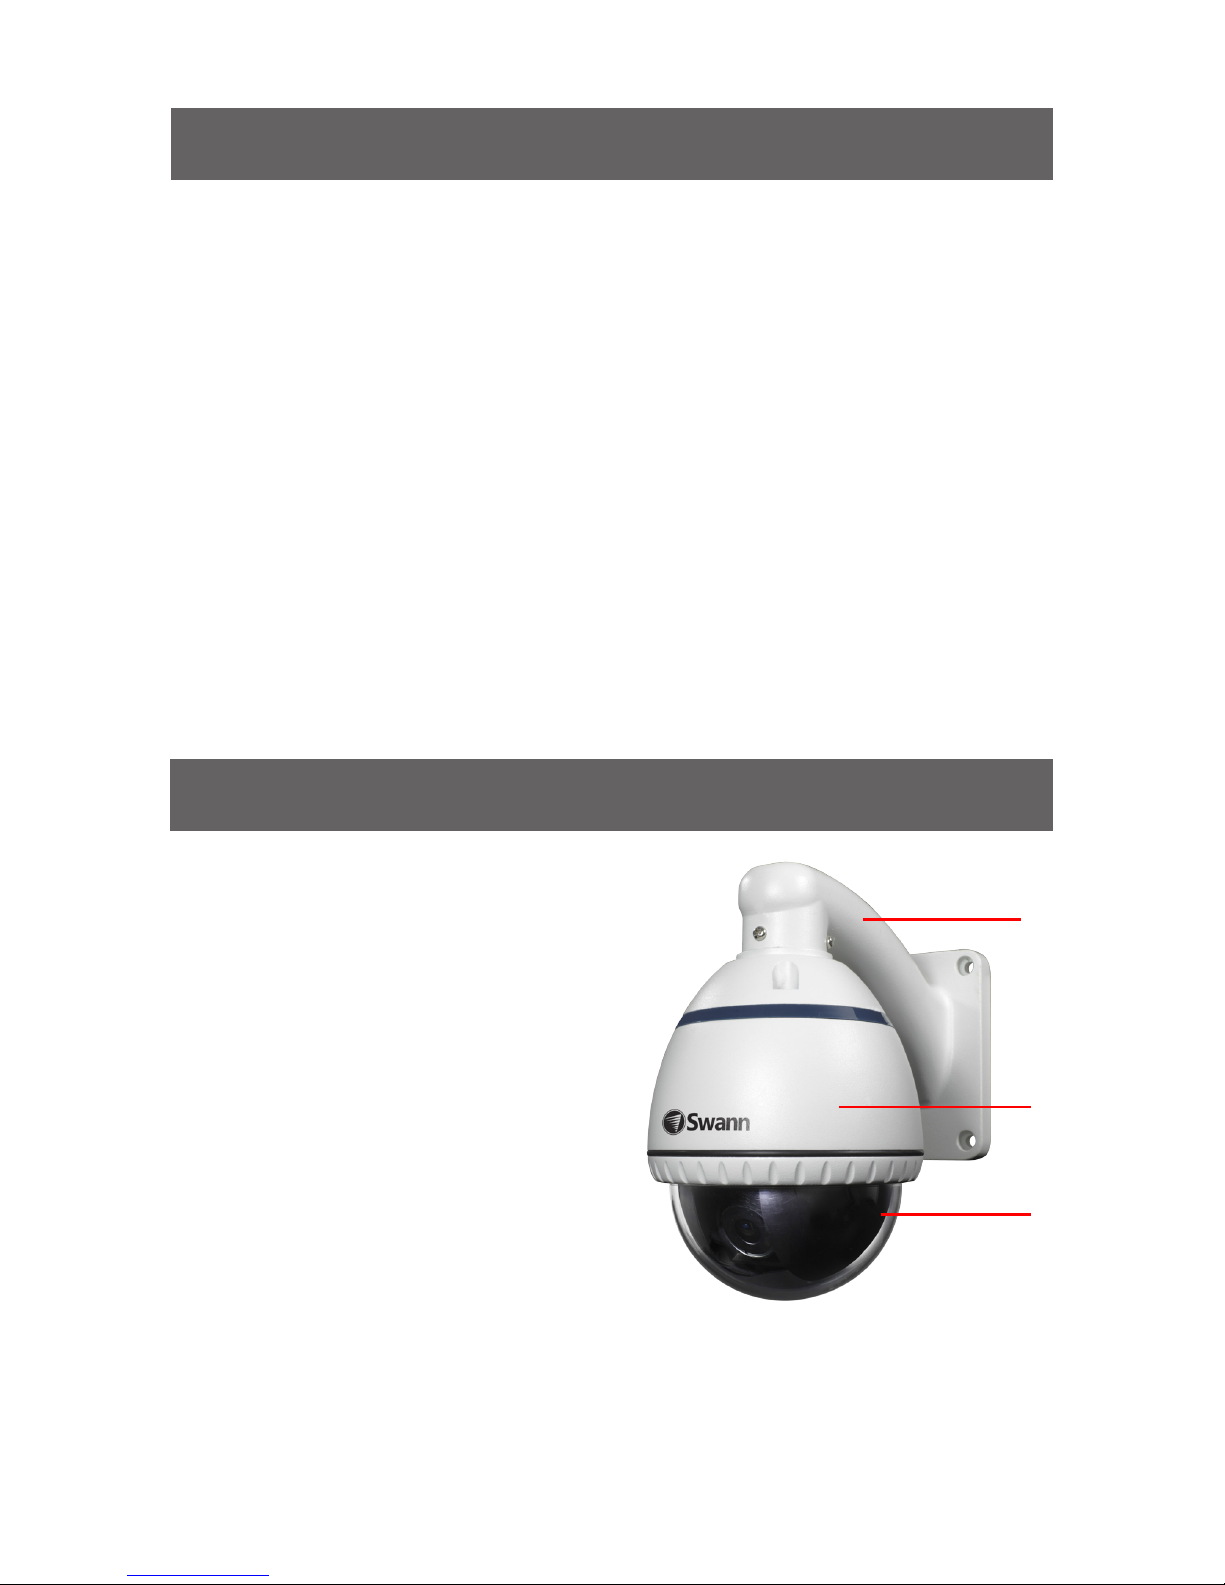
1. Mounting Bracket (Wall-mount shown)
Use wall-mount arm for mounting to a wall, post or
similar vertical surface.
Use ceiling-mount bracket for mounting to the
underside of a ceiling or overhang.
2. Camera Housing
Contains the camera, associated circuitry and
electronic components.
3. Dome Cover
Protects the camera.
* Zoom available on PRO-753 model only
Page 5
4
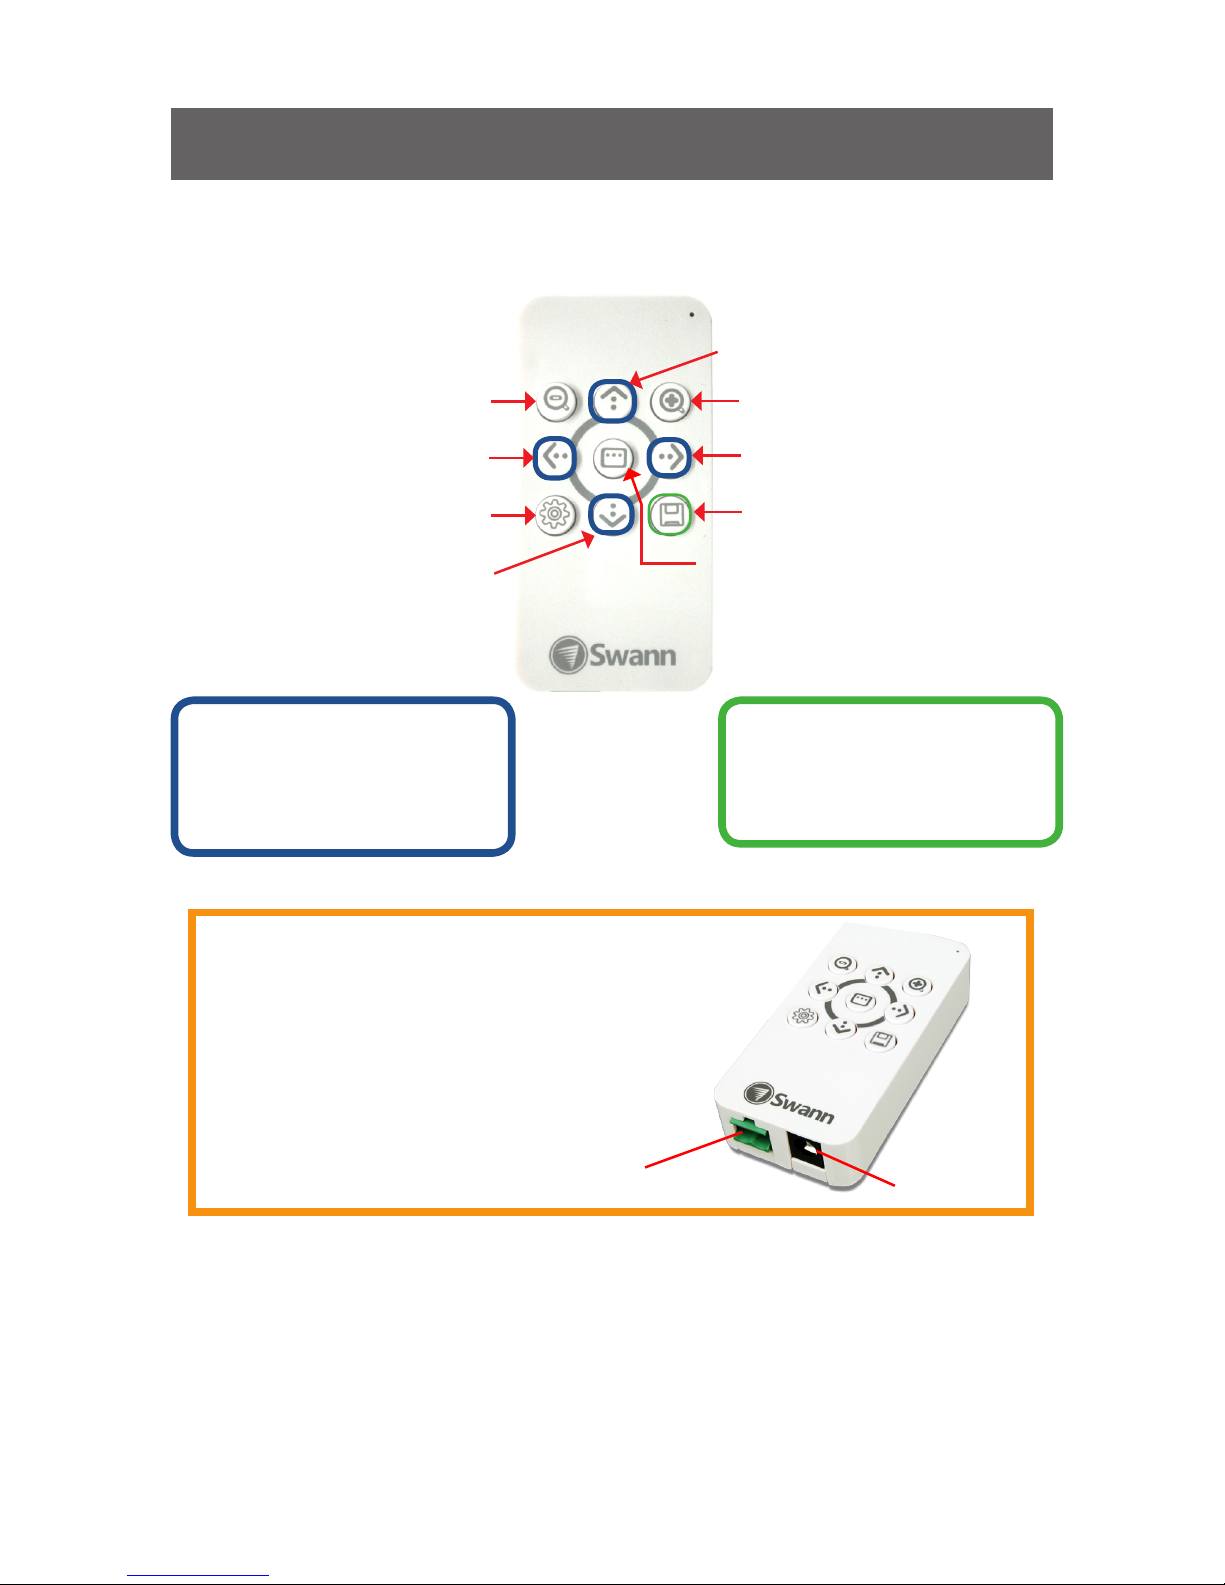
Layout of the OSD Controller
2
1
1. RS485 Port
Insert the RS485 plug into this socket.
2. DC IN 12V
Connect the supplied power adaptor to this socket.
Arrow Buttons
Used to navigate through the
OSD menu and browse different
setting options.
Save Button
Used to quickly save any setting
changes you’ve made in the OSD
menu.
The important buttons & connectors
Zoom In
Tilt Up
Camera Setup Menu/
Select function
Zoom Out
Pan Right
Quick Save
Pan Left
Tilt Down
Enter/Exit
OSD Main
Menu
Page 6

5
Installation
Choosing the Location
For best results, carefully consider where you want to mount the dome. Whilst the
optimal placement solution will vary from application to application depending on intent of
installation, the environment of use and the lighting conditions encountered, there are a
few points which are almost universal.
What you want to monitor
The most obvious factor to consider when planning where to install your camera is
the question of what you wish to monitor, and how a movable camera system can be
incorporated into your specific environment.
• Ensure that the camera is located close enough to what you want to monitor to capture
the required details. For example, if you wish to capture the details of a face, the
camera may need to be located within fifty feet (about 15m) of the subject (assuming
the lens is fully zoomed in). This is also true if trying to read printed information - such
as a vehicle’s registration plate.
• Try to place the camera in a position that a potential security threat will find it difficult
to avoid.
• A strategy which is often effective is to monitor entrances and exits - after all, a
security threat has to get in somewhere.
Field of view
The dome camera can pan a full 360º. This means that (for example) installing the dome
camera in a tight corner is probably not an ideal utilization of its potential! A wall is a better
option, as it allows 180º of view for the camera. A freestanding pole of sufficient height
and integrity to reliably hold the camera securely is an ideal choice, as is the centre of the
ceiling in a larger room or a warehouse.
Height
For best results, the dome camera should be mounted as high up as practicable. This is
because the camera has complete freedom of tilt movement below. Stated more simply, it
can see things below it, but not above!
General
• Try to aim the camera at an area which is evenly lit. Objects or people in shadows near
brightly lit objects are very hard to see.
• It’s better to have the camera in the shade looking into the light than vice-versa.
• When running your cable, try to avoid bending it at sharp angles. This can interrupt
the signal flow and degrade the quality of your images. If the cable must be bent, try to
make the bend as gradual as possible.
• Don’t put your cable near live electrical wiring. AC electricity generates radio “noise”
which can interfere with the signal from your camera.
Page 7

6
Installation
Joining Cables
We strongly advise against the modification (i.e. cutting and/or joining) of video cables. Each
cut/join will noticeably reduce video quality, and increase the chances of the system failing
over time. We also advise against using cable joiners/adapters to plug multiple cables
together. Rather, we suggest using a single unmodified video cable, preferably the supplied
one.
Exposure to Weather
The camera is weather and water resistant. However, be aware that long term exposure to
adverse weather conditions (extreme temperature fluctuation, excessive moisture or direct
sunlight) may eventually interfere with the correct operation of the unit.
IMPORTANT: If mounting the camera outside, be sure to properly seal all joints in the
mounting arm/bracket using a silicone sealant. If this is not fully sealed, water can
enter the dome causing malfunction or failure.
Attaching the Mount
1. Run the camera cable through the mounting arm or bracket you would like to use.
2. After the camera cable has been pulled through, attach the mounting arm/bracket
onto the dome.
3. Secure the dome and mounting arm/bracket using 3 screws (supplied).
NOTE: Be careful not to damage the connectors on the end of the cable as the connectors
are fragile!
Mounting the Camera
After attaching the mount onto the camera as described above, place it in the desired
location. Then, using appropriate screws for the surface you’re fixing the camera to, screw
the arm/bracket into place.
Ensure you have enough cable coming through the mounting arm/bracket to connect it to
your system. If you want to run the cables through a wall/ceiling, be sure to drill a hole for
the cable as well.
Page 8

7
INPUT
3
1
2
4
5A
5
6
1. Connect the BNC connector and DC power connector to the extension cable.
2. Connect the camera’s green RS485 plug to the extension cable. You may first need to
connect the red and black wires to the RS485 plug as shown in the diagram above.
3. Connect the BNC plug on the end of the extension cable to a BNC input on your TV or
DVR (as applicable). If your monitor/recorder does not have a BNC connection, then
use a BNC to RCA adapter.
4. Connect the extension cable’s DC socket to the power adapter (or one end of the
power splitter if using the OSD Controller).
5. Attach the extension cable’s RS485 plug to the PTZ port on the rear of the DVR. To set
up the camera for use with your DVR, see “Setting up the Camera(s) for use with your
DVR” on page 8.
5A. (Optional) To use the OSD Controller, plug the extension cable’s RS485 plug and the
other end of the power splitter to the OSD Controller’s RS485 port and DC in power
jack.
6. Plug the power adapter into a wall outlet. (If using the OSD Controller, first connect
the power splitter to the power adapter).
Connecting the Camera
Connection Guide
Advanced Feature: On Screen Display (OSD)
The OSD is an optional, advanced feature and recommended only for experienced users. The
camera will work perfectly well if you never attach the OSD controller - it will regulate all its
settings automatically. For more information, see “Advanced Feature: On-Screen Display”
on page 10.
Page 9

8
Connection Guide
Connecting two RS485 cables
So, you’ve got two (or more) RS485 cables to connect, and only one RS485 port. How does
this work?
• Insert all red connectors into the “A” or “+” socket of the RS485 port.
• Tighten the locking screw to secure in place. Don’t do it up too tight - just tight enough
to ensure a good connection, and so the connectors don’t fall out of the socket.
• Insert the all black connectors into the “B” or “-” socket of the RS485 port, and tighten
the right screw.
• To connect more than two PTZ devices to one DVR, you might need to use a terminal
block or other wire-coupling device.
Setting up the Camera(s) for use with your DVR
Once you’ve got the PRO-747 / PRO-753 properly connected to your DVR as shown already
in this manual and have followed the basic configuration procedures as described in your
DVR’s manual:
1. Navigate to the PTZ Configuration menu. Ensure that the settings in this menu match
the following:
If you’ve connected the PRO-747 / PRO-753 to channel 1, you shouldn’t need to change
anything on your DVR.
2. If you’ve more than 1 camera connected, you will need to assign each camera a unique
“Command Address” before you can control them individually via the DVR.
• Connect additional cameras one at a time to the channel 1 input on your DVR.
• Bring up the PTZ Control Interface and call “Preset 95” to display the Camera ID
menu shown on the right.
• From the PTZ Control Interface, use the arrow buttons
to scroll to the “ADDRESS” setting. Then, select a unique
address for the camera using the left and right arrows.
To make it easy to remember, we suggest numbering it to
correspond to the channel input that you’re plugging this
camera into. So if this camera is going to be connected to
channel 2, then set the command address to 2 as well).
• Take note of the Protocol and Baudrate that the camera
uses. You will need this information later when you configure the camera’s PTZ
settings on your DVR.
Page 10

9
Connection Guide
Controlling the Camera
3. Gather each camera’s red and black wires and connect to the “A” or “+” and “B” or “-”
sockets on the RS485 plug. If you’re not sure how, see “Connecting two RS485 cables”
on the previous page. Then, attach the RS485 plug to the PTZ port on the rear of the
DVR.
4. Finally, configure each camera’s PTZ settings on the DVR. Each camera must be set
up individually based on their corresponding channel number.
• Go to the PTZ Configuration menu.
• Select the camera channel and then enter the Baud Rate, Protocol and Address
values obtained from step 2. Do this for all the PTZ cameras you’ve connected to
the DVR.
• Click Apply to save the new PTZ settings.
All done! Now you are ready to control PTZ operations for multiple cameras individually
using your DVR’s PTZ interface.
Using the PTZ Control Interface on the DVR, you can perform pan, tilt and zoom movements
on your camera(s) with ease with the directional buttons. For more experienced users, you
can also use the PTZ Control Interface for more advanced functions like programming the
camera to move between different focus points for a specific duration.
Availability of advanced PTZ functions varies between DVR models (consult your DVR
documentation for information on the available PTZ functions) but generally, on most
capable DVRs you should be able to:
• Define Presets: Program movements for your camera system to repeat over time, or
to remember a specific viewpoint for easy access later.
• Initiate Patrol mode: Using a series of presets, you can run patrol mode where the
camera will move from one point (also sometimes called “Keypoint” on the interface)
to another. The camera stays at a single point for a set duration (“Dwell Time”) before
moving on to the next point.
• Adjust PTZ Speed: Change the speed of pan, tilt and zoom movements.
Page 11

10
Advanced Feature: On-Screen Display
We’ve pre-configured the PRO-747 / PRO-753 to operate autonomously - it will
automatically detect the conditions in your environment and adjust itself accordingly.
For the vast majority of applications, it’s easier and often more useful to let the camera
automatically adjust its settings.
However, the PRO-747 / PRO-753 is an advanced PTZ camera with professional image
adjustment options for experienced users. You can access and control the advanced
camera features using the On-Screen Display (OSD). The OSD allows you to customize
the various camera settings for image quality, white balance and shutter speed. There’s
no requirement to use the OSD - in the majority of situations, the automatic settings work
quite well.
The OSD controls are many and varied, and there’s simply not enough room in this manual
to cover it. You can download an in-depth guide to the OSD from our website:
www.swann.com/osdpro
Accessing the OSD Camera Setup Menu
Via DVR PTZ Control Interface
• Press the “Iris +” to display the Camera Setup
menu
• Use the up/down arrows to navigate and the left/
right arrows to adjust options.
• The Iris + button also functions as the SELECT
button.
• Click Apply to save any changes you’ve made to
the camera settings.
Via Controller
• Press to display the Camera Setup menu.
• To navigate and adjust different setting options,
use the arrow buttons.
• also functions as the SELECT button.
• Press to quickly save any changes you’ve
made to the camera settings.
For illustration only. Actual PTZ control panel layout
may vary on your DVR but functions will be the same.
IRIS + / - Buttons
Camera Setup Menu/
Select function
Quick Save
Page 12

11
Problem: My DVR is in Motion Detection mode, and continually records whilst
the camera is moving.
Solution: This is not a malfunction. When a DVR looks for “motion”, what it is really doing
is looking for a change between one image it captures and the next. Therefore, it doesn’t
matter whether it’s something the camera sees or the camera itself that is moving, the
DVR will interpret the change as movement. Turn off Motion Detection on your DVR if you
are using the camera in Patrol Mode.
Problem: I can’t make the camera move.
Solution: There are a few possible reasons why the camera(s) may not be working
properly.
• Check the integrity of the RS485 connections - a loose wire will stop the system
working.
• Check the polarity - the red wire should always be connected to a terminal marked
“A” or “+” of the RS485 port and the black wire to a terminal marked “B” or “-” of the
RS485 port.
• Check the settings in the DVR’s PTZ Configuration menu, and ensure the Baud Rate,
Protocol and Address values match your camera’s settings.
Problem: I don’t know my Command Address!
Solution: You can either go through them one at a time to see which one works, or follow
the instructions on page 8 to reset the Command Address.
Problem: The camera won’t turn on.
Solution: Check your power adapter is the right one for the camera (DC 12V). Make sure
both the camera and the controller are supplied power.
Problem: I can’t see anything at night.
Solution: Whilst the camera has great low-light vision (needing only 0.1 Lux) it does need
some light. If used in a pitch-black environment, it will not be able to see anything. Consider
illuminating your subject - perhaps simply leaving a light on will make all the difference. If
you really need to see in absolute darkness, consider upgrading to a camera with infrared
night-vision built in.
Troubleshooting
Page 13

12
Notice
The information printed in this instruction manual is correct at the time of publication.
As we’re constantly making improvements to our products, firmware, software and user
manuals, we reserve the right to change the information without prior notice.
Remember to check the Swann website for updates and more information:
www.swann.com
Notes
Page 14

© Swann Communications 2013
Helpdesk / Technical Support Details
Swann Technical Support
All Countries E-mail: tech@swann.com
Telephone Helpdesk
USA Toll Free 1-800-627-2799
USA Exchange & Repairs 1-800-627-2799 (Option 1)
(M-F, 9am-5pm US PT)
AUSTRALIA 1300 138 324
NEW ZEALAND Toll Free 0800 479 266
UK 0203 027 0979
M747_753C A M170 713 E
 Loading...