

Page 1
1
INSTRUCTION MANUAL
EN
MicroCam
HD Security Camera
Security Made Smarter
720PPRO-SERIES HD
Page 2

2
3
Notice about this manual
The content in this manual is for information purposes only and is subject to change
without notice. While every effort is made to ensure that this manual is accurate
and complete at the time of printing, no liability is assumed for any errors and
omissions that may have occurred. A s we’re constantly making improvements to our
product s, firmware, sof tware and user manuals, we reserve the right to change the
information without prior notice. For the latest updates and information, please visit:
http://support.swann.com
Limited Warranty Terms & Conditions
Swann Communications w arrants this product against defects in workmanship and
material for a period of one (1) year from its original purchase date. You must present
your receipt as proof of date of pur chase for warrant y validation. Any unit which pro ves
defective during the stated period will be repaired without charge for parts or labour
or replaced at the sole discretion of Swann. The end user is responsible for all freight
charges incurred to send the product to Swann’s repair centres. The end user is
responsible for all shipping costs incurred when shipping from and to any country
other than the country of origin.
The warranty does not cover any incidental, accidental or consequential damages
arising from the use of or the inability to use this product. Any costs associated with
the fitting or removal of this produc t by a tradesman or other person or any other costs
associated with its use are the responsibility of the end user. This warranty applies to
the original purchaser of the product only and is not transferable to any third party.
Unauthorized end user or third party modifications to any component or evidence of
misuse or abuse of the device will render all warr anties void.
By law some countries do not allow limitations on certain exclusions in this warranty.
Where applicable by local laws, regulations and legal rights will take precedence.
For Australia: Our goods come with guarantees which cannot be excluded under
Australian Consumer Law. You are entitled to a replacement or refund for a major
failure and for compensation for any other reasonably foreseeable loss or damage.
You are also entitled to have the goods repaired or replaced if the goods fail to be of
acceptable quality and the failure does not amount to major failure.
FCC Verification
NOTE: This equipment has been tested and found to comply with the limits for Class B
digital dev ice, pursuant to par t 15 of the FCC Rules. The se limits are des igned to provide
reasonable protection against harmful inter ference in a residential installation. This
equipment gen erates, uses and ca n radiate radio freq uency energy and, i f not installed
and used in accordance with the instructions, may cause har mful interference to radio
communications. However, there is no guarantee that interference will not occur in a
particular installation. If this equipment does cause harmful interference to radio or
television reception, w hich can be determined by turning the equipment off and on, the
user is encour aged to try to correct the inter ference by one of the follow ing measures:
• Reorient or relocate the receiving antenna
• Increase the separation between the equipment and the receiver
• Connect the equipment into an outlet on a circuit different from that to which the
receiver is connected
• Consult the dealer or an experienced radio/TV technician for help
These devices comply with part 15 of the FCC Rules. Operation is subject to the
following two conditions:
1. These devices may not cause harmful interference, and
2. These devices must accept any interference received, including interference that
may cause undesired operation.
Important Note
All jurisdictions have specific laws and regulations relating to the use of camer as.
Before using any camera for any purpose, it is the buyer’s responsibility to be aware
of all applicable laws and regulations that prohibit or limit the use of camer as and to
comply with the applicable laws and regulations.
WARNING
Modifica tions not approve d by the party re sponsible for co mpliance could void u ser’s
authority to operate the equipment.
Important Safety Instructions
• Make sure product is fixed correctly and stable if fastened in place.
• Do not operate if wires and terminals are exposed.
Page 3
4
5
Welcome Choosing a location
Mounting the camera
Congratulations on your purchase of the Swann MicroCam HD Security Camera
– a tiny yet powerful camera perfect for discreet and covert indoor surveillance.
DVR Compatibility
The camera is compatible with the following Swann 720p DVR models:
• 1575, 1580, 1590, 1600 & 4350 Series DVRs
This is not an exhaustive list - since the time of publication we will have
released newer DVRs with which the camera may be supported. For the latest
list of compatible DVR models, please check: www.swann.com/swads-minicam
The MicroCam can be mounted on a flat surface, such as a wall or ceiling,
using the supplied screw. The surface must have sufficient strength to hold the
camera. To mount the MicroCam, follow the steps below:
1. Remove the screws on the sides of the camera securing the mounting
bracket.
2. Place the mounting bracket where you want the camera to be installed
and mark the location of the screw hole on the surface.
3. If you are mounting to a wooden surface, then screw the mounting bracket
directly to the surface. If you are mounting to a masonry surface (bricks,
concrete or similar), then you will need to insert a wall plug before
screwing the mounting bracket to the surface.
CAUTION: Do not overtighten the screw as this can cause the screw hole
on the mounting bracket to deform.
4. Attach the camera to the mounting bracket with the two screws removed
in step 1. The camera can be aimed in almost any direction. After you have
finished adjusting the viewing angle of the camera, tighten the screws to
lock the position in place.
The MicroCam is very flexible, and can be installed almost anywhere indoors,
provided there is some protection against direct sunlight. The MicroCam is
great for monitoring long, narrow spaces such as hallways or corridors. It’s
also great for monitoring a specific space, such as a doorway, smaller room or
staircase.
Some of the things you’ll have to consider when choosing a location are:
• What you want to monitor, and where you’ll get the best view of it. A
strategy which is often effective is to monitor entrances and exits - after
all, a security threat has to get in somewhere.
• How you’re going to connect the camera to your monitoring system. When
running the cable, avoid bending it at sharp angles and avoid positioning
the cable near live electrical wiring as electrical current generates a
magnetic field which can interfere with the signal from your camera.
• How to keep the camera out of harm’s way. The higher the camera is
mounted, the harder it’ll be for an intruder to access the camera or
interfere with it.
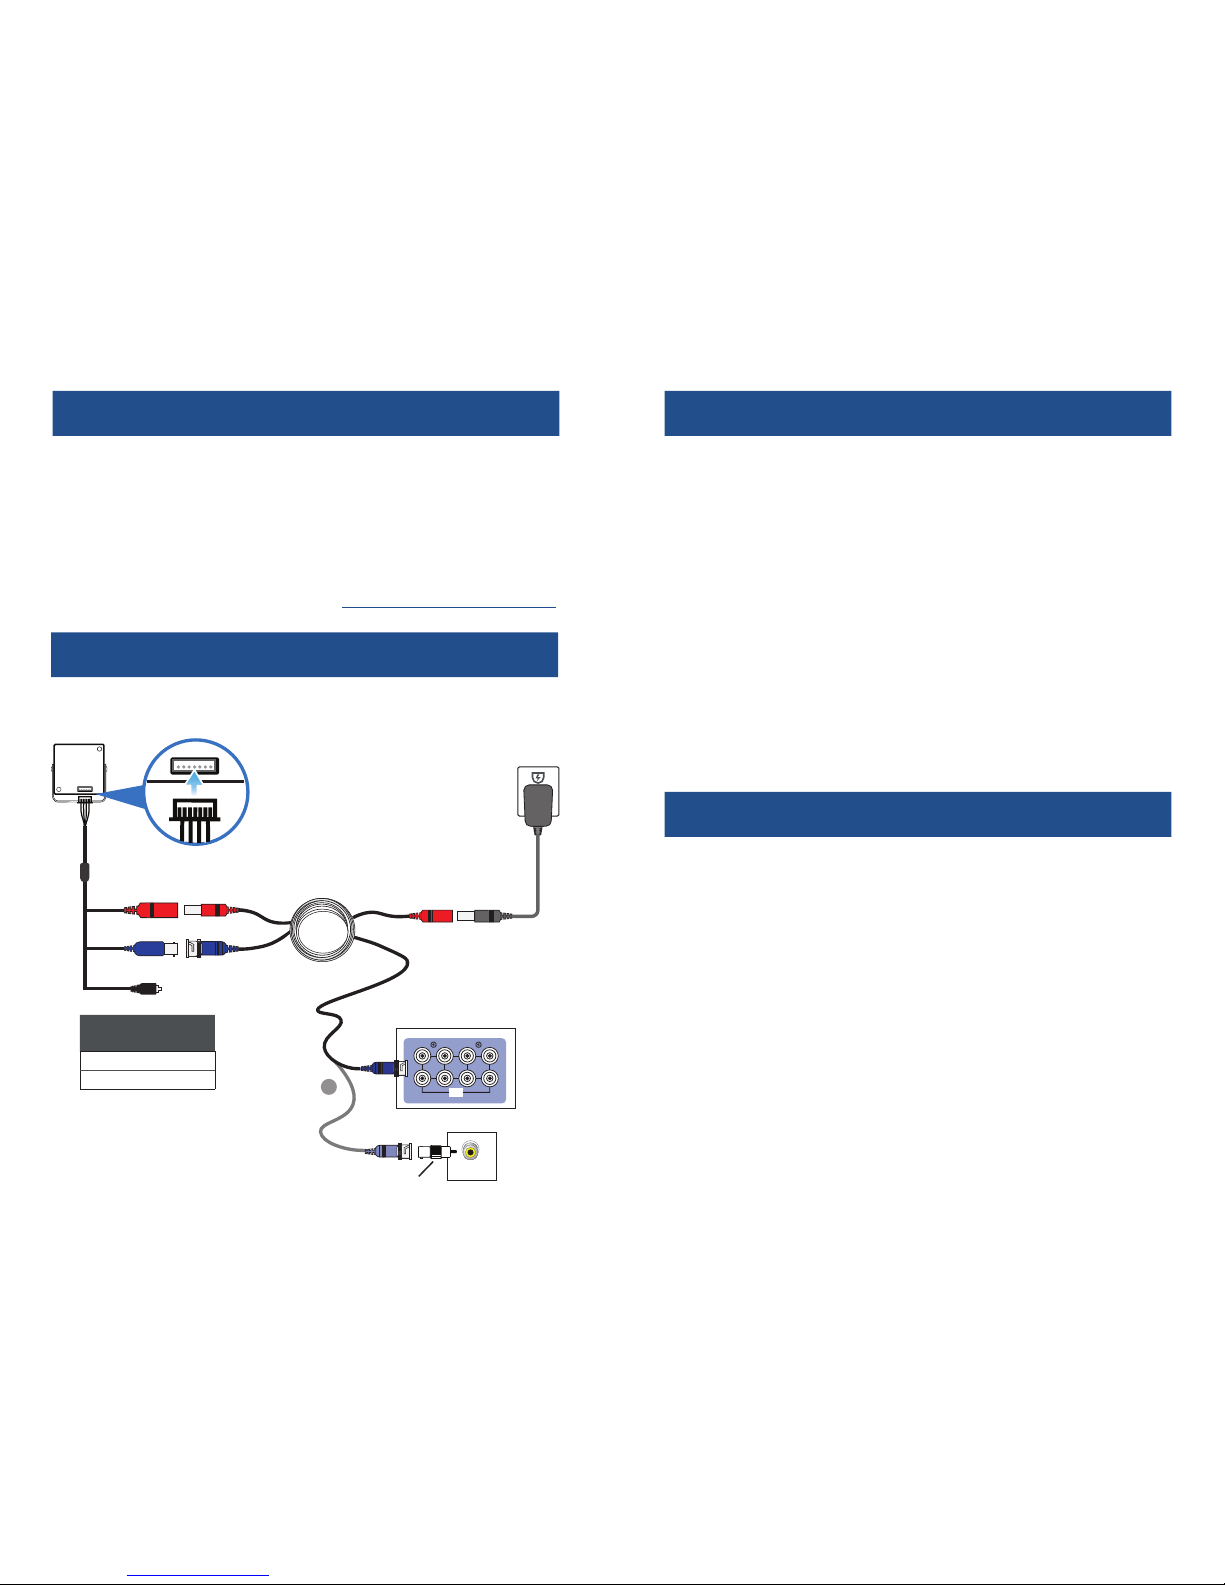
Connect the MicroCam to your DVR as shown in the connection diagram below.
Connecting the camera
1
3
5
7
2 4 6 8
VIDEO
INPUT
VIDEO
INPUT
VIDEO IN
OR
Power
Video
Push-button switch
Video &
Power cable
Power
Adapter
DVR
MicroCam
TV (960H mode only)
BNC to RCA TV Adapter
Button
Position
Video Mode
IN 960H
OUT 720p HD
The cable connector only fits into the
port on the back of the MicroCam
one way. Do not force it in. Be careful
also not to bend the pins inside the
connector.
Note: Images contained in this diagram
are for illustrative purposes only.
Page 4

6
7
Troubleshooting Notes
I don’t see an image on the DVR or TV.
• Check that all cables are properly connected and secure; connections may
be loose. Make sure that the MicroCam is being supplied power from the
included power adapter.
• If the MicroCam is connected to your TV, make sure that the appropriate
video input option is selected on your TV (consult your TV manual for
further assistance with selecting the correct A/V connection) and the
MicroCam's push-button switch is in the depressed ("IN") position which
sets the camera to 960H video mode, enabling the camera to output video
to your TV.
I can’t see anything at night.
The MicroCam is designed for daytime use only. It does not have built-in
infrared capabities.
The image is blurry.
The MicroCam has already been pre-focussed at the factory. If, by the slight
chance, you find the image blurry, you can manually adjust the focus of the
lens by following the steps below:
1. Slightly loosen the screw securing the lens bezel of the camera.
2. Using a straightened paper clip or the tip of a pen, carefully rotate the
bezel until the camera's live view image doesn’t look blurry anymore.
3. Once the desired focus is obt
ained, tighten the screw to secure the
lens bezel.
Having problems?
We are here to help! Visit us at http://support.swann.com. You will find
all the answers to the most frequently asked questions. If you would like
to reach us by email or phone, our technical support contact details are
available on the back of this manual.
Page 5

8
Helpdesk / Technical Support Details
Telephone Helpdesk
USA 1800 627 2799
USA Parts & Warranty 1800 627 2799
(M-F, 9am-5pm US PT)
AUSTRALIA 1800 788 210
NEW ZEALAND 0800 479 266
UK 0808 168 9031
© Swann Communications 2016
Swann Technical Support
All Countries E-mail: [email protected]
MINICAMVER1E
290816
 Loading...