

Page 1
Chematest 35
Version 1.03 and higher
s Manual
Operator’
A-96.730.121 / 080519
Page 2

Customer Support
SWAN and its representatives maintain a fully trained staff of technical specialists
around the world. For any technical question, contact your nearest
SWAN representative, or the manufacturer:
SWAN ANALYTISCHE INSTRUMENTE AG
Studbachstrasse 13
8340 Hinwil
Switzerland
Internet: www.swan.ch
E-mail: support@swan.ch
Document Status
Title:
ID:
Chematest 35 Operator’s Manual
A-96.730.121
Revision Issue
00 May 2019 First edition
© 2019, SWAN ANALYTISCHE INSTRUMENTE AG, Switzerland, all rights reserved
subject to change without notice
Page 3

Chematest 35
Table of Contents
1. Safety Instructions . . . . . . . . . . . . . . . . . . . . . . . . . . . . . . . . . . . 3
2. Parts and Controls . . . . . . . . . . . . . . . . . . . . . . . . . . . . . . . . . . . 5
2.1. Instrument Overview. . . . . . . . . . . . . . . . . . . . . . . . . . . . . . . . . . . 5
2.2. Keys . . . . . . . . . . . . . . . . . . . . . . . . . . . . . . . . . . . . . . . . . . . . . . . 6
2.3. Display . . . . . . . . . . . . . . . . . . . . . . . . . . . . . . . . . . . . . . . . . . . . . 7
3. Initial Setup . . . . . . . . . . . . . . . . . . . . . . . . . . . . . . . . . . . . . . . . . 8
3.1. Select language . . . . . . . . . . . . . . . . . . . . . . . . . . . . . . . . . . . . . . 8
3.2. Set time and date . . . . . . . . . . . . . . . . . . . . . . . . . . . . . . . . . . . . . 8
3.3. Optional: Activate expert mode . . . . . . . . . . . . . . . . . . . . . . . . . . 8
3.4. Optional: Set up user and/or ID list. . . . . . . . . . . . . . . . . . . . . . . . 8
3.5. Optional: Set up a fixed quick start list . . . . . . . . . . . . . . . . . . . . . 9
3.6. Further settings. . . . . . . . . . . . . . . . . . . . . . . . . . . . . . . . . . . . . . . 9
3.7. Sensor calibration . . . . . . . . . . . . . . . . . . . . . . . . . . . . . . . . . . . . . 9
4. Measuring . . . . . . . . . . . . . . . . . . . . . . . . . . . . . . . . . . . . . . . . . . 10
4.1. Photometry . . . . . . . . . . . . . . . . . . . . . . . . . . . . . . . . . . . . . . . . . . 10
4.1.1 Basic Rules for Photometric Determinations. . . . . . . . . . . . . . . 10
4.1.2 How To Use Reagents . . . . . . . . . . . . . . . . . . . . . . . . . . . . . . . 11
4.1.3 Notes on Individual Methods . . . . . . . . . . . . . . . . . . . . . . . . . . . 12
4.1.4 Performing a Photometric Measurement . . . . . . . . . . . . . . . . . 13
4.2. Sensors . . . . . . . . . . . . . . . . . . . . . . . . . . . . . . . . . . . . . . . . . . . . 16
4.2.1 Basic Rules for pH and Redox . . . . . . . . . . . . . . . . . . . . . . . . . 16
4.2.2 Unlocking the Sensor Plug . . . . . . . . . . . . . . . . . . . . . . . . . . . . 17
4.2.3 Performing a Sensor-Based Measurement . . . . . . . . . . . . . . . . 17
4.3. Automatic Shutoff . . . . . . . . . . . . . . . . . . . . . . . . . . . . . . . . . . . . . 18
5. Recalling Stored Measurements . . . . . . . . . . . . . . . . . . . . . . . . 19
6. Maintenance . . . . . . . . . . . . . . . . . . . . . . . . . . . . . . . . . . . . . . . . 20
6.1. Photometer Verification . . . . . . . . . . . . . . . . . . . . . . . . . . . . . . . . 20
6.2. Cleaning . . . . . . . . . . . . . . . . . . . . . . . . . . . . . . . . . . . . . . . . . . . . 21
6.3. Calibration of the pH Sensor . . . . . . . . . . . . . . . . . . . . . . . . . . . . 22
6.4. Calibration of the Redox Sensor. . . . . . . . . . . . . . . . . . . . . . . . . . 22
6.5. Setting Time and Date . . . . . . . . . . . . . . . . . . . . . . . . . . . . . . . . . 23
7. Troubleshooting . . . . . . . . . . . . . . . . . . . . . . . . . . . . . . . . . . . . . 24
7.1. Device Errors . . . . . . . . . . . . . . . . . . . . . . . . . . . . . . . . . . . . . . . . 24
7.2. Errors During Measurement . . . . . . . . . . . . . . . . . . . . . . . . . . . . . 25
A-96.730.120 / 080519 1
Page 4

Chematest 35
8. Menu Explanations . . . . . . . . . . . . . . . . . . . . . . . . . . . . . . . . . . . 27
1 Data Storage . . . . . . . . . . . . . . . . . . . . . . . . . . . . . . . . . . . . . . . 27
2 Diagnostics . . . . . . . . . . . . . . . . . . . . . . . . . . . . . . . . . . . . . . . . 28
3 Maintenance . . . . . . . . . . . . . . . . . . . . . . . . . . . . . . . . . . . . . . . 29
4 Settings . . . . . . . . . . . . . . . . . . . . . . . . . . . . . . . . . . . . . . . . . . . 30
9. Part Numbers . . . . . . . . . . . . . . . . . . . . . . . . . . . . . . . . . . . . . . . 35
9.1. Reagents. . . . . . . . . . . . . . . . . . . . . . . . . . . . . . . . . . . . . . . . . . . . 35
9.2. Accessories. . . . . . . . . . . . . . . . . . . . . . . . . . . . . . . . . . . . . . . . . . 36
9.3. Spare Parts and Consumables. . . . . . . . . . . . . . . . . . . . . . . . . . . 36
10. Technical Data. . . . . . . . . . . . . . . . . . . . . . . . . . . . . . . . . . . . . . . 38
10.1. List of Supported Methods . . . . . . . . . . . . . . . . . . . . . . . . . . . . . . 38
10.2. Instrument Specifications . . . . . . . . . . . . . . . . . . . . . . . . . . . . . . . 39
10.3. Sensor Specifications . . . . . . . . . . . . . . . . . . . . . . . . . . . . . . . . . . 40
10.3.1 pH and redox. . . . . . . . . . . . . . . . . . . . . . . . . . . . . . . . . . . . . . . 40
10.4. Scope of Supply . . . . . . . . . . . . . . . . . . . . . . . . . . . . . . . . . . . . . . 41
11. Regulatory Information . . . . . . . . . . . . . . . . . . . . . . . . . . . . . . . 42
12. Notes . . . . . . . . . . . . . . . . . . . . . . . . . . . . . . . . . . . . . . . . . . . . . . 43
2 A-96.730.120 / 080519
Page 5
Chematest 35
Safety Instructions
Chematest 35 – Betriebsanleitung
1. Safety Instructions
For safe instrument operation, you must read and understand the
instructions in this manual.
Warning notices
The symbols used for safety-related notices have the following
meaning:
WARNUNG
Severe injuries or damage to the equipment can occur if such
warnings are ignored.
Follow the prevention instructions carefully.
VORSICHT
Damage to the equipment, minor injury, malfunctions or incorrect process can be the consequence if such warnings are ignored.
Follow the prevention instructions carefully.
A-96.730.120 / 080519 3
Page 6
Chematest 35
Safety Instructions
Reagents
Electronics
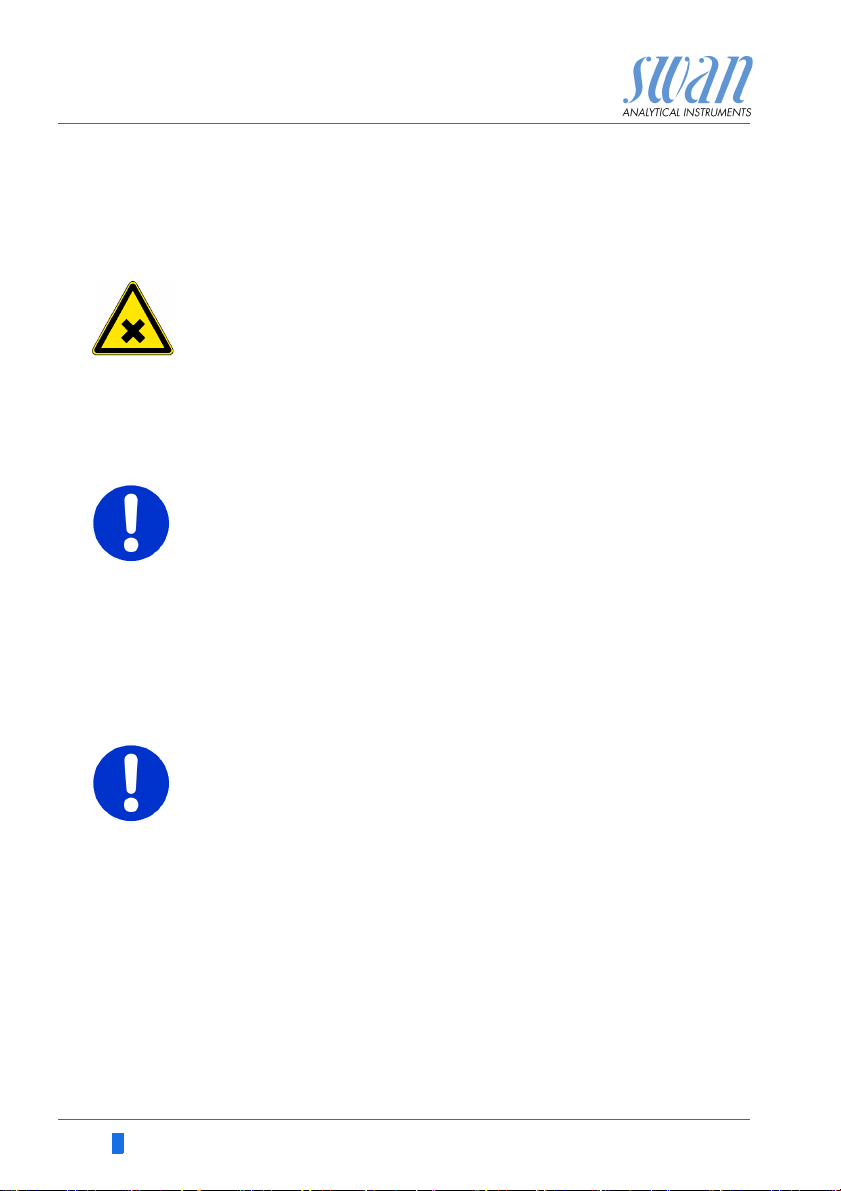
WARNUNG
Health hazard
For safe handling of the reagents, you must read and understand the corresponding Material Safety Data Sheets (MSDS).
These can be downloaded from www.swan.ch.
VORSICHT
Observe the following instructions during operation and when
charging the instrument:
Only charge the instrument using a standard type A USB
socket and the supplied USB cable.
Protect from heat and splash water during charging (not
IP67).
Do not expose the instrument to direct sunlight or other sourc-
es of heat, especially when charging.
VORSICHT
The housing must not be opened except for the housing parts
specified in the maintenance chapter.
4 A-96.730.120 / 080519
Page 7
Chematest 35
A
B
C
D
E
F
G
Parts and Controls
2. Parts and Controls
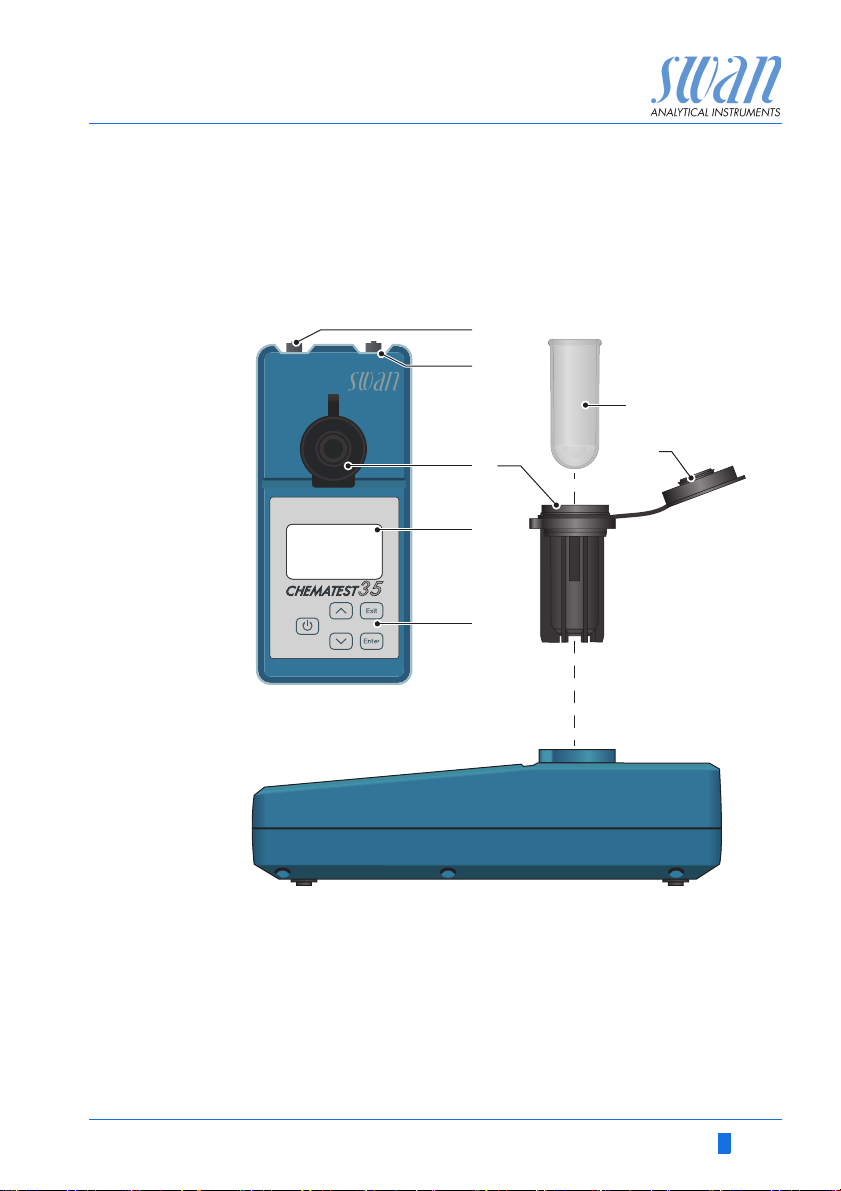
2.1. Instrument Overview
A
Sensor socket
B
Charging socket
C
Cuvette adapter
D
Display
A-96.730.120 / 080519 5
E
Keypad
F
Cuvette cap
G
Cuvette
Page 8

Chematest 35
A
B
C
D
E
Parts and Controls
2.2. Keys
A POWER
B ARROW UP
C ARROW DOWN
D EXIT
E ENTER
to power on or off the instrument
to move up in a menu list and to increase digits
to move down in a menu list and to decrease digits
to exit a menu or command
to move back to the previous menu level
to open a selected sub-menu
to accept an entry
6 A-96.730.120 / 080519
Page 9
Chematest 35
A
83%
Parts and Controls
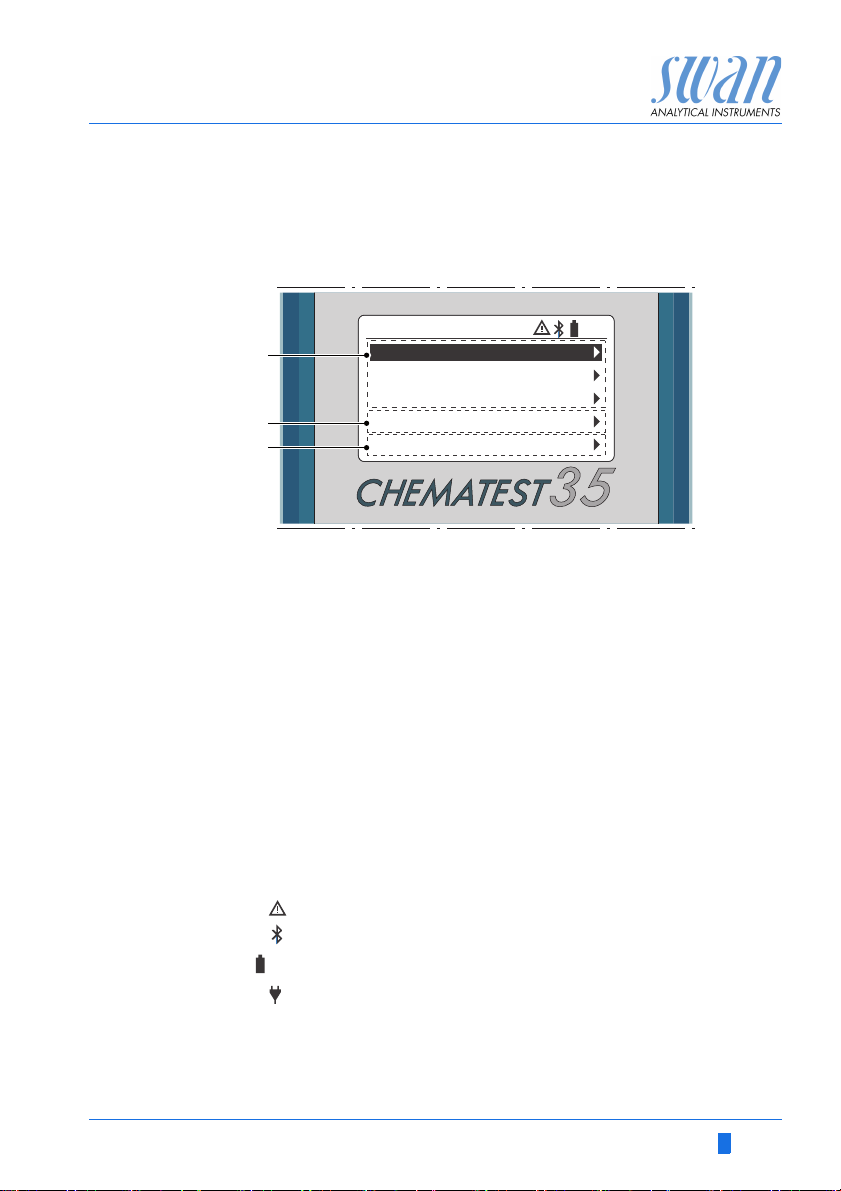
2.3. Display
Once the instrument has started up, the main menu is displayed.
The main menu is organized as follows:
Main Menu
83%
Free chlorine
Comb. Cl
1 cuv.
2
pH Phenol red
B
C
A
Quick start list
Provides quick access to the most important methods. By default, the
last three methods selected from the method catalogue are displayed.
The list is automatically adjusted each time a method is selected from
the method catalogue.
Alternatively, it is also possible to setup a fixed quick start list, see Initial
Setup, p. 8.
B
Method catalogue
List of all available methods.
C
Menu
Access to further instrument functions (e.g. display of stored measurements). Detailed descriptions of all menu functions can be found in
chapter Menu Explanations, p. 27.
Method Catalogue
Menu
Symbols The symbols displayed in the top right corner have the following
meaning:
Alarm active. See <Menu>/<Diagnostics> /<Alarms> for details.
Bluetooth activated
Battery status (remaining capacity in %)
Instrument is charging
A-96.730.120 / 080519 7
Page 10

Chematest 35
Initial Setup
3. Initial Setup
3.1. Select language
Navigate to <Menu>/<Settings>/ <Miscellaneous> /<Language>
and select the applicable language from the list.
3.2. Set time and date
Set time and date under <Menu>/<Maintenance>/ <Set Time>.
3.3. Optional: Activate expert mode
The user can choose between two types of method guidance:
Expert mode inactive (default setting):
In this mode, the Chematest 35 guides the user step-by-step
through each measurement. The user has to confirm each step
before the next step is displayed.
Expert mode active:
The expert mode is intended for experienced users who are
already familiar with the respective measurement methods and
want a faster workflow. Only the most necessary information (e.g.
required reagents, reaction times) is displayed on the screen.
This setting can be changed under menu item <Menu>/ <Settings>/
<Miscellaneous>/<Expert mode>.
3.4. Optional: Set up user and/or ID list
Navigate to <Menu>/<Settings>/ <Identification> /<Attribute> and
select which attributes should be saved with each measurement
(none/user/ID/user and ID).
If applicable, enter the user and/or ID list under
<Menu>/<Settings>/ <Identification>/<ID List> and
<Menu>/<Settings> /<Identification>/ <List of Users>.
8 A-96.730.120 / 080519
Page 11
Chematest 35
83%
[Method 1]
[Method 2]
Main Menu
[Method 3]
Method Catalogue
Menu
A
B
Initial Setup
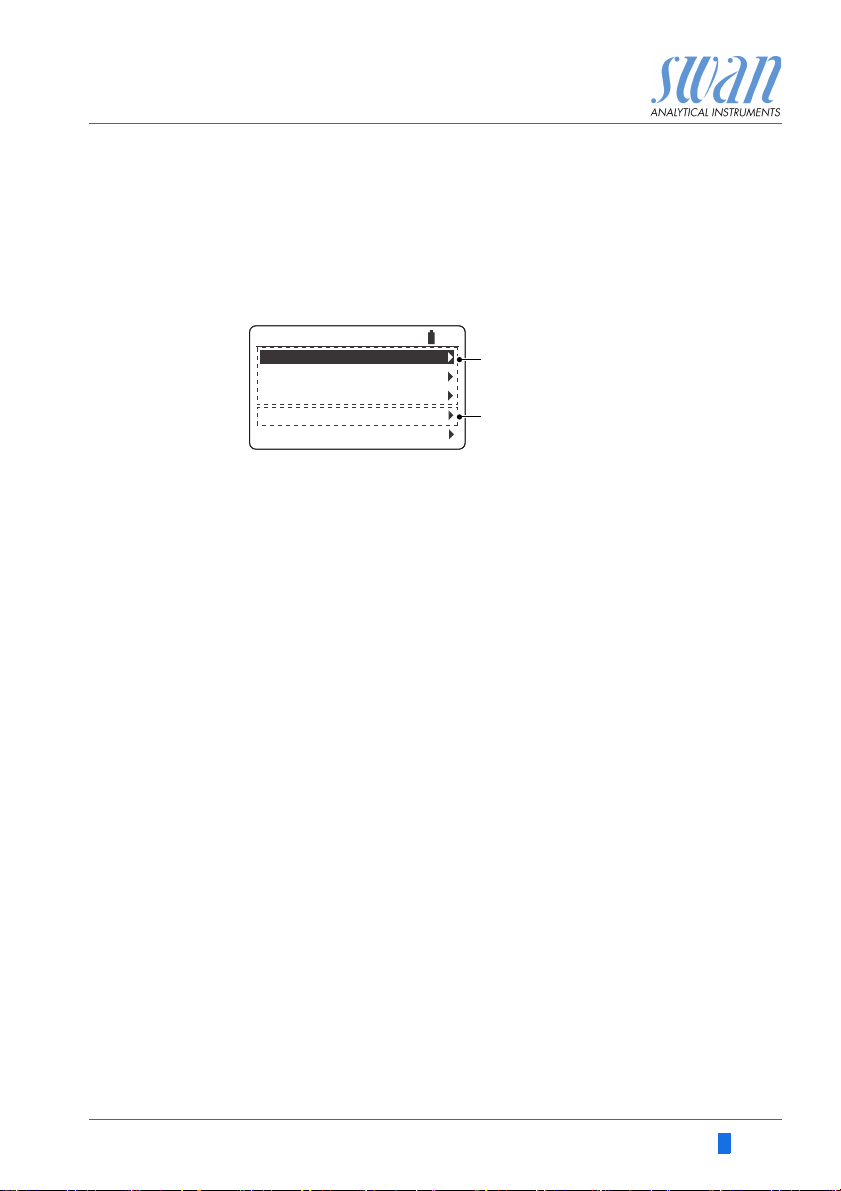
3.5. Optional: Set up a fixed quick start list
By default, the instrument is configured to display the last three
methods selected from the method catalogue [B] in the quick start
list [A]. The list is automatically adjusted every time a method is selected from the method catalogue.
Alternatively, it is possible to set up a fixed quick start list. To do
this, proceed as follows:
1 Select the required methods from the method catalogue [B] in
2 Navigate to <Menu> / <Settings> / <Miscellaneous> / <Method
ABQuick start list
Method catalogue
reverse order: First number 3, then number 2, then number 1
(the measurement can be cancelled immediately after selecting
the method by pressing [Exit]).
save> and select "No".
The quick start list contains the three methods just selected
and will no longer change.
A-96.730.120 / 080519 9
3.6. Further settings
Detailed descriptions of all instrument settings can be found in
chapter Menu explanation, subsection 4 Settings, p. 30.
3.7. Sensor calibration
Before first use, calibrate your pH and/or redox sensors, see
Calibration of the pH Sensor, p. 22 and
Calibration of the Redox Sensor, p. 22.
NOTICE: The transport cap that the sensor comes with can be
disposed of. Only use the specially designed protection caps for
the storage of sensors (see Basic Rules for pH and Redox, p.
16 for details).
Page 12

Chematest 35
Measuring
4. Measuring
4.1. Photometry
4.1.1 Basic Rules for Photometric Determinations
The precision and repeatability of a photometric determination depends greatly on the operator's technique. Please observe the following rules:
Always use clean utensils
Residues from previous measurements can falsify the results. All
utensils such as syringes, cuvettes or similar and the cuvette cap
must be rinsed with clean water after each measurement. Rinse the
cuvette with the sample 2 to 3 times before each measurement.
Position cuvettes correctly
Cuvettes must always be positioned in the same way. Keep the cuvette free of fingerprints and dry the outside of the cuvette before
inserting it into the cuvette adapter.
Wipe off condensation
If condensation occurs on the cuvette (cold sample in a warm environment), wipe it off and carry out the measurement as quickly as
possible.
Observe proper sampling
Take the water samples about 10 cm below the water surface and
about 50 cm from the edge of the pool. Allow as little time as possible to elapse between taking the sample and making the measurement.
Observe proper dosing and mixing
Use the 10 ml syringe for exact dosing of the sample. Rinse the syringe several times with the sample. When filling the syringe, make
sure that there are no air bubbles and that the volume is 10 ml.
The order in which sample and reagents are added to the cuvette
varies from method to method. If the reagents are added to the cuvette after the sample, special care must be taken to ensure that
the sample and the reagents mix well. For this purpose, carefully
turn the closed cuvette over, but do not shake it.
10 A-96.730.120 / 080519
Page 13

Chematest 35
Measuring
Observe reaction times
With most methods, the measurement can be carried out immediately after the reagents have been added and mixed with the sample. If a reaction time is required, this is indicated to the user on the
screen.
4.1.2 How To Use Reagents
Whenever possible, Swan supplies reagents in liquid form, as used
in professional laboratories. We believe that the disadvantage of
shorter shelf life is more than compensated for by the ease of use
compared to tablets or powders.
The OXYCON-DPD reagent is delivered in two small bottles to increase shelf life. One contains DPD as powder (DPD 1a), the other
contains the solvent (DPD 1b). Before use, fill the contents of DPD
1b into DPD 1a, close the bottle with the drop counter and shake
firmly until the DPD powder has completely dissolved. Write the
mixing date on the bottle. The prepared reagent can be stored at
room temperature for 2 months.
The reagents OXYCON START and OXYCON 2 have a shelf life of
at least 6 months. They will last a year if handled carefully and
stored at 5 °C. With the blister pack, all reagents can be taken out
of the case at once and placed in the refrigerator.
To dispense the necessary number of drops, hold the bottle at a 45°
angle. Before proceeding with the measurement, make sure that
the reagents are well mixed with the sample.
The Chematest 35 is calibrated against Swan's OXYCON reagents.
Accuracy may suffer severely, when reagents from other sources
are used.
A-96.730.120 / 080519 11
Page 14

Chematest 35
Measuring
4.1.3 Notes on Individual Methods
Free chlorine When free chlorine is determined in the presence of cyanuric acid,
two forms of chlorine are measured: free chlorine and chlorine
bound to cyanuric acid. To determine the disinfection capacity of
the water, the concentration of cyanuric acid must also be measured and the result of the chlorine determination must be corrected as follows:
Cyanuric acid 20 mg/l 30 mg/l 50 mg/l 70 mg/l
Percentage of free
chlorine in the measured value
50% 43% 26% 19%
Combined
chlorine
Ozone Ozone decomposes in a very short time and is usually only present
The method catalogue of the Chematest 35 contains two options
for measuring combined chlorine: with one cuvette or with two cuvettes. Apart from the fact that one or two cuvettes are used, the
two methods are identical. Measuring with only one cuvette is faster and requires less reagents. However, some standards require
measurement with two cuvettes. The selection of the method
should be based on the site-specific requirements.
in traces. It is essential to rinse the cuvette three times with the
ozone-containing water before filling in the actual sample. Carry out
the further steps as quickly as possible, but work meticulously.
12 A-96.730.120 / 080519
Page 15

Chematest 35
Measuring
4.1.4 Performing a Photometric Measurement
WARNUNG
Health hazard
For safe handling of the reagents, you must read and understand the corresponding Material Safety Data Sheets (MSDS).
These can be downloaded from www.swan.ch.
Explanation of
photometric
measurements
Starting a
measurement
The basic procedure is largely the same for all photometric measurements and is briefly outlined below. A photometric measurement consists of the following steps:
Step 1: Zero measurement
Step 2: The actual measurement
Step 3: Display and storage of the measured results. For de-
tails on the result screen, see example on 15.
The methods differ mainly in the following points:
Different reagents are required depending on the method.
Some methods require a reaction time. If this is the case for
the selected method, this will be indicated on the screen
during the measurement.
Some methods (e.g. combined chlorine) perform two different
measurements in a row and calculate the required values
from them.
To start a measurement, select the corresponding method from the
main screen. If it is not available there, select it from the method
catalogue.
The measurement itself is menu-driven. Follow the instructions on
the screen.
A-96.730.120 / 080519 13
Page 16

Chematest 35
83%
Free chlorine
Place the adapter in
the Chematest and
close the cap.
------------------------------------------
<Enter> for zero
83%
Free chlorine
Measuring zero...
------------------------------------------
Wait for instructions
83%
Free chlorine
Close the cap and
turn the adapter to mix.
Place in Chematest.
------------------------------------------
<Enter> to measure
83%
Free chlorine
Measuring...
------------------------------------------
Wait for instructions
Measuring
Example:
Measurement of
free chlorine
Step 1: Zero measurement
Free chlorine
Fill 10 ml of sample into
a cuvette. Dry outer part
and place it in the adapter.
------------------------------------------
<Enter> to continue
83%
Step 2: The actual measurement
Free chlorine
Remove adapter
with cuvette and
open the cap.
------------------------------------------
<Enter> to continue
83%
Free chlorine
Add 5 drops of both:
Oxycon START and then
Oxycon DPD.
------------------------------------------
<Enter> to continue
83%
14 A-96.730.120 / 080519
Page 17

Chematest 35
Measuring
Step 3: Display of the results
Free chlorine
Free chlorine
ID ID1
User User1
------------------------------------------
Free chlorine
ID ID1
User User1
------------------------------------------
Free chlorine
ID ID1
User User1
------------------------------------------
0.26
<Enter> to save
Please select
<Enter> to continue
ID
Please select
---------------
ID1
ID2
ID3
ID4
<Enter> to continue
User
Please select
------------------
User 1
User 2
User 3
User 4
<Enter> to continue
ppm
Pressing [Enter] saves the
83%
measurement in the data history
The measurement is initially
saved without ID and user.
NOTICE: Pressing [Exit]
discards the measurement.
83%
Depending on the
configuration, a selection
dialog for user and/or ID is
displayed or the summary
screen is displayed directly.
This can be set under
Attribute, p. 31.
Optional:
83%
– Select an ID from the list.
– Select a user from the list.
NOTICE: If you press [Exit] at
this point, you return to the main
screen, saving the measurement
83%
without user and ID.
Select "<Enter> to continue" and
Free chlorine
Please select
ID ID1
User User1
------------------------------------------
<Enter> to continue
Summary
Date, Time
Free chlorine
------------------------------------------
05.11.18 15:21
0.26 ppm
<Enter> to finish
83%
confirm with [Enter].
The ID and the user are
added to the measurement in
the data history.
Press [Enter] to return to the main
83%
screen.
A-96.730.120 / 080519 15
Page 18

Chematest 35
D
E
B
C
A
Measuring
4.2. Sensors
A pH and a redox sensor are available as accessories for the Chematest 35. Please observe the following recommendations to take
full advantage of the sensor performance:
4.2.1 Basic Rules for pH and Redox
Cover the sensor tip while the sensor is not in use
After use, store the sensor in the supplied protection cap [D]. To
create a humid atmosphere, add a few drops of water to the protection cap. Then slide the knurled nut [C] onto the sensor shaft, push
the sensor shaft into the protection cap as far as it will go and screw
the knurled nut [C] tightly to seal it.
Swan's maintenance-free pH and redox sensors must not be refilled with electrolyte.
A
Sensor shaft
B
Sensor tip
C
Knurled nut
D
Protection cap
E
Transport cap
NOTICE: The transport cap [E] that the sensor comes with is
not intended for daily use and can be disposed of.
16 A-96.730.120 / 080519
Page 19

Chematest 35
B
A
83%
pH
<Enter> to save
7.20
pH
23.0
°C
Measuring
Calibrate electrodes periodically
During their lifetime, all electrodes slowly change their properties.
To ensure correct measurement, calibrate your electrodes monthly.
The sensors also need to be calibrated before their first use.
Handling calibration standards
Use the standards at room temperature. Rinse the sensors with
clean water before dipping them into the standards. Be careful not
to interchange the bottle caps of the standards.
4.2.2 Unlocking the Sensor Plug
When plugging in or out the sensor, unlock the plug as shown in the
picture below.
4.2.3 Performing a Sensor-Based Measurement
To start a measurement, plug the sensor cable into the sensor
socket and then select the corresponding method from the main
screen. If it is not available there, select it from the method catalogue.
pH
Remove the protection cap from the sensor, rinse the sensor tip
determination
with clean water and dip the sensor into the sample. Move the sensor gently several times before letting it stand. The displayed pH
and temperature values are updated continuously.
ABPlug unlocked
Plug locked
Wait until both the pH value and the temperature value are stable.
Then press [Enter] to save the result. Next you can optionally
select an ID and/or a user name. This procedure is described in de-
A-96.730.120 / 080519 17
tail on 15.
Page 20

Chematest 35
83%
Redox/ORP
<Enter> to save
475
mV
23.0
°C
Measuring
Redox
determination
4.3. Automatic Shutoff
Remove the protection cap from the sensor, rinse the sensor tip
with clean water and dip the sensor into the sample. Move the sensor gently several times before letting it stand. The displayed redox
and temperature values are updated continuously. It may take 15–
20 minutes until the reading is stable. With freshly calibrated elec-
trodes, it might even take more time.
Wait until both the redox value and the temperature value are stable. Then press [Enter] to save the result. Next you can optionally
select an ID and/or a user name. This procedure is described in detail on 15.
If the instrument is waiting for a user input (e.g. if the measurement
result is displayed) and no key is pressed for 10 minutes, the instrument shuts off automatically to save power. The automatic shutoff
has the same effect on the saving of measurement results as
pressing the [Exit] key. See Step 3: Display of the results, p. 15 for
details.
18 A-96.730.120 / 080519
Page 21

Chematest 35
4
83%
Data History
Date, Time
Free chlorine
ID
User
20.03.19 07:59
0.26 ppm
ID 1
User 1
5
83%
Data History
ID
User
ID 1
User 1
<Enter> for more
Recalling Stored Measurements
5. Recalling Stored Measurements
Data history Previous measurements can be displayed under the menu item
<Menu> / <Data Storage> / <Data History>.
Scrolling
through the
data history
Press the ARROW DOWN and
ARROW UP keys to scroll through
the data history.
Two-page
entries
Storage
capacity
Data History
Date, Time
Free chlorine
Total chlorine
Comb. chlorine
<Enter> for more
5
20.03.19 08:25
0.22 ppm
0.26 ppm
0.04 ppm
If the text “<Enter> for more” is
83%
displayed on the bottom, the
selected entry consists of two
pages. Use the ENTER key to
toggle between the pages.
Up to 2700 measurements are memorized. Then the oldest measurement is deleted to save the newest one (circular buffer).
A-96.730.120 / 080519 19
Page 22

Chematest 35
B
A
C
Maintenance
6. Maintenance
6.1. Photometer Verification
The verification kit contains two reference cuvettes (labeled “Low”
and “High”) with certified reference absorptions of approximately
0.3 and 1.5 and an additional cuvette for zero point determination.
The exact values are specified in the enclosed calibration certificate. The absorption values of the reference cuvettes simulate approximately 1 ppm and 4.5 ppm of free chlorine.
A
Zero
B
Low absorption
C
High absorption
Reference
values
Verification
procedure
Verification
history
Prior to performing the first verification and after each recertification, the reference values for the cuvettes “Low” and “High” need to
be set in menu <Settings>\<Sensors> \ <Photometer>. The reference values are specified in the enclosed calibration certificate.
Before each use, check the expiration date on the calibration certificate. If the expiration date has passed, send the verification kit to
Swan for recertification.
To start a verification, navigate to <Menu>/<Maintenance>/
<Verification>/ <Photometer>. Select cuvette “Low” and follow the
instructions on the screen. Repeat the same procedure with the cuvette “High”.
Can be reviewed in <Menu>/<Data Storage>/<Ver. History>.
Up to 32 verifications are memorized. Then the oldest verification is
deleted to save the newest one (circular buffer).
20 A-96.730.120 / 080519
Page 23

Chematest 35
A-70.065.042
CHEMATEST
42
xxx Vers.: 1-A
Prod. No.:
Model:
Type:
Serial No.:
Made in Switzerland
B
A
B
Maintenance
6.2. Cleaning
Outside of
the housing
Photometer
compartment
If reagents drip onto the housing, wipe them off quickly with a soft
cloth moistened with water.
The photometer compartment can be easily cleaned if water or reagents have been spilled. Turn the unit to the rear, loosen the two
screws [A] and remove the cover [B]. Use a soft, lint-free cloth
moistened with water to clean the photometer compartment.
A Screws B Photometer cover
A-96.730.120 / 080519 21
Page 24

Chematest 35
Maintenance
6.3. Calibration of the pH Sensor
To start a calibration, navigate to <Menu>/<Maintenance> /
<Calibration>/<Electrode> / <pH> and follow the instructions on the
screen.
Calibration
solutions
Calibration
errors
Calibration
history
The calibration is carried out using two calibration solutions. The instrument is factory programmed for the use of calibration solutions
with pH 7 (standard 1) and 9 (standard 2) supplied by Swan. If other calibration solutions are used, the corresponding temperature
curves can be entered under <Settings>/<Sensors>/ <Electrode> /
<pH>/<Standards>.
If the calibration is aborted with the message “Offset error!” or
“Slope error!”:
Make sure that the correct standard solutions have been
measured in the correct order. The programmed values can be
viewed under <Menu>/<Settings>/ <Sensors>/<Electrode>/
<pH>/<Standards>.
Carefully clean the sensor tip with a paper tissue.
Repeat the calibration with new standard solutions.
If the above steps do not help, the sensor is defective and must be
replaced.
Can be reviewed in <Menu>/<Data Storage>/<Calibration
History>/<Sensors> /<pH>. Up to 32 calibrations are memorized.
Then the oldest calibration is deleted to save the newest one (circular buffer).
6.4. Calibration of the Redox Sensor
To start a calibration, navigate to <Menu>/<Maintenance> /
<Calibration>/<Electrode> / <Redox/ORP> and follow the instructions on the screen.
Standard
solution
The instrument is factory programmed to use the 475 mV standard
solution supplied by Swan. If another standard solution is used, the
mV value can be set under <Settings>/<Sensors>/ <Electrode>/
<Redox/ORP>/<Standards>.
22 A-96.730.120 / 080519
Page 25

Chematest 35
Maintenance
Calibration
errors
Calibration
history
If the calibration is aborted with the message “Offset error!”:
Make sure that the correct standard solution has been measured.
The programmed value can be viewed under <Menu> /
<Settings>/<Sensors> / <Electrode>/<Redox/ORP>/
<Standard>.
Carefully clean the sensor tip with a paper tissue.
Repeat the calibration with a new standard solution.
If the above steps do not help, the sensor is defective and must be
replaced.
Can be reviewed in <Menu>/<Data Storage>/<Calibration
History>/<Sensors> / <Redox/ORP>. Up to 32 calibrations are
memorized. Then the oldest calibration is deleted to save the newest one (circular buffer).
6.5. Setting Time and Date
The correct setting of the clock is important for the identification of
stored measurements. It is therefore recommended to check the
date and time setting regularly.
The time and date can be set under the menu item <Menu> /
<Maintenance>/<Set Time>.
A-96.730.120 / 080519 23
Page 26

Chematest 35
Troubleshooting
7. Troubleshooting
This chapter contains some hints to facilitate troubleshooting. For
detailed information on handling and cleaning parts, see Mainte-
nance, p. 20. For detailed information on programming the instru-
ment, see Menu Explanations, p. 27.
7.1. Device Errors
When this symbol is displayed at the top of the screen, a device error has occurred. Navigate to <Menu>/ <Diagnostics>/ <Alarms>/
<Pending errors> to see the error message.
Error Description Corrective action
E001 Bluetooth
E002 IC ADC
E003 Factory data
E004 Invalid time
E017 Events erased
– Switch the instrument on and off and check
if the error disappears.
– Call support.
– Call support.
– Send the instrument back to Swan.
– Call support.
– Send the instrument back to Swan.
– Set time and date under <Menu> /
<Maintenance>/<Set Time>.
– No action necessary.
– This message informs that the measured
data have been deleted by calling the
function “Set to factory defaults”.
24 A-96.730.120 / 080519
Page 27

Chematest 35
Troubleshooting
7.2. Errors During Measurement
Measurement
cannot be
started
Zero measure-
ment fails
Measurement
fails
Error message: Operation not possible! Consult the manual.
Possible cause Corrective action
Error E002, E003 or E004
is present
Error message: Operation not possible! Signal out of range.
Consult the manual.
Possible cause Corrective action
Extraneous light
Cuvette dirty
Residues of reagents
Lenses dirty
Turbid or bubble-containing sample
Error message: Operation not possible! Signal out of range.
Consult the manual.
Possible cause Corrective action
Extraneous light
Cuvette dirty
Concentration or pH value
outside the measuring
range of the instrument
Reagents expired
Measured value below
zero value
See Device Errors, p. 24.
Make sure that the cuvette cap is
properly closed.
Clean and rinse the cuvette.
Clean and rinse the cuvette.
Open the photometer
compartment and clean all
lenses, see Cleaning, p. 21.
Avoid formation of bubbles when
filling the sample into the cuvette.
Check sample / sampling point.
Repeat measurement.
Make sure that the cuvette cap is
properly closed.
Clean and rinse the cuvette.
Consult Instrument
Specifications, p. 39.
Repeat measurement.
Use new reagents.
Avoid formation of bubbles when
filling the sample into the cuvette.
Repeat measurement.
A-96.730.120 / 080519 25
Page 28

Chematest 35
Troubleshooting
No connection
to sensor
Sensor calibra-
tion invalid
Sensor failure Error message: Operation not possible! Sensor failure! Consult the
Error message: Operation not possible! Sensor not connected!
Consult the manual
Possible cause Corrective action
Sensor not connected.
Wrong sensor connected.
Cable or sensor defective
Error message: Operation not possible! Invalid calibration data!
Consult the manual
Possible cause Corrective action
Sensor not calibrated.
manual
Possible cause Corrective action
The sensor was disconnected from the instrument
while a measurement was
running.
Cable or sensor defective
Check if the sensor is properly
plugged in.
Check if the connected sensor
corresponds to the selected
method.
Call support.
Calibrate the sensor as described
in Maintenance, p. 20.
Do not disconnect the cable from
the instrument until the
measurement is finished.
Call support.
26 A-96.730.120 / 080519
Page 29

Chematest 35
Menu Explanations
8. Menu Explanations
Selecting <Menu> on the main screen displays the following submenus:
Menu 1 Data Storage
Menu 2 Diagnostics
Menu 3 Maintenance
Menu 4 Settings
The functions and settings of each menu are explained in the following sections.
1 Data Storage
1.1 Data History
Displays saved measurement data. Each record includes the following data:
Date, time
Measured value(s)
ID
User
If the fields ID and User contain the text "<Empty>", the assignment
of the attributes to the measurement was skipped by the user or deactivated under 4.2 Identification, p. 31.
Up to 2700 measurements are memorized. Then the oldest measurement is deleted to save the newest one (circular buffer).
1.2 Verification History
Photometer Displays previous photometer verifications. Each record includes
the following data:
Date, time
Reference value
Deviation
User
Verification passed/failed
Up to 32 verifications are memorized. Then the oldest verification is
deleted to save the newest one (circular buffer).
A-96.730.120 / 080519 27
Page 30

Chematest 35
Menu Explanations
1.3 Calibration History
Sensors Displays previous calibrations of the pH, redox and conductivity
sensors.
Each record includes the following data:
Date, time
Measured values depending on sensor:
– pH: Offset and slope in mV
– Redox: Offset in mV
– Conductivity: Sensor not yet available
User
Calibration passed/failed
NOTICE: For better traceability, both successful and failed
attempts are stored in the calibration history. However, if a
calibration fails, the instrument will continue to use the last valid
calibration.
Up to 32 calibrations are memorized for each sensor. Then the oldest verification is deleted to save the newest one (circular buffer).
2 Diagnostics
2.1 Alarms
Pending errors Provides the list of active errors with their status (active, acknowl-
Message List Shows the error history: Error code, date and time of issue and sta-
edged). If an active error is acknowledged, it is moved to the Message List.
tus (active, acknowledged, cleared). 64 errors are memorized.
Then the oldest error is cleared to save the newest error (circular
buffer).
The meaning of each error message is explained in section Device
Errors, p. 24.
2.2 Identification
Designation: Designation of the instrument, e.g. Chematest 35.
S/N: Serial number of the instrument.
Version: Installed firmware version (e.g. V1.03-04/19).
Bootloader: Installed bootloader version (e.g. V.1.01).
Factory test: Test date of the instrument.
28 A-96.730.120 / 080519
Page 31

Chematest 35
Menu Explanations
2.3 Sensors
Photometer Displays the raw value of the photo diode in volts.
Electrode Displays the raw values of the connected sensor.
Battery Displays information about the state of the battery.
2.4 Bluetooth
Device name ID that is visible to other Bluetooth-enabled devices.
State Status of Bluetooth communication.
Disabled: Bluetooth is switched off.
Advertising: The instrument is searching for other devices.
Connected: A connection with another device has been
established.
MAC Hardware address of the Chematest 35, which serves as a unique
identification feature during Bluetooth communication.
Fw ver Firmware version of the Bluetooth module.
Hw ver Hardware version of the Bluetooth module.
3 Maintenance
3.1 Simulation
For test purposes a measurement can be made with one or both
LEDs on. The results are displayed as raw values in volts. In case
of problems in the field, Swan Support may ask for these values.
LED Green Performs a test measurement with the green LED on.
LED IR Performs a test measurement with the IR LED on.
Both LEDs Performs three consecutive measurements:
both LEDs off
green LED on
IR LED on
3.2 Calibration
Electrode pH: See Calibration of the pH Sensor, p. 22.
Redox/ORP: See Calibration of the Redox Sensor, p. 22
Conductivity: Sensor not yet available
3.3 Verification
Photometer See Photometer Verification, p. 20.
3.4 Set Time
Adjust date and time.
A-96.730.120 / 080519 29
Page 32

Chematest 35
Menu Explanations
4 Settings
4.1 Sensors
Photometer Enter the reference values of the verification cuvettes according to
Electrode pH
Filter time
constant
Temp. Comp. Choose the compensation model which fits best to your application.
Standards A temperature curve is programmed for SWAN standard 1, pH 7
Electrode Redox/ORP
Filter time
constant
Standard Enter the mV value of the redox/ORP standard.
the enclosed calibration certificate.
Range: 0.000–2.000
Used to damp noisy signals. The higher the filter time constant, the
slower the system reacts to changes of the measured value.
Range: 5–300 s
Temp. Comp.
None
Nernst
Coefficient
None: no temperature compensation.
Nernst: for potable water, waste water, swimming pools.
Coefficient: for high purity water
Range: −0.100–0.100 pH unit per °C
NOTICE: For this setting the unit °C is always used, regardless
of the setting under 4.3 Units, p. 32.
and SWAN standard 2, pH 9. If you want to use your own standards
you can readjust the temperature curve according to your standards.
Standard 1: Assign the measured pH value to the according
temperature from 0–50 °C in steps of 5 °C.
Standard 2: Assign the measured pH value to the according
temperature from 0–50 °C in steps of 5 °C.
Used to damp noisy signals. The higher the filter time constant, the
slower the system reacts to changes of the measured value.
Range: 5–300 s
Range: 200–900 mV
30 A-96.730.120 / 080519
Page 33

Chematest 35
Menu Explanations
Electrode Conductivity (Sensor not yet available)
Te mp .
Compensation
Filter time
constant
Cell constant Enter the cell constant printed on the sensor label.
Factor TDS Factor for the calculation of TDS.
4.2 Identification
Attribute Select which attributes are to be queried:
ID List Enter up to 10 IDs.
List of Users Enter up to 10 user names.
Choose the compensation model which fits best to your application.
Temp. Compensation
None
Coefficient
Non-linear DIN
None: No temperature compensation.
Coefficient: The temperature coefficient for saline solutions is
2.00%. If the coefficient of the solution is known, it can be set
here. Range: 0.00%– 3.00 %.
Non-linear DIN: the non-linear temperature compensation
should be set for the conductivity measurement of natural waters
(EN 27888, ISO 7888).
Used to damp noisy signals. The higher the filter time constant, the
slower the system reacts to changes of the measured value.
Range: 5–300 s
Range: 0.0050–1.0000 cm
Range: 0.00–10.00
Optionally, each measurement can be assigned an ID (e.g. for
sampling points) and/or a user name. If activated, the ID and/or
user is queried at the end of each measurement.
Attribute
None
ID
User
ID&User
-1
A-96.730.120 / 080519 31
Page 34

Chematest 35
Menu Explanations
4.3 Units
Disinfectants Set the unit for disinfectants (all except ozone).
Disinfectants
ppm
mg/l
Ozone Set the unit for ozone.
Ozone
ppb
µg/l
ppm
mg/l
Temperature Set the unit for temperature.
Temperature
Celsius
Fahrenheit
Cond.
Concentration
Set the unit for the concentration calculated from conductivity.
Cond. Concentration
ppm
mg/l
4.4 Miscellaneous
Language Select the language from the list (the choice of languages may vary
depending on the sales region):
Language
German
English
French
Spanish
Italian
32 A-96.730.120 / 080519
Page 35

Chematest 35
Menu Explanations
Factory Setting The instrument can be reset to factory default values in three differ-
ent ways:
Set defaults
No
Cal. + Ver.
Data History
Completely
Cal. + Ver.: Deletes the user calibration of all electrodes and all
recorded verification measurements. All other values are kept in
memory.
Data History: Deletes all recorded measurements. All other
values are kept in memory.
Completely: Sets all settings and calibration values back to
default and deletes all recorded measurements and verifications.
Load Firmware Initiates a firmware upload.
NOTICE: Firmware updates should be done by instructed
service personnel only.
Load Firmware
No
Yes
Expert mode Choose between detailed instructions and expert mode for fast
workflow.
Expert Mode
Inactive
Active
Inactive: The user is guided step by step through each
measurement.
Active: The steps are displayed in shortened form and the
instrument requires as few inputs from the user as possible.
A-96.730.120 / 080519 33
Page 36

Chematest 35
Menu Explanations
Method save By default, the quick start list on the main screen contains the last
three methods selected from the method catalogue. Alternatively, a
fixed quick start list can be set up, see Initial Setup, p. 8 for details.
Method save
No
Yes
No: As soon as "no" is selected, the quick start list no longer
changes. Select this setting if you want a fixed quick start list.
Ye s: With this setting, the quick start list is automatically adjusted
every time a method is selected from the method catalogue.
Password Password: Select a password different from 0000 to prevent unau-
thorized access to the following menus:
Maintenance
Settings
Each menu can be protected by a different password. If you forgot
the passwords, contact the closest SWAN representative.
4.5 Bluetooth
Bluetooth Activates the Bluetooth connection to connect to an external app
(not yet available).
Bluetooth
Active
Inactive
34 A-96.730.120 / 080519
Page 37

Chematest 35
Part Numbers
9. Part Numbers
9.1. Reagents
Reagent sets
Reagents
Part no. Product name Methods
A-85.590.200 Oxycon Pool
A-85.590.300 Oxycon Chlor
A-85.590.400 Oxycon Des
A-85.590.500 Oxycon Ozone
A-85.580.300 Oxycon CA
A-85.580.100 Oxycon pH
Part no. Product name Description
A-85.510.100 Oxycon Start Buffer solution
A-85.510.200 Oxycon DPD
(1a + 1b)
A-85.510.300 Oxycon 2 Potassium iodide
Free chlorine
pH (phenol red)
Free chlorine
Total chlorine
Combined chlorine
Free chlorine
Free chlorine in presence
of chlorine-dioxide or
bromine
Chlorine-dioxide
Bromine
Iodine
Ozone
Ozone in presence of free
chlorine
Cyanuric acid
pH (phenol red)
DPD
A-85.580.200 Oxycon GL Reagent for masking of free
chlorine and ozone
Download
MSDS
A-96.730.120 / 080519 35
The current Material Safety Data Sheets (MSDS) for the above listed reagents are available for downloading at www.swan.ch.
Page 38

Chematest 35
Part Numbers
Calibration
solutions
Part no. Description
A-85.119.010 pH calibration set consisting of:
1x pH buffer 7 (40 ml)
1x pH buffer 9 (40 ml)
A-85.112.300 pH buffer 4 (40 ml)
A-85.113.300 pH buffer 7 (40 ml)
A-85.114.300 pH buffer 9 (40 ml)
A-85.121.300 Redox buffer 475 mV (40 ml)
9.2. Accessories
Part no. Description
A-85.153.580 Veri-Kit Transmission
A-87.160.014 Swansensor pH CT
A-87.460.014 Swansensor Redox CT
9.3. Spare Parts and Consumables
Part no. Description
A-70.065.205 Carrying case for Chematest 35/42
A-70.065.634 Protection cap for sensor
A-70.065.630 Cuvette adapter with cap
A-70.065.631 Glass cuvettes (10-pack)
A-70.065.633 Spare part set consisting of:
1 dropper bottle 125 ml
3 disposable syringes 10 ml
3 disposable syringes 20 ml
36 A-96.730.120 / 080519
Page 39

Chematest 35
Part Numbers
C-85.520.040 Cleaning wipes for cuvette (100-pack)
A-70.065.600 Brush for cuvette cleaning
C-88.917.200 USB charging cable
C-89.511.010 Blister pack for reagent bottles
Part no. Description
A-96.730.120 / 080519 37
Page 40

Chematest 35
Technical Data
10. Technical Data
10.1. List of Supported Methods
Photometry The Chematest 35 supports the following photometric methods:
Chlorine
Other
disinfectants
Other
parameters
Method Range Issued values Displayed
Free chlorine 0– 10 ppm Free chlorine ppm or mg/l
Total chlorine 0– 10 ppm Total chlorine ppm or mg/l
Combined
chlorine using
one cuvette
Combined
chlorine using
two cuvettes
Free chlorine
in presence of
chlorinedioxide or
bromine
Ozone 0–4000 ppb Ozone ppb, µg/l,
Ozone in
presence of
free chlorine
Bromine 0–23 ppm Bromine ppm, mg/l
Iodine 0–35 ppm Iodine ppm, mg/l
Chlorinedioxide
Cyanuric acid 0–100 ppm Cyanuric acid ppm
pH (phenol
red)
0–10 ppm Free chlorine (fac),
total chlorine (tc),
combined chlorine
(cc)
0–10 ppm Free chlorine (fac),
total chlorine (tc),
combined chlorine
(cc)
0–10 ppm Free chlorine ppm or mg/l
0–4000 ppb Ozone ppb, µg/l,
0–19 ppm Chlorine-dioxide ppm, mg/l
6.5–8.0 pH n/a
as
ppm or mg/l
ppm or mg/l
ppm or mg/l
ppm, mg/l
38 A-96.730.120 / 080519
Page 41

Chematest 35
Technical Data
Sensors The pH and redox sensors available as separate accessories mea-
sure in the following ranges:
Method Range Issued values Displayed
pH 1.00–13.00 pH, temperature n/a
Redox/ORP −400 –1200 mV Redox potential,
10.2. Instrument Specifications
Housing IP67 rated
Power supply Rechargeable lithium-ion battery.
Only charge the instrument using a standard type A USB socket
and the supplied USB cable. Protect from heat and splash water
during charging (not IP67).
Charging time: approximately 3 hours
Battery life: approximately 5000 measurements or one week of
standby operation
Automatic shutoff after 10 minutes of inactivity.
Conditions for
operation
Conditions for
storage:
Dimensions
and weight
Temperature: 0– 45 °C
Humidity: 0–100 % relative humidity (non-condensing)
Temperature: −20– 60 °C
For reagents and sensors, separate storage conditions apply.
Reagents: See label on packaging.
Sensors: 0–50 °C.
Instrument:
10 x 7 x 22 cm, 390 g
Carrying case with content:
46 x 12 x 38 cm, 3.1 kg
as
mV
temperature
A-96.730.120 / 080519 39
Page 42

Chematest 35
Technical Data
10.3. Sensor Specifications
10.3.1 pH and redox
Swansensor
pH CT
Swansensor
Redox CT
General
characteristics
Measuring range: 1 –13
Resolution 0.01
Automatic temperature compensation with integrated sensor.
DIN/NIST or technical buffers.
Pt-redox electrode with integrated temperature sensor for consistent data records.
Measuring range: −400 –1200 mV
Resolution: 1 mV
Poisoning-protected reference systems with solid electrolyte and
robust open junction diaphragm
Temperature range: 0–50 °C
Pressure:
Conductivity of sample:
Reference system: Ag/AgCl
Solid electrolyte: 3.5 M KCl (AgCl-free)
Diaphragm: open junction
Connection: 1 m cable with 4-pin connector
≤ 2 bar
≥ 100 µS/cm
40 A-96.730.120 / 080519
Page 43

Chematest 35
A
B
C
D
I
J
E
G
F
H
K
Technical Data
10.4. Scope of Supply
A-96.730.120 / 080519 41
A
Carrying case
B
2 blister packs for reagent
bottles
C
Storage compartment
containing USB charging
cable and 6 wipes for cuvette
cleaning
D
2 cuvette adapters
E
Dropper bottle for rinsing
water
F
2 sensor compartments
(sensors sold separately)
G
1 sensor protection cap
(additional protection cap
available as an accessory)
H
Chematest 35
I
Brush for cuvette cleaning
J
4 glass cuvettes
K
10 ml syringe
Page 44
Chematest 35
Regulatory Information
11. Regulatory Information
This product contains a third party Bluetooth module, which has
been tested and found to comply with the limits for a Class B digital
device, pursuant to part 15 of the FCC Rules.
Contains FCC ID: T9JRN4020
This product meets all requirements of the relevant EU directives.
The declaration of conformity is available from Swan on request.
According to EU legislation, this product must not be disposed of
with household waste. Observe the local regulations for the disposal of electronic equipment.
42 A-96.730.120 / 080519
Page 45

Chematest 35
Notes
12. Notes
A-96.730.120 / 080519 43
Page 46

Chematest 35
Notes
44 A-96.730.120 / 080519
Page 47

Chematest 35
Notes
A-96.730.120 / 080519 45
Page 48

Chematest 35
SWAN
is represented worldwide by subsidiary companies
and distributors.
cooperates with independent representatives
all over the world.
SWAN Products
Analytical Instruments for:
High Purity Water
Feedwater, Steam and Condensate
Potable Water
Pool and Sanitary Water
Cooling Water
Waste Water and Effluents
Made in Switzerland
46 A-96.730.120 / 080519
 Loading...