

Page 1

Things to consider when operating the Bulldog Camera
1. To extend the operating distance of the camera from your TV or VCR you will need to purchase a
suitable A/V extension Cable and gender changers where necessary. It is better to use one cable of
the correct length than 3 or 4 shorter cables with adapters. Use of more adaptors can degrade the
picture quality and reduce the effective cable length. Many electronic and hardware stores can make
suitable cables and terminate them for you. Consult with your local dealer for more information.
English
Bulldog Cam
2. The camera be placed where it looks directly into the sun or any other bright light source,
as this will not only result in a poor image, but will eventually damage the electronics of the camera.
3. Areas with a high degree of contrast in the light levels may require re-positioning of the camera in
order to obtain the best image.
4. The best viewing angle is achieved by placing the camera in a position where it is looking down on the
subject.
5. For night-time use or when situated in a dimly-lit environment the camera will
IMPORTANT:
automatically activate the Infra-Red LEDs and change to a Black & White image. You will then be able
to view the area within range of the Infra-Red LEDs.
must not
Help Desk / Support Details
Swann Technical Support
All Countries E-mail:
Telephone Helpdesk
UNITED STATES toll free
(Sun-Thurs, 2pm-10.30pm PST)
(Mon0Fri, 9am-1pm PST)
USA Exchange & Repairs
(Mon-Fri, 9am-5pm PST)
AUSTRALIA toll free
(Mon-Fri, 9am-5.30pm Aus EST)
+61 3 8412 4610
(Mon-Fri, 9am-5.30pm Aus EST)
See http://www.worldtimeserver.com for information on different time zones
and the time in Melbourne Australia compare to your local time.
tech@swann.com.au
877-274-3695
800-627-2799
562-777-2551
1300 13 8324
International
Professional Security Camera
High Powered Quality Color Surveillance
If this device does not work when you first plug it in,
do not take it back to the store.
Contact the Swann Helpdesk using our fast e-mail service
tech@swann.com.au
numbers shown on the back cover of this booklet.
Most problems can be quickly and easily fixed with a simple
e-mail or a quick chat with one of our friendly technical staff.
(Toll-Free available in the US and Australia only)
Installation Guide
or call us on one of the Toll-Free
www.swannsecurity.com
4
Page 2
Installation Instructions
How to connect the Bulldog Camera to your monitoring device
The Bulldog camera is designed for use with any DVR, VCR, Security Monitor, TV or computer with
a video capture card. The camera can be used indoors or outdoors. The Bulldog camera can be
used for a variety of purposes including monitoring callers at the door, keeping your car, yard, shop
or warehouse under observation or used as a camera to monitor your children’s play area.
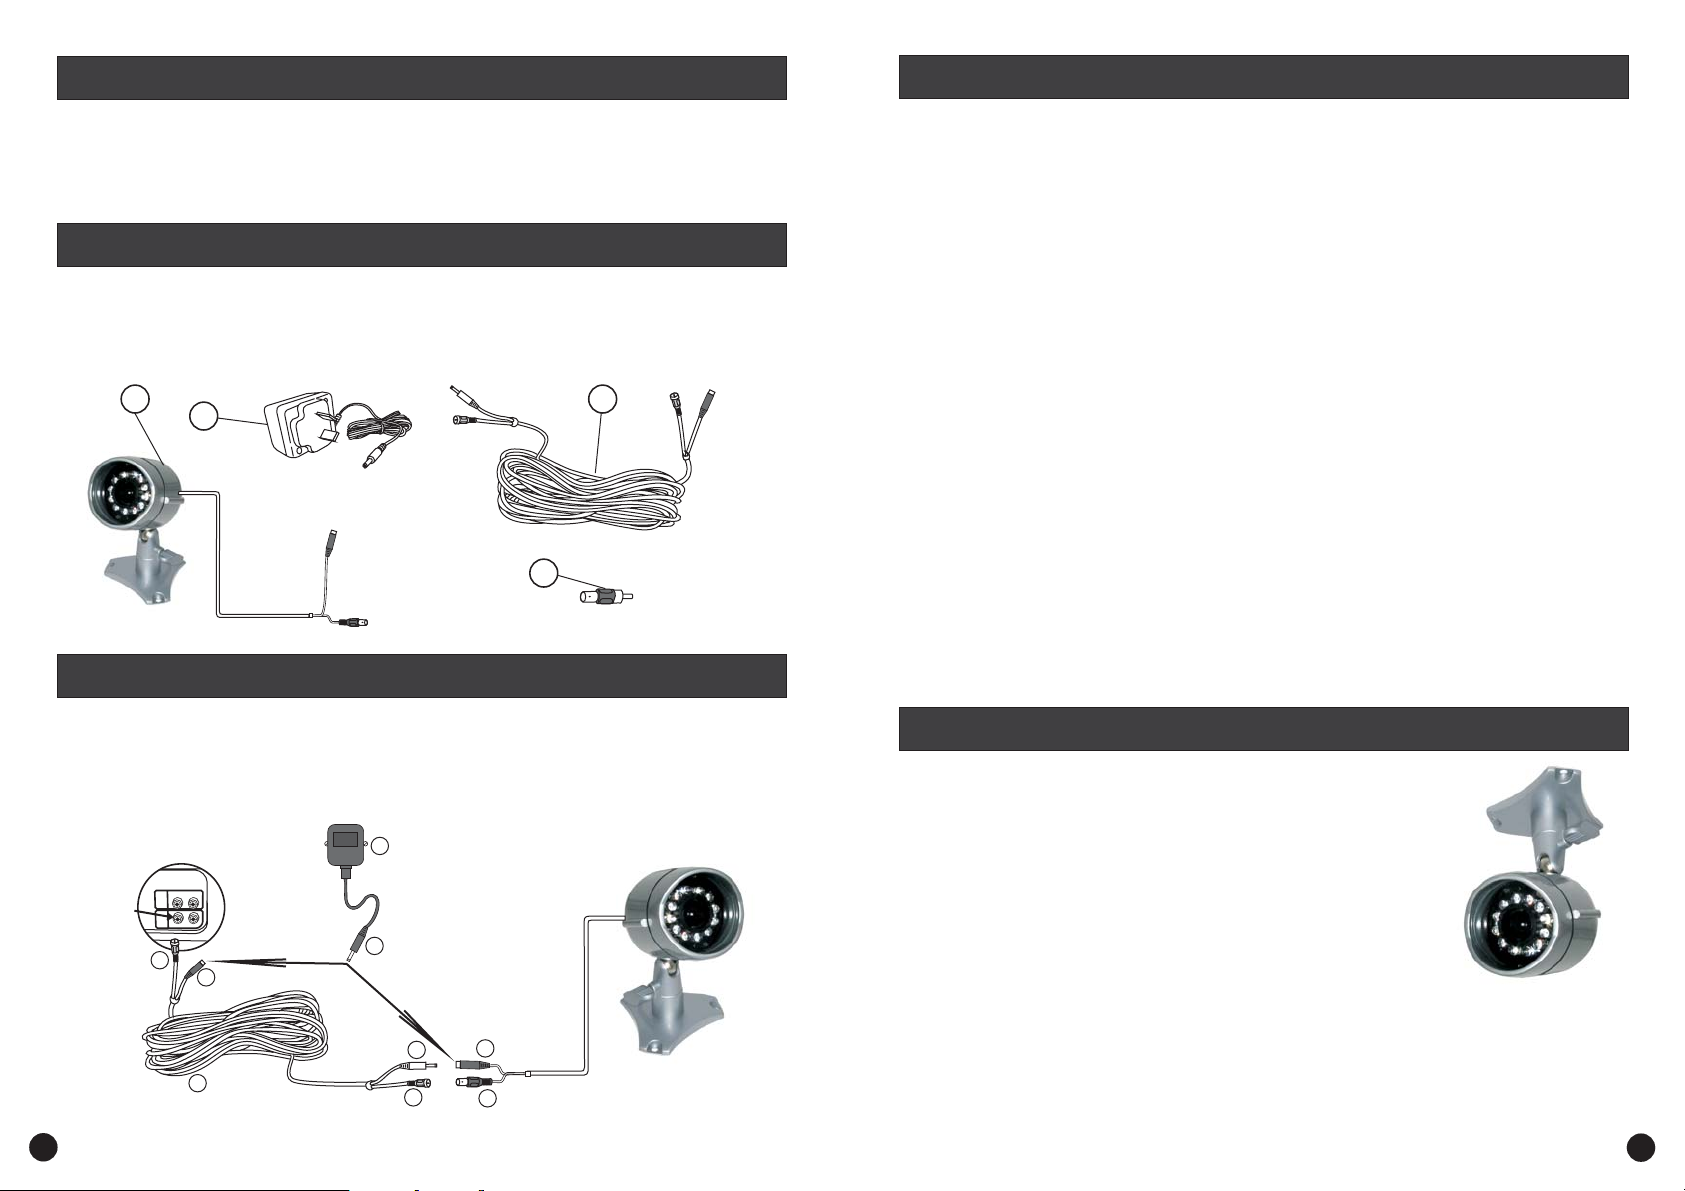
Contents and Parts Identification
Bulldog Camera with Stand and fixed cable.
1.
12Volt DC Power Adaptor (adaptor design varies depending on country).
2.
10m Power and Video Extension cable.
3.
BNC (female) to RCA (male) adaptor.
4.
1
3
2
4
How to connect the Bulldog Camera to your monitoring device
Step 1:
Step 2: BNC Female BNC Male Extension Cable
At the end of your Bulldog Camera cable you will find two plugs:
•Silver ( )
Video BNC Female
•Black ( )
DC Power Jack
Plug the ( ) into the ( ) of the ( ) and turn
the outer ring to lock the connectors. Plug the other ( ) at the opposite end of
1b 3b 3
BNC Male
3d
the extension cable into a BNC connector on your security device (usually located at the back
of your DVR or Quad Switcher).
Step 3: Power Connector power adaptor
Connect the ( ) at the end of the ( ) in to your Bulldog
Camera’s DC Jack ( ), or the 10m extension cable’s DC Jack ( ) if you are using it. Use
1a 3c
2a 2
whichever is located near the most convenient power outlet
Step 4: power adaptor
Plug the ( ) into the mains power point on your wall and switch on if
2
required.
Step 5: A/V TV BNC to RCA adaptor
Note:
If you have an with RCA sockets you will need to use the ( )
in between the ( ) on the ( ) and the of
TV VCR TV AV
your or . You will then need to switch the to the channel to view the camera.
To connect the Bulldog Camera to your , you will need to turn the to the
Input TV
selection and turn your onto the channel you would normally use to view a tape or
movie on your .
BNC Connector Extension Cable 3 RCA Socket
3d
VCR VCR A/V
VCR
The Bulldog Camera will automatically change to a black & white image using the Infra-Red
LEDs when available light is too low to support a clear colour picture.
Note: instructions VCR TV
Please read the for your or for more information on using their
A/V inputs.
4
Bulldog Camera
Your is designed to transmit high quality colour images to your security device or
Television and is operated by mains power. To help guide you through the process of setting up the
Bulldog Camera
, we have outlined the steps and numbered each of the components required in
the diagram below.
POWER
DVR, TV, VCR or MONITOR
VIDEO
AUDIO
VIDEO IN
BNC Male
2
OUT
3d
IN
V
ID
EO
AU
D
IO
3c
EXTENSION
3
DC Jack
CABLE
2
2a
DC Plug
BNC Male
ADAPTOR
DC POWER
CONNECTOR
3a
3b
DC Jack
1a
1b
BNC Female
CAMERA
Mounting the camera on your wall or ceiling
1.
Once you have chosen the best position for the camera, switch the
power to the camera off, and unplug the power lead from the
camera.
When mounting the Bulldog Camera to your ceiling or wall, please
2.
ensure that you rotate the camera so that at the top of the camera
lens is ‘up’, otherwise you will find that your pictures are displayed
upside down. (see diagram)
Hold the camera base in the position you wish to fix it, and mark the
3.
holes with an appropriate pen or pencil. Once this is done, remove
the stand and drill a hole with the appropriate drill bit for the material
you are mounting your camera to and the screws you are using.
Run the camera cable back to the TV/VCR, any holes that you drill
4.
need to be at least 14mm in diameter to allow the connectors to
pass through.
Reconnect the power lead to the camera and switch the camera
5.
power back on.
3
 Loading...