

Page 1
ENGLISH
ESPAÑOL
DEUTSCH
ITALIANO
User's Manual
Manuel d'utilisation
Manual del Usuario
Benutzerhandbuch
Manuale utente
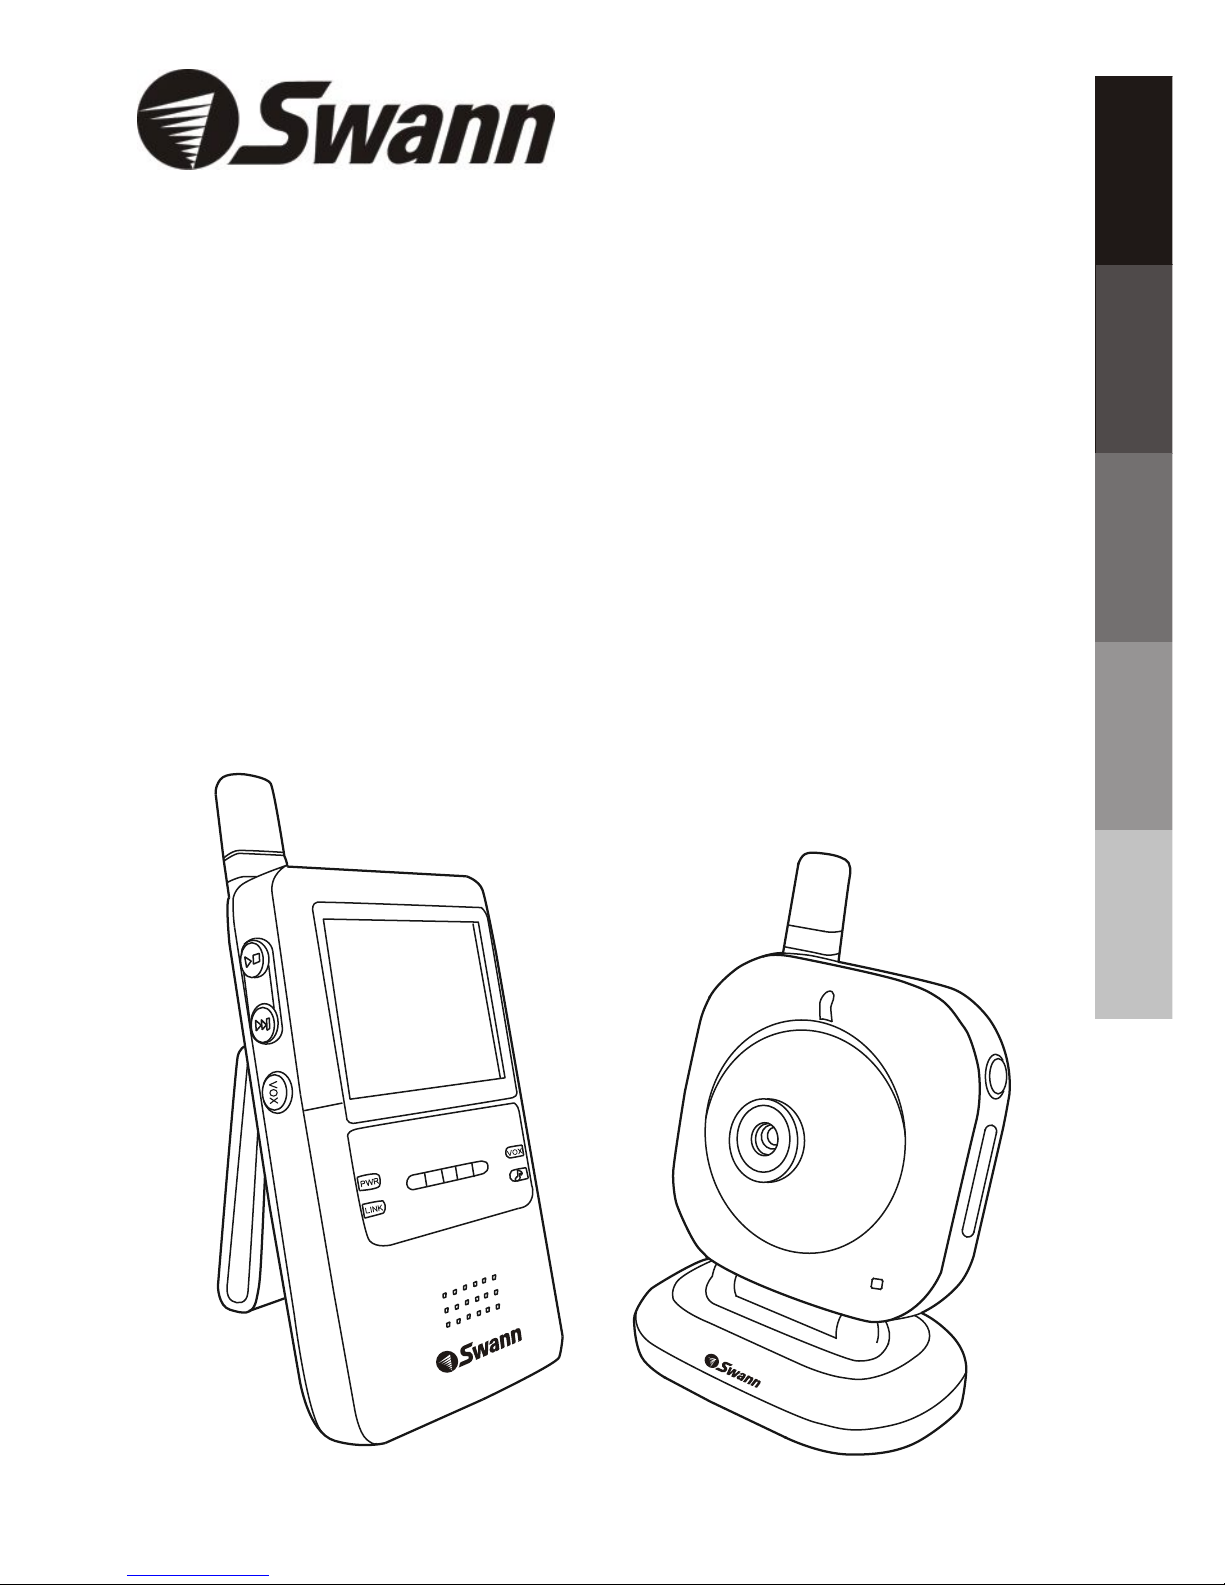
2.4 GHz Digital Wireless
Video Baby Monitor
FRANÇAIS
MIC
Music
Light
Page 2

Page 3
Product Layout / Figures des produits / Vista General del Producto
/ Produktbersicht / Profilo del prodotto
Figures and Quick Guide /
/
Figures et guide rapide
Figuras y Guía Rápido / Abbildungen und Schnellanleitung
/ Figure e guida rapida
Fig. 1
Fig. 2
i
Monitor / Moniteur
Camera / CCaméra / ámara / Kamera / Videocamera
12
13
14
15
11
1
2
3
4
5
6
7
8
9
10
1
3
4
5
6
7
8
2
Music
Screen
MIC
Light
9
11
12
10
Page 4
Setup/Installation/Instalación/Einrichtung/Configurazione
1
1.1
Fig. 3
Fig. 4
ii
Power Supply / Alimentation / Suministro de corriente / Netzgerät
/ Alimentazione
Loading the Batteries / Charger les piles / Inserción de las pilas
/ Einlegen der Batterien / Inserimento delle batterie
Using AC Power / Utiliser l'alimentation CA
/ Conexión del suministro de corriente alterna
/ Anschließen an den Netzstrom / Utilizzo dell'alimentazione CA
1
2
11
22
3
4
Camera Setup / Installer la caméra
/ Configuración de la cámara / Einrichten der Kamera
/ Installazione della videocamera
Page 5
1.2
Fig. 5
iii
Fine Tuning / / / F
/
Réglages Ajuste preciso einabstimmung
Messa a punto
Night light / Nachtlicht / Luz nocturna / Nachtlicht / Luce notturna
Fig. 6
1.3
MIC
Light
Page 6
2.2
Fig. 8
Fig. 9
iv
2
Monitor Setup / Installer le moniteur
/ Configuracin del monitor / Einrichten des Monitors
/ Installazione del monitor
Power Supply / NetzgerätAlimentation / Suministro de corriente /
/ Alimentazione
2.1
Loading the Battery / Charger les piles / Insercin de las pilas
/ Einlegen der Batterien / Inserimento delle batterie
Using AC Power / Utiliser l'alimentation CA
/ Conexión del suministro de corriente alterna
/ Anschließen an den Netzstrom / Utilizzo dell'alimentazione CA
1
2
Brightness Setting / Réglage de la luminosité / Ajuste del brillo
/ Helligkeitseinstellung / Impostazione luminosità
3
P
W
R
L
IN
K
Scr
een
Scr
een
Screen
Screen
Page 7
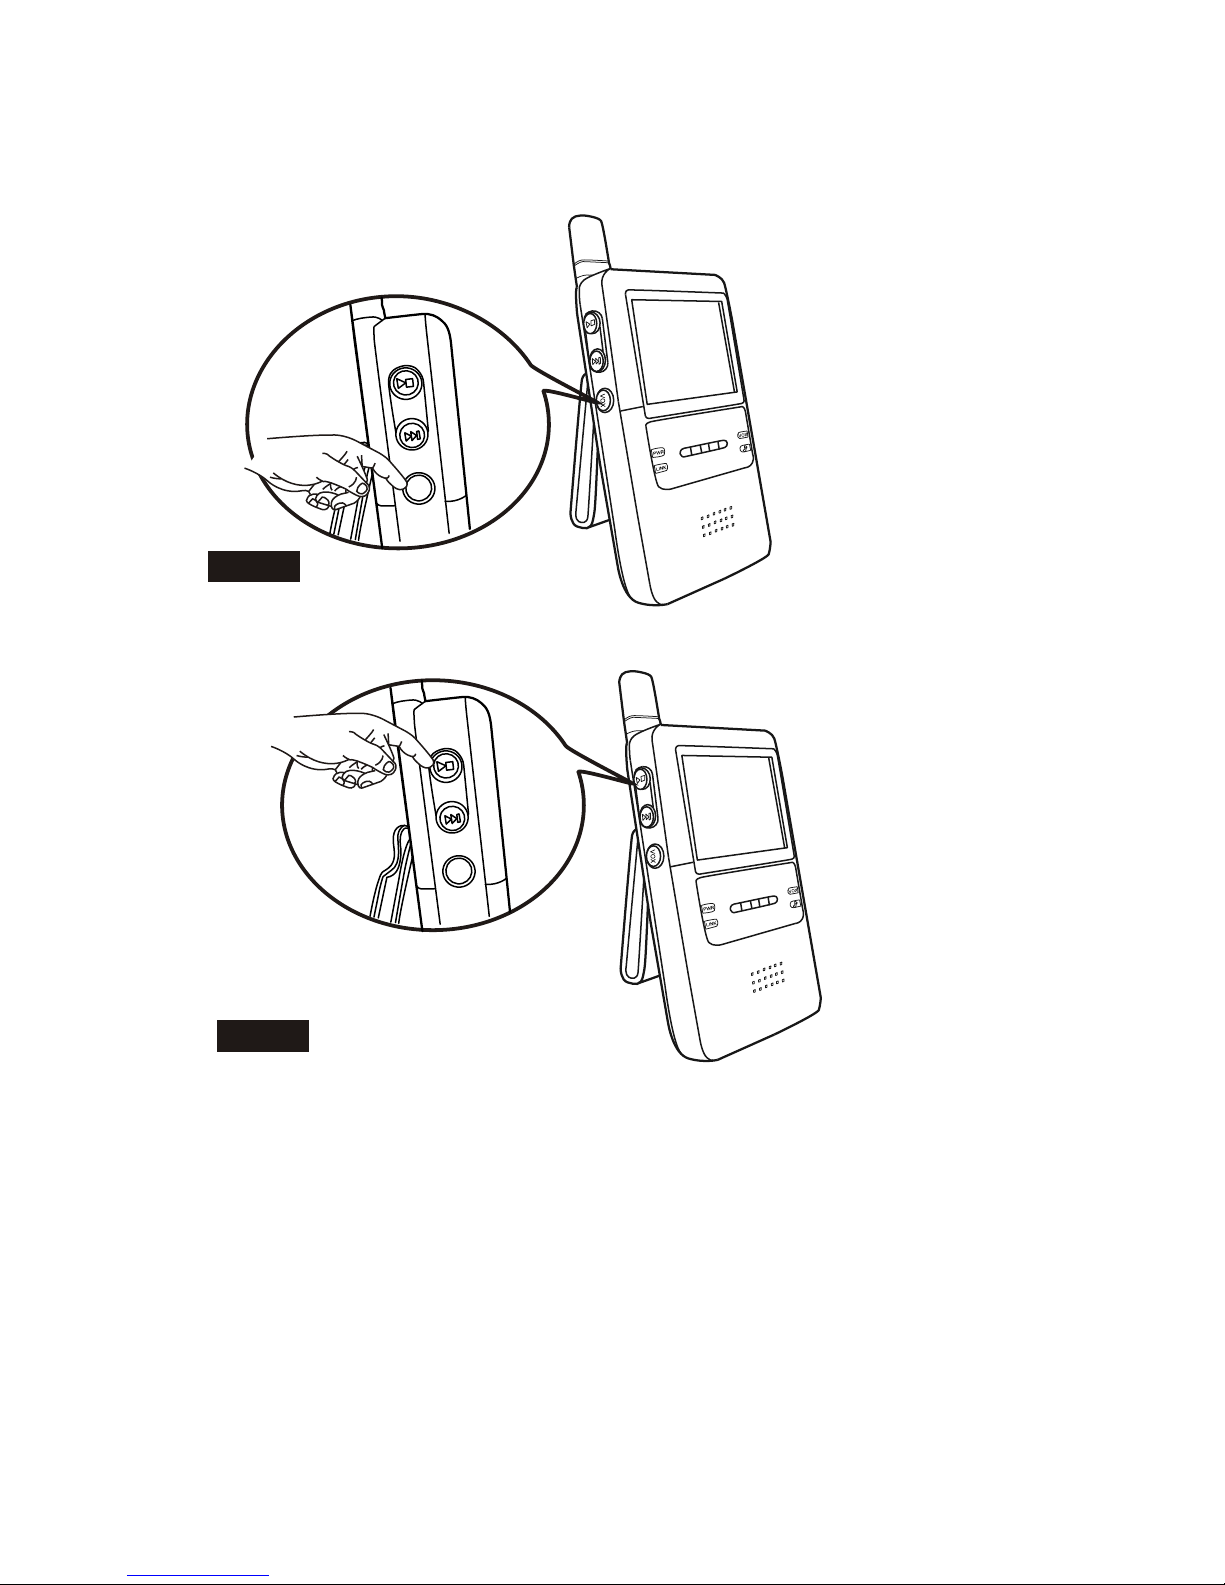
Fig. 10
v
2.3
VOX (voice-operated transmission) Function / VOX (sprachgesteuerte
Übertragung) Funktion / Función VOX (transmisión activada por voz)
/ VOX (sprachgesteuerte Übertragung) Funktion / Funzione VOX
(trasmissione a comando vocale)
2.4
Music Function / Musikfunktion / Función de música / Musikfunktion
/ Funzione musicale
Fig. 11
V
O
X
VO
X
Music
Music
Music
Music
Page 8

Page 9

Package Content
One Camera
One Monitor
Two Power Adapters
Battery for Monitor ( 3.7V 1000mAH Li-ion )
This User's Manual
Product Layout
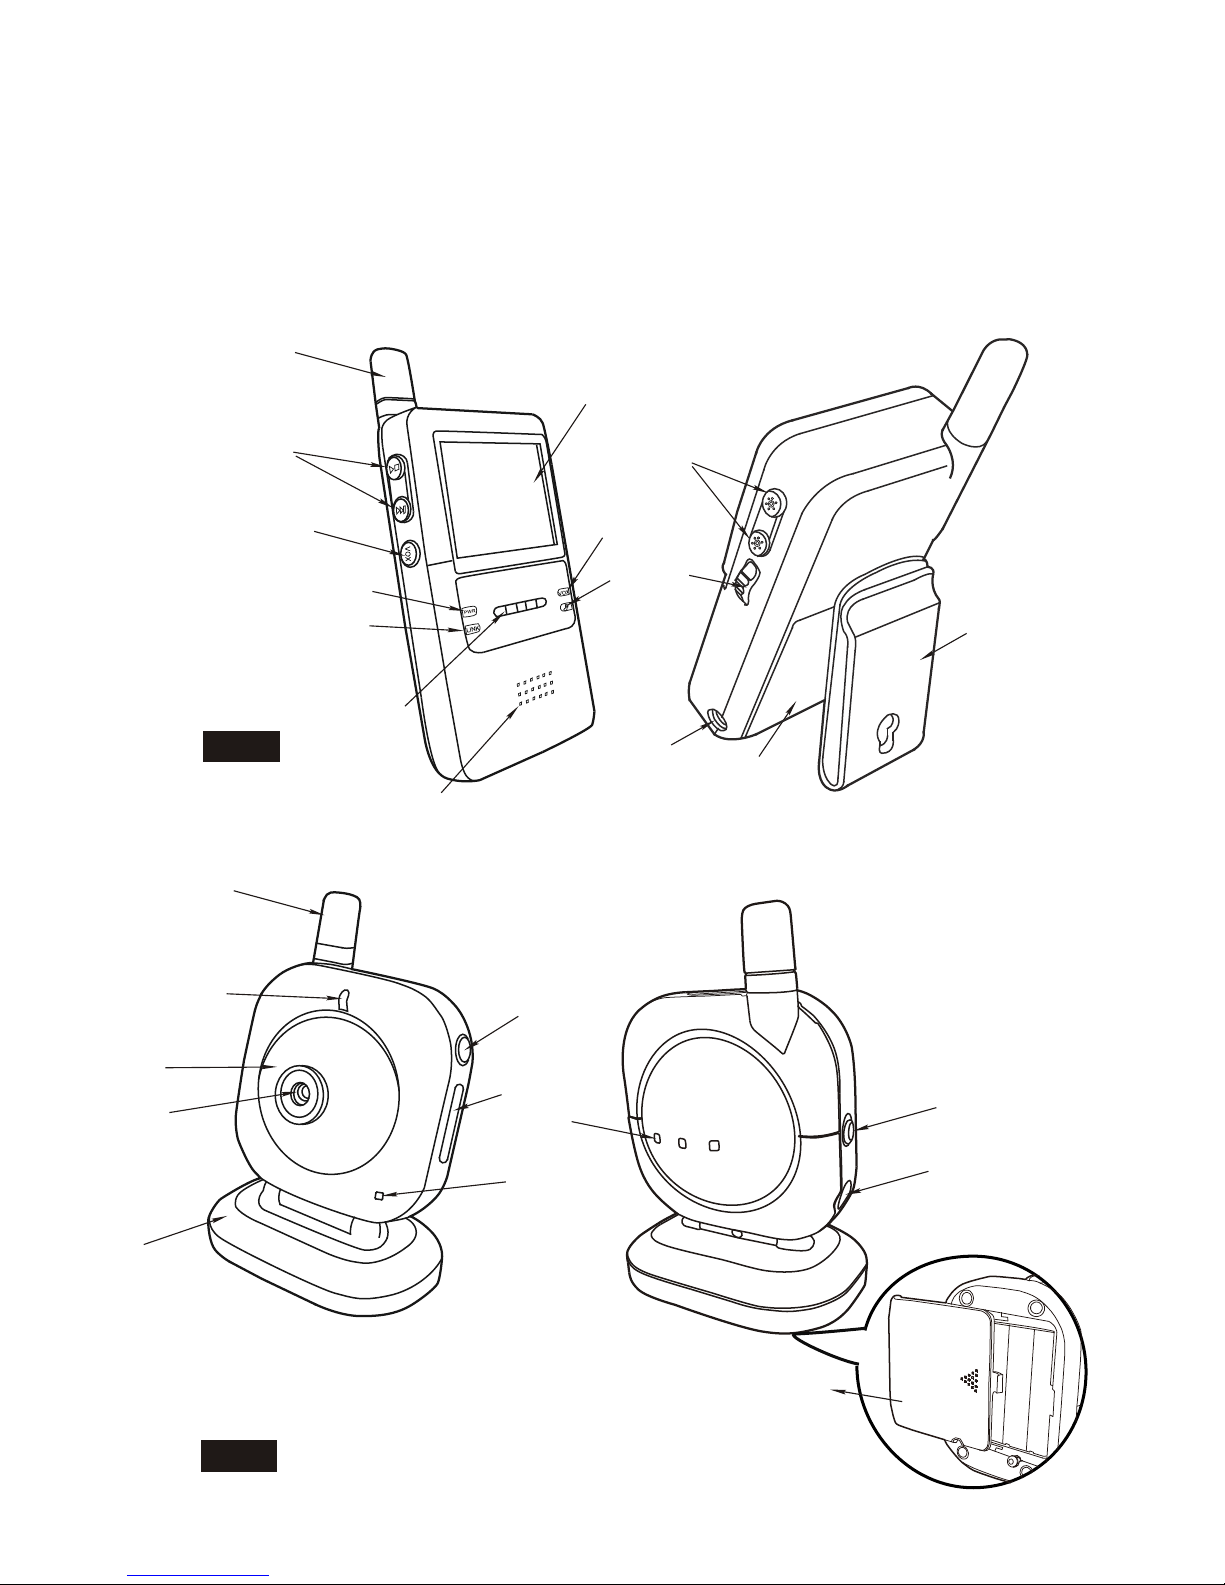
Monitor (Fig. 1)
1. LCD screen
2. Antenna
3. Music selection buttons
4. VOX:Voice Operated Transmission button
5. Power indicator LED
6. Link indicator LED
7. Volume indicator LEDs
8. Speaker
9. VOX (Voice Operated Transmission) indicator LEDs
10. Music indicator LEDs
11. Brightness adjustment buttons
12. Power / Volume control
13. Power adapter plug
14. Battery compartment
15. Clamp
Camera (Fig. 2)
1. Antenna
2. Power indicator LED
3. Infrared LEDs
4. Lens
5. Supporting stand
6. Night-light button
7. Night-light
8. Microphone
9. Speaker
10. Battery compartment
11. Power ON / OFF switch
12. Power adapter plug
ENGLISH
1
Page 10

Setup
Camera Setup
Power Supply
The camera uses either 4 AAA-Size batteries (alkaline battery recommended)
or the household AC power current.
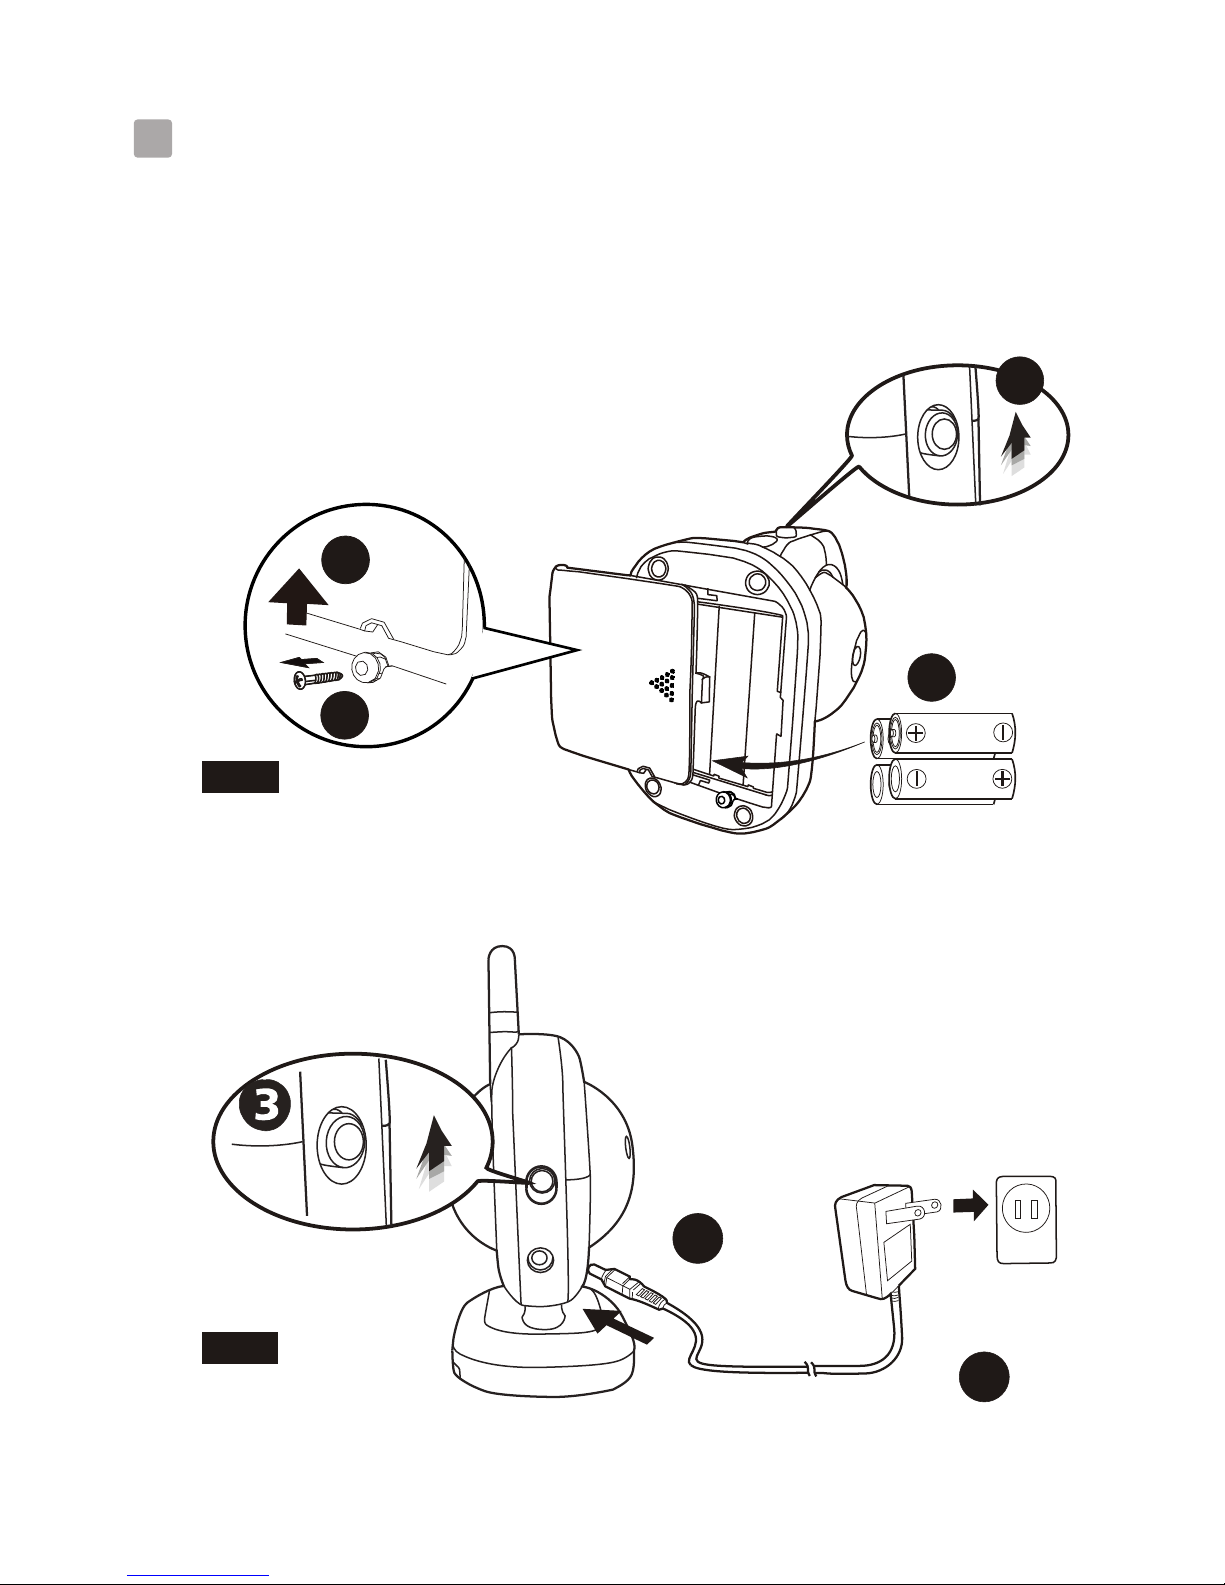
Loading the Batteries
1. See Fig. 3.
2.Open the battery compartment cover . See Fig. 3.
3.Insert 4 AAA-size batteries (follow the plus (+) and minus (-) signs inside the
battery compartment). See Fig. 3.
4.Close the battery compartment cover, and make sure it is locked securely.
Note 1: Do not mix old batteries with new ones.
Note 2: Remove the batteries from the camera if you do not plan to use it for
a prolonged period of time.
5.Slide the POWER switch to the ON position. The LED on the camera
will light up (red light). See Fig. 3.
Note : When battery power is sufficient, the light is constantly red ;
.
Using AC Power
1.Plug one end of the provided power adapter into a wall outlet and the other end
into the bottom of the camera. See Fig. 4.
Note: Use the adapter labeled OUTPUT: 6V DC with the camera.
2.Slide the ON/OFF switch to the ON position. The LED on the camera will
light up (red light). See Fig. 4.
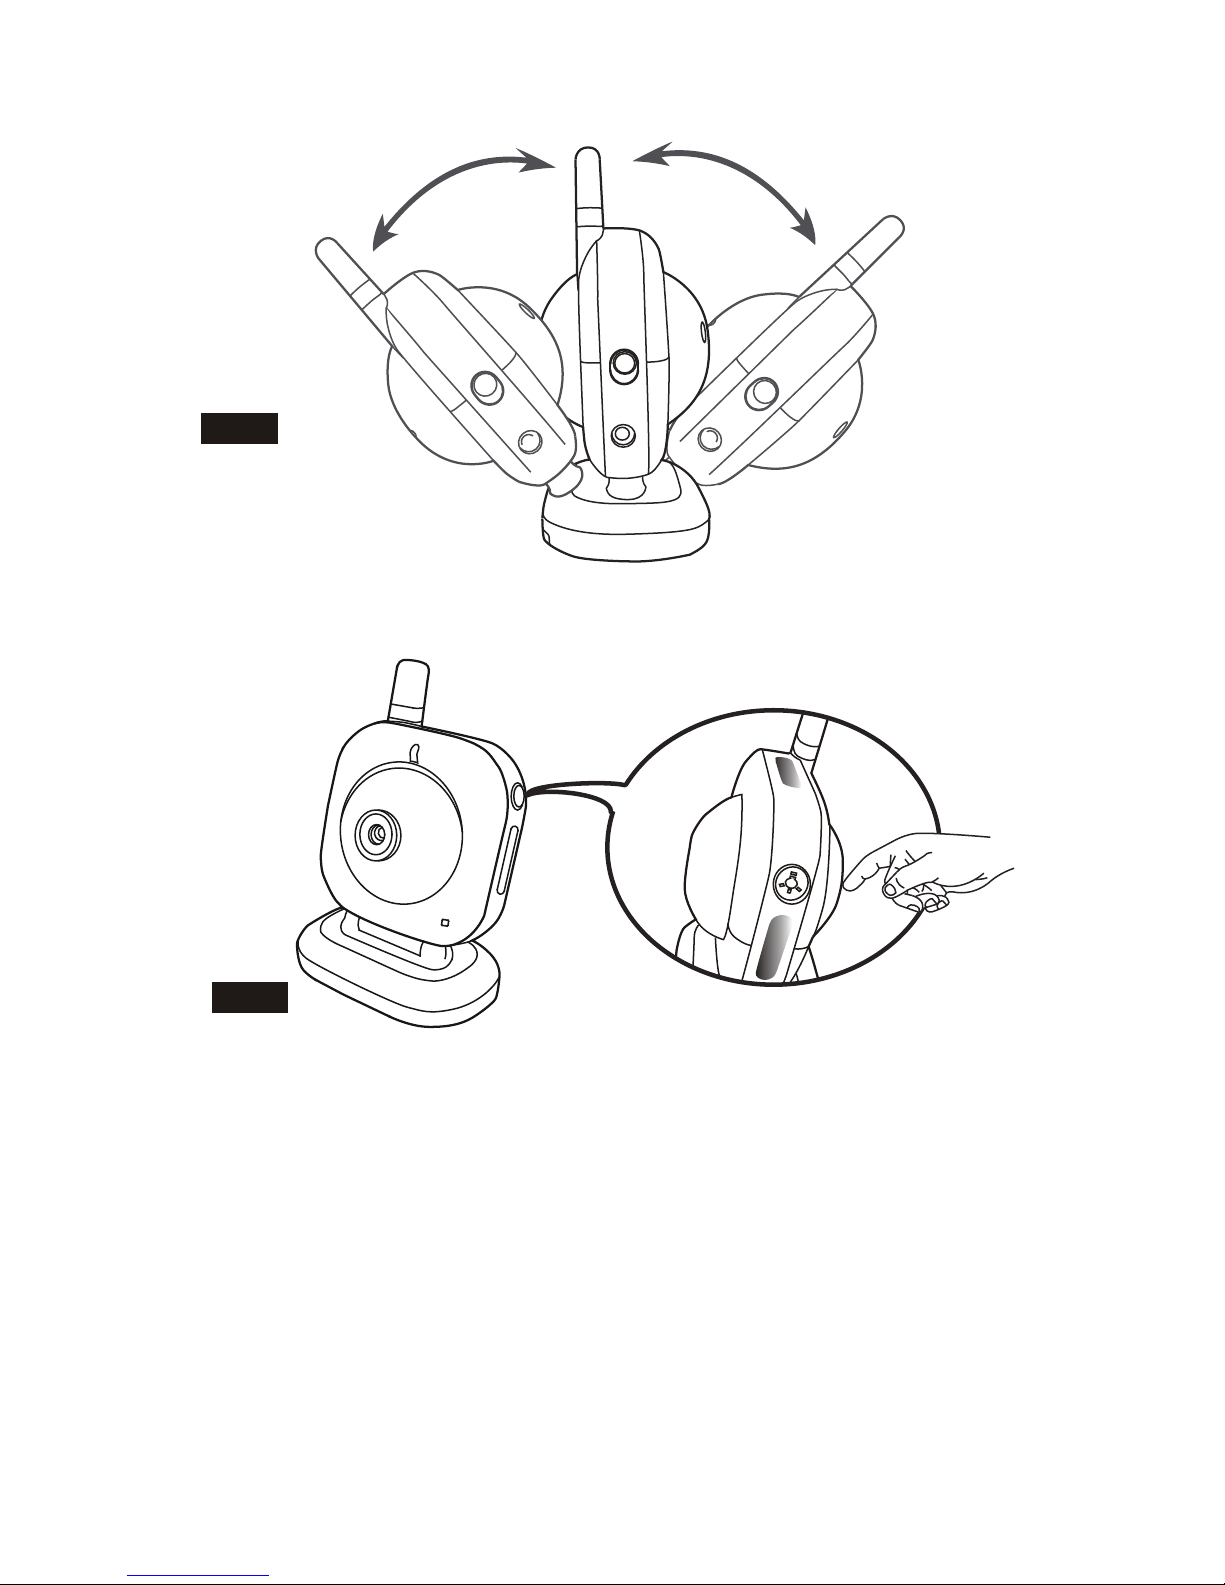
Fine Tuning
Place the camera in a convenient location, point the lens towards the observation
area and adjust the angle by rotating the lens head. See Fig. 5.
For best performance we recommend that you keep the monitor at least 1 meter
away from the camera.
Night light
Press the night light button, the night light LEDs will remain ON. See Fig. 6.
Loosen the screw on the bottom of the camera by using a screw driver.
when the battery
is low, the LED light will start blinking
1.1
1
1.2
1.3
2
Page 11

Night vision
The camera has nine high-intensity LEDs for picking up clear images in the dark.
When the built-in photo sensor detects low ambient light levels, the LEDs will
automatically activate.
1.4
Monitor Setup
Power Supply
The monitor uses 3.7V 1000mAH (Li-ion) battery or the household AC power
current.
Loading the Battery
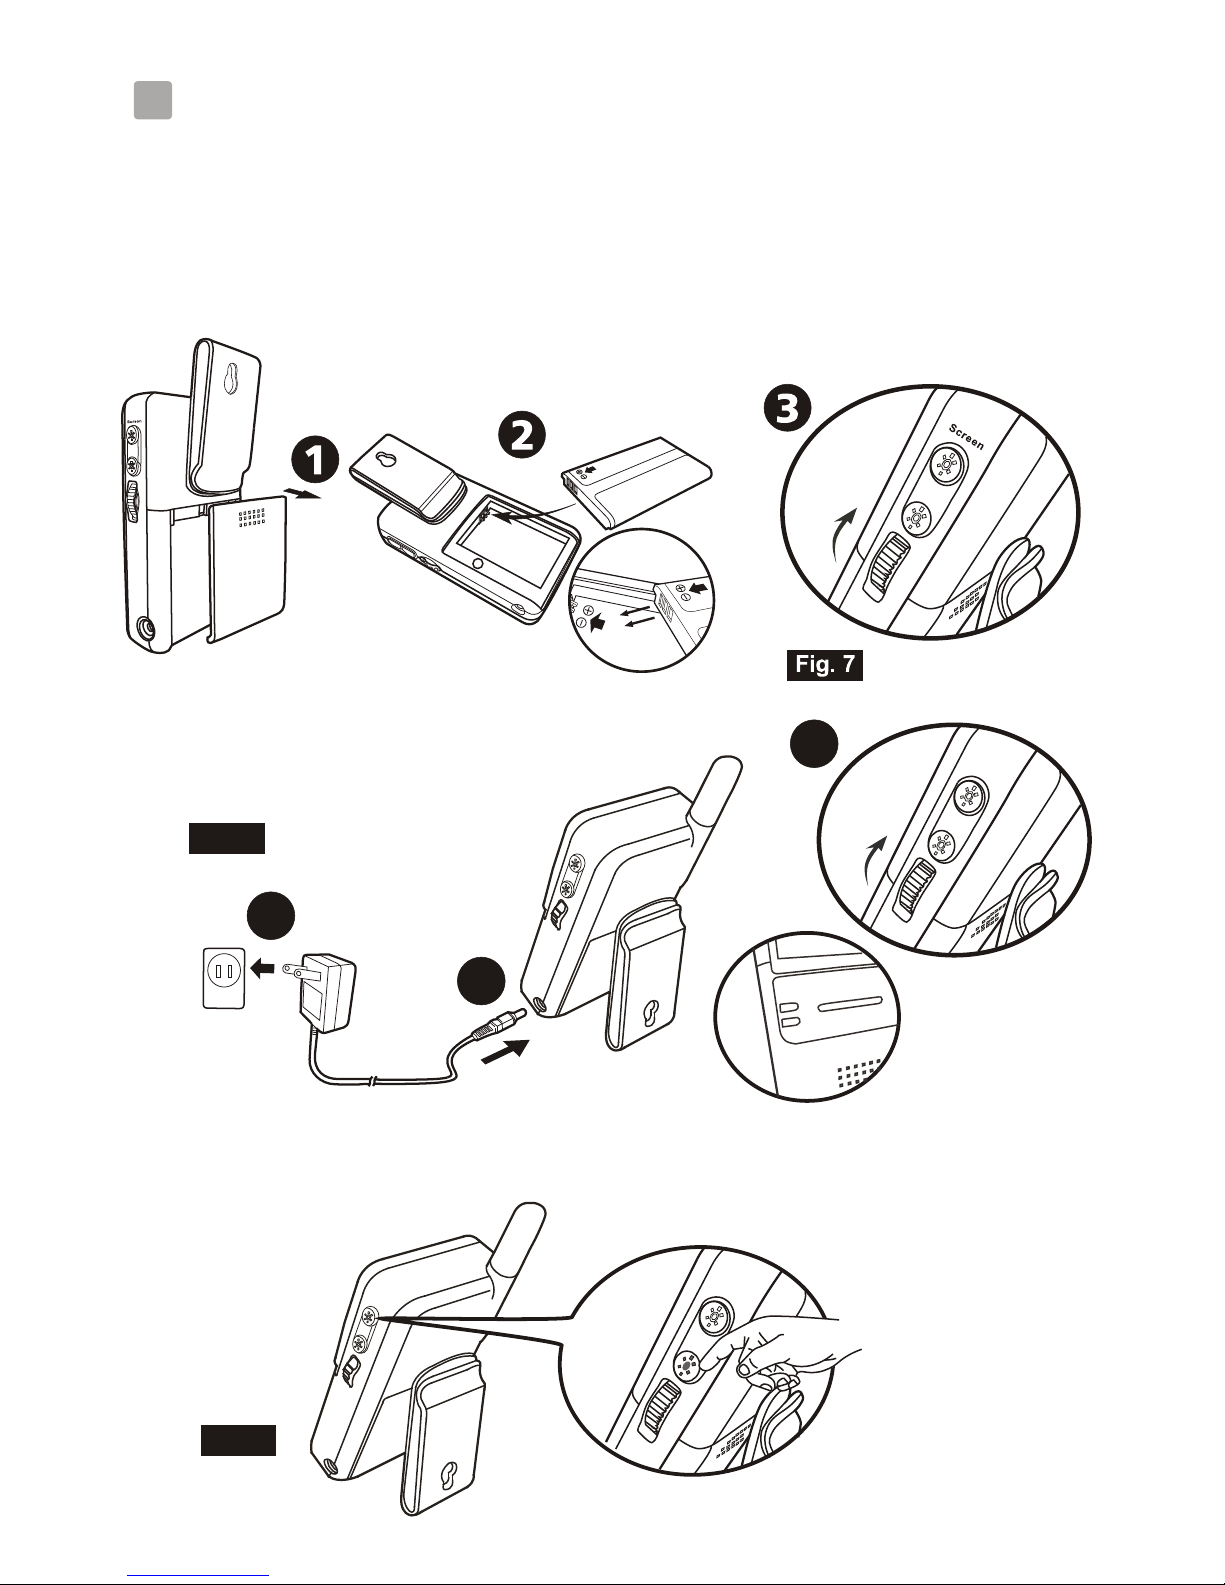
1.Open the battery compartment cover on the rear of the monitor . See Fig. 7.
2.Insert the battery and make sure the polarity is correct. See Fig 7.
3.Close the battery compartment cover, and make sure it is locked securely.
4.Turn the monitor on. See Fig 7.
Note 1: When battery power is sufficient, the light is constantly red ;
.
Note 2: Remove the battery from the monitor if you do not plan to use it for a
prolonged period of time.
5.Adjust the volume to a comfortable level.
Using AC Power
1.Plug one end of the provided power adapter into a wall outlet and the other end
into the bottom of the monitor. See Fig. 8.
Note: Use the adapter labeled OUTPUT: 6V DC with the monitor.
2.Turn the monitor on. See Fig.8.
3.Adjust the volume to a comfortable level.
Note 1: When charging starts, the "ON" LED will appear blue . If charging
is finished (full charge), the "ON"LED light will turn red.
Note 2: W , the "Link" LED will
become green; otherwise, the "Link" LED will become red and blinking.
Note 3: N
(unlink).
Brightness Setting
Adjust the Brightness selection button / to adjust brightness. See Fig. 9.
when the
battery is low, the LED light will start blinking
hen the camera and the monitor is linked
o image would be displayed on the LCD screen if the monitor is out
of range
2.1
2
2.2
3
Page 12

VOX ( voice-operated transmission) function
1.Press the "VOX" button on the side of the monitor. This will turn off the screen
but the "VOX" LED will remain ON (blue). See Fig 10.
2.When the sound from the camera reaches the set level, the screen will turn on
automatically. .
Music Function
You can play the music with the camera (three pieces of music) .
1.Press the play button , the camera will play music . See Fig 11.
2.When you press the play button again, the music will . See Fig 11.
3.P when the camera
.
Note: If you activate the music function, the music button LED will remain
ON (red).
Troubleshooting
If you are not getting any signal at all
Make sure the camera and the monitor are turned on.
Make sure the power plugs are pushed all the way in.
If the camera/monitor is powered by batteries, replace all batteries with new ones.
If the signal is poor, or there is interference
If there is a microwave oven in use in the path between the camera and monitor,
remove the microwave oven or turn it off.
Make sure the camera and the monitor are within range of each other
(range of approximately 450 feet; 150 meters in a clear line of sight).
Care and Maintenance
Keep all parts and accessories out of young children's reach.
Fingerprints or dirt on the lens surface can adversely affect camera
performances. Avoid touching the lens surface with your fingers.
Should the lens become dirty, use a blower to blow off dirt and dust, or a soft,
dry cloth to wipe off the lens.
Keep the camera dry. Precipitation, humidity, and other liquids contain minerals
will corrode electronic circuits.
Do not use or store in dusty, dirty areas.
Do not store in hot areas. High temperatures can shorten the life of electronic
devices and warp or melt certain plastics.
It will turn off again after 30 seconds if no sound is detected
be paused
ress the next button the music is playing, will play the
next song
If the power LED is on but only voice signal input is detected, the monitor can
be in voice-activated mode. Press the Auto button to turn on the screen.
1
2.3
2.4
4
Page 13

5
Specifications
Specifications subject to change without notice
Camera
Frequency 2.4 GHz
Antenna Dipole antenna
Transmission distance 150 M (Line of Sight)
Modulation FSK, FHSS
Image Sensor Color CMOS image sensor
Lens f 6.0mm, F 2.0
IR LED 9 pcs
Dimensions 8.9(W) x 10.7(H) x 8.2(D) cm;
Without stand
Weight 175g
Power DC 6V, 800mA or 4 AAA batteries
Operating temperature 0 ~ 40 (32 ~ 104 )
0678
FCC Statement
This equipment has been tested and found to comply with the limits for a Class B digital device, pursuant to Part 15 of the FCC Rules.
These limits are designed to provide reasonable protection against harmful interference in a residential installation. This equipment
generates, uses and can radiate radio frequency energy and, if not installed and used in accordance with the instructions, may cause
harmful interference to radio communications. However, there is no guarantee that interference will not occur in a particular installation.
If this equipment does cause harmful interference to radio or television reception, which can be determined by turning the equipment off
and on, the user is encouraged to try to correct the interference by one or more of the following measures:
Reorient or relocate the receiving antenna
Increase the separation between the equipment and receiver
Connect the equipment into an outlet on a circuit different from that to which the receiver is connected
Consult the dealer or an experienced radio/TV technician for help
FCC Label Compliance Statement:
This device complies with Part 15 of the FCC Rules. Operation is subject to the following two conditions: (1) this device may not cause
harmful interference, and (2) this device must accept any interference received, including interference that may cause undesired operation.
Note: The manufacturer is not responsible for any radio or TV interference caused by unauthorized modifications to this equipment.
Such modifications could void the user's authority to operate the equipment.
Monitor
Frequency 2.4 GHz
Antennas Dipole antenna
Modulation FSK, FHSS
Display 2.36" TFT LCD
Display colors Full-color
Brightness Control 5 steps
VOX Voice activation
Dimensions 6.6(W) x14.5(H) x 4.1(D) cm
Weight 120g
Power DC 6V, 800mA or Li battery
Operating temperature 0 ~ 40 (32 ~ 104 )
Do not store in very cold areas. When the system warms up (to its normal
temperature), moisture can form inside the case, which may damage electronic
circuit boards.
Do not attempt to open the case. Non-expert handling of the device may
damage the system.
Avoid dropping or strong shocks.
Operate this product using only with the power supply included or provided as
an accessory.
Do not overload electrical outlets or extension cords this can result in fire
or electric shocks.
Do remember that you are using public airwaves when you use the system
and that sound and video may be broadcast to other 2.4 GHz receiving devices.
Conversations, even from rooms near the camera, may be broadcast. To protect
the privacy of your home, always turn the camera off when not in use.
Page 14

Page 15

1
Contenu de l'emballage
Une caméra
Un Moniteur
Deux blocs d'alimentation
Pile pour l'écran (3.7V 1000mAH Li - ion)
Ce manuel de l'utilisateur
Disposition du produit
Moniteur (Fig. 1)
Ecran LCD
Antenne
Boutons de sélection de la Musique
VOX : Bouton de Transmission Vocale
Voyant d'alimentation
LED indicateur de connexion
LEDs indicateurs de Volume
haut-parleur
LEDs indicateurs VOX (Transmission Vocale)
LEDs indicateurs de Musique
Bouton d'ajustement de luminosité
Contrôle d'alimentation/volume
Fiche du bloc d'alimentation
Compartiment des piles
Pince
Caméra (Fig. 2)
Antenne
Voyant d'alimentation
Voyants infrarouges
Lentille
Support
Eclairage Nocturne
Bouton de l'éclairage nocturne
Microphone
haut-parleur
Compartiment des piles
Interrupteur d'alimentation ON/OFF
Fiche d'adaptateur d'alimentation
1.
2.
3.
4.
5.
6.
7.
8.
9.
10.
11.
12.
13.
14.
15.
1.
2.
3.
4.
5.
6.
7.
8.
9.
10.
11.
12.
FRANÇAIS
Page 16

2
Configuration
Configuration de la caméra
Alimentation
La caméra utilise soit 4 piles de taille AAA (piles alcaline recommandées)
ou le courant résidentiel CA normal.
Charger les piles
1.
2. . Voir la fig. 3.
3. Insérez 4 piles AAA (
). Voir la fig. 3.
4. Refermez le compartiment des piles, et assurez-vous qu'il est bien
verrouillé.
Remarque 1: Ne pas mélangez des piles usagées avec des piles neuves.
Remarque 2: Retirez les piles de la caméra si vous n'avez pas l'intention
de l'utiliser pour une longue période de temps.
5. Glisser l'interrupteur POWER sur la position ON. La LED sur la camra
. Voir la Fig. 3.
Remarque : Lorsque le courant est suffisant, la lumière est verte ; si le
courant est bas, la lumière est rouge.
Utiliser l'alimentation CA
1. Branchez une extrémité de l'adaptateur d'alimentation fourni dans une
prise murale et l'autre extrémité dans la caméra. Voir la fig. 4.
Remarque: Utilisez l'adaptateur étiqueté OUTPUT: 6V CC avec la caméra.
2. Glissez le commutateur ON/OFF sur la position ON (allumé). Le voyant
de la caméra devrait s'allumer (lumière verte). Voir la fig. 4.
Réglages
Placez la caméra dans un emplacement adéquat, dirigez la lentille vers
la zone d'observation et ajustez l'angle en pivotant le bord de la lentille.
Voir la fig. 5.
Eclairage Nocturne
Appuyez sur le bouton de l'éclairage nocturne, la LED d'éclairage nocturne
s'allume. Voir la fig. 6.
Desserer la vis située à l'arrière de la caméra à l'aide d'un tournevis.
Ouvrir le couvercle du compartiment à piles
respectez les signes de polarité positif (+) et négatif
(-) situés à l'intérieur du compartiment à piles
s'allumera (lumière rouge)
1.1
1
1.2
1.3
Page 17

3
Nocturne vision
La caméra possède neuf LED de haute intensité pour capturer des images
claires dans le noir. Quand le capteur de lumière intégré détecte une lumière
ambiante, les LED s'activeront automatiquement.
1.4
Configuration de l'écran
Alimentation
L'écran utilise une pile de 3.7V 1000mAH (Li-ion) ou le courant électrique CA
résidentiel.
Charger les pile
1. Ouvrez le compartiment des piles à l'arrière du moniteur. Voir la fig. 8.
2. Insérez la pile en plaçant les contacts en métal vers le compartiment à pile.
Voir la fig. 8.
3. Refermez le compartiment des piles, et assurez-vous qu'il est bien verrouillé.
4. Allumez le moniteur. Voir la fig. 8
Remarque 1: Lorsque le courant est suffisant la lumière est verte ;
Remarque 2: Retirez la pile de l'écran si vous n'avez pas l'intention de l'utiliser
pour une longue période de temps.
5. Ajustez le volume à un niveau confortable.
Utiliser l'alimentation CA
1. Branchez une extrmit de l'adaptateur d'alimentation fourni dans une prise
murale et l'autre extrmit au bas de l'cran. Voir la fig. 8.
Remarque: Utilisez l'adaptateur tiquet OUTPUT: 6V CC avec le moniteur.
2. Allumez le moniteur. Voir la fig. 8
3. Ajustez le volume un niveau confortable.
Remarque 1 : Lorsque le chargement commence, la lampe POWER .
Si le chargement est terminé (charge complète), la lampe « POWER »
Remarque 2 :
Rglage de la luminosit
Appuyez sur le bouton de sélection de la Luminosité & pour régler la
luminosité. Voir la fig. 9.
1
la lumière
est constamment rouge ; lorsque la pile est presque épuisée,
le VOYANT lumineux commence à clignoter.
apparaît en bleu
lumière passera au rouge.
Lorsque la caméra et l'écran sont connectés, le VOYANT
“Link” passe au vert ; autrement, le VOYANT “Link”
est rouge clignotant.
Remarque 3 : Aucune image n'est affichée sur l'écran LCD si celui-ci n'est pas
dans le champ de réception (non connecté).
2.1
2
2.2
Page 18

4
Fonction VOX (Transmission Vocale)
1. Appuyez sur le bouton VOX situ sur le ct de l'cran. Ceci teindra l'cran
mais la LED VOX (Bleue). Voir la fig. 10.
2. Quand le son de la caméra atteint le niveau prédéfini, l'écran s'allumera
automatiquement. Il s'éteindra à nouveau après 30 secondes.
Fonction Musique
Vous pouvez lire de la musique avec la caméra (3 morceaux).
1. Appuyez sur le bouton Lecture , la caméra jouera la musique. Voir la fig. 11.
2.
Voir la fig. 11.
3. Appuyez sur le bouton « Suivant » pendant la visibilité, la caméra jouera
le morceau suivant.
Remarque : Si vous activez la fonction musique, la LED du bouton musique
sera allumée (rouge).
Dépannage
Si vous ne recevez pas de signal du tout
Assurez-vous que la caméra et le moniteur sont allumés.
Assurez-vous que les prises de courant sont bien branchées.
Si la caméra / le moniteur sont alimentés par piles, remplacez toutes les piles
avec des piles neuves.
Si le signal est faible, ou il y a des interférences
Si un four à micro-ondes en cours d'utilisation se trouve entre la caméra et le
moniteur, retirez-le ou éteignez-le.
Assurez-vous que la caméra et le moniteur ne sont pas trop éloignés l'un de
l'autre (approximativement 100 mètres de portée avec ligne de vue dégagée).
Si le voyant d'alimentation est allumé mais seul le signal d'activation vocal
est détecté, le moniteur est peut être en mode d'activation vocale. Pressez le
bouton Auto pour allumer l'écran.
reste en MARCHE
Lorsque vous appuyez à nouveau sur le bouton de lecture, la musique passe
en mode pause.
1
2.3
2.4
Page 19

5
Soin et entretien
Gardez tous les accessoires et pièces hors de la portée des enfants.
Des traces de doigts ou de la poussière sur la surface de la lentille peuvent
affecter l'exécution de la caméra. Evitez de toucher la surface de la lentille
avec les doigts.
Si la lentille devient sale, utilisez un soufflet pour retirer la poussière, ou un
chiffon doux et sec pour essuyer la lentille.
Gardez la caméra sèche. Les précipitations, l'humidité, et autres liquides
contiennent des minéraux qui corroderont les circuits électroniques.
N'utilisez ou ne stockez pas dans des zones poussiéreuses et sales.
Ne stockez pas dans des endroits chauds. Des températures élevées peuvent
raccourcir la durée de fonction des périphériques électroniques et déformer
ou fondre certains plastiques.
Ne stockez pas dans des endroits très froids. Quand le système se réchauffe
(à sa température normale), de l'humidité peut se former, ce qui peut
endommager les cartes à circuit électroniques.
Ne tentez pas d'ouvrir le boîtier. Une mauvaise manipulation du périphérique
peut endommager le système.
Evitez chutes et chocs violents.
N'opérez ce produit qu'avec l'alimentation incluse ou fournie comme accessoire.
Ne surchargez pas les sorties ou les rallonges électriques ceci peut provoquer
des incendies ou des chocs électriques.
Souvenez-vous que vous utilisez les ondes publiques quand vous utilisez le
système et qu'audio/vidéo peuvent être diffusés à d'autres périphériques
2,4 GHz. Les conversations, même de salles proches de la caméra, peuvent
être diffusées. Pour protéger votre intimité, éteignez toujours la caméra quand
vous ne l'utilisez pas.
Page 20

Page 21

Contenido del paquete
Una cámara
Un monitor
Dos adaptadores de corriente
Batería para monitor (3,7 V 1.000 mAH Li-ion)
Este manual del usuario
Aspecto del producto
1. Pantalla LCD
2. Antena
3. Botones de selección de música
4. VOX: Botón de transmisión activado por voz
5. Indicador LED de corriente
6. Indicador LED Link
7. Indicadores LED de volumen
8. Altavoces
9. Indicadores LED de VOX (Transmisión activada por voz)
10. Indicador LED de música
11. Botones de ajuste del brillo
12. Control de encendido/volumen
13. Clavija para el adaptador de corriente
14. Compartimento de las pilas
15. Abrazadera
Cámara (Fig. 2)
1. Antena
2. Indicador LED de corriente
3. LED de infrarrojos
4. Objetivo
5. Trípode
6. Luz
7. Botón de luz nocturna
8. Micrófono
9. Altavoces
10. Compartimento de las pilas
11. Interruptor de alimentación ON/OFF
12. Clavija para el adaptador de corriente
Monitor (Fig. 1)
1
ESPAÑOL
Page 22

2
Ajuste
1.
2
3
5
Luz nocturna
Ajuste de la cámara
Suministro de corriente
La cámara utiliza 4 pilas de tamaño AAA (se recomienda utilizar pilas
alcalinas) o un adaptador de corriente alterna doméstico.
Inserción de las pilas
. Consulte la Fig. 3.
. Inserte 4 pilas de tamaño AAA
. Consulte la Fig3.
4. Cierre el compartimento de las pilas,asegurándose de que quede bien
cerrado.
Nota 1: no mezcle nunca las pilas viejas con las pilas nuevas.
Nota 2: extraiga las pilas de la cámara si no va a utilizarla durante un
periodo de tiempo prolongado
. Deslice el interruptor de encendido hasta la posición ON. El indicador
LED de la cámara deberá iluminarse ( ). Consulte la Fig. 3.
Nota: Cuando hay suficiente suministro de corriente,
Conexión del suministro de corriente alterna
1. Inserte un extremo del adaptador de corriente en una toma de corriente y
el otro extremo en la parte inferior de la cámara. Consulte la Fig. 4.
Nota: utilice el adaptador que lleva la leyenda OUTPUT: 6V CC con la
cámara.
2. Deslice el interruptor ON/OFF a la posición ON. El indicador LED
de la cámara deberá iluminarse ( ). Consulte la Fig. 4.
Ajuste preciso
Coloque la cámara en la ubicación que le resulte más cómoda, apunte el
objetivo hacia el de observación y ajuste el ángulo girando el cuerpo
del objetivo. Consulte la Fig. 5.
Afloje el tornillo en la parte trasera de la cámara usando un atornillador.
Abra la tapa del compartimiento de batería.
(Siga los segnos más (+) y menos (-)
dentro del compartimiento de bateria)
luz roja
la luz es
constantemente roja; cuando la bateria está baja, la luz del LED
empieza a destellar.
luz roja
área
Al pulsar el botón de luz nocturna, el LED de luz nocturna permanecer
en ON. Consulte la Fig. 6.
1.1
1
1.2
1.3
Page 23

3
Visión nocturna
La cámara tiene nueve indicadores LED de alta intensidad para captar imágenes en
la oscuridad. Cuando el sensor de luz incorporado detecta niveles de luz ambiente
bajos, se activan automáticamente los LED.
1.4
Ajuste del monitor
5. Ajuste el volumen en un nivel que le resulte confortable.
Nota 2:
Conexin del suministro de corriente alterna
1. Inserte un extremo del adaptador de corriente en una toma de corriente y el otro
extremo en la parte inferior del monitor. Consulte la Fig. 7.
Nota: utilice el adaptador que lleva la leyenda OUTPUT: 6V CC con la monitor.
2. Encienda el monitor. Consulte la Fig. 8
3. Ajuste el volumen en un nivel que le resulte confortable.
Nota 1 : Cuando empieza a cargarse, la luz Power .
Si se ha completado la carga (carga completa), la luz Power .
Ajuste del brillov
&
Suministro de corriente
El monitor utiliza una batería de 3,7 V de 1.000 mAH o un adaptador de corriente
alterna doméstico.
Inserción de las pilas
1. Abra la cubierta del compartimento de las pilas, en la parte trasera del monitor.
Consulte la Fig. 7.
2. Introduzca las pilas con los contactos metálicos orientados hacia el
compartimento de las pilas. Consulte la Fig. 7.
3. Cierre el compartimento de las pilas, asegurándose de que quede bien cerrado.
4. Encienda el monitor. Consulte la Fig. 7
Nota 1 : Cuando el suministro de corriente es suficiente,
extraiga las pilas del monitor si no va a utilizarlo durante un periodo
prolongado de tiempo.
Pulse el botón
la luz es constantemente
roja; cuando la bateria está baja, la luz del LED empieza a destellar.
aparecerá en azul
se tornará roja
Nota 2: Cuando la cámara y el monitor están vinculados, el LED "Link" (Vincular)
se torna verde; de lo contrario, el LED "Link" (Vincular) se torna rojo y
destella.
Nota 3: Ninguna imagen será mostrada en la pantalla LCD si el monitor está fuera
del intervalo (sin vínculo).
de selección del brillo para ajustar el brillo.
Consulte la Fig. 9.
2.1
2
2.2
Page 24

4
Función VOX (transmisión activada por voz)
permanecerá encendida ON
Cuando se presiona el botón play (reproducir) nuevamente, la música se detenerá.
la música siguiente.
1. Al pulsar el botón VOX en el lateral del monitor, esto desactivará la pantalla,
pero el indicador LED VOX LED (azul).
Consulte la Fig. 10.
2. Cuando el sonido del lugar de la cámara alcance el nivel configurado, la pantalla
se encenderá automáticamente y se apagará de nuevo a los 30 segundos.
Función de música
Con la cámara se puede reproducir música (tres piezas de música).
1. Al pulsar el botón de reproducción , la cámara reproducirá la música.
Consulte la Fig 11.
2.
Consulte la Fig. 11.
3. Al pulsar el botón Siguiente mientras está visible, la cámara reproducirá
Nota: Si activa la función de música, el botón de música LED permanecerá
en ON (rojo).
Solución de problemas
Si no recibe señal en absoluto
Asegúrese de que la cámara y el monitor están encendidos.
Asegúrese de que las clavijas de corriente están bien enchufadas.
Si la cámara o el monitor están funcionando con pilas, cambie todas las pilas
por pilas nuevas.
Si la señal es pobre o hay interferencias
Si hay un horno microondas en uso en la trayectoria que va de la cámara al
monitor, retire el horno microondas o apáguelo.
Asegúrese de que la cámara y el monitor están dentro del alcance de
funcionamiento (alcance de unos 100 metros (300 pies) siguiendo una línea
de visión clara).
Si el indicador LED de corriente está encendido pero se detecta sólo una
entrada de señal de voz, el monitor puede estar en el modo activado por la
voz. Presione el botón Auto para encender la pantalla.
2.3
2.4
Page 25

Cuidados y mantenimiento
Mantenga todas las piezas y accesorios fuera del alcance de los niños pequeños.
Las huellas dactilares o la suciedad en la superficie del objetivo pueden afectar
negativamente al rendimiento de la cámara. Evite tocar la superficie del
objetivo con los dedos.
Si el objetivo se ensucia, utilice a un secador o ventilador de aire caliente
para que la corriente de aire se lleve la suciedad y el polvo, o un paño
suave y seco para limpiar el objetivo.
Mantenga seca la cámara. Las precipitaciones, la humedad ambiental y
otros líquidos contienen minerales que corroen los circuitos electrónicos.
No utilice el producto en sucias o polvorientas.
No lo almacene en lugares calientes. Las altas temperaturas pueden
acortar la vida útil de los dispositivos electrónicos y deformar o fundir
ciertos materiales plásticos.
No almacene el producto en lugares muy fríos. Cuando el sistema realiza
su recalentamiento (hasta su temperatura normal de funcionamiento),
puede acumularse humedad en el interior de la carcasa que puede dañar
las placas de circuitos electrónicos.
No intente abrir la carcasa. Sólo un técnico experimentado debe manipular
el dispositivo; de lo contrario, el sistema puede resultar dañado.
Evite que el sistema se caiga o que reciba golpes fuertes.
Este producto sólo debe hacerse funcionar utilizando el sistema de alimentación
eléctrica incluido o proporcionado como accesorio.
No sobrecargue las tomas de corriente o cables alargadores, ya que podrá provocar
un incendio o choques eléctricos.
Recuerde que estar utilizando las ondas hertzianas públicas cuando utilice el
sistema y que el sonido y el vídeo podrán ser captados por otros dispositivos
receptores de 2,4 GHz. Podrán ser captadas las conversaciones, incluso las
que tengan lugar en habitaciones cercanas ala cámara. A fin de proteger la
privacidad de su hogar, apague siempre la cámara cuando no la utilice.
áreas
5
Page 26

Page 27

Pakungsinhalt
Eine Kamera
Batterie für den Monitor (3,7V 1000mAH Li-on)
Produkt-Layout
Monitor (Abb. 1)
1. LCD-Schirm
2. Antenne
3. Musikauswahltasten
4. VOX: Sprachgesteuerte Übertragungstaste
5. Betriebsanzeige
6. Verbindungsanzeige-LED
7. Lautstärkeanzeige-LEDs
8. Lautsprecher
9.
10. Musikanzeige-LEDs
11. Helligkeitsjustierungstasten
12. Stromversorgung/Lautstärkeregler
13. Netzgerätestecker
14. Batteriefach
15. Halterung
Kamera (Abb. 2)
1. Antenne
2. Betriebsanzeige
3. Infrarot-LEDs
4. Objektiv
5. Stützgestell
6. Nachtlicht
7. Nachtlichttaste
8. Mikrofon
9. Lautsprecher
10. Batteriefach
11. Strom-AN/AUS-Schalter
12. Netzgerätestecker
Ein Monitor
Zwei Netzgeräte
Eine Bedienungsanleitung
VOX: Sprachgesteuerte Übertragung-Anzeige-LEDs
1
DEUTSCH
Page 28

2
Einrichtung
Netzgerät
Die Kamera kann mit Batteriestrom (4 x AAA, Alkalibatterie empfohlen)
oder normalem Netzstrom versorgt werden.
Einlegen der Batterien
1.
2. ffnen Sie die Batterieabdeckung. Siehe Abb. 3
3. Legen Sie 4 Batterien Typ AAA ein
. Siehe Abb. 3.
4. Schließen Sie die Abdeckung des Batteriefachs fest zu.
Hinweis 1:Mischen Sie nie alte Batterien mit neuen.
Hinweis 2: Nehmen Sie die Batterien aus der Kamera heraus, wenn Sie
sie Zeit nicht benutzen werden.
5. Schalten Sie den Stromschalter auf die AN-Position. Die LED auf der
Kamera w (r ). Siehe Abb. 3.
Hinweis: Wenn der Strom ist, ist das Licht grün,
Anschließen an den Netzstrom
1. Verbinden Sie ein Ende des mitgelieferten mit einer Steckdose
und das andere Ende mit der Unterseite der Kamera. Siehe Abb. 4.
Hinweis: Verwenden Sie das mit OUTPUT: 6V DC gekennzeichnete
Netzgerät mit der Kamera.
2. Schalten Sie den EIN/AUS/NACHT-Schalter auf EIN. Die LED auf
der Kamera sollte jetzt aufleuchten (r ). Siehe Abb. 4.
Feinabstimmung
Stellen Sie die Kamera an einem günstigen Ort auf, richten Sie das
Objektiv auf den Beobachtungsbereich und stellen Sie durch Drehen
des Objektivtubus den Winkel ein. Siehe Abb. 5.
Nachtlicht
Sie die Nachtlichttaste, die Nachtlicht-LEDs werden anbleiben.
Siehe Abb. 6.
Kamera Einrichtung
Lösen Sie die Schraube an der Rückseite der Kamera mit einem
Schraubenzieher.
Ö
(Beachten Sie die Plus (+) und
Minus (-) Zeichen im Inneren des Batteriefachs)
ird aufleuchten ote Leuchte
Die Leuchte ist
ständig rot. Wenn der Batterieladestand niedrig ist, wird die LED
anfangen zu blinken.
ote Leuchte
längere
ausreichend
Netzgerätes
Drücken
1.1
1
1.2
1 .3
Page 29

3
Nachtsicht
Die Kamera besitzt hochintensive LEDs, um selbst im Dunklen deutliche
Bilder aufzunehmen. Wenn der eingebaute Fotosensor das Licht in der Umgebung
als schwach feststellt, werden die LEDs automatisch aktiviert.
9
1.4
Monitoreinrichtung
Netzgerät
Der Monitor verwendet eine 3,7V 1000mAH (Li-on) Batterie oder normale
Netzversorgung.
Einlegen der Betrieb
1. Öffnen Sie das Batteriefach auf der Rückseite der Monitors. Siehe Abb. 7
2. Sie die Batterien, mit den Metallkontakten auf das ,
ein. Siehe Abb. 7
3. Schließen Sie die Abdeckung des Batteriefachs fest zu.
4. Den Monitor einschalten. Siehe Abb. 7
Hinweis 1:
Hinweis 2: Nehmen Sie die Batterie aus dem Monitor heraus, wenn Sie ihn
längere Zeit nicht benutzen werden.
5. Steuern Sie die Lautstärke auf einen Sie angenehmen Pegel aus.
1. Verbinden Sie ein Ende des mitgelieferten Netzgeräts mit einer Steckdose und
das andere Ende mit dem Boden des Monitors. Siehe Abb. 8.
Hinweis: Verwenden Sie das mit OUTPUT: 6V DC gekennzeichnete Netzgerät
mit dem Monitor.
2. Den Monitor einschalten. Siehe Abb. 8
3. Steuern Sie die Lautstärke auf einen für Sie angenehmen Pegel aus.
Hinweis 1: Bei Beginn der Aufladung wird die STROM Lampe in blau
aufleuchten. Wenn die Aufladung beendet ist (voll aufgeladen),
wird die STROM L .
Helligkeitseinrichtung
Sie die Helligkeitsauswahltaste & um die Helligkeit zu justieren.
Siehe Abb. 9.
Fügen
ist das Licht grün. Die Leuchte ist
ständig rot.Wenn der Batterieladestand niedrig ist, wird die LED
anfangen zu blinken.
euchte wird rot
Hinweis 2: Wenn die Kamera und der Monitor miteinander verbunden sind, wird die
"Link" LED Grün, andernfalls wird die "Link" LED Rot und blinken.
Hinweis 3: Auf dem LCD Schirm wird kein Bild erscheinen, wenn der Monitor
außerhalb des zulässigen Bereichs liegt (getrennt).
Batteriefach zeigend
Wenn der Strom ausreichend ist,
für
Anschließen an den Netzstrom
Drücken
2.1
2
2.2
Page 30

4
VOX (sprachgesteuerte Übertragung) Funktion
1. Drücken Sie die VOX-Taste aud der Seite des Monitors. Das wird den
Bildschirm ausschalten, aber die VOX-LED wird AN bleiben (blau).
Siehe Abb. 10.
2. Wenn der Sound von der Kamera den eingestellten Pegel erreicht, schaltet sich
der Bildschirm automatisch ein. Er schaltet sich nach 30 Sekunden wieder aus.
Musikfunktion
Sie können mit der Kamera Musik abspielen (drei Titel)
1. Drücken Sie die Play-Taste . Die Kamera wird Musik abspielen.
Siehe Abb. 11.
2.
Siehe Abb. 11.
3. Sie die Weiter-Taste während sie sichtbar ist, die Kamera
w
Hinweis: Wenn Sie die Musikfunktionstaste aktivieren,
Fehlerbehebung
Wenn Sie kein Signal erhalten
Prüfen Sie, ob die Kamera und der Monitor eingeschaltet sind.
Vergewissern Sie sich, dass die Netzstecker ganz eingesteckt sind.
Wird die Kamera/der Monitor mit Batteriestrom versorgt, ersetzen Sie alle
Batterien durch .
Wenn das Signal schwach ist oder wenn
auftreten
Befindet sich ein eingeschalteter Mikrowellenherd im Pfad zwischen der
Kamera und dem Monitor, entfernen Sie die Mikrowelle oder schalten Sie
sie aus.
Vergewissern Sie sich, dass die Kamera und der Monitor innerhalb des
jeweiligen Empfangsbereichs befinden (bei klarer Sichtlinie liegt der
Bereich bei ca. 100 Metern.
Wenn die Betriebsanzeige leuchtet, jedoch nur der Voice-Signaleingang
erkannt wird, kann der Monitor sich im Voice-Aktivierungsmodus befinden.
Drücken Sie die Auto-Taste, um den Bildschirm einzuschalten.
Wenn Sie die Wiedergabetaste nochmals drücken, wird die Musik angehalten.
ird das nächste Lied wiedergeben.
Störungen
Drücken
wird die LED
AN bleiben (rot).
überhaupt
neue
2.3
2.4
Page 31

5
Pflege und Wartung
Achten Sie darauf, dass kleine Kinder keinen Zugriff auf alle Geräteteile
und Zubehörteile haben.
Fingerabdrücke oder Schmutz auf der Objektivoberfläche können sich negativ
auf die Kameraleistung auswirken. Berühren Sie die Objektivoberfläche nicht
mit Ihren Fingern.
Sollte das Objektiv schmutzig geworden sein, blasen Sie den Schmutz und
Staub mit einem Gebläse fort, oder wischen Sie das Objektiv mit einem
weichen, trockenen Tuch ab.
Schützen Sie die Kamera vor Nässe. Niederschlag, Feuchtigkeit und andere
Flüssigkeiten Mineralien, die eine Korrosion elektrischer Schaltkreise
verursachen.
Nicht an staubigen, schmutzigen Orten benutzen.
Nicht an heißen Orten aufbewahren. Hohe Temperaturen können die Lebenszeit
elektronischer Geräte verkürzen und bestimmte Plastikarten verformen oder
schmelzen.
Nicht an sehr kalten Orten aufbewahren. Während sich das System (auf seine
normale Betriebstemperatur) aufwärmt, kann sich Kondenswasser im Gehäuse
bilden, das elektronische Leiterplatten beschädigt.
Versuchen Sie nicht, das Gehäuse zu öffnen. Fachunkundiger Umgang mit dem
Gerät kann das System beschädigen.
Lassen Sie es nicht fallen und setzen Sie es keinen starken Stößen aus.
Betreiben Sie dieses Produkt nur mit dem Netzgerät, das im Lieferumfang
enthalten ist oder als Zubehör geliefert wird.
Überlasten Sie nicht die Steckdosen oder die Verlängerungsleitungen Brand
oder Stromschläge können sonst die Folge sein.
Vergessen Sie nicht, dass Sie bei Benutzung des Systems mit öffentlichen
Funkwellen arbeiten und dass Sound und Video zu anderen
2,4-GHz-Empfangsgeräten übertragen werden können. Selbst Gespräche in
Zimmern neben der Kamera können übertragen werden. Zum Schutz Ihrer
häuslichen Privatsphäre sollten Sie die Kamera immer ausschalten, wenn
sie unbenutzt ist.
enthaltenden
Page 32

Page 33

1
Contenuto della confezione
Una videocamera
Un monitor
Due adattatori
Batteria per monitor (agli ioni di litio, da 3,7V 1000mAH)
Il presente manuale d'uso
Struttura del prodotto
Monitor (Fig. 1)
1. Schermo LCD
2. Antenna
3. Tasti di selezione musica
4. VOX: tasto per trasmissione a comando vocale
5. LED alimentazione
6. Indicatore LED sinistro
7. Indicatori LED volume
8. Altoparlante
9. Indicatori LED VOX (Trasmissione Funzionata Voce)
10. Indicatori LED musica
11. Pulsante di regolazione luminosit
12. Comando alimentazione/volume
13. Spina dell'adattatore di alimentazione
14. Vano batterie
15. Fascetta
Videocamera (Fig. 2)
1. Antenna
2. LED alimentazione
3. LED infrarossi
4. Obiettivo
5. Supporto
6. Luce notturna
7. Tasto luce notturna
8. Microfono
9. altoparlante
10. Vano batterie
11. Interruttore di accensione
12. Spina dell'adattatore di alimentazione
ITALIANO
Page 34

2
Configurazione
Configurazione videocamera
Alimentazione
Per l'alimentazione della videocamera si possono utilizzare 4 batterie AAA
(si consigliano batterie alcaline) o l'alimentazione elettrica CA di rete.
Inserimento delle batterie
1.
2. Vedere fig. 3
3. Inserire 4 batterie AAA
. Vedere la Fig. 3.
4. Chiudere il vano batterie e assicurarsi che sia bloccato correttamente.
Nota 1: non utilizzare contemporaneamente batterie vecchie e nuove.
Nota 2: se si prevede di non utilizzare la videocamera per un periodo
prolungato, rimuovere le batterie.
5. Portare l'interruttore POWER sulla posizione ON. Il LED della
videocamera si illumina . Vedere Fig. 3.
Nota: se il livello di carica sufficiente,
Utilizzo dell'alimentazione CA
1. Collegare un'estremit dell'adattatore in dotazione a una presa a parete
e l'altra alla parte inferiore della videocamera. Vedere fig. 4.
Nota: per la videocamera, utilizzare l'adattatore contrassegnato da
OUTPUT: 6V CC.
2. Portare l'interruttore ON/OFF/sulla posizione ON. Il LED della
videocamera si illumina ( ). Vedere Fig. 4.
Messa a punto
Posizionare la videocamera in un punto adeguato, puntare l'obiettivo verso
l'area di osservazione e regolare l'inclinazione ruotando il barilotto
dell'obiettivo. Vedere Fig. 5.
Luce notturna
Premere il tasto luce nottura, i LED della lulce notturna resteranno accesi.
Vedere Fig. 6.
Allentare la vite nella parte posteriore della camera usando un cacciavite.
Aprire il coperchio del scompartimiento della batteria.
(seguire i simboli più (+) e meno (-) all'interno
del vano della batteria)
(luce rossa)
la luce è sempre rossa; quando
il livello della batteria è basso, il LED inizia a lampeggiare.
luce rossa
1.1
1
1
.2
1.3
Page 35

3
Visione notturna
La videocamera ha nove LED ad alta-intensità per rilevare immagini chiare
riprese al buio. Quando il sensore ottico incorporato rileva un livello di luce
ambientale basso, i LED saranno attivati automaticamente.
1.4
Configurazione del monitor
Alimentazione
Il Monitor utilizza una batteria da 3,7V 1000mAH agli ioni di litio oppure
l'alimentazione di rete CA.
Inserimento delle batteria
1. Aprire il coperchio dello vano batterie sul retro del Monitor. Vedere Fig. 7
2. Inserire la batteria con i contatti in metallo rivolti verso il vano batteria.
Vedere Fig. 7.
3. Chiudere il vano batterie e assicurarsi che sia bloccato correttamente.
4. Accendere il monitor. Vedere la Fig. 7
Nota 1: se il livello di carica è sufficiente,
Nota 2: se si prevede di non utilizzare il monitor per un periodo prolungato,
rimuovere la batteria.
5. Portare il volume al livello desiderato.
Utilizzo dell'alimentazione CA
1. Collegare un'estremit dell'adattatore di rete in dotazione a una presa a parete
e l'altra al lato inferiore del monitor. Vedere Fig. 8.
Nota: per del monitor, utilizzare l'adattatore contrassegnato da OUTPUT: 6V CC.
2.Accendete il monitor. See Fig. 8
3.Portare il volume al livello desiderato.
Nota 1: quando si avvia la carica, l'indicatore Accensione si accende con luce
blu. Se si finito di caricare (carica completa),
Impostazioni di luminosità
Premere il tasto di selezione della luminosit & per regolare la luminosit.
Vedere la Fig. 9.
la luce è sempre rossa; quando il
livello della batteria è basso, il LED inizia a lampeggiare.
la luce diventa rossa.
Nota 2: Quando la fotocamera e il monitor sono collegati, il LED "Link" diventa
verde; altrimenti, il LED "Link" lampeggia di rosso.
Nota 3: Non viene visualizzata nessuna immagine sullo schermo LCD se il
monitor è fuori portata (non collegato).
2.1
2
2.2
Page 36

4
Funzione VOX (trasmissione a comando vocale)
1. Premere il tasto VOX sul lato del monitor. Tale tasto spegno lo schermo ma
il LED VOX rimane acceso (luce blu). Vedere la Fig 10.
2. Quando il suono dalla videocamera raggiunge il livello impostato, lo schermo
si accende automaticamente, per spegnersi di nuovo dopo 30 secondi.
Funzione Musica
È possibile attivare la funzione musica con la videocamera (tre melodie).
1. Premere il tasto Riproduzione , la videocamera riprodurrà la musica.
Vedere la Fig 11.
2.
.Vedere la Fig 11.
3. Premere il tasto Successivo the mentre è visibile, v
Nota: se si attiva la funzione Musica, il LED del tasto musica LED
rimarr acceso (luce rossa).
Risoluzione dei problemi
Se non si riceve alcun segnale
Assicurarsi che videocamera e monitor siano accesi.
Assicurarsi che le spine di alimentazione siano inserite correttamente.
Se per la videocamera/il monitor si utilizza l'alimentazione a batterie,
sostituire quelle vecchie con altre nuove.
Se il segnale è basso o vi sono interferenze
Se tra la videocamera e il monitor è posizionato un forno a microonde in
funzione, rimuoverlo o spegnerlo.
Assicurarsi che videocamera e monitor si trovino a una distanza adeguata
(100 metri senza ostacoli).
Se il LED di alimentazione è acceso ma viene rilevato soltanto il segnale
di ingresso vocale, il monitor può trovarsi in modalità di attivazione vocale.
Premere il pulsante Auto per accendere lo schermo.
Quando si preme nuovamente il pulsante play, viene sospesa la riproduzione
del brano
iene riprodotto il
brano successivo.
2.3
2.4
Page 37

5
Cura e manutenzione
Tenere tutti i componenti e gli accessori lontani dalla portata dei bambini.
Impronta di dita o sporcizia sulla superficie dell'obiettivo potrebbero influire
negativamente sulla prestazione della videocamera. Evitare di toccare la
superficie dell'obiettivo con le dita.
Rimuovere eventuale sporcizia o polvere dall'obiettivo utilizzando un
aspiratore o strofinando con un panno morbido e asciutto.
Mantenere la videocamera in luogo asciutto. Pioggia, umidità e liquidi di
altro tipo contengono minerali in grado di corrodere i circuiti elettronici.
Non utilizzare o conservare in luoghi sporchi e polverosi.
Non conservare in luoghi troppo caldi. Le alte temperature possono
diminuire la vita utile dei dispositivi elettronici, nonché deformare o
sciogliere alcuni materiali plastici.
Non conservare in luoghi troppo freddi. Se il sistema si surriscalda
(rispetto alla normale temperatura), al suo interno può formarsi umidità
in grado di danneggiare le schede dei circuiti elettronici.
Non tentare di aprire la struttura. Se il dispositivo viene maneggiato
scorrettamente, il sistema può essere danneggiato.
Evitare cadute o urti.
Per la messa in funzione del prodotto, utilizzare solo l'alimentatore in
dotazione o opzionale.
Non sovraccaricare le prese elettriche o i cavi di prolunga: pericolo di
incendio o cortocircuito.
Il funzionamento del sistema comporta l'utilizzo di onde radio pubbliche;
suono e video potrebbero essere trasmessi ad altri dispositivi di ricezione a
2,4 GHz. Anche conversazioni provenienti da stanze adiacenti a quella in cui
si trova la videocamera potrebbero essere trasmesse. Per assicurare la privacy,
spegnere la videocamera quando non la si utilizza.
Page 38

Page 39

Page 40

Feb.2008
408-000481-00
 Loading...