

Page 1
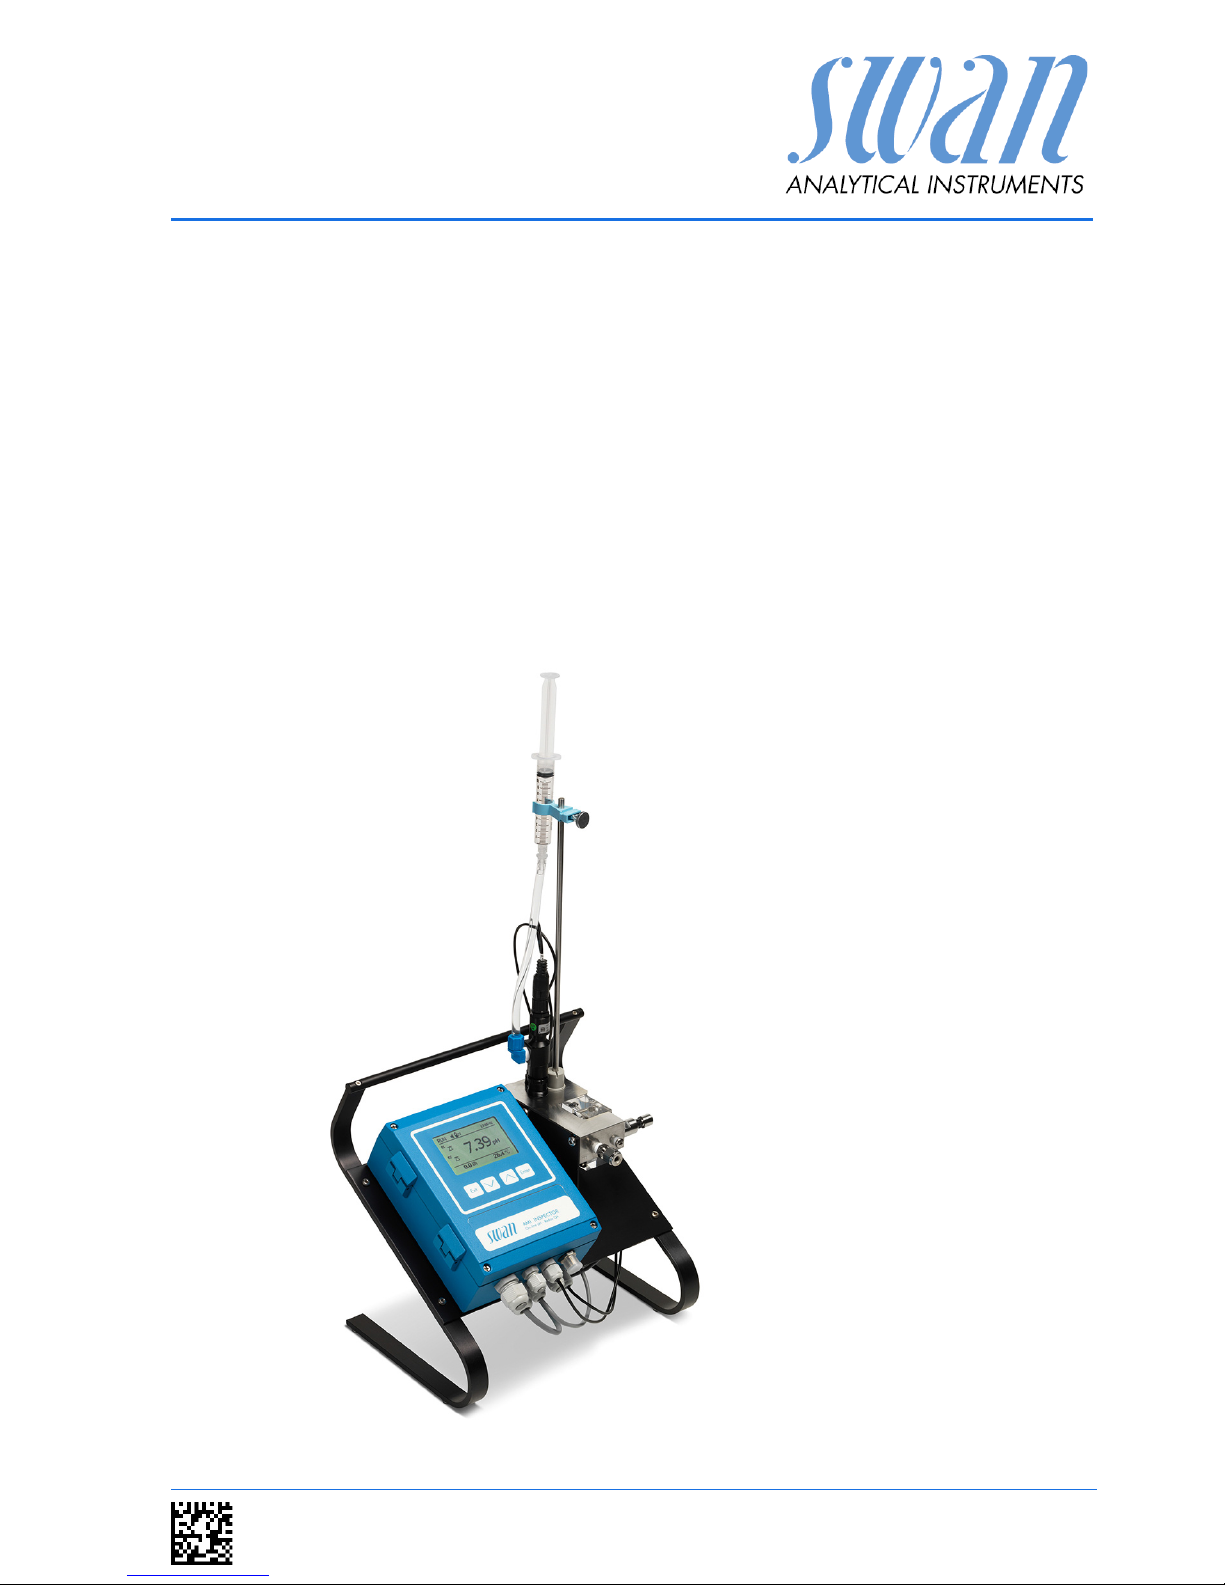
AMI INSPECTOR pH
Version 6.00 and higher
A-96.250.761 / 161017
Operator’
s Manual
Page 2
© 2016, SWAN ANALYTISCHE INSTRUMENTE AG, Switzerland, all rights reserved
subject to change without notice.
Customer Support
SWAN and its representatives maintain a fully trained staff of technical specialists
around the world. For any technical question, contact your nearest
SWAN representative, or the manufacturer:
SWAN ANALYTISCHE INSTRUMENTE AG
Studbachstrasse 13
8340 Hinwil
Switzerland
Internet: www.swan.ch
E-mail: [email protected]
Document Status
Title:
AMI INSPECTOR pH Operator’s Manual
ID:
A-96.250.761
Revision Issue
00 June 2012 First Edition
01 Sept. 2013 Main board V2.4
02 Jan. 2016 AMI Inspector Version 2-A (with AMIAKKU main-
board) and Firmware version 6.00
Page 3

AMI INSPECTOR pH
A-96.250.761 / 161017 1
Table of Contents
1. Safety Instructions . . . . . . . . . . . . . . . . . . . . . . . . . . . . . . . . . . . 3
1.1. Warning Notices . . . . . . . . . . . . . . . . . . . . . . . . . . . . . . . . . . . . . . 4
1.2. General Safety Regulations . . . . . . . . . . . . . . . . . . . . . . . . . . . . . 6
2. Product Description . . . . . . . . . . . . . . . . . . . . . . . . . . . . . . . . . . 7
2.1. Description of the System. . . . . . . . . . . . . . . . . . . . . . . . . . . . . . . 7
2.2. Instrument Overview. . . . . . . . . . . . . . . . . . . . . . . . . . . . . . . . . . . 10
2.3. Technical Data . . . . . . . . . . . . . . . . . . . . . . . . . . . . . . . . . . . . . . . 11
3. Installation. . . . . . . . . . . . . . . . . . . . . . . . . . . . . . . . . . . . . . . . . . 12
3.1. Installation Checklist. . . . . . . . . . . . . . . . . . . . . . . . . . . . . . . . . . . 12
3.2. Connecting Sample Inlet and Outlet. . . . . . . . . . . . . . . . . . . . . . . 13
3.2.1 Swagelok Fitting Stainless Steel at Sample Inlet . . . . . . . . . . . 13
3.2.2 Connect the Sample Outlet . . . . . . . . . . . . . . . . . . . . . . . . . . . . 13
3.3. Install Swansensor pH SI . . . . . . . . . . . . . . . . . . . . . . . . . . . . . . . 14
3.4. Temperature Sensor. . . . . . . . . . . . . . . . . . . . . . . . . . . . . . . . . . . 16
3.5. Electrical Connections . . . . . . . . . . . . . . . . . . . . . . . . . . . . . . . . . 17
3.5.1 Connection Diagram . . . . . . . . . . . . . . . . . . . . . . . . . . . . . . . . . 18
3.5.2 Power Supply . . . . . . . . . . . . . . . . . . . . . . . . . . . . . . . . . . . . . . 19
3.6. Relay Contacts . . . . . . . . . . . . . . . . . . . . . . . . . . . . . . . . . . . . . . . 21
3.6.1 Input . . . . . . . . . . . . . . . . . . . . . . . . . . . . . . . . . . . . . . . . . . . . . 21
3.6.2 Alarm Relay. . . . . . . . . . . . . . . . . . . . . . . . . . . . . . . . . . . . . . . . 21
3.6.3 Relay 1 and 2 . . . . . . . . . . . . . . . . . . . . . . . . . . . . . . . . . . . . . . 22
3.7. Signal Output . . . . . . . . . . . . . . . . . . . . . . . . . . . . . . . . . . . . . . . . 22
4. Instrument Setup . . . . . . . . . . . . . . . . . . . . . . . . . . . . . . . . . . . . 23
4.1. Establish Sample Flow . . . . . . . . . . . . . . . . . . . . . . . . . . . . . . . . . 23
4.2. Programming . . . . . . . . . . . . . . . . . . . . . . . . . . . . . . . . . . . . . . . . 23
5. Operation. . . . . . . . . . . . . . . . . . . . . . . . . . . . . . . . . . . . . . . . . . . 25
5.1. Keys . . . . . . . . . . . . . . . . . . . . . . . . . . . . . . . . . . . . . . . . . . . . . . . 25
5.2. Display . . . . . . . . . . . . . . . . . . . . . . . . . . . . . . . . . . . . . . . . . . . . . 26
5.3. Software Structure . . . . . . . . . . . . . . . . . . . . . . . . . . . . . . . . . . . . 27
5.4. Changing Parameters and values . . . . . . . . . . . . . . . . . . . . . . . . 28
6. Maintenance . . . . . . . . . . . . . . . . . . . . . . . . . . . . . . . . . . . . . . . . 29
6.1. Maintenance Table . . . . . . . . . . . . . . . . . . . . . . . . . . . . . . . . . . . . 29
6.2. Stop of Operation for Maintenance. . . . . . . . . . . . . . . . . . . . . . . . 29
6.3. Maintenance of Electrode. . . . . . . . . . . . . . . . . . . . . . . . . . . . . . . 29
Page 4

2 A-96.250.761 / 161017
AMI INSPECTOR pH
6.3.1 Clean pHSI Electrode . . . . . . . . . . . . . . . . . . . . . . . . . . . . . . . . 29
6.4. Calibration. . . . . . . . . . . . . . . . . . . . . . . . . . . . . . . . . . . . . . . . . . . 31
6.5. Quality Assurance of the Instrument. . . . . . . . . . . . . . . . . . . . . . . 33
6.5.1 Activate SWAN Quality assurance procedure. . . . . . . . . . . . . . 34
6.5.2 Pre-test . . . . . . . . . . . . . . . . . . . . . . . . . . . . . . . . . . . . . . . . . . . 35
6.5.3 Connect instruments . . . . . . . . . . . . . . . . . . . . . . . . . . . . . . . . . 35
6.5.4 Carry out comparison measurement . . . . . . . . . . . . . . . . . . . . . 37
6.5.5 Completion of the measurement . . . . . . . . . . . . . . . . . . . . . . . . 38
6.6. Replacing Fuses . . . . . . . . . . . . . . . . . . . . . . . . . . . . . . . . . . . . . . 39
6.7. Replacing the Battery . . . . . . . . . . . . . . . . . . . . . . . . . . . . . . . . . . 40
6.8. Longer Stop of Operation . . . . . . . . . . . . . . . . . . . . . . . . . . . . . . . 41
7. Error List . . . . . . . . . . . . . . . . . . . . . . . . . . . . . . . . . . . . . . . . . . . 42
8. Program Overview . . . . . . . . . . . . . . . . . . . . . . . . . . . . . . . . . . . 45
8.1. Messages (Main Menu 1) . . . . . . . . . . . . . . . . . . . . . . . . . . . . . . . 45
8.2. Diagnostics (Main Menu 2) . . . . . . . . . . . . . . . . . . . . . . . . . . . . . . 46
8.3. Maintenance (Main Menu 3) . . . . . . . . . . . . . . . . . . . . . . . . . . . . . 47
8.4. Operation (Main Menu 4) . . . . . . . . . . . . . . . . . . . . . . . . . . . . . . . 47
8.5. Installation (Main Menu 5). . . . . . . . . . . . . . . . . . . . . . . . . . . . . . . 48
9. Program List and Explanations . . . . . . . . . . . . . . . . . . . . . . . . . 50
1 Messages. . . . . . . . . . . . . . . . . . . . . . . . . . . . . . . . . . . . . . . . . . 50
2 Diagnostics . . . . . . . . . . . . . . . . . . . . . . . . . . . . . . . . . . . . . . . . 50
3 Maintenance . . . . . . . . . . . . . . . . . . . . . . . . . . . . . . . . . . . . . . . 52
4 Operation . . . . . . . . . . . . . . . . . . . . . . . . . . . . . . . . . . . . . . . . . . 53
5 Installation . . . . . . . . . . . . . . . . . . . . . . . . . . . . . . . . . . . . . . . . . 54
10. Material Safety Data sheets . . . . . . . . . . . . . . . . . . . . . . . . . . . . 68
10.1. Reagents. . . . . . . . . . . . . . . . . . . . . . . . . . . . . . . . . . . . . . . . . . . . 68
11. Default Values . . . . . . . . . . . . . . . . . . . . . . . . . . . . . . . . . . . . . . . 69
12. Index. . . . . . . . . . . . . . . . . . . . . . . . . . . . . . . . . . . . . . . . . . . . . . . 72
13. Notes . . . . . . . . . . . . . . . . . . . . . . . . . . . . . . . . . . . . . . . . . . . . . . 73
Page 5

AMI INSPECTOR pH
Safety Instructions
A-96.250.761 / 161017 3
AMI INSPECTOR pH - Operator’s
Manual
This document describes the main steps for instrument setup, operation and maintenance.
1. Safety Instructions
General The instructions included in this section explain the potential risks
associated with instrument operation and provide important safety
practices designed to minimize these risks.
If you carefully follow the information contained in this section, you
can protect yourself from hazards and create a safer work environment.
More safety instructions are given throughout this manual, at the
respective locations where observation is most important. Strictly
follow all safety instructions in this publication.
Target
audience
Operator: Qualified person who uses the equipment for its intended
purpose.
Instrument operation requires thorough knowledge of applications,
instrument functions and software program as well as all applicable
safety rules and regulations.
OM Location Keep the AMI Operator’s Manual in proximity of the instrument.
Qualification,
Training
To be qualified for instrument installation and operation, you must:
read and understand the instructions in this manual as well as
the Material Safety Data Sheets.
know the relevant safety rules and regulations.
Page 6
4 A-96.250.761 / 161017
AMI INSPECTOR pH
Safety Instructions
1.1. Warning Notices
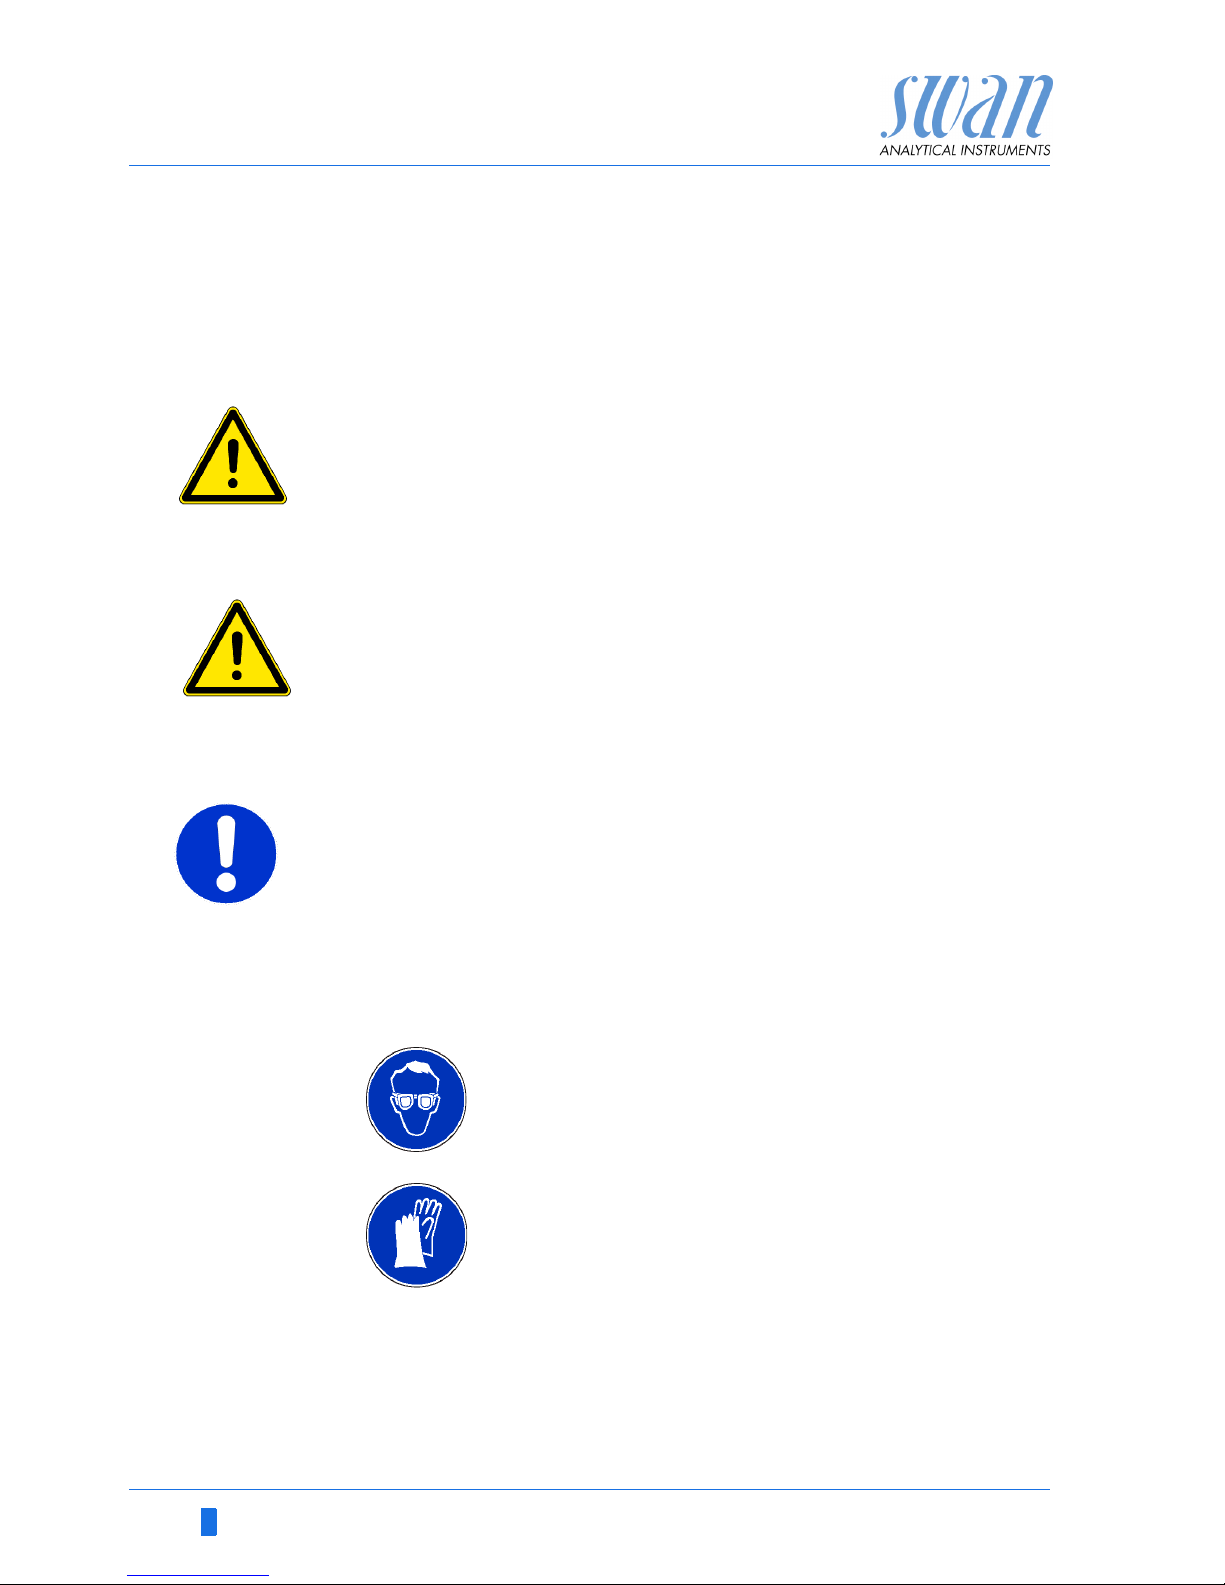
The symbols used for safety-related notices have the following significance:
DANGER
Your life or physical wellbeing are in serious danger if such
warnings are ignored.
Follow the prevention instructions carefully.
WARNING
Severe injuries or damage to the equipment can occur if such
warnings are ignored.
Follow the prevention instructions carefully.
CAUTION
Damage to the equipment, minor injury, malfunctions or incorrect process can be the consequence if such warnings are ignored.
Follow the prevention instructions carefully.
Mandatory
Signs
The importance of the mandatory signs in this manual.
Safety goggles
Safety gloves
Page 7
AMI INSPECTOR pH
Safety Instructions
A-96.250.761 / 161017 5
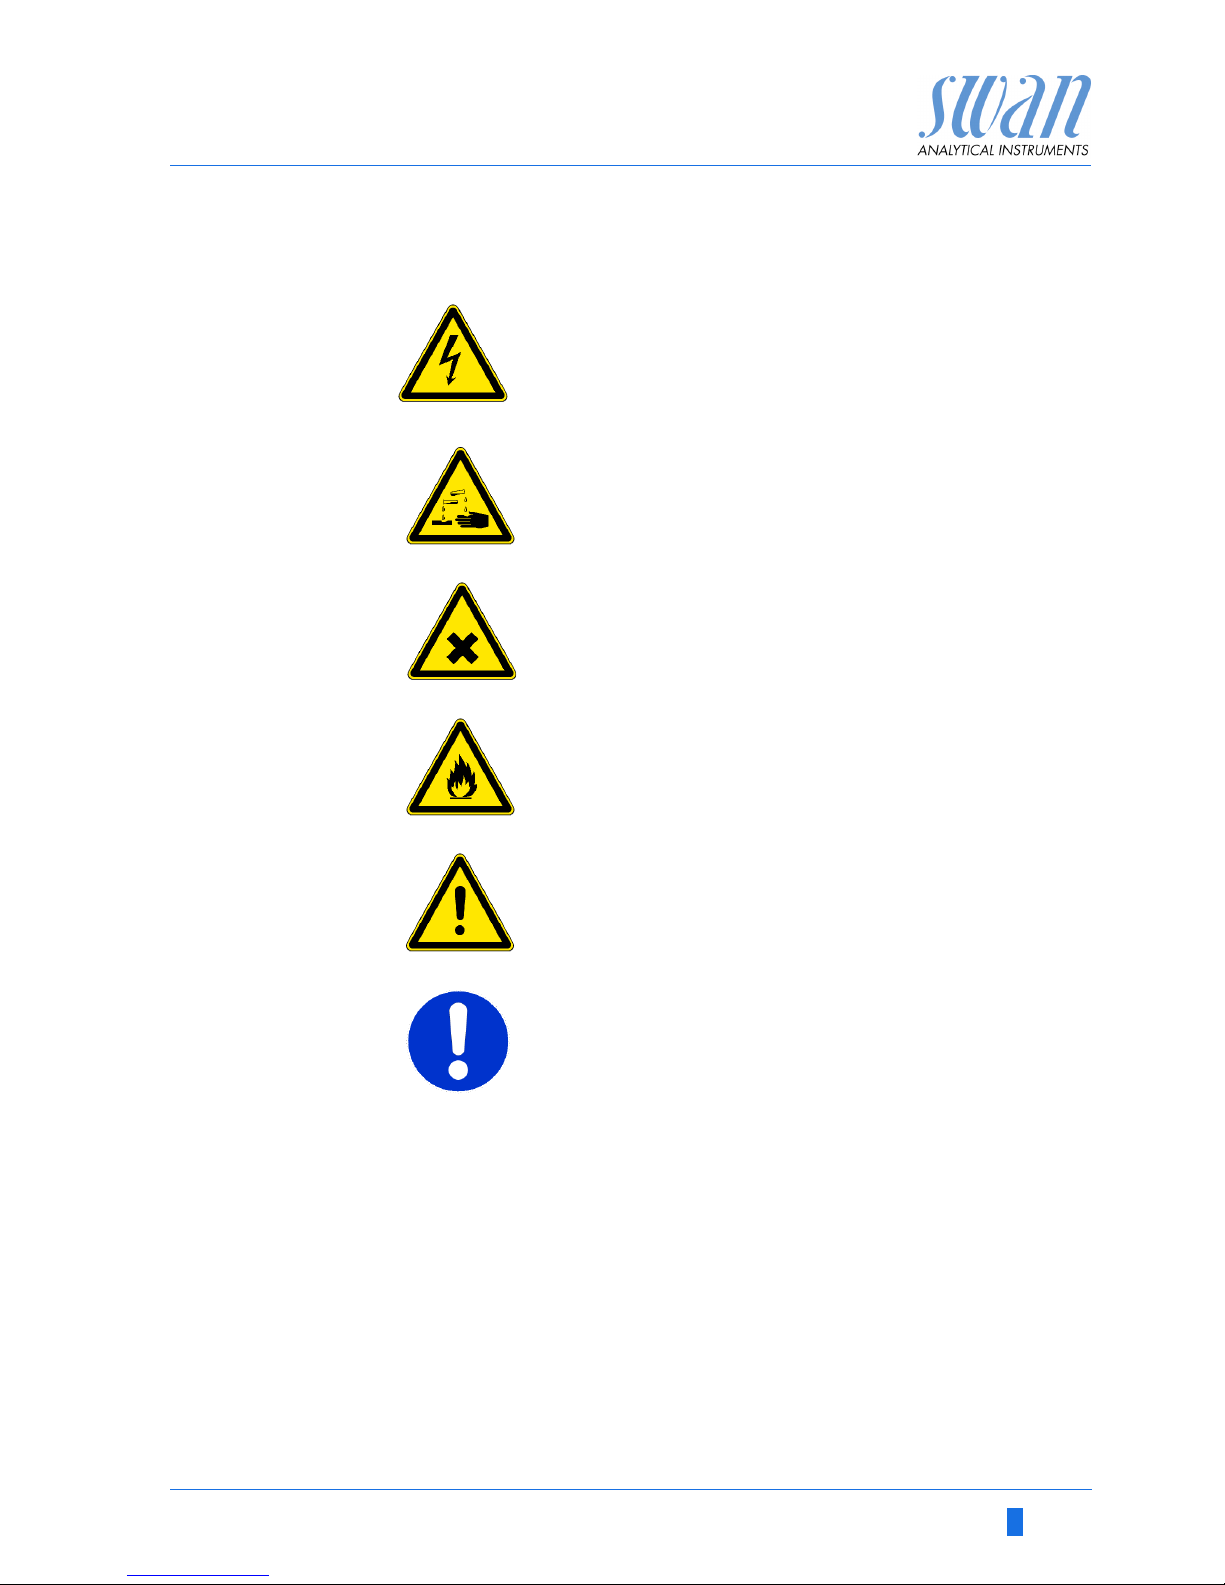
Warning Signs The importance of the warning signs in this manual.
Electrical shock hazard
Corrosive
Harmful to health
Flammable
Warning general
Attention general
Page 8
6 A-96.250.761 / 161017
AMI INSPECTOR pH
Safety Instructions
1.2. General Safety Regulations
Legal
Requirements
The user is responsible for proper system operation.
All precautions must be followed to ensure safe operation
of the instrument.
Spare Parts
and
Disposables
Use only official SWAN spare parts and disposables. If other parts
are used during the normal warranty period, the manufacturer’s
warranty is voided.
Modifications Modifications and instrument upgrades shall only be carried out by
an authorized Service Technician. SWAN will not accept responsibility for any claim resulting from unauthorized modification or alteration.
WARNING
Risk of Electrical Shock
If proper operation is no longer possible, the instrument must be
disconnected from all power lines, and measures must be taken
to prevent inadvertent operation.
To prevent from electrical shock, always make sure that the
ground wire is connected.
Service shall be performed by authorized personnel only.
Whenever electronic service is required, disconnect instru-
ment power and power of devices connected to.
–relay 1,
–relay 2,
– alarm relay
WARNING
For safe instrument installation and operation you must read
and understand the instructions in this manual.
WARNING
Only SWAN trained and authorized personnel shall perform the
tasks described in this document.
Page 9

AMI INSPECTOR pH
Product Description
A-96.250.761 / 161017 7
2. Product Description
This chapter contains technical data, requirements and performance data.
2.1. Description of the System
The portable AMI INSPECTOR instrument is a complete monitoring
system mounted on a small panel with supporting stand and a rechargeable battery for stand-alone operation (>24h), designed as
an inspection equipment for quality assurance of online process
monitors.
pH Measuring
Principle
(simplified)
The pH measurement is based on a voltage measurement. A voltage can only be measured between two different potentials, therefore, the pH measuring chain contains a measuring electrode and a
reference electrode. The reference electrode maintains a constant
potential whereas the potential of the measuring electrode changes
with the pH value. The voltage which results from this potential difference is measured and displayed on the transmitter as pH value.
The measuring chain is designed so that the voltage is zero at
pH 7.
pH Electrode The Swansensor pH SI is a combined electrode with liquid electro-
lyte (KCl) for the measurement of pH.
Features General Features of AMI INSPECTORs are:
Battery life after full charge:
– >24h at full load (use of 3 relays, USB, signal output, logger)
– >36h at minimum load (use of logger only)
Charging time: approx. 6 hours
Controlled shut-down if battery is empty.
Display of remaining battery life in hours.
For longer battery life the back light of the LC Display is dis-
abled.
Continuous operation using power adapter. The battery
should be discharged at least once a month (normal usage
until the monitor automatically shuts down).
Battery The Li-Ion battery is located in the housing of the AMI transmitter.
See chapter Power Supply, S. 19 regarding power supply and
charging of the battery.
Page 10

8 A-96.250.761 / 161017
AMI INSPECTOR pH
Product Description
Safety
Features
No data loss after power failure, all data is saved in non-volatile
memory. Over voltage protection of in- and outputs.
Galvanic separation of measuring inputs and signal outputs.
Temper ature
compensation
The pH value depends on the sample temperature. To compensate
temperature fluctuations a temperature sensor is installed in the
flow cell
Alarm Relay One potential free contact.
Alternatively:
Open during normal operation, closed on error and loss of
power.
Closed during normal operation, open on error and loss of
power.
Summary alarm indication for programmable alarm values and instrument faults.
Input One input for potential-free contact to freeze the measuring value
or to interrupt control in automated installations (hold function or re-
mote-off).
USB interface Built-in USB interface for logger download. Use the USB stick sup-
plied by Swan only (other USB sticks can dramatically reduce battery life).
Relays Two potential-free contacts programmable as limit switches for
measuring values, controllers or timer for system cleaning with automatic hold function.
Rated load: 100 mA/ 50 VAC
Signal Output One programmable signal output for measured values (freely scal-
able, linear, bilinear or logarithmic) or as continuous control output
(control parameters programmable).
Current loop: 0/4–20 mA
Maximum burden: 510
Flow Cell Flow cell QV-Flow IS1000 made of stainless steel SS316L with
built-in temperature sensor (Pt1000), flow adjustment valve, digital
sample flow meter, quick release vessel for easy sensor access
and calibration.
Page 11
AMI INSPECTOR pH
Product Description
A-96.250.761 / 161017 9
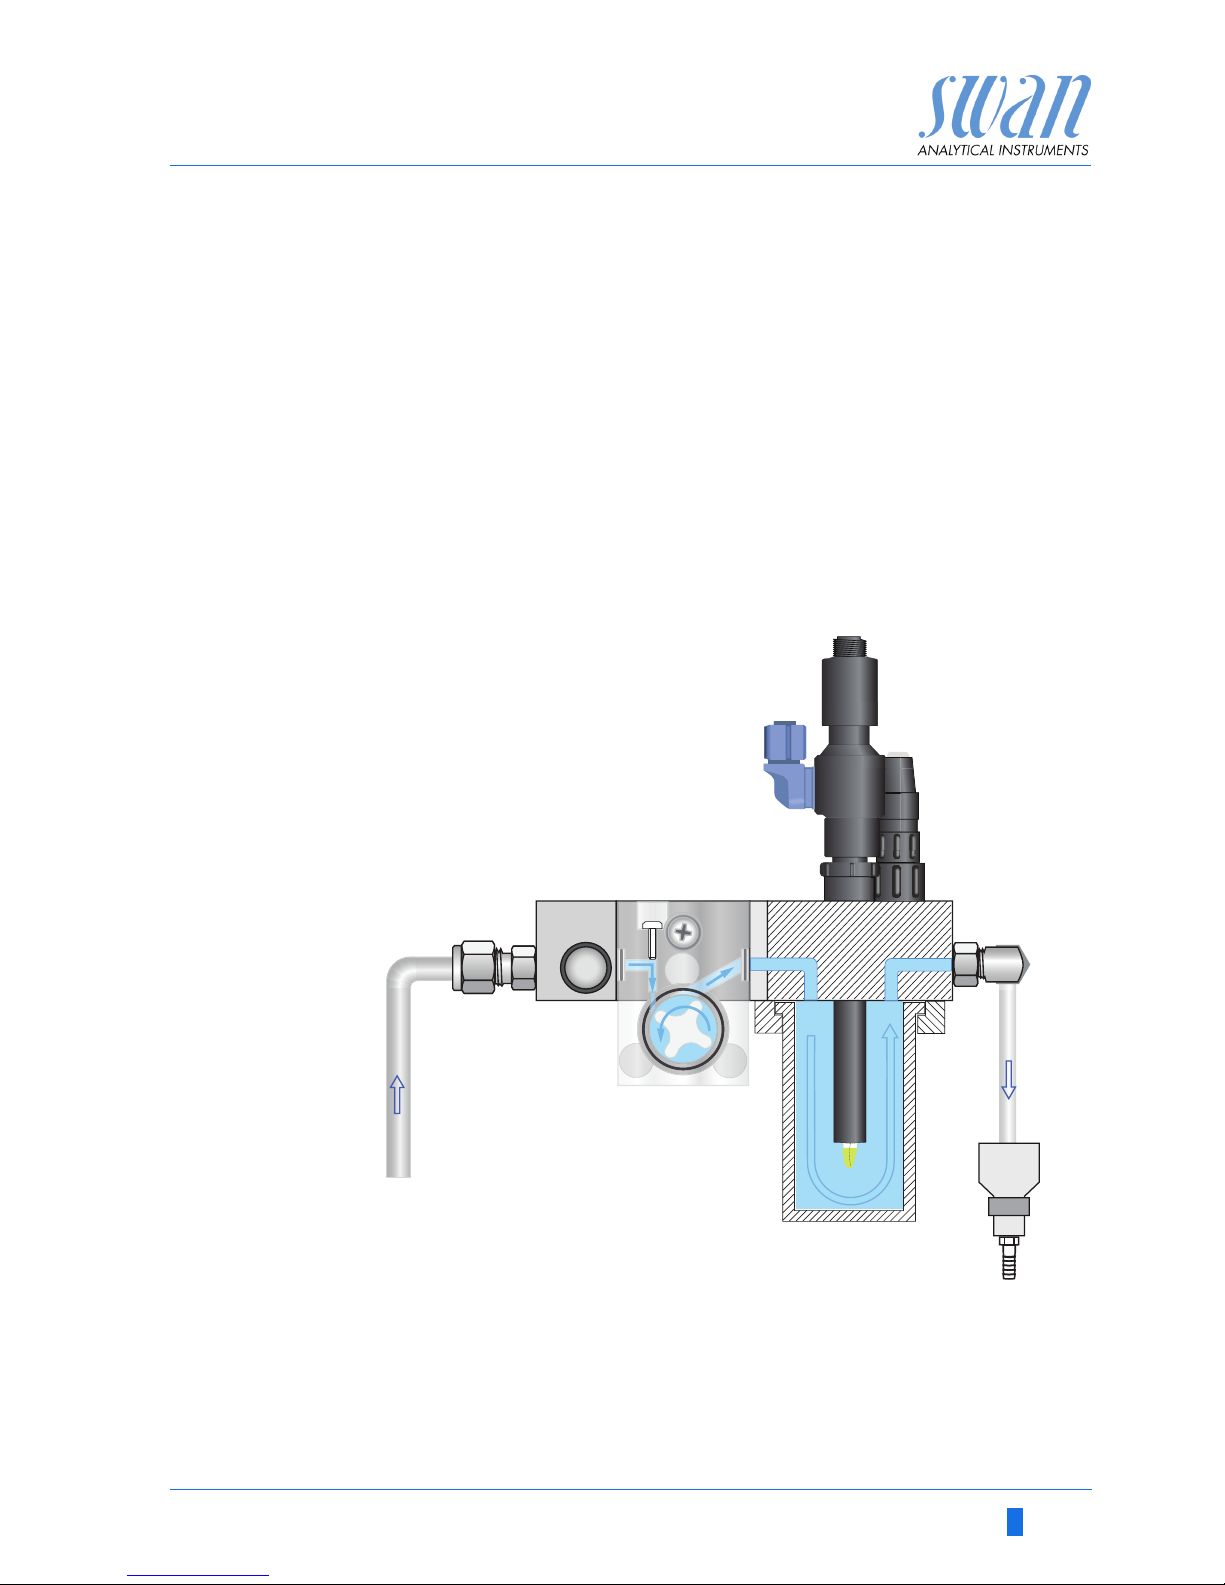
Fluidics The flow cell (QV-Flow) consists of the flow cell block [E] and the
vessel [G].
The pH sensor [A] and the temperature sensor [B] are screwed into
the flow cell block [E].
The sample enters at the sample inlet [C]. It flows through the flow
regulating valve [D], where the flow rate can be adjusted. Then the
sample flows via the flow sensor [F] and the flow cell block [E] into
the vessel [G], were the pH of the sample is measured. The pH value depends on the sample temperature. The measuring value of
the temperature sensor [B] is used to recalculate the pH measuring
value to a predefined average sample temperature.
The sample leaves the vessel via flow cell block through the sample outlet [H] and flows into the drain [I].
A
B
C
D
E
pH Sensor
Temperature sensor
Sample inlet
Flow regulating valve
Flow cell block
F
G
H
I
Flow sensor
Vessel
Sample outlet
Drain
A
B
CD E
F
G
H
I
Page 12
10 A-96.250.761 / 161017
AMI INSPECTOR pH
Product Description
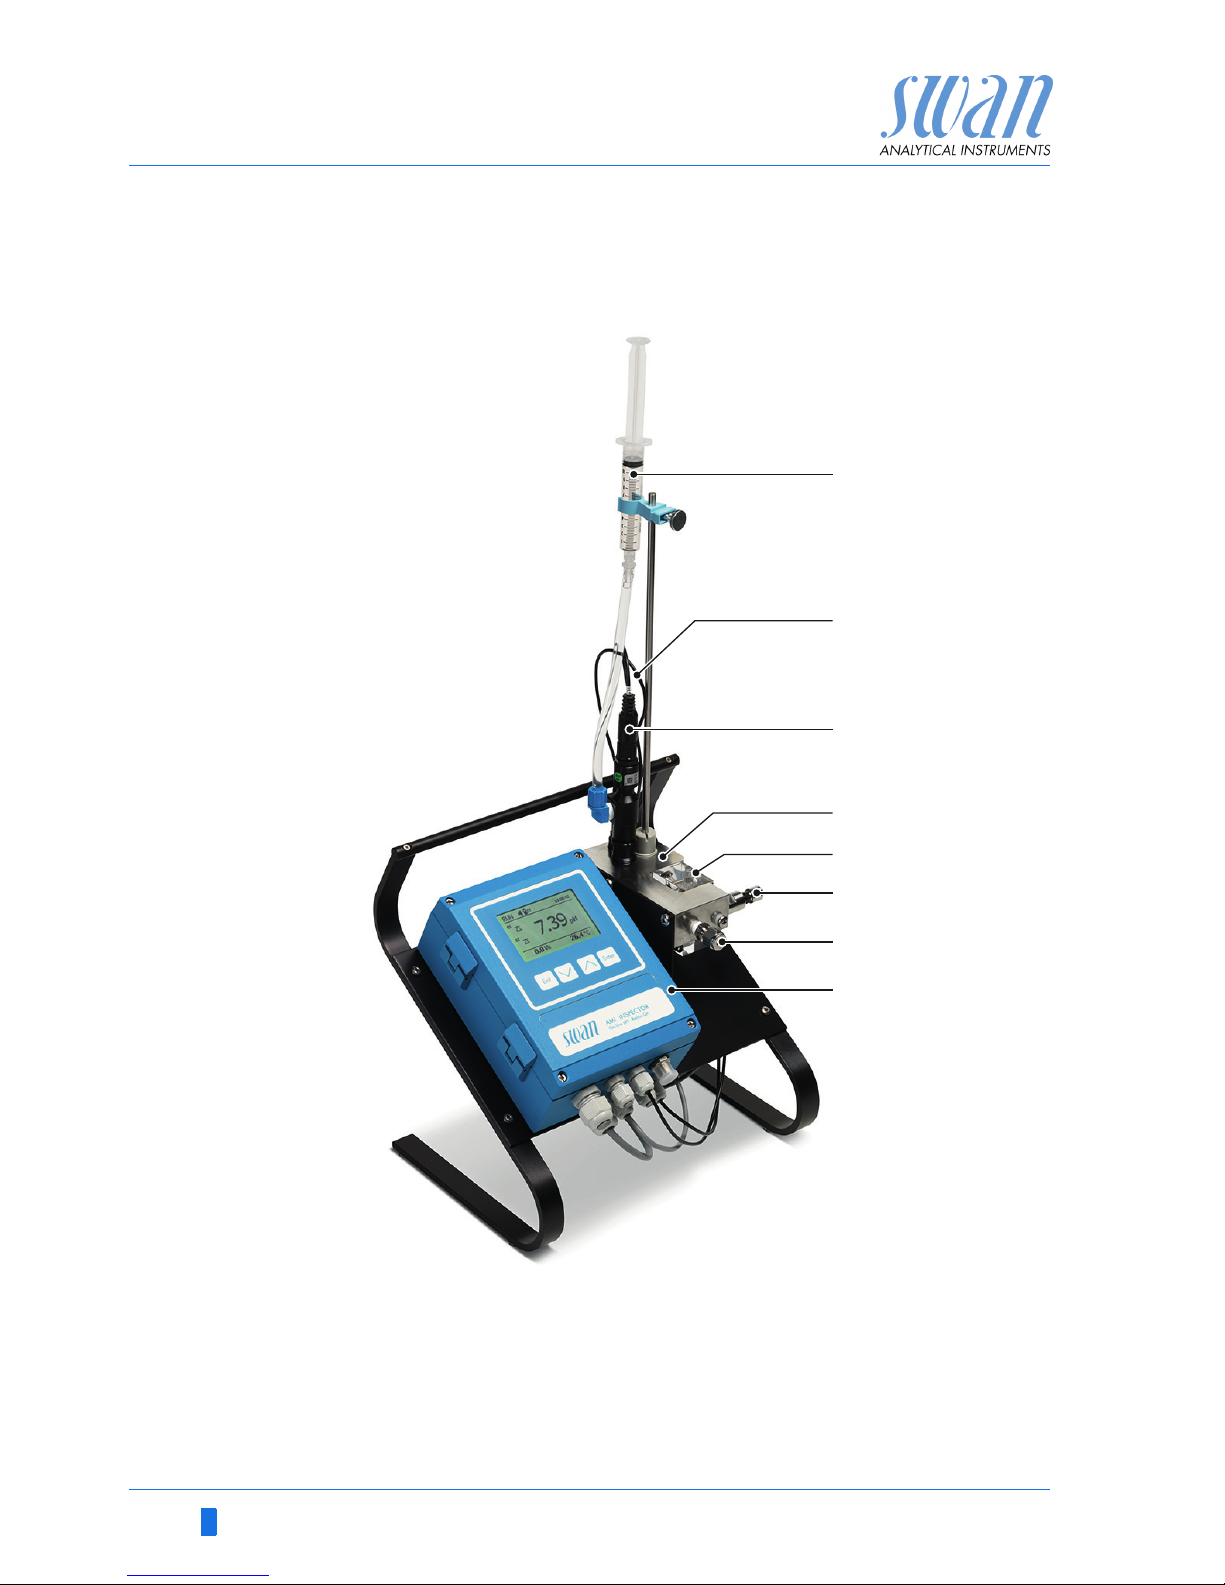
2.2. Instrument Overview
A
B
C
D
KCl reservoir
Temperature sensor (cable)
pH sensor
Flow cell
E
F
G
H
Flow sensor
Flow regulating valve
Sample inlet
AMI Transmitter
A
B
C
D
E
F
G
H
Page 13

AMI INSPECTOR pH
Product Description
A-96.250.761 / 161017 11
2.3. Technical Data
Power Supply Battery
Use original, supplied power adapter only.
Voltage:
Power consumption:
Charging Time:
Battery type:
85–265 VAC, 50/60 Hz
max. 20 VA
~ 6h
Li-Ion
During charging protect from heat impact and keep splash-proof
(not IP66).
Measuring
Range
pH:
Resolution:
1 to 12 pH
0.01 pH
Temperature
Input
for Pt1000 type sensor
Measuring range:
Resolution:
- 30 to +130 °C
0.1 °C
Sample
conditions
Flow Rate:
Temperature:
Inlet pressure:
5–10 l/h
up to 50 °C
0.2–2 bar
Temperature
monitoring
Alarm if the transmitter temperature is higher than + 65 °C or lower
than 0 °C.
Page 14
12 A-96.250.761 / 161017
AMI INSPECTOR pH
Installation
3. Installation
3.1. Installation Checklist
Check
Instrument’s specification must conform to your AC power
ratings. See External power adapter, p. 20.
Check if the battery is fully charged.
Installation
Connect sample inlet and outlet to the flow cell.
pH electrode
Install the sensor (see Install Swansensor pH SI, p. 14).
Connect sensor cables.
Store the protective caps for later use.
Power-up
Turn on the sample flow and wait until the flow cell is
completely filled.
Switch on power.
Instrument
set-up
Adjust sample flow.
Program all parameters for sensor.
Program all parameters for instrument operation (limits,
alarms).
Run-in period
Let the instrument run continuously for 1 h.
Page 15
AMI INSPECTOR pH
Installation
A-96.250.761 / 161017 13
3.2. Connecting Sample Inlet and Outlet
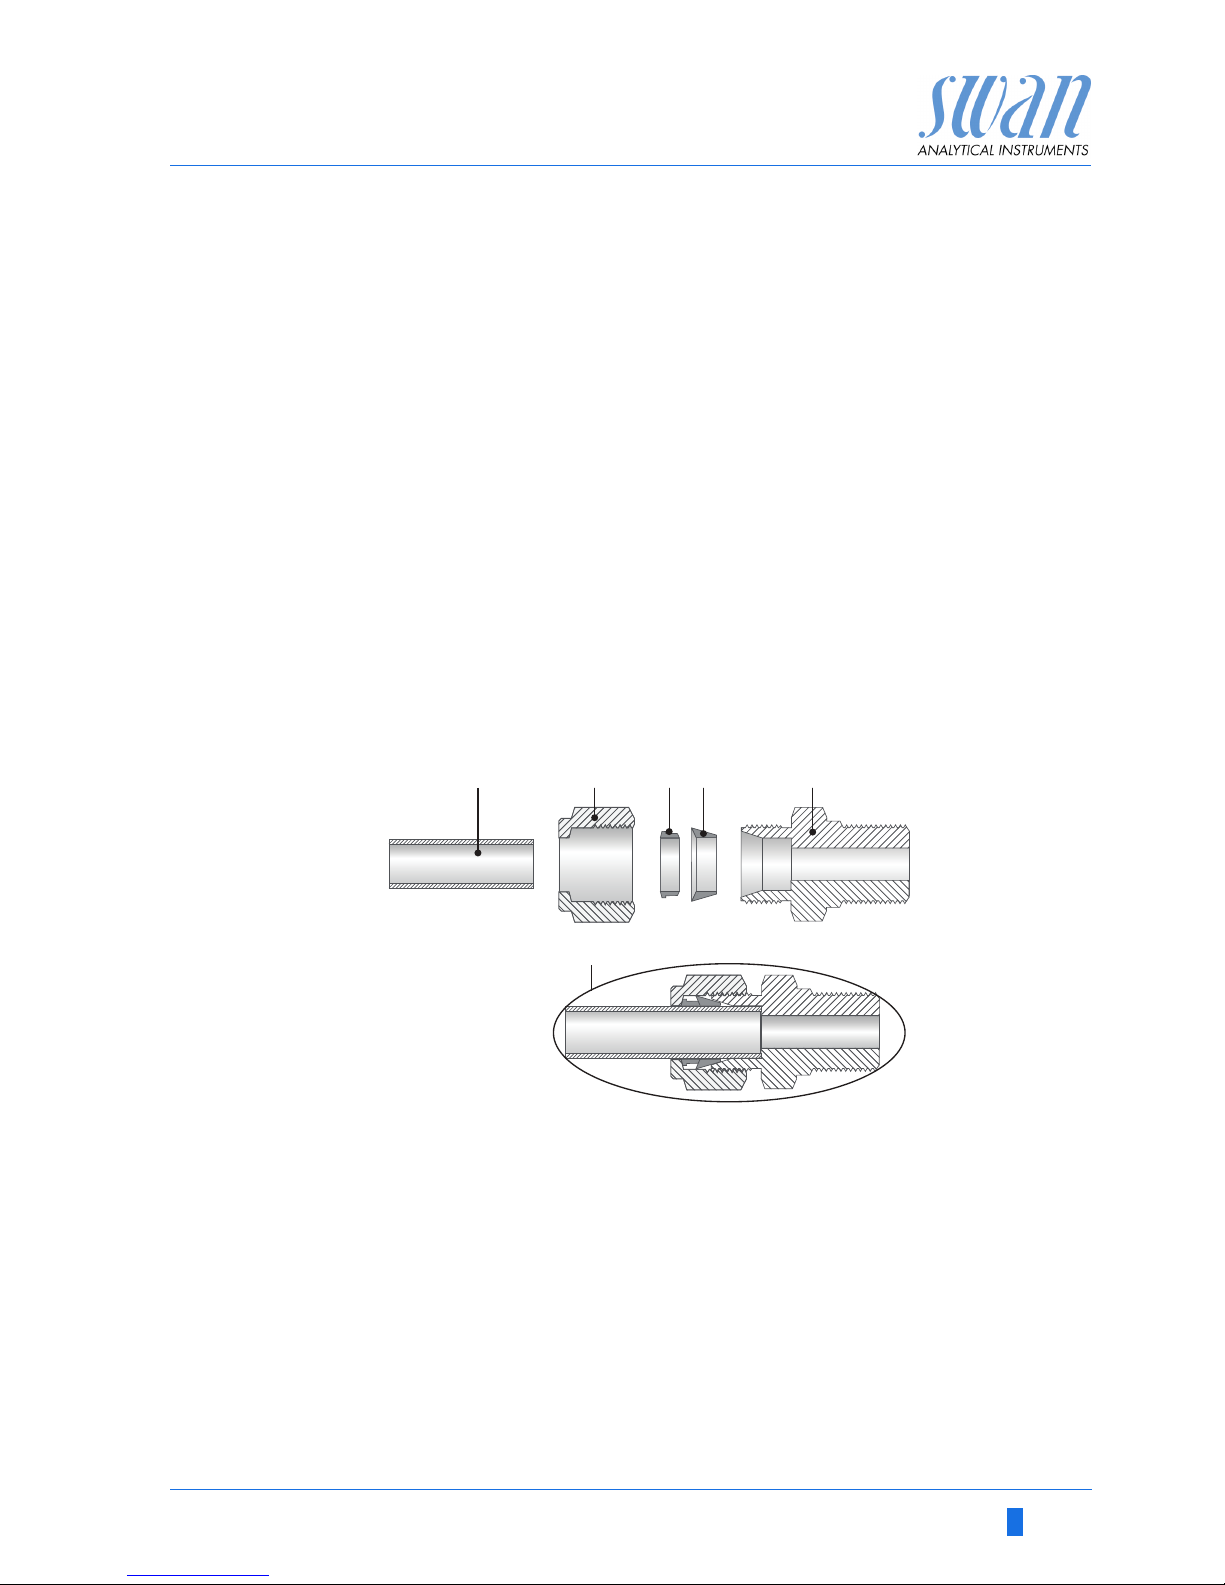
3.2.1 Swagelok Fitting Stainless Steel at Sample Inlet
Preparation Cut the tube to length and deburr it. The tube must be straight and
free from blemishes for approximately 1,5 x tube diameter from the
end.
Lubrication with lubricating oil, MoS2, Teflon etc. is recommended
for the assembly and reassembly of bigger sized unions (thread,
compression cone).
Installation 1 Insert the compression ferrule [C] and the compression
cone [D] into the union nut [B].
2 Screw on the union nut onto the body, do not tighten it.
3 Push the stainless steel pipe through the union nut as far as it
reaches the stop of the body.
4 Tighten down the union nut 1¾ rotation using an open ended
spanner. Hold Body from turning with a second wrench.
3.2.2 Connect the Sample Outlet
Connect the 1/2” tube to the waste funnel of the AMI INSPECTOR
pH.
A
B
C
Tube
Union nut
Compression ferrule
D
E
F
Compression cone
Body
Tightened connection
ABCDE
F
Page 16
14 A-96.250.761 / 161017
AMI INSPECTOR pH
Installation
3.3. Install Swansensor pH SI
The pH electrode SI is packed separately and protected with a cap
filled with KCl. After the AMI INSPECTOR pH has been installed
and connected to the sample line, install the pH electrode SI as follows:
CAUTION
Fragile parts.
The pH electrode is fragile.
Handle with care.
Do not spill KCL when removing the protection cap.
Prepare the
KCl Reservoir
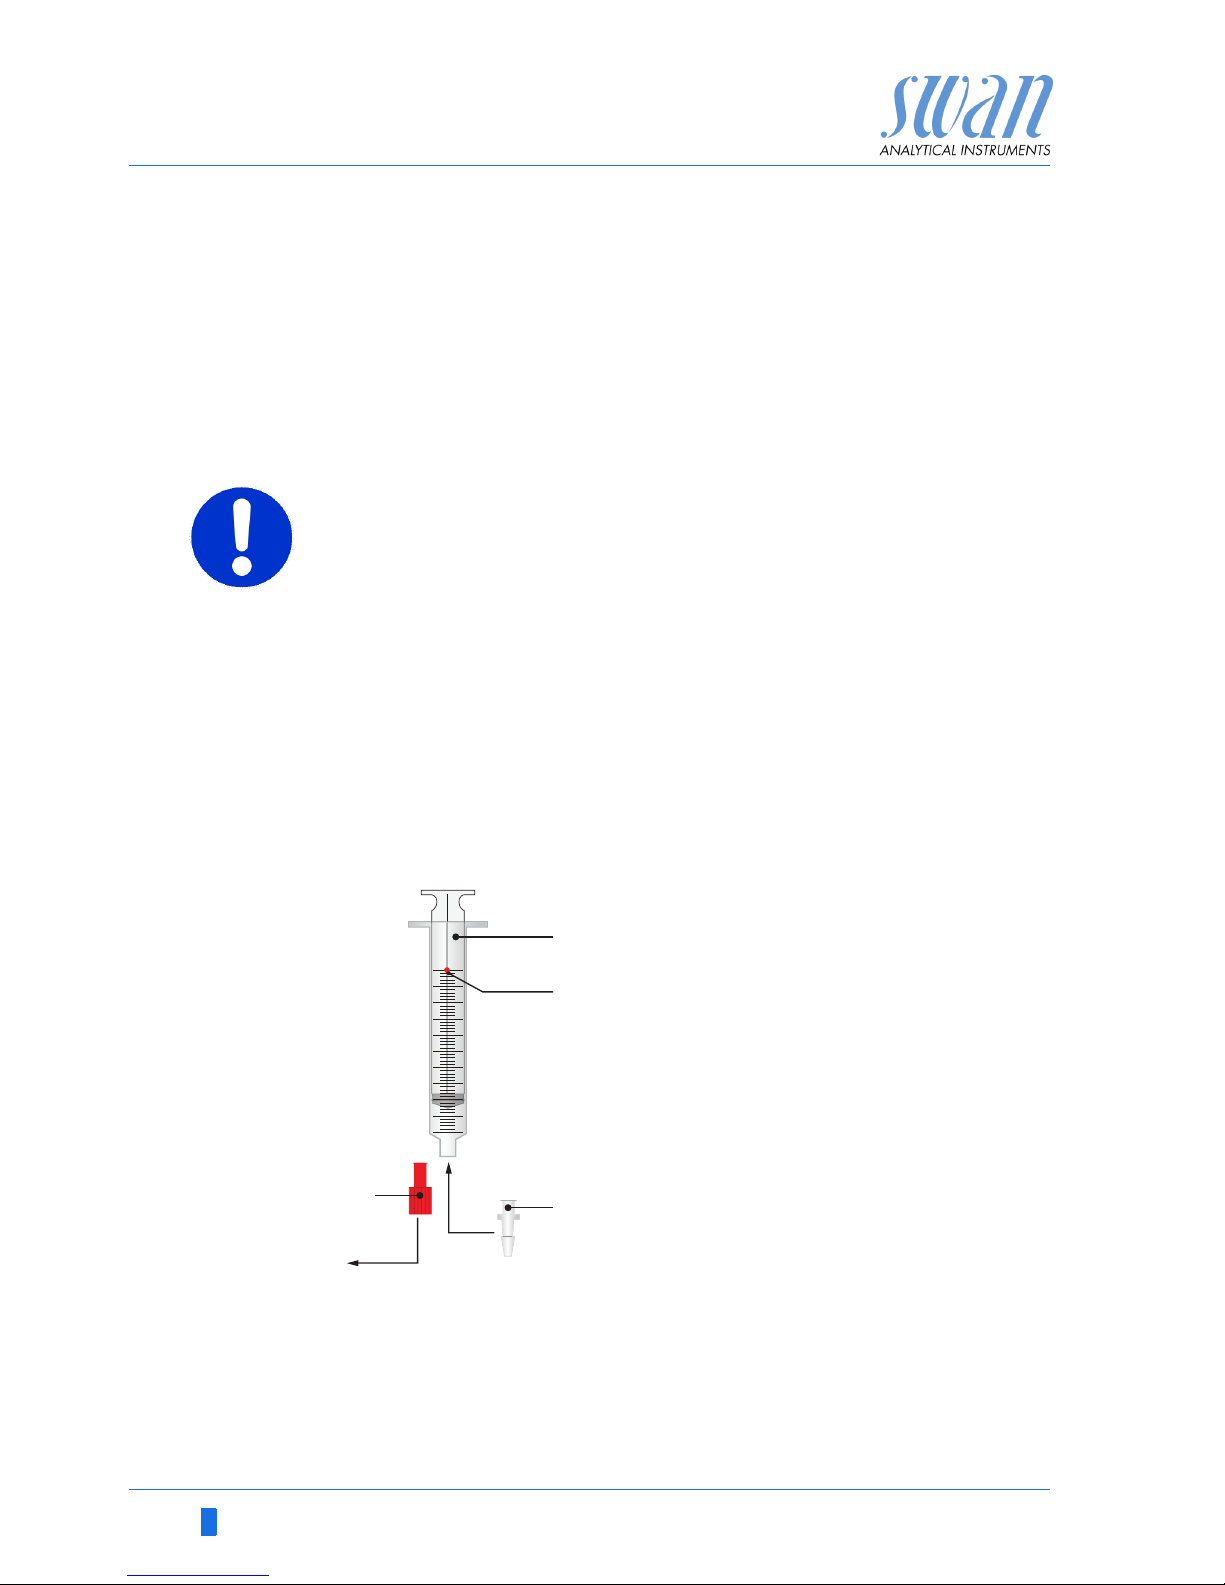
The KCl supply to the reference electrode is ensured by a syringe
[A] with a volume of 10ml. The syringe is connected to the reference electrode with a Luer-Lock connector [D].
To ensure a continuous flow of KCl to the reference electrode, pull
the plunger of the syringe over the punched hole [B].
1 Remove the Luer-Lock seal cone [C] from the tip of the syringe
[A].
2 Insert the Luer-Lock connector [D] into the tip of the syringe.
A
B
C
D
Syringe
Punched hole
Luer-Lock seal cone
Luer-Lock connector
A
B
C
D
Page 17
AMI INSPECTOR pH
Installation
A-96.250.761 / 161017 15
Install the
Electrode
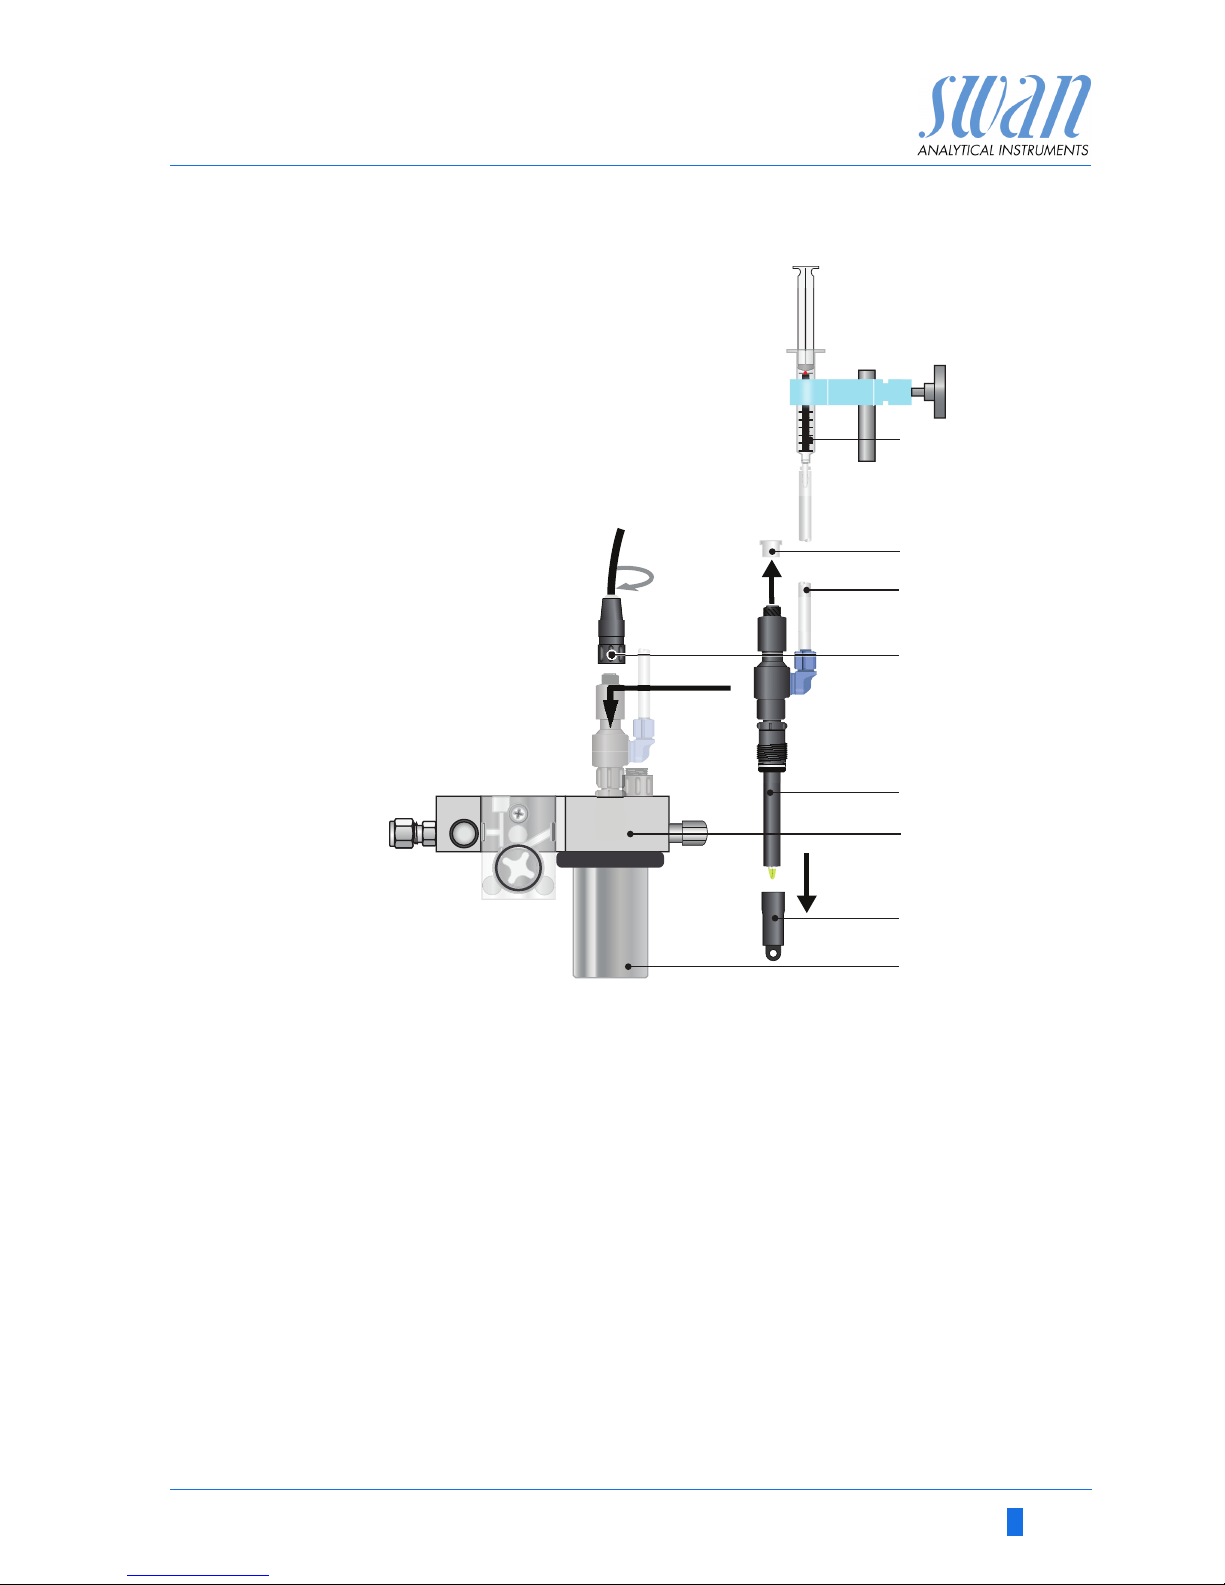
1 Carefully remove the protective cap [G] from the electrode tip.
Turn it clockwise only.
2 Rinse the electrode tip with clean water.
3 Insert the electrode through the flow cell block [F] into the cali-
bration vessel [H].
4 Tighten it hand-tight.
5 Remove the connector cap [B].
6 Screw the connector [D] marked with pH onto the sensor.
7 Keep the protective caps on a secure place for later use.
A
B
C
D
Syringe (KCl reservoir)
Connector cap
KCl supply tube
Connector
E
F
G
H
Electrode
Flow cell block QV-Flow
Protective cap
Calibration vessel
B
A
E
F
H
G
D
C
Page 18
16 A-96.250.761 / 161017
AMI INSPECTOR pH
Installation
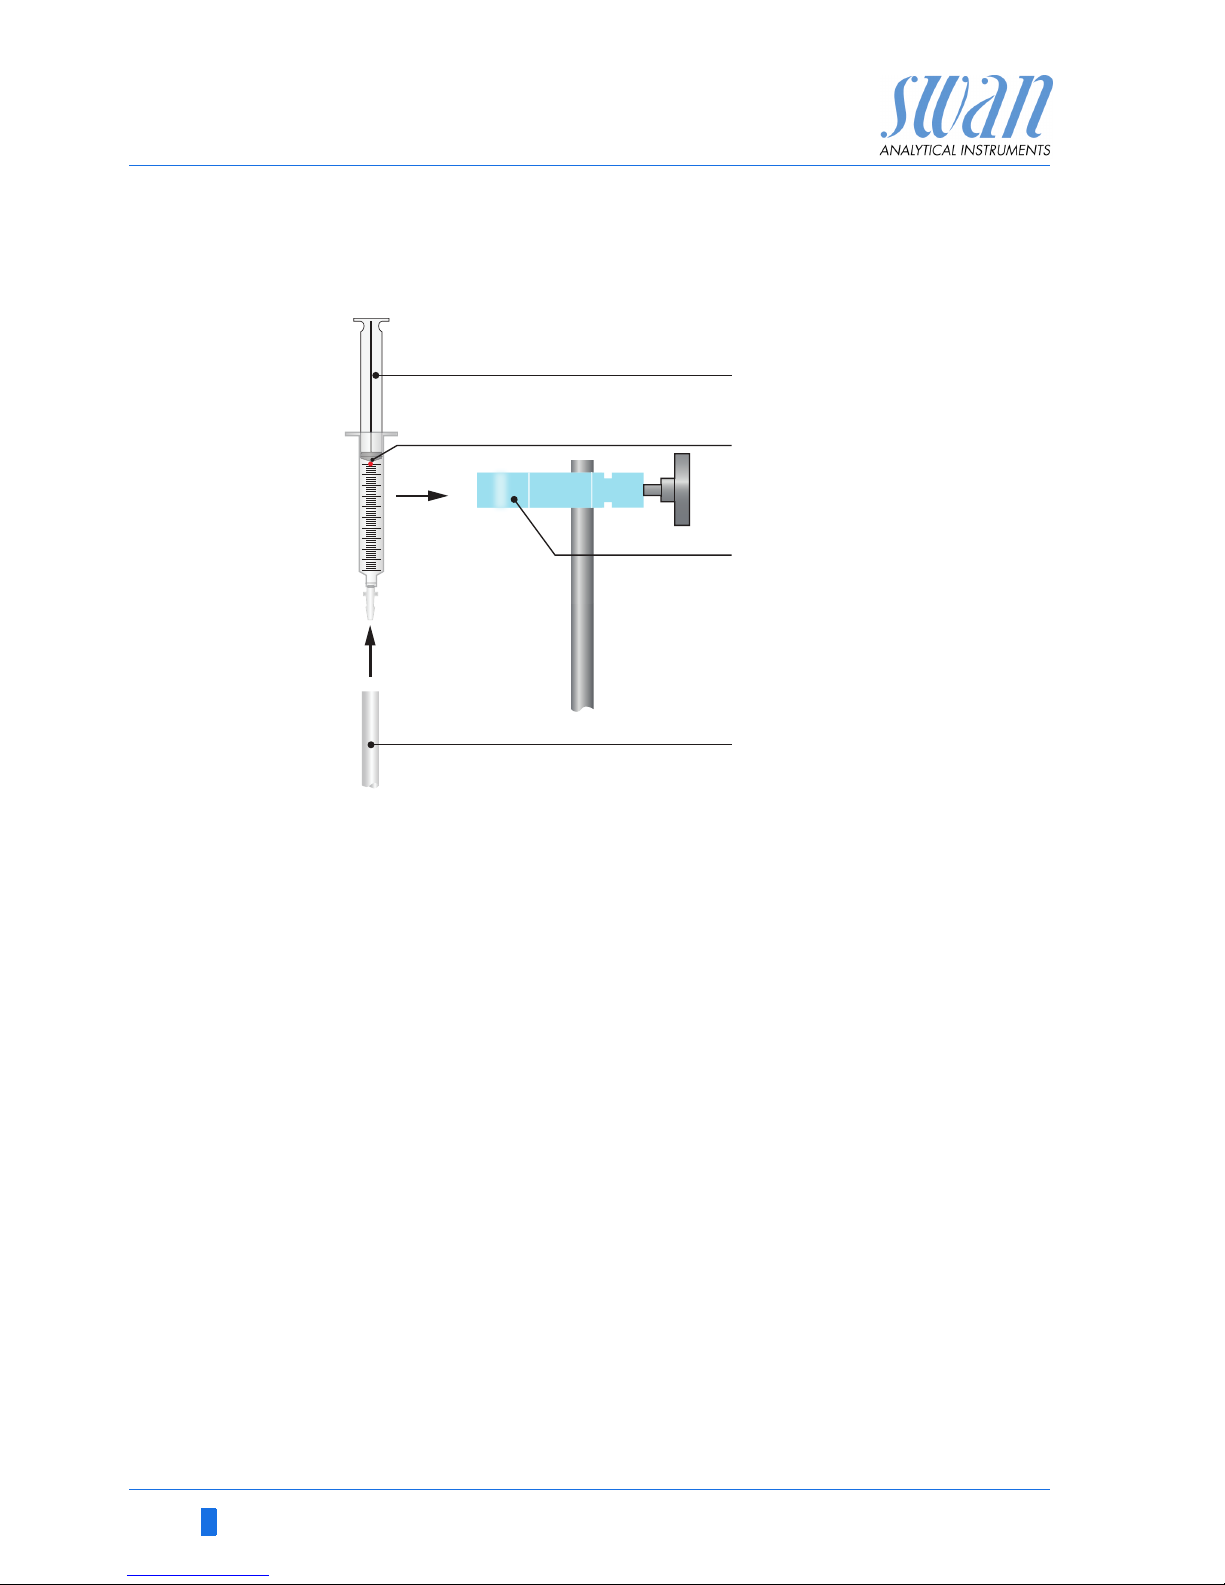
1 Fill the KCl supply tube [D] of the electrode completely with
electrolyte.
Ensure that no air bubbles remain in the tube.
2 Fill the syringe completely with electrolyte by pulling the plunger
just below the punch hole [B].
3 Connect the syringe to the KCl supply tube (Luer-Lock) and clip
it to the holder [C].
4 Pull the plunger slightly over the air hole.
3.4. Temperature Sensor
The temperature sensor is permanently glued to the flow cell block.
Screw the connector marked with T onto the temperature sensor.
ABPlunger
Punch hole
CDHolder
KCl supply tube
A
B
C
D
Page 19
AMI INSPECTOR pH
Installation
A-96.250.761 / 161017 17
3.5. Electrical Connections
WARNING
Always turn off DC power before manipulating electric parts.
Make sure the power specification of the wall mount adapter
corresponds to the power on site.
Cable
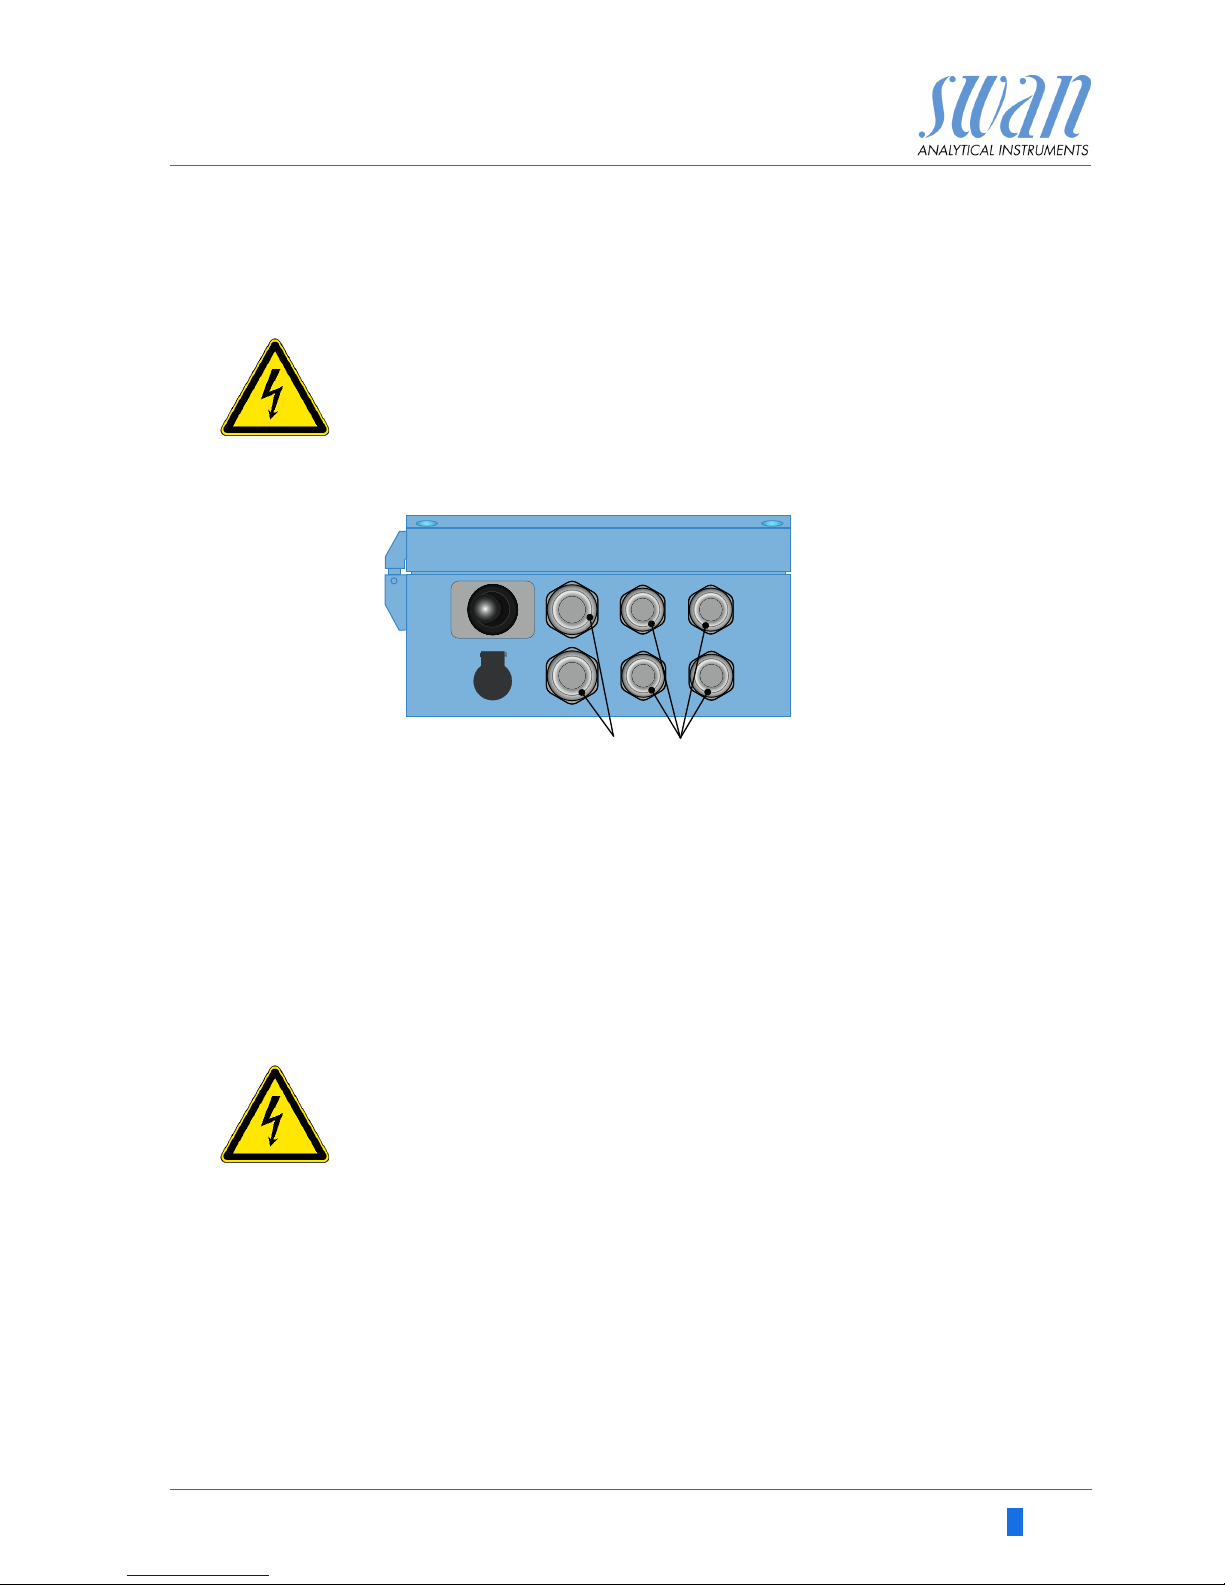
thicknesses
In order to comply with IP66, use the following cable thicknesses
NOTICE: Protect unused cable glands
Wire For Relays: Use max. 1.5 mm
2
/ AWG 14 stranded wire with
end sleeves.
For Signal Outputs and Input: Use 0.25 mm
2
/ AWG 23
stranded wire with end sleeves.
WARNING
External Voltage.
External supplied devices connected to relay 1 or 2 or to the
alarm relay can cause electrical shocks
Make sure that the devices connected to the following con-
tacts are disconnected from the power before resuming installation.
– relay 1
– relay 2
– alarm relay
ABPG 9 cable gland: cable Ø
outer
4–8 mm
PG 7 cable gland: cable Ø
outer
3–6.5 mm
ON
OFF
AB
Page 20
18 A-96.250.761 / 161017
AMI INSPECTOR pH
Installation
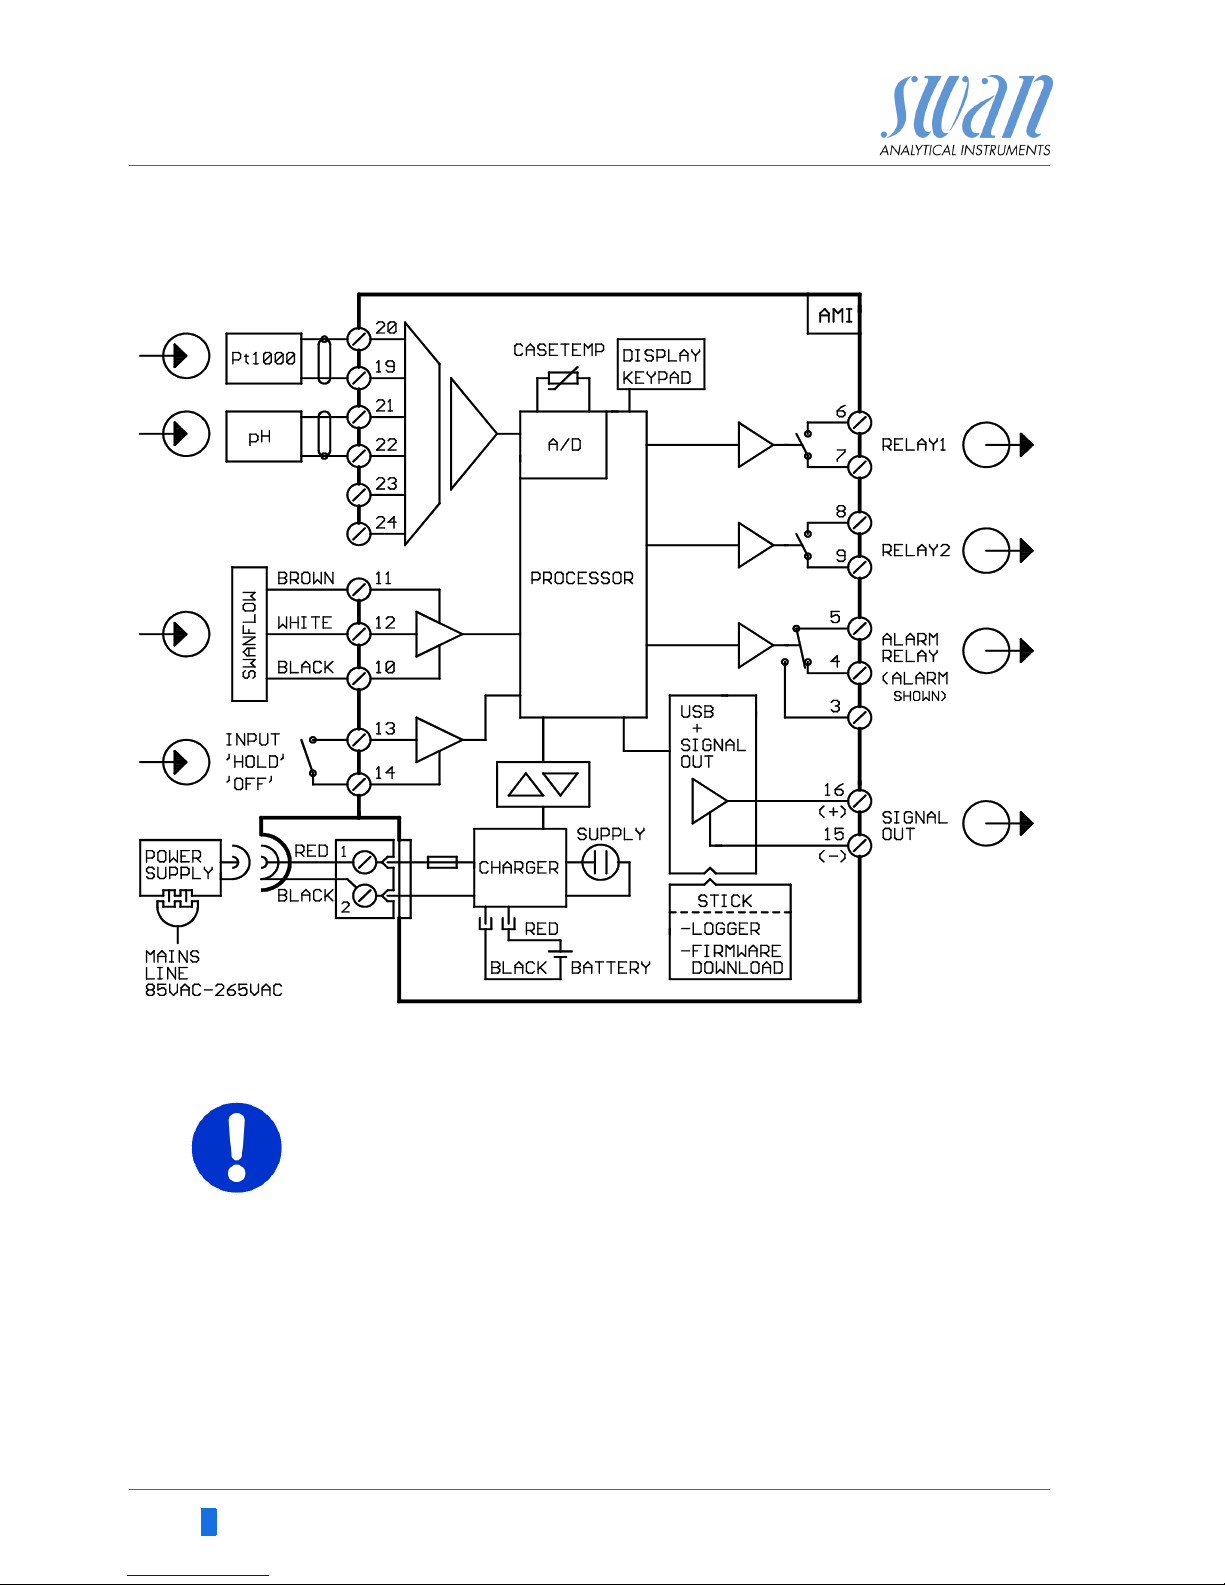
3.5.1 Connection Diagram
CAUTION
Use only the terminals shown in this diagram, and only for the
mentioned purpose. Use of any other terminals will cause short
circuits with possible corresponding consequences to material
and personnel.
Page 21
AMI INSPECTOR pH
Installation
A-96.250.761 / 161017 19
3.5.2 Power Supply
Contrary to all other Swan online process monitors the AMI INSPECTOR transmitter is supplied with power by battery only. The
rechargeable battery (Li-Ion) enables a stand-alone operation for at
least 24 hours.
WARNING
Do not provide power directly to the transmitter as this will destroy the motherboard. All AMI INSPECTOR transmitters are
supplied with power by battery only.
Charging Use the original supplied power adapter to charge AMI INSPEC-
TOR only. Charging time: approx 6h.
Fully charged stand-alone operating time of at least 24h is guaran-
teed:
>24h at full load (use of 3 relays, USB, signal output, logger)
>36h at minimal load (use of logger only)
In case that the battery is discharged completely the firmware will
automatically shut down.
Switch Power
ON - OFF
Switch the instrument ON or OFF using the toggle switch on the
transmitter.
Continuous
operation
For continuous operation use the power adapter as well.
CAUTION
If the AMI powers ON and then immediately shuts OFF, the
battery is empty. Do not hold the toggle switch in ON position,
as this can damage the battery.
CAUTION
During charging protect from heat impact and keep splash-
proof (plug of power adapter is not IP66).
Do not supply external devices, e.g. pumps, magnetic valves
or any other current consumers with AMI INSPECTOR.
CAUTION
Use the original supplied power adapter to charge AMI IN-
SPECTOR only. Use of any other power adapter can damage
the battery or cause malfunction.
Page 22
20 A-96.250.761 / 161017
AMI INSPECTOR pH
Installation
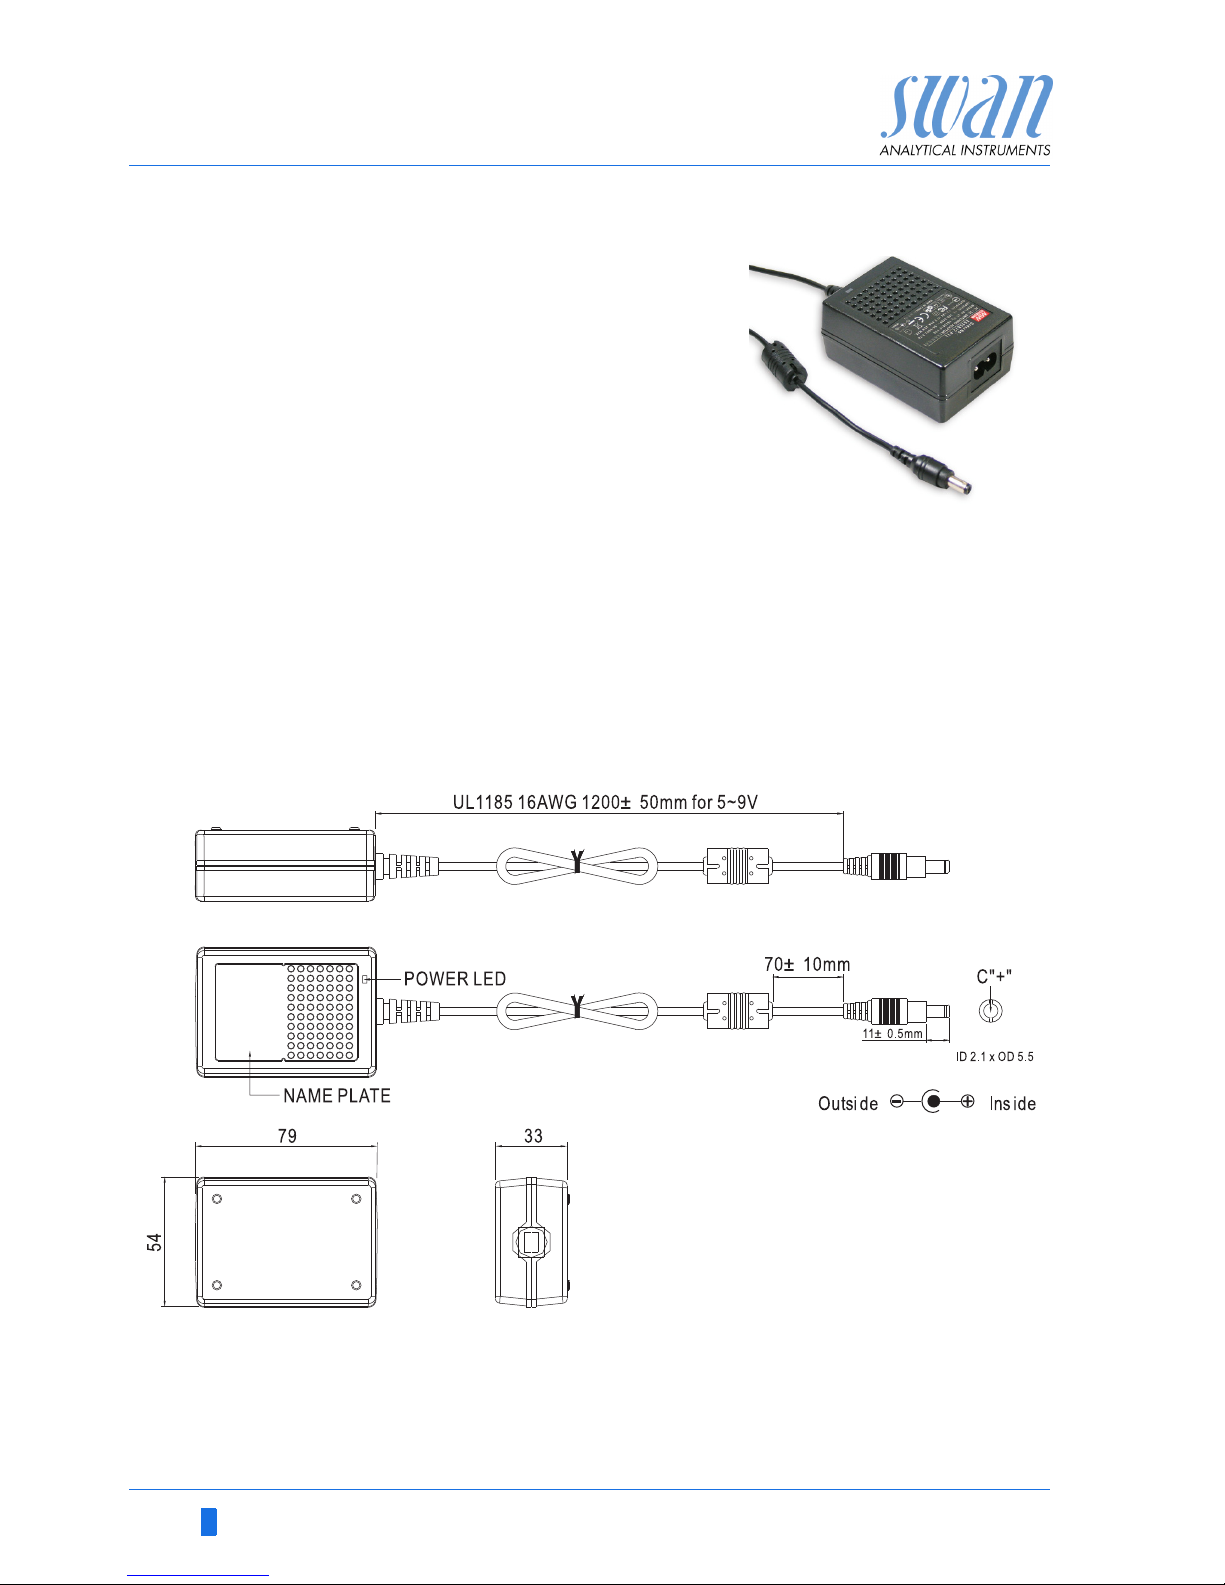
External
power adapter
Universal input range
85 - 265 VAC
Continuous short circuit protection
Over voltage protection
LED indicator for power on
2-pin AC inlet (IEC 320-C8) for
detachable country-specific power
cord
Power cords Two different power cords are supplied:
Power cord with type C plug (Europlug)
Power cord with type A plug (NEMA-1)
If a different plug type is needed, please purchase a suitable power
cord from your local supplier.
NOTICE: Do not use any plug adapters.
Dimensions
Unit: mm
Page 23

AMI INSPECTOR pH
Installation
A-96.250.761 / 161017 21
3.6. Relay Contacts
Programming of the relay contacts see 5.3 Relay Contacts, p. 59.
3.6.1 Input
NOTICE: Use only potential-free (dry) contacts.
Terminals 13 /14
If signal output is set to hold, measurement is interrupted if input is
active.
For programming see menu 5.3.4, p. 65.
3.6.2 Alarm Relay
NOTICE: For resistive loads only; do not use with capacitive or
inductive loads. Max. load 1 A/250 VAC.
Alarm output for system errors.
Error codes see Error List, p. 42.
Programming see 5.3.1, p. 59
NOTICE: With certain alarms and certain settings of the AMI
transmitter the alarm relay does not switch. The error, however,
is shown on the display.
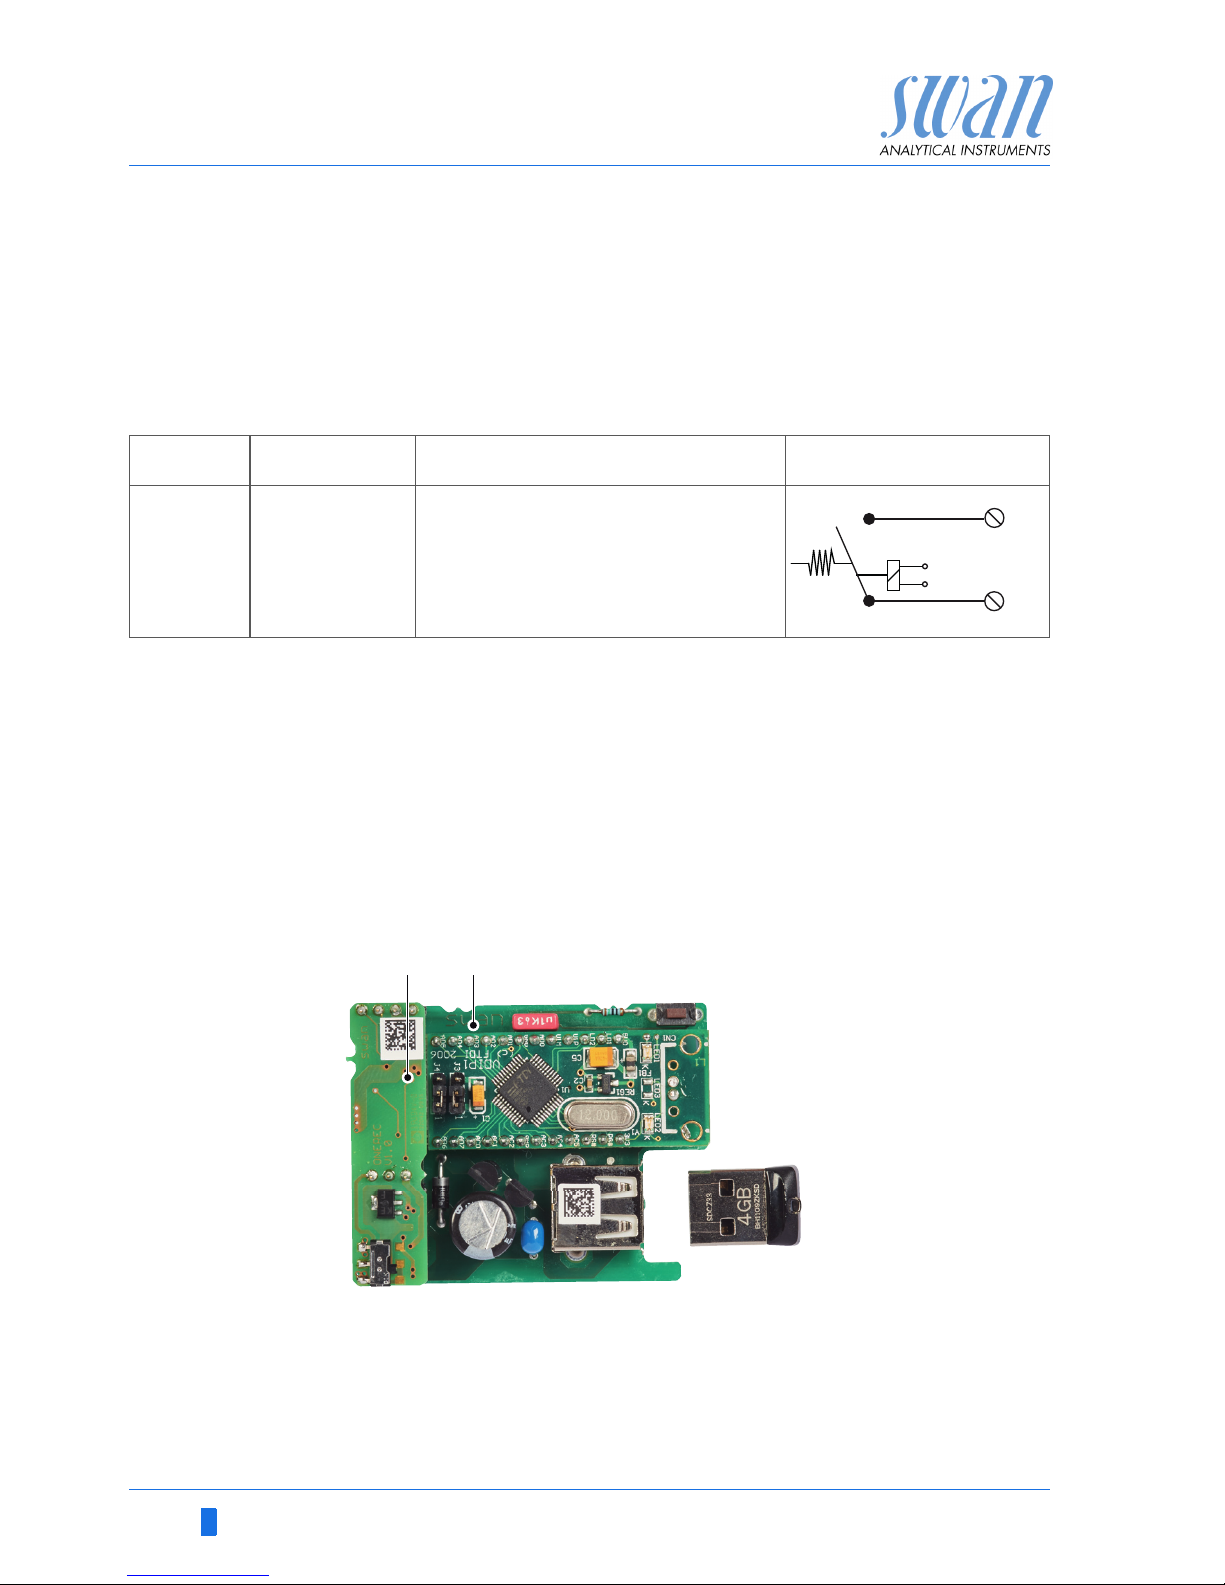
1) usual use
Terminals Description Relay connection
NC
1)
Normally
Closed
5/4 Active (opened) during normal
operation.
Inactive (closed) on error and
loss of power.
NO
Normally
Open
5/3 Active (closed) during normal
operation.
Inactive (opened) on error and
loss of power.
4
3
5
0V
1)
4
3
5
0V
Page 24
22 A-96.250.761 / 161017
AMI INSPECTOR pH
Installation
3.6.3 Relay 1 and 2
NOTICE: For resistive loads only; do not use with capacitive or
inductive loads. Max. load 100 mA/50 VAC.
For programming see Menu Installation 5.3.2 /3, p. 61.
3.7. Signal Output
The signal output 0/4–20 mA PCB is plugged onto the USB interface PCB.
NOTICE: Max. burden 510 Ω.
Terminals 16 (+) and 15 (-).
For programming see menu 5.2 Signal Outputs, p. 55.
.
Termin als Description
Relay connection
NO
Normally
Open
6/7: Relay 1
8/9: Relay 2
Inactive (opened) during normal
operation and loss of power.
Active (closed) when a programmed function is executed.
ABSignal output 0/ 4–20 mA PCB
USB interface
A B
6/8
0V
7/9
Page 25

AMI INSPECTOR pH
Instrument Setup
A-96.250.761 / 161017 23
4. Instrument Setup
4.1. Establish Sample Flow
1 Open sample flow tap.
2 Wait until the flow cell is completely filled.
3 Switch on power.
4.2. Programming
Programming Set all necessary sensor parameters in menu 5.1 Installation/Sen-
sors, further information see 5.1 Sensors, S. 54:
Type of sensor: set type of sensor to pH.
Flow measurement: Set the flow measurement to Q-flow.
Temperature: set Temp. Sensor to yes
Standards: Program the buffer values (pH buffer table) if you
do not use the SWAN standards.
NOTICE: The standards must be ordered separately.
Program all parameters for instrument operation (limits, alarms).
See Program Overview, S. 45, for explanations, see Program List
and Explanations, S. 50.
Calibration of
pH electrode
The instrument should be operating for 1 h before performing a pH
calibration.
Calibrate the pH electrode with two buffers, e.g. pH 7.00 and
pH 9.00. See Calibration, S. 31, for details.
Page 26

24 A-96.250.761 / 161017
AMI INSPECTOR pH
Instrument Setup
Set Buffer
Val ues
Please note that this list is only valid for Swan buffers. If you use
different buffers please ask the manufacturer.
The temperature curves for the buffer solutions for:
Standard 1 = pH7
Standard 2 = pH9
are already implemented in the transmitter firmware. To program
the temperature curve for the buffer solution pH4 overwrite standard 2.
Temperature Value pH7 Value pH9 Value pH4
Buffer value at 0°C
7.13 9.24
Buffer value at 5°C
7.07 9.16 3.99
Buffer value at 10°C
7.05 9.11 3.99
Buffer value at 15°C
7.02 9.05 3.99
Buffer value at 20°C
7.00 9.00 3.99
Buffer value at 25°C
6.98 8.95 4.01
Buffer value at 30°C
6.97 8.91 4.01
Buffer value at 35°C
6.96 8.88
Buffer value at 40°C
6.95 8.85 4.03
Buffer value at 50°C
6.95 8.79 4.05
Buffer value at 60°C
4.09
Page 27
AMI INSPECTOR pH
Operation
A-96.250.761 / 161017 25
5. Operation
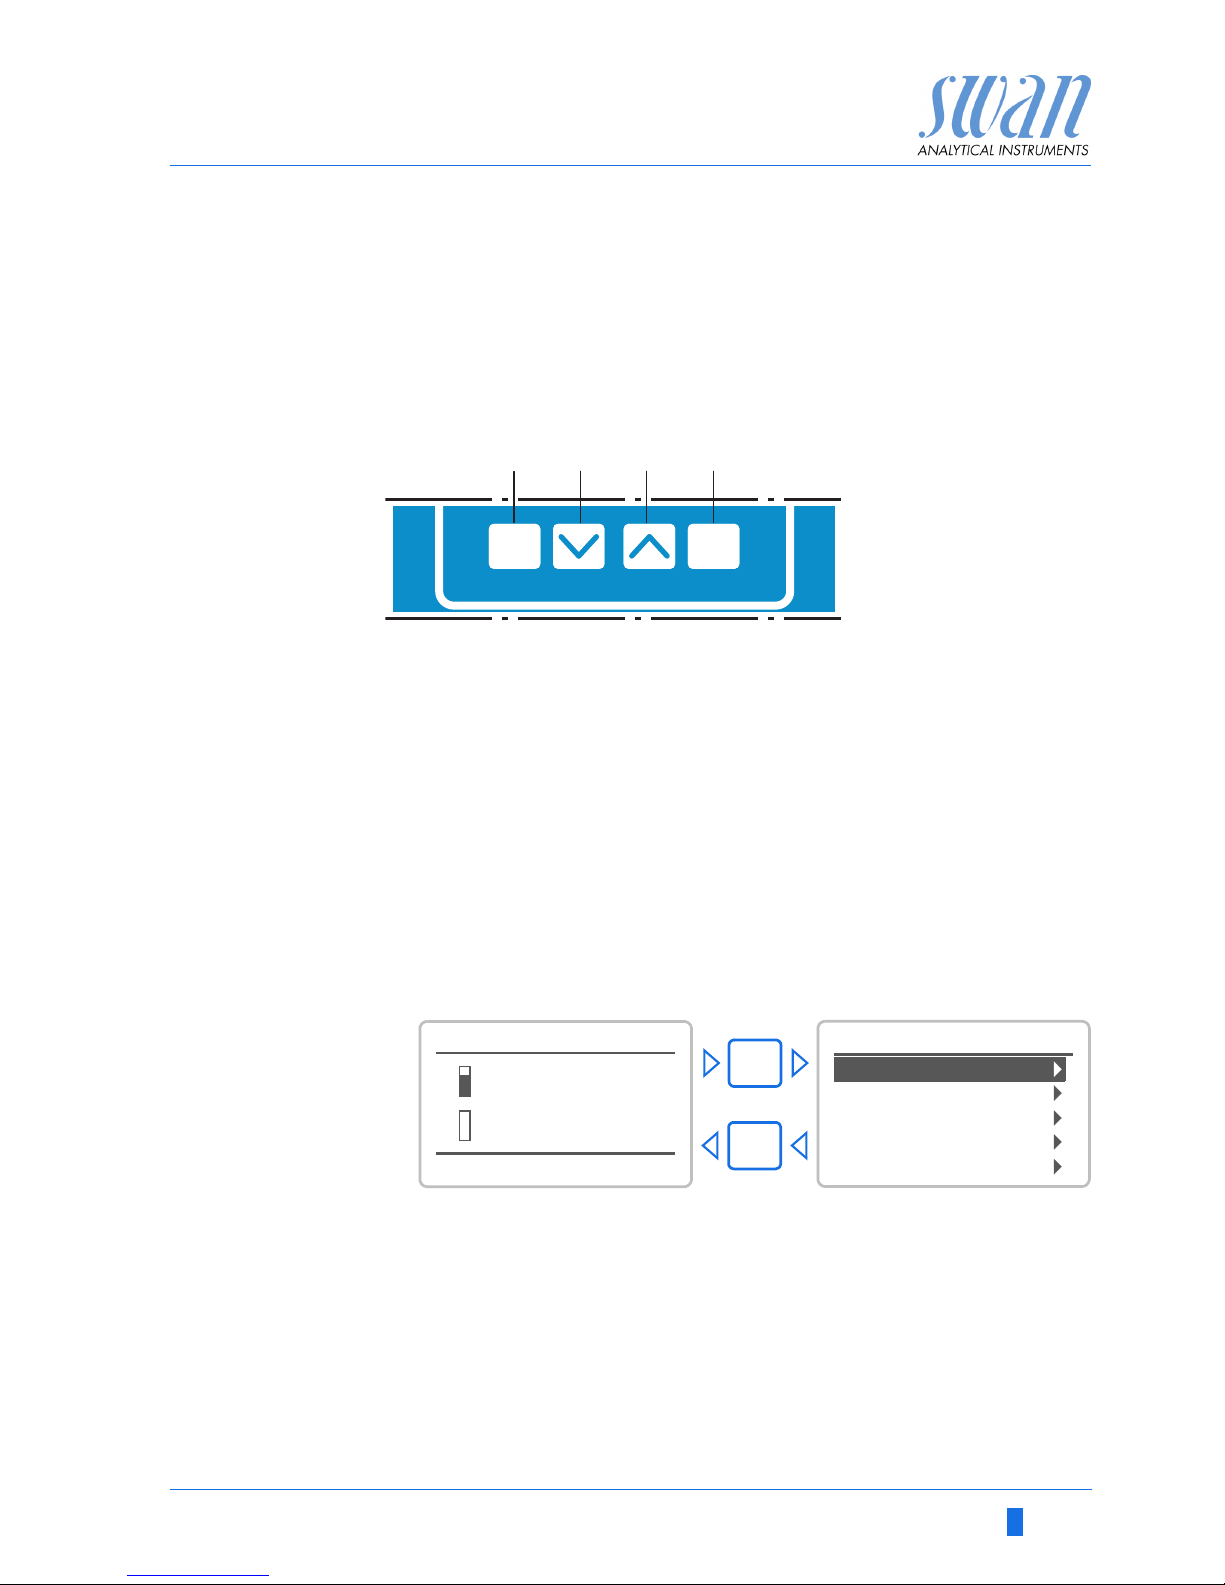
5.1. Keys
Program
Access, Exit
A to exit a menu or command (rejecting any changes)
to move back to the previous menu level
B to move DOWN in a menu list and to decrease digits
C to move UP in a menu list and to increase digits
D to open a selected sub-menu
to accept an entry
Exit Enter
BCDA
25.4°C
RUN
9 l/h
14:10:45
R1
7.04 pH
R2
1
Installation
Operation
Diagnostics
Messages
Maintenance
Main Menu
Enter
Exit
Page 28
26 A-96.250.761 / 161017
AMI INSPECTOR pH
Operation
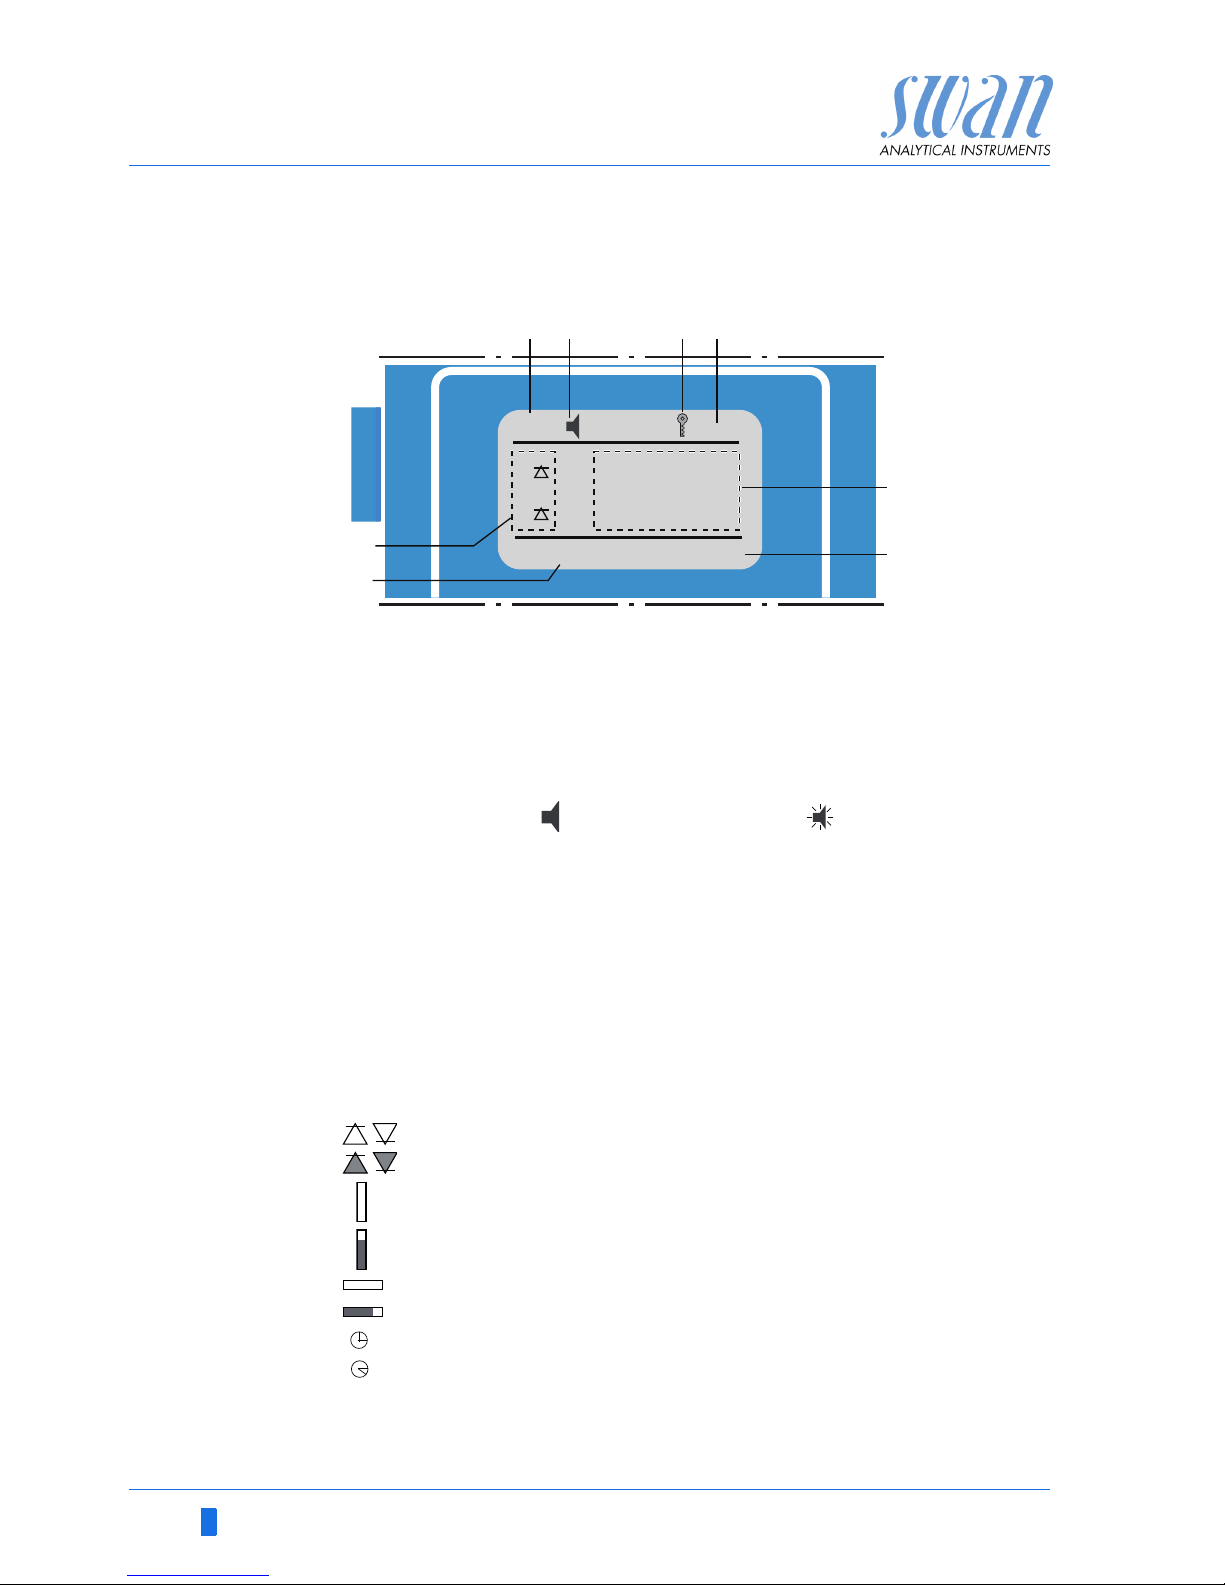
5.2. Display
Relay status, symbols
A RUN normal operation
HOLD input closed or cal delay: Instrument on hold (shows
status of signal outputs).
OFF input closed: control/limit is interrupted (shows status
of signal outputs).
B ERROR Error
Fatal Error
C Battery status (remaining operating time in h)
D Time
E Process values
F Sample temperature
G Sample flow
H Relay status
upper/lower limit not yet reached
upper/lower limit reached
control upw./downw. no action
control upw./downw. active, dark bar indicates control intensity
motor valve closed
motor valve: open, dark bar indicates approx. position
timer
timer: timing active (hand rotating)
RUN
15:20:18
R1
R2
6.5 l/h 24.8°C
pH
8.45
AB D
E
F
H
G
C
Page 29
AMI INSPECTOR pH
Operation
A-96.250.761 / 161017 27
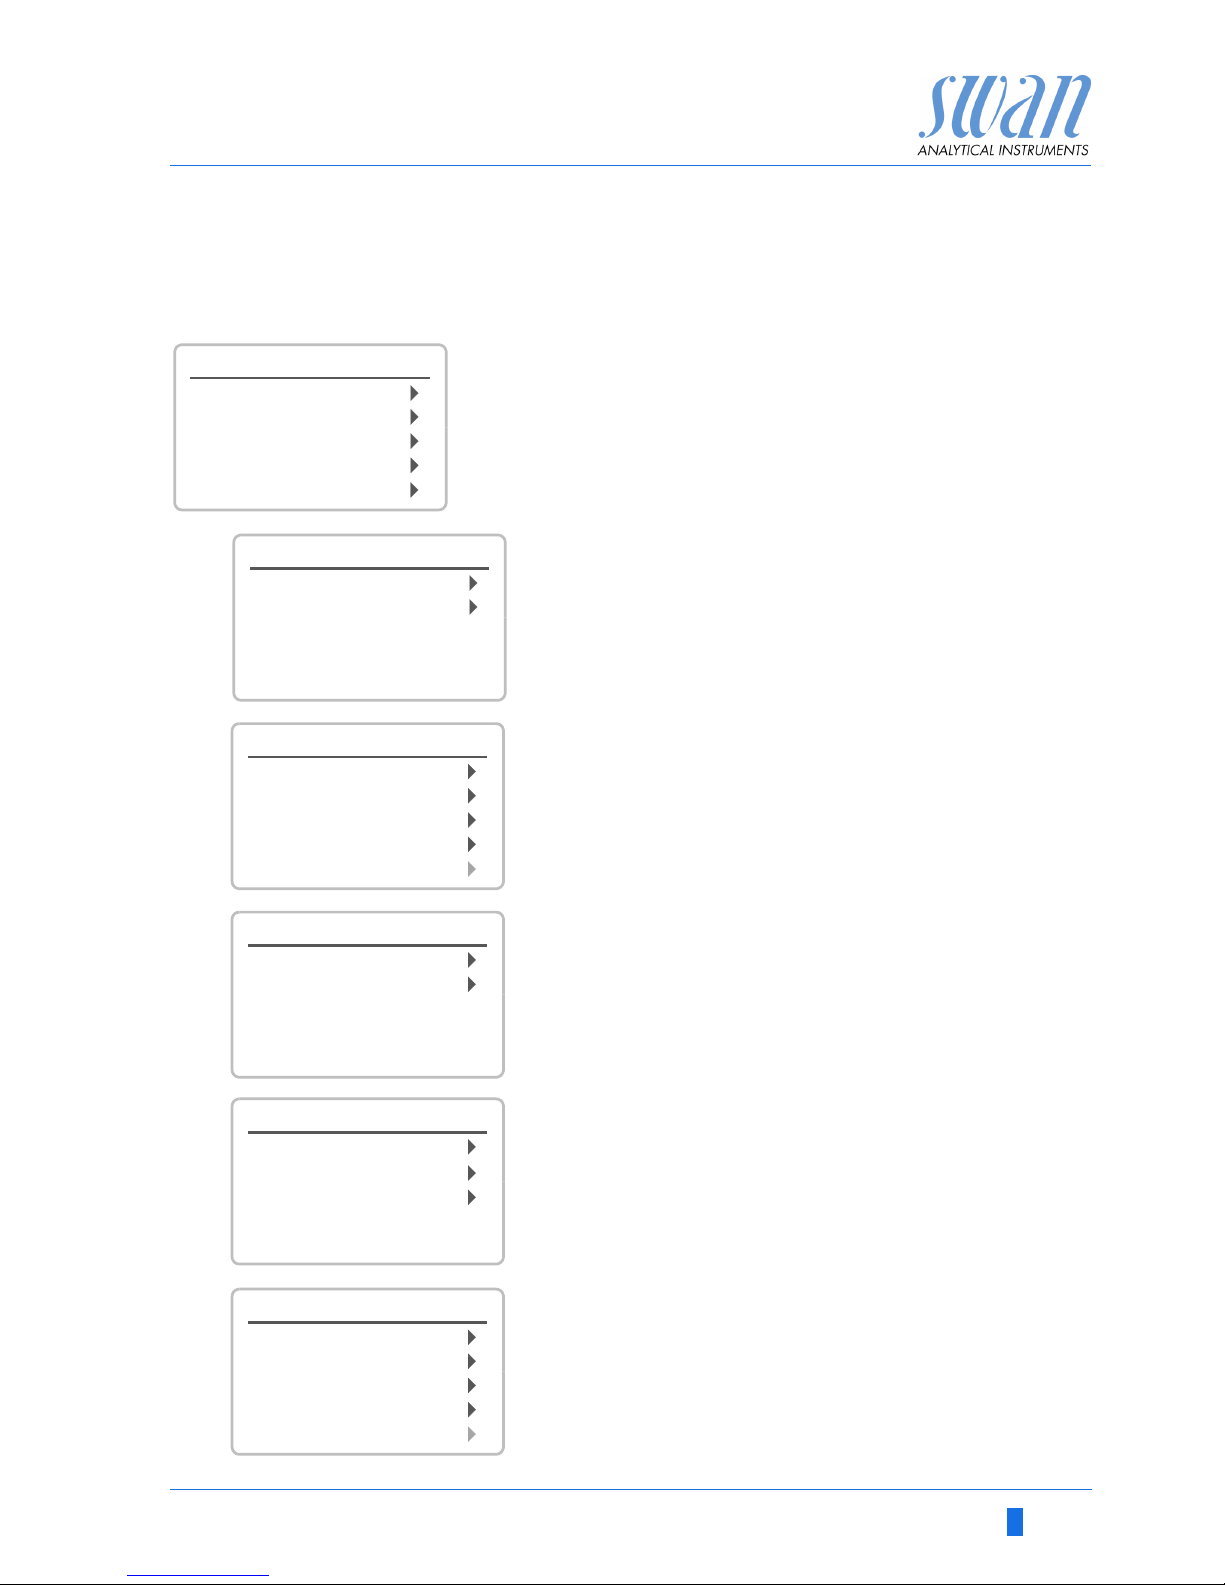
5.3. Software Structure
Menu Messages 1
Reveals pending errors as well as an event history
(time and state of events that have occurred at an
earlier point of time).
It contains user relevant data.
Menu Diagnostics 2
Provides user relevant instrument and sample data.
Menu Maintenance 3
For instrument calibration, relay and signal output
simulation, and to set the instrument time.
It is used by the service personnel.
Menu Operation 4
User relevant parameters that might need to be
modified during daily routine. Normally password
protected and used by the process-operator.
Subset of menu 5 - Installation, but process-related.
Menu Installation 5
For initial instrument set up by SWAN authorized
person, to set all instrument parameters. Can be
protected by means of password.
1
Messages
Operation
Maintenance
Diagnostics
Main Menu
Installation
1.1
Pending Errors
Messages
Message List
2.1
Interface
I/O State
Sample
Identification
Sensors
Diagnostics
3.1
Calibration
Simulation
Maintenance
Set Time 23.09.06 16:30:00
4.1
Logger
Relay Contacts
Sensors
Operation
5.1
Interface
Miscellaneous
Relay Contacts
Sensors
Signal Outputs
Installation
Page 30
28 A-96.250.761 / 161017
AMI INSPECTOR pH
Operation
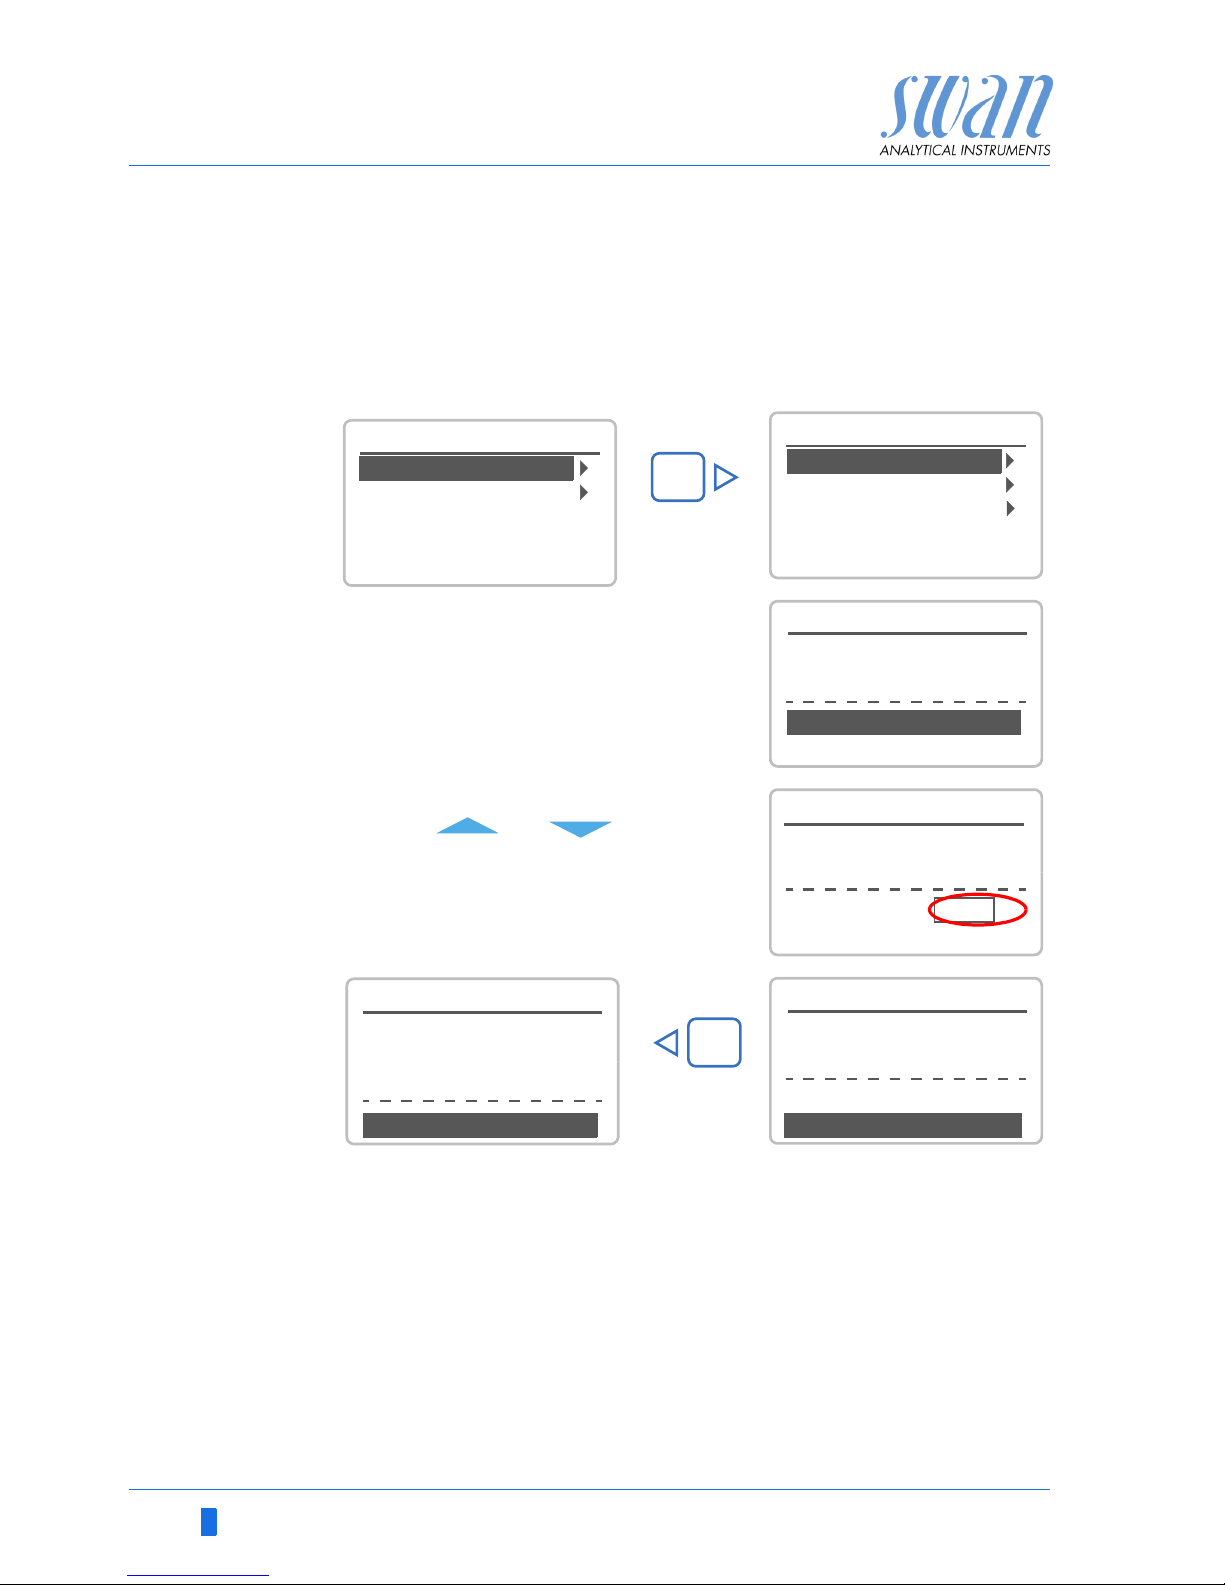
5.4. Changing Parameters and values
Changing
parameters
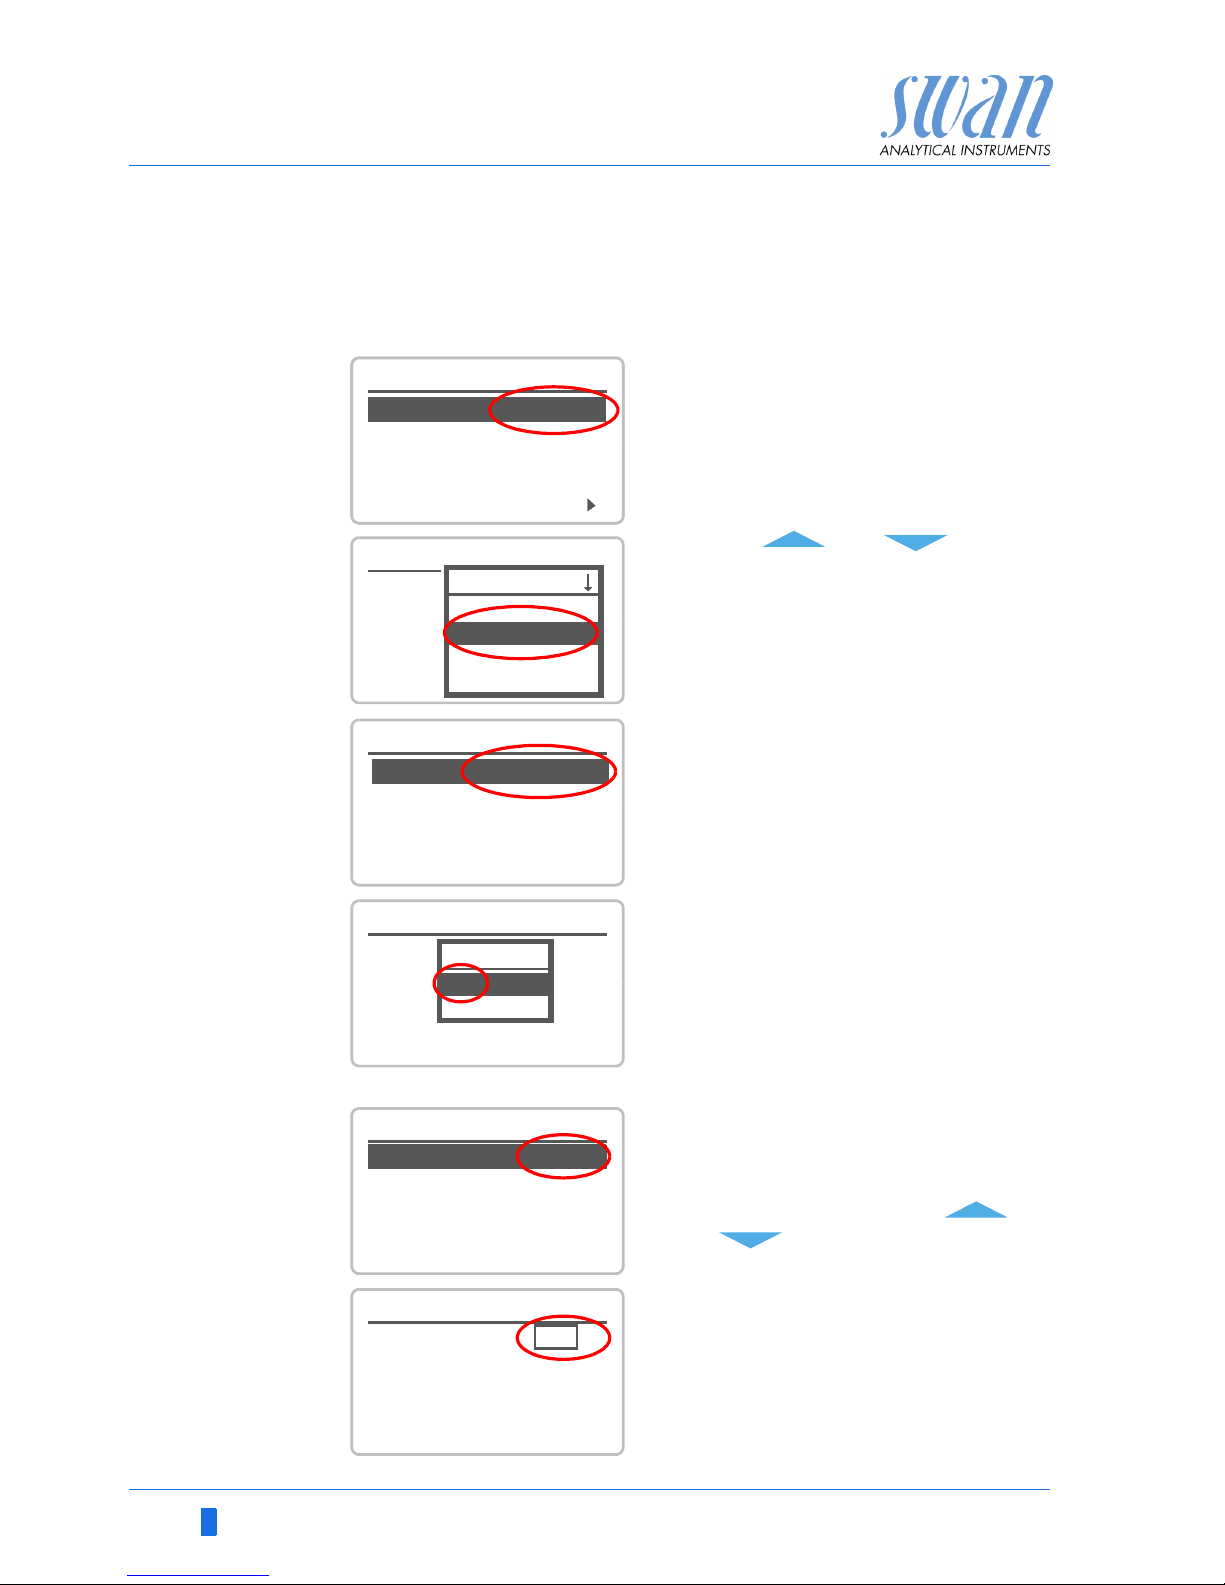
The following example shows how to change the logger interval:
Changing
values
1 Select the parameter you want to
change.
2 Press <Enter>
3 Press < > or< > to high-
light the required parameter.
4 Press <Enter> to confirm the se-
lection or <Exit> to keep the previous parameter).
The selected parameter is
highlighted (but not saved yet).
5 Press <Exit>.
Yes is highlighted.
6 Press <Enter> to save the new pa-
rameter.
The system reboots, the new
parameter is set.
5.1.2
Sensors
Sensor type FOME
Temperature NT5K
Standards
Disinf. Free chlorine
4.4.1
Logger
Log interval 30 min
Clear logger no
4.1.3
Logger
Clear logger no
Log interval 30min
1 Hour
Interval.
5 min
30 min
10 min
4.1.3
Logger
Log interval 10 min
Clear logger no
4.1.3
Logger
Log interval event driven
Clear logger no
No
Save ?
Yes
1 Select the value you want to
change.
2 Press <Enter>.
3 Set required value with < >
or< >.
4 Press <Enter> to confirm the new
value.
5 Press <Exit>.
Yes is highlighted.
6 Press <Enter> to save the new val-
ue.
5.3.1.1.1
Alarm High 12.00 pH
Alarm
Alarm Low -3.00 pH
Hysteresis 0.10 pH
Delay 5 Sec
5.3.1.1.1
Alarm
Alarm Low -3.00 pH
Hysteresis 0.10 pH
Delay 5 Sec
Alarm High 9.00 pH
Page 31
AMI INSPECTOR pH
Maintenance
A-96.250.761 / 161017 29
6. Maintenance
6.1. Maintenance Table
Swansensor pH SI
6.2. Stop of Operation for Maintenance
1 Stop sample flow.
2 Shut off power of the instrument.
6.3. Maintenance of Electrode
WARNING
Chemicals can be toxic, caustic, and flammable.
Read the Material Safety Data Sheets (MSDS) first.
Only persons trained in handling dangerous chemicals are al-
lowed to prepare the reagents.
Wear suitable protective clothing, gloves and eye/face protec-
tion.
6.3.1 Clean pHSI Electrode
NOTICE: Do not put the electrode into acids to clean it.
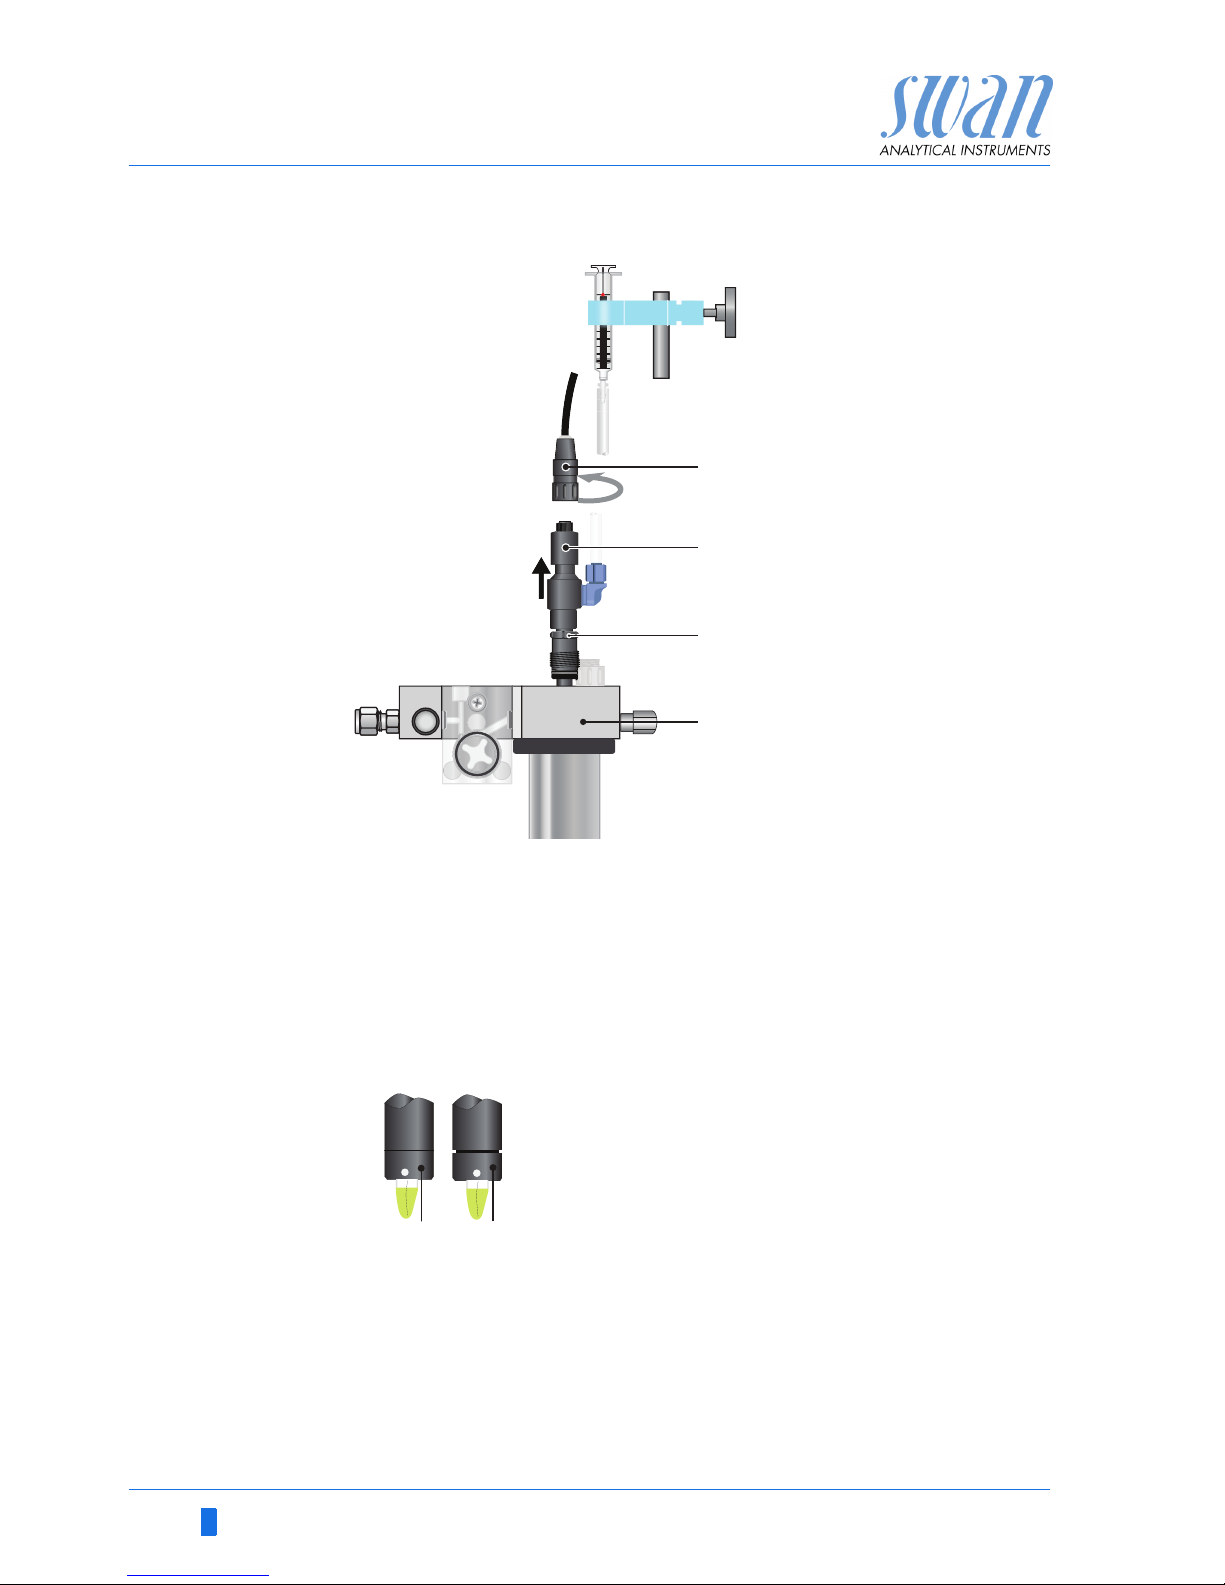
To remove the electrode from the flow cell proceed as follows:
1 Unscrew and remove the connector [A] from the electrode [B].
2 Unscrew and remove the electrode [B] from the flow cell block
by turning the union screw [C] counterclockwise.
Weekly Check level in syringe. If necessary refill.
Monthly Calibrate electrode.
Quarterly Open cap of reference electrode slightly and let
flow out 5 ml of electrolyte. Fasten cap hand-tight.
Page 32
30 A-96.250.761 / 161017
AMI INSPECTOR pH
Maintenance
Clean
pH Electrode
1 If necessary wipe the electrode shaft and the green tip cautious-
ly with a soft, clean, and damp paper tissue.
2 Remove grease with a tissue moistened with alcohol.
3 Slightly open the sensor cap of reference electrode and let flow
out about 5 ml of electrolyte.
4 Rinse the electrode tip thoroughly with clean water.
5 Tighten the sensor cap hand tight.
6 Install the electrode into the flow cell again.
7 Let the electrode run-in for 1 h before the first calibration.
ABConnector
Electrode
CDUnion screw
Flow cell block
B
A
C
D
ABSensor cap tightened
Sensor cap slightly opened
AB
Page 33
AMI INSPECTOR pH
Maintenance
A-96.250.761 / 161017 31
6.4. Calibration
Process
pH Calibration
The process calibration is based on a comparative measurement of
the on-line instrument with a calibrated comparative electrode. Perform a valid manual measurement with the calibrated comparative
electrode. Then compare the measuring value with the on-line instrument and if necessary, enter the correct measuring value in the
menu <Maintenance/ Electrode 1/2 /Process Cal.> of the on-line instrument.
The deviation of the measuring values is shown as offset in mV.
Select <Save> and press <Enter> to save the correct measuring
value.
Standard
pH Calibration
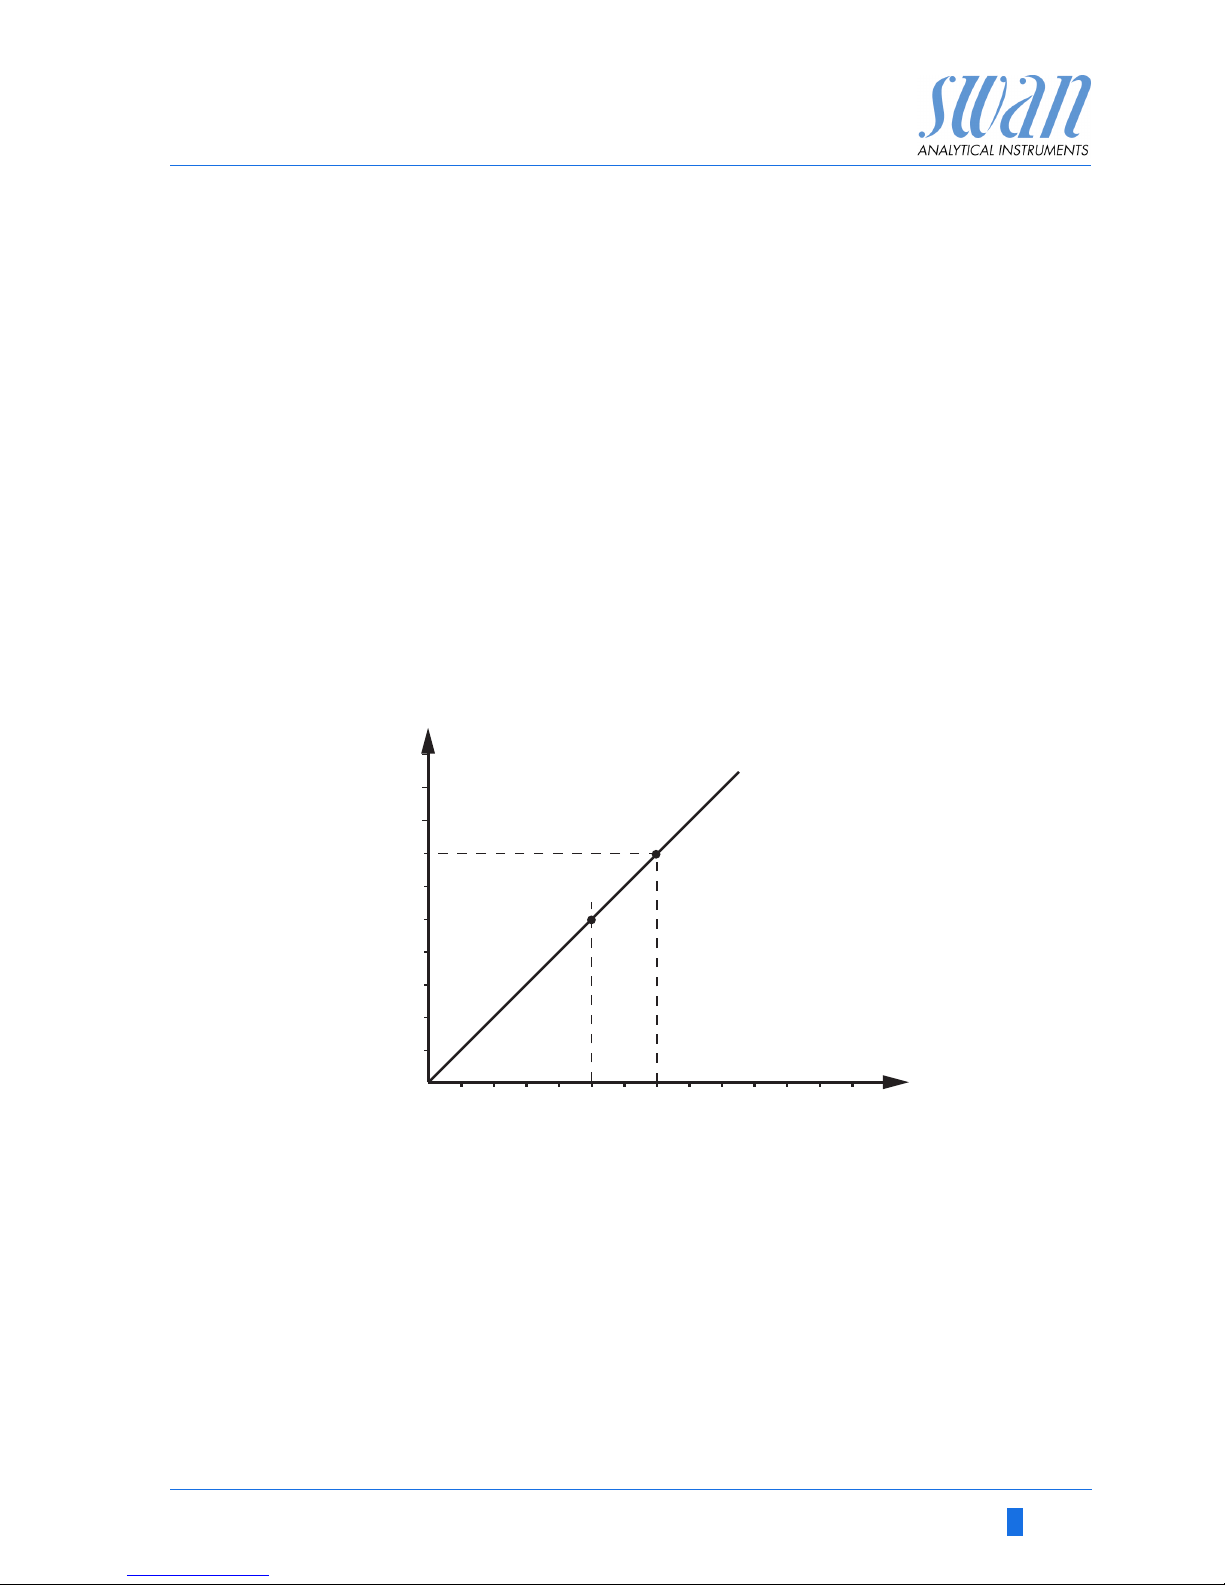
The ideal pH electrode has an offset of 0 mV at pH 7 and a slope of
59.16 mV/pH unit. Real electrodes differ from this ideal. Therefore,
pH electrodes are calibrated with two buffer solutions, of different
pH values.
.
pH
14 13 12 11 10 9 8 7 6 5 4 3 2 1 0
0
-59
59
-118
118
-177
177
-236
-295
-354
-413
mV
Page 34
32 A-96.250.761 / 161017
AMI INSPECTOR pH
Maintenance
Process
Calibration pH
Use a Chematest 25 photometer (or equivalent) to determine the
sample pH value.
NOTICE: Make sure your reference instrument is calibrated
correctly!
Possible error
message
Offset error:
Last calibration wrong.
Electrode old or dirty.
Cable wet or brocken.
Reference measuring wrong
Enter the correct value
with the [ ] or [ ]
key.
3.1
Calibration
Simulation
Maintenance
Set Time 01.01.05 16:30:00
Calibration
Enter
3.1.1
Standard pH
Calibration
Process pH
Process pH
Offset x mV
Save <Enter>
Process Value 7.78 pH
3.1.2.4
Current Value 7.78 pH
Process pH
Current Value 7.78 pH
Offset x mV
Save <Enter>
Process Value 7.70 pH
3.1.2.4
3.1.2.5
Process pH
Current Value 7.70 pH
Offset y mV
Slope x.xx mV
Calibration successful
Enter
3.1.2.5
Process pH
Current Value 7.70 pH
Offset y mV
Process Value 7.70 pH
Save <Enter>
Page 35

AMI INSPECTOR pH
Maintenance
A-96.250.761 / 161017 33
6.5. Quality Assurance of the Instrument
Every SWAN on-line instrument is equipped with integrated, autonomous quality assurance functions to survey the plausibility of each
measurement.
For AMI pH-Redox these are:
continuous monitoring of sample flow
continuous monitoring of the temperature inside the transmit-
ter case
Further a manual, menu driven inspection procedure can be carried
out using a certified reference instrument. Running at the same
sampling point as an inspection equipment, the AMI Inspector pH
verifies the measuring results. After enabling the quality assurance
procedure by defining the quality assurance level, the instrument
reminds the user periodically to run the procedure and results are
stored in a history for review.
Quality assur-
ance level
Central feature of the quality assurance function is the assignment
of the monitored process to a Quality assurance level.
There are three predefined levels plus a user level. Hereby the inspection interval, the deviation limits of temperature and measuring
result between the inspection equipment and the monitoring instrument are defined.
Level 1: Trend; Measurement used as an additional informa-
tion to follow the process indicating trends.
Level 2: Standard; Monitoring of several parameters of a pro-
cess (e.g. oxygen, hydrazine and pH in feedwater). In case of
instrument failure, other parameters can be used for process
monitoring.
Level 3: Crucial; Monitoring of critical processes, value is
used for control of another part or subsystem (valve, dosing
unit, etc.).
Additional level:
Quality level 4: User; User defined inspection interval, maxi-
mal deviation of temperature and measuring result.
Page 36
34 A-96.250.761 / 161017
AMI INSPECTOR pH
Maintenance
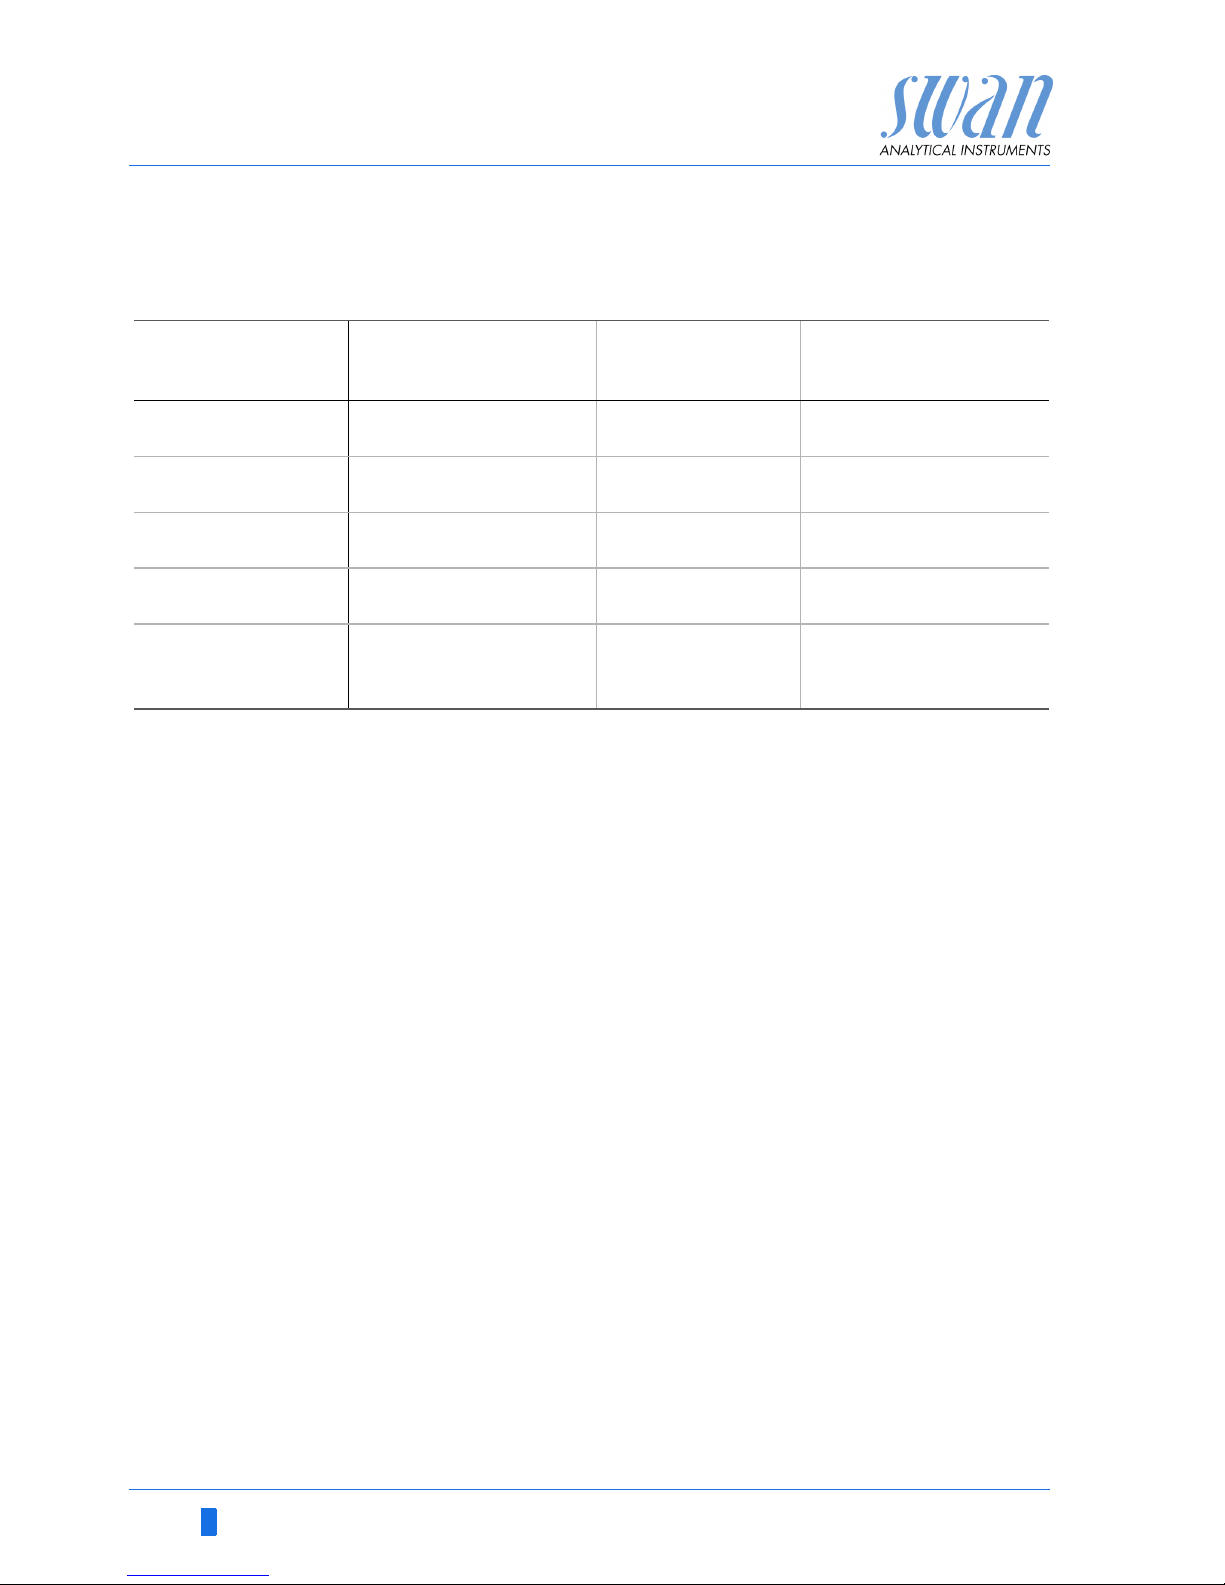
Limits and interval for AMI pH-Redox:
Procedure The standard workflow contains following procedures:
1 Activate SWAN Quality assurance procedure, p. 44
2 Pre-test, p. 45
3 Connect instruments, p. 45
4 Carry out comparison measurement, p. 47
5 Completion of the measurement, p. 48
NOTICE: The procedure should only be carried out through
qualified personnel.
Materials / Inspection equipment:
Reference instrument: AMI Inspector pH
Two tubes made of FEP
6.5.1 Activate SWAN Quality assurance procedure
Enable quality assurance procedure at each instrument by selecting the quality level in menu 5.1.2.1 Quality Assurance [Installation\Sensors].
The corresponding submenus are then activated.
NOTICE: The activation is necessary the first time only.
Quality Level
max. deviation
temperature [°C]
a)
max. deviation
result [%]
min. inspection
interval
0: Off
Off Off
Off
1: Trend
0.5 °C 10 %
annual
2: Standard
0.4 °C 5 %
quarterly
3: Crucial
0.3 °C 5 %
monthly
4: User
0–2°C 0–20%
annual, quarterly,
monthly
a) sample temperature must have 25°C +/- 5°C.
Page 37

AMI INSPECTOR pH
Maintenance
A-96.250.761 / 161017 35
6.5.2 Pre-test
Reference instrument: AMI INSPECTOR pH:
– Check certificate; reference instrument certificate not older
then one year.
– Check battery; Battery of the AMI INSPECTOR pH should
be completely charged. Remaining operating time on
display minimum 20 hours.
– Disable temperature compensation (set to “none”)
On-line instrument: Monitor AMI pH/Redox:
– Good order and condition; Flow cell free of particles,
Sensor surface free of deposits.
– Check message list; Review the message list in menu 1.3
and check for frequently alarms (as for example flow
alarms). If alarms occur frequently remove cause before
starting the procedure.
6.5.3 Connect instruments
The AMI Inspector pH sample inlet is equipped with a serto fitting
for stainless steel pipes. To connect the sample stream to the AMI
Inspector pH proceed according to chapter Serto Fitting Stainless
Steel, S. 32. The choice of sampling depends strongly on local con-
ditions on site. Possible sampling:
via Sample point,
via T-fitting or
as piggyback / downstream
NOTICE: Important for correct measurements are in any case:
• sample as near as possible to the process monitor,
• wait approx. 10 minutes, whilst measurement is running,
until measurement value and temperature are stabilized.
Example:
Sampling via
T-fitting
The reference instrument, AMI Inspector pH, is connected parallel
to the Monitor AMI pH-Redox by installing a T-Fitting at the sample
inlet tube and dividing the sample stream to each instrument.
Page 38
36 A-96.250.761 / 161017
AMI INSPECTOR pH
Maintenance
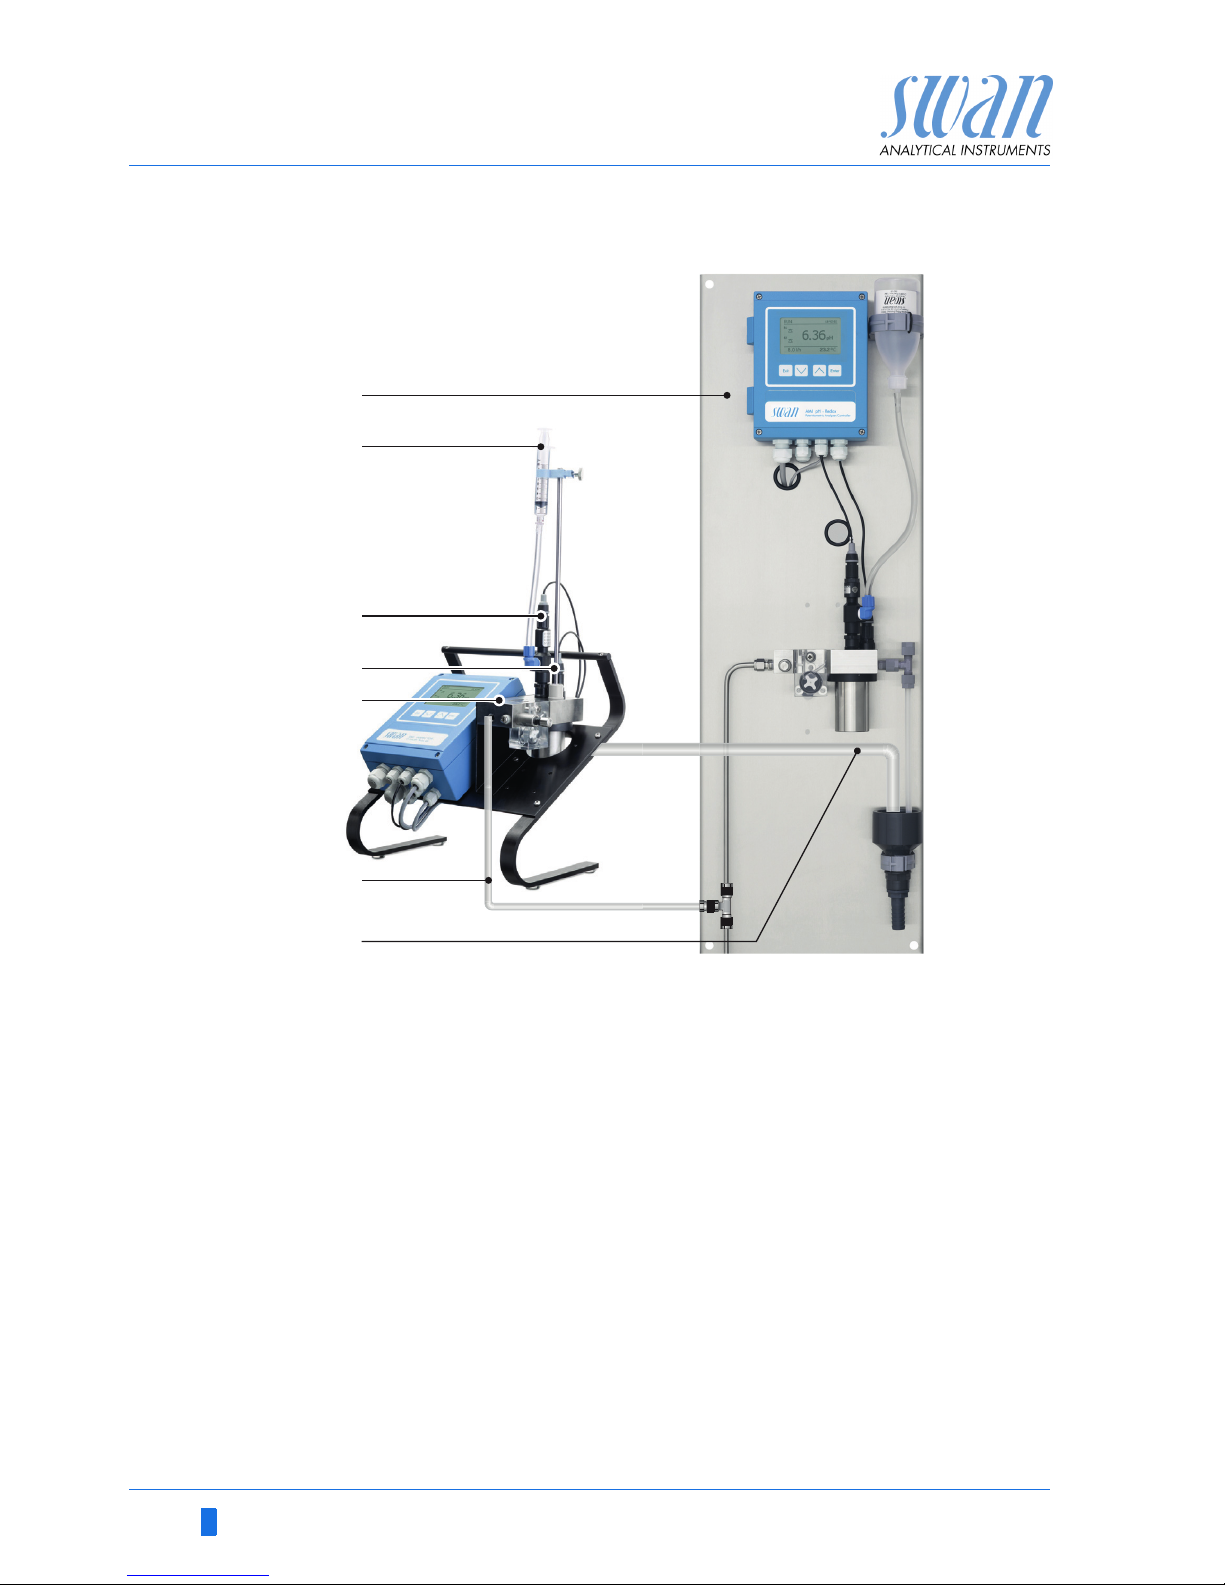
1 Stop sample flow to the monitor AMI pH-Redox by closing the
appropriate valve, e.g. back pressure regulator, sample preparation or flow regulating valve at flow cell.
2 Connect sample line of the Monitor AMI pH-Redox [A] with the
sample inlet of the reference instrument AMI INSPECTOR pH.
Use the supplied tube, made of FEP.
3 Connect sample outlet of the reference instrument AMI IN-
SPECTOR pH to the sample outlet funnel of the monitor.
4 Switch on AMI INSPECTOR pH. Open the flow regulating valve
and regulate the sample flow.
A
B
C
D
Monitor AMI pH-Redox
KCl reservoir
pH electrode
Temperature sensor
E
F
G
Flow cell block
Sample inlet
Sample outlet
A
B
C
D
E
F
G
Page 39
AMI INSPECTOR pH
Maintenance
A-96.250.761 / 161017 37
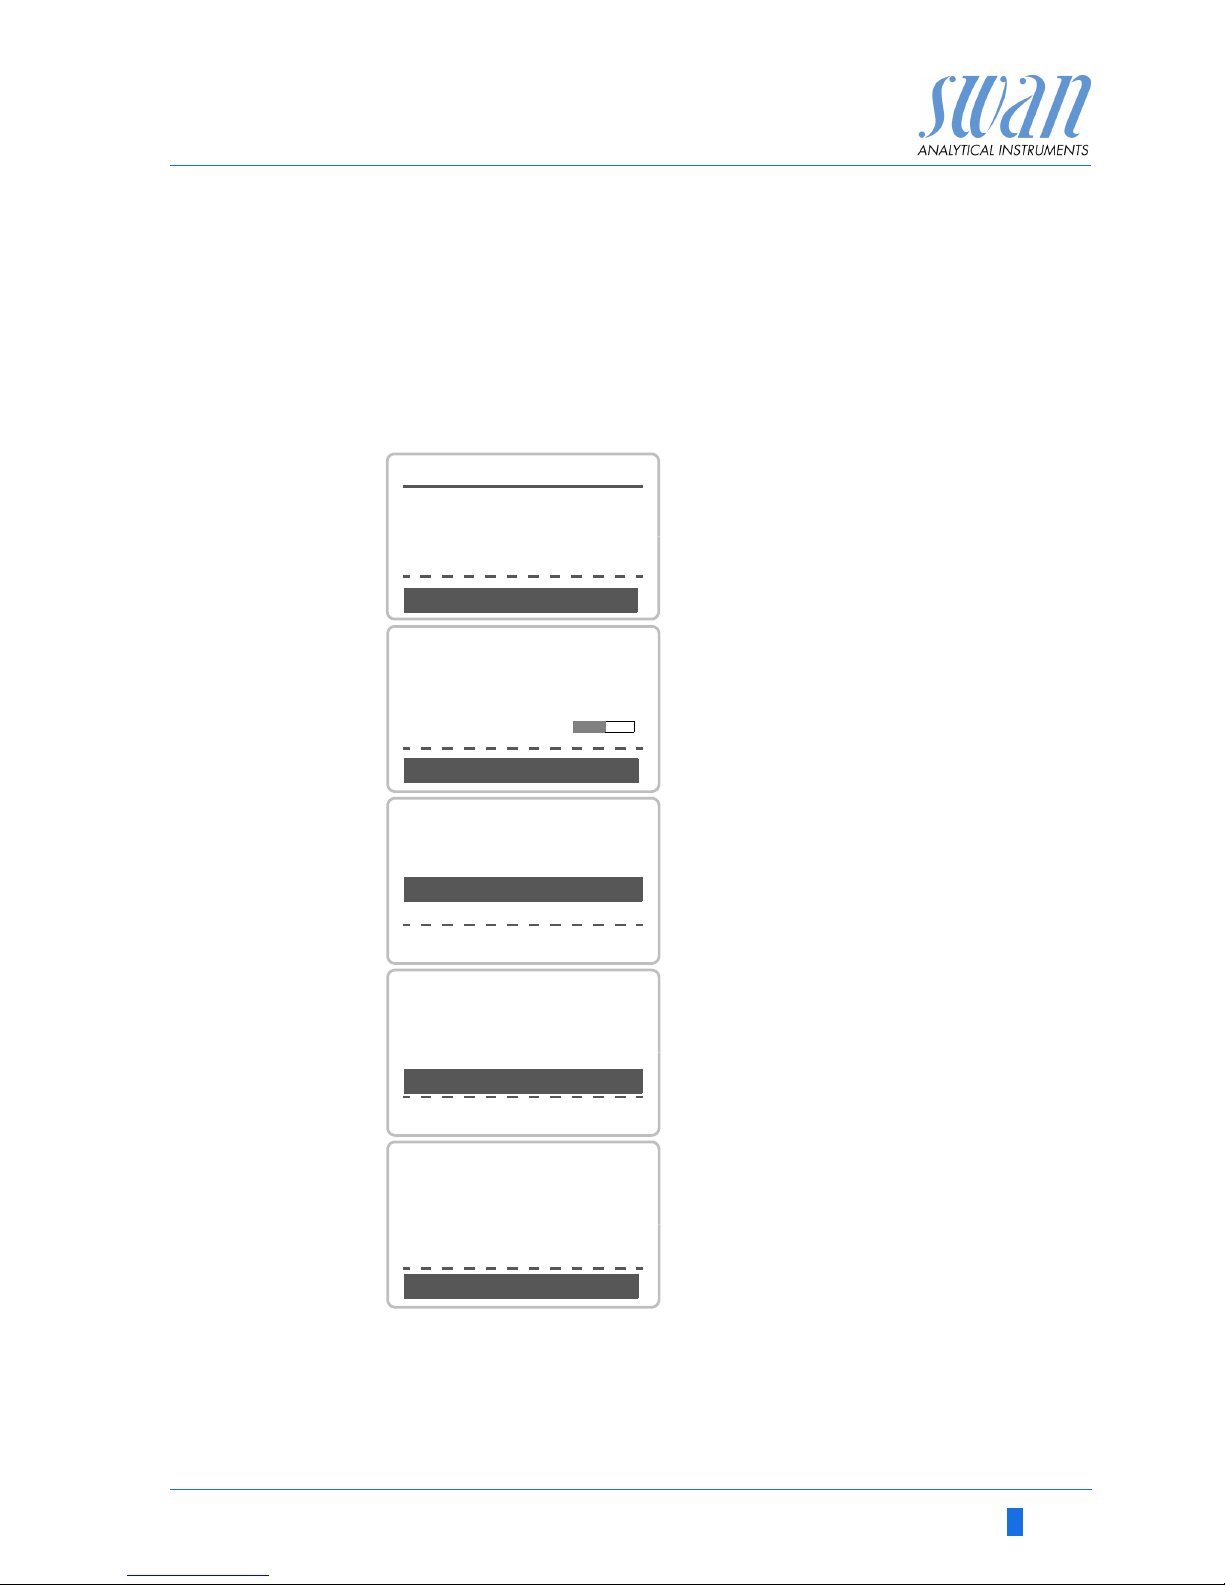
6.5.4 Carry out comparison measurement
The comparison measurement is menu driven. Start by selecting
Quality assurance in menu 3.4 of the monitor AMI pH-Redox.
NOTICE: Temperature compensation is automatically
deactivated during comparison measurement.
If QA-Check is not successful it is recommended to clean the sensor, see Maintenance of the Sensor, p. 36.If QA-Check fails again
contact your local SWAN distributor for support.
1 Carry out pre test preparations.
Connect instruments.
Regulate sample flow to 10 l/h using the appropriate valve.
2 Wait 10 minutes whilst measure-
ment is running.
<Enter> to continue.
3 Read the pH value of the reference
instrument and enter under “Inspector.” by using the Up/Down
keys. <Enter> to confirm.
4 Read temperature value of the ref-
erence instrument and enter under “Inspector Temp.” busing Up/
Down keys. <Enter> to confirm.
<Enter> to continue.
5 - Review result.
- Results are saved in QA-History
regardless if successful or not.
3.4.5
Quality Assurance
- carry out preparations
- install Inspector
- sample flow to 10 l/h
<Enter> to continue
3.4.5
Quality Assurance
Value 8.05 pH
Value Temp. 25 C
Wait 10 min.
<Enter> to continue
3.4.5
Quality Assurance
Value 8.05 pH
Value Temp. 25 C
<Enter> to continue
Inspector 8.12 pH
Inspector Temp. 25 C
3.4.5
Quality Assurance
Value 8.05 pH
Value Temp. 25 C
<Enter> to continue
Inspector 8.12 ppm
Inspector Temp. 25 C
3.4.5
Quality Assurance
Max. Dev. 0.07 pH
Max. Dev. Temp. 0.0 C
QA-Check succesful
Dev 0.07 pH
Dev. Temp. 0.0 C
Page 40

38 A-96.250.761 / 161017
AMI INSPECTOR pH
Maintenance
6.5.5 Completion of the measurement
1 Stop the sample flow to the AMI pH-Redox by closing the ap-
propriate valve, e.g. back pressure regulator, sample preparation or flow regulating valve at flow cell again.
2 Close flow regulating valve of the AMI Inspector pH.
3 Disconnect the AMI Inspector pH by removing the tubes and
connect the sample outlet of the Monitor AMI pH-Redox to the
sample outlet funnel again.
4 Start sample flow again and regulate sample flow.
5 Shutdown AMI Inspector pH.
If the instrument will not be used for a longer period of time, see
Longer Stop of Operation, S. 41.
Page 41
AMI INSPECTOR pH
Maintenance
A-96.250.761 / 161017 39
6.6. Replacing Fuses
WARNING
External Voltage.
External supplied devices connected to relay 1 or 2 or to the
alarm relay can cause electrical shocks.
Make sure that the devices connected to the following con-
tacts are disconnected from the power before resuming installation.
– relay 1
– relay 2
– alarm relay
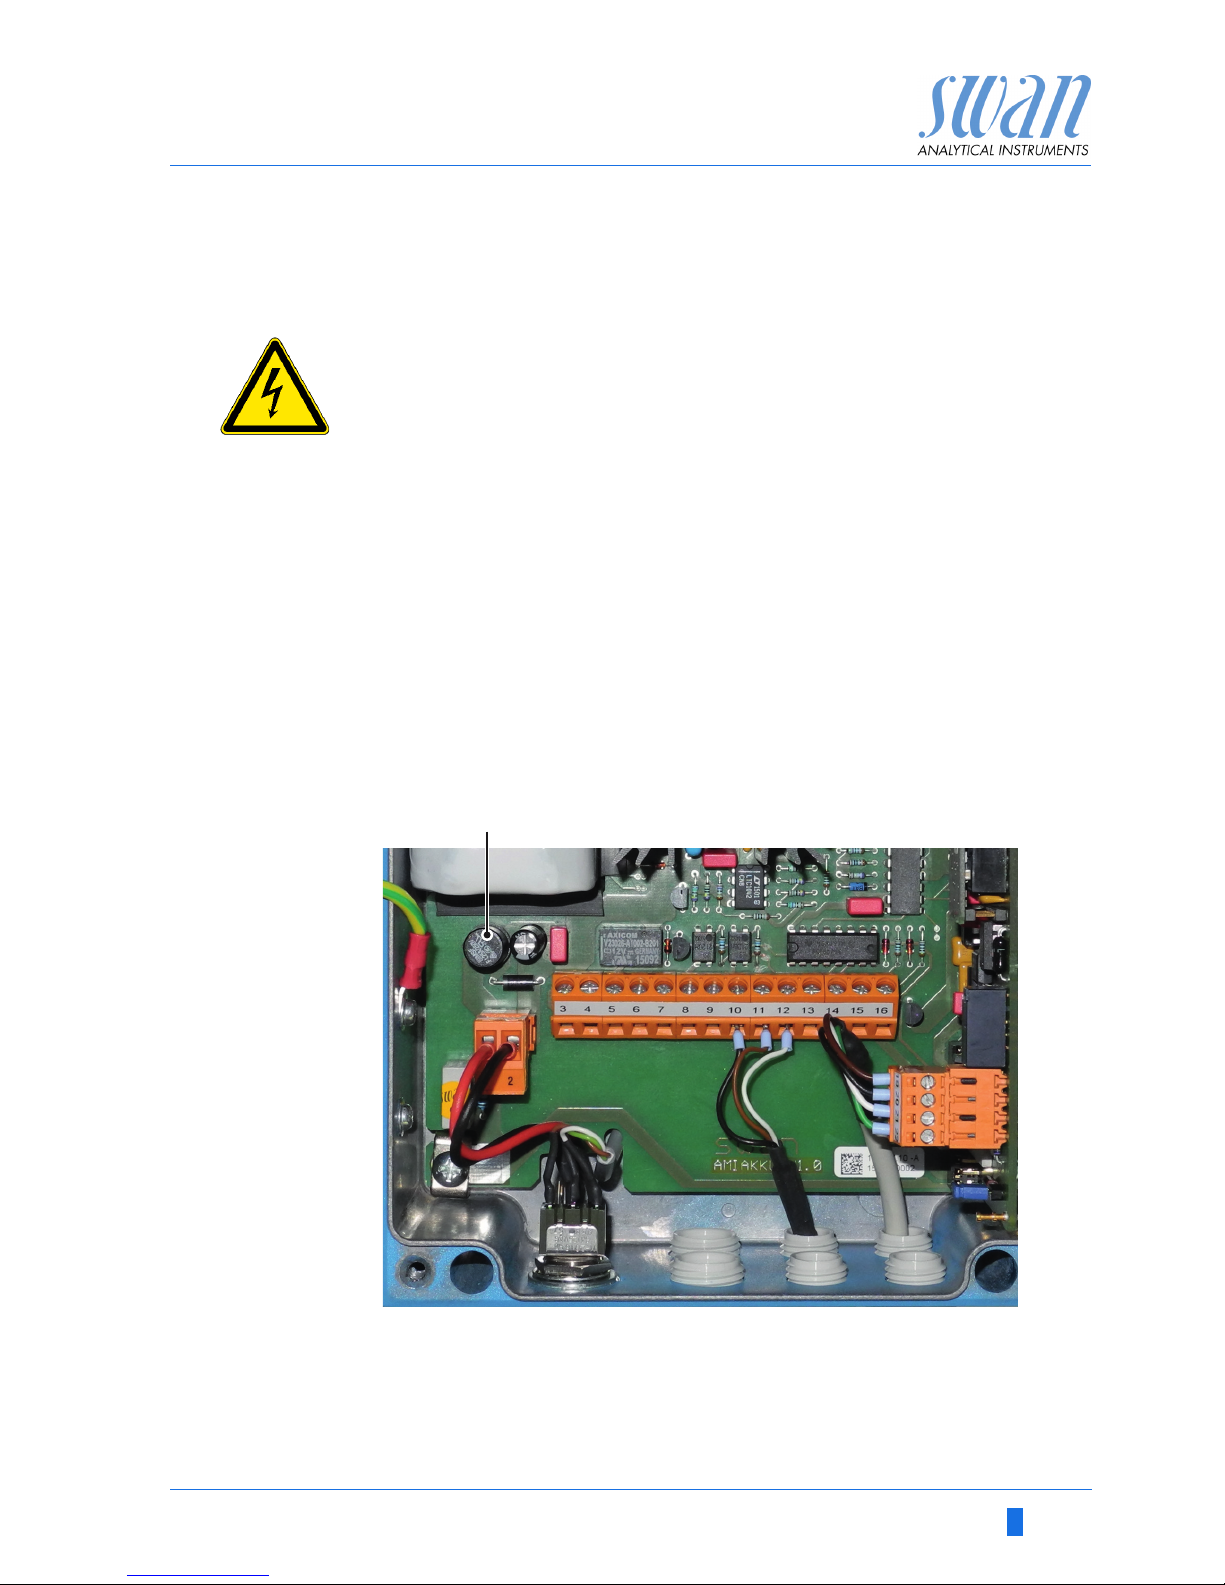
Find and repair the cause for the short circuit before replacing the
fuse. Use tweezers or needle-nosed pliers to remove the defective
fuse.
Use original fuses provided by SWAN only.
A 1.25 AF/250V Instrument power supply
A
Page 42
40 A-96.250.761 / 161017
AMI INSPECTOR pH
Maintenance
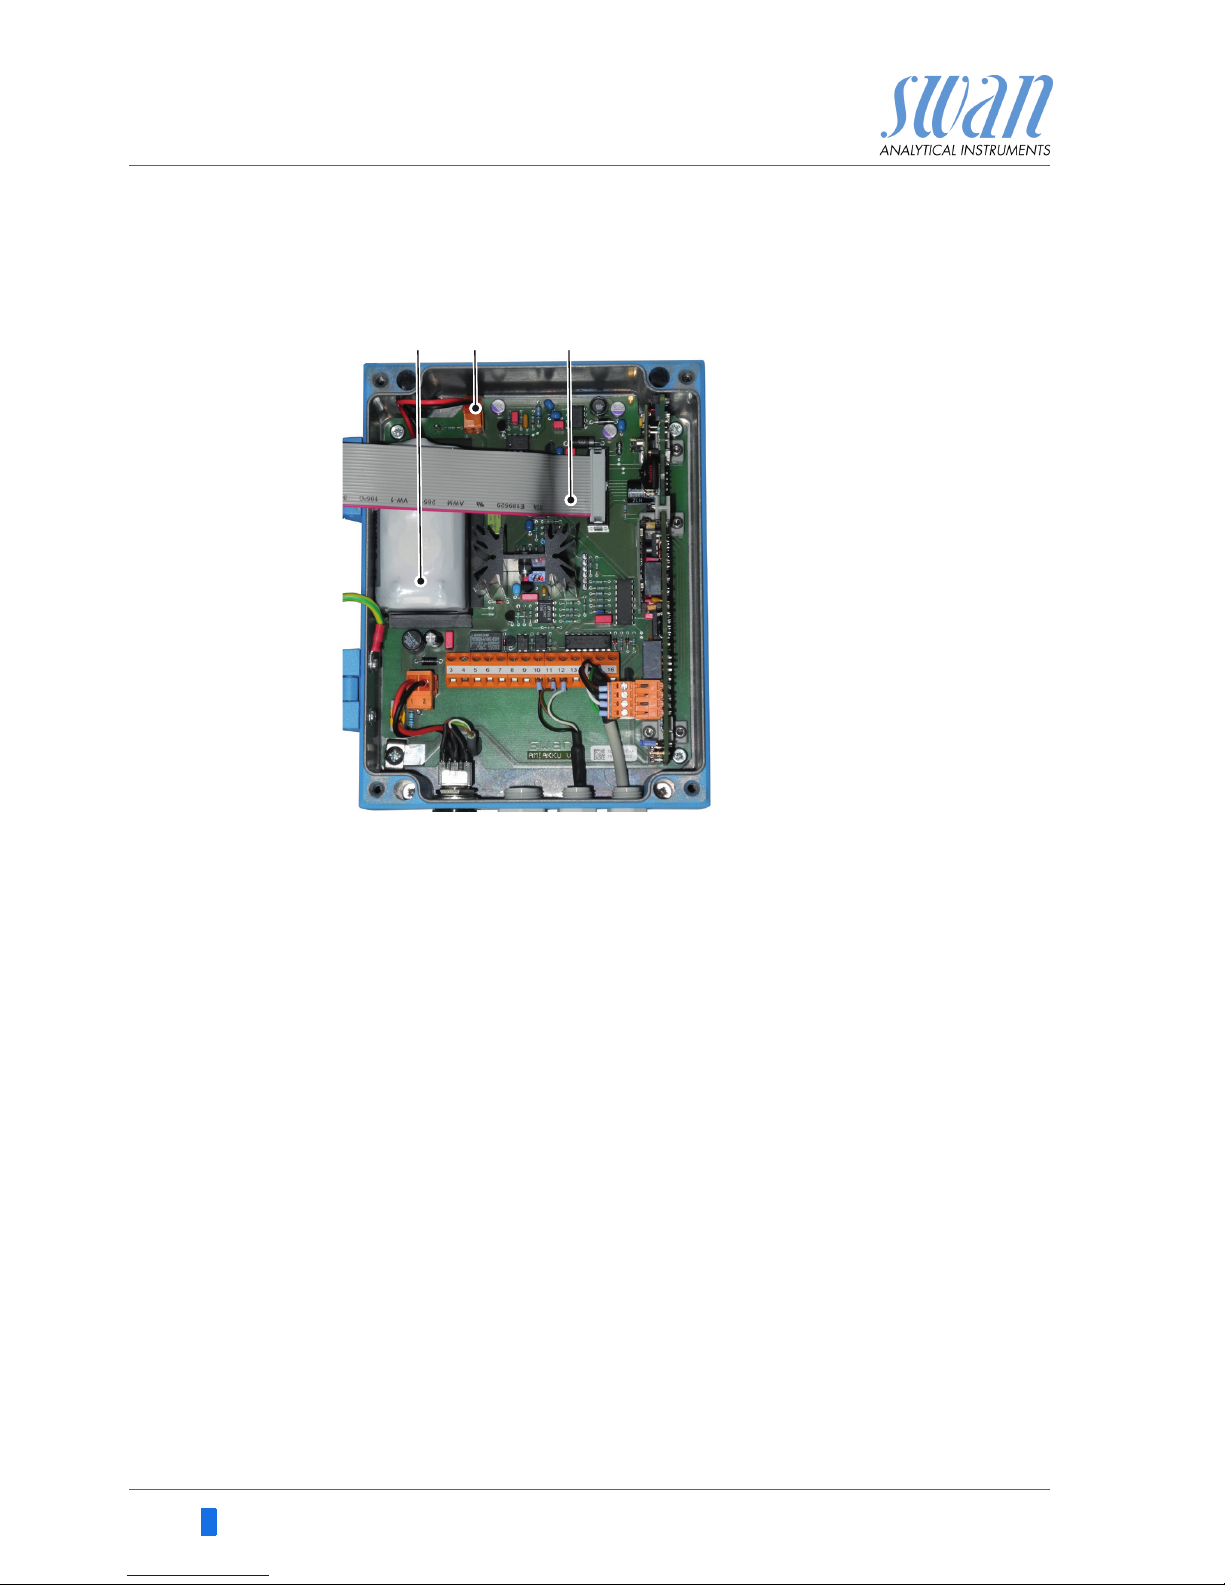
6.7. Replacing the Battery
1 Switch the AMI Inspector off.
2 If connected, disconnect the power adapter from the power
jack.
3 Open the transmitter housing.
4 Pull out the ribbon cable [C] from the mainboard.
5 Disconnect battery plug [B] and replace the battery.
A
B
C
Battery
Battery plug
Ribbon cable
CBA
Page 43
AMI INSPECTOR pH
Maintenance
A-96.250.761 / 161017 41
6.8. Longer Stop of Operation
1 Stop sample flow.
2 Shut off power of the instrument.
3 Unscrew and remove the connector from the electrode.
4 Put the connector cap on it.
5 Remove the electrode from the flow cell and rinse it well with
clean water.
6 Fill 3.5 molar KCl (if not available: clean water) into the protec-
tive cap and put it on the tip of the electrode.
7 Store the electrode with the tip pointing downwards in a frost-
protected room.
8 Stop flow of KCl by pushing the plunger of the syringe under the
air hole.
9 Empty and dry the calibration vessel.
CAUTION
Damage of pH sensor
Wrong storage will damage the pH sensor.
Never store the pH sensor dry.
Store the pH sensor with tip pointing downwards in a frost-
protected room.
Page 44
42 A-96.250.761 / 161017
AMI INSPECTOR pH
Error List
7. Error List
Error
Non-fatal Error. Indicates an alarm if a programmed value is exceeded.
Such Errors are marked E0xx (bold and black).
Fatal Error (blinking symbol)
Control of dosing devices is interrupted.
The indicated measured values are possibly incorrect.
Fatal Errors are divided in the following two categories:
Errors which disappear if correct measuring conditions are re-
covered (i.e. Sample Flow low).
Such Errors are marked E0xx (bold and orange)
Errors which indicate a hardware failure of the instrument.
Such Errors are marked E0xx (bold and red)
Error or fatal Error
Error not yet acknowledged.
Check Pending Errors 1.1.5 * and
take corrective action.
Press <ENTER>.
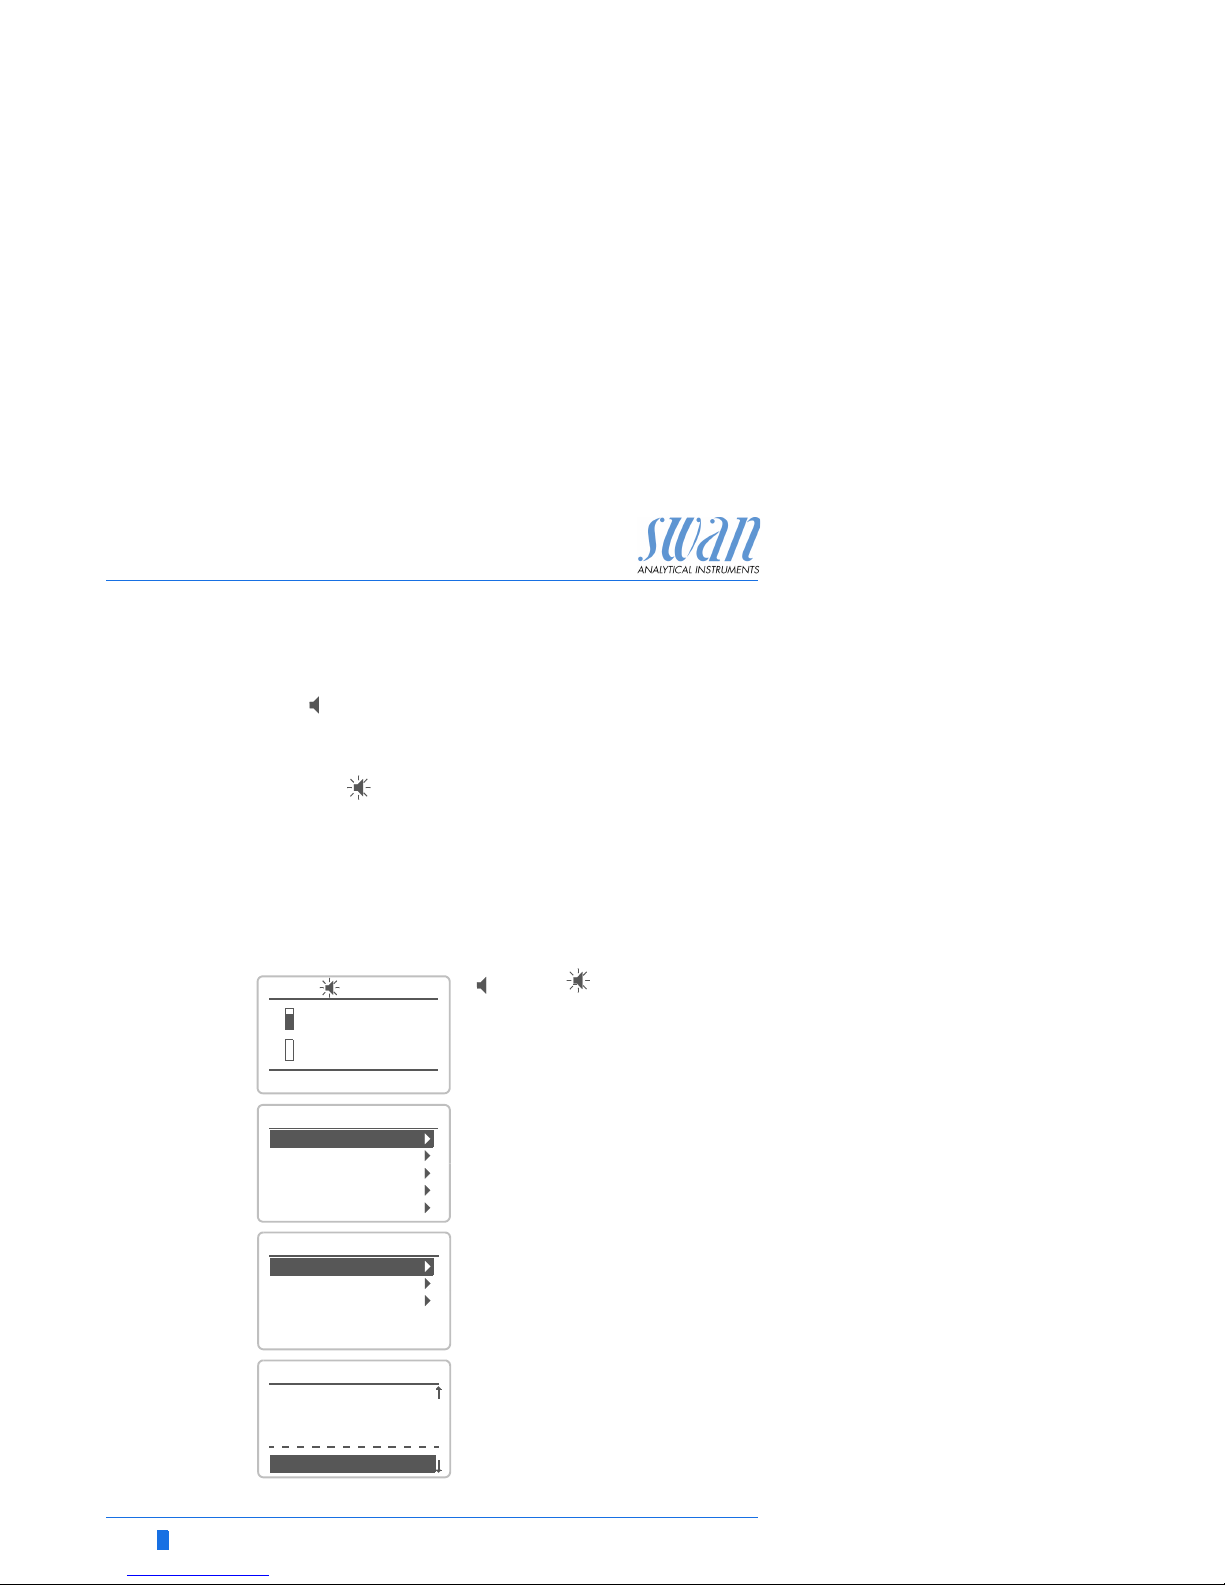
Navigate to menu Messages.
Press <ENTER>.
Navigate to menu Pending Errors.
Press <ENTER>.
Press <ENTER> to acknowledge the
Pending Errors. The Error is reset and
saved in the Message List.
* Menu numbers see
Program Overview, S. 45
25.4°C
HOLD
8 l/h
14:10:45
R1
7.04 pH
R2
1
Installation
Operation
Diagnostics
Messages
Maintenance
Main Menu
1.1
Message List
Pending Errors
Maintenance List
Messages
1.1.5
Pending Errors
Error Code E002
Alarm low
<Enter> to Acknowledge
Page 45
AMI INSPECTOR pH
Error List
A-96.250.761 / 161017 43
Error Description Corrective action
E001 Alarm high
– check process
– check programmed value, see
5.3.1.1.1, S. 59
E002 Alarm low
– check process
– check programmed value, see
5.3.1.1.26, S. 59
E007 Sample Temp. high
– check process
– check programmed value, see
5.3.1.3.1, S. 60
E008 Sample Temp. low
– check process
– check programmed value, see
5.3.1.3.26, S. 60
E009 Sample Flow high
– check sample flow
– check programmed value, see
5.3.1.2.2, S. 60
E010 Sample Flow low
– establish sample flow
– clean instrument
– check programmed value, see
5.3.1.2.36, S. 60
E011 Temp. shorted
– Check wiring of temperature sensor
– Check temperature sensor
E012 Temp. disconnected
– Check wiring of temperature sensor
– Check temperature sensor
E013 Case Temp. high
– check case/environment temperature
– check programmed value, see 5.3.1.4,
S. 60
E014 Case Temp. low
– check case/environment temperature
– check programmed value, see 5.3.1.5,
S. 60
E017 Control Timeout
– check control device or programming in
Installation, Relay contact, Relay 1/2
see 5.3.2/3, S. 61
E024 Input active
– See If Fault Yes is programmed in
Menu see 5.3.4, S. 65
Page 46

44 A-96.250.761 / 161017
AMI INSPECTOR pH
Error List
E026 IC LM75
– call service
E030 EEProm Frontend
– call service
E031 Cal. Recout
– call service
E032 Wrong Frontend
– call service
E033 Power-on
– none, normal status
E034 Power-down
– none, normal status
Error Description Corrective action
Page 47

AMI INSPECTOR pH
Program Overview
A-96.250.761 / 161017 45
8. Program Overview
For explanations about each parameter of the menus see Program
List and Explanations, S. 50
Menu 1 Messages informs about pending errors and mainte-
nance tasks and shows the error history. Password protection
possible. No settings can be modified.
Menu 2 Diagnostics is always accessible for everybody. No
password protection. No settings can be modified.
Menu 3 Maintenance is for service: Calibration, simulation of
outputs and set time/date. Please protect with password.
Menu 4 Operation is for the user, allowing to set limits, alarm
values, etc. The presetting is done in the menu Installation
(only for the System engineer). Please protect with password.
Menu 5 Installation: Defining assignment of all inputs and
outputs, measuring parameters, interface, passwords, etc.
Menu for the system engineer. Password strongly recommended.
8.1. Messages (Main Menu 1)
Pending Errors Pending Errors 1.1.5* * Menu numbers
1.1*
Message List Number 1.2.1*
1.2* Date, Time
Page 48

46 A-96.250.761 / 161017
AMI INSPECTOR pH
Program Overview
8.2. Diagnostics (Main Menu 2)
Identification Desig. AMI pH/Redox * Menu numbers
2.1* Version V6.00-10/15
Factory Test Instrument 2.1.3.1*
2.1.3* Motherboard
Front End
Operating Time Years / Days / Hours / Minutes / Seconds 2.1.4.1*
2.1.4*
Sensors Electrode Current Value pH
2.2* 2.2.1* (Raw value) mV
Cal. History Number 2.2.1.5.1*
2.2.1.5* Date, Time
Offset
Slope
Miscellaneous Case Temp. 2.2.2.1*
2.2.2*
Sample Sample ID 2.3.301*
2.3* Temperature
I/O State Alarm Relay 2.4.1*
2.4* Relay 1/2 2.4.2*
Input
Signal Output 3
Interface Protocol 2.5.1* (only with RS485
2.5* Baud rate interface)
Page 49

AMI INSPECTOR pH
Program Overview
A-96.250.761 / 161017 47
8.3. Maintenance (Main Menu 3)
8.4. Operation (Main Menu 4)
Calibration Process pH Process pH 3.1.1.4* * Menu numbers
3.1* 3.1.1*
Standard pH Standard pH 3.1.2.5*
3.1.2*
Simulation Alarm Relay 3.2.1*
3.2* Relay 1 3.2.2*
Relay 2 3.2.3*
Signal Output 3 3.2.4*
Set Time (Date), (Time)
3.3*
Sensors Filter Time Const. 4.1.1*
4.1* Hold after Cal. 4.1.2*
Relay Contacts Alarm Relay Alarm Alarm High 4.2.1.1.1*
4.2* 4.2.1* 4.2.1.1* Alarm Low 4.2.1.1.26*
Hysteresis 4.2.1.1.36*
Delay 4.2.1.1.46*
Relay 1/ 2 Setpoint 4.2.x.100*
4.2.2* - 4.2.3* Hysteresis 4.2.x.200*
Delay 4.2.x.30*
Input Active 4.2.4.1*
4.2.4* Signal Outputs 4.2.4.2*
Output / Control 4.2.4.3*
Fault 4.2.4.4*
Delay 4.2.4.5*
Logger Log Interval 4.3.1*
4.3* Clear Logger 4.3.2* * Menu numbers
Page 50

48 A-96.250.761 / 161017
AMI INSPECTOR pH
Program Overview
8.5. Installation (Main Menu 5)
Sensors Flow Flow measurement 5.1.1.1* * Menu numbers
5.1* 5.1.1*
Parameter Type of sensor 5.1.2.1*
5.1.2* Sensor Check 5.1.2.2*
Temperature Temp. Sensor 5.1.3.1*
5.1.3* Default Temp. 5.1.3.21*
Temp. Compensation Comp. 5.1.3.3.1*
5.1.3.3*
Standards Standard 1 @ 0 °C– 50 °C 5.1.40.1.1–10*
5.1.40* 5.1.40.1*
Standard 2 @ 0 °C–50 °C 5.1.40.2.1– 10*
5.1.40.2*
Signal Outputs Signal Output 1/ 2 Parameter 5.2.1.1 - 5.2.2.1*
5.2* 5.2.1* - 5.2.2* Current Loop 5.2.1.2 - 5.2.2.2*
Function 5.2.1.3 - 5.2.2.3*
Scaling Range Low 5.2.x.40.10/10*
5.2.x.40 Range High 5.2.x.40.20/20*
Relay Contacts Alarm Relay Alarm Alarm High 5.3.1.1.1*
5.3* 5.3.1* 5.3.1.1* Alarm Low 5.3.1.1.26
Hysteresis 5.3.1.1.36
Delay 5.3.1.1.46
Sample Temp. Alarm High 5.3.1.3.1*
5.3.1.3 Alarm Low 5.3.1.3.26*
Case Temp. high 5.3.1.5*
Case Temp. low 5.3.1.60*
Relay 1/2 Function 5.3.2.1 –5.3.3.1*
5.3.2* - 5.3.3* Parameter 5.3.2.20– 5.3.3.20*
Setpoint 5.3.2.300– 5.3.3.301*
Hysteresis 5.3.2.400 – 5.3.3.401*
Delay 5.3.2.50–5.3.3.50*
Input Active 5.3.4.1*
5.3.4* Signal Outputs 5.3.4.2*
Output/Control 5.3.4.3*
Fault 5.3.4.4*
Delay 5.3.4.5* * Menu numbers
Page 51

AMI INSPECTOR pH
Program Overview
A-96.250.761 / 161017 49
Miscellaneous Language 5.4.1*
5.4* Set defaults 5.4.2*
Load Firmware 5.4.3*
Password Messages 5.4.4.1*
5.4.4* Maintenance 5.4.4.2*
Operation 5.4.4.3*
Installation 5.4.4.4*
Sample ID 5.4.5*
Interface Protocol 5.5.1* (only with RS485
5.5* Device Address 5.5.21* interface)
Baud Rate 5.5.31*
Parity 5.5.41* * Menu numbers
Page 52

50 A-96.250.761 / 161017
AMI INSPECTOR pH
Program List and Explanations
9. Program List and Explanations
1 Messages
1.1 Pending Errors
1.1.5 Provides the list of active errors with their status (active,
acknowledged). If an active error is acknowledged, the alarm relay
is active again. Cleared errors are moved to the Message list.
1.2 Message List
1.2.1 Shows the error history: Error code, date / time of issue and status
(active, acknowledged, cleared). 65 errors are memorized. Then
the oldest error is cleared to save the newest error (circular buffer).
2 Diagnostics
In diagnostics mode, the values can only be viewed, not modified.
2.1 Identification
Desig.: Designation of the instrument.
Ver sion : Firmware of instrument (e.g. V6.00-10/15)
2.1.3 Factory Test: Test date of the Instrument and Motherboard
2.1.4 Operating Time: Years / Days / Hours / Minutes / Seconds
2.2 Sensors
2.2.1 Electrode:
Current value: Shows the actual measuring value in pH or mV.
Raw value: Shows the actual measuring value in mV.
2.2.1.5 Cal. History: Review diagnostic values of the last calibrations.
pH: Number; Date, Time, Offset, Slope
or
mV: Number; Date, Time, Offset,
Max. 64 data records are memorized. One process calibration
corresponds to one data record:
2.2.2 Miscellaneous:
2.2.2.1 Case Temp: Shows the actual temperature in [°C] inside the
transmitter.
Page 53

AMI INSPECTOR pH
Program List and Explanations
A-96.250.761 / 161017 51
2.3 Sample
If <Flow measurement> = None and <Temp. Sensor> = no
2.3.301 Sample ID: Shows the assigned sample identification. This
identification is defined by the user to identify the location of the
sample
Temperature: Shows the predefined comp. temperature in °C.
If <Flow measurement> = Q-Flow and <Temp. Sensor> = no
2.3.311 Sample ID: Same as 2.3.301
Temperature: Same as 2.3.301
Sample flow: Shows the actual sample flow in l/h and the
Raw value in Hz
2.4 I/O State
Shows actual status of all in- and outputs.
2.4.1
2.5 Interface
Protocol USB Stick.
Alarm Relay:
Active or inactive.
Relay 1 and 2:
Active or inactive.
Input:
Open or closed.
Signal Output 3:
Actual current in mA
Page 54

52 A-96.250.761 / 161017
AMI INSPECTOR pH
Program List and Explanations
3 Maintenance
3.1 Calibration
3.1.1 Process pH/ Redox: The process calibration is based on a com-
parative measurement of the current electrode with a calibrated
comparative electrode. See Calibration, p. 31.
3.1.1.4 Current Value: Shows the measuring value of the current electrode.
Offset: Shows the deviation of the measuring value of the current
electrode and the calibrated comparative electrode in mV.
Process Value: Enter the measured value of the calibrated compar-
ative electrode.
3.1.1 Standard pH/Redox: Performs a standard calibration. Follow the
instruction on the screen. See Calibration, p. 31
3.2 Simulation
To simulate a value or a relay state, select the
alarm relay,
relay 1 and 2
signal output 1 and 2
with the [ ] or [ ] key.
Press the [Enter] key.
Change the value or state of the selected item with the [ ] or
[] key.
Press the [Enter] key.
The value is simulated by the relay/signal output.
At the absence of any key activities, the instrument will switch back
to normal mode after 20 min. If you quit the menu, all simulated values will be reset.
3.3 Set Time
Adjust date and time.
Alarm Relay:
Active or inactive.
Relay 1:
Active or inactive.
Relay 2:
Active or inactive.
Signal Output 3:
Current in mA
Page 55

AMI INSPECTOR pH
Program List and Explanations
A-96.250.761 / 161017 53
4 Operation
4.1 Sensors
4.1.1 Filter Time Constant: Used to damp noisy signals. The higher the
filter time constant, the slower the system reacts to changes of the
measured value.
Range: 5–300 Sec
4.1.2 Hold after Cal: Delay permitting the instrument to stabilize again
after calibration. During calibration plus hold-time, the signal
outputs are frozen (held on last valid value), alarm values, limits are
not active.
Range: 0–6‘000 Sec
4.2 Relay Contacts
See Relay Contacts, p. 21
4.3 Logger
The instrument is equipped with an internal logger. The data can be
copied to a PC with the installed USB stick.
The logger can save approx. 1500 data records. The Records
consists of: Date, time, alarms, measured value, measured value
uncompensated, temperature, flow.
4.3.1 Log Interval: Select a convenient log interval. Consult the table
below to estimate the max logging time. When the logging buffer is
full, the oldest data record is erased to make room for the newest
one (circular buffer).
Range: 1 Second to 1 hour
4.3.2 Clear Logger: If confirmed with yes, the complete logger data is
deleted. A new data series is started.
4.3.3 Eject USB Stick: If <Enter> is pressed, all logger data will be copied
to the USB stick and afterwards the USB stick will be deactivated.
Interval 1 s 5 s 1 min 5 min 10 min 30 min 1 h
Time 25 min 2 h 25 h 5 d 10 d 31 d 62 d
Page 56

54 A-96.250.761 / 161017
AMI INSPECTOR pH
Program List and Explanations
5 Installation
5.1 Sensors
5.1.1 Flow
5.1.1.1 Flow measurement: Select the type of flow sensor if a flow sensor
is installed.
Possible flow sensors: None; Q-Flow; deltaT
5.1.2 Parameters:
5.1.2.1 Type of Sensor: Set the type of installed sensor.
Possible types: pH or Redox
5.1.2.2 Sensor Check: Not yet implemented. Set to off.
5.1.3 Temperature:
5.1.3.1 Temp. Sensor: The pH measurement is temperature dependent
therefore it is possible to install a temperature sensor.
Possible settings:
Temp. Sensor; <yes>, <no>
If <no> is set the measuring value is compensated with the default
temperature.
5.1.3.21 Default Temp.: If no temperature sensor is installed, set the default
temperature to the assumed average temperature of the sample.
The measuring value is then compensated with this value.
5.1.3.3 Temp. Compensation (only available for pH measurement)
5.1.3.3.1 Comp.: Choose the compensation model which fits best to your application.
Available compensation models: Nernst, non-linear, coefficient.
We recommend: Nernst compensation for potable water, waste wa-
ter, swimming pools, non-linear or coefficient for high purity water.
5.1.40 Standards: A temperature curve is programmed for SWAN standard 1, pH 7 and SWAN standard 2, pH 9. If you want to use your
own standards you can readjust the temperature curve according to
your standards.
5.1.5.1 Standard 1: Assign the measured pH value to the according tem-
perature from 0–50 °C in steps of 5 °C.
5.1.5.2 Standard 2: Assign the measured pH value to the according tem-
perature from 0–50 °C in steps of 5 °C.
5.1.5.3 Standard: Enter the mV value of the redox standard.
5.1.5 Quality Assurance:
Not applicable.
Page 57

AMI INSPECTOR pH
Program List and Explanations
A-96.250.761 / 161017 55
5.2 Signal Outputs
5.2.1 Signal Output 3 (signal outputs 1 and 2 are deactivated)
5.2.1.1 Parameter: Assign one of the process values to the signal output.
Available values:
Meas. Value
Temperature
Sample Flow (if a flow sensor is selected)
5.2.1.2 Current Loop: Select the current range of the signal output.
Make sure the connected device works with the same current
range.
Available ranges: 0–20 mA or 4– 20 mA
5.2.1.3 Function: Define if the signal output is used to transmit a process
value or to drive a control unit. Available functions are:
Linear, bilinear or logarithmic for process values.
See As process values, p. 56
Control upwards or control downwards for controllers.
See As control output, p. 57
Page 58

56 A-96.250.761 / 161017
AMI INSPECTOR pH
Program List and Explanations
As process
values
The process value can be represented in 3 ways: linear, bilinear or
logarithmic. See graphs below.
5.2.1.40 Scaling: Enter beginning and end point (Range low & high) of the
linear or logarithmic scale. In addition, the midpoint for the bilinear
scale.
Parameter: Meas value
5.2.1.40.10 Range low: -3 pH – 15 pH
5.2.1.40.20 Range high: -3 pH – 15 pH
Parameter: Temperature
5.2.1.40.11 Range low: -25 °C to + 270 °C
5.2.1.40.21 Range high: -25 °C to + 270 °C
Parameter: Sample flow
5.2.1.40.12 Range low: 0– 200 l / h
5.2.1.40.22 Range high: 0– 200 l /h
ABlinear
bilinear
X Measured value
X Measured value (logarithmic)
20
0.0 0.1 0.2 0.3 0.4 0.5
10 12
(0 - 20 [mA])
0 / 4
(4 - 20 [mA])
[mA]
X
AB
20
1
01234
10 100 1’000 10’000
10 12
(0 - 20 [mA])
0 / 4
426
(4 - 20 [mA])
[mA]
X
Page 59

AMI INSPECTOR pH
Program List and Explanations
A-96.250.761 / 161017 57
As control
output
Signal outputs can be used for driving control units. We distinguish
different kinds of controls:
P-controller: The controller action is proportional to the devia-
tion from the setpoint. The controller is characterized by the
P-Band. In the steady-state, the setpoint will never be
reached. The deviation is called steady-state error.
Parameters: setpoint, P-Band
PI-controller: The combination of a P-controller with an
I-controller will minimize the steady-state error. If the reset
time is set to zero, the I-controller is switched off.
Parameters: setpoint, P-Band, reset time.
PD-controller: The combination of a P-controller with a
D-controller will minimize the response time to a fast change
of the process value. If the derivative time is set to zero, the
D-controller is switched off.
Parameters: setpoint, P-Band, derivative time.
PID-controller: The combination of a P-, an I - and a D-con-
troller allows a proper control of the process.
Parameters: setpoint, P-Band, reset time, derivative time.
Ziegler-Nichols method for the optimization of a PID controller:
Parameters: Setpoint, P-Band, Reset time, Derivative time
The point of intersection of the tangent with the respective axis will
result in the parameters a and L.
Consult the manual of the control unit for connecting and
programming details. Choose control upwards or downwards.
A
B
X
Response to maximum control output
Tangent on the inflection point
Time
Xp
Tn
Tv
= 1.2/a
= 2L
= L/2
X
Y
B
A
L
a
Page 60

58 A-96.250.761 / 161017
AMI INSPECTOR pH
Program List and Explanations
If Control upwards or Control downwards is active
5.2.1.43 Control Parameters
Setpoint: User-defined process value (Measured value or flow)
P-Band: Range below (upwards control) or above (downwards
control) the set-point, within the dosing intensity is reduced from
100% to 0% to reach the set-point without overshooting.
5.2.1.43 Control Parameters: Parameter = Meas. value
5.2.1.43.10 Setpoint: -3.00 to +15.00 pH
5.2.1.43.20 P-Band: 0 –2.0 pH
5.2.1.43 Control Parameters: Parameter = Temperature
5.2.1.43.11 Setpoint: - 25 to + 270 °C
5.2.1.43.21 P-Band: 0 to +100 °C
5.2.1.43 Control Parameters: Parameter = Sample Flow
5.2.1.43.12 Setpoint: 0– 200 l / h
5.2.1.43.22 P-Band: 0– 200 l / h
5.2.1.43.3 Reset time: The reset time is the time till the step response of a
single I-controller will reach the same value as it will be suddenly
reached by a P-controller.
Range: 0–9’000 sec
5.2.1.43.4 Derivative time: The derivative time is the time till the ramp
response of a single P-controller will reach the same value as it will
be suddenly reached by a D-controller.
Range: 0–9’000 sec
5.2.1.43.5 Control timeout: If a controller action (dosing intensity) is constantly
over 90% during a defined period of time and the process value
does not come closer to the setpoint, the dosing process will be
stopped for safety reasons.
Range: 0–720 min
Page 61

AMI INSPECTOR pH
Program List and Explanations
A-96.250.761 / 161017 59
5.3 Relay Contacts
5.3.1 Alarm Relay: The alarm relay is used as cumulative error indicator.
Under normal operating conditions the contact is active.
The contact is inactive at:
Power loss
Detection of system faults like defective sensors or electronic
parts
High case temperature
Process values out of programmed ranges.
Program alarm levels, hysteresis values and delay times for the
following parameters:
Meas. Value
Temperature
Sample Flow (if a flow sensor is programmed)
Case Temperature high
Case Temperature low
5.3.1.1 Alarm
5.3.1.1.1 Alarm High: If the measured value rises above the alarm high
value, the alarm relay is activated and E001, is displayed in the
message list.
Range: -3.00 pH –15.00 pH
5.3.1.1.26 Alarm Low: If the measured value falls below the alarm low value,
the alarm relay is activated and E002 is displayed in the message
list.
Range: -3.00 pH –15.00 pH
5.3.1.1.36 Hysteresis: Within the hyst. range, the relay does not switch. This
prevents damage of relays contacts when the measured value
fluctuates around the alarm value.
Range. 0.00 pH –2.00 pH
5.3.1.1.46 Delay: Duration, the activation of the alarm relay is retarded after
the measuring value has risen above/fallen below the programmed
alarm.
Range: 0–28‘800 Sec
Page 62

60 A-96.250.761 / 161017
AMI INSPECTOR pH
Program List and Explanations
5.3.1.2 Sample Flow: Define at which sample flow a flow alarm should be
issued.
5.3.1.2.1 Flow Alarm: Program if the alarm relay should be activated if there
is a flow alarm. Choose between yes or no. The flow alarm will
always be indicated in the display, pending error list, saved in the
message list and the logger.
Available values: Yes or no
NOTICE: Sufficient flow is essential for a correct measurement.
We recommend to program yes.
5.3.1.2.2 Alarm High: If the measuring values rises above the programmed
value E009 will be issued.
Range: 0–200 l/h
5.3.1.2.36 Alarm Low: If the measuring values falls below the programmed
value E010 will be issued.
Range: 0–200 l/h
5.3.1.3 Sample Temp.: Define at which sample temperature an alarm
should be issued.
5.3.1.3.1 Alarm High: If the measured value rises above the alarm high val-
ue, the alarm relay is activated and E007 is issued.
Range: -25–270 °C
5.3.1.3.26 Alarm Low: If the measured value falls below the alarm high value,
the alarm relay is activated and E008 is issued.
Range: -25–270 °C
5.3.1.4 Case Temp. high: Set the alarm high value for temperature of
electronics housing. If the value rises above the programmed value
E013 is issued.
Range: 30–75 °C
5.3.1.5 Case Temp. low: Set the alarm low value for temperature of
electronics housing. If the value falls below the programmed value
E014 is issued.
Range: -10–20 °C
Page 63

AMI INSPECTOR pH
Program List and Explanations
A-96.250.761 / 161017 61
5.3.2/3 Relay 1 and 2: The function of relay contacts 1 or 2 are defined by
the user
NOTICE: The navigation in the menu <Relay 1> and <Relay 2>
is equal. For reason of simplicity only the menu numbers of
Relay 1 are used in the following.
1 First select the functions as:
- Limit upper/lower,
- Control upwards/downwards,
- Timer
- Fieldbus
2 Then enter the necessary data depending on the selected func-
tion. The same values may also be entered in menu 4.2 Relay
Contacts, p. 53
When the relays are used as upper or lower limit switches, program
the following:
5.3.2.20 Parameter: select a process value
5.3.2.300 Setpoint: If the measured value rises above respectively falls below
the set-point, the relay is activated.
5.3.2.409 Hysteresis: within the hysteresis range, the relay does not switch.
This prevents damage of relay contacts when the measured value
fluctuates around the alarm value.
5.3.2.50 Delay: Duration, the activation of the alarm relay is retarded after
the measuring value has risen above/fallen below the programmed
alarm.
Range. 0–600 Sec
5.3.2.1 Function = Limit upper/ lower:
Parameter Range
Meas. Value -3.00 pH –15.00 pH
Temperature -25 to +270 °C
Sample flow 0– 200 l/h
Parameter Range
Meas. Value 0 pH – 2.00 pH
Temperature 0 to + 100 °C
Sample flow 0– 200 l/h
Page 64

62 A-96.250.761 / 161017
AMI INSPECTOR pH
Program List and Explanations
The relays may be used to drive control units such as solenoid
valves, membrane dosing pumps or motor valves. When driving a
motor valve both relays are needed, relay 1 to open and relay 2 to
close the valve.
5.3.2.22 Parameter: Choose on of the following process values.
Meas. value
Temperature
Sample Flow
5.3.2.32 Settings: Choose the respective actuator:
Time proportional
Frequency
Motor valve
Examples of metering devices that are driven time proportional are
solenoid valves, peristaltic pumps.
Dosing is controlled by the operating time.
5.3.2.32.20 Cycle time: duration of one control cycle (on/off change).
Range: 0–600 Sec.
5.3.2.32.30 Response time: Minimal time the metering device needs to react.
Range: 0–240 Sec.
5.3.2.32.4 Control Parameters
Range for each Parameter same as 5.2.1.43, p. 58
Examples of metering devices that are pulse frequency driven are
the classic membrane pumps with a potential free triggering input.
Dosing is controlled by the repetition speed of dosing shots.
5.3.2.32.21 Pulse frequency: Max. pulses per minute the device is able to re-
spond to. Range: 20–300/min.
5.3.2.1 Function = Control upwards or downwards:
5.3.2.32.1
Actuator = Time proportional
5.3.2.32.1
Actuator = Frequency
Page 65
AMI INSPECTOR pH
Program List and Explanations
A-96.250.761 / 161017 63
5.3.2.32.31 Control Parameters
Range for each Parameter same as 5.2.1.43, p. 58
Dosing is controlled by the position of a motor driven mixing valve.
5.3.2.32.22 Run time: Time needed to open a completely closed valve
Range: 5–300 Sec.
5.3.2.32.32 Neutral zone: Minimal response time in % of the runtime. If the re-
quested dosing output is smaller than the response time, no
change will take place.
Range: 1–20 %
5.3.2.32.4 Control Parameters
Range for each Parameter same as 5.2.1.43, p. 58
The relay will be activated repetitively depending on the programmed time scheme.
5.3.2.24 Mode: Operating mode (interval, daily, weekly)
5.3.2.340 Interval: The interval can be programmed within a range
of 1–1’440 min.
5.3.2.44 Run Time: Enter the time the relay stays active.
Range: 5–32’400 Sec.
5.3.2.54 Delay: during run time plus the delay time the signal and control
outputs are held in the operating mode programmed below.
Range: 0–6’000 Sec.
5.3.2.6 Signal Outputs: Select operating mode of the signal output:
5.3.2.32.1
Actuator = Motor valve
5.3.2.1 Function = Timer:
5.3.2.24
Interval
Cont.: Signal outputs continue to issue the measured value.
Hold: Signal outputs hold the last valid measured value.
Measurement is interrupted. Errors, except fatal errors,
are not issued.
Off: Signal outputs are switched off (set to 0 or 4 mA).
Errors, except fatal errors, are not issued.
Page 66

64 A-96.250.761 / 161017
AMI INSPECTOR pH
Program List and Explanations
5.3.2.7 Output/ Control: Select operating mode of the controller output:
The relay contact can be activated daily, at any time of a day.
5.3.2.341 Start time: to set the start time proceed as follows:
1 Press [Enter], to set the hours.
2 Set the hour with the [ ] or [ ] keys.
3 Press [Enter], to set the minutes.
4 Set the minutes with the [ ] or [ ] keys.
5 Press [Enter], to set the seconds.
6 Set the seconds with the [ ] or [ ] keys.
Range: 00:00:00–23:59:59
5.3.2.44 Run Time: see Interval
5.3.2.54 Delay: see Interval
5.3.2.6 Signal Outputs: see Interval
5.3.2.7 Output/ Control: see Interval
The relay contact can be activated at one or several days, of a
week. The daily starting time is valid for all days.
5.3.2.342 Calendar:
5.3.2.342.1 Start time: The programmed start time is valid for each of the pro-
grammed days. To set the start time see 5.3.2.341, p. 64.
Range: 00:00:00–23:59:59
5.3.2.342.2 Monday: Possible settings, on or off
to
5.3.2.342.8 Sunday: Possible settings, on or off
5.3.2.44 Run Time: see Interval
5.3.2.54 Delay: see Interval
5.3.2.6 Signal Outputs: see Interval
5.3.2.7 Output/ Control: see Interval
Cont.: Controller continues normally.
Hold: Controller continues based on the last valid value.
Off: Controller is switched off.
5.3.2.24
daily
5.3.2.24
weekly
Page 67

AMI INSPECTOR pH
Program List and Explanations
A-96.250.761 / 161017 65
The relay will be switched via the Profibus input. No further parameters are needed.
5.3.4 Input: The functions of the relays and signal outputs can be defined depending on the position of the input contact, i.e. no function,
closed or open.
5.3.4.1 Active: Define when the input should be active:
5.3.4.2 Signal Outputs: Select the operation mode of the signal outputs
when the relay is active:
5.3.4.3 Output/Control: (relay or signal output):
5.3.4.4 Fault:
5.3.4.5 Delay: Time which the instrument waits, after the input is
deactivated, before returning to normal operation.
Range: 0–6‘000 Sec
5.3.2.1
Function = Fieldbus:
No: Input is never active.
When closed Input is active if the input relay is closed
When open: Input is active if the input relay is open
Cont.: Signal outputs continue to issue the measured
value.
Hold: Signal outputs issue the last valid measured value.
Measurement is interrupted. Errors, except fatal
errors, are not issued.
Off: Set to 0 or 4 mA respectively. Errors, except fatal
errors, are not issued.
Cont.: Controller continues normally.
Hold: Controller continues on the last valid value.
Off: Controller is switched off.
No: No message is issued in pending error list and the
alarm relay does not close when input is active.
Yes: Message E024 is issued and stored in the mes-
sage list. The Alarm relay closes when input is
active.
Page 68

66 A-96.250.761 / 161017
AMI INSPECTOR pH
Program List and Explanations
5.4 Miscellaneous
5.4.1 Language: Set the desired language.
Available settings: German/English/ French / Spanish
5.4.2 Set defaults: Reset the instrument to factory default values in three
different ways:
Calibration: Sets calibration values back to default. All other
values are kept in memory.
In parts: Communication parameters are kept in memory. All
other values are set back to default values.
Completely: Sets back all values including communication
parameters.
5.4.3 Load Firmware: Firmware updates should be done by instructed
service personnel only.
5.4.4 Password: Select a password different from 0000 to prevent
unauthorized access to the menus “Messages”, “Maintenance”,
“Operation” and “Installation”.
Each menu may be protected by a different password.
If you forgot the passwords, contact the closest SWAN
representative.
5.4.5 Sample ID: Identify the process value with any meaning full text,
such as KKS number.
Page 69

AMI INSPECTOR pH
Program List and Explanations
A-96.250.761 / 161017 67
5.5 Interface
Select one of the following communication protocols. Depending on
your selection, different parameters must be defined.
5.5.1 Protocol: Profibus
5.5.20 Device address: Range: 0–126
5.5.30 ID-Nr.: Range: Analyzer; Manufacturer; Multivariable
5.5.40 Local operation: Range: Enabled, Disabled
5.5.1 Protocol: Modbus RTU
5.5.21 Device address: Range: 0–126
5.5.31 Baud Rate: Range: 1200–115
200 Baud
5.5.41 Parity: Range: none, even, odd
5.5.1 Protocol: USB-Stick:
Only visible if an USB interface is installed. No further settings are
possible.
Page 70

68 A-96.250.761 / 161017
AMI INSPECTOR pH
Material Safety Data sheets
10. Material Safety Data sheets
10.1. Reagents
Download
MSDS
The current Material Safety Data Sheets (MSDS) for the above listed Reagents are available for downloading at www.swan.ch.
Catalogue No.:
Product name:
A-85.112.300
Calibration Solution pH 4
Catalogue No.:
Product name:
A-85.113.300
Calibration Solution pH 7
Catalogue No.:
Product name:
A-85.114.300
Calibration Solution pH 9
Catalogue No.:
Product name:
A-87.893.300
Reference filling solution for Swansensor Reference FL Swansensor pH SI and Swansensor
Redox (ORP) SI
Page 71

AMI INSPECTOR pH
Default Values
A-96.250.761 / 161017 69
11. Default Values
Operation:
Sensors: Filter Time Const.: .................................................................30 Sec
Hold after Cal.:.....................................................................300 Sec
Alarm Relay ...................................................................... same as in Installation
Relay 1 / 2 ...................................................................... same as in Installation
Input ...................................................................... same as in Installation
Logger: Logger Interval:.............................................................. 30 Minutes
Clear Logger:................................................................................ no
Installation:
Sensors Flow: Flow measurement: ....................................................... None
Parameter: Type of sensor: .............................. as set, pH or Redox
Parameter: Sensor Check: .......................................................... Off
Temp. Sensor: ............................................................................. No
Default Temp. ..........................................................................25 °C
Temp. Compensation............................................................. Nernst
Standards: Standard 1............see Chap. 4 Set Buffer Values, S. 24
Standards: Standard 2............see Chap. 4 Set Buffer Values, S. 24
Standards: Redox Standard .................................................475 mV
Quality Assurance.................................................................... 0: Off
Signal Output Parameter:.................................................................... Meas. Value
Current loop:................................................................. 0/4 – 20 mA
Function:.................................................................................. linear
Scaling: Range low:................................................... 0.00 pH/0 mV
Scaling: Range high: ......................................... 14.00 pH/1000 mV
Alarm Relay: Alarm:
Alarm high: ........................................................ 15.00 pH/1500 mV
Alarm low:............................................................-3.00 pH/-500 mV
Hysteresis:........................................................................... 0.10 pH
Delay: ......................................................................................5 Sec
Sample Temp:
Alarm High:.............................................................................. 55 °C
Alarm Low:................................................................................. 5 °C
Case temp. high: ..................................................................... 65 °C
Case temp. low:......................................................................... 0 °C
Page 72

70 A-96.250.761 / 161017
AMI INSPECTOR pH
Default Values
Relay 1/ 2 Function: .......................................................................... limit upper
Parameter: .................................................................... Meas. Value
Setpoint:............................................................. 14.00 pH/ 1500 mV
Hysteresis: ............................................................... 0.10 pH/10 mV
Delay:.....................................................................................30 Sec
If Function = Control upw. or dnw:
Parameter: .................................................................... Meas. Value
Settings: Actuator: ...........................................................Frequency
Settings: Pulse Frequency: ............................................ 120/min.
Settings: Control Parameters: Setpoint: ......... 14.00 pH/1000 mV
Settings: Control Parameters: P-band:................. 0.10 pH/10 mV
Settings: Control Parameters: Reset time: ...........................0 Sec
Settings: Control Parameters: Derivative Time: ...................0 Sec
Settings: Control Parameters: Control Timeout:..................0 Min.
Settings: Act. ..................................................................Time prop.:
Cycle time: ............................................................................. 60 s
Response time: ..................................................................... 10 s
Settings: Act. ................................................................ Motor valve:
Run time: ...............................................................................60 s
Neutral zone: ...........................................................................5%
If Function = Timer:
Mode:.................................................................................... Interval
Interval:.................................................................................1 min
Mode: ....................................................................................... daily
Start time: ........................................................................00.00.00
Mode:.....................................................................................weekly
Calendar; Start time: .......................................................00.00.00
Calendar; Monday to Sunday: .................................................. Off
Run time: ...............................................................................10 Sec
Delay:.......................................................................................5 Sec
Signal output:............................................................................. cont
Output/Control: .........................................................................cont.
Input: Active............................................................................when closed
Signal Outputs ........................................................................... hold
Output/Control ..............................................................................off
Fault..............................................................................................no
Delay......................................................................................10 Sec
Page 73

AMI INSPECTOR pH
Default Values
A-96.250.761 / 161017 71
Miscellaneous Language:............................................................................. English
Set default: ...................................................................................no
Load firmware:.............................................................................. no
Password:........................................................... for all modes 0000
Sample ID:....................................................................... - - - - - - - -
Interface Protocol: ...........................................................................USB Stick
Page 74

AMI INSPECTOR pH
Index
72 A-96.250.761 / 161017
12. Index
A
Alarm Relay . . . . . . . . 8, 21
C
Cable thicknesses . . . . . . 17
Calendar
. . . . . . . . . . . . 64
Calibration
. . . . . . . . . . . 31
Changing parameters . . . . 28
Changing values
. . . . . . . 28
Charging
. . . . . . . . . . . . 19
Checklist. . . . . . . . . . . . 12
Cleaning
. . . . . . . . . . . . 29
D
Default Values . . . . . . . . 69
E
Error List. . . . . . . . . . . . 42
external devices . . . . . . . 19
F
Fluidics . . . . . . . . . . . . 10
I
Input . . . . . . . . . . . . 8, 21
Interface
. . . . . . . . . . . . 22
L
Longer Stop of Operation . . 40
P
pH and the ORP electrodes
Installation
. . . . . . . . 14
pH Measuring Principle
. . . . 7
Power ON - OFF . . . . . . . 19
Power Supply
. . . . . . . . . 11
Process pH Calibration
. . . 31
Programming . . . . . . . . . 23
R
Reference Electrode . . . . . . 7
S
Safety Features . . . . . . . . 8
Sample flow, establish
. . . . 23
Set Buffer Values . . . . . . 24
Setup . . . . . . . . . . . . . 23
shut-down
. . . . . . . . . . . 19
Signal Outputs . . . . . . . . 22
Software . . . . . . . . . . . . 27
Standard pH Calibration
. . . 31
System, Description of . . . . 7
T
Temperature compensation. . 8
Terminals . . . . . . 18, 21–22
W
Wire . . . . . . . . . . . . . . 17
Page 75
AMI INSPECTOR pH
Notes
A-96.250.761 / 161017 73
13. Notes
Page 76
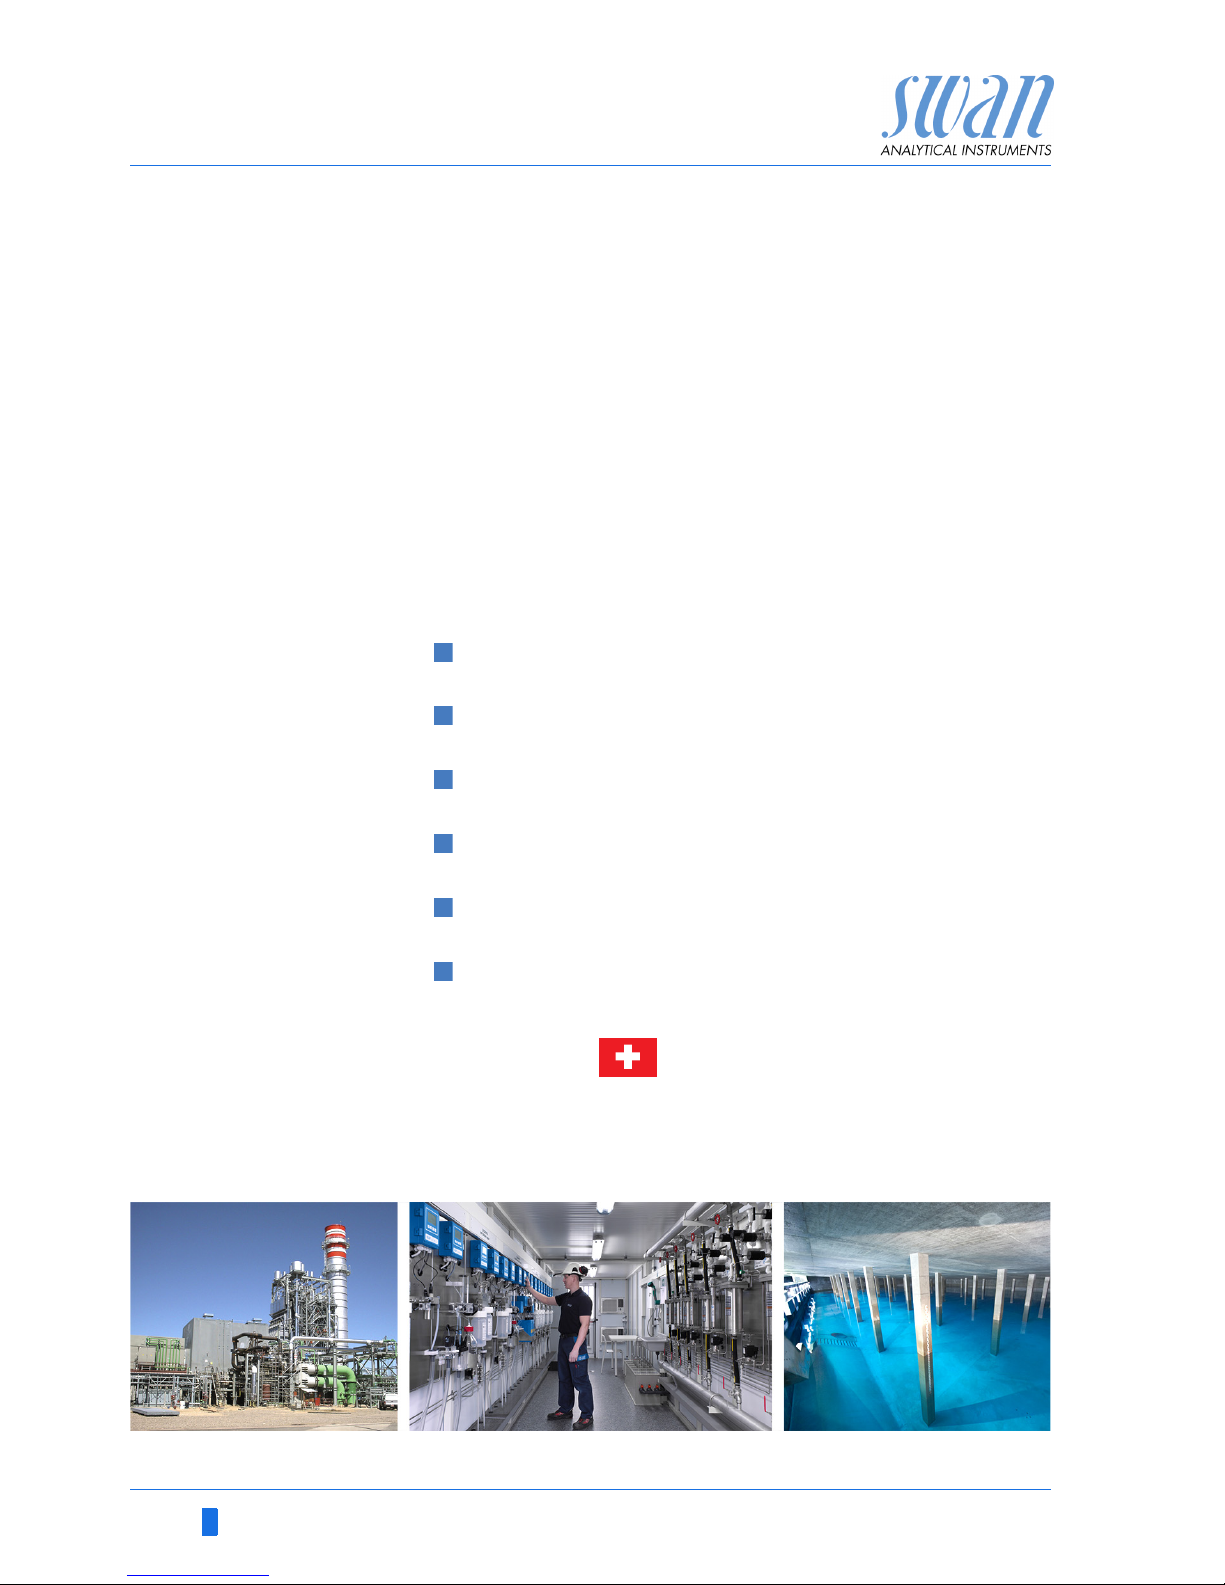
74 A-96.250.761 / 161017
AMI INSPECTOR pH
SWAN
is represented worldwide by subsidiary companies
and distributors.
cooperates with independent representatives
all over the world.
SWAN Products
Analytical Instruments for:
High Purity Water
Feedwater, Steam and Condensate
Potable Water
Pool and Sanitary Water
Cooling Water
Waste Water and Effluents
Made in Switzerland
 Loading...