

Page 1
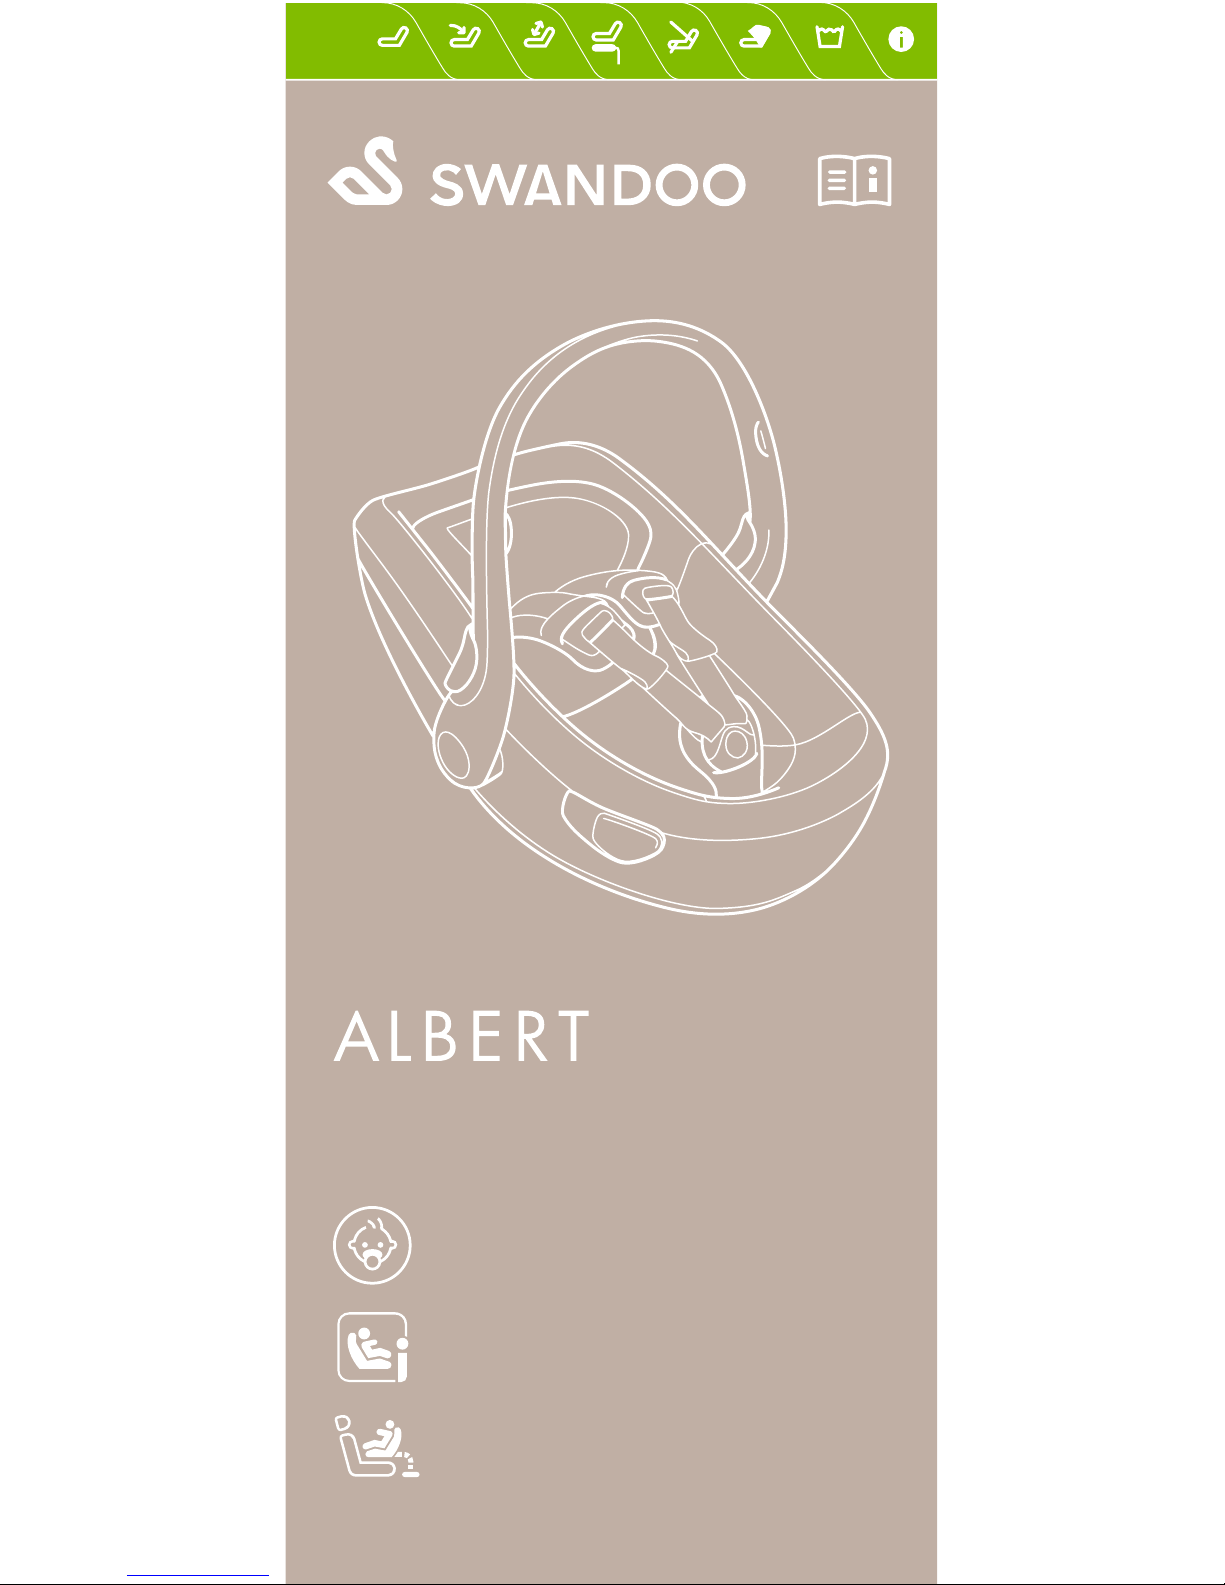
FOR THE LITTLE ONES
FÜR UNSERE KLEINSTEN
40–85 cm, up to / bis zu 13 kg
I-SIZE, ECE R129/00
When used with / gemeinsam mit
Albert i-Size Base
INSTALLATION
with ISOFIX and support leg
mit ISOFIX und Stützbein
i-Size Baby Car Seat
i-Size Babyschale
Page 2
ALWAYS WITH YOU
Page 3
Say Hi to Albert!
Smart and beautiful –
The perfect fit for
your baby.
Das ist Albert!
Smart und schick ist er
der perfekte Begleiter
für Ihr Baby.
Product Parts
Placing Your Baby
Adjusting Headrest
and Handle
Installation Using
Albert i-Size Base
Installation Using
a Seatbelt
Using the Canopy
Washing the Product
Important Information
Sitz-Komponenten
Richtige Sicherung
Ihres Kindes
Verstellbare Kopf stütze
und Tragegriff
Installierung mit
Albert i-Size Base
Installierung mit
Sicherheitsgurt
Nutzung des
Sonnenschutzes
Reinigung des Produktes
Wichtige Informationen
Page 4

EN For the maximum
protection and comfort
of your child, it is essential
that you read through the
entire manual carefully and
follow all instructions on
how to install and use the
product. Always keep it in
the storage compartment
of your seat. Also read the
instructions in the vehicle
owner’s manual related to
child safety seats. If not
operated correctly it may
result in serious injuries
or even death.
NOTICE
This is an “i-Size” Child
Restraint System. It is
approved to Regulation No.
129/00 for use in “i-Size
compatible” vehicle seating
positions as indicated by
vehicle manufacturer in the
vehicle users’ manual. If
in doubt, consult either the
child restraint manufacturer
or the retailer.
Only use this product on a
forward-facing seat. Do not
place rear-facing car seats
on front seats with airbags.
This product has been
approved according to the
strictest European safety
standards (ECE R129/00)
and is suitable for rearward
facing (40–85 cm) with
ISOFIX and support leg
anchoring systems.
DE Um höchste Sicherheit
und Komfort für Ihr Kind
zu gewährleisten, ist es
unerlässlich, dass Sie
das gesamte Handbuch
sorgfältig lesen und
allen Anweisungen zur
Installation und Benutzung
des Produktes genau
folgen. Bewahren Sie
dieses Handbuch im
Aufbewahrungsfach unter
dem Sitz auf. Lesen Sie
ebenfalls die Anweisungen
im Handbuch Ihres
Fahrzeugs bezüglich
Kindersitze. Eine falsche
Verwendung des Sitzes
kann zu lebensgefährlichen
or lebensbedrohenden
Verletzungen Ihres Kindes
führen.
ANMERKUNG
Dies ist ein „i-Size“ Kinderrückhaltesystem. Es erfüllt
die Regulierung Nr.
129/00 für die Nutzung
in „i-Size kompatiblen“
Autositzpositionen Ihres
Fahrzeugs, die im Handbuch
Ihres Fahrzeugs ausgewiesen
sind. Setzen Sie sich
im Zweifels fall mit dem
Hersteller oder Händler des
Kindersitzes in Verbindung.
Verwenden Sie dieses
Produkt nur auf einem
nach vorne gerichteten
Sitz. Platzieren Sie keine
rückwärts gerichteten
Kindersitze auf
Vordersitzen mit Airbags.
Dieses Produkt ist nach
strengsten europäischen
Sicherheitsstandards (ECE
R129/00) zugelassen für
rückwärts gerichtete ISOFIX
Systeme (40–85 cm) mit
Stützbein und Ankerarm.
Page 5
A
I
J
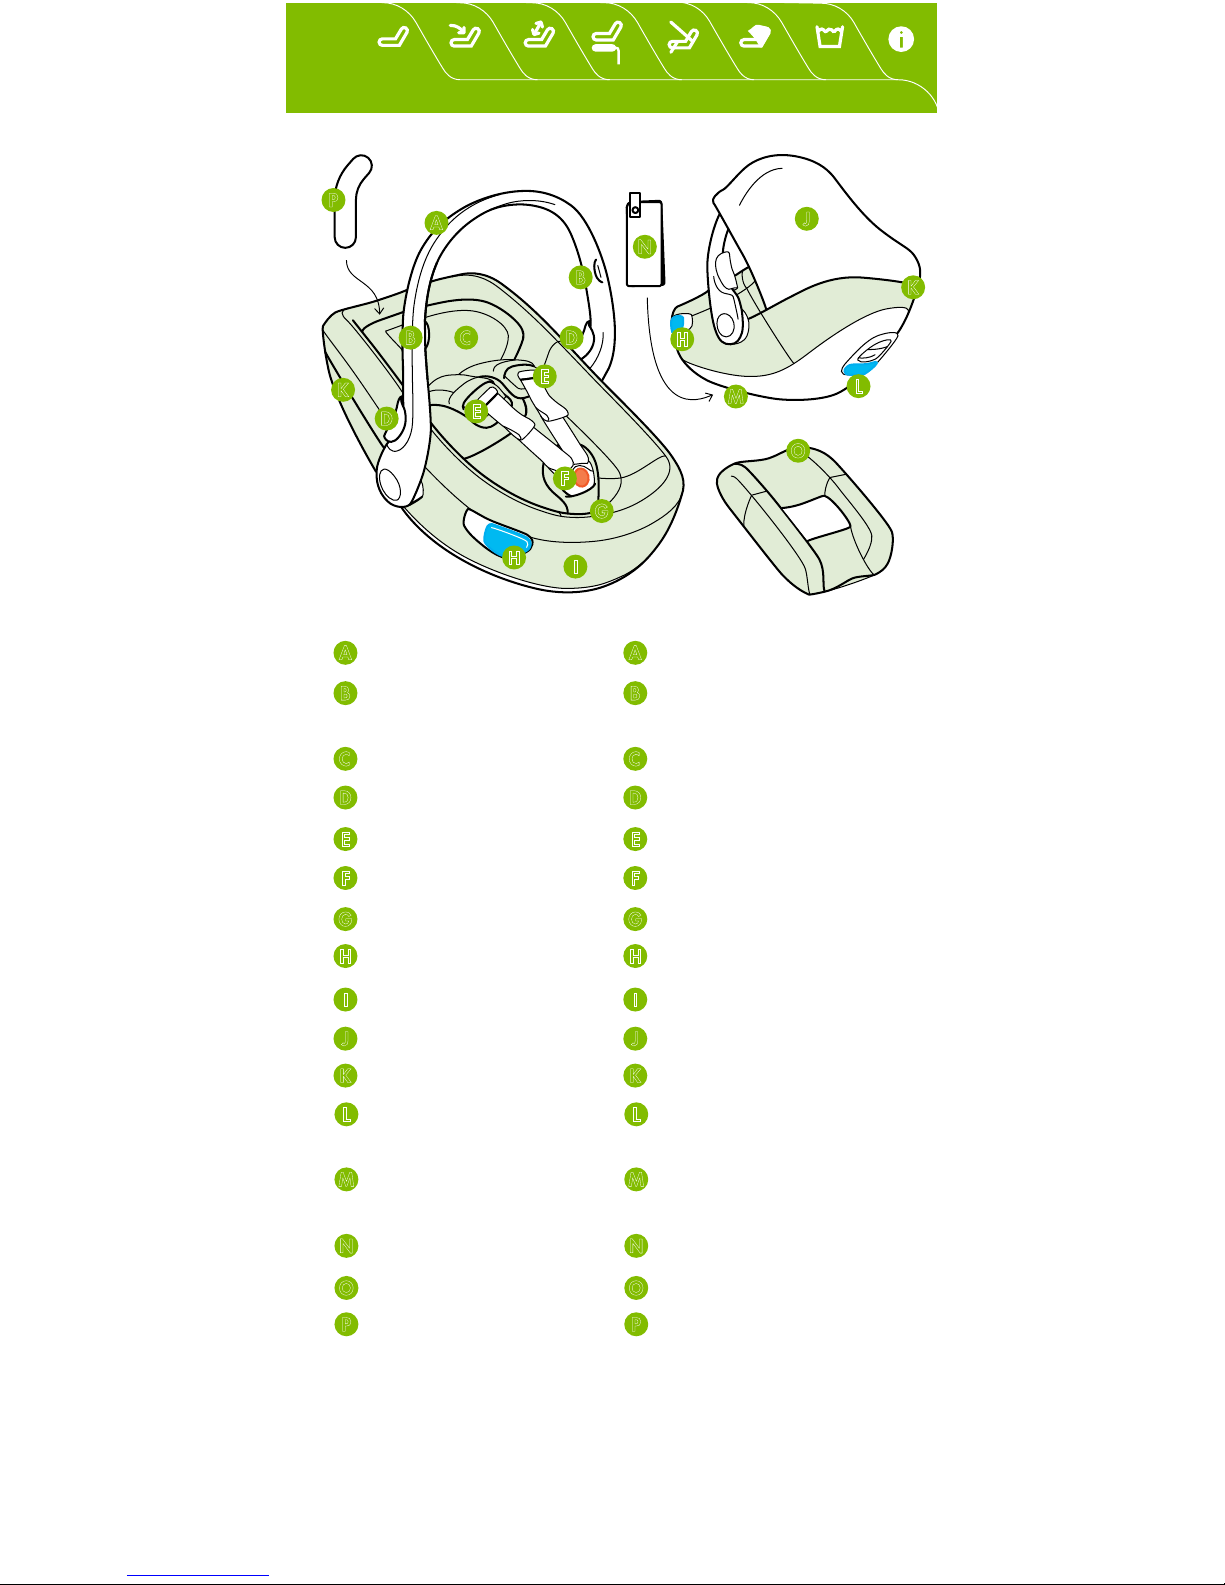
Carrying handle
Small slots for
fixing the sun canopy
Adjustable head rest
Handle release buttons
Harness adjuster
Belt buckle
Crotch strap
2 guides for car lap belt
Fabric cover
Integrated sun canopy
Pocket for sun canopy
Guide for car
shoulder belt
Storage compartment
for user manual
User manual
Newborn pillow
Fabric cover
installation tool
Tragegriff
Steckplätze für
Sonnenschutz
Verstellbare Kopfstütze
Verstelltasten Tragegriff
Gurtanpassungsknopf
Gurtschloss
Schrittgurt
2 Beckengurt-Führungen
Stoffbezug
Integrierter Sonnenschutz
Fach für Sonnenschutz
Schultergurt-Führung
für den Autogurt
Aufbewahrungsfach
für Handbuch
Handbuch
Neugeboreneneinlage
Werkzeug zur Montage
des Stoffbezugs
A
A
I
I
J
J
Page 6
A
A
F
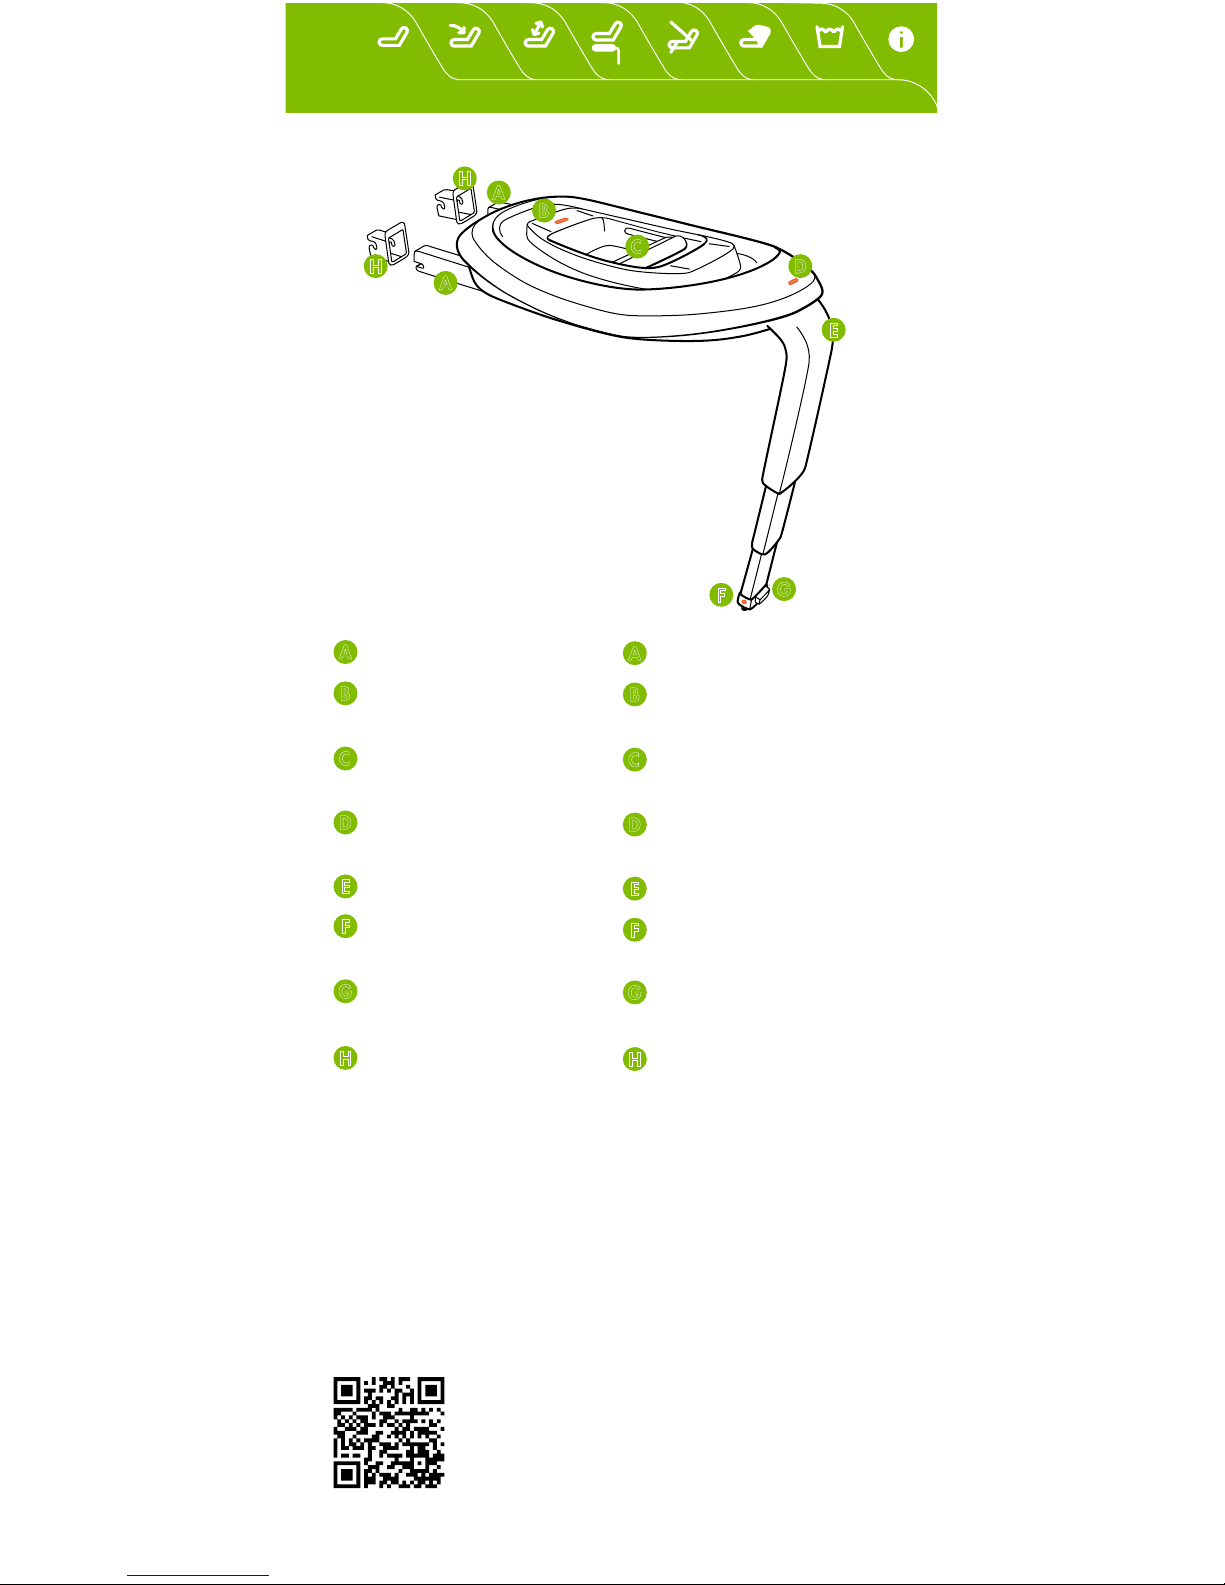
ISOFIX connectors
Colour indicator
for connectors
Release button for
connectors
Colour indicator
for child seat
Support leg
Colour indicator
for support leg
Release button
for support leg
ISOFIX guides
ISOFIX-Ankerarme
Farbindikator für die
Ankerarme
Entriegel ungs taste
für die Ankerarme
Farbindikator für
den Kindersitz
Stützbein
Farbindikator
für das Stützbein
Entriegelungstaste
für das Stützbein
ISOFIX-Führungen
A
A
F
F
Bitte lesen Sie im
Handbuch Ihres
Autoherstellers nach,
wo sich die ISOFIXAnkerpunkte befinden.
Die Base ist nicht für
jedes Auto geeignet. Um
herauszufinden, ob sie in
Ihr Auto passt, gehen Sie
bitte auf swandoo.com/
albert-isofix
Please check your vehicle
manufacturer’s handbook
to locate the ISOFIX anchor
points. The base will not fit
every vehicle. To find out
if the base fits your car,
please check swandoo.
com/albert-isofix
Page 7
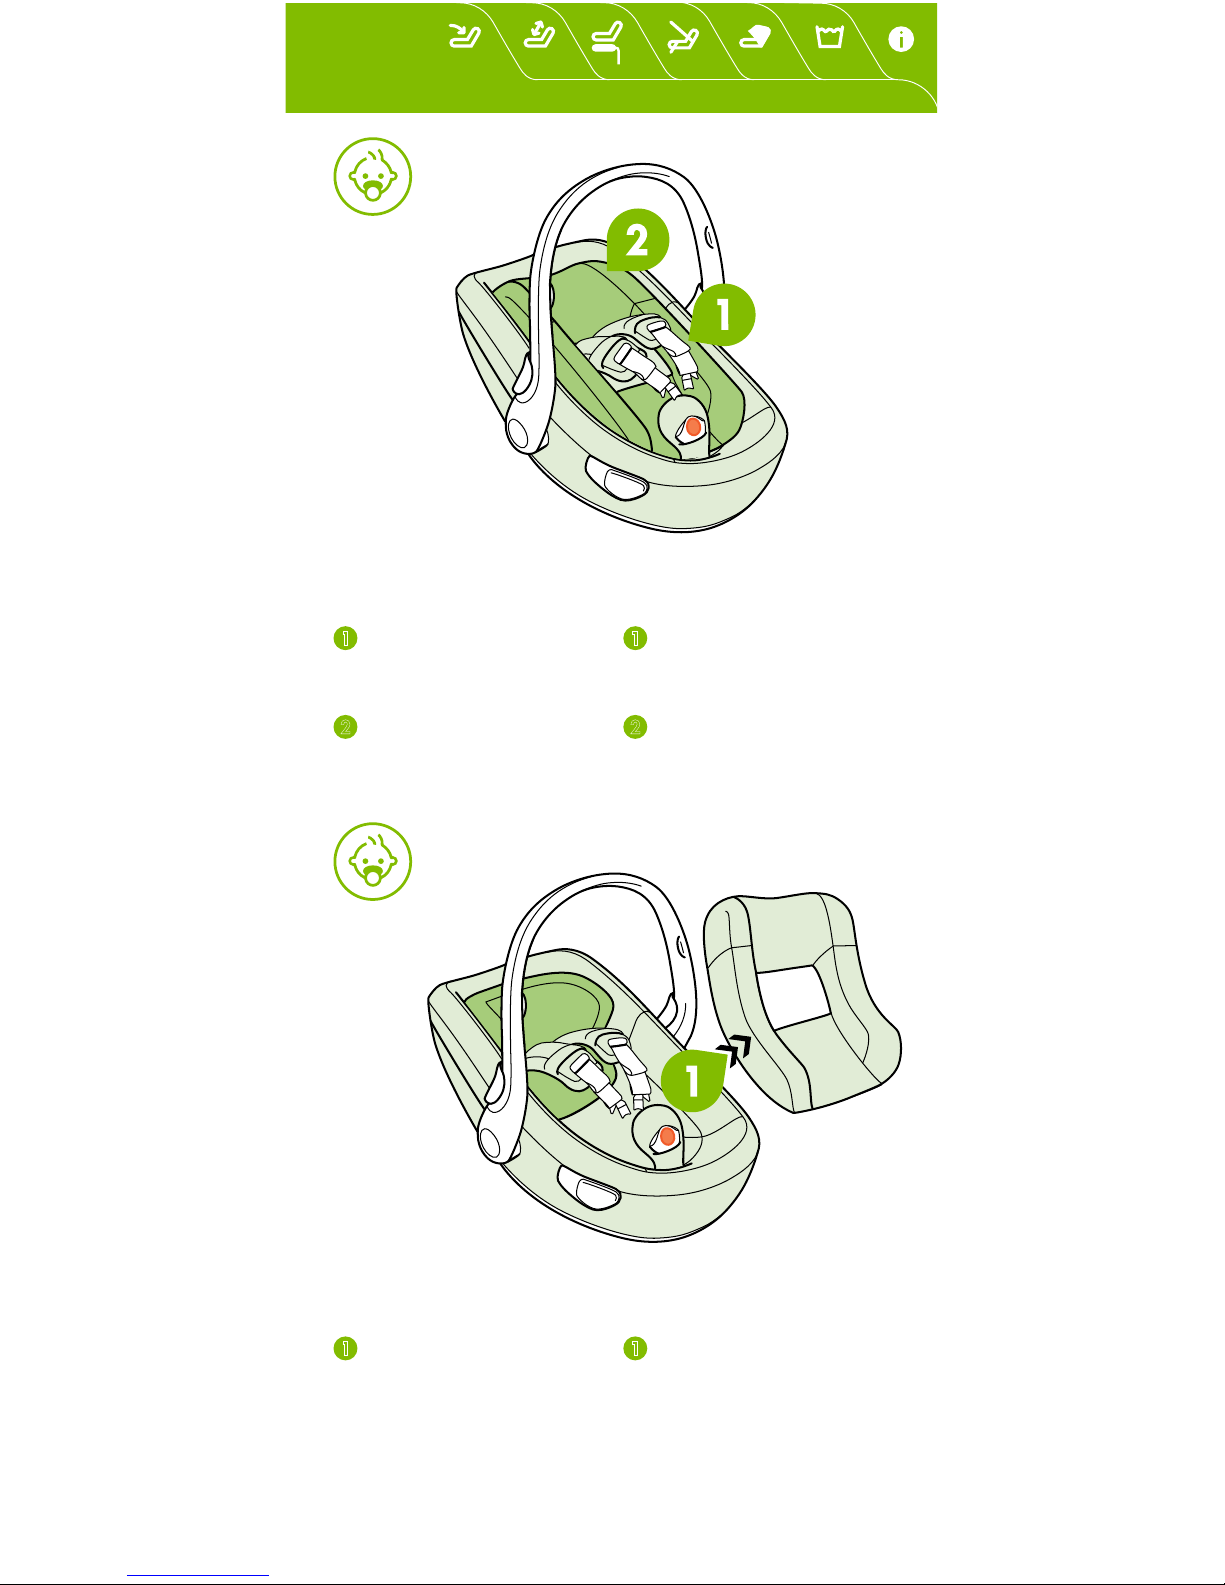
PLACING THE
NEWBORN PILLOW
1
Feed the shoulder
harness through the hole
of the newborn pillow.
Clad the head rest
with the pillow.
REMOVING THE
NEWBORN PILLOW
1
Remove the pillow from
the head rest and pull the
pillow away from the seat.
INSTALLATION DER
NEUGEBORENENEINLAGE
1
Fädeln Sie die Schultergurte durch das Loch der
Einlage.
Stülpen Sie die Einlage
über die Kopfstütze.
ENTFERNEN DER
NEUGEBORENENEINLAGE
1
Ziehen Sie die Einlage
von der Kopfstütze ab
und heben Sie sie
vom Sitz weg.
0 – 6 KG
40 – 60 CM
6 –1 3 KG
60 – 85 CM
Page 8
<
60 cm
6 kg
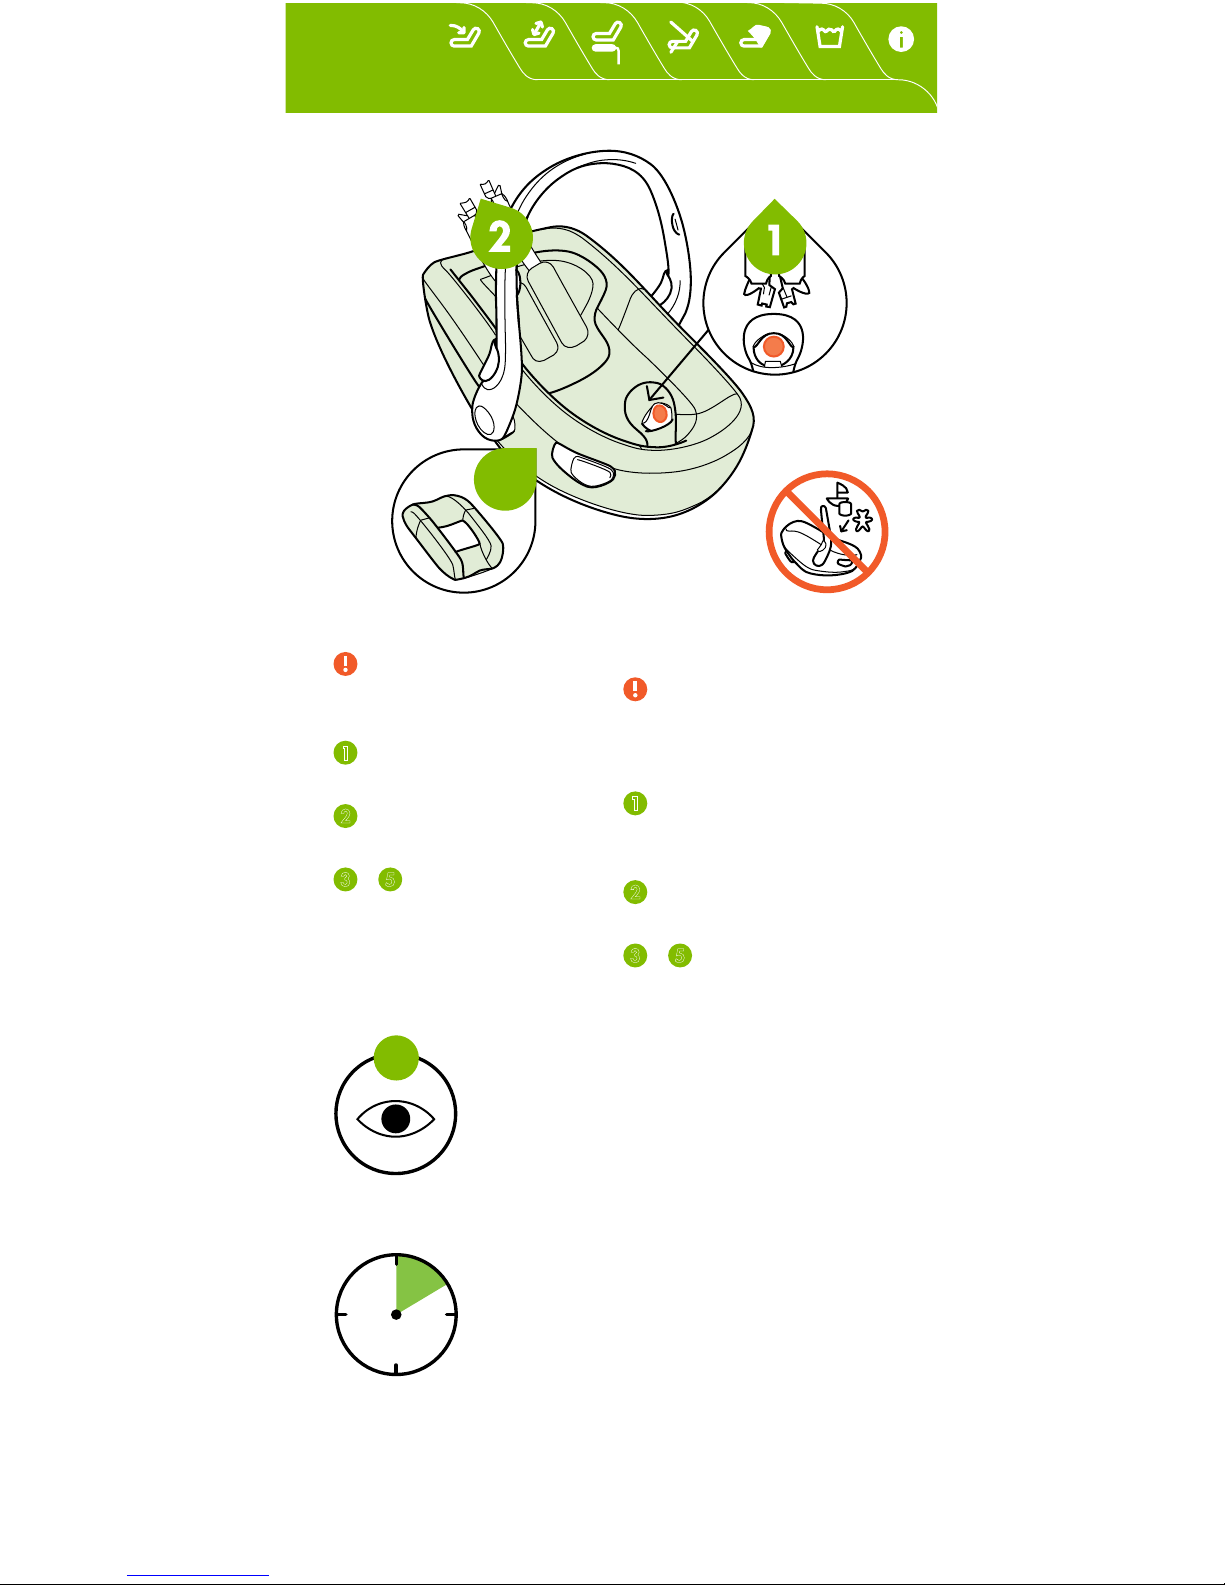
PLACING YOUR BABY
Notice: Please always
use the attached pillow for
babies below 6kg.
1
Press the red button of
the buckle to open it.
Rise the shoulder
harness of the child seat.
– 5 on next page
RICHTIGE SICHERUNG
IHRES KINDES
Bitte benutzen Sie für
Babies unter 6kg immer
die mitgelieferte Neugeboreneneinlage.
1
Drücken Sie den roten
Knopf des Schlosses um es
zu öffnen.
Heben Sie die Schultergurte des Kindersitzes an.
– 5 auf der nächsten
Seite
Warning: Never leave your child
unattended in a child seat, not
even for a short time.
Warnung: Lassen Sie Ihr Kind niemals
unbeaufsichtigt in einem Kindersitz,
auch nicht für eine kurze Zeit.
Warning: You shouldn’t have your
child sitting in a car seat for more
than two hours at a time.
Warnung: Ihr Kind sollte niemals
länger als 2 Stunden ohne
Unterbrechung im
Kindersitz sitzen.
!
Page 9
5
CLICK!
< 1 CM
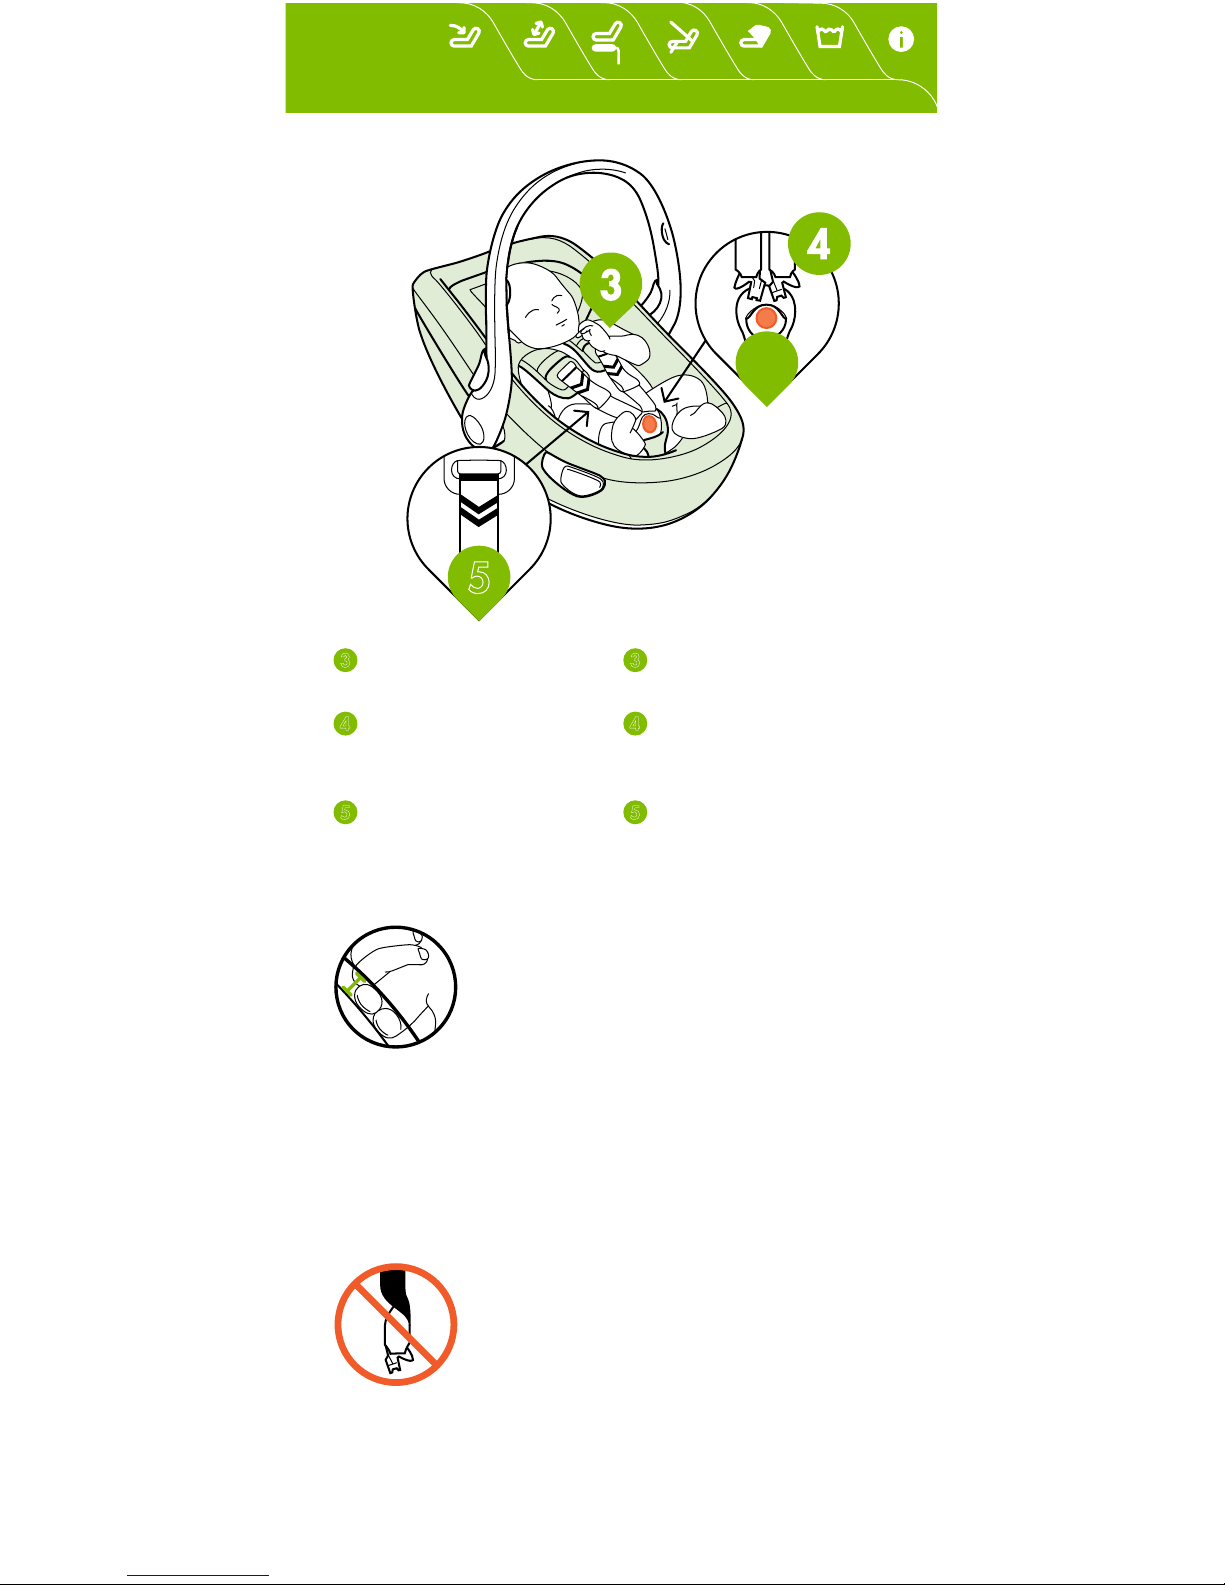
Place your baby
into the child seat.
Put the buckle back
together until you hear
a “Click”.
5
Adjust the length of the
harness to suit your baby.
Setzen Sie Ihr Baby
in den Kindersitz.
Stecken Sie den Gurt
in das Schloss bis Sie es
einrasten hören.
5
Passen Sie die Länge
der Sitzgurte an den
Körper Ihres Babys an.
Notice: Make sure you can fit no more
than one finger between the harness and
your baby (1cm). If you cannot tighten the
seat appropriately, stop using the seat
immediately and contact your retailer.
Anmerkung: Gehen Sie sicher, dass der
Abstand zwischen dem Sitzgurt und Ihrem
Baby nicht mehr als eine Fingerbreite
beträgt (1 cm). Wenn Sie den Sitzgurt
nicht angemessen anziehen können,
benutzen Sie den Sitz nicht weiter und
kontaktieren Sie Ihren Händler.
Warning: Never use this seat if the
harness is damaged, twisted or worn-out.
Warnung: Benutzen Sie diesen Sitz
niemals, wenn der Sitzgurt beschädigt,
verdreht oder abgenutzt ist.
Page 10
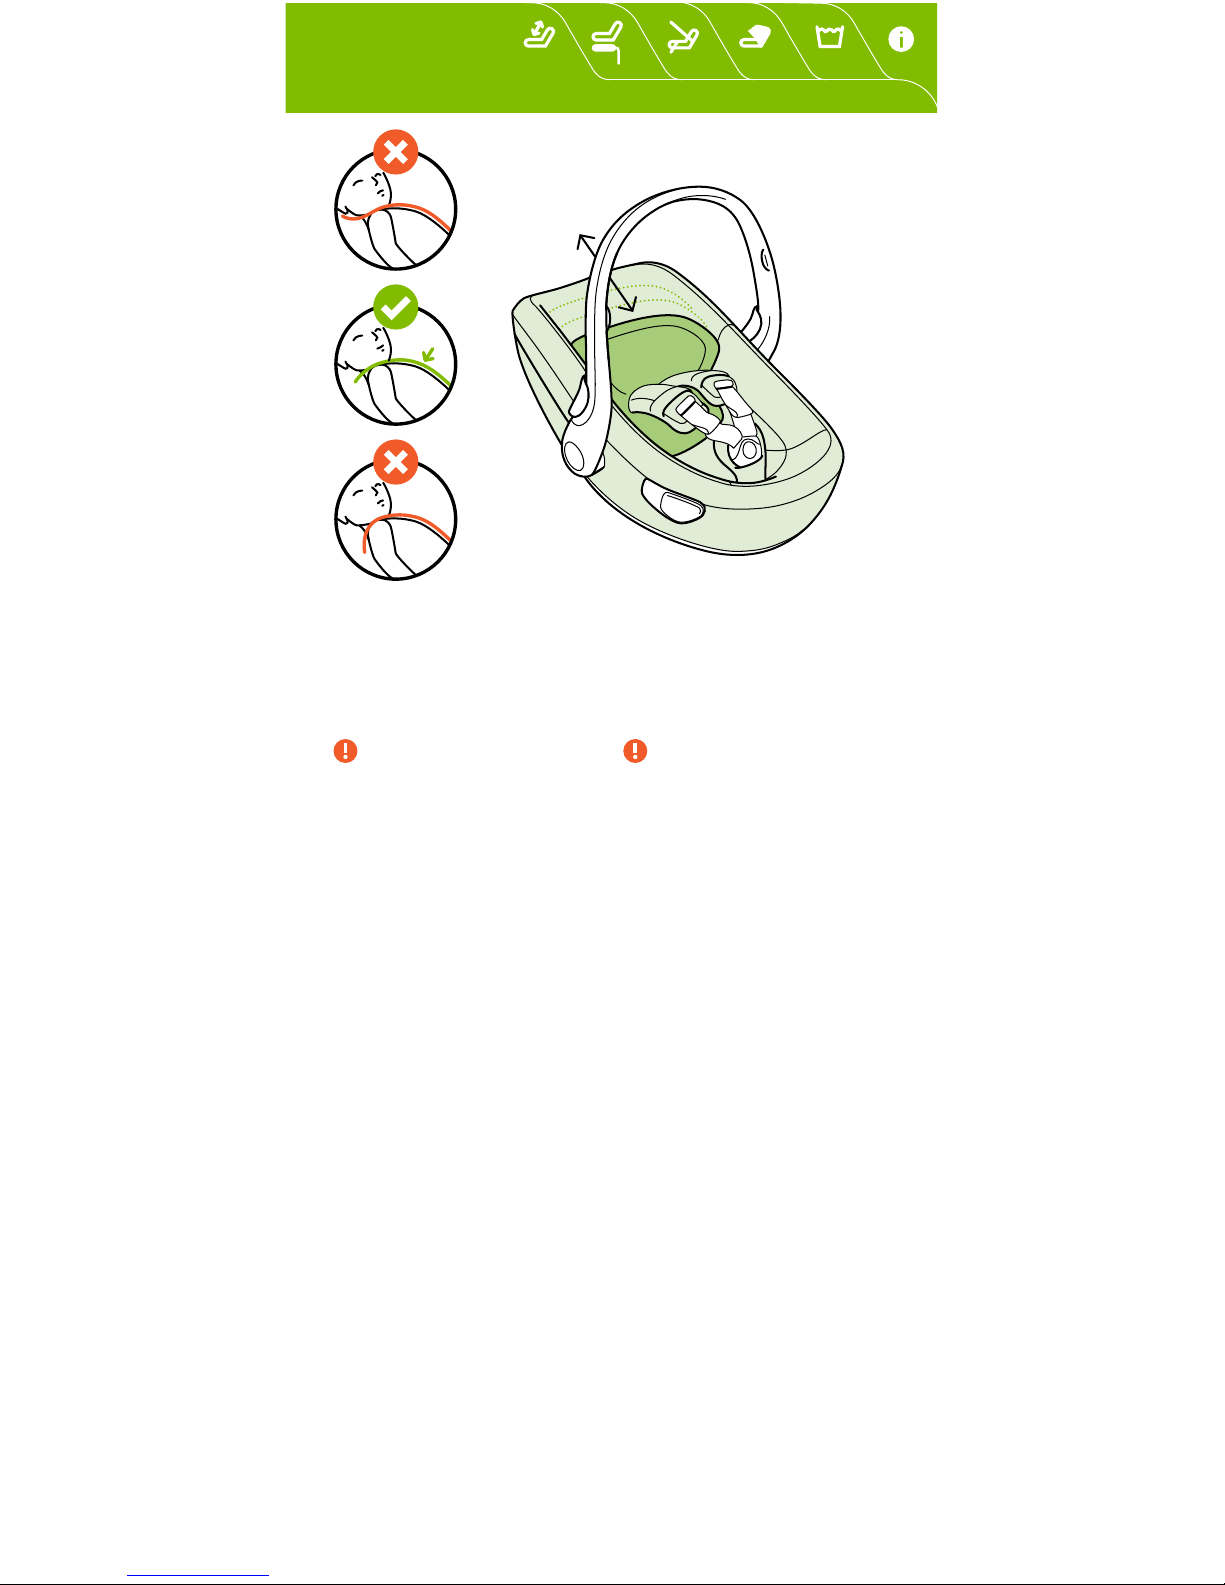
Always secure your baby
with the seat harness.
Never take your child out
of the child safety seat
when the vehicle is moving.
Never use the product
in any configuration or
assembling method not
shown in the instructions.
Always cover the product
when exposed to direct
sunlight. Parts of the seat
may get too hot for your
child’s skin. Check the
temperature before placing
your child into the seat.
Make sure the seat harness
is fastened tightly around
the pelvis of your child.
Sichern Sie Ihr Baby stets
mit dem Sitzgurt. Nehmen
Sie Ihr Kind niemals aus der
Babyschale während sich
das Fahrzeug in Bewegung
befindet.
Nehmen Sie das Produkt
niemals in einer anderen
Konfiguration oder Montage art in Benutzung als in den
Anweis ungen beschrieben.
Bedecken Sie den Sitz immer,
wenn er di rektem Sonnenlicht
aus gesetzt ist. Teile können
für die Haut Ihres Kindes zu
heiß werden. Kontrollieren
Sie die Temperatur bevor Sie
Ihr Kind in den Sitz setzen.
Gehen Sie sicher, dass der
Sitzgurt fest um das Becken
Ihres Kindes angezogen ist.
Adjust the headrest position whilst
your baby is in the child seat.
Passen Sie die Position der Kopfstütze an,
während sich Ihr Baby im Sitz befindet.
Page 11
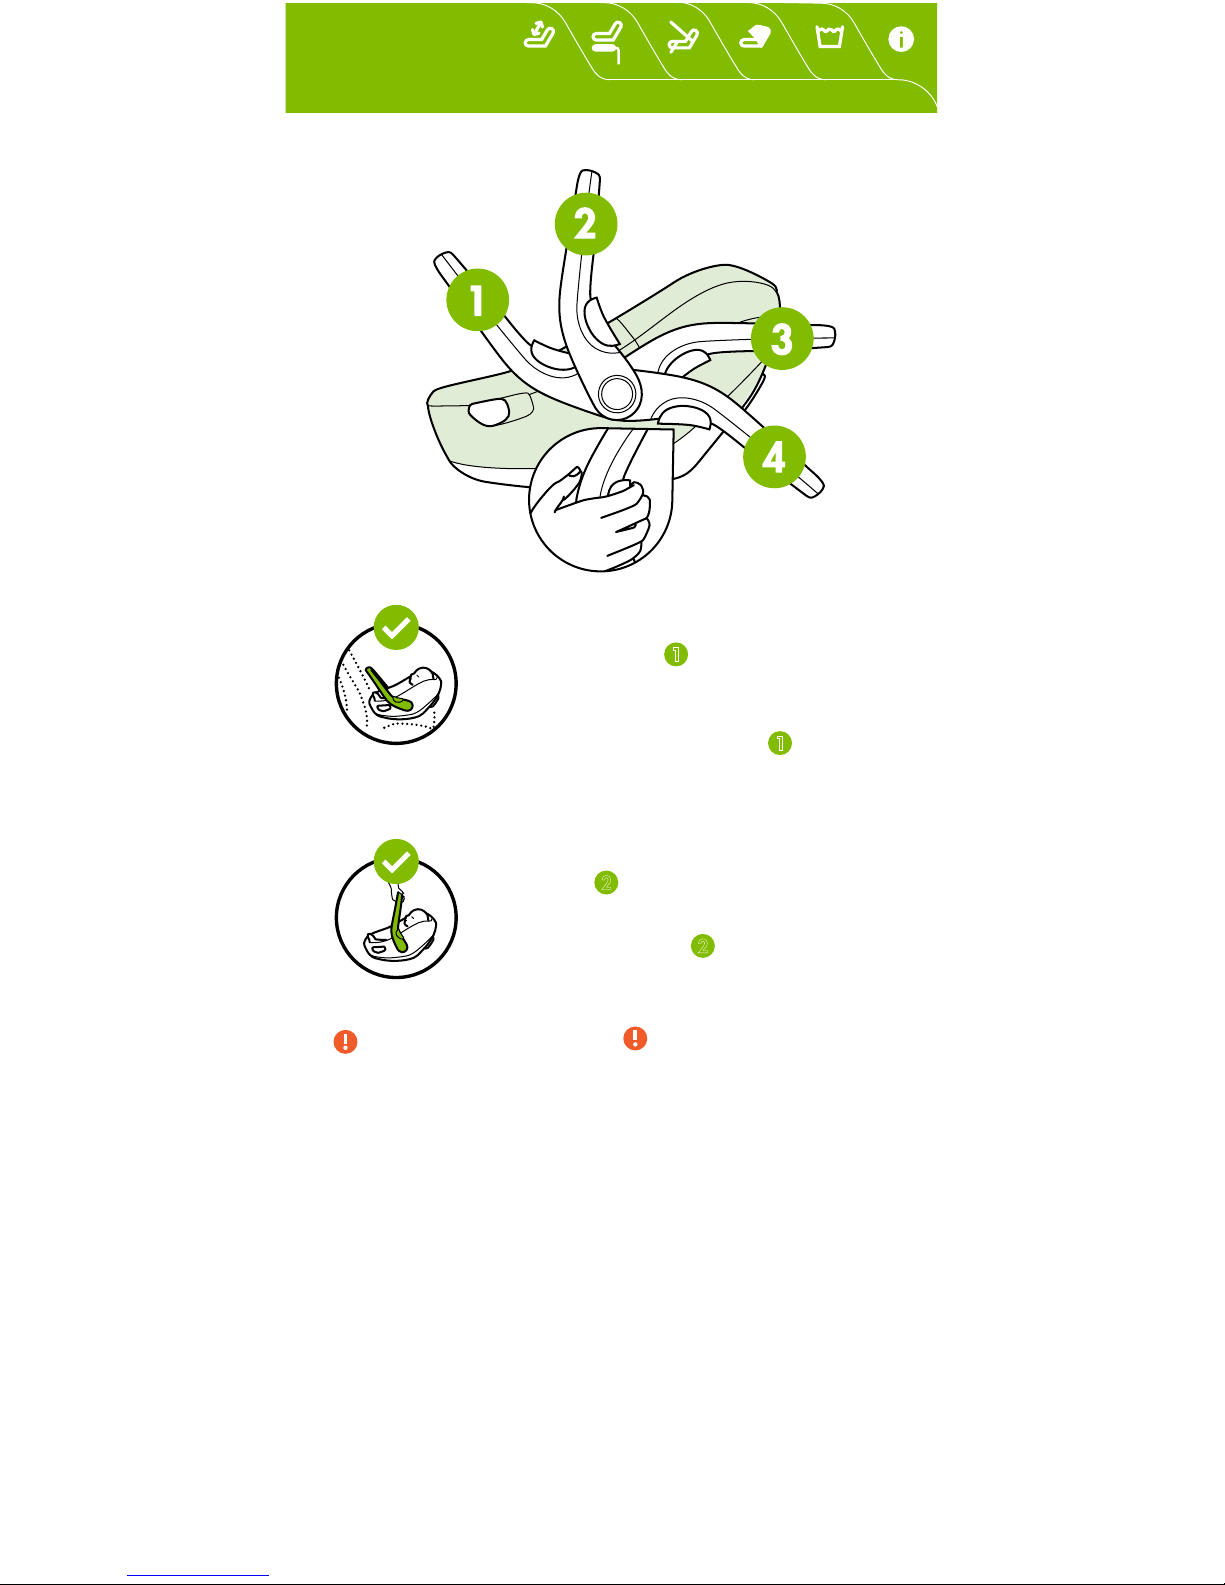
Notice: Make sure the handle is
locked in position
1
when you use
the product in the car.
Anmerkung: Gehen Sie sicher, dass
der Tragegriff in der Position
1
eingerastet ist, wenn Sie das Produkt im
Auto verwenden.
Notice: Make sure the handle is locked
in position
when you lift it up.
Anmerkung: Gehen Sie sicher, dass der
Tragegriff in Position
eingerastet ist,
wenn Sie den Sitz anheben.
Prevent the product
from becoming trapped or
weighed down by luggage
or any heavy objects.
Make sure that the product,
its rigid items and plastic
parts are located and
installed in a way that
they are not liable, during
everyday use of the
vehicle, to become trapped
by a moveable seat or in
a door of the vehicle.
Verhindern Sie,
dass das Produkt von
Gepäckstücken oder
anderen schweren
Objekten eingeklemmt
oder beschwert wird.
Stellen Sie sicher, dass das
Produkt, sämtliche harten
Bestandteile und Plastikteile
so installiert sind, dass sie
im täglichen Gebrauch nicht
von einem beweglichen
Sitz oder einer Türe des
Fahrzeuges eingeklemmt
werden können.
Page 12
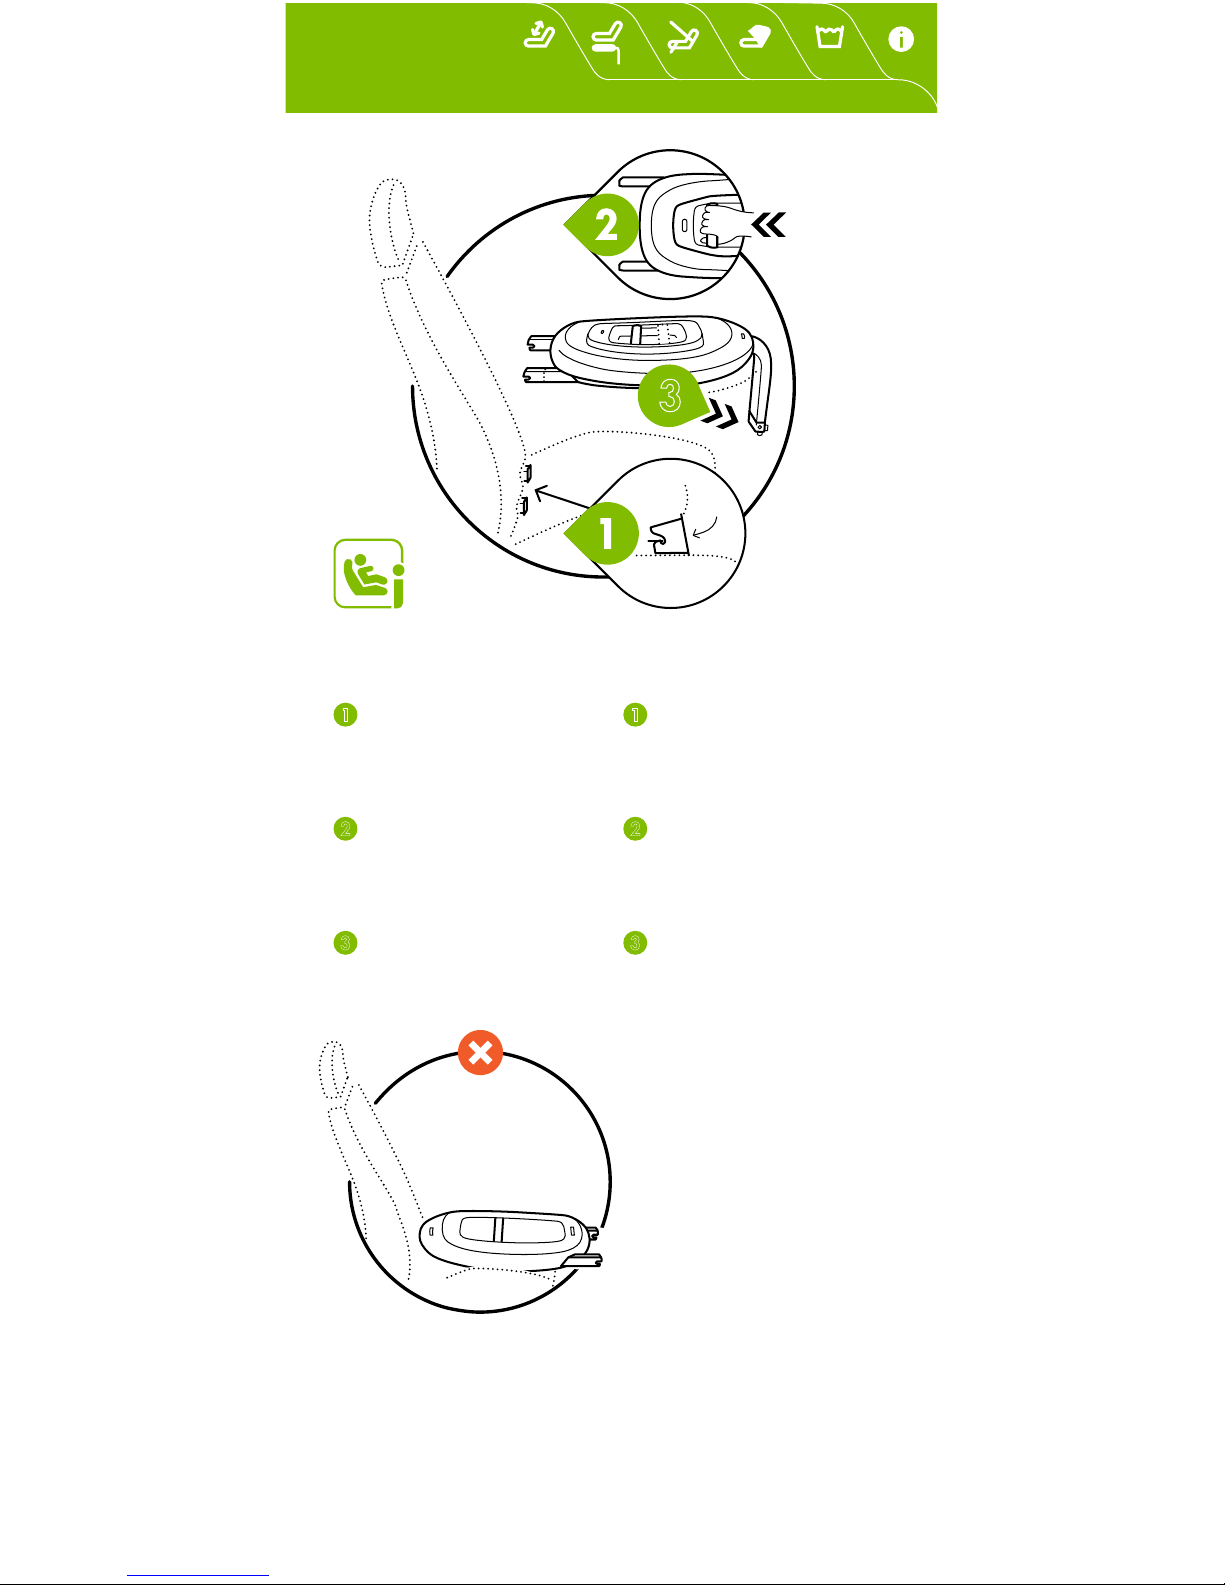
PREPARING THE
ISOFIX BASE
1
Place the two ISOFIX
guides on both ISOFIX
anchor points between the
seat and the seat back.
Extend the ISOFIX
connectors by pushing
the release button for the
connectors forward.
Fold out the support leg.
VORBEREITUNG
DER ISOFIX BASE
1
Platzieren Sie beide
ISOFIX-Führungen auf die
Ankerpunkte zwischen dem
Sitz und der Rücken lehne.
Ziehen Sie die ISOFIXAnkerarme mit hilfe der
Entriegel ungs taste nach
vorne raus.
Klappen Sie das
Stützbein aus.
Warning: Never use the
product in any configuration or assembly
method not shown in the
instructions.
Warnung: Verwenden Sie
das Produkt nie in einer
anderen Konfiguration
oder Montageart als in den
Anweisungen beschrieben.
3
Page 13
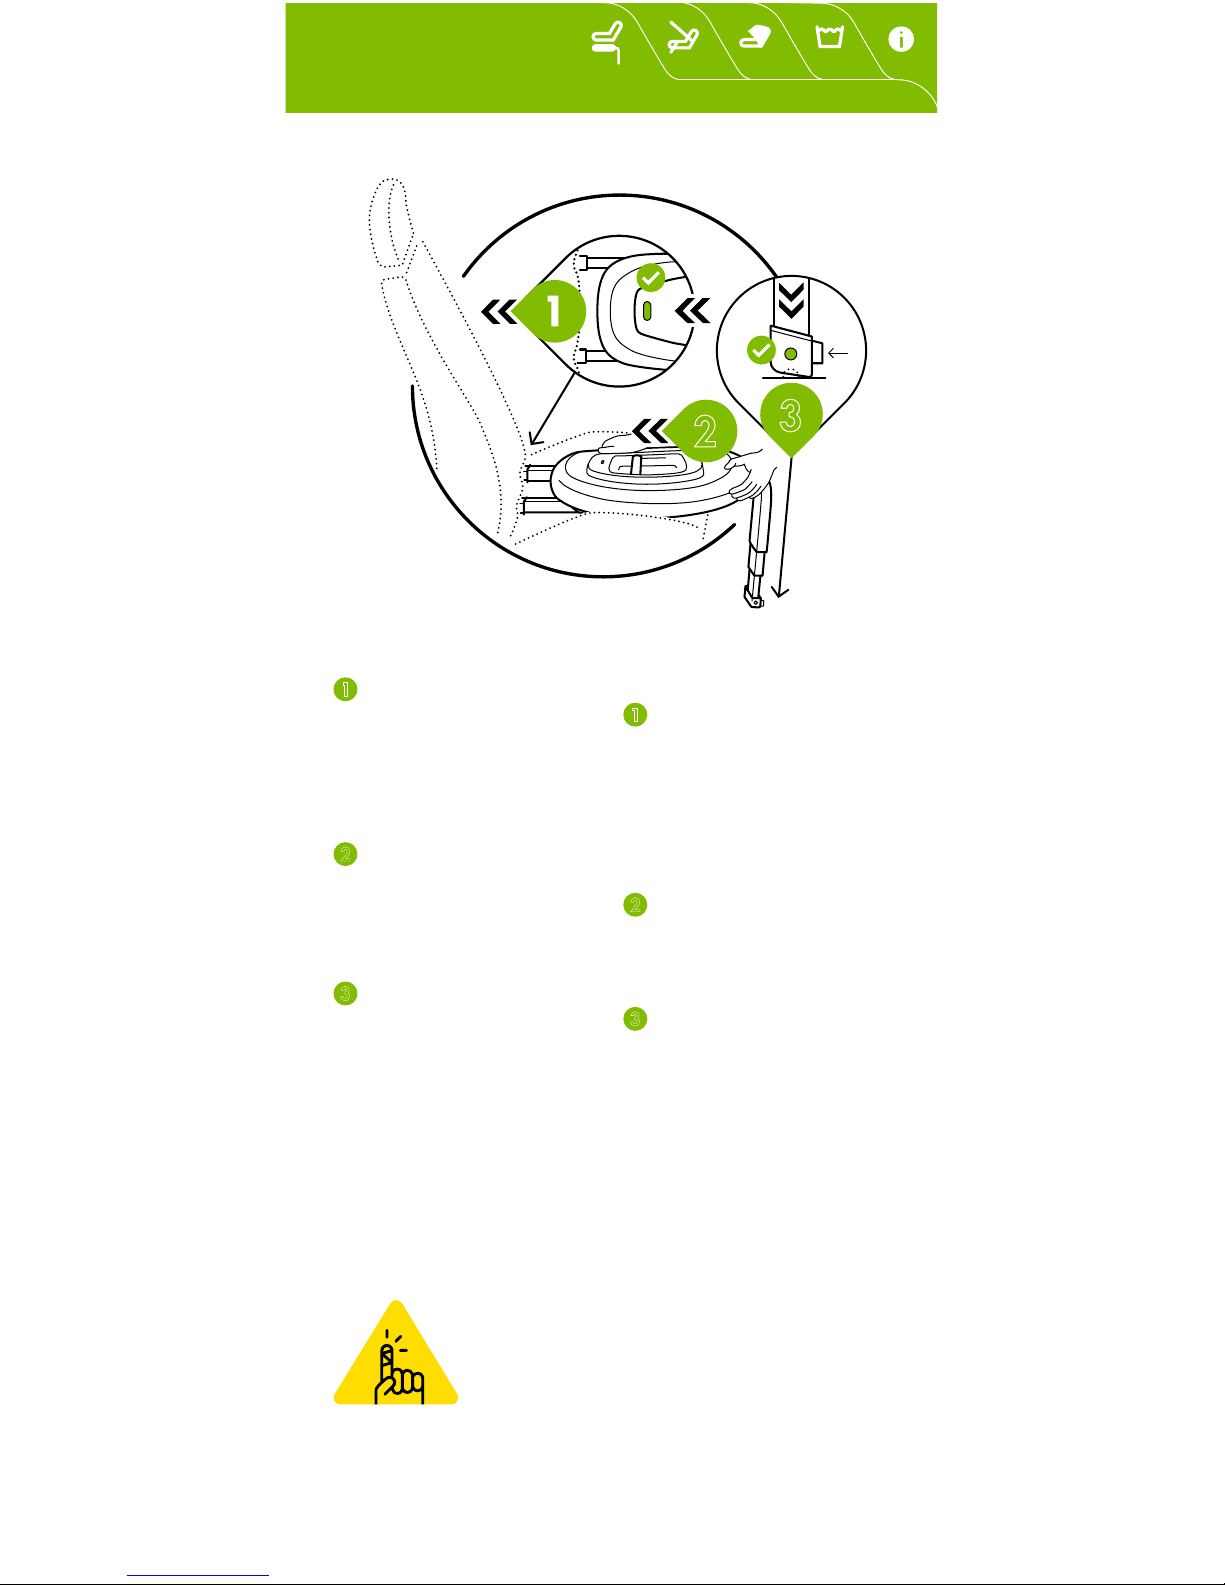
INSTALLING THE BASE
1
Insert both connectors
into the ISOFIX anchor
points until you hear a
“Click”. Check that the
indicator for connectors
have turned green.
Place both hands on
the ISOFIX Base and push
it against the car seat as
strongly as possible until it
is firmly positioned.
Push the release button
for the support leg and
move the leg downwards
until it reaches the floor
of the car. Check that the
indicator for the support
leg is green.
INSTALLATION
DER BASE
1
Führen Sie beide
ISOFIX-Ankerarme in die
Ankerpunkte bis Sie ein
„Klick“ hören. Gehen Sie
sicher, dass der Indikator
der Ankerarme grün
erscheint.
Drücken Sie mit beiden
Händen gegen die Base
Richtung Rückenlehne bis
die Base fest sitzt.
Drücken Sie die
Entriegelungstaste des
Stützbeins und bewegen
Sie das Bein nach unten bis
es den Boden des Autos
erreicht. Überprüfen Sie,
dass der Indikator für das
Stützbein grün ist.
2
3
Warning: Watch your fingers when folding
or unfolding the ISOFIX Base leg.
Warnung: Passen Sie auf ihre Finger
auf wenn Sie das Bein der ISOFIX
Base ein- und ausklappen.
Page 14
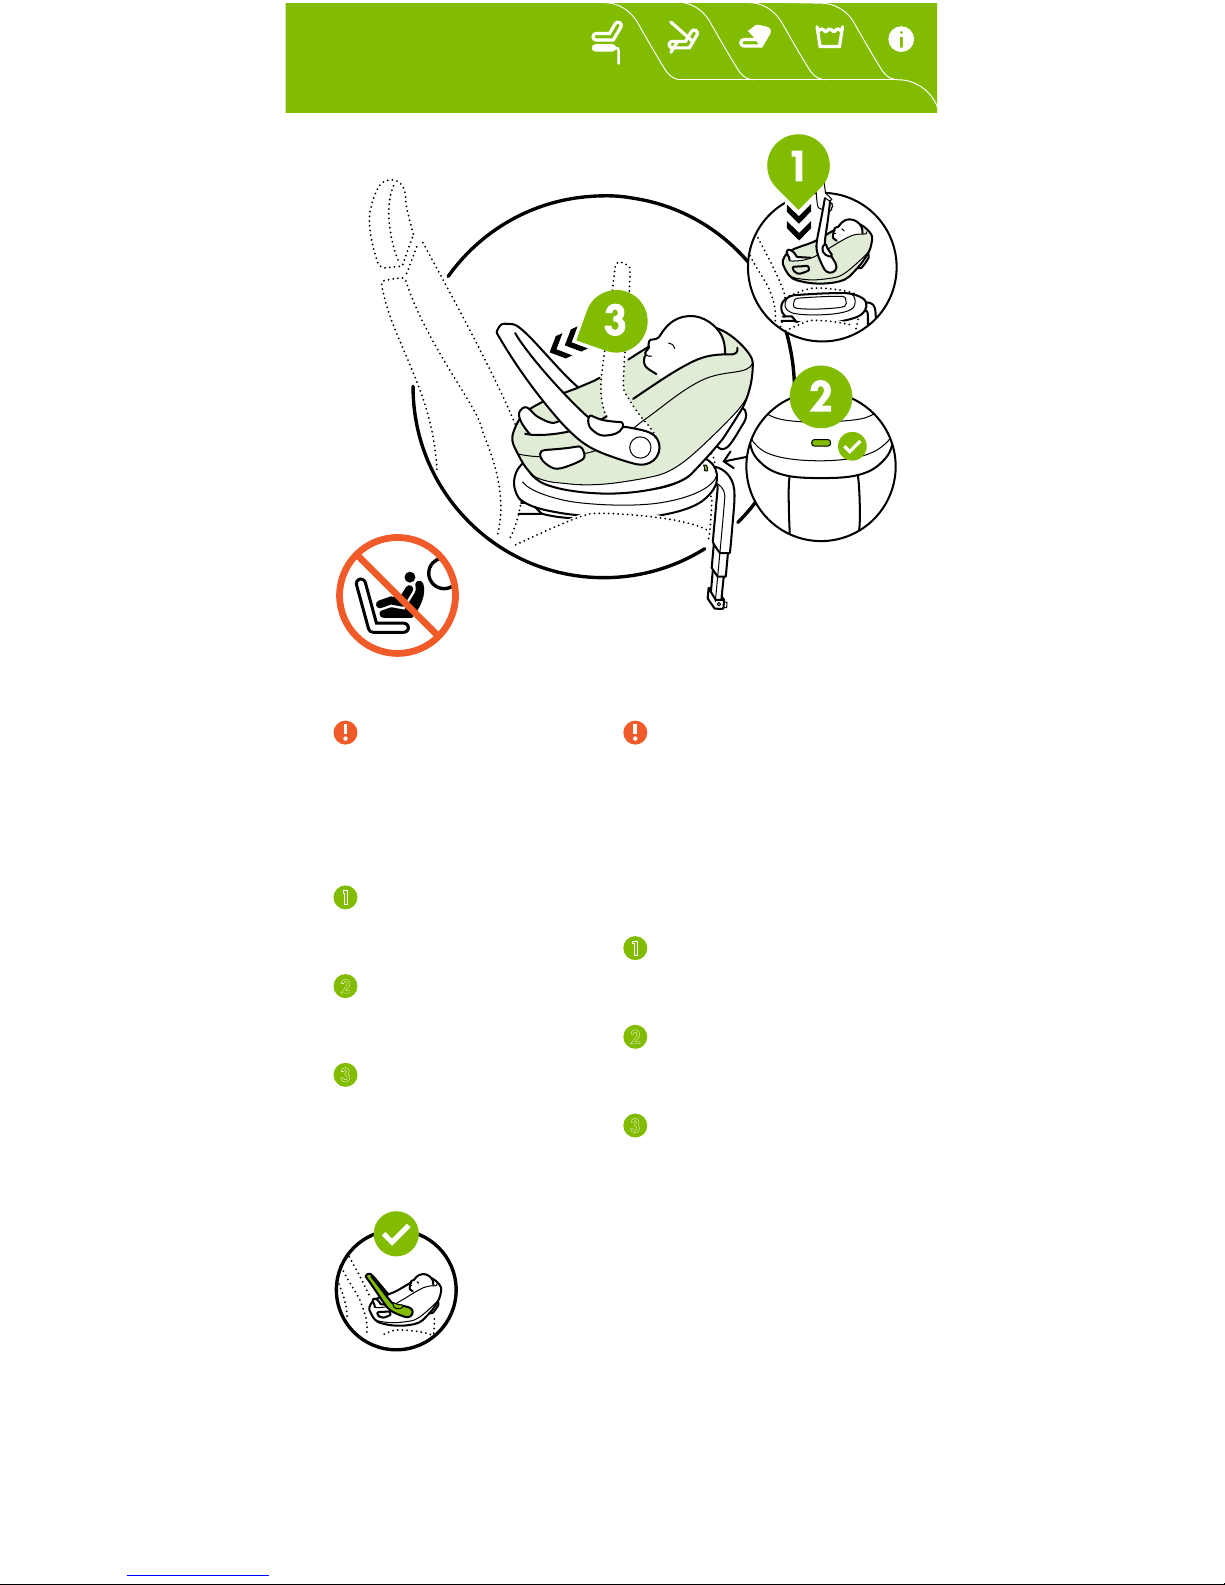
PLACING THE SEAT
Before placing the seat,
make sure that the ISOFIX
Base is properly installed
and read the Albert seat
user manual on how to use
the seat correctly.
1
Place the seat on the
base until you hear a
“Click”.
Check that the indicator
for the seat of the ISOFIX
Base is green.
Put the handle of the
seat into the indicated
position.
DEN SITZ PLATZIEREN
Stellen Sie vor der
Installation des Sitzes
sicher, dass die ISOFIX
Base korrekt installiert ist
und lesen Sie sich das
Handbuch des Albert
Kindersitzes über die
Nutzung durch.
1
Platzieren Sie den Sitz
auf der Base bis Sie ein
„Klick“ hören.
Gehen Sie sicher, dass
der Indikator der ISOFIX
Base grün erscheint.
Stellen Sie den Tragegriff
des Sitzes in die angezeigte
Position.
Notice: Make sure the handle is locked
in the indicated position when you use the
product in the car.
Anmerkung: Gehen Sie sicher, dass
der Tragegriff in der angezeigten Position
ist, wenn Sie das Produkt im Auto
verwenden.
Page 15
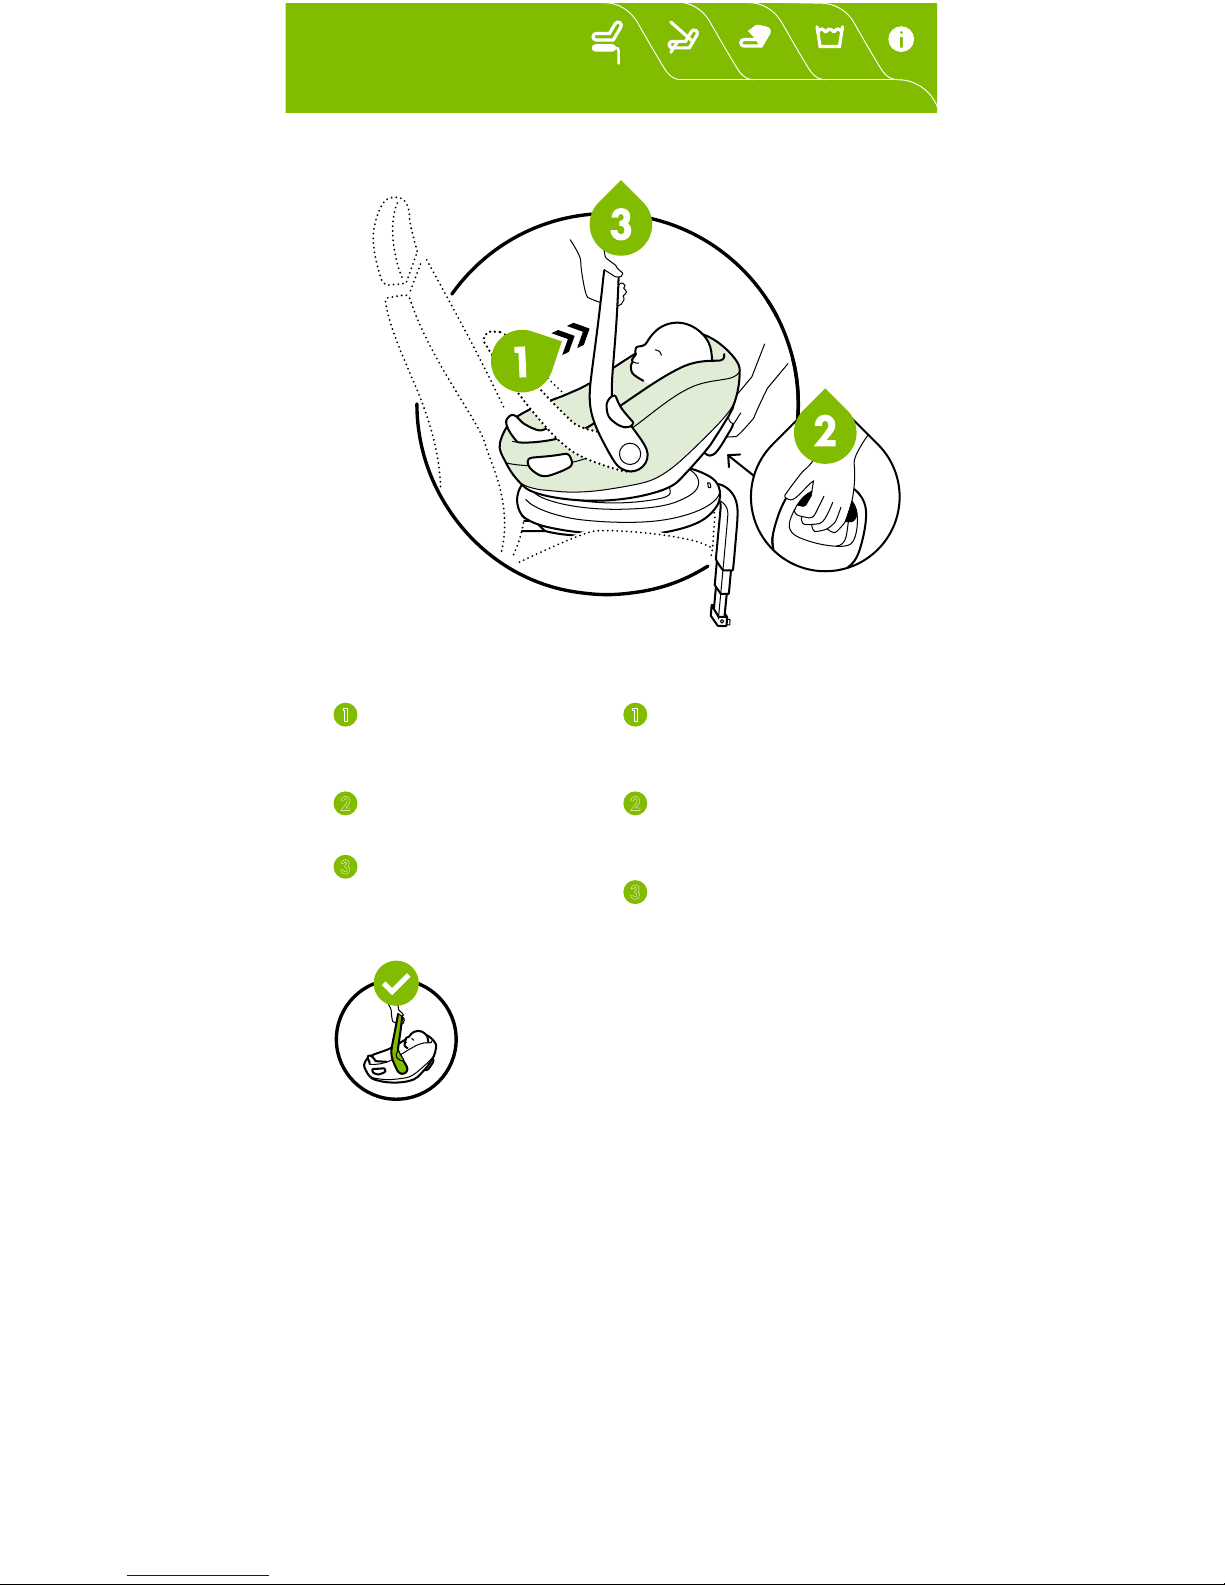
UNLOCKING THE SEAT
1
Put the handle of the
seat into the indicated
position.
Push the release button
at the back of the seat.
Lift the seat.
DEN SITZ ENTRIEGELN
1
Stellen Sie den
Tragegriff in die
angezeigte Position.
Drücken Sie den
Auslöseknopf auf der
Rückseite des Sitzes.
Heben Sie den Sitz an.
Notice: Make sure the handle is locked in
the indicated position when you lift it up.
Anmerkung: Gehen Sie sicher, dass
der Tragegriff in der gezeigten Position
ein gerastet ist, wenn Sie den Kindersitz
anheben.
Page 16
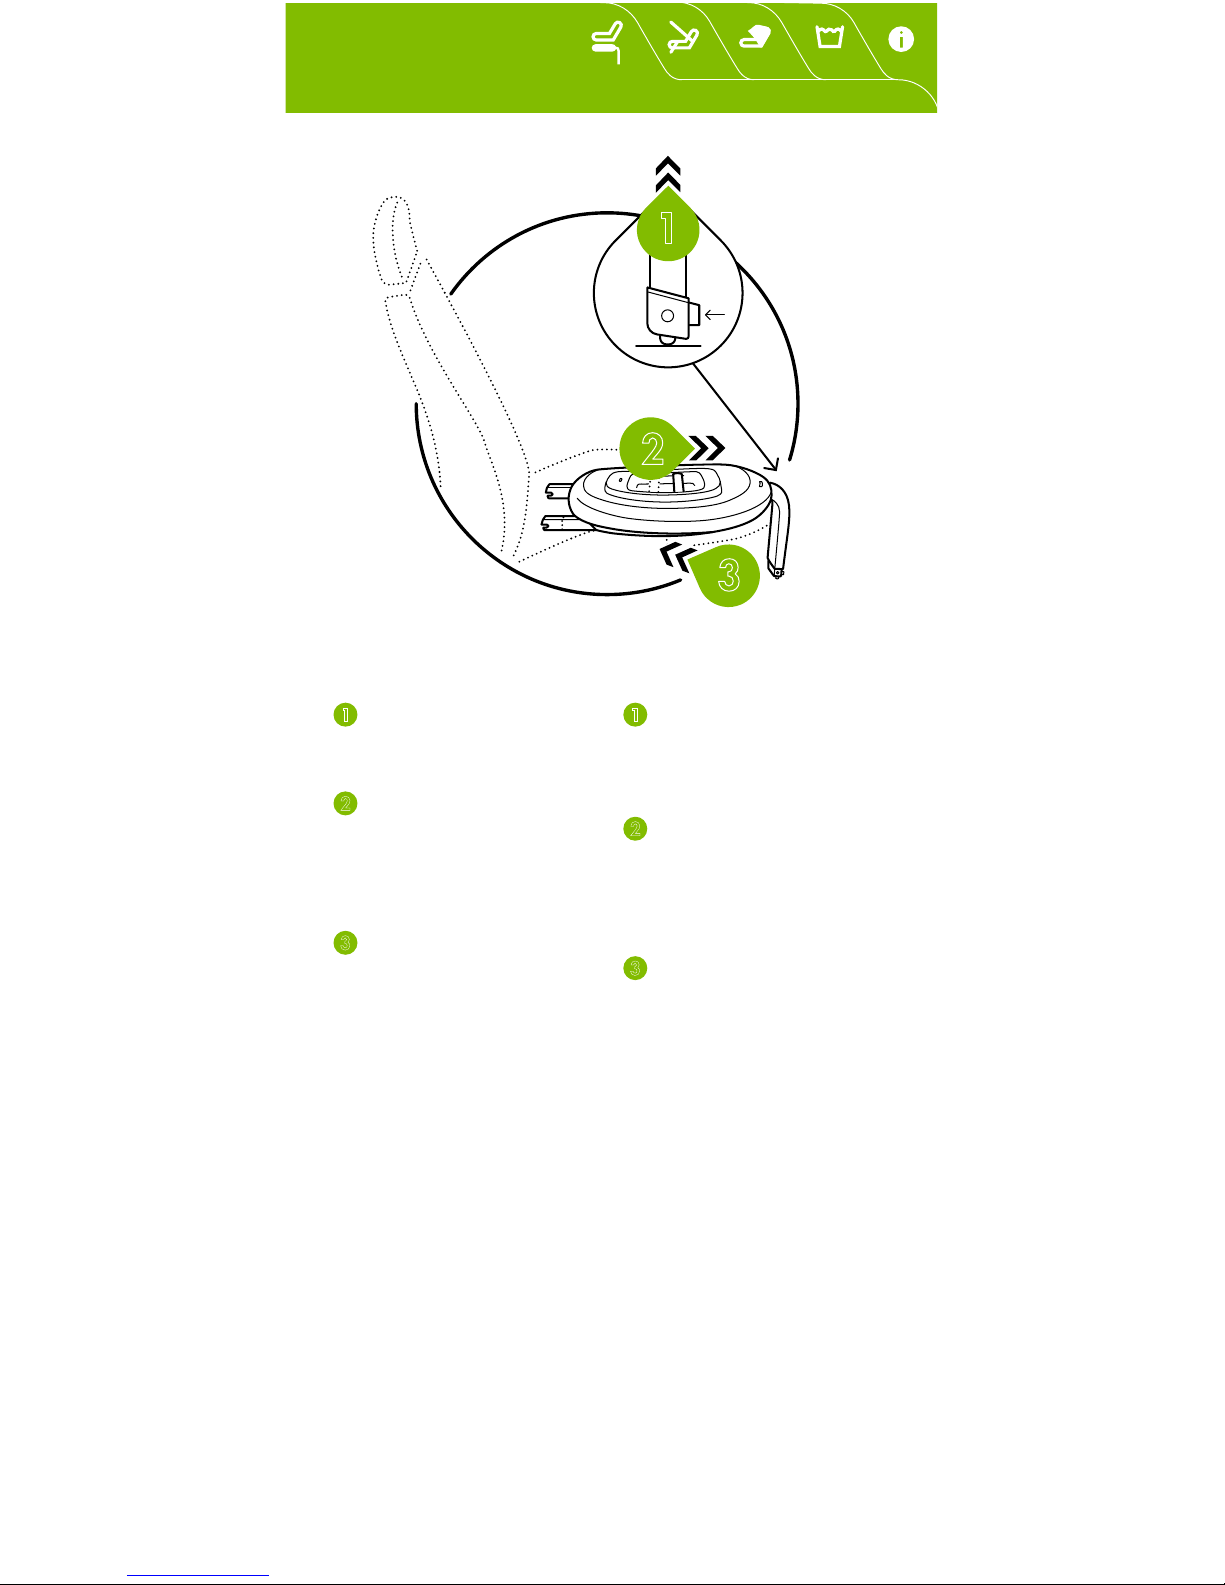
REMOVING THE BASE
1
Push the release button
for the support leg and
move the leg upwards.
Push and hold the
release button for the
ISOFIX connectors and pull
the ISOFIX Base away from
the car seat.
Fold in the support leg.
DIE BASE ENTFERNEN
1
Drücken Sie die
Entriegelungstaste des
Stützbeins und bewegen
Sie es nach oben.
Drücken und halten
Sie die Ent riegelungs taste
der ISOFIX-Anker arme und
ziehen Sie die Base vom
Autositz weg.
Klappen Sie das
Stützbein ein.
2
3
1
Page 17
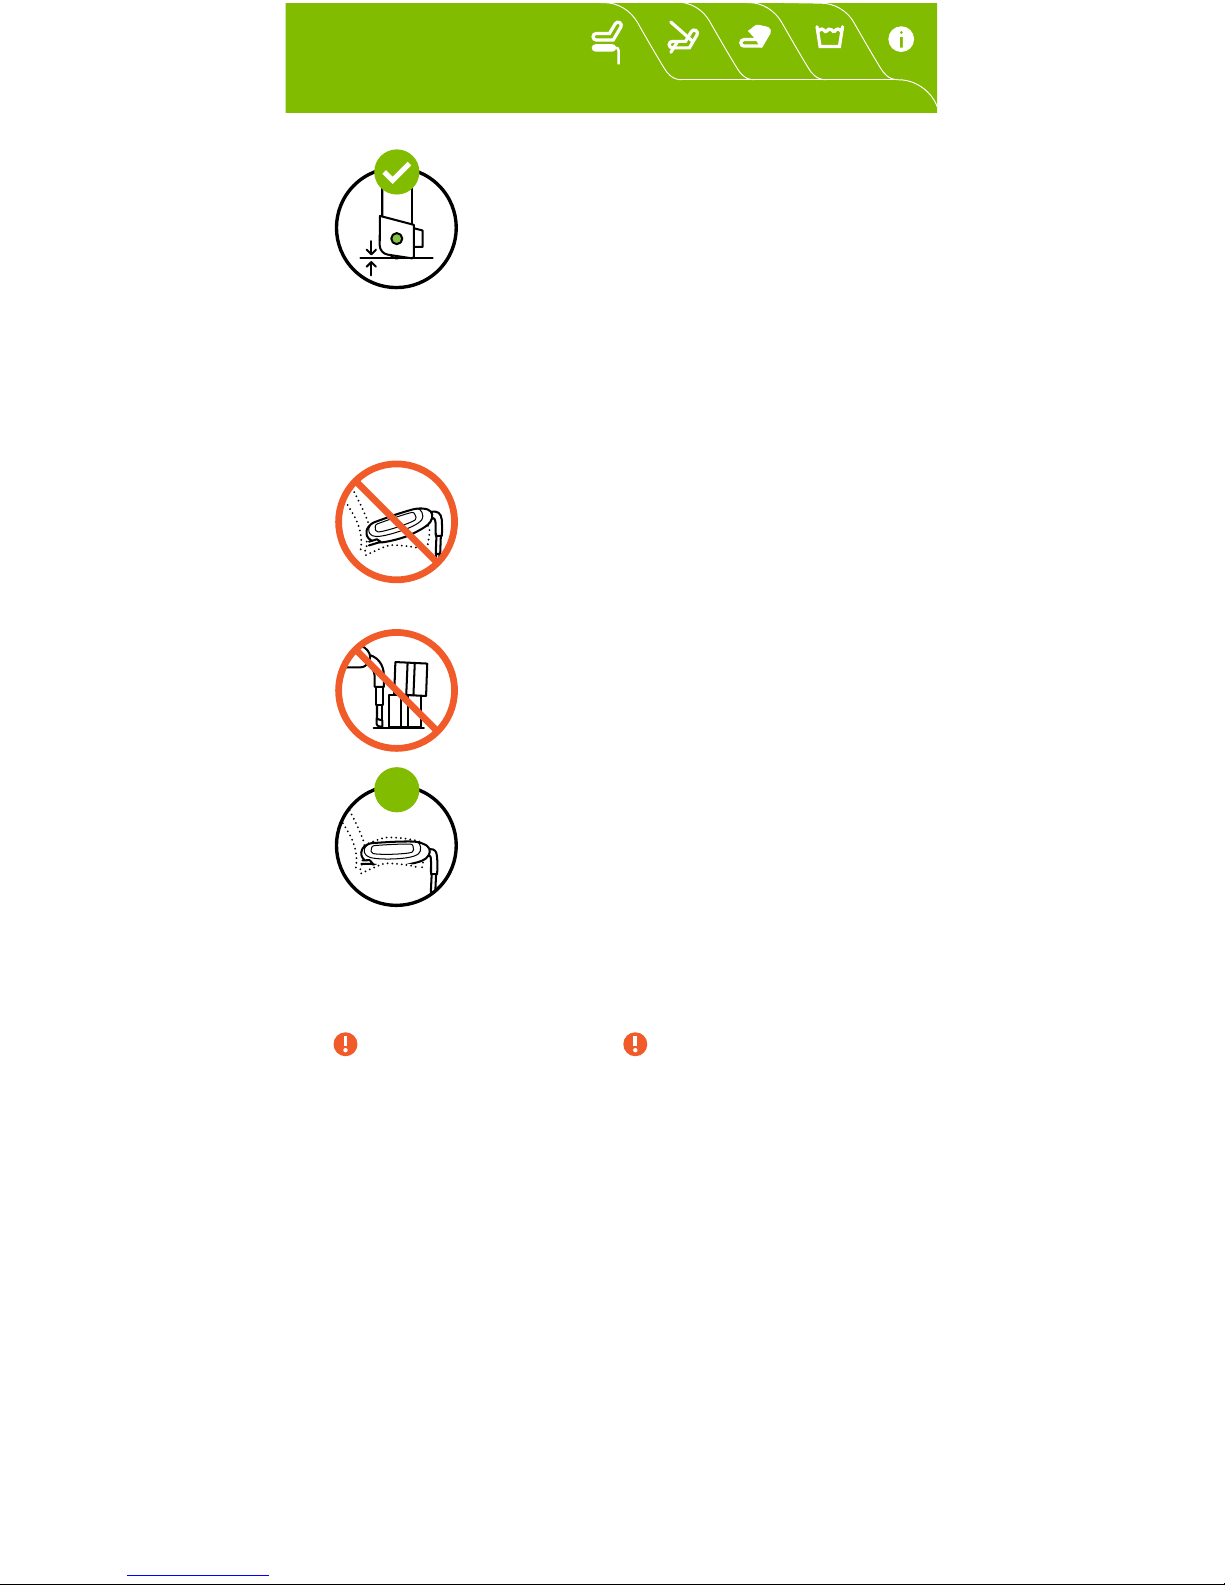
!
Notice: The front support leg must make full
and firm contact with the vehicle floor. The
support leg must never be suspended in midair or supported by other objects. Do not
place the front support leg on a floor storage
compartment lid.
Anmerkung: Das Stützbein muss immer
festen Kontakt mit dem Fahrzeugboden
haben. Es darf nie frei in der Luft schweben
oder durch andere Objekte gestützt werden.
Platzieren Sie das Stützbein nie auf einer
Aufbewahrungsklappe.
Warning: Make sure that the support leg
does not raise the base from the surface of
the vehicle seat.
Warnung: Das Stützbein darf die Base nicht
vom Autositz anheben.
Warning: Do not place any objects in the
foot well in front of the base.
Warnung: Stellen Sie keine Objekte in den
Fußraum vor die Base.
Notice: The base should always be installed
correctly, even when not in use. In a crash or
sudden stop, the unsecured base may harm
other occupants.
Anmerkung: Auch eine unbenutzte Base
muss immer korrekt installiert sein. Im
Falle eines plötzlichen Haltens oder Unfalls
könnte eine ungesicherte Base Mitfahrende
verletzen.
This product should be
replaced when it has been
subject to violent stress in
an accident.
The correct fitting of the
ISOFIX and support leg
anchoring systems is of
vital importance for the
safety of your child.
Nach einem Unfall sollte
das Produkt ersetzt werden.
Die korrekte Installation
der ISOFIX-Ankerarme
und des Stützbeins ist von
lebenswichtiger Bedeutung für
die Sicherheit Ihres Kindes.
Page 18
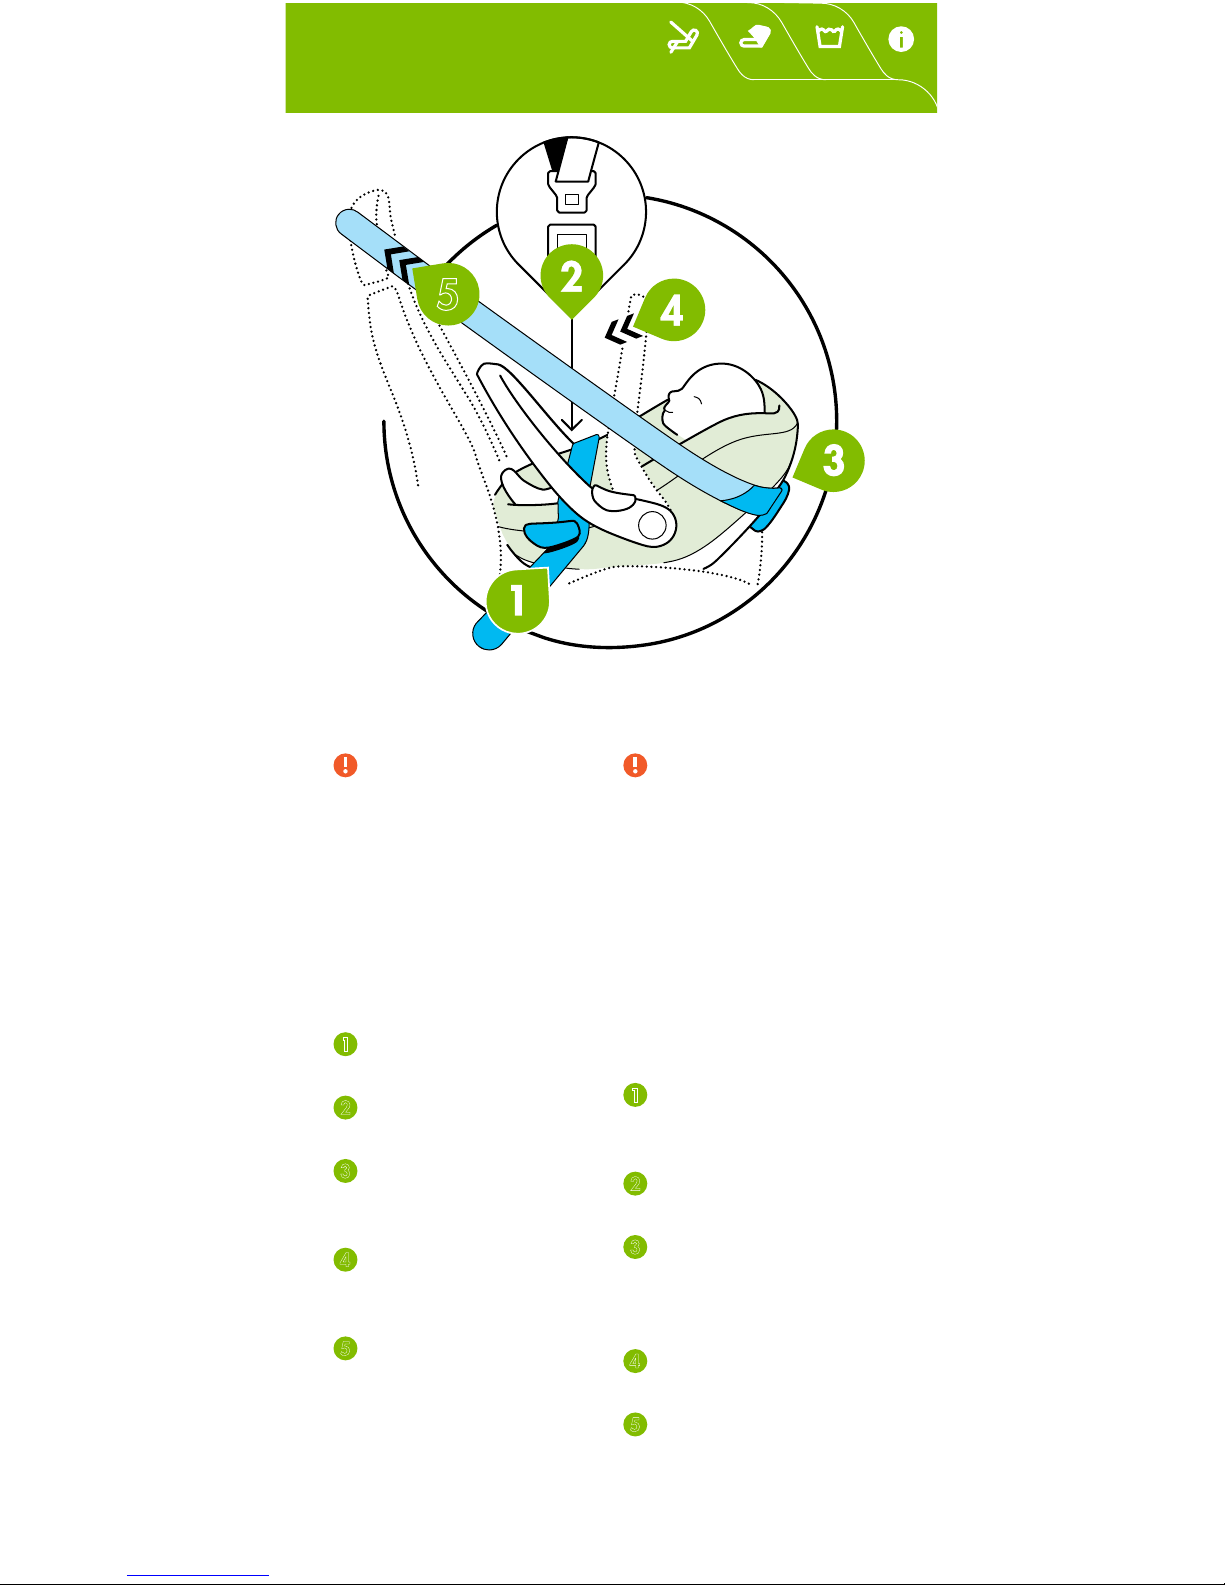
5
INSTALLATION
WITH SEATBELT
Please place the child
seat on the car seat exactly
as the illustration shows.
Only use the child seat on
a forward-facing car seat
that is fitted with a 3-point
safety belt that complies
with the ECE R16 and
GB14166 standards (at a
minimum).
1
Feed the car seat belt
through the lap belt guides.
Lock it until you
hear a ”Click”.
Pass through the
shoulder belt guide at the
back of the child seat.
Put the handle of the
seat into the indicated
position.
5
Fasten the car
seat belt tightly.
INSTALLATION MIT
SICHERHEITSGURT
Bitte platzieren Sie
die Babyschale auf dem
Autositz exakt wie in der
Illustration gezeigt.
Verwenden Sie die Babyschale nur auf einem nach
vorne gerichteten Autositz,
der mit einem 3-PunktSicherheitsgurt ausgestattet
ist, welcher den Normen
ECE R16 und GB14166
entspricht (mindestens).
1
Ziehen Sie den
Autogurt durch die
Beckengurt-Führungen.
Schließen Sie ihn bis
Sie ein „Klick“ hören.
Lassen Sie den Gurt
durch die SchultergurtFührungen auf der Rück seite
des Sitzes laufen.
Stellen Sie den Trage griff
in die angezeigte Position.
5
Ziehen Sie
den Autogurt
fest an.
Page 19
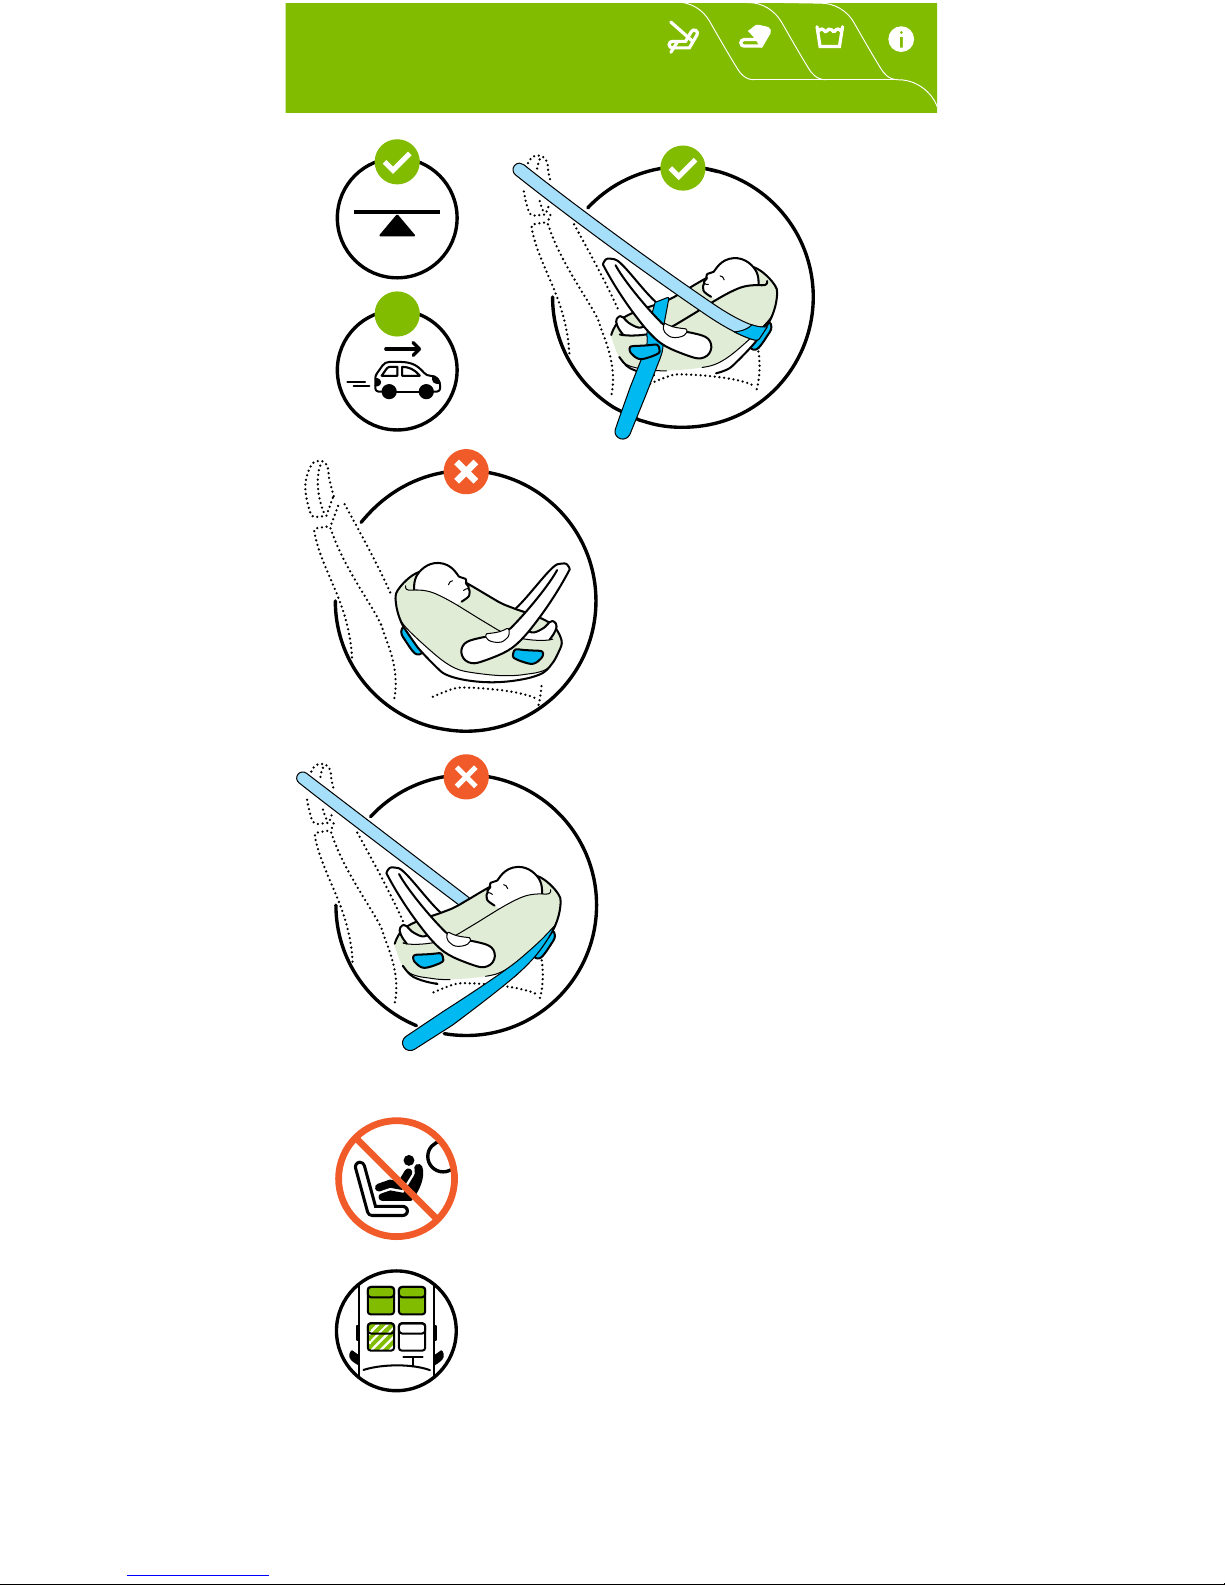
!
Warning: The product may
only be installed in a rearfacing position in your car.
Warnung: Das Produkt
darf nur in einer rückwärts
gerichteten Position in Ihrem
Auto installiert werden.
Warning: The three-point belt
must only be passed through
the designated guides. The
belt guides are described in
detail in this manual and are
marked in blue on the infant
car seat.
Warnung: Führen Sie den
3-Punkt-Gurt nur durch die
dafür be stimmten Führungen.
Diese sind in diesem
Handbuch im Detail erklärt
und auf der Babyschale in
blau markiert.
Warning: The safest place for your baby
is the rear of your car. However, if you
need to install the seat in the front
passenger seat, please ensure that the
airbag is deactivated.
Warnung: Der sicherste Ort für Ihr Baby
ist der hintere Teil Ihres Fahrzeugs. Falls
Sie den Sitz dennoch auf dem vorderen
Beifahrer sitz installieren müssen,
gehen Sie sicher, dass
der Airbag unbedingt
deaktiviert ist.
Page 20
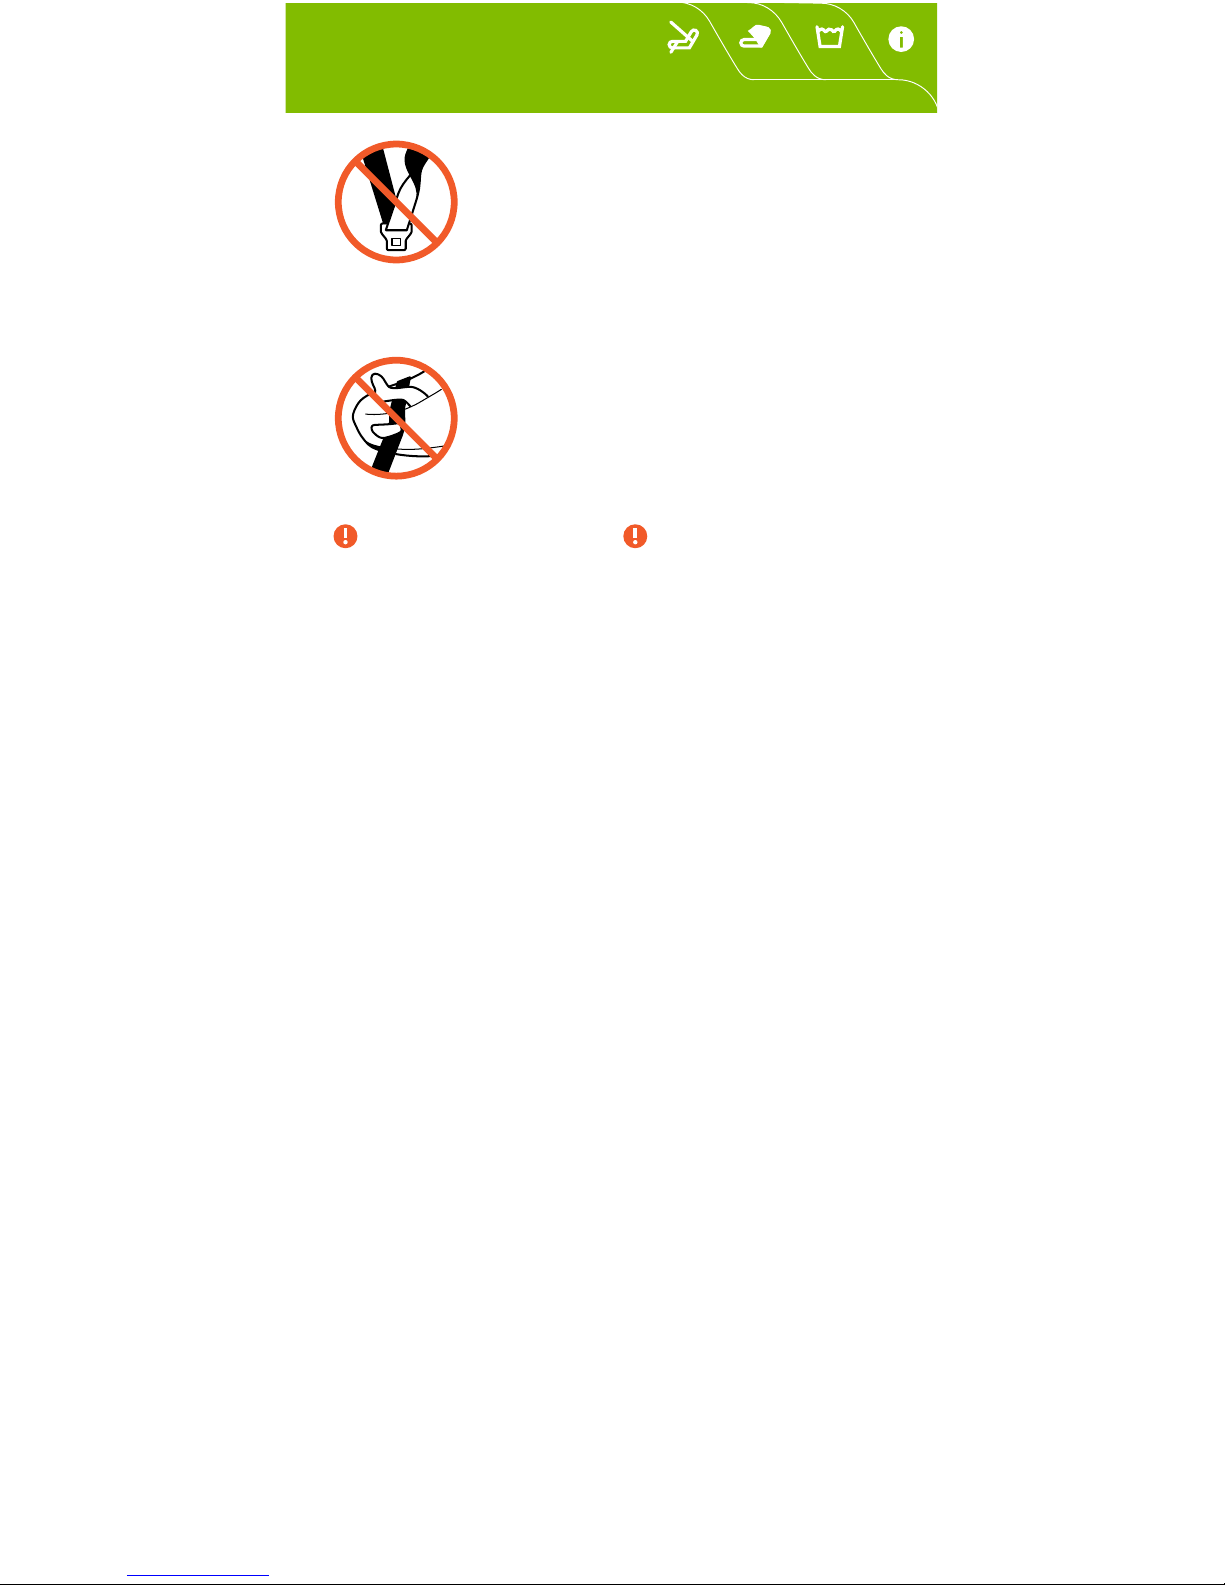
Warning: Make sure that the belt holding
the seat to the vehicle is tight and not
damaged, twisted or worn-out.
Warnung: Gehen Sie sicher, dass der Autogurt, der die Babyschale auf dem Autositz
befestigt, fest angezogen, nicht beschädigt,
verdreht oder abgenutzt ist.
Warning: Make sure that the legs of your
baby are secured under the car belt.
Warnung: Gehen Sie sicher, dass sich
die Beine Ihres Babies gesichert unter
dem Autogurt befinden.
Do not use any load
bearing contact points
other than those described
in the instructions and
marked on the child
restraint.
The seat should always be
securely belted in the car
even when not in use. In a
crash or sudden stop, the
unsecured seat may harm
other occupants.
Make sure the fold-down
rear seat is locked into
position.
After an accident, the
product and your car seat
belts should be replaced.
Although they may look undamaged, they may not be
able to protect your child as
well as they should.
Make sure luggage or
other objects are properly
secured. Unsecured luggage may cause severe
injuries to children and
adults in an accident.
Verwenden Sie keine Lastenpunkte, die nicht in diesem
Handbuch beschrieben und
auf dem Produkt markiert sind.
Der Sitz sollte im Fahrzeug
immer mit dem Gurt gesichert installiert sein, selbst
wenn er nicht in Gebrauch
ist. Im Falle eines Aufpralls
oder abrupten Haltens
könnte der ungesicherte Sitz
andere Insassen verletzen.
Nach einem Unfall sollten
das Produkt und Ihre Autogurte ersetzt werden. Auch
wenn sie keine offen sichtlichen
Schäden auf weisen, können
sie Ihr Kind möglicherweise
nicht mehr so gut sichern
wie sie es sollten.
Gehen Sie sicher, dass Gepäck stücke und andere Objekte
angemessen ge sichert sind.
Ungesichertes Gepäck kann
im Falle eines Unfalls Kindern
ebenso wie Erwachsenen
schwere Verletzungen zufügen.
Page 21
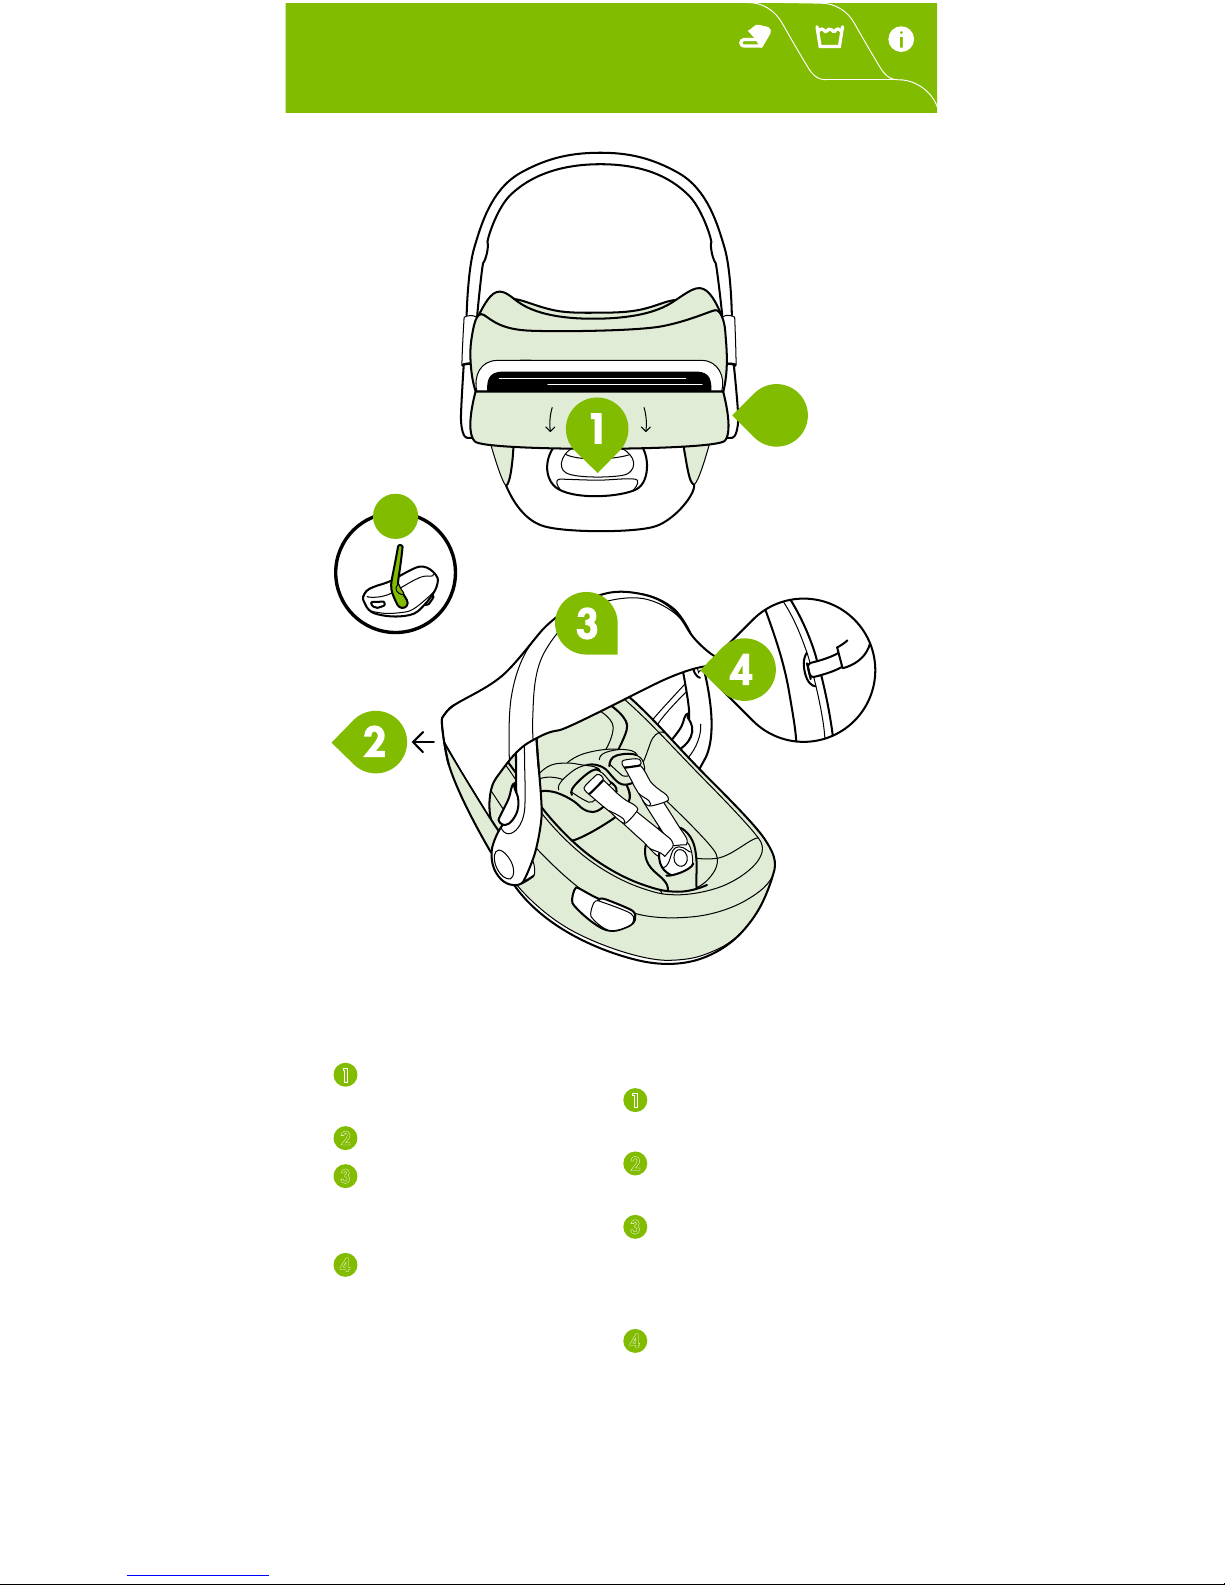
CLICK!
!
USE OF THE SUN CANOPY
1
Open the pocket
of the canopy.
Extract the canopy.
Make sure the handle
is in the vertical position,
then pull the canopy over it.
Fix the canopy by in serting the arched struc ture on
the indicated handle slots.
MONTAGE DES
SONNEN SCHUTZES
1
Öffnen Sie das Fach für
den Sonnenschutz.
Entnehmen Sie den
Sonnenschutz.
Der Tragegriff muss sich
in vertikaler Position befinden.
Ziehen Sie den Sonnenschutz
darüber.
Fixieren Sie den Schutz
indem sie den Bogen an
den Steckplätzen am Griff
befestigen.
Page 22
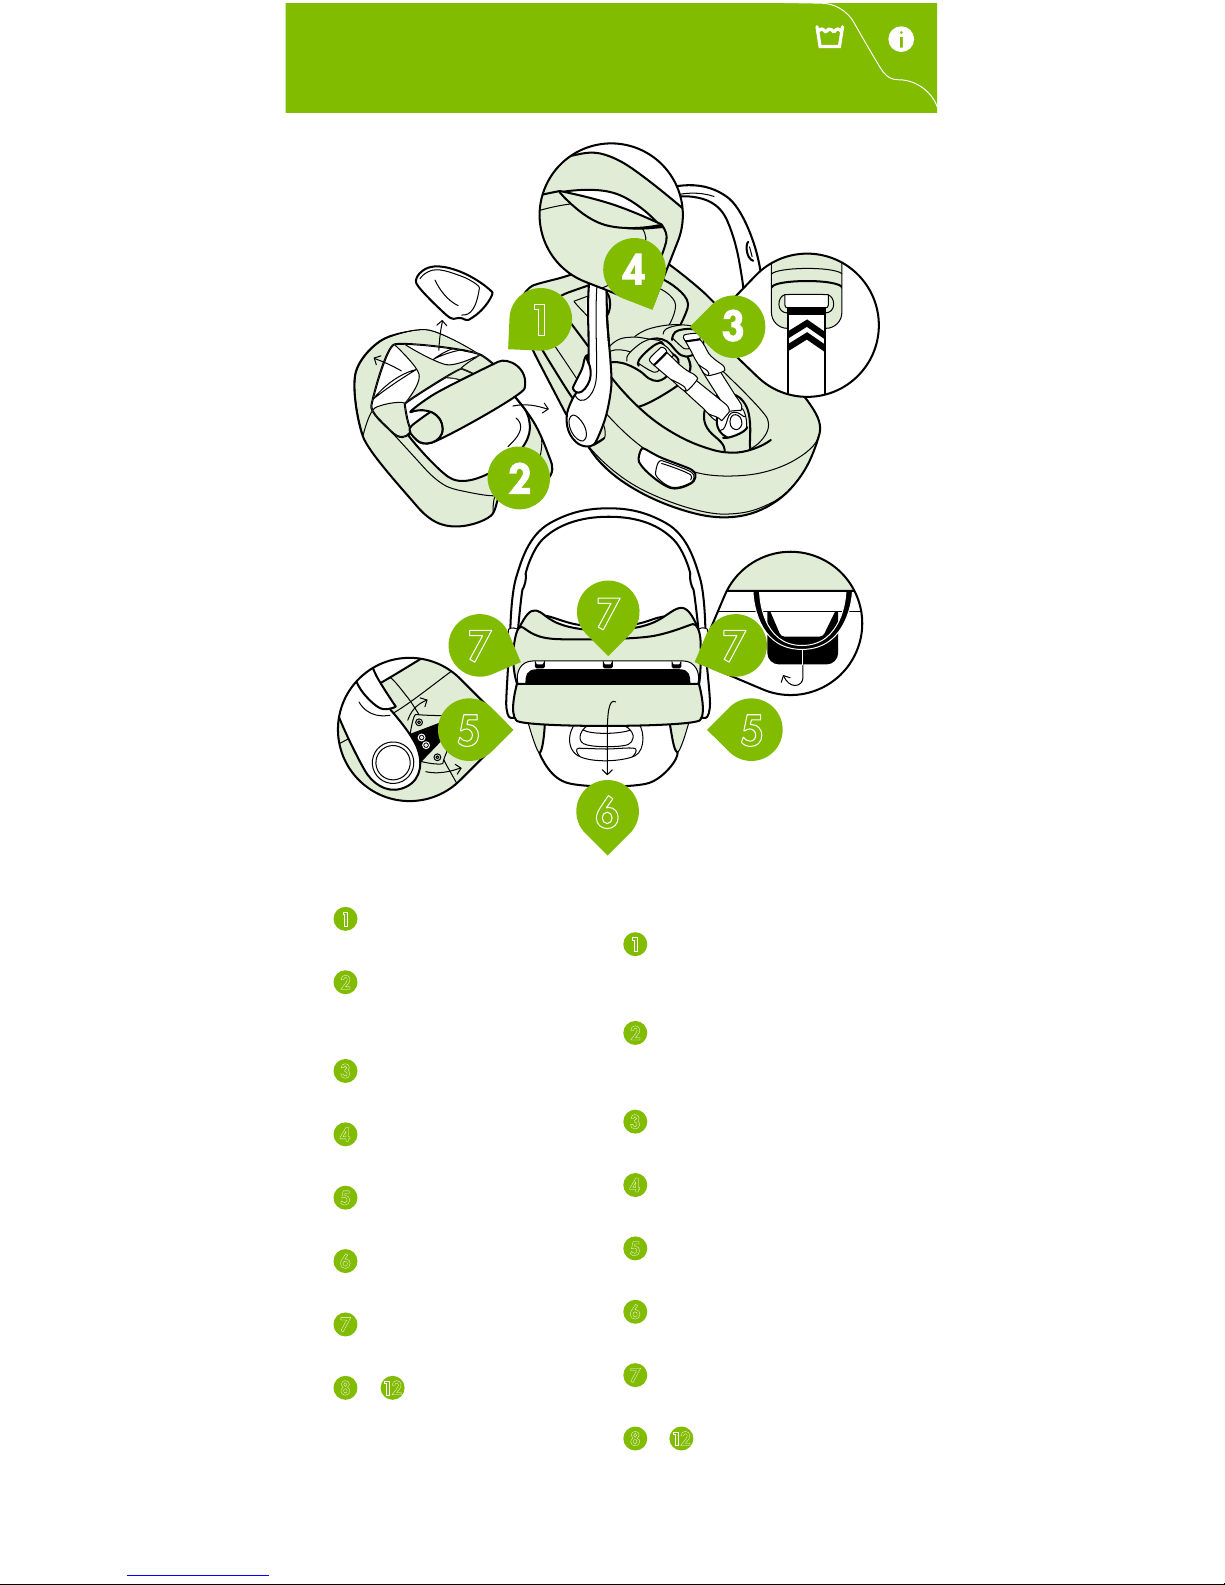
REMOVING THE COVER
1
Remove the newborn
pillow. (If in use)
Remove the side fillings,
and open the back pocket
to remove the center filling.
Simply pull the harness
through the pads.
Remove the cover from
the headrest.
5
Unfasten the snap
buttons on both sides.
Open the pocket
of the sun canopy.
Unhook the 3 elastic
latches.
–
on next page
ABNEHMEN DES
STOFFBEZUGS
1
Nehmen Sie die
Neugeboreneneinlage ab.
(falls verwendet)
Nehmen Sie die Füllung
aus den Seiten und aus der
rückseitigen Tasche heraus.
Ziehen Sie die Gurte
durch die Polsterung.
Lösen Sie den Stoffbezug
von der Kopfstütze.
5
Lösen Sie die Schnappverschlüsse auf beiden Seiten.
Öffnen Sie die Tasche für
den Sonnenschutz.
Lösen Sie die 3 ElastikBänder.
–
auf der
nächsten Seite
1
7
6
7
7
5 5
Page 23
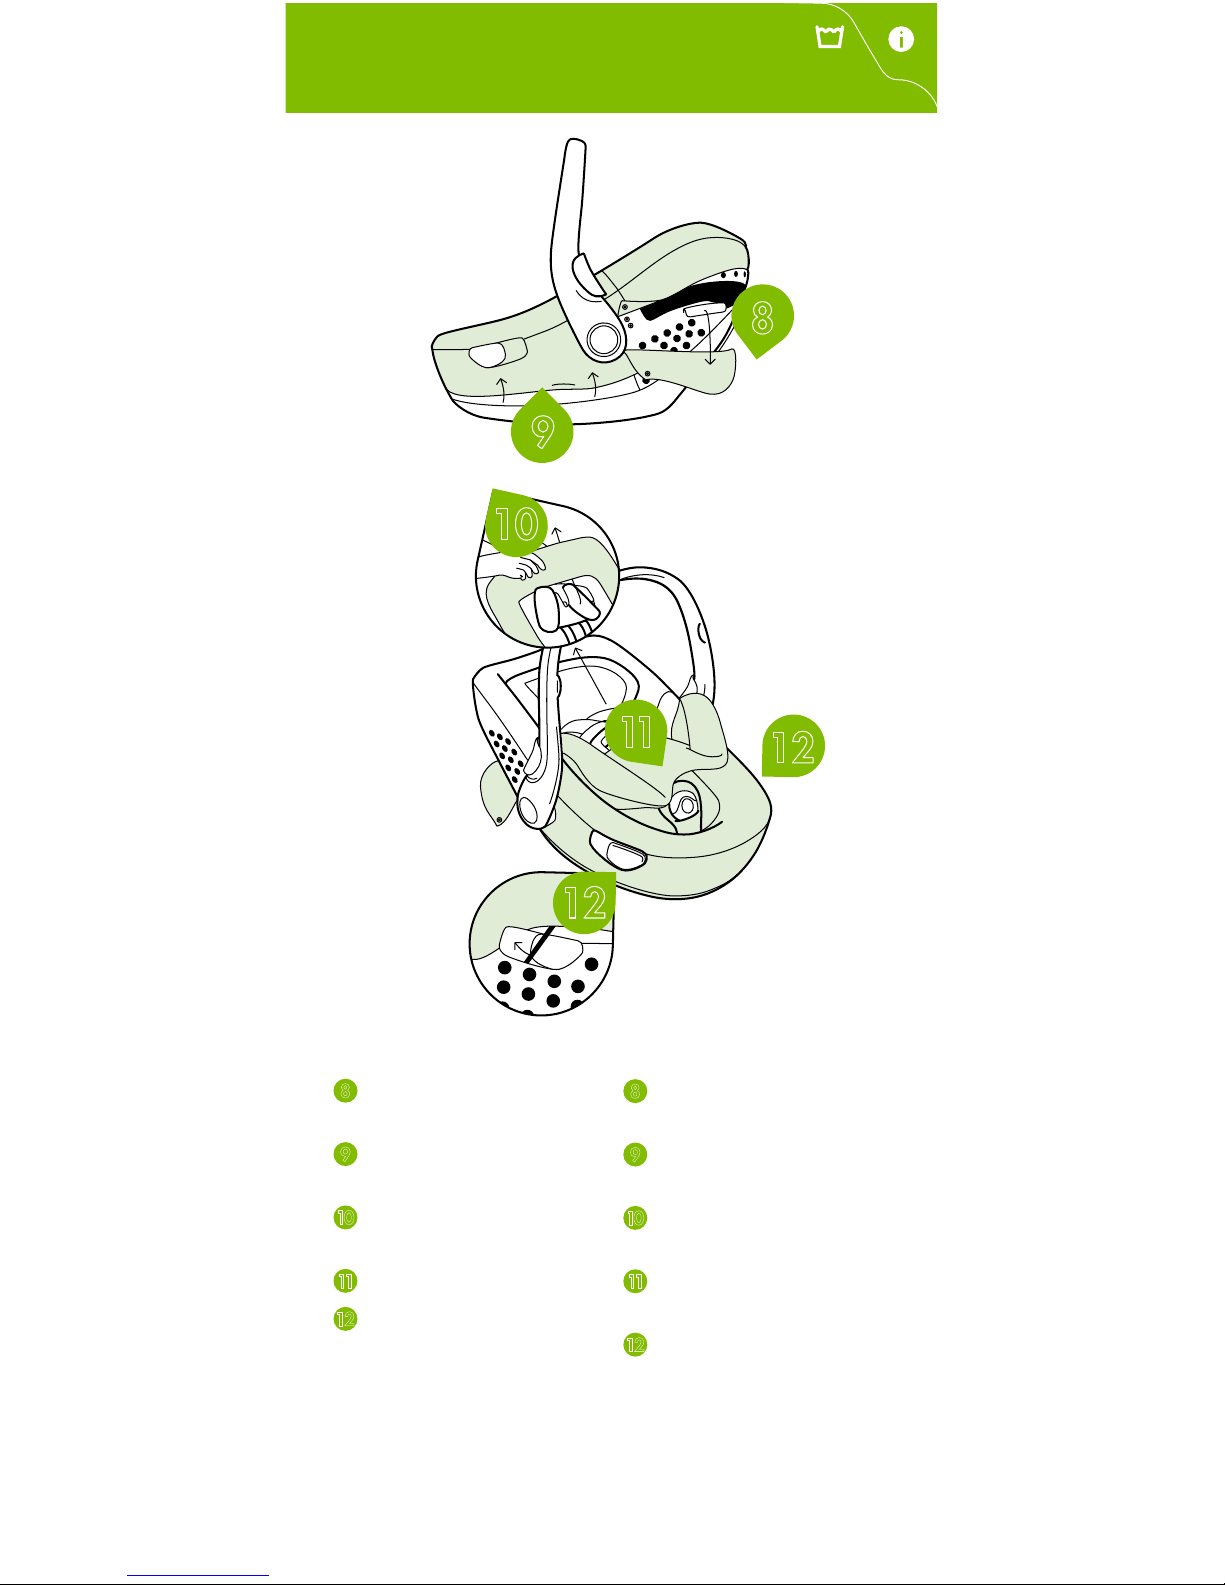
9
8
10
12
12
11
Entfernen Sie den
Überzug von der Tasche.
Lösen Sie den Bezug
durch Anheben.
Ziehen Sie die Kopfstütze von hinten heraus.
Entfernen Sie den
Stoffbezug.
Entfernen Sie die
Schlaufen auf beiden
Seiten vom Haken.
Remove the cover
from the pocket.
Loosen the
cover by lifting it up.
Pull out the head
rest from the back.
Remove the cover.
Unhook the elastic
latches from both sides.
Page 24
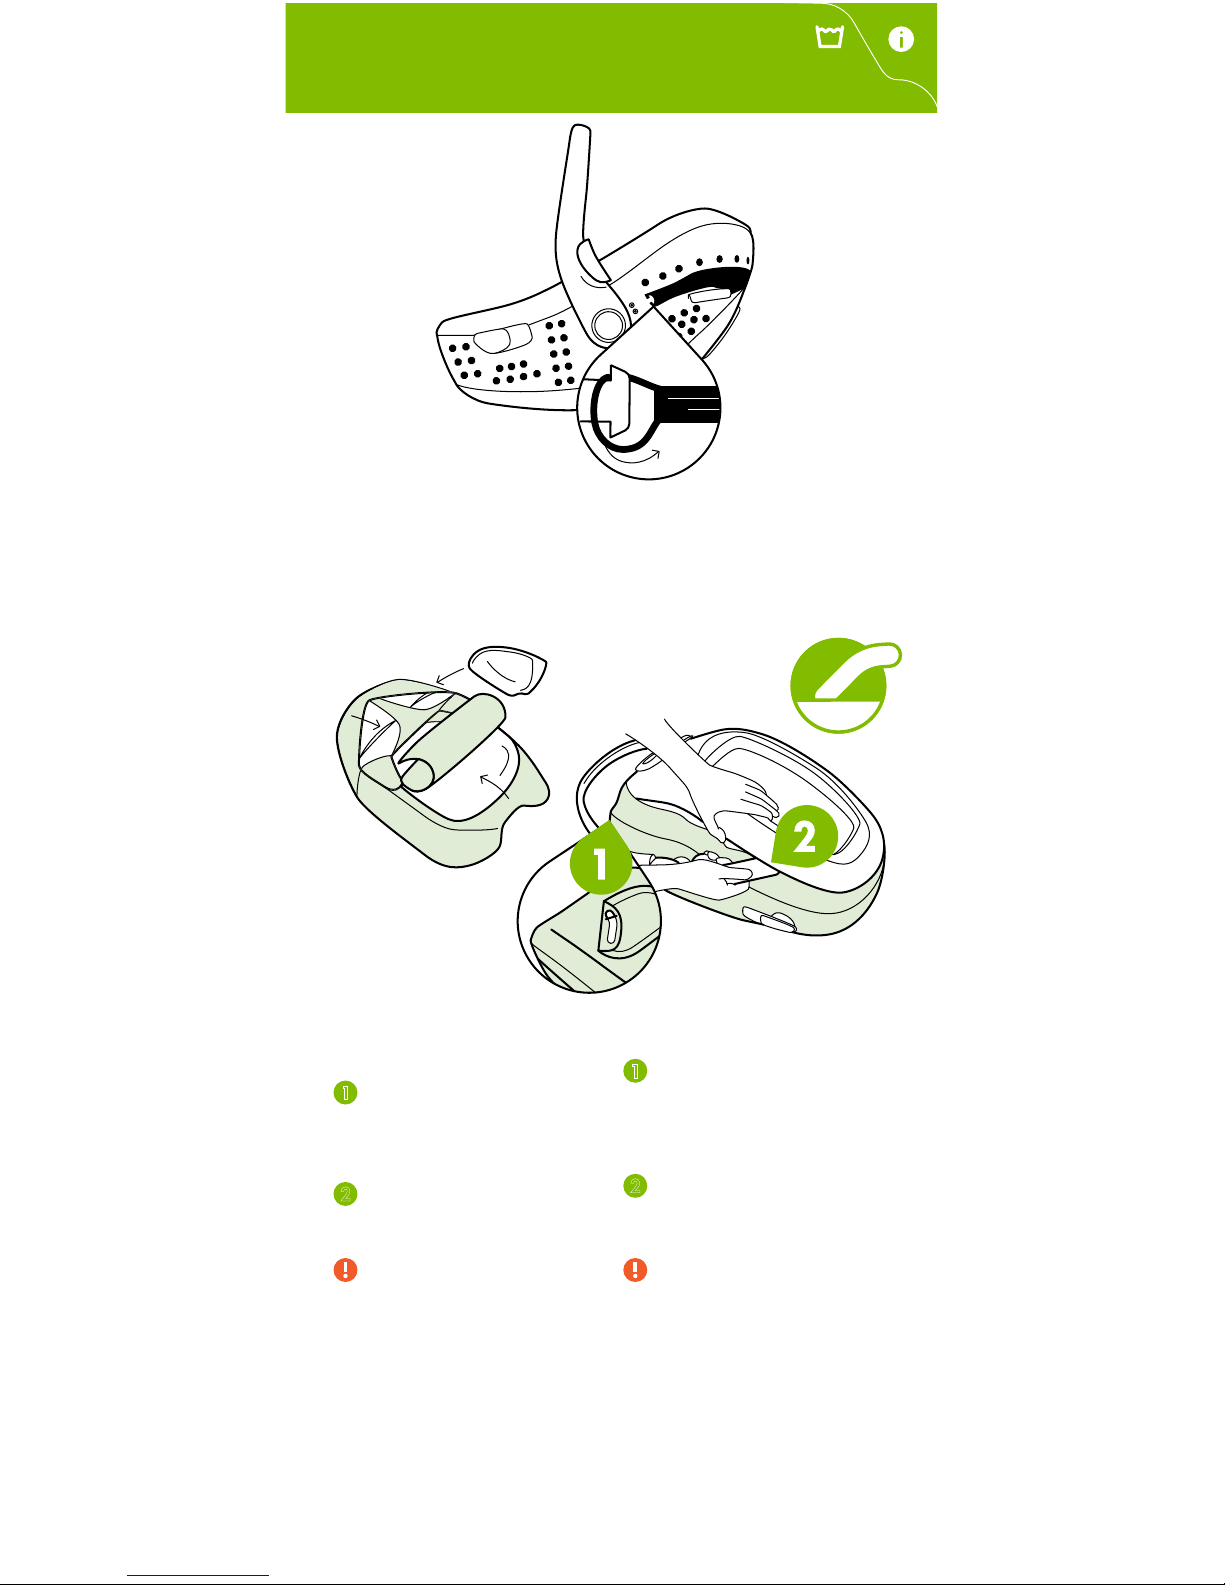
REMOVING SUN CANOPY
Unhook the elastic latch
from both sides.
ABNEHMEN DES
SONNENSCHUTZES
Entfernen Sie die Schlaufen
auf beiden Seiten vom
Haken.
BEZIEHEN DES SITZES
1
Das Montagewerkzeug
für den Stoffbezug befindet
sich unter dem Kopfpolster
auf der linken Seite.
Benutzen Sie es um den
Bezug zu positionieren.
Stellen Sie sicher, dass
Sie die Stoffbezüge so
anlegen wie sie waren.
Folgen Sie den vorhergehenden Schritten in der
umgekehrten Reihenfolge damit alles
an seinem
Platz ist.
REPOSITIONING
THE COVER
1
The fabric installation
tool is under the left side of
the newborn pillow.
Use it to push the cover
into the right position.
Make sure to put the
covers back the same way
they previously were. You
can follow the previous
steps in reverse order to
make sure everything is in
its place.
Page 25
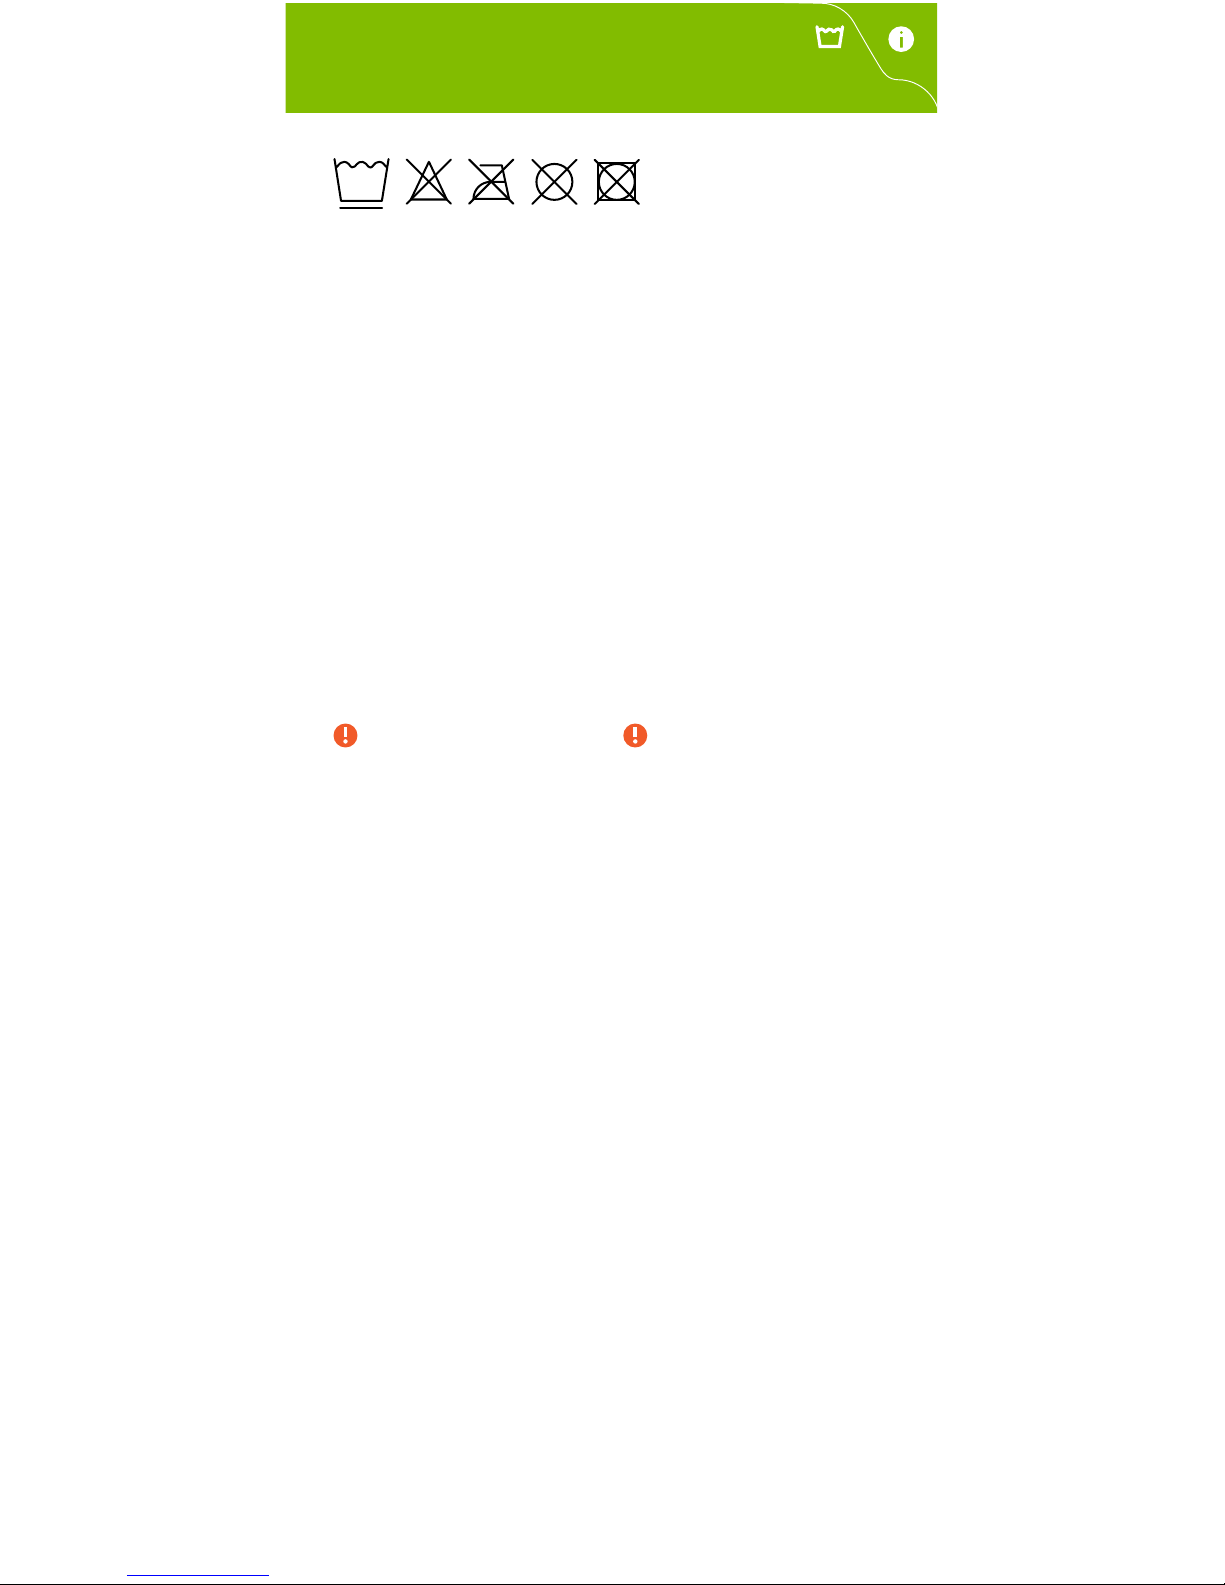
30°
Hand wash recommended
(max. 30°C).
Use mild detergents.
Do not iron, dry clean,
bleach or tumble dry. Keep
away from direct heat.
Do not use bleach,
abrasive or upholstery
cleaning agents.
Clean the plastic parts
and the integrated harness
system with a mild detergent
and warm water.
Handwäsche empfohlen
(max. 30°C).
Benutzen Sie milde Reinigungsmittel.
Nicht bügeln, chemisch
reinigen, bleichen, oder
im Trockner trocknen.
Benutzen Sie keine
bleichenden, schleifenden
oder scheuernden Reinigungsmittel.
Reinigen Sie die Plastikkomponenten und das
integrierte Gurtsystem mit
warmen Wasser und einem
milden Reinigungsmittel.
The fabric cover is a safety
feature and the product
should never be used
without it.
If the cover needs
replacing at any time,
only use official Swandoo
Albert fabrics.
Your Swandoo Albert
must undergo regular
maintenance. Do not use
lubricants or aggressive
cleaning agents.
Der Stoffbezug trägt zur
Sicherheit des Sitzes bei.
Das Produkt darf niemals
ohne ihn benutzt werden.
Falls der Bezug ersetzt
werden muss, ersetzen
Sie ihn nur mit offiziellen
Swandoo Albert Bezügen.
Ihr Swandoo Albert
muss einer regelmäßigen
Wartung unterzogen
werden. Verwenden
Sie keine Schmier- oder
aggressive Reinigungsmittel.
Page 26

WARNING
Only adults should fix or
adjust the product.
Do not make any changes
to the product whatsoever.
This could affect its
performance and make it
unsafe.
Do not use the product with
damaged or missing parts.
Do not use a second-hand
child seat or child seat
whose history you do
not know. Please check
the security mark of the
product. It is dangerous
to use unauthorized or
changed products!
Do not use the product if
there is any evidence of
unlicensed modification.
Do not remove any labels
on the product. They contain
important information.
Never use the seat as a
shopping bag or as a
means for transporting
something.
In the event of an emergency, it is important to
re lease the child quickly.
This means that the buckle
is not fully tamperproof and
therefore your child should
never play with the buckle.
WARNUNG
Nur Erwachsene dürfen
das Produkt installieren
oder einstellen.
Nehmen Sie keinerlei
Anpassungen an dem
Produkt vor. Dies kann
seine Leistung und
Sicherheit beeinträchtigen.
Benutzen Sie das Produkt
nicht wenn es beschädigt ist
oder Komponenten fehlen.
Benutzen Sie keine Secondhand-Babyschale oder
Sitze, dessen Geschichte
Sie nicht kennen.
Kontrollieren Sie bitte das
Sicherheitszeichen des
Produktes. Es ist gefährlich
nicht autorisierte oder
veränderte Produkte zu
verwenden!
Benutzen Sie das
Produkt nicht, wenn es
Anzeichen von unbefugter
Veränderung aufweist.
Entfernen Sie keine
Etiketten und Labels am
Produkt. Diese beinhalten
wichtige Informationen.
Benutzen Sie den Sitz
niemals als Einkaufstasche
oder als zweckentfremdetes
Transportmittel.
Im Notfall ist es wichtig,
dass Sie das Kind schnell
von dem Sitz lösen können.
Aus diesem Grund ist das
Gurtschloss nicht komplett
gegen Eingriffe gesichert.
Das Kind sollte daher nie
mit dem Schloss spielen.
Page 27

WARRANTY
Our warranty of 2 years
reflects our confidence in the
high quality of our design,
engineering, production
and product performance.
In case of defect, please
present your proof of
purchase and the product’s
serial number which is
located on the bottom of
the product.
The 2 year warranty
covers all manufacturing
and material defects
existing at the date of
purchase, or appearing
within 2 years from the
date of purchase from the
retailer. All fabric parts,
including the seat cover,
headrest cover, newborn
pillow cover, canopy and
shoulder pads, are covered
by a warranty for a period
of 6 months.
You can extend your
product warranty to 3
years for free, simply by
registering your product
online. In order to do so,
scan the QR-Code on the
handle of your Albert i-Size
Baby Car Seat, or on the
back of your Albert i-Size
Base. You can also visit
swandoo.com/registerproduct.
If you have any questions
or concerns about this
product, or this user
manual, please contact us
before using the product.
We are looking forward to
hearing from you.
GARANTIE
Die 2-jährige Garantie
spiegelt unser Vertrauen
in die hohe Qualität von
Design, Technik, Produktion
und Produkt-Performance
wieder. Im Falle eines
Defektes weisen Sie bitte
Ihre Rechnung und die
Seriennummer vor, welche
auf der Unterseite des
Produktes zu finden ist.
Die 2-jährige Garantie gilt
für alle Fabrikations- und
Materialmängel, welche
beim Kaufzeitpunkt bereits
vorhanden sind oder aber
innerhalb von 2 Jahren
ab Kaufzeitpunkt vom
Händler auftreten. Alle
Teile, inklusive Überzug,
Kopf- und Schulterpolster
haben nur eine 6-monatige
Garantie.
Sie können die
Produktgewährleistung
kostenlos auf 3 Jahre
verlängern indem Sie ihr
Produkt einfach online
registrieren. Scannen Sie
dazu den QR-Code auf der
Rückseite ihrer Albert i-Size
Base. Ebenso können Sie
swandoo.com/registerproduct besuchen.
Falls Sie Fragen oder
Bedenken zu diesem Produkt
oder Benutzerhandbuch
haben, kontaktieren Sie uns
bitte bevor Sie das Produkt
verwenden. Wir freuen uns,
von Ihnen zu hören.
Please recycle
Page 28

Always with you
+86 512 6636 0798
[email protected]
www.swandoo.com
138 Zhujiang Road,
Wuzhong District, Suzhou
215000 Jiangsu, China
If you have any questions,
contact our team. We are
happy to hear from you!
+86 512 6636 0798
Wir freuen uns, von
Ihnen zu hören.
 Loading...