

Page 1

USER MANUAL
In order to continue serving our customers and providing the best products, our product information including our user manuals
may receive updates from time to time. Please check our website for the latest user manuals and product materials.
Ver. 1.0 6/19/19
Page 2

Page 3
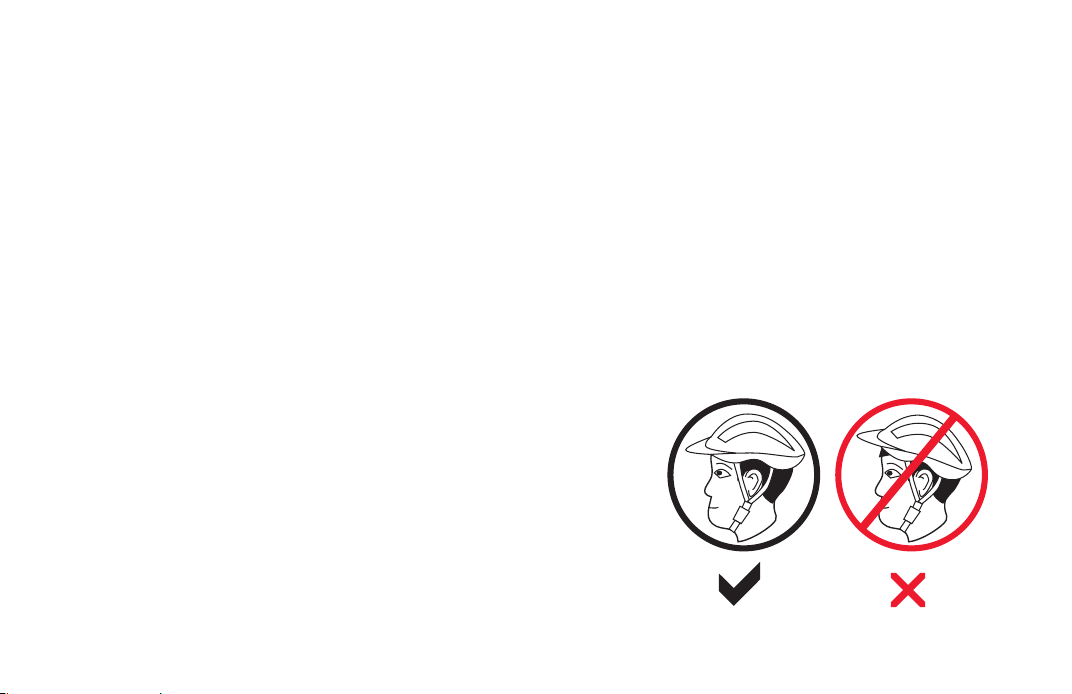
PROTECT YOUR DOME
HELMETS SAVE LIVES
Helmets can reduce 85% of critical head injuries.
Elbow pads can reduce 82% of elbow injuries.
Knee pads can reduce 32% of knee injuries.
From https://www.ncbi.nlm.nih.gov/pubmed/2716781
Always wear proper protective gear when riding. This includes knee and elbow pads and an age-appropriate
helmet.
• Helmets should t comfortably and snugly, covering the forehead but
not hindering your eld of vision.
• The helmet should have a chin strap and buckle to keep the helmet in
place.
• The helmet should be made out of a hard, protective outer shell and
an impact-absorbing inner layer at least 1/2-inch thick.
• The helmet should be approved by the U.S. Consumer Product Safety
Commission (CPSC), the Snell Memorial Foundation, or the American
Society for Testing and Materials (ASTM).
Page 4

Thank you for your purchase of the Swagger 8 Folding Electric Scooter!
The Swagger 8 takes the power of electricity, the style of a traditional scooter, adds them together, and tops it off with an
extra bit of swag.
To ensure your safety and the safety of others, please read and follow the guidelines in this user manual carefully and
thoroughly before and during riding.
If you have any questions regarding the Swagger 8, contact us at 1-844-299-0625 for further assistance.
Happy Riding!
-The SWAGTRON® Tea m
Page 5

TABLE OF CONTENTS
GENERAL INFORMATION
1.1 Important Information . . . . . . . . . . . . . . . . . . . . . . . . . . . . . . . . . . . . . . . . . . . . . . . . .01
1.2 Safety Warnings. . . . . . . . . . . . . . . . . . . . . . . . . . . . . . . . . . . . . . . . . . . . . . . . . . . . .02
1.3 Disposal at End-of-Life . . . . . . . . . . . . . . . . . . . . . . . . . . . . . . . . . . . . . . . . . . . . . . . . .03
1.4 Main Specifications . . . . . . . . . . . . . . . . . . . . . . . . . . . . . . . . . . . . . . . . . . . . . . . . . . .04
PARTS & FEATURES
2.1 What’s in the Box? . . . . . . . . . . . . . . . . . . . . . . . . . . . . . . . . . . . . . . . . . . . . . . . . . . .05
2.2 Swagger 8 Diagram . . . . . . . . . . . . . . . . . . . . . . . . . . . . . . . . . . . . . . . . . . . . . . . . . . .05
2.3 Display Overview . . . . . . . . . . . . . . . . . . . . . . . . . . . . . . . . . . . . . . . . . . . . . . . . . . . .06
2.4 Display Indicators . . . . . . . . . . . . . . . . . . . . . . . . . . . . . . . . . . . . . . . . . . . . . . . . . . . .06
FOLDING & ASSEMBLY
3.1 Assembling the Handlebars . . . . . . . . . . . . . . . . . . . . . . . . . . . . . . . . . . . . . . . . . . . . . .10
3.2 Standing the Scooter . . . . . . . . . . . . . . . . . . . . . . . . . . . . . . . . . . . . . . . . . . . . . . . . . .10
3.3 Folding & Unfolding the Scooter . . . . . . . . . . . . . . . . . . . . . . . . . . . . . . . . . . . . . . . . . . . .10
CHARGING
4.1 How to Charge . . . . . . . . . . . . . . . . . . . . . . . . . . . . . . . . . . . . . . . . . . . . . . . . . . . . .11
4.2 Battery Specifications. . . . . . . . . . . . . . . . . . . . . . . . . . . . . . . . . . . . . . . . . . . . . . . . . .12
USAGE
5.1 How to Ride . . . . . . . . . . . . . . . . . . . . . . . . . . . . . . . . . . . . . . . . . . . . . . . . . . . . . . .13
5.2 Practicing Guidelines . . . . . . . . . . . . . . . . . . . . . . . . . . . . . . . . . . . . . . . . . . . . . . . . . .15
MAINTENANCE
6.1 Cleaning. . . . . . . . . . . . . . . . . . . . . . . . . . . . . . . . . . . . . . . . . . . . . . . . . . . . . . . . .16
6.2 Storage . . . . . . . . . . . . . . . . . . . . . . . . . . . . . . . . . . . . . . . . . . . . . . . . . . . . . . . . .16
6.3 Transportation . . . . . . . . . . . . . . . . . . . . . . . . . . . . . . . . . . . . . . . . . . . . . . . . . . . . .17
90-DAY LIMITED HARDWARE WARRANTY
Page 6
Section 1
GENERAL INFORMATION
Before operating this vehicle, please read all instructions. This manual will guide you through the functions, usage, and proper
care of your Swagger 8. If you have any questions or cannot find the information you need in the manual, please contact your
place of purchase or our customer service at 1-844-299-0625. Before contacting customer service, please have your purchase
information ready as this may be needed during the call. This information may be recorded below.
Date of Purchase:
Place of Purchase:
It is important that you follow all safety warnings that appear throughout this manual and exercise good
judgment when using your Swagger 8 scooter. Consult this manual before attempting to ride.
1.1 Important Information
Within this manual, “the Swagger 8”, “your Swagger 8”, “your scooter” and “the scooter” refer to the Swagger 8 Folding
Electric Scooter. The Swagger 8 is a personal scooter that uses electrical power. By riding the Swagger 8 scooter, the user
acknowledges and accepts responsibility for all risks associated with the use of the scooter which may include, but are not
limited to, muscle injuries, broken bones, lacerations, serious injury, and possible death, which may be sustained while using
the Swagger 8.
To better ensure your safety, ALWAYS USE APPROPRIATE PROTECTIVE GEAR, read and follow all instructions and
warnings in the User Manual.
Appropriate protective gear should include an ASTM F1492, F1447, F1492, Snell B-90A, B-95, N-942, or CPSC
approved helmet and other gear including knee and elbow pads.
Use the Swagger 8 at your own risk. SWAGTRON shall not be held responsible for accidents due to poor judgment.
SWAGTRON S WAGGER 8 USER MANUAL 01
Page 7

1.2 Safety Warnings
When reading this manual, note these icons:
Notes with this icon MUST be read, understood, and obeyed to prevent injury or damage, etc.
Notes with this icon include relevant information.
Properly dispose of all packaging material. Some items may be packed in plastic bags or material and may cause
suffocation or injury to pets or children.
Verify that all parts of the product are accounted for. If any part is missing, call customer service.
If any ports or cables or surrounding parts are damaged, do not use the product.
Never insert objects into the product other than the cables etc. as described in this manual.
If the product is to be used by children, the parent or legal guardian should explain the contents of the user manual to
the children and should provide adequate supervision to ensure that the device is being used as explained in the user
manual.
Use only the parts included in the original packaging or received from the manufacturer.
Risk of shock. Do not allow water and/or liquids to come in contact with any part of the product.
Use dry, non-abrasive cloth to remove debris or dust. Do not spray liquids onto the product.
Never submerge the product or any of the product’s components and/or accessories into water.
Do not ride over stairs.
Do not allow more than one person on the scooter at a time.
The product shall only be used as described in this manual.
02
Page 8

Cover the product to protect it from dust. Do not store in a dusty environment as, with all electronic devices, this may
cause damage over time.
WARNING- RISK OF FIRE - No user serviceable parts
AVERTISSEMENT - Risque d’incendie - Aucune des pièces ne peut être réparée par l’utilisateur
1.3 Disposal at End-of-Life
This product must not be disposed of by incineration, landfilling, or mixing with household trash. Improper disposal of the
battery contained within this product may result in the battery heating up, rupturing, or igniting which may cause serious
injury. The substances contained inside the battery present chemical risks to the environment. The recommended disposal
for SWAGTRON® Swagger 8 Folding Electric Scooter at its end-of-life is to dispose of the entire unit at or through an
e-waste recycling center, program, or facility.
Local regulations and laws pertaining to the recycling and disposal of lithium-ion batteries and/or products containing
them will vary according to countr y, state, and local governments. You must check laws and regulations corresponding to
where you live in order to dispose of the battery and/or unit properly. It is the user’s responsibility to dispose of their waste
equipment properly in accordance with local regulations and laws.
For additional information about where you should drop off your batteries and electrical or electronic waste, please contact
your local or regional waste management office, your household waste disposal service, or your point-of-sale.
SWAGTRON S WAGGER 8 USER MANUAL 03
Page 9

1.4 Main Specifications
Indicators Items Parameters
Dimensions
Weight Vehicle Weight
Requirements
Performance
Wheels
Power
Charger
Opened
Folded
Suitable Rider Height 4’ - 6’6” (120 - 200 cm)
Weight Capacity 44 - 150 lb. (20 - 63 kg)
IP Rating IPX4
Working Temp. 32°F to 109 °F
Storage Temp.
Max. Speed* 15.5 mph (25 km/h)
Max. Climbing* 10
Range per Charge* 4~10 mi. (6.4~16.1 km)
Brakes Electronic, Rear friction, “Autoguard”
Suspension Front, Coil-sprung
Wheel Type Passive (front), Motorized (rear)
Wheel Size 5.5 in.
Tire Material Solid rubber
Tire Inflation 50 PSI / 3.4 BAR
Battery Type Lithium-ion (rechargeable)
Battery Management Automatic shutoff, Overcharging, Under-voltage, Overheating
Voltage
Charging Time
Model
Input Voltage
Output Voltage
Manufactured By
04
36.41 x 16.9 x 40.15 in (93x43x102 cm)
33.46 x 16.9 x 11.41 in. (85x4 3x29 cm)
17.42 lb. / 7.9 kg
14°F to 122°F / -10°C to 50°C
o
24V 4.0 Ah
3 hours
ABT010294
100-240V 50/60Hz 1.5A
DC 29.4V 1A
Duangdong ABT indus trial CO., LTD
Add: #2 JiLi Rd PingDi Town, LongGang Dis trict, Shenzhen GuangDong China, 518117
77°F / 25°C
Page 10
Section 2
PARTS & FEATURES
2.1 What’s in the Box?
■ 1 x Swagger 8
■ 1 x Charger
■ 2 x Handles
■ 1 x User Manual
■ 1 x Allen Key
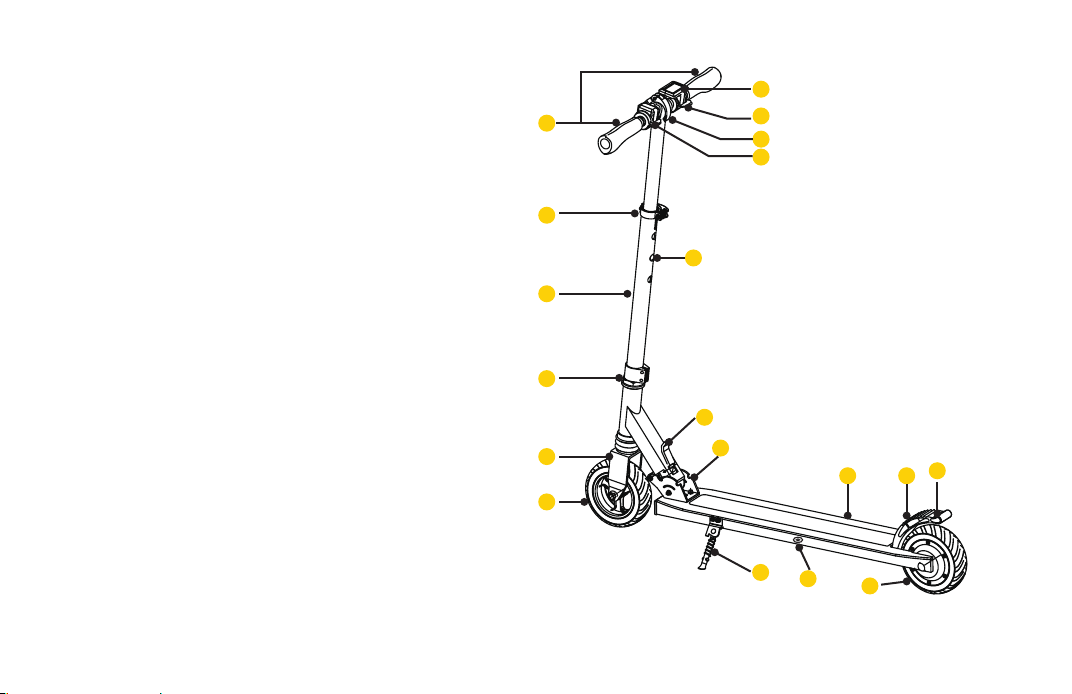
2.2 Swagger 8 Diagram
1. Handles 10. Reflec tor
2. Lower Clamp 11. Footbrake
3. Stem 12. De ck
4. Stem Tap 13. Folding Notch
5. Fork 14. Folding Latch
6. Front Wheel 15. Metal Peg Hole
7. K i c ks ta nd 16. Handbrake
8. Charging Port 17. Upper Clamp
9. Rear Motorized Wheel 18. Throttle
19. Display
19
1
2
15
3
4
5
6
18
17
16
14
13
12 11
7
8
SWAGTRON S WAGGER 8 USER MANUAL 05
9
10
Page 11
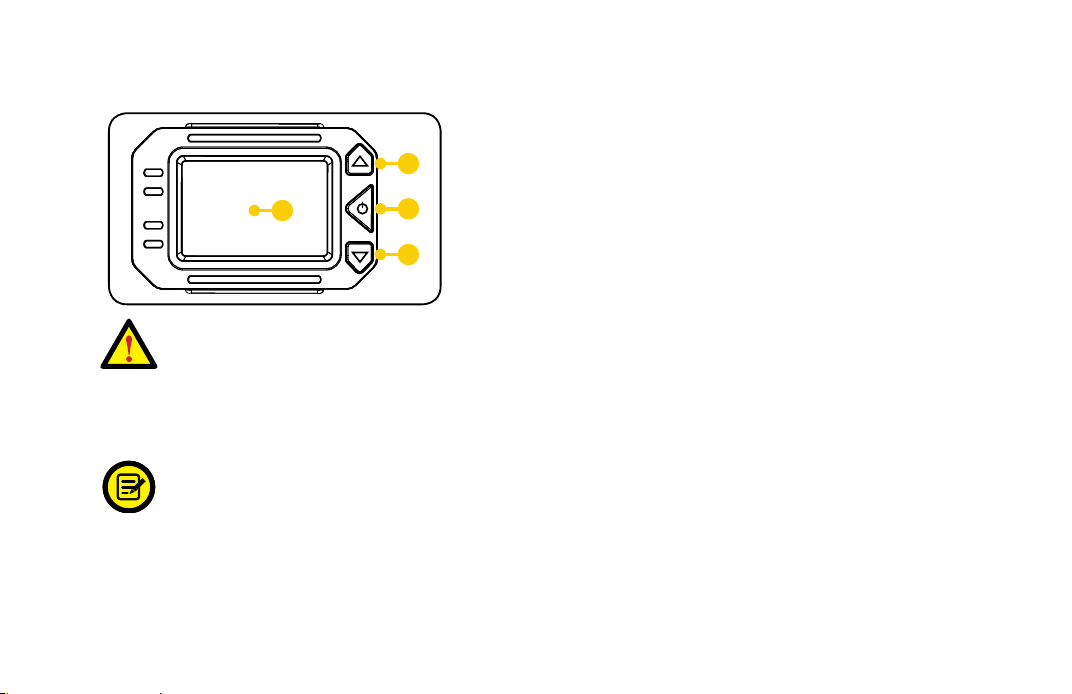
2.3 Display Overview
1. Screen 2. Up Button
3. Power Button 4. Down Button
2
Press and hold the POWER button for ~3s to turn on the display.
The display is made up of these parts:
1
3
4
• DO NOT expose the display to direct sunlight or high heat for extended periods of time.
• DO NOT store the scooter inside a vehicle or other location subject to high heat. Any of these conditions
may damage the display’s interface.
2.4 Display Indicators
To navigate through the display use the UP and DOWN buttons.
From default settings, the display will turn of f when the scooter turns off or after 5 minutes of non-use.
06
Page 12
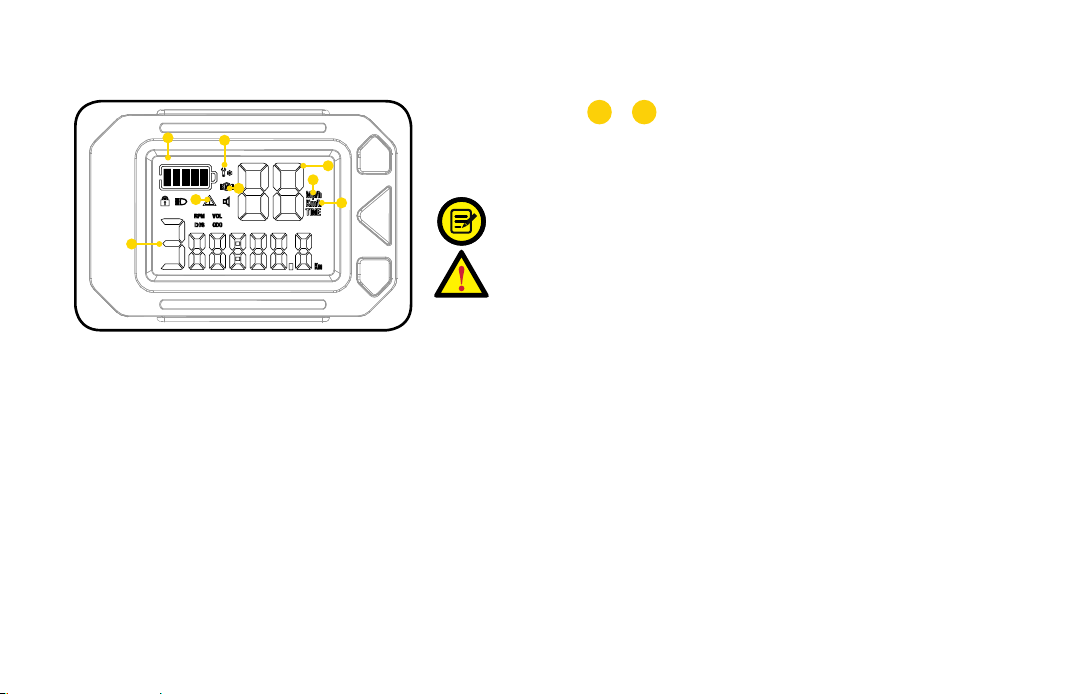
General Indicators and Fault Indicators:
6
There are two icons (
1
2
3
6
7
8
4
5
circumstances and/or if the internal system or parts inside the scooter
encounter some type of issue. In the event that any of these icons
appears, first turn the scooter off and back on again.
If turning the scooter off and on again doesn’t resolve the
issue, contact customer service as soon as possible.
& 7) which will appear under abnormal
When the battery level is low, stop riding, turn off the
scooter, and fully recharge it before riding again.
1. Battery Level: Displays current battery level.
2. Setting: This icon will appear when modifying program settings. Please see 2.5 Program Menu Settings for more
information on these settings.
3. Speed: Displays current speed readings and will change as the scooter is in use.
4. Speed Measurement: MPH (miles per hour).
5. Speed Measurement: KPH (kilometers per hour).
6. Motor Warning: Indicates possible motor issues or abnormality and will appear if an element of the motor fails to function
properly.
7.
Brake Warning: Indicates possible brake issues or abnormality and will appear if an element of the brakes fails to function
properly.
8. Speed Mode: This icon indicates current throttle-only speed mode, which have upper speed limits as follows:
9. S peed mode max. speeds (throttle only):
Mode 1: ~6.2 mph
Mode 2: ~11.2 mph
Mode 3: ~15 mph
SWAGTRON S WAGGER 8 USER MANUAL 07
Page 13
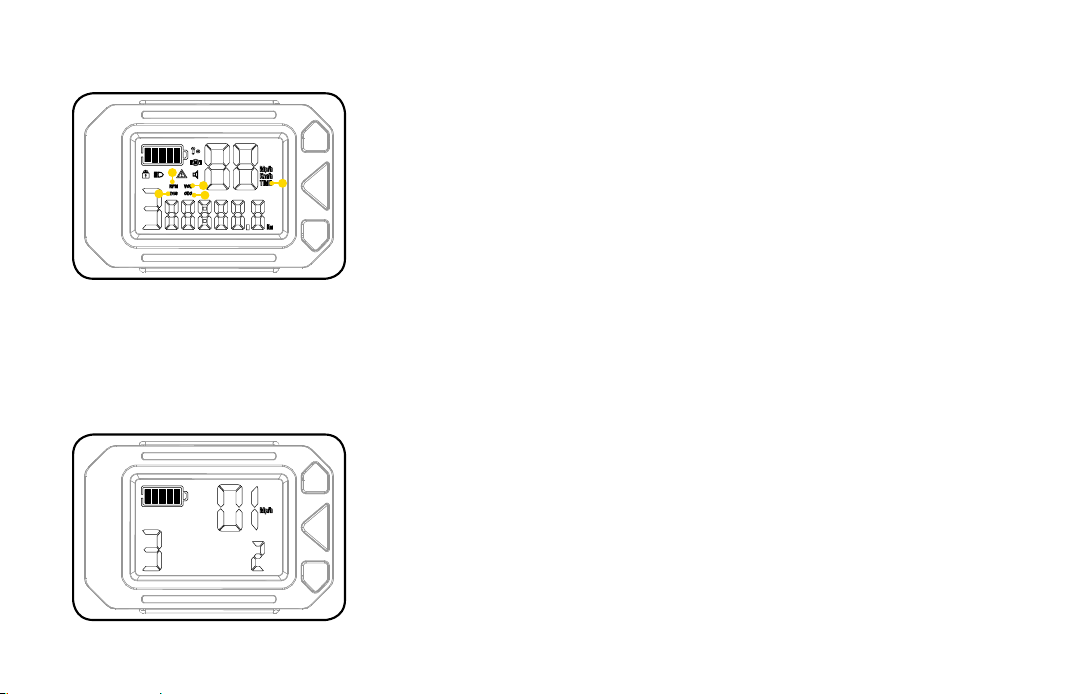
Display Indicators & Modes
Different screens and their related settings may be shown on the display as desired.
To switch between screens and display different information, briefly press the
POWER button.
1
2
4
3
5
1. RPM: This icon displays revolutions per minute.
2. Volta ge: This icon displays upon start-up. The voltage is related to internal
settings within the scooter and is not user-accessible.
3. Odometer: When this mode is selected, the odometer icon and the
corresponding value will appear on the highlighted area on the display.
4. Trip Meter: When this mode is selected, the distance icon and the corresponding
value will appear on the highlighted area on the display. This icon tracks your travel
distance per trip. Turn off the scooter to reset or press and hold the UP button.
5. Time: When this mode is selected, the time icon and the corresponding value will appear on the highlighted area on the
display. This icon is related to tracking the travel time per trip. To reset, turn the scooter off.
2.5 Program Menu
The display also features five program settings which are not readily indicated on the screen by default. Follow the steps to
access the settings screen and make changes.
Step 1. Press and hold the UP and DOWN buttons simultaneously for ~2 seconds.
Step 2. Press the POWER button to cycle through the 6 program options (see
Step 3. For each setting, press UP or DOWN buttons adjust the option.
Step 4. Press the POWER button to confirm changes and cycle to the next screen.
Step 5. Press and hold the UP and DOWN buttons simultaneously for ~2 seconds to
The display will timeout after a few seconds of inactivity and return to the main display
interface.
08
below).
exit settings.
Page 14

01: Adjusting Brightness of Display’s Backlight
Press UP and DOWN buttons to adjust the brightness of the display’s backlight.
02: Measurement Setting
Change the current speed measurement in this setting. Speed may be displayed in either miles per hour (MPH) or kilometers
per hour (KM/H). Option 0 is KM/H. Option 1 is MPH. By default, this option is set to 1. If changed, the display will show the
related icons.
03: Shutoff Time
Set the time, between 0 and 60 minutes, that the scooter will power down after inactivity.
04: Manual Kick-Start Motor
Options can be set to 0 (off) or 1 (on). By default, this option is off. Selecting 1 turns on this feature. When activated, the
throttle can not be used until you reach 1.8 mph manually. If you drop below the trigger threshold, the throttle cannot engage
again until you reach 1.8 mph. For details on the different ways to accelerate, please see Section 5.1.
This feature will remain active until you turn it off from the Program Menu, even if you turn off the scooter.
05: Cruise Control
Options can be set to 1 (off) or 2 (on). By default, this option is off. Selecting 2 turns the feature on.
This feature will remain active until you turn it off from the Program Menu, even if you turn off the scooter.
06: Clear Odometer (ODO) Data
Press and hold the UP button until the settings icon disappears. All mileage will be deleted and the display will automatically
power off.
SWAGTRON S WAGGER 8 USER MANUAL 09
Page 15
Section 3
FOLDING & ASSEMBLY
Make sure the Swagger 8 is turned off before working with any of its parts. The
scooter comes mostly assembled within the package. Some minor assembly is
required before riding. All parts and tools are included.
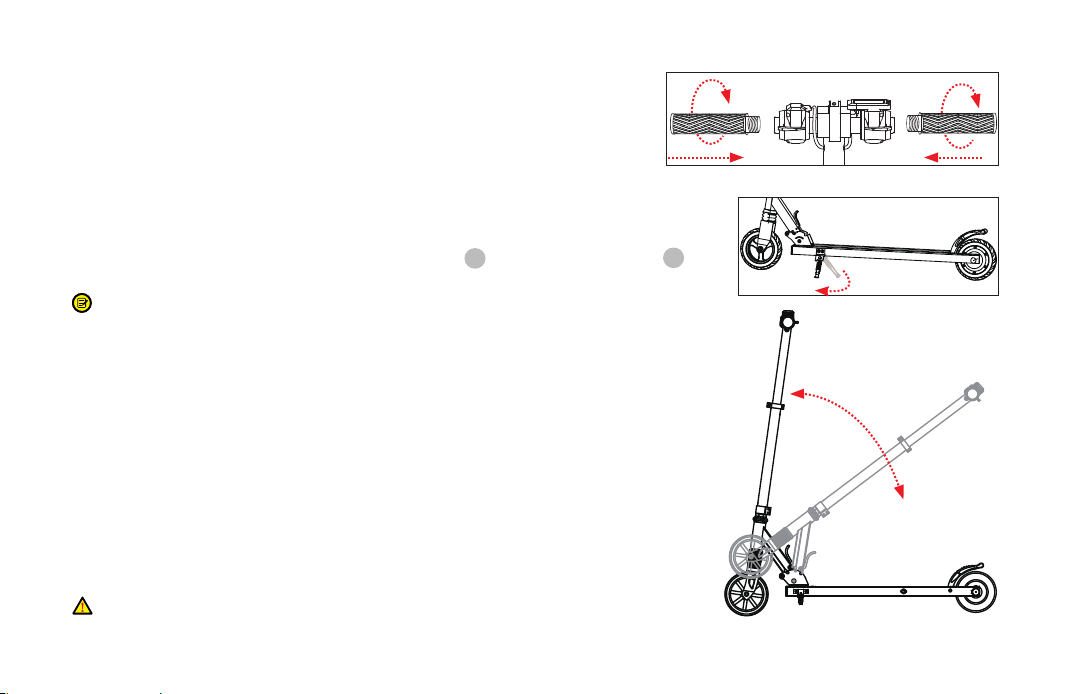
3.1 Assembling the Handlebars
Before installing the handlebars, please check each for a small letter to indicate which
side of the scooter the handle should be attached to. L is for the left side while R is
for the right side. Screw in each handle and make sure everything is securely attached.
When facing forward on the scooter, screw the handles toward you to tighten.
3.2 Standing the Scooter
1. Locate the kickstand on the side of the scooter’s deck.
2. Push the kickstand down and away from the scooter. Then carefully lean the weight of
the scooter onto the kickstand.
3.3 Folding & Unfolding the Scooter
1. Pull the folding latch down to unlock the stem. Then pull the stem down towards the
deck.
2. Make sure it locks into the lowest notch. It will “click” into place.
3. To unfold the scooter, pull up the stem away from the deck. When the stem is fully
unfolded, it will lock into the topmost notch.
Before moving, lifting, or otherwise transporting the scooter, ensure it is
turned off.
10
Page 16
Section 4
CHARGING
Charge the scooter before using it.
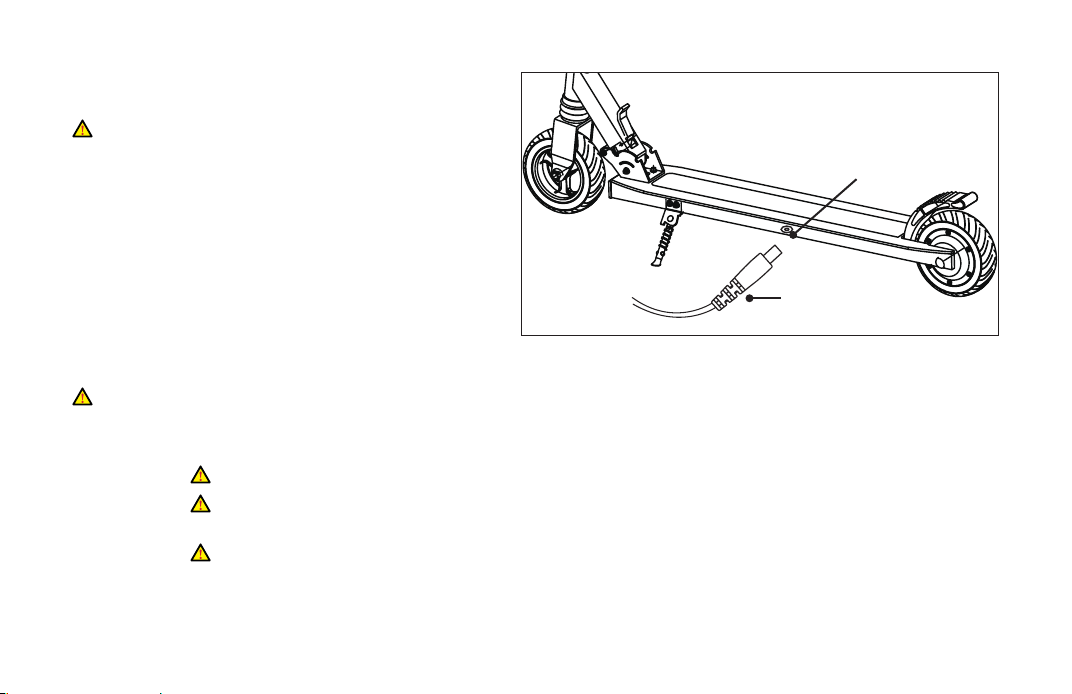
4.1 How to Charge
Charging Port
Step 1. Ensure the scooter is turned off before and
during the charging process.
Step 2. Locate the charging port near the
kickstand and remove the cap if needed.
Step 3. Use the charger and the charging port to
connect the scooter to an outlet.
Charging Cable
Step 4. While the scooter is charging, the
adapter’s indicator light will turn red.
If charging for the first time, charge the scooter for at least 3 hours before using it.
Step 5. When the scooter is fully recharged, the adapter’s indicator light will turn green. You may then disconnect the
scooter from the charger.
DO NOT, under any circumstances, use the scooter while it is connected to the charger.
Do not charge longer than necessary. Standard charging time is approx. 3 hours. Charging
longer than this may affect battery life and/or performance.
To maximize the battery life, charge it once every other month or every couple days after
riding.
SWAGTRON S WAGGER 8 USER MANUAL 11
Page 17
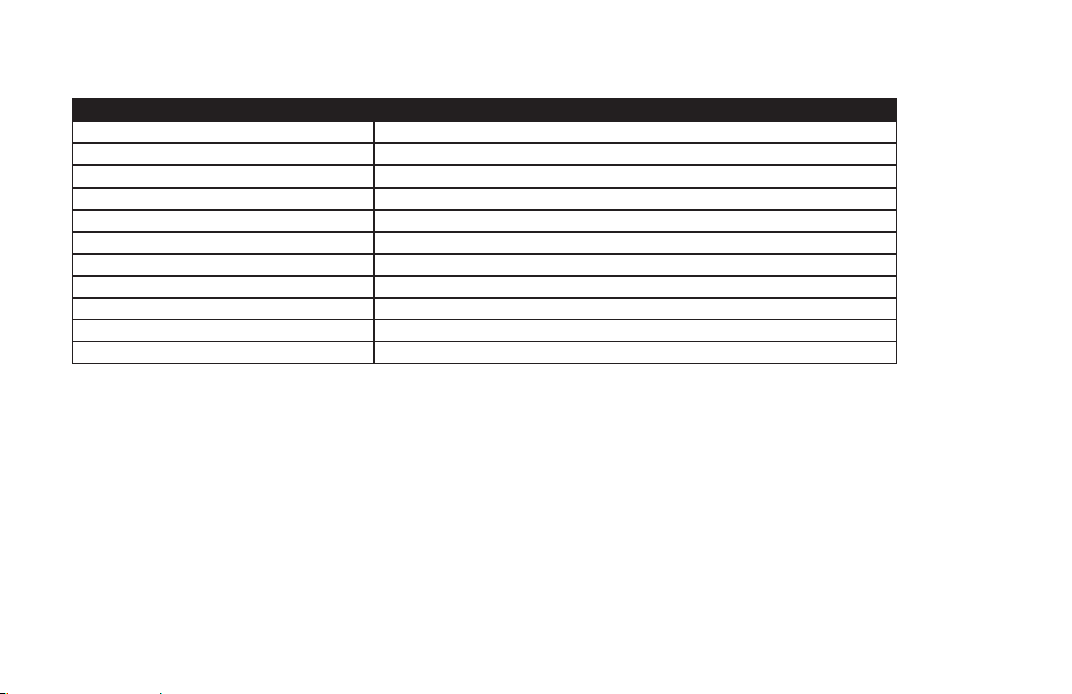
4.2 Battery Specifications
Items Parameters
Type Lithium-ion (rechargeable)
Charging Time 3 hours @1A
Voltage 24V
Capacity 4 Ah
Weight 1.75 lbs / 0.8kg
Dimensions 10.55 x 2.83 x 0.95 in / 268 x 72 x 24 mm
Operating Temp. 14°F to 140°F / -10°C to 60°C
Charging Temp. 32°F to 113°F / 0°C to 45°C
Storage Temp. 23°F to 95°F / -5°C to 35°C
Watt Hours 100.8
Management Automatic shutoff, Overcharging, Under-voltage, Overheating
12
Page 18

Section 5
USAGE
Read the following information before attempting to ride your Swagger 8.
An ASTM F1492-approved helmet as well as other protective gear must be worn at all times.
The Swagger 8 supports up to 150 lb. (68 kg). Do not carry passengers.
Only operate the Swagger 8 where permitted. Local laws may restrict where you may ride.
The Swagger 8 contains a motor and may be classified as a motor vehicle under local laws in your area. It is your
responsibility to abide by any local laws restricting how or where you may ride.
5.1 How to Ride
Always wear suitable protective gear when riding the Swagger 8. Place the scooter on a level surface. Make sure it is
completely charged before using. For your safety, please read this entire section before attempting to ride.
Step 1. Carefully step on with one foot and stand upright but relaxed. Grab both handles.
Step 2. Keep one foot on the ground and kick off to begin accelerating manually. Use the handles to steer.
Step 3. Start your Swagger 8 by pressing and hold the power button for ~3s. Then start accelerating by pushing the
throttle.
Step 4. To stop, release the throttle and use the handbrake, footbrake, or both to gradually coast to a stop. Then step
off the scooter one foot at a time. Be extra cautious when dismounting for the first time.
Step 5. To turn the scooter off, remain at a complete stop for a few seconds and press and hold the power button for
3~5 seconds.
The display shows how much charge is left in the battery. Make sure the battery is at full power before heading out on
a long distance ride.
SWAGTRON S WAGGER 8 USER MANUAL 13
Page 19

Manual (Non-Motorized)
Step 1. Carefully step on the scooter deck with one foot. Stand upright but relaxed and grab both handles.
Step 2. Keep one foot on the ground and kick off to begin accelerating manually. Use the handles to steer.
Step 3. To stop, use the brake to gradually coast to a stop then step off the scooter one foot at a time. Be extra cautious when
dismounting for the first time. When using the brake, the taillight will turn red automatically.
Step 4. If the scooter is on, press and hold the power button for ~3 seconds to turn off the scooter. The display and lights will
turn off as the scooter powers off.
Manual (Kick-Start Motor)
Using this Manual Kick-Star t Motor feature can conserve battery power, improve battery life, and extend range-percharge.
Step 1. Turn on the Manual Kick-Start Motor feature (see Section 2.5 Program Menu).
Step 2. Carefully step on the scooter deck with one foot. Stand upright but relaxed and grab both handles.
Step 3. Keep one foot on the deck and kick off to begin accelerating manually.
Step 4. Once you reach approx. 1.8 mph, the throttle will activate. Press the throttle to accelerate to the desired speed.
Step 5. To stop, release the throttle and use the brake to gradually coast to a complete stop. When using the brake, the
taillight will turn red automatically.
Dismount one foot at a time. Be extra cautious when dismounting for the first time.
This feature remains active until you manually turn it off in the Program Menu (see Section 2.5 Program Menu),
even if you power off the scooter.
Cruise Control
Step 1. Turn on Cruise Control (see Section 2.5 Program Menu).
14
Page 20
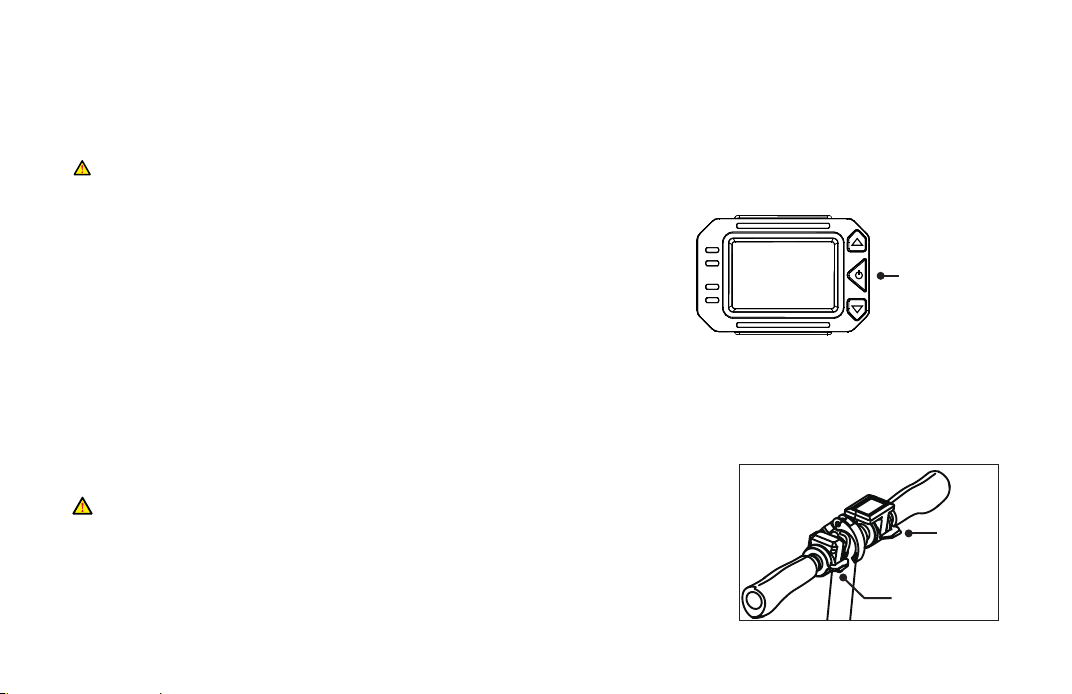
Step 2. Accelerate to reach the desired speed.
Step 3. Hold the throttle for approx. 6 seconds to turn on Cruise Control and maintain speed.
Step 4. Using the throttle or the brake will turn off Cruise Control.
This feature remains ac tive until you manually turn it off in the Program Menu (see Section 2.5 Program Menu),
even if you power off the scooter.
5.2 Practicing Guidelines
Practice until you are comfortable with using all of the scooter’s functions. See the
following tips below.
■ Avoid wearing anything that can drape over or get caught into/under the
wheels. Wear closed-toe, flat shoes to maintain flexibility and stability.
■ Practice until you can easily get on, move for ward, turn, stop, and dismount
with ease.
■ The scooter is designed to handle inclines up to 8°. Riding over steep inclines is not recommended.
■ The Swagger 8 is designed for relatively smooth, flat terrain.
■ Until you are comfortable using the scooter, avoid operating in places with slopes, pedestrians, or obstacles.
■ Familiarize yourself with the Program Menu Settings (see section 2.5).
Section 6
MAINTENANCE
Do not perform any maintenance when the power is on, or the battery is
charging.
After each ride, especially if you have traveled a long distance, inspec t your scooter.
■ Inspect the brakes to make sure that is working properly.
■ Make sure all screws and bolts are taut and properly fastened to prevent injury and
unnecessary wear and tear.
SWAGTRON S WAGGER 8 USER MANUAL 15
Power Button
Handbrake
Throttle
Page 21

Tire wear and tear is normal. The rate at which the tires deteriorate depends on riding style. E.g., casual riding may
yield minimal wear while heavy drifting may yield excessive wear. To purchase tire replacements and/or for
questions about your scooter’s par ts, contact customer service or visit our website.
6.1 Cleaning
The Swagger 8 may need cleaning after riding for extended periods of time.
Completely power off the scooter before cleaning.
Use dry, non-abrasive cloth to gently remove debris or dust.
The Swagger 8 may not come in contact with it in any kind of liquid.
Never use alcohol or ammonia-based cleaning solutions.
Never spray liquid directly onto any part of the scooter.
6.2 Storage
To store the Swagger 8, see the following information below.
Before storing, fully charge the Swagger 8 to prevent battery over-discharge due to non-use.
If storing for more than one month, discharge and recharge the battery every three months.
Cover the Swagger 8 to protect it from dust. Do not store in a dusty environment as, with all electronic devices, this
may cause damage over time.
Do not store in an unheated garage, shed, or other location with extreme temperature fluctuations.
16
Page 22

6.3 Transportation
Before moving, lifting, or otherwise transporting the scooter, turn it off. Fold the scooter (see Section 3.3 for instructions) and
pull the scooter along as you move, if needed.
Section 7
90-DAY LIMITED HARDWARE WARRANTY
Your SWAGTRON® Swagger 8 Folding Electric Scooter (“Product”) includes a 90-Day Limited Hardware Warranty (“Warranty”).
The Warranty covers product defects in materials and workmanship under normal use. This Warranty is limited to residents of the
United States (excluding Hawaii, Alaska and U.S. Territories) and Canada only and is available only to original purchasers. This
Warranty gives you specic legal rights and you may also have other rights which vary from state to state.
This Warranty starts on the date of your purchase and lasts for ninety (90) days (the "Warranty Period"). The Warranty Period is not
extended if the Product is repaired or replaced. We may change the availability of this limited warranty at our discretion, but any
changes will not be retroactive.
Warranty services are provided by SWAGTRON®. If a hardware defect arises and a valid claim is received within the Warranty
Period, at its option and to the extent permitted by law, SWAGTRON® will: (1) repair the hardware defect by using new or
refurbished parts that are equivalent to new in performance and reliability; or (2) exchange the Product with a product that is
new or refurbished which is substantially equivalent to the original product. This Warranty is for one replacement only of likeitems and does not cover items out of production if the product is no longer made or stocked. This Warranty is not assignable or
transferable. The original purchaser may call SWAGTRON’s toll-free number at 1-844-299-0625 for service request.
When a product or part is exchanged, any replacement item becomes your property and the replaced item becomes
SWAGTRON®’s property. This warranty only covers technical hardware defectiveness during the warranty period and under normal
use conditions. SWAGTRON® does not warrant uninterrupted or error-free operation of this Product.
Return shipping shall only be provided for Products dead on arrival (“DOA”) within 30 days of purchase only. All other returns/
SWAGTRON S WAGGER 8 USER MANUAL 17
Page 23

repairs shall require payment of shipping cost at discounted rate to be determined as follows:
SWAGTRON® E-Scooters, and Hoverboards shall be Twenty Dollars ($20)**
**shipping prices are subject to change without further notice.
This Warranty does not cover any damage due to: (a) transportation; (b) storage; (c) improper use; (d) failure to follow the product
instructions or to perform any preventive maintenance; (e) modifications; (f) unauthorized repair; (g) normal wear and tear(
including but not limited to wearables and other consumable parts such as tires); or (h) external causes such as accidents, abuse,
or other actions or events beyond our reasonable control.
Important: Do not disassemble the Product. Disassembling the Product will void this Warranty. Only SWAGTRON® or a party
expressly authorized by SWAGTRON® should perform service on this Product.
DISCLAIMER OF WARRANTY: THE REMEDIES DESCRIBED ABOVE ARE YOUR SOLE AND EXCLUSIVE REMEDIES AND OUR
ENTIRE LIABILITY FOR ANY BREACH OF THIS LIMITED WARRANTY. OUR LIABILITY SHALL UNDER NO CIRCUMSTANCES
EXCEED THE ACTUAL AMOUNT PAID BY YOU FOR THE DEFECTIVE PRODUCT, NOR SHALL WE UNDER ANY CIRCUMSTANCES
BE LIABLE FOR ANY CONSEQUENTIAL, INCIDENTAL, SPECIAL OR PUNITIVE DAMAGES OR LOSSES, WHETHER DIRECT OR
INDIRECT.
SOME STATES DO NOT ALLOW THE EXCLUSION OR LIMITATION OF INCIDENTAL OR CONSEQUENTIAL DAMAGES, SO THE
ABOVE LIMITATION OR EXCLUSION MAY NOT APPLY TO YOU.
THE DURATION AND REMEDIES OF ALL IMPLIED WARRANTIES, INCLUDING WITHOUT LIMITATION THE WARRANTIES OF
MERCHANTABILITY AND FITNESS FOR A PARTICULAR PURPOSE ARE LIMITED TO THE DURATION OF THIS EXPRESS LIMITED
WARRANTY.
Page 24

COPYRIGHT © 2019 S WAGT RO N. ALL RI GHTS R ESER VED.
 Loading...