

Page 1

XL4 user manual
1
Page 2

Table of Contents
Safety Information ....................................................................................................3
Appearance and Key Function..............................................................................5
Introduction ................................................................................................................6
Call Functions ...........................................................................................................8
Contacts ....................................................................................................................10
Messaging ................................................................................................................13
Internet Browser .....................................................................................................14
Bluetooth ..................................................................................................................16
Camera ......................................................................................................................17
Gallery .......................................................................................................................19
Music..........................................................................................................................20
2
Page 3

Sound Recorder ......................................................................................................22
Alarm Clock ..............................................................................................................23
FM Radio ...................................................................................................................24
Settings .....................................................................................................................27
Storage ......................................................................................................................31
Safety Information
Please carefully read the terms below:
Use Safely
Do not use your mobile phone where it might cause danger.
Transportation Safety
Please observe all transportation laws and regulations.
Please drive with both hands on the wheel.
DO NOT TEXT AND DRIVE
Hospitals
Please follow limitations.
3
Page 4

Please turn off your mobile ph on e w h en n ear m edical instruments .
Airports
Please f ollow all flight safety regulations an d d o not use your phone during flight.
Toxic Chemicals
Do not use your mobile phone around fuels or ch emicals.
Explosion Hazard
Please observe relat ed lim it ations and do not use your mobile phone ar oun d an area where explos i ons
may occur.
Accessories and Batteries
Please use only Blu a uthorized accessories and batter ies.
Backup
Please rem em ber to keep a writt en r ec or d of all i mp ortant information.
Water
Your phone is not waterproof. Keep it away from water and liquids.
SOS Emergency Calls
Make sur e you r m obile phone is switc h ed on and in a se rvice area. In home screen, tap the phone key
and dial 911 and send.
4
Page 5
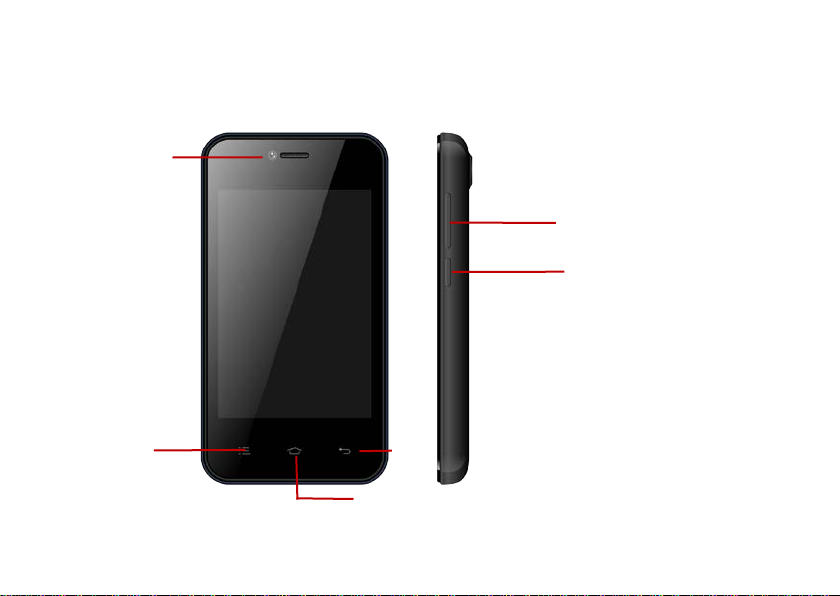
Appearance and Key Function
Front
Camera
Volume
Power
Menu
Back
Home
5
Page 6
Flash
Speaker
Introduction
Installation of the SIM Card
Please install the SIM card before using you r phone.
6
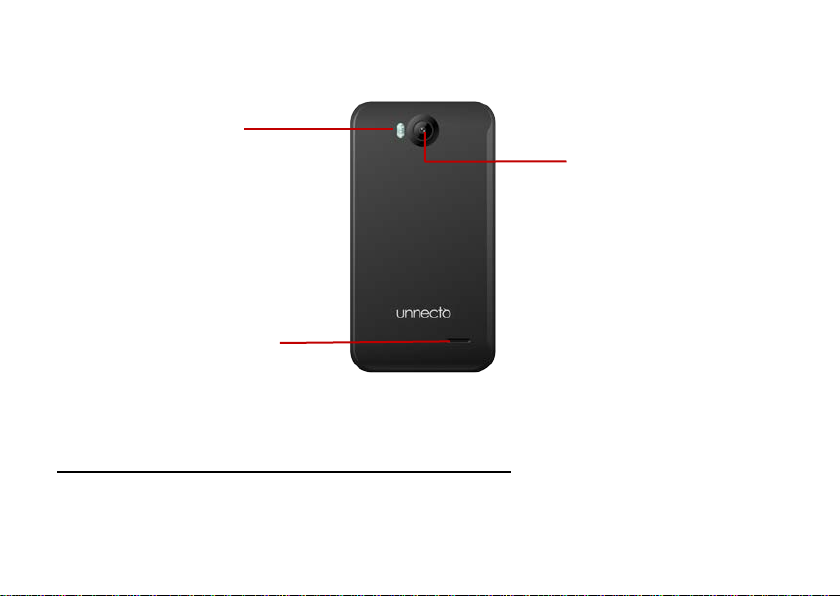
Rear Camera
Page 7
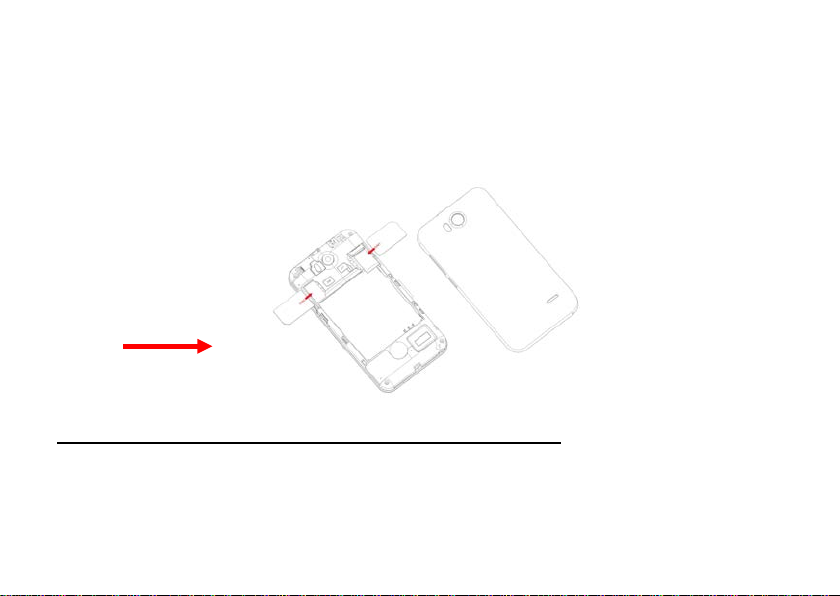
SIM Slot(s)
Note: Please keep the SIM card out of the reach of children. The SIM card and its contact are easily
damag ed du e to sc ratching or bend in g. P l ease be cautious when carrying, ins t alling or taking out the
SIM card.
To insert SIM card(s):
1. Switch off the mobile phone and remove the rear cover .
2. Inse rt the SIM card(s)
3. Replace the rear cover of the mobile phone and power on.
Power On and Off
On - Please ensure the SIM c ard has been properl y ins erted into the phone. Long press the Power key
to switch on t h e ph on e on.
Off - In standb y m od e, l ong pr ess on Power key until an options menu app ear s . S el ect OFF in the
7
Page 8

menu and confirm
Password Lock
You may set a screen unlock picture or a PIN code lock as a security measure. For further information
regard in g p assword locks, password revisi on an d other functions pl ease enter the s ecur ity settings of
the phone.
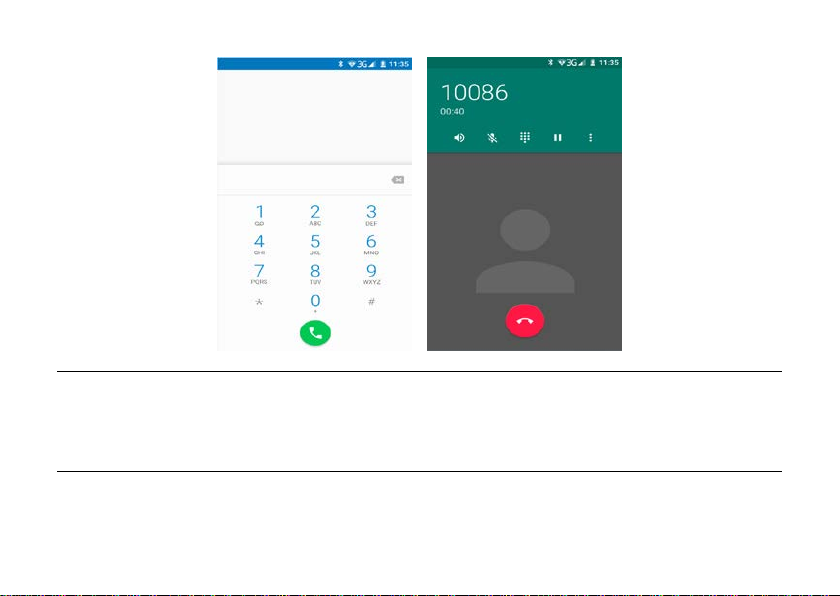
Call Functions
At the dial keyboard, enter the phone number and then click the dial key. You may choose which SIM
card the c all wi ll b e placed on. If dialin g an ext ens ion, you may clic k th e dial pad icon in the bott om of
the screen to open the interface and enter the number of the extension. You may also ent er an inp ut
number and call contacts through speed dial.
8
Page 9
Call Logs
Every telephone number called and received will be saved in the phones call log. There will be an
indicator in the call logs that will display SIM1 or SIM2. All numbers in the call log can be dialed directly
by clicking the dial ico n on the right side of the screen. When the number appears on the list, click it to
view details.
Proximity Sensor
The proximity sensor de termines how far away an object is from the device. During the call or when you
place the phone close to the ear , the backlight will turn off automatically which conserves battery and
9
Page 10

prevents inadvertently touching.
Contacts
Enter: Click on the applications menu and select contacts
• The default dis p lay is the phone contacts and SIM card c ont acts
• The contacts are organized alphabetically by default.
10
Page 11
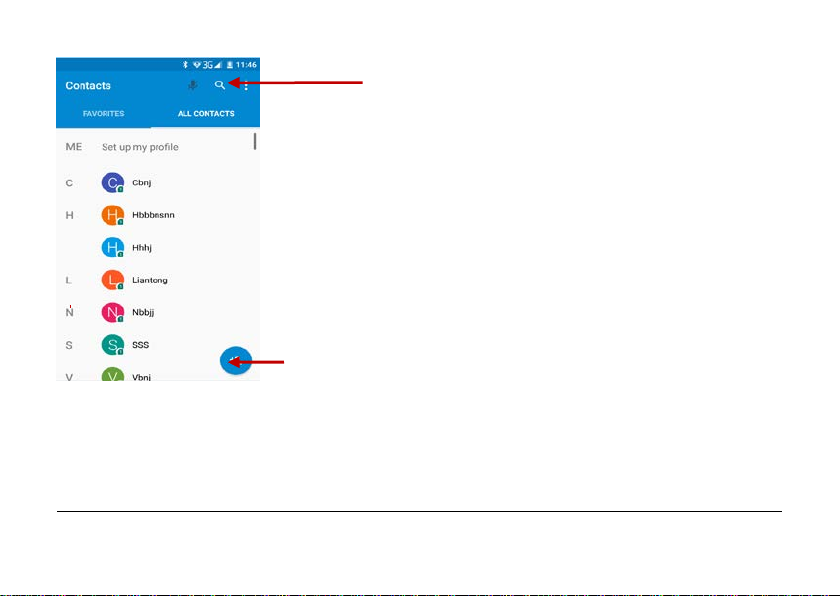
Add Contact
Search
Click the Search icon to enter the contact search interfa ce.
• Any numb ers or letters associated with any of the cont act s saved in the list will be shown in
the search results.
• If there were no matches for the inputted contact, the interface will display no contacts found.
Add New Contact
11
Page 12

1. Click “Add Contact” icon
2. Select to save contacts to phone or SIM card
3. You may edi t c ontact picture, n am e, tel ep hone number, gr oup, address, an d em ai l am on g ot h er
options
4. Click to finish and save contact.
12
Page 13

Messaging
You may use this function to exc h ange text mess ages and multimedia m essages with your fam il y and
friends. The messa ges to and from the same contact or phone number will be saved into a single
conversation so you may see the entire message history conveniently.
Send an SMS
Application Menu » Messaging » New message
(or use shortcut icon)
1. Click to enter recipient (You may enter contacts from contact book or enter a new number)
2. Compose Message
3. Send
Send an MMS
When creating messag e, the default mess age s tyle is SMS. The mes s ag e wil l automaticall y c on ver t t o
MMS when adding an attach ment.
1. Click the “+” icon in the messaging interface.
2. Chose to add attachm ents .
13
Page 14

Internet Browser
Menu Functions
Backward
• After brows i n g through multiple pages, this option will return the user to the previous page.
14
Page 15

Forward
• After brows i n g through multipl e pag es , t his op ti on w il l m ove to a web page after the current
page.
Windows
• You may view all windows open by clicking the windows icon in the upper right part of the
browser.
Bookmarks
• Click the Bookmarks option to make the current URL as a saved Bookmark.
• Click Book m ar ks t o open ed saved bookm arks .
More
Find on page: Search current page.
Share page: Select to share the current page.
Save for offline reading: Saves page for offline reading.
Page inf o: Dis play page addr ess and other information of the current br ows i ng
History: Show your browsing history and view the most visited pages.
Settings: Contains a variety of browser settings.
15
Page 16

Browser
Bluetooth
Bluetooth is a short-range wirel es s c omm un ications techn ology that devices can use to exch ang e
inform at i on an d c onn ec t to different types of d evices which inclu d e headsets, car kits, an d ot h er
devices.
Power on Bluetooth
1) Settings » Wireless & Networks » Bluetooth and select to power on Bluetooth.
2) The Bluetooth icon will appear grey in the
phone will start to scan for all devices within range.
3) In Bluetooth settings all the devices found will displayed in the list under the icon.
in the notificatio n bar. Click “scan for devices” and the
16
Page 17

Note: The maximum detect ing time of the phone is 2 minutes.
List of avai l abl e
devices
Camera
Camera
Prior to use: Install memory card before using the camera or video camera. All photos or videos taken
17
Page 18

by the phon e are s tored in the mem or y c ar d.
Open Camera
1. Applications Menu » Camera
2. Switc h to video mode if you w ant to record videos.
Note: You may also place a camera shor tc ut on any of the screens
Take photos
1. In the All Apps screen, touch the Camera icon to open the camera.
2. Tap the icon to take photos after the view is satisfactory.
To view it, slide the screen to the left or just tap the picture in the right corner of the screen.
Record video clips
You can use icon to change from Camera to Camcorder or vice versa.
Tap the icon to start recording and touch the icon to end.
After a video is recorded, you can slide the screen to the left or touch the frame in the corner to view the video.
Camera settings
On the camera screen, touch the icon, and then touch to set GPS location info, Exposure, Color effect,
Scene mode, White balance, Image properties and Anti-flicker. Touch
capture, Face Detection, Smile shot, HDR, Auto scene detection, Self timer, Continuous shot, Picture size and
Preview size, ISO, Face beauty. Touch
quality.
to set EIS, Microphone, Audio mode, Time lapse interval and Video
18
to set Zero shutter delay, Voice
Page 19

Touch the icon to change to the back or front camera.
Camera Options
Select from
Camera or Video
Gallery
Open Images
Applications Menu » Gallery
Share Pict ures
19
Page 20

You may share pictures by sending them through Gmail or the E-mail appl ication. You may also send
pictures through the MMS m essage function b y c omp os in g a m essage and attachi ng the picture. Any
image can also be sent via the Bluetooth function by selecting Bluetooth equipment that has been
paired.
Adjust Image
Press Menu and Edit to adjust images
Edit light : Fi ll Light, Highlight s , Sh adows, Aut o-Fix.
Edit i mage effec ts: Cross-process, Posturize, Logo, Documentary, and Fish Eye.
Color Effects: Warmth, Saturation, B&W, Sepia, Negative, Tint, Duo-tone, Doodle.
Crop: Crop, Red Eye, Straighten, Rotate, Flip, Sharpen.
View Images
In the picture interface, click on an album to view images
You can choose to display small or large thumbnails. In the photo album, scroll the picture towards left
to view the next picture or towards right to view the previous one.
Crop Pictures
1. If you want to adjust the size of the picture, use the crop tools. Once t h e arr ow appears, pinc h you r
fingers in or ou t to adjust the size.
2. If you want t o adj ust the image and keep its proportion, please hold dow n any of the four corner s of
the image and adj us t.
Music
20
Page 21

Open Music
Application Menu » Music
Player Options
Song Controls
Song Status
Search Music
You may choose to search for music from media folder through artist name, song name, album name.
The following formats are available: AMR, M4A, MIDI, MP3, WAV, and OGG.
21
Page 22

Sound Recorder
The Sound Recorde r can record voice or any audio.
You may send any rec or d ed au di o vi a Bl u etooth or MMS and also have the option to m ak e an y
recorded audio the phones default ring tone.
Notice: Th e rec or d er onl y uses A MR 3G P P f ormat .
Record
- K eep th e phone’s microphone near the voic e s ource.
- Click the record button to record the audio.
- Click the stop button to stop recording the audio.
All recordings will be saved in my recording folder in the default music program.
22
Page 23

Controls
Recording
Time
Recording
Alarm Clock
1. Click on the Clock icon in the ap pl ication menu
2. Click s et al ar m button and enter th e alarm clock set inter face where you m ay ad d and edit alarms
23
Page 24

Click to add, edit
or delete alarms
FM Radio
FM Radio
Through this function, you may listen to FM radio on the device. The FM radio uses the wired
headphones as an antenna in order to receive signal. Before using this function, co nnect the original
24
Page 25

equipment headphones that came with the phone.
Open FM radio
Press the FM Radio icon to open the application.
- Tap or to scan for available FM channels.
- Tap / to change the frequency by +/–0.1 MHz.
- Press the Volume Keys to adjust the volume.
- Touch to select preset list.
- Touch to switch off the radio.
- Touch to search radio channels, choose the sound from speaker and record FM.
- Touch to add to favorites/remove from favorites.
25
Page 26

Options
FM Radio as Backgrou nd
Click on the Home key to move the FM Radio program to the background.
26
Radio
Scan
Page 27

Settings
Wi-Fi / WLAN
• Wi-Fi » Wi-Fi settings » Click Wi-Fi to power on. When switched on, the Wi-Fi will
automatically search for available networks. Any unsecured network can be used directly and
any secured network requires a password or credentials prior to connection.
Bluetooth
• Press the switch to power on Bluetooth. Once on, the Bluetooth will automatically scan for
any nearb y op en equipment.
Data Usage
• Data usage and mobile data traffic limit.
SIM Management (Dual SIM)
• Select to disable the SIM card.
• Network Operators.
Wireless & Networks
• Airplane Mode
• VPN
• T ethering & Portable hotspot
27
Page 28

• Mobil e net w orks an d APN Settings
Note: When in flight mode, Wi-Fi will turn off aut om atically.
Sound & notification
This option sets the phone tone se ttings for receiving calls or notifications. Some of the settings include
• Vibrate, vol um e, r i ng t ones, ring tones n otification and haptic feedbac k ton es
Display
(a) Brightness (b) Auto rotating screen (c) Wallpaper (d) Screen Timeout
Storage
• View the SD card and ph on e m em ory usage.
• Allows the removal or formatting of the SD card.
• Allows s elec ti on of t h e d efault memory.
Battery
• General power usage
Apps
• Manag e app lications - Manage and delete installed applications.
• Running services - Press any of the se rv i ce s liste d i n the two -button operation box. Press the
‘Stop’ button to stop any of the service s listed and removes from the "running services" list.
Location
28
Page 29

• Use wir eless - Use wireless services to find locations in applications.
• When using the GPS satellite positioning, set accuracy to street level (Cancel it to save
battery).
Security
Set up screen locks: Use a pattern, PIN or password to lock the screen.
• Pattern: The first time there wi ll be simple unlock instruc tions and examples. Click “next step”
to continue the se curity pattern step.
• PIN: Enter PIN number to unlock the screen.
• Password: Set password to unlo ck the screen.
You may stop the security feature at any time.
Set up SIM card PIN lock
• SIM ca rd PIN (Personal Identification Number) is used to prev en t un a uthorized use of SI M
cards.
T o change a blocked PIN code, you will need to unlock the SIM lock then go to the Change Pa ssword
screen. The phone will automat ically prompt you enter the old PIN c od e and as k to enter a new PIN
code twice. The phone will then pr om pt you that the change was successful. If you ent er th e PIN
incorrectly three times, the SIM and PIN codes will be automatically locked. You will need the PUK code
to unlock the ph on e w hic h is av ailable throug h you r s ervice provider. If you enter the PUK code
incorrectly 10 times, the SIM card will be permanently locked. Please see your service provider for a
new SIM card.
• Password visible – Make the password visible when it’s typed.
29
Page 30

• Use se curity credentials - All ow applications to vi sit security credentials or other c redentials.
• Install from SD card - Install the encrypted certificate from SD card.
Language & Input
• Language – Change the language of the phone.
• Custom Dictionary - A dd or d el ete words to the cust om dic t i on ary.
• Keyboard Settings – (a) Haptic vibration (b) Haptic tone s (c) Capitalizing (d) Speech Input (e)
Inputting words (f) Predictive text function (g) Auto-Text (h) Input keyboard method
Backup & reset
• Backup Data – Will back up all application data, WLAN passwords, and other settings to
Google's servers
• Restore to Factory Settings - Clear all data stored on the phone.
Date & Time
• Automation - Use date and time provided by Network.
• Date and Time adjustment.
• Time Zone - Select Time Zone acc or d in g t o wh er e you r location.
• Select Date Format.
Schedule Power On & Off
• Schedul e p ow er on and off
Accessibility
30
Page 31

• Power button ends call
• Speak Passwords
• T ouch Delay
Developer Optio ns
If the phone does not display D e vel op er options, to access: Press ‘B uild nu mb er ’ seven (7) times in
the about ph one tab in settings .
• The devel op er op ti ons gives access to USB D eb ug gi ng and other devel op er options
About Phone
• You can check the inf or m ati on on status and remain in g p ow er
• You may periodically check for any software or firmware updates through the System
Updates option.
• Unlock Developer options
Storage
Connect t h e ph on e wi th the USB cable pro vi d ed. Once connected, a c onn ec t i on icon will appear in the
status bar. Slide down bar and click on connection icon. Once in the connection mode interface, select
USB mass storage and turn on from the connection screen.
31
Page 32

Some system settings and user interface (UI) options may vary depending on final SW version.
FCC Statement
1. This device complies with Part 15 of t he FCC Rules. Operation is subject to the following two
conditions:
(1) This device may not cause harmful interference.
32
Page 33

(2) Thi s device must accept any interference received, including interference that may cause
undesired opera tion.
2. Changes or modifications not expressly appr oved by the party responsible for compliance could
void the user's authority to operate the equipment.
NOTE:
This equipment has been tested and found to comply with the limits for a Class B digital device,
pursuant to Part 15 of the FCC Rules. The se limits are designed to provide reas onable protection
against harmful interference in a residential installation.
This equipment generates uses and can radiate radio frequency e nergy and, if not installed and used
in accordance with the in st ruc tions, may cause harmful interference to radio communications.
However, there is no guarantee that interference will not occur in a particular installation. If this
equipment does cause harmful interference to radio or television recepti on, which can be deter mined
by turning the equipment off and on, the user is encouraged to try to correct the interference by one
or mor e of the fol lowing measures:
Reor ient or re locate th e r eceiving antenn a.
Increase the separation between the equipment and receiver.
Connect the equipment into an outlet on a circuit different from that to which the receiver is
connected.
Consult the dealer or an experienced radio/TV technician for help.
33
Page 34

SAR Information Statement
Your wireless phone is a radio transmitter and receiver. It is designed and manufactured not to
exceed the emission limits for exposur e to radiofrequency (RF) energy set by the Feder al
Communications Commission of t he U.S. Government. These li mi t s are part of com prehe nsive
guidelines and establish permitted levels of RF energy for the general population. The guidelines are
based on standards that were developed by independent scientific organizations through periodic
and thorough evaluation of scientific studies. The standards include a substantial safety margin
designed to assure the safety of a ll persons, regar dless of age and health. The expos ure standard for
wir e less mobi l e phones em ploys a unit of measurement known as the Specific Absorption Rate, or
SAR. The SAR limit set by the FCC is 1.6 W/kg. * Tests for SAR are conducted with the phone
transmitting at its highest certified power level in all tested frequency bands. Although the SAR is
determined at the highest certified power level, the actual SAR level of the phone while operating
can be w ell below t he maximum value. This is because the phone is designe d t o operate at multiple
power level s so as to use only the powe r required to reach the network . In general, the closer you are
to a wireless base station antenna, the lower the power output. Before a phone mo del is av ail able for
sale to the pu bli c, it must be tested and certified to the FCC that it does not excee d the limit
established by the government adopted requirement for safe exposure. The test s are performed in
positions and locations (e.g., at the ear and wor n on the body) as required by the FCC for e ach
model. The highest SAR value for thi s model phone when tes ted for use at the e ar is 0.759W/Kg
and when worn on the body, as described in this user guide, is 0.671W/Kg(Body-worn
34
Page 35

measurements differ among phone models, depending upon available accessories and FC C
requirements). The m aximum sca l ed SAR in hotspot mode is 0.795W/Kg. Wh il e there may be
differences between the SAR levels of various phones and at various positions, they all meet the
government requirement for safe exposure. The FCC has granted an Equipment Aut horization for
this model phone with all reported SAR levels evaluated as in compliance with the FCC RFexposure
guidelines. SAR information on this model phone is on file with the FCC and can be found under
the Display Grant section of http://www.fcc.gov/ oet/fccid after searching on
FCC ID:
O55XL442A Additional information on Specific Absorption Rates (SAR) can be found on
the Cellular Telecommunications Industry Asso-ciation ( C TIA) web-site at
http://www.wow-com.com. * In the United States and Canada, the SAR limit for mobile phones
used by the public is 1.6 watts/kg ( W/kg) averaged over one gram of t issue. The standard
incorporates a sub-stantial margin of safety to gi ve additional protecti on for the public and to
account for any variations in measurements.
Body-worn Operation
This device was tested for typical body-worn operat ions. To comply w ith RF exposure requirement s ,
a minimum separation distance of 15mm must be main ta ine d between the user’s body and the
handset, including the ant e nna. Third-party belt -clips, holsters, and simila r ac cesso ries us ed by this
device should not contain any metallic components. Body-worn accessories that do not meet these
requirements may not comply with RF exposure requirements and should be avoided. Use only the
35
Page 36

sup plied or an approved a ntenna.
36
 Loading...