

Page 1
1
Page 2

U
Y
i
a
Y
e
A
M
S
c
g
y
a
s
u
d
N
Y
O
i
s
eff
s
UNONU
Statement
Getting to
Switching
Touch Scr
Using a M
Getting St
Charging
Desktop
Lock Scre
Installed
Desktop
Managing
Clock
Installing
Browser
Calendar
Camera
Calculator
Sound Re
Email
File Mana
Wi-Fi
Music
Video Pla
Settings
FAQ
Device Sp
Battery m
Important
T7010 User Man
s, Disclosures an
Know Your UNO
our Tablet On/
een
cro SD Card
rted
our Device
n
pplications
enu
Applications
oftware Online
order
er
er
ecifications
nagement
afety instruction
al
Precautions
U UT7010 Tabl
and certificat ion
3
t
5
5
5
6
6
7
9
9
10
11
11
13
14
16
16
17
18
18
18
21
22
22
24
24
29
30
31
32
2
Page 3

u
o
a
d
d
n
e
m
d
d
e
m
e
e
e
r
c
e
u
d
h
z
o
e
a
m
o
a
u
o
t
d
e
e
e
a
f
b
s
b
a
N
n
g
h
n
s
f
D
q
f
a
n
s
p
m
t
k
a
a
m
t
g
t
o
o
e
c
s
u
r
n
y
Statement
Thank yo
invite you
you can c
For additi
Warnings
− Plea
prod
− Avoi
− Avoi
low
mag
− If cl
wipe
che
− Avoi
acci
− Exc
per
− Plea
acc
viola
− Plea
deal
− If th
no r
othe
ope
Statement
− Spe
− Whil
man
s, disclosures an
for purchasing t
to read the instru
onfigure and utili
nal information y
nd Precautions
se do not disass
uct.
any heavy imp
using this prod
temperatures,
etic fields, and/
aning is necess
the outer shell
ical cleaning sol
placing this pr
ental spillage on
ss use of hea
anent hearing im
se only use
ssories with this
te the warranty r
se follow the rel
with obsolete pro
product becom
sponsibility for
r files. Please
ation and timely
s and Disclosure
ifications are su
the utmost c
al neither UNO
precautions
is innovative tab
ctions contained
e all the functio
u can visit us at:
mble; this is a hi
ct or collision wit
uct in the followi
oist or dusty
r long term expo
ry, only use a so
of the product.
tions.
duct near any li
o or into the prod
phones at high
pairment.
permitted batte
product; use o
gulations and m
vant local enviro
ducts and acces
s faulty at any
ny loss of data/
ollow the user
ackups.
ject to change wi
re has been ta
U, nor any other
let from UNONU.
in this user manu
s of your new t
unonumobile.co
hly precise elec
this product
g conditions: hi
environments, s
ure to sunlight.
t moist cotton cl
o not use any
uids in case th
uct
volume may
ries, chargers,
any other type
y be dangerous.
mental regulatio
ories.
oint, Unonu ass
usic/video and/o
manual for sta
hout notice.
en in producing
ffiliated compan
We
al so
blet.
ronic
h or
rong
th to
ther
re is
ause
and
will
ns to
mes
any
dard
this
,
3
Page 4

u
d
e
O
g
e
a
o
e
x
o
c
o
o
r
u
c
w
O
s
e
O
r
e
e
d
n
N
A
w
d
n
i
p
n
n
g
o
n
o
o
s
a
m
e
r
t
T
s
c
r
m
e
f
m
t
r
o
a
u
l
ass
me responsibility
this
ocument.
− Scr
− UN
en captures pre
purp
oses, actual scre
NU and the UN
Swa
resp
− Alw
ys remember to
resp
− Plea
− Alth
se read the op
acc
ssories supplie
une
pected damage.
uct is used with i
prod
ugh the latest ve
products manu
the
spe
ifications, UNO
perf
rmance of the
and/
− The
− We
− UN
e may be slight
this
manual and the
acc
rate.
annot be respo
soft
are and/or anyth
NU cannot sup
offer
user
may download, i
tek, Inc. Othe
ctive owners.
nsibility for any
r any errors/soft
any support for
for any mistak es
ented in this ma
ns may vary.
NU logo are re
trademarks are
back-up importan
rrors with this pr
rating instructio
with the pr
Warranty cann
compatible acce
rsion of Android
facturing is co
U assumes no
ndroid softwar
are bugs/softwa
iscrepancies be
actual product.
sible for any act
ng else that is co
ort the Android
any Android ba
stall, and/or pur
or errors contain
ual are for refe
istered trademar
the property of
t data; we assu
duct
s carefully. Us
duct to avoid
t be honored i
sories.
vailable at the ti
patible with
responsibility fo
supplied by G
e failures.
ween pictures/d
he actual prod
of downloading i
nsidered illegal.
Operating Syste
ed software tha
hase.
ed in
ence
ks of
their
e no
the
any
the
e of
ablet
the
ogle
ta in
ct is
legal
m or
t the
4
Page 5
Y
a
e
c
n
o
a
k
N
f
o
o
n
w
g
s
t
w
r
o
u
e
s
d
n
n
e
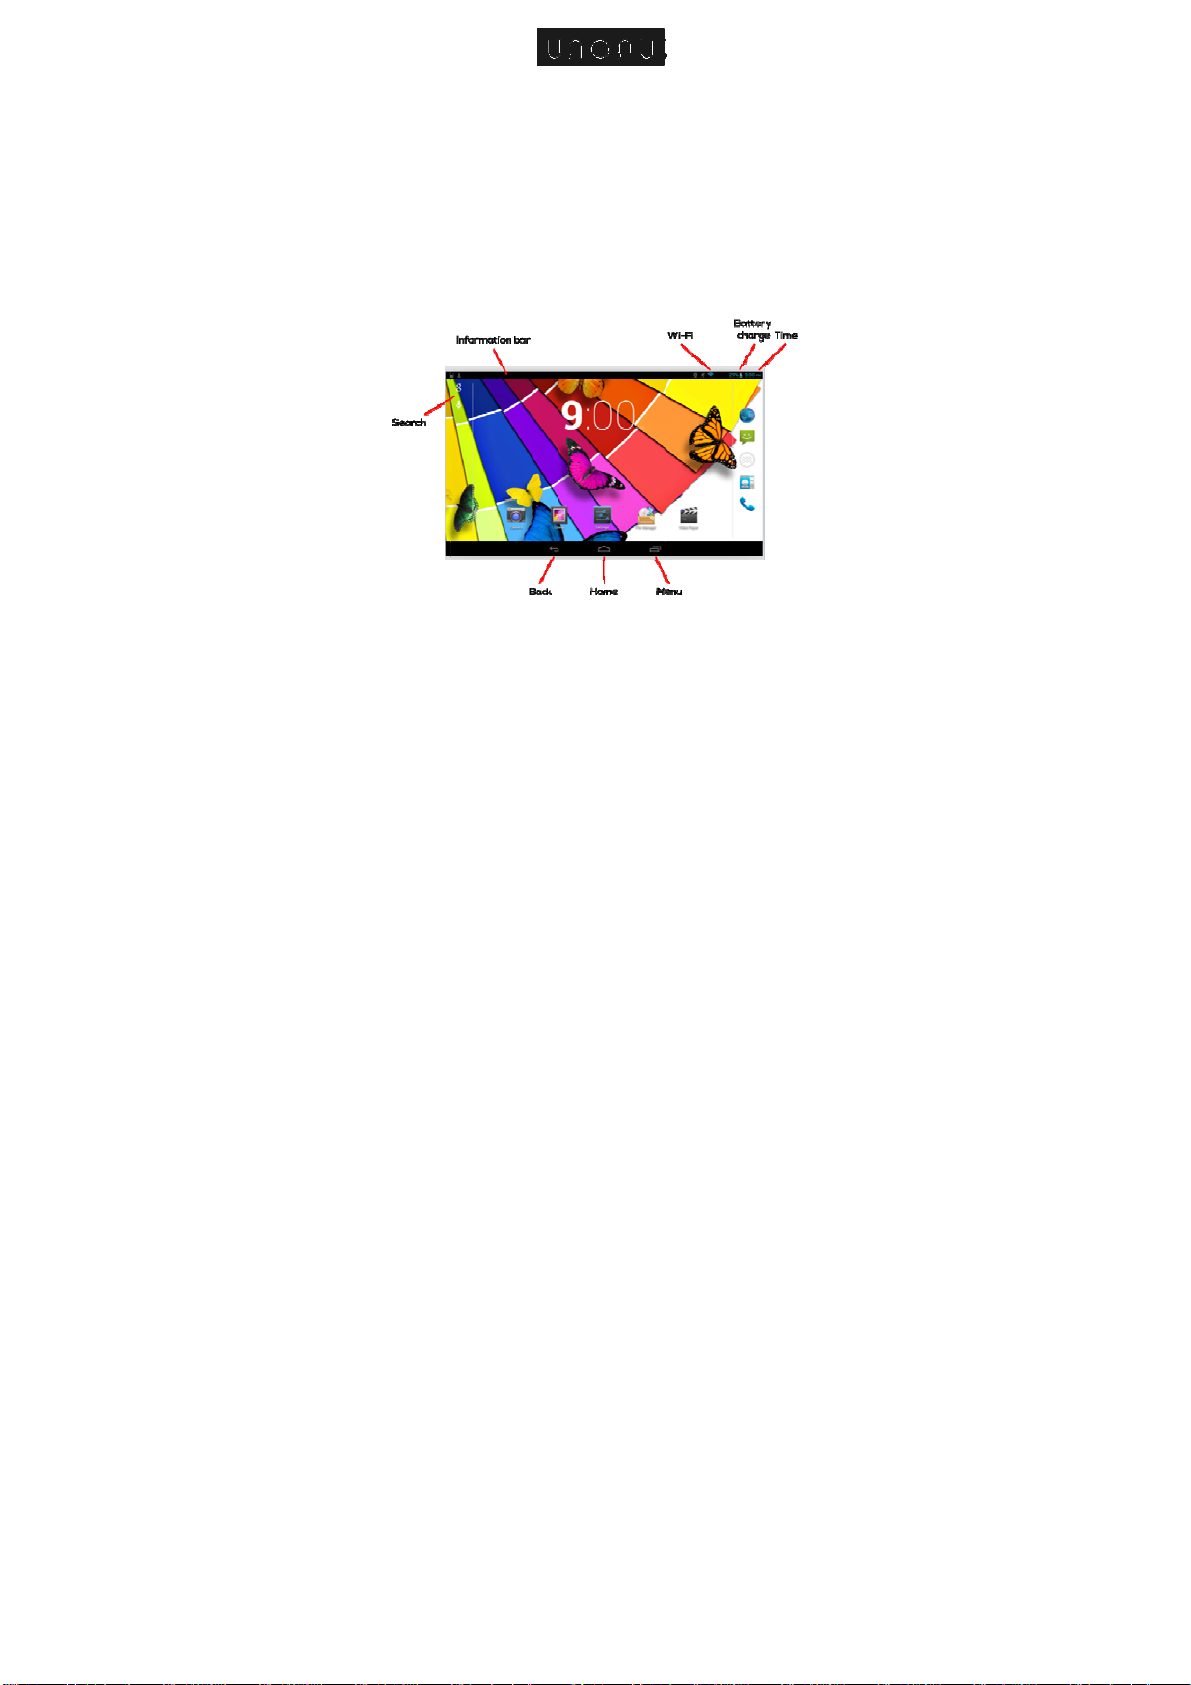
Getting to
Know Your UNO
U UT7010
Switching
To switch
wait for st
To switch
click Pow
Lock/unlo
the scree
Forced sh
the power
Warning:
system!
Touch Scr
The touch
touch scre
Single clic
our Tablet On/O
on: press and h
rtup.
off: press and h
r off → click OK.
k screen: briefly
.
ut down: if the d
switch for 7 seco
forced shut-do
een
screen is easy a
en in the followin
: briefly tap the
ld the power swi
ld the power s
press the powe
evice is not resp
ds to force a sh
n may cause un
nd convenient to
methods:
creen with your fi
5
ch for 3 second
itch for 3 secon
switch to lock/u
nding, press and
t-down.
xpected errors i
use. You can us
nger.
and
s →
lock
hold
the
the
Page 6

h
k
i
c
F
c
e
→
d
e
c
d
a
m
e
r
n
l
c
o
d
n
p
e
o
g
y
M
i
s
a
r
d
a
u
a
a
e
r
g
n
e
b
Click and
2 seconds
Drag: clic
finger, the
To avoid d
Using a M
Your devi
labeled T-
old: click the sc
.
a certain icon o
icon will move ac
amaging the scre
cro SD Card
e supports up to
lash on your tab
een with your fin
the screen and
cordingly.
en, never put an
a 32GB storage
et to access the
er and hold for
hold, then move
thing on it.
card. Locate th
icro SD slot.
bout
your
slot
Insert the
a “click” is
Removing
First, clos
Storage
finger, an
Avoid ins
this may
brand car
Getting St
Reminder
These re
of the scr
ard into the card
heard. Now the
Micro SD card
all programs
Remove SD car
simply remove it
rting and removi
ause damage to
s to ensure com
rted
icons
inder icons app
en to provide inf
slot, and push it
ard is ready for u
r files on the c
→ OK. Then p
when it is ejecte
g the card repe
the card. We s
atibility.
ar in the inform
rmation as to the
6
n with your finge
e.
rd. Click Settin
ess the card wit h
.
tedly in a short
ggest you use
tion bar along th
status of your ta
until
s →
your
time,
ame
top
let.
Page 7
D
u
+
-
t
b
u
t
c
e
y
n
S
n
D
C
m
C
C
D
w
e
1
n
/
m
m
e
e
e
a
c
r
d
e
e
s
h
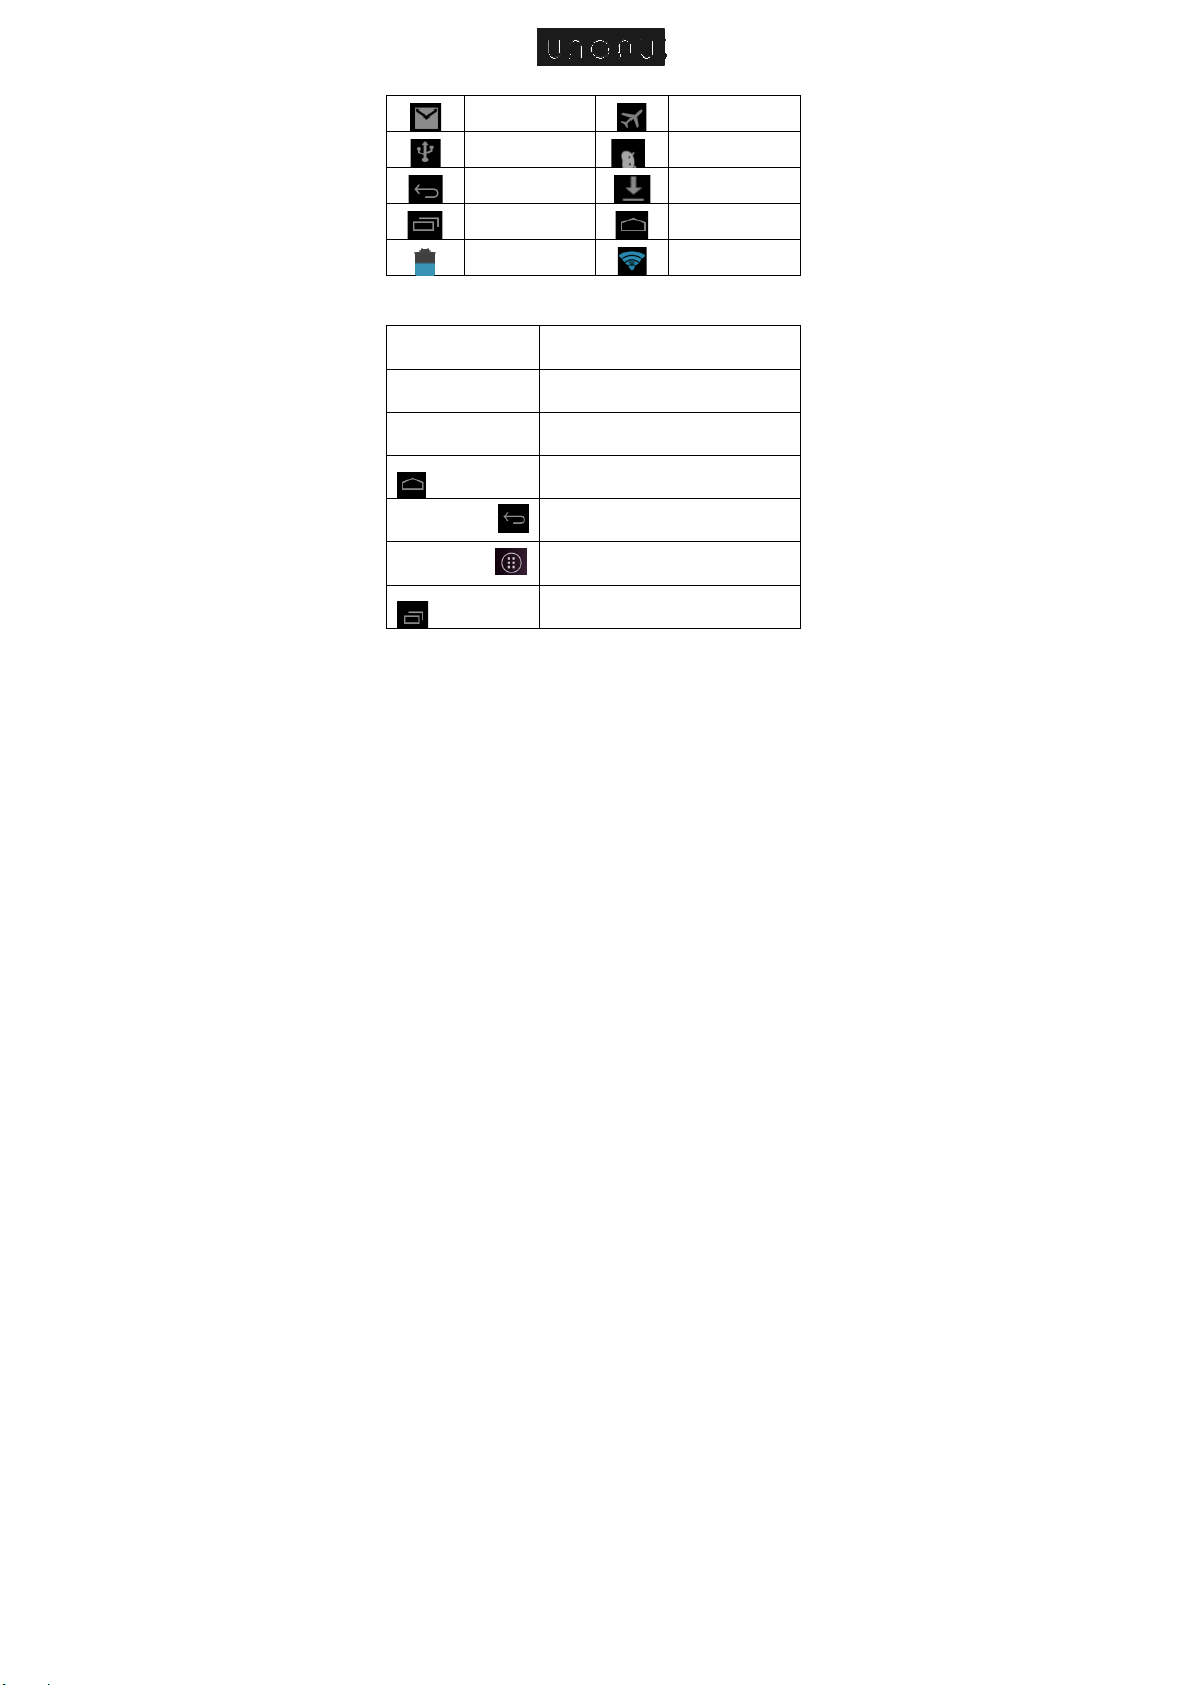
New email
USB connect
ed
Airplane Mode
USB connecte
on
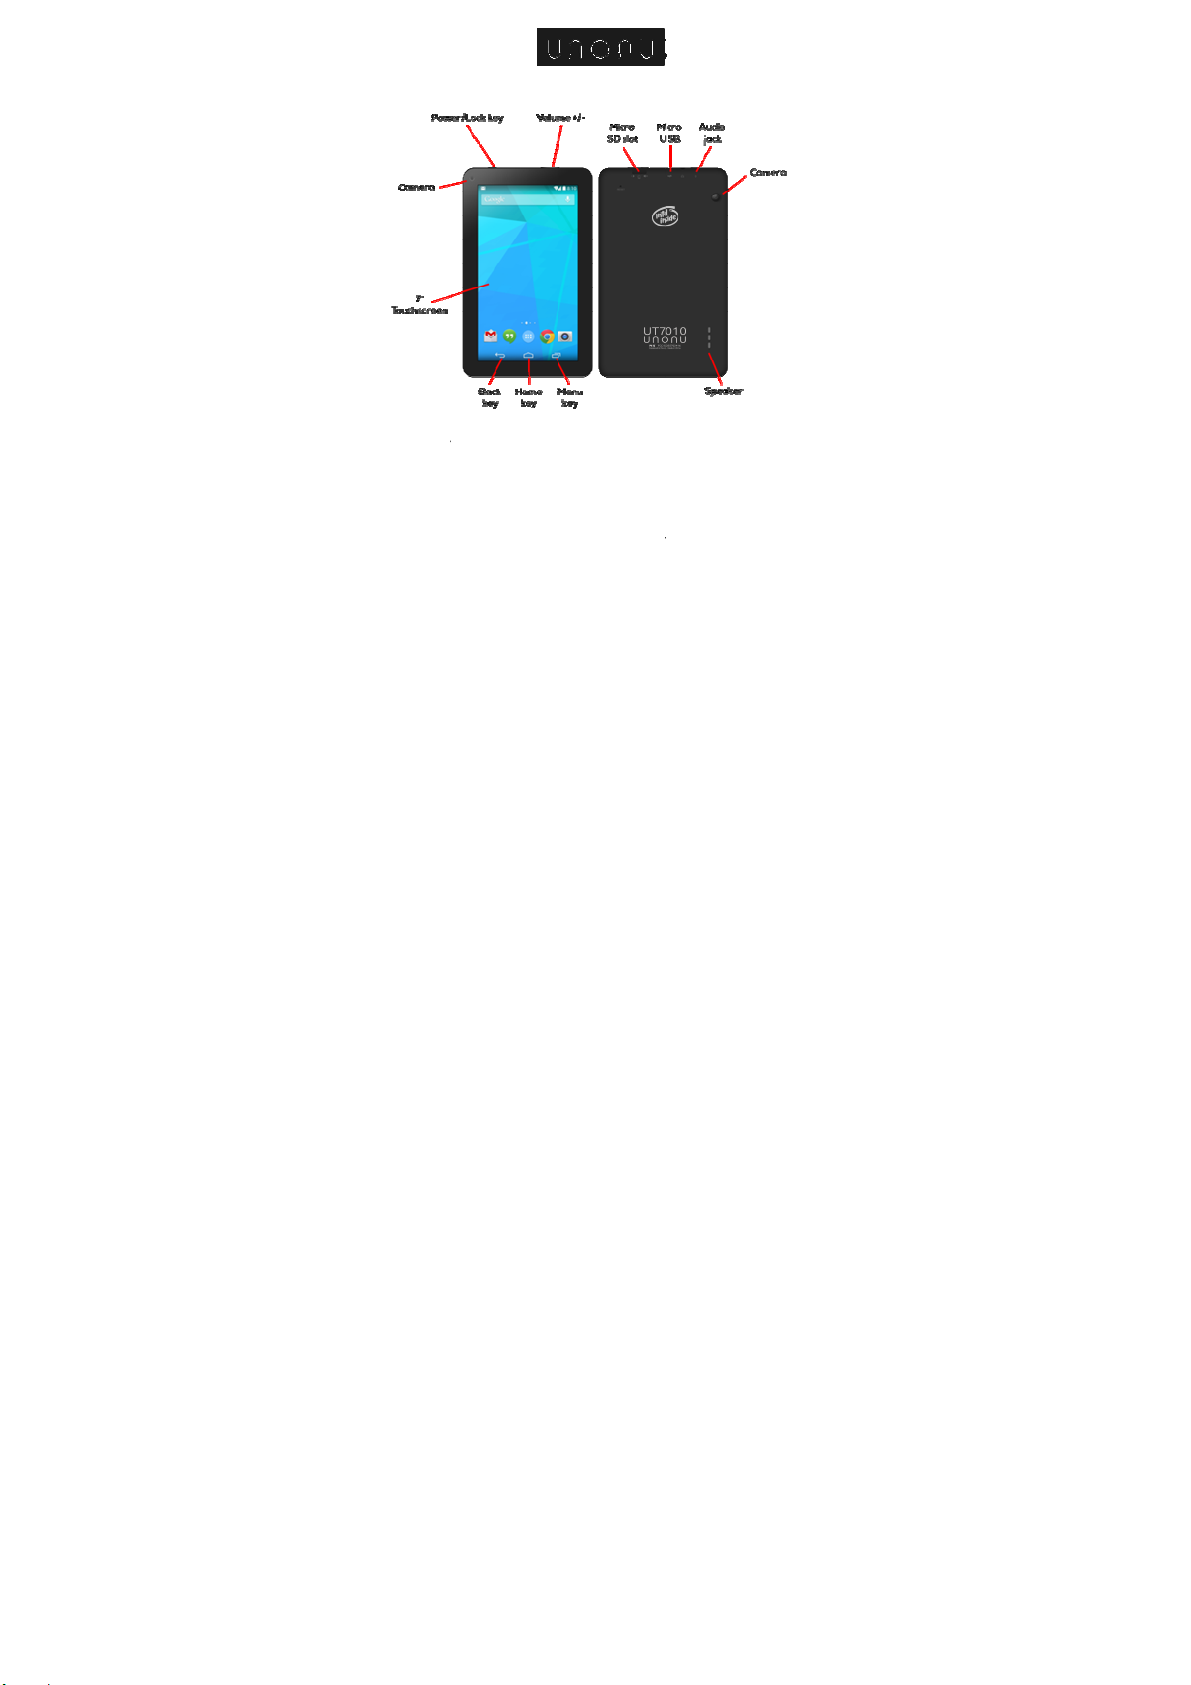
Buttons:
Power b
Volume
Volume
HOME b
Back bu
Setting
Menu b
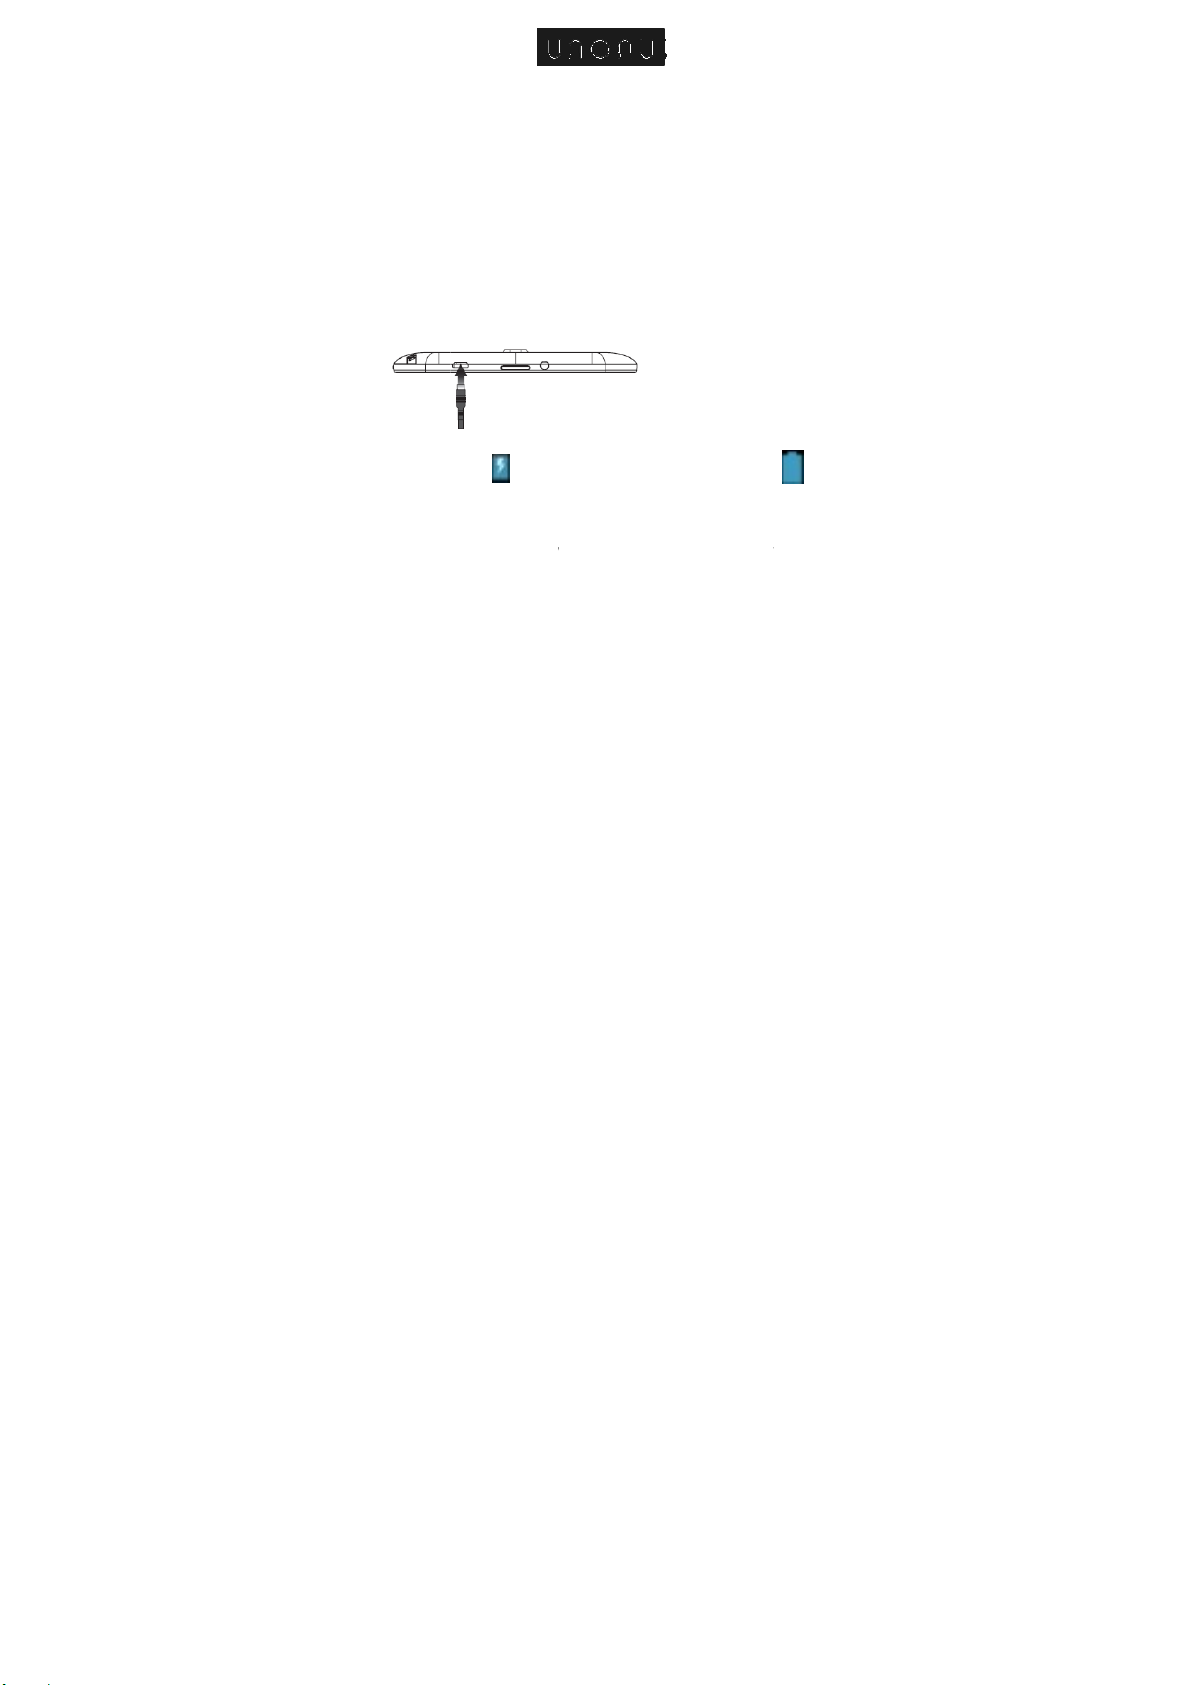
Charging
The devi
charged b
the batter
Return butto
Display
Charge
escriptions and F
tton
(up) I
(down)
utton
ton
utton
tton
unctions
ong press: turn o
L
hort press: sleep
crease the volu
ecrease the volu
lick from any scr
ain screen
lick from any scr
p
revious screen
lick to display th
isplay recently br
he device
e is equipped
fore using for th
for minimum of
ith a built-in b
first time. It is re
0 hours for the fi
Downloading
Home button
Wi-Fi connecte
/shut down
wake up
e
e
en to return to th
en to return to th
menu interface
owsed history
ttery which mu
ommended to c
st time.
d
t be
arge
7
Page 8
u
n
h
d
r
p
n
e
e
e
k
h
a
t
a
o
a
w
n
T
k
p
h
U
s
C
r
d
o
o
s
o
u
e
y
s
W
You may
the chargi
se the device w
g time.
ile it is charging
, but this may pr
long
Only use t
AC110〜2
responsibl
charging
To charge
outlet and
normal co
device).
The batte
(it will sto
Starting th
Press and
startup.
Wi-Fi setti
We sugg
new tablet
1. Click S
2. Switch
availab
to ent
networ
e authorized ch
40V 50/60Hz; ou
e for damages ca
evice or other un
device: connect
the other end to t
nditions it may t
y icon will roll
rolling), please d
e device
hold the power s
gs
st you configure
, as many functio
ttings→ Wireless
the Wi-Fi on.
le Wi-Fi networ
r the correct
.
rger provided wit
put: DC5V/2A).
used by using an
uthorized acces
ne end of the A
he Micro USB po
ke about 5 hou
during charging,
isconnect the AC
itch for 3 secon
your Wi-Fi netw
s require it to w
and Network
he device will
s. If an icon is
assword to co
the unit (input:
NONU is not
unauthorized
ories.
adaptor to the p
t on the device (
rs to fully charg
and when it is fu
adaptor.
s and wait for s
rk before using
rk normally.
earch for and li
displayed, you
nnect to that
ower
nder
the
ll
stem
your
t all
need
i-Fi
8
Page 9
e
a
t
d
e
e
F
e
e
o
m
e
n
w
c
y
h
r
v
t
c
s
3. Click t
any) →
4. Click R
If the Wiautomatic
and enter
Desktop
he desired Wi-
Click Connect.
turn to return to t
Fi network is s
lly. In this cas
he necessary inf
i network → E
he desktop.
t as hidden it
you need to cli
rmation manuall
ter the passwo
ill not be disco
k Add Wi-Fi Ne
.
d (if
ered
work
12
13 14
Click any i
Click and
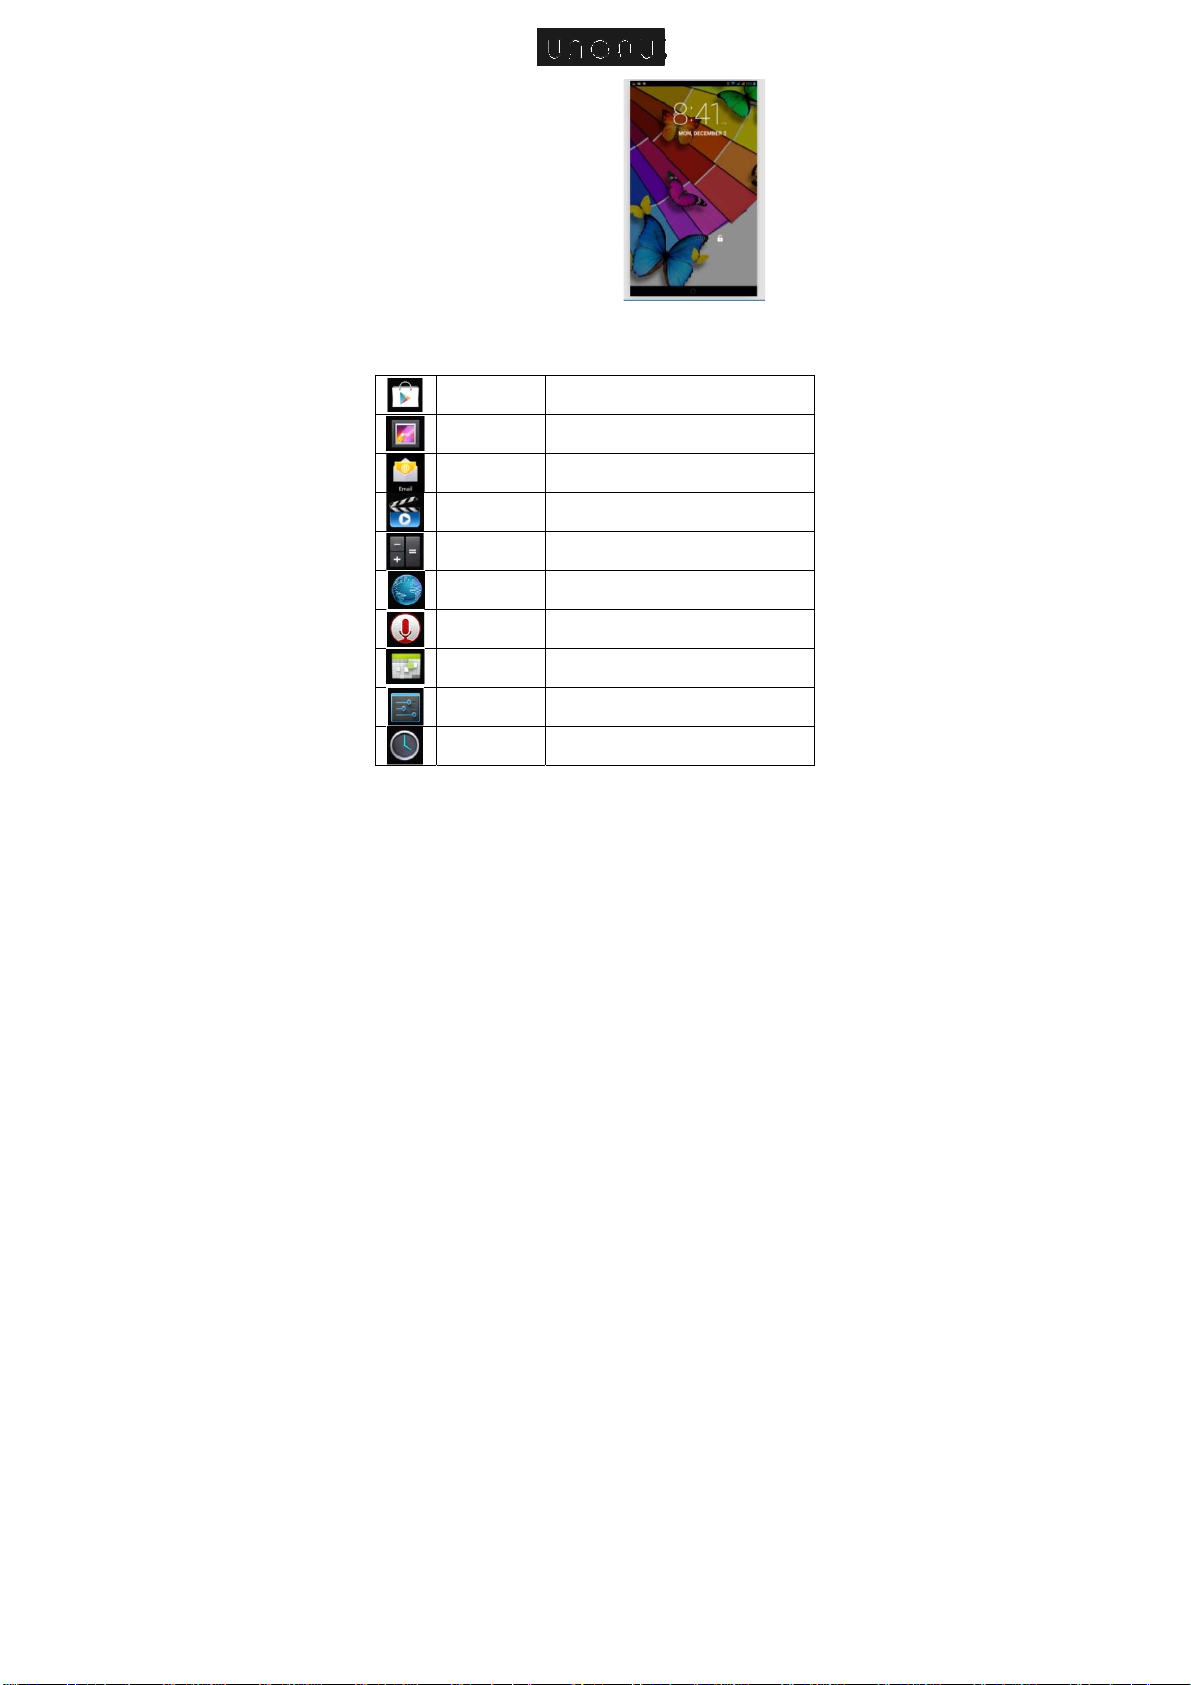
Lock Scre
You can s
the power
con to open the d
rag the icon to
n
t auto lock scre
button. The lock
ocument or run t
ove it to another
n or lock screen
screen interface i
9
e application.
location on the s
manually by pre
s as follows:
reen.
sing
Page 10
Slide to
t
S
t
A
P PEHpCBS
R C S C
o
o
D
c
V
S
a
P
F
C
R
C
a
P
V
s
e
x
b
n
t
e
t
o
screen.
and enter
Installed
he right to unl
lide to the left t
he camera.
pplications
lay Store
hoto album
ck the
unlock
ownload appli
onveniently.
iew your picture
cations easily
.
and
mail
D video
layer
alculator
rowser
ound
ecorder
alendar
ettings
lock
end and receive
ddress.
lay and manage
or arithmetic op
onnect to and e
ecord and play-
alendar for setti
gendas.
ersonalize your
iew current time
10
emails via your
your videos.
rations.
plore the Interne
ack sounds.
g schedules and
ablet’s settings.
and set alarm cl
mail
.
ck.
Page 11
S FDf C M
M
s
e
e
G
Vaa
H
T
P
e
o
e
a
o
a
n
h
a
n
b
a
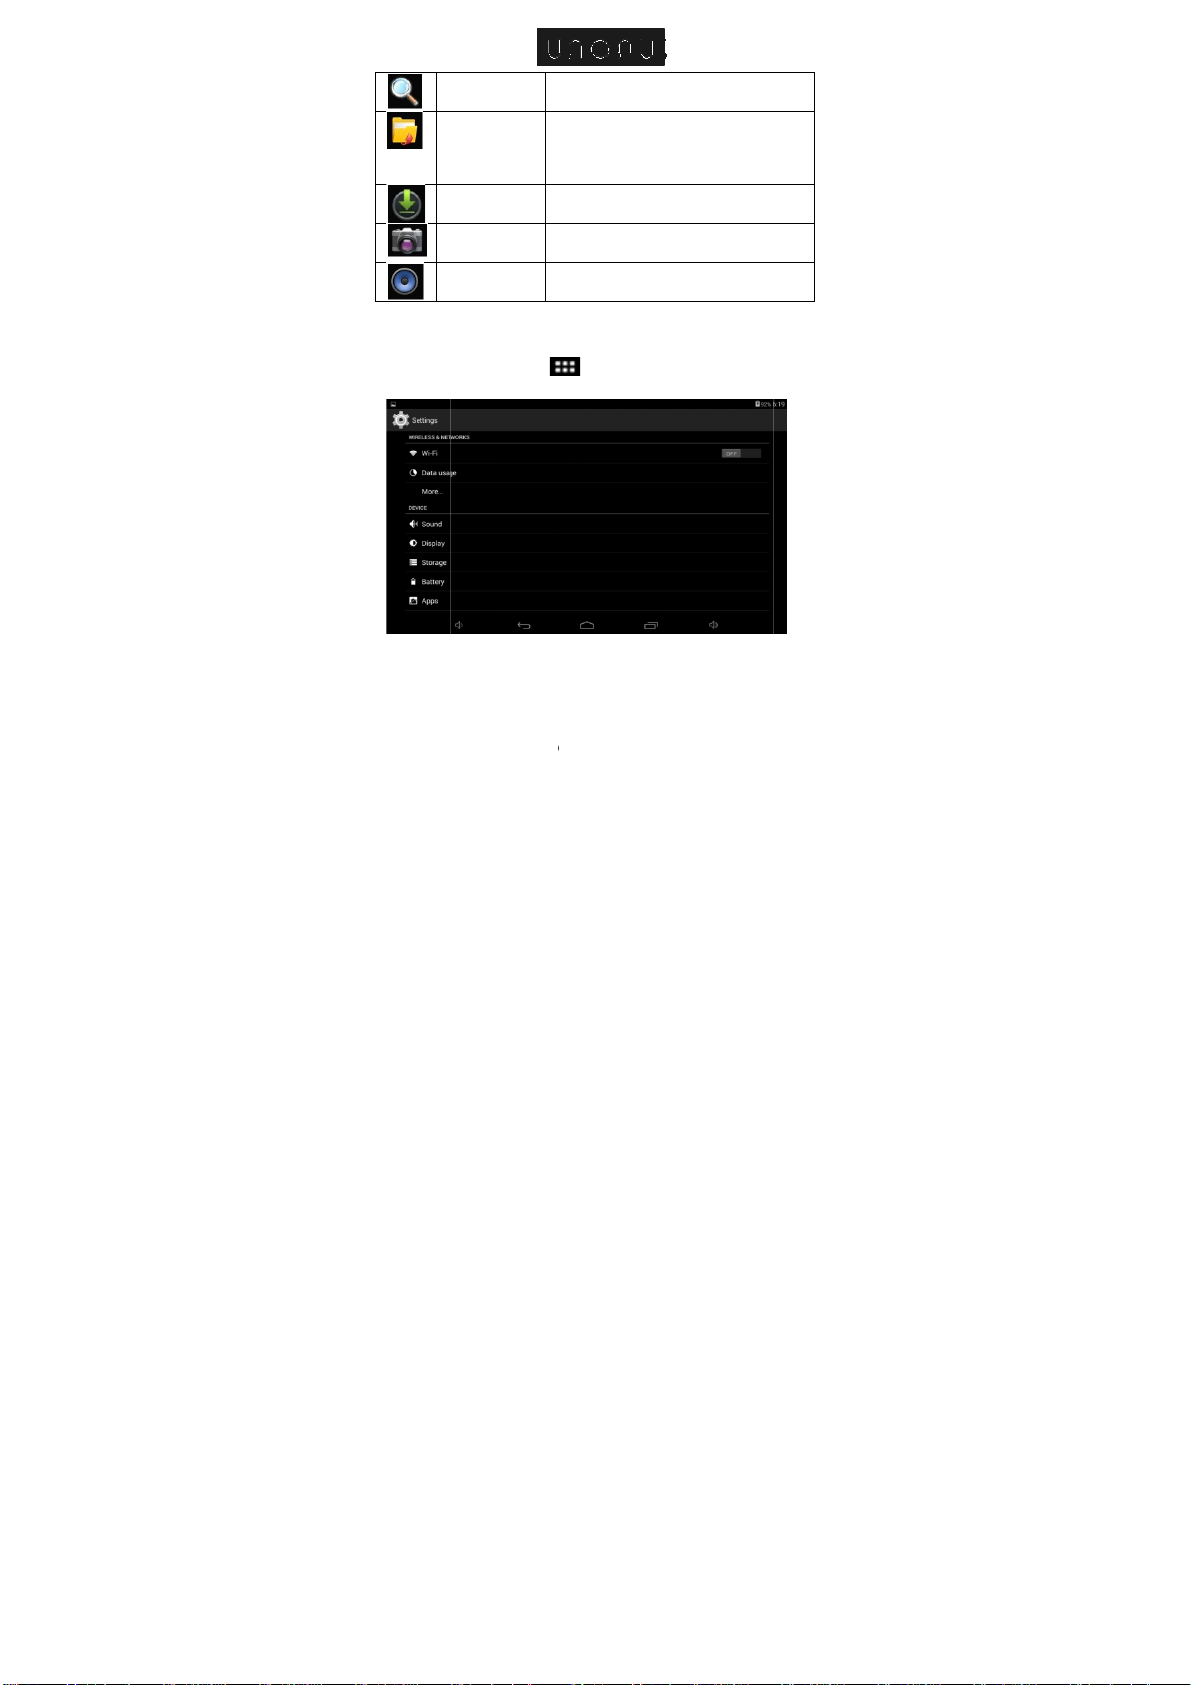
earch
ile manager
oogle search to
iew and manag
pplications. Inst
nd backup files
ls.
your files and
ll Android applic
n SD card.
tions
Desktop
On the de
You can s
Managing
Installing
You can
through th
ownloaded
iles
amera
usic
enu
ktop, click icon
lect your desired
Applications
find many inter
internet. Simply
istory of downlo
ake photos of yo
lay and manage
to display me
wallpaper from t
sting and free
open the browse
ded files.
ur favorite mome
your music files.
u functions.
e images availa
Android applic
r and search for
ts.
le.
tions
11
Page 12

A
h
y
→
t
t
h
p
O
i
c
n
t
t
a
h
o
s
n
c
a
w
v
(
d
i
r
o
a
k
l
f
e
d
u
c
o
u
a
n
“Android
Your purc
and simpl
1. Copy
disk
pplications”.
ased or downloa
installed throug
the .apk file you
insert the card
ded Android appl
the File Manage
want to install t
r connect the US
cations can be q
.
the SD card or
B disk to the devi
ickly
USB
e.
2. Click
he File Manager
3. Click
4. Selec
an .apk file → In
ning .apk files.
contai
Now t
e application is i
will a
pear on the appli
5. Click
le Browser interf
the Fi
Download
ng applications fr
You can
from the i
onveniently do
ternet to your de
1. Click
2. Enter
want
3. After
the d
Click
o install.
the application
ownloaded file
o open → Install.
Uninstallin
g an application
You can e
sily uninstall An
or
pen to run the a
Browser icon
the URL and
icon .
tall.
stalled and the
ations screen.
pplication, or clic
ce.
om the internet
nload and instal
ice.
to connect to the
click the link o
has download
in the Downloa
roid applications.
12
and find the f
pplication icon
Complete to ret
Android applic
internet.
the application
d, press and
ed Files scree
lders
rn to
tions
you
hold
) →
Page 13

t
O
c
c
e
m
C
c
S
C
C
e
o
v
y
C
→
u
e
o
h
a
a
m
k
n
n
h
o
t
M
r
o
o
f
y
a
e
o
m
o
a
p
c
P
a
c
1. Click
2. Click
3. Click
Clock
Click Clo
Alarm clo
The devic
When the
screen, it
Add alarm
→ Settings
he application yo
K to uninstall th
k icon t
supports more t
icon appe
eans at least on
clock
Applications →
want to uninstal
application.
view the cu
an one alarm cl
rs in the status
e alarm clock is a
anage Applicati
l → Uninstall.
rent date and
ck at the same ti
bar on the top
ctivated.
ns.
time.
e.
f the
1.
2.
lick Clock icon
Double click
lock.
3.
et your desired
4.
lick Activate alar
5.
lick Complete.
Stop the a
sh
to
and
larm cloc
Wh
n the set time
wing the name
alarm again 10
repeat. Click Ca
Acti
ate the snooze fe
this function whe
Use
stop
it temporarily wit
1.
In the alarm cl
ou want to activa
2.
lick Reactivate.
larm.
of the alarm. I
ature
.
Set alarm cl
clock.
is reached, a
minutes later,
cel to stop the al
the alarm is act
out deleting it.
ck interface, s
e.
13
ck→+ Add
window will po
you want the
ou can click
rm clock.
ivated but you w
lect the alarm
larm
up
lock
ause
nt to
lock
Page 14

k
C
e
C
C
C
k
S
e
a
d
i
h
y
e
o
a
a
n
d
k
→
k
o
t
o
o
u
a
u
o
p
e
r
d
e
c
h
t
m
m
v
a
o
c
c
Edit
the alarm cloc
Clic
Clock icon
1.
lick the alarm
larm clock.
a
Del
te the alarm cloc
Click .
clock you want
to edit → Edi
the
1.
2.
3.
Clic
Installing
There ar
Google Pl
onto your
Download
1. Click t
If this
ask
regist
a Go
accoun
inform
2. You c
the Fe
you wa
3. Click a
4. When
lick Clock icon
lick the alarm cl
lick to delete the
to return
oftware Online
many applicati
y website. You
evice.
ng applications
e Google Play ic
is the first time
ou to register
red account, yo
gle account.
t, simply click
tion, click Login
n select applic
atured list. Yo
nt by entering a s
application → D
ownloading com
→ Click
ck you want to d
alarm clock.
o desktop.
ns available fo
can easily and q
n .
you use this fun
and login. If
need to click
If you alrea
Login and
gain to login.
ations from the
can also sear
pecific name in t
wnload.
letes, click Instal
14
.
lete.
download fro
uickly download
ction, the syste
you don’t ha
Register to est
y have a G
nter your ac
Top Rated or
h for the appli
e search box.
l.
the
them
will
e a
blish
ogle
ount
from
ation
Page 15

w
a
n
n
c
s
o
e
m
e
e
h
w
p
s
m
o
c
u
Y
e
c
w
o
o
t
o
n
w
L
5. Click
return t
Record
When do
installed
applicatio
applicatio
Menu fun
Click to di
Personal f
Click to vi
change e
icon at th
account.
About
Display th
Open to run t
o Google Play.
nloading com
pplication. You
or view other u
s.
tion
play the menu fu
lder
w personal infor
ail address and
top right corner
version and sup
e application,
letes, click Re
can submit yo
ers’ comments.
nctions for Googl
ation. You can
save your pass
of the personal f
port information f
r click Comple
ord to manage
r comments t
ou can also uni
Play.
hange your pass
ord. Click the
lder to logout of
r Google Play.
e to
the
the
stall
ord,
ogin
your
15
Page 16

c
c
C
h
o
n
p
u
o
e
w
c
u
k
e
e
.
Browser
You can
Browser i
onnect to the in
on on the deskto
ternet through th
to open the bro
e browser. Clic
ser.
the
Calendar
Click the
If this is t
create an
password,
account c
Adding a
alendar icon
e first time you
Exchange acc
click Next, and
nfiguration. Now
ew activity or ev
.
se the calendar
unt. Enter you
follow the instru
you are ready to
nt
16
function, you ne
r email address
tions to complet
se the Calendar
d to
and
the
Page 17

1. From
n
t
c
t
p
t
h
s
R
n
t
n
o
e
t
a
n
a
d
o
e
t
h
t
e
.
t
m
u
k
h
r
n
f
t
w
m
h
w
add a
2. Selec
activity
3. Click C
4. Click ic
The da
Camera
Click
Menu fun
1. Press
includ
video.
2. From
3. From
video
Taking a
1. From
2. The p
3. Click
photo
4. Click
5. Click
Recording
1. Click
the calendar i
activity.
t the time of th
in the field provid
omplete.
on to selec
e with agenda is
Camera ico
tion
the Menu butt
es: Switch to vid
he camera interf
the video recordi
list.
hoto
he camera interf
oto will be save
the thumbnail
.
eturn to return t
to exit cam
a video
to switch
terface, click t
e activity → en
ed.
your desired cal
displayed in grey
.
n to bring up
o / Switch to ca
ce, click My alb
g interface, clic
ce, click to
automatically.
to enter My al
camera.
ra and return to t
o video mode to
e date you wa
er the details o
ndar interface.
he menu list,
era and My albu
m to view your p
My video to vie
take a photo.
bum to view full
e desktop.
ecord videos.
t to
the
hich
/My
otos.
the
size
17
Page 18

2. Click
e
t
R
t
c
h
d
t
s
v
t
o
o
e
a
o
e
s
e
s
o
o
u
r
e
a
t
e
o
e
o
M
s
o
3. The r
4. Click
5. Click
6. Click
7. Click
Calculator
1. Click
2. Click
3. Click
Clear
Sound Re
to start rec
corded video will
he thumbnail
eturn to return t
to switch ba
to exit cam
the Calcul
he numbers and
Clear to clear th
to clear all entrie
order
rding, click
be saved autom
to play the vide
camera.
ck to camera inte
ra and return to
tor icon.
perators to mak
entry one by
.
to stop.
tically.
o.
rface.
he desktop.
operations.
ne, or click and
hold
1. Click t
2. Click t
3. When
recor
4. Click
Email
The email
Creating a
You can
on the de
1. Click
2. In the
e Sound Record
he icon to
recording is c
ing.
he Play icon
application supp
new email acco
et-up one or mo
ice.
he Email icon
Your account int
r icon .
tart recording.
mplete, click th
to play the rec
rts POP3 and S
nt
e email account
.
rface, click Next.
18
icon to
rded sound.
TP accounts.
that you want t
stop
use
Page 19

3. Click
E
c
a
m
s
r
n
p
o
e
t
y
e
e
e
t
e
s
a
c
n
t
a
h
r
a
C
o
c
e
c
i
w
t
v
c
n
a
a
o
s
c
m
o
d
o
p
e
a
e
s
e
e
e
n
M
t
4. In the
5. Click
6. Manu
an e
addre
serve
neces
7. Optio
8. Enter
After com
email acc
there sev
Inbox
mail address op
Password option
omplete.
l setting (option
ail provider (suc
s you have ente
settings, you c
sary changes. Cli
al: enter account
the signature →
leting the set-up
unt, please con
r supports (POP)
ion → Enter your
→ Enter your em
l): the server wi
as gmail.com)
ed. However, if y
n click Manual
ck Next.
name.
lick Complete.
process, if you
firm with your e
and (SMTP) prot
email address.
il password.
ll automatically
ccording to the
u need to chang
ettings and mak
annot connect to
ail provider wh
cols.
elect
mail
e the
the
your
ther
1. Click
2. If onl
open
3. If ther
4. Click
Open an
1. From
2. If th
corre
SD c
3. If you
a. Ent
b. Cli
me
se
4. Click C
he Email icon
one email acc
d directly.
are multiple ac
the email accou
mail
he Inbox interfac
re is an atta
ponding applicat
rd.
want to reply, clic
er the reply you
k Send to send
ssage will be sa
d it, it will be dis
ancel to cancel a
.
unt is configure
ounts they will all
nt you want to
, click an email t
hment, click O
on, or click Sav
k Reply or Reply
ant to send.
he email. If you
ed but not sent;
arded.
email immediat
19
, that account w
be listed.
open → Click I
open it.
en to activate
to save it to a
ll.
save it as a draf
if you don’t save
ly.
ill be
box.
the
icro
, the
it or
Page 20

t
S
h
C
n
t
t
o
v
c
t
t
a
h
O
e
e
e
m
p
m
c
t
o
t
o
c
d
C
s
a
j
m
c
a
y
h
c
w
a
c
d
e
Compose
1. From
2. Click
3. If you
bcc, t
4. In the
5. Click
6. If se
Add a
7. When
Edit email
1. Click
2. From
3. Edit y
4. Click
Delete an
If you ha
default ac
default.
1. Click
2. From
3. Click
4. In t
accou
5. Click
an email
he Inbox interfac
end to option to
wish to cc or bcc
en enter the corr
title bar of the e
ompose email o
ding an attach
tachment.
completed, click
account
he Email icon
the Inbox interfa
ur email accoun
to return t
email account
e more than on
ount, then the n
he Email icon
he Inbox interfac
nd hold the acc
e pop up Ac
nt.
k to confirm to
, click →
nter the addres
others, click the i
sponding email
ail, enter the sub
tion to enter you
ent with your
→ Send.
.
e, click → A
settings.
the Inbox interf
e account, and
ext account on t
.
e, click → Ac
unt you want to d
ount option
elete.
ompose your em
of the Recipient.
con → Add c
ddresses.
ect of your email.
r message.
essage, click
count setting.
ce.
ou have delete
e list will becom
ount.
elete.
indow, click D
il.
and
→
the
the
elete
20
Page 21

Set defaul
t
d
a
t
t
a
a
h
g
n
1
u
d
s
t
f
e
i
e
g
n
s
o
w
c
a
e
s
o
b
m
s
i
d
d
You shoul
than one
email account
always have a
ccount, you can
efault email acc
elect which one
unt. If you have
ill be the default.
ore
1. Click
2. From
3. Click
If the def
become t
File Mana
Click
storage m
USB disk.
applicatio
Functions
UDISK1
SDCARD
Copy files
You can
he Email icon
he Inbox interfac
nd select the de
ult account is d
e default.
er
File Browser i
ediums including
You can also qu
s onto the devic
of the File Mana
Previous folder
View
Multi select
Send email
Previous folder
USB disk
Micro SD card
between a PC a
se the File Brow
.
e, click → A
ault account.
leted, the next
con to view the
: internal storag
ckly and easily in
.
er icons are as f
d your device
er to copy files
count setting.
ccount on the li
files contained
, Micro SD car
tall Android
llow:
etween a PC an
t will
n all
and
the
21
Page 22

external/in
o
r
h
i
w
c
a
c
h
l
e
s
c
m
o
n
w
S
c
r
g
u
t
u
o
s
t
m
t
o
S
m
o
→
O
3
e
e
c
A
device, y
USB disk.
The folde
name of t
disk is “ud
The follo
from a Mi
to copy fil
After, you
the files to
ternal storage
u have the opti
name of the i
e storage card
sk”.
ing example sho
ro SD card or U
es from the devi
can connect you
the desired folde
ediums. When
n of copying to
ternal storage
is “sdcard”, and
s you how to c
B disk. You can
e to the Micro
storage mediu
r.
copying files to
he Micro SD ca
edium is “Local”
he name of the
py a file to the d
use the same m
D card or USB
to your PC and
your
rd or
, the
USB
vice
thod
disk.
copy
1. Click
contai
2. Click
Copy.
3. Click i
click t
Delete a fi
Select the
OK to del
Wi-Fi
This allow
the status
Music
The musi
ned on the stora
or
nd hold the file o
on to ret
e folder you wan
e
file or folder yo
te.
you to switch y
by looking at the
player support
t
e medium.
r folder you want
rn to internal stor
to copy to
want to delete
ur tablet’s Wi-Fi
in the statu
: MP1, MP2,MP
22
display the files
to copy → click
age medium →
→ click Paste.
click Delete →
N or OFF. Che
s bar.
, WMA, OGG,
click
k
PE,
Page 23

FLAC, W
A
t
b
t
e
t
s
e
e
h
M
T
d
e
t
o
a
e
d
a
A
w
w
y
t
p
t
n
Playing yo
V, AC3, AAC, A
ur music
R, DTS, RA, M4
formats.
1. Click
2. Selec
All/Al
3. Click
4. To r
click
Click the
interface i
From this
Play/Paus
play.
Functions
New play l
1. Click s
2. Enter t
3. Click O
My music icon
the track you wa
um/Artist/Album/
o play the desire
turn to the pr
to return to
rack in the list t
the following:
interface, you c
, Next track/Pr
in the play list
ist
tting, and click A
e name of the pl
K.
.
nt to play from:
rack/Playlist/No
track.
vious screen
he desktop.
enter Music Pla
n access opera
vious track, Re
d play list
y list.
playing.
hile playing a
er. The Music P
ions such as Se
eat all and Ra
rack,
layer
arch,
dom
23
Page 24

h
h
c
h
y
,
h
t
n
/
h
A
h
J
c
r
P
o
i
e
o
A
e
e
P
uala
d
R
r
a
Rename o
Click and
New track
Click and
play list”.
Delete tra
Click and
Video Pla
The video
3GP, M4A
Supported
r delete the play l
old the play lists
old the track you
old the track you
er
player supports:
MPG, FLV, Flas
picture formats:
ist
→ click Rename
want to add to pl
want to delete →
VI, MOV, MP4,
Player.
PG, JPEG, BMP
r Delete.
ay list, → click “A
click Delete.
SF, WMV, RM,
and PNG.
d to
MVB,
1. Click t
2. Selec
All/Co
3. Click
pause
4. Click t
5. Click
Settings
Wireless
and netwo
e Video Player i
the video o
tent/My favorite/
on the screen t
play, brightness,
e picture to prev
to return to
Wi-Fi
Wi-Fi
rks
Mobil
Mute
on .
picture you
ersonal list.
adjust the vid
etc.).
ew or play in slid
list.
En
Se
network Se
A
mode M
24
want to play
o (including vol
.
able Wi-Fi.
tting
t roaming, netwo
N option.
te except media
rm clock.
from
ume,
k,
nd
Page 25

m
c
a
e
o
t
r
n
m
a
e
w
o
jalanotmo
h
t
l
cscr
athe
c
hscrbetLanthedev
omonec
n
hdisthe
jscr
e
j
e
e
d
n
r
j
r
Sound
Display
Volu
e Ad
Notifi
ation
ne
ringto
Oper
tion tone To
Scre
n lock
prom
te tone
Brigh
ness Cli
Auto
otate
n
scree
G-se
sor
inate
coord
syste
Anim
tion W
Scre
n timeout Ad
Use
ireless
netw
rk
ust volume of m
rm clock and
ification. Click an
ve the slider
, t
en click OK.
Se
lect desired
no
ification ringtone.
ne played when
se
ecting on screen.
ne played when
To
king/unlocking
lo
een.
ck and move slid
djust brightness
to
screen and click
to
onfirm.
W
en selected, the
een will switch
ween Portrait an
dscape accordi
direction of the
ice.
Us
e the different
co
rdinate system
de, which is
essary under ce
co
ditions.
ether or not to
play in animation
operation
ust the time befo
een lock.
e wireless netwo
Us
vi
w location in
dia,
d
r
of
OK
g to
tain
in
re
k to
25
Page 26

n
n
z
c
e
w
s
l
a
o
c
c
g
g
pGo
s
r
a
oaccoth
scer
s
e
s
oappele
ains
eser
e
c
p
v
psynrectim
s
r
i
e
n
c
e
d
s
e
s
h
m
Location a
security
Location a
security
Applicatio
Account a
synchroni
nd
nd
s
d
ation
Set s
reen lock Us
Visibl
pass
ord
Selec
t device
mana
ge
Use
ecurity
ntial
crede
Instal
from TF In
card
Set p
ssword Se
Clear
storage Cl
Unkn
wn source All
Mana
ge
ation
appli
Servi
e in
proce
ss
Stora
e status Vi
Devel
opment Se
Back
round Se
data
ap
lications (such a
ogle Maps).
e picture, PIN or
sword to lock sc
pa
e password is vis
Th
d or delete devic
Ad
m
nager.
All
w applications
ess to security a
een.
ble.
d
er credentials.
tall encrypted
tificate from SD
t or change cred
pa
sword.
ar all credentials
re
t the password.
ard.
ntial
and
w installing
lications supplie
by
ctronic market.
M
nage and delete
talled application
Vi
w and control th
vices in process.
.
w the space
oc
upation of the
ap
lication.
t application
elopment option
de
t whether or not t
lications will
ap
chronize, send a
eive data from ti
.
e
nd
e to
e.
26
Page 27

r
r
o
g
napp
tandGo
h
n
t
ethe
r
adat
e~ G~ Dthe
p
Aapp
t~ S
papp
h
t
d
o
n
e
k
a
e
d
u
n
f
w
a
f
Privacy
Auto
synch
onization
Back
up my data Ba
Auto
ecovery W
Rest
re factory
settin
s
Au
to data
chronization of t
sy
lication.
ck up the applica
a, Wi-Fi passwor
da
other settings t
ogle server.
en an applicatio
rei
stalled, the syst
wil
l recover the bac
tings or other dat
se
ck to clear all dat
Cli
th
device. Click R
device to, or clic
to cancel an
ret
urn to the previo
sc
een.
W
rning: the followi
a will be deleted
th
device:
oogle account.
ata and settings
system and
ap
lications.
~
ll downloaded
lications.
Th
e following data
no
be deleted:
ystem software
reinstalled
lications.
e
ion
is
m
-up
a.
on
set
k
s
g
rom
of
ill
nd
27
Page 28

u
o
/U
a
/U
o
n
o
n
p
r
T
Fcarpho
scarins
hdisRedis
r
cloc
c
aexa
mswand
atexvoi
c
.
D
U
k
S
m
n
e
i
u
w
Storage
Language
input/outp
and
t
Total
capacity,
free s
pace
Rem
ve SD
card
SB disk
Form
t SD
card
SB disk Foca
t language Se
Selec
Pers
nal
dictio
ary
Andr
id keypad Sc
Liste
ing
exam
le
Prefe
red engine Se
Voice
speed Pl
Pico
TS Pi
~
iles on the Micro
d, such as music
tos.
Di
play when an S
d or USB disk is
erted.
en a TF card or
W
k is inserted, clic
move SD card/U
k to remove the
rmat (clear) TF
d/USB disk.
lect language
ac
ording to your
ation.
d words to the us
Ad
di
tionary.
reen keypad setti
Pl
y short voice
mples.
t the voice
bination engine
co
itching between t
voice.
y speed after the
ts are converted
ce.
o TTS setting.
SD
and
SB
B
.
er
g.
for
xt
nto
Auto
Us
e the network val
to synchronize
i.e
28
e,
ith
Page 29

t
i
c
o
n
n
m
a
m
t
2
s
a
e
h
e
e
d
e
s12-
estamokerver
m
t
o
m
a
k
n
W
c
e
o
Date and
About the
FAQ
Android
Q: What
device?
A: Andro
Basic fun
Q: Do I n
A: Yes.
but y
chargi
Email
Q: Can I
emails
A: The d
may
your e
ime
Set d
Set ti
Selec
Use
time
Selec
form
device
is the Android
d 4.4 KitKat
tion of the device
eed to charge th
You need to c
u can operate t
g, always use th
use my own
?
evice supports P
ot support som
ail provider for
th
te Se
e Se
time zone
4-hour
ystem
t date
Se
Se
sy
Se
t
Vi
version that co
device before us
arge the battery
he device while
AC adaptor.
email account
OP3 and SMTP
free email acc
etails.
network time.
t date.
t time.
lect time zone.
lect 24-hour time
tem or
hour time syste
lect date format.
w status, battery
tus, legal inform
del, Android vers
nel version and
sion number, loc
es preloaded o
e?
for at least 4 h
it is charging.
o send and re
accounts. The d
unts. Please c
.
tion,
ion,
.
my
ours,
hen
eive
vice
nsult
29
Page 30

a
s
S
a
c
c
s
p
P
c
c
t
d
M
p
Y
n
c
o
l
n
T
U
G
e
,
d
m
o
N
o
o
e
Y
t
e
e
n
u
i
o
p
o
p
g
?
p
r
o
e
c
o
w
a
e
o
r
Storage c
Q: What
A: Micro
Music
Q: What
A: MP2,
Q: How
A: You
card
or USB di
Pictures
Q: What
A: JPG, J
Q: How
A: You
USB disk
Video
Q:What vi
A: MP4/
Q: Can I
A: Yes.
Q:How ca
A: You
card
the Fi
Wi-Fi
Q: Do I
Inter
A: No.
UNONU
rd
torage card does
D card up to 32
udio formats do
MP3, WAV, AAC
an I add music to
an copy the au
k then copy the
icture formats d
EG, BMP and P
an I add pictures
an copy pictures
hen copy them t
eo formats does
PEG/H264 plus
lay YouTube vid
ou can click the
I add videos to
an copy the vid
r USB disk, th
e Browser.
need an exter
et?
he device has b
T7010 Specificat
the device supp
B.
s the device sup
WMA
the device?
io files from you
to the device thr
es the device su
G.
to the device?
from your PC to
the device throu
the device suppo
ther formats.
os on my device
ouTube icon to
he device?
o files from you
n copy them t
al Wi-Fi devic
ilt in Wi-Fi conne
ons
rt?
ort?
r PC to the Micr
ugh the File Bro
port?
the Micro SD c
h the File Brows
rt?
lay videos.
PC to the Micr
the device th
to connect to
tivity.
SD
ser.
rd or
r.
SD
ough
the
30
Page 31

oOpMeExtDis
-
u
m
e
a
e
r
e
h
a
t
h
e
n
G
1
m
o
/
o
p
s
9
e
Pr
Ca
Wi
Co
M
Se
Ba
Di
W
Spec
Battery m
We sugg
using you
Many tim
following t
● Use the
● Fully ch
cessor
erating System
mory
ernal Memory
play
meras
Fi
nnectors
ltimedia
nsors
ttery
ensions &
ight
ifications are subjec
nagement
st you charge t
device.
s the useful lif
ese simple tips:
device at least o
rge the battery o
Quad-Core 1.0
Android 5.1 Loll
8GB (ROM) +
Micro SD slot (
7” Touchscreen
1024X600 Res
5MP + 1.3MP
Wi-Fi (802.11 b
Micro USB
3.5mm audio
FM Radio
Speaker & micr
Audio & Video
Photo viewer
G-sensor(3-axi
2800mAh Li-ion
191 X 109.9 X
350 g.
to change without n
e battery for at
of the battery
ce every week.
n a regular basis.
hz
ipop
GB (RAM)
ax. 32GB)
lution
g/n)
phone
layer
)
.9 MM
otice.
least 4 hours b
can be extende
fore
d by
31
Page 32

● Never
e
t
i
y
s
a
h
h
c
o
e
t
d
i
h
e
e
b
h
o
o
y
e
r
r
o
t
y
r
i
e
e
s
F
u
o
B
C
s
t
n
o
n
a
d
e
e
e
a
s
o
r
c
n
g
p
r
r
e
p
n
o
time.
● Keep th
Charging
Your dev
To charge
outlet and
may take
the
device wh
The batter
Important
Please fo
device to
● Keep t
● Keep t
● Prote
cord, d
protect t
● Pleas
Using o
● Never
needs
informat
Cleaning t
Clean the
screen, w
Do not us
This devic
condition t
keep the batte
device and the
he battery
ice comes wit
device: connect
the other end t
about 5 hours to
le it’s charging.
icon will display
afety instruction
llow the followin
void risk of fire,
e product away f
e product away f
t the power c
not step on it
he connectors of
only use the
her adaptors ma
isassemble or t
servicing vis
on.
e device
screen with car
suggest you us
any rough cloth
e complies with
hat it does not ca
ry discharged f
attery away from
a Micro US
ne end of the A
the Micro USB
fully charge the
the status in the
g safety instruc
lectric shock or i
om rain and hum
om direct sunligh
rd. When c
or place anythi
he power cord.
approved AC
cause damage.
y to repair the
t unonumobil
. To clean fing
a soft cloth (lik
or harsh chemic
CC requirement
se harmful interf
r a long peri
heat.
port for cha
adaptor to the p
port on the devi
device). You ca
tatus bar.
ions while usin
jury:
idity.
t and heat.
nnecting the
g on it. Use ca
daptor for cha
evice. If your d
.com for su
rprints or dust o
a camera lens c
ls.
and is subject t
erence.
d of
ging.
ower
e (it
use
the
ower
e to
ging.
vice
port
the
loth).
the
32
Page 33

For additi
o
r
b
e
b
A
h
e
a
e
e
O
o
l
e
o
q
n
n
a
T
o
o
t
m
A
m
e
v
e
e
e
o
m
t
e
s
e
e
h
m
h
e
u
a
e
i
o
a
s
s
y
F
u
m
d
i
t
t
contained
www.unon
For suppo
unonumo
For detail
unonumo
Made in C
ny C
approv
compli
operat
This d
Rules.
conditi
harmfu
accept
interfer
operati
This e
exposu
enviro
This tr
operati
antenn
nal information y
in the unit
umobile.com.
t contact informa
ile.com.
d warranty infor
ile.com.
HIN
anges or
d by th
nce could
the equipm
vice compli
peration is
ns: (1) Th
interferenc
any interf
nce that
n.
uipment c
re limits se
ment .
ansmitter
g in con
or transmi
u can reference
itself or you
ion visit our web
ation visit our we
odification
party r
oid the us
ent.
s with part
subject to t
is device
, and (2) t
rence rec
may ca
mplies with
t forth for
ust not b
junction w
ter.
the full user’s m
can visit u
site
b site
not expre
sponsible
r's authorit
15 of the
e following
ay not ca
is device
ived, inclu
se undes
FCC radia
n uncontro
co-located
th any o
nual
at
sly
for
to
CC
two
se
ust
ing
red
ion
lled
or
her
Note:
found t
his equipm
comply wit
nt has been
h the limits f
33
tested and
r a Class B
Page 34

digital
d
T
a
e
m
e
h
t
h
o
i
m
n
u
o
s
e
e
e
f
o
r
f
p
y
h
a
a
e
1
a
n
a
a
b
d
h
v
e
a
C
s
a
a
s
e
e
n
a
a
Rules.
reason
interfer
equip
radio fr
used in
cause
commu
guaran
particul
cause
televisi
by turn
is enco
by one
—Reor
—Incre
equip
—Con
evice, purs
hese limits
ble protecti
nce in a re
ent generat
quency en
accordanc
armful inter
nications. H
ee that inte
ar installatio
armful inter
n reception
ng the equi
uraged to tr
or more of t
ient or reloc
ase the sep
ent and rec
ect the equi
ant to part
are designe
n against h
idential inst
s, uses and
rgy and, if
with the ins
erence to r
wever, ther
ference will
n. If this equ
erence to r
, which can
ment off an
to correct t
e following
te the recei
ration betw
iver.
pment into
5 of the FC
d to provide
armful
llation. Thi
can radiate
ot installed
tructions, m
dio
e is no
not occur in
ipment doe
dio or
e determin
on, the us
e interfere
measures:
ing antenn
en the
n outlet on
nd
y
a
d
r
ce
.
34
Page 35

circuit
d
s
V
m
e
c
e
c
is conn
—Con
radio/T
ifferent fro
ected.
ult the d
technician
that to whi
aler or a
for help.
h the receiv
n experien
r
ed
35
 Loading...