

Page 1

www.swagelok.com
TUBE FACING TOOL
USER’S MANUAL
Page 2

Table of Contents
Safety Precautions and In fo rma t io n.........................................................................................................2
Identification of Components....................................................................................................................3
Setup
Installing or Relocating th e Cu tting In se rt....................................................................................4
Cutting Insert Position Chart........................................................................................................5
Collet Change and Installation.....................................................................................................7
Operation
Motor Settings for Non- G u ard e d Trigg e r.....................................................................................8
Cutting Techiniques with S p eed a n d Fe ed Ch a rts......................................................................9
Facing the Tube.........................................................................................................................10
Bench Mount Stand................................................................................................................................12
Special Adjustment Fea tu re s .................................................................................................................13
Spare Parts and Accesso rie s.................................................................................................................14
Ordering Information Collet s an d In se rts ...............................................................................................14
Assembly Drawing .................................................................................................................................15
CE Declaration of Conformit y.................................................................................................................16
Warranty Information Form....................................................................................................................17
About The Tube Facing Tool
Installing or Relocating The Cutting Insert
Your facing tool has been shipped with a cutting insert in position number 1. If you will be facing
tubing larger than 3/4 in. (18 mm) O.D. you will need to relocate the cutting insert to a different pocket.
Cutting insert life is dependent upon tube material, tube diameter, depth of cut, and operational
technique.
Collet Change and Installation
The tube facing tool cuts a wide range of diameters through the use of tube collets. Two collet halves
per size are required and must be ordered separately.
(See Chart B on page 14)
Motor Settings
The facing tool is driven by a heavy-duty industrial motor. There are three control knobs that must be
set properly to maximize the performance of the facing tool.
Facing The Tube
As you prepare to face your tubing there are some factors to consider. The method used to cut the
tubing may affect the amount of material needed to be removed. The facing tool has been designed to
allow for a random amount of material removal if finished length is not critical. You can also control
the amount of material removed if the finished length is important.
Bench Mount Stand
The bench mount stand does not require any tool to remove or secure the facing tool. The base plate
will accommodate permanent bench mounting.
Spare Parts and Accessories
Spare part and accessories can be ordered as needed through your Swagelok sales representative.
SAVE THESE INSTRUCTIONS
– 1 –
Page 3

SAFETY PRECAUTIONS
The following is a list of general safety guidelines to be considered when operating this tool.
Standard safe machining practices should always be observed when operating this tool.
Before operating this tool, read this User’s Manual completely.
Inspect tool, cord, and accessories for damage prior to operating.
Safety guards have been installed for your protection.
SAFETY GUARDS IN PLACE.
The motor should always be disconnected from the power source whenever servicing the unit or
changing cutting inserts, collets, or other components.
Refer to the operating/instruction manual for specific safety and operating instructions for the motor
included with this tool.
DO NOT OPERATE TOOL WITHOUT
SAFETY INFORMATION
WARNING!
MOVING PARTS.
parts. Unplug equipment prior to adjusting or servicing. Serious injury can occur.
WARNING!
ELECTRICAL SHOCK.
and manuals prior to operation.
Keep hands, loose clothing, and long hair away from rotating or moving
Read all enclosed safety instructions
WARNING!
KEEP DRY.
Equipment and components are not waterproof.
WARNING!
FIRE OR EXPLOSION.
or explosive atmosphere.
Do not use equipment in a combustible
WARNING!
EYE PROTECTION.
or working near the equipment.
Eye protection must be worn while operating
CAUTION!
EAR PROTECTION
the equipment for prolonged periods of time
. Ear protection may be required if operating or working near
– 2 –
Page 4

Identification of Components
2 Spare Torx® Screws
Hi/Low
Motor Setting
(For use with cutting inserts)
R/Min/Speed
Adjustment
Trigger
Spindle Feed
Handle
The following items are included
with your facing tool:
A)
Shipping/storage case with foam
B)
Facing tool
C)
Large storage case for collets and tools
– hex keys
– Torx
– bent needle-nosed pliers
D)
Small storage case for extra cutting inserts and
hardware
E)
Bench stand (optional)
®
driver
F
B
E
F)
User’s Manual
Torx is a registered trademark of Textron, Inc.
D
C
A
– 3 –
Page 5

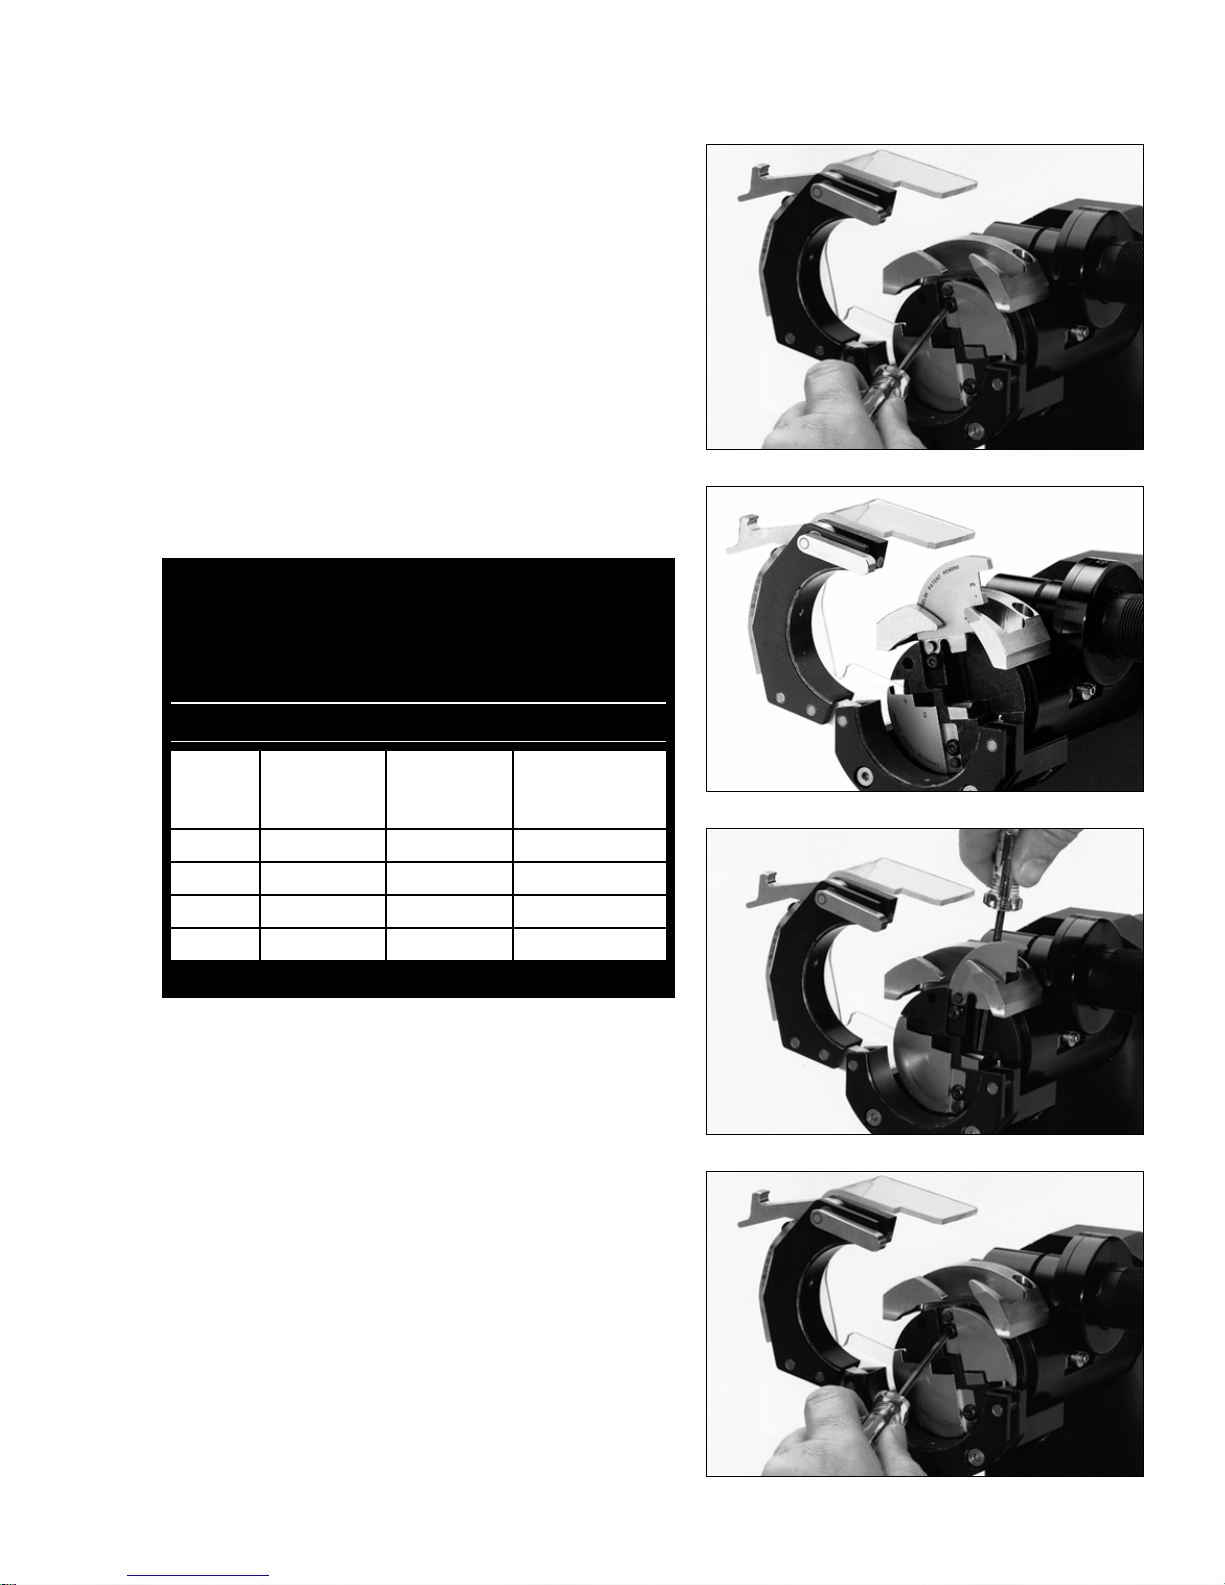
Installing or Relocating
the Cutting Insert
Make sure motor is unplugged.
To relocate the cutting insert:
1. Open top half of fixture and swing completely out of
the way as follows:
Figure-1
Lever
Chip
Deflector
a) Turn lever to 12 o’clock position.
(See Figure-1)
b) Firmly press down on top half of fixture.
(See Figure-2)
c) Release latch.
d) Swing open top half.
(See Figure-3)
(See Figure-4)
Cutting
Insert
Figure-2
Figure-3
Latch
Figure-4
– 4 –
Page 6
Installing or Relocating
the Cutting Insert
(Continued)
Figure-5
2. Loosen chip deflector Torx® screw.
(See Figure-5)
3. Rotate chip deflector out of the way.
(See Figure-6)
4. Loosen cutting insert Torx
cutting insert.
®
screw and remove
(See Figure-7)
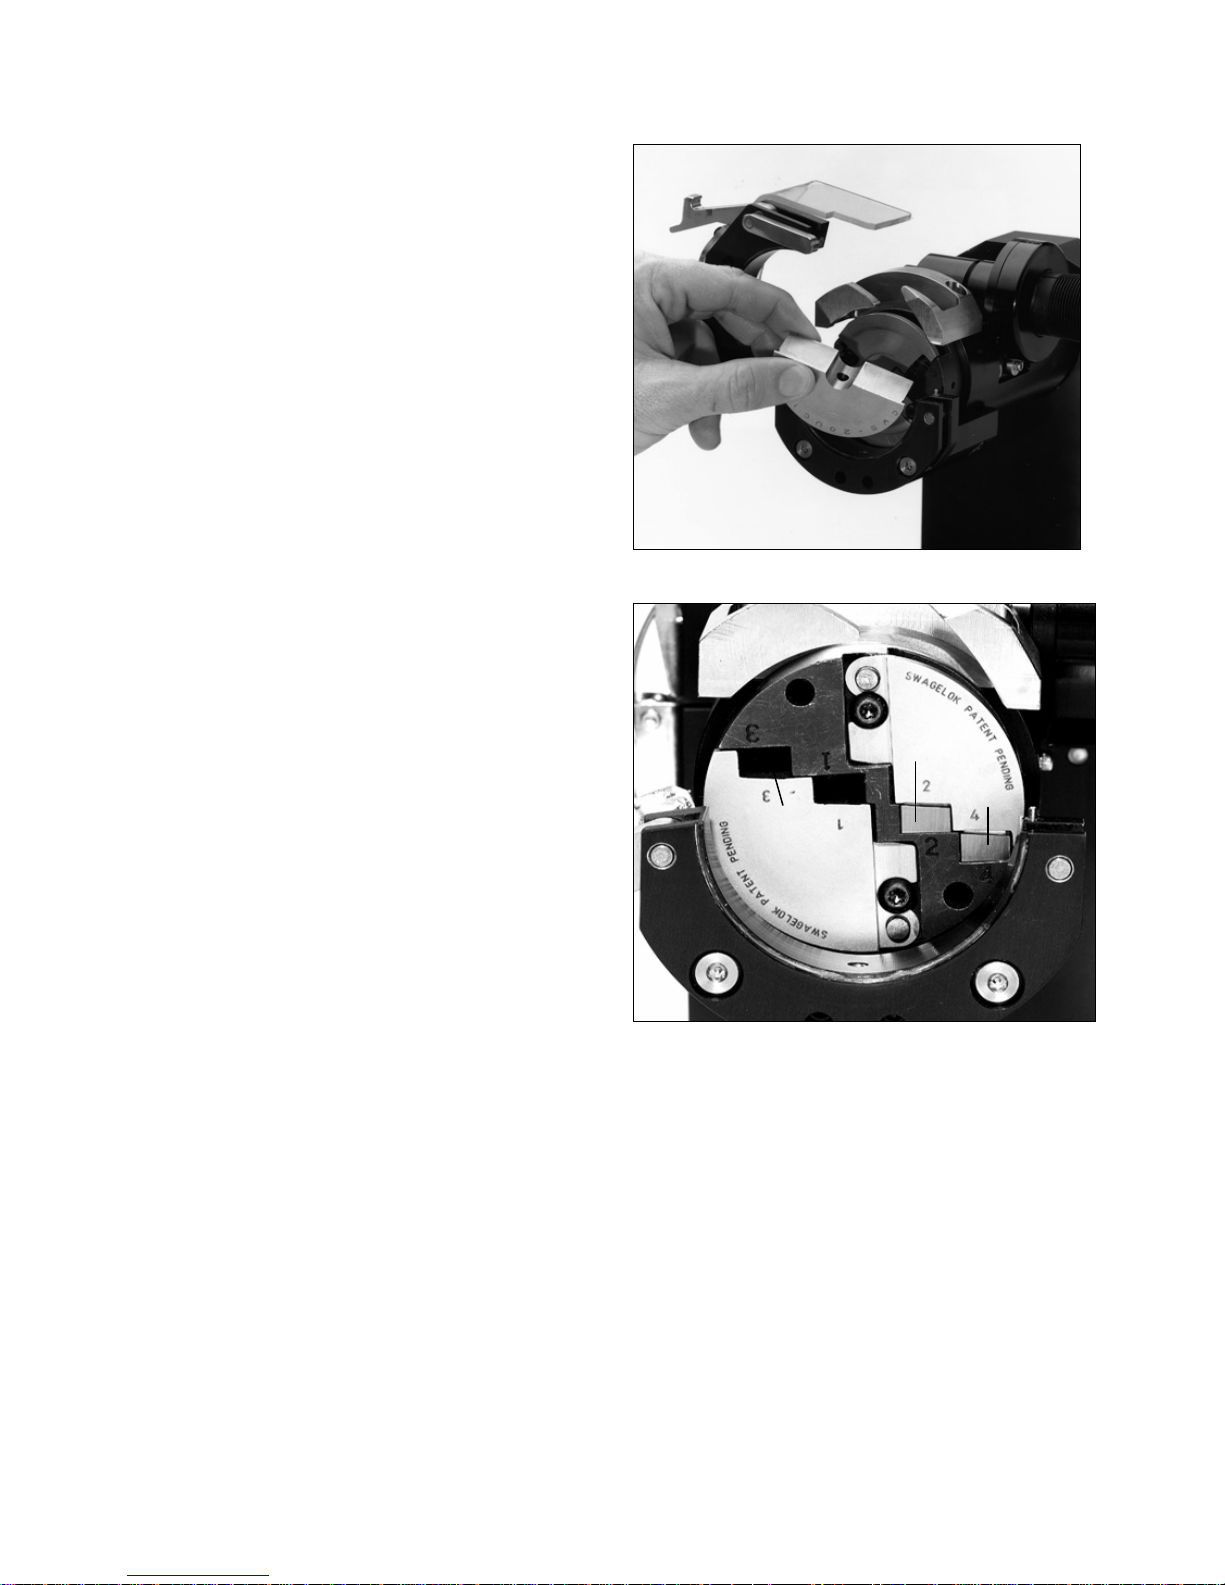
5. Install new cutting insert in appropriate pocket in
spindle. Clear pocket of chips and debris before
installing cutting insert.
(Refer to Chart A below)
6. Reposition chip deflector and tighten.
(See Figure-8)
SWAGELOK
INSERT POSITION CHART
Pocket
Number
1 up to 3/4 up to 20 Not Required
2 7/8 to 1 1/4 20 to 33 Not Required
3* 1 5/16 to 1 3/4 33 to 50 1
4* 1-7/8 to 2 50 to 52 2
Range
Diameter
in
Range
Diameter
mm
Secondary
Insert Pocket
Number
Figure-6
Figure-7
*
See
Special Instructions
CHART A
and Figure-10 on page 6.
Figure-8
– 5 –
Page 7
Installing or Relocating
the Cutting Insert
7. You may want to install the collet halves at this
point while fixture is open.
(See Figure-9 and refer to page 7)
8. Close top half of fixture and secure by following
Steps 1.a) and 1.b) and secure latch.
(Refer to page 4)
NOTE: Additonal Torx
inserts are included in the housing.
(Refer to tool photo on page 3)
®
screws for the cutting
(Continued)
Figure-9
Special Instructions
* When facing tubing with a cutting insert in pocket
3 or 4, it is recommended that a cutting insert be
installed in the adjacent pocket.
facing 2 in. O.D. tubing with a cutting insert in
Pocket 4, a cutting insert should be installed in
Pocket 2.
The secondary cutting insert blocks the
opening and helps prevent any chips from entering
the I.D. of the tube. The secondary insert can be a
used cutting insert.
Do not use the facing tool with cutting inserts
installed in all four pockets , or in the following
combinations: 1 and 2; 2 and 3; 3 and 4.
EXAMPLE: When
Figure-10
Secondary
Insert
Cutting
Insert
Insert
Pocket
Chip
Deflector
– 6 –
Page 8

Collet Change and Installation
1. Open top half of fixture.
(See Figures 1 thru 4 on page 4)
Figure-11
2. Install collet halves.
(See Figure-11)
3. Secure with socket head cap screw.
(See Figure-12)
4. Close top half of fixture and secure by following
Steps 1.a) and 1.b) and securing latch.
(Refer to page 4)
Figure-12
– 7 –
Page 9

Motor Settings for
Non-Guarded Trigger
Figure-13
Hi/Low Motor Setting
1. Set Hi/Low motor setting
R/Min
(See Figure-14)
(See Figure-13)
and
according to the speed
tables found on page 9. Rotate clockwise to go
from Turtle to Rabbit (Low to Hi) and
counter-clockwise to go from Rabbit to Turtle
(Hi to Low).
of gear.
Do not force the switch into or out
If you encounter difficulty engaging or
disengaging the switch, rotate the spindle
simultaneously while turning the switch.
2. Verify Hammer Switch is in drill mode as shown in
Figure-15.
3. Verify reverse switch is in forward mode as shown
in Figure-16.
NOTE: Operating the Tool with the motor in either
mode can cause reduced cutting insert life and
could cause damage to the Facing Tool.
Figure-14
R/Min/Speed Adjustment
Figure-15
Figure-16
Hammer Switch
Reverse
Switch
– 8 –
Page 10

Motor Settings for
Guarded Trigger
1. Set torque adjustment to highest setting [+].
(See Figure-13)
Figure-13
Torque Adjustment
2. Set Hi/Low motor setting
R/Min
(See Figure-15)
(See Figure-14)
and
according to the speed
tables found on page 9. Rotate clockwise to go
from Turtle to Rabbit (Low to Hi) and counterclockwise to go from Rabbit to Turtle (Hi to Low).
Do not force the switch into or out of gear.
you encounter difficulty engaging or disengaging
the switch, rotate the spindle simultaneously
while turning the switch.
If
Figure-14
Hi/Low Motor Setting
– 8 –
Figure-15
R/Min/Speed Adjustment
Page 11

Motor Settings for Guarded Trigger (Continued)
Motor Settings and Cutting Techniques
This information is for reference only. Actual settings and cutting techniques may vary from these
charts depending on the chemical, physical and mechanical properties of the tubing.
Stainless 316L / 316LV
Tube
Diameter
in
1/8* to 1/4 3 to 6 >1400
5/16 to 3/8 8 to 10 800 to 1400
1/2 to 3/4 12 to 18 450 to 700
7/8 to 2 20 to 52 350 to 500
Continuous feed to desired depth. Intermittent feed will
help to break chips on deep cut.
Tube
Diameter
mm
RPM
Setting
Hi/Low
Motor Setting
Low Manganese / Low Sulfur Stainless
Tube
Diameter
in
1/8* to 1/4 3 to 6 600 to 1000
5/16 to 3/8 8 to 10 500 to 800
1/2 to 3/4 12 to 18 350 to 600
7/8 to 2 20 to 52 250 to 400
Use very gradual feed to eliminate deformation of material
before the material can sheer.
Tube
Diameter
mm
RPM
Setting
Hi/Low
Motor Setting
Alloy 400
Tube
Diameter
in
1/8* to 1/4 3 to 6 800 to 1000
5/16 to 3/8 8 to 10 600 to 900
1/2 to 3/4 12 to 18 450 to 700
7/8 to 2 20 to 52 350 to 500
Gradual feed may be required to minimize chip thickness.
Take caution not to overheat cut zone. If chips are blue,
reduce speed and/or feed.
Tube
Diameter
mm
RPM
Setting
Hi/Low
Motor Setting
Carbon Steel
Tube
Diameter
in
1/8* to 1/4 3 to 6 >1500
5/16 to 3/8 8 to 10 1000 to 1500
1/2 to 3/4 12 to 18 600 to 900
7/8 to 2 20 to 52 450 to 700
Continuous feed to desired depth. Intermittent feed will
help to break chips on deep cut.
Tube
Diameter
mm
RPM
Setting
Hi/Low
Motor Setting
Titanium
Tube
Diameter
in
1/8* to 1/4 3 to 6 >1800
5/16 to 3/8 8 to 10 1200 to 1500
1/2 to 3/4 12 to 18 800 to 1400
7/8 to 2 20 to 52 600 to 1000
Caution should be taken not to overheat cut zone. If chips
are blue, reduce speed and/or feed.
*
Instructions For Facing 1/8 in. (3 mm)
Tube
Diameter
mm
RPM
Setting
Hi/Low
Motor Setting
Tubing
1. Insert the tubing approximately 0.05 to 0.06
in. (1.3 to 1.5 mm) past the end of the collet
and lock into place.
2. Set motor settings according to appropriate
chart above.
3. Fully depress the trigger.
4. Advance the spindle slowly towards the
tubing so that when contact is made, the
cutting insert lightly touches the tubing.
– 9 –
Alloy 600
Tube
Diameter
in
1/8* to 1/4 3 to 6 550 to 900
5/16 to 3/8 8 to 10 450 to 800
1/2 to 3/4 12 to 18 350 to 700
7/8 to 2 20 to 52 250 to 600
Continuous feed, take caution not to overheat cut zone.
Tube
Diameter
mm
RPM
Setting
Hi/Low
Motor Setting
5. Use short interrupted cuts to face the tubing.
This seems to achieve a better result than a
continuous uninterrupted cut.
6. Remove all chips after each piece of tubing
is faced.
7. A very small OD burr (approximately 0.005
in.) may be present after facing the tubing.
This burr will be consumed into the weld bead
or it can be removed with a deburring tool.
Page 12

Motor Settings for Non-Guarded Trigger (Continued)
Motor Settings and Cutting Techniques
This information is for reference only. Actual settings and cutting techniques may vary from these
charts depending on the chemical, physical and mechanical properties of the tubing.
Stainless 316L / 316LV
Tube
Diameter
in
1/8* to 1/4 3 to 6 >D
5/16 to 3/8 8 to 10 B to D
1/2 to 3/4 12 to 18 D to F
7/8 to 2 20 to 52 C to D
Continuous feed to desired depth. Intermittent feed will help to
break chips on deep cut.
Tube
Diameter
mm
RPM
Setting
Hi/Low
Motor Setting
Low Manganese / Low Sulfur Stainless
Tube
Diameter
in
1/8* to 1/4 3 to 6 E to G
5/16 to 3/8 8 to 10 D to F
1/2 to 3/4 12 to 18 C to E
7/8 to 2 20 to 52 B to D
Use very gradual feed to eliminate deformation of material
before the material can sheer.
Tube
Diameter
mm
RPM
Setting
Hi/Low
Motor Setting
Alloy 400
Tube
Diameter
in
1/8* to 1/4 3 to 6 E to G
5/16 to 3/8 8 to 10 E to G
1/2 to 3/4 12 to 18 D to F
7/8 to 2 20 to 52 C to D
Gradual feed may be required to minimize chip thickness. Take
caution not to overheat cut zone. If chips are blue, reduce speed
and/or feed.
Tube
Diameter
mm
RPM
Setting
Hi/Low
Motor Setting
Carbon Steel
Tube
Diameter
in
1/8* to 1/4 3 to 6 >D
5/16 to 3/8 8 to 10 C to D
1/2 to 3/4 12 to 18 E to G
7/8 to 2 20 to 52 D to F
Continuous feed to desired depth. Intermittent feed will help to
break chips on deep cut.
Tube
Diameter
mm
RPM
Setting
Hi/Low
Motor Setting
Titanium
Tube
Diameter
in
1/8* to 1/4 3 to 6 >E
5/16 to 3/8 8 to 10 C to D
1/2 to 3/4 12 to 18 B to D
7/8 to 2 20 to 52 B to C
Caution should be taken not to overheat cut zone. If chips are
blue, reduce speed and/or feed.
*
Instructions For Facing 1/8 in. (3 mm)
Tube
Diameter
mm
RPM
Setting
Hi/Low
Motor Setting
Tubing
1. Insert the tubing approximately 0.05 to 0.06
in. (1.3 to 1.5 mm) past the end of the collet
and lock into place.
2. Set motor settings according to appropriate
chart above.
3. Fully depress the trigger.
4. Advance the spindle slowly towards the
tubing so that when contact is made, the
cutting insert lightly touches the tubing.
Alloy 600
Tube
Diameter
in
1/8* to 1/4 3 to 6 D to G
5/16 to 3/8 8 to 10 D to G
1/2 to 3/4 12 to 18 C to F
7/8 to 2 20 to 52 B to E
Continuous feed, take caution not to overheat cut zone.
Tube
Diameter
mm
RPM
Setting
5. Use short interrupted cuts to face the tubing.
This seems to achieve a better result than a
continuous uninterrupted cut.
6. Remove all chips after each piece of tubing
is faced.
7. A very small OD burr (approximately 0.005
in.) may be present after facing the tubing.
This burr will be consumed into the weld bead
or it can be removed with a deburring tool.
– 9 –
Hi/Low
Motor Setting
Page 13

Facing the Tube
Figure-17
Cutting Technique:
When facing the tube, there
are several techniques that can be employed. The
two most common are one long continuous cut, and
short interrupted cuts. The type of cut used may be
determined by material type, material hardness,
tube diameter, etc. The cutting technique used can
also affect the quality of the face, as well as tool bit
(Refer to page 9)
life.
Operating Tip:
Chips will begin to accumulate in
the spindle after facing of tubing. Bent needle-nose
pliers have been supplied to aid in the removal of
these chips, as needed. NEVER USE YOUR FINGERS TO REMOVE CHIPS!
(See Figure-17)
Random Material Removal
1. Rotate lever to 12 o’clock position to open the
collets.
(See Figure-18)
2. Slowly insert tubing until it gently contacts the
spindle/cutting insert. Withdraw tube slightly so that
it does not contact the cutting insert.
CAUTION: DO NOT START MOTOR IF
TUBE IS CONTACTING SPINDLE/CUTTING
INSERT.
Figure-18
3. Rotate lever clockwise to secure tubing. Tubing will
be held securely provided enough pressure (force)
is applied to the lever.
(See Figure-19)
4. Before operating the facing tool, make sure motor
settings are correct and plastic safety guard is in
place.
(See Figure-20 on page 11)
WARNING: A clear plastic safety sh ield has
been attached for your protection. DO NOT
REMOVE THE SHIELD. Do not operate tool if
shield is damaged or missing. Refer to page
15 for ordering information.
5. Fully depress trigger.
(See Figure-21 on page 11)
6. When motor achieves full R/Min, begin to slowly
advance the spindle with the spindle feed handle
until the tool bit makes contact with the tube.
7. Continue to advance the spindle until desired
amount of material is removed.
8. Return handle to home position.
9. Release the trigger to stop the motor and
spindle rotation.
Figure-19
10. Release tubing by turning the lever to the
12 o’clock position.
11. Remove tubing and insert a new piece of tubing
to begin the process over again.
– 10 –
Page 14

Facing The Tube (Continued)
Controlled Material Removal
1. Rotate lever to 12 o’clock position to open the
collets.
(See Figure-18 on page 10)
2. Slowly insert tubing until it gently contacts the
spindle/cutting insert.
CAUTION: DO NOT START MOTOR IF
TUBE IS CONTACTING SPINDLE/CUTTING
INSERT.
3. With the fixture not secured, slowly advance the
spindle and begin to push the tubing back out of
the collets.
NOTE: Rotate handle clockwise from the
“0” position. (See Figure-22)
Figure-20
4. Continue to advance the spindle from the “0”
mark until the stationary line lines up with [.00].
(See Figure-23)
5. Rotate lever clockwise to secure tubing. At the
same time, the spindle can be returned to the
home position – “0” mark. The tubing will be held
securely provided enough pressure (force) is
applied to the lever.
(See Figure-19 on page 10)
6. Before operating the facing tool, make sure motor
settings are correct and plastic safety guard is
in place.
(See Figure-20)
WARNING: A clear plastic safety sh ield has
been attached for your protection. DO NOT
REMOVE THE SHIELD. Do not operate tool if
shield is damaged or missi ng. Refer to page
15 for ordering information.
7. Fully depress trigger.
(See Figure-21)
8. When motor achieves full R/Min, begin to slowly
advance the spindle with the spindle feed handle
until the tool bit makes contact with the tube.
9. Each graduation on the feed handle represents
0.015 inch (0.38 mm) spindle advance. Continue
to rotate handle to advance spindle until desired
amount of material is removed.
Figure-21
Figure-22
Figure-23
10. Return handle to home position.
11. Release the trigger to stop the motor and
spindle rotation.
12. Release tubing by turning the lever to the
12 o’clock position.
13. Remove tubing and insert a new piece of tubing
to begin the process over again.
– 11 –
Page 15

Bench Mount Stand
(See Figures-24 thru 27)
1. Assemble vertical piece to base with the two (2)
screws provided and secure tightly.
2. Release latch to open top half.
3. Swing top half open.
4. Place barrel of housing into bracket. Align slot
in housing with face of vertical plate.
5. Close top half.
Figure-24
6. Secure with latch.
NOTE: Base plate has holes provided for mounting
to a bench top.
Figure-25
Figure-26
– 12 –
Figure-27
Page 16

g
Special Adjustment Features
Fixture Set Screw
There is a set screw located in the top of the hinge
of the fixture
(See Figure-28).
only require use if you experience problems
securing the tubing. If the tubing is undersized and
rotates in the collet, the set screw can be turned
clockwise. If the tubing is oversized and the latch
will not secure the tubing, the set screw can be
turned counter-clockwise. If you are still unable
to secure the tubing properly after making these
adjustments, then the tubing is outside of the size
range for the collets.
Motor/Housing Set Screw
There is a set screw located in the underside of the
facing tool housing
should only be used if the motor and housing are
separated, such as if the motor were to be replaced.
An adjustment to this set screw may be needed if
there is a change to the orient a tion of th e mo t or
handle and spindle feed handle. This set screw
provides a centering adjustment between the motor
and the housing.
(See Figure-29).
This screw should
The set screw
Figure-28
Figure-29
Set
Screw
Hinge
Housin
Set Screw
– 13 –
Page 17

Spare Parts/Accessories and Ordering Numbers
Nominal
Outside
Diameter
(inches)
1/8
3/16
1/4
3/8
1/2
5/8
3/4
7/8
1
1-1/8
1-1/4
1-1/2
2
Hex Keys
(0.050 in. thru 3/16 in.)
(CWS-HEX-SET)
COLLET TABLE
Size
Designator
02
03
04
06
08
10
12
14
16
18
20
24
32
Diameter
Torx® Drive T-15
(SWS-EP-14108)
Torx® Screws
(13329)
Items shown are included with your Facing Tool.
Nominal
Outside
(mm)
3
6
8
10
12
14
16
18
20
22
25
28
35
40
52
Size
Designator
03
06
08
10
12
14
16
18
20
22
25
28
35
40
52
Bent Needle Nose Pliers
(SWS-14410)
Cutting Inserts
(SWS-232-BIT-HST)
CHART B
Add the designator as a suffix to the Collet Ordering Number.
04
EXAMPLE: CWS-20UCI-
, CWS-20UCI-
12mm
– 14 –
Page 18

Replacement Parts Illustration
For proper assembly and
operation, not all components
will be sold separately. Some
items will only be available as
sub-assemblies.
– 15 –
Page 19

– 16 –
Page 20

SWAGELOK TUBE FACING TOOL
Warranty Information Form
IMPORTANT
Please complete and return this form to your Swagelok
Date of Delivery:
Tube Facing Tool Model Number:
Serial Number:
Company Name:
Distributor Where Purchased:
Market Area (check all that apply)
Semiconductor Bioprocess / Pharmaceutical
Representative for warranty activation.
Oil & Gas Analytical Instrumentation
Power
Other (Please
describe)
User Type (check all that apply)
O.E.M. Maintenance Department
Fabricator University or Research and Development Lab
Contractor Operator Training Program
Other (Please
describe)
Intended Use (check all that apply)
Maintenance Distributor Use (Rental, Demonstration, Service)
New Construction Cleanroom Class:
Research and Development Training
Other (Please describe)
© 1999, 2004 Swagelok Company, All Rights Reserved
– 17 –
Page 21

Swagelok—TM Swagelok Company
© 1999, 2004 Swagelok Company
Printed in U.S.A., PPI
August 2004, R4
SWS-MANUAL-232EP-E
 Loading...