

Page 1
Owner’s Manual
Read the instructions and
warnings in this manual
CAREFULLY BEFORE using
this firearm.
2100 Roosevelt Avenue • Springfield, MA 01104
1-800-331-0852 • Fax: 413-747-3317
www.smith-wesson.com
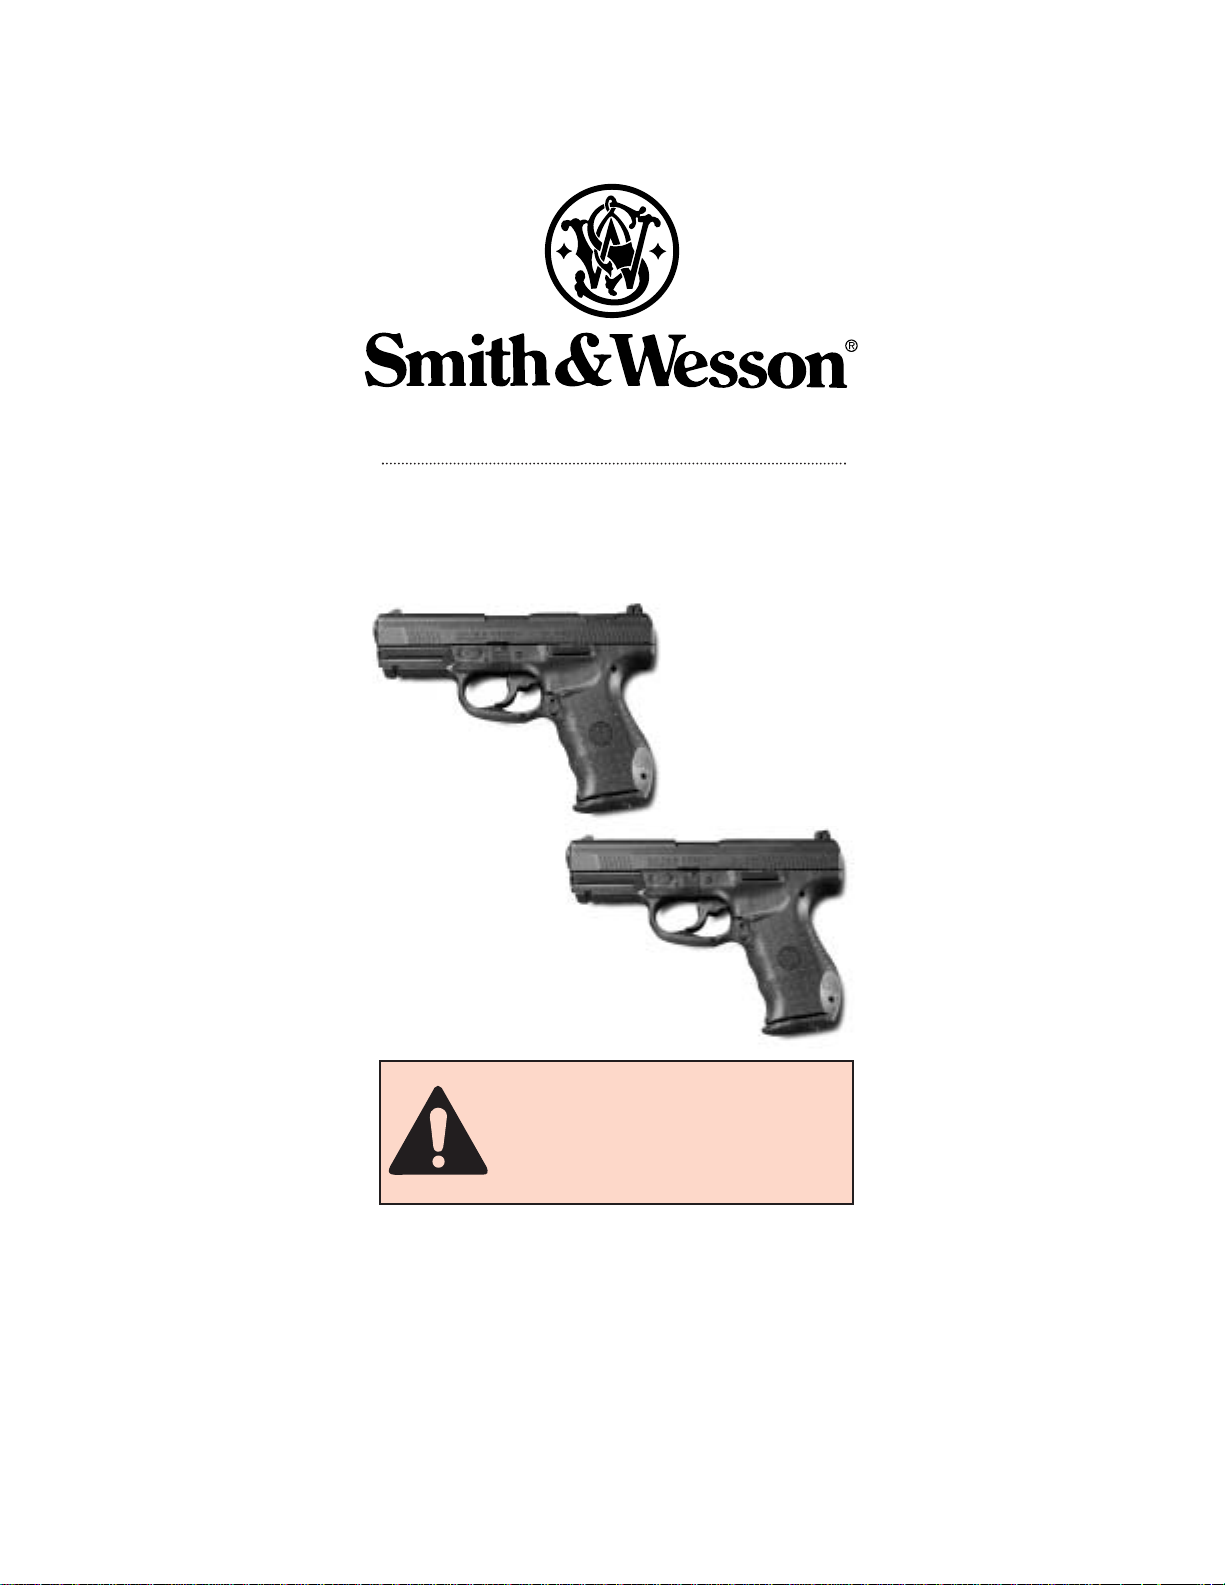
SW99
SW99NJ
Page 2

SMITH & WESSON PISTOL
SAFETY, INSTRUCTION, AND
PARTS MANUAL
READ THESE INSTRUCTIONS
AND W ARNINGS CAREFULLY. BE
SURE Y OU UNDERSTAND THESE
INSTRUCTIONS AND WARNINGS
BEFORE USING THIS FIREARM.
This SAFETY, INSTRUCTION
and PARTS MANUAL should
always accompany this firearm
and be transferred with it upon
change of ownership or presented
to another person. A copy of the
SAFETY, INSTRUCTION, & PARTS
MANUAL is available FREE upon
request from:
SMITH & WESSON
CUSTOMER SUPPORT CENTER
2100 ROOSEVELT AVENUE
SPRINGFIELD, MA 01104
TEL.: 1-800-331-0852
Email: qa@smith-wesson.com
2
Page 3

INDEX
SAFETY . . . . . . . . . . . . . . . . . . . . . . . . . . . . . . . . . .4
BASIC FIREARMS SAFETY RULES . . . . . . . . . . . . . . . .5-6
MODEL NUMBER IDENTIFICATION . . . . . . . . . . . . . . . . .7
SAFE STORAGE AND TRANSPORTATION . . . . . . . . . . .8-9
NOMENCLATURE . . . . . . . . . . . . . . . . . . . . . . . . . .9-10
PREPARATION FOR FIRING . . . . . . . . . . . . . . . . . .10-11
AMMUNITION . . . . . . . . . . . . . . . . . . . . . . . . . . .11-12
INSPECTING YOUR PISTOL . . . . . . . . . . . . . . . . . . . .13
REPLACING BACKSTRAPS . . . . . . . . . . . . . . . . . . . . .14
LOADING . . . . . . . . . . . . . . . . . . . . . . . . . . . . . .14-15
FIRING . . . . . . . . . . . . . . . . . . . . . . . . . . . . . . . . . .16
LOADED CHAMBER INDICATOR . . . . . . . . . . . . . . . . . .16
COCKING INDICATOR . . . . . . . . . . . . . . . . . . . . . . . .17
TRIGGER - SW99NJ . . . . . . . . . . . . . . . . . . . . . . . . .17
AFTER FIRING - SW99NJ . . . . . . . . . . . . . . . . . . . . . .18
TRIGGER - SW99 . . . . . . . . . . . . . . . . . . . . . . . . . . .18
DECOCKING THE STRIKER - SW99 . . . . . . . . . . . . . . . .19
CLEAR ING MISFIRES . . . . . . . . . . . . . . . . . . . . . . . .19
PRODUCT WARNING . . . . . . . . . . . . . . . . . . . . . . . . .19
UNLOADING . . . . . . . . . . . . . . . . . . . . . . . . . . . . . .20
SIGHT ADJUSTMENT . . . . . . . . . . . . . . . . . . . . . . . . 20
FIELD STRIPPING DISASSEMBLY - SW99NJ . . . . . . . . .21
FIELD STRIPPING DISASSEMBLY - SW99 . . . . . . . . . . .22
FIELD STRIPPING REASSEMBLY . . . . . . . . . . . . . . .22-23
REASSEMBLY . . . . . . . . . . . . . . . . . . . . . . . . . . . . .23
MAGAZINE DISASSEMBLY . . . . . . . . . . . . . . . . . . . . .23
MAGAZINE REASSEMBLY . . . . . . . . . . . . . . . . . . . . . .24
CLEANING & MAINTENANCE . . . . . . . . . . . . . . . . . . . .24
SERVICE/SHIPPING/PARTS . . . . . . . . . . . . . . . . . .25-26
WARRANTY . . . . . . . . . . . . . . . . . . . . . . . . . . . . . . .27
EXTENDED SERVICE POLICY . . . . . . . . . . . . . . . . . . . .28
COMPONENT PARTS . . . . . . . . . . . . . . . . . . . . . . .29-30
WARNINGS . . . . . . . . . . . . . . . . . . . . . . . . . . . . . . .31
3
Page 4

SAFETY
SAFETY IS YOUR NUMBER
ONE
RESPONSIBILITY!!!!
• Safe gun handling is
YOUR personal
responsibility at all times. Firearms are dangerous
and can cause serious injury and death if they are
misused or used inappropriately. Safety must be the
prime consideration of anyone who owns or handles
firearms.
•You are responsible for the firearm at all times.
In owning a firearm, you must undertake full-time
responsibility for your firearm’s safety and security.
You must protect yourself and all others against
injury or death from misuse of the firearm.
• Safe storage is your responsibility.
In particular,
you must secure firearms safely from children and
unauthorized users. A lock has been provided for
your use with this firearm.
• Accidents are the result of violating the rules of
safe gun handling and common sense.
• For your safety and the safety of others, never
rel
y on mechanical features alone.
Only your
safe gun-handling habits will ensure the safe use of
your firearm. This is your responsibility.
•Ne
ver keep ammunition in the same location as
the handgun. Store in a separate and secure
place.
• READ
and UNDERSTAND these instructions
bef
ore using your firearm.
WARNING
YOU MUST FOLLOW ALL OF THESE SAFETY
RULES TO ENSURE THE SAFE USE OF YOUR
FIREARM
4
Page 5

At home, in the field, at the range, or anywhere, the first
concern of every firearm owner should be safety. Apply the following safety rules in every situation, with any kind of firear m.
• BEFORE HANDLING ANY FIREARM,
UNDERSTAND ITS OPERA
TION.
Not all firearms
are the same. Familiarize yourself with the
mechanical features of any firearm you intend to
use. If you feel uncertain about any operational aspects
of your handgun, please contact Smith & Wesson
at 1-800-331-0852 before proceeding with its operation.
•AL
WAYS SAFELY STORE AND SECURE YOUR
FIREARM. Safe and secure storage of your firearm
is one of the most important responsibilities of
firearms ownership. It is a full-time responsibility.
You must always secure your firearm and
ammunition separately so that they are not
accessible to children or other unauthorized persons.
(See Safe Storage Instructions on pages 8-9. )
•AL
WAYS
TREAT EVERY FIREARM AS IF IT
WERE
LO
ADED AND READY T
O FIRE IF THE TRIGGER
IS PULLED. Do not take anyone’s word that the
firearm is unloaded – always check for yourself.
Never pass your firearm to another person until the
cylinder or action is open and you visually check that it
is unloaded. Keep your firearm unloaded when not
in use.
•AL
WAYS KEEP YOUR FIREARM POINTED IN A
SAFE DIRECTION. Never point a firearm at anyone
or anything you do not intend to shoot whether or not
it is loaded.This is particularly important when
loading, unloading, or field stripping the gun. ALWAYS
control the direction of the firearm.
• NEVER PLACE YOUR FINGER INSIDE THE
TRIGGER GUARD UNLESS YOU INTEND TO FIRE.
Your firearm cannot fire unless the trigger is pulled.
Ensure that other objects do not actuate the trigger.
•AL
WAYS BE SURE OF YOUR TARGET AND WHAT
IS BEYOND IT. Always be sure of where the bullet
will strike and shoot only where there is a safe
backstop free of obstructions, water or other
surfaces which can cause ricochets. Do not fire into
the sky.
BASIC FIREARM
SAFETY RULES
5
WARNING!
THE FAILURE T O FOLLOW THESE B ASIC
FIREARM SAFETY RULES MAY RESULT IN AN
UNINTENDED DISCHARGE WHICH COULD CAUSE
SERIOUS PERSONAL INJURY OR DEATH.
Page 6

ADDITIONAL IMPORTANT SAFETY RULES
• Never carry or store a firearm with the hammer or striker in
the cocked position.
• Do not allow a firearm to be used by individuals who have
not read these basic firearms safety rules and do not understand its safe operation and the rules of safe gun-handling.
• Be sure all accessories, such as holsters and grips,
are compatible with the firearm and that the
accessories do not interfere with safe operation.
• Use the correct ammunition for your particular
firearm as indicated by the marking on the barrel.
Reloaded ammunition is not safe to use.
• Discharging firearms in poor ly ventilated areas,
cleaning firearms, or handling ammunition may result
in exposure to lead and other substances known to
cause birth defects, reproductive harm, and other
serious physical injury. Review the warnings and
labels for all ammunition and cleaning products
carefully. Have adequate ventilation at all times.
Wash hands thoroughly after exposure.
• Never use alcohol or drugs before or while shooting.
Do not use your firearm if you are on any medication
which impairs, even slightly, your mental or physical
ability.
• Wear eye and hearing protection appropriate for
firearm use every time you discharge your firearm.
Make sure others in the vicinity of where you will be
shooting do so as well.
• Do not allow any alteration or replacement of parts in
your Smith & Wesson firearm unless performed by a
qualified gunsmith using genuine Smith & Wesson
parts. If you do otherwise, improper functioning of
your firearm may occur and serious injury may result.
• Never cross obstacles such as fences or streams
with a loaded firearm.
• Firearm safety training is available. Contact your dealer for
availability.
• Appropriate use for your firearm means using your firearm
for legal purposes. For example - target shooting and
lawful resistance of deadly criminal force.
• These are basic firearms safety rules. There are other
common sense safety rules that should be followed at all
times under the circumstances then presented.
SAFE USE OF A FIREARM IS YOUR PERSONAL
RESPONSIBILITY AND THE FAILURE TO FOLLOW ALL
OF THESE BASIC SAFETY RULES MAY RESULT IN
SEVERE PERSONAL INJURY OR DEATH.
BASIC FIREARM SAFETY RULES CONT’D.
6
Page 7
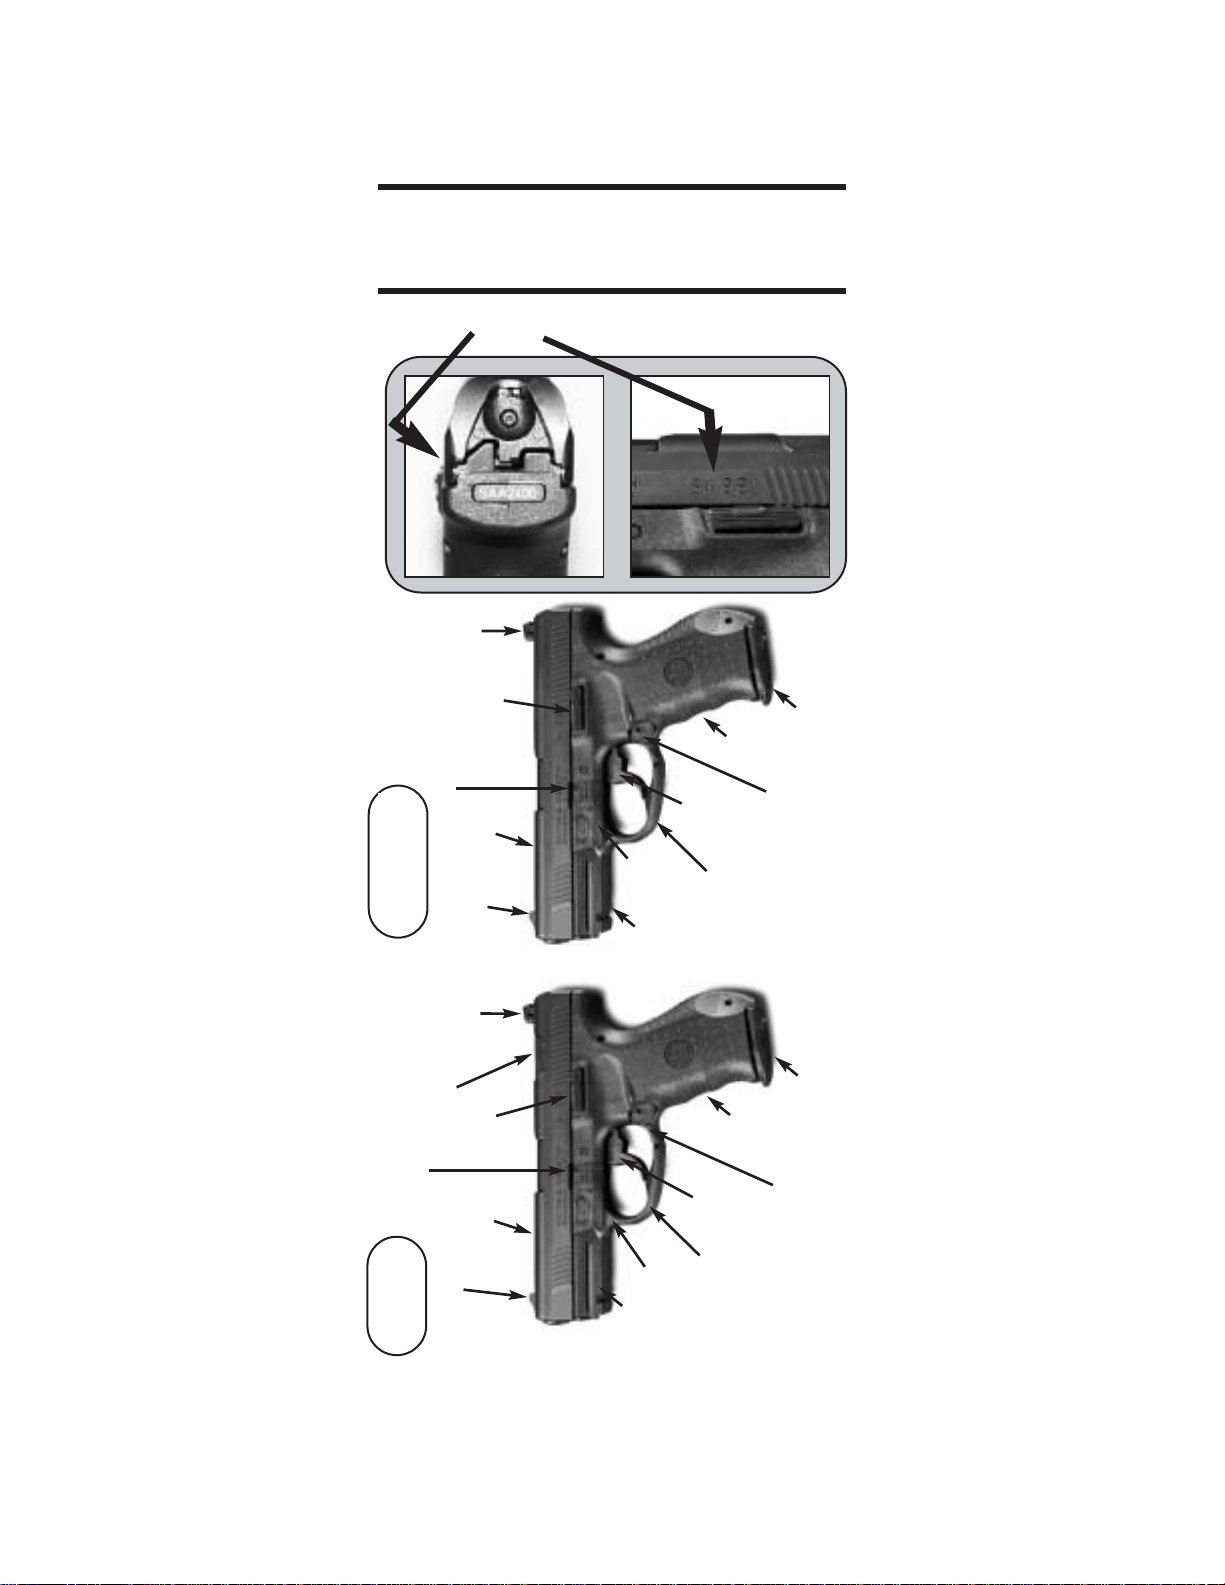
MODEL NUMBER
IDENTIFICATION
The serial number and the model number appear here on your
pistol.
Equipment Rail
Trigger Guard
Trigger
Grip
Magazine
Magazine
Release
Front Sight
Frame
Slide
Slide Stop
Notch
Slide Stop
7
Equipment Rail
Trigger Guard
Trigger
Grip
Magazine
Magazine
Release
Front Sight
Frame
Slide
Slide Stop
Notch
Decocker
Slide Stop
Rear Sight
Rear Sight
SW99
SW99NJ
FIGURE 1
FIGURE 2FIGURE 3
Page 8

WARNING
SAFE AND SECURE STORAGE OF YOUR
FIREARM IS ONE OF THE MOST IMPORTANT
RULES OF FIREARM SAFETY. YOUR
FAILURE TO FOLLO W THESE RULES MA Y
RESULT IN SERIOUS INJURY OR DEATH.
• You must always secure your firearm and ammunition
separately so that they are not accessible to children
or other unauthorized persons.
• Safe and secure storage and transportation of your
firearm are your responsibility. It is a full-time
responsibility.
•AL
WAYS STORE YOUR FIREARM UNLOADED.
Your firearm and ammunition should be stored separately in
places and in a manner inaccessible to children and
unauthorized persons.
•SMITH &
WESSON HAS PROVIDED A LOCK FOR
USE WITH YOUR FIREARM. There are also a variety of
other locks and safe storage containers available in the
marketplace which may be appropriate for your particular
needs. Consult your local gunshop, hardware store, or
local police department for guidance on the variety of other
safe storage devices or practices which may be appropriate
for your particular needs. By purchasing this firearm you
have taken on the responsibility of safely securing the
firearm at all times and preventing its unauthorized use. It
is your personal responsibility to select and use whatever
devices or practices that will enable you to safely secure
your firearm at all times. Do not use a lock on a loaded
handgun.
Onl
y you can determine what devices or practices are
appr
opriate for the safe storag
e of your firearm and
y
our ammunition.
• NEVER ASSUME THAT A “HIDING” PLACE IS A
SECURE STORAGE METHOD. Others may be aware of
your storage location or come upon it by chance. It is your
personal responsibility to use common sense when storing
and securing your firearm and ammunition and to always
make sure that it is not accessible to children or other
unauthorized persons.
• FOLLO
W THE LAW!! You must be familiar with all local,
state, and federal laws regarding the safe storage and
transportation of your firearm. Failure to know and follow
the law may result in unauthorized access or use of your
firearm by another. Obey all laws relating to the storage
and transportation of firearms.
• NEVER
TRANSPORT A LOADED FIREARM.
When transporting your firearm, be sure it is unloaded and
that the cylinder or action is open.
SAFE STORAGE &
TRANSPORTATION
8
Page 9

• Your local police department or gunshop will furnish you
with available information on storing and/or transporting a
firearm legally.
•Y
OUR FIREARM IS YOUR RESPONSIBILITY.
Protect your firearm from theft or misuse by untrained or
unqualified individuals.
MAINTENANCE BEFORE ST
ORAGE
When storing, do not encase your firearm in anything that will attract or
hold moisture, for example, leather or heavy cloth. Also, do not store
guns with a plug inserted in the barrel for this is a contributing factor to
moisture accumulation. If your firearm is to be stored for an extended
period, the bore, chambers and internal working mechanism should be
oiled with acid-free lubricating oil or preservative, and the external
working mechanisms, frame, cylinder and barrel should be coated with
an anti-rust oil. Before using your firearm again, be sure to clean it.
Every time you clean your firearm, check it for signs of wear. If wear is
noted, do not use the firearm. Return it to Smith & Wesson for service
or have it checked by a qualified gunsmith.
MAINTENANCE BEFORE USE
Before using your firearm, it should be cleaned. (See Cleaning
Instructions at page 24.) Your firearm has been treated with either a
preservative or oil to protect it against corrosion. Before using it, all
excess oil should be wiped from the bore, chamber(s), and exposed
areas using a clean swab or patch. A light coat of high quality gun oil
should be applied to the outside surfaces and mechanism. Care
should be taken not to oil the mechanism to the degree that dust and
lint may be trapped by the oil.
SAFE STORAGE & TRANSPORTATION CONT’D.
Smith & Wesson handguns are simple and safe to use when
the basic firearm safety rules are followed. There are a
number of internal safety mechanisms within the
lockwork of the handgun which ensure that the firearm will
not discharge unless the trigger of the handgun is pulled.
That is one reason why it is important to never modify or
alter your firearm. Before you use your handgun, you
should be fully familiar with its operation. Here is a
description of its basic functions and see pages 29 & 30 for
a drawing of its component parts:
AMMUNITION-CENTERFIRE
- Ammunition which
contains the primer in the center of the base of the case. Among
the most common centerfire handgun cartridges are the .32,
.38 Special, .380, 9mm, .357 Magnum®, .40 S&W®, .45 ACP
and the .44 Magnum®.
CALIBER - The diameter of a bullet, designated in
hundredths or thousandths of an inch (.357) or in
millimeters (9mm).
DECOCK
- The process by which the hammer or striker is safely
lowered.
NOMENCLATURE
9
Page 10

DOUBLE ACTION -A firing action where the hammer or striker
is drawn back, released, and the gun fired by a single pull of the
trigger.
DOUBLE ACTION ONLY
-A firearm designed so that it can only
be fired in double action.
PIST
OL -A handgun that contains the car tr idges in a magazine.
REVOLVER -A handgun that contains the cartr idges in a
cylinder that revolves at the rear of the barrel.
SINGLE A
CTION - Pulling the trigger to fire the handgun by
releasing the hammer from the cocked position.
The operation of your handgun will be explained in greater detail
in the pages that follow, as well as a greater description of key
component parts.
NOMENCLATURE CONT’D.
PREPARATION FOR
FIRING
AL
WAYS WEAR EYE AND EAR PROTECTION WHICH IS
SPECIFIED FOR FIREARM USE.
• Failure to wear adequate and proper ear protection on
even one occasion can potentially permanently damage
your hearing. Make sure others who are nearby are
wearing ear protection as well.
• Always wear safety glasses, whether indoors or out.
Safety glasses protect your eyes from the firing flash and
particles associated with the discharge of ammunition.
• DO NO
T SHOOT A
T HARD SURFACES, WATER OR UP
INTO THE SKY. Always select a place to shoot that has a
safe backstop, is free from obstructions and water surfaces
which cause ricochets.
• Alw
ays be aware of other people so that persons cannot
accidentally walk into the line of fire.
• Position the shooter and all others so that they are not
within an area where they may be struck by particle-spitting
from a revolver or by ejected cases from other types of
firearms.
• Keep fingers and other parts of your body away from the
muzzle and away from the gap between the revolver barrel
and cylinder, and away from the pistol slide and ejection
port.
• Be aler t and always follow the safety instruction of the
range officer.
10
Page 11

• Be sure that all cylinders and actions of firearms are
open, that chambers are clear of cartridges,
magazines are removed, and that firearms are
pointing in a safe direction before anyone is allowed
in front of the firing position.
• Be aler t at all times. Never shoot if you are tired,
cold or impaired in any way.
• Treat your firearm as if it were loaded at all times.
AMMUNITION
PREPARATION FOR FIRING CONT’D.
A. GENERAL PRINCIPLES
• A firearm and ammunition are a system and must work
together. Their performance is closely related. There are
different types of ammunition for different types of firearms.
Your firearm has been designed for ammunition of a specific
type and a specific caliber. It is important to select the
proper ammunition for your firearm.
!! W
ARNING !!
• Never use ammunition not specifically designated for
use in your firearm. Failure to use the correct type or
caliber of ammunition may cause the firearm to jam, fail
to fire or even generate excessive pressure which can
damage or even rupture your firearm, causing personal
injury or property damage.
• You are responsible for selecting ammunition that meets
industry standards and is appropriate in type and caliber for
this firearm.
• Locate the caliber designation printed on the handgun.
This information indicates the ammunition caliber that
should be used in this firearm. (See figure #4)
B.
HANDLOADED OR RELOADED AMMUNITION
!! WARNING !!
• Never use non-standard,reloaded or “handloaded”
ammunition which has not been subjected to internal
ballistic pressure testing. Reloaded or handloaded
ammunition, may have many manufacturing and quality
variables (such as the type and amount of gun powder).
• Any ammunition that is improperly manufactured,
even in the slightest degree,
may fail to fire or may
generate excessive
internal pressures which
can damage or even
rupture the firearm,
causing personal injury to
the shooter or those in the
immediate vicinity.
11
FIGURE 4
Page 12

• Use only commercially manufactured ammunition with
internal ballistic pressures which are in strict accordance
with the specifications of the Sporting Arms and
Ammunition Manufacturers’Institute (SAAMI).
• Be certain all ammunition you use complies with the
SAAMI specifications. If you are uncer tain, contact your
ammunition supplier for verification.
C.
MISFIRES
• If your firearm fails to fire when the trigger is pulled
(misfires), keep the firearm pointed in a safe direction,
remove your finger from the trigger, and wait 10 seconds.
Only after you have completed all of the above steps,
remove the magazine or open the cylinder and remove the
cartridge from the chamber and dispose of it properly.
Keep your firearm pointed in a safe direction at all times.
• If you have heard an unusual sound or felt an unusual recoil
on firing, stop firing, wait 10 seconds, unload the firearm,
and examine the barrel bore for obstructions.
• Make sure your barrel is clear and free of obstructions.
If you see an obstruction, return your firearm to
Smith & Wesson or take it to a qualified gunsmith. Never
fire a firearm with an obstructed barrel.
D
.
AMMUNITION SPECIFICS
• Use only ammunition specifically recommended by
Smith & Wesson for your firearm.
• Never mix ammunition.
• Never use a car tridge not specifically designated for use in
your firearm. Pressure from the wrong type of ammunition
may be beyond the capability of your firearm to withstand
and may damage or even rupture your firearm.
• Whenever rimless pistol car tr idges are used in the cylinder
of a Smith & Wesson revolver, (except M547) full or
half-moon clips MUST be used to both position and extract
such cartridges. Failure to use ammunition clips with
rimless cartridges may result in malfunction of the revolver.
• Additional ammunition calibers can be fired from the
following list of select calibers.
Caliber on Barrel
Can also Fire
.44 Magnum .44 Special
.357 Magnum .38 Special, .38 Special +P
.45 ACP .45 Auto Rim (in revolvers only)
.22LR .22L, .22 Short, .22CB, .22BB
10mm .40 S&W (in revolvers only)
• In some cases, a round of ammunition not specified on your
handgun may fit into the chamber or cylinder. Firing
ammunition not specified on your handgun may cause it to
rupture and cause serious injury or death.
AMMUNITION CONT’D.
12
Page 13

INSPECTING YOUR
PISTOL
When you inspect your pistol, you should first check for yourself
to insure that it is unloaded.To do this, grasp the pistol with your
finger off the trigger and outside the trigger guard
, (Figure 5)
point the muzzle in a safe direction. Depress the magazine
release, and remove the magazine.
With the muzzle still pointing in a safe direction, grasp the
serrated sides of the slide from the rear with the thumb and
fingers and briskly draw the slide fully rearward in order to
extract any cartridge from the barrel chamber and clear it from
the pistol. Do not obstr uct the ejection por t because doing so
can interfere with ejection of a cartridge and thereby creates the
risk of exploding an unchambered cartridge and possible injury.
In order to lock the slide in the open position, allow the slide to
move slightly forward from the rearmost position while pressing
upward on the slide stop. You are now able to safely check the
barrel chamber and bore visually for any obstructions.You
must follow this procedure every time your firearm is inspected,
cleaned, handed to another person, transported or stored.
Unload the magazine by holding it with the bullet end of the
cartridge pointing away from you and others and pressing each
cartridge forward and out of the magazine.
FIGURE 5
13
DO NOT BLOCK EJECTION PORT!
Page 14
LOADING
• Do not load the pistol until you are ready to use it.
Keep your finger outside the trigger guard until you are ready
to fire.
WARNING: Once the magazine is removed from the
pistol and the trigger is fully released, subsequent
cycling of the trigger will not fire the pistol until the
magazine is fully reinserted. (This may not apply to certain
pistols that have been marked “CAUTION - CAPABLE OF
FIRING WITHOUT MAGAZINE”)
WARNING: Some Smith & Wesson centerfire pistols
are designed to disengage the trigger linkage, and
thereby prevent the trigger from firing the pistol
when the magazine is removed from the pistol. Be certain
to fully release the trigger and remove your finger from
within the trigger guard when the magazine is removed from
the pistol. Failure to fully release the trigger could result in
firing the handgun. After inserting a magazine, always test
to make sure it is locked in place by applying some removal
pressure to the exposed portion of the magazine butt plate.
14
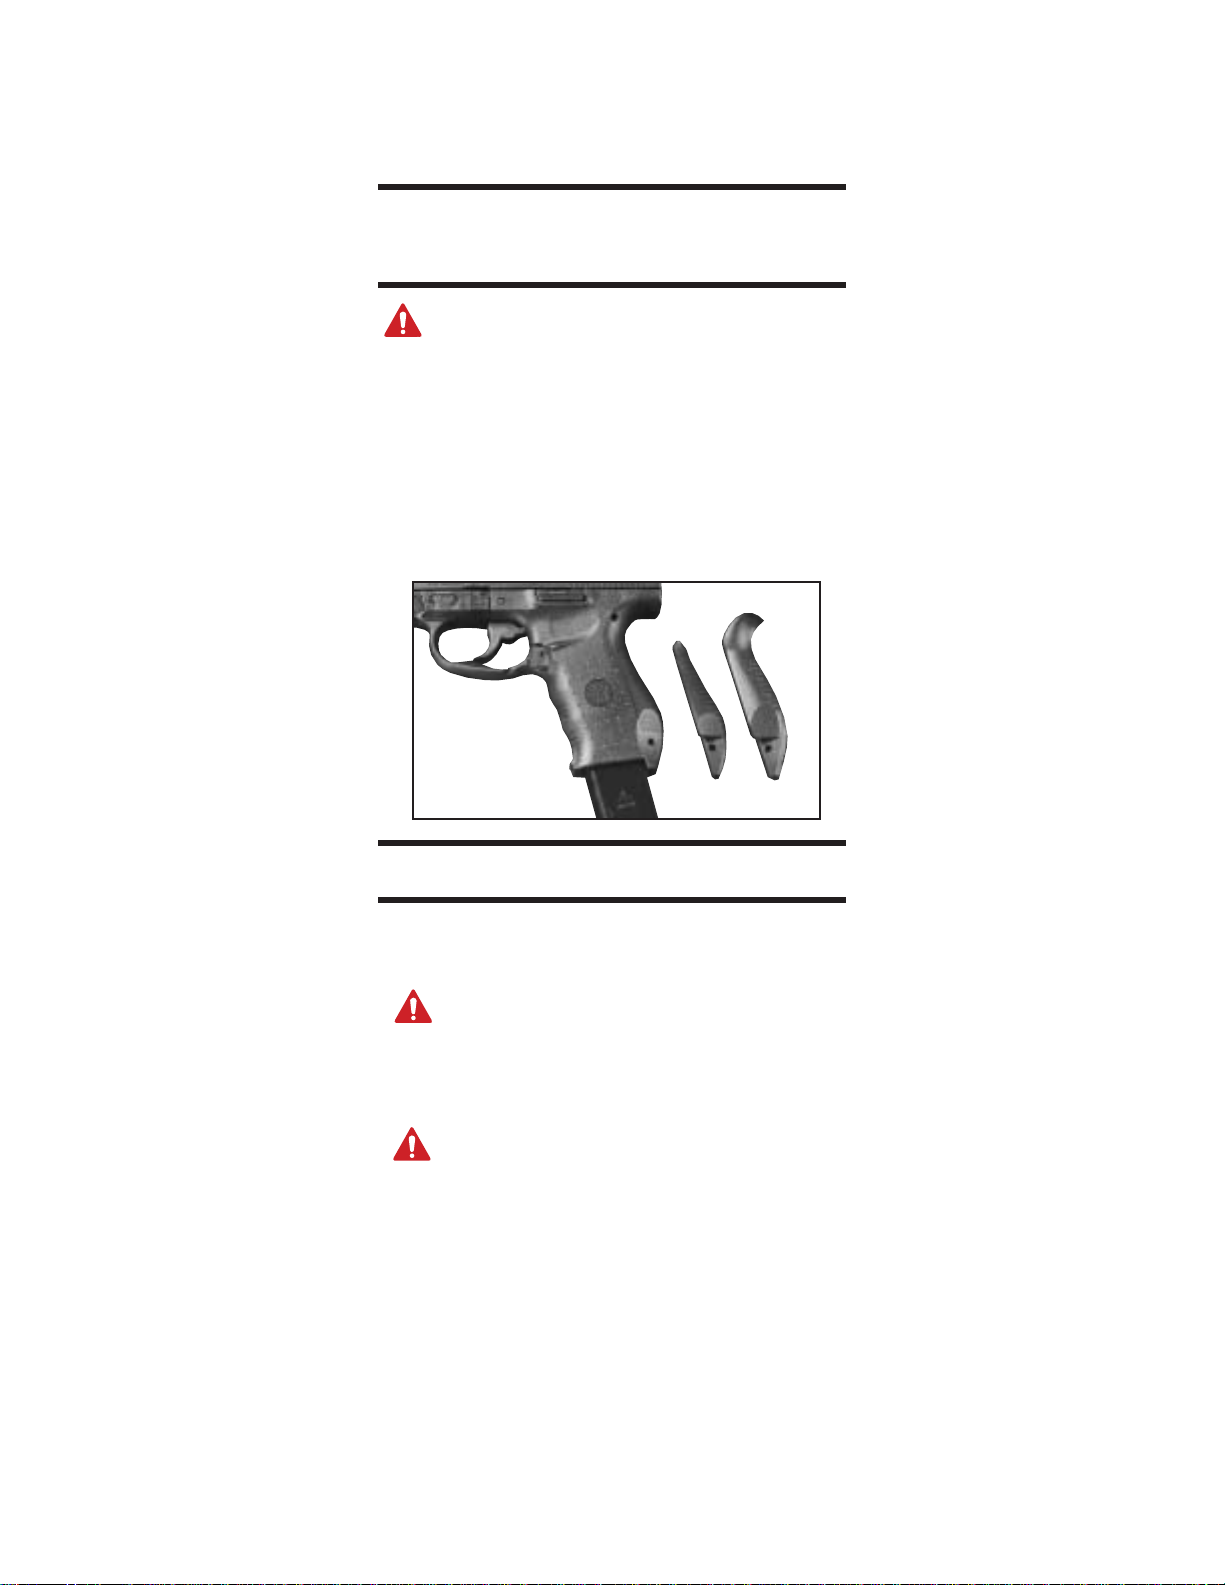
REPLACING THE
BACKSTRAP
WARNING: Make sure the handgun is unloaded
before changing the backstrap.
• If the backstrap currently on your pistol does not fit your hand
comfortably, you can install one of a different size and shape.
Using a pin punch, gently tap out the roll pin in the lower part
of the grip and remove the backstrap.
• When installing the new backstrap, first fit the small tab at the
top of the backstrap into the frame, then push the lower end
into the slot.
• Carefully put the roll pin back in place and tap it into the grip
until it is centered.
FIGURE 6
Page 15

15
• Only use Smith & Wesson magazines specifically
manufactured for your par ticular model of pistol. Do not
interchange magazines from one model pistol into another
model pistol.
• Smith & Wesson has provided you with a magazine
designed to operate in your specific model of pistol.While
your magazine may be able to be inserted into another
model pistol, it will only function properly in the specific
model for which it was designed.
•Follow instructions in this manual and any other specific
instructions which may be marked onto, or accompany, a
magazine. Failure to use the particular type of Smith &
Wesson magazine specified for your model and caliber of
pistol may result in a malfunction.
• Load the magazine by pressing a cartridge head (rear of
cartridge) downward on the forward portion of the magazine
follower (or downward on the case of the previously loaded
cartridge) and sliding the car tridge fully under the lips of the
magazine until the cartridge head is against the rear wall of
the magazine. Repeat the procedure for the number of
cartridges you wish to load, up to the magazine capacity.
Do not attempt to load your magazine with more than the
specified number of cartridges because doing so can cause
a feeding failure.
• Inspect your pistol as previously described in the “Inspecting
Your Pistol” section. Hold the pistol in one hand with the
muzzle pointing in a safe direction and with your finger off
the trigger and outside the trigger guard. Insert the loaded
magazine into the magazine well of the pistol until it is locked
in place.
WARNING: Do not use excessive upward force when
inserting a loaded magazine into the pistol. Excessive
upward force could cause the slide to move forward,
chambering a round and making the pistol ready to fire.
•To make sure that the magazine is fully and securely
inserted, apply some removal pressure to the exposed
portion of the magazine butt plate.
• Press down on the slide stop to release the slide and allow it
to carry fully forward. This strips a cartridge from the
magazine and seats it in the chamber of the barrel.
CAUTION
The pistol can now be fired simply by pulling the trigger to the rear.
LOADING CONT’D.
Page 16

FIRING
• Hold the pistol in your shooting hand with your finger outside
the trigger guard. After verifying that the target and the area
beyond are safe, align the sights on the target. When you
are ready to shoot, place the pad of your index finger on the
trigger.
• When the trigger is drawn fully to the rear, the striker is
released, striking the cartridge pr imer and firing the cartridge.
• Upon firing, the slide moves rearward thereby extracting and
ejecting the spent cartridge case. The slide then retur ns
forward feeding the next cartr idge from the magazine into the
barrel chamber.During firing operation, the thumb must not
interfere with the slide or slide stop. This sequence can be
repeated until the last round has been fired at which time the
magazine follower exerts upward pressure on the slide stop
causing it to engage the slide and to hold it in the open
position.
WARNING: The single action trigger pull is lighter
and may be shorter than the double action pull.
Check the cocking indicator in the rear of the slide
to determine if you are in double or single action
mode before putting your finger on the trigger.
WARNING: Upon firing the pistol or releasing the
slide from the slide stop, the slide moves rearward
or forward with significant force and speed. To avoid
injury be sure no part of your body is in the path of
the slide’s travel.
16
LOADED CHAMBER
INDICATOR
• If the chamber is loaded, the rear of the extractor is recessed
in the slide. There is a red dot on the right side of the slide
which is visible when the chamber is loaded with a cartridge.
WARNING: Cleaning
solvents or wear
may darken or
remove the red
color, or powder residue or
dirt may cover it up. If you
do not see the red dot, don’t
assume the chamber is
empty. Pull the slide back
until you can look in the
chamber and verify whether it
is empty or not.
FIGURE 7
Page 17

17
COCKING INDICATOR
• When the striker is cocked, it protrudes out of the slide end
cap and displays a red dot.
WARNING: Do not count on seeing the red dot.
Cleaning solvents or wear may darken or remove
the red color, or powder residue or dirt may cover
it up. If you do not see the red dot, don’t assume
the striker is decocked. Look at the striker or feel it with
your finger so you know if the striker is cocked.
TRIGGER - SW99NJ
SINGLE ACTION - Trigger Forward
• This operation mode features a cocked striker for a long,
reduced weight single action trigger pull. The SW99 will be
in this mode after releasing the slide to chamber a round or,
moving the slide 3/8” to the rear and releasing. Although the
trigger is in the same forward position as the double action
mode, the trigger pull is much lighter.
SINGLE ACTION - Trigger Rearward
• After firing, the pistol cycles, ejecting the fired case,
chambering a round and cocking the striker. Subsequent
rounds are fired in a short stroke single action mode. The
pistol should be returned to the trigger forward mode before
holstering.
DOUBLE ACTION
• In the SW99NJ pistol, an additional mode is only available in
the event that the chambered round failed to fire and may be
used to restrike the cartridge in the chamber. It may also be
used to dry fire the pistol.
WARNING: The single action trigger pull is lighter and
may be shorter than the double action pull. Check the
cocking indicator in the rear of the slide to determine
if you are in double or single action mode before
putting your finger on the trigger.
FIGURE 8
Page 18

TRIGGER - SW99
The SW99 features one double action and two single action
modes for firing.
DOUBLE ACTION
• The Smith & Wesson traditional double action mode begins
with the trigger in the forward position. The trigger is pulled
through the full length of travel, cocking the striker and firing
the pistol in one motion.
SINGLE ACTION - Trigger Forward
• The second operation mode features a cocked striker for a
long, reduced weight single action trigger pull. The SW99
will be in this mode after releasing the slide to chamber a
round or, when the gun is decocked, moving the slide 3/8” to
the rear and releasing. Although the tr igger is in the same
forward position as the double action mode, the trigger pull is
much lighter.
WARNING: The single action trigger pull is
lighter and may be shorter than the double action
pull. Check the cocking indicator in the rear of the
slide to determine if you are in double or single action
mode before putting your finger on the trigger.
SINGLE ACTION - Trigger Rearward
• After firing, in either of the above modes, the pistol cycles,
ejecting the fired case, chambering a round and cocking the
striker. Subsequent rounds are fired in a short stroke single
action mode. The pistol should be returned to one of the
trigger forward modes before holstering. The SW99 can be
decocked from any trigger position.
18
AFTER FIRING
SW99NJ
WARNING: During the procedure of manually cycling
the slide, any chambered round will be ejected and
should be recovered once the firearm is safely
secured.
•To return the trigger to the forward position, change the
magazine and cycle the slide to assure that the pistol is
ready to fire. This process will return the trigger to the
forward mode. If immediate readiness is not a concern, the
pistol may be unloaded.
OPTIONAL TECHNIQUE
• Pull the slide rearward 3/8” and then press the slide forward
to assure that it is in battery. This process will also return
the trigger to the forward mode.
WARNING: Keep your finger off the trigger and out of
the trigger guard during this process.
WARNING: Failure to cycle the slide “briskly” on a
loaded weapon could cause a jam.
Page 19

DECOCKING THE
STRIKER - SW99
When the striker is cocked, the trigger is in single action mode.
To return the trigger to double action mode, press down on the
decocker. This will allow the striker to go forward without firing
the cartridge in the chamber.
WARNING: Keep your finger off the trigger and
out of the trigger guard during this process.
CLEARING MISFIRES
•If, dur ing fir ing, a car tr idge fails to fire, the chamber must be
manually cleared.Wait ten seconds while keeping the muzzle
pointed in a safe direction. Grasp the serrated sides of the slide
from the rear and briskly pull the slide fully rearward to eject the
misfired round. Keep your finger off of the trigger and out of the
trigger guard. Do not obstruct the ejection port, and do not
attempt to catch the round by placing your hand over the ejection
port. (See figure 5) Also, remember that any time you release the
slide while a magazine containing cartridges is in the pistol, you will
have reloaded the chamber.
PRODUCT WARNING
All Smith & Wesson Handguns Capable of Double Action
Firing
• It has come to our attention that some users of
Smith & Wesson pistols capable of firing in double action
may stage the trigger in anticipation of firing a shot in the
double action mode.Staging is the act of pulling the trigger
rearward toward — but just short of — the point where the
hammer falls and the pistol fires.Such manipulation of the
trigger can reduce the user’s control of the handgun and can
result in an unintentional discharge. Fur ther more if the user
decides not to fire, release of the trigger from a position
close to the firing point in the staging process could result in
a discharge.
•Obviously “staging” the trigger violates a basic rule of firear m
safety which warns you to keep your finger off the trigger and
outside the trigger guard until ready to fire.
•We warn all users of our pistols capable of firing in double
action to refrain from “staging” the trigger.
19
Page 20

TARGETING AND
SIGHT ADJUSTMENT
•Your pistol has been targeted at the factory, however should
you wish to further adjust the windage, simply move the sight
in the direction you want the bullet to move on the target.
There are four different front sight heights available from our
product service department.
•To move the rear sight, turn the screw on the right side of the
rear sight. One click (1/4 turn) moves the bullet a little over
1/16” at 25 yards. Turn the sight screw clockwise to move
the point of impact left. Turn the sight screw counter clockwise to move the point of impact right. The elevation is
adjusted by changing front sight heights. To change the front
sight, follow the instructions for field stripping and remove
the barrel from the slide assembly, remove the front sight
screw from inside the slide assembly and remove the front
sight. Assembly is in reverse
order. To move the point of
impact up, install a lower front
sight. To move the point of
impact down, install a taller front
sight.
20
UNLOADING
• Lock the slide to the rear by pushing the slide stop lever
upwards while pulling the slide back and allowing it to go
forward slightly to be held rearward by the slide stop lever.
• Look into the chamber and down through the magazine well.
Verify that no ammunition remains in the pistol.
• Pull the slide to the rear and release it or depress the slide
stop lever to allow the slide to move forward.
•Point the muzzle in a safe direction.Make sure your finger is
off the trigger, and the trigger is in the "at rest" or forward
position. Depress the magazine release, and remove the
magazine.With the muzzle still pointing in a safe direction,
and with your finger off the trigger and outside the trigger
guard, grasp the serrated sides of the slide from the rear with
the thumb and fingers, and briskly draw the slide fully
rearward in order to extract any cartridge from the barrel
chamber and clear it from the pistol.
WARNING: Do not obstruct the ejection port
because doing so can interfere with ejection of a
cartridge and thereby creates the risk of exploding
an unchambered cartridge and possible injury.
• Visually check the barrel chamber to be sure it is empty.
• Unload the magazine by holding it with the bullet end of the
cartridge pointing away from you and pressing each cartridge
forward and out of the magazine.
Figure 9
Page 21

21
FIELD STRIPPING
SW99NJ
During field stripping of your pistol:
WARNING: ALWAYS POINT THE MUZZLE IN A
SAFE DIRECTION AND BE SURE TO KEEP YOUR
FINGER OUTSIDE THE TRIGGER GUARD. BE SURE YOUR
PISTOL IS UNLOADED BEFORE DISASSEMBLY.
•To disassemble, depress the magazine release and remove
the magazine. Grasp the rear of the slide and br iskly pull it
fully rearward to eject the cartridge from the chamber.
WARNING: Do not obstruct the ejection port
because doing so can interfere with ejection of a
cartridge and thereby creates the risk of exploding
an unchambered cartridge and possible injury.
• Lock the slide to the rear by pushing the slide stop lever
upwards while pulling the slide back and allowing it to go
forward slightly to be held rearward by the slide stop lever.
• Look into the chamber and down through the magazine well.
Verify that no ammunition remains in the pistol.
• Pull the slide to the rear and release it or depress the slide
stop lever to allow the slide to move forward.
WARNING: To complete disassembly, you will be
required to pull the trigger. If you have failed to
unload your pistol and a round is left in the
chamber,the pistol will discharge and may cause injury.
Therefore, be sure that the chamber is empty before
proceeding further.
•Verify that the muzzle is pointed in a safe direction and pull
the trigger to decock the striker for disassembly.
• Pull the slide back about 1/8”and depress the takedown
catch on both sides of the frame with your thumb and
forefinger.(Figure 11)
• Push the slide off the frame.(Figure 12)
•Grasp the slide just behind the front sight and remove the
slide by pulling it forward while being careful to retain the
recoil spring and guide rod assembly. (Figure 13)
• Remove the recoil spring, guide rod assembly and barrel.
(Figure 14 & 15)
• The pistol is now ready for normal cleaning and lubrication.
Further disassembly is not recommended and should only be
undertaken by a Smith & Wesson Certified Armorer or the
Factory Service Center.
Page 22

FIELD STRIPPING
SW99
WARNING: ALWAYS POINT THE MUZZLE IN A SAFE
DIRECTION AND BE SURE TO KEEP YOUR FINGER
OUTSIDE THE TRIGGER GUARD. BE SURE YOUR PISTOL IS UNLOADED BEFORE DISASSEMBLY.
•To disassemble, depress the magazine release and remove
the magazine. Grasp the slide from the rear and briskly pull
the slide fully rearward to eject the cartridge from the
chamber.
WARNING: Do not obstruct the ejection port because
doing so can interfere with ejection of a cartridge and
thereby creates the risk of exploding an unchambered
cartridge and possible injury.
• Lock the slide to the rear by pushing the slide stop lever
upwards while pulling the slide back and allowing it to go
forward slightly to be held rearward by the slide stop lever.
• Look into the chamber and down through the magazine well.
Verify that no ammunition remains in the pistol.
• Pull the slide to the rear and release it or depress the slide
stop lever to allow the slide to move forward.
• Decock the striker by pressing the decocker downward.
(Figure 10)
• Pull the slide back about 1/8” and depress the takedown
catch on both sides of the frame with your thumb and
forefinger.(Figure 11 & 12)
•Grasp the slide just behind the front sight and remove the
slide by pulling it forward while being careful to retain the
recoil spring and guide rod assembly. (Figure 13)
• Remove the recoil spring, guide rod assembly and barrel.
(Figure 14 & 15)
• The pistol is now ready for normal cleaning and lubrication.
Further disassembly is not recommended and should only be
undertaken by a Smith & Wesson Certified Armorer or the
Factory Service Center.
FIGURE 10
FIGURE 11
FIGURE 12
FIGURE 13
22
Page 23

DISASSEMBLY
1. Using a drift punch, depress floorplate catch (4) through hole
in magazine floorplate (5).
2. Slide magazine floorplate (5)
out of magazine tube (1)
while holding floorplate
catch (4) in the magazine
tube (1).
3. Remove floorplate catch (4)
and magazine spring (3) out
through bottom of magazine
tube (1).
4. Turn magazine tube (1)
right side up and remove
magazine follower (2)
through bottom of
magazine tube (1).
MAGAZINE DISASSEMBLY
(1)
(2)
(3)
(4)
(5)
23
FIGURE 17
REASSEMBLY
• With the rear of the slide pointed in a safe direction and the
bottom of the slide turned up, replace the barrel in the slide
so the muzzle is flush with the end of the slide and barrel
lug is turned up (away from the ejection port). Replace the
recoil spring. Be sure the recoil spring is centered and
seated properly.
• Holding the slide and recoil spring firmly in one hand, move
the rear of the slide onto the frame rails. Continue moving
the slide onto the frame until the slide is fully rearward
before allowing the slide to return forward to the closed
position.
FIGURE 14
FIGURE 15
FIGURE 16
Page 24

CLEANING AND
MAINTENANCE
!! WARNING !!
Ensure your firearm is unloaded before beginning to clean
it. At all times follow the basic rules of safe gun handling.
Your firearm is a precision instrument and to insure reliable
function, it is necessary to follow a routine maintenance
procedure. After firing your firearm, be sure to unload it following
the procedure outlined in the section entitled “Unloading” on
page 20 before any cleaning or maintenance procedure. Your
pistol should be cleaned by brushing the barrel bore and
chamber with a good powder-removing solvent and bore brush.
Wipe the areas clean with patches or a swab. Using a small
brush dipped in solvent, remove all deposits from around the
breech of the barrel, and chamber, extractor and adjacent areas
which have been subjected to the action of powder or primer
residue. Remove any residue on the frame with light brushing
and a solvent. After cleaning the entire gun, use a cloth to apply
a light film of high quality gun oil to all external metal surfaces
and wipe clean.
Cleaning is considered essential in order to ensure the proper
functioning of your handgun.
For additional maintenance, we recommend the services of a
qualified gunsmith. Please refer to section entitled “Service”. If
your firearm will be used or stored in a cold climate, be sure to
use an oil that will not thicken at low temperatures.
ASSEMBLY (see Figure 16)
1. Install magazine follower (2) in bottom of the magazine tube
(1) with the notched edges of the magazine follower (2)
toward the round side of the magazine tube (1).
2. Install magazine spring (3) and floorplate catch (4) in
magazine tube (1).
3. While holding floorplate catch (4) in magazine tube (1), slide
magazine floorplate (5) into magazine tube (1) so that the
round projection of the floorplate catch (4) engages the
magazine floorplate (5).
MAGAZINE ASSEMBLY
24
Page 25

SERVICE,
SHIPPING & PARTS
SERVICE
Should your Smith & Wesson firearm require service, it should
be returned to Smith & Wesson in its original case or in a similarly secure container. It is not necessary to take the gun to a dealer for shipment. However, before shipping your firearm, call or
email our Customer Service Dept. for authorization and shipping
instructions.
Before shipping your handgun, ensure that the firearm is
unloaded, package it securely, and do NOT ship any ammunition.
The package must NOT bear any markings which indicate the
identity of the contents. Enclose a letter which includes your full
name and address (no P.O. Boxes, please), daytime telephone
number, email address, the serial number of the firearm, and
details of the problem experienced or work desired. Record the
serial number before shipping, in case you wish to check on the
repair status of your firearm.
Ship Centerfire pistols and ALL
revolvers to:
Customer Service, 2100 Roosevelt Avenue, Springfield, MA 01104
Ship ALL .22 caliber pistols to:
Customer Service, 19 Aviation Drive, Houlton, ME 04730
Please call the above telephone number or email the above
address before shipping!!
Since we cannot assume responsibility for custom parts and
accessories, such as stocks, special sights, or holsters, please
remove these items before returning your firearm.
Warranty repair work will begin upon receipt and examination of
the firearm. In the case of repairs or work not covered by the
warranty, a quotation covering the cost of the work plus round
trip transportation charges will be sent to you. Repairs or modification will begin upon receipt of payment.
Customer Service
2100 Roosevelt Avenue
Springfield, MA 01104
Tel: 800-331-0852 • 413-781-8300
E-mail: qa@smith-wesson.com
For Owners Within The United States
25
Page 26

SHIPPING
When shipping a firearm, it is most important that you comply
with federal, state, and local laws and regulations. The following
guidelines are meant to help, but you must seek assistance from
the appropriate authorities if necessary.
• Check magazines and chambers to ensure that they
are unloaded. Do not ship ammunition.
• Do not attempt to MAIL a handgun; only federally
licensed dealers may mail a firearm.
• If your firearm must be replaced, it may be necessary
to ship the replacement to a dealer rather than directly
to you. You will be requested to furnish a signed FFL
(Federal Firearms License) from your dealer in such an
instance.
• When returning a pistol, please include all magazines
ensuring they are unloaded; they are impor tant to the
proper function of the handgun.
A
CCESSORIES & PARTS
Replacement parts and accessories for your Smith & Wesson
firearm are available from your local Smith & Wesson Stocking
Dealer, or directly from the Smith & Wesson Parts Department.
When ordering parts directly from the factory, please provide the
following information:
• Model Number
• Dash Number
• Serial Number
• Approximate date of purchase
•Par t view Number (refer to diagram)
• Complete Return Address
• VISA/Discover/MasterCard Number and
Expiration Date
•For Foreign Orders Only, Fax Number or Email
Address
SERVICE, SHIPPING, & PARTS CONT’D.
26
Page 27

WARRANTY
This warranty is granted by Smith & Wesson, 2100 Roosevelt
Avenue, P.O. Box 2208, Springfield, MA 01102-2208.
This warranty is effective from the date of purchase after
February 1, 1989 and applies to the original owner of any
handgun purchased after that date. With respect to such
handguns, this warranty supersedes any and all other
warranties.
Smith & Wesson handguns are warrantied to be free from
defects in material and workmanship. Any such defects of which
Smith & Wesson receives written notice within one year from the
date of purchase by the original owner, will be remedied by
Smith & Wesson without charge within a reasonable time after
such notification and delivery of the handgun as provided below.
If any unsafe and/or illegal condition is found during warranty
inspection, Smith & Wesson will return the handgun to its original
specification.
Warranty claims (in writing) and the handgun concerned should
be delivered to Smith & Wesson’s Customer Service Department
at the above address. In addition, a copy of the bill of sale in the
owner’s name, or a copy of ATF Form 4473 indicating date of
purchase must be included.
Warranty claims should state the model and serial number of the
handgun concerned and the description of the difficulty experienced. It is recommended that shipments be insured by the
owner, since Smith & Wesson will accept no responsibility for loss
or damage in transit. Transportation and insurance charges for
return to owner will be paid by Smith & Wesson if the claim is
covered by the warranty.
UNDER NO CIRCUMSTANCES SHALL SMITH & WESSON BE
RESPONSIBLE FOR INCIDENTAL OR CONSEQUENTIAL
DAMAGES WITH RESPECT TO ECONOMIC LOSS, INJURY OR
PROPERTY DAMAGE,WHETHER AS A RESULT OF BREACH
OF EXPRESS OR IMPLIED WARRANTY, NEGLIGENCE OR
OTHERWISE.
Some states do not allow the exclusion or limitation of incidental
or consequential damages, so the above limitation or exclusion
may not apply to you.
Smith & Wesson will not be responsible for defects resulting from
careless handling, unauthorized adjustments or modifications,
defective or improper ammunition, corrosion, neglect, abuse,
ordinary wear and tear, or unreasonable use.
Smith & Wesson reserves the right to determine what constitutes
ordinary wear and tear. However, we can rebuild handguns that
have experienced extreme usage or are beyond their normal useful life at a fee that will be quoted to the owner.
This warranty gives you specific legal rights. You may also have
other rights that vary from state to state.
For Owners Within The United States
27
Page 28

EXTENDED
SERVICE POLICY
Even after the warranty period has expired, Smith & Wesson will
repair, without charge, any handgun purchased by the original
owner on or after February 1, 1989 that is found to have defect in
material or workmanship. Eligibility for this extended service
policy requires returning the Product Registration Card within
thirty days of purchase. A copy of the bill of sale in the owner’s
name and the sales receipt should accompany the handgun.
If any unsafe and/or illegal condition is found during warranty
inspection, Smith & Wesson will return the handgun to its original
specification.
This policy covers functional defects;it does not include the
handgun’s finish, grips, magazines or sights.
This policy is in addition to and not an extension of the
Smith & Wesson Warranty.
Lif
etime Service Policy
Fast Reliable Service
If you have any questions or concerns regarding your Smith &
Wesson product, please give us a call. Our customer service
representatives are product knowledgeable and are here to help
you.
911 Priority Repair Ser
vice
In the event of an emergency (repairs needed by law
enforcement, an upcoming match or hunting trip), call
1-800-331-0852 and ask for 911 Priority Repair Service. This
allows you to speak with a Smith & Wesson
representative. Immediately upon receipt, your handgun will be
assigned to a gunsmith. After the work is completed, we will
return your Smith & Wesson handgun via overnight delivery.
For Owners Within The United States
28
Page 29

COMPONENT PARTS
29
SW99NJ
This schematic diagram and part description conforms to current
specifications. From time to time, changes may be made, and the
gun which you own may not correspond exactly with the information
provided on this sheet.
1. Front Sight Assembly
3. Slide
5. Extractor
6. Extractor Plunger Assembly
7. Extractor/ Mag. Catch Spring
8. Rear Sight Assembly
10. Rear Sight Plunger Assembly
11. Striker Spring Keeper
12. Striker Spring
13. Striker Guide
14. Striker Return Spring
15. Striker Assembly
16. Trigger Return Spring
17. Trigger Bar Guide
18. Safety Plunger Assembly
19. Barrel
20. Slide End Cap
21. Recoil Guide Rod Assembly
22. Locking Block Pin
23. Takedown Catch
24. Trigger Assembly
25. Slide Stop Lever
26. Trigger Pin
27. Takedown Catch Pin
28. Barrel Lock Assembly
29. Frame
29.1. Locking Block
30. Slide Stop Lever Spring
31. Sear Housing Block Pin
32. Sear Housing Assembly
33. Magazine Assembly
35. Backstrap/ Mag. Catch Assembly
36. Magazine Catch
38. Backstrap
39. Magazine Follower
40. Magazine Tube
41. Magazine Butt Plate Catch
42. Magazine Butt Plate
43. Magazine Spring
SW99NJ
Page 30

COMPONENT PARTS
30
This schematic diagram and part description conforms to current
specifications. From time to time, changes may be made, and the
gun which you own may not correspond exactly with the information
provided on this sheet.
1. Front Sight Assembly
3. Slide
4. Decocking Assembly
5. Extractor
6. Extractor Plunger Assembly
7. Extractor/ Mag. Catch Spring
8. Rear Sight Assembly
10. Rear Sight Plunger Assembly
11. Striker Spring Keeper
12. Striker Spring
13. Striker Guide
14. Striker Return Spring
15. Striker Assembly
16. Trigger Return Spring
17. Trigger Bar Guide
18. Safety Plunger Assembly
19. Barrel
20. Slide End Cap
21. Recoil Guide Rod Assembly
22. Locking Block Pin
23. Takedown Catch
24. Trigger Assembly
25. Slide Stop Lever
26. Trigger Pin
27. Takedown Catch Pin
28. Barrel Lock Assembly
29. Frame
29.1. Locking Block
30. Slide Stop Lever Spring
31. Sear Housing Block Pin
32. Sear Housing Assembly
33. Magazine Assembly
35. Backstrap/ Mag. Catch Assembly
36. Magazine Catch
38. Backstrap
39. Magazine Follower
40. Magazine Tube
41. Magazine Butt Plate Catch
42. Magazine Butt Plate
43. Magazine Spring
SW99
S
W99
Page 31

This handgun is not equipped with a
device that fully blocks use by
unauthorized users. More than 200,000
firearms like this one are stolen from their
owners every year in the United States. In
addition, there are more than a thousand
suicides each year by younger children
and teenagers who get access to firearms.
Hundreds more die from accidental discharge. It is likely that many more children sustain serious wounds or inflict such
wounds accidentally on others. In order to
limit the chance of such misuse, it is
imperative that you keep this weapon
locked in a secure place and take other
steps necessary to limit the possibility of
theft or accident. Failure to take reasonable preventative steps may result in innocent lives being lost, and in some circumstances may result in your liability for
these deaths.
The certification below is required only for handguns sold in the
United States with a barrel length shorter than 3”.
Smith & Wesson Corp. hereby certifies average accuracy test results for
all new handguns with a barrel shorter than 3” as follows:
7 yards 14 yards 21 yards
.22 cal. 1.7” 3.9” 5.1”
.380 cal. 1.6” 3.2” 6.3”
.38, .44 spec.
.44 Mag, .357 cal. 1.0” 2.1” 2.5”
This certification is based on tests conducted by Smith & Wesson Corp.
using a fixed handgun, rest and firing ammunition manufactured by a
member of the Shooting Arms and Ammunition Manufacturers Institute
(SAAMI) as defined in ANSI/SAAMI Z299.3-1993.
This certification represents actual tests based on several handguns,
selected at random. Your particular handgun may have accuracy better
than the results stated in this certification. Any caliber handgun not
specifically listed will perform comparably to the nearest caliber listed.
31
Page 32

Smith & Wesson
2100 Roosevelt Avenue • Springfield, MA 01104
www.smith-wesson.com
REV:SW99-NJ101500
 Loading...