

SW 2753 Series, 2653 Series, 2851 Series, 2853 Series, 2952 Series Installation & Operating Instructions Manual
...Page 1
WALK-IN TUB MANUAL
INSTALLATION & OPERATING INSTRUCTIONS
WI-3.2 THIS LATEST MANUAL VERSION
SUPERSEDES ALL PREVIOUS VERSIONS.
FOR
MODELS
2646**
2653**
2739**
2747**
2753**
2851**
2853**
2952**
2953**
3053**
3054**
3153**
3060**
3140**
3238**
3260**
3660**
**
MANUAL IS FOR MULTIPLE
WALK-IN TUB MODELS.
IMAGE MAY VARY FROM
ACTUAL PRODUCT.
INSTALLATION & OPERATING INSTRUCTIONS
DON’T WAIT!
REGISTER NOW!
Register your product within 90 days to ensure your bathtub is
recognized as an ofcial purchase and is eligible for warranty
coverage.
Mail in the completed registry card (Pg. 2) or register online
at www.SWCORP.com/register.
5701 NW 35 Avenue Miami, FL 33142 • Phone 866-633-4882 • Fax 866-560-1060
Page 2

WALK-IN TUB MANUAL
PRODUCT REGISTRATION
PRODUCT REGISTRATION*
IMPORTANT: YOUR WARRANTY WILL NOT BE RECOGNIZED UNLESS THIS CARD IS
FULLY COMPLETED AND RETURNED OR ONLINE REGISTRATION IS COMPLETED.
To ensure that your warranty is registered and conrmed please do one of the following:
1. Register online at www.SWCORP.com/register. You will be asked to fill out the
same information you would in the registration card. Registering online is fast, secure
and ensures we receive your information.
OPERATING INSTRUCTIONS
PRODUCT REGISTRATION
2. Complete, cut-out and mail the registration card below. By returning this registration
card we confirm the date of purchase for your new product. This confirmation will allow
us to process any warranty claims.
Mail the card to: 5701 NW 35 Avenue, Miami, FL 33142
CUT ALONG
DOTTED LINE.
Product Registration Card
Name ..................................................................................... Address ....................................................................................................................
City ............................................... State ........................... Zip ..............................
Phone ........................................... Email ....................................................................
Date of Purchase........................... Order or Purchase # .................................................... SKU or Model # .........................................................
Installer’s Name ..................................................................... Phone ................................................................................
I have read the Owner’s Guide carefully and understand and agree that any installation, operation or maintenance of the bathtub must be done strictly
in accordance with instructions and guidelines contained in the owner’s manual and installation guide.
Signature.............................................................................. Date ..................................................................................
Page 2
5701 NW 35 Avenue Miami, FL 33142 • Phone 866-633-4882 • Fax 866-560-1060
Page 3

WALK-IN TUB MANUAL
TABLE OF CONTENTS
TABLE OF CONTENTS
PRODUCT REGISTRATION ......................................................................................... 2
THANK YOU FOR YOUR PURCHASE ............................................................................. 4
SAVE THIS MANUAL! ............................................................................................... 5
UNPACKING THE UNIT .............................................................................................. 6
PRE-INSTALLATION ................................................................................................. 7
INSTALLATION PREPARATION .................................................................................... 8
ELECTRICAL PREPARATION ....................................................................................... 9
INSTALLATION PROCEDURES .................................................................................... 10
DRAIN CONNECTION ................................................................................................ 11
CONNECTING THE AUTO DRAIN .................................................................................. 12
CONNECTING DOOR DRAIN ....................................................................................... 14
INSTALLATION AND EXTENSION PANELS ...................................................................... 15
FAUCET INSTALLATION ............................................................................................. 16
OPERATING SAFETY INSTRUCTIONS ............................................................................ 17
OPERATING INSTRUCTIONS ...................................................................................... 19
TUB CONTROLS ...................................................................................................... 20
CLEANING AND MAINTENANCE .................................................................................. 21
WARRANTY ........................................................................................................... 22
RETURN POLICY ..................................................................................................... 23
TABLE OF CONTENTS
5701 NW 35 Avenue Miami, FL 33142 • Phone 866-633-4882 • Fax 866-560-1060
Page 4

WALK-IN TUB MANUAL
THANK YOU & CONTACT INFORMATION
THANK YOU FOR YOUR PURCHASE!
The purchase of a walk-in bathtub is made out of a necessity for safety, comfort and quality of life. It is not a small investment but it
pays for itself by recapturing the peace of mind and freedom you once had.
Our mission is to provide anyone with limited mobility the tools they need to once again enjoy the complete bathing experience.
To help ensure you get the most out of your investment below is list of ESSENTIAL DO’s and DON’Ts that must be kept in mind
during and after your bathtub’s installation.
ESSENTIAL DO’S & DON’TS
THANK YOU / CONTACT
DO REGISTER YOUR PRODUCT!
Register your product within 90 days to ensure your bathtub is recognized as an official purchase and is eligible
for warranty coverage. Mail the completed registry card (Pg. 2) or register online at www.SWCORP.com/register.
DO LEVEL THE TUB USING THE BUILT-IN LEVELING FEET TO PREVENT DOOR LEAKAGE!
Every walk-in bathtub comes equipped with adjustable leveling feet. THE LEVELING FEET MUST BE ADJUSTED TO
ENSURE THE TUB IS LEVEL AGAINST THE ONSITE FLOOR/SURFACE. FAILURE TO DO SO MAY RESULT IN LEAKAGE!
DO REPORT ANY DEFECTS, DAMAGES OR MISSING ITEMS RIGHT AWAY!
Thoroughly review the bathtub and contents of the package. Any defects or damages must be reported within 5
business days of receiving the product.
DON’T LIFT OR PULL THE BATHTUB BY THE PLUMBING!
Every walk-in bathtub is built with a steel support frame. This support frame features a set of handles which
should be used to lift, push and pull the bathtub to ensure no damage is done to the tub body, components or
plumbing.
DON’T LEAN OR SUPPORT YOURSELF ON THE BATHTUB DOOR!
The bathtub door’s alignment is key to providing a watertight seal. Using the door to support your weight or
leaving the door open for extended periods of time will compromise this alignment and possibly lead to leakage.
Page 4
5701 NW 35 Avenue Miami, FL 33142 • Phone 866-633-4882 • Fax 866-560-1060
Page 5

WALK-IN TUB MANUAL
SAVE THIS MANUAL
SAVE THIS MANUAL!
READ THESE INSTRUCTIONS COMPLETELY BEFORE INSTALLING THE PRODUCTS. FAILURE TO DO SO COULD RESULT IN AN
IMPROPER INSTALLATION AND COULD VOID THE WARRANTY.
RESPONSIBILITY OF THE INSTALLER
THE INSTALLER MUST INSPECT AND WATER TEST THE PRODUCT PRIOR TO INSTALLATION TO ENSURE THE UNIT IS FREE OF
DEFECT OR DAMAGE. IN THE EVENT OF A PROBLEM, THE UNIT MUST NOT BE INSTALLED. IF THE CRATE OR THE PRODUCT
HAS BEEN DAMAGED DURING SHIPPING, PLEASE CALL US IMMEDIATELY.
THIS PRODUCT MUST BE INSTALLED BY A LICENSED/CERTIFIED CONTRACTOR
LICENSED PLUMBERS AND ELECTRICIANS SHOULD BE EMPLOYED TO INSURE PROPER INSTALLATION. INSTALLERS
ASSUME ALL LIABILITY FOR THE CORRECT INSTALLATION PROCEDURES. ONLY ACCESSORIES AUTHORIZED BY THE
MANUFACTURER SHOULD BE USED WITH THIS PRODUCT.
SAVE THIS MANUAL
WARNING! WHEN USING THIS PRODUCT, BASIC PRECAUTIONS SHOULD ALWAYS BE FOLLOWED.
READ AND FOLLOW ALL INSTRUCTIONS PERTAINING TO RISK OF FIRE, ELECTRICAL SHOCK, AND/
OR OTHER INJURIES.
IMPORTANT SAFETY INSTRUCTIONS. INSTRUCTIONS IMPORTANTES RELATIVES A LA SECURITE.
READ AND FOLLOW ALL INSTRUCTIONS. LIRE ET SUIVRE TOUTES LES INSTRUCTIONS.
SAVE THESE INSTRUCTIONS. CONSERVER CES INSTRUCTIONS.
WARNING: RISK OF ACCIDENTAL INJURY OR DROWNING; CHILDREN SHOULD NOT USE HYDROMASSAGE BATHTUB
WITHOUT ADULT SUPERVISION. AVERTISSEMENT. RISQUE DE BLESSURE ET DE NOYADE. NE PAS LAISSER UN ENFANT
UTILISER LA CUVE A REMOUS EN L’ABSENCE D’UN ADULTE
WARNING: TO AVOID INJURY, EXERCISE CARE WHEN ENTERING OR EXITING THE HYDROMASSAGE BATHTUB.
AVERTISSEMENT. POUR EVITER LES BLESSURES, USER DE PRUDENCE EN ENTRANT DANS LA CUVE A REMOUS ET EN LA
QUIT TANT.
WARNING: RISK OF ELECTRIC SHOCK; DO NOT PERMIT ELECTRIC APPLIANCES (SUCH AS A HAIR DRYER, LAMP, TELEPHONE,
RADIO, OR TELEVISION) WITHIN 1.5 M OF THIS HYDROMASSAGE BATHTUB. AVERTISSEMENT. RISQUE DE CHOC ELECTRIQUE.
NE PAS PLACER D’APPAREILS ELECTRIQUES (LUMINAIRE, TÉLÉPHONE, RADIO, TELEVISEUR, ETC.) A MOINS DE 1.5 M DE
CETTE CUVE A REMOUS.
OPERATING INSTRUCTIONS
CAUTION: TEST THE GROUND FAULT CIRCUIT INTERRUPTER PROTECTING THIS APPLIANCE PERIODICALLY IN ACCORDANCE
WITH THE MANUFACTURER’S INSTRUCTIONS. ATTENTION. VERIFIER REGULIEREMENT LE FONCTIONNEMENT DU
DISJONCTEUR DE FUITE A LA TERRE CONFORMEMENT AUX INSTRUCTIONS DU FABRICANT.
Page 5
5701 NW 35 Avenue Miami, FL 33142 • Phone 866-633-4882 • Fax 866-560-1060
Page 6
WALK-IN TUB MANUAL
UNPACKING
UNPACKING THE UNIT
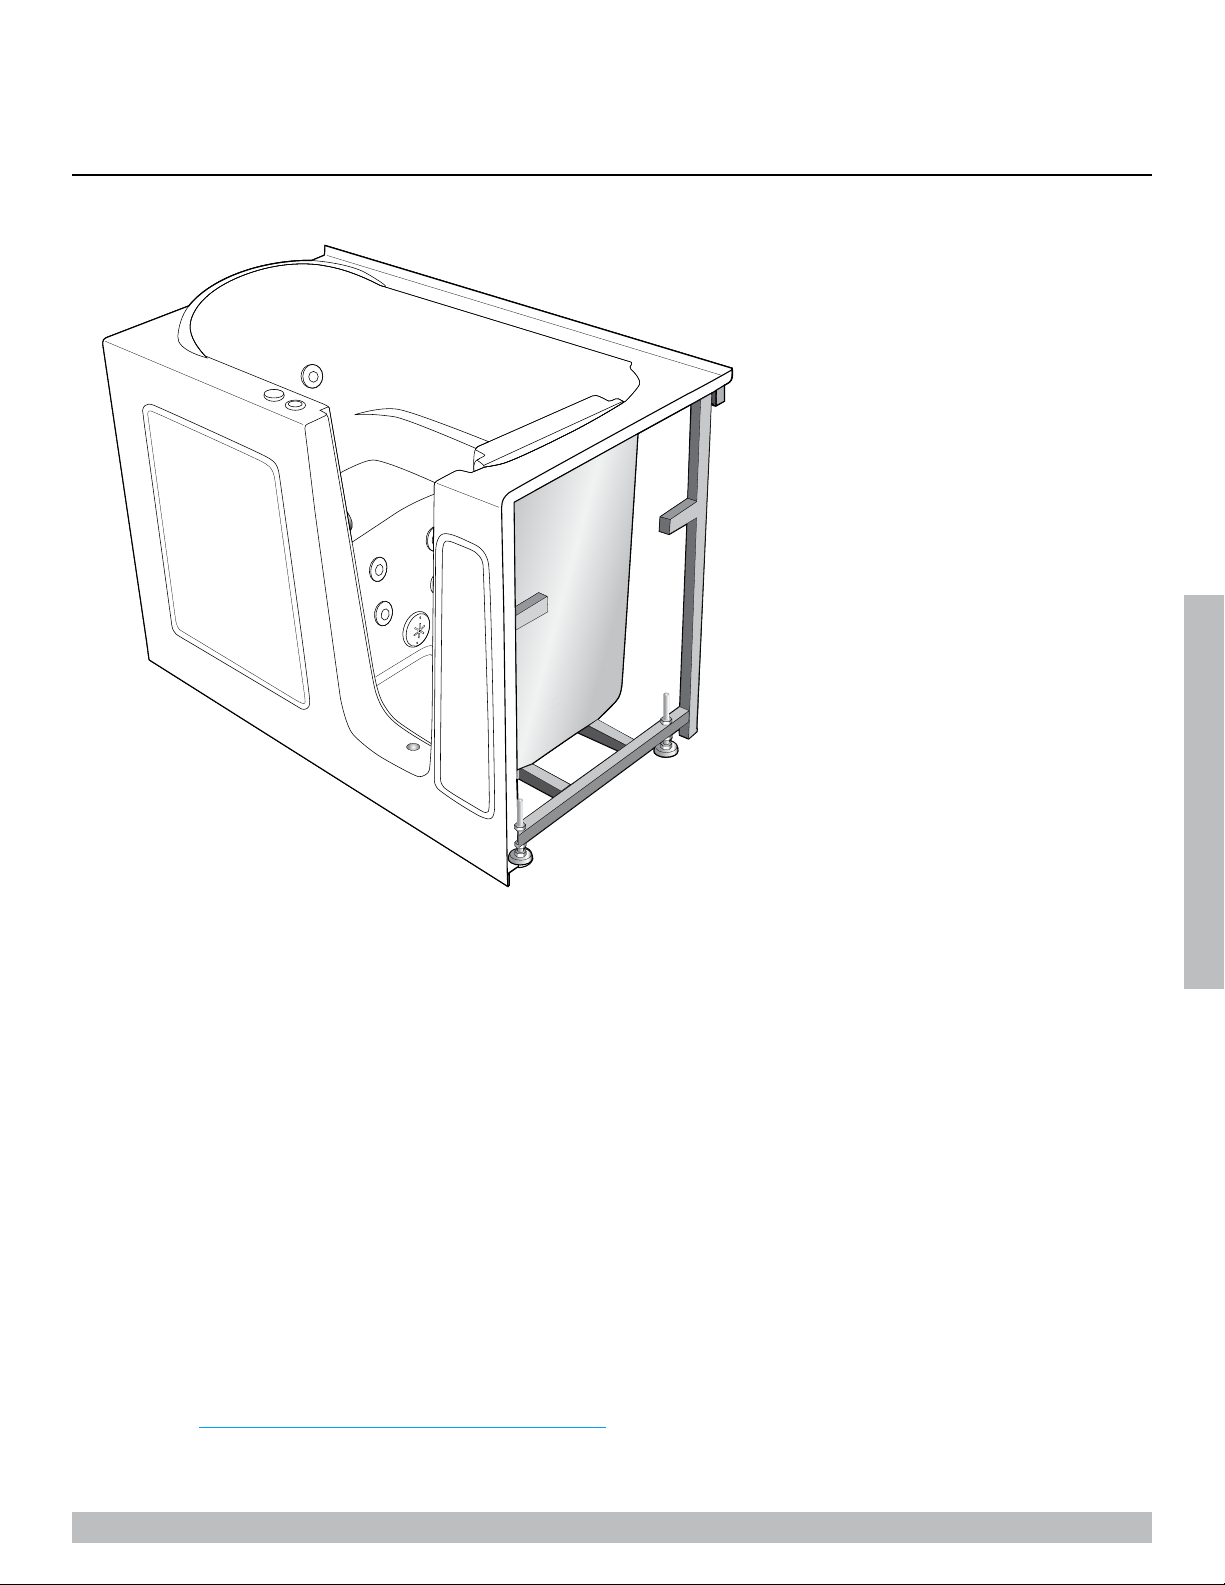
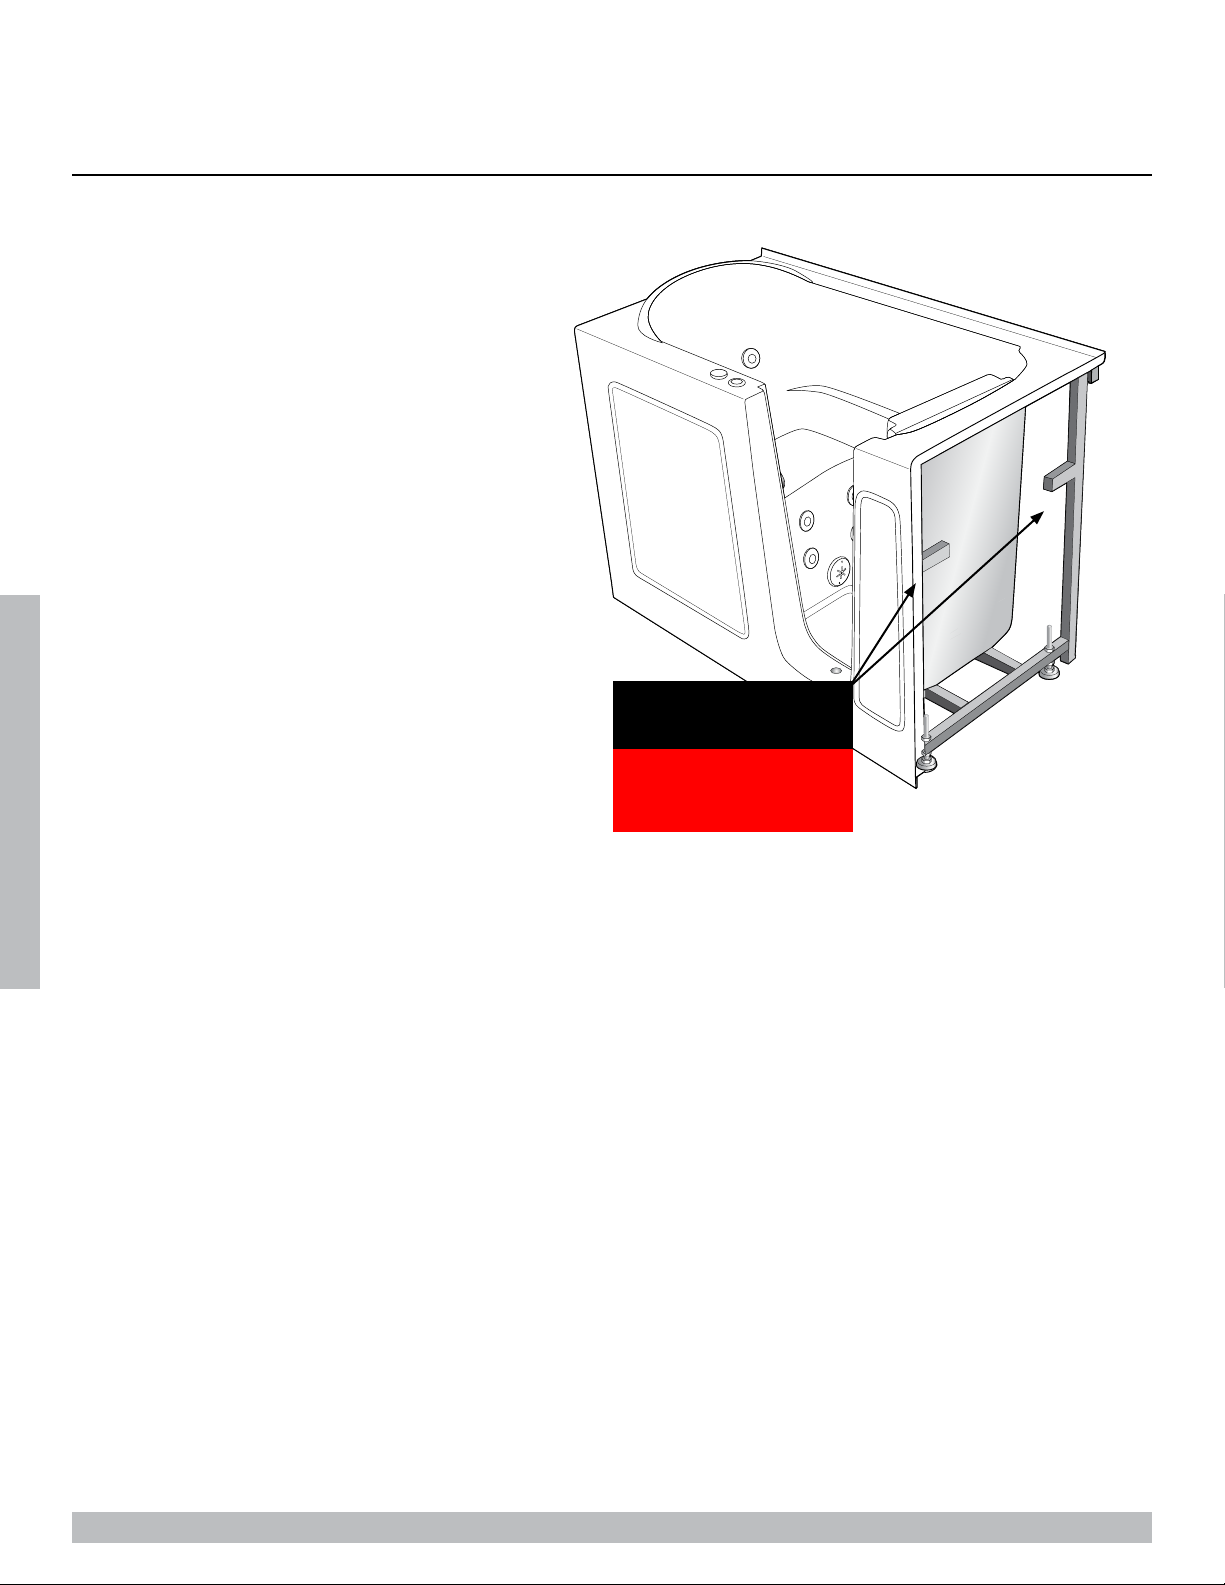
USE FRAME HANDLES TO LIFT / MOVE
TUB. NEVER BY THE PLUMBING!
Never lift the walk-in bathtub by the plumbing. Doing so
may result in damaging the plumbing and causing a leak.
INSPECTING THE UNIT
Immediately inspect the unit for damage even if there is
OPERATING INSTRUCTIONS
no carton damage. If any damages are noted, photograph
the damaged area(s) and notify us immediately. Damages
USE THESE HANDLES
TO LIFT TUB.
DO NOT LIFT BY
must be reported within 5 business days. Once the unit is
installed surface damages will be assumed to be installation related if not reported at this point.
PLUMBING!
PLACING THE UNIT
Please note that an installer(s) assumes full liability for damages to the walk-in bathtub after the unit is installed in the “cradle”/niche.
WHAT’S INSIDE
Inside you’ll should find the following:
• Walk-In Bathtub Unit
• Walk-In Bathtub Extension Kit (if applicable)
• Waste & Overflow Kit
• Sanitary Tee
• Door Drain Adaptor with 3/8” Barb
• Faucet Set (if applicable for model)
• Suction Cup Handle
• Owner’s Manual (with Registration Card)
UNPACKING
Page 6
5701 NW 35 Avenue Miami, FL 33142 • Phone 866-633-4882 • Fax 866-560-1060
Page 7

WALK-IN TUB MANUAL
SAFETY
PRE-INSTALLATION*
* All walk-in bathtubs are 100% water tested at the factory certified to be free of leaks.
Transportation and mishandling may cause leaks. It is necessary to test the bathtub
while there is access to all sides of the bathtub.
TEST THE BATHTUB WHILE YOU HAVE ACCESS TO ALL
SIDES AND BEFORE PERMANENTLY INSTALLED.
READ AND FOLLOW ALL INSTRUCTIONS
• Place the tub on a completely flat surface in an area where it may be drained after testing.
SAFETY
• Close the drain and fill the tub until it is above the highest jet. If it’s a soaker fill up to normal water height level.
• Allow the water to stand in tub for 30 minutes and then inspect all plumbing and seals for leaks.
• If tub is jetted, supply electric to unit and run for 10 minutes and inspect for leaks. Inspect the unions around the pump; if leaks
persist from the unions after tightening; loosen the unions and insure the O-ring is seated properly.
NOTE: IF THE PUMPS DO NOT OPERATE, CHECK THE BREAKER TO ENSURE POWER IS ON AND THE CABLE CONNECTING THE
CONTROLS TO THE PUMP IS ATTACHED.
WARNING! DO NOT RUN ANY PUMPS UNLESS THE TUB IS FILLED WITH WATER TO PROPER
LEVEL. DAMAGE DUE TO DRY RUNNING PUMPS IS NOT COVERED UNDER WARRANTY. FAILURE TO
PERFORM THESE TESTS BEFORE INSTALLATION WILL MAKE THE INSTALLER LIABLE FOR FUTURE
REPAIR COSTS.
OPERATING INSTRUCTIONS
5701 NW 35 Avenue Miami, FL 33142 • Phone 866-633-4882 • Fax 866-560-1060
Page 7
Page 8
WALK-IN TUB MANUAL
INSTALLATION PREPARATION
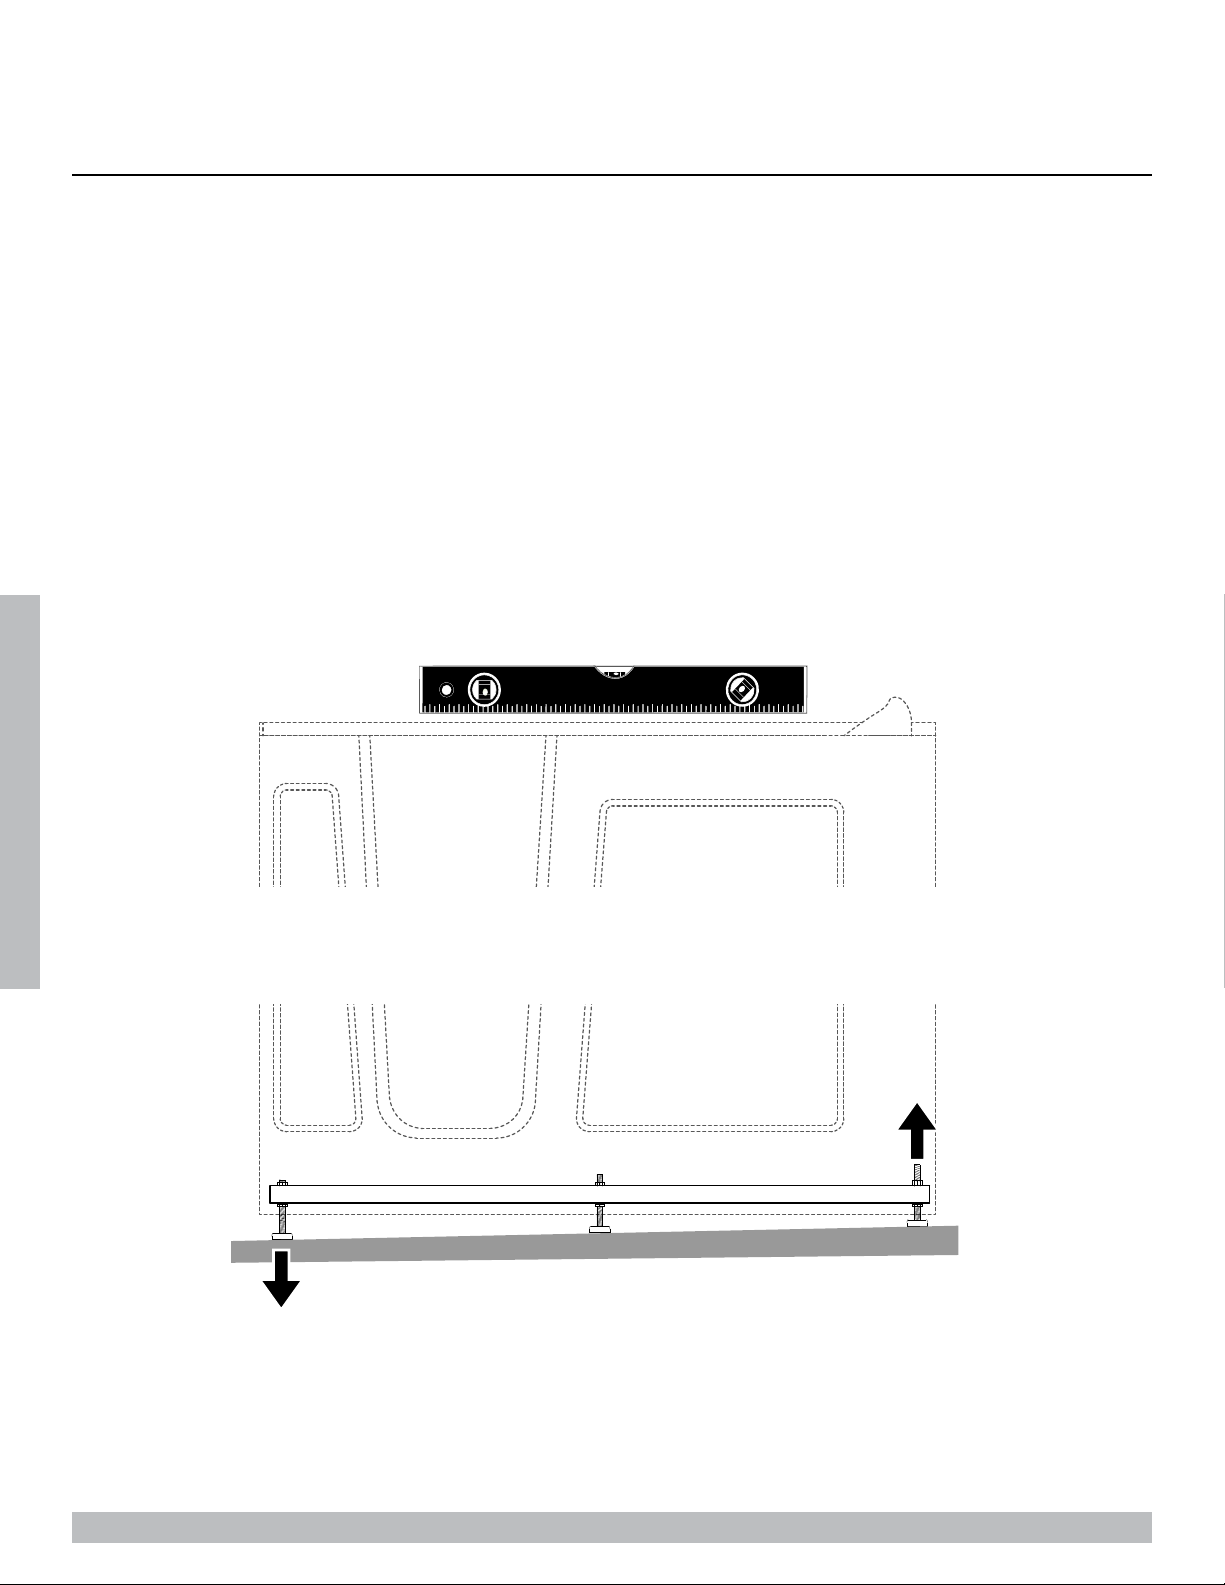
A BAD LEVEL WILL MAKE YOUR TUB LEAK!
1. CHECK FLOOR LEVEL
2. ADJUST LEVELING FEET AS NEEDED
Clear the floor of any debris or trash and use a 5-6 foot level to determine if the floor is level. If the
floor is not level, it is imperative that the bathtub’s leveling feet are used to ensure the tub itself is
perfectly level.
Note: it is important that all leveling feet are completely touching the oor and level for the door
system to work properly.
INSTALLATION PREPARATION
Adjust leveling feet as needed making sure all feet are completely
touching the oor. The tub must be completely level to avoid leakage.
1. Check to ensure that the drain piping has been “roughed-in” at the proper location.
2. Ensure that the proper electrical service has been installed at the pump location. See electrical requirements in the manual (on
following page).
Page 8
5701 NW 35 Avenue Miami, FL 33142 • Phone 866-633-4882 • Fax 866-560-1060
Page 9

WALK-IN TUB MANUAL
Soaker w / Light
Jet Massage Or Air Massage
Jet Massage Or Air Massage w/ Auto Drain™
Jet Massage & Air Massage (Dual)
Jet Massage & Air Massage (Dual) w/ Auto Drain™
Whirlpool Inline Heater - Dedicated 15 Amp Circuit
ELECTRICAL PREPARATION
ELECTRICAL PREPARATION
All electrical wiring must be installed in accordance with the National Electrical Code and with all local codes. All wiring shall be done
by a qualified electrician. Run one, two or three branch circuits (as required) from the main electrical service panel to the pump area
of the framing structure to provide power to the unit.
Electrical components have specific wiring requirements. Refer to the matrix below for the electrical supply requirements for the jet
massage bathtub and factory installed components.
Branch circuits must be rated for 110 – 120 volts. Use 12 Gauge, 3 conductor cable for the circuits. If the length run exceeds 100
feet check with local codes for requirements. Install moisture proof junction box(s) 6” above the floor at the pump end of the framing
for each circuit.
NOTE: DO NOT INSTALL THE JUNCTION BOX(S) WHERE IT CAN BE REACHED WHILE SITTING OR STANDING IN THE TUB OR
TOUCHING THE FAUCETS.
AUTO DRAIN™, LIGHTS, WHIRLPOOL, AIR SPA, COMBO & HEATER ELECTRICAL
REQUIREMENTS
This section lists the factory installed components of the Jet Massage and/or Air Massage Systems.
Systems
Soaker w / Auto Drain™
Soaker w / Auto Drain™ w / Light
Jet Massage Or Air Massage w / Light
Jet Massage Or Air Massage w/ Light & Auto Drain™
Jet Massage & Air Massage (Dual) w/ Light
Jet Massage & Air Massage (Dual) w/ Light & Auto Drain™
All electrical connections must be carried out b y a certified electrician in accordance with local electrical requirements and codes.
Electrical Rang
Circuit 1
15 Amp GFCI
15 Amp GFCI
15 Amp GFCI
15 Amp GFCI
15 Amp GFCI
15 Amp GFCI
15 Amp GFCI
20 Amp GFCI
20 Amp GFCI
20 Amp GFCI
20 Amp GFCI
Dedicated
Circuit
15 Amp GFCI
ELECTRICAL PREPARATION
5701 NW 35 Avenue Miami, FL 33142 • Phone 866-633-4882 • Fax 866-560-1060
Page 9
Page 10

WALK-IN TUB MANUAL
INSTALLATION PROCEDURES
INSTALLATION PROCEDURES
WARNING! WHEN INSTALLING A JETTED WALK-IN BATHTUB, THE FOLLOWING BASIC
PRECAUTIONS SHOULD BE FOLLOWED.
DANGER! RISK OF ELECTRIC SHOCK. CONNECT ONLY TO SEPARATE CIRCUIT PROTECTED BY A
GROUND FAULT CIRCUIT INTERRUPTER (GFCI) ON PLUG IN UNITS.
NOTE: INSTALLATION MUST PROVIDE ACCESS FOR SERVICING PUMP/MOTOR (ALL TUBS COME WITH AN ACCESS PANEL
FOR THE PUMP/MOTOR).
OPERATING INSTRUCTIONS
GENERAL GUIDE-THROUGH
• Install tub waste/overflow according to instructions (see page 11).
• After framing is a complete (see attached diagrams), set product in place to make certain the tub can be
properly leveled. (Caution: If a walk-in bathtub is not resting on all leveling feet, water will not drain properly
and may cause the door to leak) (see page 8).
• Verify the product’s level by checking tub’s deck surface and ensure all leveling feet are touching the
ground (see page 8).
• Electrical connection is made pre-instruction on specified models.
• After plumbing and electrical connections have been made, the tub should be cleaned of dirt and debris.
• Installation is not complete until the tub has been tested in place.
INSTALLATION PROCEDURES
Page 10
5701 NW 35 Avenue Miami, FL 33142 • Phone 866-633-4882 • Fax 866-560-1060
Page 11

WALK-IN TUB MANUAL
INSTALLATION INSTRUCTIONS
DRAIN CONNECTION
To ensure safe transit for your walk-in tub, the overflow drain components are not connected to the unit during the
process of production. The following instructions are provided for installation purposes:
Your walk-in tub is supplied with a 1 ½” drain pipe overflow.
1. The open and close valve with the turn knob should be attached to the unit at the 1 ½” pre-drilled opening in
the wall of the unit from the outside.
2. The opposite end of the overflow should be attached to the 1 ½” pre-drilled opening in the foot well of the unit
from the underside.
3. The chrome turn knob and the drain cover should be attached to the appropriate ends of the overflow drain
from the inside of the unit.
4. Place the chrome cap with stem into the floor drain to close off the opening.
5. The cable attached to the turn knob of the overflow is also connected to a lever inside the floor drain which
allows the drain to be opened or closed.
6. Once the components of the overflow are secured into place, turn the overflow knob to the open and closed
position to ensure proper function. The cap and stem will move up and down, opening and closing the drain
(Figure 1).
overflow
drain cable
Parts Provided
Not Provided
drain shoe
drain tee
drain cable
drain
INSTALLATION INSTRUCTIONS
FIGURE 1
5701 NW 35 Avenue Miami, FL 33142 • Phone 866-633-4882 • Fax 866-560-1060
Page 11
Page 12

WALK-IN TUB MANUAL
INSTALLATION INSTRUCTIONS
CONNECTING THE AUTO DRAIN
1. Drain System requires the connection to a minimum 1 ½ sanitary drain line.
2. Use UPC Approved PVC Glue, primer, and Schedule 40 1 ½ ’ pipe.
3. Do not change or modify the location and or piping of the Back Flow Preventer.
4. The sanitary tee is installed directly above the drain tee with clearance not greater than 1’’.
INSTALLATION INSTRUCTIONS
5. Dry fit the drain overflow assembly to the sanitary drainage pipe and check for proper fit.
6. Glue the High-Speed Auto drain Fittings, pipe and drain overflow assembly to the sanitary drainage pipe.
7. Reference figure 2 for connecting auto drain in a soaker or air jetted tub. (page 13)
8. Reference figure 3 for connecting auto drain in a hydro or dual jetted tub. (page 13)
• NOTE: WATER TIGHT INSTALLATION OF THE WASTE/ OVERFLOW IS THE INSTALLER’S RESPONSIBILITY.
DRAIN LEAKAGE IS EXCLUDED FROM MEDITUB WARRANTY OF THIS PRODUCT.
WARNING: WE HAVE TAKEN RESPONSIBLE PRECAUTIONS TO ENSURE THE HIGH-SPEED AUTO DRAIN IS
SUITABLE FOR RESIDENTIAL PLUMBING. IT IS THE RESPONSIBILITY OF THE INSTALLER TO INSURE THE
SANITARY SYSTEM IS ACCEPTABLE FOR THE USE OF THE HIGH-SPEED AUTO DRAIN. WE DO NOT ACCEPT
RESPONSIBILITY FOR DAMAGE ARISING FROM THE USE OF THE HIGH- SPEED AUTO DRAIN.*
*-Ensure compliance with local plumbing codes.
Page 12
5701 NW 35 Avenue Miami, FL 33142 • Phone 866-633-4882 • Fax 866-560-1060
Page 13

WALK-IN TUB MANUAL
reducer
Parts Provided
Not Provided
overflow
drain cable
drain cable
drain
drain shoe
sanitary tee
drain tee
back flow preventer
110V-60hz pump
INSTALLATION INSTRUCTIONS
overflow
drain cable
Parts Provided
Not Provided
sanitary tee
drain tee
back flow preventer
reducer
drain cable
drain
button (on/off)
110V-60hz pump
drain shoe
FIGURE 2
SOAKER & AIR JET
AUTO DRAIN CONNECTION
overflow
drain cable
Parts Provided
Not Provided
sanitary tee
drain tee
back flow preventer
reducer
drain cable
drain
diverter valve
jets
110V-60hz pump
drain shoe
button (on/off)
FIGURE 3
HYDRO & DUAL JET
AUTO DRAIN CONNECTION
Page 13
INSTALLATION INSTRUCTIONS
5701 NW 35 Avenue Miami, FL 33142 • Phone 866-633-4882 • Fax 866-560-1060
Page 14
WALK-IN TUB MANUAL
INSTALLATION INSTRUCTIONS
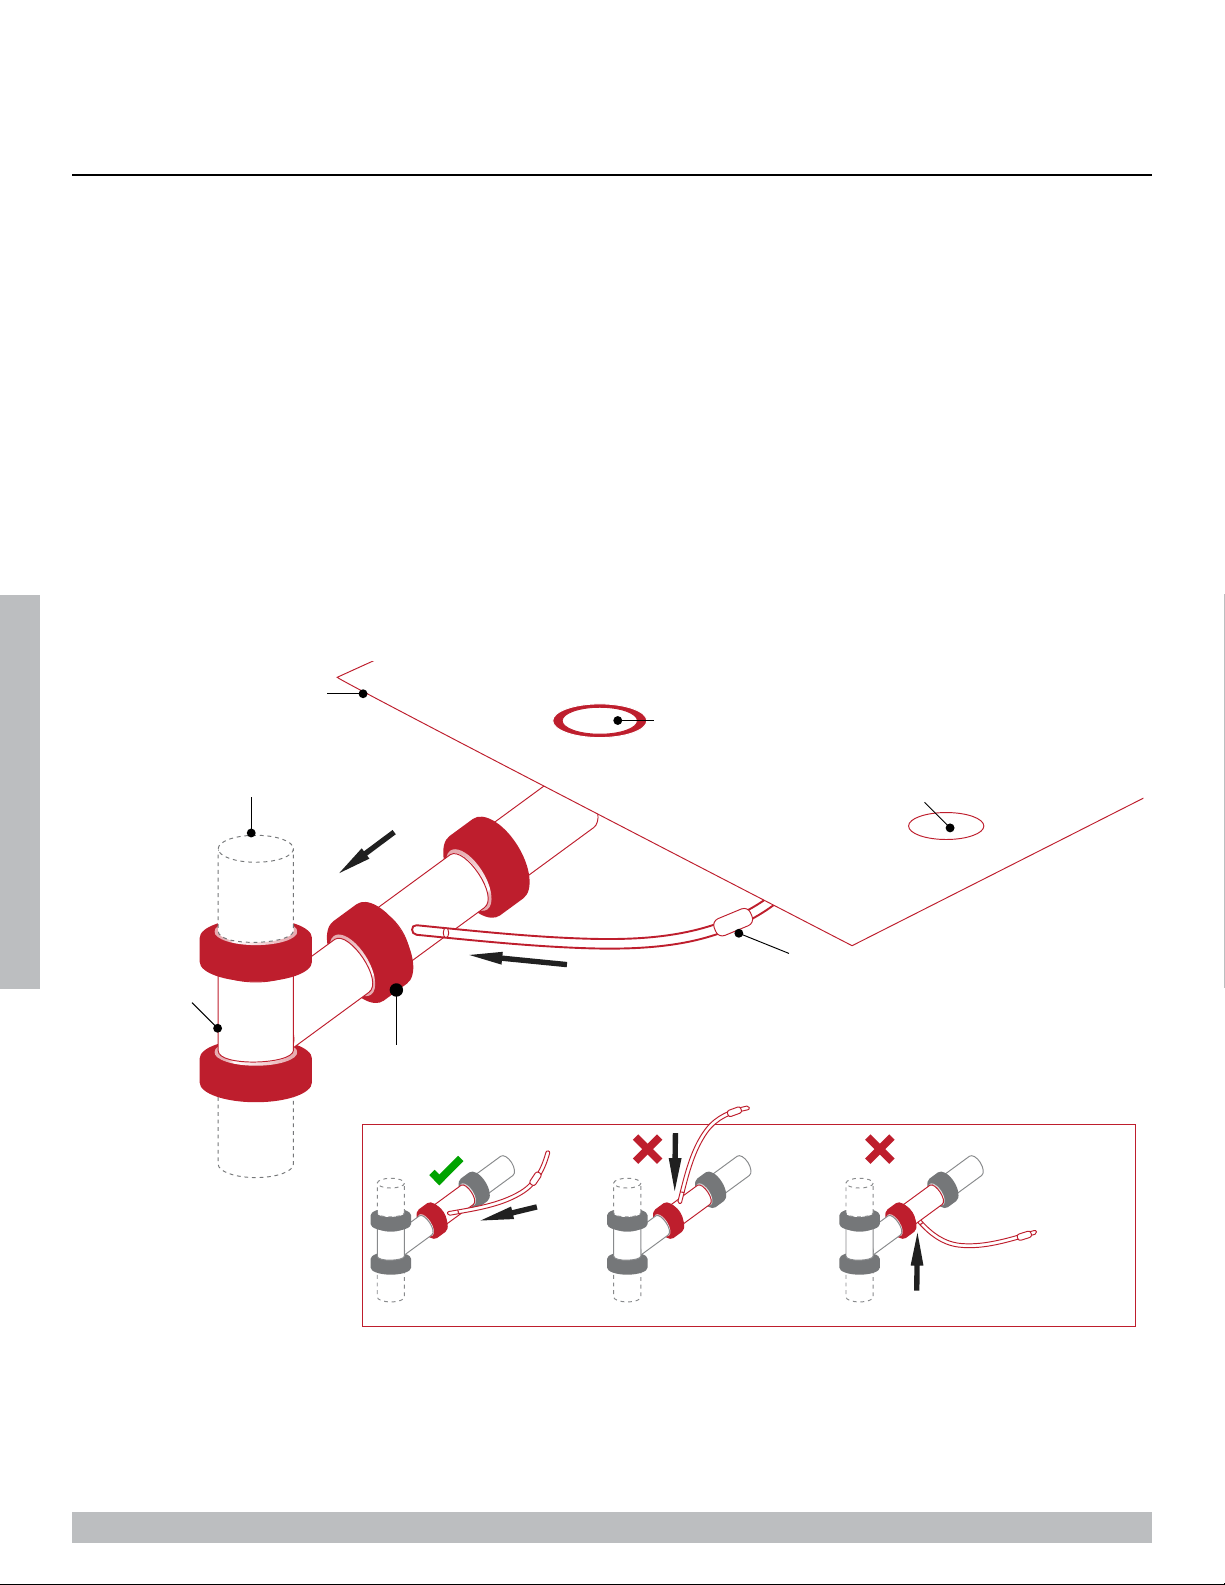
DOOR DRAIN CONNECTION
Your walk-in tub also has a door drain to remove excess water from the door after each use.
1. From the underside of the unit, a hose is connected to the door drain with a check valve. This hose and valve is to provide a oneway flow from the door drain to the main drain pipe. The check valve will constrict the water flow away from the door.
2. Insert the opposite end of the hose into the port on the main drain. Be sure the port is open before attaching the hose. Secure
the hose with clamps or ties.
3. Once the hose is in place, close the door on the unit, place the handle in the locked position, and fill tub with at least 12” of water
to test the connection.
4. Once the completion of the drain components are installed and have been tested for proper function, the unit can be leveled and
give a final water test before installation of unit (Figure 4).
INSTALLATION INSTRUCTIONS
Walk-in Bathtub
Floor Drain
Overflow Pipe
Sanitary
Tee
Flow
Door Drain
Connection Pipe
Connect door drain to
floor drain pipe from
about a 45° angle.
Flow
Door Drain
Check Valve
Do not connect from
directly above because
it may hinder flow.
Do not connect from below
45° as water will fall back
into the door drain tube.
Page 14
FIGURE 4
5701 NW 35 Avenue Miami, FL 33142 • Phone 866-633-4882 • Fax 866-560-1060
Page 15

WALK-IN TUB MANUAL
Inner flange
Top panel
Side panel
Wall
Bathroom (Waterproof) Sheetrock
Mortar
Tile
Silicone
Screw*
*4mm screws
not included
2-piece extension panels
Molded flange to bolt unit to wall
Custom-built wall section(s) for open ends or install against corners of
full wall
INSTALLATION INSTRUCTIONS
INSTALLATION AND EXTENSION PANELS
ASSEMBLY & PLACEMENT
Connect the two panels using pre-drilled holes:
INSTALLATION INSTRUCTIONS
5701 NW 35 Avenue Miami, FL 33142 • Phone 866-633-4882 • Fax 866-560-1060
Page 15
Page 16

WALK-IN TUB MANUAL
INSTALLATION INSTRUCTIONS
FAUCET INSTALLATION
diverter
hot control handle
fixing nut
metal washer
INSTALLATION INSTRUCTIONS
valve body
spout
rubber washer
fiber washer
metal washer
fixing nut
fixing nut
metal washer
rubber o-ring
rubber washer
valve body
cold control handle
rubber washer
valve body
fiber washer
metal washer
fixing nut
shower head
rubber o-ring
rubber washer
gasket
connection
Page 16
3/4”
hot water
1/2”
connection
steel braided 19” hose
local water line
(not included)
steel braided 19” hose
3/4”
connection
cold water
72” shower hose
steel braided 19” hose
local water line
(not included)
5701 NW 35 Avenue Miami, FL 33142 • Phone 866-633-4882 • Fax 866-560-1060
Page 17

WALK-IN TUB MANUAL
OPERATING SAFETY INSTRUCTIONS
INSTRUCTIONS PERTAINING TO RISK OF FIRE, ELECTRICAL SHOCK OR INJURY
TO PERSONS
WARNING! RISK OF PERSONAL INJURY:
• Use this unit for its intended use as described in this manual. DO NOT use attachments not recommended by the manufacturer.
• To avoid injury, exercise caution when entering or exiting your walk-in tub.
• To reduce the risk of injury, do not permit children or persons with infirmities to use this product unless they are closely
supervised at all times.
• The maximum recommended temperature is 102 F° (38.8 C °). Fifteen minutes per soak is the recommended maximum time at
102 F°, which may induce Hyperthermia which is an increase in body temperature. This can be a serious medical condition and
all bath users are cautioned against lengthy immersion at high water temperatures. Should you become light-headed, dizzy, or
nauseous, immediately get out of the bath and cool off.
• Risk of electric shock; do not permit electric appliances (such as a hair dryer, lamp, telephone, radio or television) within four
feet of this bathtub.
• Never drop or insert any objects into any openings.
• Do not operate this unit without the guard over the suction fittings.
WARNING! RISK OF HYPERTHERMIA AND POSSIBLE DROWNING. People using medications, herbal remedies, sleep aids,
and /or having adverse medical history should consult a physician before using this product.
WARNING! NO FOOD OR ALCOHOLIC BEVERAGES. Use of your bathtub immediately after meals is not recommended. Avoid
alcohol consumption before or during the bathing. Alcoholic beverages can cause drowsiness or hyperthermia resulting in loss of
consciousness or even drowning.
OPERATING INSTRUCTIONS
5701 NW 35 Avenue Miami, FL 33142 • Phone 866-633-4882 • Fax 866-560-1060
Page 17
Page 18

WALK-IN TUB MANUAL
OPERATING SAFETY INSTRUCTIONS CONTINUED
The unit must be connected only to a supply circuit that is protected by a ground-fault circuit-interrupter (GFCI). Such a GFCI should
be provided by the installer and should be tested on a routine basis. To test the GFCI, push the test button. The GFCI should interrupt
power. Push the reset button. Power should be restored. If the GFCI fails to operate in this manner, there may be a ground current
flowing, indicating the possibility of an electric shock. Do not use this massage bathtub. Disconnect the jet massage bathtub and
have the problem corrected by a qualified service representative before using.
To reduce the risk of electrical shock, the dedicated electrical supply circuit(s) must be grounded. To do this, connect the third leg of
OPERATING INSTRUCTIONS
the 3-conductor wiring cable to the grounding terminal of the electrical service panel and run continuously to the green grounding
screw on the GFCI or electrical receptacle in the wiring compartment.
IN-LINE HEATERS
If your bathtub is equipped with an in-line heater, it will operate only when the pump is on.
NOTE: THE IN-LINE HEATER IS DESIGNED TO KEEP YOUR WATER WARMER LONGER, BUT IS NOT DESIGNED TO INCREASE
THE WATER TEMPERATURE. HEAT SETTINGS ARE NOT ADJUSTABLE.
Page 18
5701 NW 35 Avenue Miami, FL 33142 • Phone 866-633-4882 • Fax 866-560-1060
Page 19

WALK-IN TUB MANUAL
OPERATING INSTRUCTIONS
When entering the walk-in tub, be sure to close the door, placing the
handle in the down position. Before activating any of the jetting controls,
you must first fill the bath to a water level at least 2 inches above the
highest jet placement. Do not put weight on the door when entering and
exiting the tub. It is recommended to leave the door in the open position
when the tub is not in use.
The pump is operated by the hydro control button, which starts the
water flow. The blower is operated by the air control button which starts
the air flow (see page 20).
Adjust the direction and rate of flow of the jets by moving the nozzle for direction. Turn either the outside ring or the nozzle clockwise
or counterclockwise for flow (some jets adjust the flow with the outside ring and some with the nozzle). Adjust the air pressure flow
of all water jets by using the hydro jet ow control (see page 20), which controls air-water mixture.
Our walk-in tubs equipped with the chromotherapy lights (ordered separately), feature a dedicated on/off switch. Pressing the
switch off and back on will change the color of light (see page 20).
EX AMPLE TUB DOOR HANDLE
OPERATING INSTRUCTIONS
5701 NW 35 Avenue Miami, FL 33142 • Phone 866-633-4882 • Fax 866-560-1060
Page 19
Page 20
WALK-IN TUB MANUAL
OPERATING INSTRUCTIONS
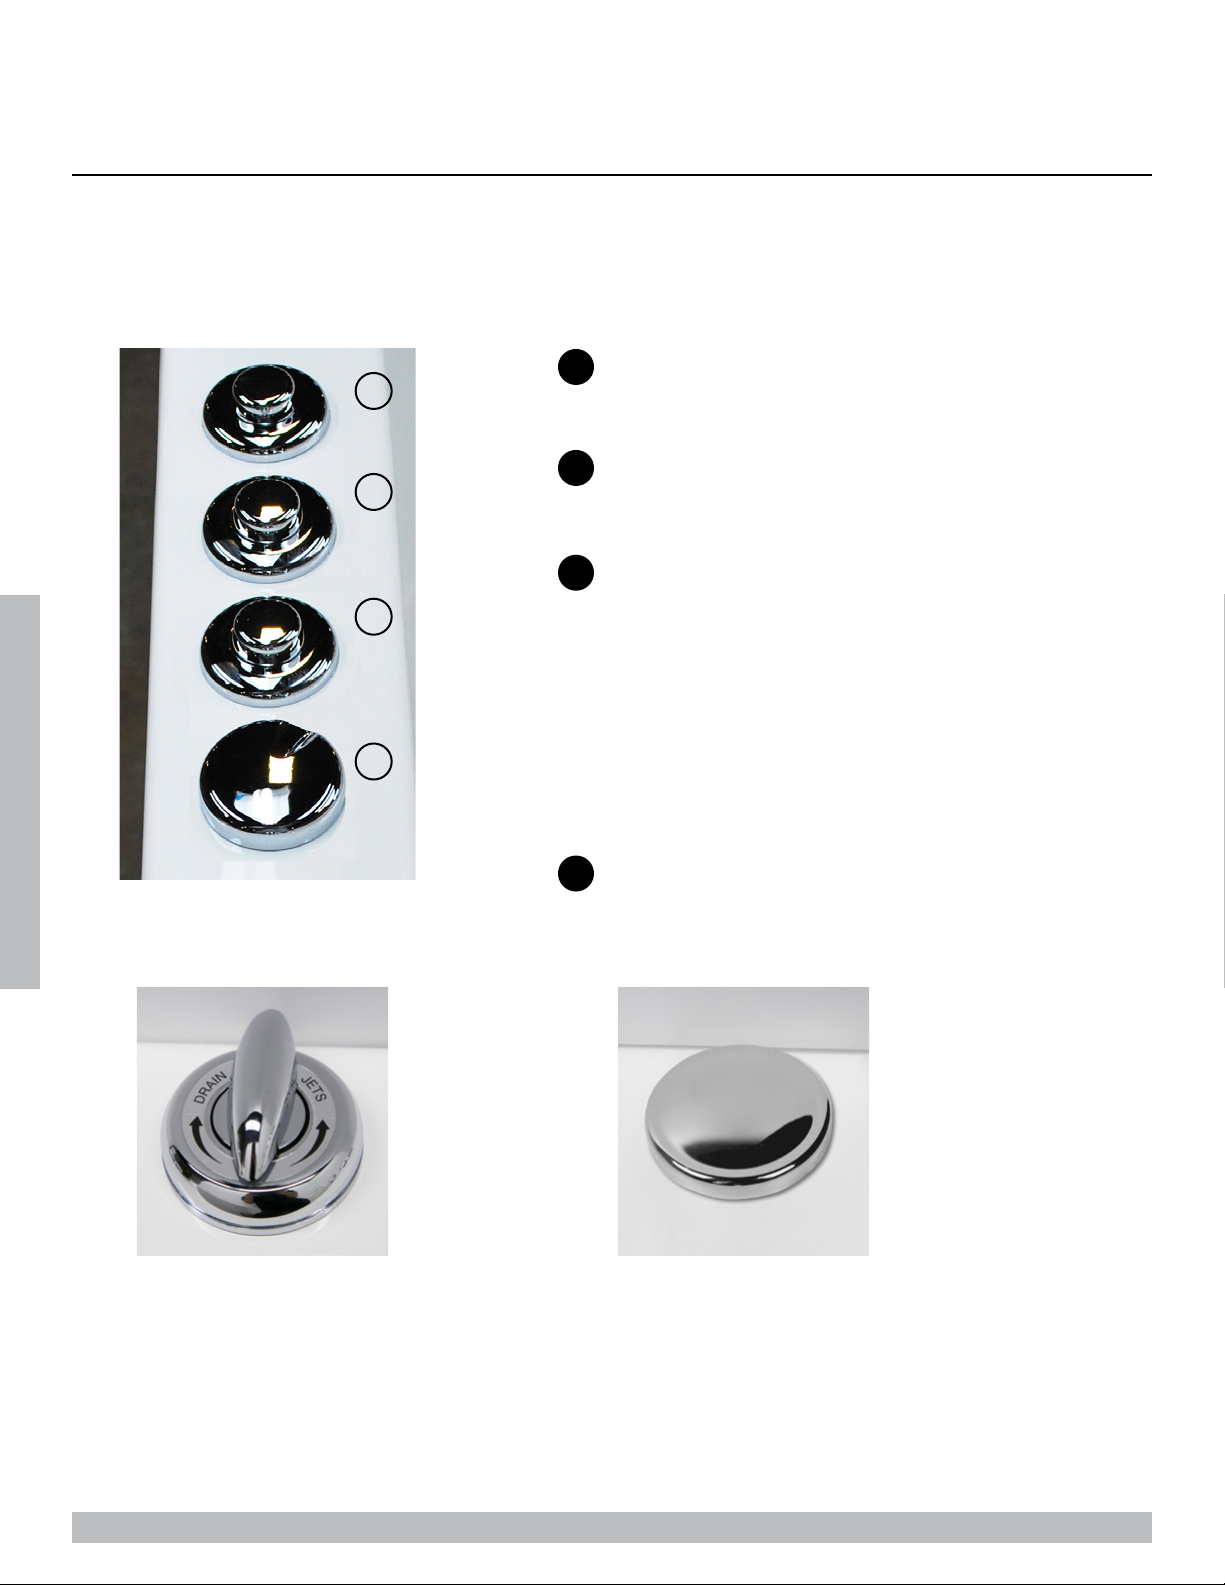
TUB CONTROLS
1
1
2
2
3
3
FOR TUBS WITH WATER JET OPTION.
HYDRO CONTROL (PUMP)
Used to turn the water jets ON and OFF.
FOR TUBS WITH AIR JET OPTION.
AIR CONTROL (BLOWER)
Used to turn the air jets ON and OFF.
FOR TUBS WITH CHROMATHERAPY LIGHT OPTION.
CHROMATHERAPY LIGHT
PRESS ONCE (when light is OFF) - Turns light ON in Auto-
Cycle Mode which will slowly transition from color to color.
OPERATING INSTRUCTIONS
PRESS TWICE (when light is ON)- Turns on static, nonchanging color mode. Continue to press twice to move on to
the next color until you find your desired choice.
4
PRESS ONCE (when light is ON) - Turns off light. Resets cycle
after 2 second pause.
FOR TUBS WITH WATER JET OPTION.
4
HYDRO JET FLOW CONTROL
Used to increase or decrease air pressure flowing through the
water jets.
Page 20
FOR TUBS WITH AUTO DRAIN OPTION. FOR TUBS WITH AROMATHERAPY OPTION.
AUTO DRAIN DIVERTER
While the HDYRO PUMP is running, use this
diverter to channel the pumped water through
the HYDRO JETS or down the drain.
AROMATHERAPY CAP
Unscrew cap and insert your favorite fragrance
beads to bathe in a soothing aroma scent.
5701 NW 35 Avenue Miami, FL 33142 • Phone 866-633-4882 • Fax 866-560-1060
Page 21

WALK-IN TUB MANUAL
CLEANING AND MAINTENANCE
Pump and pipe circulation systems should be flushed before first use and on a monthly basis when product is under normal use.
Below are the recommended procedures for cleaning:
• Do not run whirlpool dry. Fill the tub with hot water 2-3 inches above the jets and add 2-3 teaspoons of low foaming
detergent such as dishwashing machine detergent
• Turn on whirlpool system and run for 10 minutes
• Drain tub completely
• Fill tub with cold water above jets
• Turn on whirlpool system and run for 15 minutes
• Drain tub completely
• Cleaning the suction cover: Clean and remove any hair or lint from the suction cover (see image below). On a monthly basis,
unscrew the suction cover and clean away any hair, lint or debris from the cover and housing, then remount the cover in place. Some
suctions are not designed to be removed; only suctions that have screws on the cover, visible from the inside of the tub, can be
removed.
WARNING! NEVER OPERATE THE UNIT WITH THE SAFETY SUCTION COVER OFF.
OPERATING INSTRUCTIONS
SUCTION COVER
5701 NW 35 Avenue Miami, FL 33142 • Phone 866-633-4882 • Fax 866-560-1060
Page 21
Page 22

WALK-IN TUB MANUAL
WARRANTY
WARRANTY
DON’T FORGET TO REGISTER! PRODUCT MUST BE REGISTERED WITHIN 90 DAYS OF DELIVERY DATE TO ACTIVATE
WARRANTY. REGISTER AT WWW.SWCORP.COM/REGISTER OR FILL OUT AND MAIN IN THE REGISTRATION CARD ON PAGE
2 OF THIS MANUAL.
IMPORTANT! THOROUGHLY REVIEW THE BATHTUB AND CONTENTS OF THE PACKAGE. ANY DEFECTS OR DAMAGES MUST
BE REPORTED WITHIN 5 BUSINESS DAYS OF RECEIVING THE PRODUCT.
This 10-year warranty is extended to the first user to be free from defects in workmanship and material under
normal use and conditions for a period of 10 years from the date of the original purchase. This warranty relates to the
bathtub shell, frame and finish. The finish’s warranty does not apply to fading, cracking, delaminating or blistering
WARRANTY
due to excessive wear, sun fading or scouring due to cleaning. Different warranty periods apply. The tub and all its
components including motors, electronic controls, waste and overflow, fittings and all plated finishes are covered by
a limited one year warranty, subject to verification of the defect or malfunction. All labor and repair-related services
are covered within the first 90 days of purchase. This warranty is non-transferable and applies only to the original
owner as stated on the original purchase order. Notification must be sent via certified mail to 5701 NW 35 Avenue.
Miami, FL 33142. The manufacturer will not be responsible for any water damage to any structures or any property
for any reason (including but not limited to manufacturer defects or improper installation). Manufacturer will assume
no responsibility for the loss of the system, inconvenience due to loss, damage to real or personal property or any
other consequential damage. Manufacturer will not be liable for any incidental expenses or material charges in
connection with removal or replacement of the purchased part or any part or parts of the system. Manufacturer is
not responsible for failures or damage that could have been discovered, repaired, or avoided by proper inspection
and testing prior to installation. This warranty shall not apply to any type of failure resulting from negligence,
abuse, misuse, misapplication, improper installation, alteration or modification, chemical corrosion or improper
maintenance. Scratches and surface damages must be reported within 5 days of delivery and prior to installation.
Page 22
5701 NW 35 Avenue Miami, FL 33142 • Phone 866-633-4882 • Fax 866-560-1060
Page 23

WALK-IN TUB MANUAL
WARRANTY
Scratches and other surface damages reported after installation will be assumed to be a result of installation and
will not be covered. Every walk-in tub must be installed by a licensed plumber, electrician and/or contractor; failure
to do so will hereby void the warranty. There will be a charge for replacement parts or the replacement of the entire
electrical unit if the defective unit is returned for any of the reasons listed above.
NOTE: WITHIN THE LIMITED ONE YEAR WARRANTY, THERE WILL BE A PRORATED CHARGE FOR ANY ELECTRICAL AND
PLATED REPLACEMENTS PARTS, INCLUDING SHIPPING AND HANDLING CHARGES.
Manufacturer reserves the sole authority to make any type of warranty changes at any time. The manufacturer will
not be responsible for any warranty information that is being misrepresented by outside sources including dealers,
retailers, distributors or contractors. Manufacturer does not warranty the installation, plumbing or electrical related
connections, of any of our products including Walk-In Baths, shower pans or shower stalls. Improper or negligent
installation of the product or other components, alteration made of, or alterations or medications to the system,
may cause the product or the system to malfunction. Such problems are not covered by warranty. Manufacturer
warranties the door seal for the life of the unit under normal use and conditions for the original owner of the tub.
This warranty shall not apply to any failure resulting from negligence, abuse, misuse, misapplication, alternation, or
medication or improper maintenance. Additionally, this warranty does not cover discontinued or display products.
The replacement door seal will be issued to the end user however installation and repairs must be performed by
a certified installer/plumber. Manufacturer will not be liable for any incidental expenses or material charges in
connection with removal or replacement of the door seal.
NOTE: TO THE EXTEND PERMITTED BY LAW, ALL IMPLIED WARRANTIES INCLUDING THOSE OF MERCHANT ABILITY AND
FITNESS FOR A PARTICULAR PURPOSE ARE HEREBY DISCLAIMED. THIS COMPANY AND SELLER HEREBY DISCLAIM ANY
LIABILITY FOR SPECIAL, INCIDENTAL, OR CONSEQUENTIAL DAMAGES.
Some states/provinces do not allow limitations on how long an implied warranty lasts, or the exclusion or limitation
special, incidental or consequential damages, so these limitations and exclusions may not apply to you. This warranty
WARRANTY
gives you specific legal rights. You may have other rights, which vary from state/province to state province. All
lawsuits must be filed in Miami-Dade County, Florida. Tub units are for residential use only.
This warranty is in effect as of May, 2019. This warranty supersedes all previous warranties and/or
claims both stated and implied. This warranty is subject to change without notice.
Page 23
5701 NW 35 Avenue Miami, FL 33142 • Phone 866-633-4882 • Fax 866-560-1060
Page 24

WALK-IN TUB MANUAL
RETURN POLICY
RETURN POLICY
We are committed to providing premium customer service. In the event that a product must be returned due to reasons other
than defects, as mentioned in the warranty, the following procedures apply:
Requests for returns and/or exchanges must be made within 30 days of receipt of product. The product must be in its original
packaging and received at our facility in saleable condition. All returns will receive a 20% restocking fee plus all freight costs of
the original shipment and return shipment to us.
RETURN POLICY
All requests for return must first be approved by us and have an assigned Returned Merchandise Authorization number
(RMA#).
Page 24
5701 NW 35 Avenue Miami, FL 33142 • Phone 866-633-4882 • Fax 866-560-1060
 Loading...