

Page 1
O WNE R ’ S
G UI D E
SVS Family of
Speakers: SBS-01,
SCS-01 and MTS-01
Contents:
Chapter 1 - Welcome
Chapter 2 - Safety
Chapter 3 - About your SVS speakers
Chapter 4 - Speaker placement
Chapter 5 - Room diagrams: 5.1 and 7.1 channel
Chapter 6 - Wiring
Chapter 7 - Speaker orientation
Chapter 8 - Tweeter attenuation (MTS-01 only)
Chapter 9 - Port tuning (MTS-01 only)
Chapter 10 - Audio system configuration
Chapter 11 - Channel level calibration
Chapter 12 - Speaker specifications
Chapter 13 - Warranty
Last update: 30 September, 2008
Page 2
Chapter 1-2 Welcome
SVSound
Welcome: Congratulations on your purchase of
these high-performance SVS audio speakers.
At SVS, you can actually hear the
tireless research and design efforts
built in to our speakers. Years are
spent developing any SVS product
— with work typically spanning
from our Ohio headquarters… to
US west coast technology cen-
ters… and over to the finest com-
ponent suppliers in Asia and
Europe as well. Nothing in our
speaker offerings is an ―off the
shelf‖ product. SVS is committed
to making better sound systems
with elegant looks, robust construction and world-class technology and materials. We believe you
deserve nothing less.
This manual and the printed ―Quick Start‖ sheet will help you integrate
these speakers with your subwoofer quickly and with professional results.
Armed with only a few basic tools, such a sound pressure level (SPL)
meter, and the test tones built in to most audio/video receivers (AVR),
you will achieve smooth, detailed and powerful reproduction of all your
favorite music and movie audio. Expect to hear things you never heard
before… and expect not to hear some of the artifacts you might have
accepted in the past with inferior speakers.
Have a question about your surround sound system? For more
discussion about speaker or subwoofer setup check out our website or
that of your exclusive regional SVS’s Dealer. Contact us via phone, email or fax should you have any question regarding our products.
SVS was founded by audio enthusiasts — our commitment to service is
the only thing that rivals the products we create. Our resellers around
the world feel the same way.
The SVS Team, Ohio, USA
March, 2008
Page 3

Chapter 2-1 Safety
IMPORTANT SAFETY INSTRUCTIONS
1. Read these instructions.
2. Keep these instructions.
3. Heed all warnings.
4. Follow all instructions.
5. Do not use this apparatus near water.
6. Clean only with dry cloth.
7. Do not block any ventilation openings. Install in accordance with the
manufacturer's instructions.
8. Do not install near any heat sources such as radiators, heat registers, stoves, or other apparatus (including amplifiers) that produce
heat.
9. Do not defeat the safety purpose of any polarized or grounding-type
plug. A polarized plug has two blades with one wider than the other.
A grounding type plug has two prongs and a third grounding point.
The wide blade or the third prong are provided for your safety. If the
provided plug does not fit into your outlet, consult an electrician for
replacement of the obsolete outlet.
10. Protect your power cords from being walked on or pinched particularly at plugs, convenience receptacles, and the point where they exit
from the apparatus.
11. Only use attachments/accessories specified by the manufacturer.
12. Use only with the cart, stand, tripod, bracket, or table specified by
the manufacturer, or sold with the apparatus. When a cart is used
use caution when moving the cart/apparatus combination to avoid
injury from tip-over.
SVSound
Page 4

SVSound
Chapter 2-2 Safety
13. Unplug this apparatus during lightning storms or when unused for
long periods of time.
14. Refer all servicing to qualified service personnel. Servicing is re-
quired when the apparatus has been damaged in any way, such as
power-supply cord or plug is damaged, liquid has been spilled or
objects have fallen into the apparatus, the apparatus has been exposed to rain or moisture, does not operate normally, or has been
dropped.
15. WARNING: To reduce the risk of fire or electric shock, this appara-
tus should not be exposed to rain or moisture and objects filled with
liquids, such as vases, should not be placed on this apparatus.
16. To completely disconnect this equipment from the mains, discon-
nect the power supply cord plug from the receptacle.
17. The mains plug of any power supply cord shall remain readily oper-
able.
The lightning flash with arrowhead symbol within an
equilateral triangle, is intended to alert the user to the
presence of un-insulated "dangerous voltage " within
the product's enclosure that may be of sufficient
magnitude to constitute a risk of electric shock to
persons.
The exclamation point within an equilateral triangle is
intended to alert the user to the presence of important
operating and maintenance (servicing) instructions in
the literature accompanying the product.
Page 5

SV Subwoofers
SVSound
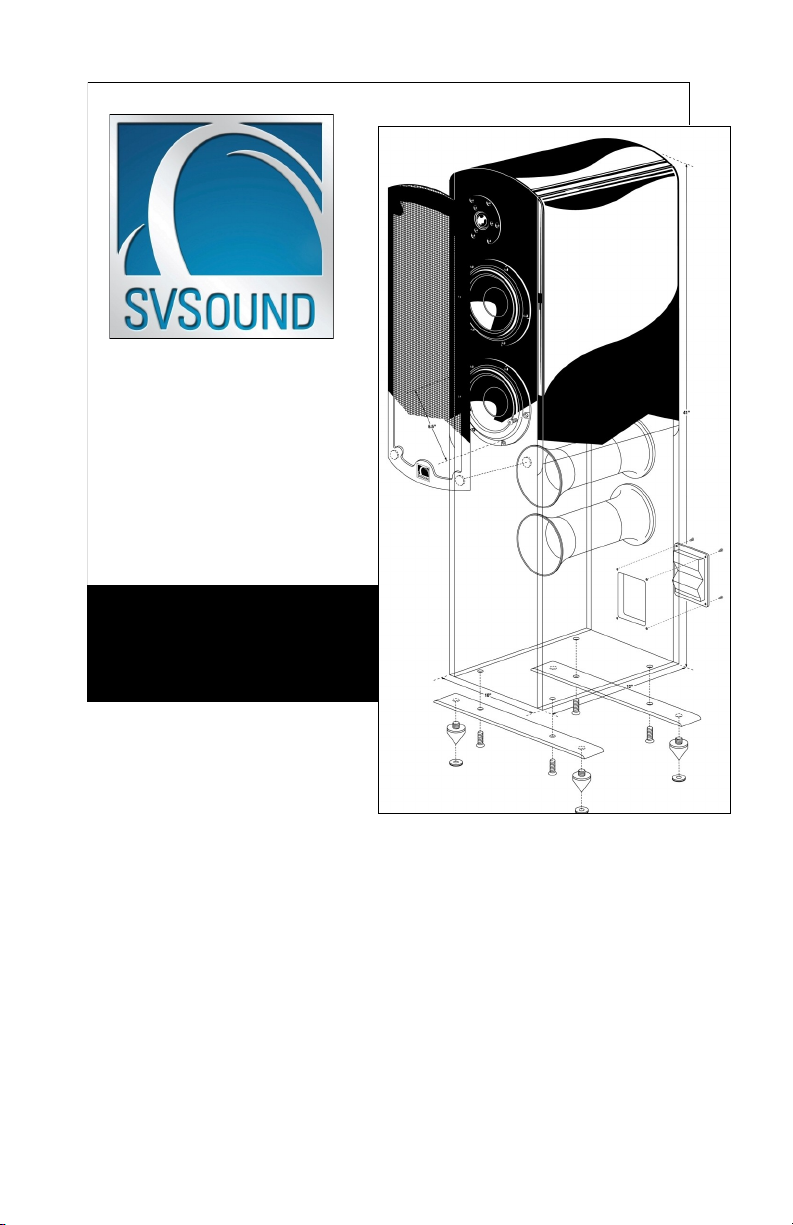
Chapter 3-1 About your speakers
About your SVS speakers:
Un-box your speakers and you will
immediately be impressed with several
things. First, our components are of
exceptional quality: from synthetic rubber
surrounds to the elegant trim rings. With
stylish touches like real wood veneer, they
look as good with the matching fabric grills
off as they do on.
Expensive tweeters and hand-built
crossovers result in a very natural sounding
yet powerful speaker, which will stand up to any music or movie audio you
send to it. Notice too, the simple yet modern design details, such as
smooth ―seamless‖ corners and magnetized grill retainers. These are just
a few of the dozens of parts our factory-direct sales model provides you,
at prices virtually no other major brand can match.
What is not visible is, of course,
often more important than what
is visible. And SVS is long
known for including features
you might never see!
All our speakers are shielded
for use near any sort of video
display. And those heavy cabinets are acoustically damped and
bolstered internally with computer cut
braces. Pick up any SVS speaker and
you will notice immediately just how
heavy they are. This is quality you
can hear, and feel.
Sometimes, looking at the back of a
product tells you still more about the
care that went inside too. We never
use crude surface-mounted binding posts. Every part is flush fit into your
speaker with precision and care. Note threaded inserts and special
rubber or metal feet for secure placement in a variety of home
environments.
The costly finishes on our famous speakers are already legendary for
providing attractive designs that will withstand the rigors of use around the
world. High grade polymer laminates, hand-finished gloss and real wood
veneers ensure your speakers complement your décor for years to come.
Page 6
Chapter 4-1 Speaker Placement
Page 6
SV Sound
Location, location, location: Properly set up in a typical
home, your SVS speaker package, backed by a high quality subwoofer,
will provide startlingly realistic reproduction of any sort of music or movie
soundtrack.
Take time to carefully unpack everything. Look thoroughly in each box.
Locate all the items you’ll need to proceed to installing your speakers
(tools, wire, wall brackets, SPL meter, etc.). Save the box and shipping
materials, just in case you need to return a component or move your
system to a new home.
Where you put your speakers can be just as key as how well they are
designed! Discussions in this section of your manual are meant to
provide general guidance. We encourage some experimentation in
placement as your time and room allows.
Later, we will also review your receiver or audio processor settings, and
touch on DVD or CD player internal settings too, which can affect sound
just as where you place your speakers will. In the final chapter we
outline how to achieve a realistic blend between all your speakers and
your sub.
Speaker Placement: Any speaker tends to benefit from
placement spaced somewhat from rear or side walls. Ideally you should
arrange to have all tweeters (the small element in your cabinet) at ―ear
height‖, or tilted to point towards your seats. Attempt to place them so
you sit an equal distance from each speaker cabinet.
Page 7
SV Sound
Chapter 4-2 Speaker Placement
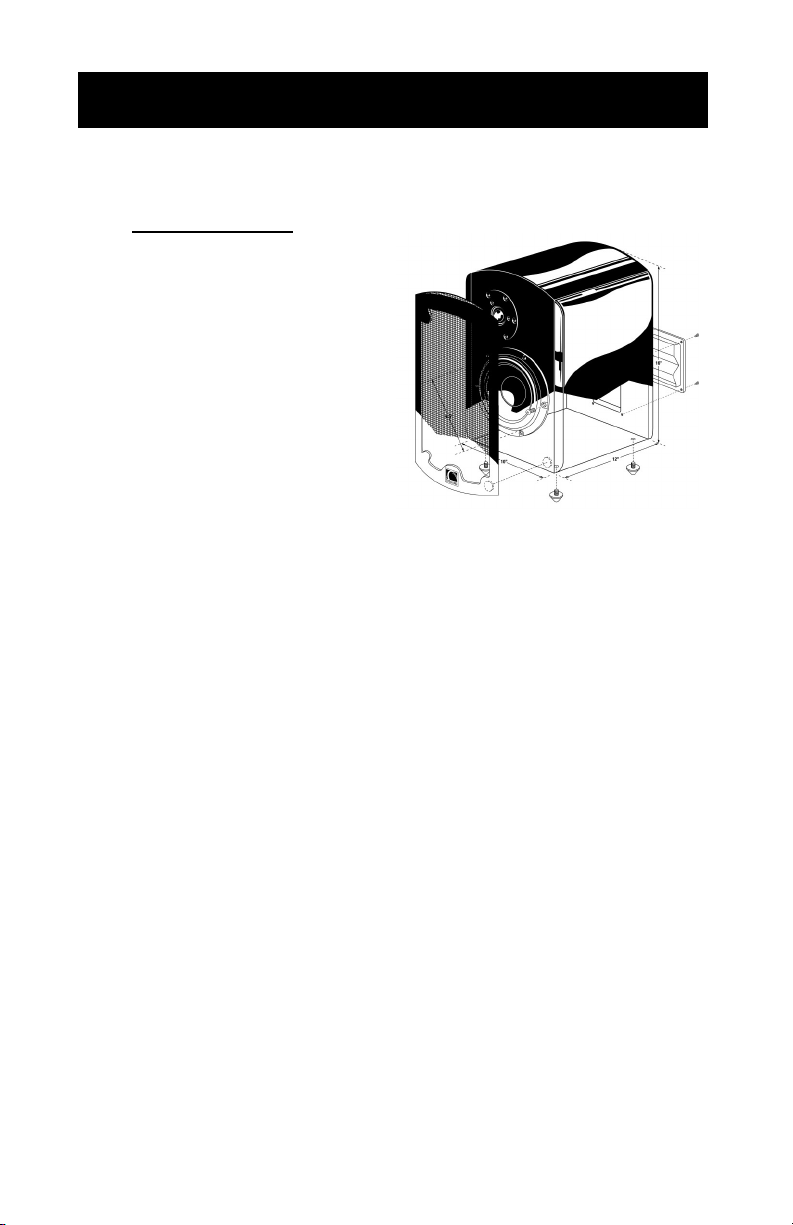
Placing your SVS speakers within your room
As you unpack them, you will notice a variety of
ways to securely place your speakers inside you
listening room. You can put bookshelf speakers
them on optional stands or brackets, and of
course, bookshelf and center channel speakers
can also be put on any convenient shelves in
your home.
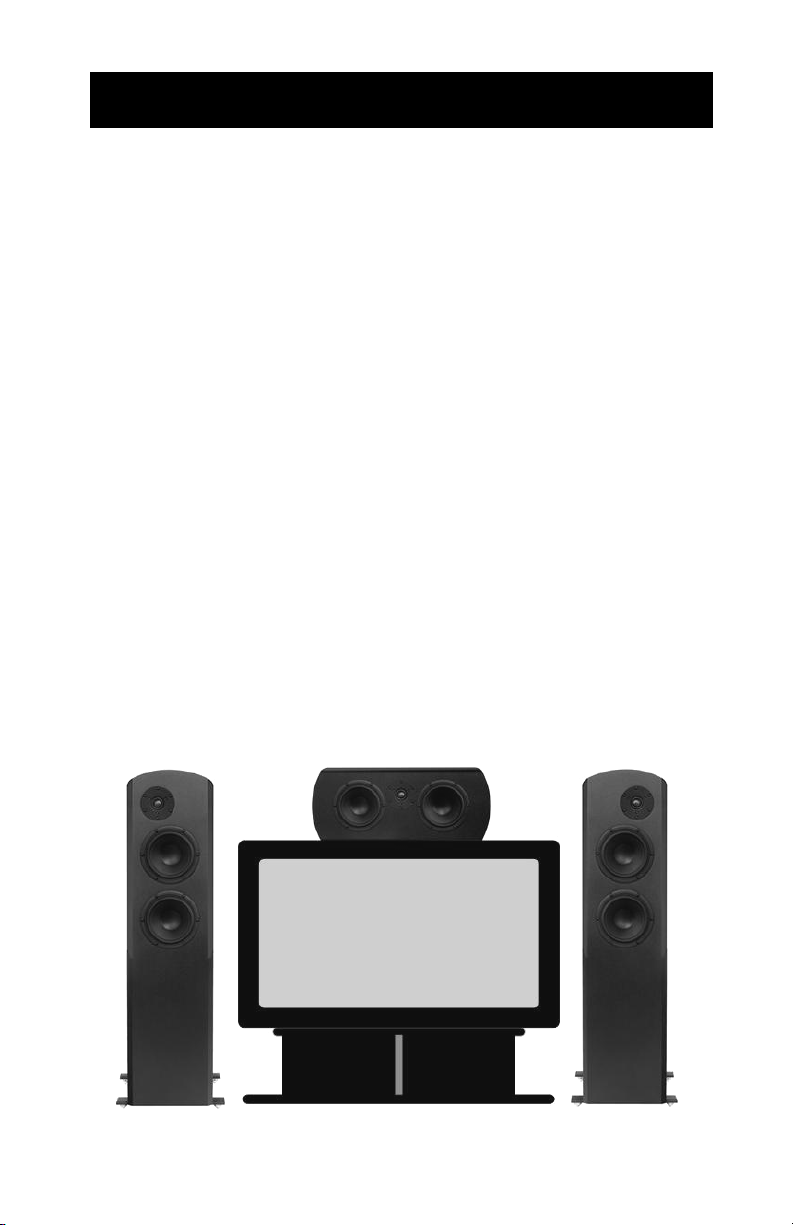
Setup and room integration:
So, there are many ways to put these speakers
someplace in your home. However those particular places will have
a significant impact on the sound heard at your primary listing positions. Again, where possible, try to keep speakers roughly the same
distance from the floor. Using a combination of speaker stands,
brackets or shelves, should allow center-channel speaker and main
channels to keep the tweeter/woofer
assemblies at the same level.
The next Chapter shows a top view of a
room in 5.1 channel surround sound
installation and then a typical 7.1 channel setup. Notice the speakers are away
from back and side walls, and they are
angled a bit so that a convincing sonic
―image‖ is achieved even if you use your
system for two channel stereo music.
When optimized for your room, you
should be able to hear sound even to
the right and left of each speaker, which
enhances the spaciousness of the front
―soundstage‖.
Note the location of the ―rear‖ speakers in the next Chapter as well.
Also called ―surround speakers‖, they tend to be the most difficult to
place in rooms. Higher placement, using brackets with downward tilt
(aiming towards the listening area) is often required and is an acceptable compromise when speaker stands are impractical. Consider foot-traffic in your room and ensure you, children or pets are
not likely to tip over your SVS speakers, or alternatively bumping
their heads on our rather stoutly built speaker cabinets!
Page 8

Chapter 4-3 Speaker Placement
Speaker placement: 5.1 versus 7.1 channel
5.1 channel surround-sound systems
employ Right, Center, Left, and Left
Surround and Right Surround speakers, plus a Subwoofer. This basic
―theater‖ configuration is depicted in
the next Chapter.
Such systems are being supplanted
by 7.1 channel systems shown in
the second room diagram.
The differences in sound between
5.1 and 7.1 channel audio systems
can vary significantly, with larger
rooms usually benefiting from the
added speakers more than smaller
rooms.
The practical differences between the two common surroundsound configurations are probably obvious. Not only does a 7.1
system require more speakers, but a somewhat different roomplacement strategy.
With 7.1 systems, there are ―back‖ speakers roughly centered on
the rear wall of your room. The ―surrounds‖ then are usually
pulled forward from the back wall some, and often placed in line
with your seats, or just behind.
Note: a 7.1 channel audio/video receiver (AVR) can be readily
configured to do a 5.1 channel setup, using the AVR’s setup
menu to designate what speakers are present. However, the
reverse situation is not true. A receiver that is ―only‖ equipped
with 5.1 channel processing can not be used in a 7.1 channel
configuration.
Check your surround sound receiver/processor for additional
guidance. Not all AVR’s work precisely the same with regards to
the methods used to create the rear channel sound fields. Thus
some receiver brands will suggest somewhat different placement.
Once you have your speakers placed throughout the room we
can move on to wiring them up, then system configuration, and
finally channel level calibration.
SV Sound
Page 9

Chapter 5-1 Room diagram
Left Front
Center
Right Front
Right Surround
Left Surround
Subwoofer
Typical 5.1 Channel
Speaker Placement
Figure 4.
SV Sound
Speaker placement: 5.1 Channel Surround Sound System
Page 10

SV Sound
Left Front
Center
Right Front
Right Surround
Left Surround
Subwoofer
Right Back
Left Back
Typical 6.1 or 7.1
Channel Speaker
Placement
Chapter 5-2 Room diagram
Speaker placement: 7.1 Channel Surround Sound System
Typical 7.1 channel
surround sound
speaker system
configuration
Page 11

Chapter 6-1 Wiring
SV Sound
Speaker wiring: Exceptional care must be used at this stage
to ensure details are not overlooked. Check everything closely as
you wire things up, then ―double check‖ each aspect of your
connections before you move on.
First, review the printed Quick Start Guide and note the simplified
wiring diagram which should allow you to visualize your system’s
connections. The diagram in the guide shows a 5.1 channel
configuration with a typical AVR that’s actually capable of powering
an additional set of rear/back speakers in 7.1 channel fashion.
Next, be sure everything in your
system is turned off and unplugged
from electrical power.
Now, study the speaker wire you
have purchased. For long runs
over 5-10 meters we recommend
―12 gauge‖ wire. For shorter runs,
―14 gauge‖ is adequate. If you
bought wires from your SVS dealer,
you will notice the red/black color coding on the ends of the wires.
Observe that on the back of your speakers are ―binding posts‖ which
are likewise colored. Probably the back of your receiver or amp is
also marked in this manner. Red is universally ―+‖ or ―Positive‖ in
polarity. In contrast notice that Black is ―-‖ or ―Negative‖ polarity. The
thin ―banana‖ plugs are meant for the AVR side of your audio
connections. The flat ―spades‖ are best for connecting the speaker
binding posts themselves.
It is critical that you not have stray strands of wire which allow Red
(+) and Black (-) to touch each other either at the receiver, or the
speakers. Also vital is the need to keep polarity correct. By
―polarity‖, we mean that if you trace any wire from your receiver’s
Red positive (+) connection it must lead to the positive (+) Red
terminal on the properly matched speaker. Naturally, Black must
lead to Black too.
Now, not all wire is so cleverly color coded. Good quality copper wire
from any hardware store can work well, but may require you to look
more closely at the wire, or insulating jacket. Often times the jacket
itself is marked with printing or a thin color thread to allow you to
keep polarity in your system lined up.
Page 12

SV Sound
Chapter 6-2 Wiring
Connections, phase, wire and more
Regardless of the sort of wire you use, keep a consistent approach to
your wiring so you do not
inadvertently mismatch
your Plus (+) or Negative
(-) terminals on any
speaker and its run to the
r e c e i v e r ’ s s p e a k e r
outputs.
After tightening down your
speaker terminals it’s
important to periodically
check on them. If you are
using bare, stripped wire
you may notice it will tend
to flatten over time.
Loose connections at
your speaker binding
posts can be a result.
Again look at the diagram
on the printed Quick
Start sheet to get an idea
of how you should
configure wiring with a
typical AVR and a basic
surround-sound system.
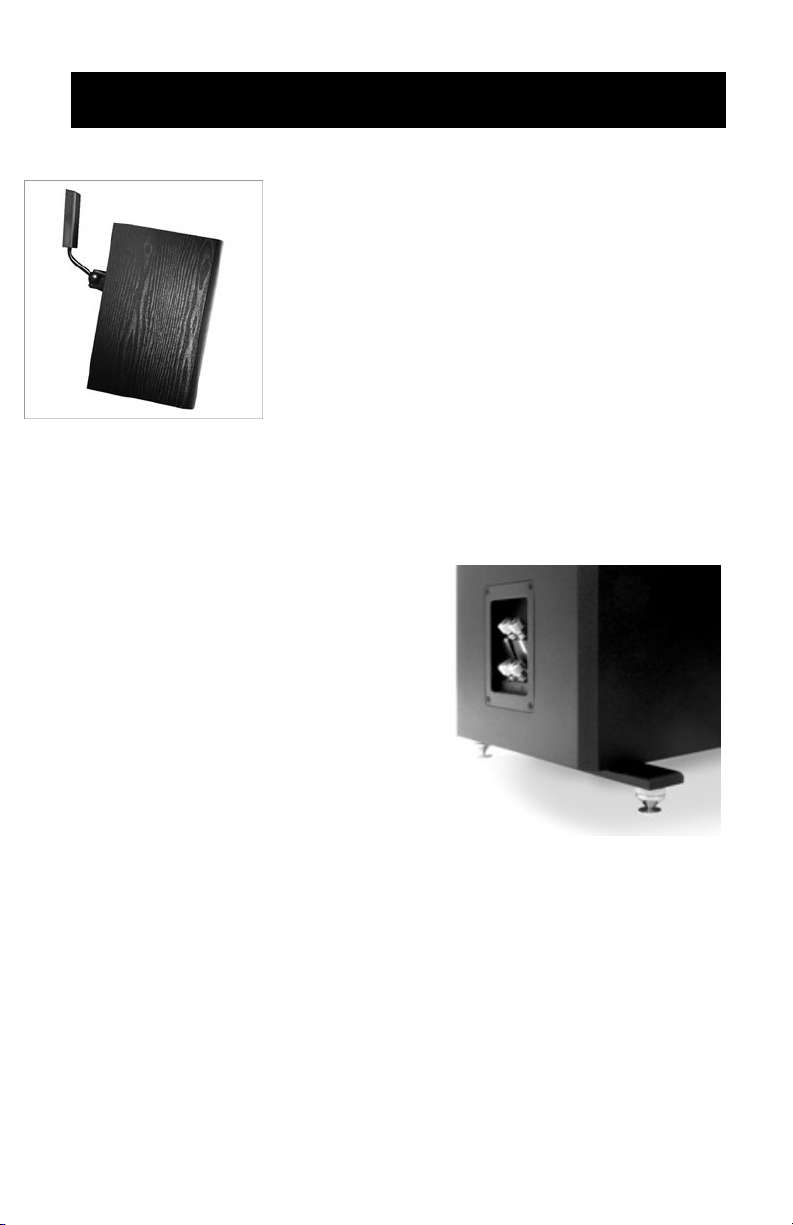
Your speaker is ―bi-wire‖ and ―bi-amp‖ capable with gold-plated bars
installed as a default for use with most consumer audio systems. Biwiring your speakers (and removing the bars connecting the two sets
of binding posts) is unlikely to produce an improvement in sound
quality, but this configuration is often the choice of discerning
audiophiles. While not necessary for excellent sound, bi-amping your
speakers may result in better performance, with improved headroom
and dynamic range.
The upper terminal set is for the tweeter, and the lower terminal set is
for the mid-bass driver(s). Be sure to maintain correct wiring polarity
(+ to +, - to -) for all connections.
Page 13

Chapter 7-1 Speaker orientation
Speakers with “mirrored” tweeter: MTS-01 and SCS-01
In any audio system, your room’s shape and the position of any speaker in that
room, plus your own position, all affect the way sound which reaches your ears.
Sound bounces off of walls, or it can be absorbed by nearby furniture or floor
coverings. Moving a speaker or subwoofer a few feet,
sometimes only inches can have subtle or even significant audible consequences, so experimentation is rec-
ommended. Physical position in one’s room is perhaps
the most obvious setup aspect you might vary.
A second placement aspect is ―toe‖ or pointing your
speakers at least partially towards primary listeners.
This technique can vary the sense of space and
precise ―imaging‖ of sounds in your room.
With ―mirrored‖ speakers
such as MTS-01’s, there is
a third consideration:
Tweeter location. One
look at your speakers will
indicate you have two op-
tions: ―tweeter in‖ or ―out‖.
Try both options. Side reflections from walls, along
with ―toe‖ will serve to
prompt subtle shifts in how
“Tweeters In”
SVSound
“Tweeters Out”
your soundstage is rendered. You might find no substantive difference in your
sound with changes to placement, toe or tweeter orientation. Yet if you move to
another room, changes can be striking. Take a moment to see which situation applies in your room and contact your dealer if you have any questions about these
versatile speakers.
Page 14

Chapter 8-1 Tweeter attenuation (MTS-01 Only)
SVSound
Tweeter Attenuation Control: Placed inside your binding post
cup in the back of
your speaker, the
standard tweeter
switch setting (0dB)
is best for medium to
large rooms with
typical levels of
acoustic damping
(curtains, upholstered furniture, carpeting), or for small
rooms which are acoustically treated with panels and diffusers.
In rooms without acoustical treatments, and which have a significant percentage of exposed and highly reflective surfaces (drywall, brick, glass),
you may find the standard tweeter setting too ―bright‖ and accentuated. In
such instances, try the attenuated tweeter setting, which mitigates some
of the extreme high frequencies and will sound ―softer‖ as a result.
Evaluate the two modes using music which you know well. Ultimately
your personal preference will dictate the optimal tweeter switch setting.
The red trace below is the ―flat‖ 0dB tweeter setting, blue is with the –3dB
attenuation selected.
Page 15

Chapter 9-1 Port tuning
MTS-01 Speaker family port
tuning
Your MTS-01 speaker family (including the
MCS-01 and MBS-01) can be run in either
their efficient and deep ―vented‖ configuration
(using no foam port plugs). Or ―sealed‖ with
their rear-located ports filled by the included
plugs.
For most applications, we recommend the
vented mode with the speakers set to ―Small‖
in your AVR’s setup menu, along with an 80
Hz bass management setting as well. Depending on the room acoustics and the slope
of the high pass filter in your AVR, you may
find that sealed mode with a 100 Hz bass
management setting provides better results
in the mid-bass regions. We encourage you
to audition both modes and crossover frequencies to determine what sounds best in
your system and room.
Blue trace below is sealed mode. Red trace shows open ports.
SVSound
Page 16

Chapter 10-1 Audio system configuration
SVSound
Audio/Video System Configuration:
The most important things to know about your speakers are in
this document, but find your AVR and your DVD or CD player
manuals too. We recommend you reacquaint yourself with the
setup menu options in each of these important pieces of audio
gear. Even speakers as fine these from SVS will not sound correct if poor choices are made during system configuration.
Becoming familiar with the setup menus of your AVR and DVD
player usually requires your primary video display show all settings easily (some receivers only offer front panel displays for
this).
DVD player: Frequently, DVD players ship with their digital audio outputs not configured to send Dolby Digital and DTS audio
to your AVR. Go into your setup menu and see how your player
is set up. Note: If you use a Dolby Digital capable AVR, your
DVD player should be connected with ONLY a single-element
RCA to RCA ―interconnect‖, or an optical cable. Avoid using the
―Right/Left‖ analog audio outputs of any DVD player. These
outputs will not provide the high fidelity sound from your movie
or music disks which digital signals provide.
Within DVD player setup menu for digital audio, the digital output
on should be enabled and also set to ―BITSTREAM‖ (or in some
cases simply annotated as ―Dolby Digital‖). Ensure this setting is
not on ―PCM‖ which is the secondary audio track on virtually all
DVD’s, (but with inferior sound relative to Dolby Digital or DTS).
Often ―DTS‖ is a sound menu selection and should be enabled
too if your AVR is compatible with this alternative audio format.
If you have purchased a high-definition Blu-ray disk™ player, or
even the latest generation standard-definition DVD players, you
may be able to use an ―HDMI‖ cable to send digital video and
audio via that single connection. Consult your player’s guide for
the various options offered to exploit the newest audio formats
on Blu-ray™ . These include ―Dolby Digital Plus‖ and ―Dolby
True HD‖ which can provide even better fidelity and press the
capabilities of your speakers and subs even more than ever!
Page 17

Chapter 10-2 Audio system configuration
On your receiver: There are often confusing and even conflicting set-
tings in a modern AVR. The basics of proper audio setup are quite simple however.
First, make sure all speakers actually installed in your system are also
selected in the receiver setup menu. Of course if you do not have any
particular speaker (say surround ―back‖ speakers in a 7.1 system), then
these should be set to ―Off‖ or ―No‖ … so your sound is processed properly. Second, ensure the ―size‖ of the speakers are correctly noted in
your AVR. In most instances, a system which also includes a highquality subwoofer will produce better sound with all speakers set to
―Small‖.
Note: Virtually every consumer audio speaker system, including those
from SVS, requires a quality subwoofer to achieve ―full range‖ sound
reproduction. We recommend you configure speakers in your AVR to
―Large‖ only if you have no subwoofer. Add an SVS sub to your sys-
tem for superior clarity, depth and dynamic range.
If adjustable in your AVR, set your bass management (a sort of electronic crossover built into your receiver) to 80hz. This eases the deep
bass burden on your speakers and uses your subwoofer properly too.
In some AVR’s your ―LFE‖ (―low frequency effects‖, the ―.1 channel‖)
can be routed to the subwoofer and your Right and Left main speakers.
Do not use this feature. LFE should be directed to the subwoofer only.
Be sure to set the ―distance‖ figures for each speaker correctly too. Use
a tape measure to determine what these distances are. If there are any
―peak limiters‖, DRC circuits, or ―Mid-night mode‖ options, disable all
these too. Your SVS speakers can handle the widest dynamic range
possible and ―compression‖ modes should be avoided.
Finally, a word about modern AVR ―auto-setup‖ routines: Many AVR’s
today include microphones which can be used to optimize speakers
with a corrective equalization profile. Such systems will set speaker
―size‖ and the level (loudness) of each speaker. These systems can
and do make mistakes however.
We highly recommend you ―double check‖ the results of any such auto-
setup scheme. If your speakers are set to ―Large‖ for instance, go back
into the setup menu and change back to ―Small‖, and consider using a
consistent 80hz AVR menu selection for all speakers. Use a sound
pressure level (SPL) meter with the AVR’s test tones to validate channel
levels as well. More on this critical audio setup step in the next chapter.
SVSound
Page 18

SVSound
Chapter 11-1 Channel level calibration
Speaker “Level Calibration”: In home audio, ―calibration‖ is
simply a method to ensure ―all speakers play back the same volume when
the same volume signal is fed to each. Correct speaker playback levels
are critical to reproducing the ―soundstage‖ intended by the musical artist
or movie director. This calibration section is common with SVS subwoofer
manuals. Even with ―auto-setup‖ routines included in today’s AVR’s, it is
important to validate and adjust channel balance.
As always, we recommend consulting your manual to refresh on the procedures to vary individual channel levels and use the test tones built into
any AVR. Usually you can do this just by using the correct keys on your
receivers own remote control. Purchase a basic SPL meter and you have
everything you need to achieve professional setup results!
System configuration review prior to calibrating channel levels:
Are your speakers set correct to the
correct “size”? Your AVR should
allow of ―Small‖ or ―Large‖, which enables ―bass management‖ in your
sound system. Selecting ―Small’‖ with
typically ensures most of the ―midbass‖ goes to your room’s speakers,
with deep bass going to the sub.
Also, is your AVR’s subwoofer out-
put jack enabled? This will only hap-
pen if you indicate ―Yes‖ (or ―ON‖) in
the speaker configuration selection of
your AVR’s setup menu.
Is your receiver connected to the
sub amp? Use a well-shielded ―RCA cable‖, sometimes called an
―interconnect‖ to link the subwoofer output of your AVR to one RCA
input jack of any SVS subwoofer amplifier. You will need to ―split‖ the
AVR’s subwoofer signal with a ―Y Cable‖ if you bought a pair of subs.
Talk to your SVS Dealer for more info on twin subwoofers.
Switch on your Radio Shack ® sound pressure level (SPL) me-
ter. Seen above, this tool is absolutely essential to proper surround
audio setup. An SPL meter is akin to a tire pressure gauge for your
car. Set the meter to ―Slow‖ and ―C-weighting‖, and turn the dial to
70 or 80dB, depending on your test tone source.
Page 19

Chapter 11-2 Channel level calibration
SV Sound
Getting ready to start: Make sure your receiver/processor
master volume is set at ―00 dB‖ or some other easy to remember reference level. Set your subwoofer’s volume/gain
control to no more than 1/3rd up for now (it can be turned up
later).
Check the subwoofer level control of your AVR before you
begin the test tones. Initially set your receiver’s dedicated
subwoofer output control no higher than ―-3 dB‖ given a typical
receiver’s subwoofer channel level limits of –12dB to +12dB) .
Turn off any sound processing schemes such as ―midnight
mode‖, ―Dynamic Range Compression‖ (DRC) etc. Finally,
ensure your AVR is in Dolby Surround/Dolby Digital playback
mode.
Put your SPL meter on a tripod, or hold it in front of you, with
the meter angled upward at 45 degrees. It should remain in
this position for all channels (do not point the meter at each
speaker playing).
Now play your receiver's internal test tones so you have
something to measure with your SPL meter. Or, use a test
DVD such as the Avia, which can yield even more accurate
channel calibration results than AVR test tones. A test tones
from Avia will ensure your entire audio signal path, from the
DVD player to your speakers, is set correctly.
Watching your sound meter now: when the test tones start
alternating from speaker to speaker, use your AVR remote
control to set each speaker’s volume to about 75 dB (Note:
85dB if using Avia). You should only adjust the AVR’s dedi-
cated channel level controls and leave receiver’s master vol-
ume control untouched.
If your readings for the subwoofer are high (more on this in
a moment), we recommend you turn down the receiver’s subwoofer output level before you significantly lower your sub’s
volume/gain control. This helps keep distortion sent to your
subwoofer to a minimum. You should not set the AVR’s sub-
woofer level control lower than - 6 dB however, since some
provision for further downward adjustment by your AVR’s re-
mote control should be maintained. If your subwoofer SPL
reading is too low, raise the gain at the subwoofer amp before
changing the AVR settings.
Page 20

Chapter 11-3 Channel level calibration
SV Sound
But what’s “too high” for your subwoofer?? Tastes vary,
and so do movie soundtracks, but if you purchased an SVS
subwoofer, it’s capable of tremendous levels of low distortion,
low frequency bass — often much more than most subwoofers.
Take advantage of this, especially if you like action movies with
lots of bass action. You can do so by allowing your subwoofer
levels to rise a couple dB’s louder than your other speakers
during your level calibration. Since most audio enthusiasts
don’t watch movies at full theater playback levels, this often
yields a more satisfying movie and music experience.
What subwoofer levels do we recommend? If you pur-
chased an SVS subwoofer, and watch movies at relatively
moderate sound levels, audition a range of +1dB to +3dB
above your other channels (as measured with your SPL meter). This means the test tone will waiver about 78dB for the
subwoofer portion of the calibration run (88dB with Avia).
(Note: You may want to rotate the sound meter SPL meter
dial to 80dB to get a good reading with these higher levels.)
The above is a guide… experiment! The louder your master
volume though, the more you should back off the subwoofer’s
level to compensate. Audible distress is a sign to lower things a
bit. Avoid your driver bottoming, resulting in a loud ―clack‖!
Location and measurement. You should take the above
measurements from your typical preferred seat for watching
movies. Be advised, strong bass levels can vary tremendously
simply by moving your seat, or your subwoofer, only a few feet.
Such is the nature of long wave-length, low bass sound. Do
not hesitate to try different locations and different playback
levels for your subwoofer.
Setting levels for the subwoofer which are too high (and
often, too low) is the most common audio system setup
error. If you make any changes to your system configuration,
or move your speaker or subs, you should always run your
AVR test tones to validate channel levels a final time. If you
ever hear a hard ―clack‖ from your subwoofer during movie or
music playback, you should immediately turn down your sub-
woofer level control at the AVR, or the subwoofer’s own gain
control, or both.
Page 21

SV Sound
Chapter 12-1 Specifications
Specifications
Model Name MBS-01
Configuration
Design
Dimensions
H x W x D 406mm x 254mm x 330mm
Weight
Drivers Tweeter:
Woofer: 6.5" (165mm) Nomex ® cone
Frequency Response
Nominal Impedance 8 (Ohms)
Sensitivity
Power Handling
Mid-sized Bookshelf Speaker
Bass-reflex (with port plugs for sealed mode)
16" x 10" x 13"
27lbs (12kg)
1" (25mm) ScanSpeak ® ―AirCirc‖
60Hz - 30kHz ± 3dB
85dB
20W - 250W
Magnetic Shielding?
Mounting Options
Enclosure Material
Finish
Yes
Threaded inserts for wall bracket
Surface mount with rubber feet
Compatible with speaker stands
Medium Density Fiberboard (MDF) with internal
bracing
Charcoal black laminate with wood veneer or
gloss accent panels
Page 22

Chapter 12-2 Specifications
SV Sound
Specifications
Model Name MCS-01
Configuration
Design
Dimensions
H x W x D 254mm x 610mm x 330mm
Weight
Drivers Tweeter:
Woofer: Twin 6.5" (165mm) Nomex ® cone
Frequency Response
Nominal Impedance 6 Ohms)
Sensitivity
Power Handling
Magnetic Shielding?
Mid-sized Center Speaker
Bass-reflex with sealed mode
10" x 24" x 13"
39lbs (17kg)
1" (25mm) ScanSpeak ® ―AirCirc‖
65Hz - 30kHz ± 3dB
89dB
20W - 250W
Yes
Mounting Options
Enclosure Material
Finish
Wall Bracket (two Omni 20 or equivalent)
Surface mount with foam-disk feet
Medium density fiberboard with internal
bracing
Charcoal black laminate with wood veneer or
gloss accent panels
Page 23

SV Sound
Chapter 12-3 Specifications
Specifications
Model Name MTS-01
Configuration
Design
Dimensions (Grills
included)
H x W x D 1041mm x 254mm x 330mm
Weight
Drivers Tweeter:
Woofer: Twin 6.5" (165mm) Nomex ® cone
Frequency Response
Nominal Impedance 6
Sensitivity
Power Handling
Mid-size Tower Speaker
2 ½ way bass-reflex with sealed mode
41" x 10" x 13"
60lbs (27.3kg)
1" (25mm) ScanSpeak ® ―AirCirc‖
60Hz - 30kHz ± 3dB
91dB
20W - 250W
Magnetic Shielding?
Mounting Options
Enclosure Material
Finish
Yes
Included optional stability bars
Floor placement with plated cone feet
Medium density fiberboard with internal bracing
Charcoal black laminate with wood veneer or
gloss accent panels
Page 24

SV Sound
Chapter 13
Terms and Conditions
Terms and Conditions: Details are available on request, please contact
your Dealer for more. Note that these terms and conditions do not affect
your statutory rights.
Shipping: When you receive your new subwoofer, please check to ensure there is no damage. If after unpacking you discover any damage that
may have been caused by transportation on your product, we request you
contact SVS or if outside the USA your Dealer immediately and if possible, provide a photo of damage in question to them to ensure the fastest
possible correction to the situation.
Warranty: The product has a 3 year warranty against defects in materials
and workmanship. Upon return, the products will be repaired, and redelivered. Naturally, this warranty does not cover any product subjected to
misuse or accidental damage.
The bottom line: We’re proud of these subwoofers and want you to be
as happy owning one, as we are selling one (or more) to you. E-mail your
Dealer if you have any warranty question or contact SVS directly if in
North America.
 Loading...