

Page 1

SV Sound, LLC
© 2009 SV Sound, LLC • 6420 Belmont Avenue, Girard, OHIO • 703.845.1472 • www.svsound.com
Page 2

AS-EQ1 Operator Manual
SV Sound, LLC
What’s in the Box
*
• SVS AS-EQ1 subwoofer EQ with detachable faceplate.
• Quick start guide
• Installation software CD (Operator Manual, Installation software, CutePDF Writer,
SVS desktop pack).
• 10’ USB cable.
• Matched Audyssey calibration microphone.
1
• Isolated AC/DC power supply
.
• Mono mini-jack pass through cable.
• Rubber isolation feet.
• Rack ears.
* Optional SVS audio interconnect shown • 1.) Elementech Power Supply, part no: AU1241202g
© 2009 SV Sound, LLC • 6420 Belmont Avenue, Girard, OHIO • 703.845.1472 • www.svsound.com
FIG. 1
2
Page 3

AS-EQ1 Operator Manual
SV Sound, LLC
Table of Contents
Safety Instructions 4
Introduction 6
About this Manual 8
Installing the SubEQ GUI and AS-EQ1 Manual on your PC 9
Connecting the AS-EQ1 to your Audio System 11
Calibrating the AS-EQ1 in your Listening Environment 13
Integrate the AS-EQ1 with your Auto EQ Receiver or Pre/Pro 14
Channel Conguration 18
Level Matching 19
Measuring your Subwoofer(s) 23
Detection Results Entry into AVR or Pre/Pro 25
Save Results to AS-EQ1 27
Create HTML Certicate Document 29
Appendix A – Why EQ? 30
Terms and Conditions 34
© 2009 SV Sound, LLC • 6420 Belmont Avenue, Girard, OHIO • 703.845.1472 • www.svsound.com
3
Page 4

AS-EQ1 Operator Manual
SV Sound, LLC
Important Safety Instructions
1. Read these instructions.
2. Keep these instructions.
3. Heed all warnings.
4. Follow all instructions.
5. Do not use this apparatus near water.
6. Clean only with dry cloth.
7. Do not block any ventilation openings. Install in accordance with the manufacturer’s instructions.
8. Do not install near any heat sources such as radiators, heat registers, stoves, or other apparatus
(including amplifiers) that produce heat.
9. Do not defeat the safety purpose of any polarized or grounding-type plug. A polarized plug has two
blades with one wider than the other. A grounding type plug has two prongs and a third grounding
point. The wide blade or the third prong are provided for your safety. If the provided plug does not fit
into your outlet, consult an electrician for replacement of the obsolete outlet.
10. Protect the power cord from being walked on or pinched particularly at plugs, convenience receptacles,
and the point where they exit from the apparatus.
11. Only use attachments/accessories specified by the manufacturer.
12. Use only with the cart, stand, tripod, bracket, or table specified by the manufacturer, or sold with the
apparatus. When a cart is used use caution when moving the cart/apparatus combination to avoid
injury from tip-over.
© 2009 SV Sound, LLC • 6420 Belmont Avenue, Girard, OHIO • 703.845.1472 • www.svsound.com
FIG. 2
4
Page 5

AS-EQ1 Operator Manual
SV Sound, LLC
Important Safety Instructions
13. Unplug this apparatus during lightning storms or when unused for long periods of time.
14. Refer all servicing to qualified service personnel. Servicing is required when the apparatus has been
damaged in any way, such as power-supply cord or plug is damaged, liquid has been spilled or objects
have fallen into the apparatus, the apparatus has been exposed to rain or moisture, does not operate
normally, or has been dropped.
15.
WARNING: To reduce the risk of fire or electric shock, this apparatus should not be exposed to rain or
moisture and objects filled with liquids, such as vases, should not be placed on this apparatus.
16. To completely disconnect this equipment from the mains, disconnect the power supply cord plug from
the receptacle.
17. The mains plug of the power supply cord shall remain readily operable.
© 2009 SV Sound, LLC • 6420 Belmont Avenue, Girard, OHIO • 703.845.1472 • www.svsound.com
FIG. 3
5
Page 6

AS-EQ1 Operator Manual
SV Sound, LLC
Introduction
Audio lovers, perfect bass is finally possible, easy, and downright fun to achieve. Your AV receiver investment is solidified since the
matter what your current or future room looks like. Switch one on, run setup, and you won’t ever switch it
off. Harness the power and refinement of your system, and take the room out of the equation, finally.
AS-EQ1 is compatible with any sort you have. Your bass needs are covered no
AS-EQ1 Features
• Driven by an advanced Digital Signal Processor (DSP) using sophisticated Audyssey® customized
room-correction algorithms
• Utilizes Adaptive Low Frequency Correction
advanced bass calibration method available to consumers today
• Performs analysis in both frequency and time domain, for superior artifact-free bass adapted for your room
• Dual subwoofer processing for better blending and integration with main channels
• FIR filters to avoid time/phase distortion inherent with IIR filters for superior bass clarity
• Corrects bass for an incredible 32 positions in horizontal and vertical space to cover any listening area
• Heavy-duty steel chassis with SVS’s magnetically-retained CNC’d aluminum face-plate
• Twin sub in, twin out, with multiple configuration modes. Mains level calibration signal output jack
• Easy-to-use laptop PC graphical user interface (GUI) and CD operating software with operator manual
• Dedicated Audyssey microphone and AV receiver external calibration pass thru cables included
• High quality, isolated 12V. power supply, and USB cable included
• On-line SVS tech support page for easy software updates, upgrades and news
TM
technology (ALFC) from Audyssey LaboratoriesTM the most
• Power and unit status LEDs
• Front-panel easy access for calibration microphone and USB connection
• Final test and assembly in SVS’s Ohio headquarters
© 2009 SV Sound, LLC • 6420 Belmont Avenue, Girard, OHIO • 703.845.1472 • www.svsound.com
6
Page 7

AS-EQ1 Operator Manual
SV Sound, LLC
Introduction
SVS AS-EQ1 Features:
© 2009 SV Sound, LLC • 6420 Belmont Avenue, Girard, OHIO • 703.845.1472 • www.svsound.com
FIG. 4
7
Page 8

AS-EQ1 Operator Manual
SV Sound, LLC
About This Manual
This document is intended to provide you with all the information necessary to properly install and integrate
the SVS AS-EQ1 into your audio environment. After installing the Sub EQ GUI on your personal computer
and properly attaching the AS-EQ1 to your Audio Video Receiver (AVR) or Preamp/Processor (Pre/Pro), you
will be able to quickly step through a small number of tasks designed to equalize your subwoofer(s) in your
listening environment. This manual will discuss each task in detail and discuss what you should see at the
conclusion of each task.
When referencing the AS-EQ1 in this manual, we are referring to the hardware device that integrates into
your audio system. When referencing
runs on your PC to facilitate calibrating your AS-EQ1 to your listening environment.
In addition to the information contained in this manual, you will also find directed workflow reminders in
the Sub EQ GUI to insure the steps contained in each task are performed in the proper sequence.
Sub EQ in this manual, we are referring to the software GUI that
NOTE
It is strongly recommended you read through
this manual in its entirety before installing and setting up the
AS-EQ1 to insure understanding of what each task is intended
to accomplish, and to make the actual activity of equalizing
your subwoofer(s) a simple and straightforward exercise. You
will also find helpful tips and techniques in this manual that
are not found in the GUI for reasons of space.
© 2009 SV Sound, LLC • 6420 Belmont Avenue, Girard, OHIO • 703.845.1472 • www.svsound.com
:
8
Page 9

AS-EQ1 Operator Manual
SV Sound, LLC
Installing the Sub EQ GUI on your PC
To install the Sub EQ GUI on your computer system, insert the CD that came with your AS-EQ1 into your
CD drive on the computer you will be using to configure the AS-EQ1. If the drive has been configured for
“AutoRun”, the installer should automatically run. If not, browse the drive in which the Sub EQ installation
CD resides and double click on
Setup.exe
When the installer runs, you will see the following Screen:
FIG. 5
© 2009 SV Sound, LLC • 6420 Belmont Avenue, Girard, OHIO • 703.845.1472 • www.svsound.com
FIG. 6
9
Page 10

AS-EQ1 Operator Manual
SV Sound, LLC
Installing the SubEQ GUI and AS-EQ1 Manual on your PC
Select the “Install Audyssey SubEQ” option, and follow the steps in the install program as to where to place
the program. The SubEQ program will be installed on your system and be available through your Start - >
All Programs -> Audyssey Labs folder if the defaults are accepted. If you would like shortcuts on your Windows Desktop for SubEQ and the AS-EQ1 Operator Manual, you can simply drag a copy from the
Programs -> Audyssey Labs folder.
After installing the software on your PC, you can start the Sub EQ application from this Install screen by
clicking on Launch Sub EQ Application, or from the
Start - > All Programs -> Audyssey Labs folder.
Start - > All
To exit the setup process, select
Exit.
To Uninstall Sub EQ from your system, go to:
My Computer - > Control Panel -> Add or Remove Programs - > Audyssey Sub EQ and select for removal.
To install the AS-EQ1 Operator Manual on your PC, simply copy the file SVS_AS_EQ1OperatorManual.pdf
from the Installation CD to the desired location on your PC.
© 2009 SV Sound, LLC • 6420 Belmont Avenue, Girard, OHIO • 703.845.1472 • www.svsound.com
10
Page 11

AS-EQ1 Operator Manual
SV Sound, LLC
Connecting the AS-EQ1 to Your Audio System
The AS-EQ1 is designed to connect between your AVR or “Pre/Pro” (Pre-amp/Processor) and your subwoofer(s)
so that after calibration, the AS-EQ1 can apply the necessary corrections to “flatten” the response of bass
in your listening environment.
As shown below, the AS-EQ1 has two subwoofer Inputs labeled A and B and two subwoofer Outputs labeled
A and B on the back panel. You’ll also notice an Output connector marked Sat Center/Left we’ll reference later
in the calibration process.
FIG. 7
The AS-EQ1 handles three different subwoofer configurations: (see Fig. 7 above and Fig. 8 on the next page)
A single subwoofer. If you have one subwoofer in your system (or co-located subs and you want to equalize
1.
them as a single subwoofer), attach the subwoofer pre-out from your AVR or Pre/Pro to the Sub A input.
Take the cable formerly run from your AVR or Pre/Pro to your subwoofer and connect to the AS-EQ1 Sub A Output.
Two subs driven from one output. This is the most common configuration when running multiple subs.
2.
You may have taken the subwoofer pre-out from your AVR or Pre/Pro and run it through a “Y” connector
to split the signal in two; one for each of your subwoofers. In this case, remove the Y splitter and
attach the subwoofer pre-out to the Sub A input on the AS-EQ1. Connect one of your subs to the
Sub A output and the other to the Sub B output on your AS-EQ1.
Two subwoofers driven from two outputs. If you use discrete subwoofer or LFE outputs on your AVR or
3.
Pre/Pro (or have two different systems with a subwoofer in each) and want the signals to be treated
individually, attach one of the outputs to the Sub A Input and the other output to the Sub B Input on the
ASEQ1. Take the cables from the subwoofers that were formerly attached to theAVR or Pre/Pro and
connect them to the Sub A and Sub B Outputs on the ASEQ1.
© 2009 SV Sound, LLC • 6420 Belmont Avenue, Girard, OHIO • 703.845.1472 • www.svsound.com
11
Page 12

AS-EQ1 Operator Manual
SV Sound, LLC
Connecting the AS-EQ1 to Your Audio System
AS-EQ1 Connection for Day-to-Day Operation
© 2009 SV Sound, LLC • 6420 Belmont Avenue, Girard, OHIO • 703.845.1472 • www.svsound.com
FIG. 8
12
Page 13

AS-EQ1 Operator Manual
SV Sound, LLC
Calibrating the AS-EQ1 in Your Listening Environment
Once you have the AS-EQ1 connected to your AVR or Pre/Pro and subwoofer(s), you are ready to step through
the calibration tasks to set up your room EQ. Although the AS-EQ1 Calibration process is very straightforward,
you should allow yourself an hour or so to comfortably complete the activity for the first time.
Connect your PC to the AS-EQ1 using the supplied USB cable, power on the AS-EQ1 using the on/off switch
on the back panel, allow your PC to recognize the AS-EQ1, then start the Sub EQ GUI (note that if you start
the Sub EQ GUI before connecting the AS-EQ1 via USB, Sub EQ will not recognize the AS-EQ1 is attached.
Terminate and restart Sub EQ to force device recognition).
You should see the following Screen on your display:
Select
“Start Sub EQ Calibration” to begin stepping through the tasks that will lead to a calibrated AS-EQ1.
The following pages will detail each task and what you should expect to see after successfully completing
the task. In addition, you will find an abbreviated set of workflow steps located in the left sidebar of the Sub
EQ GUI to help you with step-by-step activities when calibrating your subwoofer(s).
© 2009 SV Sound, LLC • 6420 Belmont Avenue, Girard, OHIO • 703.845.1472 • www.svsound.com
FIG. 9
13
Page 14

AS-EQ1 Operator Manual
SV Sound, LLC
Calibrating the AS-EQ1 in Your Listening Environment
TASK
Integrate the AS-EQ1 with your Auto EQ Receiver or Pre/Pro
:
FIG. 10
NOTE
If your AVR or Pre/Pro does not have Auto EQ capability (or you have chosen not to use it) you
can skip this Task and proceed to the next Task, “Channel Configuration”
The AS-EQ1 is designed to integrate with any Auto EQ system that may be part of your AVR or Pre/Pro.
NOTE
If you use the Auto EQ feature of your AVR or Pre/Pro to EQ your listening environment, you
MUST perform this step first. If you do not, your AVR or Pre/Pro and the AS-EQ1 will both apply EQ correction
files to the subwoofer, which will result in poor subwoofer sound/performance.
:
:
© 2009 SV Sound, LLC • 6420 Belmont Avenue, Girard, OHIO • 703.845.1472 • www.svsound.com
14
Page 15

AS-EQ1 Operator Manual
SV Sound, LLC
Calibrating the AS-EQ1 in Your Listening Environment
Your EQ-equipped AVR or Pre/Pro normally handles the full frequency range of your system which includes
the subwoofer and main speakers. The AS-EQ1 is designed to handle the lower frequencies where your
subwoofer(s) operate, and apply its own, more sophisticated correction filters in the place of that provided
by your AVR or Pre/Pro. This task will effectively set your AVR or Pre/Pro to equalize only the main (and
Satellite) speakers in your system so the AS-EQ1 can assume the EQ of the subwoofers and not have any
overlap of EQ filters in your system. (see Fig. 11 below and Fig. 12 on page 17)
1. Carefully remove the front panel of your AS-EQ1. It is attached magnetically and should pull off easily.
FIG. 11
2. Take the Calibration Microphone from your AVR or Pre/Pro (NOT the Calibration Microphone from the
AS-EQ1) and plug it into the Pass-through Mic In jack located on the front of the AS-EQ1. (see Fig. 12)
3. Locate the calibration microphone “patch cable” that came with your AS-EQ1 (1/8” mono male connectors
on each end). Plug one end into the AS-EQ1’s Passthrough Mic Out jack, and the other end into the
Calibration Microphone input jack on your AVR or Pre/Pro.
4. On the Sub EQ GUI running on your PC, make sure the “On” Radio Button has been checked on the Auto
EQ Assist screen (Note: Navigating away from this screen (forward or back), exiting the Sub EQ GUI, or
powering off the AS-EQ1device will turn external calibration mode to Off).
5. Calibrate the AVR or Pre/Pro as directed by its owner’s manual. Note: Your subwoofer will be “detected”
during the AVR’s calibration process although you will hear no sound from the sub.
© 2009 SV Sound, LLC • 6420 Belmont Avenue, Girard, OHIO • 703.845.1472 • www.svsound.com
15
Page 16
AS-EQ1 Operator Manual
SV Sound, LLC
Calibrating the AS-EQ1 in Your Listening Environment
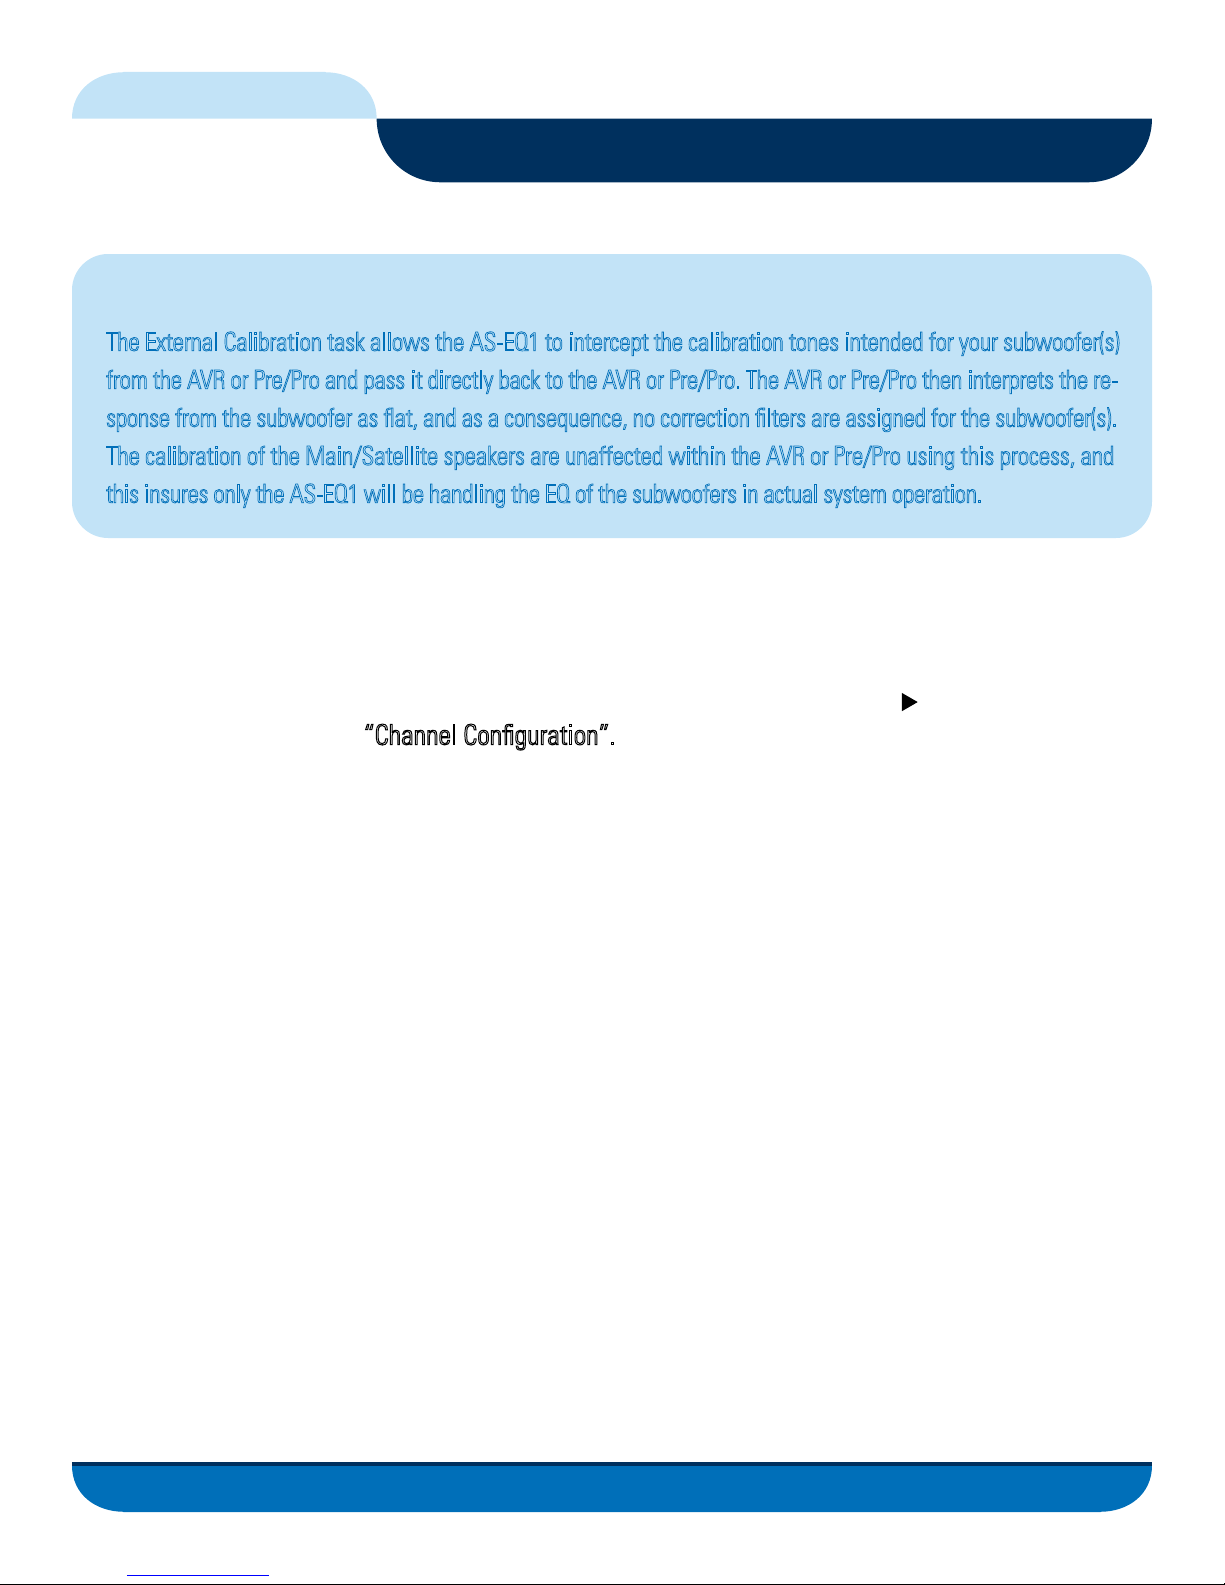
Capturing Intended Calibration Tones
The External Calibration task allows the AS-EQ1 to intercept the calibration tones intended for your subwoofer(s)
from the AVR or Pre/Pro and pass it directly back to the AVR or Pre/Pro. The AVR or Pre/Pro then interprets the response from the subwoofer as flat, and as a consequence, no correction filters are assigned for the subwoofer(s).
The calibration of the Main/Satellite speakers are unaffected within the AVR or Pre/Pro using this process, and
this insures only the AS-EQ1 will be handling the EQ of the subwoofers in actual system operation.
6. After completing the calibration of your AVR or Pre/Pro, remove its Calibration Microphone along with
the calibration microphone patch cable from the AS-EQ1 and your AVR or Pre/Pro.
7. At this time, your AVR or Pre/Pro and the AS-EQ1 are integrated properly. Click on the Sub EQ GUI to
continue to the next Task, “Channel Configuration”.
© 2009 SV Sound, LLC • 6420 Belmont Avenue, Girard, OHIO • 703.845.1472 • www.svsound.com
16
Page 17
AS-EQ1 Operator Manual
SV Sound, LLC
Calibrating the AS-EQ1 in Your Listening Environment
AS-EQ1 Configuration for Auto EQ Task
© 2009 SV Sound, LLC • 6420 Belmont Avenue, Girard, OHIO • 703.845.1472 • www.svsound.com
FIG. 12
17
Page 18

AS-EQ1 Operator Manual
SV Sound, LLC
Calibrating the AS-EQ1 in Your Listening Environment
TASK
:
Channel Conguration
FIG. 13
As mentioned earlier in this manual when discussing connecting the AS-EQ1 to your audio system, there
are three different subwoofer configurations the AS-EQ1 will support when EQing your listening environment. Depending on which configuration you have, click the associated Radio Button on this screen then
click the button to continue to the next task “Level Matching”.
NOTE
When calibrating your subwoofers later in the process, the AS-EQ1 will treat dual subwoofers as follows:
One IN to two OUT represents dual combined subwoofers. The AS-EQ1 will “ping” Subwoofer A, ping Subwoofer B,
then ping Both Subwoofers. It EQs both subwoofers independently, but will also EQ the combined response and tweak
both subwoofers as needed.
Dual discrete IN to dual discrete OUT represents “stereo bass” (two separate sources of bass). Alternatively, it can
be used to connect two separate systems in the same room if you have that configuration. The AS-EQ1 will ping
Subwoofer A, ping Subwoofer B, EQ Subwoofer A, then EQ Subwoofer B. It will not ping or EQ the combined A+ B.
:
© 2009 SV Sound, LLC • 6420 Belmont Avenue, Girard, OHIO • 703.845.1472 • www.svsound.com
18
Page 19
AS-EQ1 Operator Manual
SV Sound, LLC
Calibrating the AS-EQ1 in Your Listening Environment
TASK
:
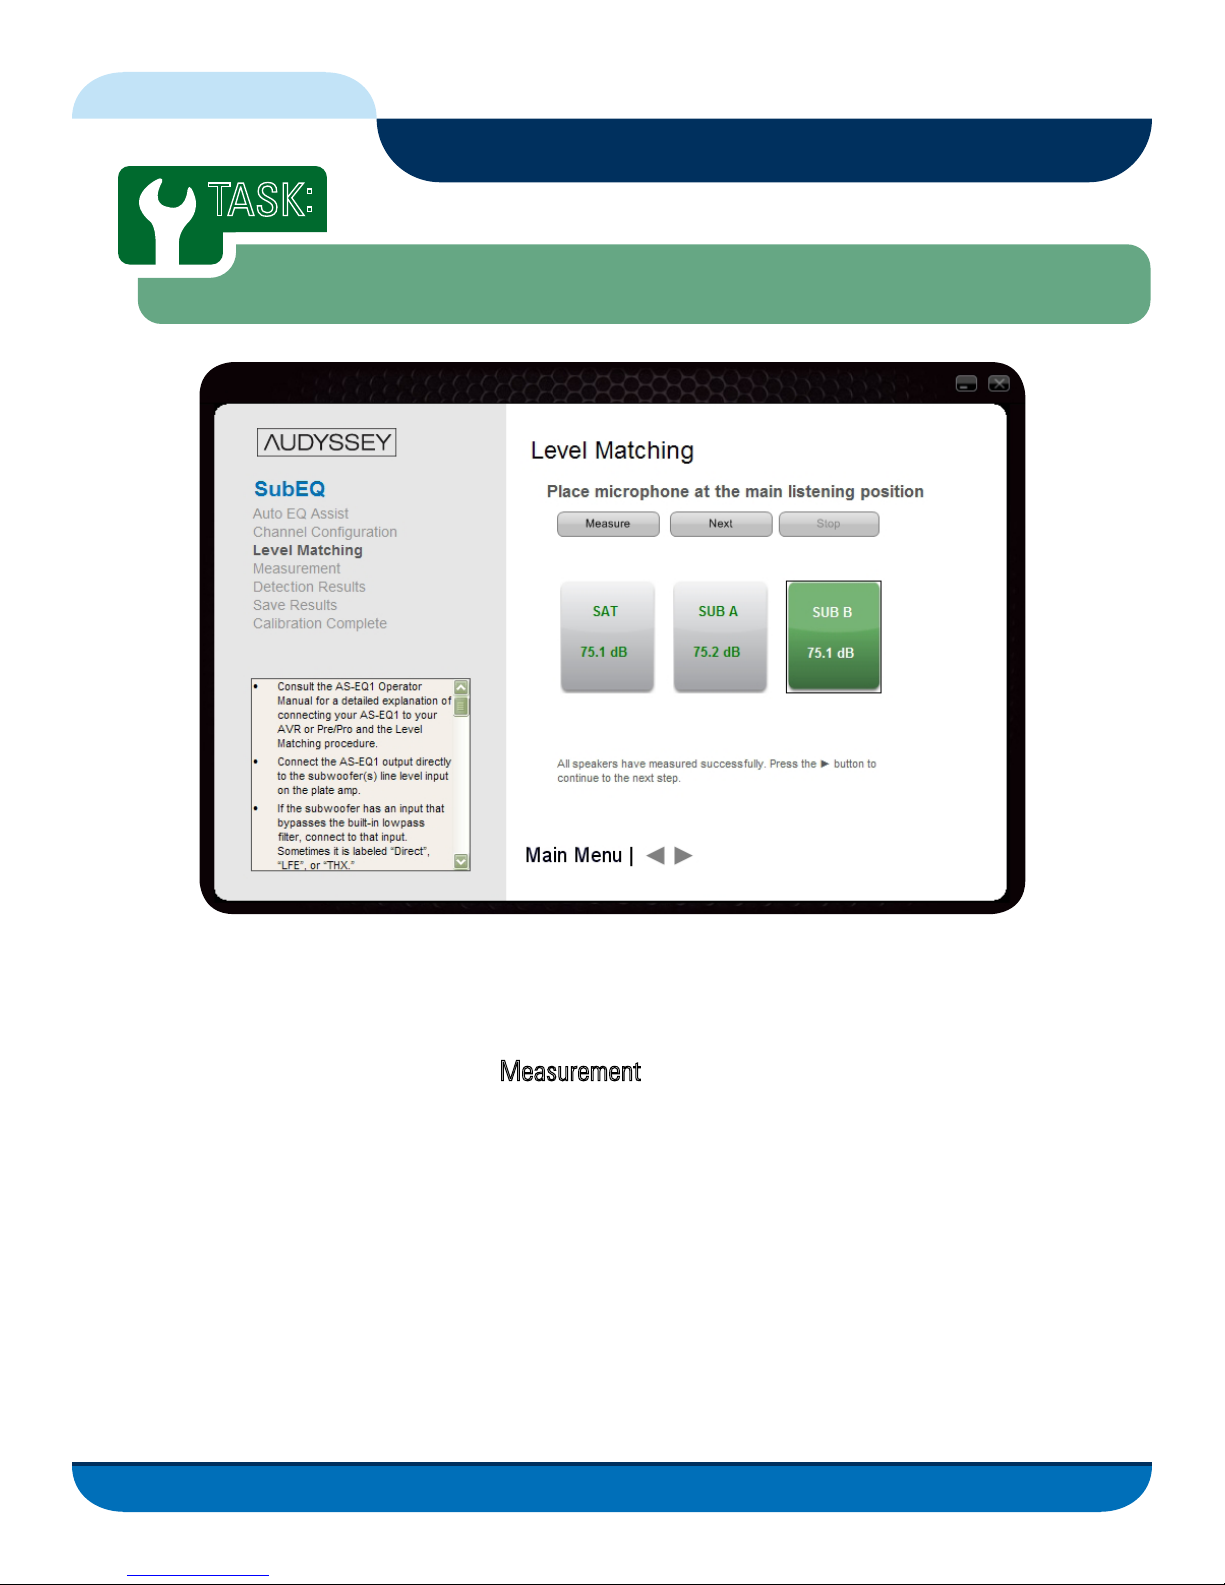
Level Matching
FIG. 14
Before you can take measurements of your listening environment with the AS-EQ1, you need to insure that
your AVR or Pre/Pro and subwoofer(s) are set up properly before the AS-EQ1 measures your room and creates
its correction filters. It is important that you read, understand, and follow these instructions to insure the
best possible results during the upcoming
1. Insure the Gain on your subwoofer(s) plate amp is set to the middle of its range.
2. Set the Phase control of your subwoofer(s) to 0 (the AS-EQ1 will adjust each subwoofer to insure proper
phase alignment).
3. Defeat the subwoofer’s built-in lowpass filter (crossover) by use of a defeat switch, or if the sub
woofer has no bypass switch but has an input (sometimes it is labeled “Direct”, “LFE”, or “THX”)
that bypasses the lowpass filter, connect to that input. If it is not possible to bypass the lowpass
filter, set the filter knob on the subwoofer to the highest frequency setting.
Measurement task.
© 2009 SV Sound, LLC • 6420 Belmont Avenue, Girard, OHIO • 703.845.1472 • www.svsound.com
19
Page 20
AS-EQ1 Operator Manual
SV Sound, LLC
Calibrating the AS-EQ1 in Your Listening Environment
4. Attach the Calibration Microphone supplied with the AS-EQ1 to the Cal Mic Input on the front of the
AS-EQ1. DO NOT use the microphone supplied with your AVR or Pre/Pro or any other Microphone as it
may produce inaccurate results.
5. Connect the Sat Center/Left Output on the back of the AS-EQ1 to the Left or Center Multi Channel
Analog Input on your AVR or Pre/Pro. Insure that any processing or bass management your AVR or
Pre/Pro may be performing on those inputs is disabled and the appropriate input is selected on your
AVR or Pre/Pro for playing the Level Matching test tone.
During the Calibration process, you will first adjust the output of your subwoofer(s) to match your speakers,
and then the AS-EQ1 will EQ your subwoofer(s) and provide you with a new subwoofer channel “Trim”
setting to enter into your AVR or Pre/Pro. To facilitate this, the Sub EQ GUI can function as a calibration tone
generator and a level meter. The subwoofer(s) must be level matched with the speakers before proceeding
to the next step.
To use the Sub EQ GUI to assist in setting your speaker and subwoofer levels, perform the following steps:
(see page 22 Fig. 15 for a graphical connection)
1. Place the AS-EQ1 Calibration Microphone in the main listening position at ear height with its tip pointed
directly at the ceiling.
2. It is important all sources of background noise have been quieted in the room to insure accurate data acquisition.
3. Highlight the “Sat” Channel and click the “Measure” button on the Level Matching screen to begin testing.
4. Adjust the master volume of the AVR or Pre/Pro to the “Reference Calibration Level.” This is typically
“0.0 dB,” but check the AVR or Pre/Pro owners manual, since this is often not the reference level; or
recall how you calibrated to be sure.
5. While measuring the level of the satellite, adjust the trim level (
not the master volume) for that speaker
in the AVR’s setup menu/channel level control until it measures 75 dB. The window color will change
from red to green when you are approaching the target level of 75 dB.
© 2009 SV Sound, LLC • 6420 Belmont Avenue, Girard, OHIO • 703.845.1472 • www.svsound.com
20
Page 21
AS-EQ1 Operator Manual
SV Sound, LLC
Calibrating the AS-EQ1 in Your Listening Environment
NOTE
Some AVRs and Pre/Pros have “global” channel Trim level menus which uniformly affect
all inputs (i.e., multi-channel and digital). However, some AVRs have separate and independent Trim
level menus for the analog multi-channel inputs and the digital inputs. If that is the case, make sure the
correct Trim level setting for the selected satellite speaker is input at all Trim level menus.
6. It is the responsibility of the user to ensure that the remaining speaker channels are also calibrated to
75 dB. One way to accomplish this is to connect the AS-EQ1 to the other multi-channel speaker inputs,
play the test tone from the AS-EQ1, and adjust the respective speaker Trim levels accordingly. Make sure
these Trim level settings are migrated to all affected inputs (both multi-channel analog and digital).
7. Click “Next” and Measure Sub A. Adjust the Gain control on the subwoofer amplifier until the level
reads 75 dB. If you are running two subwoofers, repeat for Sub B.
NOTE
If you are running dual subwoofers and do not have your subwoofer levels set at or close
:
:
to 75 dB, it is possible Sub EQ may recommend excessive AVR or Pre/Pro subwoofer Trim adjustments
due to acoustical coupling. Keep this in mind before performing an extensive Measurement exercise
(below) with a large number of measurement positions in order to avoid rework.
If you are running more than two subwoofers (e.g. multiple subs attached to the AS-EQ1 Sub A or Sub
B outputs) it is suggested you contact SVS Support for a discussion of properly Level Matching your
specific configuration for your listening environment.
8. Once level matching of the satellite and subwoofer(s) is complete, click the button to move on to the
next task, “Measuring your Subwoofer(s)”.
© 2009 SV Sound, LLC • 6420 Belmont Avenue, Girard, OHIO • 703.845.1472 • www.svsound.com
21
Page 22
AS-EQ1 Operator Manual
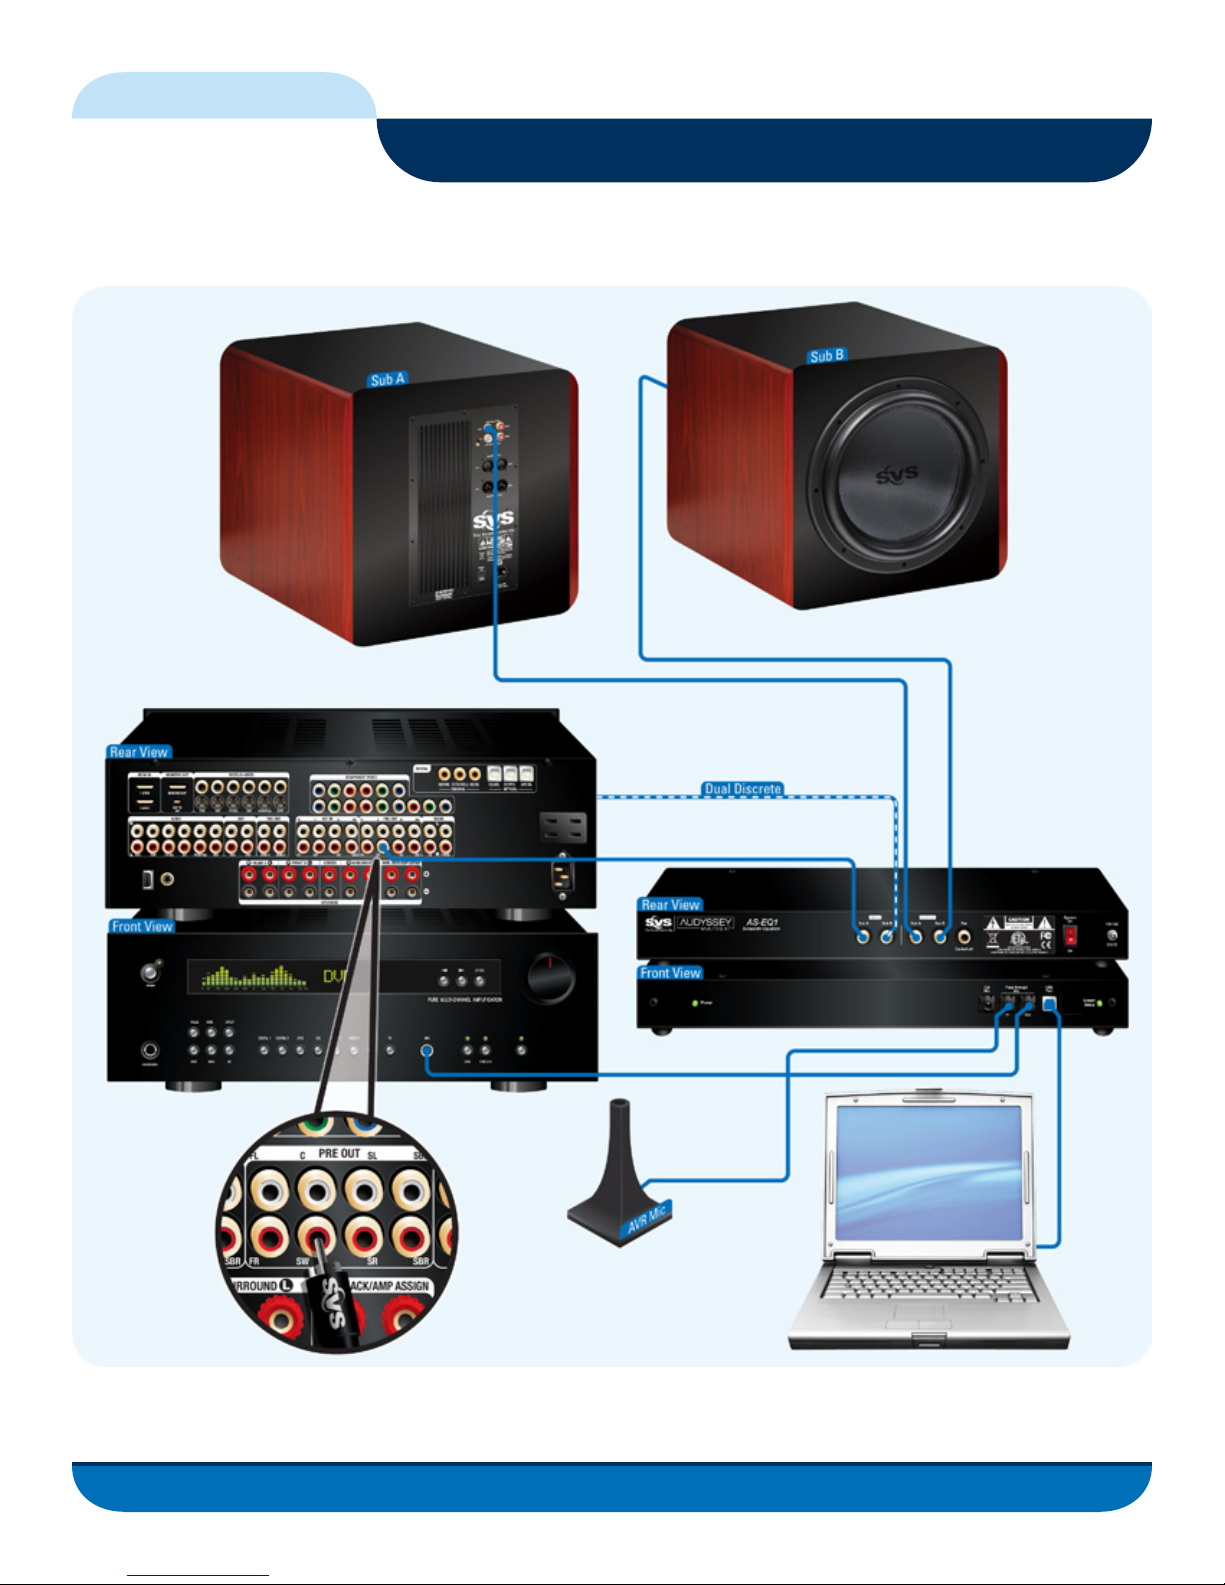
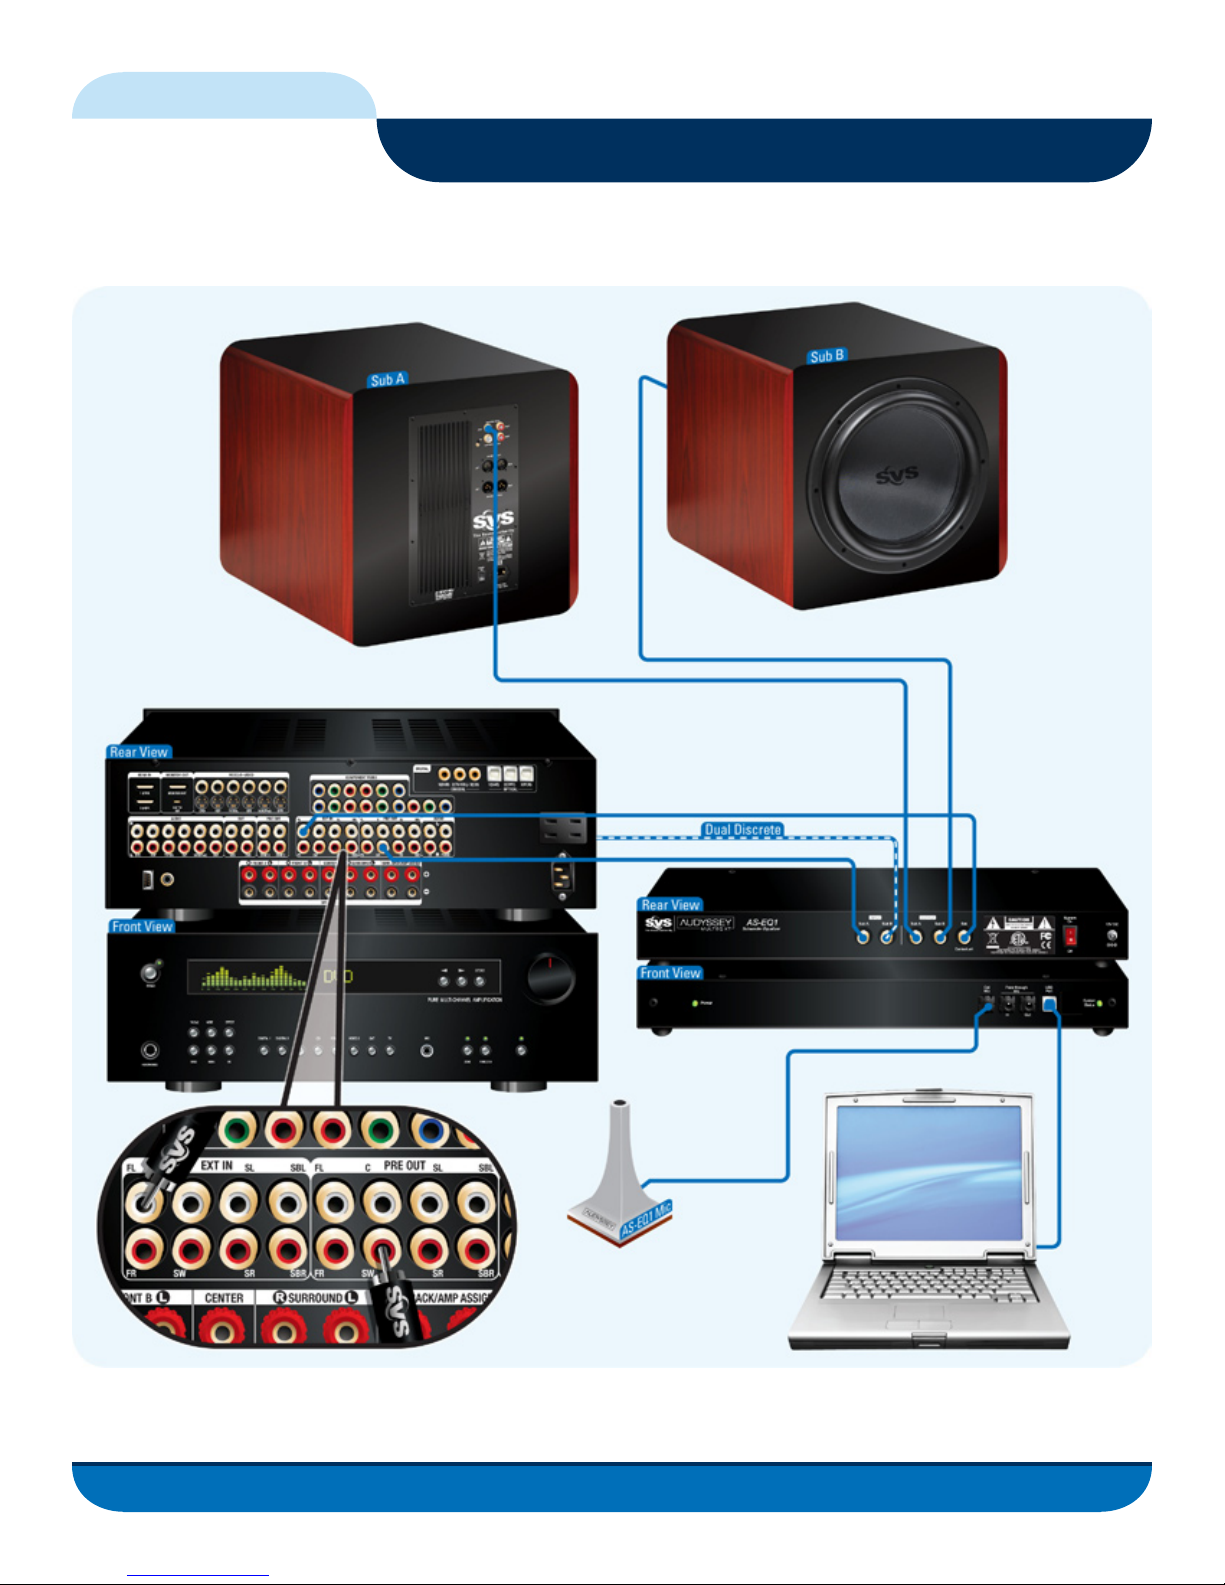
AS-EQ1 Configuration for Level Setting and Measurement Tasks
SV Sound, LLC
Calibrating the AS-EQ1 in Your Listening Environment
© 2009 SV Sound, LLC • 6420 Belmont Avenue, Girard, OHIO • 703.845.1472 • www.svsound.com
FIG. 15
22
Page 23
AS-EQ1 Operator Manual
SV Sound, LLC
Calibrating the AS-EQ1 in Your Listening Environment
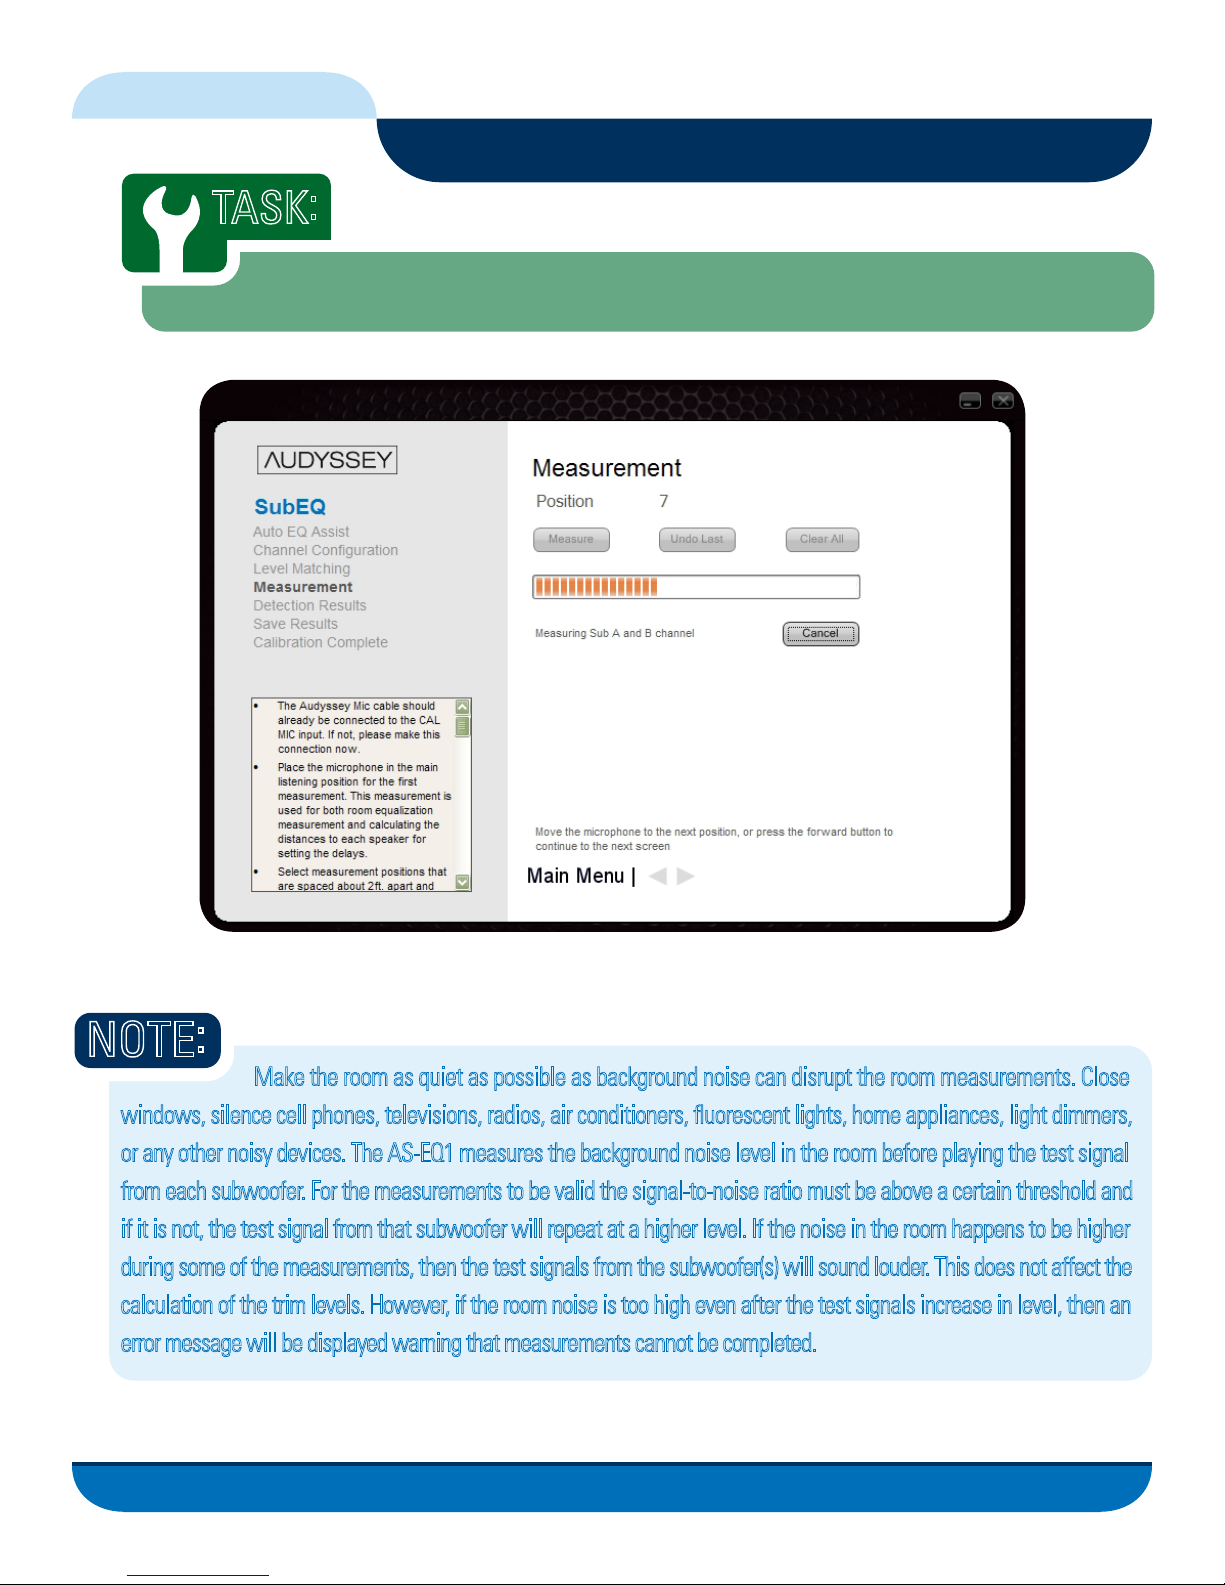
TASK
:
Measuring your Subwoofer(s)
You are now ready to begin measuring your subwoofer(s) so the AS-EQ1 can Equalize your listening environment.
NOTE
Make the room as quiet as possible as background noise can disrupt the room measurements. Close
windows, silence cell phones, televisions, radios, air conditioners, fluorescent lights, home appliances, light dimmers,
or any other noisy devices. The AS-EQ1 measures the background noise level in the room before playing the test signal
from each subwoofer. For the measurements to be valid the signal-to-noise ratio must be above a certain threshold and
if it is not, the test signal from that subwoofer will repeat at a higher level. If the noise in the room happens to be higher
during some of the measurements, then the test signals from the subwoofer(s) will sound louder. This does not affect the
calculation of the trim levels. However, if the room noise is too high even after the test signals increase in level, then an
error message will be displayed warning that measurements cannot be completed.
:
© 2009 SV Sound, LLC • 6420 Belmont Avenue, Girard, OHIO • 703.845.1472 • www.svsound.com
23
Page 24
AS-EQ1 Operator Manual
SV Sound, LLC
Calibrating the AS-EQ1 in Your Listening Environment
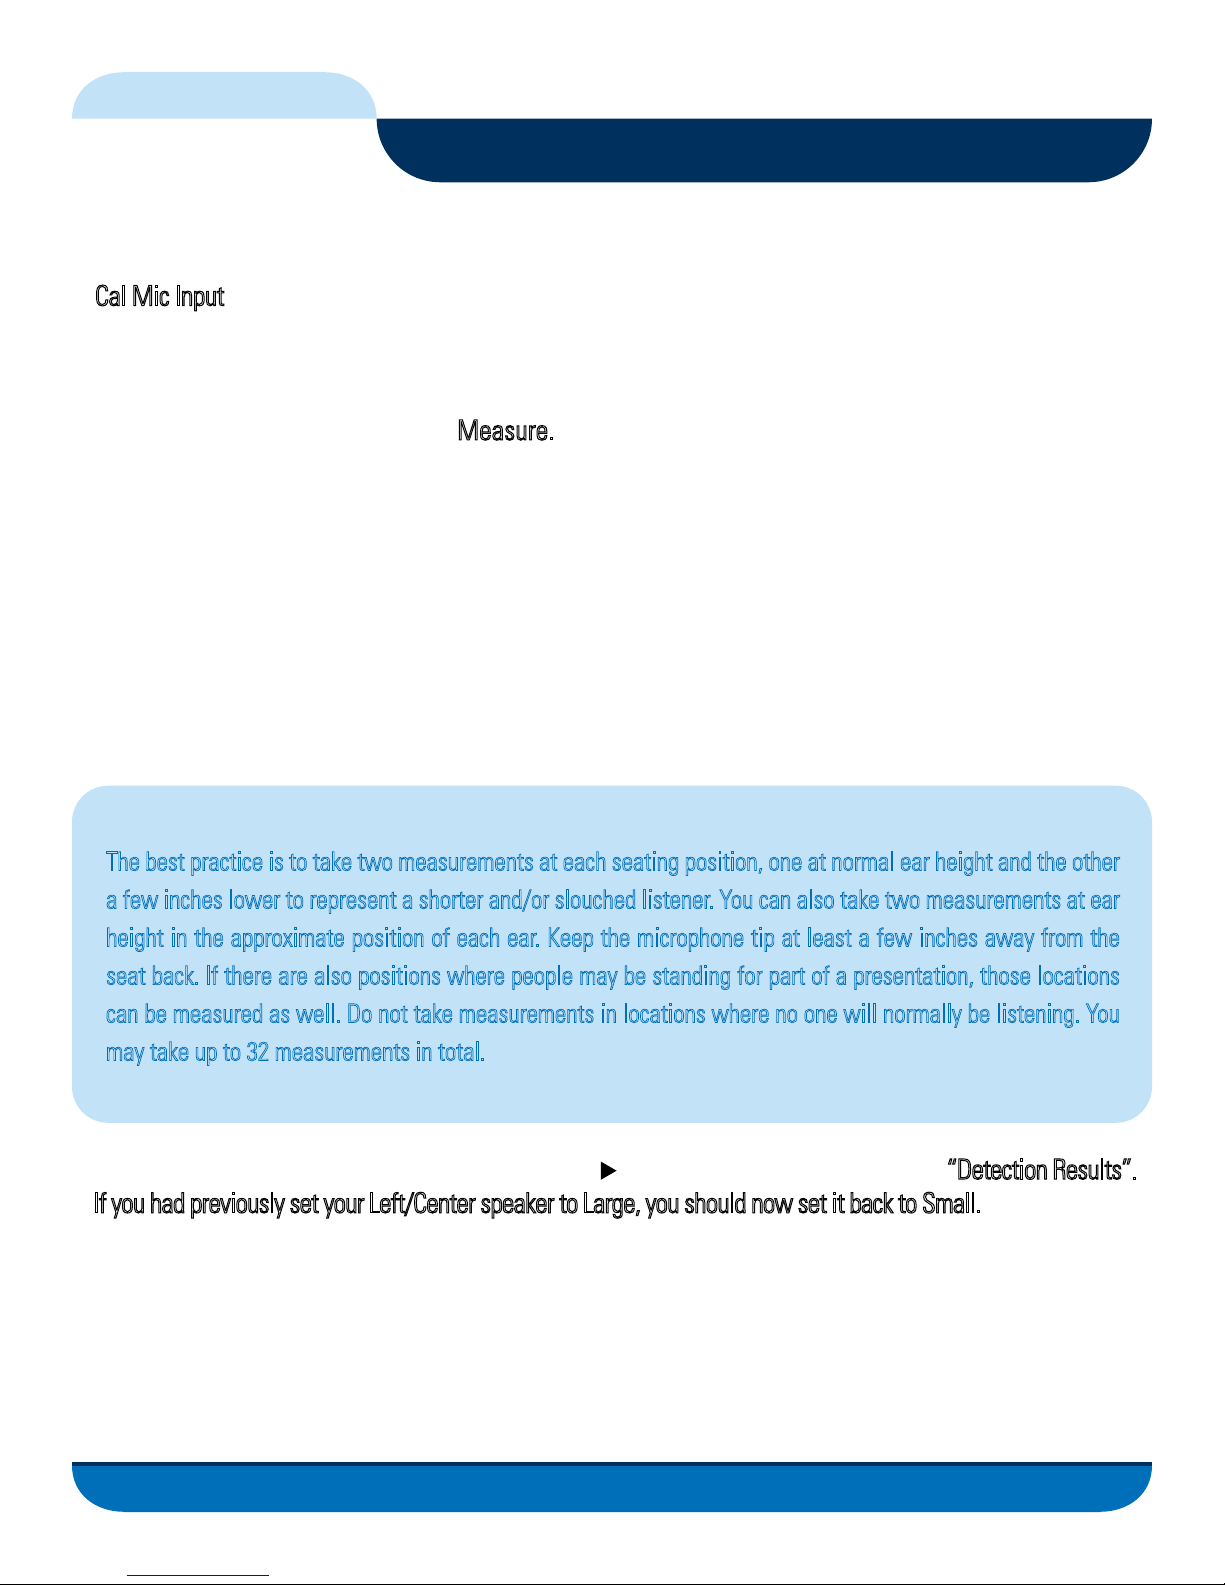
1. If you have not already done so, attach the Calibration Microphone included with the AS-EQ1 to the jack labeled
Cal Mic Input on the front panel (behind the magnetically attached faceplate) of the AS-EQ1. DO NOT use the
microphone supplied with your AVR or Pre/Pro or any other microphone as it may produce inaccurate results.
2. Place the AS-EQ1’s Microphone in your main listening position at ear height, with the tip of the micro
phone pointed at the ceiling. Press Measure. This first measurement is used for both room equalization
measurement and calculating the distances to each speaker for setting the delays.
3. After the first position is measured, the AS-EQ1 needs to measure other positions in the room (minimum of three)
around the listening area. These do not necessarily have to be in each individual seat (see below). You should
measure a minimum of 8 locations within the listening area in order to provide the AS-EQ1 with sufficient
information about the room acoustics so it can develop an optimal EQ solution for all listening locations. If
you use the best practices below, this will give 2 – 3 measurements per seating position for a total of 12 – 24
measurements for an average sized room. For a large room you might want to take the full 32 measurements for
optimum results.
Some Best Practices for Measurement
The best practice is to take two measurements at each seating position, one at normal ear height and the other
a few inches lower to represent a shorter and/or slouched listener. You can also take two measurements at ear
height in the approximate position of each ear. Keep the microphone tip at least a few inches away from the
seat back. If there are also positions where people may be standing for part of a presentation, those locations
can be measured as well. Do not take measurements in locations where no one will normally be listening. You
may take up to 32 measurements in total.
4. After completing taking your measurements, click the button to continue to the next task
If you had previously set your Left/Center speaker to Large, you should now set it back to Small.
“Detection Results”.
© 2009 SV Sound, LLC • 6420 Belmont Avenue, Girard, OHIO • 703.845.1472 • www.svsound.com
24
Page 25
AS-EQ1 Operator Manual
SV Sound, LLC
Calibrating the AS-EQ1 in Your Listening Environment
TASK
:
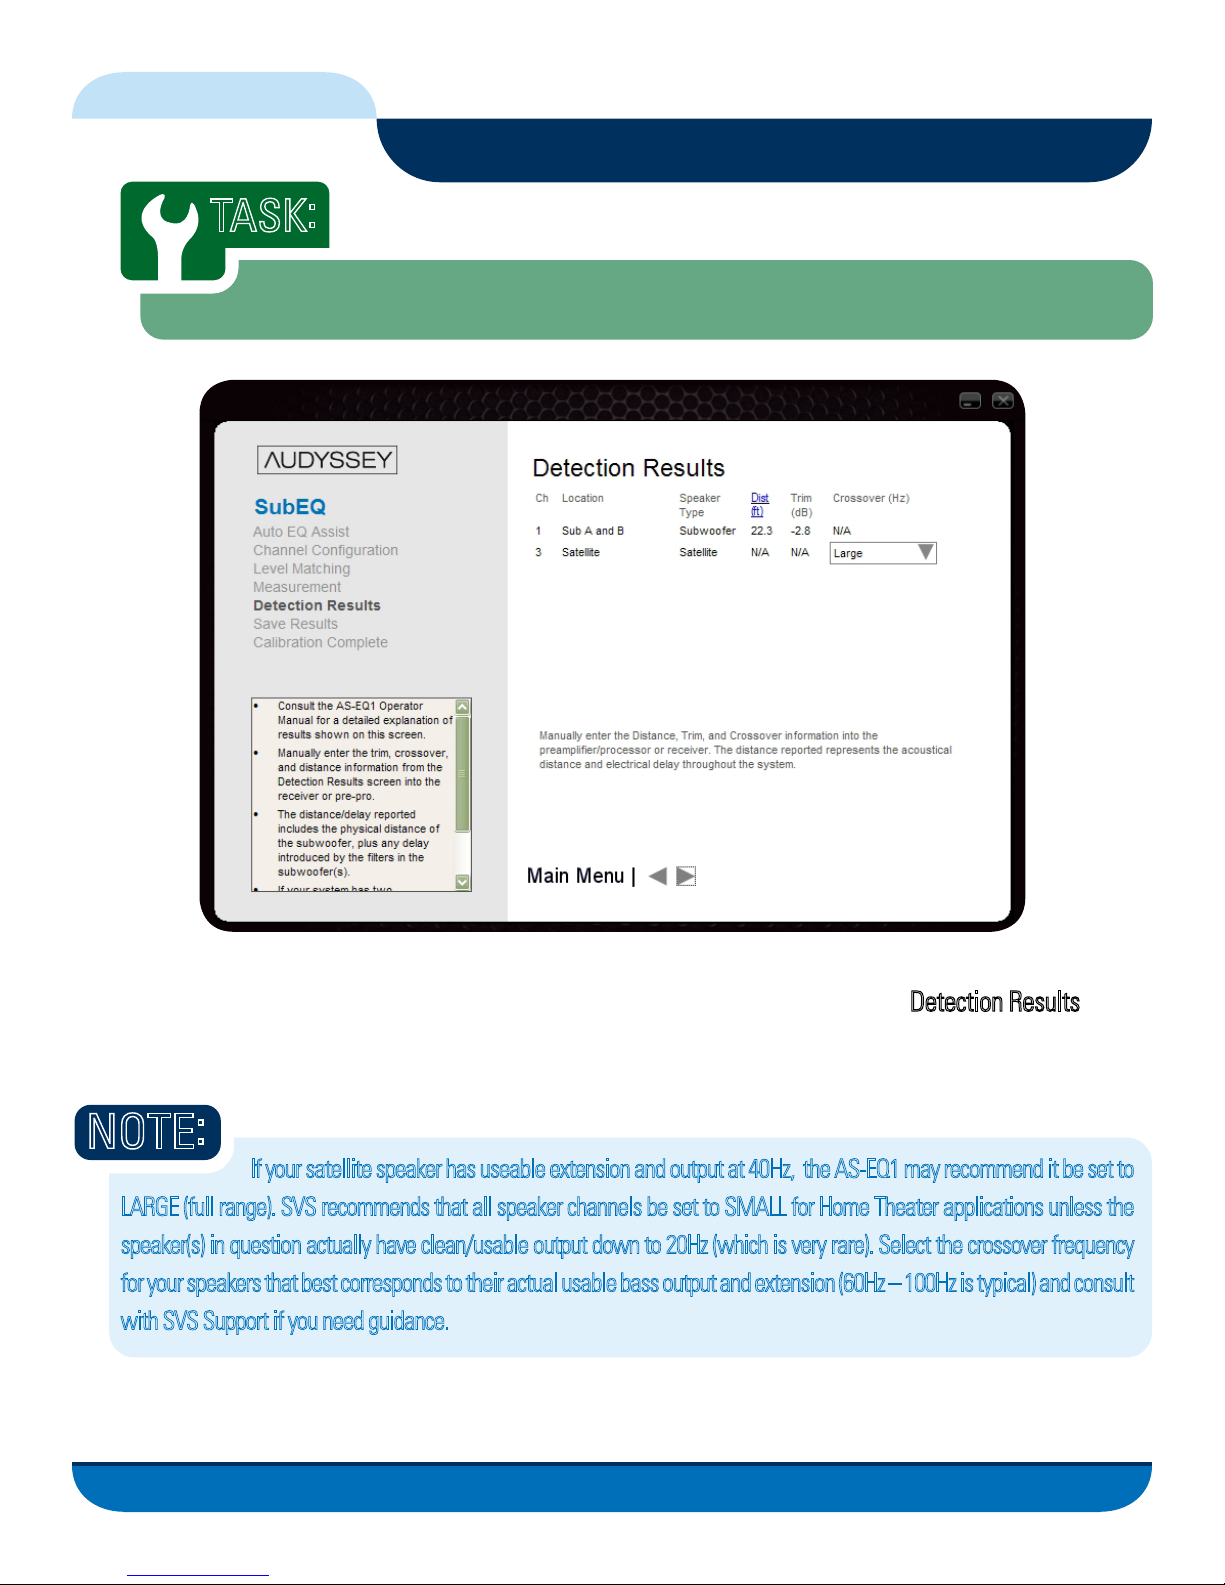
Detection Results Entry into AVR or Pre/Pro
FIG. 17
Congratulations! At this time you have completed measuring your listening environment and are ready to complete
the Calibration of your AVR or Pre/Pro and your AS-EQ1. The information shown on the
represents the Distance/Delay and Trim settings to be entered into your AVR or Pre/Pro for your Subwoofer now
that Sub EQ has processed your measurements.
NOTE
If your satellite speaker has useable extension and output at 40Hz, the AS-EQ1 may recommend it be set to
LARGE (full range). SVS recommends that all speaker channels be set to SMALL for Home Theater applications unless the
speaker(s) in question actually have clean/usable output down to 20Hz (which is very rare). Select the crossover frequency
for your speakers that best corresponds to their actual usable bass output and extension (60Hz – 100Hz is typical) and consult
with SVS Support if you need guidance.
:
© 2009 SV Sound, LLC • 6420 Belmont Avenue, Girard, OHIO • 703.845.1472 • www.svsound.com
Detection Results screen
25
Page 26

AS-EQ1 Operator Manual
SV Sound, LLC
Calibrating the AS-EQ1 in Your Listening Environment
1. Enter the Distance for the subwoofer into the speaker/subwoofer set-up menu for your AVR or Pre/Pro.
The value reported represents the acoustical distance of the subwoofer, plus the electrical latency of
the AS-EQ1. The distance reported will always be higher than the actual physical distance between the
subwoofer(s) and the microphone location, and this is perfectly normal and not cause for concern.
By clicking on the Distance Heading, Sub EQ will convert to Feet, Meters or Time (Milliseconds) to
match the units you are using in your AVR or Pre/Pro so you won’t have to manually compute the
conversions before entry.
For Older AVRs or 2 Channel...
If your AVR or Pre/Pro does not have the capability to set the distance from your subwoofer(s) to your listening
position, you may need to move your subwoofer(s) closer to your listening position in order to maintain proper
phase alignment between the speakers and the subwoofer(s). This would typically only occur in a 2-channel
application with a stereo pre/pro which lacks speaker/subwoofer distance settings. If moving the subwoofers is
not possible, there are external devices available that can be used to delay the signal being sent to the speakers
in order to achieve the proper phase alignment between the speakers and the subwoofer(s).
Contact SVS Support for more information.
2. Enter the Trim value (dB) for your subwoofer(s) as shown on the
Detection Results screen. This is the
actual value to be used, not an offset from your current Trim value.
More on Subwoofer Trim Values
The Trim value given in the Detection Results screen is what Sub EQ calculates is needed to achieve a postequalization subwoofer level of 75 dB. The EQ solution developed by Sub EQ will have both cuts and boost,
so an overall subwoofer trim level adjustment is usually needed to rebalance the subwoofer level. If you are
running dual subwoofers, the recommended Trim level will compensate for their acoustic coupling.
If you have successfully followed the steps and guidance in the previous Level Matching and Measurement
sections, the recommended Trim level will fall within the adjustment range of your subwoofer channel level
control in your AVR or Pre/Pro. If not, please revisit those sections and make the necessary corrections.
3. Click the button to continue to the next task
© 2009 SV Sound, LLC • 6420 Belmont Avenue, Girard, OHIO • 703.845.1472 • www.svsound.com
“Save Results to AS-EQ1”.
26
Page 27

AS-EQ1 Operator Manual
SV Sound, LLC
Calibrating the AS-EQ1 in Your Listening Environment
TASK
:
Save Results to AS-EQ1
The final task in setting up your AS-EQ1 is to save the results of your calibration to the device.
WARNING - do not quit the Sub EQ application or disconnect the
AS-EQ1 from your PC until the transfer is complete.
© 2009 SV Sound, LLC • 6420 Belmont Avenue, Girard, OHIO • 703.845.1472 • www.svsound.com
FIG. 18
27
Page 28

AS-EQ1 Operator Manual
SV Sound, LLC
Calibrating the AS-EQ1 in Your Listening Environment
1. By pressing the Transfer to AS-EQ1 button, the calibration file will be sent to the AS-EQ1 and allow you to listen
to the non-EQ and EQ environment by selecting the Turn MultEQ On and Turn MultEQ Off buttons.
2. If you would like to see a preliminary graphical representation of Before and After results of Equalizing your listening
environment, press
watermark on the Results screen).
View Results. (note – until you have permanently saved your results you will see a “DRAFT”
3. If you are satisfied with the results of your calibration run, press the
Save Permanently to AS-EQ1 button at which
time the results of your calibration run will be stored in the device and remain until replaced by a subsequent
calibration exercise.
4. If you would like to abandon the current calibration run, press the Cancel button.
5. At this time you can disconnect the AS-EQ1 Calibration Microphone and the connection from the AS-EQ1 to your
AVR or Pre/Pro Sat channel. If you had changed the speaker size of your Center/Left channel for level setting and
measurement, remember to reinstate the original speaker size settings in your AVR or Pre/Pro.
6. Click the button to continue to the next task “Create HTML Certificate Document”
© 2009 SV Sound, LLC • 6420 Belmont Avenue, Girard, OHIO • 703.845.1472 • www.svsound.com
28
Page 29

AS-EQ1 Operator Manual
SV Sound, LLC
Calibrating the AS-EQ1 in Your Listening Environment
TASK
:
Create HTML Certicate Document
FIG. 19
This HTML document will show the before and after performance of your subwoofer(s) frequency response using the AS-EQ1. Use your native HTML browser’s print functions to print this document. Your results will have
DRAFT watermark on it until it has been permanently saved to the AS-EQ1 in the previous task.
the
If you would like to capture your results to a file for storage or sharing, you can use one of many .pdf file creator
printer drivers available. One such driver (freeware) is CutePDF which can be found on the AS-EQ1 Installation
CD in the file CuteWriter.zip. Un-Zip this file and follow the instructions in the Readme file to install on your PC.
Alternatively you can visit the CutePDF web site at http://www.cutepdf.com/Products/CutePDF/writer.asp
Remove the USB cable from the AS-EQ1 and replace the front panel. You are now ready to experience some of
the best and most accurate bass available. Throw some of your best bass demo material at your system and
prepare to hear what flat, accurate bass sounds like in your room. Enjoy!
© 2009 SV Sound, LLC • 6420 Belmont Avenue, Girard, OHIO • 703.845.1472 • www.svsound.com
29
Page 30

AS-EQ1 Operator Manual
SV Sound, LLC
Appendix A - Why EQ?
Despite efforts by speaker designers to provide a specific type of frequency response for their products, the
environment in which they are tested is typically anechoic (a room designed to absorb sound and eliminate reflective effects) or quasi-anechoic (ground plane). This test environment removes the acoustic effects of the listening
room, and allows the designer to specifically tailor the characteristics of the speaker to a desired set of criteria.
In many (but not all) cases the designer will try and achieve a “flat” response – e.g. very close to the same energy
produced at all frequencies covered by the speaker. The attached graph shows a plot of sound energy of a flat
subwoofer in an quasi-anechoic environment.
Subwoofer Response in a Quasi-Anechoic Environment
When a speaker or subwoofer is then placed in a non-anechoic environment (read – our listening rooms and
Home Theaters) the frequency response of the speaker/subwoofer is rarely close to that measured in the anechoic
environment, due to the reflection and absorption of sound waves off of hard and soft surfaces. This in turn causes
positive and negative reinforcement of sound energy and as such, the sound that then reaches our ears may seem
overly loud in some frequencies and muted in others – and definitely different than what the speaker designer and
recording engineer intended. The attached graph is an example of the effects of a listening room on our formerly
flat subwoofer.
© 2009 SV Sound, LLC • 6420 Belmont Avenue, Girard, OHIO • 703.845.1472 • www.svsound.com
FIG. 20
30
Page 31

AS-EQ1 Operator Manual
SV Sound, LLC
Appendix A - Why EQ?
FIG. 21
Subwoofer Response In-Room
What we hear in such rooms is not what was intended to be heard when the sound engineer created the mix for
the movie or music soundtrack. Instead we may hear certain frequencies that have become very loud and dominant due to positive reinforcement of the sound energy in our room, and also the inverse – very soft and hard
to hear frequencies due to cancellation effects as well as the overbearing positively reinforced frequencies. In the
lower frequencies, the result is what some call “one note bass” or “bass bloat”, and robs us of the accurate listening experience we built our home theaters and listening rooms to achieve.
The good news is that there are several things that can be done to correct the effects of our room acoustics.
One thing that many people try is changing the placement of their speakers or subwoofer(s) in the room. In many
cases just moving a speaker or subwoofer(s) a small distance can make a significant difference in the way certain
frequencies are heard. In other cases, the acoustic characteristics of the listening space can be changed with
“room treatments” – e.g. sound-absorptive materials to cut down on reflections in the room and get closer to an
anechoic environment.
Another method is referred to as “Room Equalization” which involves using electronic means to counter the positive
and negative reinforcement of sound energy in the room. For example, frequencies that have had their energy boosted (louder) can have their energy reduced in the affected frequencies before sending the signal to the speaker or
© 2009 SV Sound, LLC • 6420 Belmont Avenue, Girard, OHIO • 703.845.1472 • www.svsound.com
31
Page 32
AS-EQ1 Operator Manual
SV Sound, LLC
Appendix A - Why EQ?
subwoofer(s), effectively quieting the artificially boosted frequency. In some (but not all) cases, other frequencies that have had their energy decreased due to cancellation will now appear louder due to the reduction
of boosted frequencies and will be easier to hear. In some cases decreased frequencies can be boosted to
make them louder, however in other cases no amount of boost will effectively increase a range of frequencies
if they are being cancelled by a reflection of the original frequency.
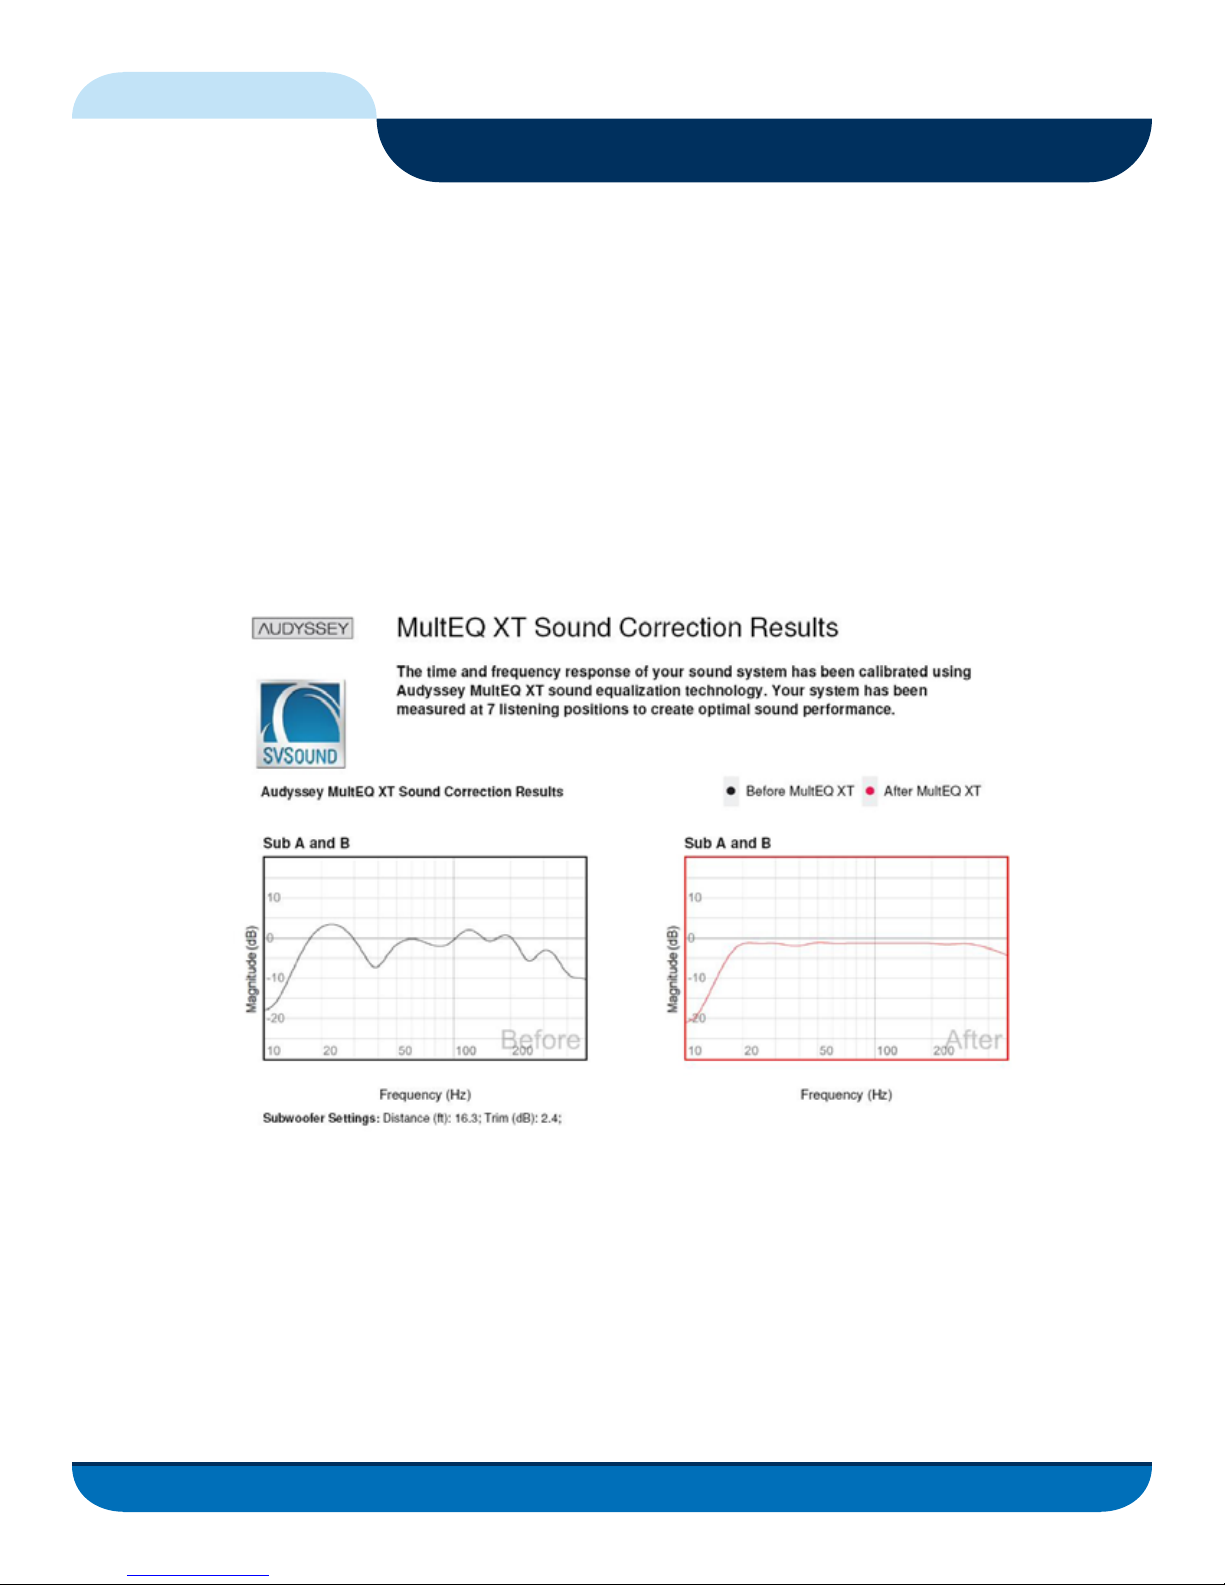
The graphs shown below are an example of a room before and after applying electronic EQ. You can clearly
see in the two Subwoofer examples how boosted frequencies have been cut, and where possible, decreased
frequencies have been boosted.
All of these methods, if done effectively, have historically required professional help along with specialized
tools and techniques to achieve better results in a room. The audio and home theater enthusiast developed
manual measurement techniques using inexpensive Sound Pressure Level (SPL) Meters, Excel Spreadsheets
and test tone CDs, along with Graphic and Parametric Equalizers to attempt to correct their listening environments.
In some cases people found they could hear and see improvements, and in just as many cases only minor
improvements would be seen. In any case however, manually EQing a room is a labor-and-time intensive
activity, and in many situations a pure “labor of love”.
© 2009 SV Sound, LLC • 6420 Belmont Avenue, Girard, OHIO • 703.845.1472 • www.svsound.com
FIG. 22
32
Page 33

AS-EQ1 Operator Manual
SV Sound, LLC
Appendix A - Why EQ?
Especially difficult are the multiple subwoofer cases where an enthusiast would have more than one subwoofer
- often in different parts of their listening rooms - in order to attempt to smooth bass response and perhaps
overcome some of the acoustical challenges of their environment. In many cases rather than improving their
situation, it was discovered that the interaction of multiple subwoofers in a room required even more effort
in order to get closer to a flat room in the bass frequencies.
In recent years, electronic EQ systems have evolved and become more commonplace in mid-to-high range
AVRs and Pre/Pros that attempt to correct room anomalies in a simple way that does not require an expert
(or an exhausted and frustrated enthusiast). In addition, since lower frequencies (sub 200Hz) present their
own special set of problems apart from the low-midrange to the upper frequency spectrum, a specialized
area of EQ just focusing on bass frequencies and subwoofers has emerged.
SV Sound and Audyssey Laboratories – each leaders in their respective fields of Speakers/Subwoofers and
Auto Equalization technology – have created the latest and most advanced subwoofer Auto EQ device to
date, the AS-EQ1. The AS-EQ1 is designed specifically to Auto EQ just subwoofers – and not just a single
subwoofer but duals – tackling one of the most difficult room EQ challenges facing the audio and home
theater enthusiast.
The AS-EQ1 specializes in the low frequency range where subwoofers are designed to operate. It will
interface with any Auto EQ system in your AVR or Pre/Pro, and will handle the subwoofer channel, leaving
the AVR or Pre/Pro to handle the speaker channels. Using sophisticated algorithms developed by Audyssey
Labs, the AS-EQ1 has the ability to flatten frequency response for one or multiple subwoofers to a level
previously unheard of even in the professional calibration ranks.
You are no longer at the mercy of your room acoustics, especially at the low end. You can now enjoy the best
sonic performance from your subwoofer, as intended by the design engineer, and you’ll now hear the music
and movie sound tracks as intended by the mastering/recording engineers.
© 2009 SV Sound, LLC • 6420 Belmont Avenue, Girard, OHIO • 703.845.1472 • www.svsound.com
33
Page 34

AS-EQ1 Operator Manual
SV Sound, LLC
Terms & Conditions
Terms and Conditions: Details are available on request, please contact your Dealer for more. Note that these
terms and conditions do not affect your statutory rights.
Shipping: When you receive your new AS-EQ1, please check to insure there is no damage. If after unpacking you
discover any damage that may have been caused by transportation on your product, we request you contact SVS
or if outside the USA your Dealer immediately and if possible, provide a photo of damage in question to them to
ensure the fastest possible correction to the situation.
Warranty: The product has a 3 year warranty against defects in materials and workmanship. Upon return, the
products will be repaired, and redelivered. Naturally, this warranty does not cover any product subjected to misuse
or accidental damage.
The bottom line: We’re proud of our products and want you to be as happy owning one, as we are selling one (or
more) to you. E-mail your Dealer if you have any warranty question or contact SVS directly if in North America.
SV Sound, LLC
6420 Belmont Avenue, Girard, Ohio 44420
Fax: 703-997-2603
Phone: 703-845-1472
Email: custservice@svsound.com
Technical Support: techsupport@svsound.com
Audyssey LaboratoriesTM, Audyssey®, Audyssey MultEQ® XT and Sub EQTM are registered trademarks of Audyssey Laboratories, Inc.
SVS AS-EQ1 manufactured under license from Audyssey Laboratories. U.S. and foreign patents pending.
©2009 SV Sound, LLC. • 6420 Belmont Avenue, Girard, Ohio 44420 • 703.845.1472 • All rights reserved.
© 2009 SV Sound, LLC • 6420 Belmont Avenue, Girard, OHIO • 703.845.1472 • www.svsound.com
34
 Loading...