

Page 1

Table of ContentsTable of Contents
What’s in the Box
Unpacking and Preparing Prime Wireless Speaker
Front Panel Controls
Rear Panel Connections/Controls
Placing and Connecting Prime Wireless Speaker
WiFi Network Requirements
Connection Options
Setting up WiFi and the DTS Play-Fi App
Audio Streaming Guide
Setting Up Custom Presets
Enabling Critical Listening Mode
Using Spotify Connect
Streaming Spotify In Multiple Rooms
Creating Speaker Groups
Multi-Zone Streaming
Streaming a “Line-In” Audio Input
Setting Up Bluetooth
Connecting Devices via AUX and Optical Inputs
Connecting a Subwoofer
Setting Up / Using Amazon Alexa Voice Control
Directions for Setting Up Amazon Alexa
Setting Up Your Prime Wireless Speaker with Amazon Alexa
Controlling with Amazon Alexa Voice Commands
Rebooting Your System
Initiating a Factory Reset
Caring for Your Prime Wireless Speaker
Basic Troubleshooting
Router Optimization
Warranty
Additional Information
DTS Play-Fi app
DTS Play-Fi Firmware
SVS Firmware
Share Your Thoughts
FCC Compliance
Wireless Transmitter Compliance
1
2
3
4
5
6
7
8
9
10
11
12
13
14
15
16
17
18
19
20
21
22
23
24
25
26
27
28
29
30
31
32
33
34
35
36
Page 2

Prime Wireless Speaker ManualPrime Wireless Speaker Manual
Congratulations on bringing home the SVS Prime Wireless Speaker, a stunning achievement in speaker
versatility, connectivity and most importantly, sound quality. We want to make it as easy as possible to set up
your Prime Wireless Speaker, so this manual will walk you through downloading the DTS Play-Fi app and
everything you need to know to get the most out of the Prime Wireless experience. Our SVS Sound Experts
are also available seven days a week to take the guess work out of anything. They are equipped to handle
even the most complicated questions about connectivity, control, adjusting settings and optimizing sound
quality.
One of the key features of the SVS Prime Wireless Speaker is DTS Play-Fi mobile app, which enables WiFi
connectivity with your home network and provides smartphone or tablet control that unlocks direct
streaming from Spotify, Pandora, SiriusXM, Amazon Music and many more popular services, multi-room
audio playback, voice control via Amazon Alexa and much more. You’ll want to download the app before
doing anything else, so just visit the Apple® App Store, Google Play™ Store, Amazon Appstore or Microsoft
Store and search “DTS Play-Fi” to get started.
If you have any questions about your new SVS Prime Wireless Speaker, please contact the SVS Sound Experts.
Email • (877) 626-5623 • Chat
To download and/or print this manual as a PDF, please click here: [Download PDF Manual]
Happy Listening!
What's in the BoxWhat's in the Box
1 Prime Wireless Active Speaker AC Power Cord
Page 3

Unpacking and Preparing Your Prime Wireless SpeakerUnpacking and Preparing Your Prime Wireless Speaker
1. Locate elastomer feet in the packaging and attach 4 to the bottom your Prime Wireless Speaker to protect
surfaces and speakers from scratching.
2. Remove plastic film from front panel display by gently peeling off from the corner.
3. Locate the power cord for later use.
4. Protective grille covers come attached via pin/cup retention system. Prime Wireless Speaker can also be
used without grille covers depending on your aesthetic preference, just avoid making direct contact with
exposed drivers.
Front Panel ControlsFront Panel Controls
Source & Preset Control
Rotate the left knob to change the input. Press the knob to select a preset (after they are programmed).
Front Panel Display
LED backlighting indicates the selected audio source (Wi-Fi, Bluetooth, Optical or Auxiliary) and preset (1-6).
Wi-Fi indicator will turn green when streaming Spotify.
Play, Pause & Volume
Rotate the right knob to adjust volume. Press the knob to pause/un-pause.
You can pause and restart the music at any time for any source right from your Prime Wireless Speaker
without the need for your handheld device or the app. Simply press the right hand knob firmly to pause and
press it again to play. The source indicator light on the LED panel will flash while paused to give you a visual
1 Premium Cloth Speaker Grille Covers 4 Elastomer Bumper Feet
Page 4

indication that your music is paused. Note that some streaming services do not allow their streams to be
paused. In that case the music will be muted when you press the knob and unmuted when you press it again.
Rear Panel Connections & ControlsRear Panel Connections & Controls
1. Sub Out
Add a subwoofer using standard audio interconnect cable (not included) or the optional SVS SoundPath
Wireless Kit.
2. L/R AUX RCA In
Connect any stereo source that has a left and right stereo analog output.
3. 3.5mm AUX In
Connect to headphone outputs of smartphones, tablets or other audio devices. Note that 3.5mm input will
override L/R AUX RCA inputs if both are used simultaneously.
4. Out to Left Speaker
Connects your active Prime Wireless speaker to the passive speaker using supplied speaker interconnect
cable.
5. Optical In
Connect sources with optical digital outputs such as a TV or game console.
6. WiFi Setup
Enables WiFi set-up mode and shows status of wireless connection. Blinking yellow light indicates set-up
mode, solid light means it’s set-up and ready to use.
7. In/Out Network
Connect standard Ethernet cable for hard-wired network connection.
8. Mono/Stereo
Toggles between Mono mode for a single Prime Wireless powered speaker or Stereo mode for active and
passive Prime Wireless Speaker.
9. Service USB
For firmware updates and charging phones and tablets or powering USB devices like a SoundPath Wireless
Audio Adapter to make your subwoofer fully wireless.
10. Bluetooth Setup
Enables Bluetooth pairing mode and shows status of Bluetooth connection. Blinking blue light indicates
pairing mode, solid light means it’s connected and ready to use.
11. AC Power Cord Input
Page 5

Placing and Connecting Prime Wireless SpeakerPlacing and Connecting Prime Wireless Speaker
1. Set switch on rear panel to "Mono".
2. Position speaker as you want it in your room.
3. Plug power cord into the AC power cord input on the rear of the active speaker, plug it in, and continue to
“Setting Up Wi-Fi and the DTS Play-Fi App” section to set up and name your Prime Wireless Speaker.
Page 6

Connection OptionsConnection Options
Your Prime Wireless Speaker streams music directly from your home WiFi network using the DTS Play-Fi app.
You can also stream at the highest resolution possible from any Bluetooth enabled smartphone, tablet or
computer. For direct connections to computers, TVs, Blu-ray players, gaming consoles and more; there’s a
3.5mm and L/R line level inputs and an optical input. A subwoofer output is also available for deeper and
more powerful bass.
Instructions for setting up and using all of these connections can be found in this manual. If you have any
questions during set-up, please contact our SVS Sound Experts for prompt and professional service: Email •
(877) 626-5623 • Chat
WiFi Network RequirementsWiFi Network Requirements
To get the most out of your new SVS Prime Wireless Speaker’s dual-band WiFi, you’ll need a router with
2.4GHz and/or 5GHz WiFi connectivity and a connected mobile device. Play-Fi is compatible with all routers
that are Wi-Fi certified and meet Wi-Fi standards.
NOTE: Satellite internet services are prone to playback issues due to fluctuating download rates.
NOTE: Have your network password ready before connecting the SVS Prime Wireless Speaker to your
network.
Setting Up WiFi And The DTS Play-Fi AppSetting Up WiFi And The DTS Play-Fi App
The DTS Play-Fi app offers a rich feature set that unlocks the full potential of your Prime Wireless Speaker with
smart, wireless speaker capabilities not available from any other wireless audio products. Downloading the
app is an important first step towards getting the most out of your new speaker.
1. Download the Play-Fi App
Search “Play-Fi” in the Apple App Store, Google Play Store, Amazon Appstore or Microsoft Store and
Page 7

download the free DTS Play-Fi app to start unlocking the full potential of your new Prime Wireless Speaker.
2. WiFi Set-up Mode
Once powered on for the first time, the active Prime Wireless Speaker will automatically go into Wi-Fi setup
mode, indicated by a rapidly blinking yellow light on the rear panel of the speaker. When the blinking light
slows down to a slow pulse, the speaker is ready to connect. Wi-Fi connection will be confirmed when
yellow light remains on permanently.
3. Connect Speaker to WiFi Network
iOS users must go to the “Settings” -> “WiFi” on their mobile device and select the “PlayFiDevice…” like you
would a normal Wi-Fi network then open the Play-FI app to continue.
Android users proceed directly to step 4.
4. Configure Play-Fi App
Open the Play-Fi app and follow the prompts to finish setting up your Prime Wireless Speaker on your
home Wi-Fi network
(image 9a and 9b)
.
From here, the app will find your new Prime Wireless Speaker and connect it to the Wi-Fi network for you.
NOTE: You will type in your network password once (image 9c), and the app will do the rest. It’s important
not to close or exit out of the app until the process is fully complete or it may disrupt the configuration.
During installation, the Play-Fi app will look for and install any updates. These product updates add 3-5
minutes to the installation time.
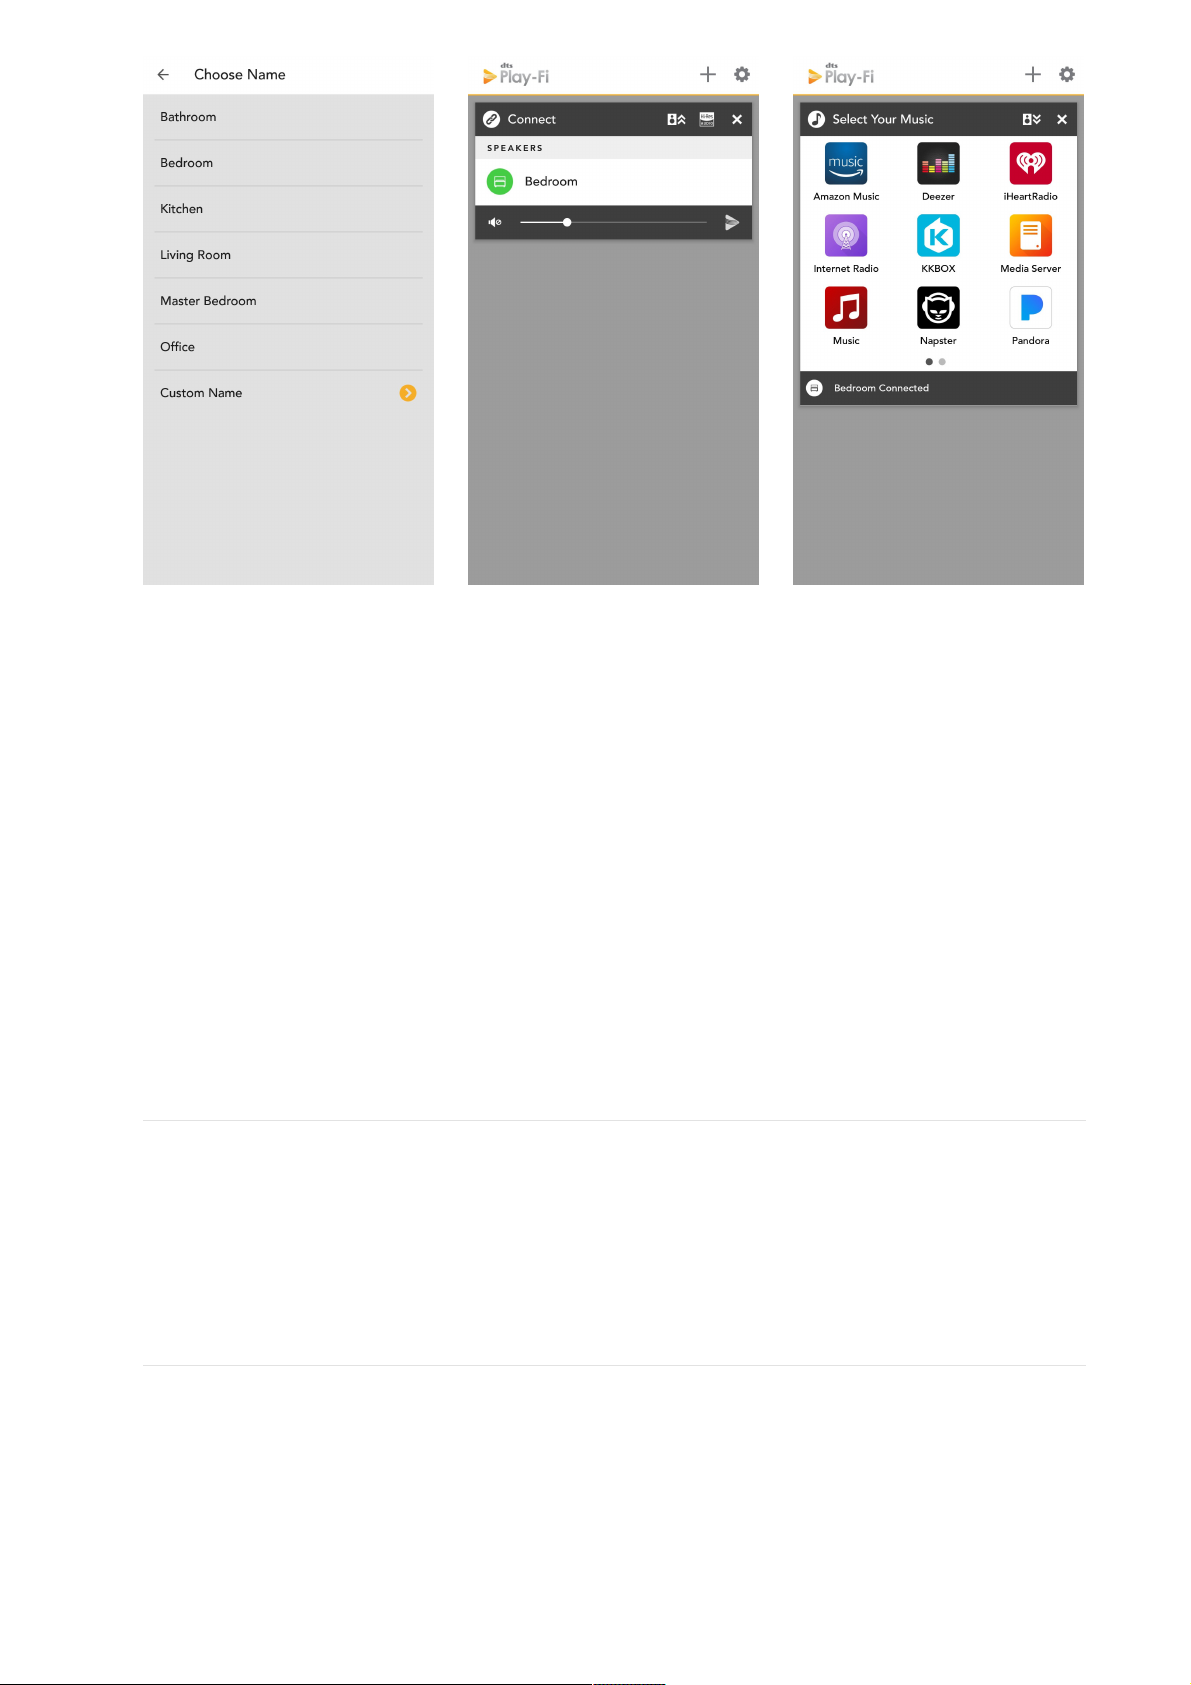
Once network set up and updates are completed, you can select a name for your new Prime Wireless
Speaker
(image 9d)
, control volume
(image 9e)
and start enjoying music from your favorite streaming
services
(image 9f)
.
Image 9a. Image 9b. Image 9c.
Image 9d. Image 9e. Image 9f.
Page 8
Having Trouble Connecting?
The Prime Wireless Speaker may require an update before letting you stream music. The Play-Fi app will show
a notification and complete the update automatically.
If your SVS Prime Wireless Speaker is not being discovered by the WiFi network, try moving it closer to your
router or to a stronger signal area to establish a connection. Also, make sure the Prime Wireless Speaker and
app are both configured to the same WiFi network in your home if you have more than one.
Prime Wireless Speaker not going into setup mode?
Standard Set-Up Mode: To put the Prime Wireless Speaker into Standard Set-Up Mode, press and hold the
Wi-Fi button for 8 seconds. You will hear a tone at 4 seconds, but do not release the button until after you
hear the same tone again after the full 8 seconds. The product will now be in Standard Set-Up Mode, and the
Wi-Fi light will slowly pulse on and off.
WPS Mode: To put the Prime Wireless Speaker into WPS Mode, press and hold the Wi-Fi button for 4 seconds.
At 4 seconds you will hear a tone and the Wi-Fi light will begin to blink a pattern of two times on and then a
pause and then repeat. It is now ready for WPS pairing.
If you have any questions during WiFi set-up, please contact our SVS Sound Experts: Email • (877) 626-5623 •
Chat
Audio Streaming GuideAudio Streaming Guide
Connect. Select. Play.
Once your Prime Wireless Speaker is set up, you can access music from your smartphone, tablet and
computer and stream your favorite music services directly via your home’s WiFi network using the DTS Play-Fi
app. You can also enjoy ultra high-resolution Critical Listening Mode, create a multi-room audio system and
enjoy all the benefits of the DTS Play-Fi app.
Setting Up Custom PresetsSetting Up Custom Presets
A unique feature of the Prime Wireless Speaker, the six custom presets give you instant access via WiFi to your
favorite music service playlists, Internet Radio stations and streaming music services that exist within the DTS
Play-Fi app without needing a phone or tablet. You can simply walk up to your Prime Wireless Speaker, push
the knob to start a preset and your favorite music will start playing.
1. From the Play-Fi app, start the streaming service you want to program as a preset.
2. Firmly press the left control knob to select which preset you want to program (1-6). Each time you press
Page 9
the knob, it will move to the next preset.
3. When desired preset number is selected, press and hold the preset knob for about three seconds. The
preset number will blink several times then remain solid to indicate the preset has been programmed, and
music will resume playing.
4. Follow instructions above for the remaining five presets as desired
NOTE: It takes a few seconds for the preset to connect to music services from your WiFi network. The
preset number will flash while it establishes a connection and remain highlighted once connected. This
delay is completely normal.
5. You can now access your favorite content by firmly pressing and releasing the left knob to toggle through
your presets at any time.
6. To re-program a preset, simply repeat steps 1 – 3.
NOTE: When setting up Pandora or Spotify as presets, the app may ask you to sign into your account first.
Enabling Critical Listening ModeEnabling Critical Listening Mode
Critical Listening mode will enable native rendering of high-resolution files up to 24-bit/192KHz, with no
down-sampling or network synchronization adjustment.
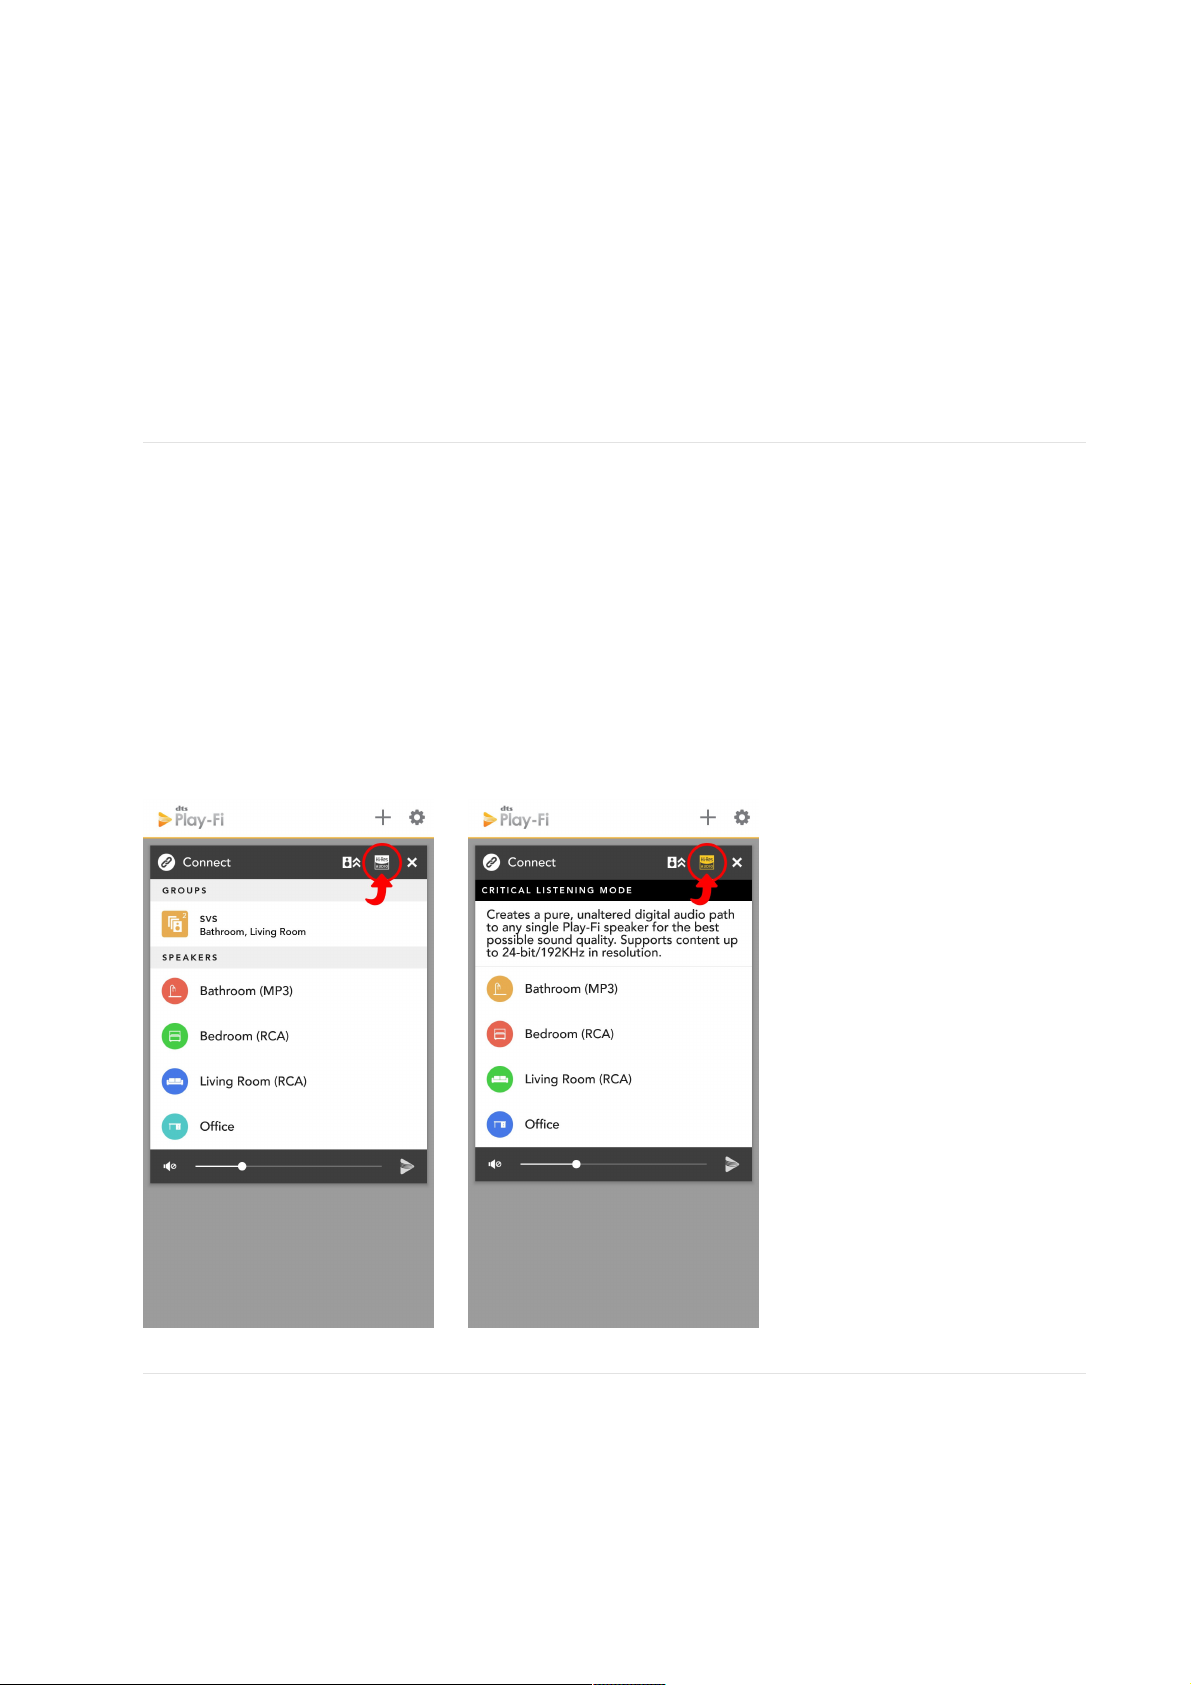
1. 1. When you start the Play-Fi app, before selecting your Prime Wireless Speaker, tap the Hi-Res button in
the top bar of the zone module
(image 12a)
.
2. The Hi-Res logo will turn gold, the app will display CRITICAL LISTENING MODE, and the list will only display
the products that are compatible with this mode
(image 12b)
.
3. 3. Select the Prime Wireless Speaker(only one pair can be selected), and then play from your desired
source for the truest audio reproduction possible over WiFi.
Using Spotify ConnectUsing Spotify Connect
Spotify works differently from the other streaming services. Instead of Spotify living in the Play-Fi app, the
Play-Fi product itself communicates directly with Spotify.
To use Spotify Connect you must have a Spotify Premium account.
1. Open up your Spotify app, sign in and start playing something.
2. On the Now Playing screen, press the “Devices Available” button, which we’ve circled below
(image 13a)
.
Image 12a. Image 12b.
Page 10
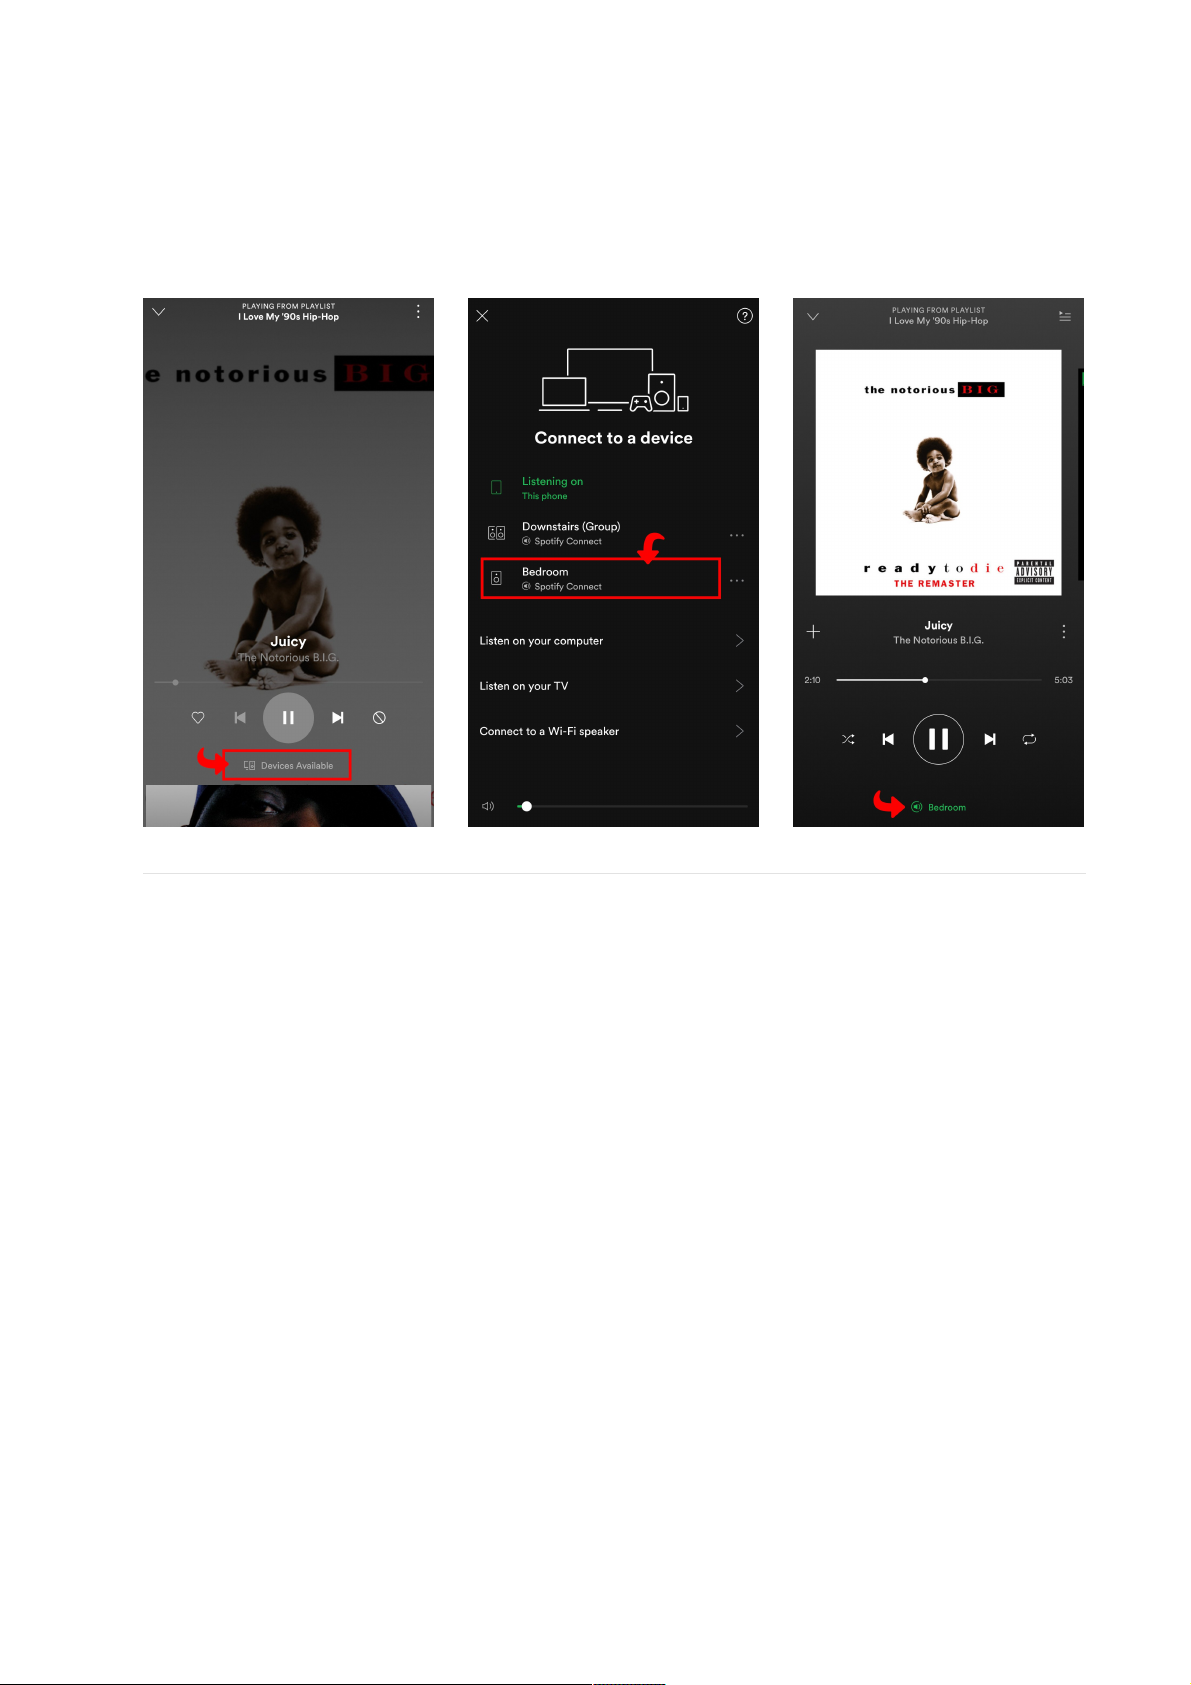
3. You'll then be able to see all the Spotify enabled devices on the network, including your Prime Wireless
Speaker that have been configured as Spotify Groups, or just individuals. The selected products are now
tied to your Spotify Premium account, and as long as the product can communicate with the Internet, you
can play to it from your Spotify app
(Image 13b-13c)
.
NOTE: You can stream Spotify to your Prime Wireless Speaker from your smartphone using the mobile app or
a computer via the desktop app. Both apps update in real time so you can start streaming from the desktop
app, leave the room, open the app on your phone, and control all functions without interruption.
Streaming Spotify In Multiple RoomsStreaming Spotify In Multiple Rooms
Spotify Groups are different from normal Play-Fi groups in that they specifically group speakers together for
viewing within the Spotify app. This is so that normal grouping and zoning functions remain modular within
the Play-Fi streaming system.
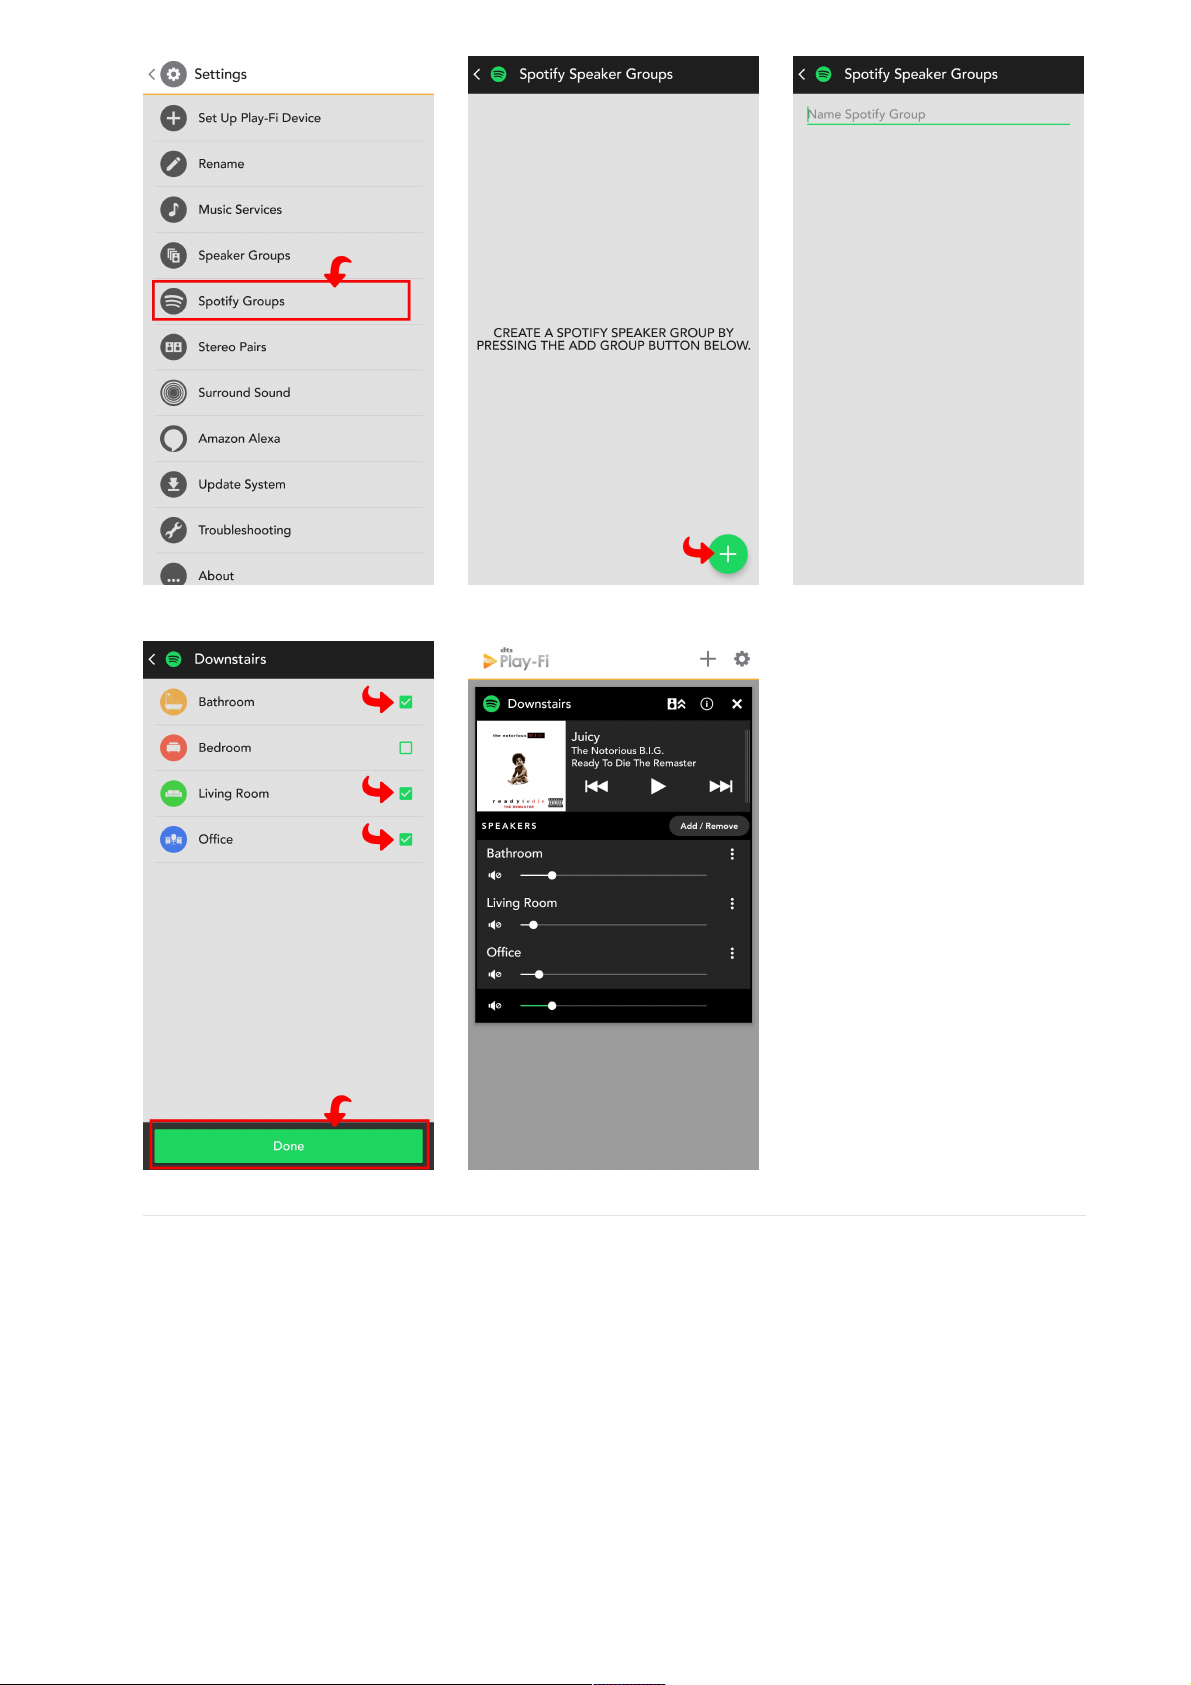
1. First create a Spotify Group within the Play-Fi app. From the Play-Fi Control screen of the Play-Fi app, tap
the Settings button to open the pop-up menu, and select Spotify Groups, which we’ve circled below. This
option allows you to edit or create Spotify Groups
(image 14a)
.
2. After you've elected to create a new group and given it a name (we labeled it "Downstairs" in the
example) you can then pick from any of your Prime Wireless products to be added to this group. Any
speakers that can't be joined in a Spotify Group will be greyed out. Once you’re done, head to the
Spotify app to start streaming
(images 14b, 14c and 14d)
.
3. If you want to control the volume of individual products within the Spotify Group after you’ve started
your stream, head back to the Play-Fi app, and your Spotify Group will automatically populate a module
on the Play-Fi Control screen
(image 14e)
.
4. For more information on using Spotify Connect, please visit the DTS Play-Fi Knowledgebase.
If you have any questions during Spotify set-up, please contact our SVS Sound Experts: Email • (877) 626-5623
• Chat
Image 13a. Image 13b. Image 13c.
Image 14a. Image 14b. Image 14c.
Page 11
Creating Speaker GroupsCreating Speaker Groups
You can add more Prime Wireless or other DTS Play-Fi enabled speakers or amplifiers at any time when using
the Play-Fi app, or from the Play-Fi applet in Windows in a few easy steps. Once added, Prime Wireless
Speakers can be combined into a “Group” that allows the same content to be played across all speakers in the
group.
1. Tap the Play-Fi icon. In the app, it’s the orange triangle icon on the bottom right side of the screen, and in
Windows, it appears as a system icon in the lower bar. This will open the Play-Fi Control screen.
2. From the control screen, you can see the speakers tied to each source and adjust their volume individually
or all together. Pressing the Add/Remove button
(image 15a)
will expand the speaker list to all of those on
your network and allow you to select or deselect speakers for a Group
(image 15b)
.
3. Select the Prime Wireless Speaker you want to include and tap the “Save as Group?” option at the bottom.
Then tap “Create Speaker Group”
(Image 15c)
, name the group
(Image 15d)
and you’re all set.
4. To create new groups or edit groups outside of playback, just hit the “Settings” button on the Play-Fi
Image 14d. Image 14e.
Page 12
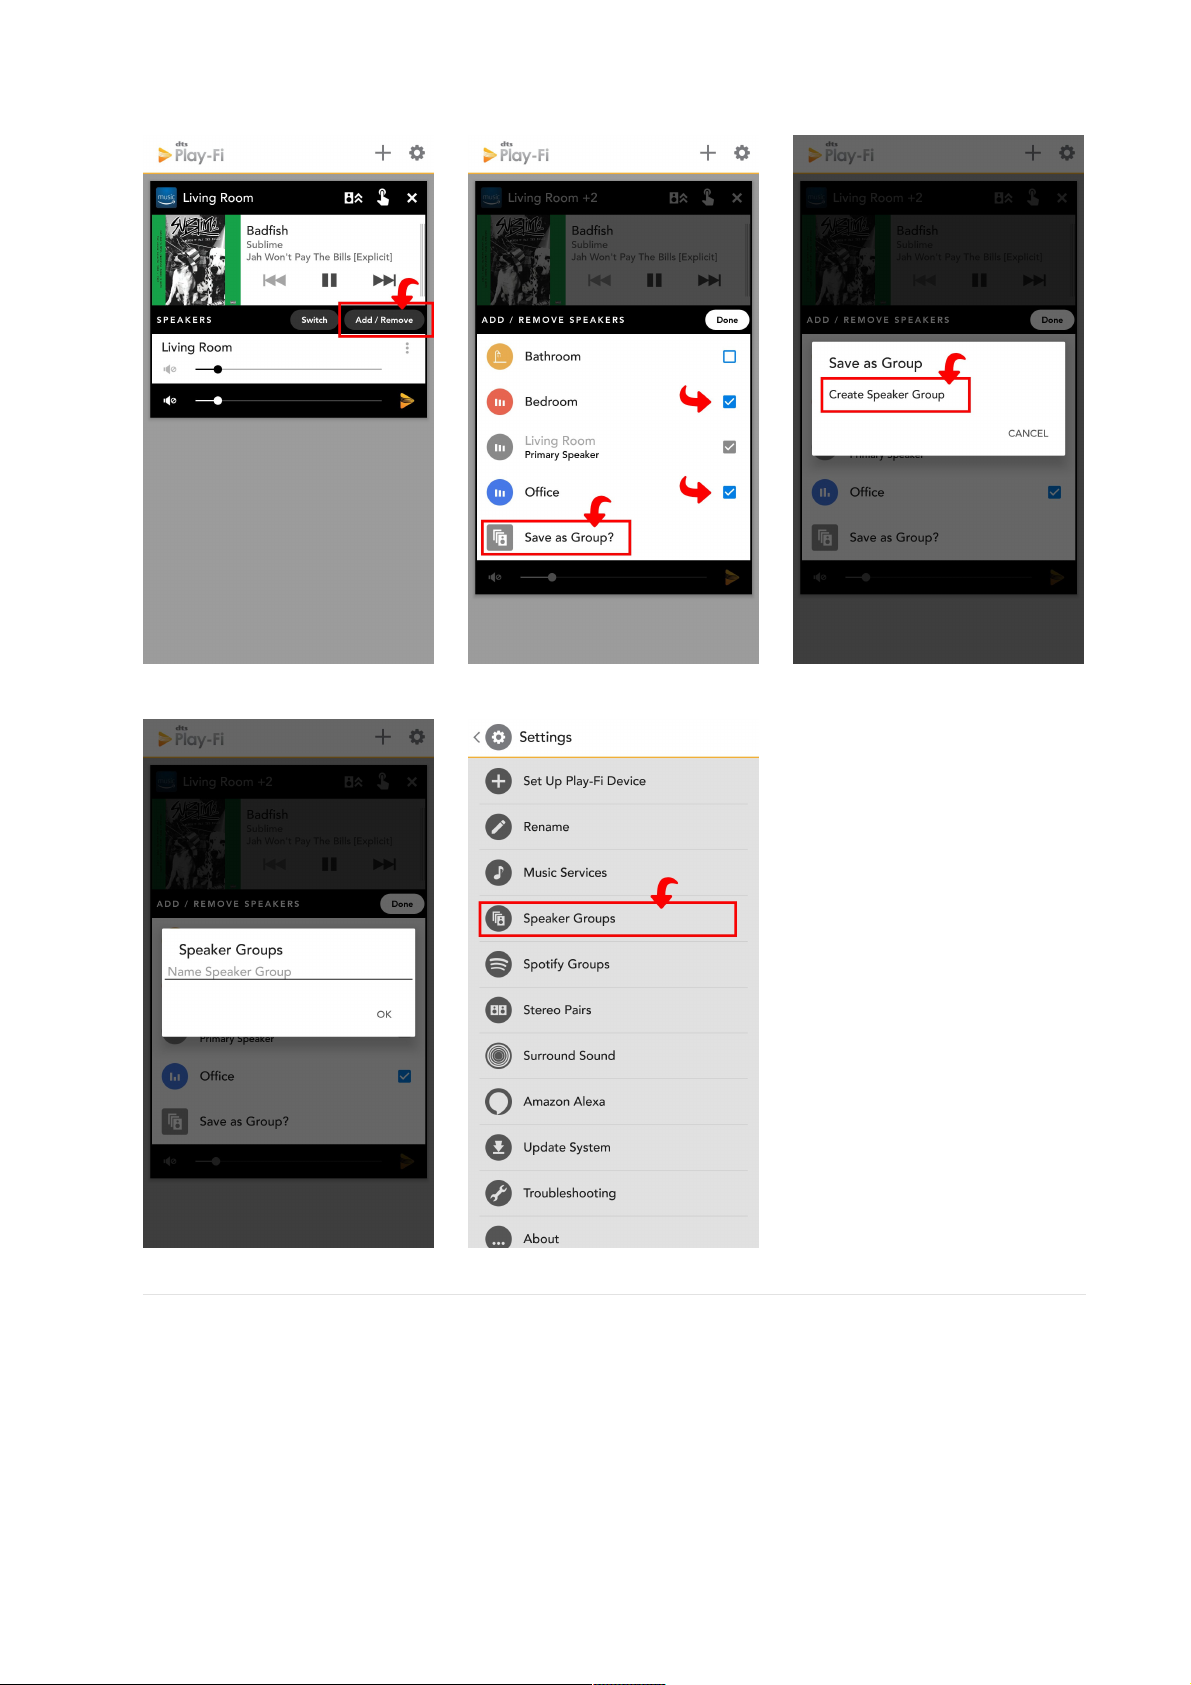
Control screen, select the “Speaker Groups”
(image 15e)
and repeat the steps above.
Multi-Zone StreamingMulti-Zone Streaming
When additional Prime Wireless products are added, Play-Fi supports streaming different audio to different
rooms or zones, directly from the Play-Fi app. So, for example, you can send Pandora downstairs for a dinner
party, and keep Radio Disney playing upstairs for the kids.
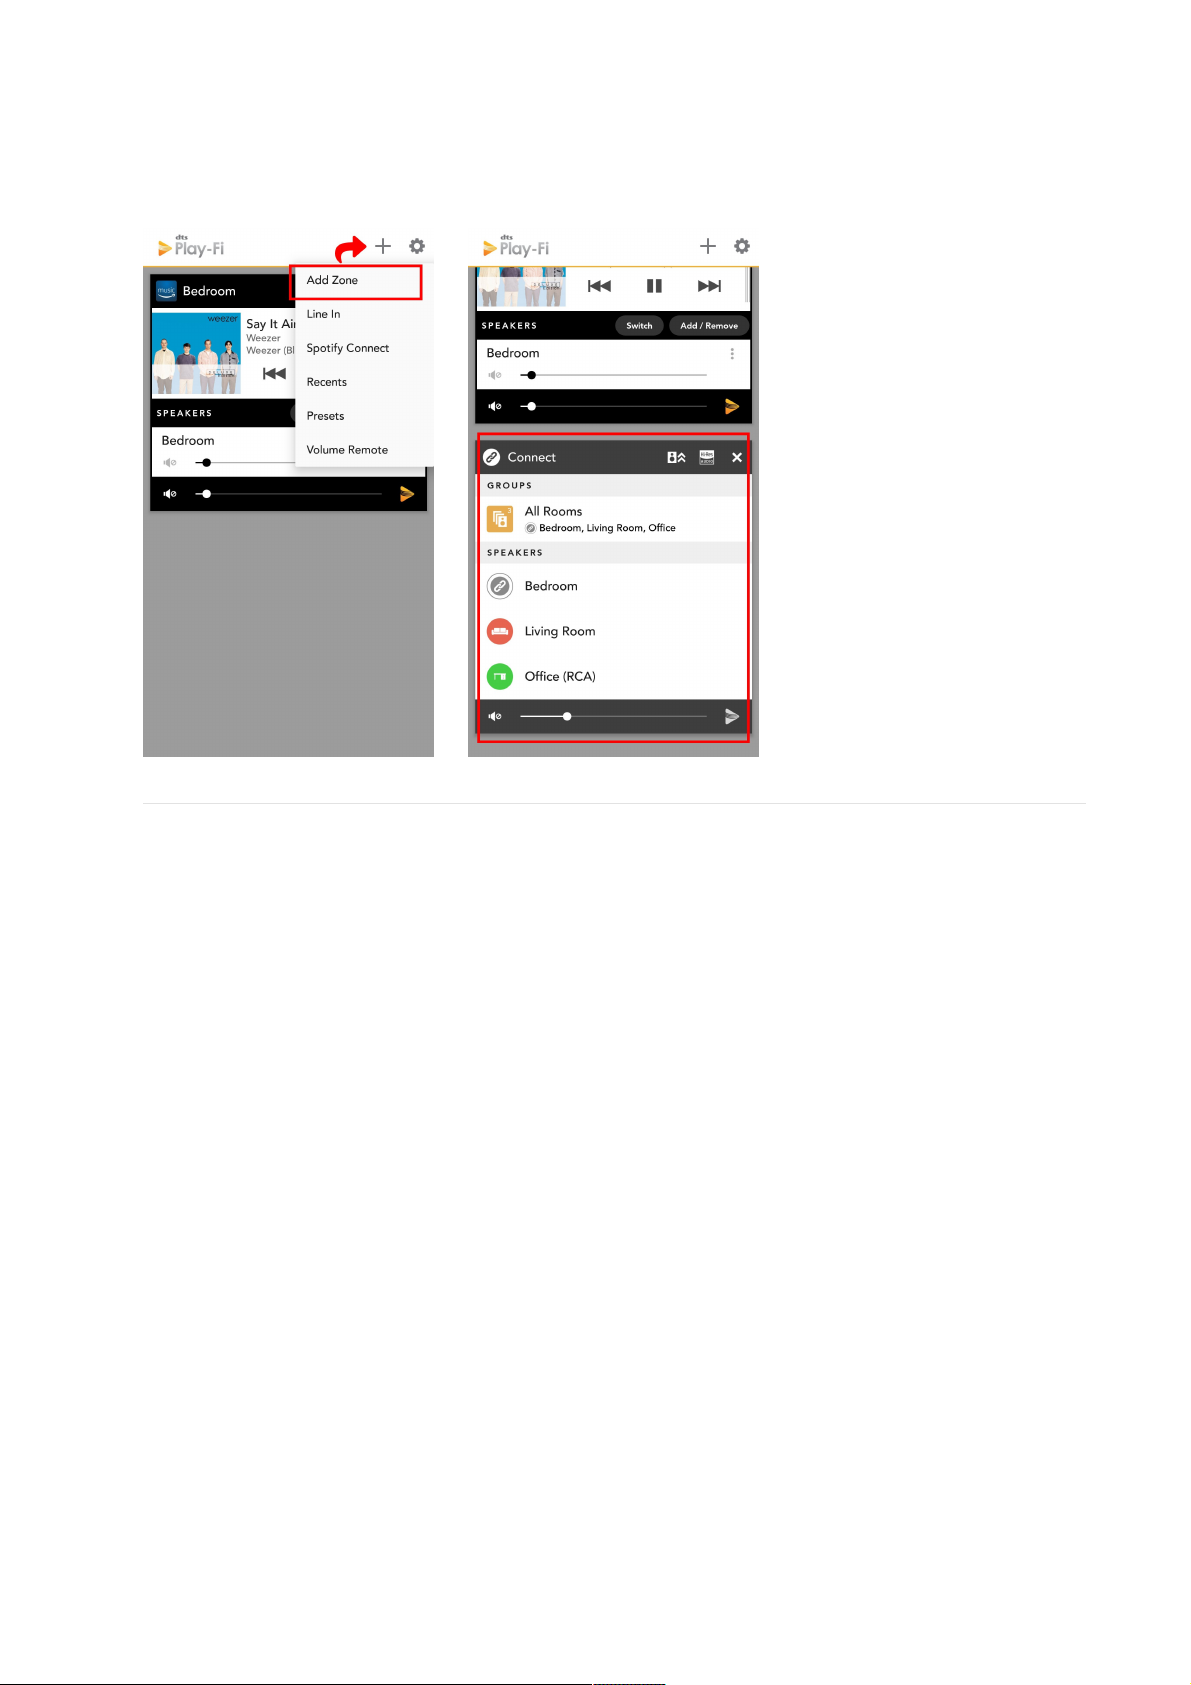
1. To set up a new zone, open up the Play-Fi Control screen by pressing the Play-Fi button in the app.
2. You will see the currently playing products and what they are playing in a Zone module.
3. To add another Zone, simply press the Plus (+) icon in the top right of the screen
(image 16a)
.
4. A new Zone module will be created allowing you to pick your Prime Wireless Speaker, and then you can
select your music source
(image 16b)
.
Image 15a. Image 15b. Image 15c.
Image 15d. Image 15e.
Page 13
5. Once configured, you can press the Play-Fi button to return to the Play-Fi Control screen, where you can
easily manage each Zone.
6. You can have up to four zones at once, and each zone can include up to 16 Prime Wireless Speakers.
NOTE: Each zone does have to play from a different music source or server.
Streaming a “Line-In” Audio InputStreaming a “Line-In” Audio Input
Prime Wireless products have the capability to capture audio from one of their on-board audio inputs and
then redistribute it through a Play-Fi group. This is called Line-In Streaming, and speakers paired together
streaming from Line-In are called a Line-In Zone.
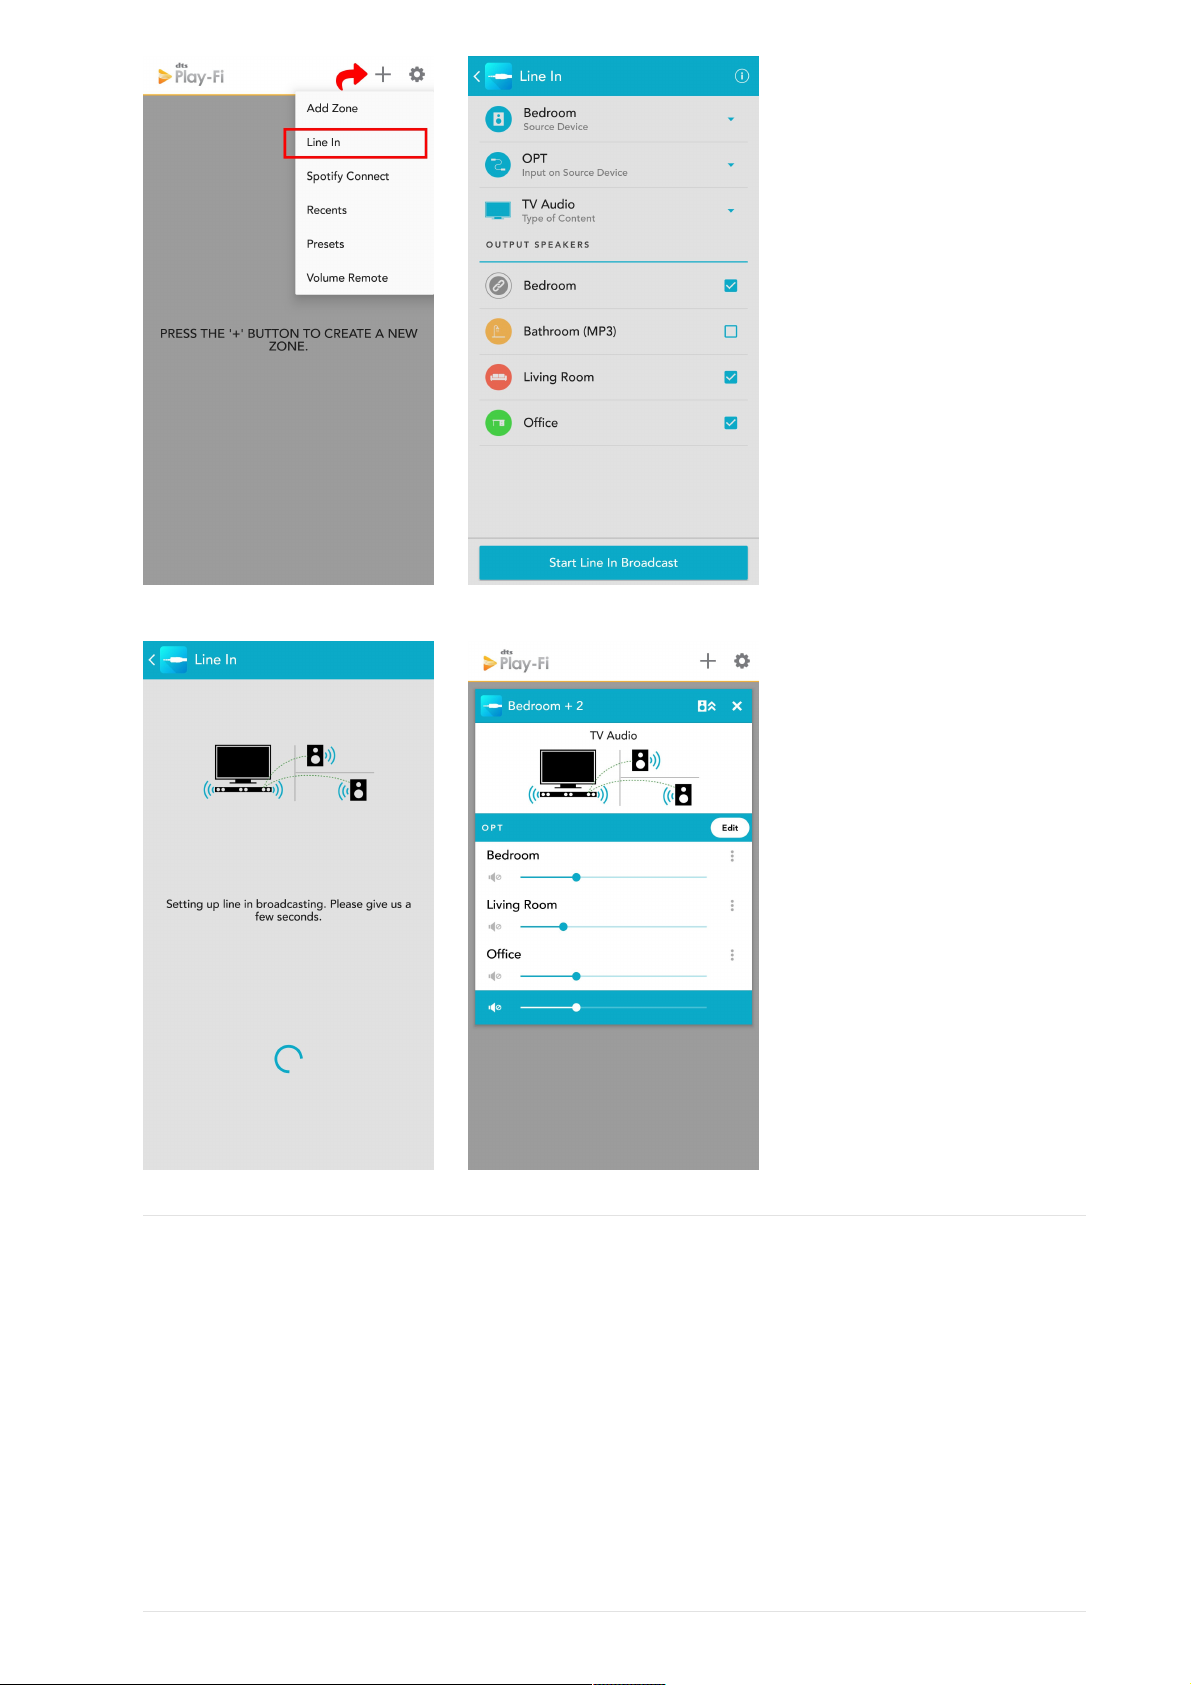
1. To initiate a Line-In Zone, simply tap on the Add Zone button—which is the little + icon at the top of the
main Play-Fi Control screen—then select the Line-In option
(Image 17a)
.
2. 2. The Line-In screen will display and list the products you can pick to lead the zone
(Image 17b).
3. After selecting the product, if it has more than one audio input, you'll be able to select which one you'd like
as the source.
4. You can also select between the type of content, which includes a Music mode and a TV audio mode to
optimize the listening experience for each different source.
5. Lastly, you'll be able to select the additional Play-Fi products to join to the Line-In Zone.
NOTE: The app automatically remembers your last configuration, so that you can start streaming quickly
the next time.
Once you're ready to go, just tap the Start button, and the app will send all the information over to the host
product so that it can configure the zone. Now that everything is up and running, you can close the app or
leave the network, and the Line-In Zone will continue to run so long as there is content being played on its
input.
Image 16a. Image 16b.
Image 17a. Image 17b.
Page 14
Setting Up BluetoothSetting Up Bluetooth
Establishing a Bluetooth connection allows you to wirelessly stream to your Prime Wireless Speaker from any
smartphone, tablet or Bluetooth enabled device at the highest resolution possible.
1. Press the Bluetooth Setup button on rear panel of active Prime Wireless Speaker once to activate
Bluetooth pairing. This is indicated when the blue LED on the rear panel goes from slow to rapid blinking.
2. Select Bluetooth as your source by rotating the left knob until the Bluetooth logo on the front panel display
is highlighted.
3. View Bluetooth settings on your smartphone or mobile device and connect to “SVS SPEAKER...”
4. Confirm pairing when the light stops blinking and remains on.
5. You can now stream music services and audio content directly from your paired device any time you select
Bluetooth as your source.
Image 17c. Image 17d.
Page 15

Connecting Devices via AUX and Optical InputsConnecting Devices via AUX and Optical Inputs
Your Prime Wireless Speaker is equipped with multiple input connections that allow it to provide audio
playback for a wide array of devices, including: computers, TVs, AV receivers, Blu-ray players, gaming consoles,
handheld devices, turntables with phono preamps and more. Connecting these devices to your Prime
Wireless Speaker is as simple as plug-and-play.
1. Ensure the device you want to connect has the appropriate AUX or optical output.
2. Check to see that you have the proper optical, stereo RCA or 3.5mm RCA cable (not included) for
connecting your device and the Prime Wireless Speaker.
3. Connect your device to the Optical input, L/R AUX stereo inputs or the 3.5mm AUX input on your Prime
Wireless Speaker.
4. Select the input by rotating the left control knob. The source will be displayed on the front panel with
backlighting.
a. Select “OPT” for audio playback of devices connected to the Optical input.
b. Selecting “AUX” will allow you to access both the stereo L/R inputs or the 3.5mm line level input.
NOTE: If devices are connected to both the 3.5mm AUX inputs and the L/R RCA AUX inputs, the 3.5MM
input will override the L/R AUX inputs.
5. Operate device as normal.
6. Volume can be controlled from the right-hand control knob of the Prime Wireless Speaker or from the
Play-Fi app.
a. Simply open the app and the default screen will show a scrolling volume control bar for whatever input
you have selected.
If you have any questions about using connecting via line level inputs, please contact our SVS Sound Experts:
Email • (877) 626-5623 • Chat
Streaming a “Line-In” Audio InputStreaming a “Line-In” Audio Input
Prime Wireless products have the capability to capture audio from one of their on-board audio inputs and
then redistribute it through a Play-Fi group. This is called Line-In Streaming, and speakers paired together
streaming from Line-In are called a
Line-In Zone
.
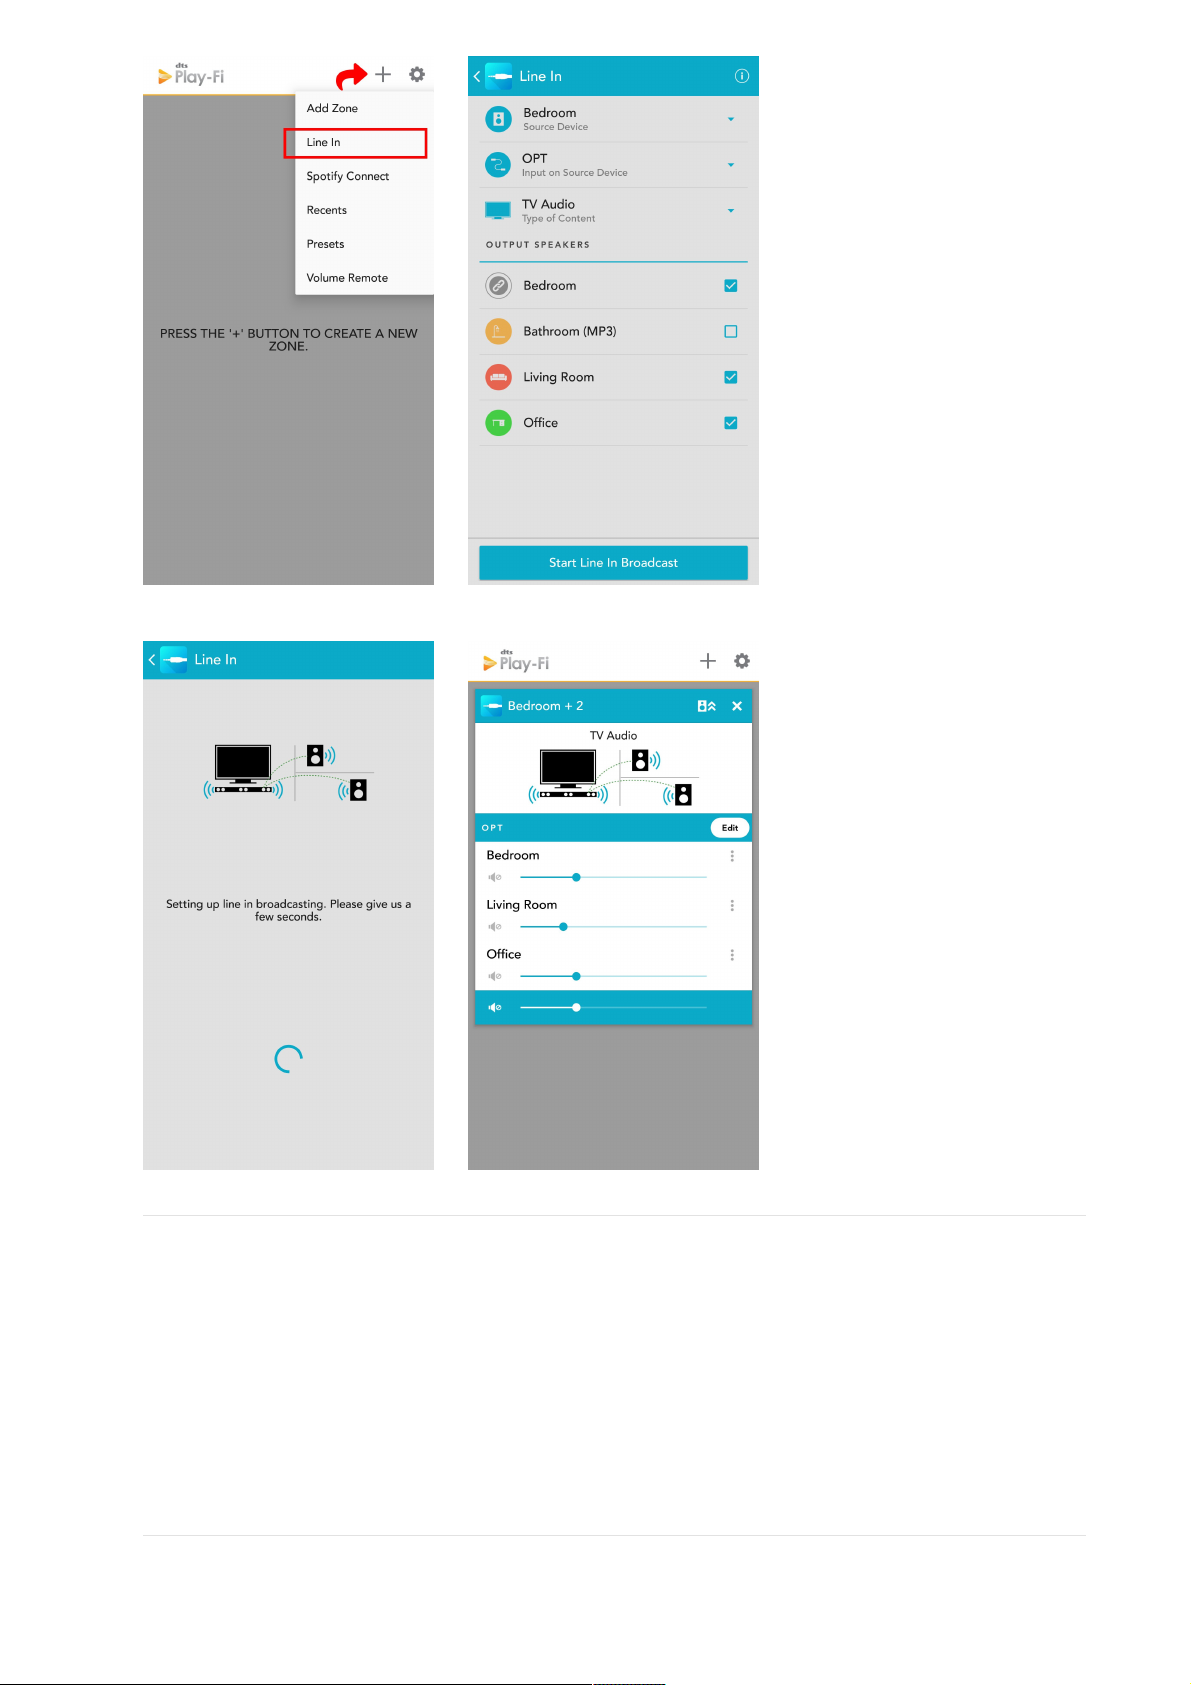
1. To initiate a Line-In Zone, simply tap on the Add Zone button—which is the little + icon at the top of the
main Play-Fi Control screen—then select the Line-In option
(image 20a)
.
2. The Line-In screen will display and list the products you can pick to lead the zone
(image 20b)
.
3. After selecting the product, if it has more than one audio input, you'll be able to select which one you'd like
as the source.
4. You can also select between the type of content, which includes a Music mode and a TV audio mode to
optimize the listening experience for each different source.
5. Lastly, you'll be able to select the additional Play-Fi products to join to the Line-In Zone.
NOTE: The app automatically remembers your last configuration, so that you can start streaming quickly
the next time.
Once you're ready to go, just tap the Start button, and the app will send all the information over to the host
product so that it can configure the zone
(images 20c, 20d)
. Now that everything is up and running, you can
close the app or leave the network, and the Line-In Zone will continue to run so long as there is content being
played on its input.
Image 20a. Image 20b.
Page 16
Connecting A SubwooferConnecting A Subwoofer
For deeper and more powerful bass, a subwoofer output allows you to directly connect a subwoofer from SVS
or any other brand.
1. Locate the “LFE” input on your subwoofer and connect a standard RCA Audio interconnect cable.
2. Connect opposite end of cable to the “SUB Out” output on your Prime Wireless Speaker.
3. An active High Pass Filter is automatically set at 80Hz when the subwoofer is detected.
4. We recommend setting the Low Pass Filter on the subwoofer to 90Hz.
5. Adjust the gain (volume) on the subwoofer to blend based on your personal preferences.
Setting Up and Using Amazon Alexa Voice ControlSetting Up and Using Amazon Alexa Voice Control
Image 20c. Image 20d.
Page 17
Prime Wireless Speaker does not have a built in microphone. You'll need an Amazon Echo, Dot, or similar
product to communicate voice commands to your system and to "Discover Devices" so that your Prime
Wireless Speaker can be identified.
Voice control of music from any Amazon Alexa Device on your WiFi network is as simple as, “Alexa, play
reggae in the living room,” and you can adjust volume, skip track forward, mute, pause and stop the music.
Set-up requires just a few simple steps.
Directions for Setting Up Amazon AlexaDirections for Setting Up Amazon Alexa
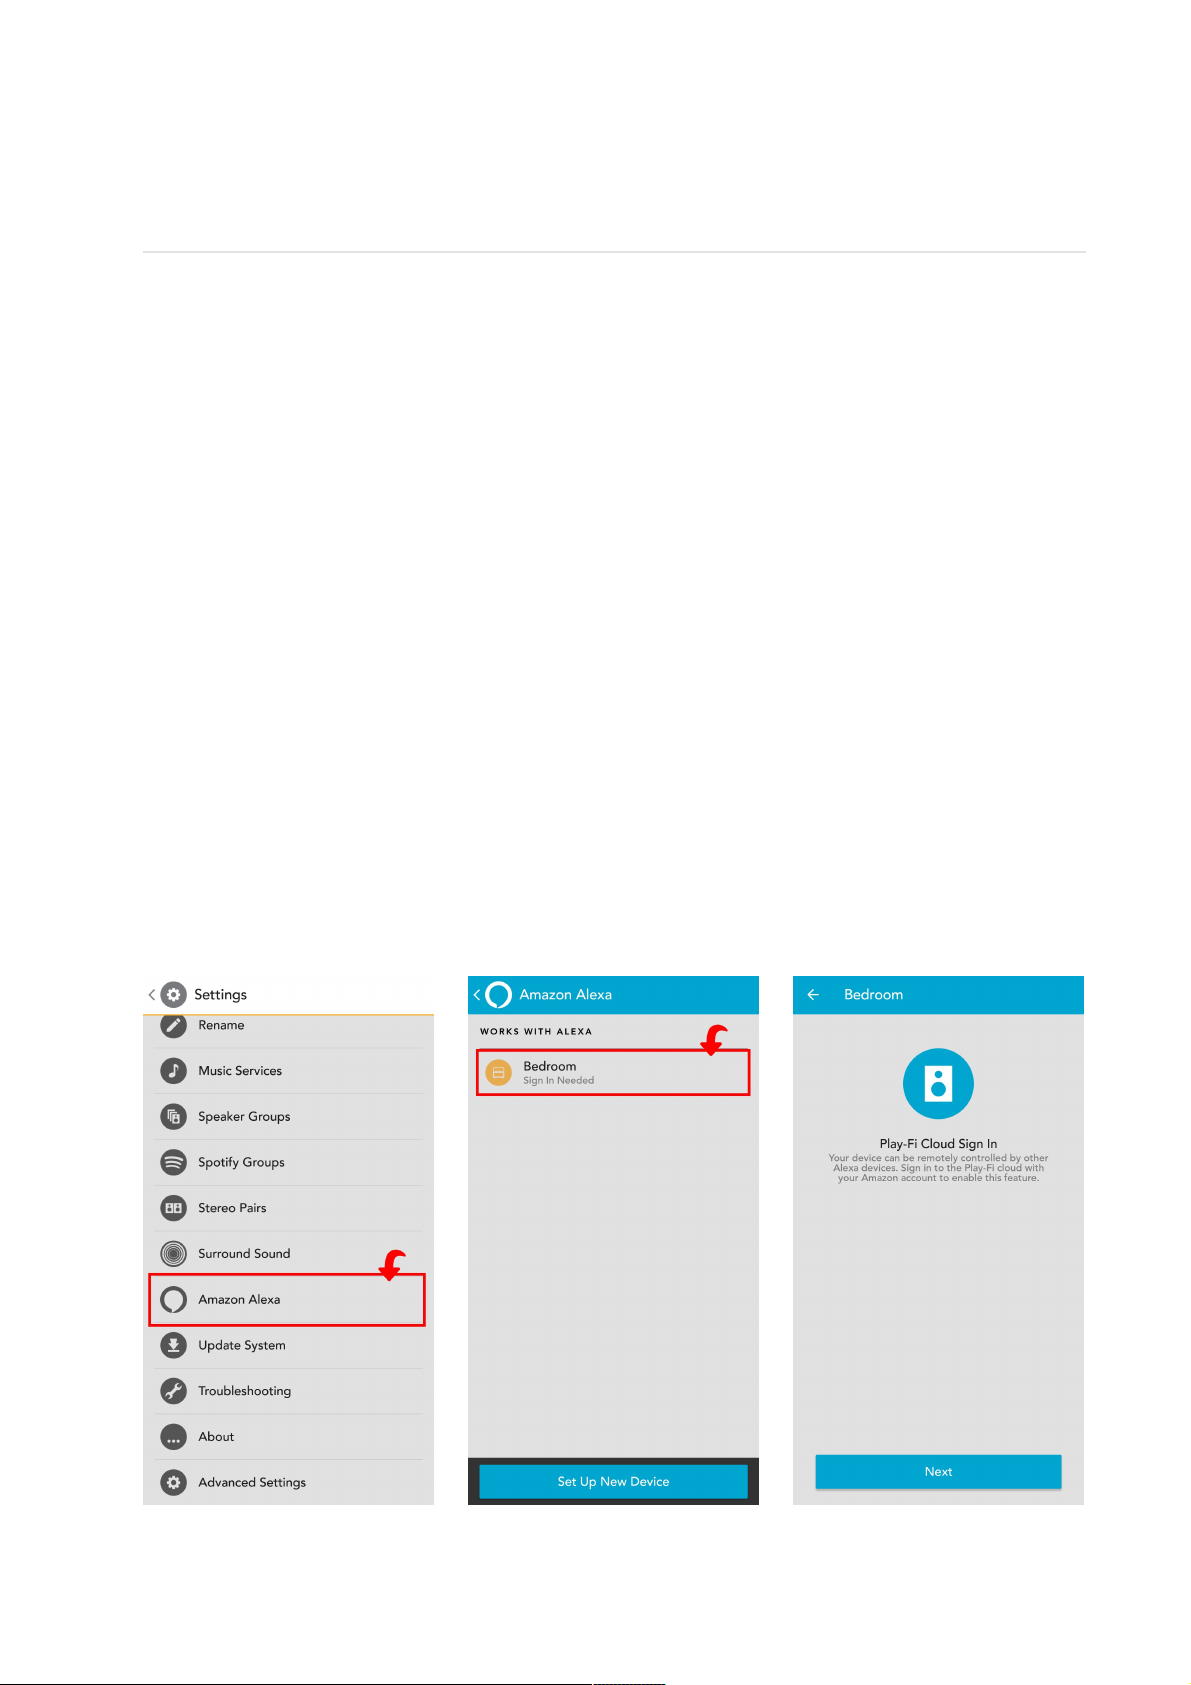
1. Once you’ve joined your Prime Wireless product to the network using the Play-Fi app, the app should
automatically prompt you to link it to your Amazon account.
NOTE: If you don’t see the prompt, or are linking your Amazon account after the fact, you can get to the
below screen by going into Settings in the Play-Fi app and selecting the Amazon Alexa option, as directed
below.
NOTE: Depending on your location, you may be prompted to select your default language for Alexa. Once
ready to proceed, Alexa will prompt you for your Amazon account, but if you’ve already used an Amazon
sign-on or authentication on your device before, it should automatically apply the credentials for you.
2. Open the Play-Fi app, go to “Settings”. Find “Amazon Alexa”
(image 23a)
and select the Prime Wireless
device to use with Alexa
(image 23b)
. Follow prompts to sign in and verify your Amazon account
(images
23c-23e)
.
3. After your device is registered, you will be prompted to launch the Amazon Alexa App (or download it if it’s
not already installed) to finish the Alexa setup
(image 23f)
.
4. Within the Amazon Alexa app, choose the specific Amazon Alexa device you will be connecting, and select
language for your Echo if prompted.
5. Find the Play-Fi skill by going to the menu, clicking on “Skills & Games” and searching for “Play-Fi”
(images
23g, 23h and 23i)
.
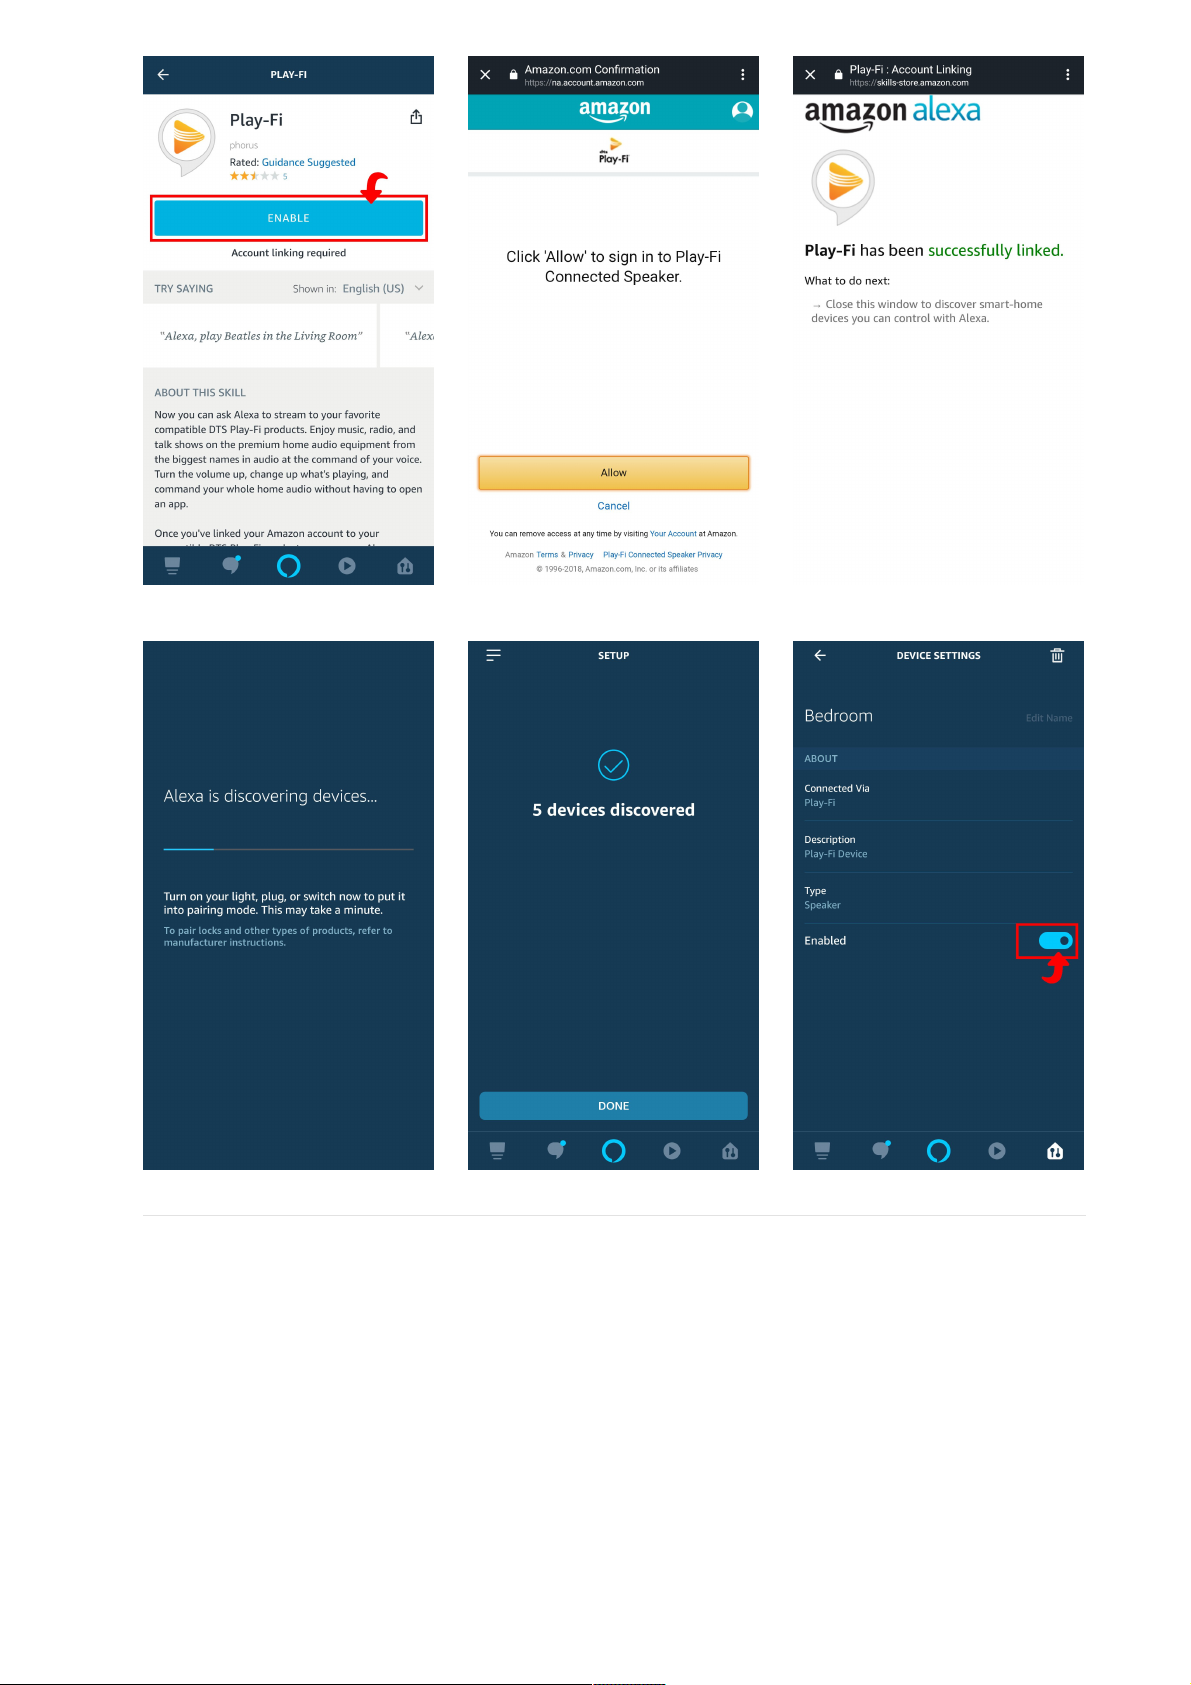
6. Click “Enable” then “Allow” to finish linking the Play-Fi skill
(images 23j-23l)
.
7. 7. Once the skill is successfully linked, the Alexa will begin searching for compatible devices. Once
complete, select your Prime Wireless device to use with Alexa. Make sure the Prime Wireless device is set
to “Enabled” within the device settings
(images 23m-23o)
.
Image 23a. Image 23b. Image 23c.
Image 23d. Image 23e. Image 23f.
Page 18
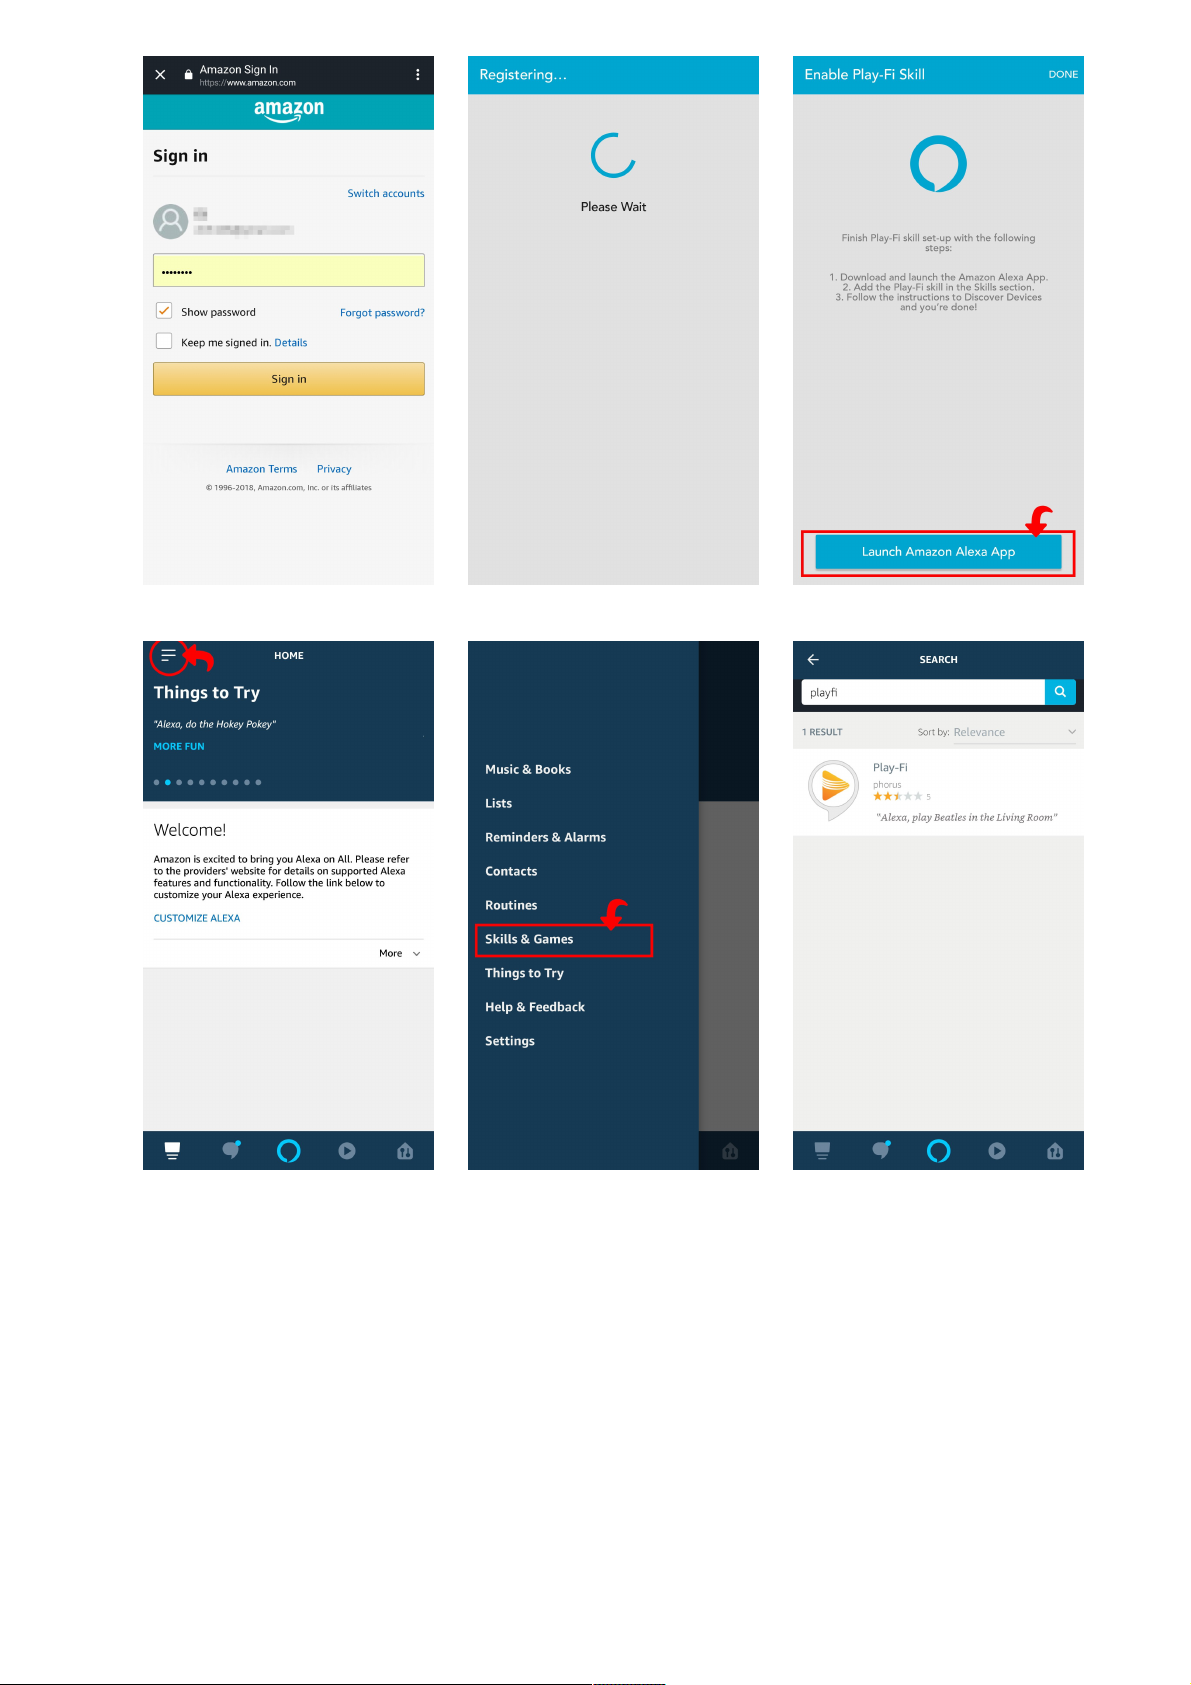
Image 23g. Image 23h. Image 23i.
Image 23j. Image 23k. Image 23l.
Page 19
Controlling with Amazon Alexa Voice CommandsControlling with Amazon Alexa Voice Commands
Below is a simple list of commands you can use with your Prime Wireless Speaker. Keep in mind, these
commands are simplified, but Alexa will understand and interpret some natural language, so saying “Stream”
instead of “Play”, or “on” instead of “in” is also acceptable.
Initiating Streams (example: Alexa play Reggae in the Living Room)
Alexa Play [Artist] in [Zone]
Alexa Play [Album] in [Zone]
Alexa Play [Song] in [Zone]
Alexa Play [Station] in [Zone]
Alexa Play [Podcast] in [Zone]
Alexa Play [Song] from [Album] by [Artist] on [Music Service] in [Zone] or less specific variations of this and
everything in-between
Controlling Streams (Alexa or DTS Play-Fi)
Image 23m. Image 23n. Image 23o.
Page 20

Alexa Next or Next Track
Alexa Previous or Previous Track
Alexa Pause or Stop or other variations
Alexa Play or Resume
Alexa Set Volume to [1 through 10] in [Zone]
Alexa Louder in [Zone]
Alexa Quieter in [Zone]
Alexa Mute in [Zone]
Alexa Unmute in [Zone]
Special Streaming Service Functions (depending on service and stream type)
Alexa Loop
Alexa Shuffle
Alexa Like this
Alexa Unlike this
Alexa Skip Forward 30 Seconds
Alexa Skip Backward 30 Seconds
If you have any questions about installing or using Amazon Alexa with your Prime Wireless Speaker, please
contact our SVS Sound Experts: Email • (877) 626-5623 • Chat
Rebooting Your SystemRebooting Your System
Simply unplug for 10 seconds, then plug them back in.
NOTE: The system will reboot and all previous settings will still be there.
Initiating A Factory ResetInitiating A Factory Reset
There are a few reasons why you might need to restore your Prime Wireless Speaker to its original factory
settings, including: pairing with a new router, changing the assigned WiFi network, clearing out all the presets,
or clearing out all connected Bluetooth devices.
Note: All saved settings will be lost.
To initiate a factory reset:
1. Press and Hold both the WiFi and Bluetooth pairing buttons on the rear panel, as well as the Play/Pause
knob on the front panel until you hear a series of two audible beeps.
2. The reset will begin after the second audible beep.
Note: All saved settings will be lost.
Caring for Your Prime Wireless SpeakerCaring for Your Prime Wireless Speaker
Your Prime Wireless Speaker may be gently cleaned as follows:
1. Use a dry microfiber duster to remove any loose surface dust.
2. Use a water-damp, lint-free microfiber cloth to remove fingerprints, smudges and other contaminants.
Wipe in one direction only.
3. Follow any damp cleaning immediately with a dry microfiber cloth. Again dry wipe in one direction only.
Router OptimizationRouter Optimization
Most modern routers are already set up to work really well with streaming products like Play-Fi, but even with
current routers, there are some things you can check to make sure you get the best possible Play-Fi
experience before setting up your Prime Wireless Speaker.
1. Select the best WiFi channel for your network.
2. Enable Quality of Service (QoS) features like Wireless Multimedia Extensions (WMM)
Page 21

3. If using advanced DHCP assignments or port-forwarding, allow exceptions for Play-Fi
4. Double-check to be sure your router is assigning network access and that UPnP and DHCP are enabled.
For more information on Play-Fi and wireless troubleshooting visit play-fi.com
2-year Unconditional Warranty2-year Unconditional Warranty
SVS offers the industry's most comprehensive warranty on all our products. SVS warrants the Prime Wireless
Speaker to be free from defects in the workmanship for 2 years from date of purchase. This, and all of the SVS
customer Bill of Rights can be viewed online at www.svsound.com/pages/bill-of-rights.
Additional InformationAdditional Information
For DTS patents, see http://patents.dts.com. Manufactured under license from DTS, Inc. DTS, Play-Fi, the
Symbol, and Play-Fi together in combination with the Symbol are trademarks of DTS, Inc. DTS and Play-Fi are
registered trademarks of DTS, Inc. © DTS, Inc. All Rights Reserved
The Spotify software is subject to third party licenses found here: www.spotify.com/connect/third-party-
licenses
Windows is a registered trademark of Microsoft Corporation in the United States and other countries.
Other trademarks and trade names are those of their respective owners.
Share Your ThoughtsShare Your Thoughts
At SVS, we strive to deliver products that surpass every expectation and provide unbeatable value. After you
have had an opportunity to install and audition your Prime Wireless Speaker, please share your comments for
our team and others to see.
Write a review at https://www.svsound.com/products/prime-wireless-speaker-system
FCC CompliancyFCC Compliancy
This device complies with Part 15 of the FCC Rules. Operation is subject to the following two conditions: (1)
This device may not cause harmful interference, and (2) This device must accept any interference received,
including information that may cause undesired operation. Changes or modifications not expressly approved
by the party responsible for compliance could void the user’s authority to operate the equipment.
This product has been tested and found to comply with the limits for a Class B digital device, pursuant to Part
15 of the FCC Rules. These limits are designed to provide reasonable protection against harmful interference
in a residential installation. This product generates, uses, and can radiate radio frequency energy and, if not
installed and used in accordance with the instructions, may cause harmful interference to radio
communications. However, there is no guarantee that interference will not occur in a particular installation. If
this product does cause harmful interference to radio or television reception, which can be determined by
turning the equipment off and on, the user is encouraged to try to correct the interference by one or more of
the following measures:
Reorient or relocate the receiving antenna.
Increase the separation between the equipment and receiver.
Connect the equipment into an outlet on a circuit different from that to which the receiver is connected.
Consult the dealer or an experienced radio/TV technician for help.
Page 22

This device complies with Industry Canada license-exempt RSS standard(s). Operation is subject to the
following two conditions:
1. this device may not cause interference, and
2. this device must accept any interference, including interference that may cause undesired operation of the
device.
Wireless Transmitter Compliance InformationWireless Transmitter Compliance Information
This equipment complies with FCC and IC radiation exposure limits set forth for an uncontrolled environment.
This equipment should be installed and operated with minimum distance 20 cm between the radiator and
your body. This transmitter must not be co-located or operating in conjunction with any other antenna or
transmitter. To reduce potential radio interference to other users, the antenna type and its gain should be so
chosen that the equivalent isotropically radiated power (e.i.r.p.) is not more than that permitted for successful
communication.
 Loading...