

Page 1

1
Quick Start Guide
PB16-Ultra
Congratulations on choosing the flagship SVS PB16-Ultra, our most powerful and advanced
subwoofer. We know you’re anxious to get it cranking, so the following steps will guide you
through the quick and easy set-up process.
For more detailed information about set-up and optimization for your new subwoofer, please
reference the full owner’s manual included. We strongly recommend reading the manual to
get the best possible performance out of your new subwoofer.
Unbox It
If you followed the PB16-Ultra Subwoofer unboxing instructions properly you
will have the following items in front of you. Please confirm all pieces are
available before continuing.
[Detachable Power Cord] [IR Remote Control][Port Plugs]
[PB16-Ultra Subwoofer]
[Removable Metal Grille]
Page 2

2
Set It Up
3
The location of your subwoofer in the listening environment can affect its performance. If possible, start with corner placement
on the same wall as the front speakers, or anywhere along the front stage in between or outside of your main speakers.
Corner Placement: offers huge impact and reduces the
potential to encounter bass nulls, or ‘dead spots’. If “boominess” occurs, you can try pulling it away from the wall and
using the DSP tuning controls to smooth performance.
Hook It Up
Line Level Connection – Single LFE Channel
RECEIVER/PREAMP
LINE LEVEL OUTPUTS
SUBWOOFER
(SUB1)
REAR FRONT
CENTER
Front Placement: In between or to the side of the front
channel speakers often results in the best blending with the
main speakers and center channel and minimizes localization effects.
For most set-ups, a single RCA subwoofer interconnect cable running from the AV Receiver’s “SUB 1” output to the PB16-Ultra’s
“LFE” line level input is all that’s required to connect the subwoofer into your system. If you run separate Preamplifier and Power
Amplifiers, follow the “Line Level Connection – Stereo Receiver or Preamplifier Left/Right Channels” connection guide below.
Line Level Connection – Stereo Receiver or Preamplifier Left/Right Channels
RECEIVER/PREAMP
LINE LEVEL OUTPUTS
Side Wall Placement: Side wall placement is less frequently
used but can be an effective subwoofer location for
excellent accuracy and output.
REAR FRONT
L
R
Need Help?
Our Sound Experts are standing by to help with subwoofer placement, installation,
calibration, AV receiver settings, room rattle and anything else you need advice about.
Just call, email or chat online with our Sound Experts:
(877) 626-5623 | [email protected] | www.svsound.com
Page 3
4
Get Control
5
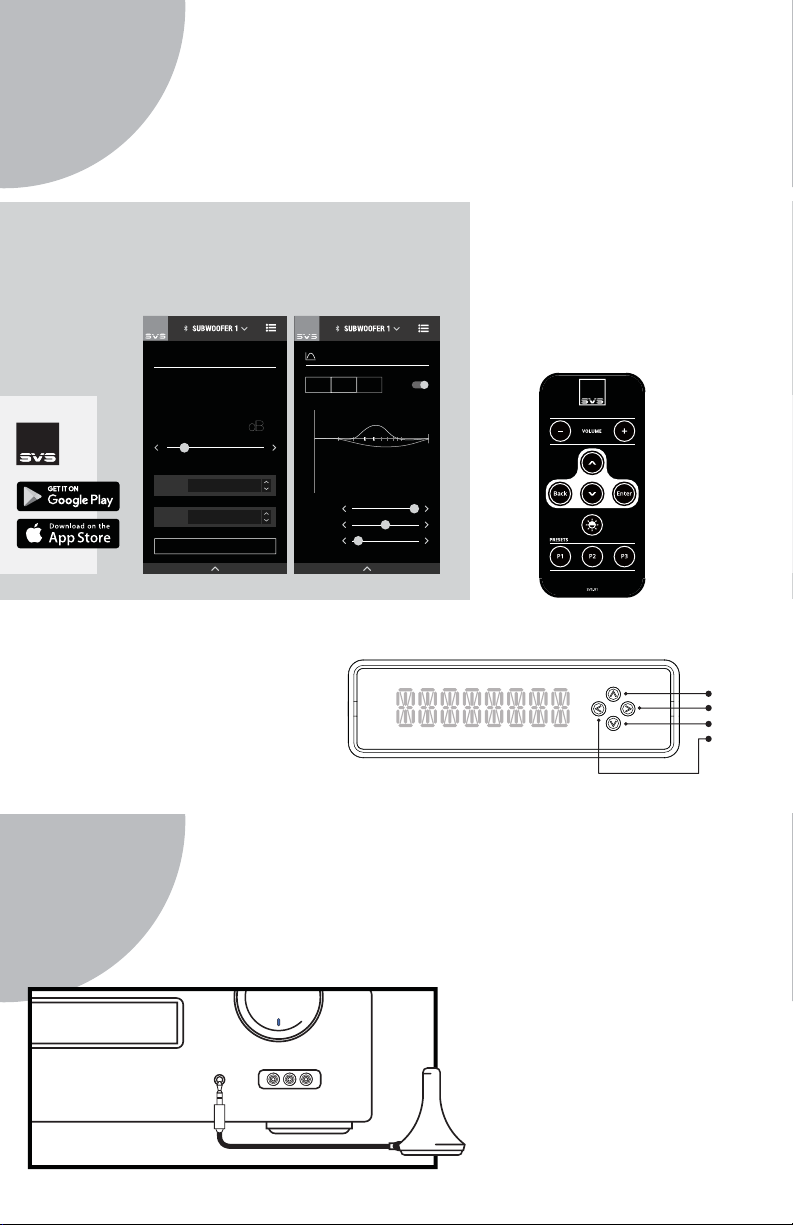
Your SVS PB16-Ultra Subwoofer can be controlled from the new SVS Mobile
App, an included IR Remote Control or via the front panel for unprecedented
flexibility when optimizing performance for room layout, speakers, system
set-up and more.
Download The App
The SVS App is the easiest and most convenient way to
access all of the advanced control features available on
your PB16-Ultra, from the comfort of your favorite seat.
PARA METRIC E Q
PEQ1
PEQ2
ACTIVE
ACTIVE
20 40
0
6
4
2
0
-2
-4
-6
-8
-10
-12
FREQ: 200
Hz
BOOST: 0 dB
Q FACTOR: 1.2
DISABLED
PEQ3
10050
200
For iOS
& Android
Devices
HOME / VOLUME
-22
MOVIE
PRESET
LOW PASS FILTER
OPTIONS
SUBWOOFER DISPLAY - ON/OFF
On The Subwoofer
The font panel features an intuitive
user interface with simplified button
controls that can be used to adjust the
majority of the subwoofer’s advanced
control settings.
In The Box
The included IR remote is another
convenient way to adjust your
subwoofer’s advanced control
settings.
UP
ENTER
DOWN
BACK
AUTO EQ - START
Get Calibrated
Set the PB16-Ultra volume to -10, then run auto-set-up in the AV receiver/processor. It is important to re-run your receiver’s calibration set-up if you are upgrading from another subwoofer and each time you move the subwoofer.
If your set-up doesn’t include an
Auto-EQ feature, adjust the
subwoofer volume control to
level-match to your loudspeakers.
MIC INPUT
For additional guidance on recommended crossover settings, visit our
Merlin Subwoofer Matching tool at
www.svsound.com/merlin, or
contact our Sound Experts.
 Loading...