

Page 1
User`s
Manual
Page 2
18
Page 3
2
Page 4

3
Page 5
4
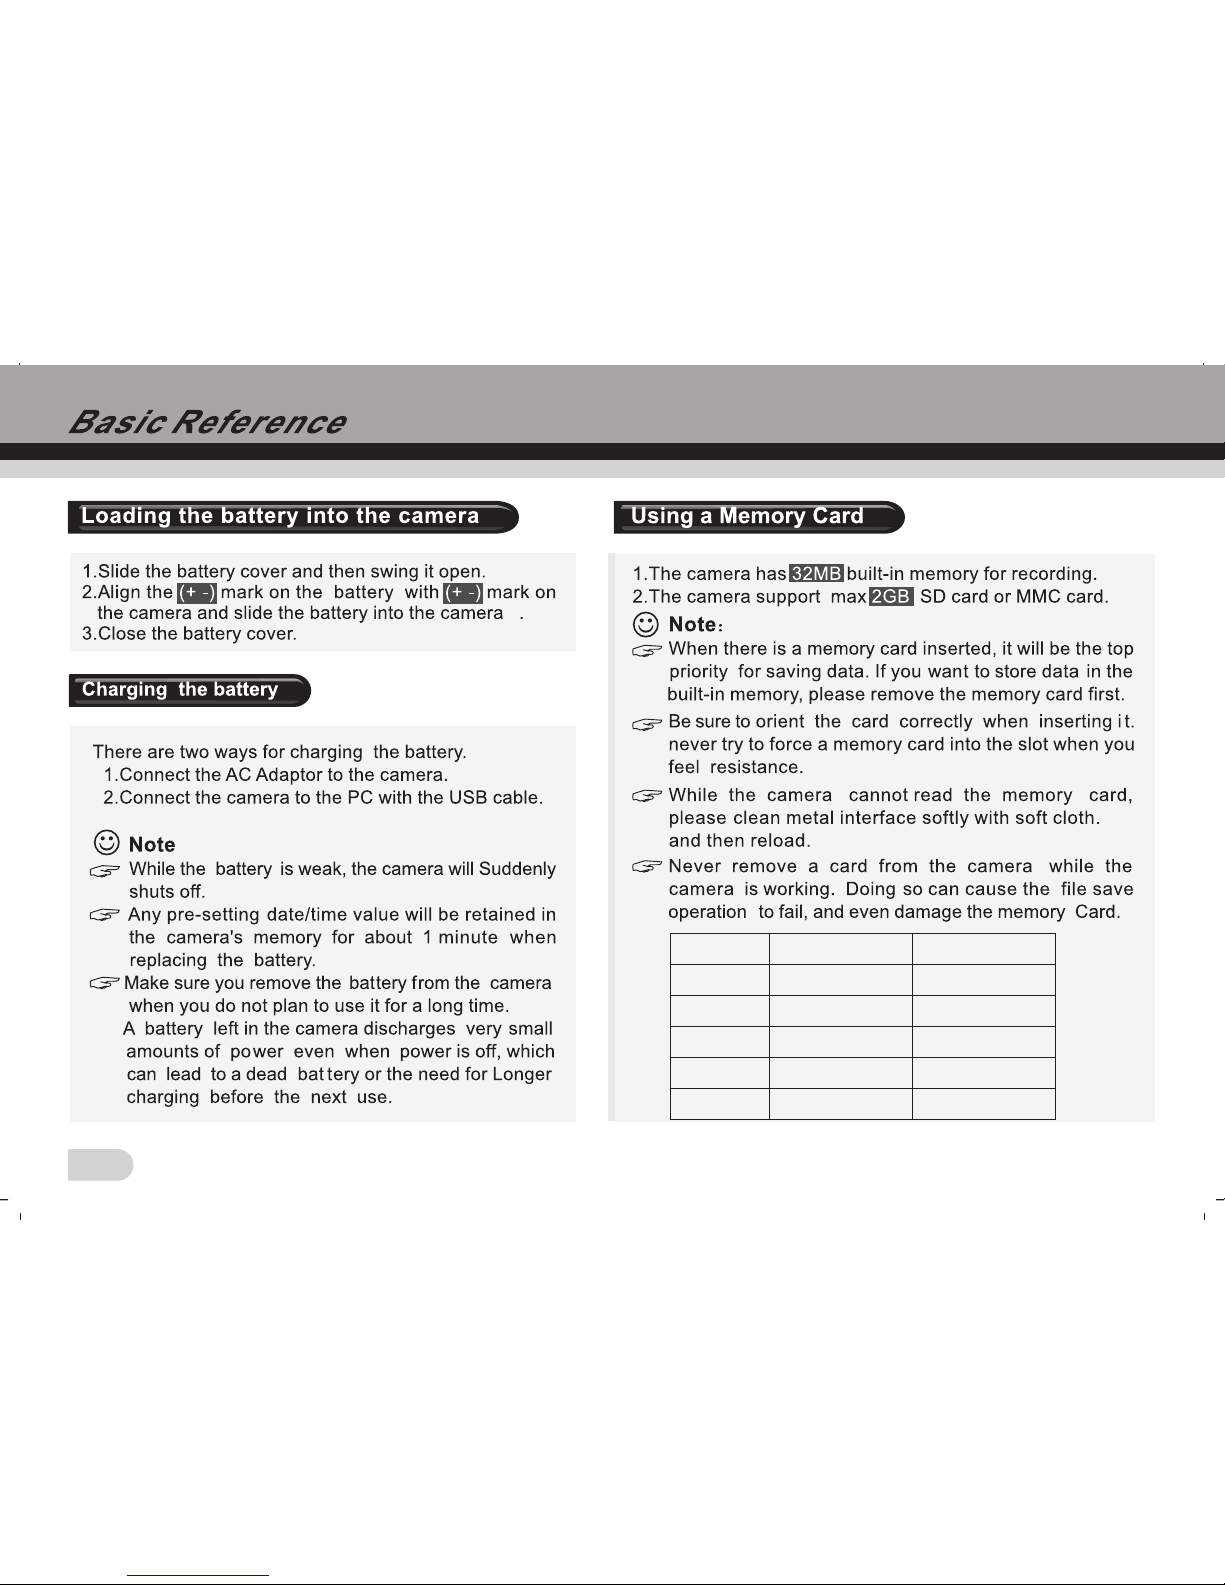
CAPACITY
Time for AVI(COACH 6) Time for AVI(COACH 7)
128MB
256MB
512MB
1GB
2GB
3mins
12mins
25mins
1H
2Hs
12mins
20mins
40mins
70mins
2.5Hs
Page 6
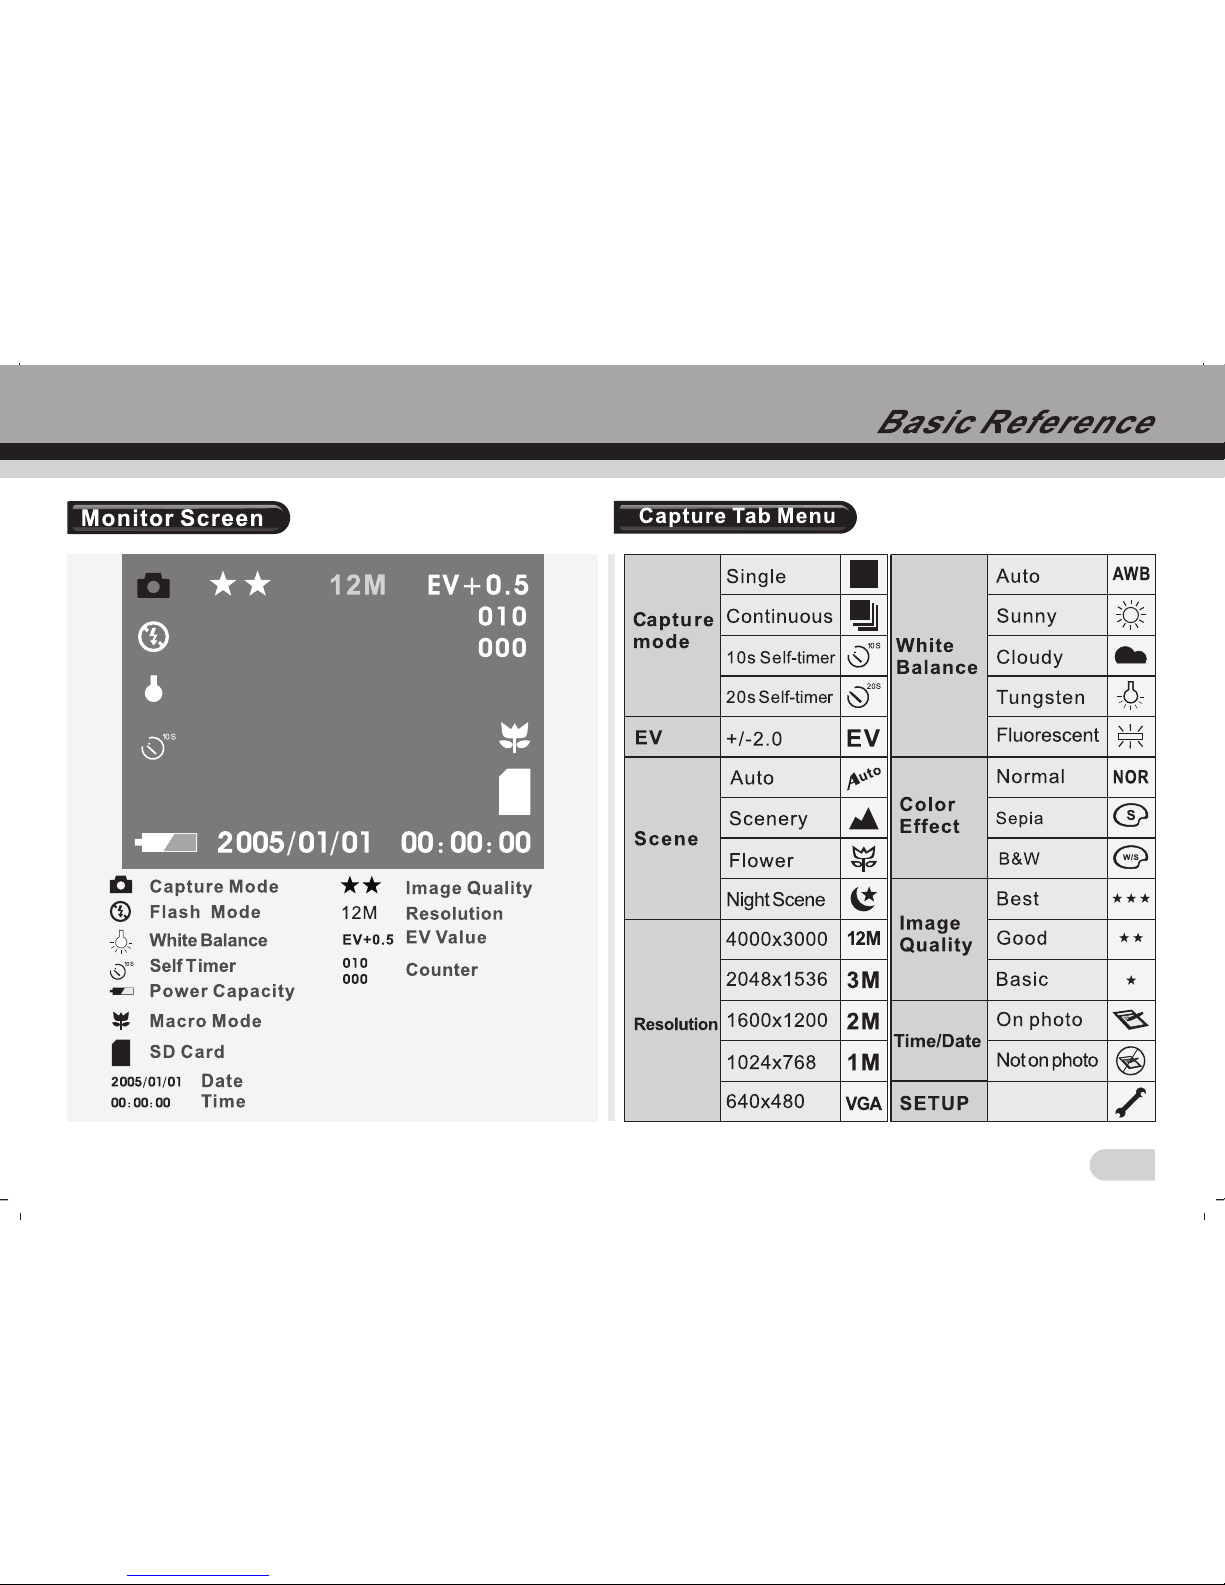
5
Page 7
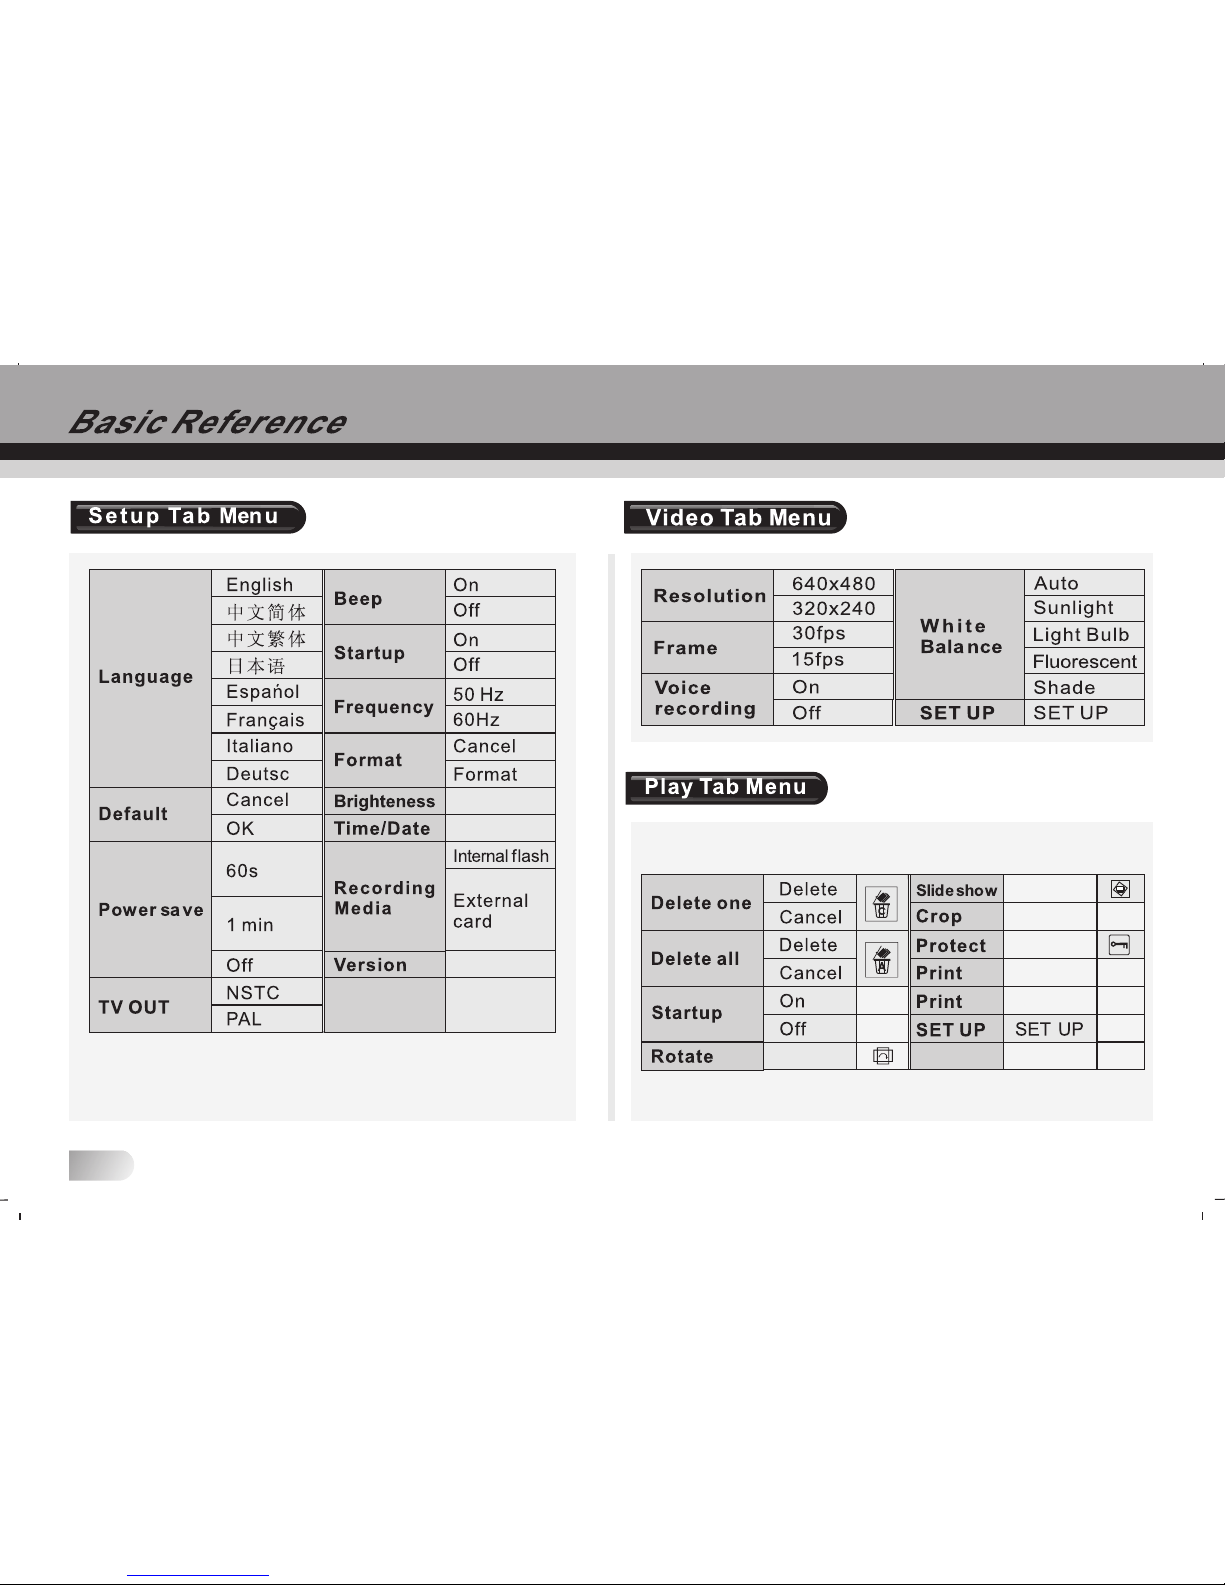
6
Page 8
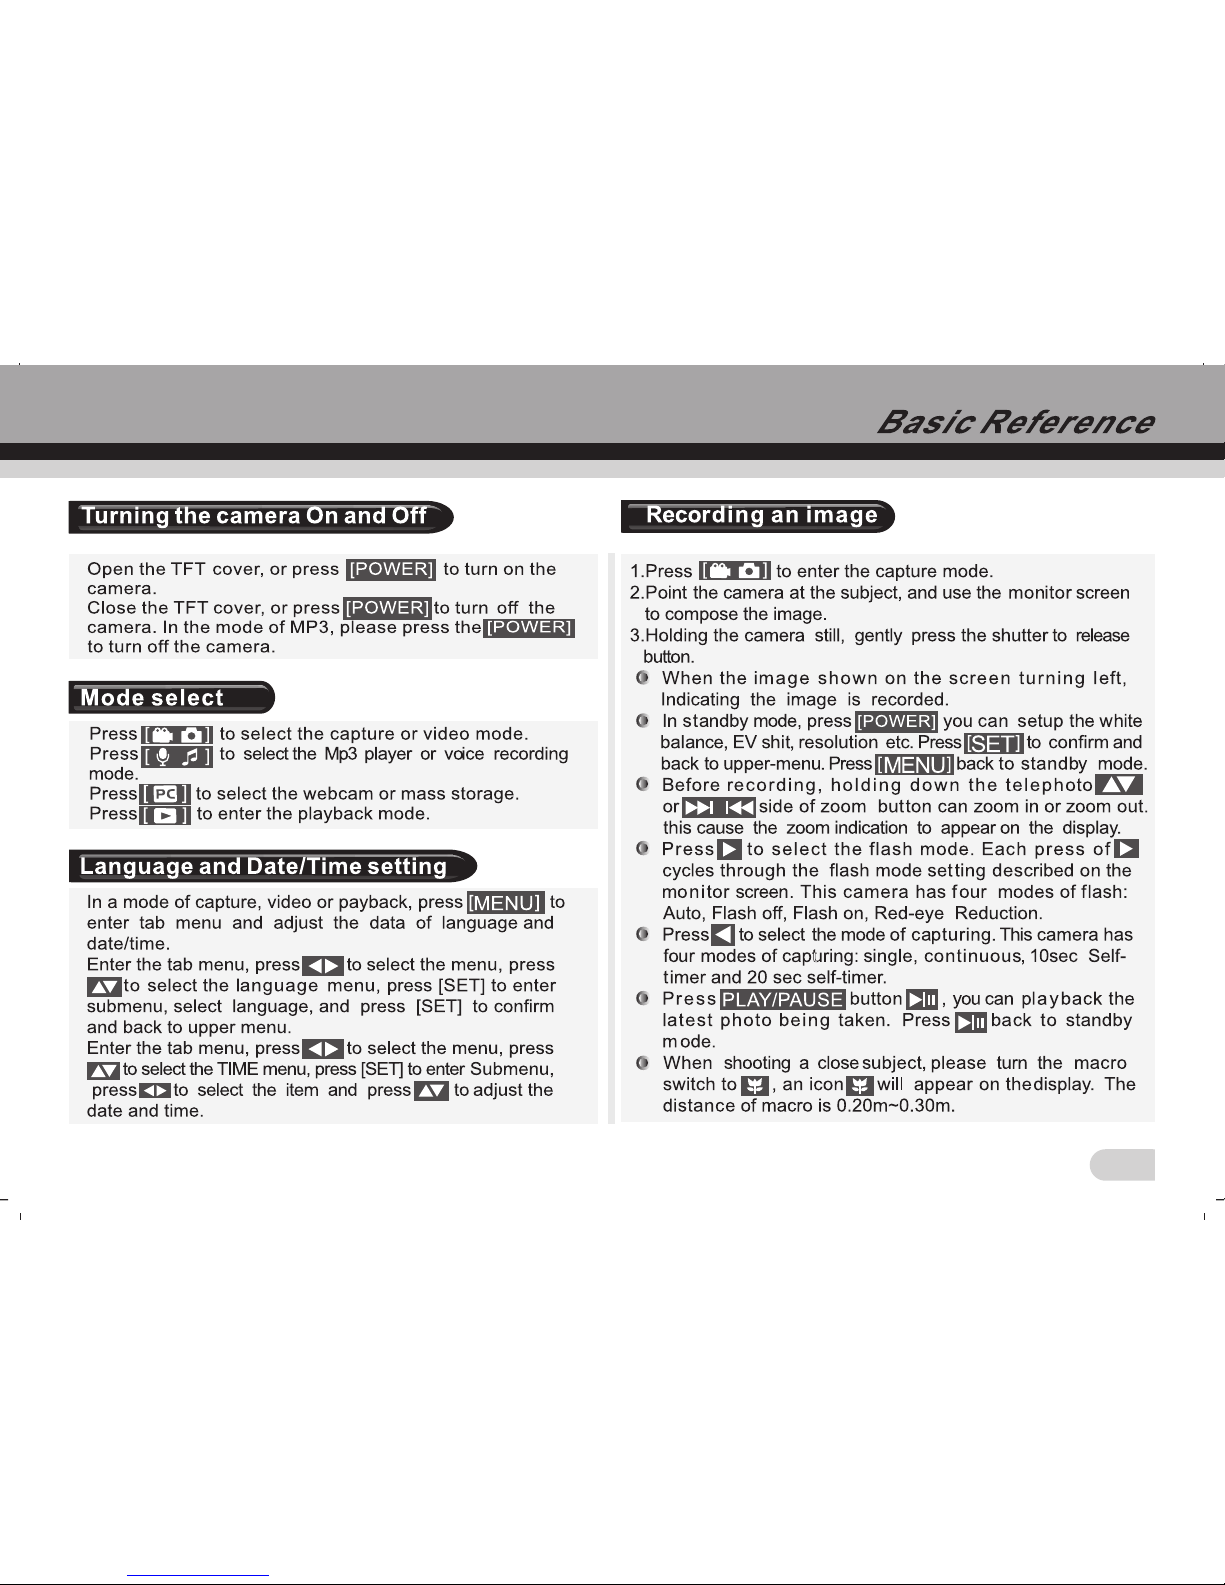
7
Page 9
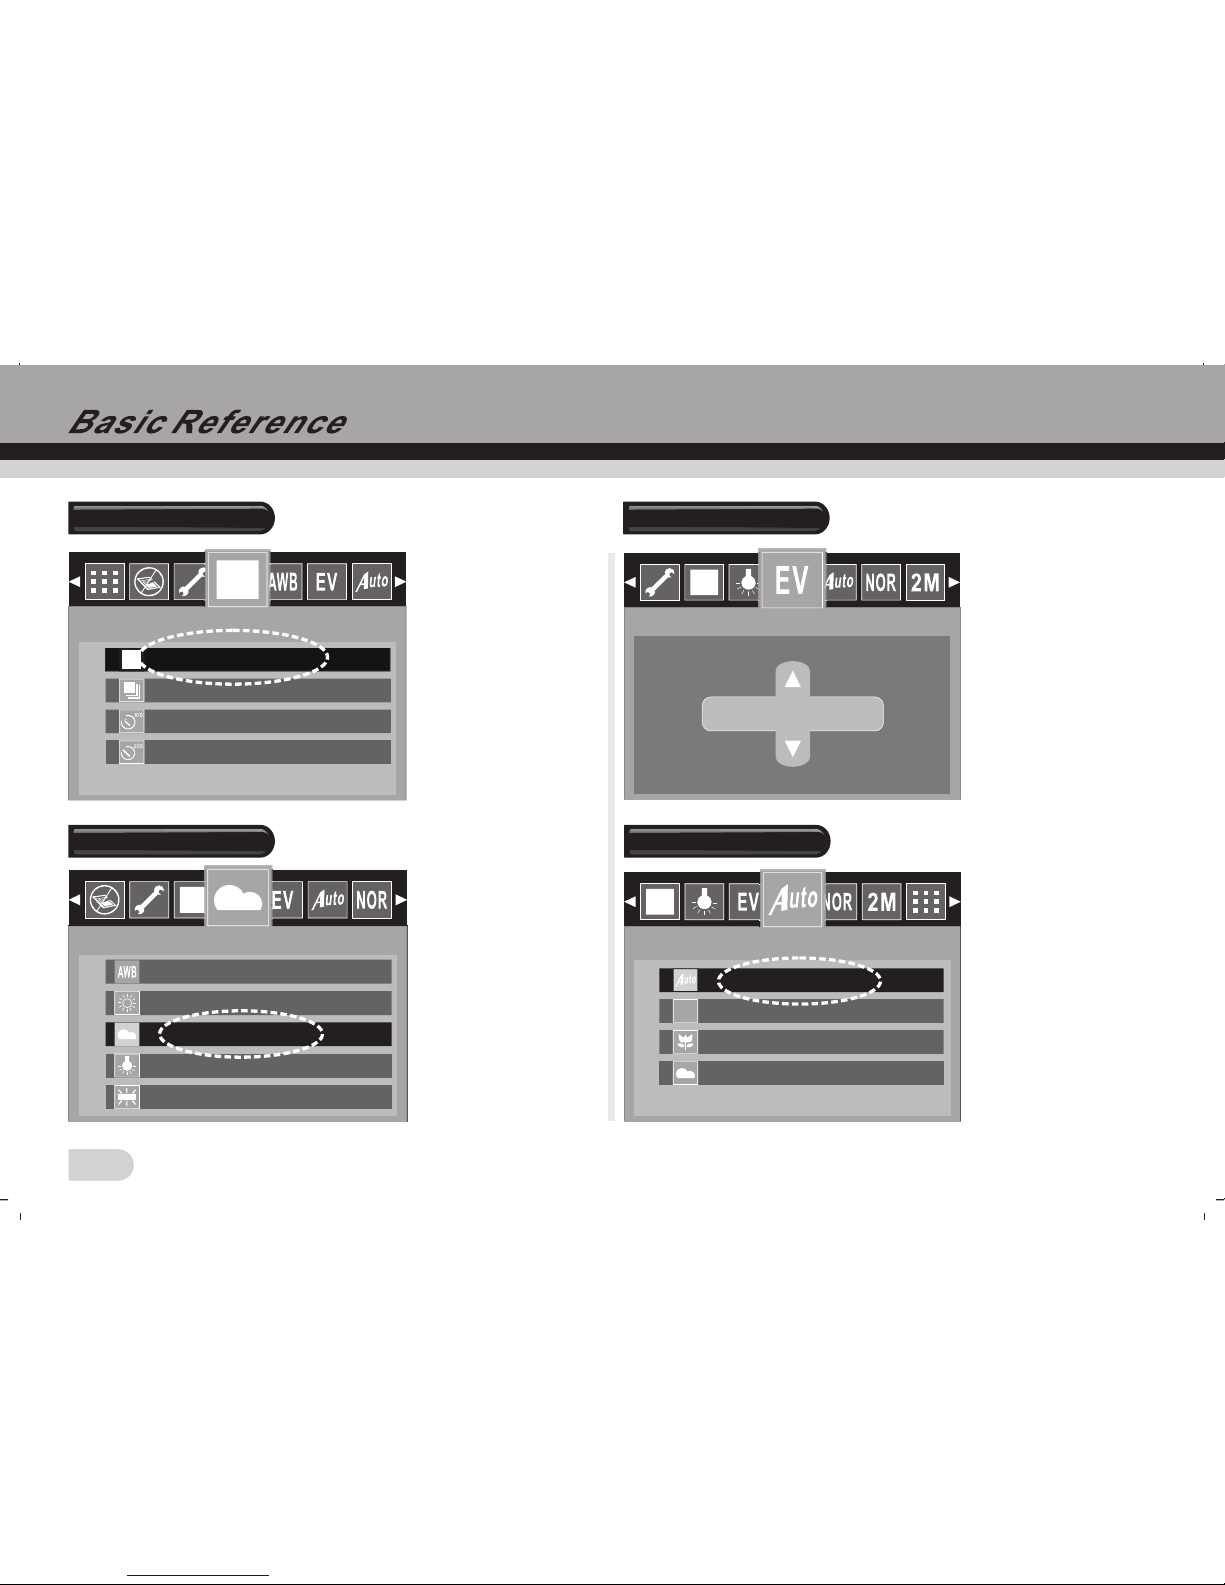
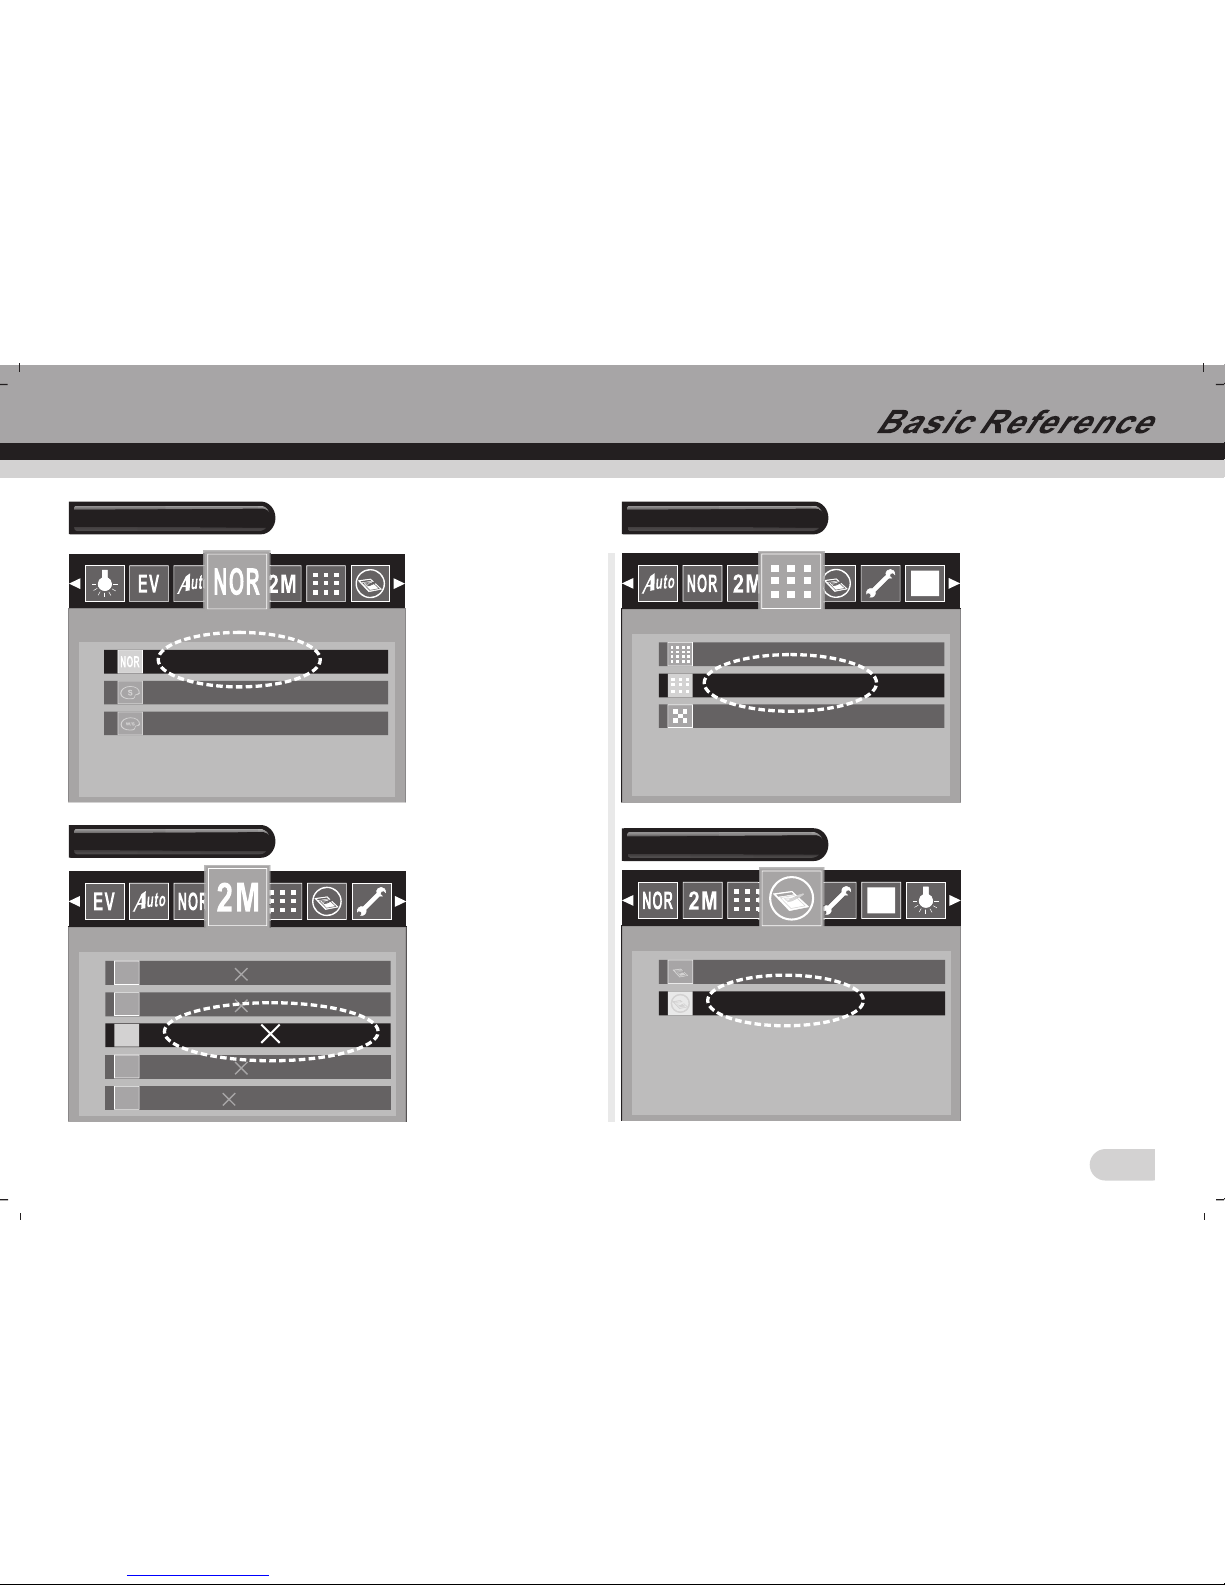
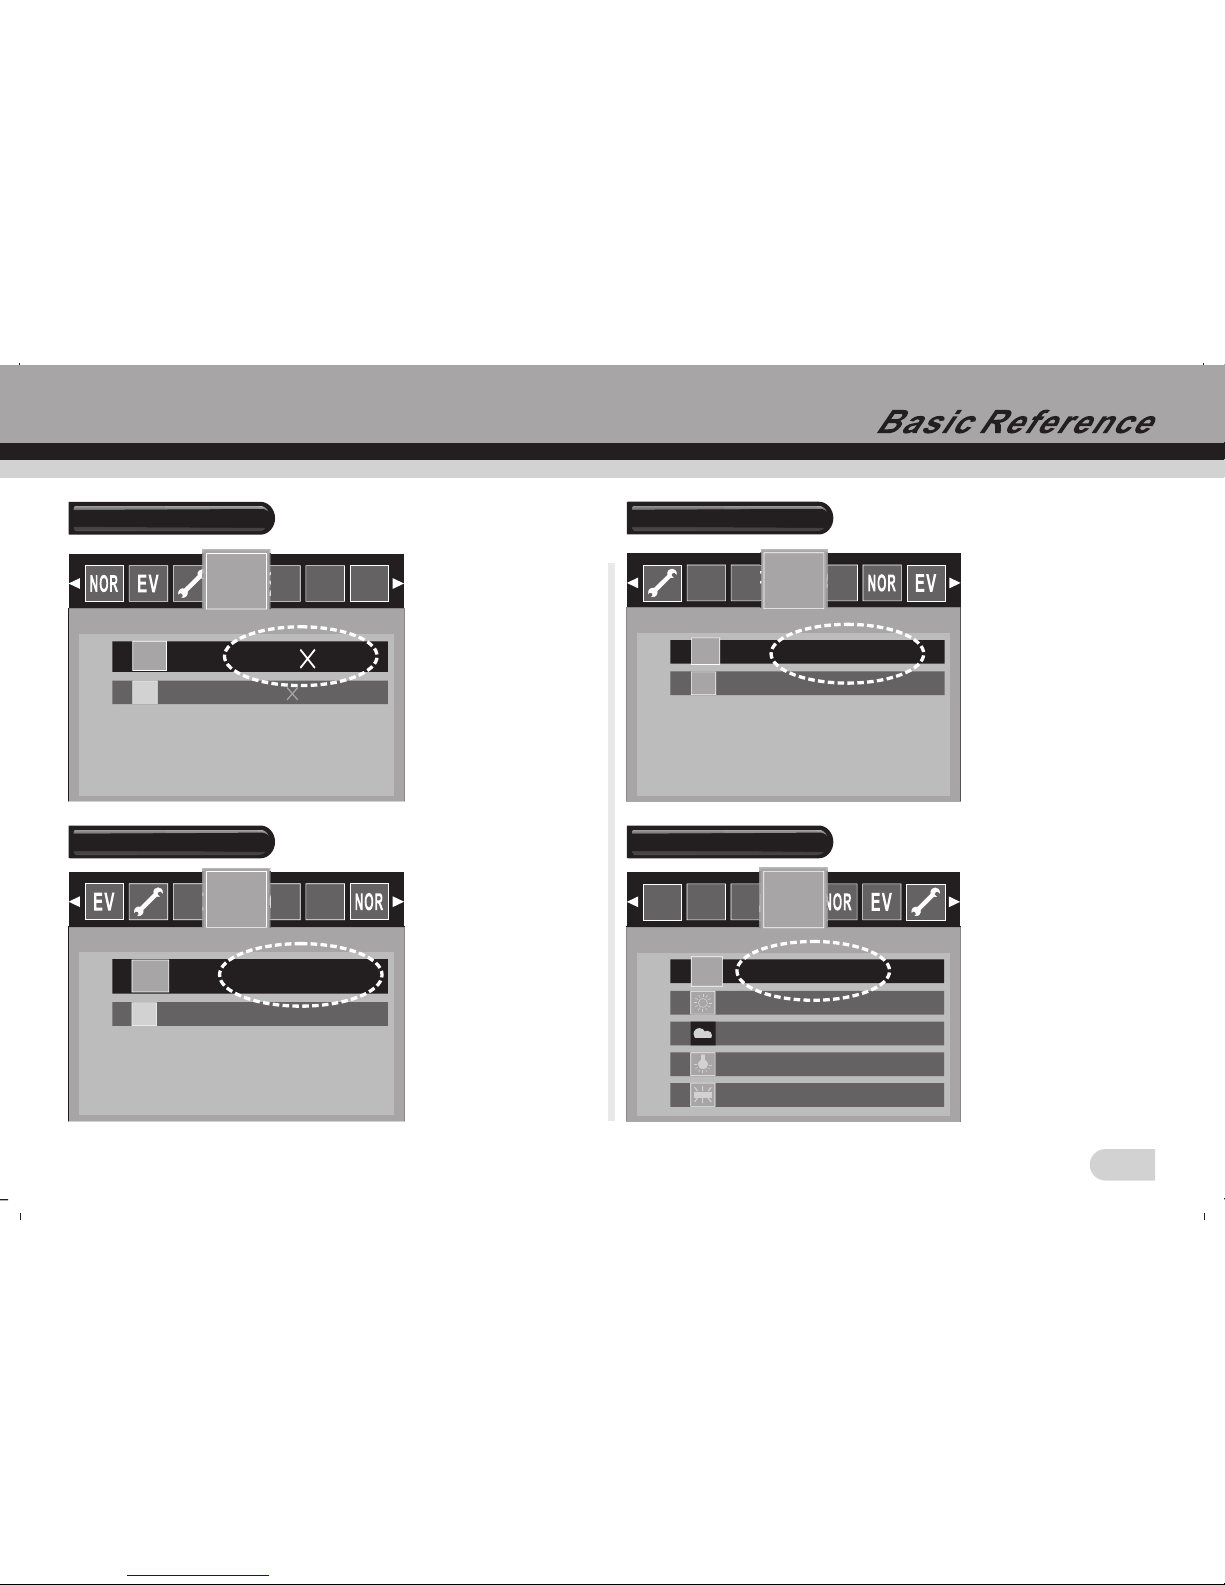
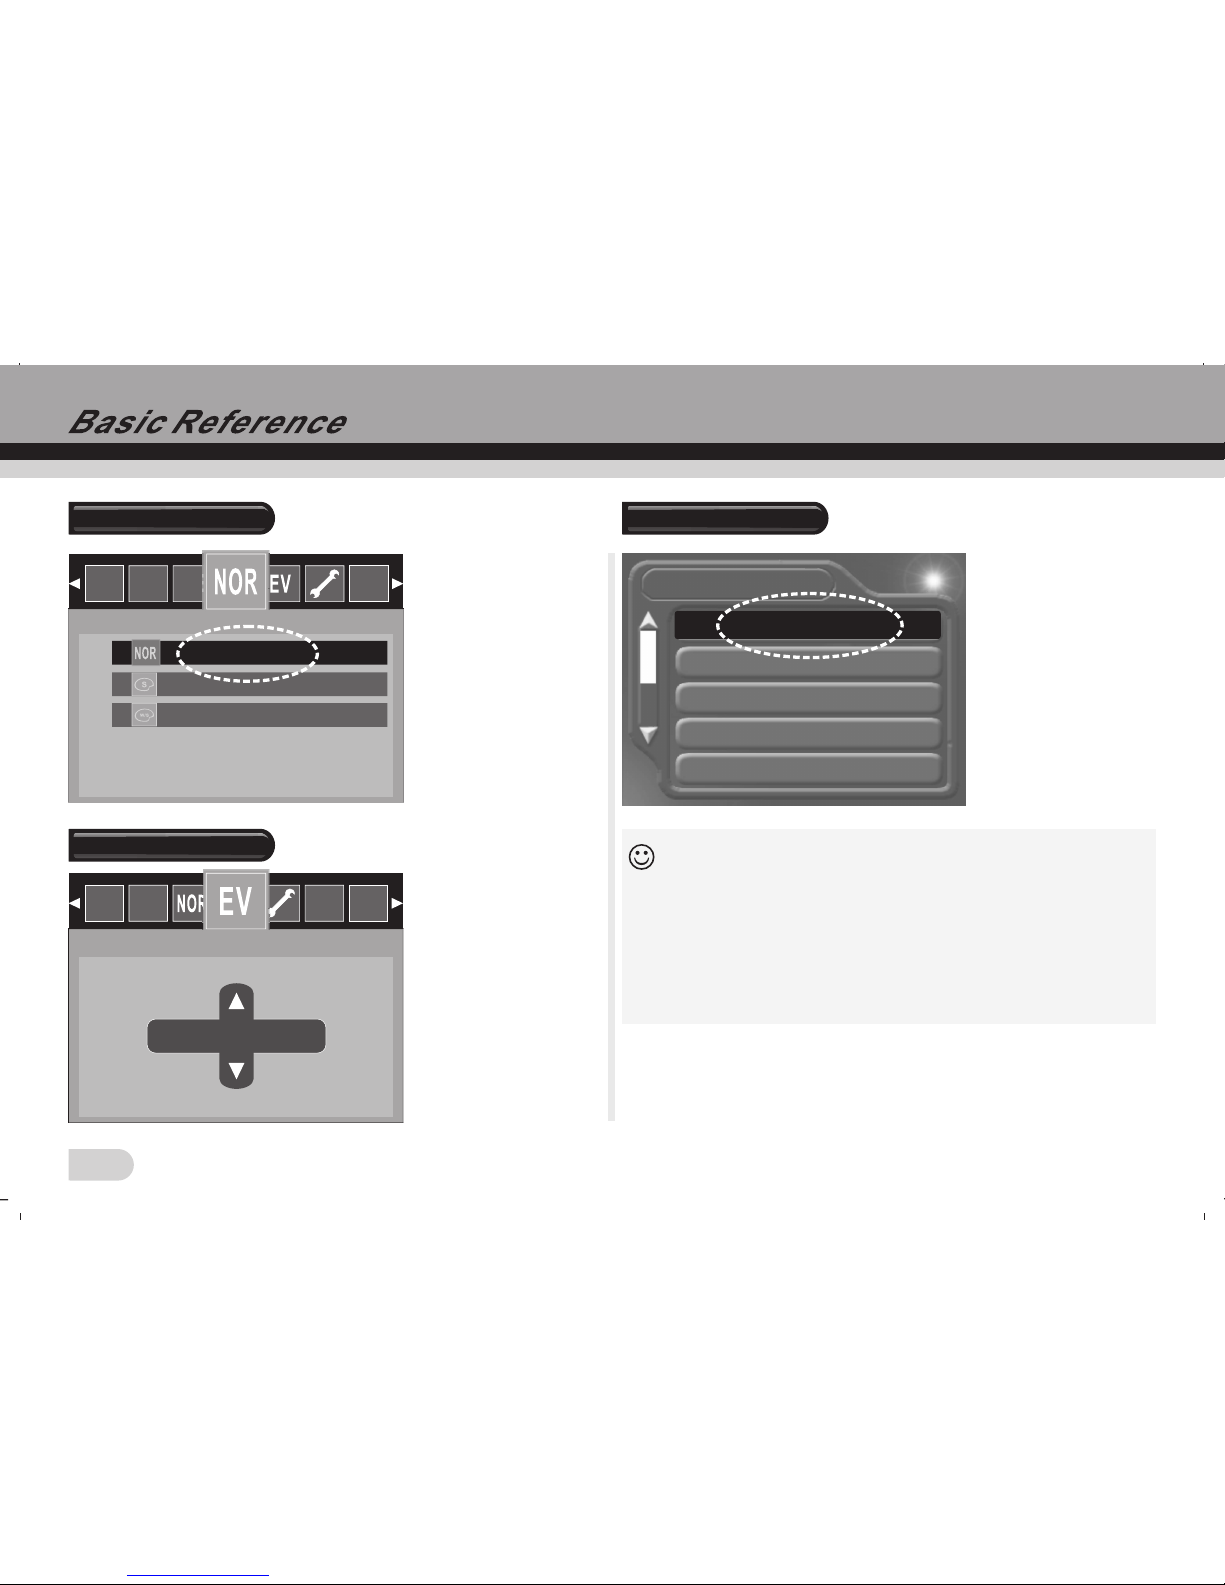
Function: According
to your requirement,
you can select different
capture modes.
Five different effects
can be selected.
-1.5
Function: according
to the current light
source, adjust the
exposure value.
Normally, when the
light is dark, the value
should be plus;
contrarily, should be
minus.
Scene
Scenery
Flower
Night
Function: According
to the different environment, select the
different scenery
mode to make better
picture.
Capture
EV Shift
White Balance
Scene
8
Capture
Single
Continuous
10 Sec.Self-timer
20 Sec.Self-timer
Auto
Sunny
Tungsten
Fluorescent
White Balance
EV Shift
Cloudy
Auto
Page 10
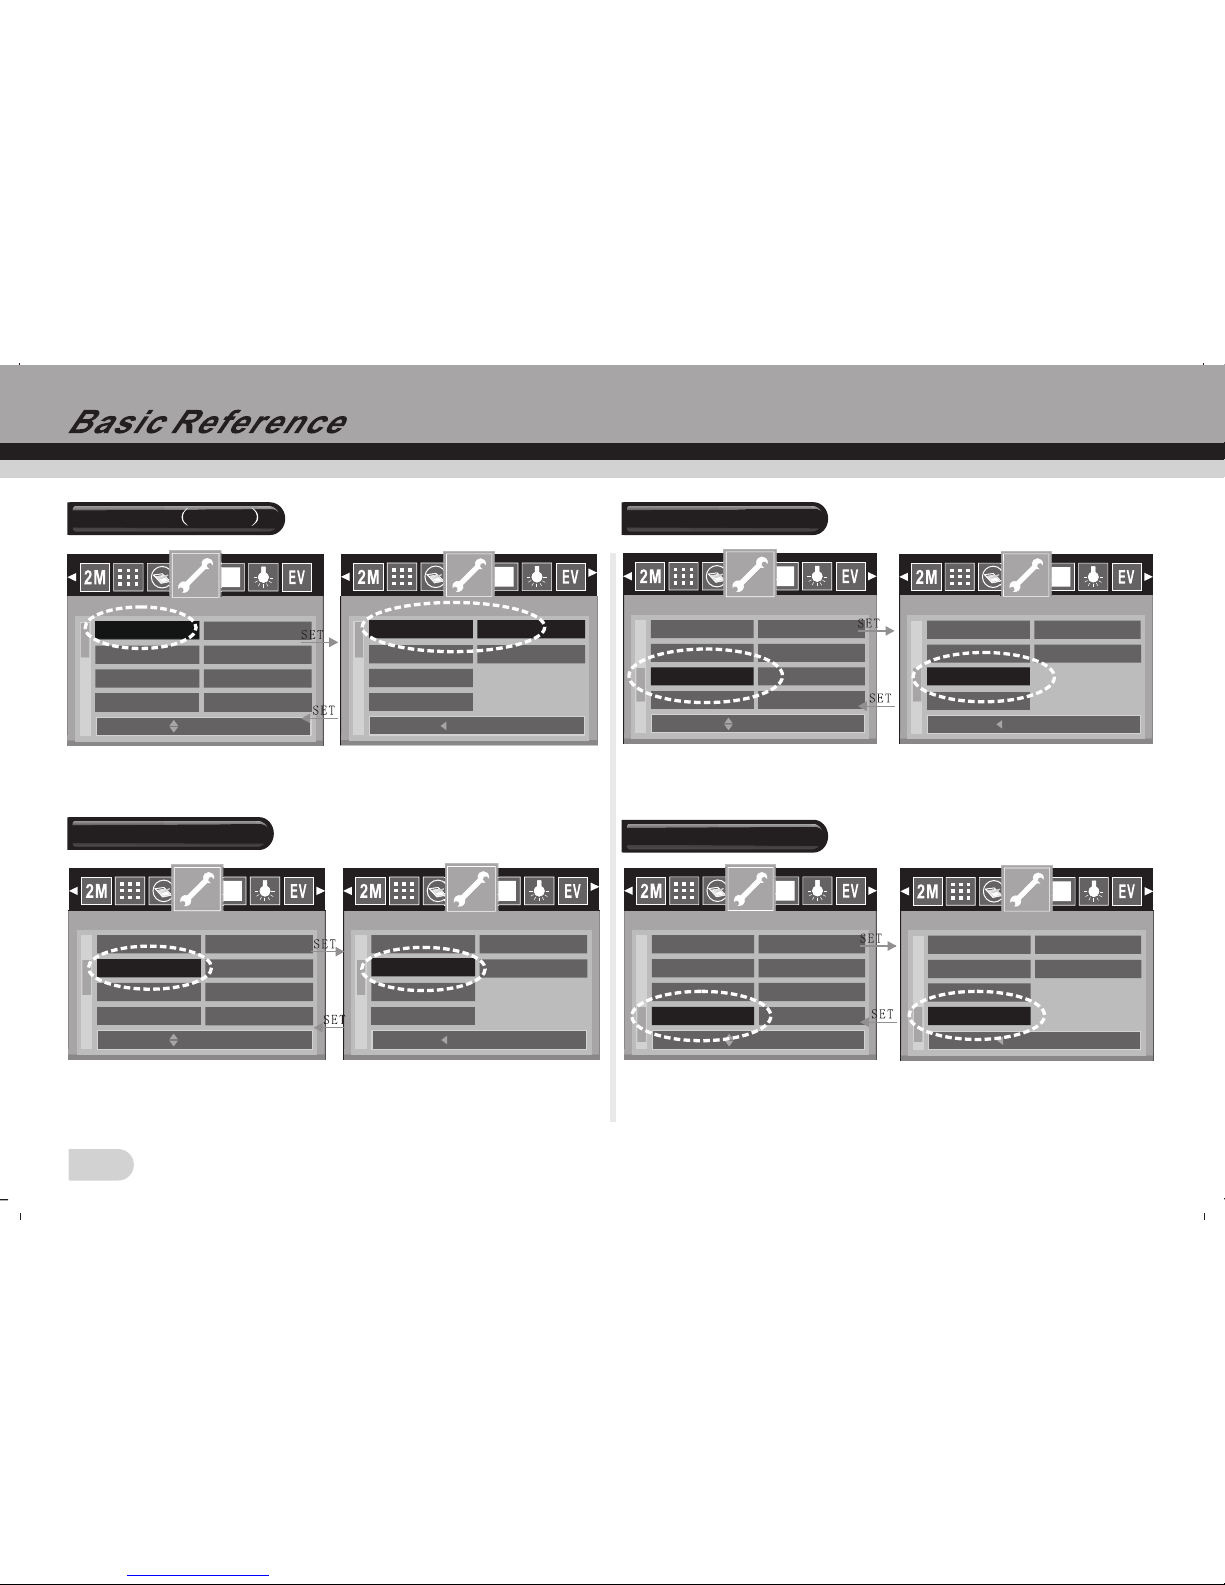
Function: According
to your favourite, set
up different color.
4000 3000
12M
3M
1M
VGA
2048 1536
1024 768
640 480
Function: According
to your requirement,
adjust the different
resolutions.
S.Fine
Normal
Function: Three quality
modes can be selected.
Better quality, the picture
takes more storage.
Color Effect
Resolution
S.Fine
Function: The right
date and time can be
indicated on the picture
or videos you took.
Quality
Time Stamp
9
Sepia
Black
Color Effect
Resolution
Quality
Time Stamp
Color
Fine
2M
1600 1200
Fine
Page 11
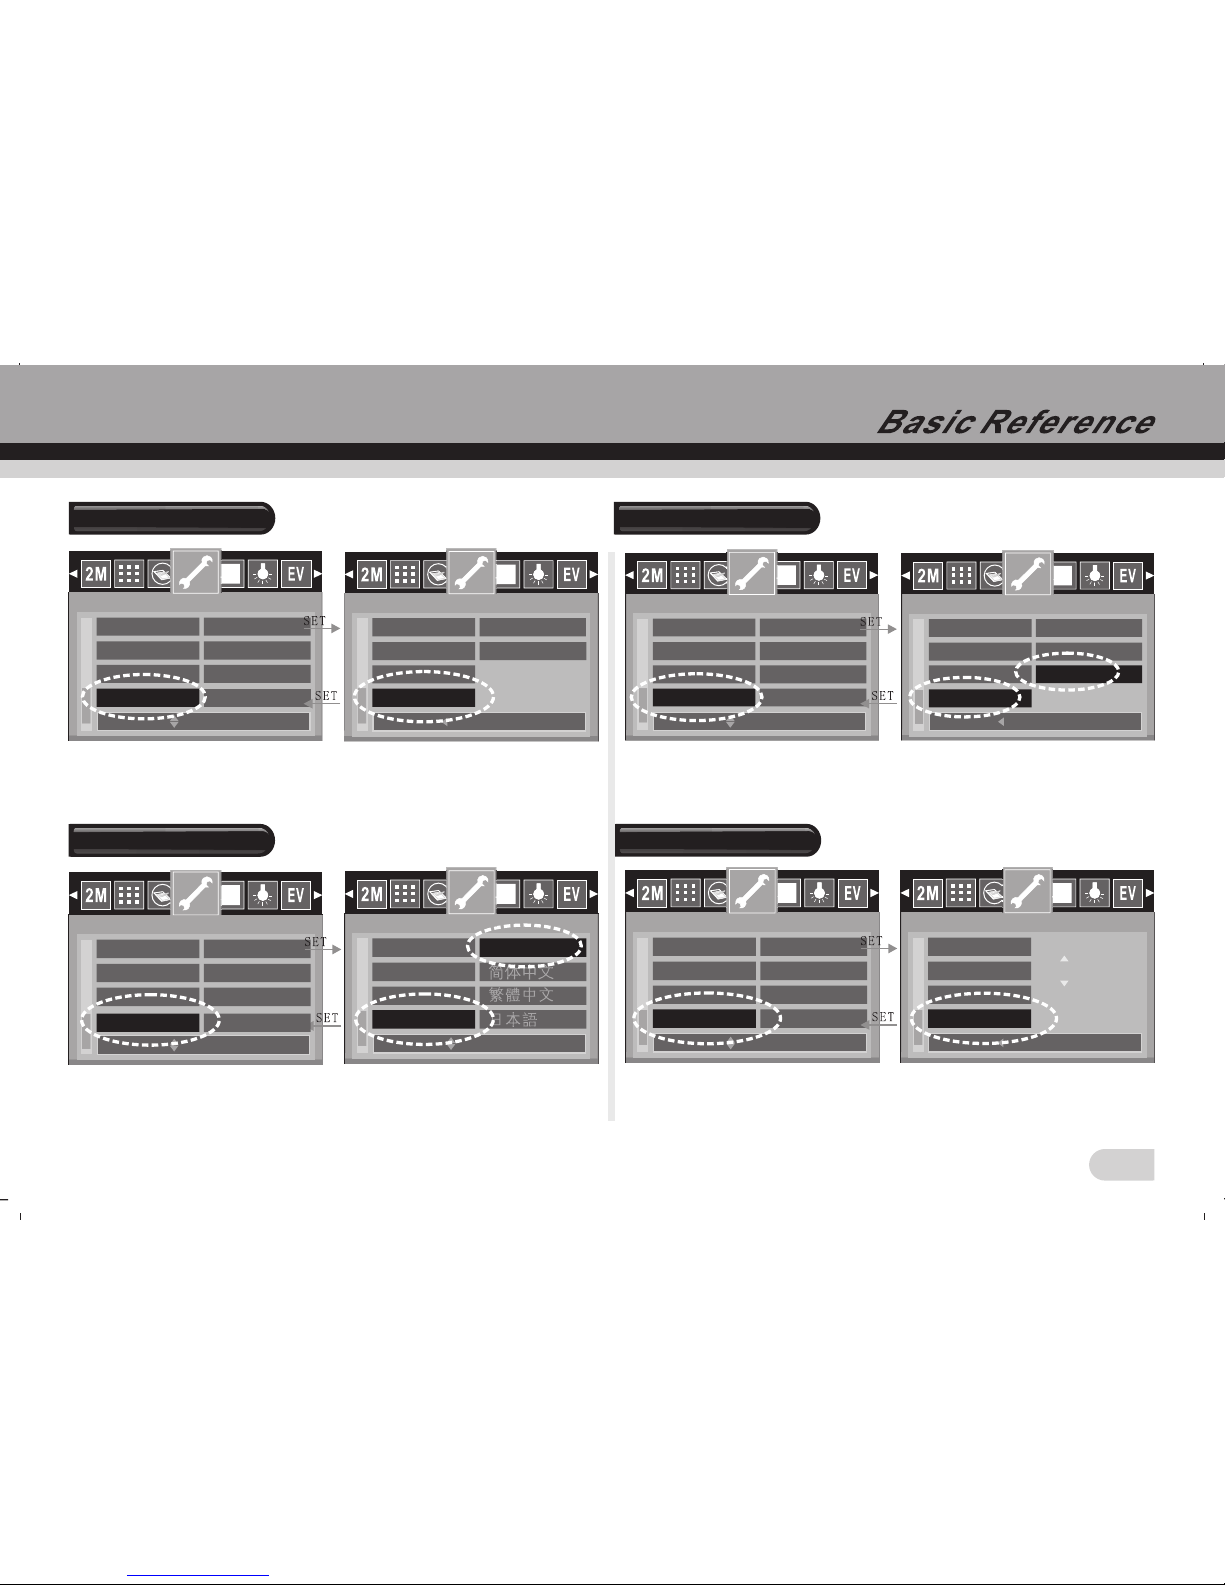
Function: Beep in use can convenience to make sure your
operations to the menu have been done.
Function: When this mode is set on, a logo which appointed by
the system will show when the digital video is turned on.
SET UP Beep
10
Animation
Frequency
Beep
Animation
Frequency
Format
ON
ON
60Hz(US)
No
Move :
Modify : OK
Animation
Frequency
Format
Back :
OFF
Set : OK
SET UP
SET UP
Function: According to the different light source, you can set up
the right flicker frequency to make sure the image and monitor
screen be in the best work studio.
Function: Format the current media deletes any data including
protected images stored in it. Note that the data deleted by
formatting cannot be recovered. Check to make sure you do not
need any of the data in memory before you format it.
Format
Beep
Animation
Format
Back :
50Hz(EU)
Set : OK
60Hz(US)
Beep
Animation
Format
Move :
ON
ON
60Hz(US)
No
Modify : OK
SET UP
SET UP
Beep
Animation
Frequency
Back :
Yes
Set : OK
Beep
Animation
Frequency
Move :
ON
ON
60Hz(US)
No
Modify : OK
No
SET UP
SET UP
Beep
Animation
Frequency
Format
Move :
ON
Modify : OK
ON
60Hz(US)
No
Beep
Frequency
Format
Back :
ON
Set : OK
OFF
SET UP
SET UP
Animation
Beep
ON
Frequency
Frequency
Format
Format
Page 12
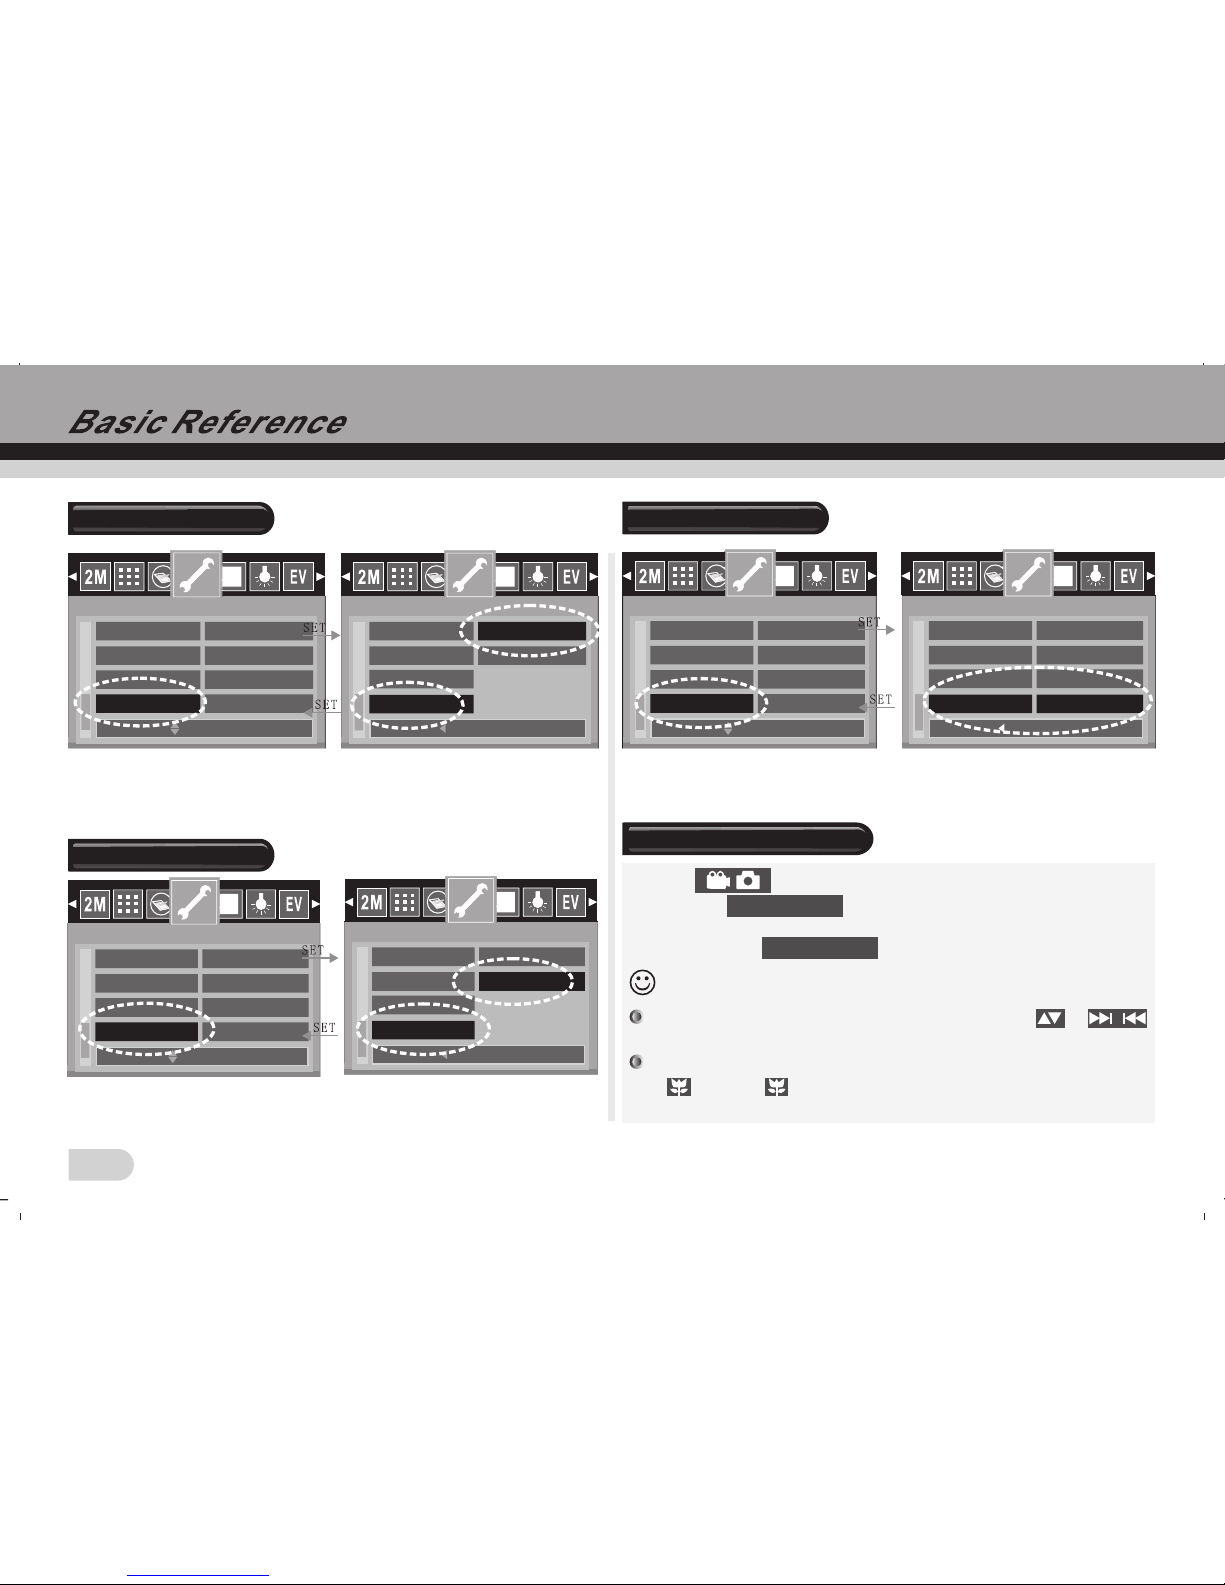
Function: Default settings can make the Digital Video system back
to the factory setting.
Function: You can select your native language in eight supported
language.
Function: This function enables you to save power.
Function: The right date and time can be indicated on the picture
or videos you took..
11
Default
Language
Sleep
DATE TIME
Animation
Frequency
Format
Back :
SET UP
Set : OK
Animation
Frequency
Format
Move :
ON
60Hz(US)
No
Modify : OK
Cancel
Cancel
Default
SET UP
Default
SET UP
Frequency
Format
Move :
ON
50Hz(EU)
Modify : OK
Default
Cancel
Frequency
Format
Default
English
Move :
Modify : OK
Language
SET UP
Language
English
SET UP
Format
Move :
ON
Modify : OK
Default
Language
Cancel
OFF
Back :
Set : OK
Format
Default
Language
1 min
2 min
English
Sleep
SET UP
SET UP
Sleep
OFF
Move :
OFF
Modify : OK
Default
Sleep
Cancel
2006/03/15
English
Language
Default
Sleep
2006 03 15
Language
00:29
Back :
Set : OK
DATE TIME
SET UP
DATE TIME
SET UP
Page 13
Function: This digital video can work cooperating with external
SD disk. Via the digital video, you can browse the pictures,
listen to the MP3 music and transfer the files.
Function: You can select the right TV-OUT system to fit your
TV set. ( The TV-OUT system for US is NTSC.)
Function: You can check or update the firmware version of your
digital video system.
Recording a video
12
Media
TV-OUT
Version
Move :
Modify : OK
Language
English
Sleep
DATE TIME
Internal Flash
OFF
2006/03/15
Back :
Set : OK
External Card
Language
Sleep
DATE TIME
Media
SET UP
Internal Flash
Media
SET UP
Move :
Modify : OK
Sleep
DATE TIME
Media
Internal Flash
PAL
Back :
Set : OK
Bright
DATE TIME
Media
NTSC
OFF
2006/03/15
TV-OUT
SET UP
TV-OUT
PAL
SET UP
Move :
Modify : OK
DATE TIME
Media
Internal Flash
TV-OUT
PAL
2368F3620AA115-C
2006/03/15
Back :
Set : OK
DATE TIME
Media
PAL
2006/03/15
TV-OUT
YES
Version
SET UP
2368F3620AA115-C
Version
SET UP
1.Press to enter the video mode.
2.Press the to release button fully to start video
recording. A red dot and the recording time will appear on the
display Press again to stop video recording.
In recording mode, holding down the telephoto or
side of zoom button can zoom in or zoom Out.
When shooting a close subject, please turn the macro switch
to , an icon will appear on the display. The distance of
macro is 0.20m~0.30m.
[]
[SHUTTER]
[SHUTTER]
Note:
Page 14
Function: According to
your requirement, set
the resolutions of the
movie. Larger resolution,
shorter time movie could
be taken.
Resolution
Function: According to
your requirement, set
the frame rate of the
movie. Larger rate,
shorter time movie can
be taken.
Frame Rate
Function: You can take
movie in mute or with
audio.
Audio
White Balance
Function: The digital
video offers five effects
for the movie. You can
select the right one
according to your
current environment.
13
ON
AWB
30
F
320
320 240
640 480
640
640
Resolution
640
ON
AWB
15
F
15FPS
30FPS
30
F
30
F
Frame Rate
640
AWB
OFF
30
F
OFF
ON
ON
ON
Audio
640
ON
30
F
Sunny
Cloudy
Tungsten
Fluorescent
Auto
AWB
AWB
White Balance
Page 15
Function: According
to your favourite,
setup different color.
Function: according
to the current light
source, adjust the
exposure value.
Normally, when the
light is dark, the value
should be plus;
contrarily, should be
minus.
Color Effect
PC Mode
Pc Camera
Mass Storage
Function: In this mode,
the camera can perform
for PC camera or net
meeting video via
internet.
Note:
1. Press PC button
2. Connect the camera and PC via USB cable
3. Open the software of video impression, the camera
can work as pc camera.
Function: Browse and edit the files in the camera via your
computer.
14
EV Shift
PC Mode
ON
AWB
30
F
Sepia
640
Black
Color
Color Effect
0.0
AWB
ON
640
30
F
EV Shift
Page 16
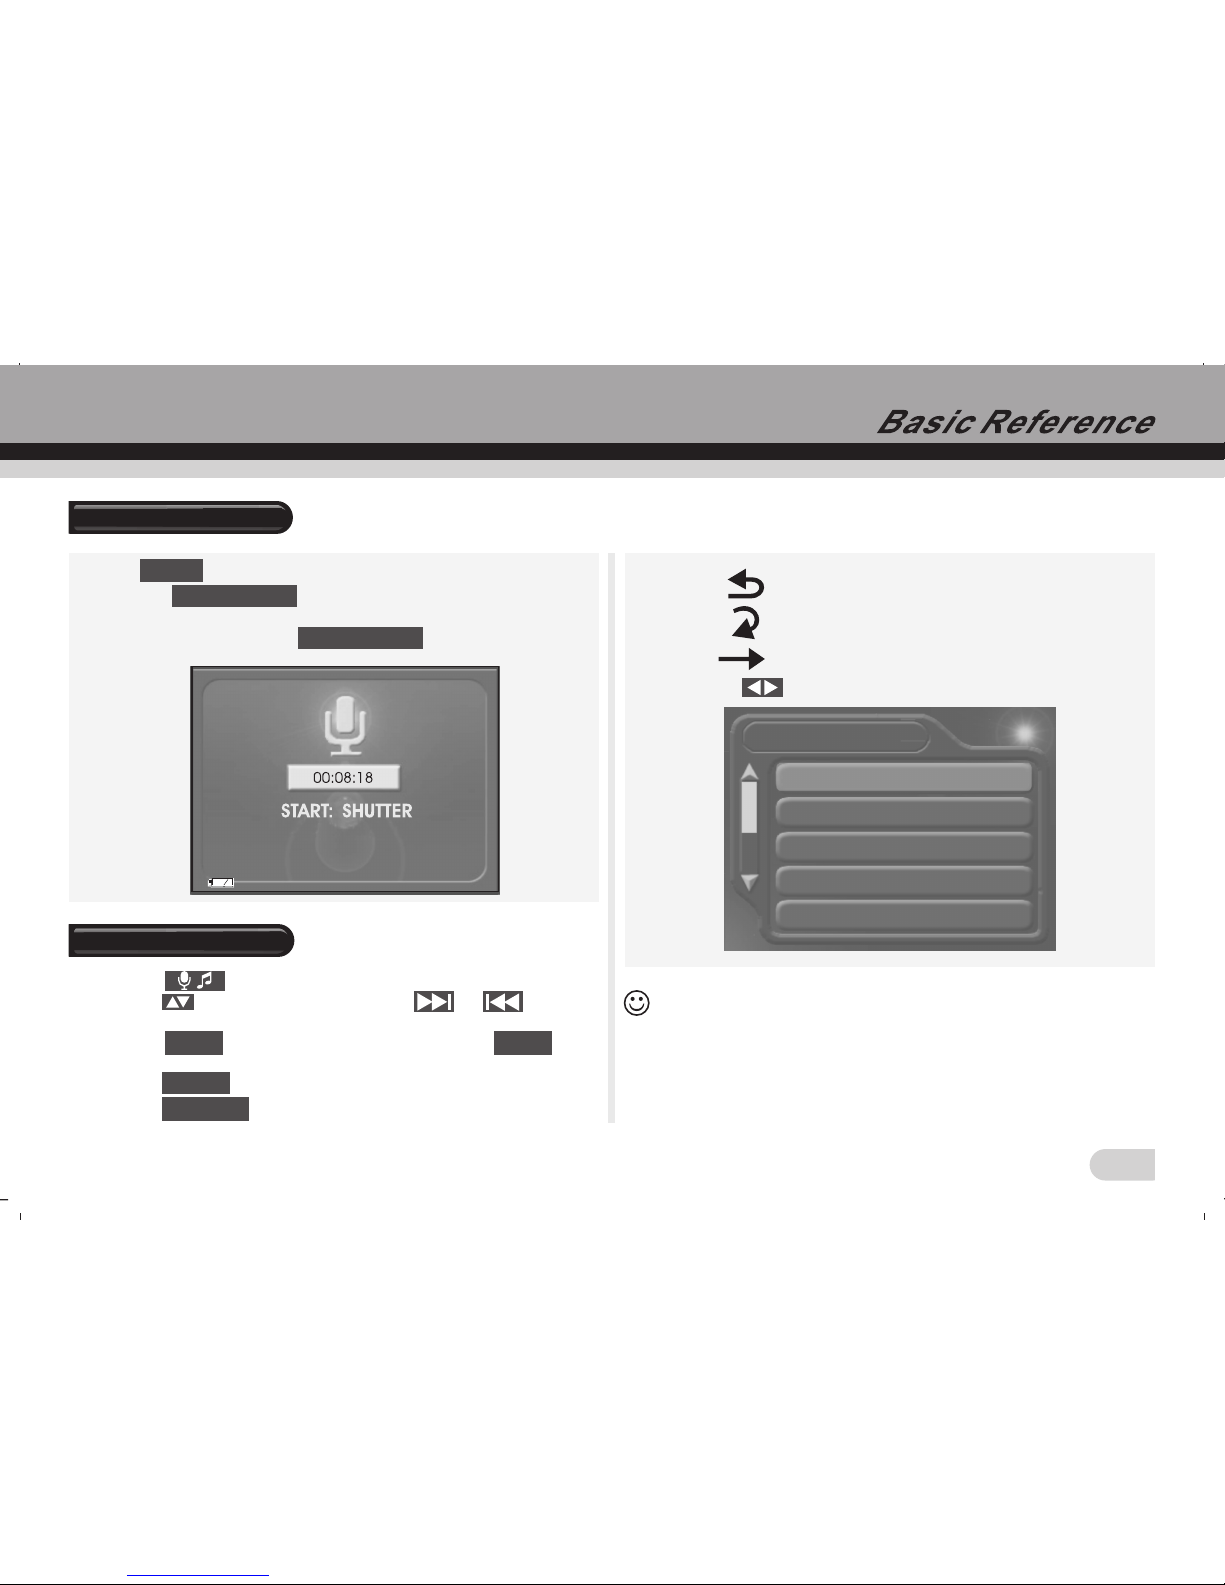
1. Press button, select voice recording.
2. Press the release button fully to start voice
recording. The recording time will appear on the display and
the recording time. Press again to stop
recording.
Recording Voice
Playing Mp3 files
1. Press button, enter Mp3 player mode.
2. Press to select Mp3 file or press or to select
Mp3 file.
3. Press to start player music. And press again
to stop.
Press to pause playing.
Press to select play mode:
Play the files circularly
Repeat the current file
Play all file one time
Press to adjust the volume.
Mp3
NO FILE
When you use MP3 from pc to digital camera and SD card: select
mass storage in pc mode. Connect the digital camera with pc via
USB cable. In the pc path: My computer/ Removable disk. Create
a folder name MP3. Copy your selected files into this folder.
15
[Mp3]
[SHUTTER]
[SHUTTER]
[ ]
[SET] [SET]
[DISP]
[MENU]
NOTE:
Page 17
Playback
16
Press on the TFT can scroll the image.
When the file is photo format, use or holding down
to enlarge or minify the photo;
When the file is video or voice, press or on
the TFT to start playing, press again to stop.
Holding down or can fast forward or fast
reverses the movie and voice.
1. Press to enter play mode.
2. Use until the image you want to display.
Note:
[ ]
[SET]
USB MODE
In USB mode, you can choose mass storage to use the
camera as a removeable disk, and choose PC camera as
a webcam.
Download photos and video to computer
Install Device Driver for USB Driver only use under
WIN 98 / 2000 XP.
1. Insert CD into CD-ROM.
2. Finish installation according to the indication on screen.
3. Restart your computer.
Connect your computer and camera.
1. Set you camera to USB mode, and choose the mass storage.
2. Connect your computer and camera with the USB cable.
3. Find out the removeable disk in My computer, and the photos
and video you have taken are stored in this path My Computer/
Removable Disk/ DCIM/ 100 coach.
Download photos and video
Have your camera power on and connect it to computer with the
USB cable.Set your camera to PC mode, and choose the mass
storage. Then you can use your camera as a removeable disk.
You can copy the pictures on video that you have taken to your
computer or other CDs.
Mass Storage
Page 18
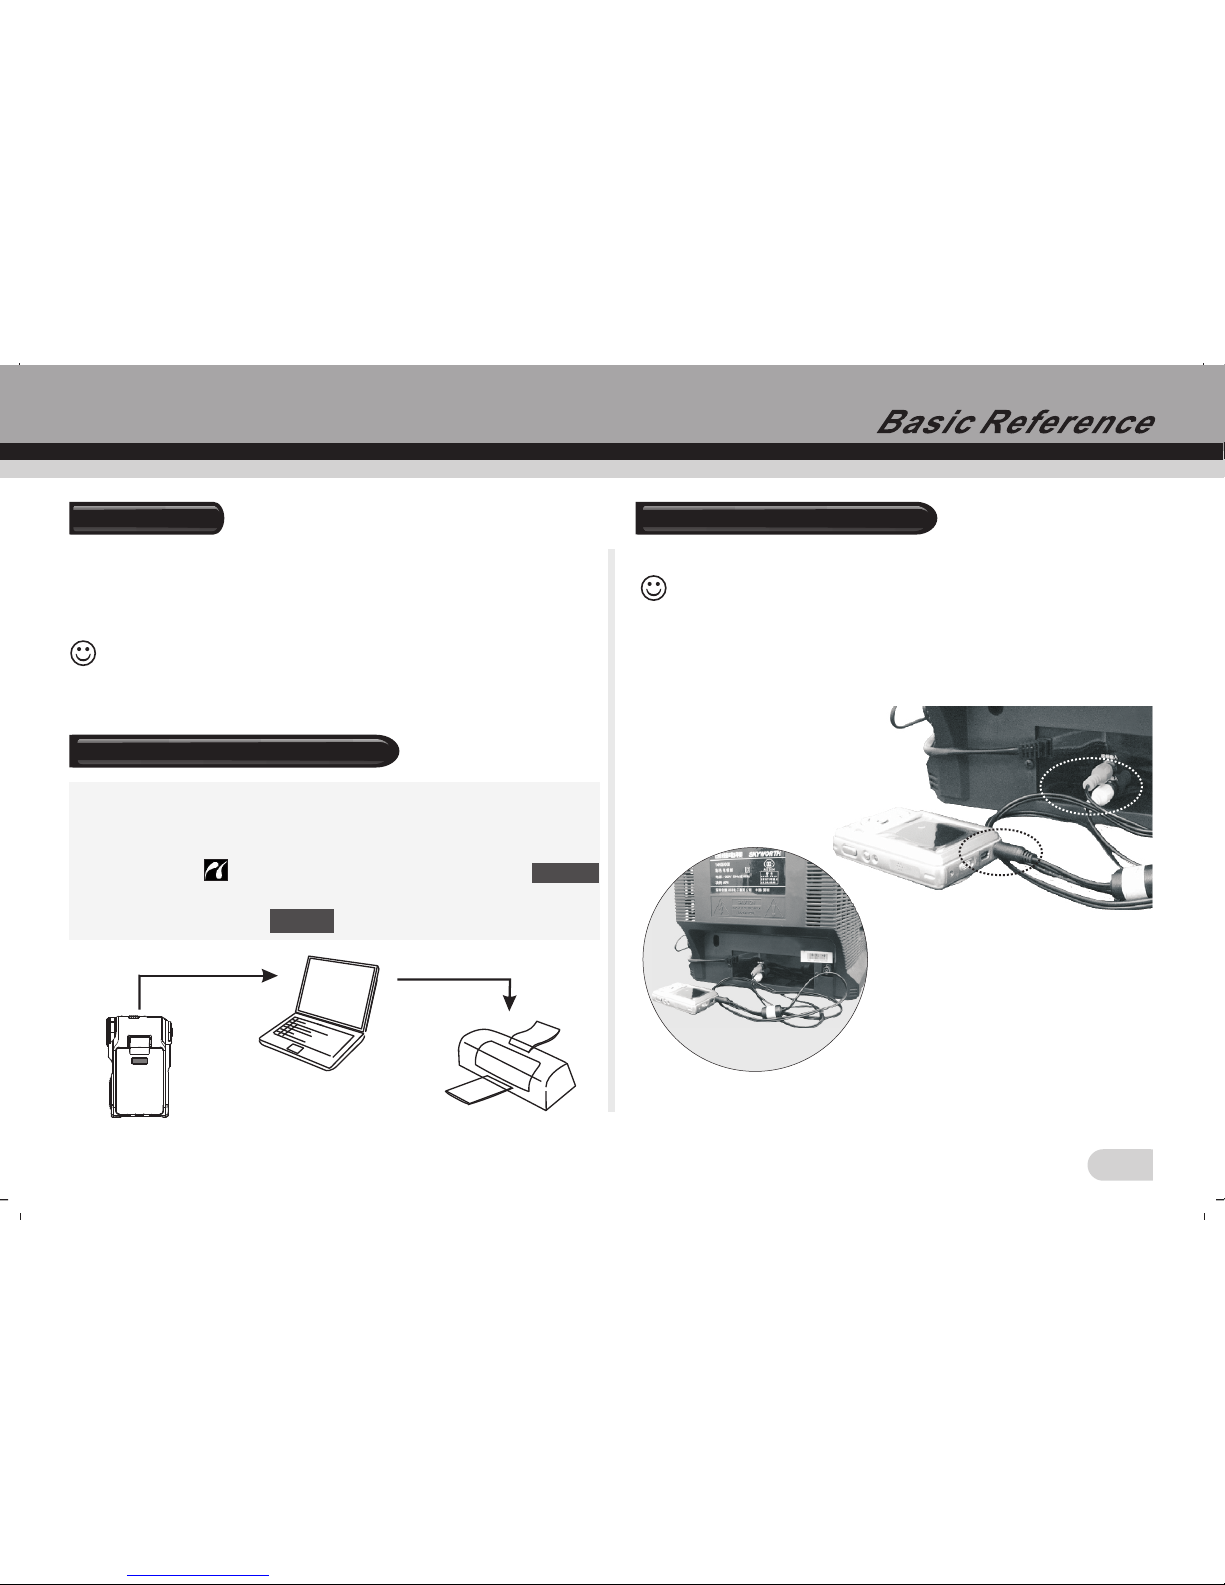
PC camera
1. Have your camera power on. Set your camera to PC mode.
2. Connect your camera and computer with the USB cable.
3. Open the software Video Edit Tool and so on. you can set your
camera to webcam.
17
How to connect with a printer
Print the picture directly via a PictBridge printer. Power-up the
camera, enter Playback mode, choose the Picture which one
will be printed, connect the printer through USB cable; There
will be an icon display on the Left-topcorner, press
button, enter Print Menu. Waiting for the system finish the
operation, and choose to print.
[Menu]
[YES]
You can skip your pictures and videos on TV
Note:
1. Have your camera and TV power on
2. Use the supplied AV cable to connect the TV and camera.
3. Press down the direction button to review the pictures and
vedio on TV.
How to connect with a TV
Note:
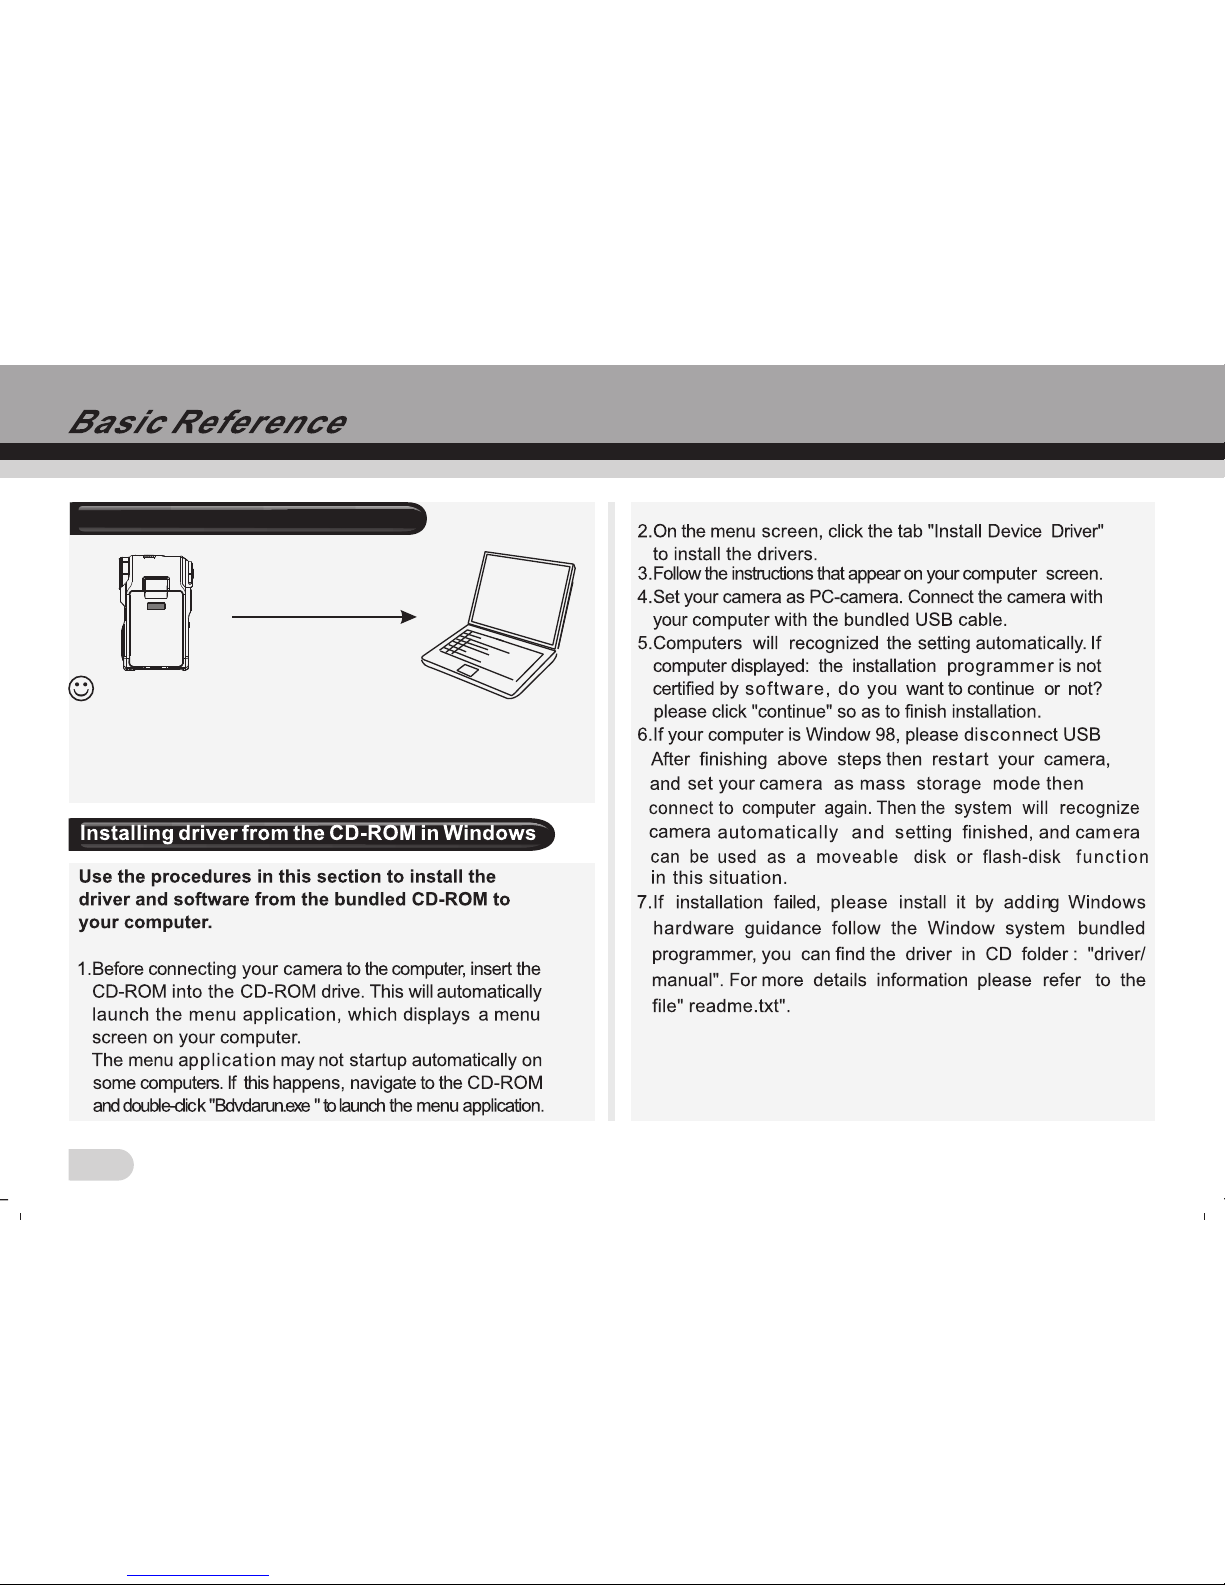
Before Using PC Camera, you should insert CD in CD-ROM
Driver to install Video Edit Tool.
Page 19
18
How to connect with a computer
1. Have the camera and computer on.
2. Choose the USB mode in setup mode and then use the USB
cable to connect the computer and camera. You can download
images to your computer.
Note:
Page 20
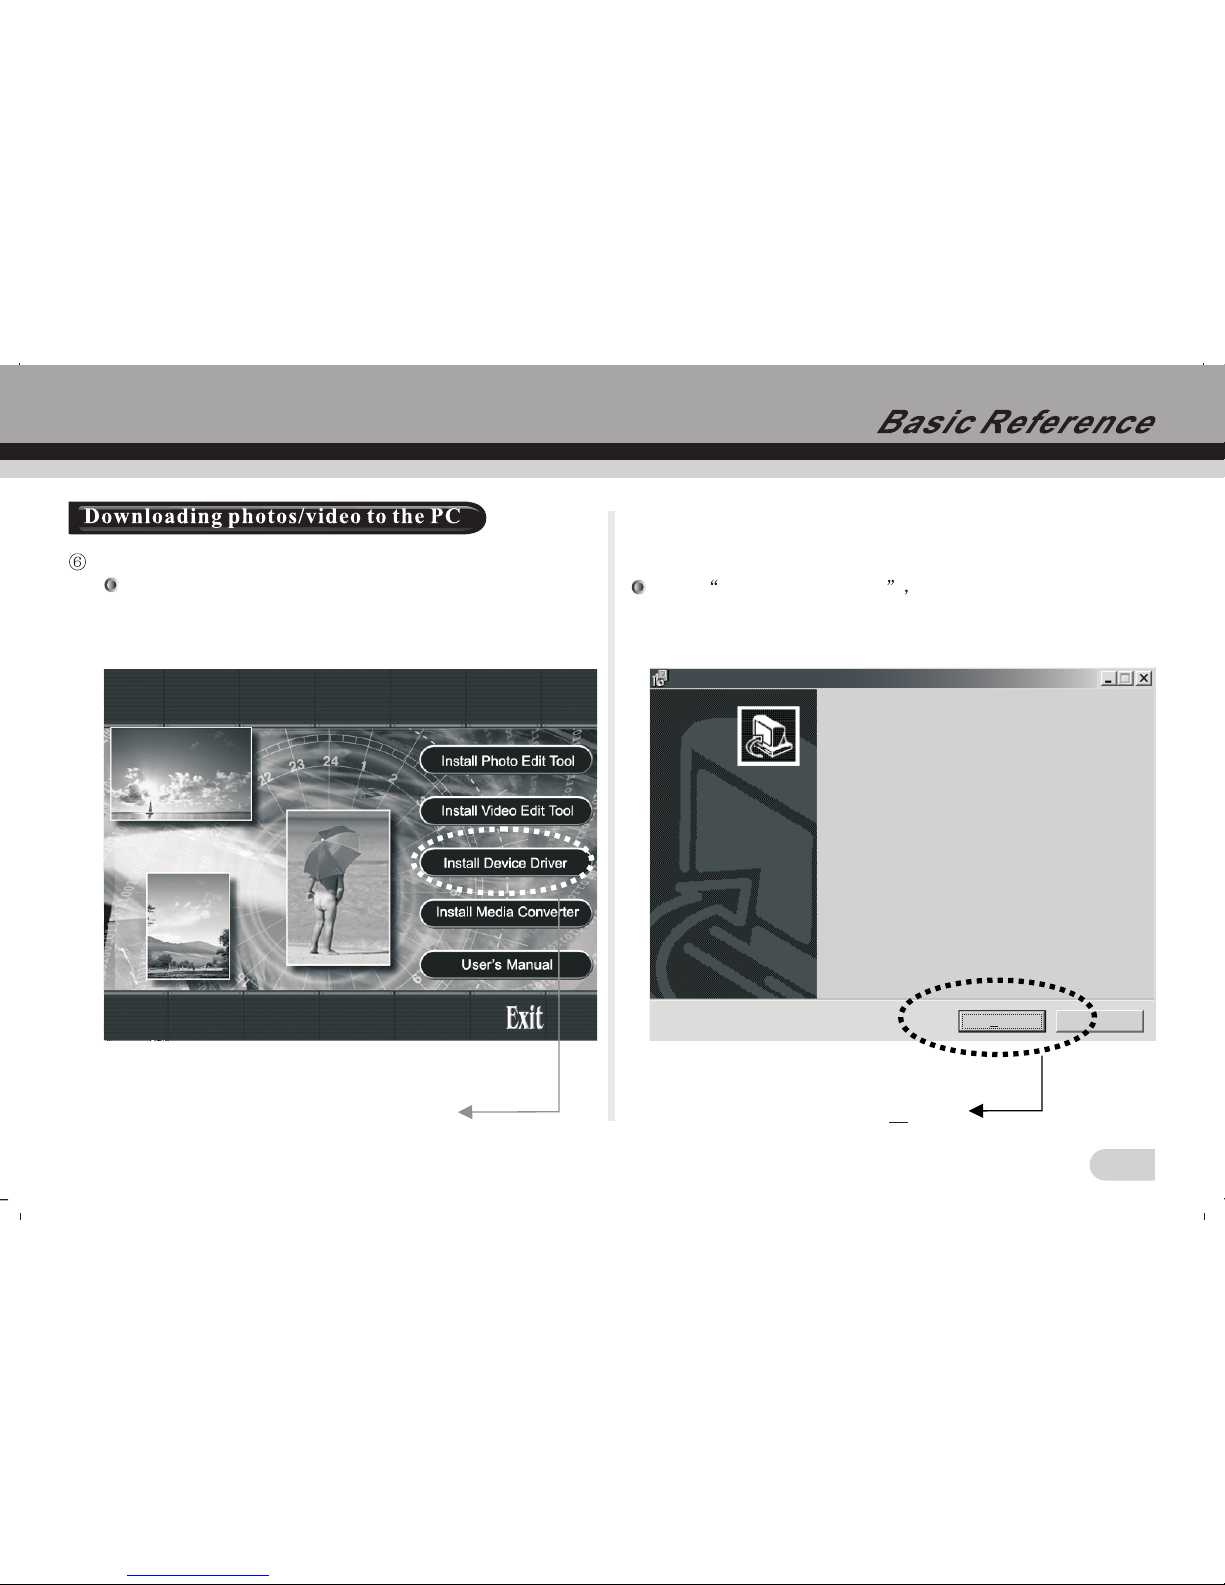
Take Windows XP for example:
Don not connect the camera to computer. Insert the software
CD into the CD-ROM, and the CD will run automatically.
Following dialog box appears:
Set up- Video Camera Drivers
Welcome to the Video Camera
Drivers set up wizard
This will install Video Camera Drivers V1.0 on your computer.
It is recommended that you close all other applications before
continuing.
Click Next to continue, or cancel to exit setup.
Next
Cancel
Chick Install Device Driver and the following dialog box
appears:
Next
19
Install Device Driver
Page 21
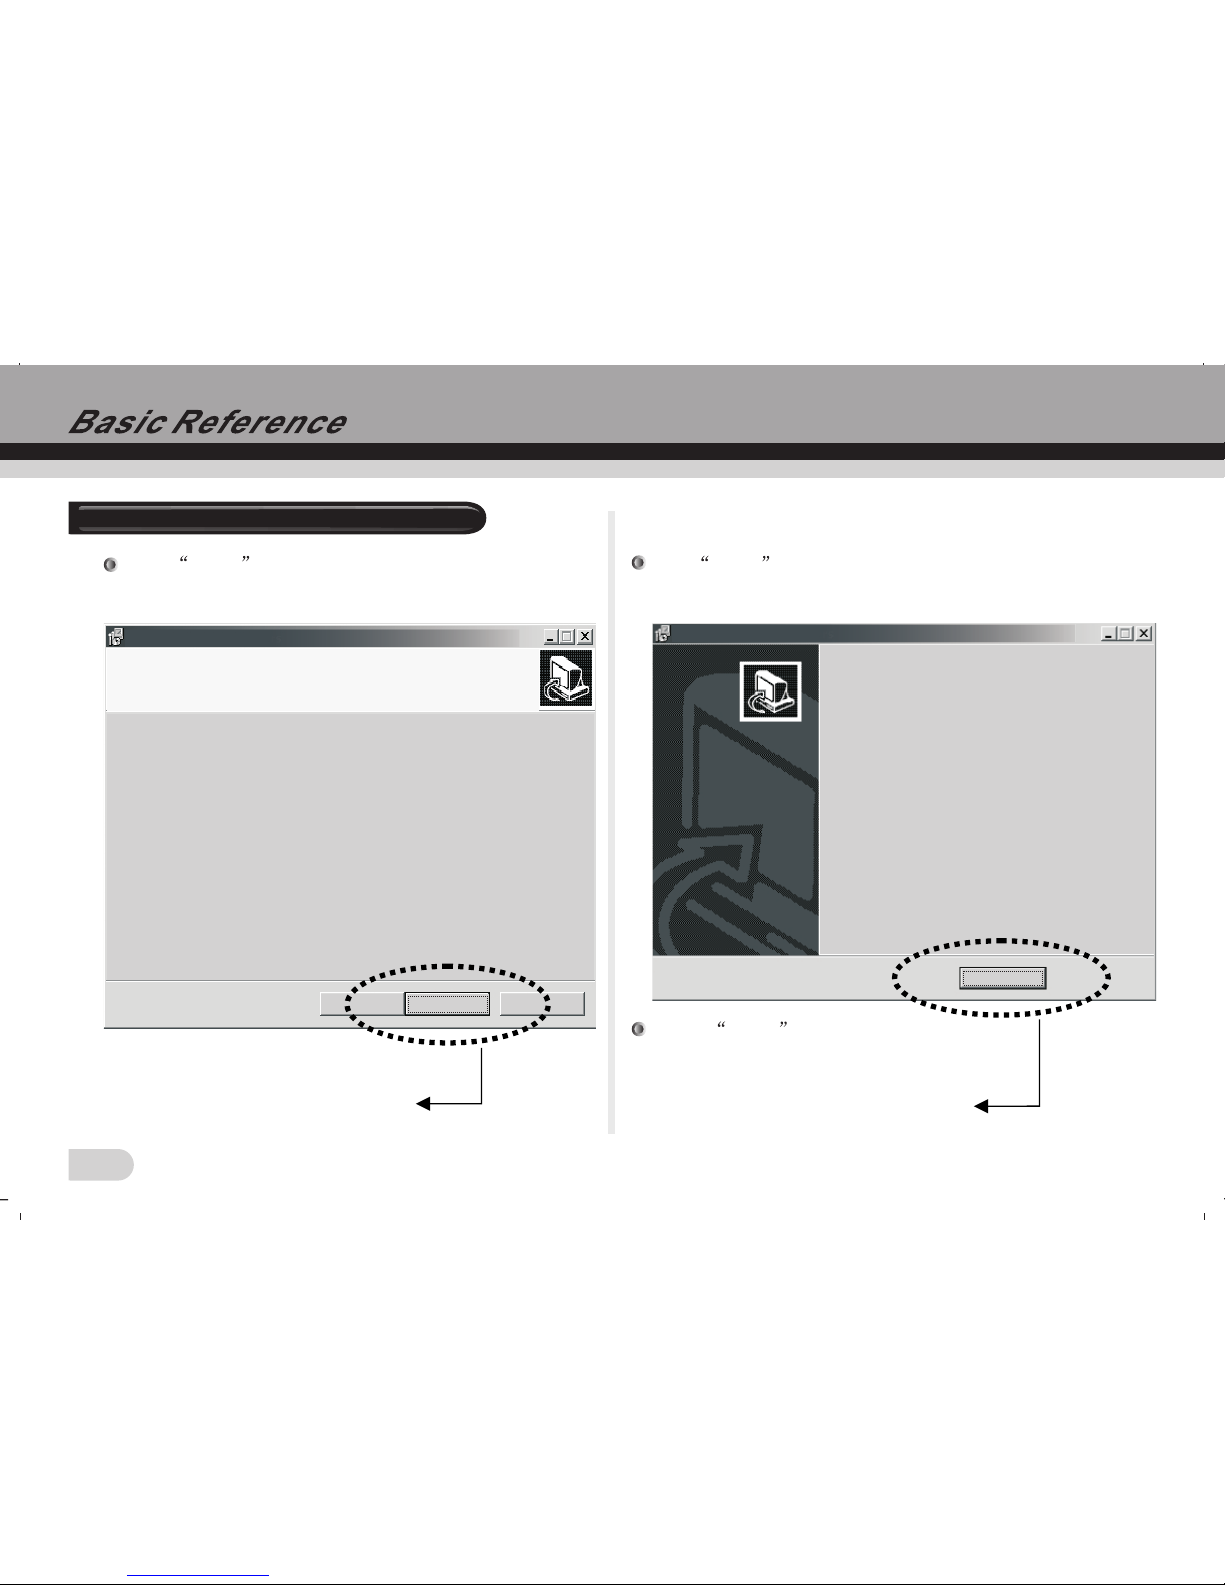
Set up- Video Camera Drivers
Ready to Install
Set up is now ready to begin installing Video Camera Drivers on you computer.
Click Install to continue with the installation.
< Back(B)
Install(i) Cancel
Downloading photos / video to the PC
Click NEXT , the following dialog box appears:
Set up- Video Camera Drivers
Completing the Video Camera
Drivers set up wizard
Set up has finished installing Video Camera Drivers on your
computer
Click Finish to exit setup.
Finish
Click Install to copy the document, the following dialog box
appears:
Select Finish .
Install(i)
Finish
20
Page 22
21
Set up- Video Camera Drivers
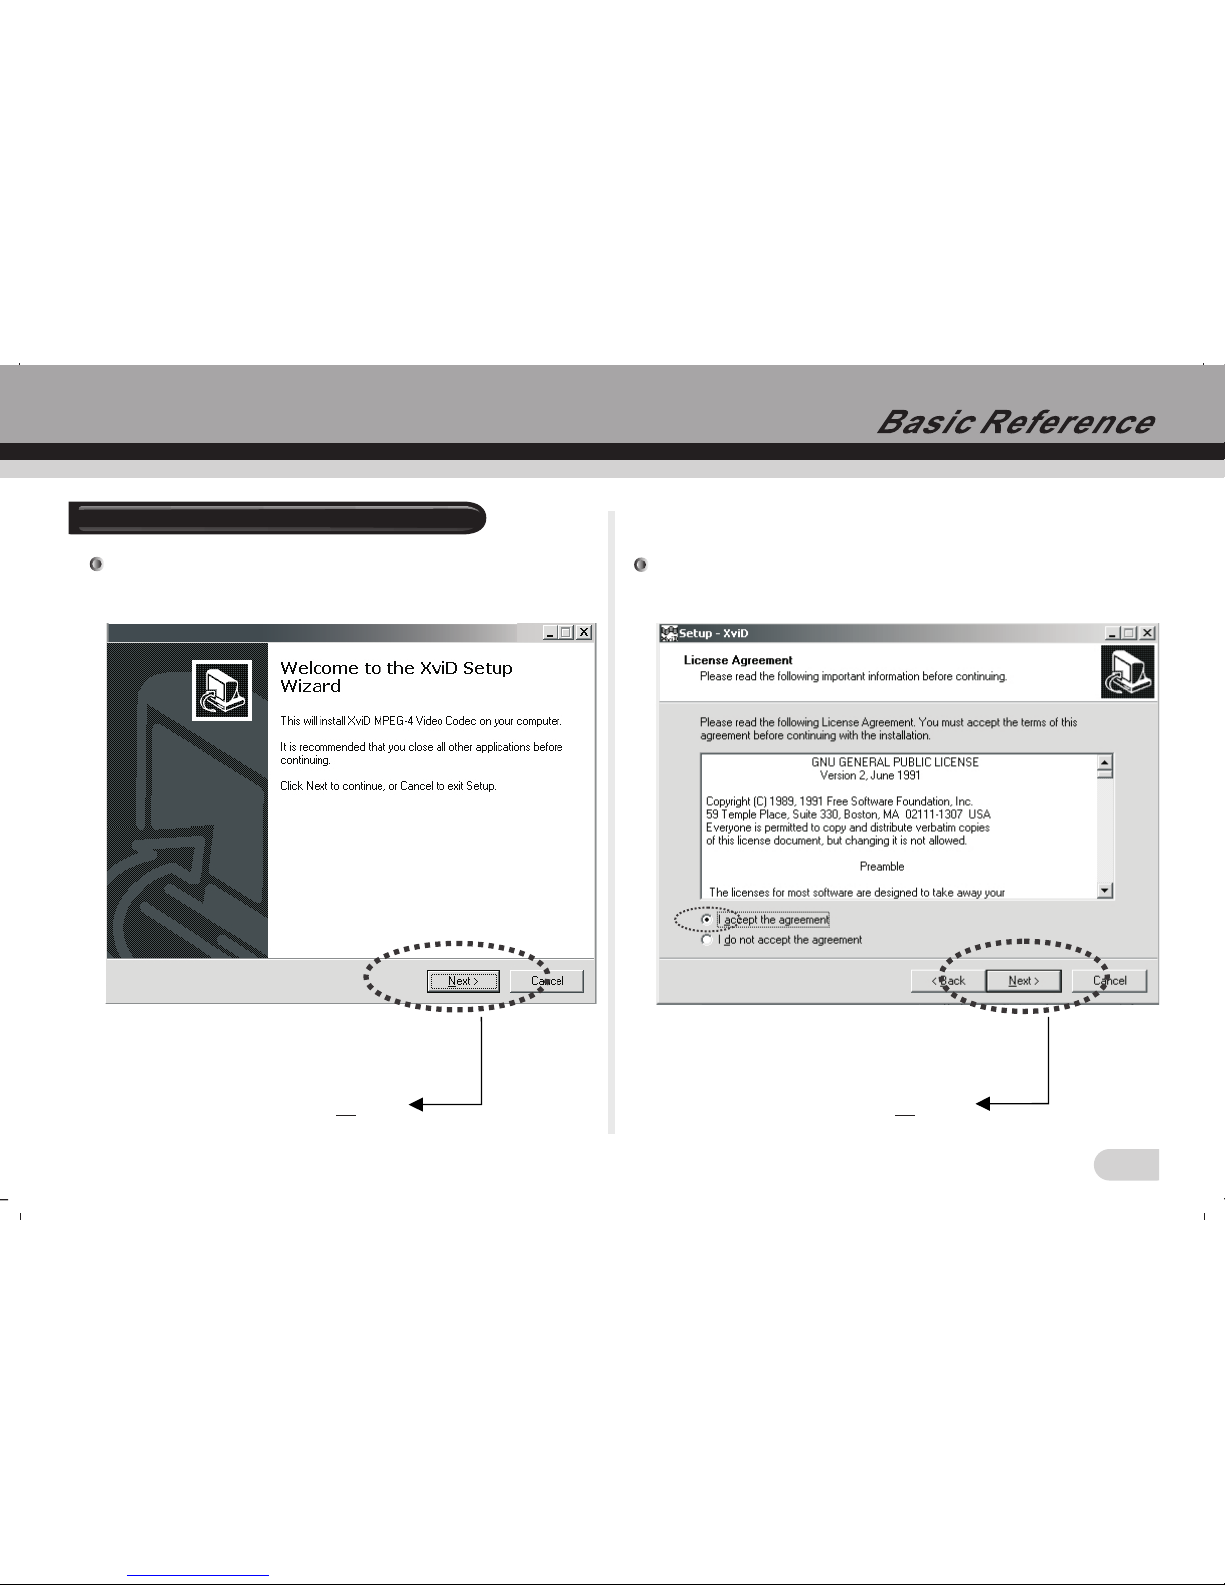
Welcome to the Xvid Setup Wizard, click NEXT tocontinue.
Downloading photos / video to the PC
Next
Please read the following License Agreement. You must accept
the terms of this agreement before continuing with the installation.
Next
Page 23
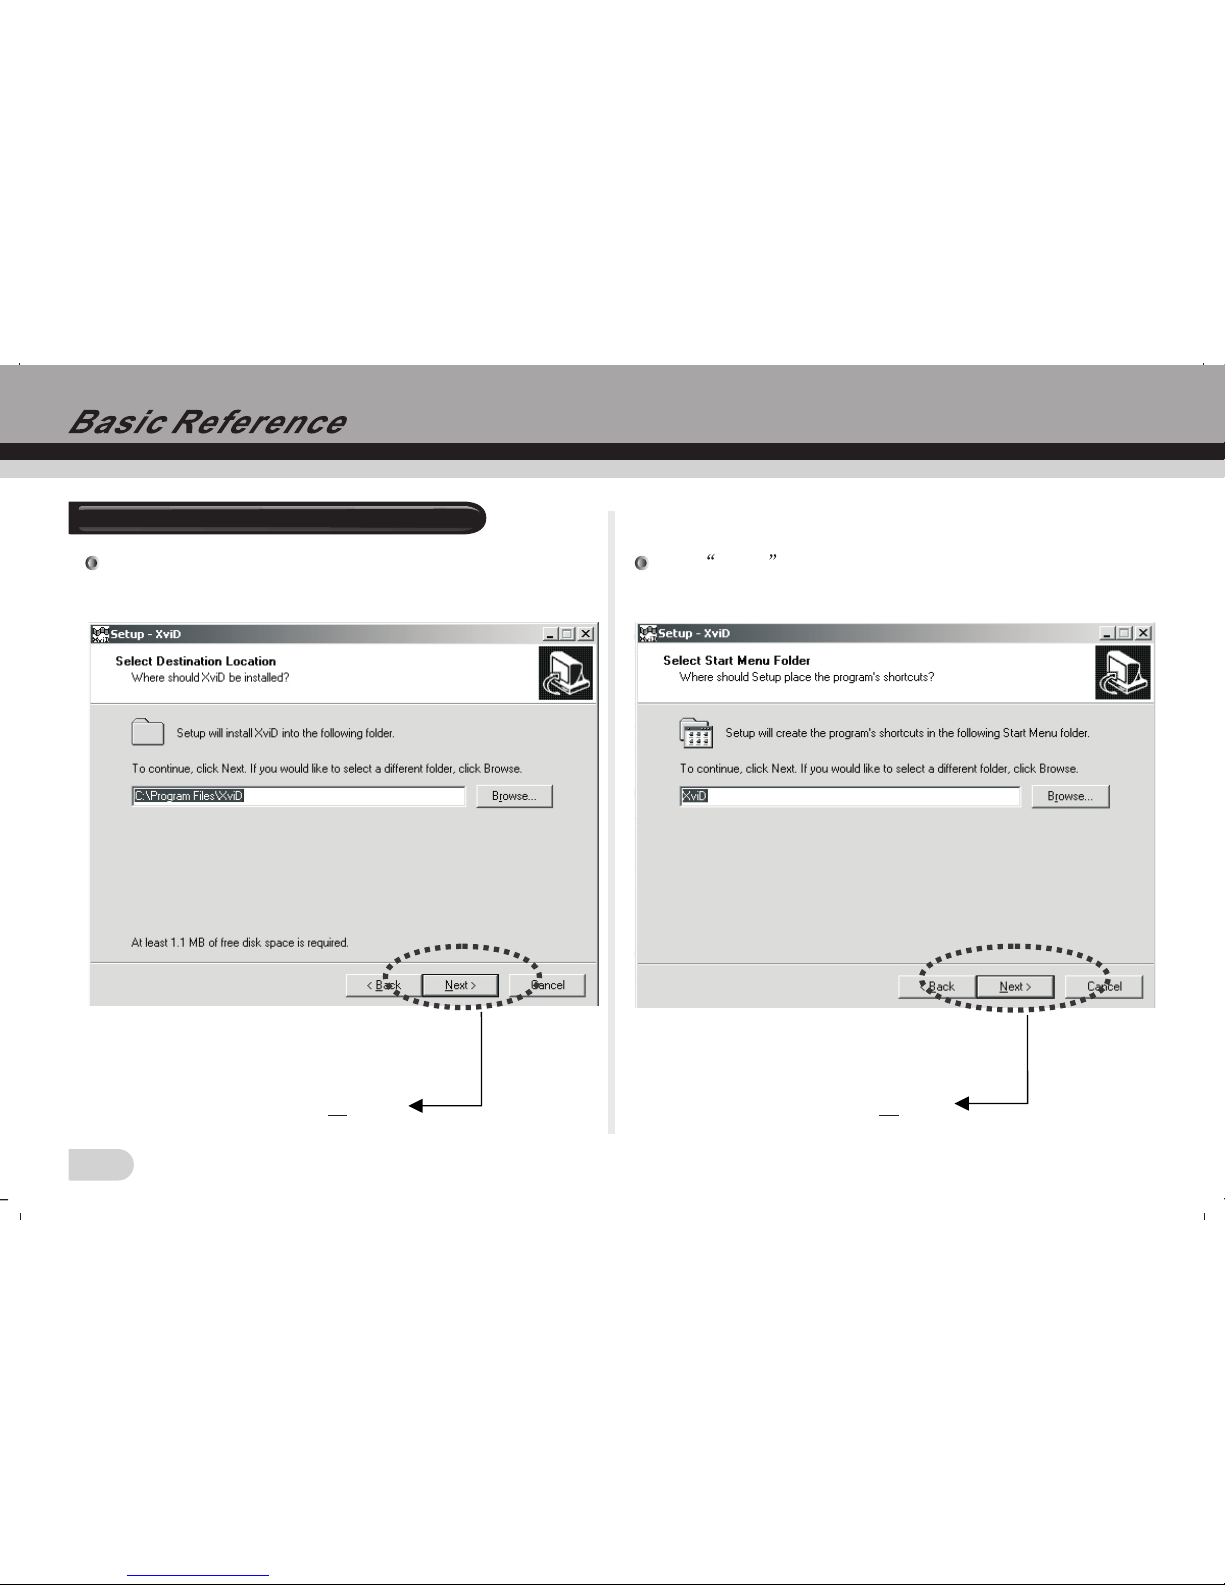
Select Destination Location, and click NEXT to continue.
22
Downloading photos / video to the PC
Next
Click NEXT , the following dialog box appears:
Next
Page 24
23
Downloading photos / video to the PC
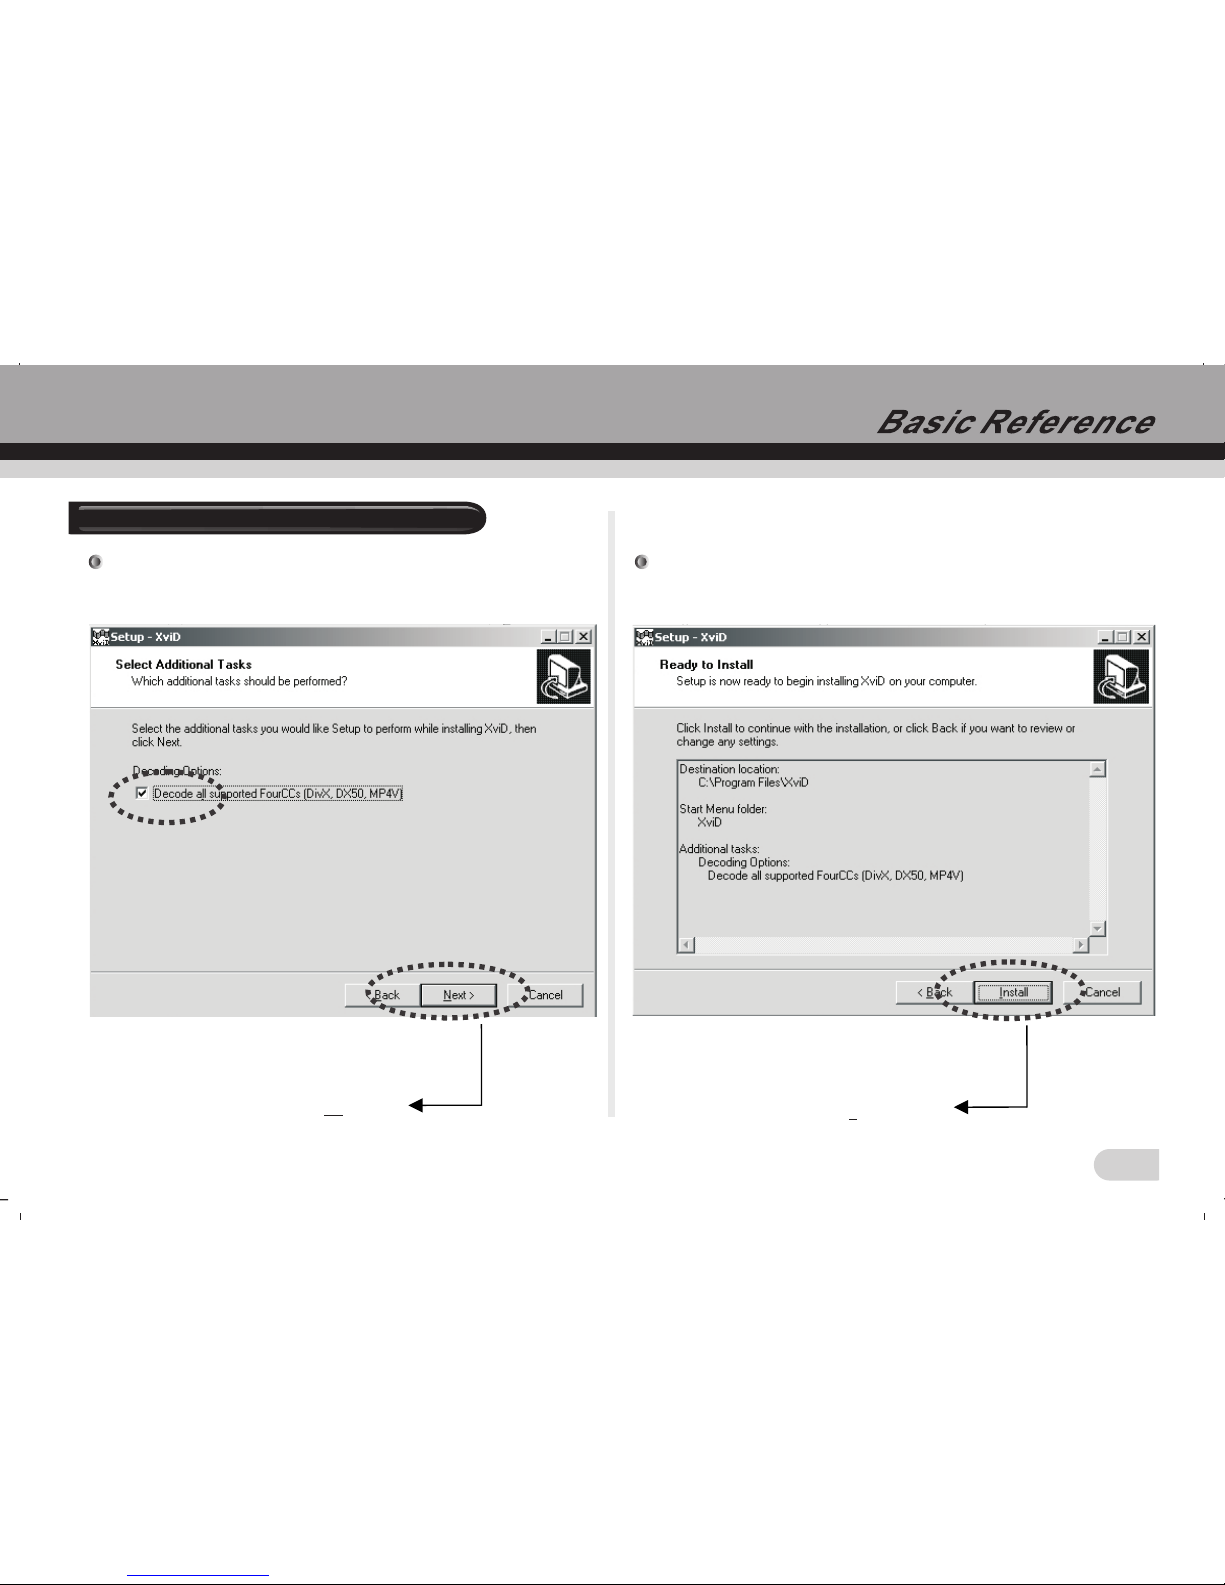
Select the additional tasks you would like Setup to perform
while installing XviD, then click NEXT.
Next
Click Install to continue with the installation.
Install
Page 25
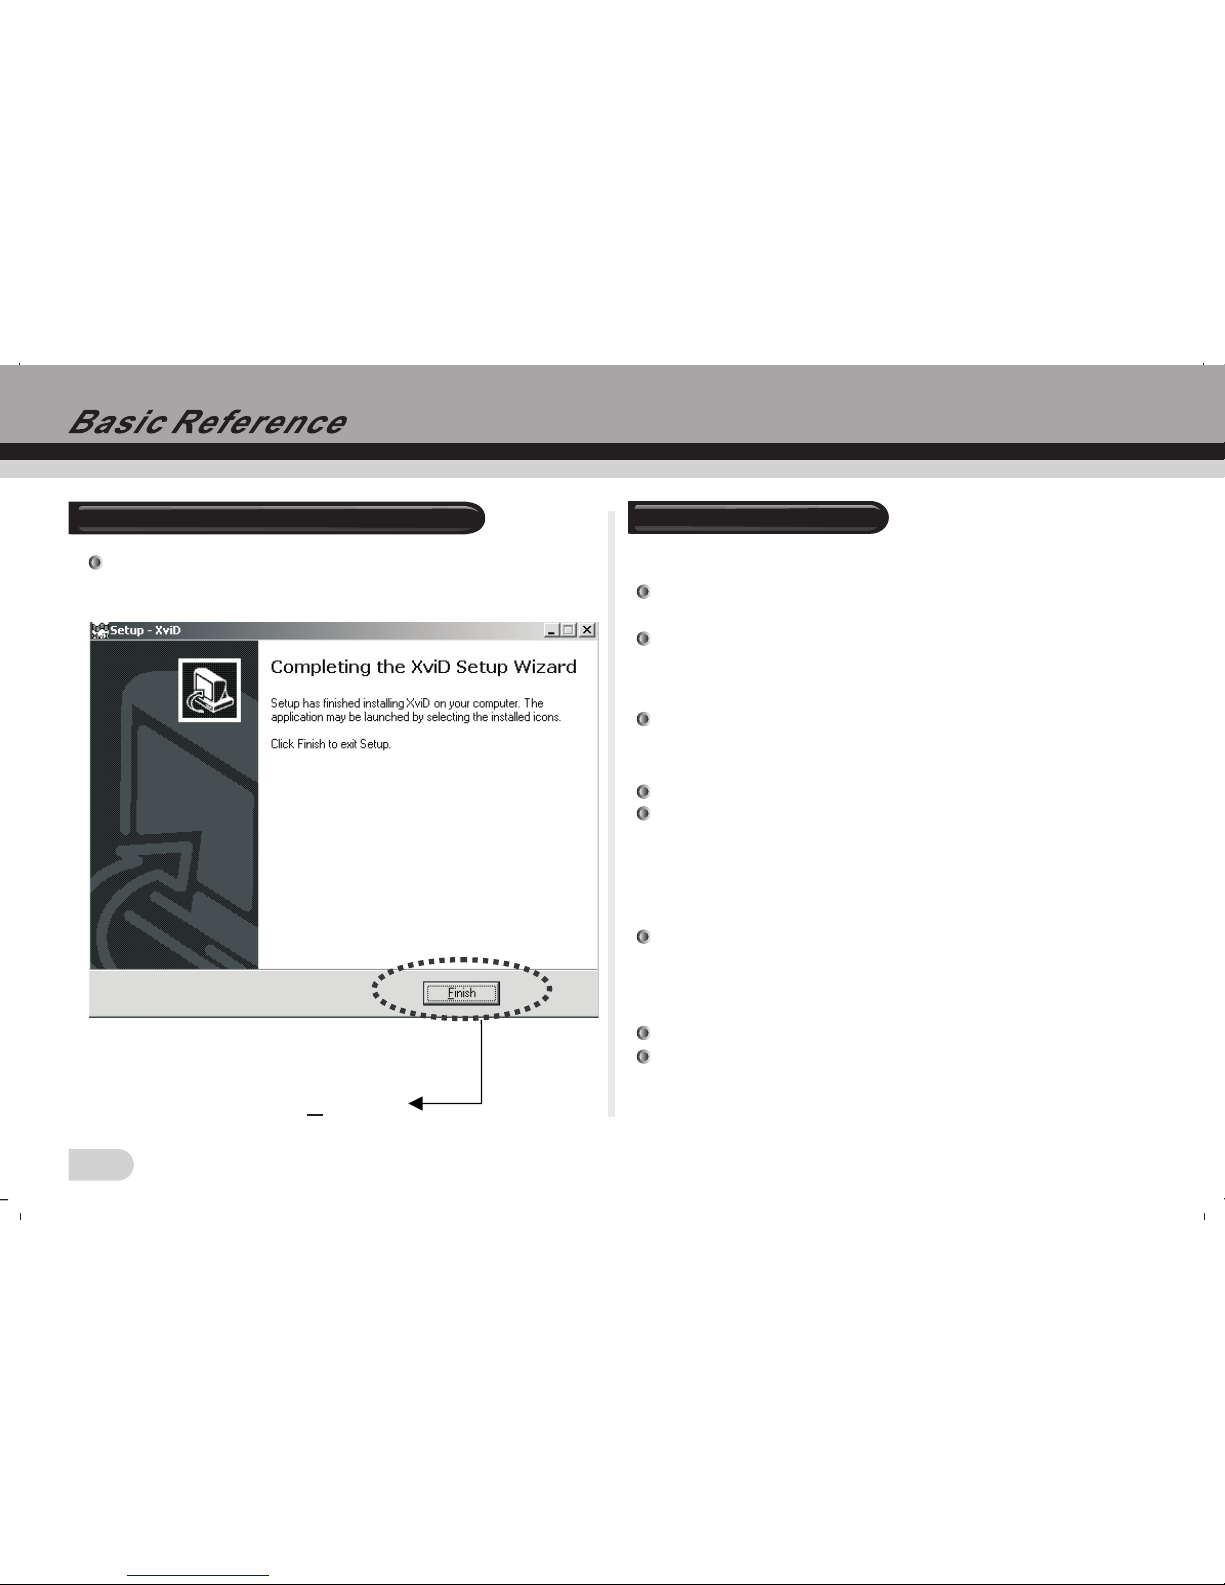
Click Finish to complete installation.
24
Downloading photos / video to the PC
Finish
TROUBLE SHOOTING
Power does not turn on
The battery is not oriented correctly. Please orient the
battery correctly.
The battery is dead. Please charge the battery.
After turning on, camera suddenly turns off.
The battery goes dead soon. Please charge the battery.
The camera turns off automatically.
The battery goes dead soon. Please charge the battery.
The camera is set to turn off automatically 1 min or 2
min when no operation performed for 1 min or 2 min.
After inserting a memory card, screen indicates
mistake message.
The memory card is not format or not the FAT or FAT32
format. Please re-format it to FAT or FAT32.
A memory card is loaded, camera cannot record.
Memory card is locked. Please unlock it.
Memory card is full. Please transfer the files you want
to keep to your computer and then delete files from
memory, or use a different memory Card.
Page 26
25
TROUBLE SHOOTING
Image is not recorded when the shutter button
is pressed.
The camera is not in the capture or video mode. Please
press or button to enter the currently
selected recording mode.
Flash unit is being charged. Please wait until the flash unit
finished charging.
Memory card is full. Please transfer the files you want to keep
to your computer and then delete files from image memory, or
use a different memory card.
[Video]
[Capture]
Please reset the white balance.
The color of the photo taken is not normal.
The image is too dark or too bright.
Flash off is selected as the flash mode. Please select a
different mode.
The date displayed is not correct.
Please reset the date and time in setup mode.
Can not delete the files in camera.
All button and switches are disable.
Circuit problem caused by electronic charge, impact, etc. While
the camera was conne cted to anot her device. please re mov e t he
battery from the camera, reinsert It, And then try again.
Camera can not work as web cam over a USB
Connection.
The USB mode is not set as PC camera .
Check the connection between the camera and USB cable.
USB driver is not installed. Please install the USB driver on your
computer.
Camera can not transfer files over a USB
connection.
The USB mode is not set as Mass storage .
Check the USB connection between the camera and computer.
USB driver is not installed. Please install the USB driver on your
computer.
Icons disappear on the monitor screen.
Please press button to set the camera display icons
on the screen.
[DISP]
Page 27
26
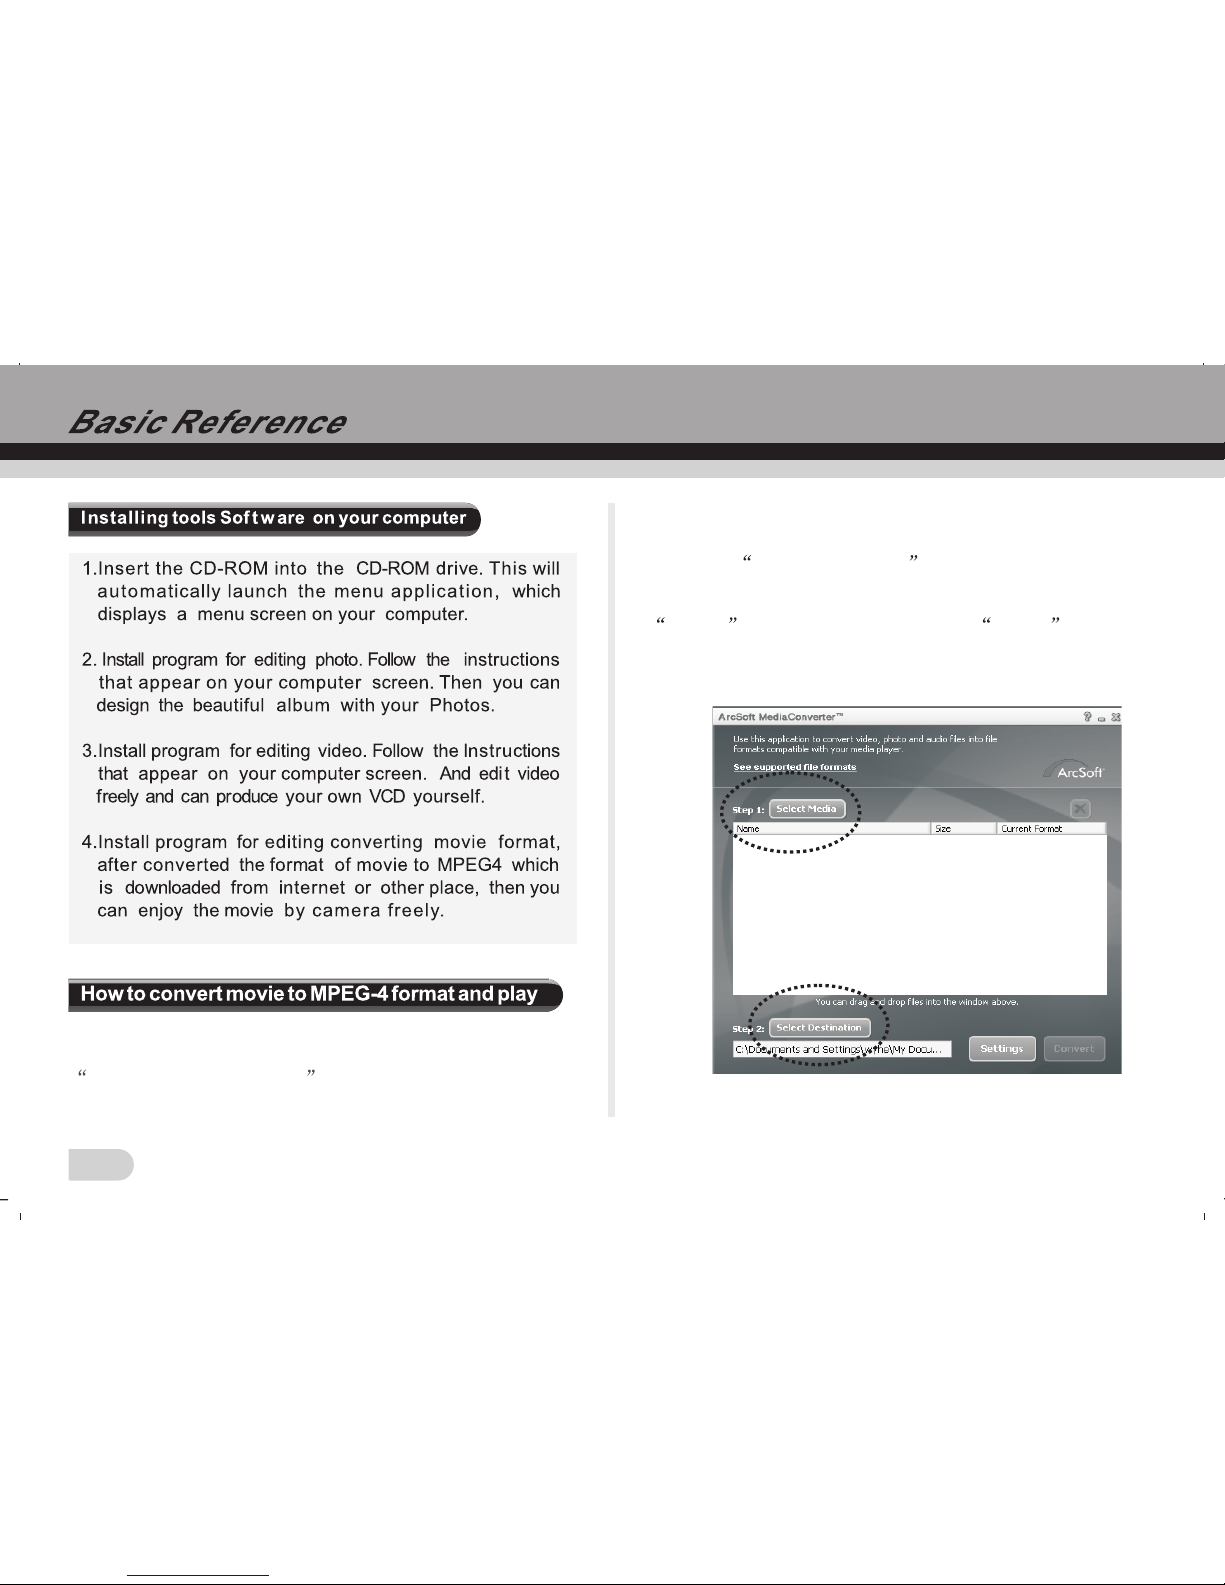
Use the procedures in this section to install the software
from the bundled CD-ROM to your computer. Select
Install media converter in the CD-ROM to install the
software for converting video file to MPEG-4 format.
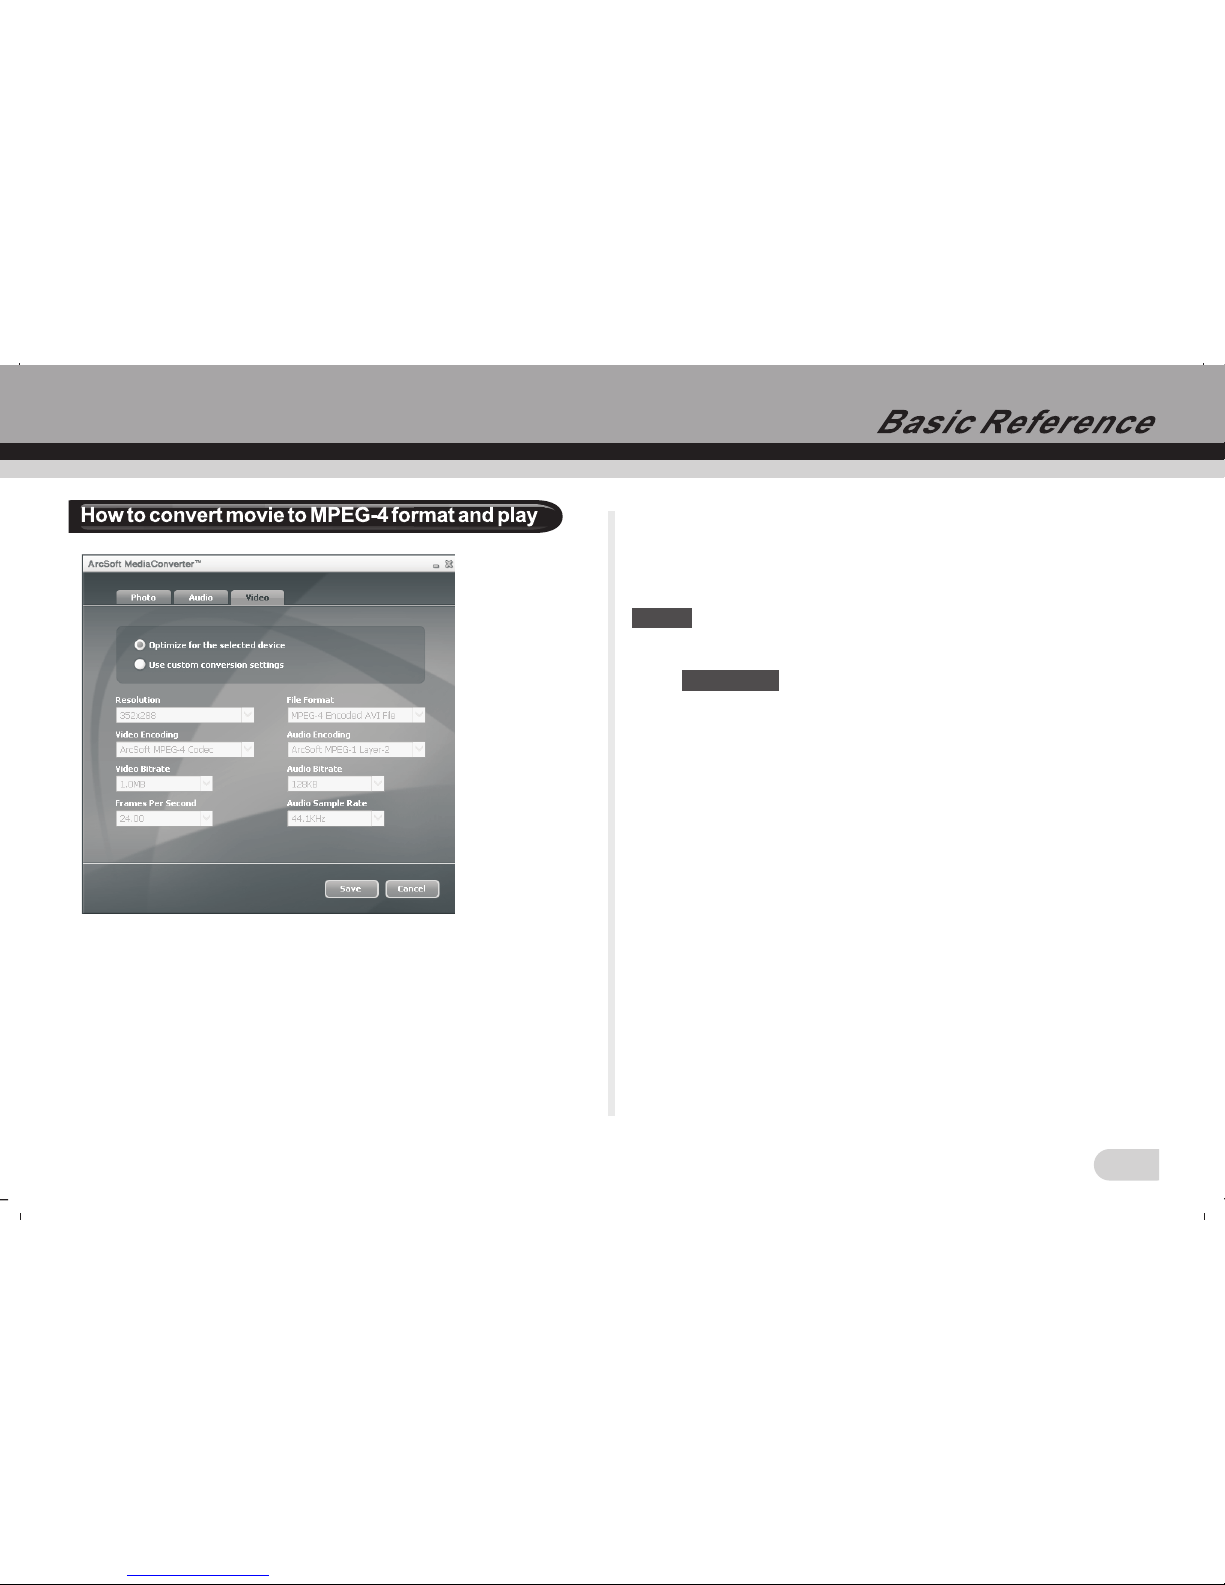
1. Run the Media Converter , and choose a source file
which comes from your computer to convert, then select
the path which you want to save the MPEG-4 movie. Click
setting button. After setting, click onvert button at
right bottom of the window, you will begin to convert the
source file.
1
2
Page 28
27
2. You can find out the MPEG-4 files in the path you have
chosen at the first step.
3. Set your camera to Mass Storage, and use the USB cable
to connect your camera and computer.
4. Copy the MPEG-4 files to the memory card. The right path
is DCIM\100COACH\document.
5. Reboot the camera and set it to play mode, you can enjoy
the movie.
Note:
In playback mode, press SET to browse the movie and press
again to pause.
If you want to fast or slow the playing speed or adjust the
volume of playing, you can press SET to pause playing and
press button, then use direction button to adjust
the speed and volume.
SET
DISPLAY
Copyright
 Loading...