

Page 1

Preface
Thank you for purchasing this camera. This camera will help you
fulfill all your digital picture processing needs.
The camera is equipped with eight modes ( Auto Mode, P/A/S/M
Mode, Continuous Shot Mode,Scene Mode, Movie Mode, Audio Mode,
Setup Mode and Power Off ) for your exploration. In combination
with all the above modes function, not only will this camera serve
as a digital camera, but it can also be used in recording short movie
and audio recording.
This versatile, neat design camera offers 5.36 mega pixels highquality image along with precise 12 x zoom (3 x optical plus 4 x
digital). The built-in 16MB internal memory can store your images,
video clip and audio files. Its auto focus lens supports a macro mode
from 10cm to 50cm. Normally, it can take the pictures from 50cm
to infinite range. Through the USB cable connection, pictures can
be easily transmitted from the camera to the PC. It also pro-vides
a TV-out function to perform the operatation through TV.
To make the best out of this camera, we strongly suggest that you
read through this manual prior to operating this camera.
1
Page 2

Preface ...................................................................................1
Setup ......................................................................................3
Unpacking the Camera ...............................................................3
Camera Parts .............................................................................4
Loading the Batteries and SD Card .............................................5
Basic Settings ............................................................................6
Formatting the Internal Memory and SD Card ..............................6
Basic Operating Procedure ....................................................7
Turning the Camera ON/OFF .......................................................7
Basic Shooting ...........................................................................7
Auto-Focus Function ...................................................................8
Zooming In/Out ..........................................................................8
Viewing Pictures .........................................................................8
Quick Delete Picture ...................................................................8
Basic Function Buttons ................................................................9
Main Modes and Instructions ................................................11
Auto Mode .................................................................................12
PASM Mode ................................................................................14
Continuous Shot Mode ...............................................................17
Scene Mode ..............................................................................18
Movie Mode ...............................................................................20
Audio Mode ...............................................................................21
Playback Mode...........................................................................22
Setup Mode................................................................................25
Making Connections ...............................................................30
Installing Software .....................................................................30
Connecting through the USB .......................................................31
Connecting through TV-out .........................................................31
Appendix .................................................................................32
2
Table of Contents
Table of Contents
Page 3
Setup
Setting up this digital camera is quick and simple. Follow these
steps, and you'll be on your way to infinite boundaries.
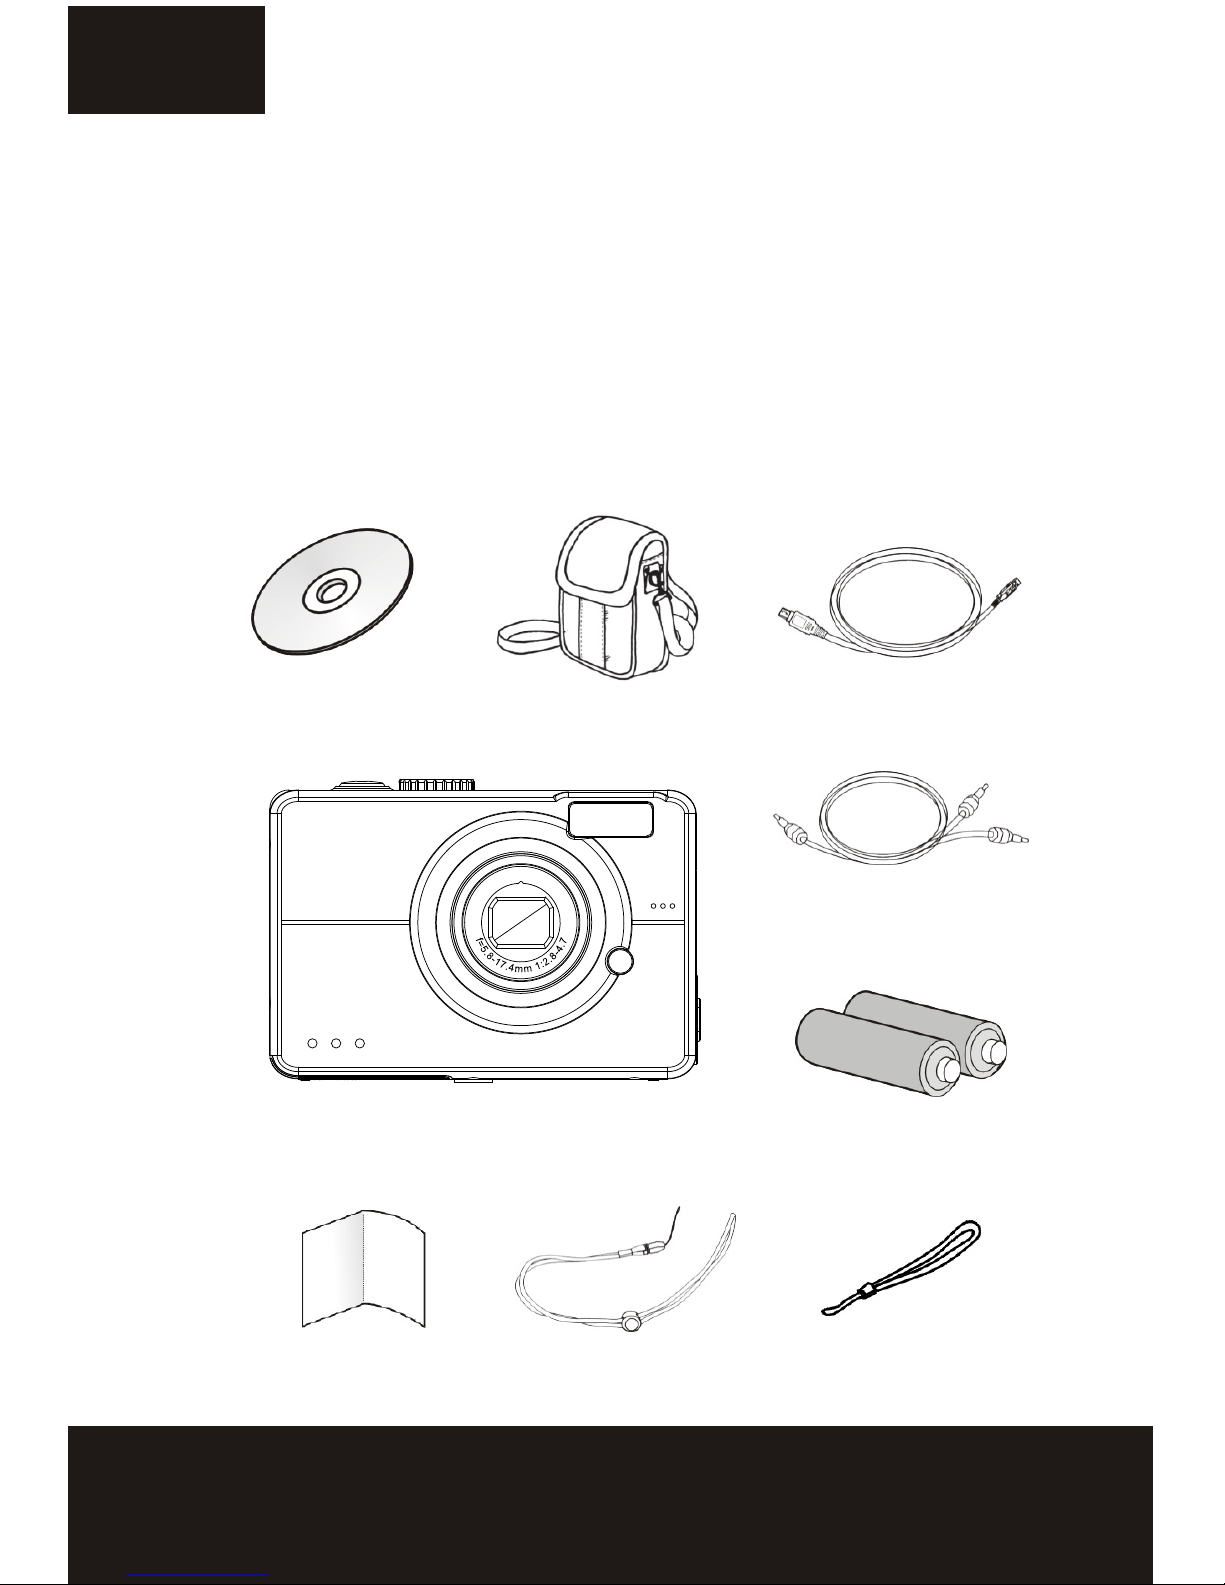
Unpacking the Camera
1. Clear all items from the box. (It is highly recommended that
the box and wrappings are kept for future usage)
2. Double check for the following items:
3
CD-ROM
Pouch
Mini USB cable
Video cable
Camera
Strap
Quick Guide
3
X
O
P
T
I
C
A
L
Z
O
O
M
L
E
N
S
Hand strap
Batteries
Page 4
3
X
O
P
T
I
C
A
L
Z
O
O
M
L
E
N
S
4
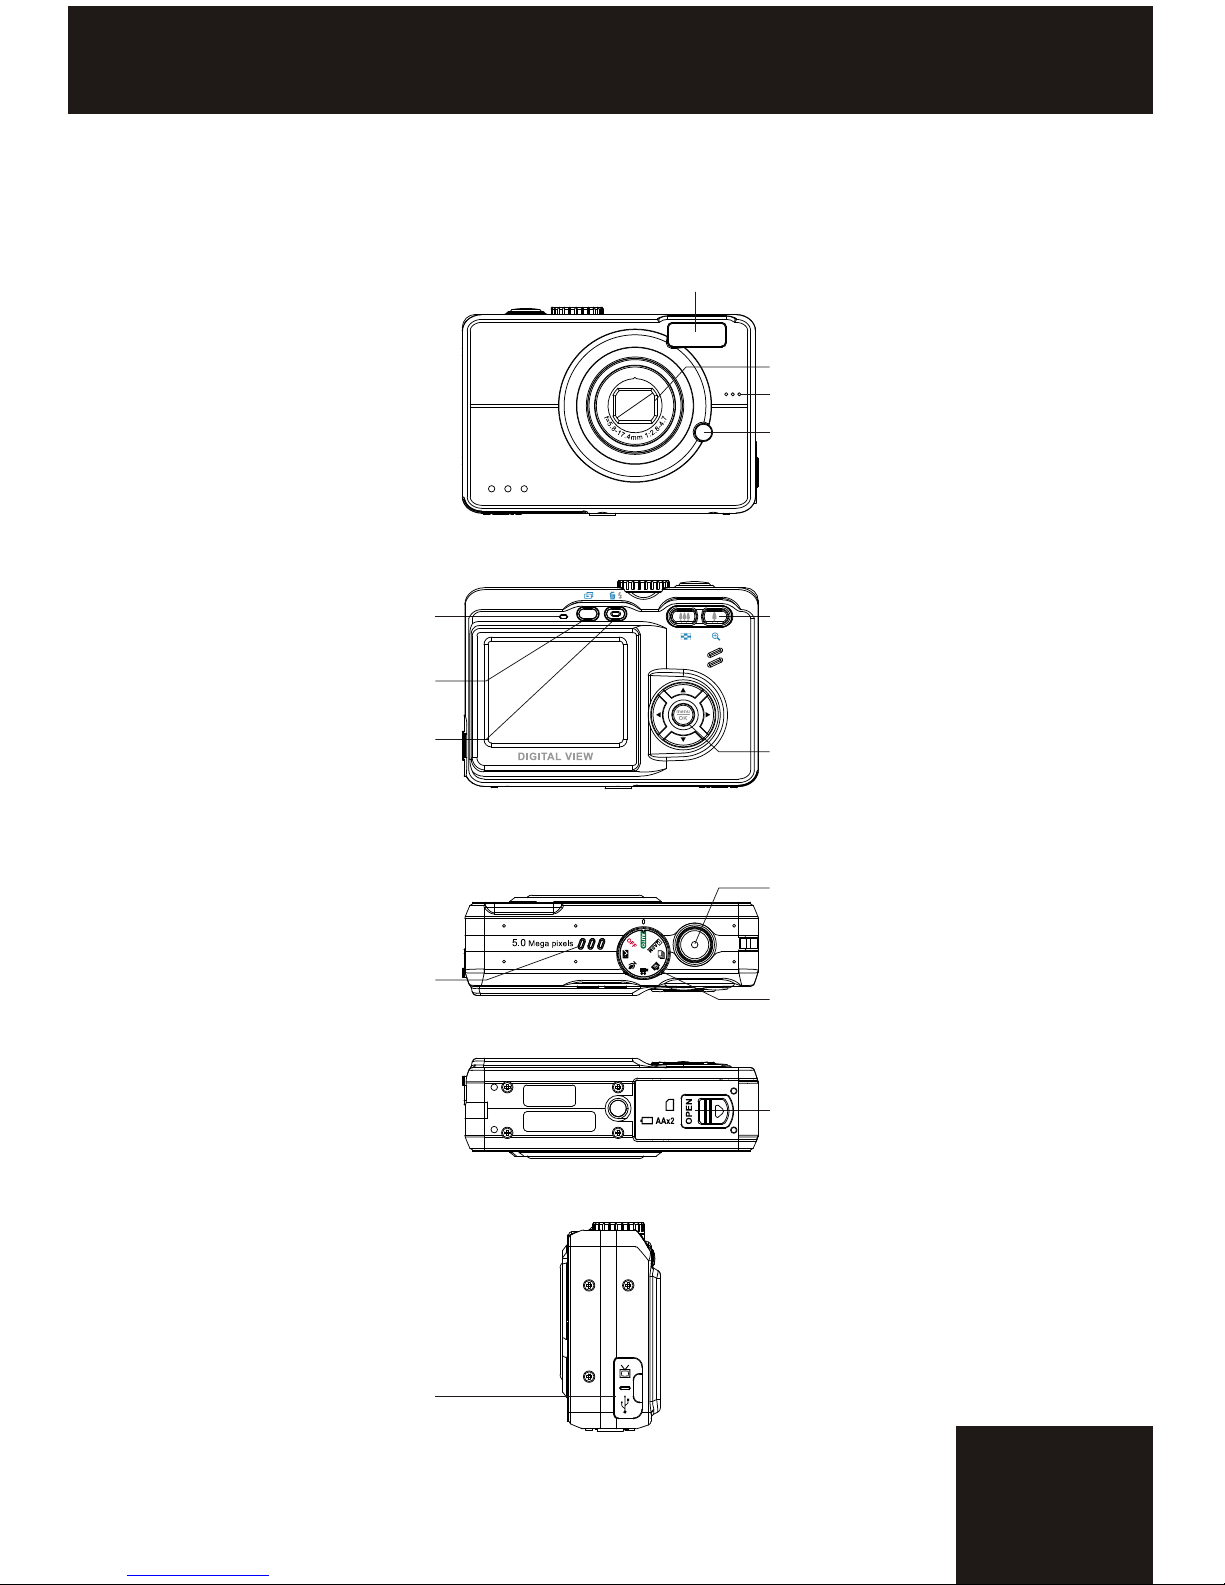
Camera Parts
Setup
Flash
Auto-Focus Assist/
Self-Timer LED
Microphone
Lens
Zoom In/Out button
Status LED
Delete/Flash button
Playback button
menu/OK button
Mode Dial
Connectivity
( USB and TV-out )
Battery Door
(Battery and SD card)
Shutter button
Speaker
Page 5
5
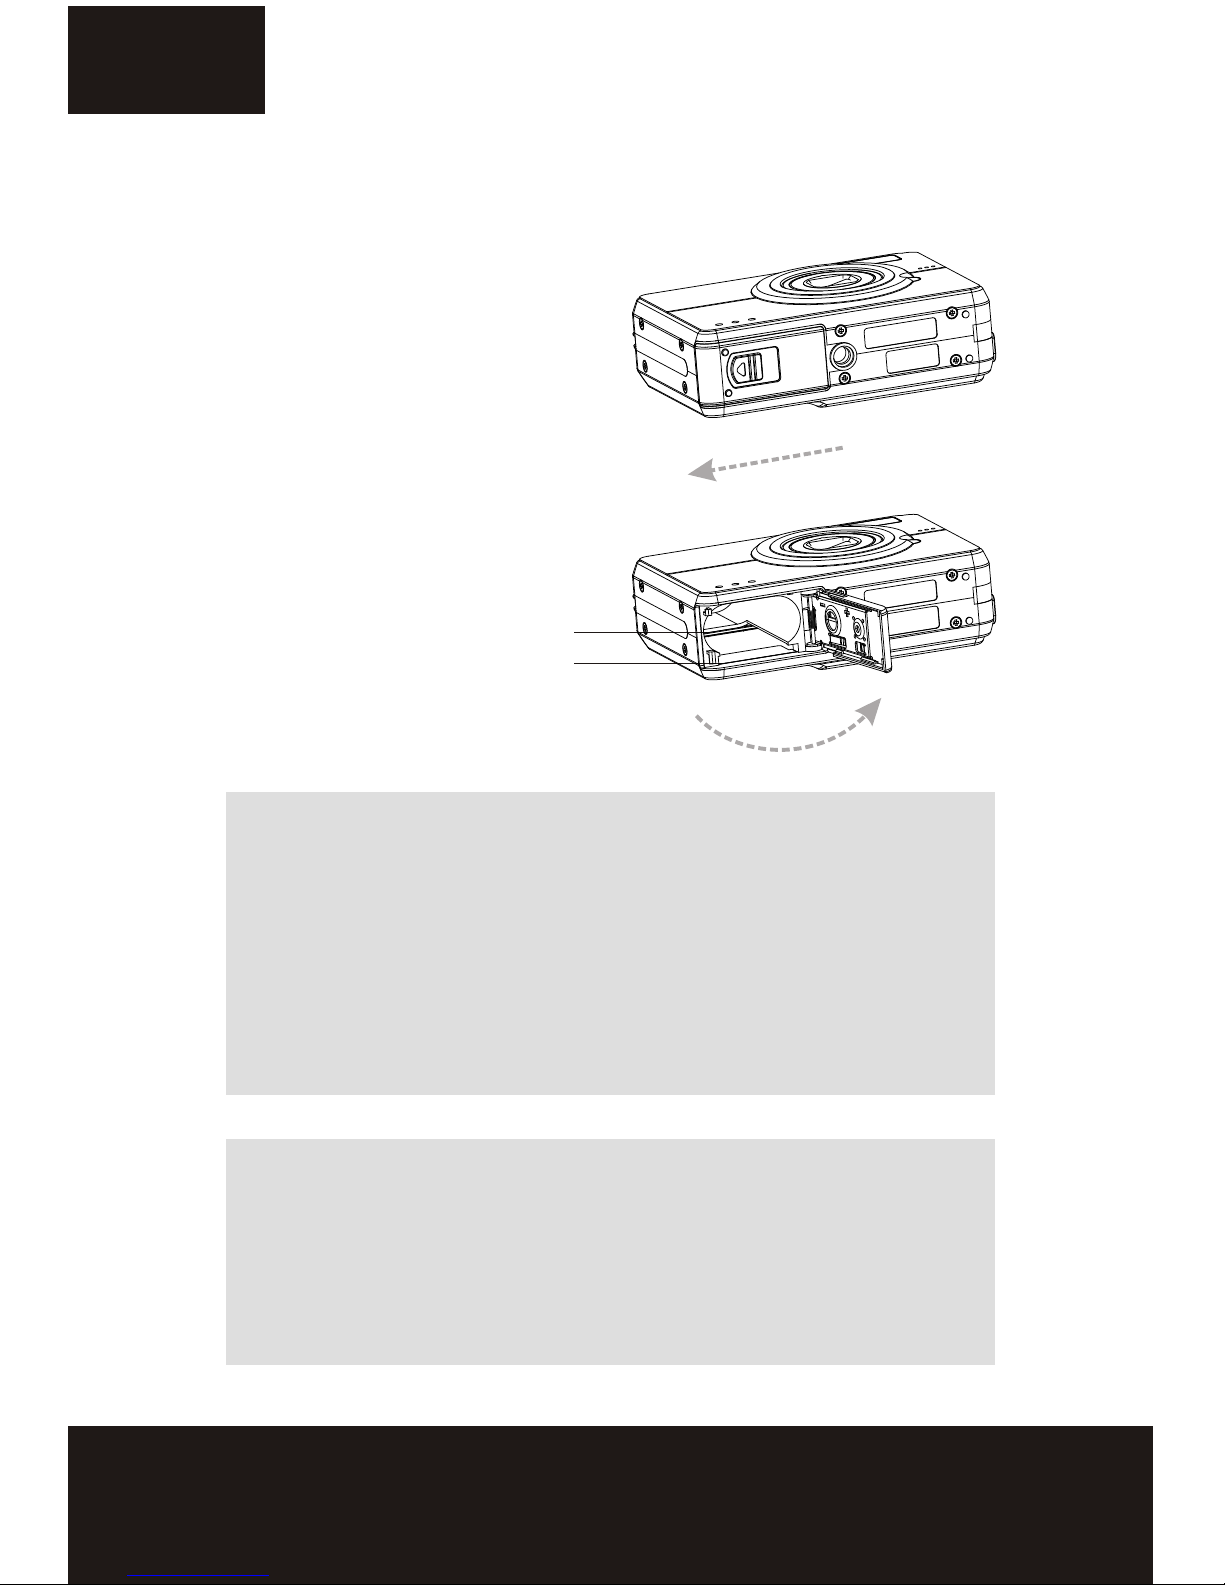
Loading the Batteries and SD Card
This camera uses 2 AA batteries. The batteries and SD card share the same compartment
and door.
1. Slide the battery/SD card door in the
direction of the arrow, then lift to open.
2. Load the included batteries
into the battery compartment. (a)
3. Insert the SD card into the slot. (b)
4. Close the battery/SD card door.
CAUTION!
1. Use only the specified battery for use with this camera.
Other power sources may cause fire.
2. To improve battery performance, replace all installed
batteries at the same time and keep batter way from
heat.
3. To dispose off batteries, please refer to index of battery
manufacturer.
4. Do not mix battery types or it may cause a fire or
explosion. Use only one battery type at one time
5. Batteries should be inserted in the battery compartment
with the "+" and "-" sides facing correctly.
1. Upon loading new batteries, users will need to reset
their Basic Settings
2. Do not open the battery/SD card door or remove the
batteries when the camera is in its ON status. Only
remove the batteries and SD card when the camera is
not in use, or in its OFF status.
3. If you do not plan on using the camera for a long period
of time, please remove the batteries and SD card.
NOTE:
a
b
Page 6

6
Basic Settings
Turning the mode dial to the Setup Mode , a " welcome image " will appear on the
LCD display. Please proceed with the following settings:
1. To set desired language from "Language" option of 16 setting options.
2. Find "Date and Time" option the same menu for date and time adjustment.
Formatting the Internal Memory / SD Card
To take more pictures effectively, format the content of the Internal Memory/SD card. To
format SD card, please insert your compatible SD card into SD slot. Then proceed with the
following steps:
1. Turn the Mode Dial to Setup Mode.
2. Selecting "Format" function of the menu by buttons.
3. You will then be asked "Format SD Card?" on the LCD Display.
4. Press the menu/OK button to confirm and proceed with formatting.
As a result, if there is no SD/MMC card in camera, the LCD display will show the following
message for confirmation: "Format internal Memory?" Then, press menu/OK button to
perform formatting internal memory.
Basic Settings
Page 7

3
X
O
P
T
I
C
A
L
Z
O
O
M
L
E
N
S
7
Basic Operating Procedure
This Quick Start provides simple and basic directions to get you started
with your camera. From this section, you will learn how to turn the camera ON and OFF, shoot pictures, use the Auto Focus function, Zooming
In and Out, and Playback your pictures.
Turning the Camera ON/OFF
Turning the mode dial to select shooting mode ( Auto, P/A/S/M, Continuous
Shot, Scene, Movie, Audio) or Setup mode, then camera will be power on
automatically and enter in each individual mode. To turn off camera by
turning mode dial to "OFF".
**The backside LED indicator will remain green while
the cameral is power on**
Basic Shooting
1. Turn the mode dial
to the AUTO Mode.
2. Look into the LCD and try to
align your subject in the focus
brackets.
3. When your subject had been
aligned for shooting, press the
Shutter button down halfway for
focusing, while the subject had
been focused then keep pressing
the Shutter button all the way
down for taking picture.
Page 8

8
Auto-Focus Function
When the Shutter button is pressed halfway down (S1), the Auto-Focus
function will be activated and the subject will be focused automatically.
Follow these steps to activate this function:
Zooming In/Out
This camera has 3x optical zoom and 4x digital zoom funtion, there is a
zoom bar on the right side of LCD display to indicate the zoom status
while pressing the Zoom button, there is a white bar in the middle of
zoom bar to seperate optical zoom and digital zoom.
Press Zoom in and Zoom out button to move the lens between wide angle
(1x) and telephoto (3x) positions for optical zoom; it will activate the digital
zoom by still pressing the button after the lens had moved to telephoto
position.
Once the subject had been aligned in LCD, press the Zoom button to select
your preferred image size.
Viewing Pictures
Use the Playback button to review the recently taken images, video clips or
audio files, and use the buttons to scroll through them.
Press down Playback button again, the camera will return back capture mode.
For an in-depth description of Playback Mode , please refer to page 22.
Quick Delete Picture
In Playback mode, simply press down Delete/Flash button to quick delete
image, LCD will pop out a "Delete this file?" message, then press down the
menu/OK button to delete file.
Basic Operating Procedure
1. Before pressing down the Shuttor button, the focus brackets
are white, once the Shutter button had been pressed halfway
down (S1), and the subject is able to focus, the focus brackets
will turn green, otherwise the focus brackets will turn red.
2. When the subject had been focused successfully, press the
Shutter button all the way down (S2) to take picture.
S1
S2
Page 9
9
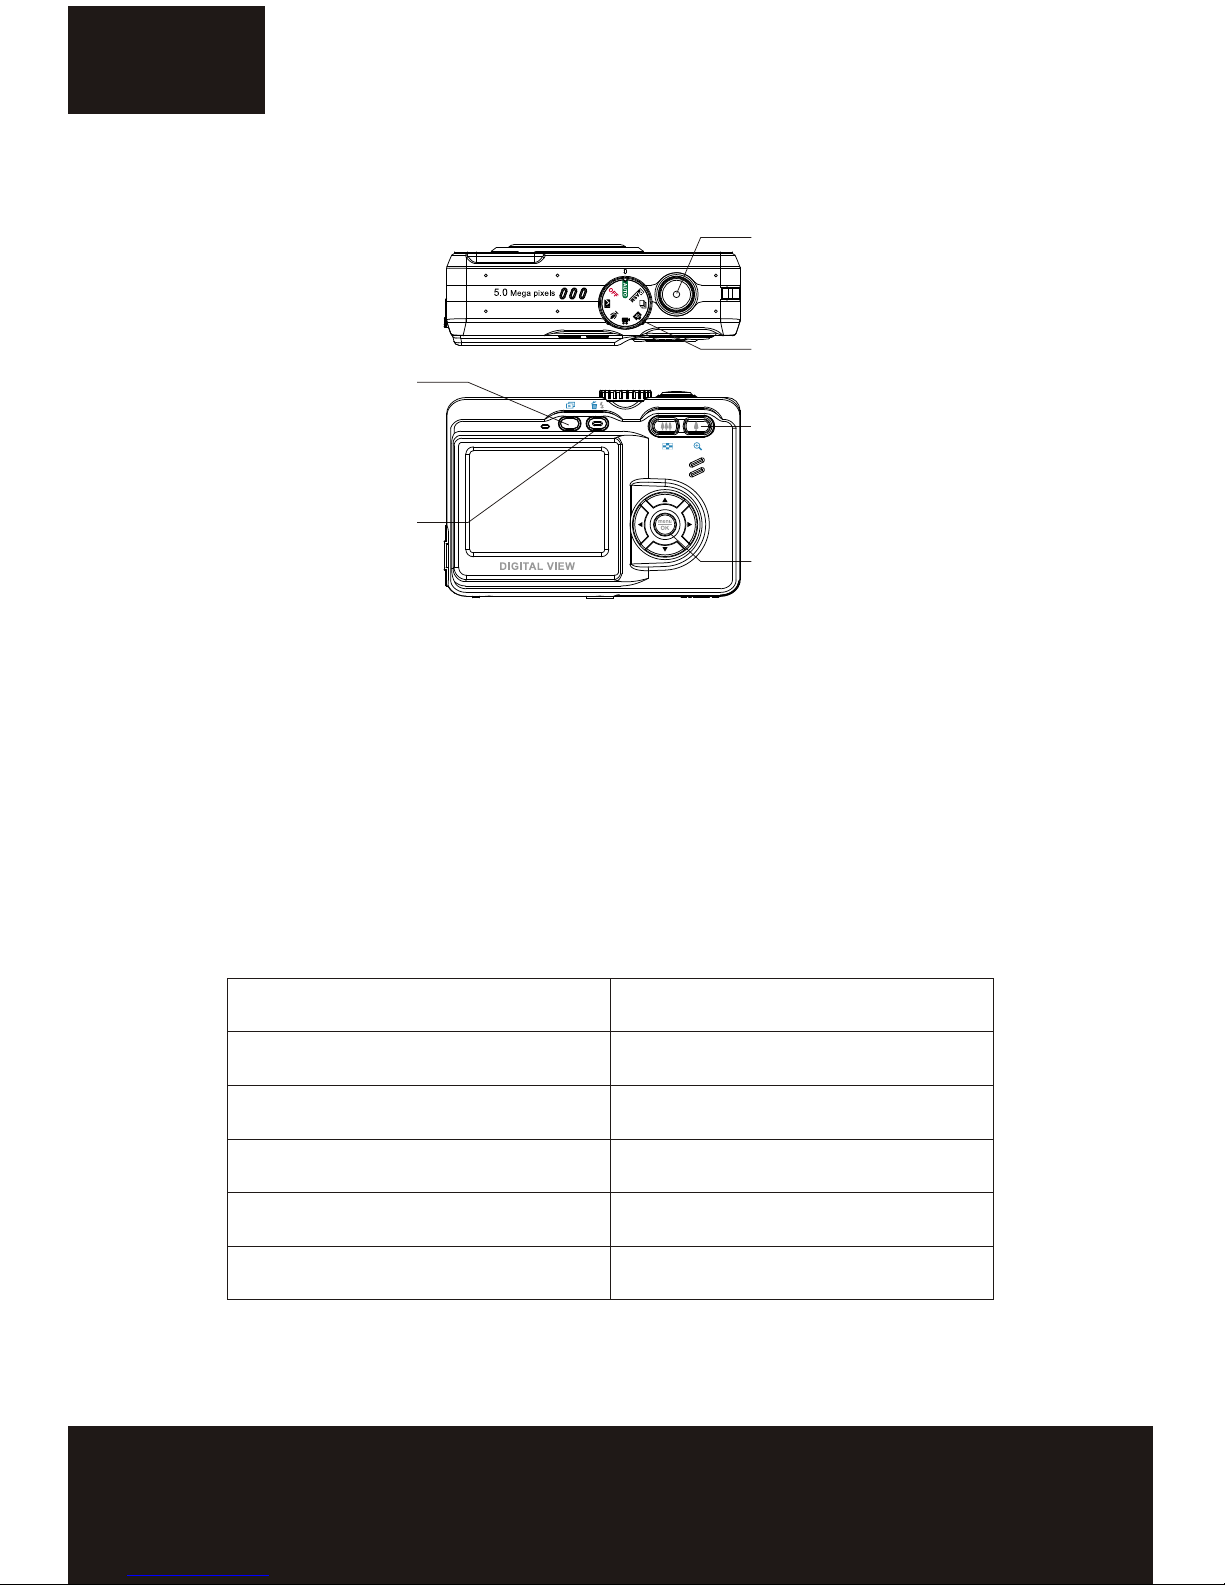
Basic Function Buttons
1. Shutter button: Taking picture, video and audio by pressing Shutter button.
2. Mode Dail: The allows user to change different mode and power off camera.
3. Zoom In/Out button : To zoom in and out lens between wide and
telephoto position to set preffered image.
Resolution
Digital Zoom
Note: Digital zoom is limited for 10.0M resolution.
3.Zoom In/Out button
5.Delete/Flash button
4.menu/OK
2.Mode Dial
1.Shutter button
6. Playback button
5.0M ( 2560 x 1920)
3.0M ( 2048 x 1536)
1.3M ( 1280 x 960)
4x
4x
4x
4x
4x
VGA ( 640 x 480)
2.0M ( 1600 x 1200)
Page 10

4. menu/OK button: This button could enter in each mode menu
for settings adjustment.
5. Delete/Flash button: This button sets flash as foce off, auto
red eye reduction, force on and slow sync under shooting modes. In
Playback Mode, a delete confirmation message will appear on LCD.
Force off: Default setting of flash mode.
Auto
Auto Red eye reduction: Press flash button once for auto red eye
reduction.
Force on: Press flash button twice again for force on.
Slow sync: Press flash button again for slow sync shot.
6. Playback button: After pressing Playback button, user can review
all the recorded files by pressing buttons. Or pressing menu/OK
button for further modification.
10
Under Capture Mode:
Zoom in: Press Zoom in button for magnify image.
Zoom out: Press Zoom out button for narrow the image.
Under Playback mode: (Magnify / Thumbnail).
Zoom in: Press Zoom in button for magnify image.
Zoom out: Press Zoom out button for thumbnail images. (2x2/3x3).
Basic Function Buttons
Page 11
11
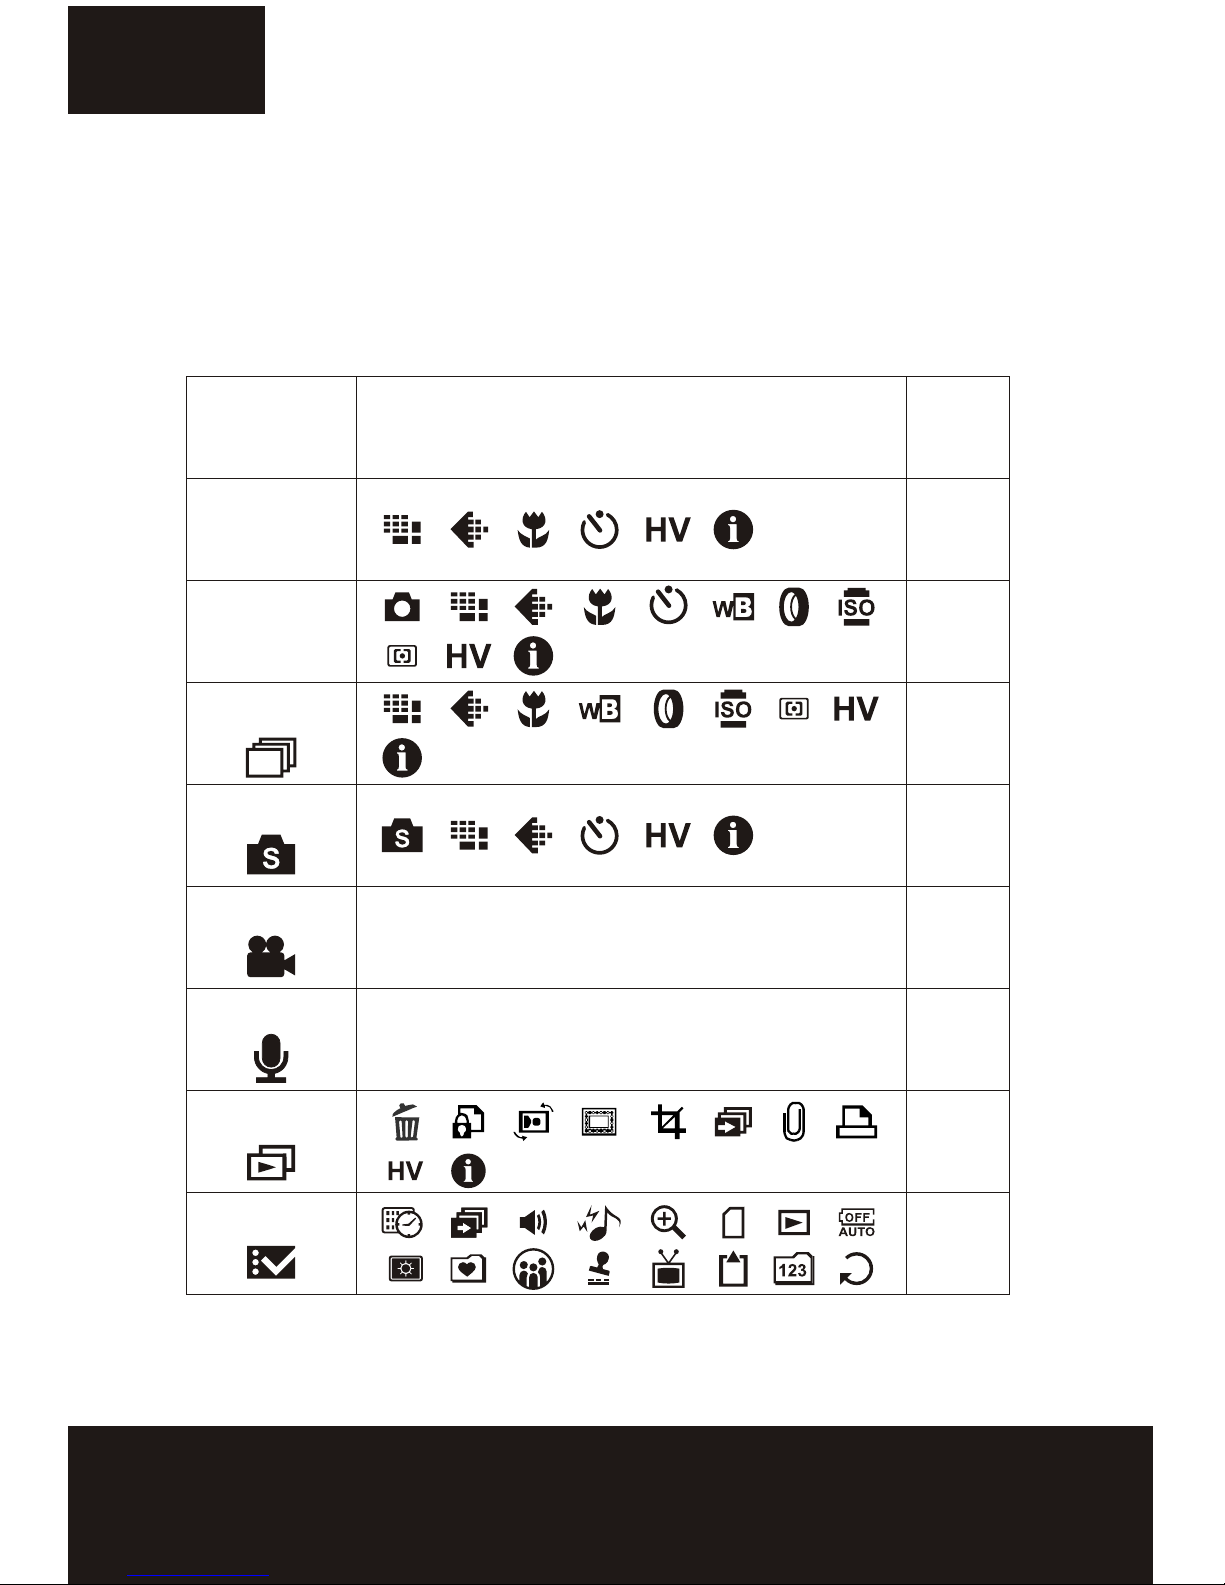
Main Modes and Instructions
This section will describe the eight modes included in this camera.
An in-depth coverage of these modes will be further described
Items Menu Setting Options
Page
Scene Mode
Movie Mode
Audio Mode
Setup Mode
Playback Mode
Auto Mode
PASM Mode
Continuous Shot
Mode
PASM
AUTO
12
14
17
18
20
25
22
21
Page 12
12
Main Modes and Instructions
Auto Mode
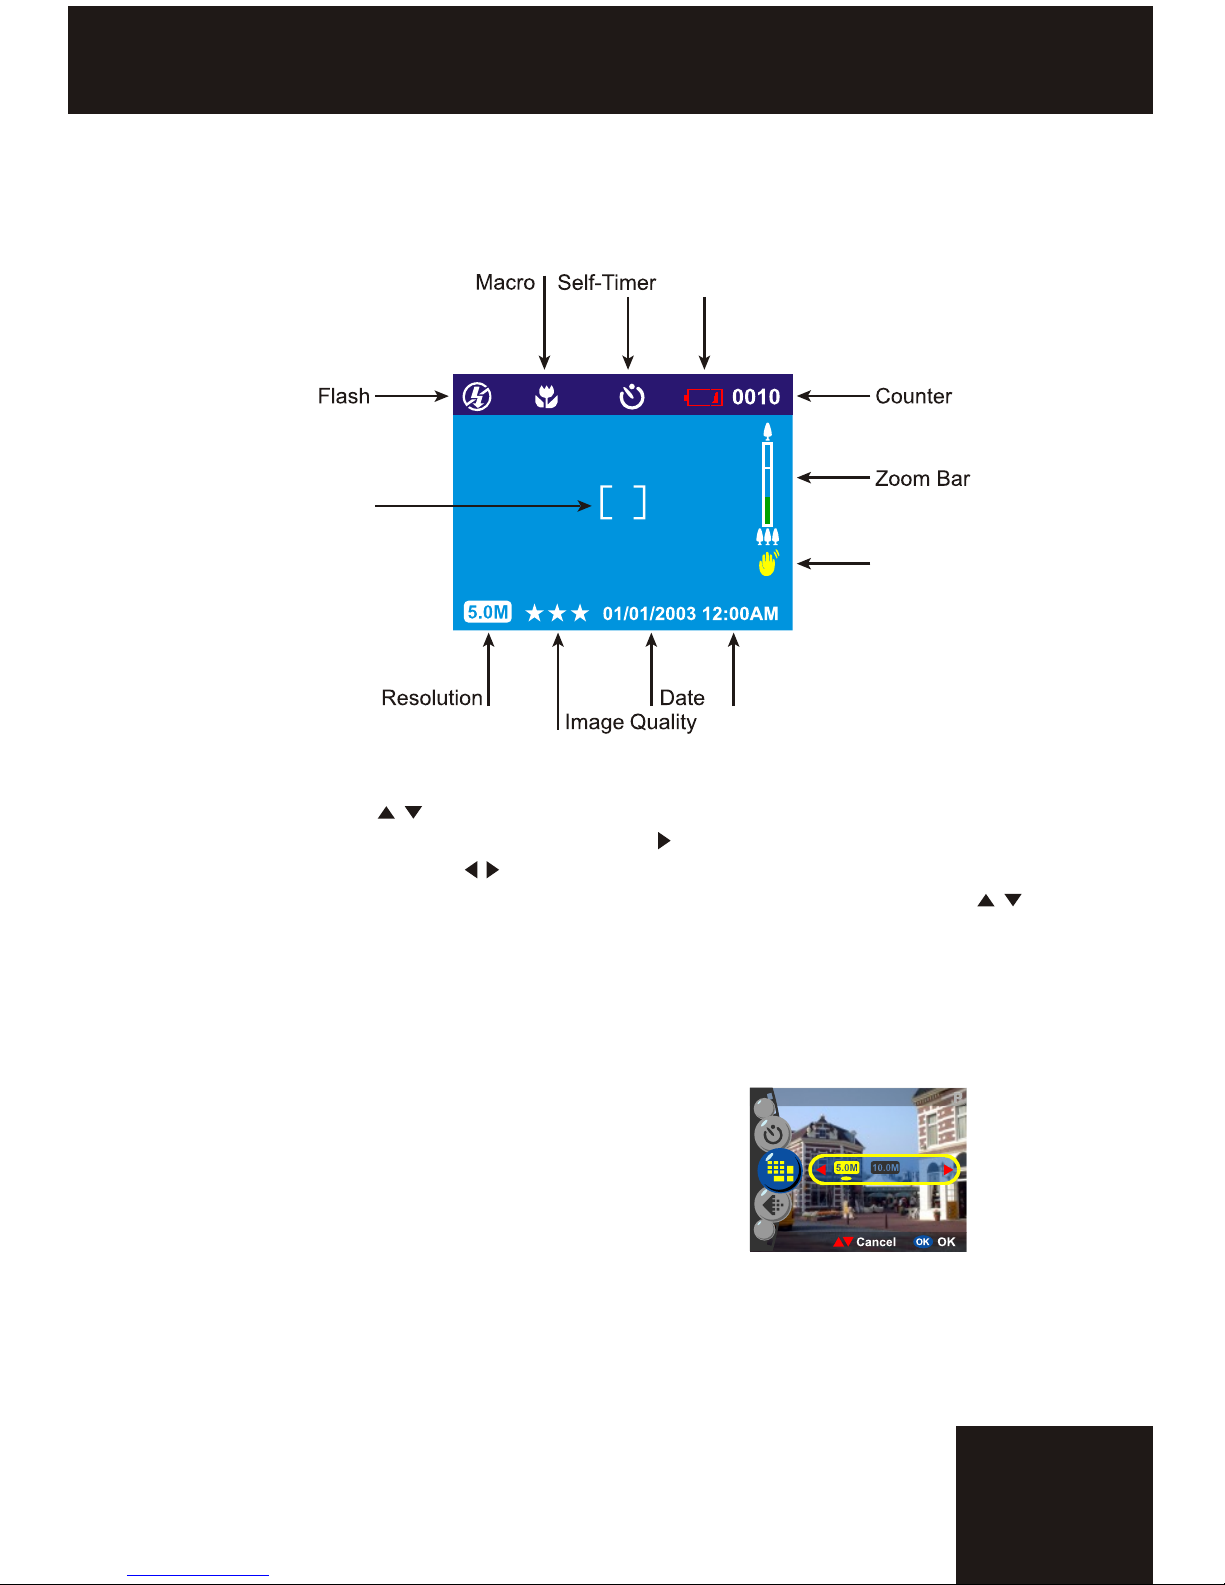
Point and shoot with the focus brackets. Everything will be automatically
set.
Resolution
This mode allows you to set the record resolution.
3648 x 2736 (10.0M)
2560 x 1920 (5.0M)(Default)
2048 X 1536 (3.0M)
1600 x 1200 (2.0M)
1280 x 960 (1.3M)
640 x 480 (VGA)
Turn the Mode Dial to the Auto Mode. Press the menu/OK button to access
menu. Then use button to select the setting option for change setting.
Once you have selected the option, press button to display the sub-menu
for all settings, and use button to scroll through them. After pressed
menu/OK button for setting confirmation and quit the sub-menu. Press
button to continue other setting options or press menu/OK button again to
quit menu.
5.0M
VGA
Power Indicator
Hand Shaking
Warning
Time
Focus Brackets
Page 13
13
Image Quality
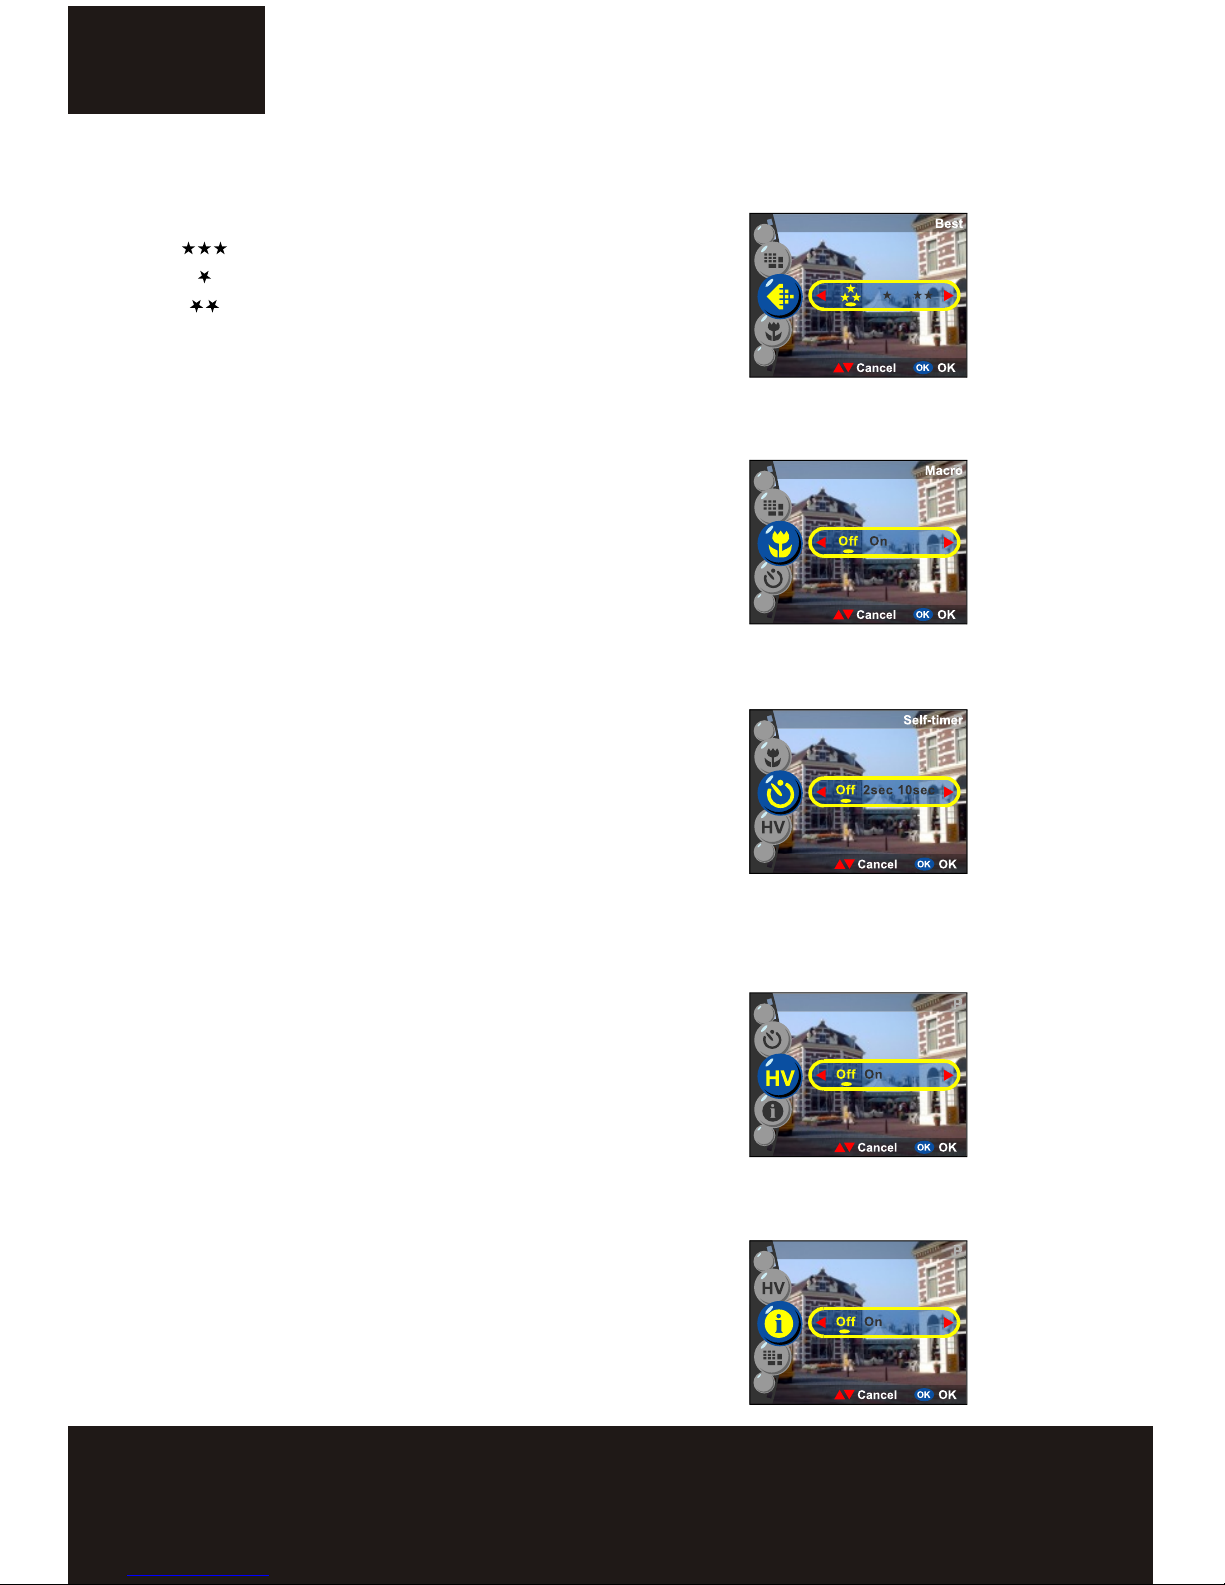
The widely-used JPEG format is used for image-recording quality setting.
Users can select from the following image quality:
Least image compression ratio (Default).
Less image compression ratio.
Economical image compression ratio.
Macro
The macro function allows users to take close up picture in a distance
within 10cm to 50 cm.
On
Off (Default)
Histogram Display
Histogram Value showing the brightness and contrast of the subject. It
enables precise exposure control. You can set
histogram display manually.
On
Off (Default)
Histogram Display
Information Display
This function supports to display capture information on LCD when take
pictures.
On
Off (Default)
Information Display
Self-timer Option
This function provides users different timer settings: 2 seconds and 10
seconds, 2 seconds is usually applied for user to
take shot without tripod to support camera steady
and prevent hand shaking by pressing Shutter
button.
2 sec
10 sec
Off (Default)
Page 14
14
Main Modes and Instructions
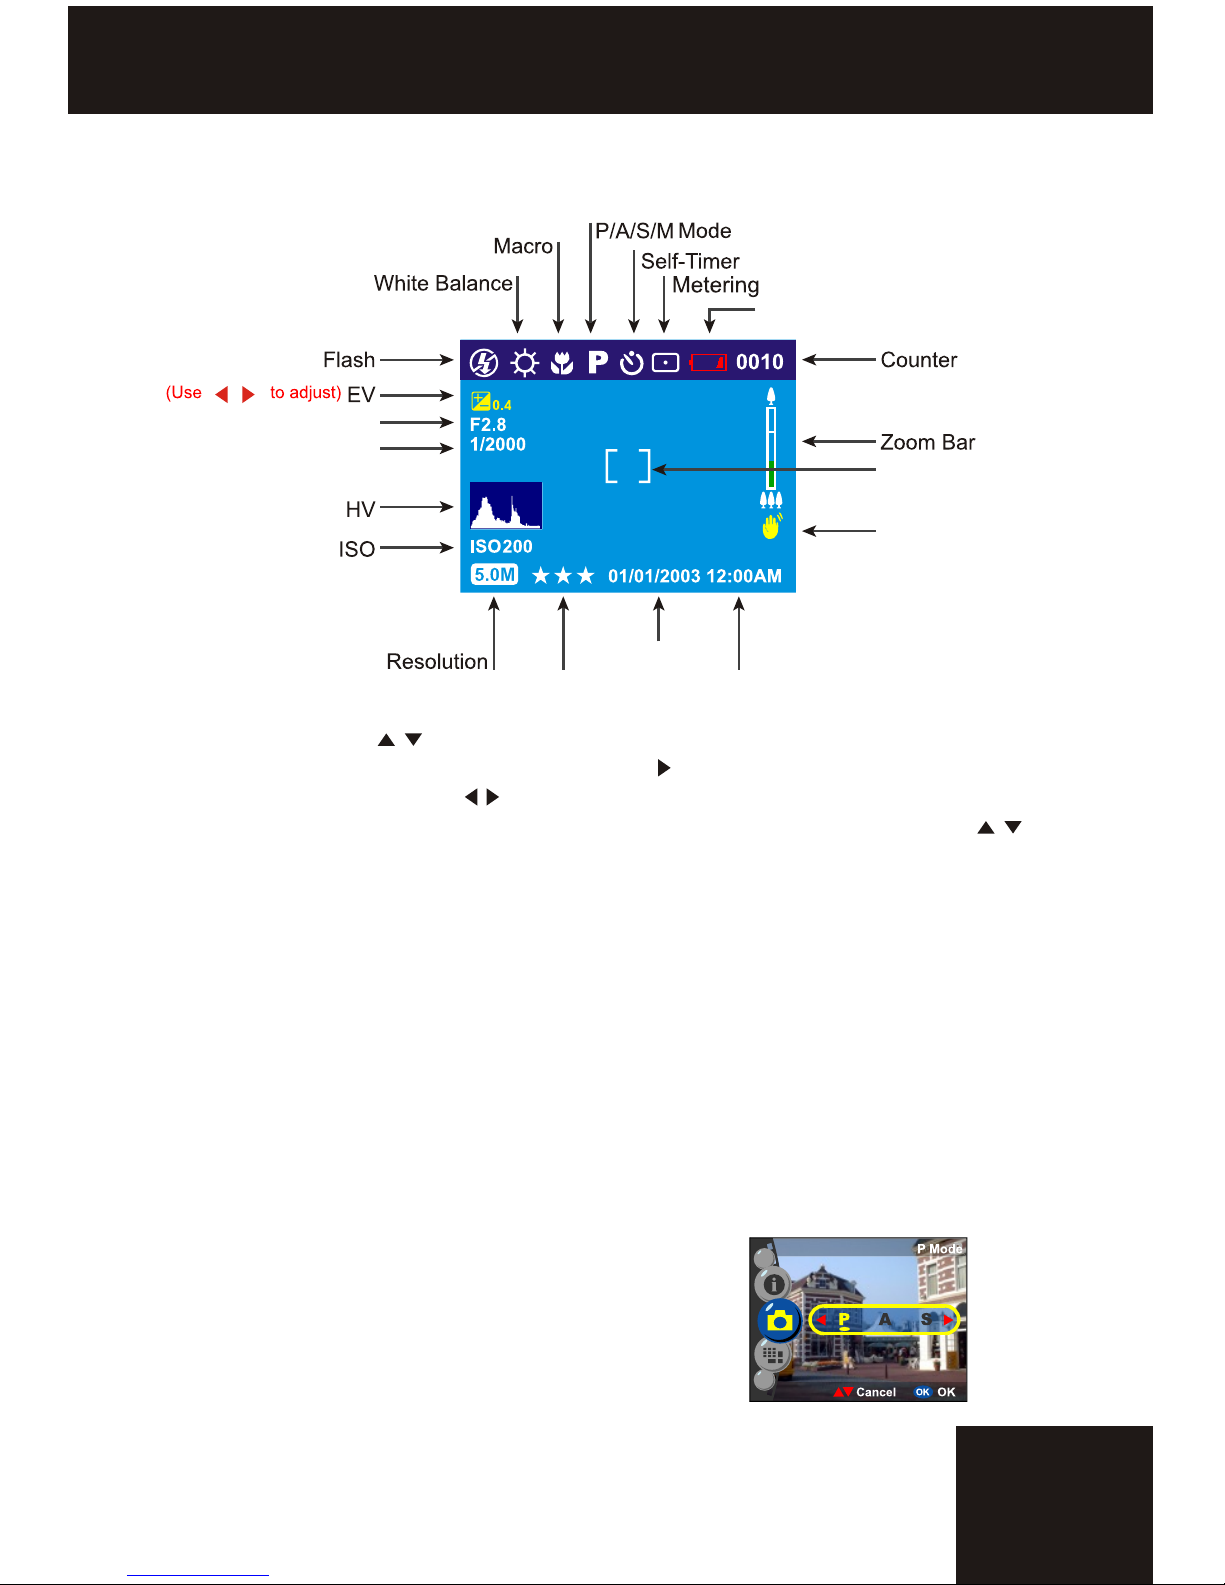
P mode-This mode allows you to take general still pictures. In this mode,
the camera will automatically set the aperture and shutter speed to suit the
scene's brightness.
Aperture Priority-In this mode, user could set the desired aperture value
and the camera will automatically set the shutter speed to suit the brightness
of the subject.
PASM Mode
This shooting mode has more image quality settings allow user to adjust, such
as Wite Balance, Digital Filter, ISO Speed, Metering, which they could provide
user to take shot similar to film camera and gain more photography fun.
Power Indicator
Aperture
ISO Speed
Image Quality
Date
Time
Hand Shake
Warning
Focus
Brackets
Turn the Mode Dial to the PASM Mode. Press the menu/OK button to access
menu. Then use button to select the setting option for change setting.
Once you have selected the option, press button to display the sub-menu
for all settings, and use button to scroll through them. After pressed
menu/OK button for setting confirmation and quit the sub-menu. Press
button to continue other setting options or press menu/OK button again to
quit menu.
Page 15
15
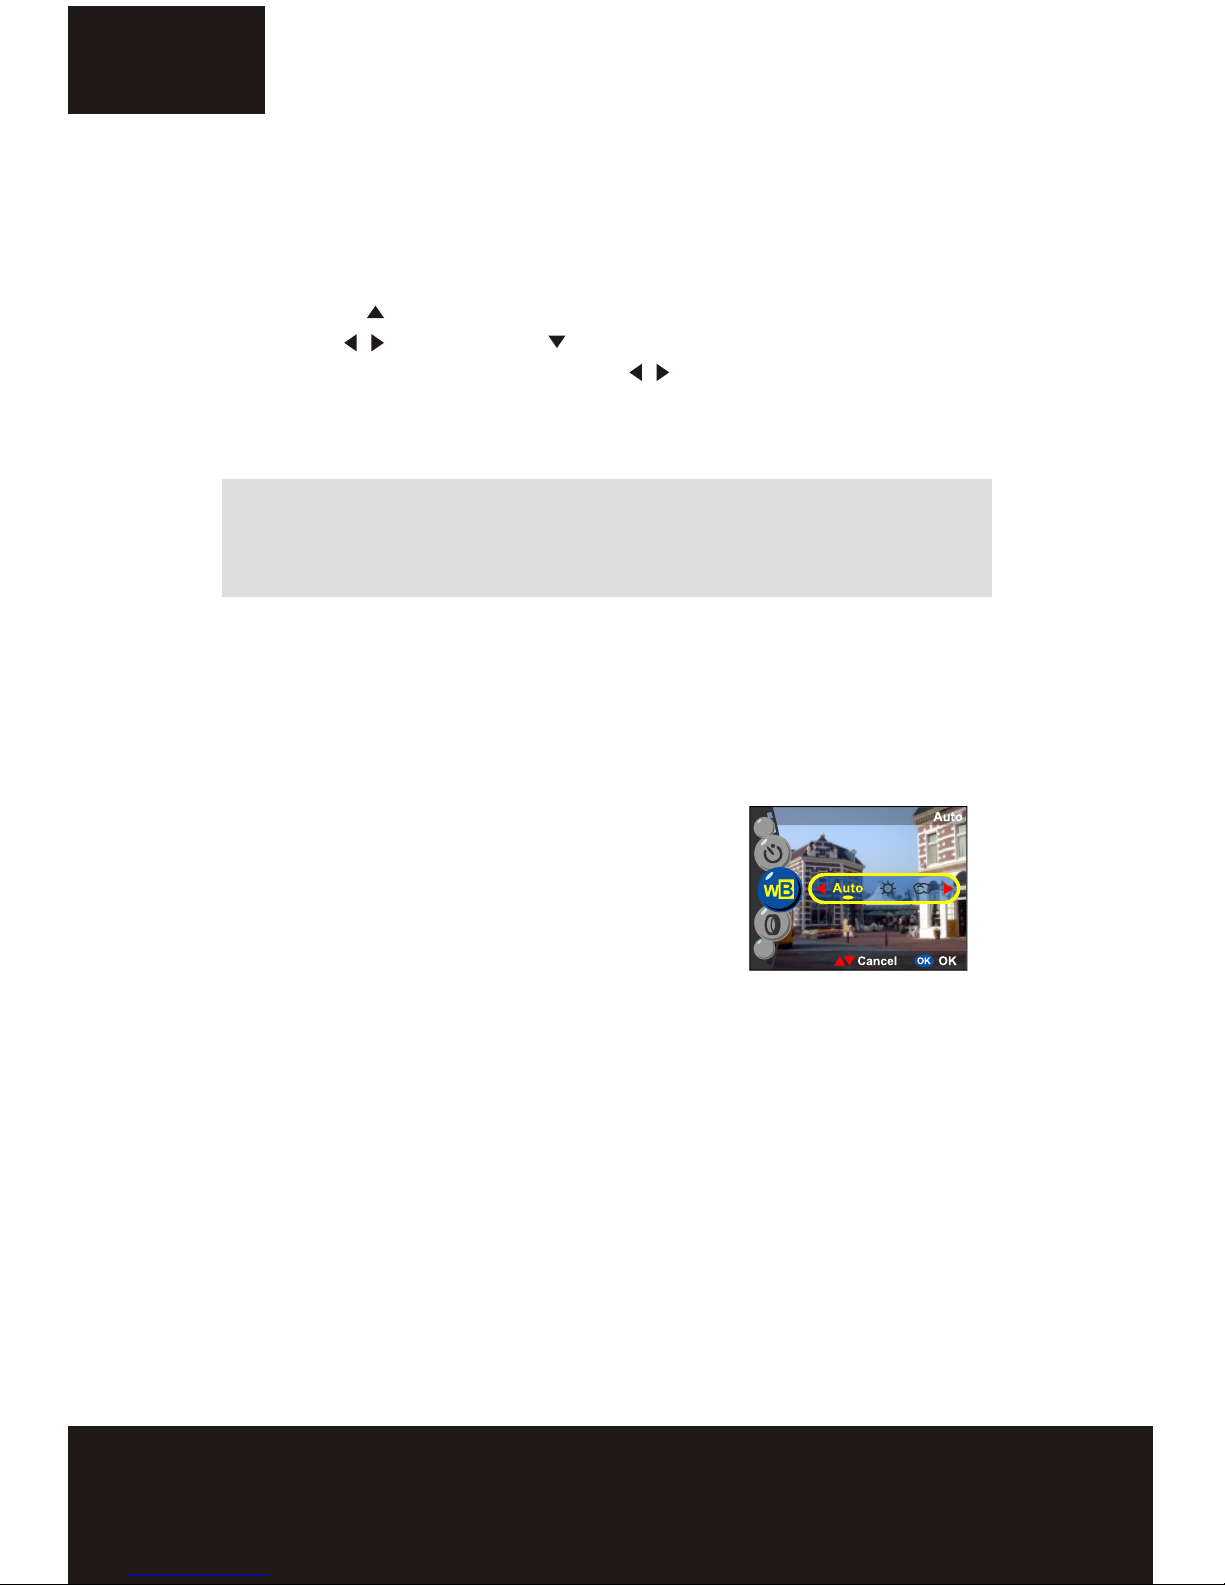
White Balance
Normally, the "Auto" WB setting will set the optimum white balance automatically. If natural colors cannot be obtained with auto WB, you can set
the white balance manually to suit the respective light source. Users can
select the following white balance:
Auto (Default)
Sun
Cloud
Tungsten
Fluorescent
Shutter Priority-In this mode, user could set the desired shutter speed
and the camera will automatically set the aperture value to suit the subject
brightness.
Manual-In this mode, could set both the shutter speed and the aperture
by manual. Use button to select the aperture setting and adjust the value
(F2.7/4.9) by button , use button to select shutter speed setting and
adjust the value ( 1/2000 ~ 16 sec.) by button.The exposure level can be
viewed on the bottom of LCD.
Tip: Resolution, Image quality, Macro, Self-Timer, White
Balance, Digital Filter, ISO speed, Metering, Histogram Display
and Infomation Display settings are available under PASM Mode.
Page 16
16
Main Modes and Instructions
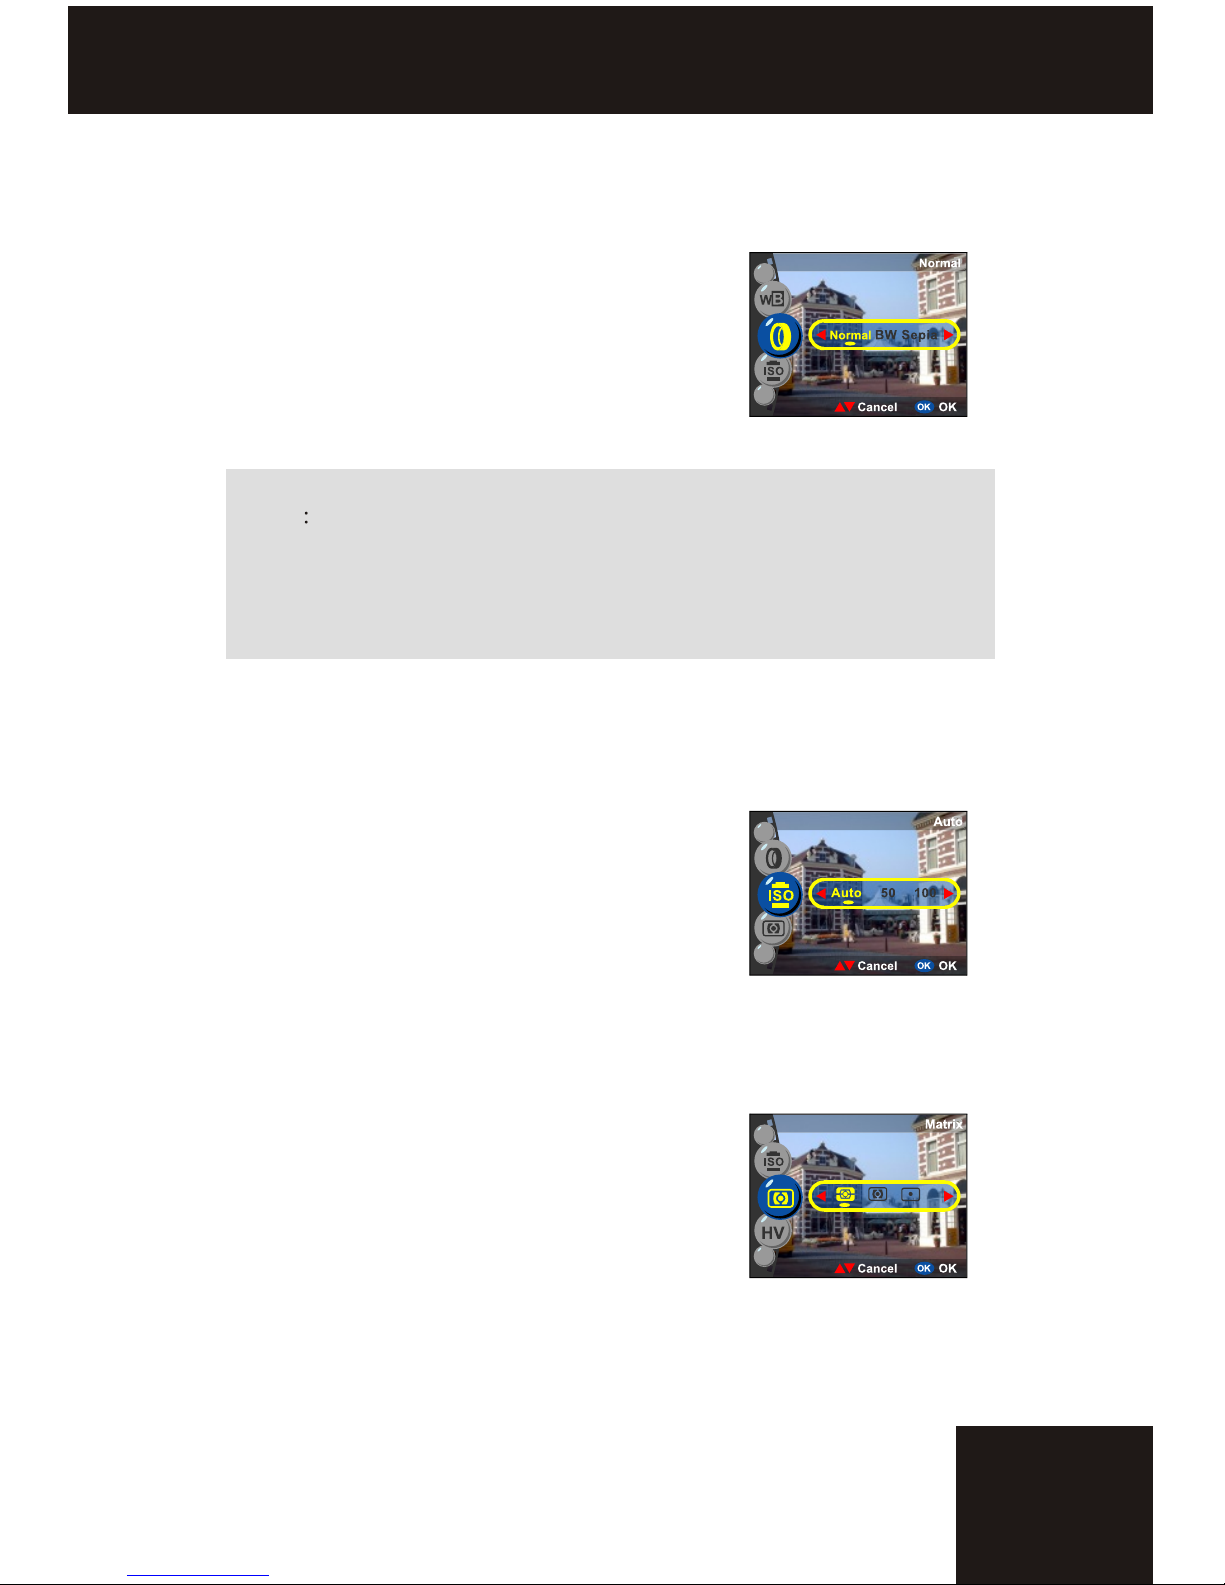
Digital Filter
This function could let user set image to have color filter effect by digital
image processing instead of lens filter:
Normal/BW/Sepia/Red/Pink/Purple/Blue/Green/
Yellow/Solarize/Negative Artwork
ISO Speed
The ISO speed is the sensitivity to light. The higher the ISO speed number,
the higher the sensitivity is to light.
Auto (Default)
50
100
200
Metering
This calculates the best overall exposure value. The camera has three
metering modes :
Matrix
Center-waighted (Default)
Spot
Tip Solarize-This effect creates the impression that the image
has been exposed to light.
Negative Artwork- Having the light and dark parts opposite
to what they were in the original picture.
Page 17
17
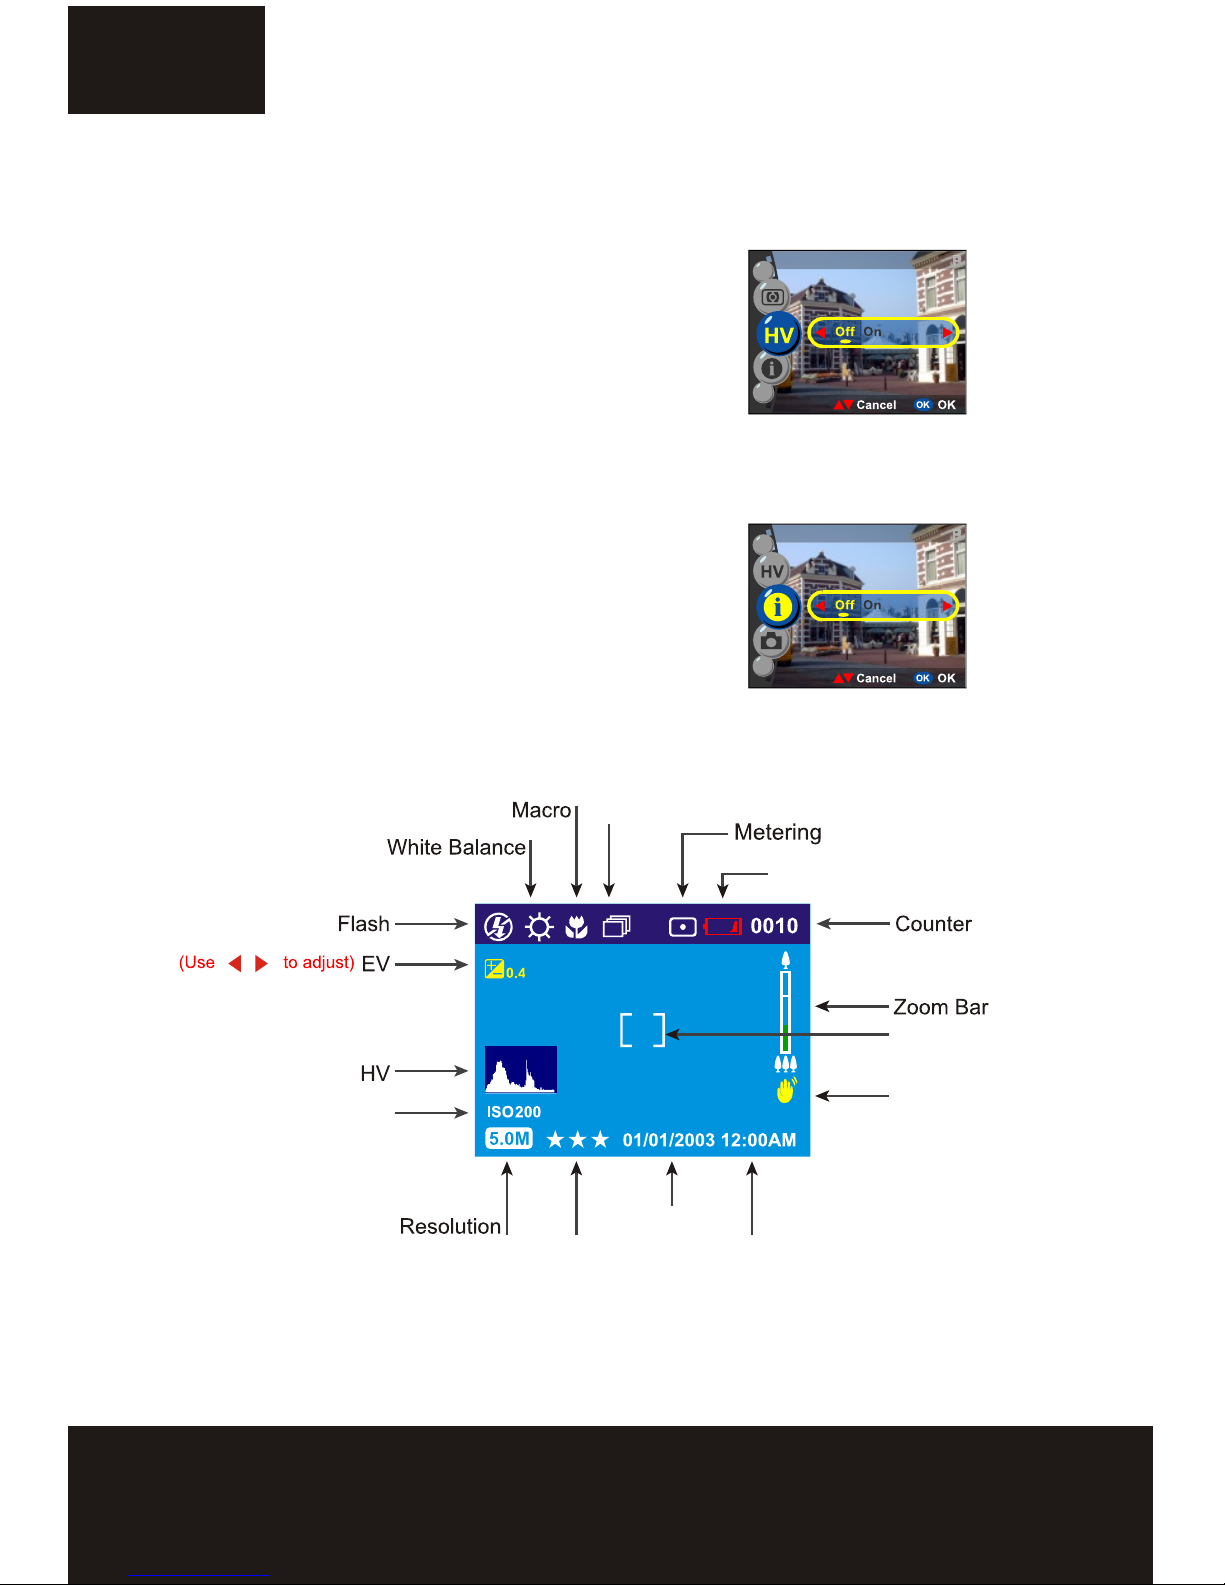
Information Display
This function supports to display capture information on LCD when take
pictures.
On
Off (Default)
Continuous Shot Mode
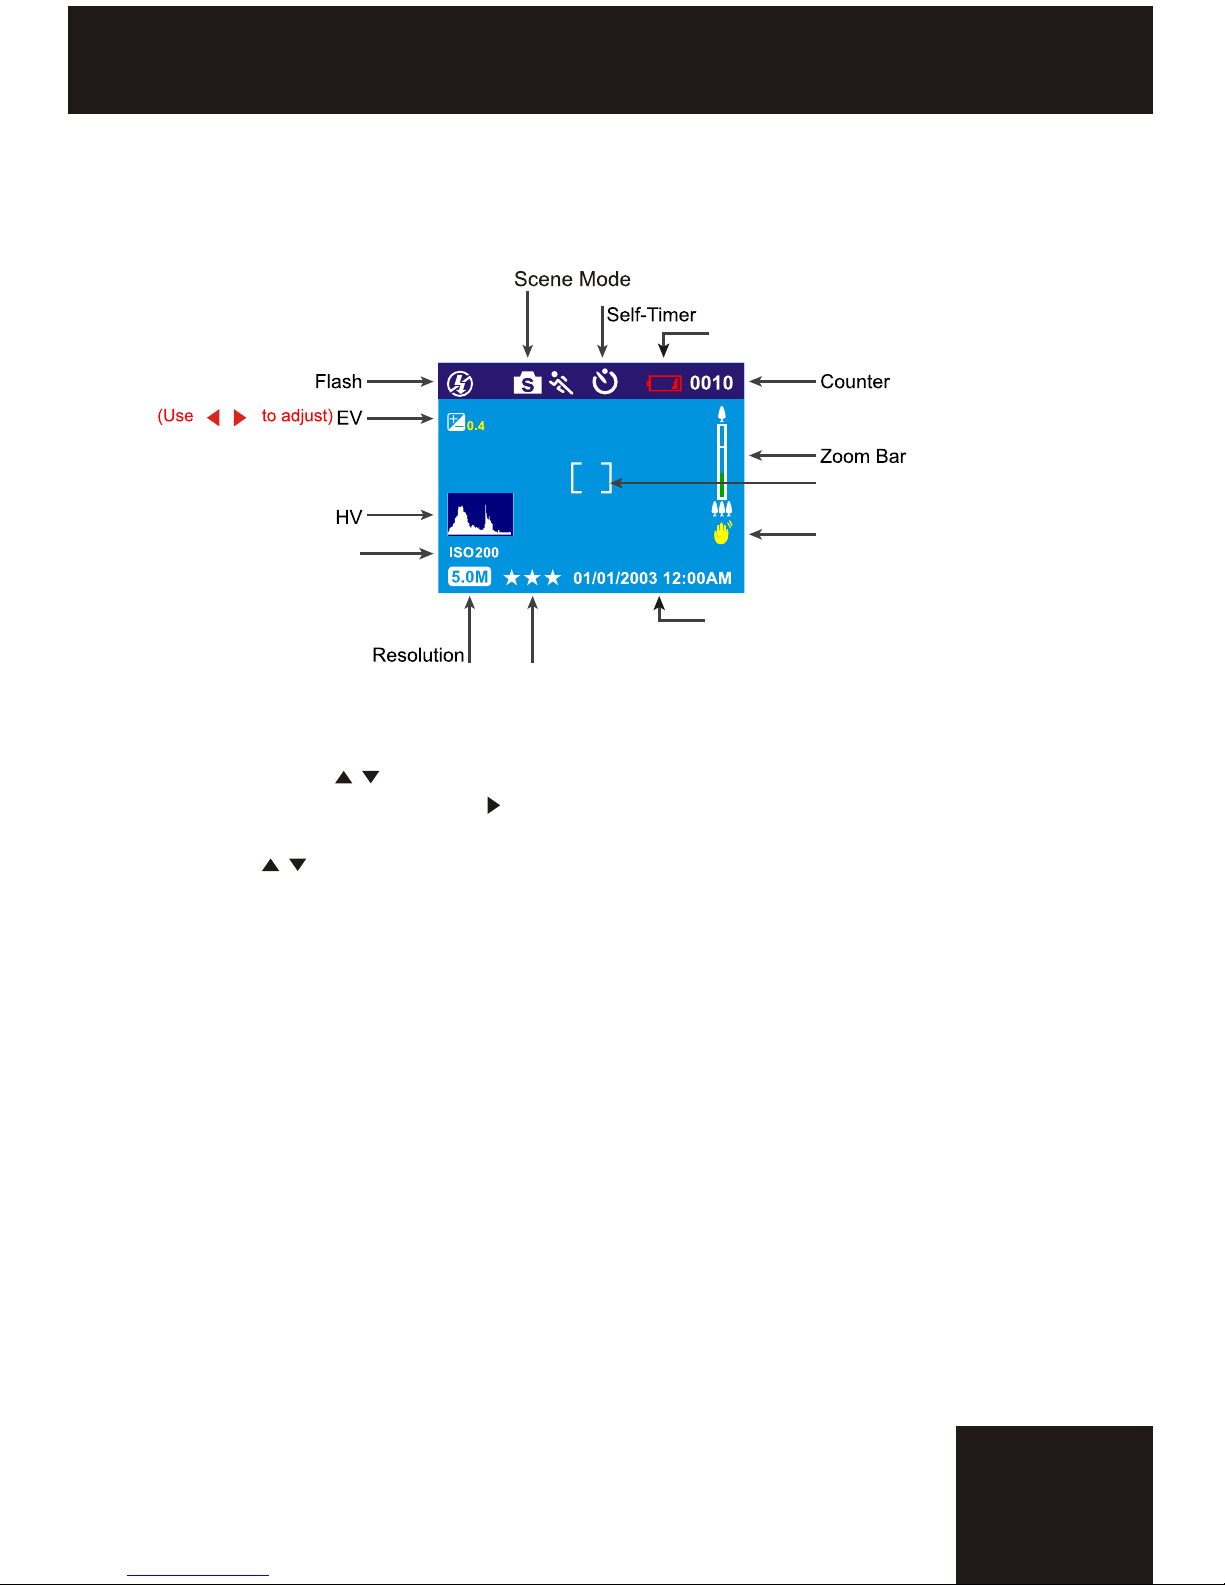
The menu contents under Continuous shot Mode are as same as PASM Mode.
Please refer the details and settings under PASM Mode. Please noticed that
Self-Timer Option is limited under PASM Mode.
Histogram Display
Histogram Value showing the brightness and contrast of the subject.
It enables precise exposure control. User can set histogram display
manually.
On
Off (Default)
Histogram Display
Information Display
Continuous Shot Mode
Power Indicator
Image Quality
Date
Time
Hand Shaking Warning
ISO Speed
Focus Brackets
Page 18
18
Main Modes and Instructions
Scene Mode
User can select from the following scenes to include in their pictures:
Scene
Turn the Mode Dial to the Scene Mode. Press the menu/OK button to access
menu. Press button to select the other setting options. Once you have
selected the option, press button to display the sub-menu for all settings.
After pressed menu/OK button for setting confirmation and quit the sub-menu.
Press button to continue other options or press menu/OK button again
to quit menu.
Power Indicator
Image Quality
Date/Time
Hand Shaking
Warning
ISO Speed
Focus Brackets
Page 19

19
Sport- This is for fast-moving subjects when you want to freeze the action.
Landscape- This is used for wide scenic views.
Night- Night view scenes.
Portrait- This mode blurs the background to focus on the portrait.
Self Portrait- It enables you to take a picture of yourself while holding the
camera. Point the lens towards yourself and take a shot of half top of protrait.
Night Portrait- This mode is for images taken during twilight or at nightfor
portrait. The flash illuminates the subject while a slow sync speed captures
a natural exposure of the background.
Sunset- To enhance the red tone for taking sunset picture.
Beach- This is for taking beach view with enhanced blue tone.
Back Light- For taking the picture of back light object by changing metering.
Autumn- This is for autumn scenic of red maple views.
Natural- This is suitable for forest or grasslands views.
Sky- This is for sky views to enhance saturation and blue tone.
Party- It enables you to take pictures under a darker environment with different lighting.
Text- This mode will project the text by enhancement of the black and
white contrast.
Tip: Resolution, Image quality, Self-Timer, Histogram Display
and Information Display settings are available under Scene
Mode. Please refer to the details from page 15.
Page 20
20
01/01/2003 12:00AM
59:59
Main Modes and Instructions
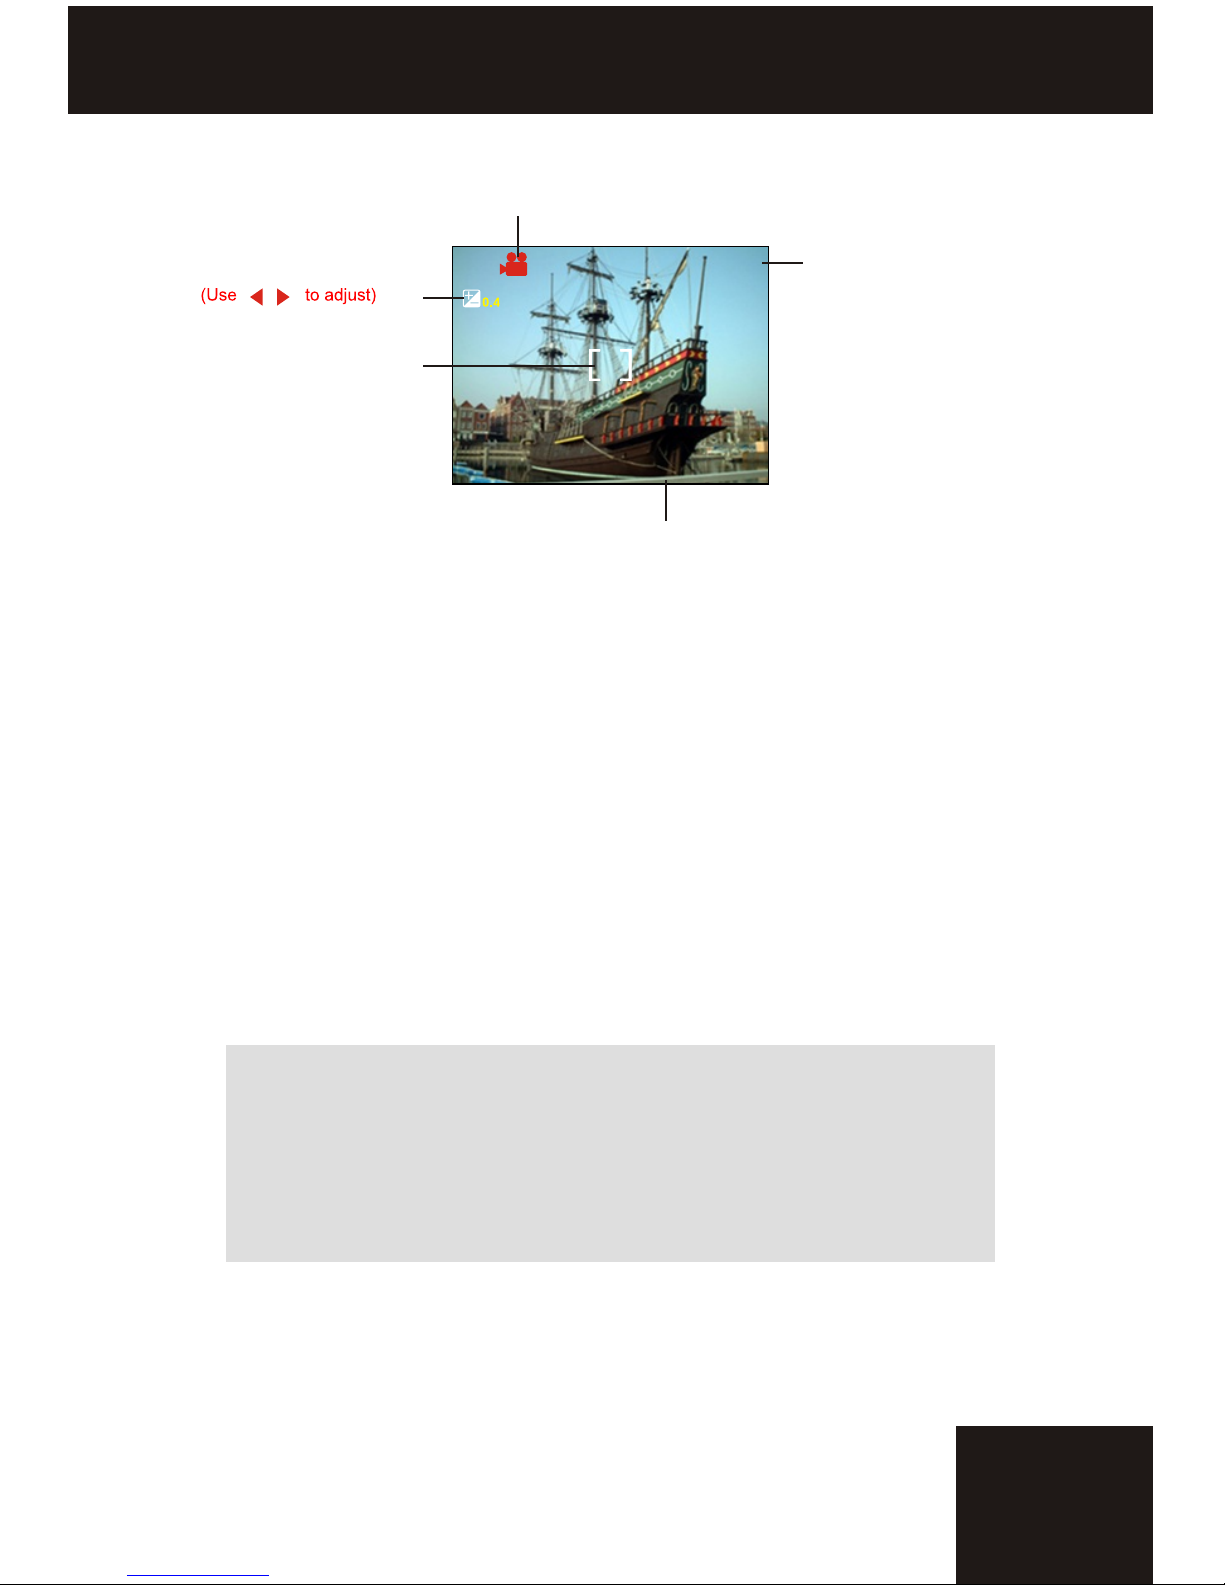
Movie Mode
Movie Mode allows you to use the camera as a movie recorder.
The length is based on the capacity of the internal memory or
SD card.
1. Turn the Mode Dial to the Movie Mode.
2. To start recording a movie, press the button. The camera will check the
capacity of the memory prior record a movie. If it is full, a warning sign
will display on the LCD, and will automatically exit the movie recording
state.
3. If there are no warning messages, the camera will start recording. To
stop recording, press the button again.
4. During movie recording, the Status LED will flash in red.
1. The file format of movie will be MPEG 4. (.asf)
2. When you playback video clip in PC, system will
require Windows Media Player 9.0 Codec. Please
link to Microsoft Website for getting the Codec.
Or you can playback the movie through bundled AP.
3. During movie recording, the zoom function is limited.
Tip:
Movie Mode
EV
Focus Brackets
Date/Time
Remain
Recording Time
Page 21
21
59:59
ShutterShutter StartStart
Ready for Record
01/01/2003 12:00AM
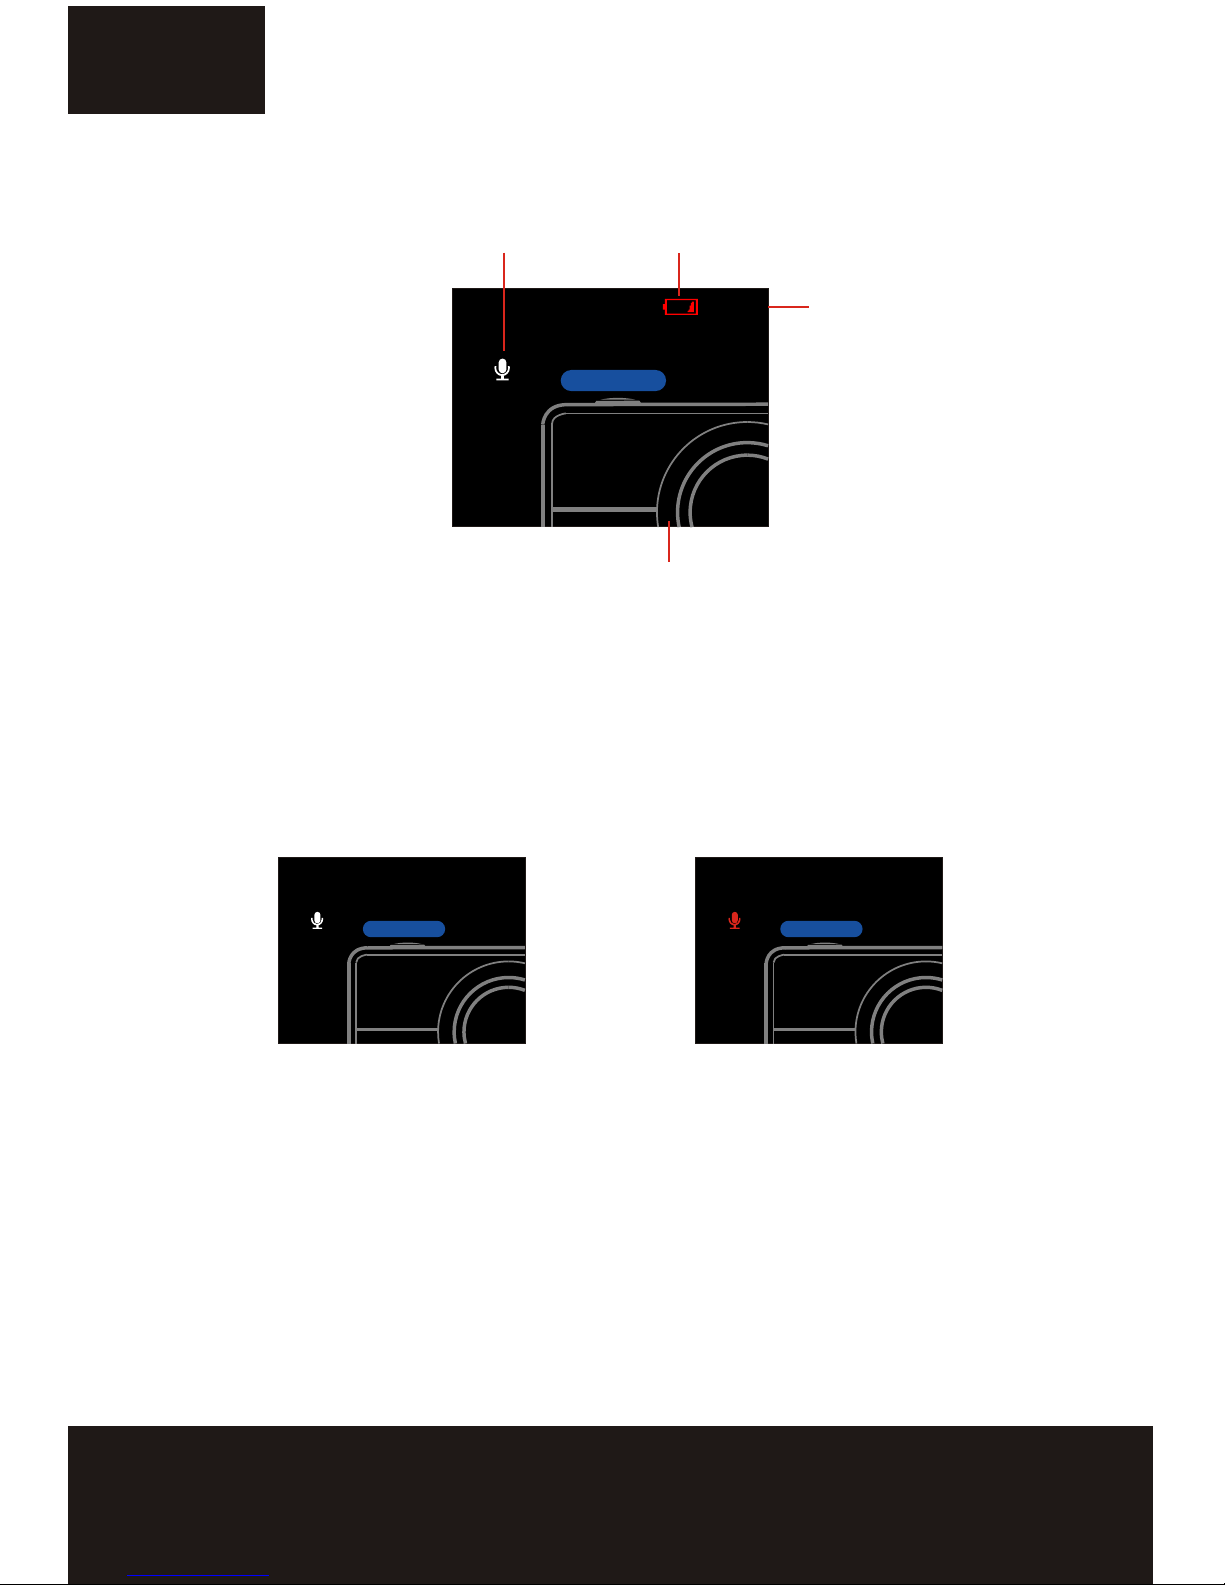
Audio Mode
Date/Time
Audio Mode
Remain Recording
Time
This function allows you to record audio. Turn the mode dial to
the Audio Mode. Press the Shutter button again to stop recording.
During the Audio recording, the Status LED will flash in red.
00:53
ShutterShutter StartStart
Processing...
01/01/2003 12:00AM
Power Indicator
59:59
ShutterShutter StartStart
Ready for Record
01/01/2003 12:00AM
Page 22
22
Main Modes and Instructions
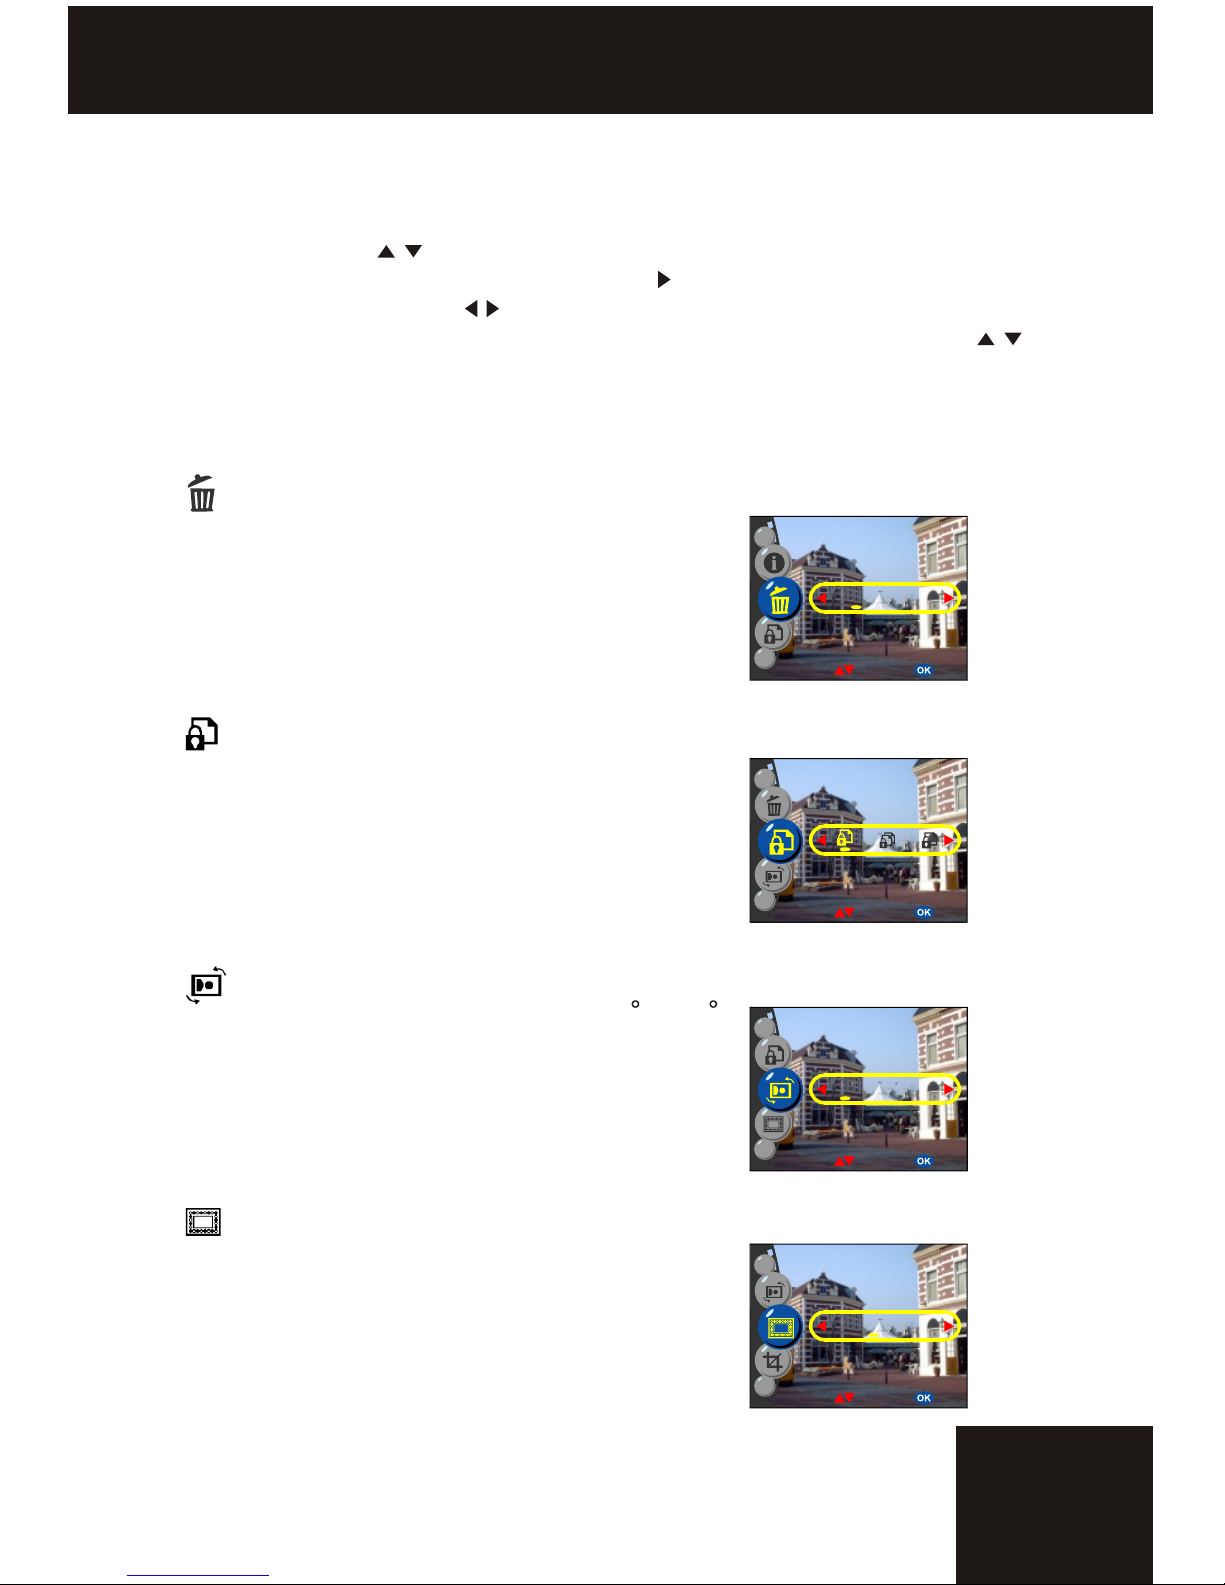
Delete
User can delete current or all files under
this :
Current
All
Main Modes and Instructions
P
Main Modes and Instructions
P
Main Modes and Instructions
P
Erase
Current All
Cancel OK
Protection
User can prevent images from accidental
erasure. This function choose to:
Protect Current
Protect All
Unprotect Current
Unprotect All
P
Main Modes and Instructions
PErase
Current All
Cancel OK
P
Main Modes and Instructions
PErase
Current All
Cancel OK
P
Protect Current
Main Modes and Instructions
PErase
Current All
Cancel OK
PProtect Current
Cancel OK
Playback Mode
Rotation
This function can rotate image 90 or 270
clockwise.
Main Modes and Instructions
PErase
Current All
Cancel OK
PProtect Current
Cancel OK
Main Modes and Instructions
PErase
Current All
Cancel OK
PProtect Current
Cancel OK
Rotation
Cancel OK
Main Modes and Instructions
PErase
Current All
Cancel OK
PProtect Current
Cancel OK
Rotation
90
270
Turn the Mode Dial to the PASM Mode. Press the menu/OK button to access
menu. Then use button to select the setting option for change setting.
Once you have selected the option, press button to display the sub-menu
for all settings, and use button to scroll through them. After pressed
menu/OK button for setting confirmation and quit the sub-menu. Press
button to continue other setting options or press menu/OK button again to
quit menu.
Following are the detial introduction of playback mode menu.
Frame Editing
This camera provide different frames for
quick image editing on LCD.
Main Modes and Instructions
PErase
Current All
Cancel OK
PProtect Current
Cancel OK
Rotation
Cancel OK
90
270
Main Modes and Instructions
PErase
Current All
Cancel OK
PProtect Current
Cancel OK
Rotation
Cancel OK
90
270
Frame Editing
Cancel OK
Main Modes and Instructions
PErase
Current All
Cancel OK
PProtect Current
Cancel OK
Rotation
Cancel OK
90
270
Frame Editing
Frame Editing
Page 23
23
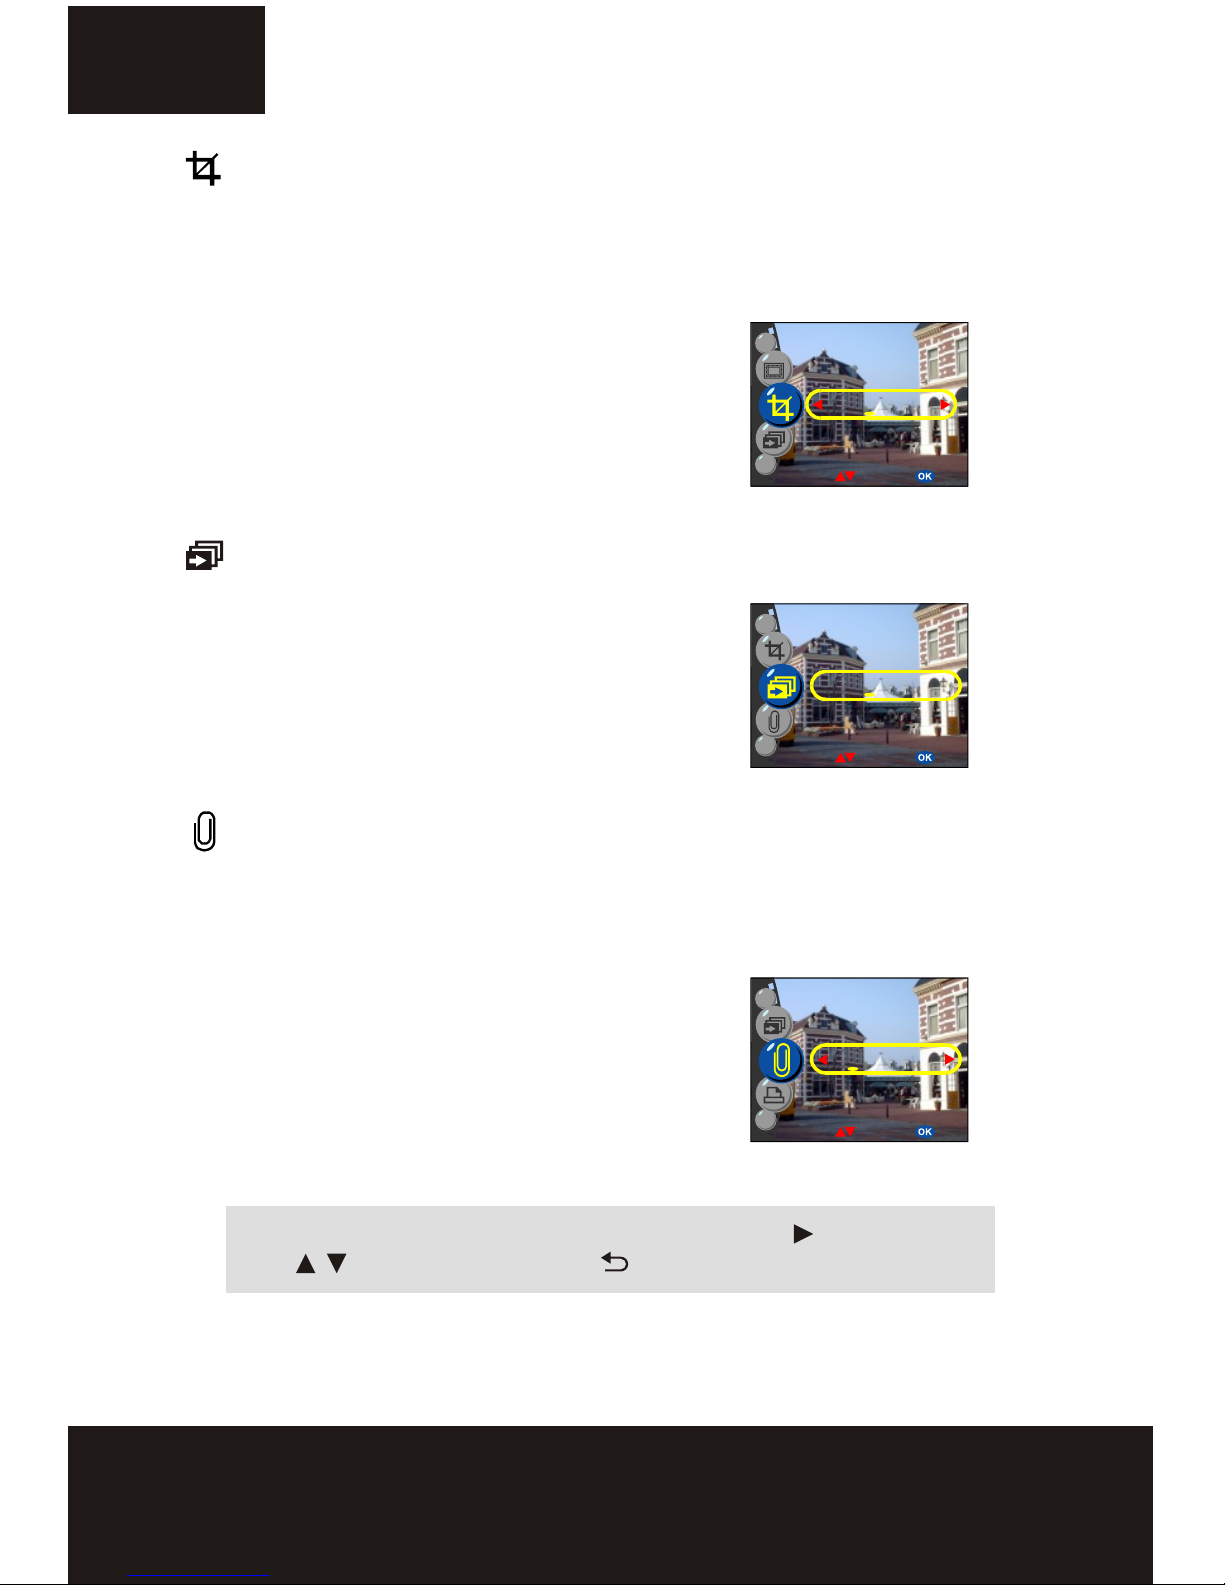
Crop Picture
User can crop images through the desired magnified area. Press
menu/OK to confirm crop function. After pressing the zoom in/out
button, the image will be magnified or minified, user can use 4 way
button to navigate the image. Once a desired section of the picture
is selected, press menu/OK again to crop.
P
P
P
Crop Picture
Cancel OK
P
Crop Picture
Crop Picture
Slide Show
Allow user to slide show all images. User also can set slide show
interval in Setup mode.
P
Crop Picture
Cancel OK
Crop Picture
P
P
Crop Picture
Cancel OK
Crop Picture
P
P
Crop Picture
Cancel OK
Crop Picture
P
Slide Show
Slide Show
Cancel OK
Voice Memo
This function provides 20 seconds voice memo for still image. Select
" Voice Memo " and press menu/OK button to start the recording
session. A countdown timer will indicate how much time is left in the
recording session. Press menu/OK button to end the recording.
P
Crop Picture
Cancel OK
Crop Picture
P
Slide Show
Slide Show
Cancel OK
P
P
Crop Picture
Cancel OK
Crop Picture
P
Slide Show
Slide Show
Cancel OK
P
P
Crop Picture
Cancel OK
Crop Picture
P
Slide Show
Slide Show
Cancel OK
P
Voice Memo
Start Erase
Cancel OK
Tip: To playback the recorded voice memo, press for play, and
use for other operation or for entering in Playback menu.
Page 24
24
Main Modes and Instructions
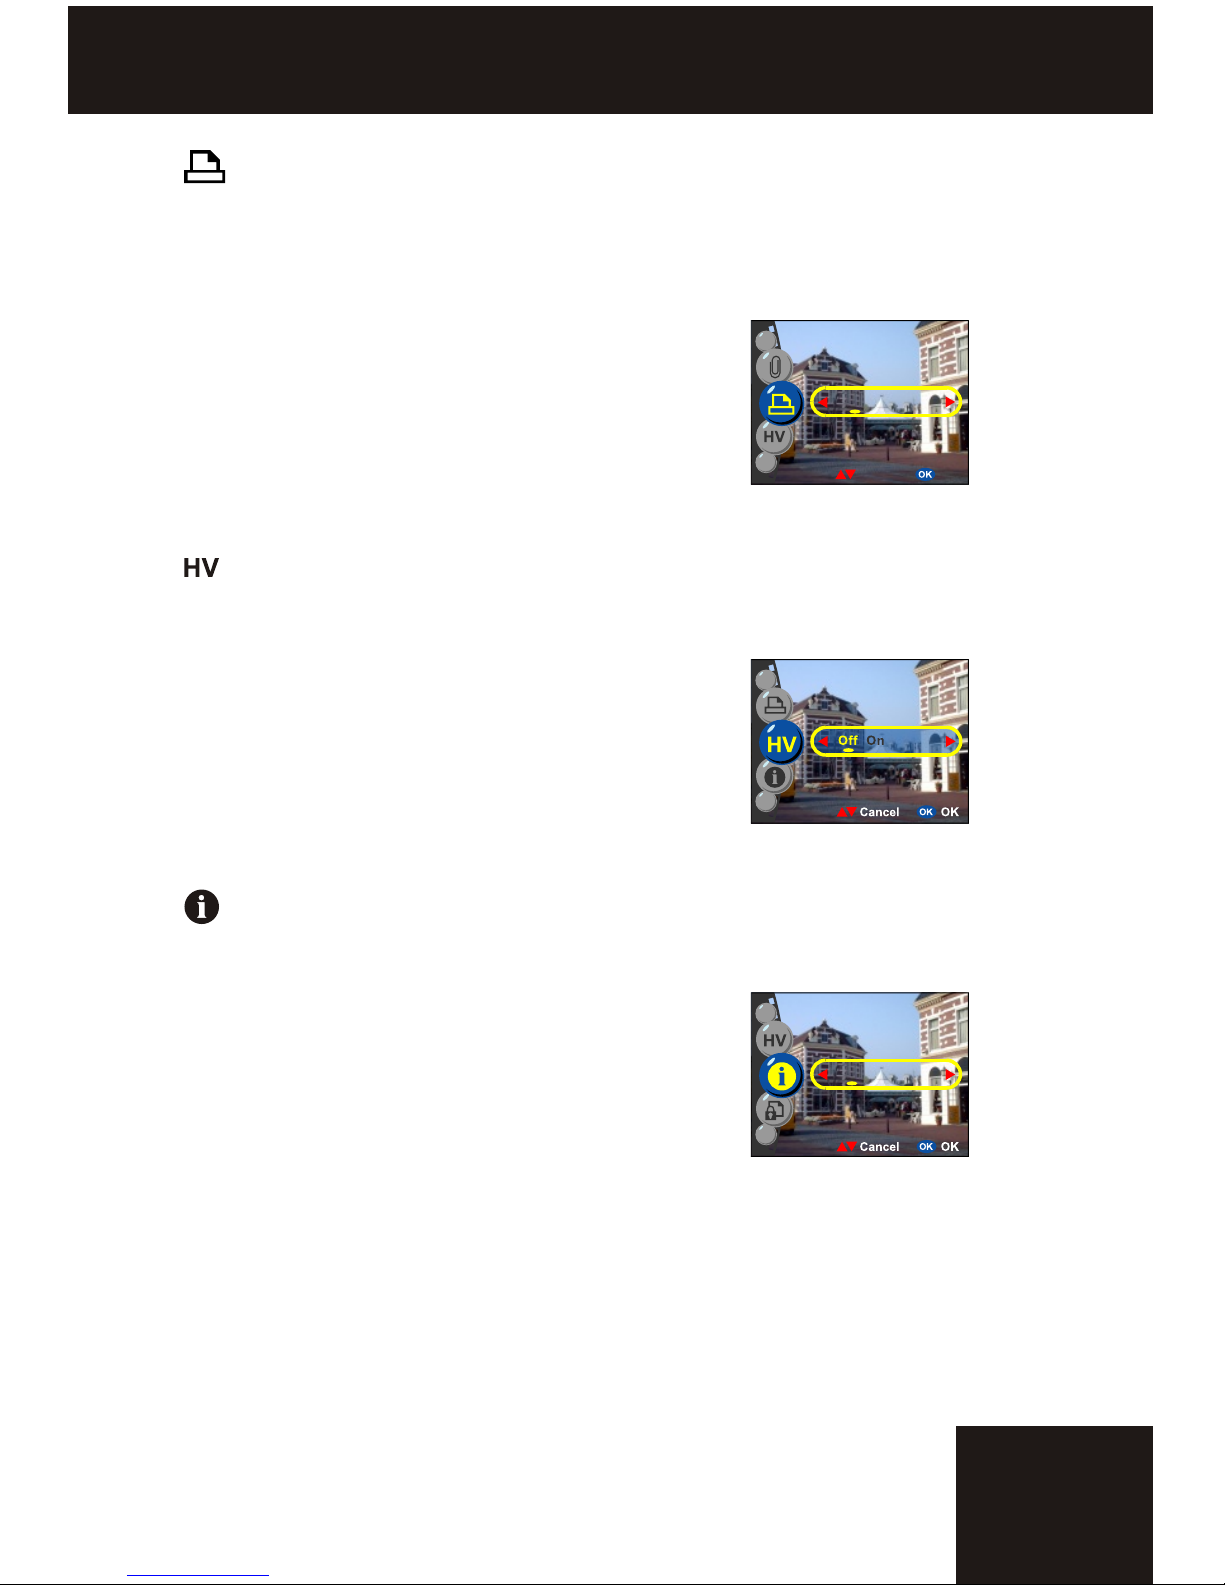
DPOF
DPOF is a format used to record automatic print information from
cameras. By specifying which pictures are to be printed, the pictures
can be printed easily by DPOF-compatible printing service labs or on
a personal DPOF-compatible printer. Users can select to print:
Current
All
Reset
Main Modes and Instructions
P
Main Modes and Instructions
P
Main Modes and Instructions
P
DPOF
Current All Reset
Cancel OK
Histogram Display
Allow user to review the histogram value condition of taken picture.
Once enable this function, user can see the HV display on LCD.
On
Off
Main Modes and Instructions
P
DPOF
Current All Reset
Cancel OK
Main Modes and Instructions
P
DPOF
Current All Reset
Cancel OK
Main Modes and Instructions
P
DPOF
Current All Reset
Cancel OK
Histogram Display
Information Display
This function supports to display recording information on LCD when
review pictures.
On
Off
Main Modes and Instructions
P
DPOF
Current All Reset
Cancel OK
Histogram Display
Main Modes and Instructions
P
DPOF
Current All Reset
Cancel OK
Histogram Display
Information Display
Main Modes and Instructions
P
DPOF
Current All Reset
Cancel OK
Histogram Display
Information Display
On Off
Page 25
25
Setup Mode
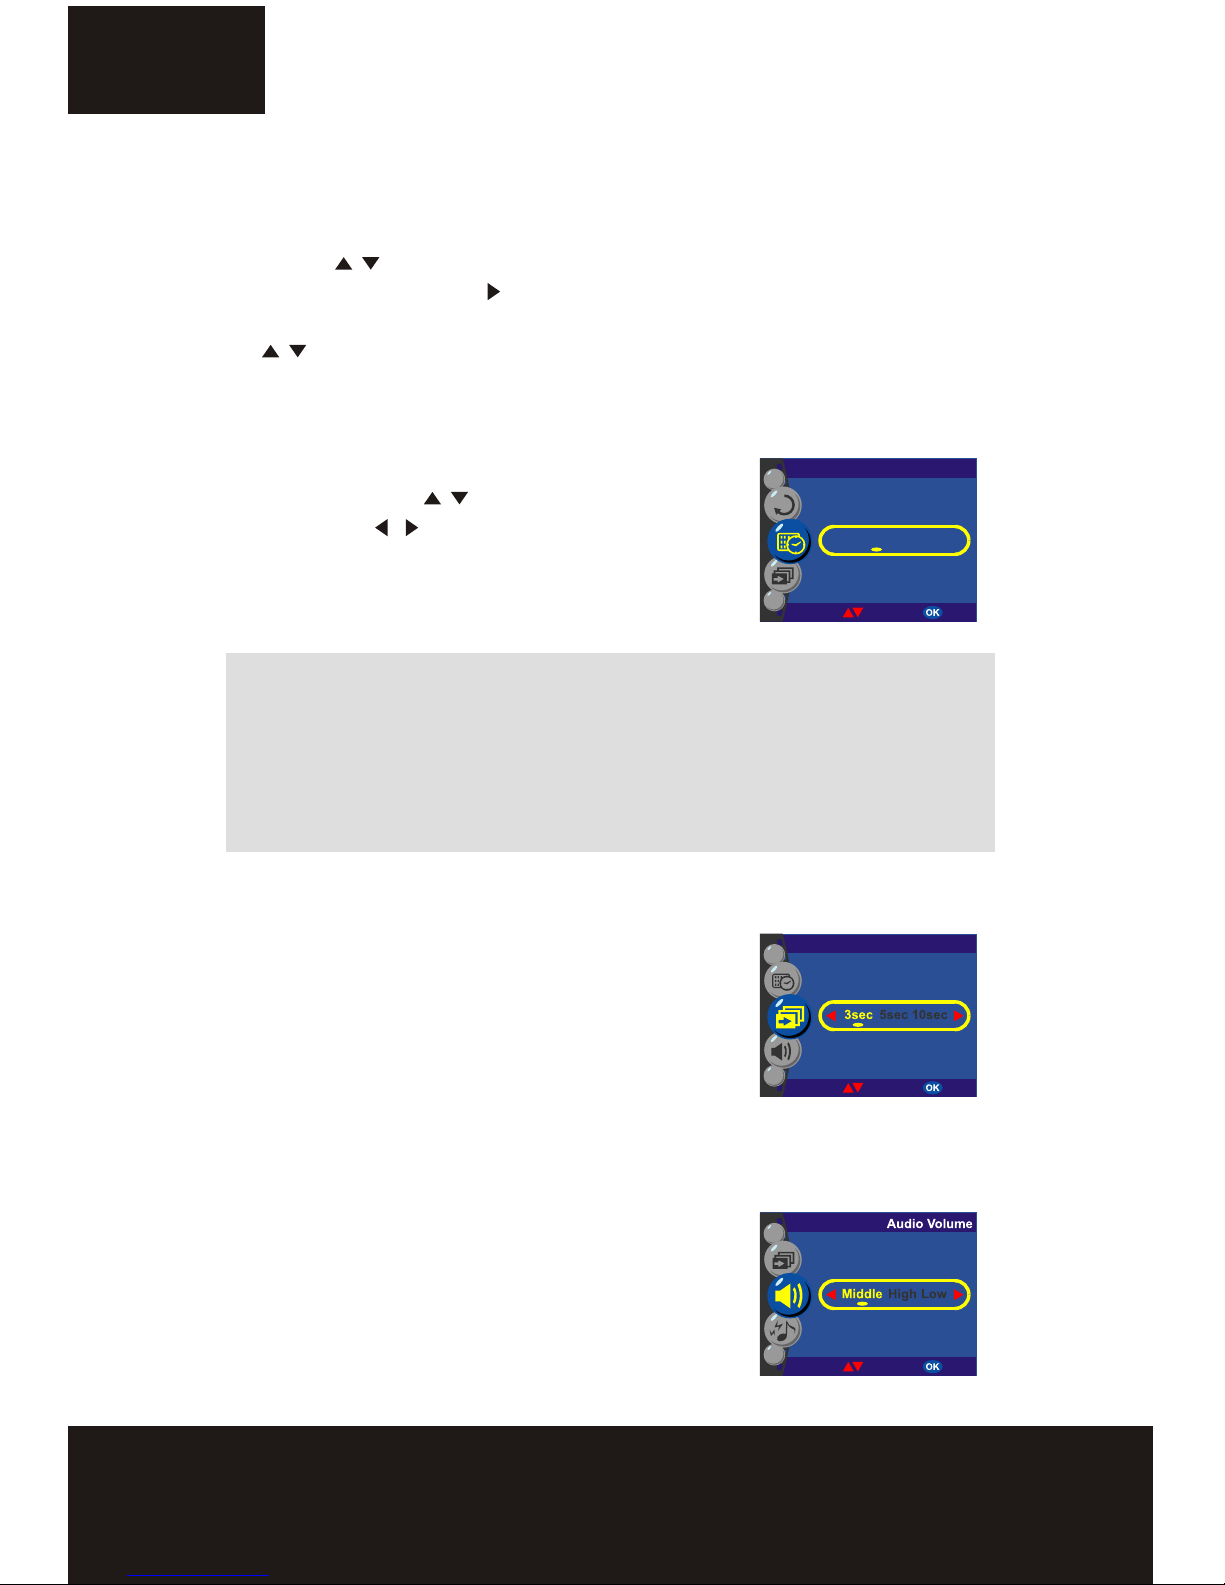
Date and Time
Reset date and time when change battery. User
can change value by button and change
setting items by button.
Slide Show Interval
Under this setting, users can set the interval of
seconds they want the slide show to proceed per
slide. Users can select:
3 seconds
5 seconds
10 seconds
Tip: Dates can be set in these formats:
YYYY.MM.DD
MM.DD.YYYY
Time can be set in these formats:
12-hour
24-hour
Cancel OK
Date and Time
Date and Time
Cancel OK
Slide Show Interval
Turn the Mode Dial to the Setup Mode. Press the menu/OK button to access
menu. Press button to select the other setting options. Once you have
selected the option, press button to display the sub-menu for all settings.
After pressed menu/OK button for setting confirmation and quit the sub-menu.
Press button to continue other options or press menu/OK button again
to quit menu. User will be able to set the following functions:
Audio Volume
Users can adjust the audio volume of audio, video
and voice memo functions:
High
Middle
Low
Cancel OK
Page 26
26
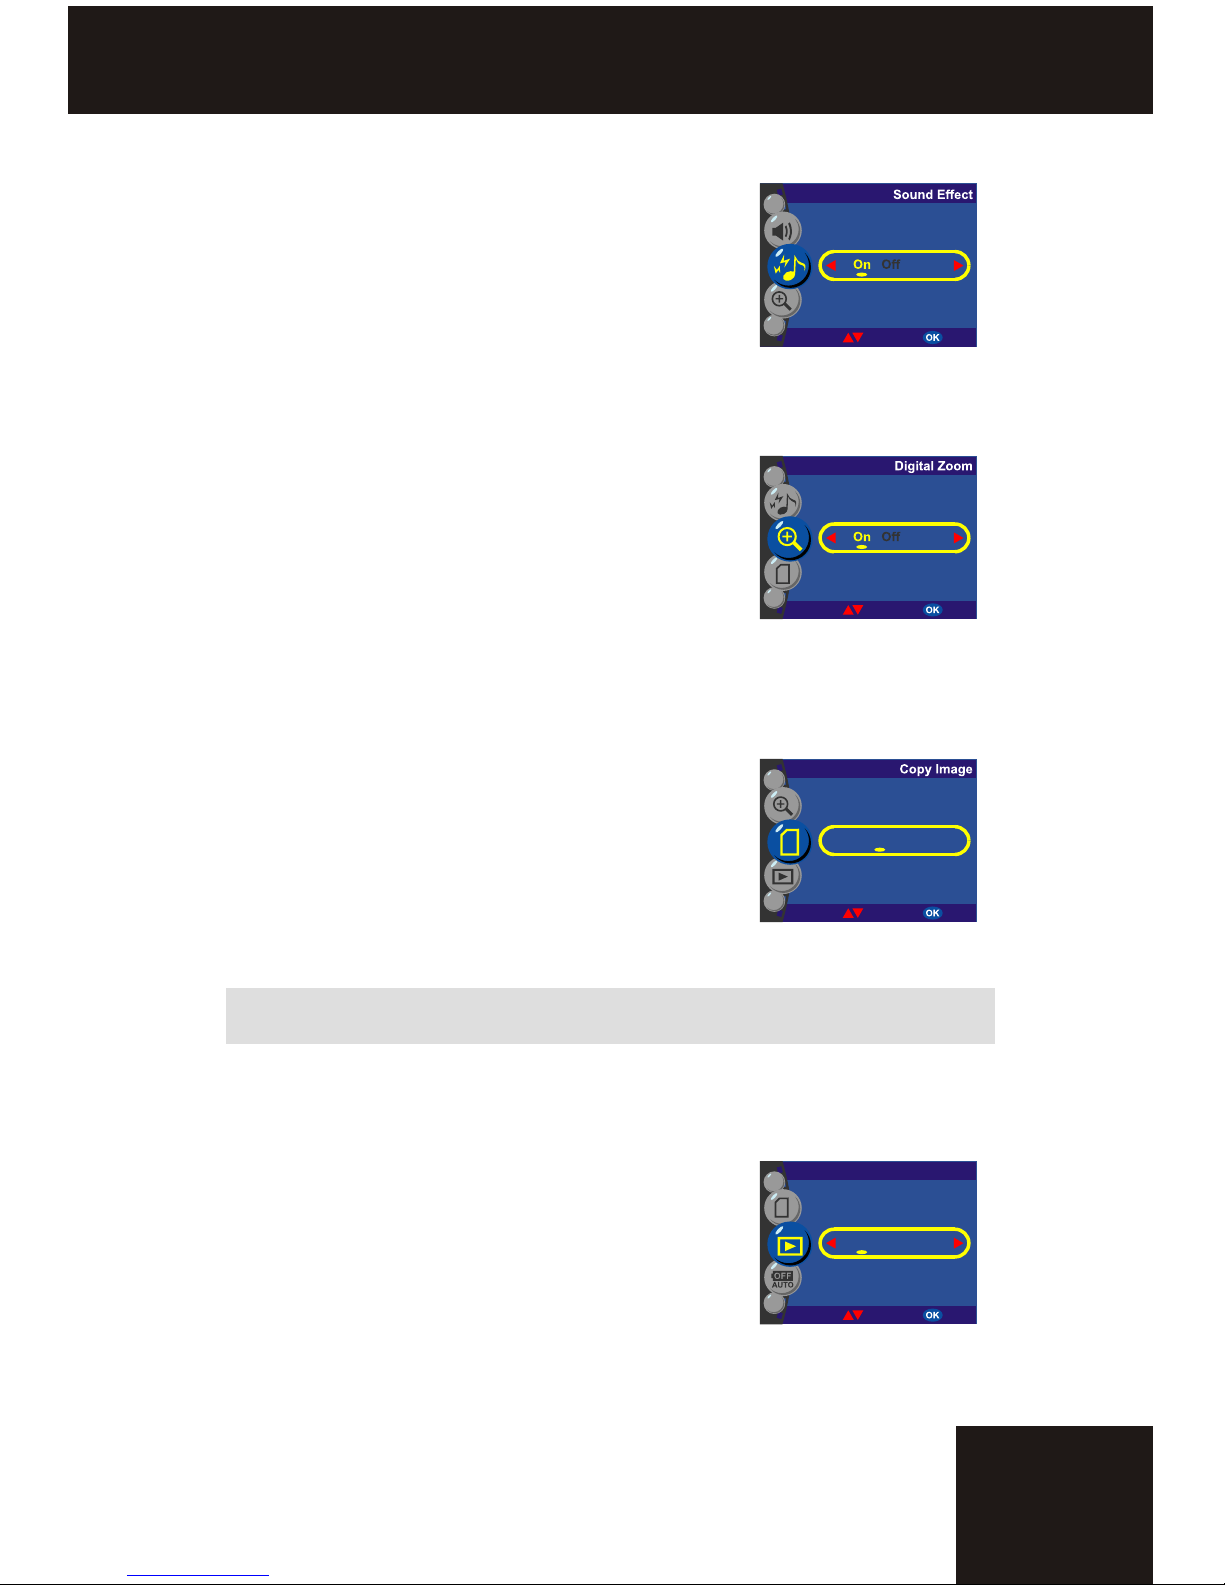
Sound Effect
This function allows users to turn the sound effect
on or off:
On
Off
Main Modes and Instructions
Copy Image
This camera can support to copy pictures from
internal memory to SD card.
Tip: Only image files can be copy from internal memory to SD card.
Digital Zoom
This camera provides up to 4x digital zoom
function when take picture. User can select to
enable digital zoom from this setting.
On
Off
Cancel OK
Cancel OK
Copy Image
Cancel OK
Instant Review
Sets the time for the picture to be previewed:
1 second
3 seconds
5 seconds
Off
Cancel OK
Instant Review
1sec 3sec 5sec
Page 27
27
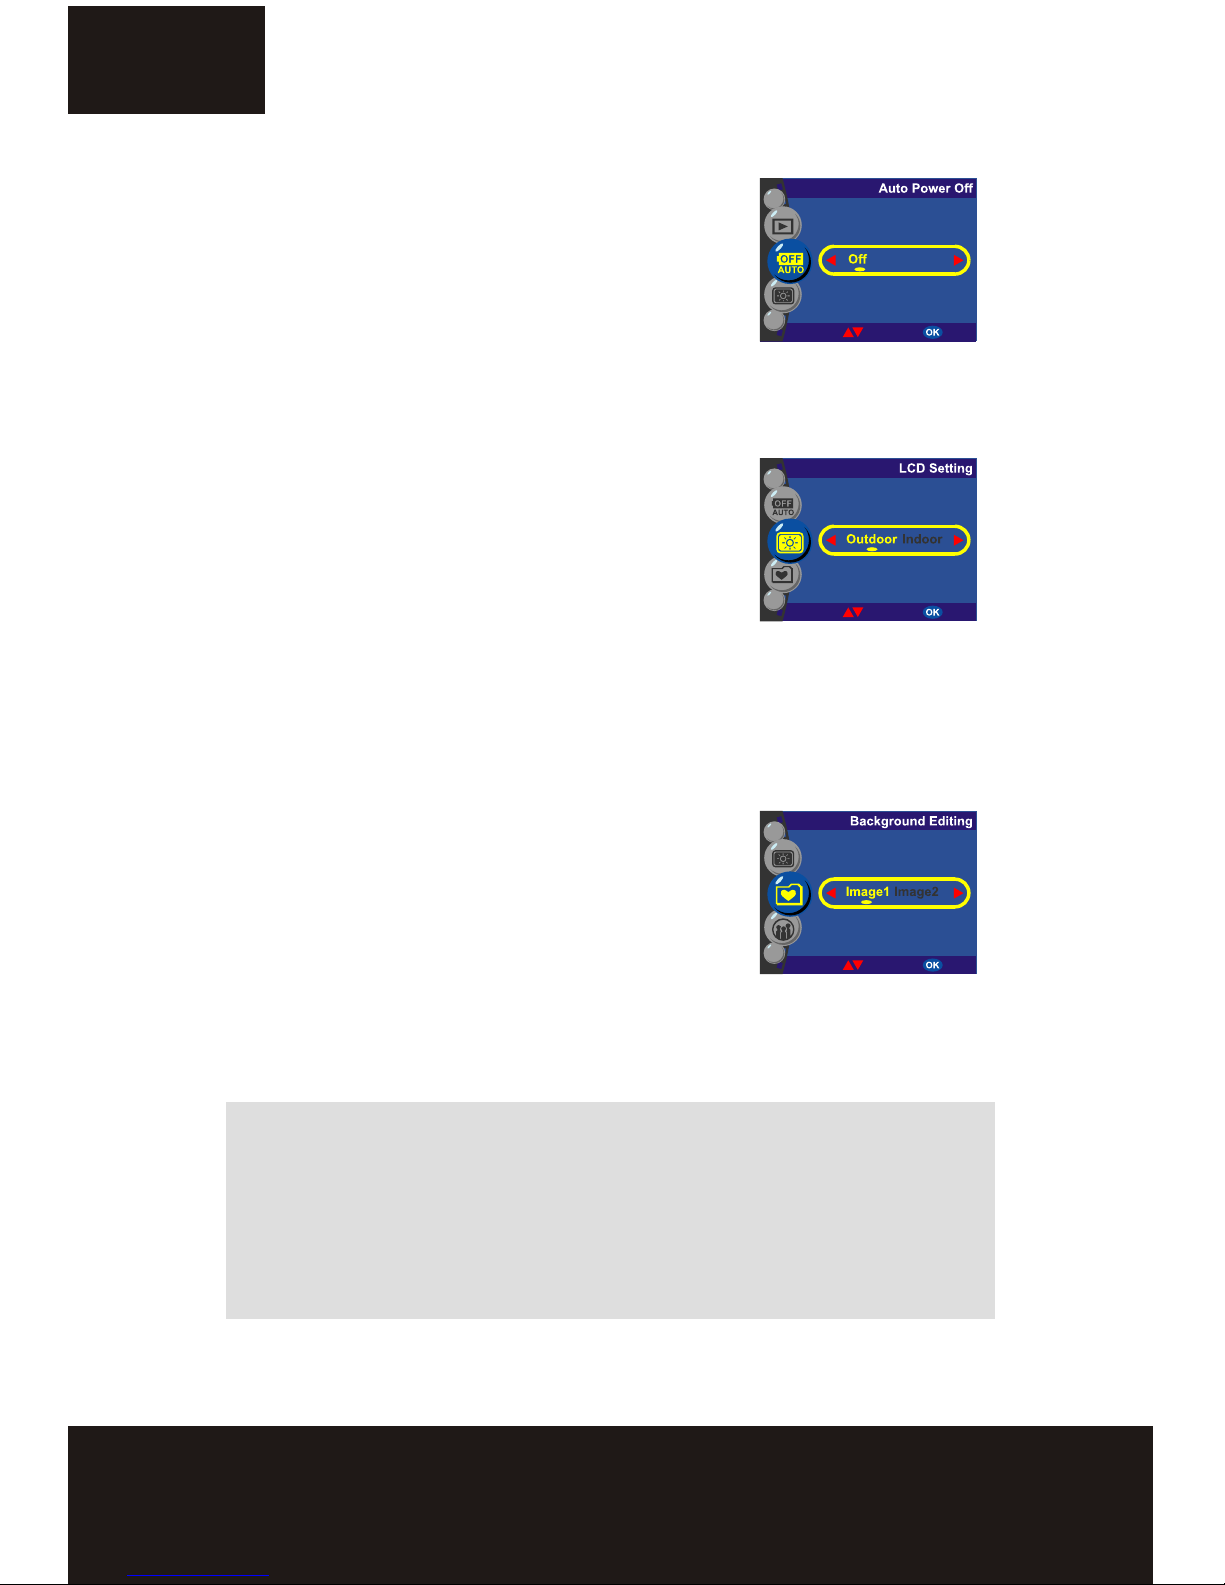
Auto Power Off
This setting automatically turns off the camera.
Users can select the following minutes to Auto
Power Off the camera.
Off
3 minutes
1 minute
LCD Setting
This setting could let user to adjust LCD
brightness depending on the enviornment
illuminance in order to let user has more clear
live view image on LCD. User can select the
brightness of the LCD:
Indoor
Outdoor
Background Editing
Allows user to select their preferred images
which are built in camera (Image 1,2) or
"My Photo" as background.
Image 1
Image 2
My Photo
Editing
Cancel OK
3minute
Cancel OK
Cancel OK
Tip: This background will be replaced the default images of welcome page and Setup mode background. User could use "Editing"
function to choose preferred images from Internal Memory or SD
card to be "My Photo", and it will will be stored in camera,
eventhough the image stored in Internal Memory or SD card had
been deleted by user, "My Photo" still keeps the image.
Page 28
28
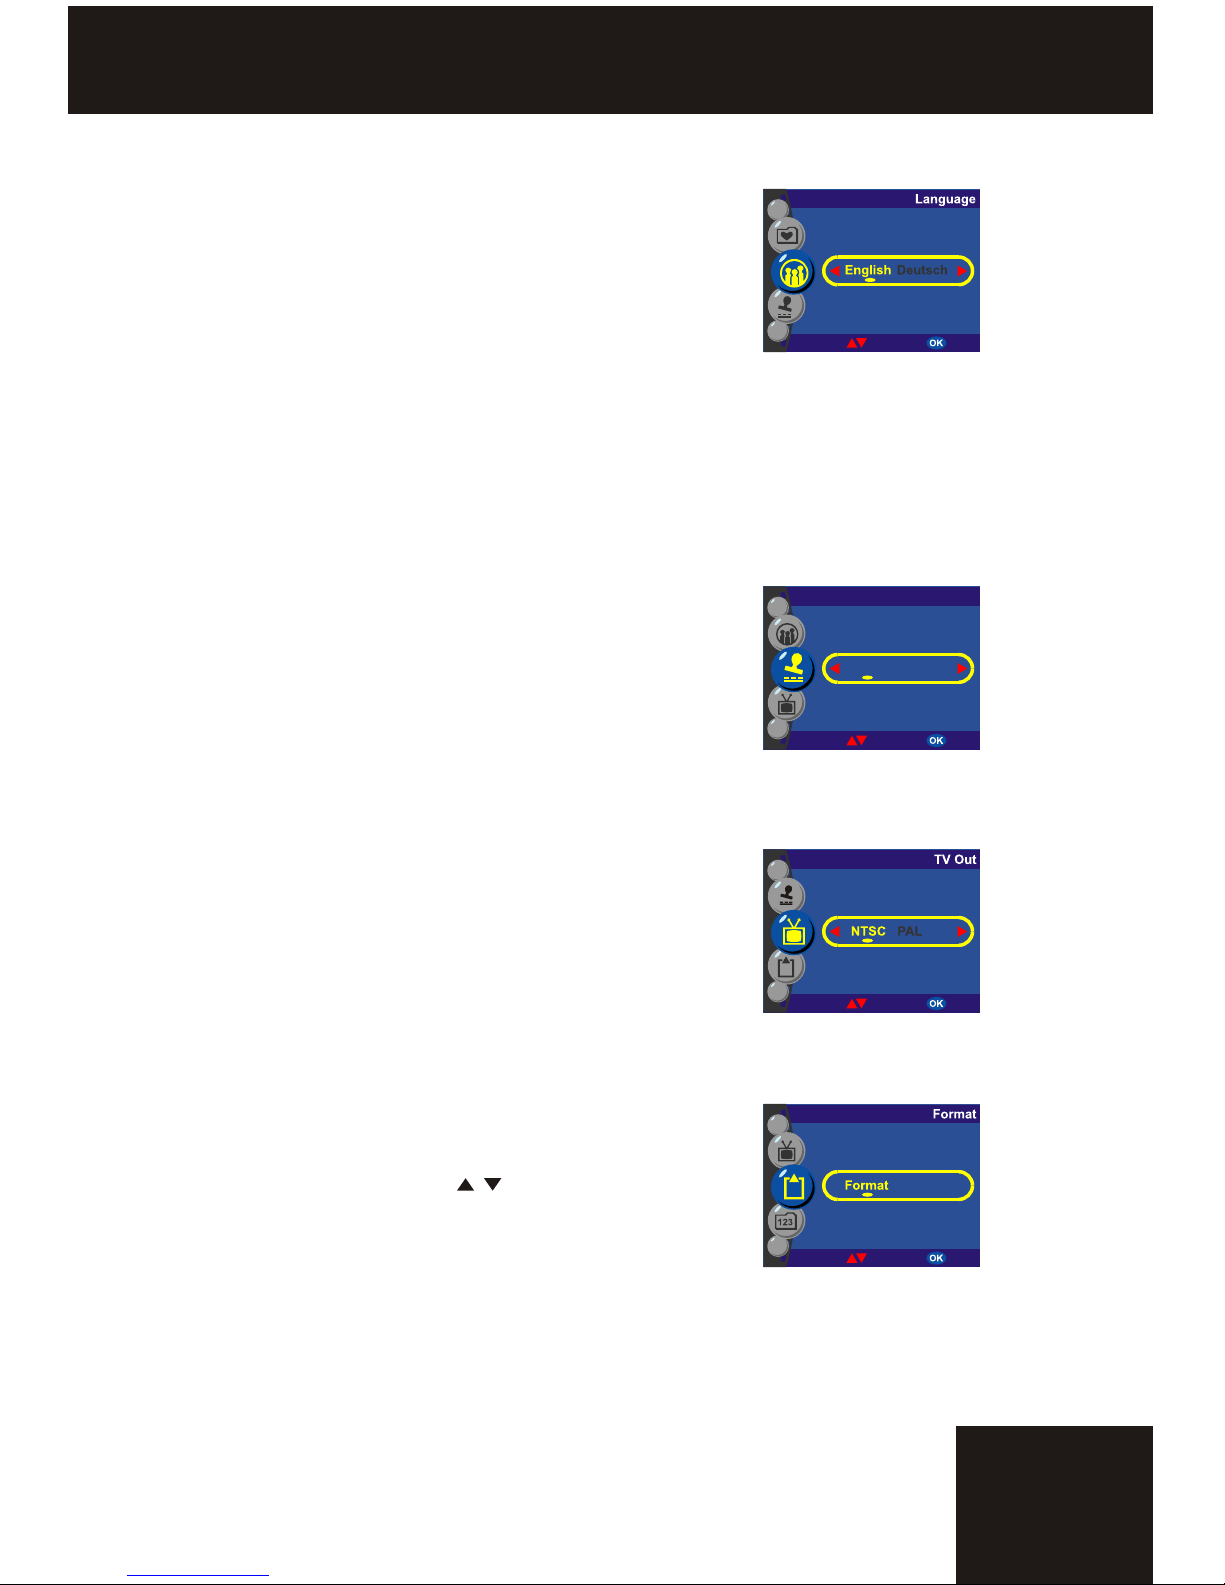
Language
Users can select from the following languages:
English
German
French
Spanish
Italian
Traditional Chinese
Simplified Chinese
Japanese
Korean
Main Modes and Instructions
TV out
Depending on where your location, different
region requires different system for "TV Out"
function. Connect Video cable for TV out.
NTSC
PAL
Cancel OK
Date Imprinting
This function is used for stamp the date & time
or date on the picture. User can select following
settings:
Date
Off
Cancel OK
Cancel OK
Off Date
Date Imprinting
Format
Formats the internal or external memory. Press
OK button to confirm or button to escape
formatting.
Cancel OK
Page 29
29
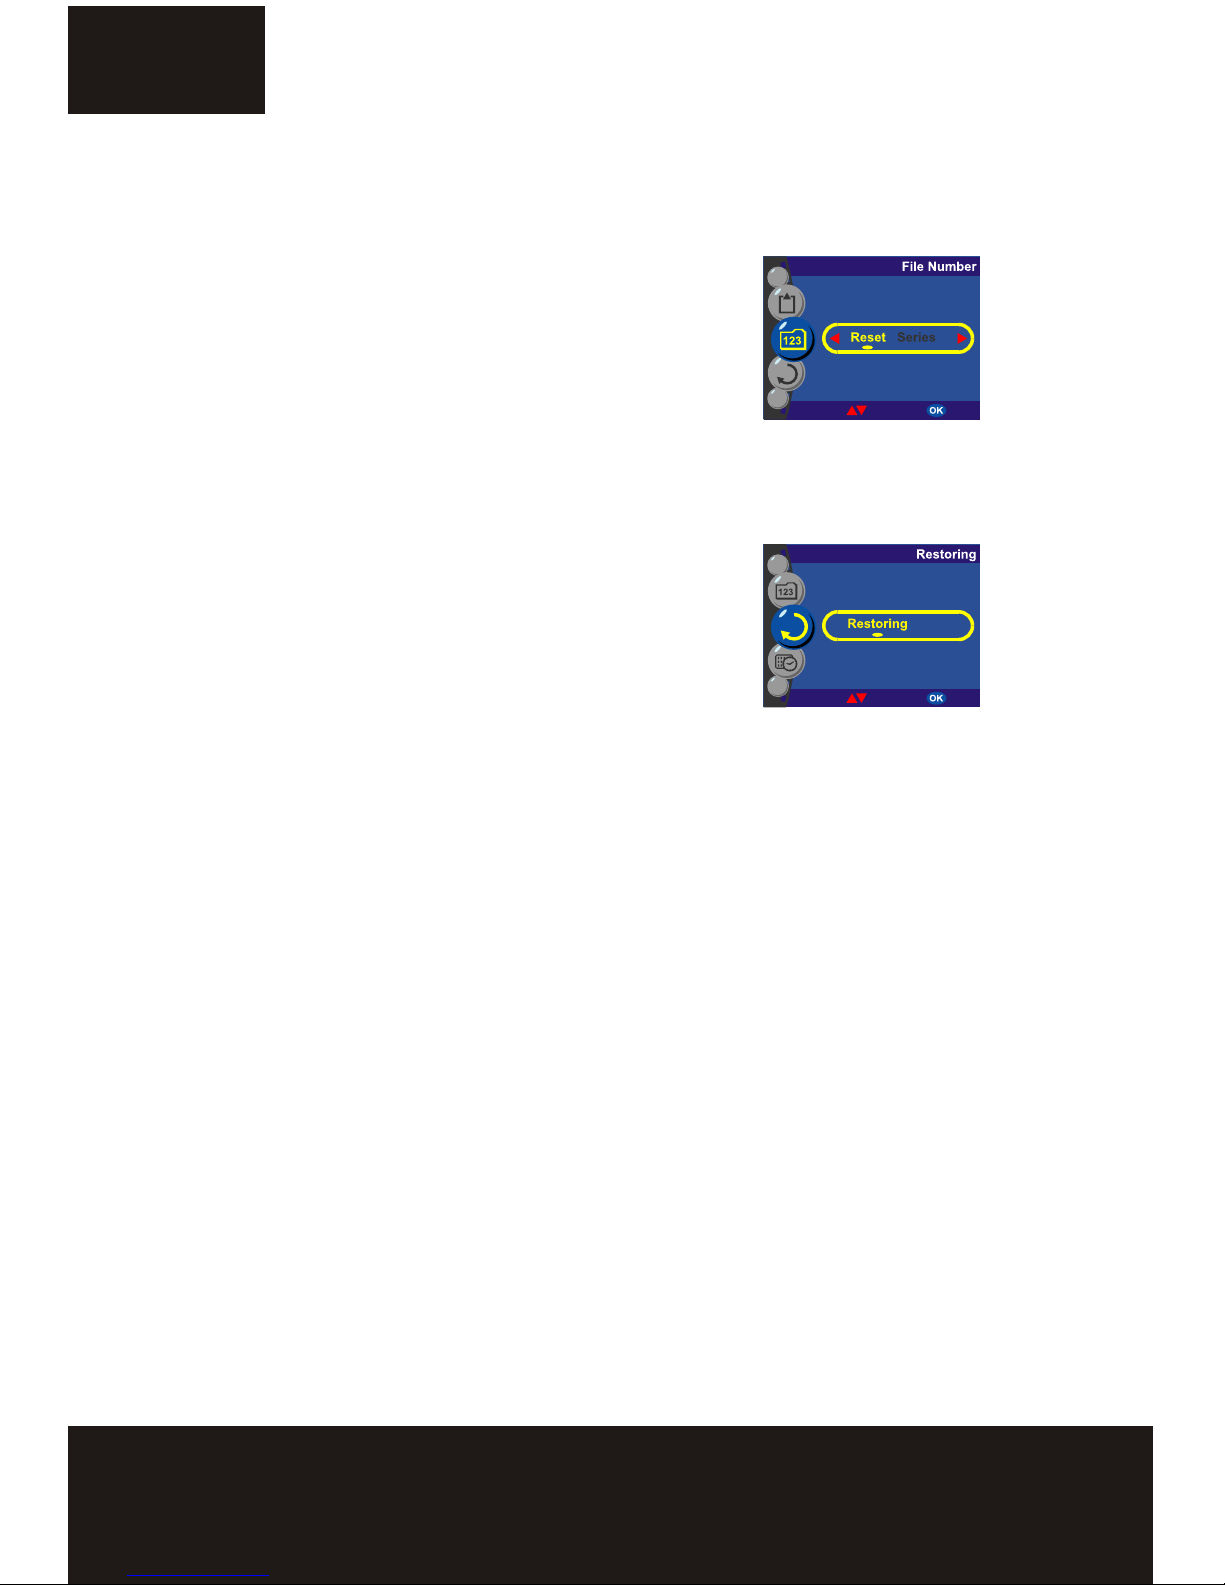
File Number
The image count will restore to zero once the pictures in memory been erased
under reset condition. Sets the order of pictures stored in the camera:
Reset- File number counting from zero
Series- File number counting from serial number
Restoring
Resets the camera to factory setting.
Cancel OK
Cancel OK
Page 30
30
Making Connection
Making Connections
In this section you will be able to connect the camera to your PC to
download or edit photos.
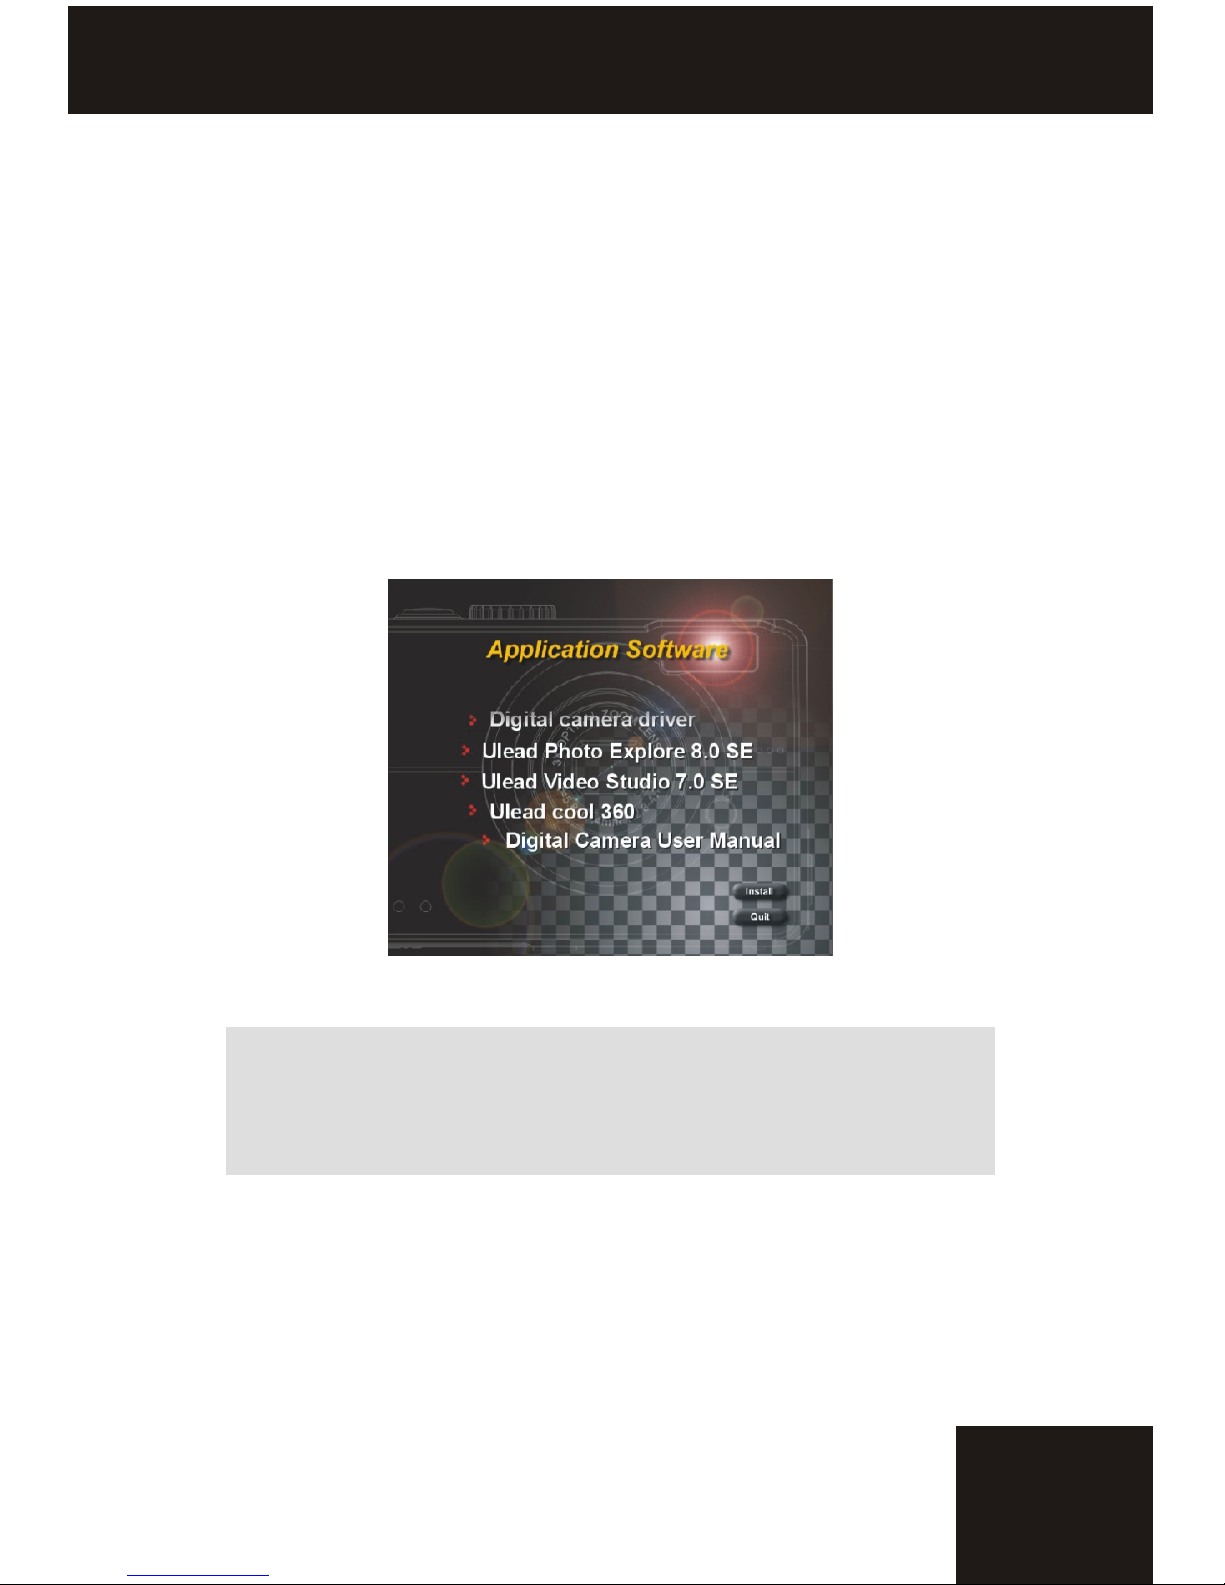
Installing Software
1. Insert the CD-ROM into your CD-ROM drive.
2. Click "Digital Camera Driver" and Install if your operating system is Windows 98.
Users can pick 5 selections and press Install (it can all be done at the same time).
3. The installation wizard will guide you through the installation.
4. You will be able to use the application once it's installed.
Caution:
1. Driver is for uploading pictures to you computer, if
the operation system is Win 98
2. If you didn't install the driver before plugging in the
USB device. System will detect new device. Please
insert the CD-ROM and complete the driver installation.
Page 31
31
Connecting through the USB
This section will show you how to download images from camera to PC
through the USB cable..
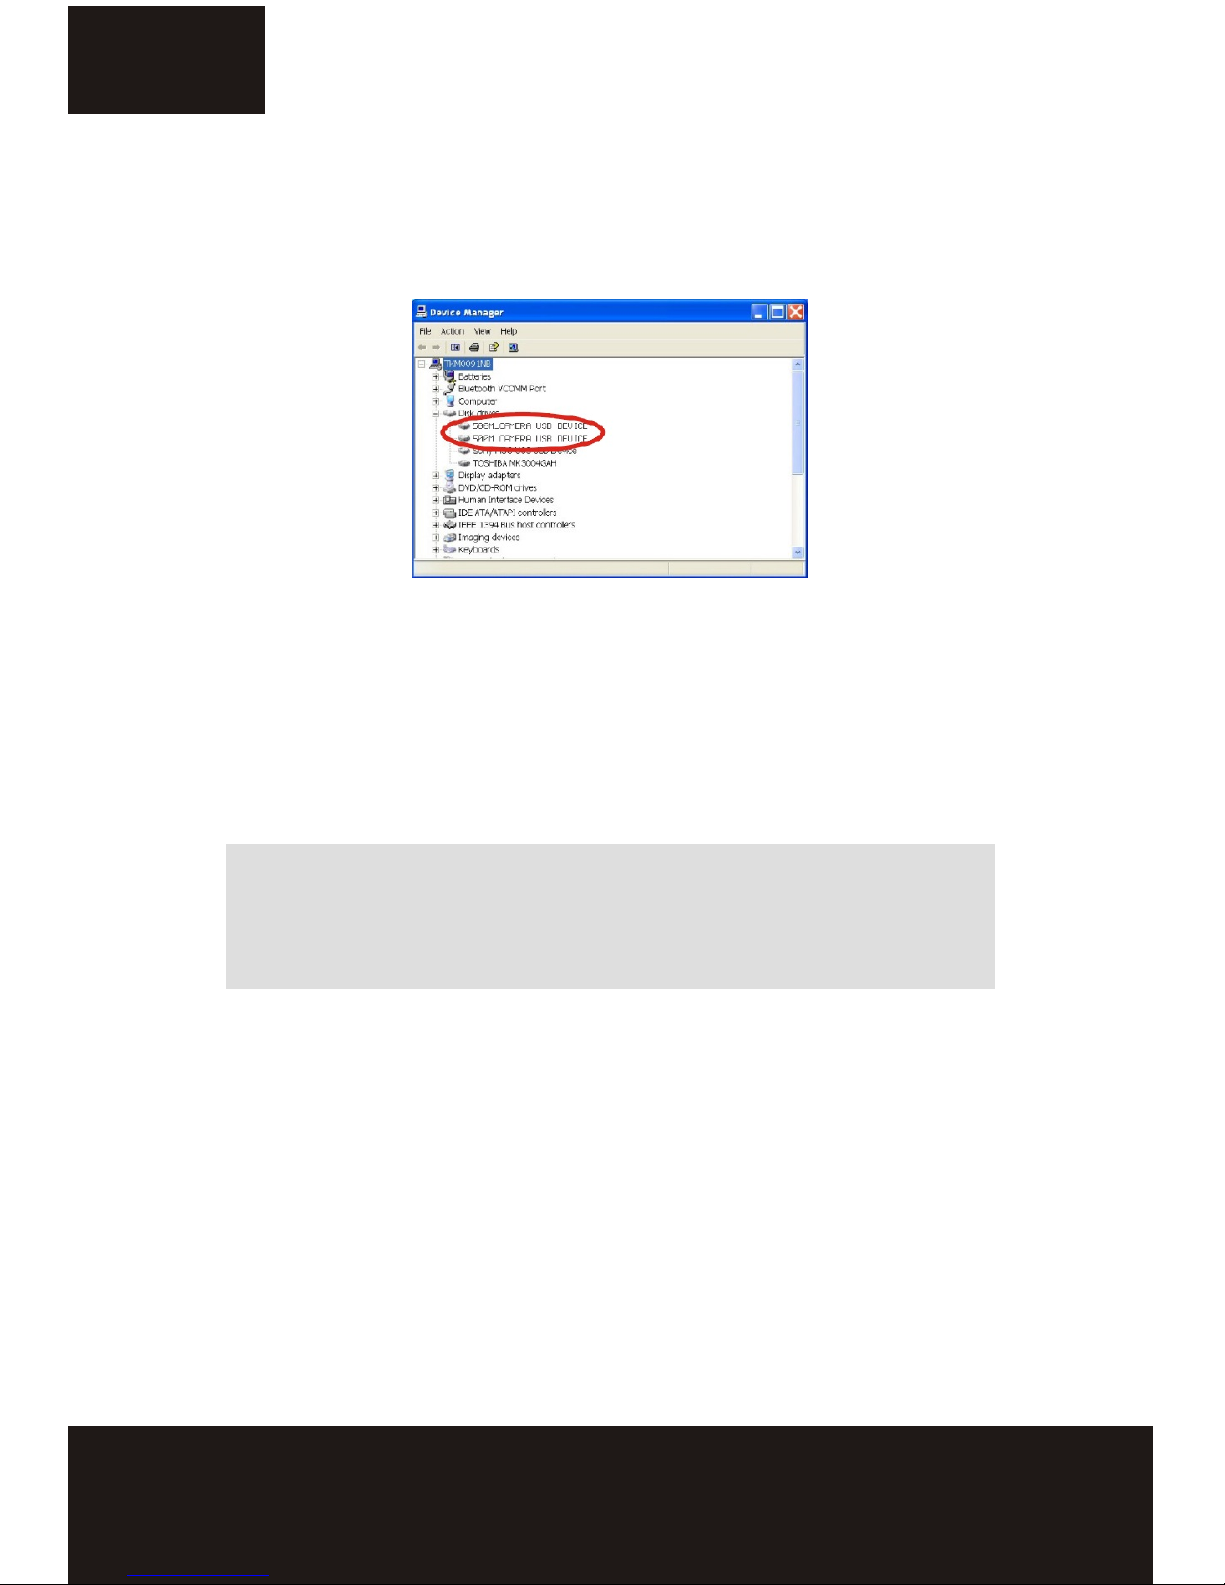
1. This camera allows users to move the images or movies from camera to PC by
MSDC support.
2. When the camera is connected to your PC, there will be one external storage under
"My computer" named " 500_CAMERA ".
3. Simply click the folder named 500D-CAM, you can find the recorded files.
4. Copy or remove these files to from camera to your PC. You can start to edit the
images according to your desired
Connecting through TV-out
Before you proceed, please determine your corresponding TV-Out mode.
This camera will enable you to achieve full camera functions by TV-out
connection. User can enable each function through the TV monitor
instead of the LCD display.
1. Connect the video cable into the video out connector.
2. Connect the other end of the video cable into the TV’s video-in jack.
3. Turn the camera ON, you should then be able to operate the camera with TV
screen. (The LCD will turn off while connected to TV-out)
NOTE:
1. Voice memo files will include three different file format as
".jpg", ".wav" and ".html". Which have the same file name,
but format. The recommended format for users (desiring to
include their recorded voice memo in their selected pictures)
is HTML.
Page 32
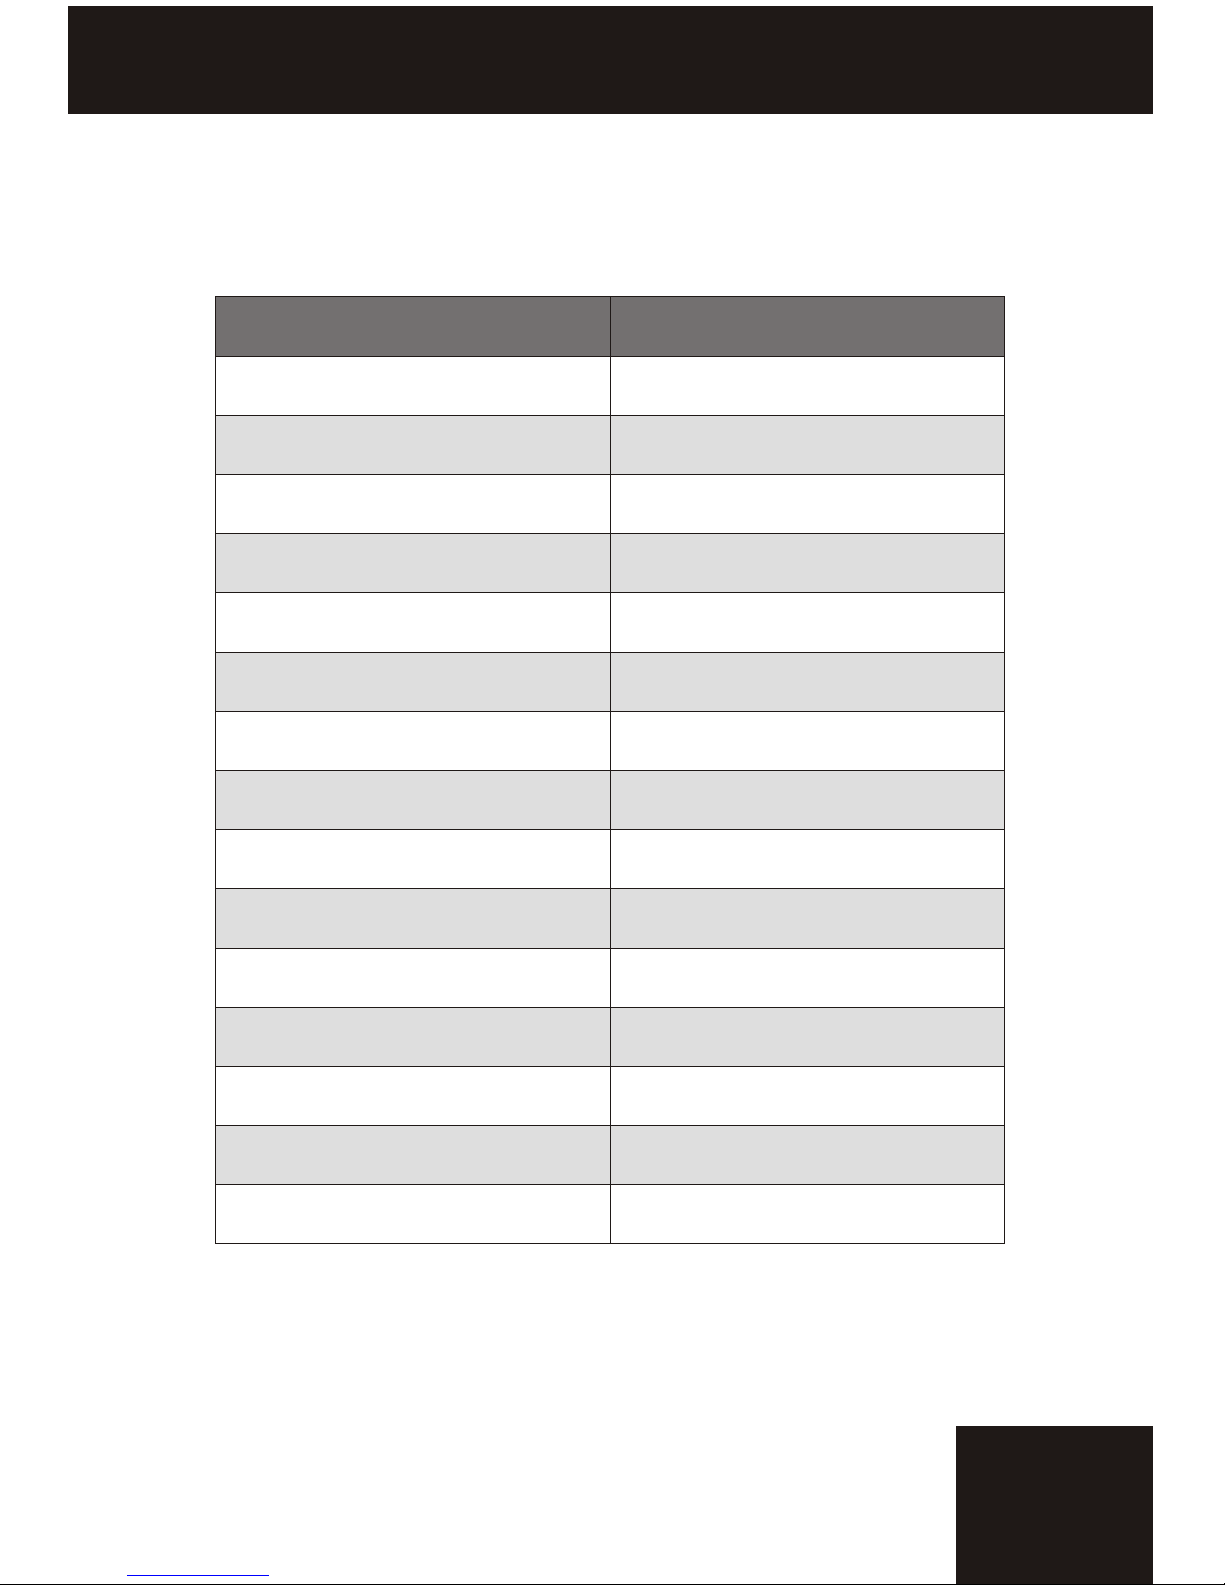
32
5M (2560x1920)
Best
Off
Resolution
Image quality
Macro
Setting matrix
Default setting
Appendix
Camera Default Setting
P mode
Auto
Color
Auto
Matrix
P/A/S/M
White Balance
Digital Filter
ISO
Metering
Off
Self-Timer
Appendix
Off
On
Sport
Histogram Display
Information Display
Scene
Slide Show Interval
Audio Valume
3 sec.
Middle
2004.01.01
Date and Time
Page 33
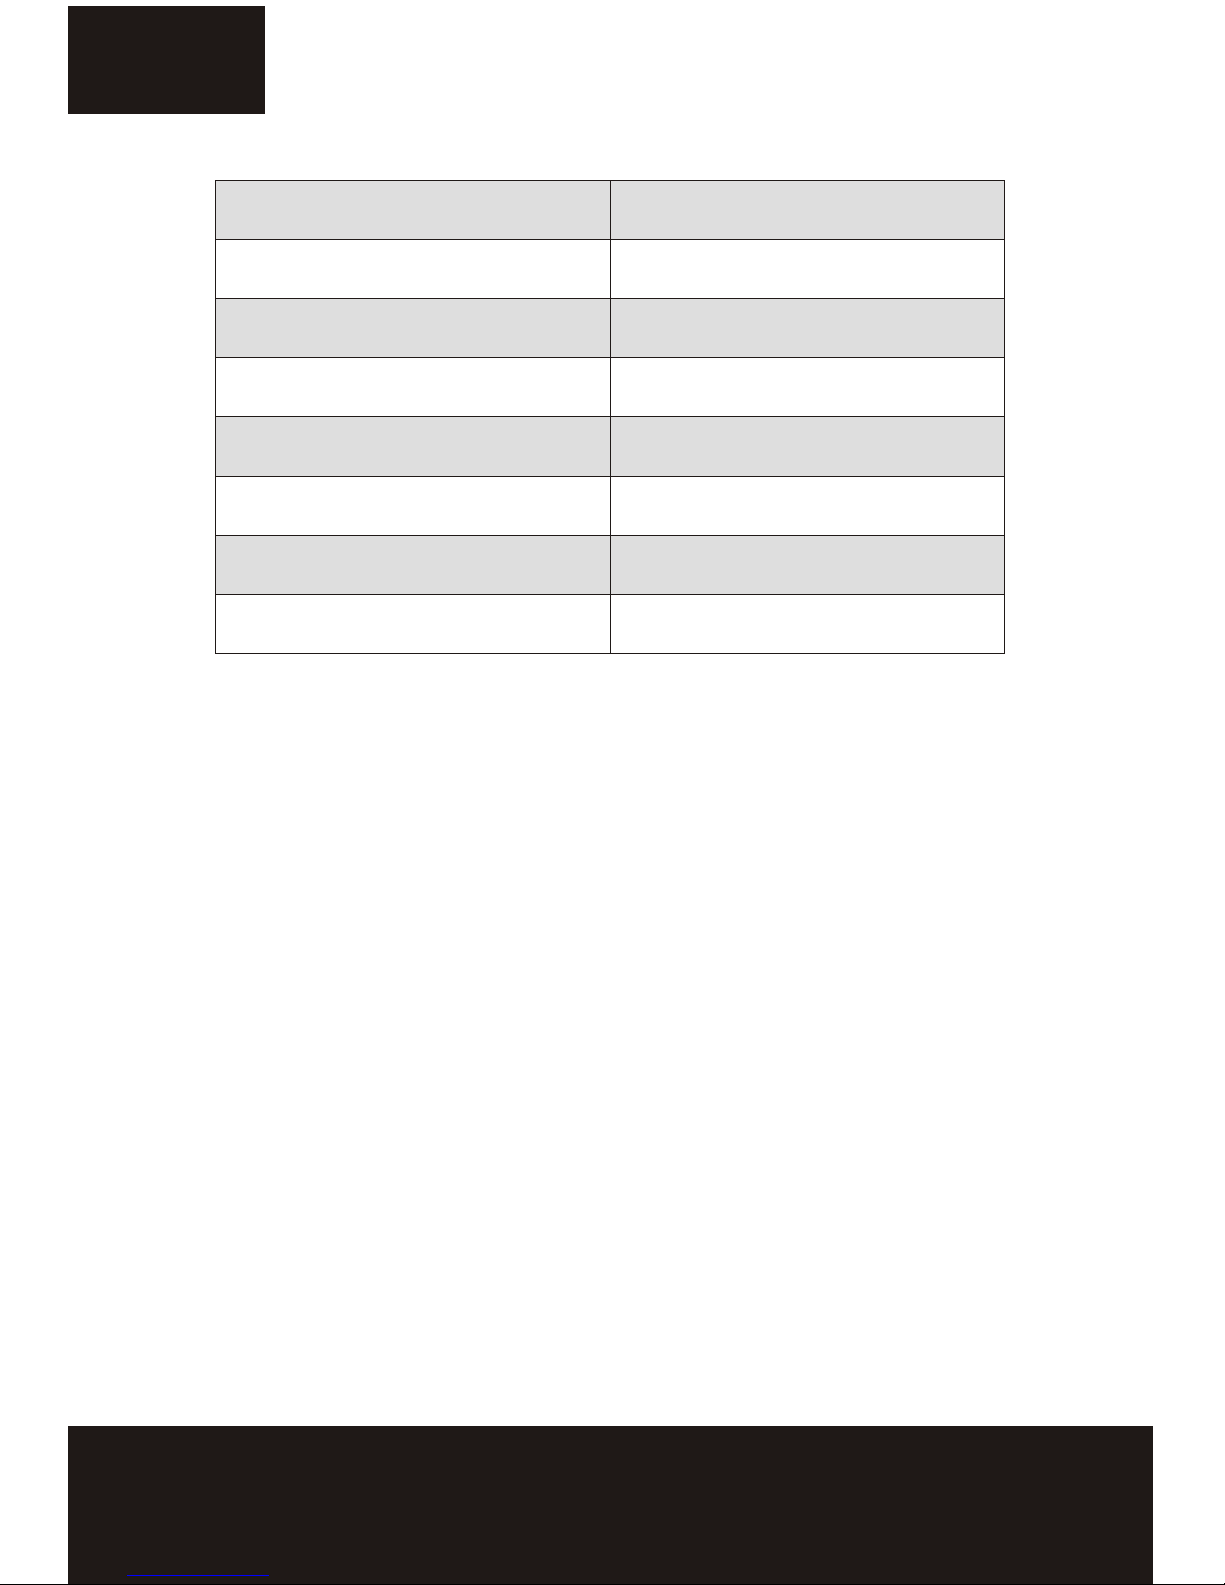
33
Sound Effect
Digital Zoom
On
On
Instant Preview
Auto power off
LCD Setting
Background Editing
Languages
File Number
1 sec
Off
Outdoor
Image 1
English
Series
Page 34
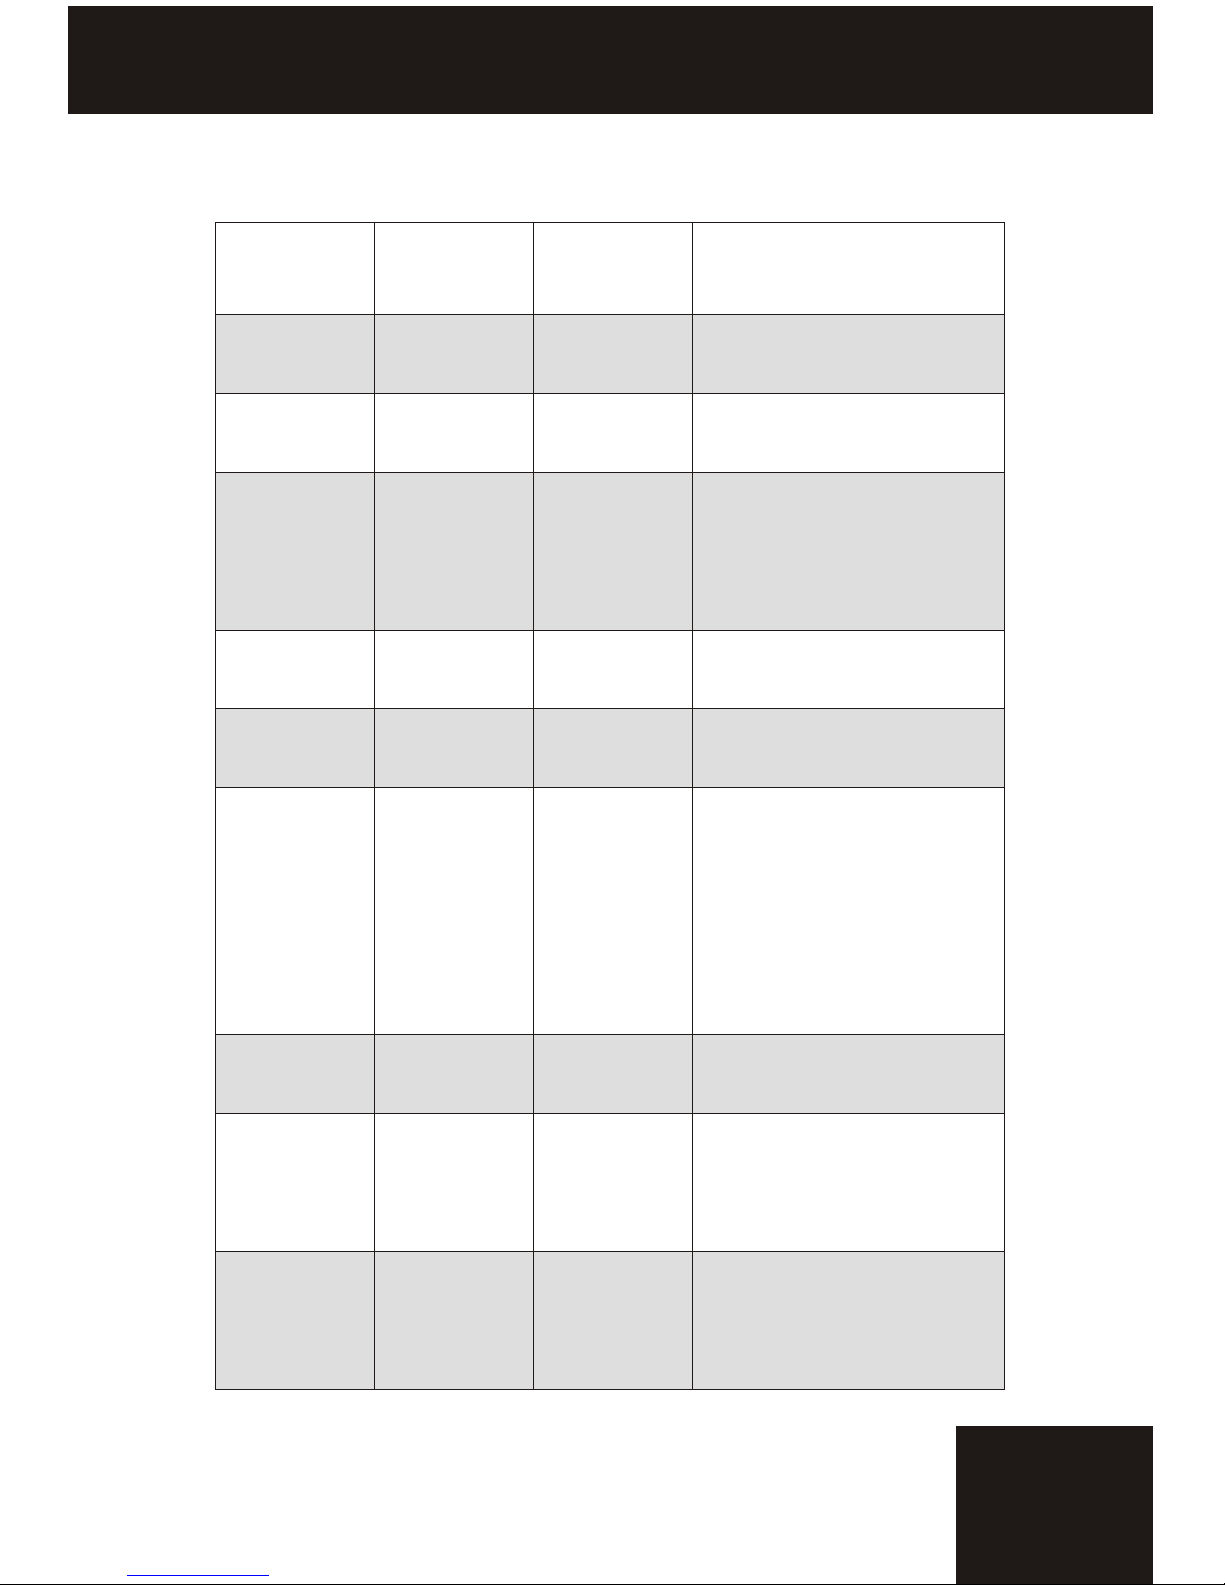
34
LED Status
Appendix
LED status
Power off
Power On
Flash
charging
Image saving
Battery low
Self-timer
AF Assist
Out of focus
Movie/Audio
recording
AF Assist/
Self-Timer
LED
Off
Off
Off
Off
Off
Flickering
RED
RED
Off
Off
Description
Camera off.
Camera on status.
When the flash is charging,
"Red" LED will flicker (2 flickers
/ s), then turn to "Green" when
the flash had charged
completely.
"Green" LED will flicker during
image saving.
Camera is going to run out of
battery power.
Self-Timer LED will flicker
together with beep according
to countdown tempo in first 7
sec. then 2 flickers/ per
sec. at last 3 sec. ; If SelfTimer is set to 3 sec., flicker
will keep 1 flicker/ per sec.till
last.
When subject illumination is
too deem for taking shot.
While focus failed, "Orange"
LED will be on, it will change
to "Green" when user release
Shuttor button.
When recording movie/audio,
the "Red" LED will flicker
slowly (1 flicker/per secretary.)
according to "REC" logo.
Status LED
Off
GREEN
Flickering
RED
Flickering
GREEN
Flickering
Orange
GREEN
GREEN
ORANGE
Slow flickering
RED
Page 35
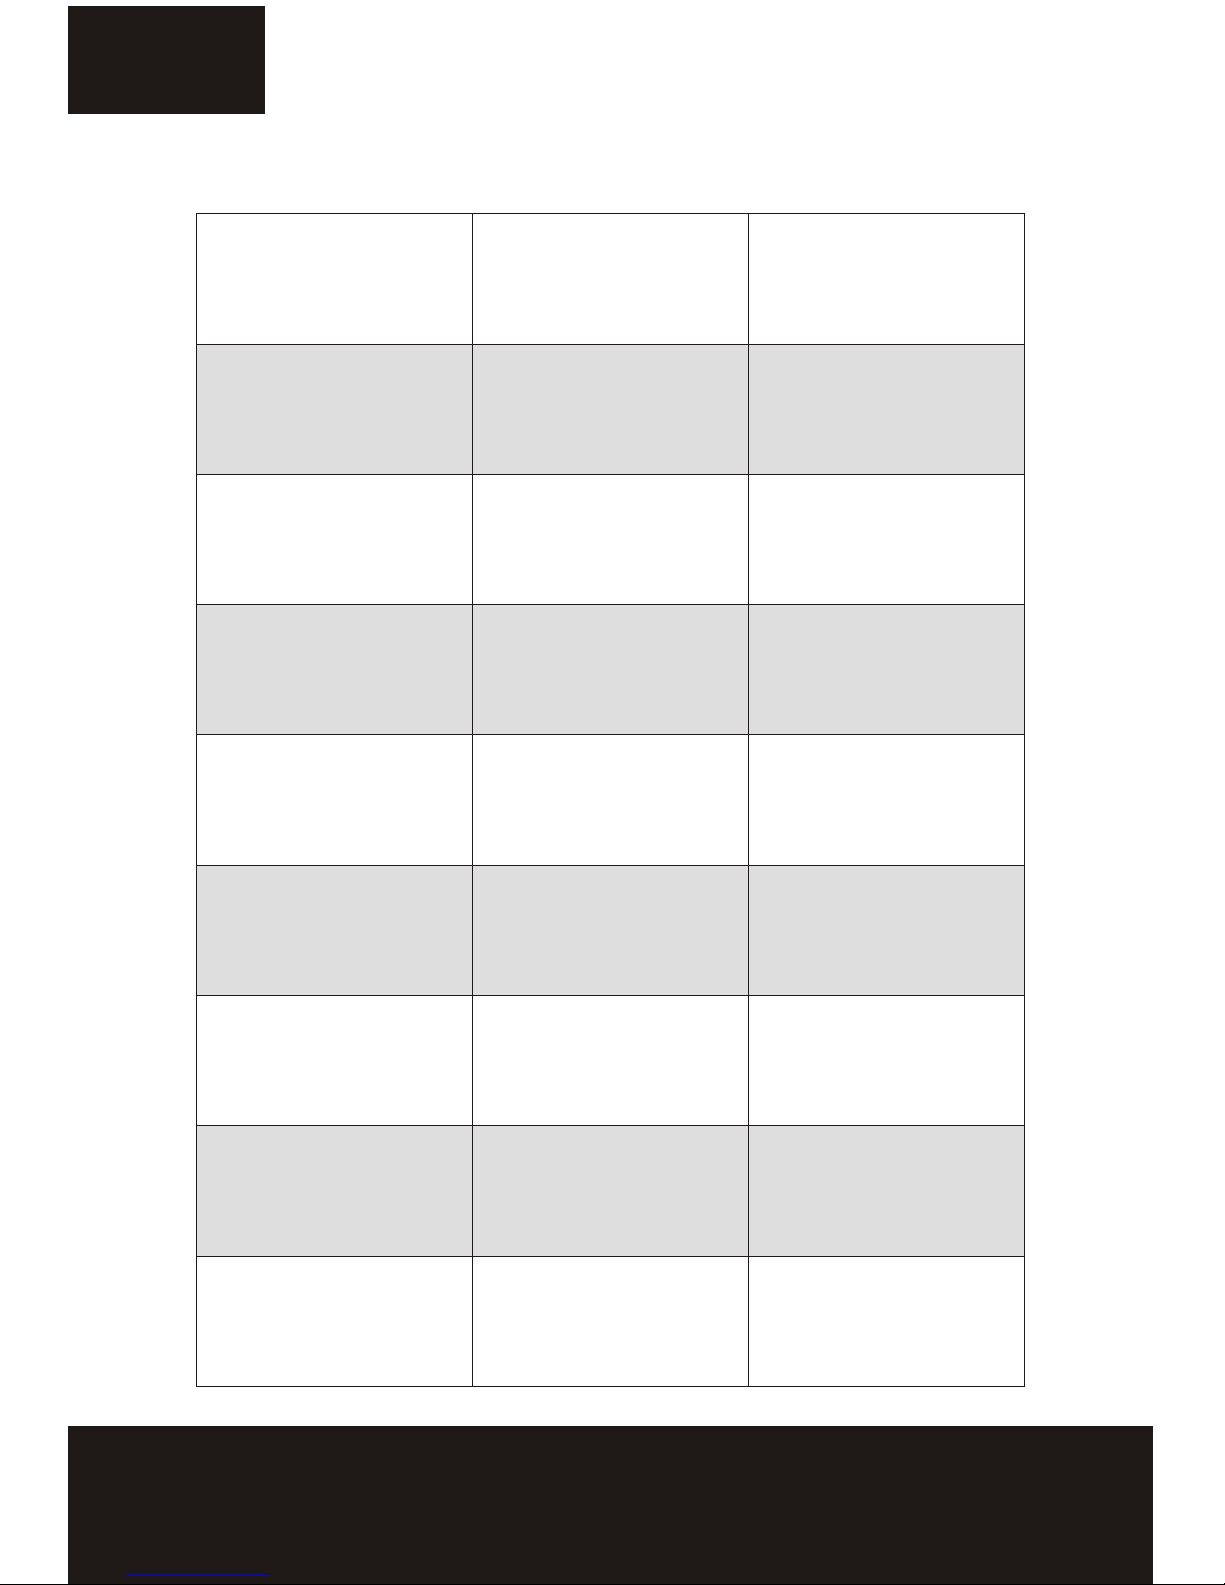
35
Information Code
Error
Card Full
Write-Protect
Card Error
Picture Error
No picture in SD
Card/internal
memory
Card Setup
Battery Empty
No Card
Possible Cause
No more pictures can
be stored
Card has been
protected
Cannot record,
playback or erase pictures on this card
This recorded picture
cannot be playback
with camera
There no image in
storage, so there
nothing in playback
This card is not
formatted
Battery low for taking
pictures
No card for "copy
image" from internal
Memory.
Corrective Action
Remove the pictures or
insert another card
To remove writeprotect latch of card
To format this card or
replace another card
To view the image
through PC. If it
canonot be done,
the picture is damaged
To take pictures or
insert another card
with images
To format this card
before using
Installing new or
charged batteries
To insert a SD/MMC
Card in cameraaq.
Page 36
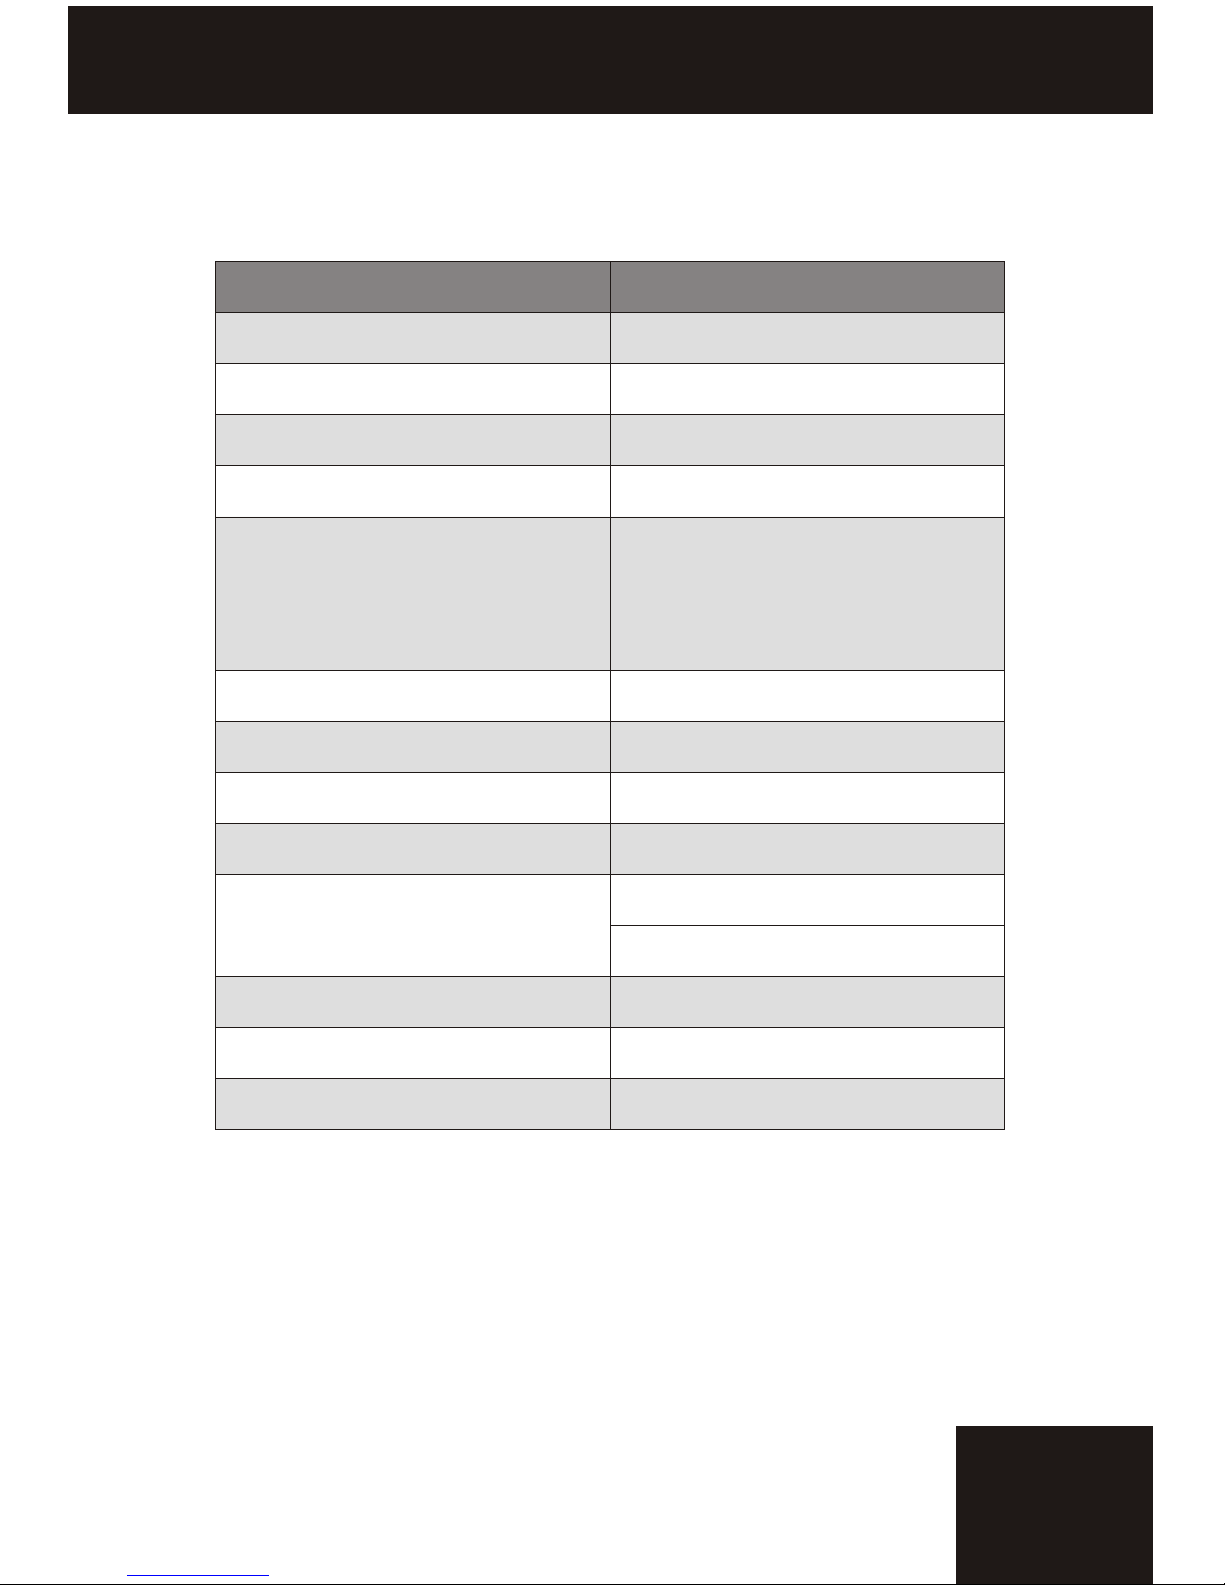
36
Specifications
Features
Content
Appendix
Sensor Photosites
Sensor Size
Sensor Type
Maximum Image Resolution
Still Image Size
Video Clip
5.36 MegaPixels
1/2.5"
CCD
3648 x 2736 (Interpolated)
3648 x 2736 2560 x 1920
2048 x 1536 1600 x 1200
1280 x 960 640 x 480
320x240 @ 30 fps
Build-in Microphone
Build-in Speaker
Yes
Yes
Storage Types
16 MB NAND Flash Memory
Secure Digital (SD) Card or
MultiMedia Card (MMC)
Build-in Memory
Optical Zoom
Digital Zoom
Focus Length
3X
4X
f = 5.8 ~ 17.4 mm
Page 37
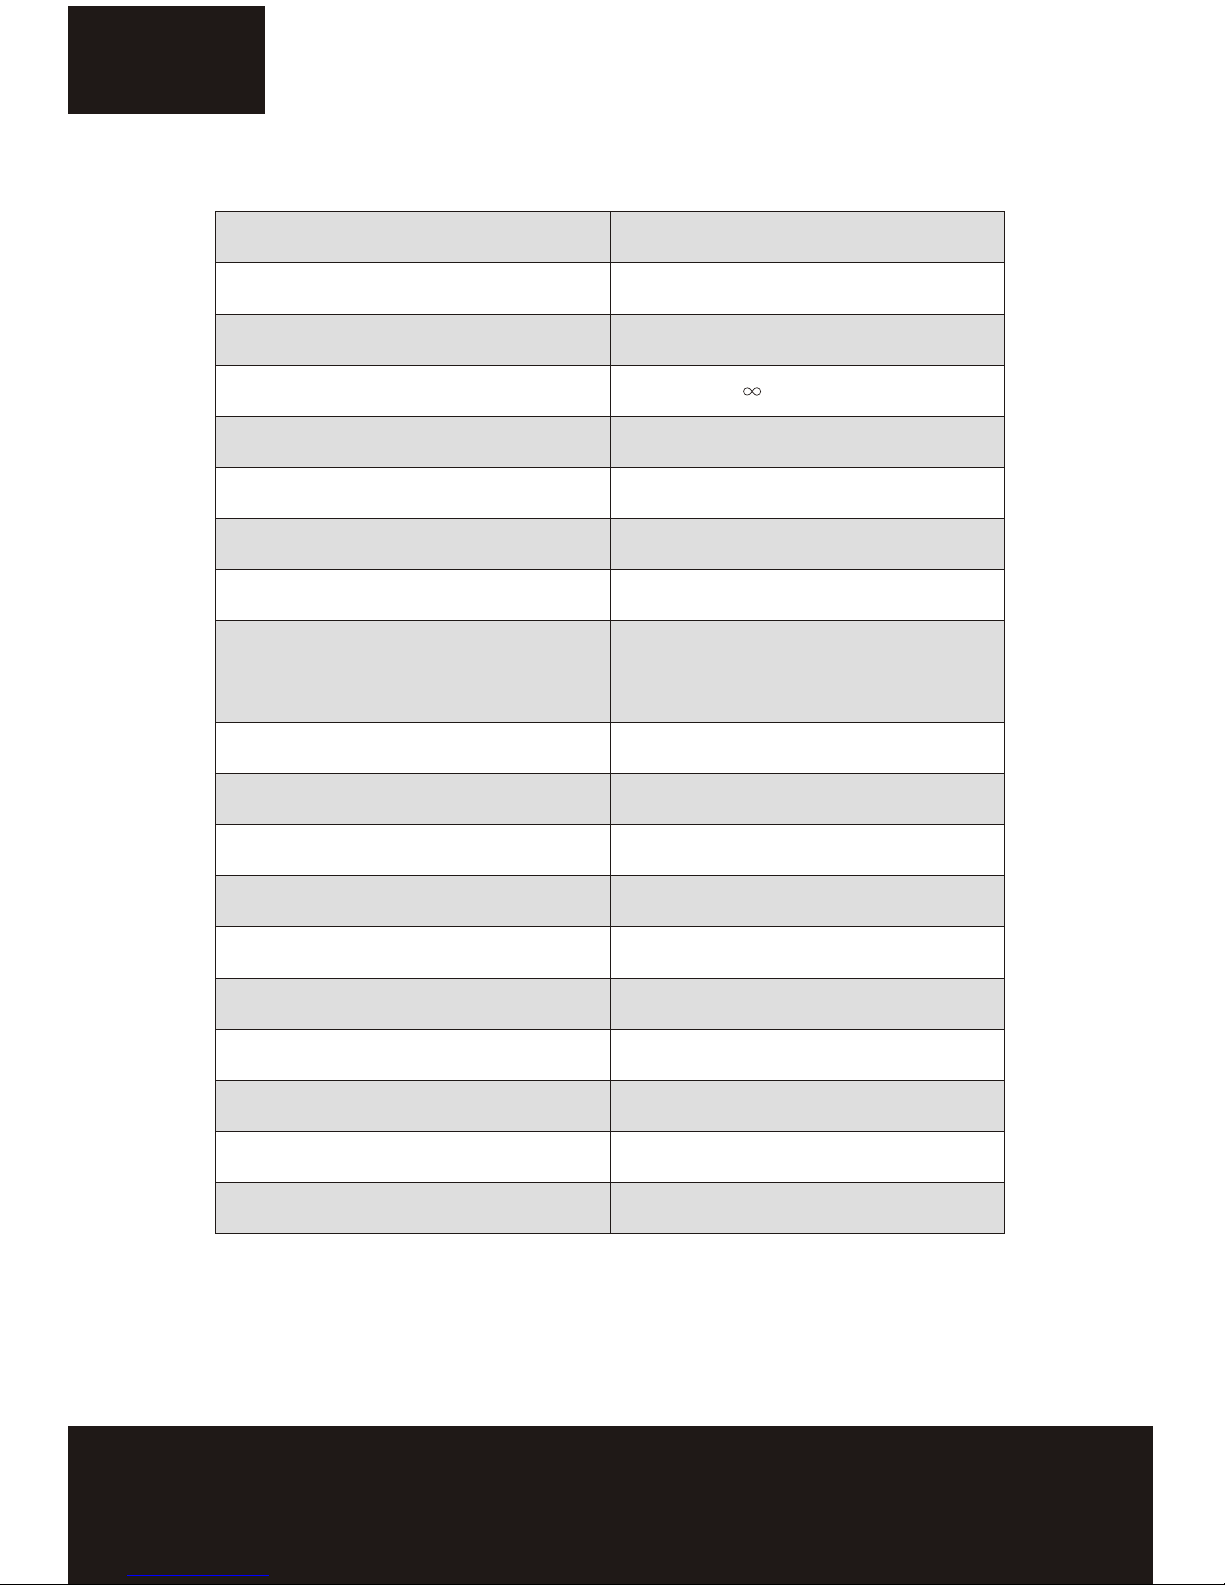
37
Aperture Range
Shutter Speed
F = 2.9 ~ 4.7
16 ~ 1/2000 sec
TTL Contrast Detection
50 cm ~
10 cm~50cm
20 seconds voice memo
WAV
Yes
Force / Auto / Auto Redeye
Reduction / Slow / Off
1.0 ~ 3.0 M
Focus Mode
Normal Focus Range
Macro Focus Range
Voice Memo
Audio Record
Sound Effect
Flash Manual Setting
Flash Range
Self-Timer
Continuous shot
Compressed File Format
Video Clip Format
LCD Display
Multiple Language OSD*
2/10 seconds delay
Yes
JPEG EXIF 2.2 ( DPOF support)
MPEG-4
2.0" LTPS TFT , 640 x 240
E / F / G / I / S / J / K / TC/SC
Playback Zoom
Video Out
PC Interface
Up to 8x
TV out with video & audio
USB 2.0 Full Speed
Page 38
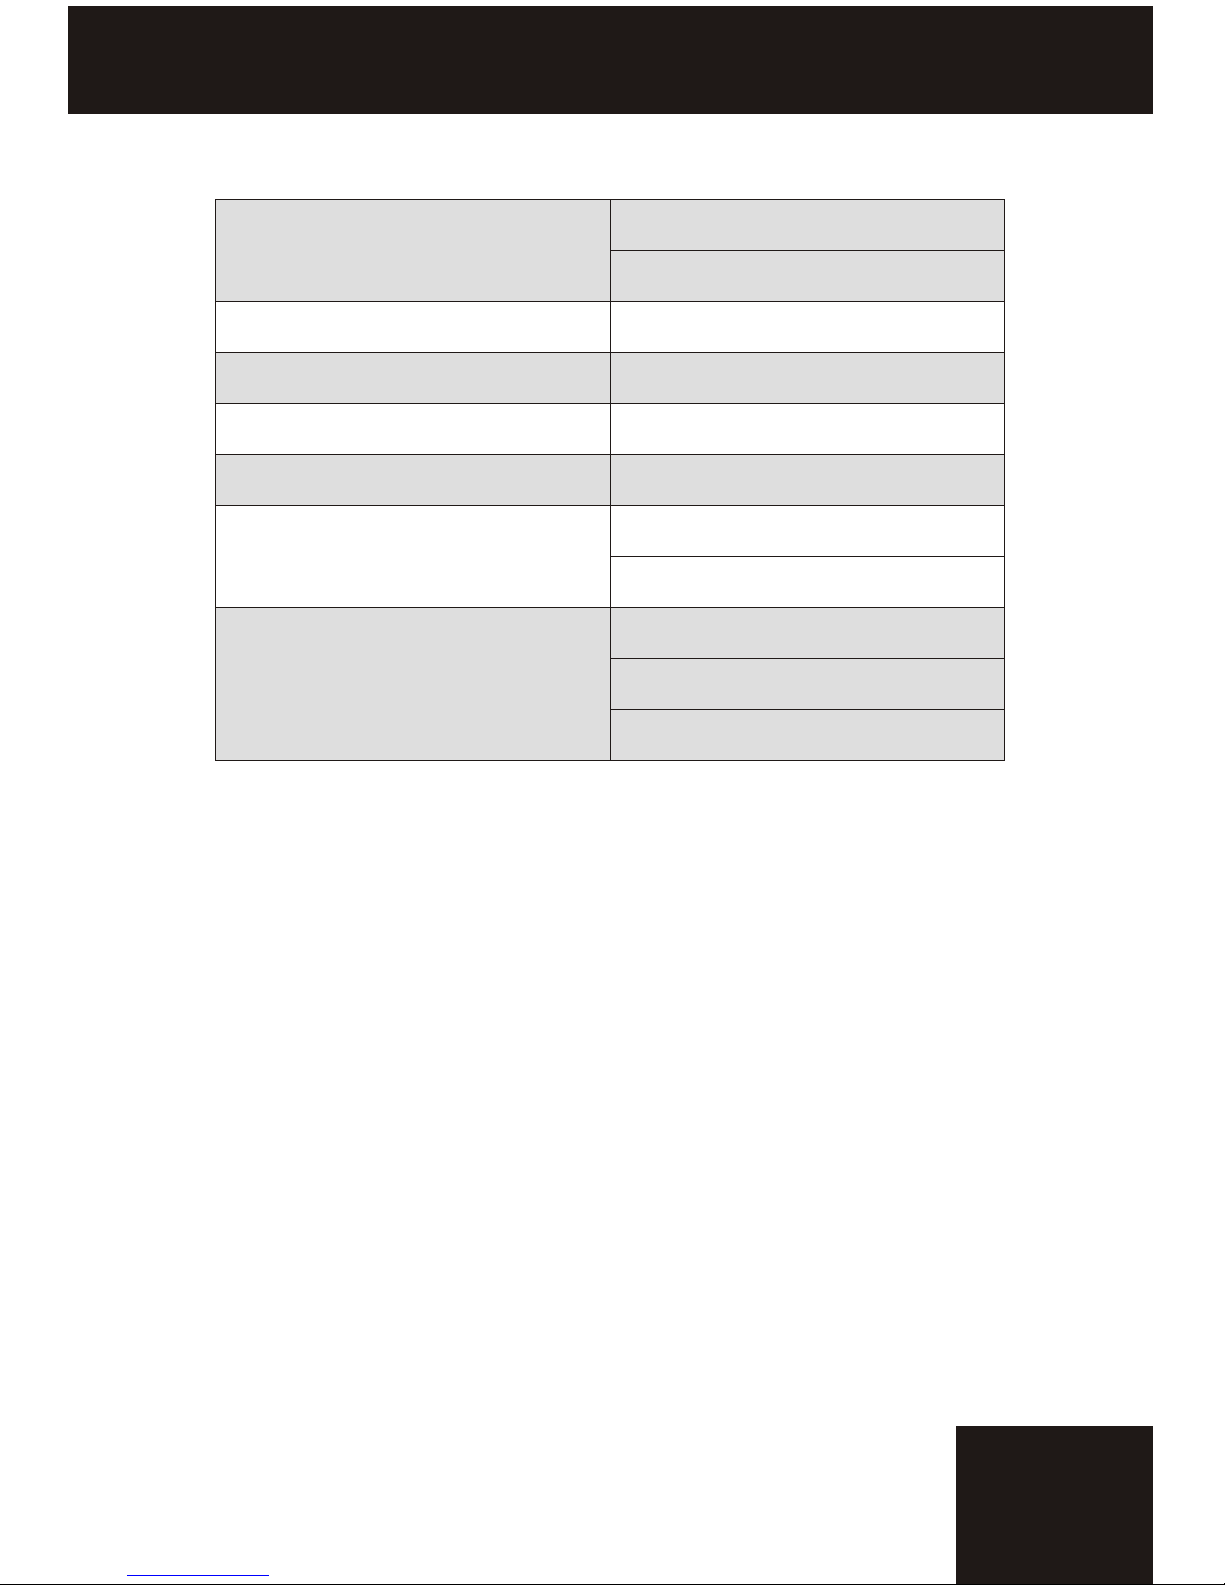
38
Power Source
2AA alkaline, Ni-MH,
Ni-Cd and CR-V3 Lithium-ion
Appendix
Body Material
Tripod Mount
Dimensions
Weight (Batteries Excluded)
Metal
Yes
90 x 61 x 26 mm
140g
Supported O/S
Bundled software
Microsoft Windows 98SE, ME,
2000, XP, Mac OS 9.1
Ulead Photo Explore 8.0 SE
Ulead Video Studio 7.0 SE
Ulead cool 360
 Loading...