

Page 1
ƵǙǥǣǤǢǖǢǘǡǢǝ
ǜǗǤǢǖǢǝ ǠǔǡǜǣǧǟdzǦǢǤ
DŽLJƾǂƶǂƸDždžƶǂ
ǃǂ ǑƾDžǃƿLJƴdžƴNJƼƼ
X-PAD
AERO
www.sven.ѵ
Page 2

RUS
DŽǧǞǢǖǢǘǥǦǖǢ ǣǢ DZǞǥǣǟǧǔǦǔǪǜǜ
ƵǟǔǗǢǘǔǤǜǠ ƶǔǥ Ǜǔ ǣǢǞǧǣǞǧ ǜǛǘǙǟǜdz ǦǢǤǗǢǖǢǝ ǠǔǤǞǜ SVEN!
ǃǙǤǙǘ DZǞǥǣǟǧǔǦǔǪǜǙǝ ǧǥǦǤǢǝǥǦǖǔ ǖǡǜǠǔǦǙǟǰǡǢ ǢǛǡǔǞǢǠǰǦǙǥǰ ǥ ǡǔǥǦǢdzǭǜǠ DŽǧǞǢǖǢǘǥǦǖǢǠ ǜ ǥǢǩǤǔǡǜǦǙ ǙǗǢ ǡǔ ǖǙǥǰ ǣǙǤǜǢǘ ǜǥǣǢǟǰǛǢǖǔǡǜdz.
ƴƶdžǂDŽDžƾǂƹ ǃDŽƴƶǂ
© 2014. SVEN PTE. LTD. ƶǙǤǥǜdz 1.0 (V 1.0).
ƸǔǡǡǢǙ DŽǧǞǢǖǢǘǥǦǖǢ ǜ ǥǢǘǙǤǚǔǭǔdzǥdz ǖ ǡǙǠ ǜǡǨǢǤǠǔǪǜdz ǛǔǭǜǭǙǡǯ ǔǖǦǢǤǥǞǜǠ ǣǤǔǖǢǠ. ƶǥǙ
ǣǤǔǖǔ ǛǔǭǜǭǙǡǯ.
džǂDŽƷǂƶǏƹ ǀƴDŽƾƼ
ƶǥǙ ǦǢǤǗǢǖǯǙ ǠǔǤǞǜ dzǖǟdzDzǦǥdz ǥǢǕǥǦǖǙǡǡǢǥǦǰDz ǜǩ ǛǔǞǢǡǡǯǩ ǖǟǔǘǙǟǰǪǙǖ.
ǃDŽƹƸLJǃDŽƹƺƸƹǁƼƹ ǂƵ ǂƷDŽƴǁƼNjƹǁƼƼ ǂdžƶƹdžDždžƶƹǁǁǂDždžƼ
ǁǙǥǠǢǦǤdz ǡǔ ǣǤǜǟǢǚǙǡǡǯǙ ǧǥǜǟǜdz ǥǘǙǟǔǦǰ DŽǧǞǢǖǢǘǥǦǖǢ ǕǢǟǙǙ ǦǢǫǡǯǠ, ǖǢǛǠǢǚǡǯ ǡǙǞǢǦǢǤǯǙ
ǡǙǥǢǢǦǖǙǦǥǦǖǜdz. ƼǡǨǢǤǠǔǪǜdz ǘǔǡǡǢǗǢ DŽǧǞǢǖǢǘǥǦǖǔ ǣǤǙǘǢǥǦǔǖǟǙǡǔ ǡǔ ǧǥǟǢǖǜdzǩ «ǞǔǞ ǙǥǦǰ».
ƴǖǦǢǤ ǜ ǜǛǘǔǦǙǟǰ ǡǙ
ǜǟǜ ǣǢǖǤǙǚǘǙǡǜdz, ǣǤǢǜǛǢǬǙǘǬǜǙ ǢǦ ǜǡǨǢǤǠǔǪǜǜ, ǥǢǘǙǤǚǔǭǙǝǥdz ǖ ǘǔǡǡǢǠ DŽǧǞǢǖǢǘǥǦǖǙ.
DŽƴDžǃƴƾǂƶƾƴ
ƴǞǞǧǤǔǦǡǢ ǤǔǥǣǔǞǧǝǦǙ ǜǛǘǙǟǜǙ, ǣǤǢǥǟǙǘǜǦǙ Ǜǔ ǦǙǠ, ǫǦǢǕǯ ǖǡǧǦǤǜ ǞǢǤǢǕǞǜ ǡǙ ǢǥǦǔǟǜǥǰ ǞǔǞǜǙǟǜǕǢ ǣǤǜǡǔǘǟǙǚǡǢǥǦǜ. ǃǤǢǖǙǤǰǦǙ ǧǥǦǤǢǝǥǦǖǢ ǡǔ ǣǤǙǘǠǙǦ ǣǢǖǤǙǚǘǙǡǜǝ. ƹǥǟǜ ǜǛǘǙǟǜǙ ǣǢǖǤǙǚǘǙǡǢ ǣǤǜ ǦǤǔǡǥǣǢǤǦǜǤǢǖǞǙ, ǢǕǤǔǦǜǦǙǥǰ ǖ ǨǜǤǠǧ, ǢǥǧǭǙǥǦǖǟdzDzǭǧDz ǘǢǥǦǔǖǞǧ; Ǚǥǟǜ
ǜǛǘǙǟǜǙ
DžǂƸƹDŽƺƴǁƼƹ
RUS ...................................................................................................
UKR ..................................................................................................
ENG .................................................................................................
ǡǙ ǨǧǡǞǪǜǢǡǜǤǧǙǦ, ǥǤǔǛǧ ǚǙ ǢǕǤǔǦǜǦǙǥǰ Ǟ ǣǤǢǘǔǖǪǧ.
1. ǂǃƼDžƴǁƼƹ ....................................................................................
2. ǀƹDŽǏ ƵƹƻǂǃƴDžǁǂDždžƼ .....................................................................
3. ƾǂǀǃƿƹƾdžǁǂDždžǐ ...........................................................................
4. ǂDžǂƵƹǁǁǂDždžƼ ...............................................................................
5. DžƼDždžƹǀǁǏƹ džDŽƹƵǂƶƴǁƼǓ ................................................................
6. ǂǃƼDžƴǁƼƹ ƾǂǁDždžDŽLJƾNJƼƼ ................................................................
7. ǃǂƸƾƿǒNjƹǁƼƹ Ƽ ƼǁDždžƴƿƿǓNJƼǓ ......................................................
8. DŽƹnjƹǁƼƹ ƶǂƻǀǂƺǁǏlj ǃDŽǂƵƿƹǀ .....................................................
ǡǙǥǧǦ ǡǜǞǔǞǢǝ ǢǦǖǙǦǥǦǖǙǡǡǢǥǦǜ ǣǙǤǙǘ ǟǜǪǢǠ ǜǟǜ ǢǤǗǔǡǜǛǔǪǜǙǝ Ǜǔ ǧǭǙǤǕ
X-PAD AERO
16
1
2
2
2
2
2
3
4
7
8
ƻǘǙǥǰ ǚǙ ƶǯ ǥǠǢǚǙǦǙ ǡǔǝǦǜ ǢǕǡǢǖǟǙǡǡǧDz ǖǙǤǥǜDz ǘǔǡǡǢǗǢ ǤǧǞǢǖǢǘǥǦǖǔ.
džǙǩǡǜǫǙǥǞǔdz ǣǢǘǘǙǤǚǞǔ ǤǔǛǠǙǭǙǡǔ ǡǔ ǥǔǝǦǙ www.sven.Н
1
Page 3

RUS
ƵǙǥǣǤǢǖǢǘǡǢǝ
ǜǗǤǢǖǢǝ ǠǔǡǜǣǧǟdzǦǢǤ
1. ǂǃƼDžƴǁƼƹ
ƵǙǥǣǤǢǖǢǘǡǢǝ ǜǗǤǢǖǢǝ ǠǔǡǜǣǧǟdzǦǢǤ X-PAD AERO ǥǢ ǖǥǦǤǢǙǡǡǯǠ ǖǜǕǤǢǠǙǩǔǡǜǛǠǢǠ ǜ ǣǤǜǙǠǡǜǞǢǠ 2,4GHz ǖ ǞǢǠǣǟǙǞǦǙ dzǖǟdzǙǦǥdz DZǤǗǢǡǢǠǜǫǡǯǠ ǗǙǝǠǣǔǘǢǠ ǘǟdz ǜǗǤ. ǑǨǨǙǞǦ ǖǜǕǤǢǢǦǘǔǫǜ ǣǙǤǙǘǔǙǦ ǢǭǧǭǙǡǜǙ ǤǙǔǟǜǥǦǜǫǡǢǥǦǜ ǖ ǜǗǤǔǩ. DŽǙǛǜǡǢǖǯǙ ǖǥǦǔǖǞǜ ǜ DZǤǗǢǡǢǠǜǫǡǔdz
ǞǢǡǥǦǤǧǞǪǜdz ǠǔǡǜǣǧǟdzǦǢǤǔ X-PAD AERO ǣǢǖǯǬǔDzǦ ǦǢǫǡǢǥǦǰ ǧǣǤǔǖǟǙǡǜdz ǖǢ ǖǤǙǠdz ǜǗǤǯ.
ǀǔǡǜǣǧǟdzǦǢǤ X-PAD AERO ǠǢǚǡǢ ǜǥǣǢǟǰǛǢǖǔǦǰ ǖ ǤǔǛǡǯǩ ǜǗǤǔǩ – ǥǜǠǧǟdzǦǢǤǔǩ, ǔǤǞǔǘǔǩ,
ǬǧǦǙǤǔǩ ǜ Ǧ. ǣ.
2. ǀƹDŽǏ
• ǁǙ ǤǔǛǕǜǤǔǝǦǙ ǧǥǦǤǢǝǥǦǖǢ ǜ ǡǙ ǤǙǠǢǡǦǜǤǧǝǦǙ ǙǗǢ ǥǔǠǜ. ǂǕǥǟǧǚǜǖǔǡǜǙ ǜ ǤǙǠǢǡǦ ǘǢǟǚǡǯ ǣǤǢ-
ǜǛǖǢǘǜǦǰ ǦǢǟǰǞǢ ǞǖǔǟǜǨǜǪǜǤǢǖǔǡǡǯǙ ǥǣǙǪǜǔǟǜǥǦǯ ǥǙǤǖǜǥǡǯǩ ǪǙǡǦǤǢǖ.
• ǂǕǙǤǙǗǔǝǦǙ ǧǥǦǤǢǝǥǦǖǢ ǢǦ ǖǢǛǘǙǝǥǦǖǜdz ǣǢǖǯǬǙǡǡǢǝ ǖǟǔǚǡǢǥǦǜ, ǣǯǟǜ, ǥǜǟǰǡǯǩ ǠǔǗǡǜǦǡǯǩ
ǣǢǟǙǝ, ǖǜǕǤǔǪǜǜ, ǖǯǥǢǞǜǩ ǦǙǠǣǙǤǔǦǧǤ, ǙǘǞǜǩ ǚǜǘǞǢǥǦǙǝ ǜ ǗǔǛǢǖ.
• LJǞǔǛǔǡǜdz ǣǢ ǧǩǢǘǧ: ǘǟdz ǢǫǜǥǦǞǜ ǞǢǤǣǧǥǔ ǜǥǣǢǟǰǛǧǝǦǙ ǫǜǥǦǧDz ǠdzǗǞǧDz ǦǞǔǡǰ. ǁǙ ǜǥǣǢǟǰǛǧǝǦǙ
ǘǟdz ǢǫǜǥǦǞǜ ǦǔǞǜǙ ǤǔǥǦǖǢǤǜǦǙǟǜ, ǞǔǞ ǕǙǡǛǜǡ ǜǟǜ ǥǣǜǤǦ, ǦǔǞ ǞǔǞ Ǣǡǜ ǠǢǗǧǦ ǣǢǖǤǙǘǜǦǰ ǣǢǖǙǤǩǡǢǥǦǰ ǧǥǦǤǢǝǥǦǖǔ.
• ǁǙ ǤǢǡdzǝǦǙ ǧǥǦǤǢǝǥǦǖǢ, ǫǦǢǕǯ ǡǙ ǣǢǖǤǙǘǜǦǰ ǙǗǢ.
3. ƾǂǀǃƿƹƾdžǁǂDždžǐ
• ǀǔǡǜǣǧǟdzǦǢǤ — 1 ǬǦ.
• ǃǤǜǙǠǡǜǞ 2,4GHz — 1 ǬǦ.
• ƵǔǦǔǤǙǝǞǜ Ǧǜǣǔ ƴƴƴ — 3 ǬǦ.
• CD-ǘǜǥǞ ǥ ǘǤǔǝǖǙǤǔǠǜ — 1 ǬǦ.
• DŽǧǞǢǖǢǘǥǦǖǢ ǣǢ DZǞǥǣǟǧǔǦǔǪǜǜ — 1 ǬǦ.
• ƷǔǤǔǡǦǜǝǡǯǝ ǦǔǟǢǡ — 1 ǬǦ.
4. ǂDžǂƵƹǁǁǂDždžƼ
• ǑǤǗǢǡǢǠǜǫǡǯǝ ǗǙǝǠǣǔǘ
• ǃǢǘǘǙǤǚǞǔ: DirectX 7.0 ǜ ǖǯǬǙ, Windows XP/Vista/7/8
• ƼǡǦǙǤǨǙǝǥ USB
• ǃǤǜǙǠǡǜǞ 2,4GHz, ǘǔǟǰǡǢǥǦǰ ǘǙǝǥǦǖǜdz – ǘǢ 7 ǠǙǦǤǢǖ
• 4 Ǣǥǜ, 8-ǣǢǛǜǪǜǢǡǡǯǝ ǘǚǢǝǥǦǜǞ, 2 ǘǚǢǝǥǦǜǞǔ-ǤǧǞǢdzǦǞǜ ǜ 12 ǞǡǢǣǢǞ
• LjǧǡǞǪǜdz ǖǜǕǤǢǢǦǘǔǫǜ ǘǟdz ǣǢǖǯǬǙǡǜdz ǤǙǔǟǜǥǦǜǫǡǢǥǦǜ
• LjǧǡǞǪǜdz Turbo ǘǟdz ǡǙǣǤǙǤǯǖǡǢǝ ǥǦǤǙǟǰǕǯ
• LjǧǡǞǪǜdz Sleep (ǤǙǚǜǠ Ǣǚǜǘǔǡǜdz) ǘǟdz DZǞǢǡǢǠǜǜ ǛǔǤdzǘǔ ǕǔǦǔǤǙǙǞ
• DŽǙǛǜǡǢǖǯǙ ǖǥǦǔǖǞǜ ǘǟdz ǞǢǠǨǢǤǦǡǢǥǦǜ
• DŽǔǕǢǦǔ ǖ ǪǜǨǤǢǖǢǠ ǜ ǔǡǔǟǢǗǢǖǢǠ ǤǙǚǜǠǔǩ
ƾǡǢǣǞǔ FC ǘǟdz ǥǢǙǘǜǡǙǡǜdz ǥ ǣǤǜǙǠǡǜǞǢǠ
•
• 3 ǕǔǦǔǤǙǝǞǜ Ǧǜǣǔ ƴƴƴ ǖ ǞǢǠǣǟǙǞǦǙ
ƵƹƻǂǃƴDžǁǂDždžƼ
ǘǟdz ǜǗǤ
5. DžƼDždžƹǀǁǏƹ džDŽƹƵǂƶƴǁƼǓ
• DžǖǢǕǢǘǡǯǝ USB-ǣǢǤǦ ǃƾ
• ǂǣǙǤǔǪǜǢǡǡǔdz ǥǜǥǦǙǠǔ Windows XP/Vista/7/8
• DirectX 7.0 ǜ ǖǯǬǙ
2
Page 4
RUS
DŽǧǞǢǖǢǘǥǦǖǢ ǣǢ DZǞǥǣǟǧǔǦǔǪǜǜ
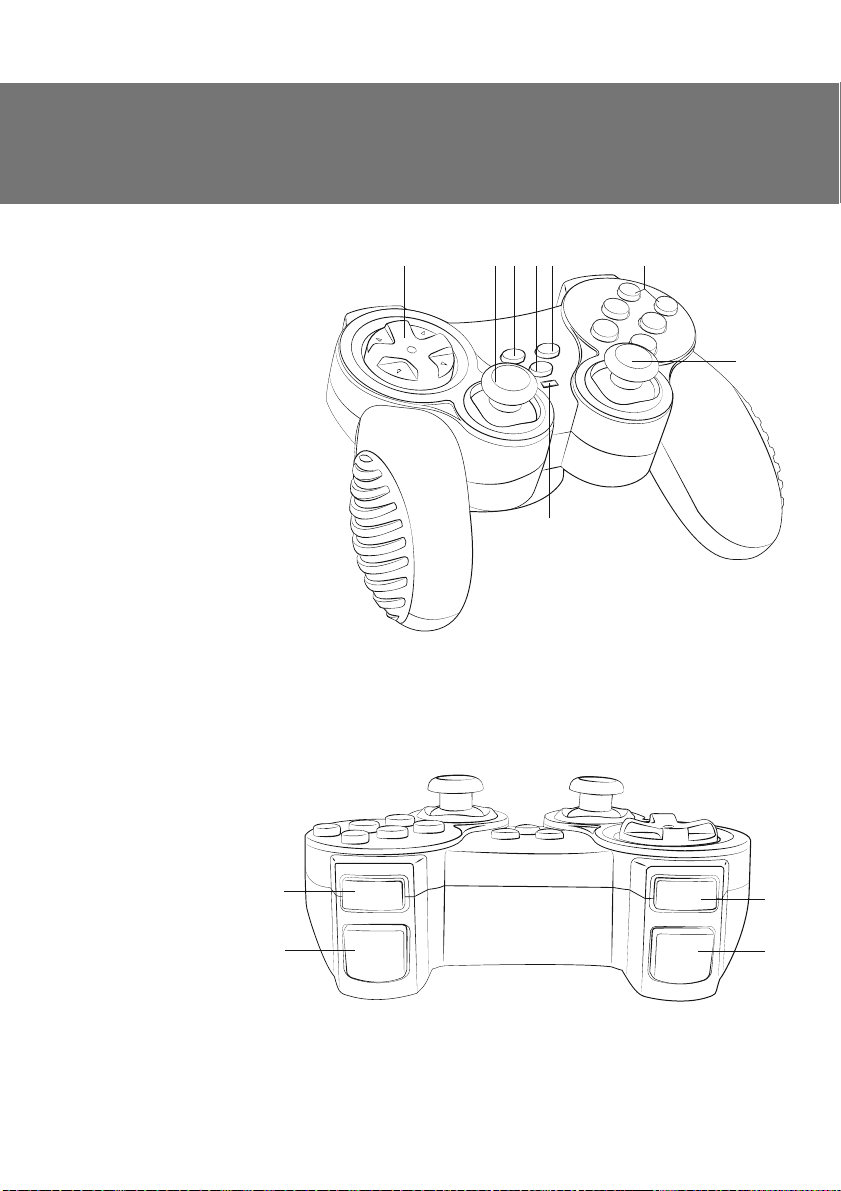
6. ǂǃƼDžƴǁƼƹ ƾǂǁDždžDŽLJƾNJƼƼ
a 8-ǣǢǛǜǪ. ǘǚǢǝǥǦǜǞ
b ƿǙǖǯǝ ǘǚǢǝǥǦǜǞ (ǞǡǢǣǞǔ 11 )
c TURBO: ǞǡǢǣǞǔ ǘǟdz ǖǞǟDz-
ǫǙǡǜdz ǤǙǚǜǠǔ TURBO
d MODE: ǞǡǢǣǞǔ ǘǟdz ǣǙǤǙ-
ǞǟDzǫǙǡǜdz ǤǙǚǜǠǢǖ
e FC: ǞǡǢǣǞǔ ǘǟdz ǥǢǙǘǜǡǙǡǜdz
ǗǙǝǠǣǔǘǔ ǥ ǣǤǜǙǠǡǜǞǢǠ
f ƾǡǢǣǞǜ 1–6
g ǃǤǔǖǯǝ ǘǚǢǝǥǦǜǞ
(ǞǡǢǣǞǔ 12)
h ƼǡǘǜǞǔǦǢǤ ǤǙǚǜǠǔ MODE
i ƾǡǢǣǞǔ 8
j ƾǡǢǣǞǔ 10
k ƾǡǢǣǞǔ 7
l ƾǡǢǣǞǔ 9
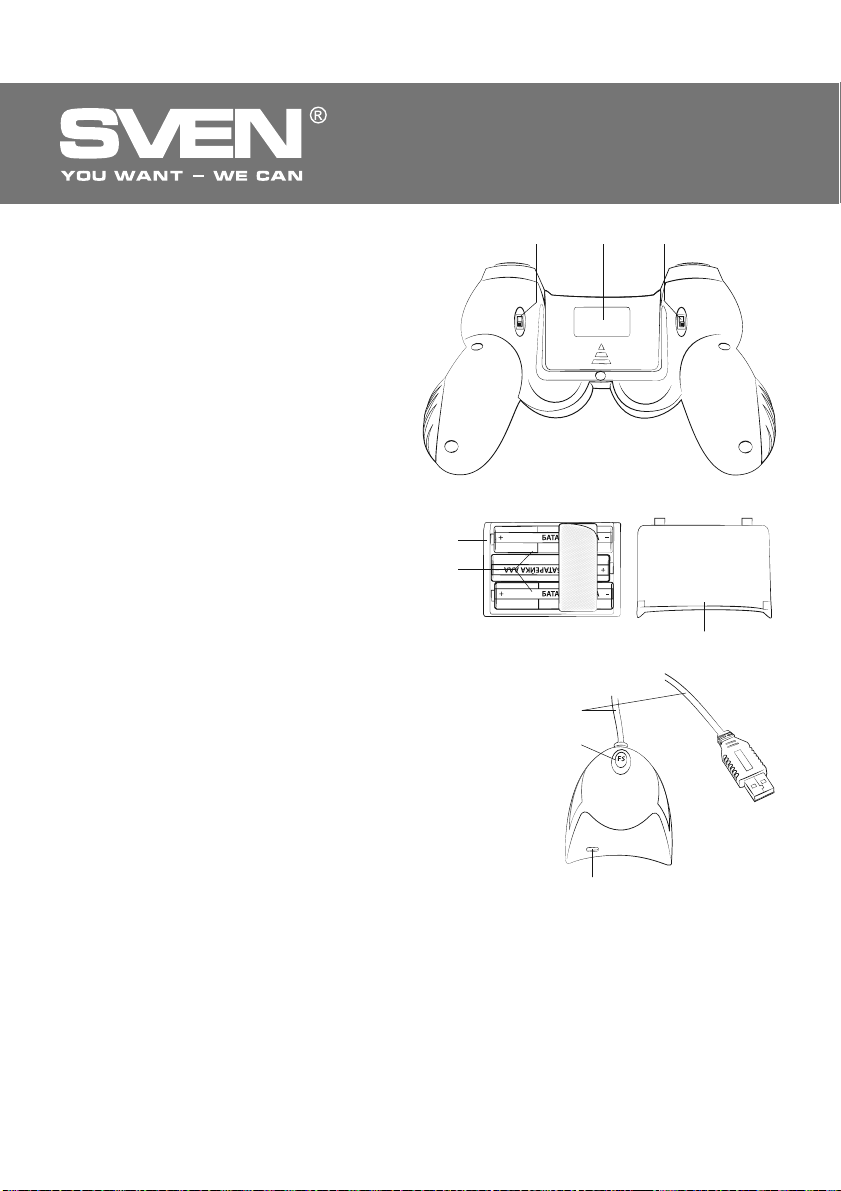
m POWER On/OԚ: ǖǯǞǟDzǫǔǦǙǟǰ
ǧǥǦǤǢǝǥǦǖǔ
n ƵǔǦǔǤǙǝǡǯǝ ǢǦǥǙǞ
o VIBRATION On/OԚ: ǖǯǞǟDzǫǔǦǙǟǰ
ǖǜǕǤǔǪǜǜ
p ƵǔǦǔǤǙǝǞǜ
q ƾǤǯǬǞǔ ǕǔǦǔǤǙǝǡǢǗǢ ǢǦǥǙǞǔ
r ƾǔǕǙǟǰ USB
s ƾǡǢǣǞǔ FC ǣǤǜǙǠǡǜǞǔ
t ƼǡǘǜǞǔǦǢǤ ǣǢǘǞǟDzǫǙǡǜdz
acbde f
X-PAD AERO
5
6
2
4
1
3
h
DžǝǦ. 1. ƷǝǙ ǦǗǚǥǪǨ
g
i
j
3
4
6
5
8
10
1
2
7
9
k
l
DžǝǦ. 2. ƷǝǙ ǦǤǚǥǚǙǝ
3
Page 5
RUS
ƵǙǥǣǤǢǖǢǘǡǢǝ
ǜǗǤǢǖǢǝ ǠǔǡǜǣǧǟdzǦǢǤ
LJǥǦǔǡǢǖǞǔ ǕǔǦǔǤǙǙǞ
mno
• ǂǦǞǤǢǝǦǙ ǞǤǯǬǞǧ ǕǔǦǔǤǙǝǡǢǗǢ ǢǦǥǙǞǔ ǡǔ ǛǔǘǡǙǝ
ǥǦǢǤǢǡǙ ǠǔǡǜǣǧǟdzǦǢǤǔ.
• ƶǥǦǔǖǰǦǙ ǕǔǦǔǤǙǝǞǜ Ǧǜǣǔ ƴƴƴ ǖ ǕǔǦǔǤǙǝǡǯǝ ǢǦǥǙǞ,
POWER
ON
VIBRATION
ON
ǣǤǜǘǙǤǚǜǖǔdzǥǰ ǣǢǟdzǤǡǢǥǦǜ (ǜǛ ǞǢǠǣǟǙǞǦǔ).
• ƻǔǞǤǢǝǦǙ ǞǤǯǬǞǧ ǕǔǦǔǤǙǝǡǢǗǢ ǢǦǥǙǞǔ.
ǃǤǜǠǙǫǔǡǜdz:
OF
OF
• LJǥǦǔǡǔǖǟǜǖǔǝǦǙ ǖǥǙǗǘǔ ǦǢǟǰǞǢ ǞǢǠǣǟǙǞǦ
ǡǢǖǯǩ ǢǘǜǡǔǞǢǖǯǩ ǕǔǦǔǤǙǙǞ. ǁǙǣǤǔǖǜǟǰǡǔdz
ǧǥǦǔǡǢǖǞǔ ǕǔǦǔǤǙǙǞ ǠǢǚǙǦ ǖǯǖǙǥǦǜ ǠǔǡǜǣǧǟdzǦǢǤ ǜǛ ǥǦǤǢdz!
• ƹǥǟǜ ǠǔǡǜǣǧǟdzǦǢǤ ǡǙ ǤǔǕǢǦǔǙǦ, ǣǤǢǖǙǤǰǦǙ ǡǔǟǜǫǜǙ
ǤǔǛǤdzǚǙǡǡǯǙ ǡǔ ǡǢǖǯǙ.
ǕǔǦǔǤǙǙǞ ǜǟǜ ǛǔǠǙǡǜǦǙ
DžǝǦ. 3. ƷǝǙ ǦǢǝǜǨ
• ƶǯǡǜǠǔǝǦǙ ǕǔǦǔǤǙǝǞǜ ǜǛ ǠǔǡǜǣǧǟdzǦǢǤǔ,
Ǚǥǟǜ ǡǙ ǥǢǕǜǤǔǙǦǙǥǰ ǣǢǟǰǛǢǖǔǦǰǥdz ǜǠ ǖ
ǦǙǫǙǡǜǙ ǘǟǜǦǙǟǰǡǢǗǢ ǖǤǙǠǙǡǜ (ǕǢǟǰǬǙ
ǡǙǘǙǟǜ).
n
p
7. ǃǂƸƾƿǒNjƹǁƼƹ Ƽ ƼǁDždžƴƿƿǓNJƼǓ
• ǃǢǥǟǙ ǦǢǗǢ, ǞǔǞ ǖǯ ǖǥǦǔǖǜǟǜ ǕǔǦǔǤǙǝǞǜ ǖ ǕǔǦǔǤǙǝǡǯǝ ǢǦǥǙǞ (ǥǠ. Ǥǜǥ. 4 ǜ ǢǣǜǥǔǡǜǙ ǖǯǬǙ), ǣǢǘǞǟDzǫǜǦǙ ǣǤǜǙǠǡǜǞ 2,4GHz ǞǔǕǙǟǙǠ USB r Ǟ
ǥǖǢǕǢǘǡǢǠǧ
DžǝǦ. 4
q
ǣǢǤǦǧ USB ǞǢǠǣǰDzǦǙǤǔ. ǃǤǜ ǣǢǘǞǟDzǫǙǡǜǜ Ǟ ǃƾ ǧǥǦǤǢǝǥǦǖǢ
ǔǖǦǢǠǔǦǜǫǙǥǞǜ ǢǣǤǙǘǙǟǜǦǥdz ǞǔǞ ǜǗǤǢǖǢǙ ǧǥǦǤǢǝǥǦǖǢ ǜ ǣǢǟǡǢǥǦǰDz ǗǢǦǢǖǢ Ǟ ǤǔǕǢǦǙ. ǂǘǡǔǞǢ ǘǟdz ǖǞǟDzǫǙǡǜdz ǨǧǡǞǪǜǜ
ǖǜǕǤǢǢǦǘǔǫǜ ǡǙǢǕǩǢǘǜǠǢ ǧǥǦǔǡǢǖǜǦǰ ǘǤǔǝǖǙǤ. ƵǙǛ ǘǤǔǝ-
r
s
ǖǙǤǢǖ ǡǙǖǢǛǠǢǚǡǔ ǦǔǞǚǙ ǞǔǟǜǕǤǢǖǞǔ ǖǦǢǤǢǗǢ ǘǚǢǝǥǦǜǞǔ.
• ǃǙǤǙǖǙǘǜǦǙ ǖǯǞǟDzǫǔǦǙǟǰ POWER m ǖ ǣǢǟǢǚǙǡǜǙ ON.
Ƹǟdz ǣǢǘǞǟDzǫǙǡǜdz ǠǔǡǜǣǧǟdzǦǢǤǔ ǖǢ ǖǤǙǠdz ǣǙǤǖǢǗǢ ǖǞǟDzǫǙǡǜdz ǡǔǚǠǜǦǙ ǞǡǢǣǞǧ FC
s ǡǔ ǣǤǜǙǠǡǜǞǙ, ǛǔǥǖǙǦǜǦǥdz
ǜǡǘǜǞǔǦǢǤ t, ǣǢǦǢǠ ǡǔǚǠǜǦǙ ǞǡǢǣǞǧ FC e ǡǔ ǠǔǡǜǣǧǟdzǦǢǤǙ. ǃǢǘǞǟDzǫǜǦǰ ǧǥǦǤǢǝǥǦǖǢ ǠǢǚǡǢ ǜ ǦǔǞ: ǡǔǚǔǖ ǞǡǢǣǞǧ FC
s ǡǔ ǣǤǜǙǠǡǜǞǙ, ǔ ǣǢǦǢǠ ǢǘǡǢǖǤǙǠǙǡǡǢ ǡǔǚǔǦǰ ǞǢǠǕǜǡǔǪǜDz ǞǡǢǣǢǞ «9+11» ǡǔ ǗǙǝǠǣǔǘǙ ǜ ǧǘǙǤǚǜǖǔǦǰ ǖ ǦǙǫǙǡǜǙ
t
DžǝǦ. 5
15 ǥǙǞ. ǂǕǤǔǦǜǦǙ ǖǡǜǠǔǡǜǙ: Ǚǥǟǜ ǣǢǥǟǙ ǣǢǘǥǢǙǘǜǡǙǡǜdz
ǜǗǤǢǞ ǡǔǚǠǙǦ Ǣǘǡǧ ǜǛ ǞǡǢǣǢǞ «9+11» ǡǔ ǗǙǝǠǣǔǘǙ, ǣǤǜǙǠǡǜǞ
ǜ ǗǙǝǠǣǔǘ ǠǢǗǧǦ ǤǔǛǮǙǘǜǡǜǦǰǥdz.
• ƶǥǦǔǖǰǦǙ CD-ǘǜǥǞ ǥ ǘǤǔǝǖǙǤǔǠǜ ǖ ǘǜǥǞǢǖǢǘ ǃƾ ǜ ǛǔǣǧǥǦǜǦǙ ǣǤǢǗǤǔǠǠǧ «setup.exe» ǘǟdz
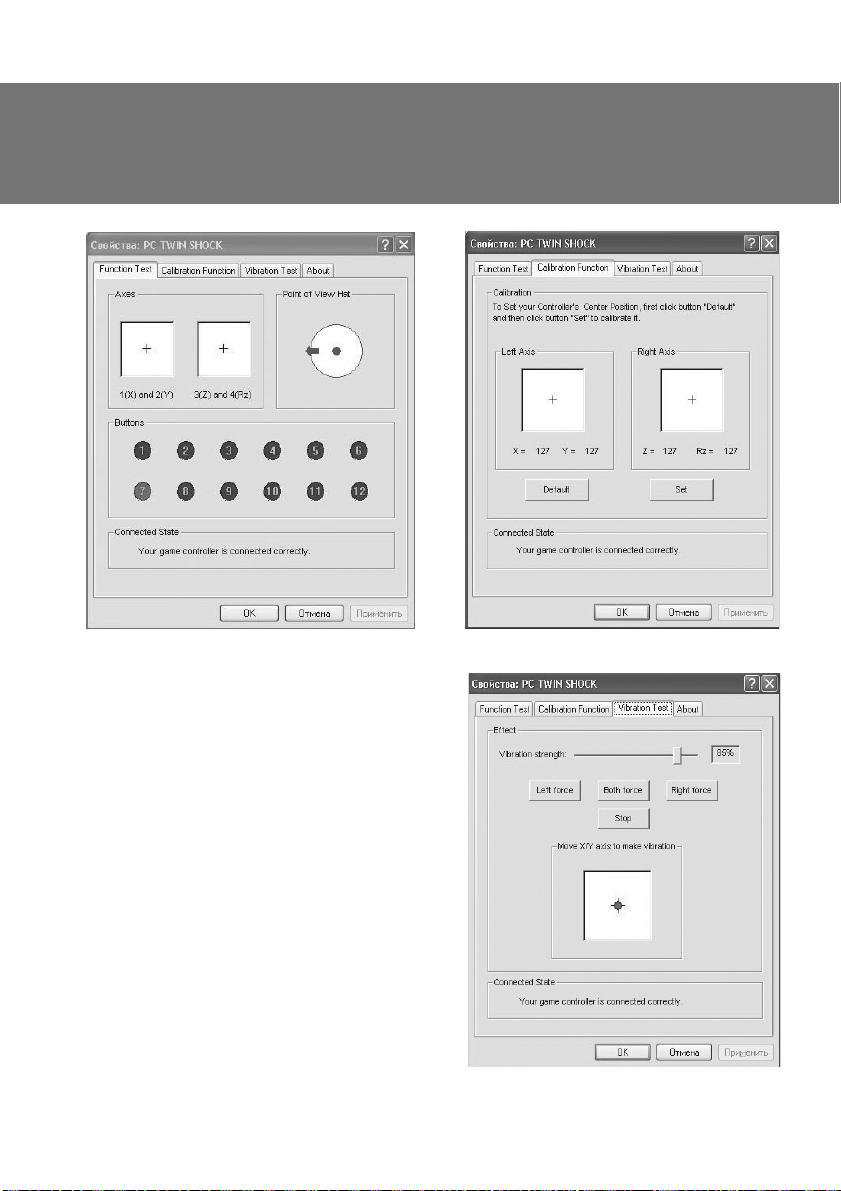
ǜǡǥǦǔǟǟdzǪǜǜ ǘǤǔǝǖǙǤǢǖ. Ƹǟdz ǣǤǢǖǙǤǞǜ ǜ ǡǔǥǦǤǢǝǞǜ ǠǔǡǜǣǧǟdzǦǢǤǔ ǡǔǘǢ ǖǯǕǤǔǦǰ «Start» о
«Control Panel» о «Game Controller». ǁǔ ǃƾ ǢǦǞǤǢǙǦǥdz ǢǞǡǢ «DžǖǢǝǥǦǖǔ: PC TWIN SHOCK» (ǥǠ.
Ǥǜǥ. 6).
• ƾǟǜǞǡǧǖ ǡǔ ǛǔǞǟǔǘǞǧ «Function Test» (Ǥǜǥ. 6), ǣǤǢǦǙǥǦǜǤǧǝǦǙ Ǣǥǜ ǜ ǞǡǢǣǞǜ.
• ƶǢǝǘdz ǖ ǛǔǞǟǔǘǞǧ «Calibration Function» (Ǥǜǥ. 7), ǢǦǞǔǟǜǕǤǧǝǦǙ ǖǥǙ ǫǙǦǯǤǙ
Ǣǥǜ.
4
Page 6
RUS
DŽǧǞǢǖǢǘǥǦǖǢ ǣǢ DZǞǥǣǟǧǔǦǔǪǜǜ
DžǝǦ. 6
• ƶǯǕǙǤǜǦǙ ǛǔǞǟǔǘǞǧ «Vibration test» (ǥǠ. Ǥǜǥ. 8)
ǘǟdz ǣǤǢǖǙǤǞǜ ǜ ǡǔǥǦǤǢǝǞǜ ǨǧǡǞǪǜǜ ǖǜǕǤǢǢǦǘǔǫǜ:
a) ǣǙǤǙǘǖǜǗǔdz ǞǧǤǥǢǤ ǖ ǥǦǤǢǞǙ «Vibration
strenght» Ǡǯ ǠǢǚǙǠ ǧǖǙǟǜǫǜǦǰ ǜǟǜ ǧǠǙǡǰǬǜǦǰ
ǥǜǟǧ ǖǜǕǤǢǢǦǘǔǫǜ, ǡǔ Ǥǜǥ. 8, ǡǔǣǤǜǠǙǤ, Ǣǡǔ ǥǢǥǦǔǖǟdzǙǦ 85 %;
Ǖ) ǡǔǚǜǠǔdz ǞǡǢǣǞǜ «Left force», «Both force» ǜǟǜ
«Right force» ǠǢǚǡǢ ǣǤǢǖǙǤǜǦǰ ǨǧǡǞǪǜDz ǖǜǕǤǢǢǦǘǔǫǜ ǡǔ ǟǙǖǢǠ, ǣǤǔǖǢǠ ǜǟǜ ǢǕǢǜǩ ǘǖǜǗǔǦǙǟdzǩ
ǥǤǔǛǧ;
ǖ) ǣǢǥǟǙ ǡǔǥǦǤǢǝǞǜ ǜ ǣǤǢǖǙǤǞǜ
(ǣǢǘǦǖǙǤǘǜǦǰ) ǖ ǡǜǚǡǙǝ ǥǦǤǢǞǙ DZǦǢǗǢ ǢǞǡǔ.
ǃǤǜǠǙǫǔǡǜǙ. LjǧǡǞǪǜdz ǖǜǕǤǢǢǦǘǔǫǜ ǖǞ ǟDzǫǔǙǦǥdz (ǣǢǟǢǚǙǡǜǙ ON) ǜ ǖǯǞǟDzǫǔǙǦǥdz (ǣǢǟǢǚǙǡǜǙ OFF) ǖǯǞǟDzǫǔǦǙǟǙǠ VIBRATION o.
ǡǔǚǠǜǦǙ ǡǔ «ǂƾ»
X-PAD AERO
DžǝǦ. 7
DžǝǦ. 8
5
Page 7

RUS
ƵǙǥǣǤǢǖǢǘǡǢǝ
ǜǗǤǢǖǢǝ ǠǔǡǜǣǧǟdzǦǢǤ
• ǃǙǤǙǞǟDzǫǙǡǜǙ ǤǙǚǜǠǢǖ.
LJǥǦǤǢǝǥǦǖǢ ǠǢǚǙǦ ǤǔǕǢǦǔǦǰ ǖ ǔǡǔǟǢǗǢǖǢǠ ǜ ǪǜǨǤǢǖǢǠ ǤǙǚǜǠǔǩ. DŽǙǚǜǠǯ ǣǙǤǙǞǟDzǫǔDzǦǥdz
ǞǡǢǣǞǢǝ MODE d, ǖ ǛǔǖǜǥǜǠǢǥǦǜ ǢǦ ǤǙǚǜǠǔ ǠǙǡdzǙǦǥdz ǪǖǙǦ ǥǖǙǦǢǘǜǢǘǔ h ǜǛ ǞǤǔǥǡǢǗǢ ǡǔ
ǛǙǟǙǡǯǝ. ƶ ǪǜǨǤǢǖǢǠ ǤǙǚǜǠǙ (ǥǖǙǦǢǘǜǢǘ ǥǦǔǡǢǖǜǦǥdz ǛǙǟǙǡǯǠ) ǘǢǥǦǧǣǡǯ 2 Ǣǥǜ ǜ 10 ǞǡǢǣǢǞ,
ǖ ǔǡǔǟǢǗǢǖǢǠ (ǥǖǙǦǢǘǜǢǘ ǥǦǔǡǢǖǜǦǥdz ǞǤǔǥǡǯǠ) ǚǙ ǤǙǚǜǠǙ ǘǢǥǦǧǣǡǯ ǖǥǙ 4 Ǣǥǜ ǜ 12 ǞǡǢǣǢǞ.
• LjǧǡǞǪǜdz TURBO (ǡǙǣǤǙǤǯǖǡǢǝ ǥǦǤǙǟǰǕǯ).
LjǧǡǞǪǜdz Turbo ǣǤǙǘǡǔǛǡǔǫǙǡǔ ǘǟdz ǜǠǜǦǔǪǜǜ ǠǡǢǗǢǞǤǔǦǡǢǗǢ ǡǔǚǔǦǜdz ǣǤǜ ǢǘǡǢǤǔǛǢǖǢǠ
ǡǔǚǔǦǜǜ ǜ ǥǢǘǙǤǚǔǡǜǜ ǟDzǕǢǝ ǜǛ ǞǡǢǣǢǞ. Ƹǟdz ǔǞǦǜǖǔǪǜǜ ǨǧǡǞǪǜǜ ǡǙǢǕǩǢǘǜǠǢ ǡǔǚǔǦǰ ǟDzǕǧDz
ǜǛ ǞǡǢǣǢǞ 1-12, ǣǢǦǢǠ, ǧǘǙǤǚǜǖǔdz ǙǙ, ǡǔǚǔǦǰ ǞǡǢǣǞǧ TURBO c. ǃǢǥǟǙ DZǦǢǗǢ ǞǡǢǣǞǔ ǕǧǘǙǦ
ǤǔǕǢǦǔǦǰ ǖ TURBO-ǤǙǚǜǠǙ. ǂǦǠǙǡǔ ǨǧǡǞǪǜǜ TURBO ǢǥǧǭǙǥǦǖǟdzǙǦǥdz ǦǔǞ: ǡǔǚǔǖ ǛǔǣǤǢǗǤǔǠǠǜǤǢǖǔǡǡǧDz ǞǡǢǣǞǧ ǥ ǨǧǡǞǪǜǙǝ TURBO ǜ ǧǘǙǤǚǜǖǔdz ǙǙ
• DŽǙǚǜǠ Ǣǚǜǘǔǡǜdz Sleep (ǘǟdz DZǞǢǡǢǠǜǜ ǛǔǤdzǘǔ ǕǔǦǔǤǙǙǞ).
ƹǥǟǜ ǧǥǦǤǢǝǥǦǖǢ ǘǟǜǦǙǟǰǡǢǙ ǖǤǙǠdz ǡǙ ǜǥǣǢǟǰǛǧǙǦǥdz, ǦǢ ǥ ǪǙǟǰDz ǧǖǙǟǜǫǙǡǜdz ǥǤǢǞǔ ǥǟǧǚǕǯ
ǕǔǦǔǤǙǙǞ ǠǔǡǜǣǧǟdzǦǢǤ ǢǥǡǔǭǙǡ ǤǙǚǜǠǢǠ Ǣǚǜǘǔǡǜdz Sleep. ǃǢǥǟǙ ǣǢǘǞǟDzǫǙǡǜdz ǣǤǜǙǠǡǜǞǔ
Ǟ ǃƾ, Ǚǥǟǜ Ǣǡ ǡǙ ǣǢǘǥǢǙǘǜǡǙǡ ǖ ǦǙǫǙǡǜǙ ǕǢǟǰǬǙ 15 ǥǙǞ ǜǟǜ ǡǙ ǣǤǢǜǥǩǢǘdzǦ ǡǜǞǔǞǜǩ ǘǙǝǥǦǖǜǝ
ǥ ǞǡǢǣǞǔǠǜ ǜǟǜ ǢǥdzǠǜ ǖ ǦǙǫǙǡǜǙ ǥǖǯǬǙ 3 ǠǜǡǧǦ, ǔǖǦǢǠǔǦǜǫǙǥǞǜ ǖǞǟDzǫǔǙǦǥdz ǤǙǚǜǠ Sleep. Ƹǟdz
ǦǢǗǢ, ǫǦǢǕǯ ǜǛǡǔǫǔǟǰǡǢ ǖǞǟDzǫǜǦǰ ǤǙǚǜǠ Ǣǚǜǘǔǡǜdz, ǡǔǘǢ ǡǔǚǔǦǰ Ǣǘǡǧ ǜǛ ǦǤǙǩ ǞǡǢǣǢǞ: «10»,
«11» ǜǟǜ «12».
• LjǧǡǞǪǜdz ǣǤǙǘǧǣǤǙǚǘǙǡǜdz Ǣ ǡǜǛǞǢǠ ǡǔǣǤdzǚǙǡǜǜ ǕǔǦǔǤǙǙǞ. ƾǢǗǘǔ ǕǔǦǔǤǙǝǞǜ ǜǠǙDzǦ ǡǜǛǞǢǙ
ǡǔǣǤdzǚǙǡǜǙ ǜǟǜ ǤǔǛǤdzǘǜǟǜǥǰ, ǛǙǟǙǡǯǝ ǜ ǞǤǔǥǡǯǝ ǥǖǙǦǢǘǜǢǘǯ ǕǧǘǧǦ ǢǘǡǢǖǤǙǠǙǡǡǢ ǥǖǙǦǜǦǰǥdz, ǫǦǢ ǧǞǔǛǯǖǔǙǦ ǡǔ ǦǢ, ǫǦǢ ǕǔǦǔǤǙǝǞǜ ǡǔǘǢ ǛǔǠǙǡǜǦǰ. DŽǔǘǜ ǧǖǙǟǜǫǙǡǜdz ǥǤǢǞǔ ǥǟǧǚǕǯ
ǕǔǦǔǤǙǙǞ ǨǧǡǞǪǜdz ǖǜǕǤǔǪǜǜ ǕǧǘǙǦ ǖǯǞǟDzǫǔǦǰǥdz ǔǖǦǢǠǔǦǜǫǙǥǞǜ.
, ǣǢǖǦǢǤǡǢ ǡǔǚǔǦǰ ǞǡǢǣǞǧ TURBO.
6
Page 8
RUS
DŽǧǞǢǖǢǘǥǦǖǢ ǣǢ DZǞǥǣǟǧǔǦǔǪǜǜ
8. DŽƹnjƹǁƼƹ ƶǂƻǀǂƺǁǏlj ǃDŽǂƵƿƹǀ
ǃǤǢǕǟǙǠǔ
ǃǢǥǟǙ ǧǥǦǔǡǢǖǞǜ ǃǂ ǘǚǢǝǥǦǜǞ
ǡǙ ǤǔǕǢǦǔǙǦ.
ƸǤǔǝǖǙǤǯ ǡǙ ǧǥǦǔǡǔǖǟǜǖǔDzǦǥdz
ǡǔ ǃƾ.
ƴǡǔǟǢǗǢǖǔdz Ǣǥǰ ǥǤǔǕǢǦǔǟǔ
ǔǖǦǢǠǔǦǜǫǙǥǞǜ ǕǙǛ
ǖǠǙǬǔǦǙǟǰǥǦǖǔ ǜǗǤǢǞǔ.
ǃǢǥǟǙ ǣǢǘǥǢǙǘǜǡǙǡǜdz
ǘǚǢǝǥǦǜǞǔ ǣǤǢǗǤǔǠǠǔ
ǘǤǔǝǖǙǤǔ ǡǙ ǡǔǝǘǙǡǔ.
ǃǢǥǟǙ ǛǔǣǧǥǞǔ ǜǗǤǯ ǨǧǡǞǪǜdz
ǖǜǕǤǢǢǦǘǔǫǜ ǖǞǟDzǫǔǙǦǥdz ǥǔǠǔ
ǕǙǛ ǖǠǙǬǔǦǙǟǰǥǦǖǔ ǜǗǤǢǞǔ.
ƶ ǣǤǢǪǙǥǥǙ ǜǗǤǯ ǨǧǡǞǪǜdz
ǖǜǕǤǢǢǦǘǔǫǜ ǡǙǘǢǥǦǔǦǢǫǡǔ.
DŽǙǬǙǡǜǙ
ƴ. ǃǤǢǖǙǤǰǦǙ, ǣǤǔǖǜǟǰǡǢ ǟǜ ǘǚǢǝǥǦǜǞ ǣǢǘǥǢǙǘǜǡǙǡ
Ƶ. LJǕǙǘǜǦǙǥǰ, ǫǦǢ ǖǯ ǢǦǞǤǯǟǜ ǢǞǡǢ «Game Port Controller»,
ǢǥǧǭǙǥǦǖǜǟǜ ǜǡǥǦǔǟǟdzǪǜDz ǜ ǡǔǚǔǟǜ ǞǡǢǣǞǧ «Conԛrm»
ǘǟdz ǣǢǘǦǖǙǤǚǘǙǡǜdz ǡǔǥǦǤǢǙǞ.
ƶ. ǃǤǢǖǙǤǰǦǙ, ǡǙ ǜǠǙǙǦ ǟǜ ǠǔǡǜǣǧǟdzǦǢǤ ǞǢǡǨǟǜǞǦǢǖ ǥ
ǘǤǧǗǜǠǜ ǣǙǤǜǨǙǤǜǝǡǯǠǜ ǧǥǦǤǢǝǥǦǖǔǠǜ.
Ʒ. ǃǙǤǙǛǔǣǧǥǦǜǦǙ ǃƾ, Ǚǥǟǜ ǠǔǡǜǣǧǟdzǦǢǤ ǙǭǙ ǡǙ ǤǔǕǢǦǔǙǦ.
LJǥǦǔǡǢǖǜǦǙ ǖǙǤǥǜDz DirectX 7.0 ǜǟǜ ǖǯǬǙ.
ƾǔǟǜǕǤǢǖǞǔ ǠǔǡǜǣǧǟdzǦǢǤǔ ǡǙ ǢǦǤǙǗǧǟǜǤǢǖǔǡǔ ǜǟǜ ǡǙ
ǣǢǘǦǖǙǤǚǘǙǡǔ ǣǢǥǟǙ ǤǙǗǧǟǜǤǢǖǞǜ.
ƻǔǝǘǜǦǙ
«ǂǕǢǤǧǘǢǖǔǡǜǙ» о «ƸǜǥǣǙǦǫǙǤ ǧǥǦǤǢǝǥǦǖ» ǜ ǧǘǔǟǜǦǙ
ǢǕǢǤǧǘǢǖǔǡǜǙ ǥ ǠǙǦǞǢǝ «!», ǢǦǥǢǙǘǜǡǜǦǙ, ǔ ǣǢǦǢǠ ǢǣdzǦǰ
ǣǢǘǥǢǙǘǜǡǜǦǙ ǠǔǡǜǣǧǟdzǦǢǤ Ǟ ǃƾ. ǃǢǥǟǙ DZǦǢǗǢ ǃƾ
ǤǔǥǣǢǛǡǔǙǦ ǥǜǥǦǙǠǧ ǘǤǔǝǖǙǤǔ.
ƶǢǝǘǜǦǙ ǖ ǡǔǥǦǤǢǝǞǜ «Force Feedback» ǖ ǜǗǤǙ ǜ ǢǦǞǔǟǜǕǤǧǝǦǙ ǨǧǡǞǪǜDz ǖǜǕǤǢǢǦǘǔǫǜ.
ƶǢǝǘǜǦǙ ǖ ǡǔǥǦǤǢǝǞǜ «Force Feedback» ǖ ǜǗǤǙ ǜ ǡǔǥǦǤǢǝǦǙ ǥǜǟǧ ǖǜǕǤǢǢǦǘǔǫǜ.
ǖ «ǀǢǝ ǞǢǠǣǰDzǦǙǤ» о «DžǖǢǝǥǦǖǔ ǥǜǥǦǙǠǯ» о
X-PAD AERO
Ǟ ǃƾ.
ƹǥǟǜ ǡǜ Ǣǘǜǡ ǜǛ ǧǞǔǛǔǡǡǯǩ ǖǯǬǙ ǥǣǢǥǢǕǢǖ ǡǙ ǣǢǛǖǢǟdzǙǦ ǤǙǬǜǦǰ ǣǤǢǕǟǙǠǧ, ǣǢǚǔǟǧǝǥǦǔ, ǢǕǤǔǦǜǦǙǥǰ Ǜǔ ǣǤǢǨǙǥǥǜǢǡǔǟǰǡǢǝ ǞǢǡǥǧǟǰǦǔǪǜǙǝ ǖ ǕǟǜǚǔǝǬǜǝ Ǟ ƶǔǠ ǥǙǤǖǜǥǡǯǝ ǪǙǡǦǤ. ǁǜǞǢǗǘǔ
ǡǙ ǣǯǦǔǝǦǙǥǰ ǤǙǠǢǡǦǜǤǢǖǔǦǰ ǜǛǘǙǟǜǙ ǥǔǠǢǥǦǢdzǦǙǟǰǡǢ.
7
Page 9

ƵǙǛǣǤǢǖǹǘǡǜǝ ǹǗǤǢǖǜǝ
ǠǔǡǹǣǧǟdzǦǢǤ
ƾƹDŽƫƶǁƼNJdžƶǂ
ƻ ƹƾDžǃƿLJƴdžƴNJƫƬ
X-PAD
AERO
www.sven.ѵ
Page 10

UKR
ƾǙǤǹǖǡǜǪǦǖǢ Ǜ ǙǞǥǣǟǧǔǦǔǪǹǺ
ƸdzǞǧǷǠǢ ƶǔǠ Ǜǔ ǞǧǣǹǖǟDz ǖǜǤǢǕǧ ǦǢǤǗǢǖǙǟǰǡǢǺ ǠǔǤǞǜ SVEN!
ǃǙǤǙǘ ǙǞǥǣǟǧǔǦǔǪǹǷDz ǣǤǜǥǦǤǢDz ǧǖǔǚǡǢ ǢǛǡǔǝǢǠǦǙǥdz Ǜ ǪǜǠ ƾǙǤǹǖǡǜǪǦǖǢǠ ǹ ǛǕǙǤǙǚǹǦǰ ǝǢǗǢ ǡǔ
ǖǙǥǰ ǣǙǤǹǢǘ ǞǢǤǜǥǦǧǖǔǡǡdz.
ƴƶdžǂDŽDžǐƾƹ ǃDŽƴƶǂ
© 2014. SVEN PTE. LTD.
NJǙ ƾǙǤǹǖǡǜǪǦǖǢ Ǧǔ ǹǡǨǢǤǠǔǪǹdz, ǭǢ ǠǹǥǦǜǦǰǥdz ǖ ǡǰǢǠǧ, ǛǔǩǜǭǙǡǢ ǔǖǦǢǤǥǰǞǜǠ ǣǤǔǖǢǠ. LJǥǹ ǣǤǔǖǔ
ǛǔǥǦǙǤǙǚǙǡǹ.
džǂDŽƷǂƶƹƿǐǁƫ ǀƴDŽƾƼ
LJǥǹ ǦǢǤǗǢǖǙǟǰǡǹ ǠǔǤǞǜ Ƿ ǖǟǔǥǡǹǥǦDz Ǻǩ ǛǔǞǢǡǡǜǩ ǖǟǔǥǡǜǞǹǖ.
ǃǂǃƹDŽƹƸƺƹǁǁǓ ǃDŽǂ ǂƵǀƹƺƹǁǁǓ ƶƫƸǃǂƶƫƸƴƿǐǁǂDždžƫ
ǁǙǛǖǔǚǔDzǫǜ ǡǔ ǘǢǞǟǔǘǙǡǹ Ǜǧǥǜǟǟdz ǛǤǢǕǜǦǜ ƾǙǤǹǖǡǜǪǦǖǢ ǦǢǫǡǹǬǜǠ, ǠǢǚǟǜǖǹ ǘǙdzǞǹ ǡǙǖǹǘǣǢǖǹǘǡǢǥǦǹ. ƫǡǨǢǤǠǔǪǹdz ǪǰǢǗǢ ƾǙǤǹǖǡǜǪǦǖǔ ǡǔǘǔǡǔ ǡǔ ǧǠǢǖǔǩ «dzǞ Ƿ». ƴǖǦǢǤ ǹ ǖǜǘǔǖǙǪǰ ǡǙ ǡǙǥǧǦǰ ǚǢǘǡǢǺ ǖǹǘǣǢǖǹǘǔǟǰǡǢǥǦǹ ǣǙǤǙǘ ǢǥǢǕǢDz ǔǕǢ ǢǤǗǔǡǹǛǔǪǹǷDz Ǜǔ ǛǕǜǦǞǜ ǔǕǢ ǧǬǞǢǘǚǙǡǡdz, Ǜǔǖǘǔǡǹ
ǹǡǨǢǤǠǔǪǹǷDz, ǭǢ ǠǹǥǦǜǦǰǥdz ǧ ǪǰǢǠǧ ƾǙǤǹǖǡǜǪǦǖǹ.
DŽǂƻǃƴƾǂƶLJƶƴǁǁǓ
ƴǞǧǤǔǦǡǢ ǤǢǛǣǔǞǧǝǦǙ ǖǜǤǹǕ, ǣǤǢǥǦǙǚǜǦǙ Ǜǔ ǦǜǠ, ǭǢǕ ǧǥǙǤǙǘǜǡǹ ǞǢǤǢǕǞǜ ǡǙ ǛǔǟǜǬǜǟǢǥdz dzǞǙǡǙǕǧǘǰ ǣǤǜǟǔǘǘdz. ǃǙǤǙǖǹǤǦǙ ǣǤǜǥǦǤǹǝ ǡǔ ǣǤǙǘǠǙǦ ǣǢǬǞǢǘǚǙǡǰ. ǓǞǭǢ ǖǜǤǹǕ ǣǢǬǞǢǘǚǙǡǢ ǣǤǜ
ǦǤǔǡǥǣǢǤǦǧǖǔǡǡǹ, ǛǖǙǤǡǹǦǰǥdz ǧ ǨǹǤǠǧ, ǭǢ ǛǘǹǝǥǡDzǷ ǘǢǥǦǔǖǞǧ; dzǞǭǢ ǖǜǤǹǕ ǡǙ ǨǧǡǞǪǹǢǡǧǷ, ǖǹǘǤǔǛǧ ǚ ǛǖǙǤǡǹǦǰǥdz ǘǢ ǣǤǢǘǔǖǪdz.
ƻǀƫDždž
RUS ..................................................................................................
UKR .................................................................................................
1. ǂǃƼDž ..........................................................................................
2. ƻƴljǂƸƼ ƵƹƻǃƹƾƼ ..........................................................................
3. ƾǂǀǃƿƹƾdžǁƫDždžǐ ...........................................................................
4. ǂDžǂƵƿƼƶǂDždžƫ ...............................................................................
5. DžƼDždžƹǀǁƫ ƶƼǀǂƷƼ .........................................................................
6. ǂǃƼDž ƾǂǁDždžDŽLJƾNJƫƬ .........................................................................
7. ǃƫƸƾƿǒNjƹǁǁǓ džƴ ƫǁDždžƴƿǓNJƫǓ .........................................................
8. ƶƼDŽƫnjƹǁǁǓ ǀǂƺƿƼƶƼlj ǃDŽǂƵƿƹǀ ..................................................
ENG ...............................................................................................
ƶǙǤǥi
dz 1.0 (V 1.0).
X-PAD AERO
10
10
10
10
10
11
12
15
16
1
8
džǙǩǡǹǫǡǔ ǣǹǘǦǤǜǠǞǔ ǤǢǛǠǹǭǙǡǔ ǡǔ ǥǔǝǦi www.sven.Н
džǔǞǢǚ ǦǧǦ ƶǜ ǛǠǢǚǙǦǙ ǛǡǔǝǦǜ ǢǡǢǖǟǙǡǧ ǖǙǤǥǹDz ǪǰǢǗǢ ǞǙǤǹǖǡǜǪǦǖǔ.
9
Page 11

UKR
ƵǙǛǣǤǢǖǹǘǡǜǝ ǹǗǤǢǖǜǝ
ǠǔǡǹǣǧǟdzǦǢǤ
1. ǂǃƼDž
ƵǙǛǣǤǢǖǹǘǡǜǝ ǹǗǤǢǖǜǝ ǠǔǡǹǣǧǟdzǦǢǤ X-Pad Aero Ǜ ǖǠǢǡǦǢǖǔǡǜǠ ǖǹǕǤǢǠǙǩǔǡǹǛǠǢǠ ǹ ǣǤǜǝǠǔǫǙǠ
2,4GHz ǧ ǞǢǠǣǟǙǞǦǹ dzǖǟdzǷ ǥǢǕǢDz ǙǤǗǢǡǢǠǹǫǡǜǝ ǗǙǝǠǣǔǘ ǘǟdz ǹǗǢǤ. ƹǨǙǞǦ ǖǹǕǤǢǖǹǘǘǔǫǹ ǣǙǤǙǘǔǷ
ǖǹǘǫǧǦǦdz ǤǙǔǟǹǥǦǜǫǡǢǥǦǹ ǖ ǹǗǤǔǩ. ƷǧǠǢǖǹ ǖǥǦǔǖǞǜ Ǧǔ ǙǤǗǢǡǢǠǹǫǡǔ ǞǢǡǥǦǤǧǞǪǹdz ǠǔǡǹǣǧǟdzǦǢǤǔ X-Pad
Aero ǣǹǘǖǜǭǧDzǦǰ ǦǢǫǡǹǥǦǰ ǧǣǤǔǖǟǹǡǡdz ǣǹǘ ǫǔǥ ǗǤǜ. ǀǔǡǹǣǧǟdzǦǢǤ X-Pad Aero ǠǢǚǡǔ ǖǜǞǢǤǜǥǦǢǖǧǖǔǦǜ ǖ ǤǹǛǡǜǩ ǹǗǤǔǩ – ǥǜǠǧǟdzǦǢǤǔǩ, ǔǤǞǔǘǔǩ, ǬǧǦǙǤǔǩ ǦǢǭǢ.
2. ƻƴljǂƸƼ ƵƹƻǃƹƾƼ
• ǁǙ ǤǢǛǕǜǤǔǝǦǙ ǣǤǜǥǦǤǹǝ ǹ ǡǙ ǤǙǠǢǡǦǧǝǦǙ ǝǢǗǢ ǥǔǠǢǥǦǹǝǡǢ. ǂǕǥǟǧǗǢǖǧǖǔǡǡdz ǹ ǤǙǠǢǡǦ ǣǢǖǜǡǡǹ
ǛǘǹǝǥǡDzǖǔǦǜ ǟǜǬǙ ǞǖǔǟǹǨǹǞǢǖǔǡǹ ǨǔǩǹǖǪǹ ǥǙǤǖǹǥǡǢǗǢ ǪǙǡǦǤǧ.
• ǂǕǙǤǹǗǔǝǦǙ ǣǤǜǥǦǤǹǝ ǖǹǘ ǖǣǟǜǖǧ ǣǹǘǖǜǭǙǡǢǺ ǖǢǟǢǗǢǥǦǹ, ǣǜǟǧ, ǥǜǟǰǡǜǩ ǠǔǗǡǹǦǡǜǩ ǣǢǟǹǖ, ǖǹǕǤǔǪǹǺ, ǘǹǺ ǖǜǥǢǞǜǩ ǦǙǠǣǙǤǔǦǧǤ, ǺǘǞǜǩ Ǥǹǘǜǡ ǹ ǗǔǛǹǖ.
• ƶǞǔǛǹǖǞǜ ǭǢǘǢ ǘǢǗǟdzǘǧ: ǘǟdz ǢǫǜǭǙǡǡdz ǞǢǤǣǧǥǧ ǖǜǞǢǤǜǥǦǢǖǧǝǦǙ ǫǜǥǦǧ Ǡ’dzǞǧ
ǖǜǞǢǤǜǥǦǢǖǧǝǦǙ ǘǟdz ǢǫǜǭǙǡǡdz ǦǔǞǹ ǤǢǛǫǜǡǡǜǞǜ, dzǞ ǕǙǡǛǜǡ ǔǕǢ ǥǣǜǤǦ, ǢǥǞǹǟǰǞǜ ǖǢǡǜ ǠǢǚǧǦǰ
ǣǢǬǞǢǘǜǦǜ ǣǢǖǙǤǩǡDz ǣǤǜǥǦǤǢDz.
• ǁǙ ǞǜǘǔǝǦǙ ǣǤǜǥǦǤǹǝ, ǭǢǕ ǡǙ ǣǢǬǞǢǘǜǦǜ ǝǢǗǢ.
3. ƾǂǀǃƿƹƾdžǁƫDždžǐ
• ǀǔǡǜǣǧǟdzǦǢǤ — 1 ǬǦ.
• ǃǤǜǙǠǡǜǞ 2,4GHz — 1 ǬǦ.
• ƵǔǦǔǤǙǝǞǜ Ǧǜǣǔ ƴƴƴ — 3 ǬǦ.
• CD-ǘǜǥǞ ǥ ǘǤǔǝǖǙǤǔǠǜ — 1 ǬǦ.
• DŽǧǞǢǖǢǘǥǦǖǢ ǣǢ DZǞǥǣǟǧǔǦǔǪǜǜ — 1 ǬǦ.
• ƷǔǤǔǡǦǜǝǡǯǝ ǦǔǟǢǡ — 1 ǬǦ.
ǦǞǔǡǜǡǧ. ǁǙ
4. ǂDžǂƵƿƼƶǂDždžƫ
• ƹǤǗǢǡǢǠǹǫǡǜǝ ǗǙǝǠǣǔǘ ǘǟdz ǹǗǢǤ
• ǃǹǘǦǤǜǠǞǔ: DirectX 7.0 ǹ ǖǜǭǙ, Windows XP/Vista/7/8
• ƫǡǦǙǤǨǙǝǥ USB
• ǃǤǜǝǠǔǫ 2,4GHz, ǘǔǟǰǡǹǥǦǰ ǘǹǺ – ǘǢ 7 ǠǙǦǤǹǖ
• 4 Ǣǥǹ, 8-ǣǢǛǜǪǹǝǡǜǝ ǘǚǢǝǥǦǜǞ, 2 ǘǚǢǝǥǦǜǞǜ-ǤǧǞǢdzǦǞǜ ǹ 12 ǞǡǢǣǢǞ
• LjǧǡǞǪǹdz ǖǹǕǤǢǖǹǘǘǔǫǹ ǘǟdz
• LjǧǡǞǪǹdz Turbo ǘǟdz ǕǙǛǣǙǤǙǤǖǡǢǺ ǥǦǤǹǟǰǕǜ
• LjǧǡǞǪǹdz Sleep (ǤǙǚǜǠ ǢǫǹǞǧǖǔǡǡdz) ǘǟdz ǙǞǢǡǢǠǹǺ ǛǔǤdzǘǧ ǕǔǦǔǤǙǝǢǞ
• ƷǧǠǢǖǹ ǖǥǦǔǖǞǜ ǘǟdz ǞǢǠǨǢǤǦǡǢǥǦǹ
• DŽǢǕǢǦǔ ǖ ǪǜǨǤǢǖǢǠǧ Ǧǔ ǔǡǔǟǢǗǢǖǢǠǧ ǤǙǚǜǠǔǩ
• ƾǡǢǣǞǔ FC ǘǟdz Ǜ’Ƿǘǡǔǡǡdz Ǜ ǣǤǜǝǠǔǫǙǠ
• 3 ǕǔǦǔǤǙǝǞǜ Ǧǜǣǧ ƴƴƴ ǖ ǞǢǠǣǟǙǞǦǹ
5. DžƼDždžƹǀǁƫ ƶƼǀǂƷƼ
• ƶǹǟǰǡǜǝ ǣǢǤǦ USB
• ǂǣǙǤǔǪǹǝǡǔ ǥǜǥǦǙǠǔ Windows XP/Vista/7/8
• DirectX 7.0 ǹ ǖǜǭǙ
ǣǹǘǖǜǭǙǡǡdz ǤǙǔǟǹǥǦǜǫǡǢǥǦǹ
10
Page 12

UKR
ƾǙǤǹǖǡǜǪǦǖǢ Ǜ ǙǞǥǣǟǧǔǦǔǪǹǺ
6. ǂǃƼDž ƾǂǁDždžDŽLJƾNJƫƬ
a 8-ǣǢǛǜǪǹǝǡǜǝ ǘǚǢǝǥǦǜǞ
b ƿǹǖǜǝ ǘǚǢǝǥǦǜǞ (ǞǡǢǣǞǔ 11 )
c TURBO: ǞǡǢǣǞǔ ǘǟdz ǖǠǜǞǔǡǡdz
ǤǙǚǜǠǧ TURBO
d MODE: ǞǡǢǣǞǔ ǘǟdz ǣǙǤǙ-
ǠǜǞǔǡǡdz ǪǜǨǤǢǖǜǩ ǤǙǚǜǠǹǖ
e FC: ǞǡǢǣǞǔ ǘǟdz Ǜ’Ƿǘǡǔǡǡdz
ǗǙǝǠǣǔǘǔ Ǜ ǣǤǜǝǠǔǫǙǠ
f ƾǡǢǣǞǜ 1–6
g ǃǤǔǖǜǝ ǘǚǢǝǥǦǜǞ (ǞǡǢǣǞǔ 12)
h ƫǡǘǜǞǔǦǢǤ ǤǙǚǜǠǧ MODE
i ƾǡǢǣǞǔ 8
j ƾǡǢǣǞǔ 10
k ƾǡǢǣǞǔ 7
l ƾǡǢǣǞǔ 9
m POWER On/OԚ: ǖǜǠǜǞǔǫ
ǣǤǜǥǦǤǢDz
n ƵǔǦǔǤǙǝǡǜǝ ǖǹǘǥǹǞ
o VIBRATION On/OԚ: ǖǜǠǜǞǔǫ
ǖǹǕǤǔǪǹǺ
p ƵǔǦǔǤǙǝǞǜ
q ƾǤǜǬǞǔ ǕǔǦǔǤǙǝǡǢǗǢ ǖǹǘǥǹǞǧ
r ƾǔǕǙǟǰ USB
s ƾǡǢǣǞǔ FC ǣǤǜǝǠǔǫǔ
t ƫǡǘǜǞǔǦǢǤ ǣǹǘǞǟDzǫǙǡǡdz
X-PAD AERO
acbde f
5
2
4
1
3
h
ǁǕǠ. 1. ƷǝǘǠǴǙ ǜǘǣǥǝ
6
g
i
j
3
4
6
5
8
10
1
2
7
9
k
l
ǁǕǠ. 2. ƷǝǘǠǴǙ ǦǤǚǥǚǙǨ
11
Page 13

UKR
ƵǙǛǣǤǢǖǹǘǡǜǝ ǹǗǤǢǖǜǝ
ǠǔǡǹǣǧǟdzǦǢǤ
ƶǥǦǔǡǢǖǟǙǡǡdz ǕǔǦǔǤǙǝǢǞ
mno
• ƶǹǘǞǤǜǝǦǙ ǞǤǜǬǞǧ ǕǔǦǔǤǙǝǡǢǗǢ ǖǹǘǥǹǞǧ ǡǔ Ǜǔǘǡǹǝ
ǥǦǢǤǢǡǹ ǠǔǡǹǣǧǟdzǦǢǤǔ.
• ƶǥǦǔǖǦǙ ǕǔǦǔǤǙǝǞǜ Ǧǜǣǧ ƴƴƴ ǖ ǕǔǦǔǤǙǝǡǜǝ
POWER
ON
VIBRATION
ON
ǖǹǘǥǹǞ, ǘǢǦǤǜǠǧDzǫǜǥǰ ǣǢǟdzǤǡǢǥǦǹ (Ǜ ǞǢǠǣǟǙǞǦǧ).
• ƻǔǞǤǜǝǦǙ ǞǤǜǬǞǧ ǕǔǦǔǤǙǝǡǢǗǢ ǖǹǘǥǹǞǧ.
ǃǤǜǠǹǦǞǜ:
OF
OF
• ƶǥǦǔǡǢǖǟDzǝǦǙ Ǜǔǖǚǘǜ ǦǹǟǰǞǜ ǞǢǠǣǟǙǞǦ
ǡǢǖǜǩ ǢǘǡǔǞǢǖǜǩ ǕǔǦǔǤǙǝǢǞ. ǁǙǣǤǔǖǜǟǰǡǙ
ǖǥǦǔǡǢǖǟǙǡǡdz ǕǔǦǔǤǙǝǢǞ ǠǢǚǙ ǣǤǜǛǖǙǥǦǜ
ǘǢ ǖǜǩǢǘǧ Ǜ ǟǔǘǧ ǠǔǡǹǣǧǟdzǦǢǤǔ!
• ǓǞǭǢ ǠǔǡǹǣǧǟdzǦǢǤ ǡǙ ǣǤǔǪDzǷ, ǣǙǤǙǖǹǤǦǙ
ǡǔdzǖǡǹǥǦǰ ǕǔǦǔǤǙǝǢǞ
ǚǙǡǹ ǡǔ ǡǢǖǹ.
ǔǕǢ ǛǔǠǹǡǹǦǰ ǤǢǛǤdzǘ-
ǁǕǠ. 3. ƷǝǘǠǴǙ ǜǢǝǜǨ
• ƶǜǝǠǔǝǦǙ ǕǔǦǔǤǙǝǞǜ Ǜ ǠǔǡǹǣǧǟdzǦǢǤǔ, dzǞǭǢ
ǡǙ ǛǕǜǤǔǷǦǙǥdz ǞǢǤǜǥǦǧǖǔǦǜǥdz ǡǜǠ ǣǤǢǦdzǗǢǠ
ǦǤǜǖǔǟǢǗǢ ǫǔǥǧ (ǣǢǡǔǘ ǦǜǚǘǙǡǰ).
7. ǃƫƸƾƿǒNjƹǁǁǓ džƴ ƫǁDždžƴƿǓNJƫǓ
n
p
• ǃǹǥǟdz ǦǢǗǢ, dzǞ ǖǜ ǖǥǦǔǖǜǟǜ ǕǔǦǔǤǙǝǞǜ (ǘǜǖ.
ǠǔǟDzǡǢǞ 4 ǹ Ǣǣǜǥ ǖǜǭǙ), ǣǹǘǞǟDzǫǹǦǰ ǣǤǜǝǠǔǫ
2,4GHz ǞǔǕǙǟǙǠ USB r ǘǢ ǖǹǟǰǡǢǗǢ ǣǢǤǦǧ USB
ǞǢǠǣ’DzǦǙǤǔ. ǃǤǜ ǣǹǘǞǟDzǫǙǡǡǹ ǘǢ ǃƾ ǣǤǜǥǦǤǹǝ ǔǖǦǢǠǔǦǜǫǡǢ
ǁǕǠ. 4
q
ǖǜǛǡǔǫǔǷǦǰǥdz dzǞ ǹǗǤǢǖǜǝ ǣǤǜǥǦǤǹǝǹ ǣǢǖǡǹǥǦDz ǗǢǦǢǖǜǝ ǘǢ
ǤǢǕǢǦǜ. ǃǤǢǦǙ ǘǟdz ǖǠǜǞǔǡǡdz ǨǧǡǞǪǹǺ ǖǹǕǤǢǖǹǘǘǔǫǹ ǡǙǢǕǩǹǘǡǢ
ǖǥǦǔǡǢǖǜǦǜ ǘǤǔǝǖǙǤǜ. džǔǞ ǥǔǠǢ ǕǙǛ ǘǤǔǝǖǙǤǹǖ
ǡǙǠǢǚǟǜǖǙ
ǞǔǟǹǕǤǧǖǔǡǡdz ǘǤǧǗǢǗǢ ǘǚǢǝǥǦǜǞǔ.
• ǃǙǤǙǖǙǘǹǦǰ ǖǜǠǜǞǔǫ POWER m ǧ ǣǢǟǢǚǙǡǡdz ON. Ƹǟdz
r
s
ǣǹǘǞǟDzǫǙǡǡdz ǠǔǡǹǣǧǟdzǦǢǤǔ ǣǹǘ ǫǔǥ ǣǙǤǬǢǗǢ ǖǠǜǞǔǡǡdz ǡǔǦǜǥǡǹǦǰ ǞǡǢǣǞǧ FC e ǡǔ ǠǔǡǹǣǧǟdzǦǢǤǹ. ǃǹǘǞǟDzǫǜǦǜ ǣǤǜǥǦǤǹǝ
ǠǢǚǡǔ ǹ ǦǔǞ: ǡǔǦǜǥǡǧǖǬǜ ǞǡǢǣǞǧ FC s ǡǔ ǣǤǜǝǠǔǫǹ, ǔ ǣǢǦǹǠ
ǢǘǡǢǫǔǥǡǢ ǡǔǦǜǥǡǧǦǜ ǞǢǠǕǹǡǔǪǹDz ǞǡǢǣǢǞ «9 + 11» ǡǔ ǗǙǝǠǣǔǘǹ ǝ ǧǦǤǜǠǧDzǫǜ Ǻǩ ǣǤǢǦdzǗǢǠ 15 ǥǙǞ. ƻǖǙǤǡǹǦǰ ǧǖǔǗǧ: dzǞǭǢ
ǣǹǥǟdz
ǣǹǘ’Ƿǘǡǔǡǡdz ǗǤǔǖǙǪǰ ǡǔǦǜǥǡǙ Ǣǘǡǧ Ǜ ǞǡǢǣǢǞ «9 + 11» ǡǔ
ǗǙǝǠǣǔǘǹ, ǣǤǜǝǠǔǫ ǹ ǗǙǝǠǣǔǘ ǠǢǚǧǦǰ ǤǢǛ’ǷǘǡǔǦǜǥdz.
• ƶǥǦǔǖǦǙ CD-ǘǜǥǞ Ǜ ǘǤǔǝǖǙǤǔǠǜ ǖ ǘǜǥǞǢǖǢǘ ǃƾ ǹ Ǜǔǣǧǥ-
t
ǁǕǠ. 5
ǦǹǦǰ ǣǤǢǗǤǔǠǧ «setup.exe» ǘǟdz ǹǡǥǦǔǟdzǪǹǺ ǘǤǔǝǖǙǤǹǖ. Ƹǟdz ǣǙǤǙǖǹǤǞǜ ǹ ǡǔǥǦǤǢDzǖǔǡǡdz ǠǔǡǹǣǧǟdzǦǢǤǔ ǦǤǙǕǔ ǖǜǕǤǔǦǜ «Start» о «Control Panel» о «Game Controller». ǁǔ ǃƾ ǖǹǘǞǤǜǷǦǰǥdz ǖǹǞǡǢ «DžǖǢǝǥǦǖǔ: PC TWIN SHOCK» (ǘǜǖ. Ǡǔǟ. 6).
• ƾǟǹǞǡǧǖǬǜ ǡǔ ǛǔǞǟǔǘǞǧ
«Function Test» (Ǡǔǟ. 6), ǣǤǢǦǙǥǦǧǝǦǙ Ǣǥǹ Ǧǔ ǞǡǢǣǞǜ.
• LJǖǹǝǬǢǖǬǜ ǖ ǛǔǞǟǔǘǞǧ «Calibration Function» (Ǡǔǟ. 7), ǖǹǘǞǔǟǹǕǤǧǝǦǙ ǖǥǹ 4 Ǣǥǹ.
• ƶǜǕǙǤǹǦǰ ǛǔǞǟǔǘǞǧ «Vibration test» (ǘǜǖ. Ǡǔǟ. 8) ǘǟdz ǣǙǤǙǖǹǤǞǜ ǹ ǡǔǥǦǤǢDzǖǔǡǡdz ǨǧǡǞǪǹǺ ǖǹǕǤǢ-
ǖǹǘǘǔǫǹ:
ǔ) ǣǙǤǙǥǧǖǔDzǫǜ ǞǧǤǥǢǤ ǧ ǤdzǘǞǧ «Vibration strenght» Ǡǜ ǠǢǚǙǠǢ ǛǕǹǟǰǬǜǦǜ ǔǕǢ ǛǠǙǡǬǜǦǜ ǥǜǟǧ
ǖǹǕǤǢǖǹǘǘǔǫǹ, ǡǔ Ǡǔǟ. 8, ǡǔǣǤǜǞǟǔǘ, ǖǢǡǔ ǥǞǟǔǘǔǷ 85 %;
12
Page 14

UKR
ƾǙǤǹǖǡǜǪǦǖǢ Ǜ ǙǞǥǣǟǧǔǦǔǪǹǺ
ǁǕǠ. 6
Ǖ) ǡǔǦǜǥǞǔDzǫǜ ǞǡǢǣǞǜ «Left force», «Both force»
ǔǕǢ «Right force» ǠǢǚǡǔ ǣǙǤǙǖǹǤǜǦǜ ǨǧǡǞǪǹDz ǖǹǕǤǢǖǹǘǘǔǫǹ ǡǔ ǟǹǖǢǠǧ, ǣǤǔǖǢǠǧ ǔǕǢ ǢǕǢǩ ǘǖǜǗǧǡǔǩ
ǛǤǔǛǧ;
ǖ) ǣǹǥǟdz ǡǔǥǦǤǢDzǖǔǡǡdz ǹ ǣǙǤǙǖǹǤǞǜ ǡǔǦǜǥǡǹǦǰ ǡǔ
«ǂƾ» (ǣǹǘǦǖǙǤǘǜǦǜ) ǧ ǡǜǚǡǰǢǠǧ ǤdzǘǞǧ ǪǰǢǗǢ ǖǹǞǡǔ.
ǃǤǜǠǹǦǞǔ. LjǧǡǞǪǹdz ǖǹǕǤǢǖǹǘǘǔǫǹ ǖǠǜǞǔǷǦǰǥdz
(ǣǢǟǢǚǙǡǡdz ON) ǹ ǖǜǠǜǞǔǷǦǰǥdz (ǣǢǟǢǚǙǡǡdz
OFF) ǖǜǠǜǞǔǫǙǠ VIBRATION o.
• ǃǙǤǙǠǜǞǔǡǡdz ǤǙǚǜǠǹǖ.
ǃǤǜǥǦǤǹǝ ǠǢǚǙ ǣǤǔǪDzǖǔǦǜ ǖ ǔǡǔǟǢǗǢǖǢǠǧ ǹ
ǤǢǖǢǠǧ ǤǙǚǜǠǔǩ. DŽǙǚǜǠǜ ǣǙǤǙǠǜǞǔDzǦǰǥdz ǞǡǢǣǞǢDz MODE d, ǛǔǟǙǚǡǢ ǖǹǘ ǤǙǚǜǠǧ ǠǹǡdzǷǦǰǥdz ǞǢǟǹǤ ǥǖǹǦǟǢǘǹǢǘǔ h Ǜ ǫǙǤǖǢǡǢǗǢ ǡǔ ǛǙǟǙǡǜǝ. LJ ǪǜǨǤǢǖǢǠǧ ǤǙǚǜǠǹ (ǥǖǹǦǟǢǘǹǢǘ ǥǦǔǷ ǛǙǟǙǡǜǠ) ǘǢǥǦǧǣǡǹ 2 Ǣǥǹ Ǧǔ 10 ǞǡǢǣǢǞ, ǖ ǔǡǔǟǢǗǢǖǢǠǧ (ǥǖǹǦǟǢǘǹǢǘ ǥǦǔǷ ǫǙǤǖǢǡǜǠ) ǚ ǤǙǚǜǠǹ ǘǢǥǦǧǣǡǹ ǖǥǹ 4 Ǣǥǹ
Ǧǔ ǖǥǹ 12 ǞǡǢǣǢǞ.
ǪǜǨ-
X-PAD AERO
ǁǕǠ. 7
ǁǕǠ. 8
13
Page 15

UKR
ƵǙǛǣǤǢǖǹǘǡǜǝ ǹǗǤǢǖǜǝ
ǠǔǡǹǣǧǟdzǦǢǤ
• LjǧǡǞǪǹdz TURBO (ǕǙǛǣǙǤǙǤǖǡǢǺ ǥǦǤǹǟǰǕǜ).
LjǧǡǞǪǹdz Turbo ǣǤǜǛǡǔǫǙǡǔ ǘǟdz ǹǠǹǦǔǪǹǺ ǕǔǗǔǦǢǞǤǔǦǡǢǗǢ ǡǔǦǜǥǞǔǡǡdz ǣǤǜ ǢǘǡǢǤǔǛǢǖǢǠǧ ǡǔǦǜǥǡǙǡǡǹ Ǧǔ ǧǦǤǜǠǔǡǡǹ Ǖǧǘǰ-dzǞǢǺ Ǜ ǞǡǢǣǢǞ. Ƹǟdz ǔǞǦǜǖǔǪǹǺ ǨǧǡǞǪǹǺ ǡǙǢǕǩǹǘǡǢ ǡǔǦǜǥǡǧǦǜ Ǖǧǘǰ-dzǞǧ Ǜ
ǞǡǢǣǢǞ 1–12, ǣǢǦǹǠ, ǧǦǤǜǠǧDzǫǜ ǺǺ, ǡǔǦǜǥǡǧǦǜ ǞǡǢǣǞǧ TURBO c. ǃǹǥǟdz ǪǰǢǗǢ ǞǡǢǣǞǔ ǣǤǔǪDzǖǔǦǜǠǙ ǖ TURBO-ǤǙǚǜǠǹ. ƶǹǘǠǹǡǔ ǨǧǡǞǪǹǺ TURBO ǛǘǹǝǥǡDzǷǦǰǥdz ǦǔǞ: ǡǔǦǜǥǡǧǖǬǜ ǛǔǣǤǢǗǤǔǠǢǖǔǡǧ
ǞǡǢǣǞǧ Ǜ
• DŽǙǚǜǠ ǢǫǹǞǧǖǔǡǡdz Sleep (ǘǟdz ǙǞǢǡǢǠǹǺ ǛǔǤdzǘǧ ǕǔǦǔǤǙǝǢǞ).
ǓǞǭǢ ǣǤǜǥǦǤǹǝ ǡǙ ǖǜǞǢǤǜǥǦǢǖǧǷǦǰǥdz ǣǤǢǦdzǗǢǠ ǣǙǖǡǢǗǢ ǣǤǢǠǹǚǞǧ ǫǔǥǧ, ǭǢǕ ǛǕǹǟǰǬǜǦǜ ǦǙǤǠǹǡ
ǥǟǧǚǕǜ ǕǔǦǔǤǙǝǢǞ, ǠǔǡǹǣǧǟdzǦǢǤ ǢǥǡǔǭǙǡǢ ǤǙǚǜǠǢǠ ǢǫǹǞǧǖǔǡǡdz Sleep. ǃǹǥǟdz ǣǹǘǞǟDzǫǙǡǡdz
ǣǤǜǝǠǔǫǔ ǘǢ ǃƾ, dzǞǭǢ ǝǢǗǢ ǡǙ ǣǹǘ’ǷǘǡǔǡǢ ǣǤǢǦdzǗǢǠ 15 ǥǙǞ ǔǕǢ ǡǙ ǖǹǘǕǧǖǔǷǦǰǥdz ǚǢǘǡǜǩ ǘǹǝ Ǜ
ǞǡǢǣǞǔǠǜ
ǦǢǗǢ ǭǢǕ ǥǣǢǫǔǦǞǧ ǧǖǹǠǞǡǧǦǜ ǤǙǚǜǠ ǢǫǹǞǧǖǔǡǡdz, ǦǤǙǕǔ ǡǔǦǜǥǡǧǦǜ Ǣǘǡǧ Ǜ ǦǤǰǢǩ ǞǡǢǣǢǞ: «10»,
«11» ǔǕǢ «12».
• LjǧǡǞǪǹdz ǣǢǣǙǤǙǘǚǙǡǡdz ǣǤǢ ǡǜǛǰǞǧ ǡǔǣǤǧǗǧ ǕǔǦǔǤǙǝǢǞ.
ƾǢǟǜ ǕǔǦǔǤǙǝǞǜ ǠǔDzǦǰ ǡǜǛǰǞǧ ǡǔǣǤǧǗǧ ǔǕǢ ǤǢǛǤdzǘǜǟǜǥdz, ǛǙǟǙǡǜǝ ǝ ǫǙǤǖǢǡǜǝ ǥǖǹǦǟǢǘǹǢǘǜ
ǕǧǘǧǦǰ ǢǘǡǢǫǔǥǡǢ ǥǖǹǦǜǦǜǥdz, ǭǢ ǖǞǔǛǧǷ ǡǔ ǦǙ, ǭǢ ǕǔǦǔǤǙǝǞǜ ǥǟǹǘ ǛǔǠǹǡǜǦǜ. ƻǔǘǟdz ǛǕǹǟǰǬǙǡǡdz
ǦǙǤǠǹǡǧ ǥǟǧǚǕǜ ǕǔǦǔǤǙǝǢǞ ǨǧǡǞǪǹdz ǖǹǕǤǔǪǹǺ ǖǜǠǞǡǙǦǰǥdz ǔǖǦǢǠǔǦǜǫǡǢ.
ǨǧǡǞǪǹǷDz TURBO ǹ ǧǦǤǜǠǧDzǫǜ ǺǺ, ǣǢǖǦǢǤǡǢ ǡǔǦǜǥǡǧǦǜ ǞǡǢǣǞǧ TURBO.
ǫǜ ǢǥdzǠǜ ǣǤǢǦdzǗǢǠ ǣǢǡǔǘ 3 ǩǖǜǟǜǡǜ, ǔǖǦǢǠǔǦǜǫǡǢ ǖǠǜǞǔǷǦǰǥdz ǤǙǚǜǠ Sleep. Ƹǟdz
14
Page 16

UKR
ƾǙǤǹǖǡǜǪǦǖǢ Ǜ ǙǞǥǣǟǧǔǦǔǪǹǺ
8. ƶƼDŽƫnjƹǁǁǓ ǀǂƺƿƼƶƼlj ǃDŽǂƵƿƹǀ
ǃǤǢǕǟǙǠǔ
ǃǹǥǟdz ǖǥǦǔǡǢǖǟǙǡǡdz ǃƻ
ǘǚǢǝǥǦǜǞ ǡǙ ǣǤǔǪDzǷ.
ƸǤǔǝǖǙǤǜ ǡǙ ǖǥǦǔǡǢǖǟDzDzǦǰǥdz
ǡǔ ǃƾ.
ƴǡǔǟǢǗǢǖǔ ǖǹǥǰ ǥǣǤǔǪDzǖǔǟǔ
ǔǖǦǢǠǔǦǜǫǡǢ ǕǙǛ ǖǦǤǧǫǔǡǡdz
ǗǤǔǖǪdz.
ǃǹǥǟdz ǣǹǘ’Ƿǘǡǔǡǡdz ǘǚǢǝǥǦǜǞǔ
ǣǤǢǗǤǔǠǧ ǘǤǔǝǖǙǤǔ ǡǙ
ǛǡǔǝǘǙǡǢ.
LjǧǡǞǪǹdz ǖǹǕǤǢǖǹǘǘǔǫǹ ǖǠǜǞǔǷǦǰǥdz ǥǔǠǔ ǕǙǛ ǖǦǤǧǫǔǡǡdz
ǗǤǔǖǪdz.
LJ ǣǤǢǪǙǥǹ ǗǤǜ ǨǧǡǞǪǹdz ǖǹǕǤǢǖǹǘǘǔǫǹ ǥǟǔǕǞǔ.
ƶǜǤǹǬǙǡǡdz
ƴ. ǃǙǤǙǖǹǤǦǙ, ǫǜ ǣǤǔǖǜǟǰǡǢ ǘǚǢǝǥǦǜǞ ǣǹǘ
Ƶ. ǃǙǤǙǞǢǡǔǝǦǙǥdz, ǭǢ ǖǜ ǖǹǘǞǤǜǟǜ ǖǹǞǡǢ «Game Port
Controller», Ǜǘǹǝǥǡǜǟǜ ǹǡǥǦǔǟdzǪǹDz ǹ ǡǔǦǜǥǡǧǟǜ ǞǡǢǣǞǧ
«Conԛrm» ǘǟdz ǣǹǘǦǖǙǤǘǚǙǡǡdz ǡǔǟǔǬǦǧǖǔǡǰ.
ƶ. ǃǙǤǙǖǹǤǦǙ, ǫǜ ǡǙ ǞǢǡǨǟǹǞǦǧDzǦǰ ǡǔǥǦǤǢǝǞǜ Ǜ ǹǡǬǜǠǜ
ǣǹǘǞǟDzǫǙǡǜǠǜ ǛǢǖǡǹǬǡǹǠǜ ǣǤǜǥǦǤǢdzǠǜ ǞǢǠǣ’DzǦǙǤǔ.
Ʒ. ǃǙǤǙǛǔǖǔǡǦǔǚǦǙ ǃƾ, dzǞǭǢ ǠǔǡǹǣǧǟdzǦǢǤ ǭǙ ǡǙ ǣǤǔǪDzǷ.
ƶǥǦǔǡǢǖǹǦǰ ǖǙǤǥǹDz Direct X 7.0 ǔǕǢ ǖǜǭǙ.
ƾǔǟǹǕǤǧǖǔǡǡdz ǠǔǡǹǣǧǟdzǦǢǤǔ ǡǙ ǕǧǟǢ ǖǹǘǤǙǗǧǟǰǢǖǔǡǢ ǔǕǢ
ǡǙ ǕǧǟǢ ǣǹǘǦǖǙǤǘǚǙǡǢ ǣǹǥǟdz ǦǔǞǢǗǢ ǤǙǗǧǟDzǖǔǡǡdz.
ƻǔǝǘǹǦǰ ǧ «ǀǹǝ ǞǢǠǣ’DzǦǙǤ» о «ƶǟǔǥǦǜǖǢǥǦǹ ǥǜǥǦǙǠǜ» о
«ǂǕǟǔǘǡǔǡǡdz» о «ƸǜǥǣǙǦǫǙǤ ǣǤǜǥǦǤǢǺǖ» ǹ ǖǜǘǔǟǹǦǰ
ǢǕǟǔǘǡǔǡǡdz Ǜ ǣǢǛǡǔǫǞǢDz «!», ǖǹǘ’ǷǘǡǔǝǦǙ, ǔ ǣǢǦǹǠ ǛǡǢǖǧ
ǣǹǘ’ǷǘǡǔǝǦǙ ǠǔǡǹǣǧǟdzǦǢǤ ǘǢ ǃƾ. ǃǹǥǟdz ǪǰǢǗǢ ǃƾ ǤǢǛǣǹǛǡǔǷ
ǥǜǥǦǙǠǧ ǘǤǔǝǖǙǤǔ.
LJǖǹǝǘǹǦǰ ǧ ǡǔǥǦǤǢǝǞǜ «Force Feedback» ǧ ǗǤǹ ǹ ǖǹǘǞǔǟǹǕǤǧǝǦǙ
ǨǧǡǞǪǹDz ǖǹǕǤǢǖǹǘǘǔǫǹ.
LJǖǹǝǘǹǦǰ
ǥǜǟǧ ǖǹǕǤǢǖǹǘǘǔǫǹ.
X-PAD AERO
’ǷǘǡǔǡǢ ǘǢ ǃƾ.
ǧ ǡǔǥǦǤǢǝǞǜ «Force Feedback» ǧ ǗǤǹ ǹ ǡǔǟǔǬǦǧǝǦǙ
ǓǞǭǢ ǚǢǘǙǡ Ǜǹ ǖǞǔǛǔǡǜǩ ǖǜǭǙ ǥǣǢǥǢǕǹǖ ǡǙ ǘǔǷ ǛǠǢǗǧ ǖǜǤǹǬǜǦǜ ǣǤǢǕǟǙǠǧ, Ǖǧǘǰ ǟǔǥǞǔ, ǛǖǙǤǡǹǦǰǥdz Ǜǔ ǣǤǢǨǙǥǹǝǡǢDz ǞǢǡǥǧǟǰǦǔǪǹǷDz ǘǢ ǡǔǝǕǟǜǚǫǢǗǢ ǘǢ ƶǔǥ ǥǙǤǖǹǥǡǢǗǢ ǪǙǡǦǤǧ. ǁǹǞǢǟǜ ǡǙ
ǡǔǠǔǗǔǝǦǙǥdz ǤǙǠǢǡǦǧǖǔǦǜ ǖǜǤǹǕ ǥǔǠǢǥǦǹǝǡǢ.
15
Page 17

PC Wireless Gamepad
OPERATION
MANUAL
X-PAD
AERO
www.sven.ѵ
Page 18

ENG
Operation Manual
Congratulations on the purchase of Sven product!
Please read this Operation Manual before using the unit and retain this Operation Manual in safe
place for future reference.
COPYRIGHT
© 2014. SVEN PTE. LTD. Version 1.0 (V 1.0).
This manual and information contained in it are copyrighted. All rights reserved.
TRADEMARKS
All trademarks are the property of their legal holders.
NOTICE OF RESPONSIBILITY RESTRICTION
Despite the exerted eԚorts to make this Manual more exact, some discrepancies may occur. The
information of this Manual is given on “as is” terms. The author and the publisher do not bear any
liability to a person or an organization for loss or damages which have arisen from the information,
contained in the given Manual.
UNPACKING
Unpack the device carefully. Make sure there are no accessories left in the box. Check up the
device for damages; if the product was damaged during transportation, address the ԛrm which
carried out the delivery; if the product functions incorrectly, address the dealer at once.
CONTENTS
RUS .......................................................................................................
UKR.......................................................................................... .............
ENG ................. ................................................................................
1. DESCRIPTION ..................................................................................
2. SAFETY PRECAUTIONS ......................................................................
3. PACKAGE CONTENTS .......................................................................
4. SPECIAL FEATURES ...........................................................................
5. SYSTEM REQUIREMENTS ....................................................................
6. DESCRIPTION OF THE DžONSTRUCTION ....................................................
7. CONNECTION AND INSTALLATION ........... .. ........... .. ............. ...... ...........
8. TROUBLESHOOTING .......................................................................
X-PAD AERO
1
8
16
18
18
18
18
18
19
20
22
Technical support is on www.sven.Н
17
Page 19

ENG
PC Wireless Gamepad
1. DESCRIPTION
X-Pad Aero Wireless Gamepad with built-in vibration mechanism and 2,4GHz Nano receiver
included is an ergonomic game controller. Vibration feedback imparts a feeling of realistic
experience during games. Rubber coating and ergonomic construction of X-Pad Aero enhance
accuracy of its operation during games. Wireless Gamepad X-Pad Aero can be used in diԚerent
games such as simulators, arcades, shooter games etc.
2. SAFETY PRECAUTIONS
• Do not disassemble or repair the device on your own. Maintenance and repairs should be carried out
by qualiԛed staԚ of the service centre only.
• Protect the device from direct impact of high humidity, dust, strong magnetic ԛelds, vibrations, high
temperatures, toxic liquids and gases.
• Instructions for device maintenance: for cleaning the case of the device please use clean soft
cloth. Do not use such solvents as gasoline or spirit for cleaning, since these solvents can damage
the surface of the device.
• Do not drop the device not to have it damaged.
3. PACKAGE CONTENTS
• Gamepad — 1 pc
• 2.4GHz Nano receiver — 1 pc
• ƴƴƴ type battery — 3 pcs
• Software CD disk —1 pc
• Operation manual — 1 pc
• Warranty card — 1 pc
4. SPECIAL FEATURES
• Ergonomic design of gamepad
• Supports DirectX 7.0 and up, Windows XP/Vista/7/8
• USB interface
• 2,4GHz Nano receiver with action range up to 7 m
• 4 axes, D-Pad, 2 joysticks and 12 buttons
• Vibration feedback function for higher realistic eԚect
• Turbo function for continuous ԛring
• Sleep function (standby mode) for longer battery life
• Rubber coating for more comfortable use
• 2 modes: Digital mode and Analog mode
• FC button for connection of Gamepad with Nano receiver
• 3 ƴƴƴ type batteries included
5. SYSTEM REQUIREMENTS
• USB port available
• Operational System Windows XP/Vista/7/8
• DirectX 7.0 Version and up
18
Page 20

ENG
Operation Manual
6. DESCRIPTION OF THE CONCTRUCTION
a D-pad
b Left joystick (button 11)
c TURBO: turbo mode ON button
d MODE: mode switch button
e FC: FC button
f Buttons 1–6
g Right joystick (button 12)
h MODE indicator
i Button 8
j Button 10
k Button 7
l Button 9
m POWER On/OԚ: power switch
n Battery box
o VIBRATION On/OԚ: vibration switch
p Batteries
q Battery box cover
r USB cable
s FC button of Nano receiver
t Connection indicator
mno
POWER
ON
OF
VIBRATION
ON
OF
X-PAD AERO
acbdef
2
1
h
Fig. 1. Top view
3
4
6
i
j
1
2
5
8
10
5
6
4
3
g
k
7
9
l
n
p
Fig. 3. Bottom view
Fig. 4
q
Fig. 2. Front view
r
s
t
Fig. 5
19
Page 21

ENG
Battery installation
• Open the cover of the battery box on the rear of
the manipulator.
• Install AAA type batteries into the battery box following their polarity. (included).
• Close the cover of the battery box.
Note:
• Always install a set of the same new batteries. Incorrect installation of batteries may
damage the game controller!
• If the manipulator does not work, check the
battery or replace the discharged battery with
a new one.
• Remove the battery from the manipulator, if
you aren’t going to use it for a long time (more
than a week).
7. CONNECTION AND INSTALLATION
• After installation of batteries (Fig. 4 ), connect
2,4GHz Nano receiver via USB cable r to available
USB port of your PC. After connection to your PC,
device is automatically detected as a game
controller and is fully ready for use. However, for
Vibration Feedback function it is necessary to
install drivers. Calibration of second joystick is also
impossible without installation of drivers.
• Change POWER ON/OFF switch m into ON
position. For connection of Gamepad and Nano
receiver press FC button s of Nano receiver, the
connection indicator t will light up, then press FC
button e on the game controller. There is also
another way for connection of Gamepad and Nano
receiver: press FC button FC s of Nano receiver,
then press at the same time combination of
buttons «9+11» on the gamepad and hold these
buttons for 15 seconds. Attention should be paid
that Nano receiver and gamepad will be
disconnected, if a gamer presses one of «9+11»
buttons after connection has been made.
• Insert Software CD disk into your PC CD Rom
and start setup.exe for installation of drivers. For
testing and setting the game controller choose
Start о Control Panel о Game Controller. There will
open up Properties: PC TWIN SHOCK (Fig. 6) on
your desktop.
PC Wireless Gamepad
Fig. 6
Fig. 7
20
Page 22

ENG
Operation Manual
• Click Function Test (Fig. 6) to test axes and buttons.
• Enter Calibration Function (Fig. 7) to calibrate all
four axes.
• Enter Vibration test (Fig. 8) to test and to set Vibration feedback function:
a) increase or reduce Vibration strength by moving
cursor. For example: vibration strength is 85% in Fig. 8.
b) test Vibration feedback function on the left or/and
right motors by pressing Left force, Both force and
Right force;
c) after setting and testing press ǂƾ (conԛrm) in the
bottom of the window.
Note. Vibration feedback function is switched
ON/OFF by VIBRATION ON/OFF switch o.
• Switching Modes.
The device works in Digital Mode and Analog Mode
that are switched by MODE button d, LED color h
changes from red to green according to the selected
Mode. Digital Mode (green LED) has 2 axes and 10
buttons available, while Analog Mode (red LED) has all
four axes and 12 buttons available.
• TURBO function.
Turbo function imitates multiple pressing and holding of any button, while it was pressed only once.
To activate this function, press any button 1-12, hold it and press TURBO button c. Now this
button will be programmed with Turbo function. To cancel this function, press button programmed
with TURBO, hold it and press TURBO button again.
• Sleep mode.
In case the device has not been used for a period of time, it enters Sleep mode to prolong battery
life. If Nano receiver has not been connected for more than 15 se- conds or there have been no
operations carried out with buttons or axes for more than 3 minutes, the device automatically gets
into Sleep mode. To turn on Sleep mode, press one of these three buttons: 10, 11 or 12.
• Low voltage alert function. When battery is weak or empty, the green LED and the red LED will
simultaneously Ԝash indicating that present batteries should be replaced or rechargeable batteries
should be recharged. To prolong battery life, the Vibration Feedback function turns oԚ automatically.
X-PAD AERO
Fig. 8
21
Page 23

ENG
8. TROUBLESHOOTING
Problem
PC Wireless Gamepad
Solution
The joystick does not work
normally after installation of
drivers on the PC.
Drivers can’t be installed on the
PC.
Some analog axis goes into
eԚect automatically.
After connecting the joystick, its
driving program can’t be found.
After entering the game,
vibration feedback function
operates automatically.
During the game vibration
feedback is insuԝcient.
If none of the above mentioned solutions removes the problem, please consult a nearest
authorized service center. Never try to repair the device on your own.
ƴ. Check whether joystick is connected properly to your PC.
B. Make sure that all the settings in Game Port Controller are
installed and conԛrmed.
C. Check whether the settings of the joystick are in conԜict
with the other peripherals.
D. Restart your PC if the device still does not work normally.
Install DirectX 7.0 or higher.
The gamepad hasn’t been calibrated or the calibration hasn’t
been conԛrmed.
Enter My computer о Properties о Hardware о Device
manager and delete corresponding equipment with «!» mark
and reconnect the gamepad to the PC. Then your PC will ԛnd
the driving system.
Enter Force Feedback and calibrate it.
Enter Force Feedback and set the force of feedback.
22
Page 24

ƵǙǥǣǤǢǖǢǘǡǢǝ
ǜǗǤǢǖǢǝ ǠǔǡǜǣǧǟdzǦǢǤ
DžǦǔǕǜǟǜǛǔǦǢǤ ǡǔǣǤdzǚǙǡǜdzDžǦǔǕǜǟǜǛǔǦǢǤ ǡǔǣǤdzǚǙǡǜdz
2.0 Multimedia Speaker System
2.0 Multimedia Speaker System 2.0 Multimedia Speaker System
Automatic Voltage Regulator
Automatic Voltage Regulator
ǀǢǘǙǟǰ:
ƼǠǣǢǤǦǙǤ ǖ DŽǢǥǥǜǜ: ǂǂǂ «DžƾƴǁƸƼdžDŽƹƿ»,
111024, DŽLj, Ǘ. ǀǢǥǞǖǔ, ǧǟ. ƴǖǜǔǠǢǦǢǤǡǔdz, ǘ. 65, ǥǦǤ. 1.
LJǣǢǟǡǢǠǢǫǙǡǡǔdz ǢǤǗǔǡǜǛǔǪǜdz ǖ DŽǢǥǥǜǜ: ǂǂǂ «DŽdž-Lj»,
105082, Ǘ. ǀǢǥǞǖǔ, ǧǟ. LjǤǜǘǤǜǩǔ ǑǡǗǙǟǰǥǔ, ǘ. 75, ǥǦǤ. 5.
LJǥǟǢǖǜdz ǗǔǤǔǡǦǜǝǡǢǗǢ ǢǕǥǟǧǚǜǖǔǡǜdz ǥǠǢǦǤǜǦǙ
ǖ ǗǔǤǔǡǦǜǝǡǢǠ ǦǔǟǢǡǙ ǜǟǜ ǡǔ ǥǔǝǦǙ www.sven.ѵ
ƷǔǤǔǡǦǜǝǡǯǝ ǥǤǢǞ: 12 ǠǙǥ. DžǤǢǞ ǥǟǧǚǕǯ: 2 ǗǢǘǔ.
ǃǤǢǜǛǖǢǘǜǦǙǟǰ: «Džƶƹǁ ǃdžƹ. ƿǜǠǜǦǙǘ»,
176 Ƹǚǧ NjǜǔǦ DŽǢǧǘ
ǃǤǢǜǛǖǙǘǙǡǢ ǣǢǘ ǞǢǡǦǤǢǟǙǠ «DžǖǙǡ DžǞǔǡǘǜǡǔǖǜdz
ƿǜǠǜǦǙǘ», 48310, Ljǜǡǟdzǡǘǜdz, ƾǢǦǞǔ,
ƾǢǦǢǟǔǩǘǙǡǦǜǙ, 15. DžǘǙǟǔǡǢ ǖ ƾǜǦǔǙ.
ǀǢǘǙǟǰ:
ǃǢǥǦǔǫǔǟǰǡǜǞ/ǹǠǣǢǤǦǙǤ ǖ LJǞǤǔǺǡǹ:
džǂƶ «Džƶƹǁ NJǙǡǦǤ»,
Ǡ. ǃǙǤǙdzǥǟǔǖ-ljǠǙǟǰǡǜǪǰǞǜǝ,
ǦǙǟ. (044) 233-65-89/98.
ǖǟǔǥǦǜǖǢǥǦǹ Ǧǔ ǖǹǘǢǠǢǥǦǹ ǣǤǢ ǕǙǛǣǙǞǧ ǦǢǖǔǤǧ ǘǜǖǹǦǰǥdz
ǧ ƾǙǤǹǖǡǜǪǦǖǹ Ǜ ǙǞǥǣǟǧǔǦǔǪǹǺ. LJǠǢǖǜ ǗǔǤǔǡǦǹǝǡǢǗǢ
ǢǕǥǟǧǗǢǖǧǖǔǡǡdz ǘǜǖǹǦǰǥdz ǖ ǗǔǤǔǡǦǹǝǡǢǠǧ ǦǔǟǢǡǹ
ǔǕǢ ǡǔ ǥǔǝǦǹ www.sven.ѵ
ƷǔǤǔǡǦǹǝǡǜǝ ǦǙǤǠǹǡ: 12 Ǡǹǥ. DžǦǤǢǞ ǥǟǧǚǕǜ: 2 ǤǢǞǜ.
džǢǖǔǤ ǥǙǤǦǜǨǹǞǢǖǔǡǢ/ǠǔǷ ǗǹǗǹǷǡǹǫǡǜǝ ǖǜǥǡǢǖǢǞ.
njǞǹǘǟǜǖǜǩ ǤǙǫǢǖǜǡ ǡǙ ǠǹǥǦǜǦǰ. ƻǕǙǤǹǗǔǦǜ ǖ ǥǧǩǢǠǧ ǠǹǥǪǹ.
ƶǜǤǢǕǡǜǞ: «Džƶƹǁ ǃdžƹ. ƿǹǠǹǦǙǘ», 176 Ƹǚǧ NjǹǔǦ DŽǢǧǘ,
д 02-02, DžǹǡǗǔǣǧǤ, 427447. ƶǜǗǢǦǢǖǟǙǡǢ ǣǹǘ
ǞǢǡǦǤǢǟǙǠ «DžǖǙǡ DžǞǔǡǘǜǡǔǖǹdz ƿǹǠǹǦǙǘ», 48310,
Ljǹǡǟdzǡǘǹdz, ƾǢǦǞǔ, ƾǢǦǢǟǔǩǘǙǡǦǹǷ, 15. ƻǤǢǕǟǙǡǢ ǖ ƾǜǦǔǺ.
Manufacturer: SVEN PTE. LTD, 176 Joo Chiat Road,
д 02-02, Singapore, 427447. Produced under the
control of Oy Sven Scandinavia Ltd. 15, Kotolahdentie,
Kotka, Finland, 48310. Made in China.
® Registered Trademark of Oy SVEN
Scandinavia Ltd. Finland.
X-Pad Aero
, д 02-02, DžǜǡǗǔǣǧǤ, 427447.
X-Pad Aero
08400, ƾǜǺǖǥǰǞǔ ǢǕǟǔǥǦǰ,
ǖǧǟ. ƷǙǤǢǺǖ ƸǡǹǣǤǔ, 31,
ǃǤǜǛǡǔǫǙǡǡdz, ǥǣǢǚǜǖǫǹ
X-PAD
AERO
SPS-619
 Loading...