

Page 1
ƼǗǤǢǖǢǝ ǠǔǡǜǣǧǟdzǦǢǤ
DŽLJƾǂƶǂƸDždžƶǂ
ǃǂ ǑƾDžǃƿLJƴdžƴNJƼƼ
DRIVER
www.sven.ѵ
Page 2

RUS
DŽǧǞǢǖǢǘǥǦǖǢ ǣǢ DZǞǥǣǟǧǔǦǔǪǜǜ
ƵǟǔǗǢǘǔǤǜǠ ƶǔǥ Ǜǔ ǣǢǞǧǣǞǧ ǜǛǘǙǟǜdz ǦǢǤǗǢǖǢǝ ǠǔǤǞǜ SVEN!
ǃǙǤǙǘ DZǞǥǣǟǧǔǦǔǪǜǙǝ ǧǥǦǤǢǝǥǦǖǔ ǖǡǜǠǔǦǙǟǰǡǢ ǢǛǡǔǞǢǠǰǦǙǥǰ ǥ ǡǔǥǦǢdzǭǜǠ DŽǧǞǢǖǢǘǥǦǖǢǠ ǜ ǥǢǩǤǔǡǜǦǙ ǙǗǢ ǡǔ ǖǙǥǰ ǣǙǤǜǢǘ ǜǥǣǢǟǰǛǢǖǔǡǜdz.
ƴƶdžǂDŽDžƾǂƹ ǃDŽƴƶǂ
© 2014. SVEN PTE. LTD. ƶǙǤǥǜdz 1.0 (V 1.0).
ƸǔǡǡǢǙ DŽǧǞǢǖǢǘǥǦǖǢ ǜ ǥǢǘǙǤǚǔǭǔdzǥdz ǖ ǡǙǠ ǜǡǨǢǤǠǔǪǜdz ǛǔǭǜǭǙǡǯ ǔǖǦǢǤǥǞǜǠ ǣǤǔǖǢǠ. ƶǥǙ
ǣǤǔǖǔ ǛǔǭǜǭǙǡǯ.
džǂDŽƷǂƶǏƹ ǀƴDŽƾƼ
ƶǥǙ ǦǢǤǗǢǖǯǙ ǠǔǤǞǜ dzǖǟdzDzǦǥdz ǥǢǕǥǦǖǙǡǡǢǥǦǰDz ǜǩ ǛǔǞǢǡǡǯǩ ǖǟǔǘǙǟǰǪǙǖ.
ǃDŽƹƸLJǃDŽƹƺƸƹǁƼƹ ǂƵ ǂƷDŽƴǁƼNjƹǁƼƼ ǂdžƶƹdžDždžƶƹǁǁǂDždžƼ
ǁǙǥǠǢǦǤdz ǡǔ ǣǤǜǟǢǚǙǡǡǯǙ ǧǥǜǟǜdz ǥǘǙǟǔǦǰ DŽǧǞǢǖǢǘǥǦǖǢ ǕǢǟǙǙ ǦǢǫǡǯǠ, ǖǢǛǠǢǚǡǯ ǡǙǞǢǦǢǤǯǙ
ǡǙǥǢǢǦǖǙǦǥǦǖǜdz. ƼǡǨǢǤǠǔǪǜdz ǘǔǡǡǢǗǢ DŽǧǞǢǖǢǘǥǦǖǔ ǣǤǙǘǢǥǦǔǖǟǙǡǔ ǡǔ ǧǥǟǢǖǜdzǩ «ǞǔǞ ǙǥǦǰ».
ƴǖǦǢǤ ǜ ǜǛǘǔǦǙǟǰ ǡǙ
ǜǟǜ ǣǢǖǤǙǚǘǙǡǜdz, ǣǤǢǜǛǢǬǙǘǬǜǙ ǢǦ ǜǡǨǢǤǠǔǪǜǜ, ǥǢǘǙǤǚǔǭǙǝǥdz ǖ ǘǔǡǡǢǠ DŽǧǞǢǖǢǘǥǦǖǙ.
DŽƴDžǃƴƾǂƶƾƴ
ƴǞǞǧǤǔǦǡǢ ǤǔǥǣǔǞǧǝǦǙ ǜǛǘǙǟǜǙ, ǣǤǢǥǟǙǘǜǦǙ Ǜǔ ǦǙǠ, ǫǦǢǕǯ ǖǡǧǦǤǜ ǞǢǤǢǕǞǜ ǡǙ ǢǥǦǔǟǜǥǰ ǞǔǞǜǙǟǜǕǢ ǣǤǜǡǔǘǟǙǚǡǢǥǦǜ. ǃǤǢǖǙǤǰǦǙ ǧǥǦǤǢǝǥǦǖǢ ǡǔ ǣǤǙǘǠǙǦ ǣǢǖǤǙǚǘǙǡǜǝ. ƹǥǟǜ ǜǛǘǙǟǜǙ ǣǢǖǤǙǚǘǙǡǢ ǣǤǜ ǦǤǔǡǥǣǢǤǦǜǤǢǖǞǙ, ǢǕǤǔǦǜǦǙǥǰ ǖ ǨǜǤǠǧ, ǢǥǧǭǙǥǦǖǟdzDzǭǧDz ǘǢǥǦǔǖǞǧ; Ǚǥǟǜ
ǜǛǘǙǟǜǙ
DžǂƸƹDŽƺƴǁƼƹ
RUS ...................................................................................................
UKR ..................................................................................................
ENG .................................................................................................
ǡǙ ǨǧǡǞǪǜǢǡǜǤǧǙǦ, ǥǤǔǛǧ ǚǙ ǢǕǤǔǦǜǦǙǥǰ Ǟ ǣǤǢǘǔǖǪǧ.
1. ǂǃƼDžƴǁƼƹ ....................................................................................
2. ǀƹDŽǏ ƵƹƻǂǃƴDžǁǂDždžƼ .....................................................................
3. ƾǂǀǃƿƹƾdžǁǂDždžǐ ............................................................................
4. ǂDžǂƵƹǁǁǂDždžƼ ...............................................................................
5. DžƼDždžƹǀǁǏƹ džDŽƹƵǂƶƴǁƼǓ ................................................................
6. ǂǃƼDžƴǁƼƹ ƾǂǁDždžDŽLJƾNJƼƼ ................................................................
7. ǃǂƸƾƿǒNjƹǁƼƹ Ƽ ƼǁDždžƴƿƿǓNJƼǓ ......................................................
8. DŽƹnjƹǁƼƹ ƶǂƻǀǂƺǁǏlj ǃDŽǂƵƿƹǀ .....................................................
ǡǙǥǧǦ ǡǜǞǔǞǢǝ ǢǦǖǙǦǥǦǖǙǡǡǢǥǦǜ ǣǙǤǙǘ ǟǜǪǢǠ ǜǟǜ ǢǤǗǔǡǜǛǔǪǜǙǝ Ǜǔ ǧǭǙǤǕ
driver
18
1
2
2
2
2
2
3
5
8
9
ƻǘǙǥǰ ǚǙ ƶǯ ǥǠǢǚǙǦǙ ǡǔǝǦǜ ǢǕǡǢǖǟǙǡǡǧDz ǖǙǤǥǜDz ǘǔǡǡǢǗǢ ǤǧǞǢǖǢǘǥǦǖǔ.
džǙǩǡǜǫǙǥǞǔdz ǣǢǘǘǙǤǚǞǔ ǤǔǛǠǙǭǙǡǔ ǡǔ ǥǔǝǦǙ www.sven.Н
1
Page 3

RUS
Игровой манипулятор
1. ОПИСАНИЕ
Игровой манипулятор DRIVER специально разработан для ПК. Эргономичный дизайн с резиновым покрытием обеспечивает оптимальный комфорт и устойчивость. Модная и оптимизированная конструкция руля обеспечивает реальное игровое ощущение. Вращение руля на
270 градусов, регулируемая чувствительность, функция виброотдачи и встроенный вентилятор удовлетворят любого драйвера.
2. МЕРЫ БЕЗОПАСНОСТИ
• Не разбирайте устройство и не ремонтируйте его сами. Обслуживание и ремонт должны про-
изводить только квалифицированные специалисты сервисных центров.
• Оберегайте устройство от воздействия повышенной влажности, пыли, сильных магнитных
полей, вибрации, высоких температур, едких жидкостей и газов.
• Указания по уходу: для очистки корпуса используйте чистую мягкую ткань. Не используйте
для очистки такие растворители, как бензин или спирт, так как они могут повредить поверхность устройства.
• Не роняйте устройство, чтобы не повредить его.
3. КОМПЛЕКТНОСТЬ
• Игровой руль — 1 шт.
• Блок педалей — 1 шт.
• Скоба крепления к столу — 2 шт.
• CD-диск с драйверами — 1 шт.
• Руководство по эксплуатации — 1 шт.
• Гарантийный талон — 1 шт.
4. ОСОБЕННОСТИ
• Совместимость с PC/PS2/PS3
• Эргономичный руль для игр
• Диаметр руля – 10" (254 мм)
• Угол поворота – 270 градусов
• Поддержка: DirectX 7.0 и выше, Windows XP/Vista/7/8
• Интерфейс USB
• Функция виброотдачи и встроенный вентилятор для повышения реалистичности
• Индикация силы ускорения и торможения
• Регулятор чувствительности
• Две оси, 8-позиционный джойстик, рычаг переключения передач «Tiptronic»,
12 дополнительных кнопок
• Резиновое покрытие руля для комфортного вождения
• Резиновые присоски и 2 скобы для надежной фиксации к столу
• Работа в цифровом и аналоговом режимах
• Педали в комплекте
• Удобное расположение на коленях
5. СИСТЕМНЫЕ ТРЕБОВАНИЯ
• Свободный USB-порт ПК
• Операционная система Windows XP/Vista/7/8
2
Page 4
RUS
DŽǧǞǢǖǢǘǥǦǖǢ ǣǢ DZǞǥǣǟǧǔǦǔǪǜǜ
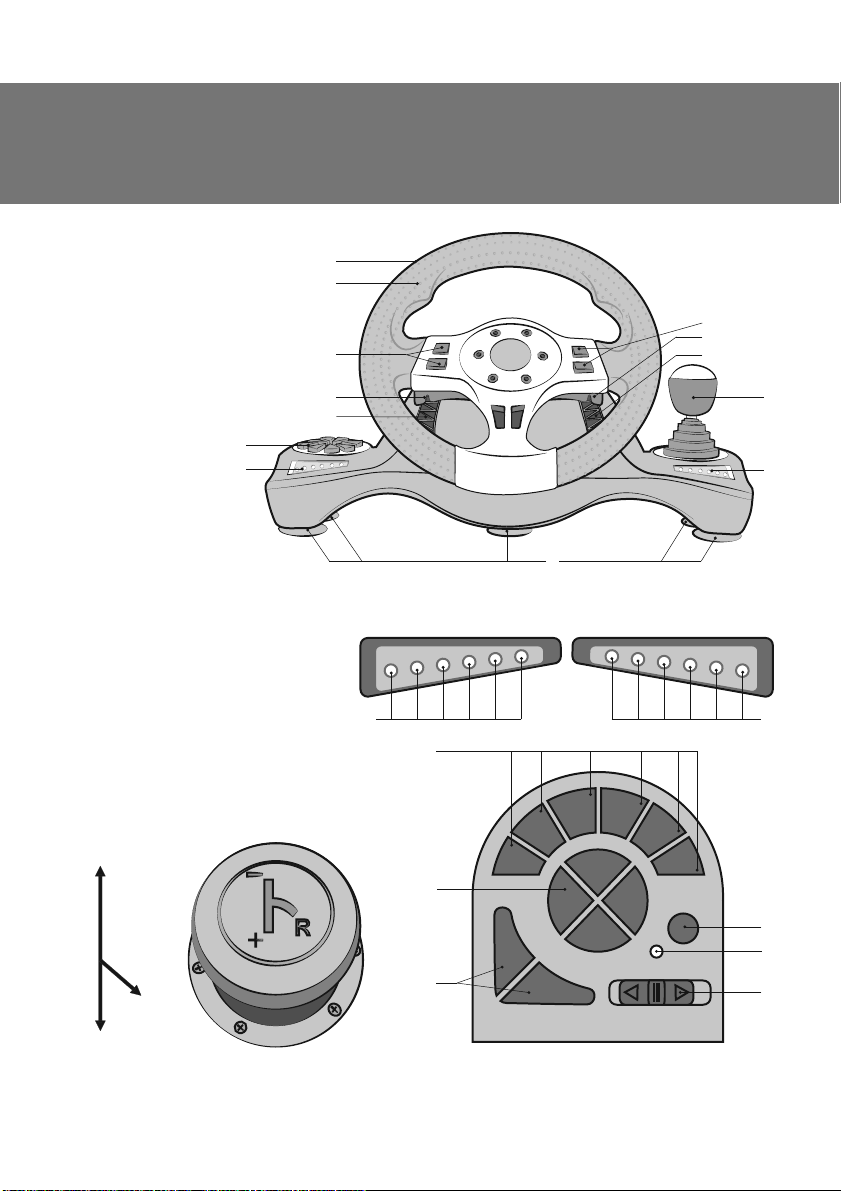
6. ǂǃƼDžƴǁƼƹ ƾǂǁDždžDŽLJƾNJƼƼ
a DŽǧǟǙǖǢǙ ǞǢǟǙǥǢ
b DŽǙǛǜǡǢǖǢǙ ǣǢǞǤǯǦǜǙ
c ƾǡǢǣǞǜ 1, 4
d ƿǙǣǙǥǦǞǜ-ǣǙǤǙǞǟDzǫǔǦǙǟǜ
e DŽǙǬǙǦǞǜ ǘǟdz ǖǙǡǦǜǟdzǪǜǜ
f ƾǡǢǣǢǫǡǔdz ǣǔǡǙǟǰ
g ƼǡǘǜǞǔǦǢǤǯ ǥǢǥǦǢdzǡǜdz
ǦǢǤǠǢǚǙǡǜdz
h ƾǡǢǣǞǜ 2, 3
i DŽǯǫǔǗ ǣǙǤǙǞǟDzǫǙǡǜdz
ǣǙǤǙǘǔǫ
j ƼǡǘǜǞǔǦǢǤǯ
ǥǢǥǦǢdzǡǜdz ǗǔǛǔ
k DŽǙǛǜǡǢǖǯǙ
ǣǤǜǥǢǥǞǜ
l ƾǡǢǣǞǜ 7–12
m 4-ǣǢǛǜǪǜǢǡǡǯǝ
ǘǚǢǝǥǦǜǞ
n ƾǡǢǣǞǜ 9–10
o ƾǡǢǣǞǔ MODE
p ƼǡǘǜǞǔǦǢǤ ǖǞǟDzǫǙǡǜdz
ǤǙǚǜǠǔ MODE
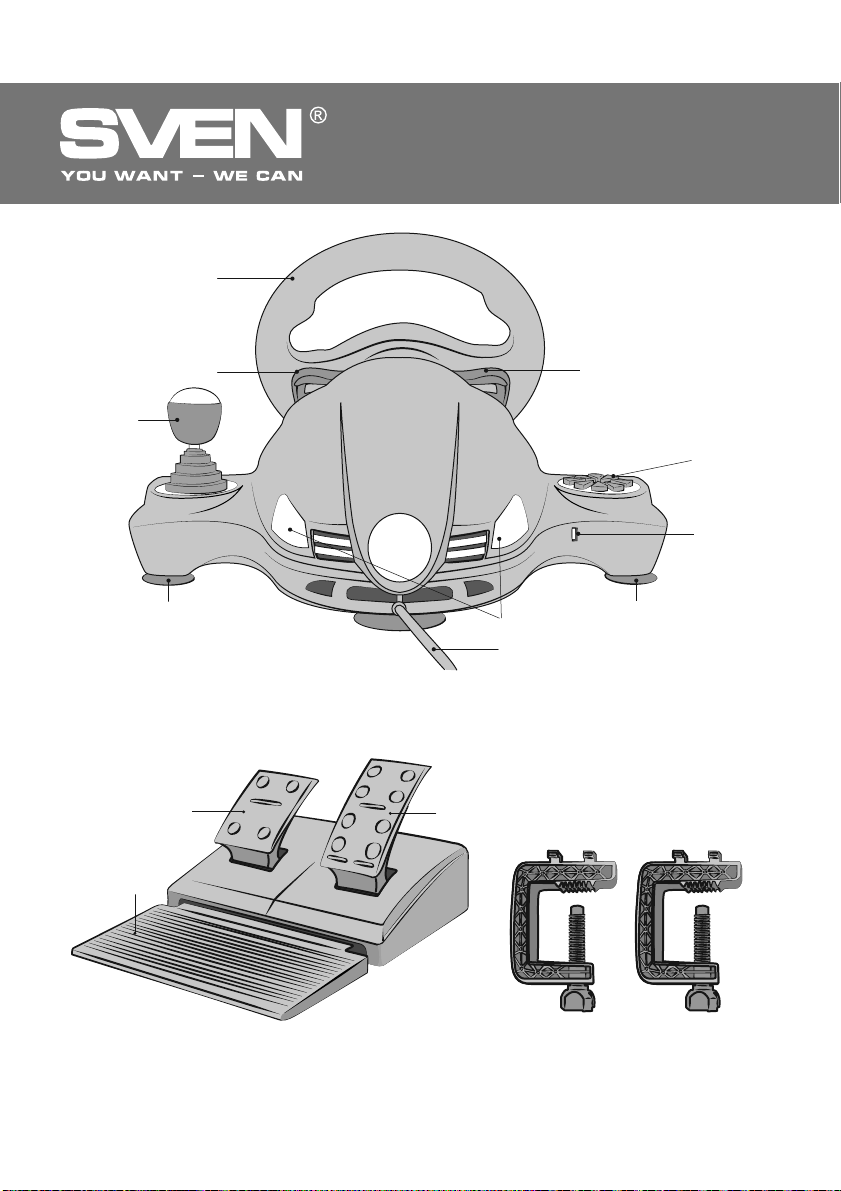
q ǃǙǤǙǞǟDzǫǔǦǙǟǰ ǫǧǖǥǦǖǜǦǙǟǰǡǢǥǦǜ
r DŽǔǛǮǙǠ ǘǟdz
ǣǙǘǔǟǙǝ
s LjǔǤǯ
t ƾǔǕǙǟǰ USB
u ǃǙǘǔǟǰ «ǦǢǤǠǢǚǙǡǜdz»
v ǃǙǘǔǟǰ «ǗǔǛǔ»
w ƶǯǘǖǜǚǡǔdz ǣǢǘǥǦǔǖǞǔ ǘǟdz ǡǢǗ
f
g
ǣǢǘǞǟDzǫǙǡǜdz
a
b
c
d
e
Red Orange OrangeGreen Green Red
g
–
R
+
k
DžǝǦ. 1. ƷǝǙ ǦǤǚǥǚǙǝ
l
5
7
m
9
n
10
driver
1
2
1
1
6
Sensitivity
LO MID HI
8
MODE
h
d
e
i
j
j
o
p
q
DžǝǦ. 2. DžǰǬǕǘ ǤǚǥǚǟǠdzǬǚǢǝǴ ǤǚǥǚǙǕǬ
4
DžǝǦ. 3. ƿǢǣǤǣǬǢǕǴ ǤǕǢǚǠDZ
3
Page 5
RUS
ƼǗǤǢǖǢǝ ǠǔǡǜǣǧǟdzǦǢǤ
a
i
w
k
u
d
DžǝǦ. 4. ƷǝǙ ǦǜǕǙǝ
v
s
t
d
f
r
k
4
DžǝǦ. 5. ƶǠǣǟ ǤǚǙǕǠǚǞ
DžǝǦ. 6. džǟǣǖǰ ǟǥǚǤǠǚǢǝǴ ǟ ǦǧǣǠǨ
Page 6
RUS
DŽǧǞǢǖǢǘǥǦǖǢ ǣǢ DZǞǥǣǟǧǔǦǔǪǜǜ
7. ǃǂƸƾƿǒNjƹǁƼƹ Ƽ ƼǁDždžƴƿƿǓNJƼǓ
• LJǥǦǔǡǢǖǜǦǙ ǧǥǦǤǢǝǥǦǖǢ ǡǔ ǤǢǖǡǢǝ ǣǢǖǙǤǩ-
ǡǢǥǦǜ (ǡǔǣǤǜǠǙǤ, ǥǦǢǟǙ) ǡǔ ǣǤǜǥǢǥǞǜ. ƹǥǟǜ
ǡǙǢǕǩǢǘǜǠǢ, ǣǤǜǞǤǙǣǜǦǙ ǙǗǢ Ǟ ǥǦǢǟǧ ǥ ǣǢǠǢǭǰDz 2 ǥǞǢǕ (ǥǠ. Ǥǜǥ. 6).
• ǃǢǘǞǟDzǫǜǦǙ Ǟ ǧǥǦǤǢǝǥǦǖǧ ǕǟǢǞ ǣǙǘǔǟǙǝ
(Ǥǜǥ. 5) ǥ ǣǢǠǢǭǰDz ǖǥǦǤǢǙǡǡǢǗǢ ǖ ǕǟǢǞ
ǞǔǕǙǟdz Ǟ ǤǔǛǮǙǠǧ RJ-11 r , ǔ ǣǢǦǢǠ ǣǢǘ-
ǞǟDzǫǜǦǙ ǥǔǠǢ ǧǥǦǤǢǝǥǦǖǢ ǞǔǕǙǟǙǠ USB t
Ǟ ǥǖǢǕǢǘǡǢǠǧ ǣǢǤǦǧ USB ǞǢǠǣǰDzǦǙǤǔ.
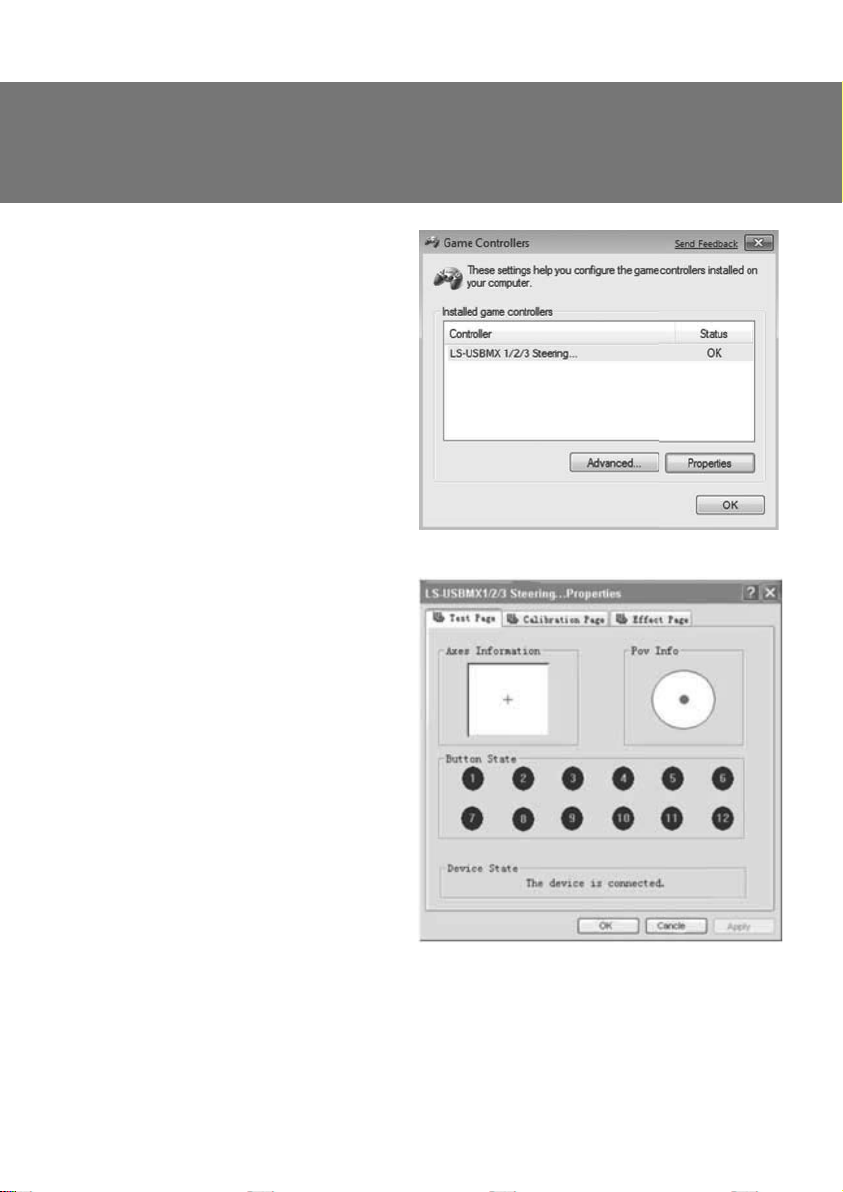
• ƶǥǦǔǖǰǦǙ CD-ǘǜǥǞ ǥ ǘǤǔǝǖǙǤǔǠǜ ǖ ǘǜǥǞǢǖǢǘ ǃƾ ǜ ǛǔǣǧǥǦǜǦǙ ǣǤǢǗǤǔǠǠǧ «setup.exe»
ǘǟdz ǧǥǦǔǡǢǖǞǜ ǘǤǔǝǖǙǤǢǖ ǡǔ ǃƾ. ƻǔǝǘǜǦǙ
ǖ ǡǔǥǦǤǢǝǞǜ ǜǗǤǢǖǯǩ ǠǔǡǜǣǧǟdzǦǢǤǢǖ ǖ ǣǔǡǙǟǜ ǧǣǤǔǖǟǙǡǜdz ǃƾ, ǣǢdzǖǜǦǥdz ǢǞǡǢ «Game
Controllers» (Ǥǜǥ. 7).
džǙǥǦǜǤǢǖǔǡǜǙ Ǥǧǟdz
• LJǚǦǧǝǥǣǗǕǢǝǚ ǣǦǚǞ. ǃǙǤǙǝǘǜǦǙ ǡǔ ǦǙǥ-
ǦǢǖǧDz ǛǔǞǟǔǘǞǧ «Test Page» (ǥǠ. Ǥǜǥ. 8), ǣǢǖǙǤǡǜǦǙ Ǥǧǟǰ ǥǟǙǖǔ ǡǔǣǤǔǖǢ, ǧǕǙǘǜǦǙǥǰ,
ǫǦǢ Ǣǥǰ X (ǞǤǙǥǦ-ǞǧǤǥǢǤ «+») ǖ ǢǞǡǙ «Axes
Information» ǣǙǤǙǩǢǘǜǦ ǥǟǙǖǔ ǡǔǣǤǔǖǢ ǣǤǔǖǜǟǰǡǢ. ƹǥǟǜ ǞǤǙǥǦ-ǞǧǤǥǢǤ ǡǔǩǢǘǜǦǥdz ǡǙ
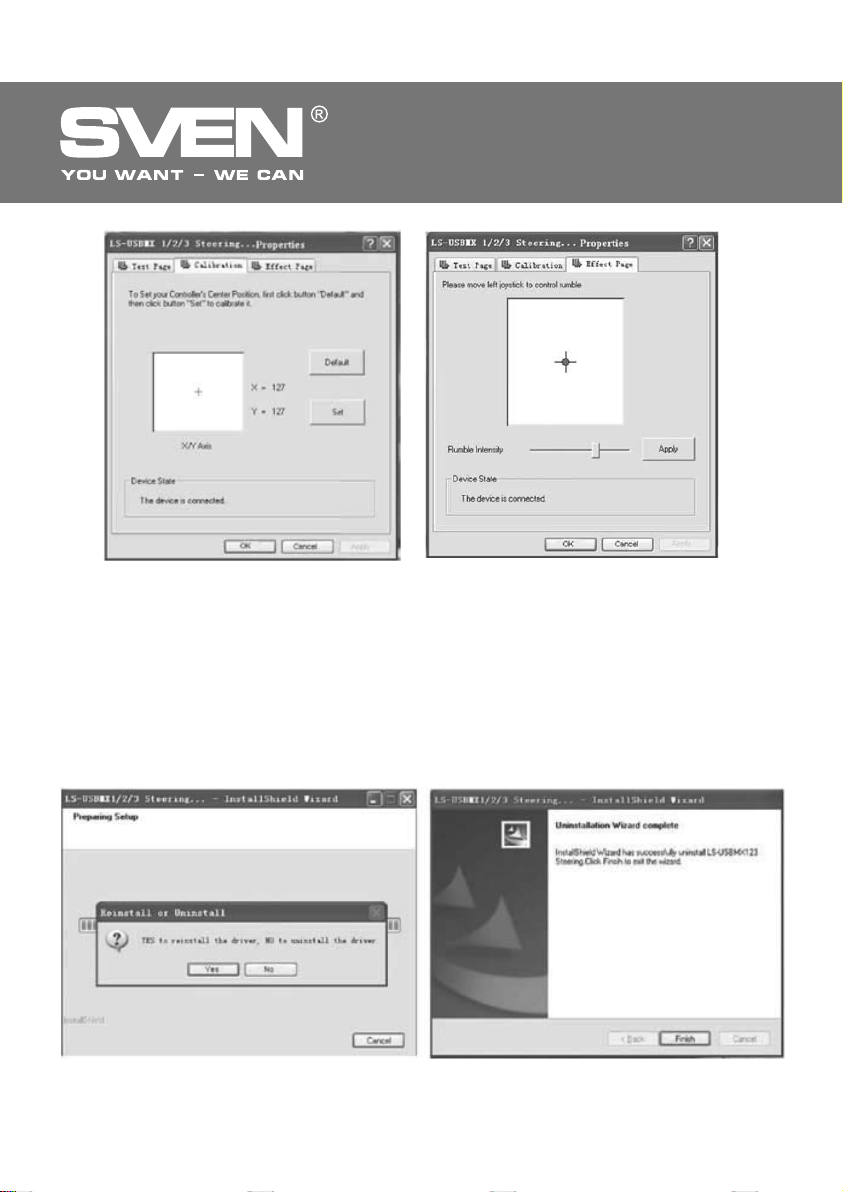
ǖ ǪǙǡǦǤǙ ǜǡǨǢǤǠǔǪǜǢǡǡǢǗǢ ǢǞǡǔ, ǣǢǚǔǟǧǝǥǦǔ, ǣǙǤǙǝǘǜǦǙ ǡǔ ǛǔǞǟǔǘǞǧ «Calibration
Page» ǜ ǣǤǢǜǛǖǙǘǜǦǙ ǞǔǟǜǕǤǢǖǞǧ.
• LJǚǦǧǝǥǣǗǕǢǝǚ ǟǢǣǤǣǟ. ǁǔǚǜǠǔdz ǞǡǢǣǞǜ ǡǔ
ǤǧǟǙ, ǧǕǙǘǜǦǙǥǰ, ǫǦǢ ǞǡǢǣǞǜ ǥ 1 ǣǢ 12 ǡǔ
ǦǙǥǦǢǖǢǝ ǛǔǞǟǔǘǞǙ «Test Page» (ǥǠ. Ǥǜǥ. 8)
ǕǧǘǧǦ ǛǔǗǢǤǔǦǰǥdz ǞǤǔǥǡǯǠ ǪǖǙǦǢǠ ǣǢǥǟǙ
ǞǔǚǘǢǗǢ ǘǙǝǥǦǖǜdz.
• LJǚǦǧǝǥǣǗǕǢǝǚ ǙǛǣǞǦǧǝǟǕ. ǁǔǞǟǢǡdzdz ǘǚǢǝǥǦǜǞ ǣǢ ǞǔǚǘǢǠǧ ǜǛ 8 ǡǔǣǤǔǖǟǙǡǜǝ (ǖǖǙǤǩ,
ǖǡǜǛ, ǖǟǙǖǢ, ǖǣǤǔǖǢ ǜ ǡǔ 45 ǗǤǔ- ǘǧǥǢǖ ǖ
ǞǔǚǘǢǠ ǡǔǣǤǔǖǟǙǡǜǜ), ǧǕǙǘǜǦǙǥǰ, ǫǦǢ
ǞǧǤǥǢǤ ǖ ǢǞǡǙ «Povinfo» (ǥǠ. Ǥǜǥ. 8)
ǘǖǜǚǙǦǥdz ǣǤǔǖǜǟǰǡǢ.
• ƿǕǠǝǖǥǣǗǟǕ ǥǨǠǴ. ǑǦǔ ǢǣǪǜdz ǜǥǣǢǟǰǛǧǙǦǥdz ǦǢǟǰǞǢ ǘǟdz ǞǔǟǜǕǤǢǖǞǜ ǣǤǜ ǡǙǜǥǣǤǔǖǡǢǥǦdzǩ ǪǙǡǦǤǜǤǢǖǔǡǜdz Ǥǧǟdz ǖ ǔǡǔǟǢǗǢǖǢǠ ǤǙǚǜǠǙ (ǥǖǙǦǢǘǜǢǘǡǯǝ ǜǡǘǜǞǔǦǢǤ ǗǢǤǜǦ ǞǤǔǥǡǯǠ):
Ǚǥǟǜ ǞǤǙǥǦ-ǞǧǤǥǢǤ ǡǔǩǢǘǜǦǥdz ǡǙ ǣǢ ǪǙǡǦǤǧ X / YǢǥǙǝ, ǞǔǞ ǣǢǞǔǛǔǡǢ ǡǔ Ǥǜǥ. 9, ǣǢǚǔǟǧǝǥǦǔ,
ǡǔǚǠǜǦǙ «ǃǢ ǧǠǢǟǫǔǡǜDz» (Default), ǛǔǦǙǠ ǡǔǚǠǜǦǙ ǞǡǢǣǞǧ «LJǥǦǔǡǢǖǜǦǰ» (Set).
• LJǚǦǧǝǥǣǗǕǢǝǚ ǙǗǝǘǕǧǚǠǚǞ. ǃǙǤǙǝǘǜǦǙ ǡǔ «EԚect Page» (Ǥǜǥ. 10) ǘǟdz ǦǙǥǦǜǤǢǖǔǡǜdz ǘǖǜǗǔǦǙǟǙǝ. ǃǢǖǙǤǡǜǦǙ Ǥǧǟǰ ǜ ǧǕǙǘǜǦǙǥǰ, ǫǦǢ ǟǙǖǯǝ ǘǖǜǗǔǦǙǟǰ ǖǜǕǤǜǤǧǙǦ. ǁǔǚǜǠǔdz ǟǙǖǯǝ
driver
DžǝǦ. 7
DžǝǦ. 8
5
Page 7
RUS
ƼǗǤǢǖǢǝ ǠǔǡǜǣǧǟdzǦǢǤ
DžǝǦ. 9
ǜ ǣǤǔǖǯǝ ǟǙǣǙǥǦǞǜ-ǣǙǤǙǞǟDzǫǔǦǙǟǜ d ǧǕǙǘǜǦǙǥǰ, ǫǦǢ ǜ ǣǤǔǖǯǝ ǘǖǜǗǔǦǙǟǰ ǖǜǕǤǜǤǧǙǦ. Džǜǟǧ
ǖǜǕǤǢǢǦǘǔǫǜ ǠǢǚǡǢ ǜǛǠǙǡdzǦǰ, ǣǙǤǙǘǖǜǗǔdz ǞǧǤǥǢǤ ǖǣǤǔǖǢ-ǖǟǙǖǢ ǣǢ ǥǦǤǢǞǙ «Rumble-Intensity»
(Ǥǜǥ. 10).
• LjǙǕǠǚǢǝǚ (ǤǚǥǚǨǦǧǕǢǣǗǟǕ) ǙǥǕǞǗǚǥǕ. ǃǙǤǙǛǔǣǧǥǦǜǦǙ ǧǥǦǔǡǢǖǭǜǞ ǘǤǔǝǖǙǤǔ. ƶ ǣǢdzǖǜǖǬǙǠǥdz
ǢǞǡǙ «Reinstallor Uninstall» (Ǥǜǥ.11) ǡǔǚǠǜǦǙ ǞǡǢǣǞǧ «ǁǙǦ» (No), ǫǦǢǕǯ ǧǘǔǟǜǦǰ ǘǤǔǝǖǙǤ. ƻǔǦǙǠ
ǡǔǚǠǜǦǙ ǞǡǢǣǞǧ «Ƹǔ» (Yes), ǫǦǢǕǯ ǣǙǤǙǧǥǦǔǡǢǖǜǦǰ ǘǤǔǝǖǙǤ.
• ƶ ǛǔǖǙǤǬǙǡǜǙ ǖ
«ƷǢ Ǧ Ǣ ǖ Ǣ » (Finish), ǫǦǢǕǯ ǣǢǘǦǖǙǤǘǜǦǰ ǜ ǖǯǝǦǜ.
ǣǢdzǖǜǖǬǙǠǥdz ǢǞǡǙ «LS- USBMX1 /2/3 steering...» (Ǥǜǥ. 12) ǡǔǚǠǜǦǙ ǞǡǢǣǞǧ
DžǝǦ. 10
DžǝǦ. 12DžǝǦ. 11
6
Page 8
RUS
DŽǧǞǢǖǢǘǥǦǖǢ ǣǢ DZǞǥǣǟǧǔǦǔǪǜǜ
ǃǤǢǗǤǔǠǠǜǤǢǖǔǡǜǙ ǞǡǢǣǢǞ
• ǃǤǢǗǤǔǠǠǡǯǙ ǞǡǢǣǞǜ 1, 2, 3, 4, 5, 6, 7 ǜ 8, ǞǢǦǢǤǯǠ ǣǢ ǧǠǢǟǫǔǡǜDz ǣǤǜǥǖǢǙǡǯ ǨǧǡǞǪǜǜ ǤǯǫǔǗǔ
ǣǙǤǙǞǟDzǫǙǡǜdz ǣǙǤǙǘǔǫ i, ǟǙǖǢǗǢ ǜ ǣǤǔǖǢǗǢ ǟǙǣǙǥǦǞǢǖ-ǣǙǤǙǞǟDzǫǔǦǙǟǙǝ d, ǣǙǘǔǟǜ ǗǔǛǔ v,
ǣǙǘǔǟǜ ǦǢǤǠǢǛǔ u, ǞǡǢǣǢǞ 11 ǜ 12. ƾǔǞǜǙ ǜǠǙǡǡǢ, ƶǯ ǢǣǤǙǘǙǟǜǦǙ ǣǤǜ ǦǙǥǦǜǤǢǖǔǡǜǜ. ƹǥǟǜ ǣǢ
ǞǔǞǜǠ-ǦǢ ǣǤǜǫǜǡǔǠ ǜǩ ǡǧǚǡǢ ǣǙǤǙǣǤǢǗǤǔǠǠǜǤǢǖǔǦǰ, Ǧ. Ǚ. ǣǤǜǥǖǢǜǦǰ ǘǤǧǗǜǙ ǨǧǡǞǪǜǜ, ǥǟǙǘǧǝǦǙ
ǡǜǚǙǣǤǜǖǙǘǙǡǡǯǠ ǤǙǞǢǠǙǡǘǔǪǜdzǠ.
• DŽǥǣǘǥǕǡǡǕ ǨǦǧǕǢǣǗǟǝ (ǞǤǢǠǙ ǤǙǚǜǠǔ NEGCON). ƻǔǝǘǜǦǙ ǡǔ ǦǙǥǦǢǖǧDz ǛǔǞǟǔǘǞǧ «Test
Page» (ǥǠ. Ǥǜǥ. 8), ǡǔǚǠǜǦǙ ǢǘǡǢǖǤǙǠǙǡǡǢ ǞǡǢǣǞǜ 9 ǜ 10 n. LJǘǙǤǚǜǖǔǝǦǙ 3 ǥǙǞǧǡǘǯ, ǣǢǞǔ ǜǡ-
ǘǜǞǔǦǢǤ ǣǤǢǗǤǔǠǠǯ ǡǙ ǛǔǗǢǤǜǦǥdz ǛǙǟǙǡǯǠ. ǁǔǚǠǜǦǙ ǞǡǢǣǞǧ, ǞǢǦǢǤǧDz ǚǙǟǔǙǦǙ ǣǙǤǙǣǤǢǗǤǔǠǠǜǤǢǖǔǦǰ. DžǖǙǦǢǘǜǢǘǡǯǝ ǜǡǘǜǞǔǦǢǤ ǣǤǢǗǤǔǠǯ ǡǔǫǡǙǦ ǠǜǗǔǦǰ. ǁǔǚǠǜǦǙ ǣǤǢǗǤǔǠǠǡǧDz ǞǡǢǣǞǧ.
DžǖǙǦǢǘǜǢǘǡǯǝ ǜǡǘǜǞǔǦǢǤ ǣǤǢǗǤǔǠǠǯ ǣǢǗǔǥǡǙǦ. ǃǤǢǗǤǔǠǠǔ ǧǥǦǔǡǢǖǟǙǡǔ.
• ǃǬǝǦǧǝǧDZ (ǨǙǕǠǝǧDZ) ǣǙǢǨ ǤǥǣǘǥǕǡǡǨ. ǁǔǚǠǜǦǙ ǢǘǡǢǖǤǙǠǙǡǡǢ ǞǡǢǣǞǜ 9 ǜ 10. LJǘǙǤǚǜǖǔǝǦǙ ǜǩ
3 ǥǙǞǧǡǘǯ, ǣǢǞǔ ǜǡǘǜǞǔǦǢǤ ǣǤǢǗǤǔǠǠǯ ǡǙ ǛǔǗǢǤǜǦǥdz ǛǙǟǙǡǯǠ. ǁǔǚǠǜǦǙ ǛǔǣǤǢǗǤǔǠǠǜǤǢ-
ǖǔǡǡǧDz ǞǡǢǣǞǧ. DžǖǙǦǢǘǜǢǘǡǯǝ ǜǡǘǜǞǔǦǢǤ ǣǤǢǗǤǔǠǠǯ ǡǔǫǡǙǦ ǠǜǗǔǦǰ. ǁǔǚǠǜǦǙ DZǦǧ ǚǙ ǞǡǢǣǞǧ
ǣǢǖǦǢǤǡǢ. ƼǡǘǜǞǔǦǢǤ ǣǤǢǗǤǔǠǠǯ ǣǢǗǔǥǡǙǦ, ǛǡǔǫǜǦ, ǣǤǢǗǤǔǠǠǔ DZǦǢǝ ǞǡǢǣǞǜ ǧǘǔǟǙǡǔ.
• ǃǬǝǦǧǝǧDZ (ǨǙǕǠǝǧDZ) ǗǦǚ ǤǥǣǘǥǕǡǡǰ. ǁǔǚǠǜǦǙ ǢǘǡǢǖǤǙǠǙǡǡǢ ǞǡǢǣǞǜ 9 ǜ 10. LJǘǙǤǚǜǖǔǝǦǙ ǜǩ
3 ǥǙǞǧǡǘǯ, ǣǢǞǔ ǜǡǘǜǞǔǦǢǤ ǣǤǢǗǤǔǠǠǯ ǡǙ ǛǔǗǢǤǜǦǥdz ǛǙǟǙǡǯǠ. ǂǦǣǧǥǦǜǦǙ ǞǡǢǣǞǜ. ǁǔǚǠǜǦǙ ǞǡǢ-
ǣǞǧ 10 ǜ ǧǘǙǤǚǜǖǔǝǦǙ ǖ ǦǙǫǙǡǜǙ 4 ǥǙǞǧǡǘ. DžǖǙǦǢǘǜǢǘǡǯǝ ǜǡǘǜǞǔǦǢǤ ǣǤǢǗǤǔǠǠǯ ǣǢǗǔǥǡǙǦ. ƶǥǙ
ǛǔǣǤǢǗǤǔǠǠǜǤǢǖǔǡǡǯǙ ǞǡǢǣǞǜ ǢǫǜǥǦdzǦǥdz. ǃǤǢǜǛǢǝǘǙǦ ǥǕǤǢǥ ǡǔǥǦǤǢǙǞ.
LJǥǦǔǡǢǖǞǔ ǧǤǢǖǡǙǝ ǫǧǖǥǦǖǜǦǙǟǰǡǢǥǦǜ (Sensitivity) Ǥǧǟdz
• NjǧǖǥǦǖǜǦǙǟǰǡǢǥǦǰ Ǥǧǟdz ǤǙǗǧǟǜǤǧǙǦǥdz ǣǙǤǙǞǟDzǫǔǦǙǟǙǠ Sensitivity q.
• C ǣǢǠǢǭǰDz ǣǙǤǙǞǟDzǫǔǦǙǟdz Sensitivity q ǠǢǚǡǢ ǡǔǥǦǤǢǜǦǰ ǦǤǜ ǧǤǢǖǡdz ǫǧǖǥǦǖǜǦǙǟǰǡǢǥǦǜ Ǥǧ-
ǟdz. ƶ ǣǢǟǢǚǙǡǜǜ «LO» ǘǟdz ǣǢǟǡǢǗǢ ǣǢǖǢǤǢǦǔ «ǞǢǟǙǥ» ǡǙǢǕǩǢǘǜǠǢ ǣǢǖǙǤǡǧǦǰ Ǥǧǟǰ ǘǢ ǧǣǢǤǔ, ǦǢ
ǙǥǦǰ ǡǔ ǖǥǙ 135 ǗǤǔǘǧǥǢǖ; ǖ ǣǢǟǢǚǙǡǜǜ «MID» ǘǢǥǦǔǦǢǫǡǢ ǣǢǖǙǤǡǧǦǰ Ǥǧǟǰ ǡǔ 2/3 ǩǢǘǔ, ǔ ǖ ǣǢǟǢǚǙǡǜǜ «HI» ǠǔǞǥǜǠǔǟǰǡǢǙ ǣǢǟǢǚǙǡǜǙ ǘǢǥǦǜǗǔǙǦǥdz ǡǔ ǧǤǢǖǡǙ 1/3 ǣǢǖǢǤǢǦǔ Ǥǧǟdz.
ǃǙǤǙǞǟDzǫǙǡǜǙ ǤǙǚǜǠǢǖ
• ƼǗǤǢǖǢǝ ǠǔǡǜǣǧǟdzǦǢǤ ǤǔǕǢǦǔǙǦ ǖ ǘǖǧǩ ǤǙǚǜǠǔǩ: ǪǜǨǤǢǖǢǝ (digital) ǜ ǔǡǔǟǢǗǢǖǯǝ (analog).
Ƹǟdz ǣǙǤǙǞǟDzǫǙǡǜdz ǖ ǔǡǔǟǢǗǢǖǯǝ ǤǙǚǜǠ:
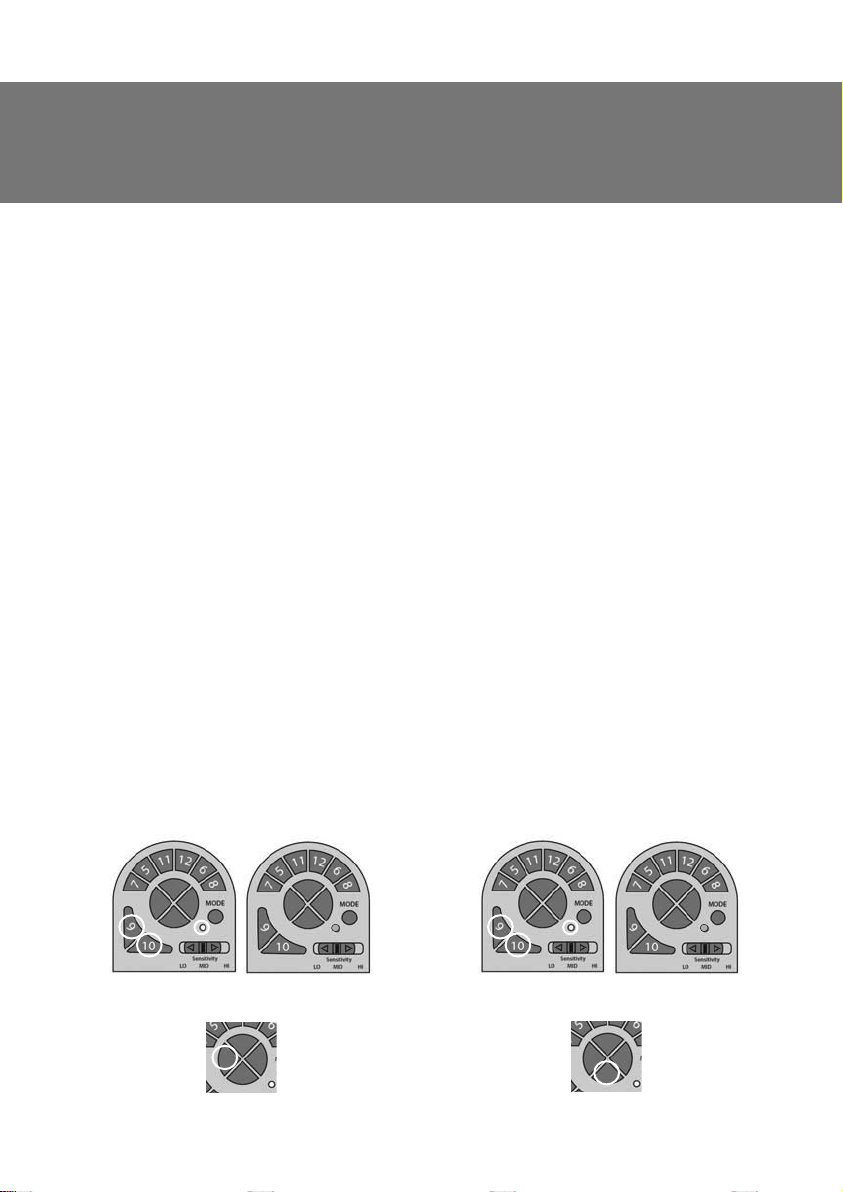
1. ǁǔǚǔǦǰ Select + Start (9+10) ǜ ǧǘǙǤǚǜǖǔǦǰ
ǜǩ ǡǔ ǣǤǢǦdzǚǙǡǜǜ 3 ǥǙǞǧǡǘ, ǜǡǘǜǞǔǦǢǤ Mode
ǛǔǗǢǤǜǦǥdz ǛǙǟǙǡǯǠ. ƻǔǦǙǠ ǢǦǣǧǥǦǜǦǰ ǞǟǔǖǜǬǜ 9 ǜ 10.
Ƹǟdz ǣǙǤǙǞǟDzǫǙǡǜdz ǖ ǪǜǨǤǢǖǢǝ ǤǙǚǜǠ:
1. ǁǔǚǔǦǰ Select + Start (9+10) ǜ ǧǘǙǤǚǜǖǔǦǰ
ǜǩ ǡǔ ǣǤǢǦdzǚǙǡǜǜ 3 ǥǙǞǧǡǘ, ǜǡǘǜǞǔǦǢǤ Mode
ǛǔǗǢǤǜǦǥdz ǛǙǟǙǡǯǠ. ƻǔǦǙǠ ǢǦǣǧǥǦǜǦǰ ǞǟǔǖǜǬǜ 9 ǜ 10.
driver
2. ǁǔǚǔǦǰ ǡǔ ǪǜǨǤǢǖǢǠ ǕǟǢǞǙ ǞǡǢǣǞǧ ǟǙǖǢǗǢ
ǡǔǣǤǔǖǟǙǡǜdz.
2. ǁǔǚǔǦǰ ǡǔ ǪǜǨǤǢǖǢǠ
ǕǟǢǞǙ ǞǡǢǣǞǧ ǖǡǜǛ.
7
Page 9
RUS
ƼǗǤǢǖǢǝ ǠǔǡǜǣǧǟdzǦǢǤ
ƶ ǪǜǨǤǢǖǢǠ ǤǙǚǜǠǙ ǣǤǜ ǡǔǚǔǦǜǜ ǡǔ ǣǙǘǔǟǜ ǣǤǢǜǥǩǢǘǜǦ ǥǦǔǦǜǫǡǢǙ ǠǔǞǥǜǠǔǟǰǡǢǙ ǖǞǟDzǫǙǡǜǙ/
ǖǯǞǟDzǫǙǡǜǙ ǥǢǢǦǖǙǦǥǦǖǧDzǭǜǩ ǢǥǙǝ, Ǧ. Ǚ. ǥǧǭǙǥǦǖǧǙǦ ǦǢǟǰǞǢ ǣǢǟǢǚǙǡǜǙ «ǖǞǟ./ǖǯǞǟ.». ƶ ǔǡǔǟǢǗǢǖǢǠ ǚǙ ǤǙǚǜǠǙ ǥǜǗǡǔǟ ǣǢǘǔǙǦǥdz ǖ ǛǔǖǜǥǜǠǢǥǦǜ ǢǦ ǠǙǤǯ ǡǔǚǔǦǜdz ǣǙǘǔǟǙǝ, Ǧ.Ǚ. ǣǟǔǖǡǢ. DŽǙǚǜǠ
ǞǡǢǣǢǞ ǡǙ ǕǧǘǙǦ ǨǧǡǞǪǜǢǡǜǤǢǖǔǦǰ, ǞǢǗǘǔ ǢǣǤǙǘǙǟǙǡǡǯǝ ǤǙǚǜǠ ǧǚǙ Ǜǔǘǔǡ ǡǔ ǞǢǡǥǢǟǜ. DžǖǙǦǢǘǜǢǘǡǔdz ǜǡǘǜǞǔǪǜdz ǤǙǚǜǠǔ ǧǞǔǛǯǖǔǙǦ ǡǔ ǦǙǞǧǭǜǝ ǔǞǦǜǖǡǯǝ ǤǙǚǜǠ. ǃǢ ǧǠǢǟǫǔǡǜDz ǖǞǟDzǫǙǡ
ǪǜǨǤǢǖǢǝ ǤǙǚǜǠ.
DŽǔǕǢǦǔ ǕǙǛ ǣǙǘǔǟǙǝ
ƼǗǤǢǖǢǝ ǠǔǡǜǣǧǟdzǦǢǤ ǢǕǢǤǧǘǢǖǔǡ ǟǙǣǙǥǦǞǔǠǜ-ǣǙǤǙǞǟDzǫǔǦǙǟdzǠǜ d, ǛǔǠǙǡdzDzǭǜǠǜ ǣǙǘǔǟǜ
ǗǔǛǔ ǜ ǦǢǤǠǢǚǙǡǜdz: ǟǙǖǯǝ ǣǙǤǙǞǟDzǫǔǦǙǟǰ ǖǯǣǢǟǡdzǙǦ ǨǧǡǞǪǜDz ǦǢǤǠǢǚǙǡǜdz, ǔ ǣǤǔǖǯǝ ǣǙǤǙǞǟDzǫǔǦǙǟǰ – ǗǔǛǔ (ǧǥǞǢǤǙǡǜdz).
ǃǤǜǠǙǫǔǡǜǙ. ǀǔǡǜǣǧǟdzǦǢǤ ǢǕǢǤǧǘǢǖǔǡ ǥǖǙǦǢǘǜǢǘǡǯǠǜ ǜǡǘǜǞǔǦǢǤǔǠǜ ǞǢǡǦǤǢǟdz «ǦǢǤǠǢǚǙǡǜdz» g ǜ «ǗǔǛǔ» j ǥǠ. Ǥǜǥ. 1. ǃǤǜ ǣǟǔǖǡǢǠ ǡǔǚǔǦǜǜ ǣǙǘǔǟǜ «ǗǔǛǔ» ǛǔǗǢǤǔDzǦǥdz ǜǡǘǜǞǔǦǢǤǯ ǛǙǟǙǡǢǗǢ ǪǖǙǦǔ, ǡǔǕǜǤǔdz ǥǞǢǤǢǥǦǰ ǛǔǗǢǤǔDzǦǥdz ǢǤǔǡǚǙǖǯǙ ǜǡǘǜǞǔǦǢǤǯ, ǛǔǦǙǠ ǞǤǔǥǡǯǙ. ƶ ǛǔǖǜǥǜǠǢǥǦǜ ǢǦ ǣǟǔǖǡǢǥǦǜ ǥǕǤǔǥǯǖǔǡǜdz ǥǞǢǤǢǥǦǜ, ǛǔǗǢǤǔDzǦǥdz ǜǡǘǜǞǔǦǢǤǯ ǛǙǟǙǡǢǗǢ, ǢǤǔǡǚǙǖǢǗǢ ǜ ǞǤǔǥǡǢǗǢ ǪǖǙǦǢǖ ǥǢǢǦǖǙǦǥǦǖǙǡǡǢ.
8. DŽƹnjƹǁƼƹ ƶǂƻǀǂƺǁǏlj ǃDŽǂƵƿƹǀ
ǃǤǢǕǟǙǠǔ
ǃǢǥǟǙ ǧǥǦǔǡǢǖǞǜ ǃǂ
ǠǔǡǜǣǧǟdzǦǢǤ ǡǙ ǤǔǕǢǦǔǙǦ.
ƶǢ ǖǤǙǠdz ǜǗǤǯ ǘǖǜǗǔǦǙǟǜ ǡǙ
ǤǔǕǢǦǔDzǦ ǖ ǖǜǕǤǢǤǙǚǜǠǙ.
ǃǢǥǟǙ ǛǔǣǧǥǞǔ ǜǗǤǯ Ǣǥǰ ǡǔǫǜǡǔǙǦ ǤǔǕǢǦǔǦǰ ǕǙǛ ǖǠǙǬǔǦǙǟǰǥǦǖǔ ǜǗǤǢǞǔ.
ǃǢǥǟǙ ǛǔǣǧǥǞǔ ǜǗǤǯ ǨǧǡǞǪǜdz
ǖǜǕǤǢǢǦǘǔǫǜ ǖǞǟDzǫǔǙǦǥdz ǥǔǠǔ ǕǙǛ ǖǠǙǬǔǦǙǟǰǥǦǖǔ ǜǗǤǢǞǔ.
ƶ ǣǤǢǪǙǥǥǙ ǜǗǤǯ ǨǧǡǞǪǜdz
ǖǜǕǤǢǢǦǘǔǫǜ ǡǙǘǢǥǦǔǦǢǫǡǔ.
DŽǙǬǙǡǜǙ
ƴ. ǃǤǢǖǙǤǰǦǙ, ǡǔǘǙǚǡǢ ǟǜ ǞǔǕǙǟǰ
ǥǢǙǘǜǡǙǡ Ǟ ǃƾ.
Ƶ. LJǕǙǘǜǦǙǥǰ, ǫǦǢ ǖǯ ǢǦǞǤǯǟǜ ǢǞǡǢ «Game Controller»,
ǢǥǧǭǙǥǦǖǜǟǜ ǜǡǥǦǔǟǟdzǪǜDz ǜ ǡǔǚǔǟǜ ǞǡǢǣǞǧ «Conԛrm»
ǘǟdz ǣǢǘǦǖǙǤǚǘǙǡǜdz ǡǔǥǦǤǢǙǞ.
ƶ. ǃǤǢǖǙǤǰǦǙ, ǡǙ ǜǠǙǙǦ ǟǜ ǠǔǡǜǣǧǟdzǦǢǤ ǞǢǡǨǟǜǞǦǢǖ
ǥ ǘǤǧǗǜǠǜ ǣǙǤǜǨǙǤǜǝǡǯǠǜ ǧǥǦǤǢǝǥǦǖǔǠǜ.
Ʒ. ǃǙǤǙǛǔǣǧǥǦǜǦǙ ǃƾ, Ǚǥǟǜ Ǥǧǟǰ ǙǭǙ ǡǙ ǤǔǕǢǦǔǙǦ.
ƶǯǝǘǜǦǙ ǜǛ ǜǗǤǯ, ǢǦǞǟDzǫǜǦǙ ǠǔǡǜǣǧǟdzǦǢǤ ǜǛ ǣǢǤǦǔ USB,
ǔ ǣǢǦǢǠ ǥǡǢǖǔ ǖǞǟDzǫǜǦǙ. ƹǥǟǜ ǨǧǡǞǪǜdz ǖǜǕǤǢǢǦǘǔǫǜ
ǣǢǥǟǙ DZǦǢǗǢ ǡǙ ǖǞǟDzǫǜǟǔǥǰ, ǣǙǤǙǛǔǗǤǧǛǜǦǙ ǃƾ.
ǂǦǞǔǟǜǕǤǧǝǦǙ ǜ ǡǔǥǦǤǢǝǦǙ «ǠǙǤǦǖǯǙ ǛǢǡǯ» ǢǥǙǝ.
DŽǔǕǢǫǔdz
ǛǢǡǔ
ǂǥǜ
ƶǢǝǘǜǦǙ ǖ ǡǔǥǦǤǢǝǞǜ «Force Feedback» ǖ ǜǗǤǙ
ǜ ǢǦǞǔǟǜǕǤǧǝǦǙ ǨǧǡǞǪǜDz ǖǜǕǤǢǢǦǘǔǫǜ.
ƶǢǝǘǜǦǙ ǖ ǡǔǥǦǤǢǝǞǜ «Force Feedback» ǖ ǜǗǤǙ
ǜ ǡǔǥǦǤǢǝǦǙ ǥǜǟǧ ǖǜǕǤǢǢǦǘǔǫǜ.
«ǀǙǤǦǖǔdz
ǛǢǡǔ»
ǠǔǡǜǣǧǟdzǦǢǤǔ ǣǢǘ-
ǂǥǜ
DŽǔǕǢǫǔdz
ǛǢǡǔ
ƹǥǟǜ ǡǜ Ǣǘǜǡ ǜǛ ǧǞǔǛǔǡǡǯǩ ǖǯǬǙ ǥǣǢǥǢǕǢǖ ǡǙ ǤǙǬǔǙǦ ǣǤǢǕǟǙǠǧ, ǣǢǚǔǟǧǝǥǦǔ, ǢǕǤǔǦǜǦǙǥǰ Ǜǔ
ǣǤǢǨǙǥǥǜǢǡǔǟǰǡǢǝ ǞǢǡǥǧǟǰǦǔǪǜǙǝ ǖ ǕǟǜǚǔǝǬǜǝ Ǟ ƶǔǠ ǥǙǤǖǜǥǡǯǝ ǪǙǡǦǤ. ǁǜǞǢǗǘǔ ǡǙ ǣǯǦǔǝǦǙǥǰ ǤǙǠǢǡǦǜǤǢǖǔǦǰ ǜǛǘǙǟǜǙ ǥǔǠǢǥǦǢdzǦǙǟǰǡǢ.
8
Page 10

ƫǗǤǢǖǜǝ ǠǔǡǹǣǧǟdzǦǢǤ
ƾƹDŽƫƶǁƼNJdžƶǂ
ƻ ƹƾDžǃƿLJƴdžƴNJƫƬ
DRIVER
www.sven.ѵ
Page 11

UKR
ƫǗǤǢǖǜǝ ǠǔǡǹǣǧǟdzǦǢǤ
ƸdzǞǧǷǠǢ ƶǔǠ Ǜǔ ǞǧǣǹǖǟDz ǖǜǤǢǕǧ ǦǢǤǗǢǖǙǟǰǡǢǺ ǠǔǤǞǜ SVEN!
ǃǙǤǙǘ ǙǞǥǣǟǧǔǦǔǪǹǷDz ǣǤǜǥǦǤǢDz ǧǖǔǚǡǢ ǢǛǡǔǝǢǠǦǙǥdz Ǜ ǪǜǠ ƾǙǤǹǖǡǜǪǦǖǢǠ ǹ ǛǕǙǤǙǚǹǦǰ ǝǢǗǢ ǡǔ
ǧǖǙǥǰ ǣǙǤǹǢǘ ǞǢǤǜǥǦǧǖǔǡǡdz.
ƴƶdžǂDŽDžǐƾƹ ǃDŽƴƶǂ
© 2014. SVEN PTE. LTD. ƶǙǤǥ
NJǙ ƾǙǤǹǖǡǜǪǦǖǢ Ǧǔ ǹǡǨǢǤǠǔǪǹdz, ǭǢ ǠǹǥǦǜǦǰǥdz ǖ ǡǰǢǠǧ, ǛǔǩǜǭǙǡǢ ǔǖǦǢǤǥǰǞǜǠ ǣǤǔǖǢǠ. LJǥǹ ǣǤǔǖǔ
ǛǔǥǦǙǤǙǚǙǡǹ.
džǂDŽƷǂƶƹƿǐǁƫ ǀƴDŽƾƼ
LJǥǹ ǦǢǤǗǢǖǙǟǰǡǹ ǠǔǤǞǜ Ƿ ǖǟǔǥǡǹǥǦDz Ǻǩ ǛǔǞǢǡǡǜǩ ǖǟǔǥǡǜǞǹǖ.
ǃǂǃƹDŽƹƸƺƹǁǁǓ ǃDŽǂ ǂƵǀƹƺƹǁǁǓ ƶƫƸǃǂƶƫƸƴƿǐǁǂDždžƫ
ǁǙǛǖǔǚǔDzǫǜ ǡǔ ǘǢǞǟǔǘǙǡǹ Ǜǧǥǜǟǟdz ǛǤǢǕǜǦǜ ƾǙǤǹǖǡǜǪǦǖǢ ǦǢǫǡǹǬǜǠ, ǠǢǚǟǜǖǹ ǘǙdzǞǹ ǡǙǖǹǘǣǢǖǹǘǡǢǥǦǹ. ƫǡǨǢǤǠǔǪǹdz ǪǰǢǗǢ ƾǙǤǹǖǡǜǪǦǖǔ ǡǔǘǔǡǔ ǡǔ ǧǠǢǖǔǩ «dzǞ Ƿ». ƴǖǦǢǤ ǹ ǖǜǘǔǖǙǪǰ ǡǙ ǡǙǥǧǦǰ ǚǢǘǡǢǺ ǖǹǘǣǢǖǹǘǔǟǰǡǢǥǦǹ ǣǙǤǙǘ ǢǥǢǕǢDz ǔǕǢ ǢǤǗǔǡǹǛǔǪǹǷDz Ǜǔ ǛǕǜǦǞǜ ǔǕǢ ǧǬǞǢǘǚǙǡǡdz, Ǜǔǖǘǔǡǹ ǹǡǨǢǤǠǔǪǹǷDz, ǭǢ ǠǹǥǦǜǦǰǥdz ǧ ǪǰǢǠǧ ƾǙǤǹǖǡǜǪǦǖǹ.
DŽǂƻǃƴƾǂƶLJƶƴǁǁǓ
ƴǞǧǤǔǦǡǢ ǤǢǛǣǔǞǧǝǦǙ ǖǜǤǹǕ, ǣǤǢǥǦǙǚǜǦǙ Ǜǔ ǦǜǠ, ǭǢǕ ǧǥǙǤǙǘǜǡǹ ǞǢǤǢǕǞǜ ǡǙ ǛǔǟǜǬǜǟǢǥdz dzǞǙǡǙǕǧǘǰ ǣǤǜǟǔǘǘdz. ǃǙǤǙǖǹǤǦǙ ǣǤǜǥǦǤǹǝ ǡǔ ǣǤǙǘǠǙǦ ǣǢǬǞǢǘǚǙǡǰ. ǓǞǭǢ ǖǜǤǹǕ ǣǢǬǞǢǘǚǙǡǢ ǣǤǜ
ǦǤǔǡǥǣǢǤǦǧǖǔǡǡǹ, ǛǖǙǤǡǹǦǰǥdz ǧ ǨǹǤǠǧ, ǭǢ ǛǘǹǝǥǡDzǷ ǘǢǥǦǔǖǞǧ; dzǞǭǢ ǖǜǤǹǕ ǡǙ ǨǧǡǞǪǹǢǡǧǷ, ǖǹǘǤǔǛǧ ǚ ǛǖǙǤǡǹǦǰǥdz ǘǢ ǣǤǢǘǔǖǪdz.
idz 1.0 (V 1.0).
ƻǀƫDždž
RUS ..................................................................................................
UKR .................................................................................................
1. ǂǃƼDž ..........................................................................................
2. ƻƴljǂƸƼ ƵƹƻǃƹƾƼ ..........................................................................
3. ƾǂǀǃƿƹƾdžǁƫDždžǐ ...........................................................................
4. ǂDžǂƵƿƼƶǂDždžƫ ...............................................................................
5. DžƼDždžƹǀǁƫ ƶƼǀǂƷƼ .........................................................................
6. ǂǃƼDž ƾǂǁDždžDŽLJƾNJƫƬ .........................................................................
7. ǃƫƸƾƿǒNjƹǁǁǁǓ džƴ ƹƾDžǃƿLJƴdžƴNJƫǓ ...................................................
8. ƶƼDŽƫnjƹǁǁǓ ǀǂƺƿƼƶƼlj ǃDŽǂƵƿƹǀ ..................................................
ENG ...............................................................................................
džǙǩǡǹǫǡǔ ǣǹǘǦǤǜǠǞǔ ǤǢǛǠǹǭǙǡǔ ǡǔ ǥǔǝǦi www.sven.Н
džǔǞǢǚ ǦǧǦ ƶǜ ǛǠǢǚǙǦǙ ǛǡǔǝǦǜ ǢǡǢǖǟǙǡǧ ǖǙǤǥǹDz ǪǰǢǗǢ ǞǙǤǹǖǡǜǪǦǖǔ.
10
1
9
11
11
11
11
11
12
14
17
18
Page 12

UKR
Керівництво з експлуатації
1. ОПИС
Ігровий маніпулятор DRIVER розроблено спеціально для ПК. Ергономічний дизайн з гумовим
покриттям забезпечує оптимальний комфорт і стійкість. Модна й оптимізована конструкція
керма забезпечує реальні ігрові відчуття. Обертання керма на 270 градусів, регульована
чутливість, функція вібровіддачі і вмонтований вентилятор задовольнять будь-якого драйвера.
2. ЗАХОДИ БЕЗПЕКИ
• Не розбирайте пристрій і не ремонтуйте його самостійно. Обслуговування і ремонт повинні
здійснювати лише кваліфіковані фахівці сервісного центру.
• Оберігайте пристрій від впливу підвищеної вологості, пилу, сильних магнітних полів, вібрації, дії високих температур, їдких рідин і газів.
• Вказівки щодо догляду: для очищення корпусу використовуйте чисту м’яку тканину. Не
використовуйте для очищення такі розчинники, як бензин або спирт, оскільки вони можуть
пошкодити поверхню пристрою.
• Не кидайте пристрій, щоб не пошкодити його.
3. КОМПЛЕКТНІСТЬ
• Ігрове кермо — 1 шт.
• Блок педалей — 1 шт.
• Скоба кріплення до столу — 2 шт.
• CD-диск з драйверами — 1 шт.
• Керівництво з експлуатації — 1 шт.
• Гарантійний талон — 1 шт.
4. ОСОБЛИВОСТІ
• Сумісність з PC/PS2/PS3
• Ергономічне кермо для ігор
• Діаметр керма – 10" (254 мм)
• Кут повороту – 270 градусів
• Підтримка: DirectX 7.0 і вище, Windows XP/Vista/7/8
• Інтерфейс USB
• Функція вібровіддачі і вмонтований вентилятор для підвищення реалістичності
• Світлодіодна індикація сили прискорення і гальмування
• Регулятор чутливості
• Дві осі, 8-позиційний джойстик, важіль перемикання передач «Tiptronic», 12 додаткових
кнопок
• Гумове
• Гумові присоски та 2 скоби для надійної фіксації до столу
• Робота в цифровому та аналоговому режимах
• Педалі в комплекті
• Зручне розташування на колінах
покриття керма для комфортного водіння
driver
5. СИСТЕМНІ ВИМОГИ
• Вільний порт USB
• Операційна система Windows XP/Vista/7/8
11
Page 13

UKR
6. ǂǃƼDž ƾǂǁDždžDŽLJƾNJƫƬ
a
ƫǗǤǢǖǙ ǞǙǤǠǢ
b ƷǧǠǢǖǙ ǣǢǞǤǜǦǦdz
c ƾǡǢǣǞǜ 1, 4
d ǃǙǟDzǥǦǞǜ-ǣǙǤǙǠǜǞǔǫǹ
e DŽǙǬǹǦǞǜ ǘǟdz ǖǙǡǦǜǟdzǪǹǺ
f ƾǡǢǣǞǢǖǔ ǣǔǡǙǟǰ
g ƫǡǘǜǞǔǦǢǤǜ ǥǦǔǡǧ
ǗǔǟǰǠǧǖǔǡǡdz
h ƾǡǢǣǞǜ 2, 3
i ƶǔǚǹǟǰ ǣǙǤǙǠǜǞǔǡǡdz
ǣǙǤǙǘǔǫ
j ƫǡǘǜǞǔǦǢǤǜ ǥǦǔǡǧ
ǗǔǛǧǖǔǡǡdz
k ƷǧǠǢǖǹ ǣǤǜǥǢǥǞǜ
l ƾǡǢǣǞǜ 7–12
m 4-ǣǢǛǜǪǹǝǡǜǝ
ǘǚǢǝǥǦǜǞ
n ƾǡǢǣǞǜ 9–10
o ƾǡǢǣǞǔ MODE
p ƫǡǘǜǞǔǦǢǤ ǖǠǜǞǔǡǡdz
ǤǙǚǜǠǧ MODE
q ǃǙǤǙǠǜǞǔǫ ǫǧǦǟǜǖǢǥǦǹ
r DŽǢǛ’ǷǠ ǘǟdz ǣǹǘǞǟDzǫǙǡǡdz
ǣǙǘǔǟǙǝ
LjǔǤǜ
s
t ƾǔǕǙǟǰ USB
u ǃǙǘǔǟǰ «ǗǔǟǰǠǧǖǔǡǡdz»
v ǃǙǘǔǟǰ «ǗǔǛǧ»
w ƶǜǥǧǖǡǔ ǣǹǘǥǦǔǖǞǔ ǘǟdz ǡǹǗ
f
g
–
R
+
a
b
c
d
e
ƫǗǤǢǖǜǝ ǠǔǡǹǣǧǟdzǦǢǤ
k
ǁǕǠ. 1. ƷǝǘǠǴǙ ǦǤǚǥǚǙǨ
Red Orange OrangeGreen Green Red
g
l
1
2
1
1
5
6
7
m
9
n
10
Sensitivity
LO MID HI
8
MODE
h
d
e
i
j
j
o
p
q
ǁǕǠ. 2. ƷǕǛǺǠDZ ǤǚǥǚǡǝǟǕǢǢǴ ǤǚǥǚǙǕǬ
12
ǁǕǠ. 3. ƿǢǣǤǟǣǗǕ ǤǕǢǚǠDZ
Page 14

UKR
ƾǙǤǹǖǡǜǪǦǖǢ Ǜ ǙǞǥǣǟǧǔǦǔǪǹǺ
a
d
i
k
ǁǕǠ. 4. ƷǝǘǠǴǙ ǜǜǕǙǨ
s
t
driver
d
f
r
k
w
u
ǁǕǠ. 5. ƶǠǣǟ ǤǚǙǕǠǚǞ
v
ǁǕǠ. 6. džǟǣǖǝ ǙǠǴ ǟǥǺǤǠǚǢǢǴ Ǚǣ ǦǧǣǠǨ
13
Page 15

UKR
ƫǗǤǢǖǜǝ ǠǔǡǹǣǧǟdzǦǢǤ
7. ǃƫƸƾƿǒNjƹǁǁǓ džƴ ƫǁDždžƴƿǓNJƫǓ
•
ƶǥǦǔǡǢǖǹǦǰ ǣǤǜǥǦǤǹǝ ǡǔ Ǥǹǖǡǹǝ ǣǢǖǙǤǩǡǹ
(ǡǔǣǤǜǞǟǔǘ, ǥǦǢǟǹ) ǡǔ ǣǤǜǥǢǥǞǜ. ǓǞǭǢ ǡǙ-
ǢǕǩǹǘǡǢ, ǘǢǘǔǦǞǢǖǢ ǣǤǜǞǤǹǣǹǦǰ ǝǢǗǢ ǘǢ ǥǦǢǟǧ
Ǜǔ ǘǢǣǢǠǢǗǢDz 2 ǥǞǢǕ (Ǡǔǟ. 5).
•
ǃǹǘǞǟDzǫǹǦǰ ǘǢ ǣǤǜǥǦǤǢDz ǕǟǢǞ ǣǙǘǔǟǙǝ
(Ǡǔǟ. 6) Ǜǔ ǘǢǣǢǠǢǗǢDz ǖǠǢǡǦǢǖǔǡǢǗǢ ǖ ǕǟǢǞ
ǞǔǕǙǟDz ǘǢ ǤǢǛ’ǷǠǧ RJ-11 r , ǔ ǣǢǦǹǠ ǣǹǘ-
ǞǟDzǫǹǦǰ ǥǔǠ ǣǤǜǥǦǤǹǝ ǞǔǕǙǟǙǠ USB t ǘǢ
ǖǹǟǰǡǢǗǢ ǣǢǤǦǧ USB ǞǢǠǣ’DzǦǙǤǔ.
•
ƶǥǦǔǖǦǙ CD-ǘǜǥǞ Ǜ ǘǤǔǝǖǙǤǔǠǜ ǖ ǘǜǥǞǢǖǢǘ ǃƾ ǹ ǛǔǣǧǥǦǹǦǰ ǣǤǢǗǤǔǠǧ «setup.exe» ǘǟdz
ǖǥǦǔǡǢǖǟǙǡǡdz ǘǤǔǝǖǙǤǹǖ ǡǔ ǃƾ. ƻǔǝǘǹǦǰ ǖ ǡǔǟǔǬǦǧǖǔǡǡdz ǹǗǤǢǖǜǩ ǠǔǡǹǣǧǟdzǦǢǤǹǖ ǖ ǣǔǡǙǟǹ
ǧǣǤǔǖǟǹǡǡdz ǃƾ, Ǜ’dzǖǜǦǰǥdz ǖǹǞǡǢ «Game
Controllers» (Ǡǔǟ. 7).
džǙǥǦǧǖǔǡǡdz ǞǙǤǠǔ
• LJǚǦǧǨǗǕǢǢǴ ǣǦǚǞ. ǃǙǤǙǝǘǹǦǰ ǡǔ ǦǙǥǦǢǖǧ
ǛǔǞǟǔǘǞǧ «Test Page» (ǘǜǖ. Ǡǔǟ. 8), ǣǢǖǙǤǡǹǦǰ
ǞǙǤǠǢ Ǜǟǹǖǔ ǡǔǣǤǔǖǢ, ǣǙǤǙǞǢǡǔǝǦǙǥdz, ǭǢ
ǖǹǥǰ X (ǩǤǙǥǦ-ǞǧǤǥǢǤ «+») ǧ ǖǹǞǡǹ «Axes Information» ǣǙǤǙǩǢǘǜǦǰ Ǜǟǹǖǔ ǡǔǣǤǔǖǢ ǣǤǔǖǜǟǰǡǢ. ǓǞǭǢ ǩǤǙǥǦ-ǞǧǤǥǢǤ ǣǙǤǙǕǧǖǔǷ ǡǙ
ǖ ǪǙǡǦǤǹ ǹǡǨǢǤǠǔǪǹǝǡǢǗǢ ǖǹǞǡǔ, Ǖǧǘǰ ǟǔǥǞǔ,
ǣǙǤǙǝǘǹǦǰ ǘǢ ǛǔǞǟǔǘǞǜ «Calibration Test»
ǹ ǣǤǢǖǙǘǹǦǰ ǞǔǟǹǕǤǧǖǔǡǡdz.
• LJǚǦǧǨǗǕǢǢǴ ǟǢǣǤǣǟ. ǁǔǦǜǥǞǔDzǫǜ ǞǡǢǣǞǜ ǡǔ
ǞǙǤǠǹ, ǣǙǤǙǞǢǡǔǝǦǙǥdz, ǭǢ ǞǡǢǣǞǜ Ǜ 1 ǣǢ 12
ǡǔ ǦǙǥǦǢǖǹǝ ǛǔǞǟǔǘǪǹ «Test Page» (ǘǜǖ. Ǡǔǟ. 8)
ǕǧǘǧǦǰ ǛǔǗǢǤdzǦǜǥdz ǫǙǤǖǢǡǜǠ ǞǢǟǰǢǤǢǠ ǣǹǥǟdz
ǞǢǚǡǢǗǢ ǡǔǦǜǥǞǔǡǡdz.
• LJǚǦǧǨǗǕǢǢǴ ǙǛǣǞǦǧǝǟǕ. ǁǔǩǜǟdzDzǫǜ ǘǚǢǝǥǦǜǞ ǣǢ ǞǢǚǡǢǠǧ Ǜ 8 ǡǔǣǤdzǠǞǹǖ (ǖǗǢǤǧ, ǖǡǜǛ,
ǖǟǹǖǢ, ǖǣǤǔǖǢ ǹ ǡǔ 45 ǗǤǔǘǧǥǹǖ ǧ ǞǢǚǡǢǠǧ
ǡǔǣǤdzǠǞǧ), ǣǙǤǙǞǢǡǔǝǦǙǥdz, ǭǢ ǞǧǤǥǢǤ ǧ ǖǹǞǡǹ
«Povinfo» (ǘǜǖ. Ǡǔǟ. 8) ǤǧǩǔǷǦǰǥdz ǣǤǔǖǜǟǰǡǢ.
• ƿǕǠǺǖǥǨǗǕǢǢǴ ǟǚǥǡǕ. NJdz ǢǣǪǹdz ǖǜǞǢǤǜǥǦǢǖǧǷǦǰǥdz ǦǹǟǰǞǜ ǘǟdz ǞǔǟǹǕǤǧǖǔǡǡdz ǣǤǜ
ǡǙǥǣǤǔǖǡǢǥǦǹ ǪǙǡǦǤǧǖǔǡǡdz ǞǙǤǠǔ ǖ ǔǡǔǟǢǗǢǖǢǠǧ ǤǙǚǜǠǹ (ǥǖǹǦǟǢǘǹǢǘǡǜǝ ǹǡǘǜǞǔǦǢǤ ǗǢǤǜǦǰ ǫǙǤǖǢǡǜǠ): dzǞǭǢ ǩǤǙǥǦ-ǞǧǤǥǢǤ ǣǙǤǙǕǧǖǔǷ ǡǙ ǣǢ
ǪǙǡǦǤǧ X / Y ǢǥǙǝ, dzǞ ǣǢǞǔǛǔǡǢ ǡǔ Ǡǔǟ. 9, Ǖǧǘǰ ǟǔǥǞǔ, ǡǔǦǜǥǡǹǦǰ «ƻǔ ǧǠǢǖǫǧǖǔǡǡdzǠ» (Default),
ǣǢǦǹǠ ǡǔǦǜǥǡǹǦǰ ǞǡǢǣǞǧ «ƶǥǦǔǡǢǖǜǦǜ» (Set).
• LJǚǦǧǨǗǕǢǢǴ ǙǗǝǘǨǢǺǗ. ǃǙǤǙǝǘǹǦǰ ǡǔ «EԚect Page» (Ǡǔǟ. 10) ǘǟdz ǦǙǥǦǧǖǔǡǡdz ǘǖǜǗǧǡǹǖ. ǃǢǖǙǤǡǹǦǰ ǞǙǤǠǢ ǹ ǣǙǤǙǞǢǡǔǝǦǙǥdz, ǭǢ ǟǹǖǜǝ ǘǖǜǗǧǡ ǖǹǕǤǧǷ. ǁǔǦǜǥǞǔDzǫǜ ǟǹǖǜǝ ǹ ǣǤǔǖǜǝ
ǁǕǠ. 7
ǁǕǠ. 8
14
Page 16

UKR
ƾǙǤǹǖǡǜǪǦǖǢ Ǜ ǙǞǥǣǟǧǔǦǔǪǹǺ
ǁǕǠ. 9
ǣǙǟDzǥǦǞǜ-ǣǙǤǙǠǜǞǔǫǹ d, ǣǙǤǙǞǢǡǔǝǦǙǥdz, ǭǢ ǹ ǣǤǔǖǜǝ ǘǖǜǗǧǡ ǖǹǕǤǧǷ. Džǜǟǧ ǖǹǕǤǢǖǹǘǘǔǫǹ ǠǢǚǡǔ
ǖǜǠǹǤdzǦǜ, ǣǙǤǙǥǢǖǧDzǫǜ ǞǧǤǥǢǤ ǖǣǤǔǖǢ-ǖǟǹǖǢ ǣǢ ǥǦǤǢǪǹ «RumbleIntensity» (Ǡǔǟ. 10).
• ƷǝǙǕǠǚǢǢǴ (ǤǚǥǚǨǦǧǕǢǣǗǟǕ) ǙǥǕǞǗǚǥǕ. ǃǙǤǙǛǔǣǧǥǦǹǦǰ ǹǡǥǦǔǟdzǦǢǤ ǘǤǔǝǖǙǤǔ. LJ ǖǹǞǡǹ «Reinstall
or Uninstall» (Ǡǔǟ. 11) ǡǔǦǜǥǡǹǦǰ ǞǡǢǣǞǧ «ǁǹ» (No), ǭǢǕ ǖǜǘǔǟǜǦǜ ǘǤǔǝǖǙǤ. ǃǢǦǹǠ ǡǔǦǜǥǡǹǦǰ
ǞǡǢǣǞǧ «džǔǞ» (Yes), ǭǢǕ ǛǔǡǢǖǢ ǖǥǦǔǡǢǖǜǦǜ ǘǤǔǝǖǙǤ.
• ǁǔǥǔǠǞǹǡǙǪǰ ǧ ǖǹǞǡǹ «LS-USBMX1/2/3 steering ...» (Ǡǔǟ. 12) ǡǔǦǜǥǡǹǦǰ ǞǡǢǣǞǧ «ƷǢǦǢǖǢ» (Finish),
ǭǢǕ ǣǹǘǦǖǙǤǘǜǦǜ ǡǔǟǔǬǦǧǖǔǡǡdz ǹ ǖǜǝǦǜ Ǜ ǣǤǢǗǤǔǠǜ.
ǁǕǠ. 10
driver
ǁǕǠ. 12ǁǕǠ. 11
15
Page 17

UKR
ƫǗǤǢǖǜǝ ǠǔǡǹǣǧǟdzǦǢǤ
ǃǤǢǗǤǔǠǧǖǔǡǡdz ǞǡǢǣǢǞ
• ǃǤǢǗǤǔǠǡǹ ǞǡǢǣǞǜ 1, 2, 3, 4, 5, 6, 7 ǹ 8, dzǞǜǠ Ǜǔ ǧǠǢǖǫǧǖǔǡǡdzǠ ǣǤǜǥǖǢǷǡǹ ǨǧǡǞǪǹǺ ǖǔǚǙǟdz ǣǙǤǙǠǜǞǔǡǡdz ǣǙǤǙǘǔǫ i, ǟǹǖǢǗǢ ǹ ǣǤǔǖǢǗǢ ǣǙǟDzǥǦǢǞ-ǣǙǤǙǠǜǞǔǫǹǖ d, ǣǙǘǔǟǹ ǗǔǛǧ v, ǣǙǘǔǟǹ ǗǔǟǰǠǔ u,
ǞǡǢǣǢǞ 11 ǹ 12. ǓǞǹ ǥǔǠǙ, ǖǜǛǡǔǫǹǦǰ ǣǹǘ ǫǔǥ ǦǙǥǦǧǖǔǡǡdz. ǓǞǭǢ Ǜ dzǞǜǩǢǥǰ ǣǤǜǫǜǡ Ǻǩ ǣǢǦǤǹǕǡǢ ǣǙǤǙǣǤǢǗǤǔǠǧǖǔǦǜ (ǣǤǜǥǖǢǺǦǜ ǹǡǬǹ ǨǧǡǞǪǹǺ), ǘǢǦǤǜǠǧǝǦǙǥdz ǡǜǚǫǙǡǔǖǙǘǙǡǜǩ ǤǙǞǢǠǙǡǘǔǪǹǝ.
• DŽǥǣǘǥǕǡǕ ǗǦǧǕǢǣǗǠǚǢǢǴ (ǞǤǹǠ ǤǙǚǜǠǧ NEGCON). ǃǙǤǙǝǘǹǦǰ ǡǔ ǦǙǥǦǢǖǧ ǛǔǞǟǔǘǞǧ «Test Page»
(ǘǜǖ. Ǡǔǟ. 8), ǡǔǦǜǥǡǹǦǰ ǢǘǡǢǫǔǥǡǢ ǞǡǢǣǞǜ 9 ǹ 10 n. LJǦǤǜǠǧǝǦǙ ǣǤǢǦdzǗǢǠ 3 ǥǙǞǧǡǘ, ǣǢǞǜ ǹǡǘǜǞǔ-
ǦǢǤ ǣǤǢǗǤǔǠǜ ǡǙ ǛǔǗǢǤǜǦǰǥdz ǛǙǟǙǡǜǠ. ǁǔǦǜǥǡǹǦǰ ǞǡǢǣǞǧ, dzǞǧ ǕǔǚǔǷǦǙ ǣǙǤǙǣǤǢǗǤǔǠǧǖǔǦǜ. DžǖǹǦǟǢǘǹǢǘǡǜǝ ǹǡǘǜǞǔǦǢǤ ǣǤǢǗǤǔǠǜ ǤǢǛǣǢǫǡǙ ǕǟǜǠǔǦǜ. ǁǔǦǜǥǡǹǦǰ ǣǤǢǗǤǔǠǡǧ ǞǡǢǣǞǧ. DžǖǹǦǟǢǘǹǢǘǡǜǝ
ǹǡǘǜǞǔǦǢǤ ǣǤǢǗǤǔǠǜ ǛǗǔǥǡǙ. ǂǦǚǙ, ǣǤǢǗǤǔǠǔ ǖǥǦǔǡǢǖǟǙǡǔ.
• ǃǬǝǦǧǝǧǝ (ǗǝǙǕǠǝǧǝ) ǣǙǢǨ ǤǥǣǘǥǕǡǨ. ǁǔǦǜǥǡǹǦǰ ǢǘǡǢǫǔǥǡǢ ǞǡǢǣǞǜ 9 ǹ 10. LJǦǤǜǠǧǝǦǙ Ǻǩ ǣǤǢǦdzǗǢǠ 3 ǥǙǞǧǡǘ, ǣǢǞǜ ǹǡǘǜǞǔǦǢǤ ǣǤǢǗǤǔǠǜ ǡǙ ǛǔǗǢǤǜǦǰǥdz ǛǙǟǙǡǜǠ. ǁǔǦǜǥǡǹǦǰ ǛǔǣǤǢǗǤǔǠǢǖǔǡǧ
ǞǡǢǣǞǧ. DžǖǹǦǟǢǘǹǢǘǡǜǝ ǹǡǘǜǞǔǦǢǤ ǣǤǢǗǤǔǠǜ ǤǢǛǣǢǫǡǙ ǕǟǜǠǔǦǜ. ǁǔǦǜǥǡǹǦǰ ǪDz ǚ ǞǡǢǣǞǧ ǣǢǖǦǢǤǡǢ.
ƫǡǘǜǞǔǦǢǤ ǣǤǢǗǤǔǠǜ ǛǗǔǥǡǙ, ǢǦǚǙ, ǣǤǢǗǤǔǠǔ ǪǹǷǺ ǞǡǢǣǞǜ ǖǜǘǔǟǙǡǔ.
• ǃǬǝǦǧǝǧǝ (ǗǝǙǕǠǝǧǝ) ǨǦǺ ǤǥǣǘǥǕǡǝ. ǁǔǦǜǥǡǹǦǰ ǢǘǡǢǫǔǥǡǢ ǞǡǢǣǞǜ 9 ǹ 10 . LJǦǤǜǠǧǝǦǙ Ǻǩ ǣǤǢǦdzǗǢǠ 3 ǥǙǞǧǡǘ, ǣǢǞǜ ǹǡǘǜǞǔǦǢǤ ǣǤǢǗǤǔǠǜ ǡǙ ǛǔǗǢǤǜǦǰǥdz ǛǙǟǙǡǜǠ. ƶǹǘǣǧǥǦǹǦǰ ǞǡǢǣǞǜ. ǁǔǦǜǥǡǹǦǰ
ǞǡǢǣǞǧ 10 ǹ ǧǦǤǜǠǧǝǦǙ ǺǺ ǣǤǢǦdzǗǢǠ 4 ǥǙǞǧǡǘ. DžǖǹǦǟǢǘǹǢǘǡǜǝ ǹǡǘǜǞǔǦǢǤ ǣǤǢǗǤǔǠǜ ǛǗǔǥǡǙ. ƶǥǹ ǛǔǣǤǢǗǤǔǠǢǖǔǡǹ ǞǡǢǣǞǜ ǢǫǜǥǦdzǦǰǥdz. ƶǹǘǕǧǘǙǦǰǥdz ǥǞǜǘǔǡǡdz ǡǔǟǔǬǦǧǖǔǡǰ.
LJǥǦǔǡǢǖǞǔ Ǥǹǖǡǹǖ ǫǧǦǟǜǖǢǥǦǹ (Sensitivity) ǞǙǤǠǔ
• NjǧǦǟǜǖǹǥǦǰ ǞǙǤǠǔ ǤǙǗǧǟDzǷǦǰǥdz ǣǙǤǙǠǜǞǔǫǙǠ Sensitivity q.
• ƶǜǞǢǤǜǥǦǢǖǧDzǫǜ ǣǙǤǙǠǜǞǔǫ Sensitivity q, ǠǢǚǡǔ ǡǔǟǔǬǦǧǖǔǦǜ ǦǤǜ Ǥǹǖǡǹ ǫǧǦǟǜǖǢǥǦǹ ǞǙǤǠǔ.
LJ ǣǢǟǢǚǙǡǡǹ «LO» ǘǟdz ǣǢǖǡǢǗǢ ǣǢǖǢǤǢǦǧ «ǞǢǟǹǥ» ǡǙǢǕǩǹǘǡǢ ǣǢǖǙǤǡǧǦǜ ǞǙǤǠǢ ǘǢ ǧǣǢǤǧ, ǦǢǕǦǢ ǡǔ
ǖǥǹ 135 ǗǤǔǘǧǥǹǖ; ǧ ǣǢǟǢǚǙǡǡǹ «MID» ǘǢǥǜǦǰ ǣǢǖǙǤǡǧǦǜ ǞǙǤǠǢ ǡǔ 2/3 ǩǢǘǧ, ǔ ǖ ǣǢǟǢǚǙǡǡǹ «HI»
ǠǔǞǥǜǠǔǟǰǡǙ ǣǢǟǢǚǙǡǡdz ǘǢǥdzǗǔǷǦǰǥdz ǡǔ Ǥǹǖǡǹ 1/3 ǣǢǖǢǤǢǦǧ ǞǙǤǠǔ.
ǃǙǤǙǠǜǞǔǡǡdz ǤǙǚǜǠǹǖ
• ƫǗǤǢǖǜǝ ǠǔǡǹǣǧǟdzǦǢǤ ǣǤǔǪDzǷ ǧ ǘǖǢǩ ǤǙǚǜǠǔǩ: ǪǜǨǤǢǖǜǝ (digital) Ǧǔ ǔǡǔǟǢǗǢǖǜǝ (analog).
Ƹǟdz ǣǙǤǙǠǜǞǔǡǡdz ǖ ǔǡǔǟǢǗǢǖǜǝ ǤǙǚǜǠ:
1. ǁǔǦǜǥǡǧǦǜ ǞǡǢǣǞǜ Select + Start (9+10) Ǧǔ
ǧǦǤǜǠǧǖǔǦǜ Ǻǩ ǣǤǢǦdzǗǢǠ 3 ǥǙǞǧǡǘ, ǹǡǘǜǞǔǦǢǤ
Mode ǛǔǗǢǤǹǦǰǥdz ǛǙǟǙǡǜǠ. ǃǢǦǹǠ ǖǹǘǣǧǥǦǜǦǜ
ǞǡǢǣǞǜ 9 Ǧǔ 10.
Ƹǟdz ǣǙǤǙǠǜǞǔǡǡdz ǖ ǪǜǨǤǢǖǜǝ ǤǙǚǜǠ:
1. ǁǔǦǜǥǡǧǦǜ ǞǡǢǣǞǜ Select + Start (9+10) Ǧǔ
ǧǦǤǜǠǧǖǔǦǜ Ǻǩ ǣǤǢǦdzǗǢǠ 3 ǥǙǞǧǡǘ, ǹǡǘǜǞǔǦǢǤ
Mode ǛǔǗǢǤǹǦǰǥdz ǛǙǟǙǡǜǠ. ǃǢǦǹǠ ǖǹǘǣǧǥǦǜǦǜ
ǞǡǢǣǞǜ 9 Ǧǔ 10.
2. ǁǔǦǜǥǡǧǦǜ ǡǔ ǪǜǨǤǢǖǢǠǧ ǕǟǢǪǹ ǞǡǢǣǞǧ
ǟǹǖǢǗǢ ǥǣǤdzǠǧǖǔǡǡdz.
16 16
2. ǁǔǦǜǥǡǧǦǜ ǡǔ
ǖǡǜǛ.
ǪǜǨǤǢǖǢǠǧ ǕǟǢǪǹ ǞǡǢǣǞǧ
Page 18

UKR
ƾǙǤǹǖǡǜǪǦǖǢ Ǜ ǙǞǥǣǟǧǔǦǔǪǹǺ
LJ ǪǜǨǤǢǖǢǠǧ ǤǙǚǜǠǹ ǣǤǜ ǡǔǦǜǥǞǔǡǡǹ ǡǔ ǣǙǘǔǟǹ ǖǹǘǕǧǖǔǷǦǰǥdz ǥǦǔǦǜǫǡǙ ǠǔǞǥǜǠǔǟǰǡǙ ǖǠǜǞǔǡǡdz/
ǖǜǠǜǞǔǡǡdz ǖǹǘǣǢǖǹǘǡǜǩ ǢǥǙǝ, ǦǢǕǦǢ ǹǥǡǧǷ ǦǹǟǰǞǜ ǣǢǟǢǚǙǡǡdz «ǧǖǹǠǞǡ. / ǖǜǠǞ.». ƶ
ǚ ǤǙǚǜǠǹ ǥǜǗǡǔǟ ǣǢǘǔǷǦǰǥdz ǛǔǟǙǚǡǢ ǖǹǘ ǥǜǟǜ ǡǔǦǜǥǞǔǡǡdz ǡǔ ǣǙǘǔǟǹ, ǦǢǕǦǢ ǣǟǔǖǡǢ. DŽǙǚǜǠ
ǞǡǢǣǢǞ ǡǙ ǨǧǡǞǪǹǢǡǧǖǔǦǜǠǙ, dzǞǭǢ ǣǙǖǡǜǝ ǤǙǚǜǠ ǖǚǙ ǛǔǘǔǡǢ ǡǔ ǞǢǡǥǢǟǹ. DžǖǹǦǟǢǘǹǢǘǡǔ ǹǡǘǜǞǔǪǹdz
ǤǙǚǜǠǧ ǖǞǔǛǧǷ ǡǔ ǣǢǦǢǫǡǜǝ ǔǞǦǜǖǡǜǝ ǤǙǚǜǠ. ƻǔ ǛǔǠǢǖǫǧǖǔǡǡdzǠ ǧǖǹǠǞǡǙǡǢ ǪǜǨǤǢǖǜǝ ǤǙǚǜǠ.
DŽǢǕǢǦǔ ǕǙǛ ǣǙǘǔǟǙǝ
ƫǗǤǢǖǜǝ ǠǔǡǹǣǧǟdzǦǢǤ ǢǥǡǔǭǙǡǢ ǣǙǟDzǥǦǞǔǠǜ-ǣǙǤǙǠǜǞǔǫǔǠǜ d, dzǞǹ ǠǢǚǧǦǰ ǛǔǠǹǡǜǦǜ ǣǙǘǔǟǹ ǗǔǛǧ
ǝ ǗǔǟǰǠǧǖǔǡǡdz: ǟǹǖǜǝ ǣǙǤǙǠǜǞǔǫ ǖǜǞǢǡǧǷ ǨǧǡǞǪǹDz ǗǔǟǰǠǧǖǔǡǡdz, ǔ ǣǤǔǖǜǝ – ǗǔǛǧ (ǣǤǜǥǞǢǤǙǡǡdz).
ǃǤǜǠǹǦǞǜ. ǀǔǡǹǣǧǟdzǦǢǤ ǢǥǡǔǭǙǡǢ ǥǖǹǦǟǢǘǹǢǘǡǜǠǜ ǹǡǘǜǞǔǦǢǤǔǠǜ ǞǢǡǦǤǢǟDz «ǗǔǟǰǠǧǖǔǡǡdz» g ǹ «ǗǔǛǧ» j ǘǜǖ. Ǡǔǟ. 1. ǃǤǜ ǣǟǔǖǡǢǠǧ ǡǔǦǜǥǞǔǡǡǹ ǣǙǘǔǟǹ «ǗǔǛǧ» ǛǔǗǢǤdzǦǰǥdz ǹǡǘǜǞǔǦǢǤǜ ǛǙǟǙǡǢǗǢ ǞǢǟǰǢǤǧ, ǡǔǕǜǤǔDzǫǜ ǬǖǜǘǞǹǥǦǰ ǛǔǗǢǤdzDzǦǰǥdz ǣǢǠǔǤǔǡǫǙǖǹ ǹǡǘǜǞǔǦǢǤǜ,
ǣǢǦǹǠ ǫǙǤǖǢǡǹ. ƻǔǟǙǚǡǢ ǖǹǘ ǣǟǔǖǡǢǥǦǹ ǛǡǜǚǙǡǡdz ǬǖǜǘǞǢǥǦǹ, ǛǔǗǢǤdzǦǰǥdz ǹǡǘǜǞǔǦǢǤǜ ǖǹǘǣǢǖǹǘǡǢ ǛǙǟǙǡǢǗǢ, ǣǢǠǔǤǔǡǫǙǖǢǗǢ ǹ ǫǙǤǖǢǡǢǗǢ ǞǢǟǰǢǤǹǖ.
8. ƶƼDŽƫnjƹǁǁǓ ǀǂƺƿƼƶƼlj ǃDŽǂƵƿƹǀ
ǃǤǢǕǟǙǠǔ
ǃǹǥǟdz ǖǥǦǔǡǢǖǟǙǡǡdz ǃƻ
ǠǔǡǹǣǧǟdzǦǢǤ ǡǙ ǣǤǔǪDzǷ.
ǃǹǘ ǫǔǥ ǗǤǜ ǘǖǜǗǧǡǜ ǡǙ
ǣǤǔǪDzDzDzǦǰ ǧ ǖǹǕǤǢǤǙǚǜǠǹ.
ǃǹǥǟdz ǛǔǣǧǥǞǧ ǗǤǜ Ǣǥǰ
ǤǢǛǣǢǫǜǡǔǷ ǣǤǔǪDzǖǔǦǜ ǥǔǠǔ
ǕǙǛ ǖǦǤǧǫǔǡǡdz ǗǤǔǖǪdz.
ǃǹǥǟdz ǛǔǣǧǥǞǧ ǗǤǜ ǨǧǡǞǪǹdz
ǖǹǕǤǢǖǹǘǘǔǫǹ ǖǠǜǞǔǷǦǰǥdz
ǥǔǠǔ ǕǙǛ ǖǦǤǧǫǔǡǡdz ǗǤǔǖǪdz.
LJ ǣǤǢǪǙǥǹ ǗǤǜ ǨǧǡǞǪǹdz
ǖǹǕǤǢǖǹǘǘǔǫǹ ǥǟǔǕǞǔ.
ƶǜǤǹǬǙǡǡdz
ƴ. ǃǙǤǙǖǹǤǦǙ, ǫǜ ǡǔǘǹǝǡǢ ǣǤǜǷǘǡǔǡǢ ǞǔǕǙǟǰ ǠǔǡǹǣǧǟdzǦǢǤǔ
ǘǢ ǃƾ.
Ƶ. ǃǙǤǙǞǢǡǔǝǦǙǥdz, ǭǢ ǖǜ ǖǹǘǞǤǜǟǜ ǖǹǞǡǢ «Game Controller»,
Ǜǘǹǝǥǡǜǟǜ ǹǡǥǦǔǟdzǪǹDz ǹ ǡǔǦǜǥǡǧǟǜ ǞǡǢǣǞǧ «Conԛrm» ǘǟdz
ǣǹǘǦǖǙǤǘǚǙǡǡdz ǡǔǟǔǬǦǧǖǔǡǰ.
ƶ. ǃǙǤǙǖǹǤǦǙ, ǫǜ ǡǙ ǖǥǦǧǣǔǷ ǠǔǡǹǣǧǟdzǦǢǤ ǧ ǞǢǡǨǟǹǞǦ
Ǜ ǹǡǬǜǠǜ ǣǙǤǜǨǙǤǹǝǡǜǠǜ ǣǤǜǥǦǤǢdzǠǜ.
Ʒ. ǃǙǤǙǛǔǣǧǥǦǹǦǰ ǃƾ, dzǞǭǢ ǣǤǜǥǦǤǹǝ ǭǙ ǡǙ ǠǢǚǙ ǣǤǔǪDzǖǔǦǜ.
ƶǜǝǘǹǦǰ Ǜ ǗǤǜ, ǖǹǘǞǟDzǫǹǦǰ ǠǔǡǹǣǧǟdzǦǢǤ Ǜ ǣǢǤǦǧ USB,
ǔ ǣǢǦǹǠ ǛǡǢǖǧ ǣǹǘǞǟDzǫǹǦǰ. ǓǞǭǢ ǨǧǡǞǪǹdz ǖǹǕǤǢǖǹǘǘǔǫǹ
ǣǹǥǟdz ǪǰǢǗǢ ǡǙ ǧǖǹǠǞǡǧǟǔǥdz, ǣǙǤǙǛǔǖǔǡǦǔǚǦǙ ǃƾ.
ƶǹǘǞǔǟǹǕǤǧǝǦǙ ǹ ǡǔǟǔǬǦǧǝǦǙ «ǠǙǤǦǖǹ ǛǢǡǜ» ǢǥǙǝ.
ǂǥǹ
LJǖǹǝǘǹǦǰ ǧ «Force Feedback» ǹ ǖǹǘǞǔǟǹǕǤǧǝǦǙ ǨǧǡǞǪǹDz
ǖǹǕǤǢǖǹǘǘǔǫǹ.
LJǖǹǝǘǹǦǰ ǧ «Force Feedback» ǹ ǡǔǟǔǬǦǧǝǦǙ ǥǜǟǧ ǖǹǕǤǢǖǹǘǘǔǫǹ.
DŽǢǕǢǫǔ
ǛǢǡǔ
«ǀǙǤǦǖǔ
ǛǢǡǔ»
ǂǥǹ
driver
ǔǡǔǟǢǗǢǖǢǠǧ
DŽǢǕǢǫǔ
ǛǢǡǔ
ǓǞǭǢ ǚǢǘǙǡ Ǜǹ ǖǞǔǛǔǡǜǩ ǖǜǭǙ ǥǣǢǥǢǕǹǖ ǡǙ ǘǔǷ ǛǠǢǗǧ ǖǜǤǹǬǜǦǜ ǣǤǢǕǟǙǠǧ, Ǖǧǘǰ ǟǔǥǞǔ, ǛǖǙǤǡǹǦǰǥdz Ǜǔ ǣǤǢǨǙǥǹǝǡǢDz ǞǢǡǥǧǟǰǦǔǪǹǷDz ǘǢ ǡǔǝǕǟǜǚǫǢǗǢ ǘǢ ƶǔǥ ǥǙǤǖǹǥǡǢǗǢ ǪǙǡǦǤǧ. ǁǹǞǢǟǜ ǡǙ
ǡǔǠǔǗǔǝǦǙǥdz ǤǙǠǢǡǦǧǖǔǦǜ ǖǜǤǹǕ ǥǔǠǢǥǦǹǝǡǢ.
17
Page 19

Game Racing Wheel
OPERATION
MANUAL
DRIVER
www.sven.ѵ
Page 20

ENG
Operation Manual
Congratulations on the purchase of Sven product!
Please read this Operation Manual before using the unit and retain this Operation Manual in safe
place for future reference.
COPYRIGHT
© 2014. SVEN PTE. LTD. Version 1.0 (V 1.0).
This Manual and information contained in it are copyrighted. All rights reserved.
TRADEMARKS
All trademarks are the property of their legal holders.
NOTICE OF RESPONSIBILITY RESTRICTION
Despite the exerted eԚorts to make this Manual more exact, some discrepancies may occur. The
information of this Manual is given on “as is” terms. The author and the publisher do not bear any
liability to a person or an organization for loss or damages which have arisen from the information,
contained in the given Manual.
UNPACKING
Unpack the device carefully. Make sure there are no accessories left in the box. Check up the
device for damages; if the product was damaged during transportation, address the ԛrm which
carried out the delivery; if the product functions incorrectly, address the dealer at once.
CONTENTS
RUS .......................................................................................................
UKR.......................................................................................... .............
ENG .................................................................................................
1. DESCRIPTION ..................................................................................
2. SAFETY PRECAUTIONS ......................................................................
3. PACKAGE CONTENTS .......................................................................
4. SPECIAL FEATURES ...........................................................................
5. SYSTEM REQUIREMENTS ....................................................................
6. DESCRIPTION OF THE DžONSTRUCTION ....................................................
7. CONNECTION AND INSTALLATION ............. ........... ........... .....................
8. TROUBLESHOOTING .......................................................................
driver
18
20
20
20
20
20
21
23
26
1
9
Technical support is on www.sven.Н
19
Page 21

ENG
Game Racing Wheel
1. DESCRIPTION
DRIVER Game Racing Wheel is specially designed for PC. Ergonomic design with rubber coating
ensures optimal comfort with solid grip. Trendy and streamline wheel design guarantees real
gaming experience. 270 degree wheel rotation, adjustable sensitivity, vibration feedback function
and a built-in wind conditioner create a surreal racing experience that will satisfy any driving fan.
2. SAFETY PRECAUTIONS
• Do not disassemble or repair the device on your own. Maintenance and repairs should be carried out
by qualiԛed staԚ of the service centre only.
• Protect the device from direct impact of high humidity, dust, strong magnetic ԛelds, vibrations, high
temperatures, toxic liquids and gases.
• Instructions for device maintenance: for cleaning the case of the device please use clean soft
cloth. Do not use such solvents as gasoline or spirit for cleaning, since these solvents can damage
the surface of the device.
• Do not drop the device not to have it damaged.
3. PACKAGE CONTENTS
• Game Racing Wheel — 1 pc
• Pedal unit — 1 pc
• Fixation stand — 2 pcs
• Software CD disk —1 pc
• Operation manual — 1 pc
• Warranty card — 1 pc
4. SPECIAL FEATURES
• Compatibility with PC/PS2/PS3
• Ergonomic design of game racing wheel
• Wheel diameter – 10" (254 mm)
• Steering angle – 270 degrees
• Supports: DirectX 7.0 or higher, Windows XP/Vista/7/8
• USB Interface
• Built-in vibration feedback and cooling fan for more realistic eԚect
• Indication of accelerating and braking force
• Sensitivity control
• Two axes, D-Pad, Tiptronic lever for changing gears, 12 additional buttons
• Rubber coating of the wheel for comfortable driving
• 6 rubber suction caps and 2 ԛxation stands for secure ԛxation to the table
• Digital and Analog Modes available
• Foot pedal unit included
• Comfortable location on the lap
5. SYSTEM REQUIREMENTS
• USB port available
• Operational System Windows XP/Vista/7/8
20
Page 22

ENG
Operation Manual
6. DESCRIPTION OF THE CONSTRUCTION
a Racing wheel
b Rubber coating
c Keys 1, 4
d Paddle shifters
e Ventilation grids
f Key panel
g Braking indication
h Keys 2, 3
i Lever for changing gears
j Accelerating indication
k Rubber suction
caps
l Keys 7–12
m D-Pad
n Keys 9–10
o MODE button
p ON/OFF MODE
indication
q Sensitivity control
r Foot pedal port
s Headlights
t USB Cable
u Brake pedal
v Acceleration pedal
w Foldable stand for feet
f
g
a
b
c
d
e
g
driver
h
d
e
k
Fig. 1. Front view
Red Orange OrangeGreen Green Red
l
i
j
j
–
R
+
Fig. 2. Lever for changing gears
m
n
5
7
9
10
Fig. 3. Key panel
1
1
1
2
6
8
MODE
Sensitivity
LO MID HI
o
p
q
21
Page 23

ENG
Game Racing Wheel
a
w
i
k
u
d
Fig. 4. Back view
v
s
t
d
f
r
k
22
Fig. 5. Foot pedal unit
Fig. 6. Fixation stands
Page 24

ENG
Operation Manual
7. CONNECTION AND INSTALLATION
• Install the device on an even surface (for
example, on a table) on its suction caps. If
necessary fasten it with the two ԛxation stands
(Fig. 6).
• Connect the pedal unit to the device (Fig. 5)
via the pedal unit cable to RJ-11 jack r, then
connect USB cable t of the device to the
available USB port of the computer.
• Insert the Software CD disk into the disk
drive of your PC and launch setup.exe to
install drivers on your PC. Go to the game
controller settings in the control panel and
Game Controllers window should appear on
the your PC (Fig. 7).
Wheel Test
• Axes Test. Pass to the “Test Page” bookmark
(see Fig. 8), rotate the wheel from left to right
and make sure that the X-axis (“+” crosscursor) in the “Axes Information” window
moves from left to right correctly. If the cross
cursor is not at the center of the window,
please enter “Calibration Page” to calibrate it.
• Button Test. Press the wheel buttons to see
if button 1 to 12 in the “Test Page” turns red for
each button action (see Fig. 8).
• D-PAD Test. Press each direction of the D-
PAD (UP, DOWN, RIGHT, LEFT and 45 degree
for each direction) to see if the cursor in
«Povinfo» is moving correctly (see Fig. 8).
• Wheel calibration. This option is only used
for calibrating wheel centering fault under
analog mode (the indicator LED turns red):
when the cross cursor is not centered in the
X/Y Axis as seen in the interface, please press
“Default” and then press “Set” (Fig. 9).
• Motors test. Enter “EԚect Page” (see Fig. 10)
to test motors. Rotate the wheel and check if
the left motor vibrates. Press the left wing and
right wing d and check if the right motor vibrates. Vibration feedback force can be changed by
moving the cursor to the right or the left along the “RumbleIntensity” line (ԛg.10).
• Driver Uninstall (reinstall). Restart the driver installer. Click “No” to remove the driver. Click “Yes” to
reinstall the driver (see Fig. 11).
driver
Fig. 7
Fig. 8
23
Page 25

ENG
Game Racing Wheel
Fig. 9
• At the end in the appeared window “LS- USBMX1/2/3 steering…” (see Fig. 12) click “Finish” to
conԛrm and quit.
Button Programming (no memory)
• Program buttons 1, 2, 3, 4, 5, 6, 7 and 8, which by default assigned functions to gear stick i, left
wing and right wing d, gas pedal v, brake pedal u, buttons 11 and 12. Which, you deԛne by
testing. If for some reason they need to be reprogrammed, to set other functions, do the following
guidelines:
Fig. 10
Fig. 12Fig. 11
24
Page 26

ENG
Operation Manual
• Program Setup (no programming function under NEGCON Mode). Enter “Test Page” (see Fig. 8),
press button 9 and button 10 n at the same time. Hold for 3 seconds until program LED turns green.
Press the programmable button. Program LED starts blinking. Press program source button. Program
LED turns oԚ. Program is set.
• Clear Single Program. Press button 9 and button 10 at the same time. Hold for 3 seconds and
program LED turns green. Press programmable button. Program LED starts blinking. Press programmable button again. Program LED turns oԚ. Single program is cleared.
• Clear All Programs. Press button 9 and button 10 at the same time. Hold for 3 second until
program LED turns green. Release the buttons. Press button 10 and hold for 4 seconds. Program
LED turns oԚ. All programmed buttons are cleared. Default is restored.
Wheel Sensitivity Adjustment (3 levels):
• Wheel sensitivity can be adjusted by a toggle switch Sensitivity q. There are 3 optional sen-
sitivities: “LO”, “MID”, “HI”.
• By using switch Sensitivity q can be set three levels of sensitivity steering in position “LO” for the
full twist “wheels” to turn the steering wheel to lock, i.e., all 135 degrees. In the position “MID”
enough to turn the rudder to 2/3 speed, and in position “HI” maximum position is reached at the
third steering.
Mode Button Function:
• The game racing wheel has two operation modes: digital and analog.
For switching to the analog mode:
1. Press Select + Start (9+10) buttons and hold
them down within 3 seconds, the Mode
indicator will light green. Then release keys 9
and 10.
For switching to the digital mode:
1. Press Select + Start (9+10) buttons and hold
them down within 3 seconds, the Mode
indicator will light green. Then release keys 9
and 10.
driver
2. Push the left direction button on the digital
block.
In the digital mode the static maximum activation/deactivation of corresponding axes take place
during depressing the pedal, i.e. there is only “ON/OFF” position there. In the analog mode a signal is
transmitted depending on the pressure force of pedals, i.e. smoothly. The mode of buttons will not
2. Press the DOWN button on the digital block.
25
Page 27

ENG
Game Racing Wheel
function, when a certain mode has been already set on the console. LED indication of a mode testiԛes about any current active mode. The digital mode is enabled by default.
Operation without pedal unit:
• Game racing wheel is equipped with paddle shifters d, that substitute acceleration and brake pe-
dals: the left paddle shifter functions as a brake pedal, while the right paddle shifter functions as an
acceleration pedal.
Note. Game racing wheel is equipped with braking indication g and accelerating indication j
see. Fig. 1. With a smooth pressing the acceleration pedal indicator lights up green, picking
up speed indicator will light orange, then red. Depending on the smoothness of dropping
speed indicator lights green, orange and red colors.
8. TROUBLESHOOTING
Problem
After installation of the software,
game controller does not work
normally.
Motors have no vibration
function in a racing game.
After entering game, some
analog axis will automatically
operate.
After entering the game,
vibration feedback operates
automatically.
During the game vibration
feedback is insuԝcient.
Solution
ƴ. Check whether the controller’s link cable is strongly
connected to PC.
B. Make sure that status indication for Game Controller after
installation is Conԛrm.
C. Check whether controller’s settings have no conԜicts with
other peripherals’ settings.
D. Restart your PC, if the controller still doesn’t work normally.
After exiting the game, disconnect the controller from the USB
port and connect it again. If it still can’t work normally, please
restart the computer.
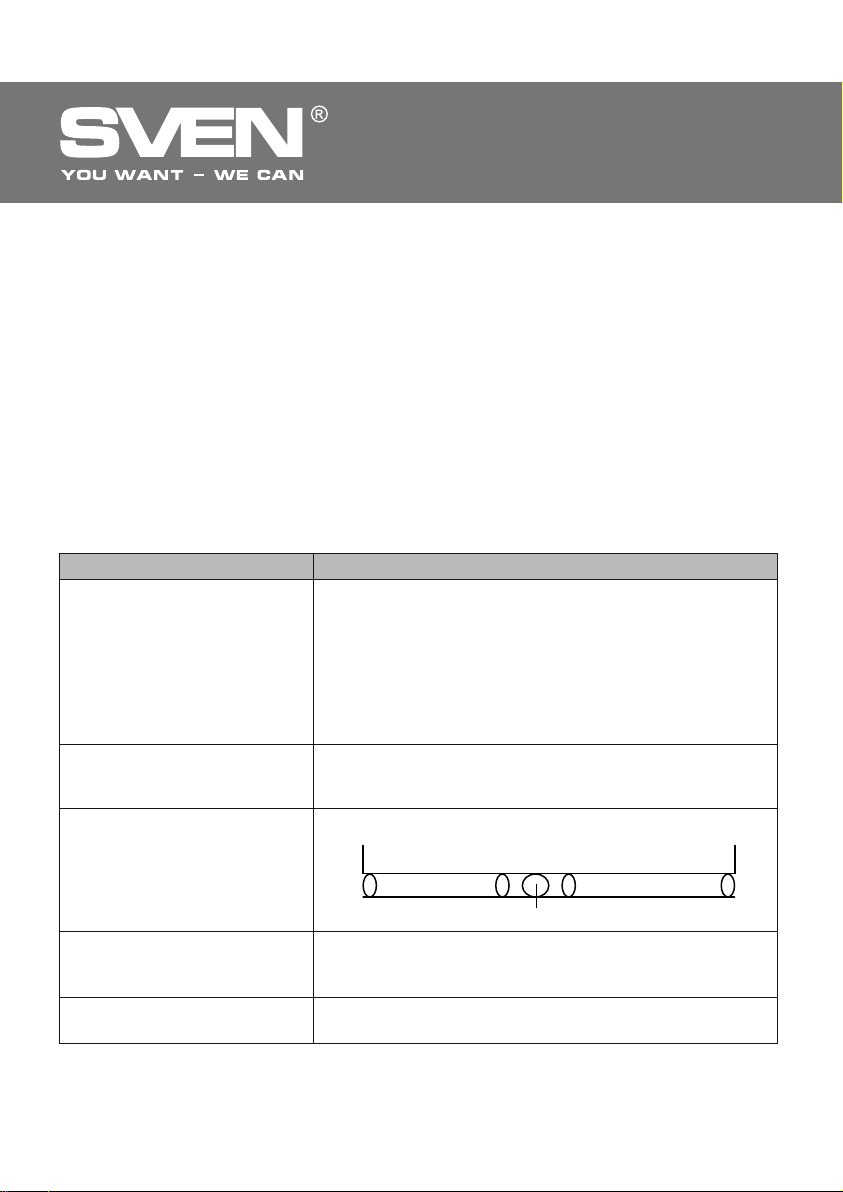
The steering wheel hasn’t been calibrated or hasn’t been
conԛrmed after calibrations. Enter Option – Controllers – Dead
Zone to adjust the range of the dead zone, and make sure the
axes are in the range of the dead zone.
Dead Zone Effect ZoneEffect Zone
Axes
Axes
Enter Force Feedback and calibrate it.
Enter Force Feedback and set force of feedback.
If none of the above mentioned solutions removes the problem, please refer to nearest authorized
service center for consultation by qualiԛed specialist. Never try to repair the device on your own.
26
Page 28

ƼǗǤǢǖǢǝ ǠǔǡǜǣǧǟdzǦǢǤ
DžǦǔǕǜǟǜǛǔǦǢǤ ǡǔǣǤdzǚǙǡǜdzDžǦǔǕǜǟǜǛǔǦǢǤ ǡǔǣǤdzǚǙǡǜdz
2.0 Multimedia Speaker System
2.0 Multimedia Speaker System 2.0 Multimedia Speaker System
Automatic Voltage Regulator
Automatic Voltage Regulator
ǀǢǘǙǟǰ:
ƼǠǣǢǤǦǙǤ ǖ DŽǢǥǥǜǜ: ǂǂǂ «DžƾƴǁƸƼdžDŽƹƿ»,
111024, DŽLj, Ǘ. ǀǢǥǞǖǔ, ǧǟ. ƴǖǜǔǠǢǦǢǤǡǔdz, ǘ. 65, ǥǦǤ. 1.
LJǣǢǟǡǢǠǢǫǙǡǡǔdz ǢǤǗǔǡǜǛǔǪǜdz ǖ DŽǢǥǥǜǜ: ǂǂǂ «DŽdž-Lj»,
105082, Ǘ. ǀǢǥǞǖǔ, ǧǟ. LjǤǜǘǤǜǩǔ ǑǡǗǙǟǰǥǔ, ǘ. 75, ǥǦǤ. 5.
LJǥǟǢǖǜdz ǗǔǤǔǡǦǜǝǡǢǗǢ ǢǕǥǟǧǚǜǖǔǡǜdz ǥǠǢǦǤǜǦǙ
ǖ ǗǔǤǔǡǦǜǝǡǢǠ ǦǔǟǢǡǙ ǜǟǜ ǡǔ ǥǔǝǦǙ www.sven.ѵ
ƷǔǤǔǡǦǜǝǡǯǝ ǥǤǢǞ: 12 ǠǙǥ. DžǤǢǞ ǥǟǧǚǕǯ: 2 ǗǢǘǔ.
ǃǤǢǜǛǖǢǘǜǦǙǟǰ: «Džƶƹǁ ǃdžƹ. ƿǜǠǜǦǙǘ»,
176 Ƹǚǧ NjǜǔǦ DŽǢǧǘ
ǃǤǢǜǛǖǙǘǙǡǢ ǣǢǘ ǞǢǡǦǤǢǟǙǠ «DžǖǙǡ DžǞǔǡǘǜǡǔǖǜdz
ƿǜǠǜǦǙǘ», 48310, Ljǜǡǟdzǡǘǜdz, ƾǢǦǞǔ,
ƾǢǦǢǟǔǩǘǙǡǦǜǙ, 15. DžǘǙǟǔǡǢ ǖ ƾǜǦǔǙ.
ǀǢǘǙǟǰ:
ǃǢǥǦǔǫǔǟǰǡǜǞ/ǹǠǣǢǤǦǙǤ ǖ LJǞǤǔǺǡǹ:
džǂƶ «Džƶƹǁ NJǙǡǦǤ»,
Ǡ. ǃǙǤǙdzǥǟǔǖ-ljǠǙǟǰǡǜǪǰǞǜǝ,
ǦǙǟ. (044) 233-65-89/98.
ǖǟǔǥǦǜǖǢǥǦǹ Ǧǔ ǖǹǘǢǠǢǥǦǹ ǣǤǢ ǕǙǛǣǙǞǧ ǦǢǖǔǤǧ ǘǜǖǹǦǰǥdz
ǧ ƾǙǤǹǖǡǜǪǦǖǹ Ǜ ǙǞǥǣǟǧǔǦǔǪǹǺ. LJǠǢǖǜ ǗǔǤǔǡǦǹǝǡǢǗǢ
ǢǕǥǟǧǗǢǖǧǖǔǡǡdz ǘǜǖǹǦǰǥdz ǖ ǗǔǤǔǡǦǹǝǡǢǠǧ ǦǔǟǢǡǹ
ǔǕǢ ǡǔ ǥǔǝǦǹ www.sven.ѵ
ƷǔǤǔǡǦǹǝǡǜǝ ǦǙǤǠǹǡ: 12 Ǡǹǥ. DžǦǤǢǞ ǥǟǧǚǕǜ: 2 ǤǢǞǜ.
džǢǖǔǤ ǥǙǤǦǜǨǹǞǢǖǔǡǢ/ǠǔǷ ǗǹǗǹǷǡǹǫǡǜǝ ǖǜǥǡǢǖǢǞ.
njǞǹǘǟǜǖǜǩ ǤǙǫǢǖǜǡ ǡǙ ǠǹǥǦǜǦǰ. ƻǕǙǤǹǗǔǦǜ ǖ ǥǧǩǢǠǧ ǠǹǥǪǹ.
ƶǜǤǢǕǡǜǞ: «Džƶƹǁ ǃdžƹ. ƿǹǠǹǦǙǘ», 176 Ƹǚǧ NjǹǔǦ DŽǢǧǘ,
д 02-02, DžǹǡǗǔǣǧǤ, 427447. ƶǜǗǢǦǢǖǟǙǡǢ ǣǹǘ
ǞǢǡǦǤǢǟǙǠ «DžǖǙǡ DžǞǔǡǘǜǡǔǖǹdz ƿǹǠǹǦǙǘ», 48310,
Ljǹǡǟdzǡǘǹdz, ƾǢǦǞǔ, ƾǢǦǢǟǔǩǘǙǡǦǹǷ, 15. ƻǤǢǕǟǙǡǢ ǖ ƾǜǦǔǺ.
Manufacturer: SVEN PTE. LTD, 176 Joo Chiat Road,
д 02-02, Singapore, 427447. Produced under the
control of Oy Sven Scandinavia Ltd. 15, Kotolahdentie,
Kotka, Finland, 48310. Made in China.
® Registered Trademark of Oy SVEN
Scandinavia Ltd. Finland.
Driver
, д 02-02, DžǜǡǗǔǣǧǤ, 427447.
Driver
08400, ƾǜǺǖǥǰǞǔ ǢǕǟǔǥǦǰ,
ǖǧǟ. ƷǙǤǢǺǖ ƸǡǹǣǤǔ, 31,
ǃǤǜǛǡǔǫǙǡǡdz, ǥǣǢǚǜǖǫǹ
DRIVER
SPS-619
 Loading...