

Page 1
ƴǞǦǜǖǡǔdz ǔǞǧǥǦǜǫǙǥǞǔdz ǥǜǥǦǙǠǔ
5.1 ǘǟdz ǘǢǠǔǬǡǙǗǢ ǞǜǡǢǦǙǔǦǤǔ
DŽLJƾǂƶǂƸDždžƶǂ
ǃǂ ǑƾDžǃƿLJƴdžƴNJƼƼ
BTR5-10
www.sven.ѵ
Page 2

RUS
DŽǧǞǢǖǢǘǥǦǖǢ ǣǢ DZǞǥǣǟǧǔǦǔǪǜǜ
ƵǟǔǗǢǘǔǤǜǠ ƶǔǥ Ǜǔ ǣǢǞǧǣǞǧ ǔǞǧǥǦǜǫǙǥǞǢǝ ǥǜǥǦǙǠǯ džǀ SVEN!
ƴƶdžǂDŽDžƾǂƹ ǃDŽƴƶǂ
© 2014. SVEN PTE. LTD. ƶǙǤǥǜdz 1.0 (V 1.0).
ƸǔǡǡǢǙ DŽǧǞǢǖǢǘǥǦǖǢ ǜ ǥǢǘǙǤǚǔǭǔdzǥdz ǖ ǡǙǠ ǜǡǨǢǤǠǔǪǜdz ǛǔǭǜǭǙǡǯ ǔǖǦǢǤǥǞǜǠ ǣǤǔǖǢǠ. ƶǥǙ
ǣǤǔǖǔ ǛǔǭǜǭǙǡǯ.
džǂDŽƷǂƶǏƹ ǀƴDŽƾƼ
ƶǥǙ ǦǢǤǗǢǖǯǙ ǠǔǤǞǜ dzǖǟdzDzǦǥdz ǥǢǕǥǦǖǙǡǡǢǥǦǰDz ǜǩ ǛǔǞǢǡǡǯǩ ǖǟǔǘǙǟǰǪǙǖ.
ǃDŽƹƸLJǃDŽƹƺƸƹǁƼƹ ǂƵ ǂƷDŽƴǁƼNjƹǁƼƼ ǂdžƶƹdžDždžƶƹǁǁǂDždžƼ
ǁǙǥǠǢǦǤdz ǡǔ ǣǤǜǟǢǚǙǡǡǯǙ ǧǥǜǟǜdz ǥǘǙǟǔǦǰ DŽǧǞǢǖǢǘǥǦǖǢ ǕǢǟǙǙ ǦǢǫǡǯǠ, ǖǢǛǠǢǚǡǯ ǡǙǞǢǦǢǤǯǙ
ǡǙǥǢǢǦǖǙǦǥǦǖǜdz. ƼǡǨǢǤǠǔǪǜdz ǘǔǡǡǢǗǢ DŽǧǞǢǖǢǘǥǦǖǔ ǣǤǙǘǢǥǦǔǖǟǙǡǔ ǡǔ ǧǥǟǢǖǜdzǩ «ǞǔǞ ǙǥǦǰ».
ƴǖǦǢǤ ǜ ǜǛǘǔǦǙǟǰ ǡǙ ǡǙǥǧǦ ǡǜǞǔǞǢǝ ǢǦǖǙǦǥǦǖǙǡǡǢǥǦǜ ǣǙǤǙǘ ǟǜǪǢǠ ǜǟǜ ǢǤǗǔǡǜǛǔǪǜǙǝ Ǜǔ ǧǭǙǤǕ
ǜǟǜ ǣǢǖǤǙǚǘǙǡǜdz, ǣǤǢǜǛǢǬǙǘǬǜǙ ǢǦ ǜǡǨǢǤǠǔǪǜǜ, ǥǢǘǙǤǚǔǭǙǝǥdz ǖ ǘǔǡǡǢǠ DŽǧǞǢǖǢǘǥǦǖǙ.
DžǂƸƹDŽƺƴǁƼƹ
RUS ..................................................................................................
1. DŽƹƾǂǀƹǁƸƴNJƼƼ ǃǂƾLJǃƴdžƹƿǒ ................................................ .. .......
2. ƾǂǀǃƿƹƾdžǁǂDždžǐ ƴDž ................................................ .....................
3. ǀƹDŽǏ ƵƹƻǂǃƴDžǁǂDždžƼ ............................................................... .. ...
4. džƹljǁƼNjƹDžƾǂƹ ǂǃƼDžƴǁƼƹ ....................................................................
5. ǃǂƸƷǂdžǂƶƾƴ Ƽ ǃǂDŽǓƸǂƾ DŽƴƵǂdžǏ ...........................................................
6. LJDždžDŽƴǁƹǁƼƹ ǁƹƼDžǃDŽƴƶǁǂDždžƹƽ ..........................................................
7. džƹljǁƼNjƹDžƾƼƹ ljƴDŽƴƾdžƹDŽƼDždžƼƾƼ .......................................................
UKR ...................................................................................................
ENG ..................................................................................................
BTR5-10
10
11
12
24
1
1
2
2
2
5
1. DŽƹƾǂǀƹǁƸƴNJƼƼ ǃǂƾLJǃƴdžƹƿǒ
• ƴǞǞǧǤǔǦǡǢ ǤǔǥǣǔǞǧǝǦǙ ǜǛǘǙǟǜǙ, ǣǤǢǥǟǙǘǜǦǙ Ǜǔ ǦǙǠ, ǫǦǢǕǯ ǖǡǧǦǤǜ ǞǢǤǢǕǞǜ ǡǙ ǢǥǦǔǟǜǥǰ
ǞǔǞǜǙ-ǟǜǕǢ ǣǤǜǡǔǘǟǙǚǡǢǥǦǜ. ǃǤǢǖǙǤǰǦǙ ǧǥǦǤǢǝǥǦǖǢ ǡǔ ǣǤǙǘǠǙǦ ǣǢǖǤǙǚǘǙǡǜǝ. ƹǥǟǜ ǜǛǘǙǟǜǙ
ǣǢǖǤǙǚǘǙǡǢ ǣǤǜ ǦǤǔǡǥǣǢǤǦǜǤǢǖǞǙ, ǢǕǤǔǦǜǦǙǥǰ ǖ ǨǜǤǠǧ, ǢǥǧǭǙǥǦǖǟdzDzǭǧDz ǘǢǥǦǔǖǞǧ; Ǚǥǟǜ
ǜǛǘǙǟǜǙ ǡǙ ǨǧǡǞǪǜǢǡǜǤǧǙǦ, ǥǤǔǛǧ ǚǙ ǢǕǤǔǦǜǦǙǥǰ Ǟ ǣǤǢǘǔǖǪǧ.
• ǃǤǢǖǙǤǰǦǙ ǞǢǠǣǟǙǞǦǡǢǥǦǰ
ǡǢǠ ǦǔǟǢǡǙ ǣǤǢǥǦǔǖǟǙǡ ǬǦǔǠǣ ǠǔǗǔǛǜǡǔ, ǤǔǛǕǢǤǫǜǖǔdz ǣǢǘǣǜǥǰ ǜǟǜ ǬǦǔǠǣ ǣǤǢǘǔǖǪǔ ǜ ǘǔǦǔ
ǣǤǢǘǔǚǜ, ǡǢǠǙǤ ǦǢǖǔǤǔ ǥǢǖǣǔǘǔǙǦ ǥ ǧǞǔǛǔǡǡǯǠ ǖ ǦǔǟǢǡǙ. ǃǢǠǡǜǦǙ, ǫǦǢ ǣǤǜ ǧǦǤǔǦǙ ǗǔǤǔǡǦǜǝǡǢǗǢ ǦǔǟǢǡǔ ǜǟǜ ǡǙǥǢǖǣǔǘǙǡǜǜ ǡǢǠǙǤǢǖ ǖǯ ǟǜǬǔǙǦǙǥǰ ǣǤǔǖǔ ǡǔ ǗǔǤǔǡǦǜǝǡǯǝ ǤǙǠǢǡǦ.
• ǁǙ ǖǞǟDzǫǔǝǦǙ ǜǛǘǙǟǜǙ ǥǤǔǛǧ ǚǙ ǣǢǥǟǙ ǖǡǙǥǙǡǜdz ǙǗǢ ǖ ǣǢǠǙǭǙǡǜǙ ǜǛ ǢǞǤǧǚǔDzǭǙǝ ǥǤǙǘǯ ǥ ǠǜǡǧǥǢǖǯǠǜ ǦǙǠǣǙǤǔǦǧǤǔǠǜ! DŽǔǥǣǔǞǢǖǔǡǡǢǙ ǜǛǘǙǟǜǙ ǡǙǢǕǩǢǘǜǠǢ ǖǯǘǙǤǚǔǦǰ ǖ ǧǥǟǢǖǜdzǩ ǞǢǠǡǔǦǡǢǝ ǦǙǠǣǙǤǔǦǧǤǯ ǡǙ ǠǙǡǙǙ 4-ǩ ǫǔǥǢǖ.
• ǃǤǙǚǘǙ ǫǙǠ ǧǥǦǔǡǔǖǟǜǖǔǦǰ ǜ ǜǥǣǢǟǰǛǢǖǔǦǰ ǜǛǘǙǟǜǙ, ǖǡǜǠǔǦǙǟǰǡǢ ǢǛǡǔǞǢǠǰǦǙǥǰ ǥ ǡǔǥǦǢdzǭǜǠ DŽǧǞǢǖǢǘǥǦǖǢǠ ǜ ǥǢǩǤǔǡǜǦǙ ǙǗǢ ǡǔ ǖǙǥǰ ǣǙǤǜǢǘ ǜǥǣǢǟǰǛǢǖǔǡǜdz.
ƻǘǙǥǰ ǚǙ ƶǯ ǥǠǢǚǙǦǙ ǡǔǝǦǜ ǢǕǡǢǖǟǙǡǡǧDz ǖǙǤǥǜDz ǘǔǡǡǢǗǢ ǤǧǞǢǖǢǘǥǦǖǔ.
ǜ ǡǔǟǜǫǜǙ ǗǔǤǔǡǦǜǝǡǢǗǢ ǦǔǟǢǡǔ. LJǕǙǘǜǦǙǥǰ ǖ ǦǢǠ, ǫǦǢ ǖ ǗǔǤǔǡǦǜǝ-
džǙǩǡǜǫǙǥǞǔdz ǣǢǘǘǙǤǚǞǔ ǤǔǛǠǙǭǙǡǔ ǡǔ
ǥǔǝǦǙ www.sven.Н
1
Page 3

RUS
ƴǞǦǜǖǡǔdz ǔǞǧǥǦǜǫǙǥǞǔdz ǥǜǥǦǙǠǔ
5.1 ǘǟdz ǘǢǠǔǬǡǙǗǢ ǞǜǡǢǦǙǔǦǤǔ
2. ƾǂǀǃƿƹƾdžǁǂDždžǐ ƴDž
• DžǔǕǖǧǨǙǤ – 1 ǬǦ.
• ƾǢǟǢǡǞǜ – 5 ǬǦ.
• ƴǞǧǥǦǜǫǙǥǞǜǝ ǞǔǕǙǟǰ – 5 ǬǦ.
• DžǦǙǤǙǢǨǢǡǜǫǙǥǞǜǝ ǥǜǗǡǔǟǰǡǯǝ ǞǔǕǙǟǰ 2RCA Ǟ 2RCA – 3 ǬǦ.
• ǃǙǤǙǩǢǘǡǜǞ 2RCA Ǟ mini-jack Ø 3,5 ǠǠ – 3 ǬǦ.
• ǃǧǟǰǦ ǘǜǥǦǔǡǪǜǢǡǡǢǗǢ ǧǣǤǔǖǟǙǡǜdz – 1 ǬǦ.
• ǑǟǙǠǙǡǦ ǣǜǦǔǡǜdz CR2025 – 1 ǬǦ.
• FM-ǔǡǦǙǡǡǔ – 1 ǬǦ.
• AM-ǔǡǦǙǡǡǔ – 1 ǬǦ.
• DŽǧǞǢǖǢǘǥǦǖǢ ǣǢ DZǞǥǣǟǧǔǦǔǪǜǜ – 1 ǬǦ.
• ƷǔǤǔǡǦǜǝǡǯǝ ǦǔǟǢǡ – 1 ǬǦ.
3. ǀƹDŽǏ ƵƹƻǂǃƴDžǁǂDždžƼ
• ƶǢ ǜǛǕǙǚǔǡǜǙ ǣǢǤǔǚǙǡǜdz DZǟǙǞǦǤǜǫǙǥǞǜǠ ǦǢǞǢǠ,
ǜ ǡǙ ǤǙǠǢǡǦǜǤǧǝǦǙ ǥǔǠǢǥǦǢdzǦǙǟǰǡǢ. ǂǕǥǟǧǚǜǖǔǡǜǙ ǜ ǤǙǠǢǡǦ ǘǢǟǚǡǯ ǢǥǧǭǙǥǦǖǟdzǦǰ ǦǢǟǰǞǢ ǞǖǔǟǜǨǜǪǜǤǢǖǔǡǡǯǙ ǥǣǙǪǜǔǟǜǥǦǯ ǧǣǢǟǡǢǠǢǫǙǡǡǢǗǢ ǥǙǤǖǜǥǡǢǗǢ ǪǙǡǦǤǔ. ǃǙǤǙǫǙǡǰ ǧǣǢǟǡǢǠǢǫǙǡǡǯǩ ǥǙǤǖǜǥǡǯǩ ǪǙǡǦǤǢǖ ǥǠǢǦǤǜǦǙ ǡǔ ǥǔǝǦǙ www.sven.Н
• ǁǙ ǘǢǣǧǥǞǔǝǦǙ ǛǔǠǯǞǔǡǜǝ ǣǤǢǖǢǘǢǖ (ǖ ǦǢǠ ǫǜǥǟǙ ǜ «ǛǔǛǙǠǟǙǡǡǯǩ») ǞǢǟǢǡǢǞ ƴDž ǠǙǚǘǧ ǥǢǕǢǝ, ǡǔ ǞǢǤǣǧǥ ǧǥǜǟǜǦǙǟdz ǜ ǡǔ ǛǙǠǟDz
• ƻǔǣǤǙǭǔǙǦǥdz ǣǤǜǞǔǥǔǦǰǥdz Ǟ ǬǦǯǤdzǠ ǥǙǦǙǖǢǝ ǖǜǟǞǜ ǔǣǣǔǤǔǦǧǤǯ ǖ ǦǙǫǙǡǜǙ 2 ǥǙǞ. ǥ ǠǢǠǙǡǦǔ
ǜǛǮdzǦǜdz ǖǜǟǞǜ ǜǛ ǥǙǦǙǖǢǝ ǤǢǛǙǦǞǜ.
• ǃǤǜ ǛǔǠǙǡǙ ǣǤǙǘǢǩǤǔǡǜǦǙǟdz ǢǦǞǟDzǫǔǝǦǙ ƴDž ǢǦ ǥǙǦǜ. ƼǥǣǢǟǰǛǧǝǦǙ ǣǤǙǘǢǩǤǔǡǜǦǙǟǜ ǦǢǗǢ ǚǙ
Ǧǜǣǔ ǜ ǡǢǠǜǡǔǟǔ. ǁǙ ǜǥǣǢǟǰǛǧǝǦǙ ǥǔǠǢǘǙǟǰǡǯǙ ǣǤǙǘǢǩǤǔǡǜǦǙǟǜ.
• ǂǕǙǤǙǗǔǝǦǙ ƴDž ǢǦ
• ǂǕǙǤǙǗǔǝǦǙ ƴDž ǢǦ ǣǢǖǯǬǙǡǡǢǝ ǖǟǔǚǡǢǥǦǜ, ǣǢǣǔǘǔǡǜdz ǖǢǘǯ ǜ ǣǯǟǜ.
• ǂǕǙǤǙǗǔǝǦǙ ƴDž ǢǦ ǡǔǗǤǙǖǔ: ǧǥǦǔǡǔǖǟǜǖǔǝǦǙ ǙǙ ǡǙ ǕǟǜǚǙ ǫǙǠ 1 Ǡ ǢǦ ǡǔǗǤǙǖǔǦǙǟǰǡǯǩ ǣǤǜǕǢ-
ǤǢǖ. ǁǙ ǣǢǘǖǙǤǗǔǝǦǙ ǖǢǛǘǙǝǥǦǖǜDz ǣǤdzǠǯǩ ǥǢǟǡǙǫǡǯǩ ǟǧǫǙǝ.
• ǁǙ ǤǔǛǠǙǭǔǝǦǙ ǡǔ ƴDž, ǔ ǦǔǞǚǙ ǖǕǟǜǛǜ ǥǜǥǦǙǠǯ ǜǥǦǢǫǡǜǞǜ ǢǦǞǤǯǦǢǗǢ ǣǟǔǠǙǡǜ.
• ǁǙ ǧǥǦǔǡǔǖǟǜǖǔǝǦǙ ƴDž ǖ ǠǙǥǦǔǩ ǥ ǡǙǘǢǥǦǔǦǢǫǡǢǝ ǖǙǡǦǜǟdzǪǜǙǝ. ǀǜǡǜǠǔǟǰǡǯǝ ǖǢǛǘǧǬǡǯǝ Ǜǔ-
ǛǢǤ – 10 ǥǠ. ǃǤǜ DZǞǥǣǟǧǔǦǔǪǜǜ ƴDž ǡǙ ǧǥǦǔǡǔǖǟǜǖǔǝǦǙ ǡǔ ǡǙǙ ǞǔǞǜǙ-ǟǜǕǢ ǧǥǦǤǢǝǥǦǖǔ, ǡǙ ǣǢǞǤǯǖǔǝǦǙ ǥǔǟǨǙǦǞǔǠǜ ǜǟǜ ǣǢǘǢǕǡǯǠǜ ǣǤǙǘǠǙǦǔǠǜ, ǛǔǦǤǧǘǡdzDzǭǜǠǜ ǢǩǟǔǚǘǙǡǜǙ.
• ǁǙ ǣǤǜǠǙǡdzǝǦǙ ǩǜǠǜǫǙǥǞǜǙ ǤǙǔǗǙǡǦǯ ǘǟdz ǫǜǥǦǞǜ ƴDž, ǜǥǣǢǟǰǛǧǝǦǙ ǠdzǗǞǧDz ǥǧǩǧDz ǦǞǔǡǰ.
4. džƹljǁƼNjƹDžƾǂƹ ǂǃƼDžƴǁƼƹ
ƴǞǧǥǦǜǫǙǥǞǔdz ǥǜǥǦǙǠǔ 5.1 (ƴDž) BTR5-10 c AM/FM-ǦDzǡǙǤǢǠ ǣǤǙǘǡǔǛǡǔǫǙǡǔ ǘǟdz
ǘǢǠǔǬǡǙǗǢ ǞǜǡǢǦǙǔǦǤǔ. ƵǟǔǗǢǘǔǤdz ǖǥǦǤǢǙǡǡǢǠǧ ǖ ǥǔǕǖǧǨǙǤ ǧǥǜǟǜǦǙǟDz ǠǢǭǡǢǥǦǜ ƴDž ǠǢǚǙǦ
ǕǯǦǰ ǣǢǘǞǟDzǫǙǡǔ ǣǤǔǞǦǜǫǙǥǞǜ Ǟ ǟDzǕǯǠ ǜǥǦǢǫǡǜǞǔǠ ǔǧǘǜǢǥǜǗǡǔǟǔ. ƶ ǞǢǠǣǟǙǞǦǙ ǣǧǟǰǦ ƸLJ.
AM/FM-ǦDzǡǙǤ ǜǥǣǢǟǰǛǧǙǦǥdz ǖ ǞǔǫǙǥǦǖǙ ǤǔǘǜǢǣǤǜǙǠǡǜǞǔ.
ǣǢǣǔǘǔǡǜdz ǖ ǢǦǖǙǤǥǦǜdz ǣǢǥǦǢǤǢǡǡǜǩ ǣǤǙǘǠǙǦǢǖ.
ƶǡǜǠǔǡǜǙ! ƶǡǧǦǤǜ ǞǢǤǣǧǥǔ ǡǔ DZǟǙǠǙǡǦǔǩ ǕǙǛ ǜǛǢǟdzǪǜǜ
ǜǠǙǙǦǥdz ǖǯǥǢǞǢǙ ǡǔǣǤdzǚǙǡǜǙ, ǞǢǦǢǤǢǙ ǠǢǚǙǦ ǖǯǛǖǔǦǰ ǣǢǤǔǚǙǡǜǙ DZǟǙǞǦǤǜǫǙǥǞǜǠ ǦǢǞǢǠ.
ǡǙ ǖǥǞǤǯǖǔǝǦǙ ǔǞǧǥǦǜǫǙǥǞǧDz ǥǜǥǦǙǠǧ (ƴDž)
, Ǧ. Ǟ. DZǦǢ ǖǯǖǢǘǜǦ ǜǛ ǥǦǤǢdz ǖǯǩǢǘǡǯǙ ǞǔǥǞǔǘǯ ǧǥǜǟǜǦǙǟdz.
ǥǢǛǘǔǡǜdz
2
Page 4
RUS
DŽǧǞǢǖǢǘǥǦǖǢ ǣǢ DZǞǥǣǟǧǔǦǔǪǜǜ
ǂǥǢǕǙǡǡǤǢǥǦǜ ƴDž
• ƶǥǦǤǢǙǡǡǯǝ 6-Ǟǔǡǔǟǰǡǯǝ ǧǥǜǟǜǦǙǟǰ
ǠǢǭǡǢǥǦǜ
• ƶǥǦǤǢǙǡǡǯǝ ǦDzǡǙǤ ƴM-FM
(ǤǔǘǜǢǣǤǜǙǠǡǜǞ)
• ƴǡǔǟǢǗǢǖǯǝ 5.1-ǖǩǢǘ, ǘǖǔ ǥǦǙǤǙǢǖǩǢǘǔ
ǘǟdz ǣǢǘǞǟDzǫǙǡǜdz ǜǥǦǢǫǡǜǞǢǖ ǛǖǧǞǔ
• ǑǟǙǞǦǤǢǡǡǯǝ ǞǢǠǠǧǦǔǦǢǤ ǣǙǤǙǞǟDzǫǙ-
ǡǜdz ǔǧǘǜǢǖǩǢǘǢǖ
• ǃǢǟǡǢǨǧǡǞǪǜǢǡǔǟǰǡǯǝ ǣǧǟǰǦ
ǘǜǥǦǔǡǪǜǢǡǡǢǗǢ ǧǣǤǔǖǟǙǡǜdz
• DŽǙǗǧǟǜǤǢǖǔǡǜǙ ǧǤǢǖǡdz ǢǕǭǙǝ ǗǤǢǠǞǢǥǦǜ ǜ ǧǤǢǖǡdz ǗǤǢǠǞǢǥǦǜ ǥǔǕǖǧǨǙǤǔ
• DŽǔǛǘǙǟǰǡǔdz ǤǙǗǧǟǜǤǢǖǞǔ ǧǤǢǖǡdz ǗǤǢǠǞǢǥǦǜ ǨǤǢǡǦǔǟǰǡǯǩ, ǦǯǟǢǖǯǩ ǜ ǪǙǡǦǤǔǟǰǡǢǝ
ǞǢǟǢǡǢǞ
• ƼǡǨǢǤǠǔǪǜǢǡǡǯǝ ǘǜǥǣǟǙǝ
• ǀǔǗǡǜǦǡǢǙ DZǞǤǔǡǜǤǢǖǔǡǜǙ
• ǀǔǦǙǤǜǔǟ ǞǢǤǣǧǥǔ
ǥǔǕǖǧǨǙǤǔ ǜ ǞǢǟǢǡǢǞ –
ǘǙǤǙǖǢ (MDF)
LJǥǦǤǢǝǥǦǖǢ ƴDž
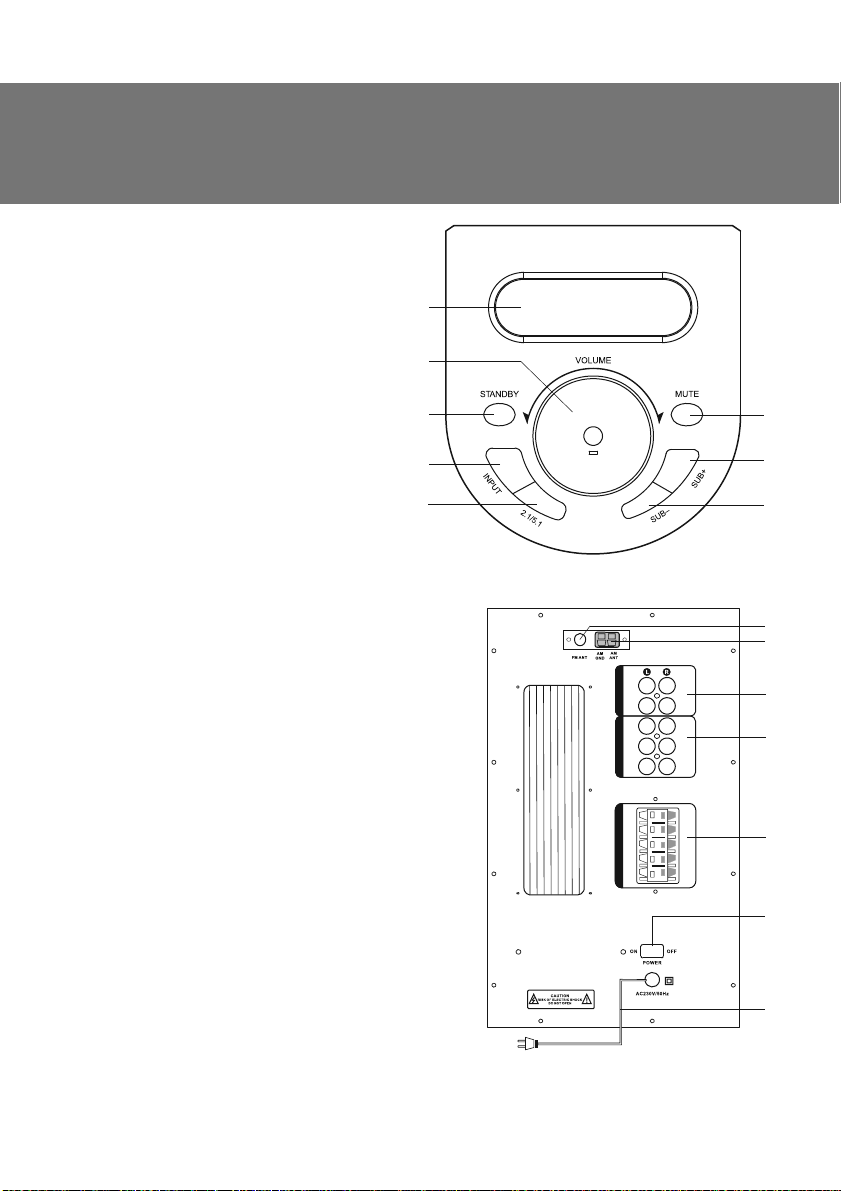
a ǑǞǤǔǡ ǘǜǥǣǟǙdz
b VOLUME: ǤǙǗǧǟdzǦǢǤ ǧǤǢǖǡdz ǢǕǭǙǝ ǗǤǢǠǞǢǥǦǜ
c STANDBY: ǞǡǢǣǞǔ ǤǙǚǜǠǔ Ǣǚǜǘǔǡǜdz
d INPUT: ǞǡǢǣǞǔ ǖǯǕǢǤǔ ǜǥǦǢǫǡǜǞǔ
ǔǧǘǜǢǥǜǗǡǔǟǔ
e 2.1/5.1: ǞǡǢǣǞǔ ǖǞǟDzǫǙǡǜdz ǤǙǚǜǠǔ
ǢǕǮǙǠǡǢǗǢ Ǜǖǧǫǔǡǜdz 2.1/5.1
f MUTE: ǞǡǢǣǞǔ ǖǯǞǟDzǫǙǡǜdz ǛǖǧǞǔ
g SUB+: ǞǡǢǣǞǔ ǧǖǙǟǜǫǙǡǜdz ǗǤǢǠǞǢǥǦǜ ǥǔǕǖǧǨǙǤǔ
h SUB–: ǞǡǢǣǞǔ ǧǠǙǡǰǬǙǡǜdz ǗǤǢǠǞǢǥǦǜ
ǥǔǕǖǧǨǙǤǔ
i FM ANT: ǤǔǛǮǙǠ ǘǟdz ǣǢǘǞǟDzǫǙǡǜdz
Fǀ-ǔǡǦǙǡǡǯ
j AM GND/AM ANT: ǤǔǛǮǙǠǯ ǘǟdz ǣǢǘǞǟDzǫǙǡǜdz
ƴM-ǔǡǦǙǡǡǯ
k
2CH INPUT: ǤǔǛǮǙǠǯ ǖǩǢǘǢǖ ǜǥǦǢǫǡǜǞǢǖ
ǥǦǙǤǙǢǥǜǗǡǔǟǔ PC ǜ AUX
l DVD (5.1CH) INPUT: ǖǩǢǘǡǯǙ ǤǔǛǮǙǠǯ
ǘǟdz ǣǢǘǞǟDzǫǙǡǜdz ǜǥǦǢǫǡǜǞǔ ǥǜǗǡǔǟǔ 5.1
m AUDIO OUTPUT: ǔǧǘǜǢǖǯǩǢǘǯ ǨǤǢǡǦǔǟǰǡǯǩ,
ǦǯǟǢǖǯǩ ǜ ǪǙǡǦǤǔǟǰǡǢǗǢ ǞǔǡǔǟǢǖ
n POWER: ǖǯǞǟDzǫǔǦǙǟǰ ǣǜǦǔǡǜdz
o njǡǧǤ ǥǙǦǙǖǢǗǢ ǣǜǦǔǡǜdz
a
b
c
d
e
BTR5-10
DžǝǦ. 1. DŽǕǢǚǠDZ ǨǤǥǕǗǠǚǢǝǴ ǦǕǖǗǨǩǚǥǕ
PC
AUX
FRFL
CEN
SWCEN
SRSL
DVD(5.1CH) INPUT 2CH INPUTAUDIO OUTPUT
FR
FL
CEN
SR
SL
DžǝǦ. 2. ƼǕǙǢǴǴ ǤǕǢǚǠDZ ǦǕǖǗǨǩǚǥǕ
f
g
h
i
j
k
l
m
n
o
3
Page 5
RUS
ƴǞǦǜǖǡǔdz ǔǞǧǥǦǜǫǙǥǞǔdz ǥǜǥǦǙǠǔ
5.1 ǘǟdz ǘǢǠǔǬǡǙǗǢ ǞǜǡǢǦǙǔǦǤǔ
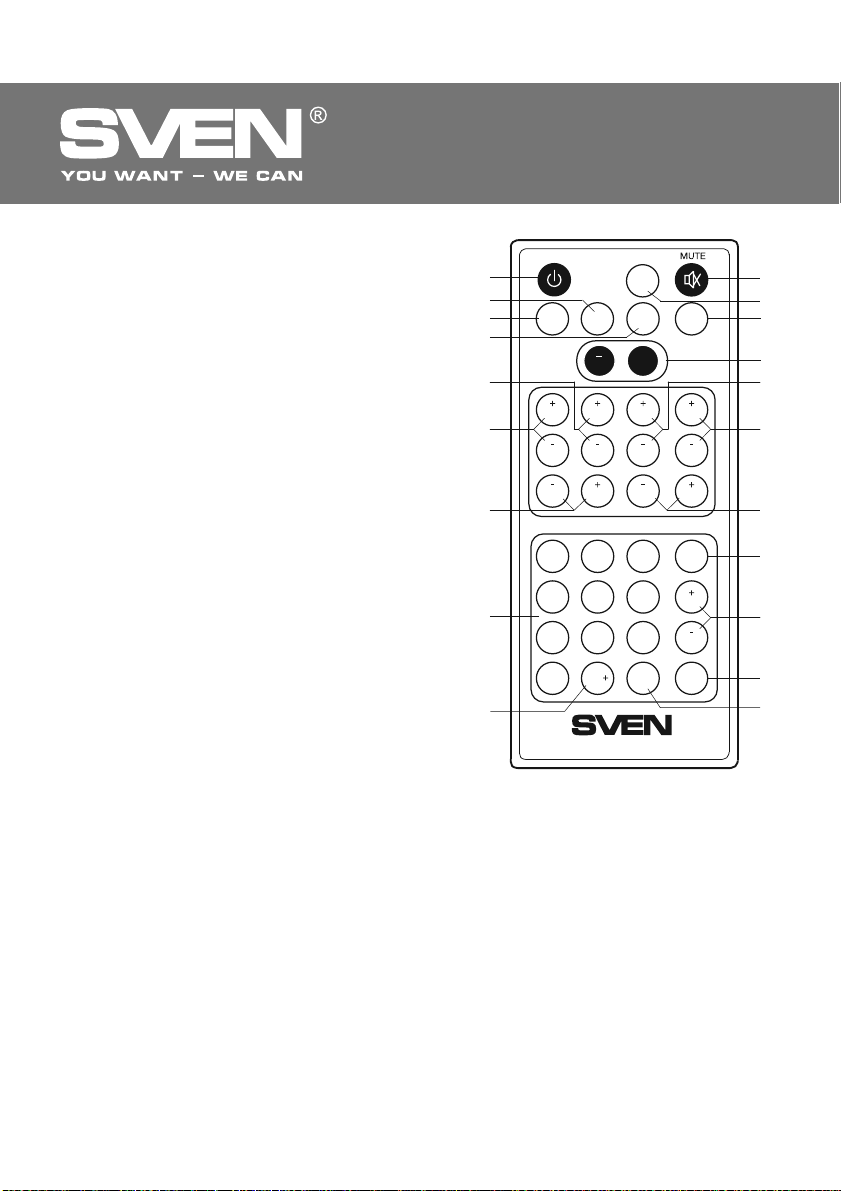
ǃǧǟǰǦ ǘǜǥǦǔǡǪǜǢǡǡǢǗǢ ǧǣǤǔǖǟǙǡǜdz
a STANDBY: ǞǡǢǣǞǔ ǤǙǚǜǠǔ Ǣǚǜǘǔǡǜdz
b PC: ǞǡǢǣǞǔ ǖǯǕǢǤǔ ǜǥǦǢǫǡǜǞǔ ǥǦǙǤǙǢǥǜǗǡǔǟǔ PC
c DVD: ǞǡǢǣǞǔ ǖǯǕǢǤǔ ǜǥǦǢǫǡǜǞǔ ǔǧǘǜǢǥǜǗǡǔǟǔ
DVD (5.1CH)
d AUX: ǞǡǢǣǞǔ ǖǯǕǢǤǔ ǜǥǦǢǫǡǜǞǔ ǥǦǙǤǙǢǥǜǗǡǔǟǔ
AUX
e SURROUND +/-: ǞǡǢǣǞǜ ǤǙǗǧǟǜǤǢǖǞǜ ǗǤǢǠǞǢǥǦǜ
ǦǯǟǢǖǯǩ ǞǔǡǔǟǢǖ
f FRONT+/-: ǞǡǢǣǞǜ ǤǙǗǧǟǜǤǢǖǞǜ ǗǤǢǠǞǢǥǦǜ
ǨǤǢǡǦǔǟǰǡǯǩ ǞǔǡǔǟǢǖ
g TREBLE+/-: ǞǡǢǣǞǜ ǤǙǗǧǟǜǤǢǖǞǜ ǦǙǠǕǤǔ ƶNj
h 0 – 9: ǞǡǢǣǞǜ ǪǜǨǤǢǖǢǝ ǞǟǔǖǜǔǦǧǤǯ
i 10+: ǠǡǢǚǜǦǙǟǰ ǪǜǨǤǢǖǢǝ ǞǟǔǖǜǔǦǧǤǯ
j MUTE: ǞǡǢǣǞǔ ǖǯǞǟDzǫǙǡǜdz ǛǖǧǞǔ
k RESET: ǞǡǢǣǞǔ
ǥǕǤǢǥǔ ǡǔǥǦǤǢǙǞ Ǟ ǛǔǖǢǘǥǞǜǠ
ǧǥǦǔǡǢǖǞǔǠ
l 2.1/5.1: ǞǡǢǣǞǔ ǖǞǟDzǫǙǡǜdz ǤǙǚǜǠǔ ǢǕǮǙǠǡǢǗǢ
Ǜǖǧǫǔǡǜdz 2.1/5.1
m VOL+/-: ǞǡǢǣǞǜ ǤǙǗǧǟǜǤǢǖǞǜ ǧǤǢǖǡdz ǢǕǭǙǝ
ǗǤǢǠǞǢǥǦǜ ǥǜǥǦǙǠǯ
n CEN+/-: ǞǡǢǣǞǜ ǤǙǗǧǟǜǤǢǖǞǜ ǗǤǢǠǞǢǥǦǜ
ǪǙǡǦǤǔǟǰǡǢǗǢ Ǟǔǡǔǟǔ
o SUB +/-: ǞǡǢǣǞǜ ǤǙǗǧǟǜǤǢǖǞǜ ǗǤǢǠǞǢǥǦǜ Ǟǔǡǔǟǔ
ǥǔǕǖǧǨǙǤǔ
p BASS+/-: ǞǡǢǣǞǜ ǤǙǗǧǟǜǤǢǖǞǜ ǦǙǠǕǤǔ ǁNj
q SCAN: ǞǡǢǣǞǔ ǔǖǦǢǠǔǦǜǫǙǥǞǢǗǢ ǣǢǜǥǞǔ
ǤǔǘǜǢǥǦǔǡǪǜǝ
r TUNE+/-: ǞǡǢǣǞǜ ǤǧǫǡǢǝ ǣǢǘǥǦǤǢǝǞǜ ǥǜǗǡǔǟǔ
ǤǔǘǜǢǥǦǔǡǪǜǜ
s FM/AM: ǞǡǢǣǞǔ ǖǯǕǢǤǔ ǘǜǔǣǔǛǢǡǔ FM ǜǟǜ AM
t MEMORY: ǞǡǢǣǞǔ ǥǢǩǤǔǡǙǡǜdz
ǖ ǣǔǠdzǦǜ ǡǔǥǦǤǢǙǞ
ǦDzǡǙǤǔ
STANDBY
a
b
c
DVD PC AUX 2.1/5.1
RESET
d
+
VOL VOL
e
SURROUND
FRONT CEN SUB
f
SURROUND
FRONT
BASS BASSTREBLE TREBLE
g
12
4
3
5
6
h
789
MEMORY
10
0
i
BTR5-10
DžǝǦ. 3. DŽǨǠDZǧ ǙǝǦǧǕǢǫǝǣǢǢǣǘǣ
ǨǤǥǕǗǠǚǢǝǴ
SUBCEN
SCAN
TUNE
TUNE
FM/AM
j
k
l
m
n
o
p
q
r
s
t
LJǥǦǔǡǢǖǞǔ ǕǔǦǔǤǙǝǞǜ ǖ ǣǧǟǰǦ ƸLJ
• ǂǦǞǤǢǝǦǙ ǢǦǥǙǞ ǘǟdz ǕǔǦǔǤǙǙǞ ǡǔ ǛǔǘǡǙǝ ǥǦǢǤǢǡǙ ǣǧǟǰǦǔ ƸLJ.
• ƶǥǦǔǖǰǦǙ ǕǔǦǔǤǙǝǞǧ Ǧǜǣǔ CR2025 (ǜǛ ǞǢǠǣǟǙǞǦǔ).
• ƻǔǞǤǢǝǦǙ ǢǦǥǙǞ ǘǟdz ǕǔǦǔǤǙǙǞ.
ǃǤǜǠǙǫǔǡǜdz:
• ƼǥǣǢǟǰǛǧǝǦǙ ǃƸLJ ǣǢǘ ǧǗǟǢǠ ǡǙ ǕǢǟǙǙ 30° ǡǔ ǤǔǥǥǦǢdzǡǜǜ ǡǙ ǕǢǟǙǙ 7 ǠǙǦǤǢǖ.
• ǁǔǣǤǔǖǰǦǙ ǃƸLJ ǡǔ ǢǞǡǢ Ƽƾ-ǣǤǜǙǠǡǜǞǔ ǡǔ ǥǔǕǖǧǨǙǤǙ.
• ƹǥǟǜ
ǃƸLJ ǡǙ ǤǔǕǢǦǔǙǦ, ǣǤǢǖǙǤǰǦǙ ǡǔǟǜǫǜǙ ǕǔǦǔǤǙǝǞǜ ǜǟǜ ǛǔǠǙǡǜǦǙ ǤǔǛǤdzǚǙǡǡǧDz ǡǔ
ǡǢǖǧDz.
• ƶǯǡǜǠǔǝǦǙ ǕǔǦǔǤǙǝǞǧ ǜǛ ǣǧǟǰǦǔ, Ǚǥǟǜ ǡǙ ǥǢǕǜǤǔǙǦǙǥǰ ǣǢǟǰǛǢǖǔǦǰǥdz ǜǠ ǖ ǦǙǫǙǡǜǙ ǘǟǜǦǙǟǰǡǢǗǢ ǖǤǙǠǙǡǜ (ǕǢǟǰǬǙ ǡǙǘǙǟǜ).
4
Page 6
RUS
DŽǧǞǢǖǢǘǥǦǖǢ ǣǢ DZǞǥǣǟǧǔǦǔǪǜǜ
5. ǃǂƸƷǂdžǂƶƾƴ Ƽ ǃǂDŽǓƸǂƾ DŽƴƵǂdžǏ
DŽǔǥǣǢǟǢǚǙǡǜǙ ƴDž
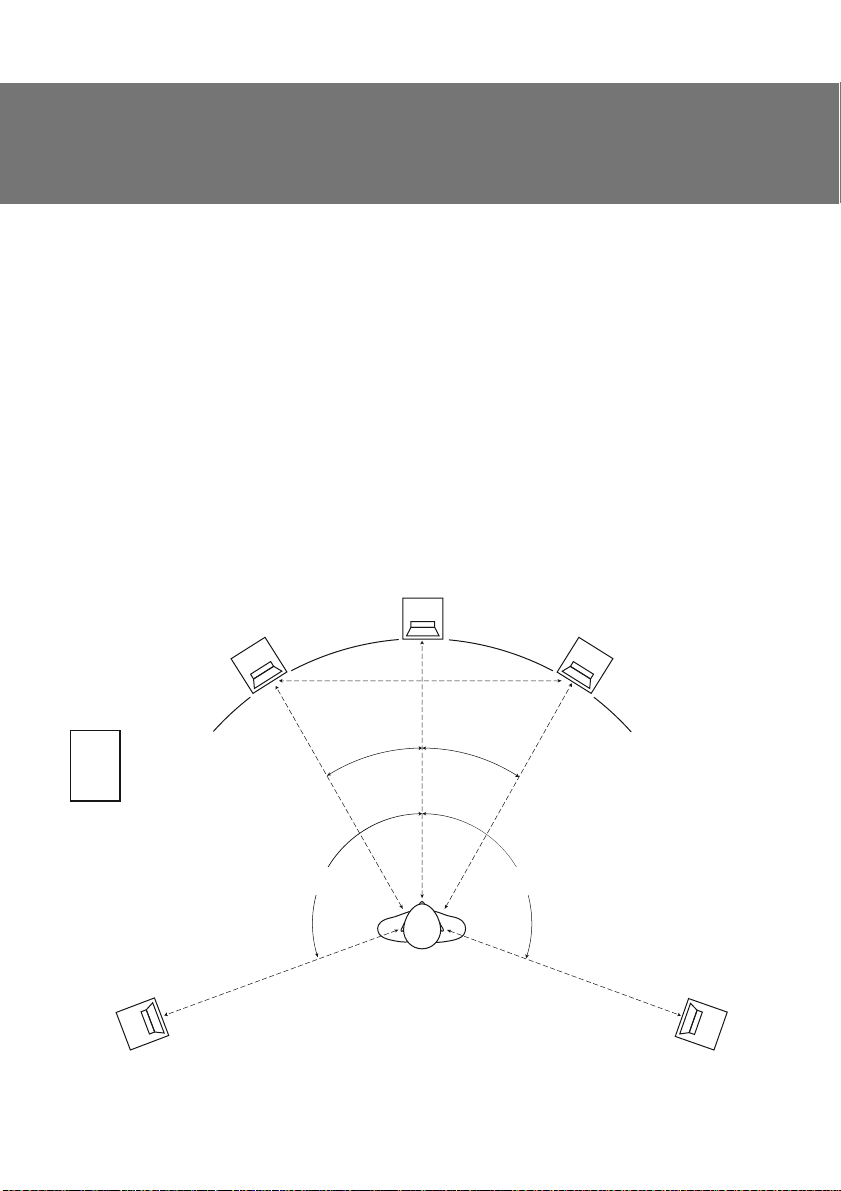
• Ƹǟdz ǘǢǥǦǜǚǙǡǜdz ǟǧǫǬǙǗǢ DZǨǨǙǞǦǔ ǖǢǥǣǤǜdzǦǜdz ƴDž ǥǟǙǘǧǙǦ ǤǔǥǣǢǟǢǚǜǦǰ ǞǢǟǢǡǞǜ ǥǢǗǟǔǥǡǢ
Ǥǜǥ. 4. NJǙǡǦǤ ǜ ǨǤǢǡǦǔǟǰǡǔdz ǣǔǤǔ ǤǔǥǣǢǟǢǚǙǡǯ ǡǔ ǟǜǡǜǜ ǖǜǤǦǧǔǟǰǡǢǝ ǢǞǤǧǚǡǢǥǦǜ, ǤǔǘǜǧǥǢǠ ǞǢǦǢǤǢǝ dzǖǟdzǙǦǥdz ǤǔǥǥǦǢdzǡǜǙ ǢǦ ǥǟǧǬǔǦǙǟdz ǘǢ ǪǙǡǦǤǔǟǰǡǢǝ ǞǢǟǢǡǞǜ, ǔ ǪǙǡǦǤǢǠ ǢǞǤǧǚǡǢǥǦǜ – ǗǢǟǢǖǔ ǥǟǧǬǔǦǙǟdz. DŽǔǥǥǦǢdzǡǜǙ ǢǦ ǥǟǧǬǔǦǙǟdz ǘǢ ǞǔǚǘǢǝ ǜǛ ǨǤǢǡǦǔǟǰǡǯǩ ǞǢǟǢǡǢǞ ǜ
ǦǤǔǟǰǡǢǝ ǞǢǟǢǡǞǜ Ǥǔǖǡǯ. DŽǔǥǥǦǢdzǡǜǙ ǠǙǚǘǧ ǨǤǢǡǦǔǟǰǡǯǠǜ ǞǢǟǢǡǞǔǠǜ ǤǔǖǡǢ ǤǔǥǥǦǢdzǡǜDz ǢǦ
ǥǟǧǬǔǦǙǟdz ǘǢ ǞǔǚǘǢǝ ǜǛ ǞǢǟǢǡǢǞ. džǯǟǢǖǯǙ ǞǢǟǢǡǞǜ ǤǔǥǣǢǟǢǚǙǡǯ ǡǔ ǦǔǞǢǠ ǚǙ ǧǘǔǟǙǡǜǜ ǢǦ
ǥǟǧǬǔǦǙǟdz (ǦǔǞǚǙ ǡǔ ǖǜǤǦǧǔǟǰǡǢǝ ǢǞǤǧǚǡǢǥǦǜ) ǣǢǘ ǧǗǟǢǠ ~110° Ǟ Ǣǥǜ «ǥǟǧǬǔǦǙǟǰ – DZǞǤǔǡ».
• ƼǛǕǙǗǔǝǦǙ ǧǥǦǔǡǢǖǞǜ ǞǢǟǢǡǢǞ ǖ ǧǗǟǔǩ ǣǢǠǙǭǙǡǜǝ ǜ ǡǙǣǢǥǤǙǘǥǦǖǙǡǡǢ ǖǢǛǟǙ ǥǦǙǡ, DZǦǢ ǠǢǚǙǦ
ǣǤǜǖǙǥǦǜ Ǟ ǖǢǛǡǜǞǡǢǖǙǡǜDz
ǠǙǭǔǝǦǙ ƴDž ǡǔ ǤǔǥǥǦǢdzǡǜǜ ǡǙ ǠǙǡǙǙ 20 ǥǠ ǢǦ ǥǦǙǡ.
• Ƹǟdz ǡǔǜǕǢǟǙǙ ǦǢǫǡǢǗǢ ǖǢǥǣǤǜdzǦǜdz ǚǙǟǔǦǙǟǰǡǢ, ǫǦǢǕǯ ǖǯǥǢǞǢǫǔǥǦǢǦǡǯǙ ǦǖǜǦǦǙǤǯ ǡǔǩǢǘǜǟǜǥǰ ǡǔ ǢǘǡǢǠ ǧǤǢǖǡǙ ǥ ǧǩǢǠ ǥǟǧǬǔǦǙǟdz.
• ǁǙ ǤǙǞǢǠǙǡǘǧǙǦǥdz ǧǥǦǔǡǔǖǟǜǖǔǦǰ ǞǢǟǢǡǞǜ ǖ ǡǜǬǜ. džǔǞǢǙ ǤǔǛǠǙǭǙǡǜǙ ǠǢǚǙǦ ǣǢǖǟǜdzǦǰ ǡǔ
ǖǢǥǣǤǢǜǛǖǙǘǙǡǜǙ ǛǖǧǞǔ, ǢǥǢǕǙǡǡǢ ǖ ǡǜǛǞǢǫǔǥǦǢǦǡǢǠ ǘǜǔǣǔǛǢǡǙ.
• DžǔǕǖǧǨǙǤ ǜǛǟǧǫǔǙǦ ǡǙǡǔǣǤǔǖǟǙǡǡǯǝ ǛǖǧǞ, ǣǢǦǢǠǧ ǙǗǢ ǠǢǚǡǢ ǤǔǥǣǢǟǢǚǜǦǰ ǖ ǟDzǕǢǠ ǠǙǥǦǙ
ǞǢǠǡǔǦǯ, ǗǘǙ ǥǔǕǖǧǨǙǤ ǕǧǘǙǦ ǛǖǧǫǔǦǰ ǡǔǜǟǧǫǬǜǠ ǢǕǤǔǛǢǠ.
ƿǙǖǔdz ǨǤǢǡǦǔǟǰǡǔdz
ǞǢǟǢǡǞǔ
DžǔǕǖǧǨǙǤ
ǡǙǚǙǟǔǦǙǟǰǡǯǩ ǤǙǛǢǡǔǡǥǢǖ ǜ ǣǤǜǛǖǧǞǢǖ. ǃǤǜ ǖǢǛǠǢǚǡǢǥǦǜ ǤǔǛ-
NJǙǡǦǤǔǟǰǡǔdz
ǞǢǟǢǡǞǔ
A
A
A
30° 30°
BTR5-10
ǪǙǡ-
ǃǤǔǖǔdz ǨǤǢǡǦǔǟǰǡǔdz
ǞǢǟǢǡǞǔ
A
ƿǙǖǔdz ǦǯǟǢǖǔdz
ǞǢǟǢǡǞǔ
110° ± 10° 110° ± 10°
A
DžǝǦ. 4. DžǕǦǤǣǠǣǛǚǢǝǚ Ƶdž
ǃǤǔǖǔdz ǦǯǟǢǖǔdz
A
ǞǢǟǢǡǞǔ
5
Page 7
RUS
ƴǞǦǜǖǡǔdz ǔǞǧǥǦǜǫǙǥǞǔdz ǥǜǥǦǙǠǔ
5.1 ǘǟdz ǘǢǠǔǬǡǙǗǢ ǞǜǡǢǦǙǔǦǤǔ
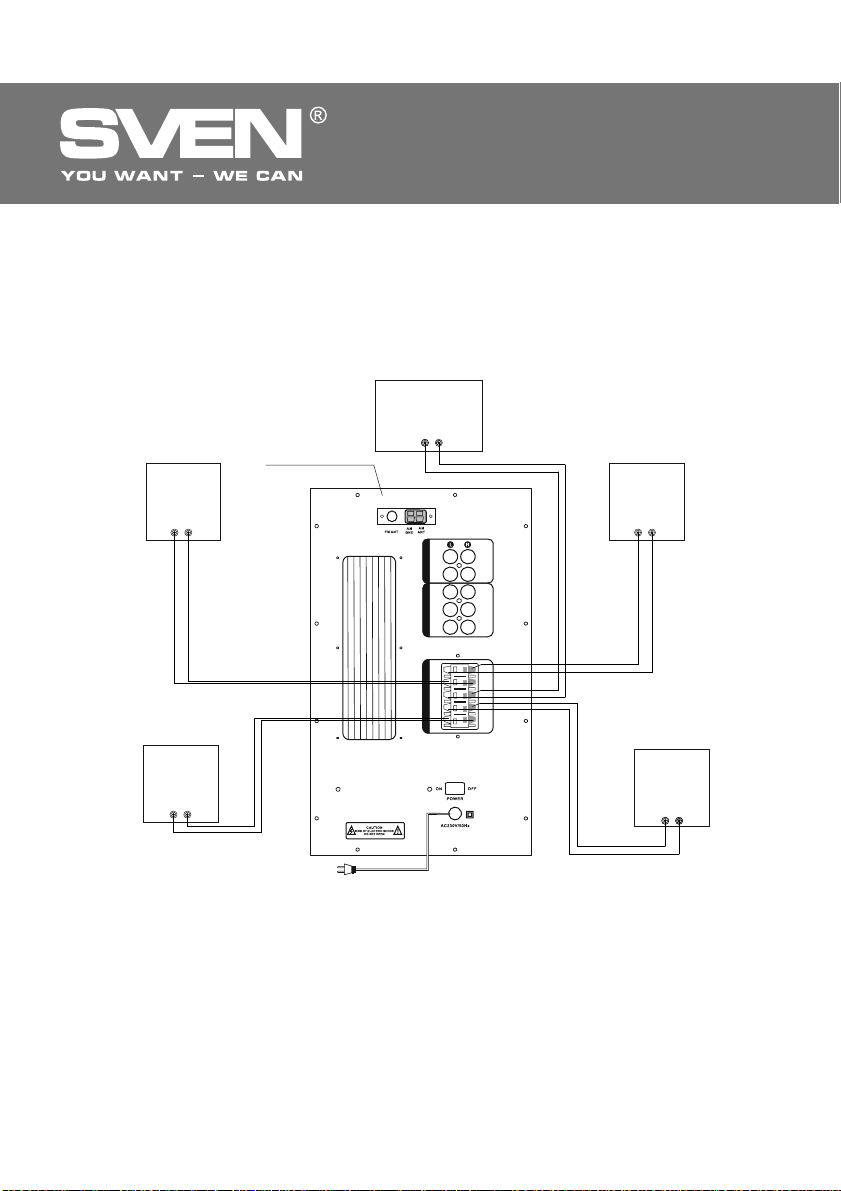
ǃǢǘǞǟDzǫǙǡǜǙ ǞǢǟǢǡǢǞ Ǟ ǥǔǕǖǧǨǙǤǧ
• ǃǙǤǙǘ ǣǢǘǞǟDzǫǙǡǜǙǠ ǞǢǟǢǡǢǞ ǧǕǙǘǜǦǙǥǰ, ǫǦǢ DZǟǙǞǦǤǢǣǜǦǔǡǜǙ ǧǥǦǤǢǝǥǦǖǔ ǢǦǞǟDzǫǙǡǢ ǢǦ ǥǙǦǜ. ǃǢǘǞǟDzǫǜǦǙ ǥǢǙǘǜǡǜǦǙǟǰǡǯǙ ǞǔǕǙǟǜ, ǞǔǞ ǣǢǞǔǛǔǡǢ ǡǔ Ǥǜǥ. 5. ǂǕǤǔǦǜǦǙ ǖǡǜǠǔǡǜǙ, ǫǦǢ ǞǤǔǥǡǯǙ (ǣǟDzǥǢǖǯǙ) ǞǟǙǠǠǯ ǞǢǟǢǡǢǞ ǘǢǟǚǡǯ ǕǯǦǰ ǥǢǙǘǜǡǙǡǯ ǥ ǞǤǔǥǡǯǠǜ ǞǟǙǠǠǔǠǜ ǥǔǕǖǧǨǙǤǔ
(+ о +), ǔ ǫǙǤǡǯǙ (ǠǜǡǧǥǢǖǯǙ) ǞǟǙǠǠǯ ǞǢǟǢǡǢǞ — ǥ ǫǙǤǡǯǠǜ ǞǟǙǠǠǔǠǜ ǥǔǕǖǧǨǙǤǔ (– о –).
• ǃǤǢǖǙǤǰǦǙ ǥǢǢǦǖǙǦǥǦǖǜǙ
ǘǢǖ ǠǙǚǘǧ ǥǢǕǢǝ ǜ ǥ ǠǙǦǔǟǟǜǫǙǥǞǜǠǜ ǫǔǥǦdzǠǜ ǔǣǣǔǤǔǦǧǤǯ.
ƿǙǖǔdz ǨǤǢǡǦǔǟǰǡǔdz
ǞǢǟǢǡǞǔ
ǣǢǟdzǤǡǢǥǦǜ ǣǢǘǞǟDzǫǙǡǜdz ǜ ǢǦǥǧǦǥǦǖǜǙ ǞǢǡǦǔǞǦǔ ǢǗǢǟǙǡǡǯǩ ǣǤǢǖǢ-
NJǙǡǦǤǔǟǰǡǔdz
ǞǢǟǢǡǞǔ
ǃǤǔǖǔdz ǨǤǢǡǦǔǟǰǡǔdz
ƻǔǘǡdzdz ǣǔǡǙǟǰ
ǥǔǕǖǧǨǙǤǔ
CEN
DVD(5.1CH) INPUT 2CH INPUTAUDIO OUTPUT
PC
AUX
FRFL
SWCEN
SRSL
ǞǢǟǢǡǞǔ
FR
FL
CEN
SR
ƿǙǖǔdz ǦǯǟǢǖǔdz
ǞǢǟǢǡǞǔ
SL
ǃǤǔǖǔdz ǦǯǟǢǖǔdz
ǞǢǟǢǡǞǔ
DžǝǦ. 5. džǪǚǡǕ ǤǣǙǟǠdzǬǚǢǝǴ ǟǣǠǣǢǣǟ
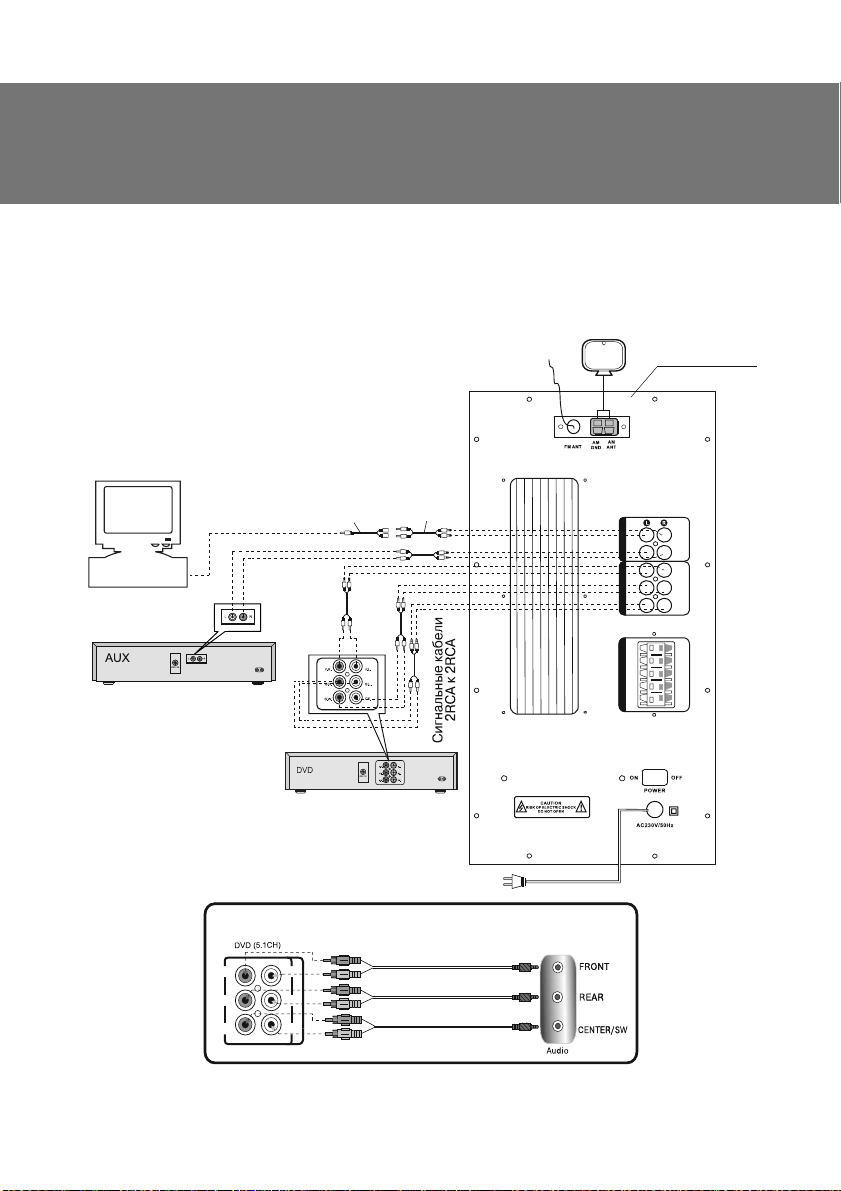
ǃǢǘǞǟDzǫǙǡǜǙ ƴDž Ǟ ǜǥǦǢǫǡǜǞǔǠ ǔǧǘǜǢǥǜǗǡǔǟǔ
ƴǞǧǥǦǜǫǙǥǞǔdz ǥǜǥǦǙǠǔ BTR5-10 ǠǢǚǙǦ ǕǯǦǰ ǣǢǘǞǟDzǫǙǡǔ ǣǤǔǞǦǜǫǙǥǞǜ Ǟ ǟDzǕǯǠ ǜǥǦǢǫǡǜǞǔǠ
ǔǧǘǜǢǥǜǗǡǔǟǔ (ǥǠ. ǥǩǙǠǧ ǡǔ Ǥǜǥ. 6).
• ǃǙǤǙǘ ǣǢǘǞǟDzǫǙǡǜǙǠ ǧǕǙǘǜǦǙǥǰ, ǫǦǢ ƴDž ǢǦǞǟDzǫǙǡǔ ǢǦ ǥǙǦǜ.
• Ƹǟdz ǣǢǘǞǟDzǫǙǡǜdz ƴDž Ǟ CD/DVD/AUX-ǣǤǢǜǗǤǯǖǔǦǙǟdzǠ, TV ǜǥǣǢǟǰǛǧǝǦǙ ǥǦǙǤǙǢǨǢǡǜǫǙǥǞǜǙ
ǥǜǗǡǔǟǰǡǯǙ ǞǔǕǙǟǜ 2RCA Ǟ 2RCA. Ƹǟdz ǣǢǘǞǟDzǫǙǡǜdz ƴDž Ǟ ǛǖǧǞǢǖǢǝ ǞǔǤǦǙ ǃƾ, ǀDŽ3/CD-ǣǟǙǙǤǔǠ
ǜǥǣǢǟǰǛǧǝǦǙ ǖǠǙǥǦǙ ǥ ǥǜǗǡǔǟǰǡǯǠ
ǞǔǕǙǟǙǠ 2RCA Ǟ 2RCA ǣǙǤǙǩǢǘǡǜǞ 2RCA Ǟ mini-jack (ǜǛ ǞǢǠ-
ǣǟǙǞǦǔ). LJǕǙǘǜǦǙǥǰ ǖ ǣǤǔǖǜǟǰǡǢǥǦǜ ǣǢǘǞǟDzǫǙǡǜdz ǟǙǖǯǩ ǜ ǣǤǔǖǯǩ ǞǔǡǔǟǢǖ. ƿǙǖǯǙ RCA-ǘǚǙǞǜ
6
Page 8
RUS
DŽǧǞǢǖǢǘǥǦǖǢ ǣǢ DZǞǥǣǟǧǔǦǔǪǜǜ
BTR5-10
ǥǟǙǘǧǙǦ ǥǢǙǘǜǡǜǦǰ ǥ ǟǙǖǯǠǜ ǤǔǛǮǙǠǔǠǜ ǧǥǜǟǜǦǙǟdz (ǢǕǯǫǡǢ ǕǙǟǢǗǢ ǪǖǙǦǔ), ǔ ǣǤǔǖǯǙ RCAǘǚǙǞǜ – ǥ ǣǤǔǖǯǠǜ ǤǔǛǮǙǠǔǠǜ ǧǥǜǟǜǦǙǟdz (ǢǕǯǫǡǢ ǞǤǔǥǡǢǗǢ ǪǖǙǦǔ).
ǃǤǜǠǙǫǔǡǜǙ. ǂǦ ǣǤǔǖǜǟǰǡǢǥǦǜ ǜ ǡǔǘǙǚǡǢǥǦǜ ǣǢǘǥǢǙǘǜǡǙǡǜdz ǞǔǕǙǟǙǝ ǡǙǣǢǥǤǙǘǥǦǖǙǡǡǢ ǛǔǖǜǥǜǦ ǞǔǫǙǥǦǖǢ ǛǖǧǞǔ. ǃǤǢǖǙǤǰǦǙ ǢǦǥǧǦǥǦǖǜǙ ǞǢǡǦǔǞǦǔ ǢǗǢǟǙǡǡǯǩ ǣǤǢǖǢǘǢǖ ǠǙǚǘǧ
ǥǢǕǢǝ ǜ ǥ ǠǙǦǔǟǟǜǫǙǥǞǜǠǜ ǫǔǥǦdzǠǜ ǔǣǣǔǤǔǦǧǤǯ.
ƾǂǀǃǐǒdžƹDŽ
CD-ǣǤǢǜǗǤǯǖǔǦǙǟǰ
ǃǙǤǙǩǢǘǡǜǞ
2RCA Ǟ
mini-jack
CǜǗǡǔǟǰǡǯǝ
ǞǔǕǙǟǰ
2RCA Ǟ 2RCA
FM-ǔǡǦǙǡǡǔ
AM-ǔǡǦǙǡǡǔ
DVD(5.1CH) INPUT 2CH INPUTAUDIO OUTPUT
ƻǔǘǡdzdz ǣǔǡǙǟǰ
ǥǔǕǖǧǨǙǤǔ
PC
AUX
FRFL
SWCEN
CEN
SRSL
FR
FL
CEN
SR
SL
DVD-ǣǤǢǜǗǤǯǖǔǦǙǟǰ
5.1-Ǟǔǡǔǟǰǡǔdz
ǛǖǧǞǢǖǔdz ǞǔǤǦǔ
FR
SR
FL
SL
CESW
CǜǗǡǔǟǰǡǯǙ ǞǔǕǙǟǜ
2RCA Ǟ mini-jack
DžǝǦ. 6. džǪǚǡǕ ǤǣǙǟǠdzǬǚǢǝǴ ǟ ǝǦǧǣǬǢǝǟǕǡ ǕǨǙǝǣǦǝǘǢǕǠǕ
njǡǧǤ ǣǜǦǔǡǜdz
7
Page 9
RUS
ƴǞǦǜǖǡǔdz ǔǞǧǥǦǜǫǙǥǞǔdz ǥǜǥǦǙǠǔ
5.1 ǘǟdz ǘǢǠǔǬǡǙǗǢ ǞǜǡǢǦǙǔǦǤǔ
LJǥǦǔǡǢǖǞǔ ǜ ǣǢǘǞǟDzǫǙǡǜǙ ǔǡǦǙǡǡ
ǃǢǘǞǟDzǫǙǡǜǙ FM-ǔǡǦǙǡǡǯ
• ƶǥǦǔǖǰǦǙ ǖǩǢǘdzǭǧDz ǖ ǞǢǠǣǟǙǞǦ ǞǢǠǡǔǦǡǧDz FM-ǔǡǦǙǡǡǧ ǖ ǗǡǙǛǘǢ «FM ANT» ǡǔ ǛǔǘǡǙǝ ǣǔǡǙǟǜ
ǥǔǕǖǧǨǙǤǔ, ǞǔǞ ǣǢǞǔǛǔǡǢ ǡǔ Ǥǜǥ. 5. LJǥǦǔǡǔǖǟǜǖǔǝǦǙ ǔǡǦǙǡǡǧ ǦǔǞǜǠ ǢǕǤǔǛǢǠ, ǫǦǢǕǯ ǞǔǫǙǥǦǖǢ
ǣǤǜǙǠǔ ǥǦǔǟǢ ǧǘǢǖǟǙǦǖǢǤǜǦǙǟǰǡǯǠ, ǔ ǣǢǦǢǠ ǛǔǞǤǙǣǜǦǙ ǔǡǦǙǡǡǧ ǖ DZǦǢǠ ǣǢǟǢǚǙǡǜǜ.
ǃǤǜǠǙǫǔǡǜǙ. ƶ ǘǢǠǔǩ ǥǢ ǥǟǔǕǯǠ ǥǜǗǡǔǟǢǠ FM ǜǥǣǢǟǰǛǧǝǦǙ ǖǡǙǬǡDzDz ǔǡǦǙǡǡǧ FMǘǜǔǣǔǛǢǡǔ 75 ǂǠ. ǂǕǯǫǡǢ 3-DZǟǙǠǙǡǦǡǢǝ
ǥǜǗǡǔǟǢǠ FM ǡǙǢǕǩǢǘǜǠǢ ǜǥǣǢǟǰǛǢǖǔǦǰ FM-ǔǡǦǙǡǡǧ ǥ 5-Dz ǜ ǕǢǟǰǬǙ DZǟǙǠǙǡǦǔǠǜ.
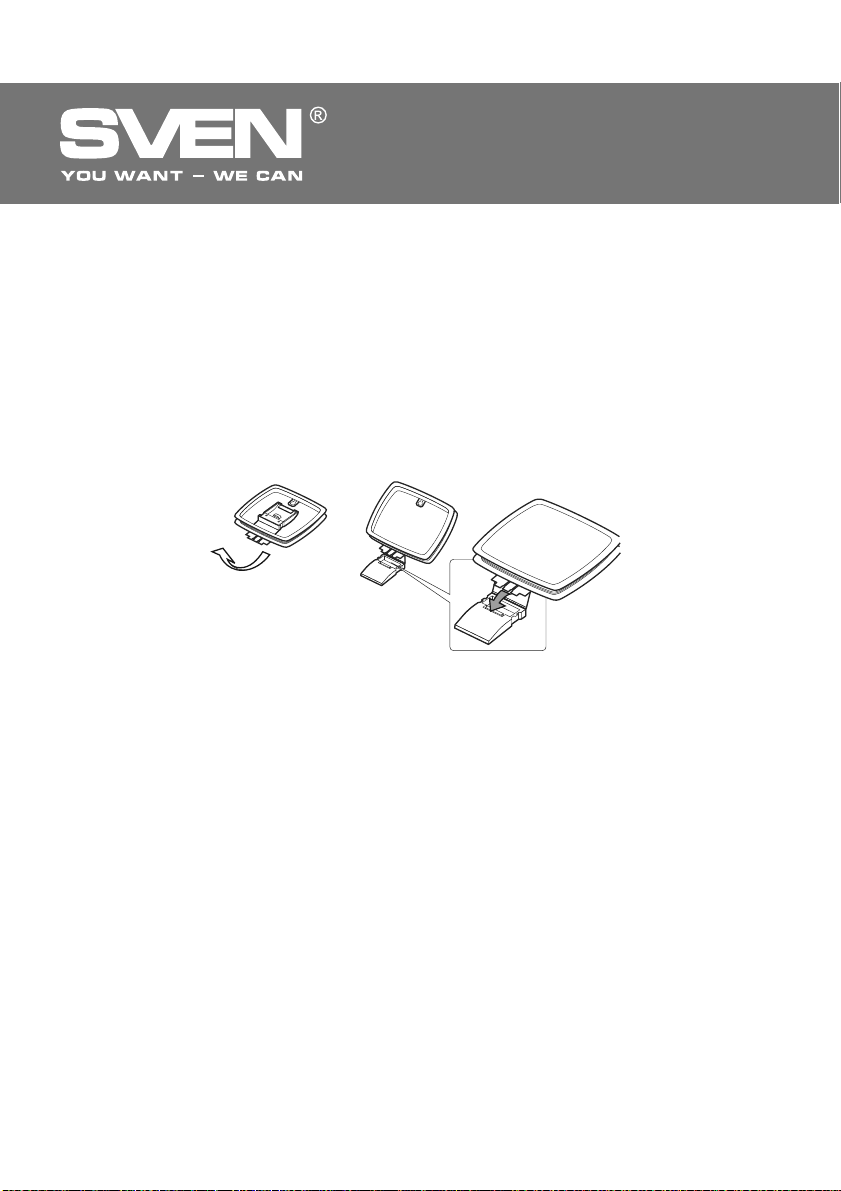
ǃǢǘǞǟDzǫǙǡǜǙ ƴM-ǔǡǦǙǡǡǯ
• NjǦǢǕǯ ǧǥǦǔǡǢǖǜǦǰ ǤǔǠǢǫǡǧDz ǔǡǦǙǡǡǧ, ǛǔǨǜǞǥǜǤǧǝǦǙ ǛǔǚǜǠ Ǟ ǢǦǖǙǤǥǦǜDz ǖ ǢǥǡǢǖǔǡǜǜ ǔǡǦǙǡ-
ǡǯ, ǞǔǞ ǣǢǞǔǛǔǡǢ ǡǜǚǙ ǡǔ Ǥǜǥ. 7 (ǬǔǗ 1).
ǔǡǦǙǡǡǯ ǘǢǥǦǔǦǢǫǡǢ, ǡǢ ǖ ǛǢǡǔǩ ǥǢ ǥǟǔǕǯǠ
12
DžǝǦ. 7. džǪǚǡǕ ǤǣǙǟǠdzǬǚǢǝǴ Ƶǁ-ǕǢǧǚǢǢǰ
• ǃǢǖǙǤǡǜǦǙ ǞǢǛǯǤǙǞ AM-ǦǙǤǠǜǡǔǟǔ ǣǤǢǦǜǖ ǫǔǥǢǖǢǝ ǥǦǤǙǟǞǜ, ǫǦǢǕǯ ǡǙǠǡǢǗǢ ǢǥǟǔǕǜǦǰ ǙǗǢ,
ǖǥǦǔǖǰǦǙ ǬǡǧǤ ǔǡǦǙǡǡǯǣǟǢǦǡǢ ǛǔǚǔǦǰ ǬǡǧǤ (ǬǔǗ 2). DžǟǙǗǞǔ ǣǢǦdzǡǜǦǙ Ǜǔ ǬǡǧǤ, ǫǦǢǕǯ ǧǕǙǘǜǦǰǥdz, ǫǦǢ Ǣǡ ǡǔǘǙǚǡǢ ǣǤǜǥǢǙǘǜǡǙǡ. LJǥǦǔǡǢǖǜǦǙ ǔǡǦǙǡǡǧ ǖ ǡǜǬǧ ǜǟǜ ǣǢǖǙǥǰǦǙ ǙǙ ǡǔ ǢǞǢǡǡǧDz ǤǔǠǧ, ǦǢ ǙǥǦǰ ǦǔǠ, ǗǘǙ
ǕǧǘǙǦ ǟǧǫǬǙ ǣǤǜǙǠ. DŽǔǛǠǙǥǦǜǦǙ ǖǥǙ ǘǤǧǗǜǙ ǣǤǢǖǢǘǔ (ǬǡǧǤ ǣǜǦǔǡǜdz, ǞǔǕǙǟǜ ǘǟdz ǞǢǟǢǡǢǞ
ǥǢǙǘǜǡǜǦǙǟǰǡǯǙ ǣǤǢǖǢǘǔ) ǣǢǘǔǟǰǬǙ ǢǦ ǔǡǦǙǡǡǯ.
• ǃǢǥǟǙ DZǦǢǗǢ ǣǢǘǥǢǙǘǜǡǜǦǙ ǤǔǠǢǫǡǧDz ǔǡǦǙǡǡǧ Ǟ ǞǟǙǠǠǔǠ «ƴǀ ANT» ǜ «AM GNT» ǡǔ ǛǔǘǡǙǝ ǣǔ-
ǡǙǟǜ ǥǔǕǖǧǨǙǤǔ (ǥǠ. ǥǩǙǠǧ ǡǔ Ǥǜǥ. 6).
ǃǤǜǠǙǫǔǡǜǙ. ǃǤǜ ǣǟǢǩǢǠ ǣǤǜǙǠǙ ǡǔ ǖǡǧǦǤǙǡǡDzDz ǤǔǠǢǫǡǧDz ǔǡǦǙǡǡǧ ƴǀ-ǘǜǔǣǔǛǢǡǔ
ǤǙǞǢǠǙǡǘǧǙǠ ǜǥǣǢǟǰǛǢǖǔǦǰ ǖǡǙǬǡDzDz ǔǡǦǙǡǡǧ ƴǀ-ǘǜǔǣǔǛǢǡǔ (ǖ ǞǢǠǣǟǙǞǦ ǡǙ ǖǩǢǘǜǦ)
ǣǤǢǜǛǖǢǘǥǦǖǙǡǡǢǗǢ ǢǕǤǔǛǪǔ.
BǞǟDzǫǙǡǜǙ
• Ƹǟdz ǖǞǟDzǫǙǡǜdz
ǞǟDzǫǔǦǙǟǰ n ǡǔ ǛǔǘǡǙǝ ǣǔǡǙǟǜ ǖ ǣǢǟǢǚǙǡǜǙ ON. ǁǔ ǣǙǤǙǘǡǙǝ ǣǔǡǙǟǜ ǥǔǕǖǧǨǙǤǔ ǛǔǥǖǙǦǜǦǥdz
DZǞǤǔǡ ǘǜǥǣǟǙdz (a, Ǥǜǥ. 1).
ǣǙǦǟǜ ǣǢǘ ǞǢǛǯǤǙǞ ǜ ǣǤǢǖǙǤǡǜǦǙ ǞǢǛǯǤǙǞ ǣǢ ǫǔǥǢǖǢǝ ǥǦǤǙǟǞǙ, ǫǦǢǕǯ
ǜǟǜ
ǥǔǕǖǧǨǙǤǔ ǣǢǘǞǟDzǫǜǦǙ ǬǡǧǤ ǣǜǦǔǡǜdz o Ǟ ǥǙǦǙǖǢǝ ǤǢǛǙǦǞǙ, ǖǞǟDzǫǜǦǙ ǖǯ-
8
Page 10

RUS
DŽǧǞǢǖǢǘǥǦǖǢ ǣǢ DZǞǥǣǟǧǔǦǔǪǜǜ
DŽǙǚǜǠ Ǣǚǜǘǔǡǜdz (STANDBY)
• LjǧǡǞǪǜdz STANDBY ǣǤǙǘǡǔǛǡǔǫǙǡǔ ǘǟdz ǕǯǥǦǤǢǗǢ ǖǞǟDzǫǙǡǜdz ǥǜǥǦǙǠǯ ǜ DZǞǢǡǢǠǜǜ ǣǢǦǤǙǕǟǙǡǜdz DZǟǙǞǦǤǢDZǡǙǤǗǜǜ. ǁǔǚǠǜǦǙ ǞǡǢǣǞǧ STANDBY (a, Ǥǜǥ. 3) ǡǔ ǣǧǟǰǦǙ ƸLJ ǟǜǕǢ ǞǡǢǣǞǧ
STANDBY (c, Ǥǜǥ. 1) ǡǔ ǣǔǡǙǟǜ ǧǣǤǔǖǟǙǡǜdz ǥǔǕǖǧǨǙǤǔ, ǫǦǢǕǯ ǖǞǟDzǫǜǦǰ/ǖǯǞǟDzǫǜǦǰ DZǦǧ
ǨǧǡǞǪǜDz. ƹǥǟǜ ǞǡǢǣǞǔ STANDBY ǖǞǟDzǫǙǡǔ, ǡǔ ǘǜǥǣǟǙǙ ǥǔǕǖǧǨǙǤǔ ǕǧǘǧǦ ǢǦǢǕǤǔǚǔǦǰǥdz ǘǖǙ
ǠǜǗǔDzǭǜǙ ǣǢǟǢǥǯ. ǁǔǚǠǜǦǙ ǞǡǢǣǞǧ ǢǣdzǦǰ ǜ ǥǜǥǦǙǠǔ ǖǢǛǖǤǔǦǜǦǥdz
ƶǯǕǢǤ ǜǥǦǢǫǡǜǞǢǖ ǥǜǗǡǔǟǔ
• ƶ ƴDž ǜǠǙǙǦǥdz 2 ǥǦǙǤǙǢǔǧǘǜǢǖǩǢǘǔ (DŽDž ǜ AUX) ǜ Ǣǘǜǡ 5.1-Ǟǔǡǔǟǰǡǯǝ ǔǧǘǜǢǖǩǢǘ ǡǔ ǛǔǘǡǙǝ
ǣǔǡǙǟǜ ǥǔǕǖǧǨǙǤǔ. Ƹǟdz ǣǤǢǥǟǧǬǜǖǔǡǜdz ǜǥǦǢǫǡǜǞǔ ǥǦǙǤǙǢǥǜǗǡǔǟǔ ǣǢǘǞǟDzǫǜǦǙ ǙǗǢ Ǟ ǤǔǛǮeǠǔǠ AUDIO INPUT (k , Ǥǜǥ. 2) ƴDž, ǞǔǞ ǣǢǞǔǛǔǡǢ ǡǔ Ǥǜǥ. 5. Ƹǟdz ǣǤǢǥǟǧǬǜǖǔǡǜdz ǥǜǗǡǔǟǔ
ǜǥǦǢǫǡǜǞǔ ǠǡǢǗǢǞǔǡǔǟǰǡǢǗǢ ǛǖǧǞǔ ǣǢǘǞǟDzǫǜǦǙ ǙǗǢ ǠǡǢǗǢǞǔǡǔǟǰǡǯǝ ǖǯǩǢǘ Ǟ ǤǔǛǮǙǠǔǠ 5.1 CH
INPUT (l, Ǥǜǥ
ǖǯǕǙǤǜǦǙ ǡǧǚǡǯǝ ǜǥǦǢǫǡǜǞ ǥǜǗǡǔǟǔ ǞǡǢǣǞǢǝ INPUT ǡǔ ǣǔǡǙǟǜ ǧǣǤǔǖǟǙǡǜdz ǥǔǕǖǧǨǙǤǔ (d,
Ǥǜǥ. 1) ǜǟǜ ǞǡǢǣǞǔǠǜ DVD b, PC c ǜǟǜ AUX d (Ǥǜǥ. 3) ǡǔ ǣǧǟǰǦǙ ƸLJ. ǁǔ ǘǜǥǣǟǙǙ ǥǔǕǖǧǨǙǤǔ
ǖǯǥǖǙǦǜǦǥdz ǡǔǘǣǜǥǰ, ǥǢǢǦǖǙǦǥǦǖǧDzǭǔdz ǔǧǘǜǢǖǩǢǘǧ.
ƶǞǟDzǫǙǡǜǙ ǜ ǡǔǥǦǤǢǝǞǔ ǦDzǡǙǤǔ
• ǁǔǚǜǠǔdz ǣǢǥǟǙǘǢǖǔǦǙǟǰǡǢ ǞǡǢǣǞǜ SCAN q ǜ FM/AM s ǡǔ ǣǧǟǰǦǙ
ǜ ǖǯǕǜǤǔǙǦǙ ǡǧǚǡǯǝ ǘǜǔǣǔǛǢǡ FM ǜǟǜ AM.
• DŽǧǫǡǔdz ǡǔǥǦǤǢǝǞǔ. ǁǔǚǜǠǔdz ǞǡǢǣǞǜ TUNE+ ǜǟǜ TUNE– r ǡǔ ǣǧǟǰǦǙ ƸLJ, ǠǢǚǡǢ ǦǢǫǡǙǙ ǡǔ-
ǥǦǤǢǜǦǰ ǦDzǡǙǤ ǡǔ ǫǔǥǦǢǦǧ ǤǔǘǜǢǥǦǔǡǪǜǜ.
• ƴǖǦǢǠǔǦǜǫǙǥǞǜǝ ǣǢǜǥǞ. LJǘǙǤǚǜǖǔdz ǞǡǢǣǞǧ SCAN q ǡǔ ǣǧǟǰǦǙ ƸLJ ǕǢǟǙǙ 1 ǥǙǞ, ǖǞǟDzǫǜǦǥdz
ǥǞǔǡǜǤǢǖǔǡǜǙ FM-ǘǜǔǣǔǛǢǡǔ (ǥ 87 ǀƷǪ) ǥ ǣǢǥǟǙǘǢǖǔǦǙǟǰǡǯǠ ǛǔǣǢǠǜǡǔǡǜǙǠ ǡǔǝǘǙǡǡǯǩ ǥǦǔǡǪǜǝ: «Džǁ 01», «Džǁ
ǫǔǥǦǢǦǯ 108 ǀƷǪ. ǃǢǥǟǙ ǥǞǔǡǜǤǢǖǔǡǜdz ǔǖǦǢǠǔǦǜǫǙǥǞǜ ǖǞǟDzǫǔǙǦǥdz ǣǙǤǖǔdz ǡǔǝǘǙǡǡǔdz ǥǦǔǡǪǜdz.
• ƾǤǢǠǙ ǦǢǗǢ, ǠǢǚǡǢ ǕǯǥǦǤǢ ǖǞǟDzǫǜǦǰ ǡǧǚǡǧDz ǤǔǘǜǢǣǙǤǙǘǔǫǧ ǫǙǤǙǛ ǞǡǢǣǞǜ ǪǜǨǤǢǖǢǝ ǞǟǔǖǜǔǦǧǤǯ (h ǜ i) ǡǔ ǣǧǟǰǦǙ ƸLJ, Ǜǔǘǔǖ ǜ ǥǢǩǤǔǡǜǖ ǖ ǣǔǠdzǦǜ ǥǜǥǦǙǠǯ ǣǢ 20 ǤǔǘǜǢǥǦǔǡǪǜǝ FM
ǜ ƴM. Ƹǟdz DZǦǢǗǢ, ǞǢǗǘǔ ǥǦǔǡǪǜdz
ǘǜǥǣǟǙǙ ǖǯǥǖǙǦǜǦǥdz ǡǔǘǣǜǥǰ «Džǁ _ _»), ǣǢǦǢǠ ǞǡǢǣǞǔǠǜ h ǜ i ǡǔ ǃƸLJ ǖǖǙǥǦǜ ǙǙ ǡǢǠǙǤ (ǢǦ
0 ǘǢ 19), ǞǢǦǢǤǯǝ ǖǯǥǖǙǦǜǦǥdz ǡǔ ǘǜǥǣǟǙǙ, ǡǔǣǤǜǠǙǤ «Džǁ 09». ǃǢǥǟǙ ǥǢǩǤǔǡǙǡǜdz ǡǢǠǙǤǢǖ
ǤǔǘǜǢǥǦǔǡǪǜǝ ǖ ǣǔǠdzǦǜ ǠǢǚǡǢ ǕǯǥǦǤǢ ǡǔǕǤǔǦǰ ǥ ǣǢǠǢǭǰDz ǞǡǢǣǢǞ ǪǜǨǤǢǖǢǝ ǞǟǔǖǜǔǦǧǤǯ (h
ǜ i) ǡǔ
LJǣǤǔǖǟǙǡǜǙ ǢǕǭǙǝ ǗǤǢǠǞǢǥǦǰDz ǛǖǧǞǔ
• ƾǡǢǣǞǔǠǜ VOL+ ǜǟǜ VOL– (m, Ǥǜǥ. 3) ǡǔ ǣǧǟǰǦǙ ƸLJ ǜǟǜ ǤǙǗǧǟdzǦǢǤǢǠ VOLUME (b, Ǥǜǥ. 1) ǡǔ
ǣǙǤǙǘǡǙǝ ǣǔǡǙǟǜ ǥǔǕǖǧǨǙǤǔ ǠǢǚǡǢ ǢǦǤǙǗǧǟǜǤǢǖǔǦǰ (ǧǖǙǟǜǫǜǦǰ/ǧǠǙǡǰǬǜǦǰ) ǧǤǢǖǙǡǰ ǢǕǭǙǝ
ǗǤǢǠǞǢǥǦǜ ǥǜǥǦǙǠǯ.
LJǣǤǔǖǟǙǡǜǙ ǗǤǢǠǞǢǥǦǰDz ǞǢǟǢǡǢǞ ǜ ǥǔǕǖǧǨǙǤǔ
• LJǤǢǖǙǡǰ ǗǤǢǠǞǢǥǦǜ ǨǤǢǡǦǔǟǰǡǯǩ, ǦǯǟǢǖǯǩ ǜ ǪǙǡǦǤǔǟǰǡǢǝ ǞǢǟǢǡǢǞ ǠǢǚǡǢ ǢǦǤǙǗǧǟǜǤǢǖǔǦǰ
ǞǡǢǣǞǔǠǜ FRONT+/- f, SURROUND+/- e ǜ CEN+/- n
ǃƸLJ ǜǟǜ SUB+ g ǜ SUB– h ǡǔ ǣǔǡǙǟǜ ǧǣǤǔǖǟǙǡǜdz ǥǔǕǖǧǨǙǤǔ (ǥǠ. Ǥǜǥ. 1) ǠǢǚǡǢ ǢǦǤǙǗǧǟǜǤǢǖǔǦǰ ǧǤǢǖǙǡǰ ǗǤǢǠǞǢǥǦǜ ǥǔǕǖǧǨǙǤǔ.
DŽǙǚǜǠ ǢǕǮǙǠǡǢǗǢ Ǜǖǧǫǔǡǜdz
• ǁǔǚǜǠǔdz ǞǡǢǣǞǧ 2.1/5.1 ǡǔ ǣǧǟǰǦǙ ƸLJ l ǜǟǜ ǡǔ ǣǔǡǙǟǜ ǧǣǤǔǖǟǙǡǜdz ǥǔǕǖǧǨǙǤǔ e ǣǤǜ ǖǞǟDzǫǙǡǡǢǠ ǜǥǦǢǫǡǜǞǙ ǛǖǧǞǔ, ƶǯ ǧǥǦǔǡǔǖǟǜǖǔǙǦǙ ǤǙǚǜǠ ǢǕǮǙǠǡǢǗǢ Ǜǖǧǫǔǡǜdz. ƶ
ǖǯǕǤǔǡǡǢǗǢ ǤǙǚǜǠǔ (2.1/5.1) ǡǔ ǘǜǥǣǟǙǙ ǢǦǢǕǤǔǚǔǙǦǥdz ǥǢǢǦǖǙǦǥǦǖǧDzǭǔdz ǡǔǘǣǜǥǰ 2.1 ǜǟǜ
5.1. ƹǥǟǜ ǚǙ ǣǢǘǞǟDzǫǙǡ ǜ ǖǞǟDzǫǙǡ ǜǥǦǢǫǡǜǞ ǥǜǗǡǔǟǔ 5.1 (DVD), ǦǢ ǤǙǚǜǠ ǢǕǮǙǠǡǢǗǢ Ǜǖǧǫǔǡǜdz
(2.1/ 5.1) ǡǙǘǢǥǦǧǣǙǡ.
. 2) ƴDž (ǥǠ. ǥǩǙǠǧ ǡǔ Ǥǜǥ. 5). ƶ ǛǔǖǜǥǜǠǢǥǦǜ ǢǦ ǡǙǢǕǩǢǘǜǠǢǗǢ ǣǢǘǞǟDzǫǙǡǜdz
02», «Džǁ 03» ǜ Ǧ. ǘ. DžǞǔǡǜǤǢǖǔǡǜǙ FM-ǘǜǔǣǔǛǢǡǔ ǕǧǘǙǦ ǣǤǢǘǢǟǚǔǦǰǥdz ǘǢ
ǡǔǝǘǙǡǔ, ǡǔǘǢ ǡǔǚǔǦǰ ǞǡǢǣǞǧ ǀƹǀORY t ǡǔ ǣǧǟǰǦǙ ƸLJ (ǡǔ
ǣǧǟǰǦǙ ƸLJ ǡǢǠǙǤ ǡǧǚǡǢǝ ǤǔǘǜǢǥǦǔǡǪǜǜ.
ǡǔ ǣǧǟǰǦǙ ƸLJ. ƴ ǞǡǢǣǞǔǠǜ SUB+/– o ǡǔ
BTR5-10
ǖ ǤǔǕǢǫǜǝ ǤǙǚǜǠ.
ƸLJ, ƶǯ ǖǞǟDzǫǔǙǦǙ ǦDzǡǙǤ
ǛǔǖǜǥǜǠǢǥǦǜ ǢǦ
9
Page 11

RUS
ƴǞǦǜǖǡǔdz ǔǞǧǥǦǜǫǙǥǞǔdz ǥǜǥǦǙǠǔ
5.1 ǘǟdz ǘǢǠǔǬǡǙǗǢ ǞǜǡǢǦǙǔǦǤǔ
ƶǤǙǠǙǡǡǢǙ ǖǯǞǟDzǫǙǡǜǙ ǛǖǧǞǔ
• ǁǔǚǠǜǦǙ ǞǡǢǣǞǧ MUTE j ǡǔ ǣǧǟǰǦǙ ƸLJ ǜǟǜ ǞǡǢǣǞǧ MUTE f ǡǔ ǣǔǡǙǟǜ ǧǣǤǔǖǟǙǡǜdz ǥǔǕǖǧǨǙǤǔ, ǫǦǢǕǯ ǖǤǙǠǙǡǡǢ ǖǯǞǟDzǫǜǦǰ ǛǖǧǞ. ǁǔǚǠǜǦǙ DZǦǧ ǞǡǢǣǞǧ ǣǢǖǦǢǤǡǢ, ǫǦǢǕǯ ǖǞǟDzǫǜǦǰ ǛǖǧǞ.
ǃǤǜǠǙǫǔǡǜǙ. ƹǥǟǜ ƶǯ ǘǟǜǦǙǟǰǡǢǙ ǖǤǙǠdz ǡǙ ǜǥǣǢǟǰǛǧǙǦǙ ƴDž, ǡǙ ǛǔǕǧǘǰǦǙ ǖǯǞǟDzǫǜǦǰ
ǧǥǦǤǢǝǥǦǖǢ ǖǯǞǟDzǫǔǦǙǟǙǠ POWER ǜ ǖǯǡǧǦǰ ǖǜǟǞǧ ǥǙǦǙǖǢǗǢ ǬǡǧǤǔ ǜǛ ǤǢǛǙǦǞǜ.
6. LJDždžDŽƴǁƹǁƼƹ ǁƹƼDžǃDŽƴƶǁǂC
ǁǙǜǥǣǤǔǖǡǢǥǦǰ
ƴDž ǡǙ ǖǞǟDzǫǔǙǦǥdz.
ǁǙǦ ǛǖǧǞǔ.
ƶ ǞǢǟǢǡǞǔǩ ƴDž
ǥǟǜǬǞǢǠ Ǧǜǩǜǝ ǛǖǧǞ.
ƼǥǞǔǚǙǡǜǙ ǛǖǧǞǔ.
ǁǙ ǨǧǡǞǪǜǢǡǜǤǧǙǦ
ǣǧǟǰǦ ƸLJ.
ǁǙ ǤǔǕǢǦǔǙǦ
FM/AM-ǦDzǡǙǤ.
ǃǤǜǫǜǡǔ
ǁǙ ǣǢǘǞǟDzǫǙǡǔ Ǟ ǥǙǦǜ.
ǁǙ ǖǞǟDzǫǙǡ ǥǙǦǙǖǢǝ ǖǯǞǟDzǫǔǦǙǟǰ.
DŽǙǗǧǟdzǦǢǤ ǗǤǢǠǞǢǥǦǜ ǧǥǦǔǡǢǖǟǙǡ
ǖ ǣǢǟǢǚǙǡǜǙ ǡǔǜǠǙǡǰǬǙǝ ǗǤǢǠǞǢǥǦǜ.
ǁǙǣǤǔǖǜǟǰǡǢ ǣǢǘǞǟDzǫǙǡ ǜǥǦǢǫǡǜǞ
ǔǧǘǜǢǥǜǗǡǔǟǔ.
DŽǙǗǧǟdzǦǢǤ ǗǤǢǠǞǢǥǦǜ ǧǥǦǔǡǢǖǟǙǡ
ǖ ǣǢǟǢǚǙǡǜǙ ǡǔǜǠǙǡǰǬǙǝ ǗǤǢǠǞǢǥǦǜ.
ƵǢǟǰǬǔdz ǔǠǣǟǜǦǧǘǔ ǖǩǢǘǡǢǗǢ
ǥǜǗǡǔǟǔ.
DŽǔǛǤdzǚǙǡǔ ǕǔǦǔǤǙǝǞǔ.
ƸǙǝǥǦǖǜǙ ǣǤdzǠǯǩ ǥǢǟǡǙǫǡǯǩ ǟǧǫǙǝ.
ǃǤǙǣdzǦǥǦǖǜǙ ǠǙǚǘǧ ǣǧǟǰǦǢǠ
ǜ ǣǤǜǙǠǡǜǞǢǠ ǥǔǕǖǧǨǙǤǔ.
ǁǙ ǣǢǘǞǟDzǫǙǡǔ FM ǜǟǜ AM-ǔǡǦǙǡǡǔ.
ǃǟǢǩǢǝ ǣǤǜǙǠ ǡǔ ǔǡǦǙǡǡǯ.
džƹƽ
DžǣǢǥǢǕ ǧǥǦǤǔǡǙǡǜdz
ǃǤǢǖǙǤǰǦǙ ǣǤǔǖǜǟǰǡǢǥǦǰ
ǣǢǘǞǟDzǫǙǡǜdz.
ƶǞǟDzǫǜǦǙ ǖǯǞǟDzǫǔǦǙǟǰ.
ǃǢǘǥǦǤǢǝǦǙ ǤǙǗǧǟdzǦǢǤ
ǗǤǢǠǞǢǥǦǜ.
ǃǢǘǞǟDzǫǜǦǙ ǜǥǦǢǫǡǜǞǜ ǥǜǗǡǔǟǔ
ǣǤǔǖǜǟǰǡǢ.
ǃǢǘǥǦǤǢǝǦǙ ǤǙǗǧǟdzǦǢǤ
ǗǤǢǠǞǢǥǦǜ.
DŽǙǗǧǟdzǦǢǤǔǠǜ ǗǤǢǠǞǢǥǦǜ ǡǔ ǜǥǦǢǫǡǜǞǔǩ ǥǜǗǡǔǟǔ ǜ ƴDž ǧǠǙǡǰǬǜǦǙ ǖǙǟǜǫǜǡǧ ǖǩǢǘǡǢǗǢ ǥǜǗǡǔǟǔ.
ƻǔǠǙǡǜǦǙ ǕǔǦǔǤǙǝǞǧ ǡǔ ǡǢǖǧDz.
ƼǛǠǙǡǜǦǙ ǤǔǥǣǢǟǢǚǙǡǜǙ
ǥǔǕǖǧǨǙǤǔ ǜǟǜ ǣǧǟǰǦǔ ƸLJ.
ƼǛǠǙǡǜǦǙ ǤǔǥǣǢǟǢǚǙǡǜǙ
ǥǔǕǖǧǨǙǤǔ ǜǟǜ ǣǧǟǰǦǔ ƸLJ.
ǃǢǘǞǟDzǫǜǦǙ FM ǜǟǜ AM-ǔǡǦǙǡǡǧ.
ǃǢǘǞǟDzǫǜǦǙ ǖǡǙǬǡDzDz
FM-ǔǡǦǙǡǡǧ ǜǟǜ AM-ǔǡǦǙǡǡǧ.
ƹǥǟǜ ǡǜ Ǣǘǜǡ ǜǛ ǧǞǔǛǔǡǡǯǩ ǖǯǬǙ ǥǣǢǥǢǕǢǖ ǡǙ ǣǢǛǖǢǟdzǙǦ ǤǙǬǜǦǰ ǣǤǢǕǟǙǠǧ, ǣǢǚǔǟǧǝǥǦǔ, ǢǕǤǔǦǜǦǙǥǰ Ǜǔ ǣǤǢǨǙǥǥǜǢǡǔǟǰǡǢǝ ǞǢǡǥǧǟǰǦǔǪǜǙǝ ǖ ǕǟǜǚǔǝǬǜǝ Ǟ ƶǔǠ ǥǙǤǖǜǥǡǯǝ ǪǙǡǦǤ. ǁǜǞǢǗǘǔ
ǡǙ ǣǯǦǔǝǦǙǥǰ
ǤǙǠǢǡǦǜǤǢǖǔǦǰ ǜǛǘǙǟǜǙ ǥǔǠǢǥǦǢdzǦǙǟǰǡǢ.
10
Page 12

RUS
Руководство по эксплуатации
7. ТЕХНИЧЕСКИЕ ХАРАКТЕРИСТИКИ
Характеристики и единицы измерения Значение
Акустическая система
Выходная мощность (RMS), Вт:
Номинальное сопротивление
нагрузки (на каждый канал), Ом
Частотный диапазон, Гц
Соотношение сигнал/шум, дБ
Диаметр динамиков, мм
Размеры (Ш × В × Г), мм
Напряжение питания, В/Гц
Вес, кг
Диапазоны частот:
АМ (при шаге 9 кГц), кГц
FМ (при шаге 100 кГц), МГц
Отношение сигнал/шум:
AM, дБ
FМ, дБ
сабвуфер
сателлиты
сабвуфер
сателлиты
сабвуфера
центральной колонки
фронт. и тыловых колонок
сабвуфера
центральной колонки
фронт. и тыловых колонок
Тюнер
60
5 × 15
6
4
40 – 20 000
≥ 83
Ø 165
Ø 38 + 2 × Ø 100
Ø 38 + Ø 100
220 × 400 × 300
400 × 150 × 240
240 × 150 × 140
~230/50
21, 5
522 ~ 1611
87 ~ 108
> 45
> 45
BTR5-10
Примечания:
• Технические характеристики, приведенные в таблице, справочные и не могут служить
основанием для претензий.
• Продукция ТМ SVEN постоянно совершенствуется. По этой причине технические ха-
рактеристики и комплектность могут быть изменены без предварительного уведомления.
11
Page 13

ƴǞǦǜǖǡǔ ǔǞǧǥǦǜǫǡǔ ǥǜǥǦǙǠǔ 5.1
ǘǟdz ǘǢǠǔǬǡǰǢǗǢ ǞǹǡǢǦǙǔǦǤǧ
ƾƹDŽƫƶǁƼNJdžƶǂ
ƻ ƹƾDžǃƿLJƴdžƴNJƫƬ
BTR5-10
www.sven.ѵ
Page 14

UKR
ƾǙǤǹǖǡǜǪǦǖǢ Ǜ ǙǞǥǣǟǧǔǦǔǪǹǺ
ƸdzǞǧǷǠǢ ƶǔǠ Ǜǔ ǞǧǣǹǖǟDz ǔǞǧǥǦǜǫǡǢǺ ǥǜǥǦǙǠǜ džǀ SVEN!
ƴƶdžǂDŽDžǐƾƹ ǃDŽƴƶǂ
© 2014. SVEN PTE. LTD. ƶǙǤǥidz 1.0 (V 1.0).
NJǙ ƾǙǤǹǖǡǜǪǦǖǢ Ǧǔ ǹǡǨǢǤǠǔǪǹdz, ǭǢ ǠǹǥǦǜǦǰǥdz ǖ ǡǰǢǠǧ, ǛǔǩǜǭǙǡǢ ǔǖǦǢǤǥǰǞǜǠ ǣǤǔǖǢǠ. LJǥǹ ǣǤǔǖǔ ǛǔǥǦǙǤǙǚǙǡǹ.
džǂDŽƷǂƶƹƿǐǁƫ ǀƴDŽƾƼ
LJǥǹ ǦǢǤǗǢǖǙǟǰǡǹ ǠǔǤǞǜ Ƿ ǖǟǔǥǡǹǥǦDz Ǻǩ ǛǔǞǢǡǡǜǩ ǖǟǔǥǡǜǞǹǖ.
ǃǂǃƹDŽƹƸƺƹǁǁǓ ǃDŽǂ ǂƵǀƹƺƹǁǁǓ ƶƫƸǃǂƶƫƸƴƿǐǁǂDždžƫ
ǁǙǛǖǔǚǔDzǫǜ ǡǔ ǘǢǞǟǔǘǙǡǹ Ǜǧǥǜǟǟdz ǛǤǢǕǜǦǜ ƾǙǤǹǖǡǜǪǦǖǢ ǦǢǫǡǹǬǜǠ, ǠǢǚǟǜǖǹ ǘǙdzǞǹ ǡǙǖǹǘǣǢǖǹǘǡǢǥǦǹ. ƫǡǨǢǤǠǔǪǹdz ǪǰǢǗǢ ƾǙǤǹǖǡǜǪǦǖǔ ǡǔǘǔǡǔ ǡǔ ǧǠǢǖǔǩ «dzǞ Ƿ». ƴǖǦǢǤ ǹ ǖǜǘǔǖǙǪǰ ǡǙ ǡǙǥǧǦǰ
ǚǢǘǡǢǺ ǖǹǘǣǢǖǹǘǔǟǰǡǢǥǦǹ ǣǙǤǙǘ ǢǥǢǕǢDz ǔǕǢ ǢǤǗǔǡǹǛǔǪǹǷDz Ǜǔ ǛǕǜǦǞǜ ǔǕǢ ǧǬǞǢǘǚǙǡǡdz, Ǜǔǖǘǔǡǹ
ǹǡǨǢǤǠǔǪǹǷDz, ǭǢ ǠǹǥǦǜǦǰǥdz ǧ ǪǰǢǠǧ ƾǙǤǹǖǡǜǪǦǖǹ.
ƻǀƫDždž
RUS .................................................................................................
UKR ..................................................................................................
1. DŽƹƾǂǀƹǁƸƴNJƫƬ ǃǂƾLJǃNJǒ ................................................ .. .. ... .... .. .
2. ƾǂǀǃƿƹƾdžǁƫDždžǐ ƴDž ................................................................ .. ..
3. ƻƴljǂƸƼ ƵƹƻǃƹƾƼ ................................................................ ........
4. džƹljǁƫNjǁƼƽ ǂǃƼDž ...............................................................................
5. ǃƫƸƷǂdžǂƶƾƴ džƴ ǃǂDŽǓƸǂƾ DŽǂƵǂdžƼ ..........................................................
6. LJDžLJǁƹǁǁǓ ǁƹDžǃDŽƴƶǁǂDždžƹƽ...................................................................
7. džƹljǁƫNjǁƫ ljƴDŽƴƾdžƹDŽƼDždžƼƾƼ .............................................................
ENG .................................................................................................
BTR5-10
22
23
24
1
12
13
14
14
14
17
1. DŽƹƾǂǀƹǁƸƴNJƫƬ ǃǂƾLJǃNJǒ
• ƴǞǧǤǔǦǡǢ ǤǢǛǣǔǞǧǝǦǙ ǖǜǤǹǕ, ǣǤǢǥǦǙǚǦǙ Ǜǔ ǦǜǠ, ǭǢǕ ǧǥǙǤǙǘǜǡǹ ǞǢǤǢǕǞǜ ǡǙ ǛǔǟǜǬǜǟǢǥdz dzǞǙ-
ǡǙǕǧǘǰ ǣǤǜǟǔǘǘdz. ǃǙǤǙǖǹǤǦǙ ǣǤǜǥǦǤǹǝ ǡǔ ǣǤǙǘǠǙǦ ǣǢǬǞǢǘǚǙǡǰ. ǓǞǭǢ ǖǜǤǹǕ ǣǢǬǞǢǘǚǙǡǢ ǣǤǜ
ǦǤǔǡǥǣǢǤǦǧǖǔǡǡǹ, ǛǖǙǤǡǹǦǰǥdz ǧ ǨǹǤǠǧ, ǭǢ ǛǘǹǝǥǡDzǷ ǘǢǥǦǔǖǞǧ; dzǞǭǢ ǖǜǤǹǕ ǡǙ ǨǧǡǞǪǹǢǡǧǷ, ǖǹǘǤǔ-
ǛǖǙǤǡǹǦǰǥdz ǘǢ ǣǤǢǘǔǖǪdz.
Ǜǧ ǚ
• ǃǤǢǥǜǠǢ ƶǔǥ ǣǙǤǙǖǹǤǜǦǜ ǞǢǠǣǟǙǞǦǡǹǥǦǰ ǹ ǡǔdzǖǡǹǥǦǰ ǗǔǤǔǡǦǹǝǡǢǗǢ ǦǔǟǢǡǔ. ǃǙǤǙǞǢǡǔǝǦǙǥdz
ǖ ǦǢǠǧ, ǭǢ ǖ ǗǔǤǔǡǦǹǝǡǢǠǧ ǦǔǟǢǡǹ ǣǤǢǥǦǔǖǟǙǡǢ ǬǦǔǠǣ ǠǔǗǔǛǜǡǧ, ǤǢǛǕǹǤǟǜǖǜǝ ǣǹǘǣǜǥ ǔǕǢ
ǬǦǔǠǣ ǣǤǢǘǔǖǪdz ǹ ǘǔǦǔ ǣǤǢǘǔǚǧ, ǡǢǠǙǤ ǦǢǖǔǤǧ ǥǣǹǖǣǔǘǔǷ Ǜǹ ǖǞǔǛǔǡǜǠ ǧ ǦǔǟǢǡǹ. ǃǔǠ’dzǦǔǝǦǙ, ǭǢ
ǣǤǜ ǖǦǤǔǦǹ ǗǔǤǔǡǦǹǝǡǢǗǢ ǦǔǟǢǡǔ ǔǕǢ ǡǙǥǣǹǖǣǔǘǔǡǡǹ ǡǢǠǙǤǹǖ ǖǜ ǖǦǤǔǫǔǷǦǙ ǣǤǔǖǢ ǡǔ
ǤǙǠǢǡǦ.
• ǁǙ ǖǞǟDzǫǔǝǦǙ ǖǜǤǹǕ ǢǘǤǔǛǧ ǣǹǥǟdz ǦǢǗǢ, dzǞ ǖǡǙǥǟǜ ǝǢǗǢ ǖ ǣǤǜǠǹǭǙǡǡdz, dzǞǭǢ ǡǔǘǖǢǤǹ ǠǹǡǧǥǢǖǔ
ǦǙǠǣǙǤǔǦǧǤǔ! DŽǢǛǣǔǞǢǖǔǡǜǝ ǖǜǤǹǕ ǡǙǢǕǩǹǘǡǢ ǖǜǦǤǜǠǔǦǜ ǖ ǧǠǢǖǔǩ ǞǹǠǡǔǦǡǢǺ ǦǙǠǣǙǤǔǦǧǤǜ ǡǙ
ǠǙǡǬǙ 4-ǩ ǗǢǘǜǡ.
• ǃǙǤǙǘ ǙǞǥǣǟǧǔǦǔǪǹǷDz ǣǤǜǥǦǤǢDz ǧǖǔǚǡǢ ǢǛǡǔǝǢǠǦǙǥdz Ǜ ǪǜǠ ƾǙǤǹǖǡǜǪǦǖǢǠ ǹ ǛǕǙǤǙǚǹǦǰ ǝǢǗǢ
ǡǔ ǧǖǙǥǰ ǣǙǤǹǢǘ ǞǢǤǜǥǦǧǖǔǡǡdz.
džǙǩǡǹǫǡǔ ǣǹǘǦǤǜǠǞǔ ǤǢǛǠǹǭǙǡǔ ǡǔ ǥǔǝǦi www.sven.Н
džǔǞǢǚ ǦǧǦ ƶǜ ǛǠǢǚǙǦǙ ǛǡǔǝǦǜ ǢǡǢǖǟǙǡǧ ǖǙǤǥǹDz ǪǰǢǗǢ ǞǙǤǹǖǡǜǪǦǖǔ.
ǗǔǤǔǡǦǹǝǡǜǝ
13
Page 15

UKR
ƴǞǦǜǖǡǔ ǔǞǧǥǦǜǫǡǔ ǥǜǥǦǙǠǔ 5.1
ǘǟdz ǘǢǠǔǬǡǰǢǗǢ ǞǹǡǢǦǙǔǦǤǧ
2. ƾǂǀǃƿƹƾdžǁƫDždžǐ ƴDž
• DžǔǕǖǧǨǙǤ – 1 ǬǦ.
• ƾǢǟǢǡǞǜ – 5 ǬǦ.
• ƴǞǧǥǦǜǫǡǜǝ ǞǔǕǙǟǰ – 5 ǬǦ.
• DžǦǙǤǙǢǨǢǡǹǫǡǜǝ ǥǜǗǡǔǟǰǡǜǝ ǞǔǕǙǟǰ 2RCA ǘǢ 2RCA – 3 ǬǦ.
• ǃǙǤǙǩǹǘǡǜǞ 2RCA ǘǢ mini-jack Ø 3,5 ǠǠ – 3 ǬǦ.
• ǃǧǟǰǦ ǘǜǥǦǔǡǪǹǝǡǢǗǢ ǧǣǤǔǖǟǹǡǡdz – 1 ǬǦ.
• ƹǟǙǠǙǡǦ ǚǜǖǟǙǡǡdz CR2025 – 1 ǬǦ.
• FM-ǔǡǦǙǡǔ – 1 ǬǦ.
• AM-ǔǡǦǙǡǔ – 1 ǬǦ.
• ƾǙǤǹǖǡǜǪǦǖǢ Ǜ ǙǞǥǣǟǧǔǦǔǪǹǺ – 1 ǬǦ.
• ƷǔǤǔǡǦǹǝǡǜǝ ǦǔǟǢǡ – 1 ǬǦ
3. ƻƴljǂƸƼ ƵƹƻǃƹƾƼ
• ǍǢǕ ǧǡǜǞǡǧǦǜ ǧǤǔǚǙǡǡdz ǙǟǙǞǦǤǜǫǡǜǠ ǥǦǤǧǠǢǠ, ǡǙ ǤǢǛǕǜǤǔǝǦǙ ƴDž ǹ ǡǙ ǤǙǠǢǡǦǧǝǦǙ ǥǔǠǢǥ-
ǦǹǝǡǢ. ǂǕǥǟǧǗǢǖǧǖǔǡǡdz ǹ ǤǙǠǢǡǦ ǣǢǖǜǡǡǹ ǛǘǹǝǥǡDzǖǔǦǜ ǟǜǬǙ ǞǖǔǟǹǨǹǞǢǖǔǡǹ ǨǔǩǹǖǪǹ ǥǙǤǖǹǥǡǢǗǢ ǪǙǡǦǤǧ. ǃǙǤǙǟǹǞ ǔǖǦǢǤǜǛǢǖǔǡǜǩ ǥǙǤǖǹǥǡǜǩ ǪǙǡǦǤǹǖ ǘǜǖǹǦǰǥdz ǡǔ ǥǔǝǦǹ www.sven.Н
• ǁǙ ǘǢǣǧǥǞǔǝǦǙ ǛǔǠǜǞǔǡǡdz ǘǤǢǦǹǖ (ǧ ǦǢǠǧ ǫǜǥǟǹ ǝ «ǛǔǛǙǠǟǙǡǜǩ») ǞǢǟǢǡǢǞ ƴDž Ǡǹǚ ǥǢǕǢDz, ǡǔ
ǞǢǤǣǧǥ
ǣǹǘǥǜǟDzǖǔǫǔ ǹ ǡǔ ǛǙǠǟDz, ǕǢ ǪǙ ǣǤǜǛǖǢǘǜǦǰ ǘǢ ǣǢǬǞǢǘǚǙǡǡdz ǖǜǩǹǘǡǜǩ ǞǔǥǞǔǘǹǖ ǣǹǘǥǜ-
ǟDzǖǔǫǔ.
• ƻǔǕǢǤǢǡdzǷǦǰǥdz ǦǢǤǞǔǦǜǥdz ǘǢ ǬǦǜǤǹǖ ǠǙǤǙǚǡǢǺ ǖǜǟǞǜ ǔǣǔǤǔǦǧǤǜ ǣǤǢǦdzǗǢǠ 2 ǥǙǞ. Ǜ ǠǢǠǙǡǦǧ
ǖǜǟǧǫǙǡǡdz ǖǜǟǞǜ Ǜ ǤǢǛǙǦǞǜ.
• ǃǹǘ ǫǔǥ ǛǔǠǹǡǜ ǛǔǣǢǕǹǚǡǜǞǔ ǖǹǘǞǟDzǫǔǝǦǙ ƴDž ǖǹǘ ǠǙǤǙǚǹ. ƶǜǞǢǤǜǥǦǢǖǧǝǦǙ ǛǔǣǢǕǹǚǡǜǞǜ ǦǢǗǢ ǚ Ǧǜǣǧ ǹ ǡǢǠǹǡǔǟǧ. ǁǙ ǖǜǞǢǤǜǥǦǢǖǧǝǦǙ ǥǔǠǢǤǢǕǡǹ ǛǔǣǢǕǹǚǡǜǞǜ.
• ǂǕǙǤǹǗǔǝǦǙ ƴDž ǖǹǘ ǣǢǦǤǔǣǟdzǡǡdz ǖ ǢǦǖǢǤǜ ǥǦǢǤǢǡǡǹǩ ǣǤǙǘǠǙǦǹǖ.
• ǂǕǙǤǹǗǔǝǦǙ ƴDž ǖǹǘ ǣǹǘǖǜǭǙǡǢǺ ǖǢǟǢǗǢǥǦǹ, ǣǢǦǤǔǣǟdzǡǡdz ǖǢǘǜ ǹ ǣǜǟǧ.
• ǂǕǙǤǹǗǔǝǦǙ ƴDž ǖǹǘ ǡǔǗǤǹǖǔǡǡdz: ǖǥǦǔǡǢǖǟDzǝǦǙ ǺǺ ǡǙ ǕǟǜǚǙ ǡǹǚ 1 Ǡ ǖǹǘ ǡǔǗǤǹǖǔǟǰǡǜǩ ǣǤǜ-
ǟǔǘǹǖ. ǁǙ ǣǹǘǘǔǖǔǝǦǙ ǖǣǟǜǖǧ ǣǤdzǠǜǩ ǥǢǡdzǫǡǜǩ ǣǤǢǠǙǡǹǖ.
• ǁǙ ǤǢǛǠǹǭǧǝǦǙ ǡǔ ƴDž, ǔ ǦǔǞǢǚ ǣǢǕǟǜǛǧ ǥǜǥǦǙǠǜ ǚǢǘǡǜǩ ǘǚǙǤǙǟ
• ǁǙ ǖǥǦǔǡǢǖǟDzǝǦǙ ƴDž ǖ ǠǹǥǪdzǩ Ǜ ǡǙǘǢǥǦǔǦǡǰǢDz ǖǙǡǦǜǟdzǪǹǷDz. ǀǹǡǹǠǔǟǰǡǜǝ ǘǢǥǦǧǣ ǣǢǖǹǦǤdz –
10 ǥǠ. ǃǹǘ ǫǔǥ ǙǞǥǣǟǧǔǦǔǪǹǺ ƴDž ǡǙ ǥǦǔǖǦǙ ǡǔ ǡǙǺ Ǖǧǘǰ-dzǞǹ ǣǤǜǥǦǤǢǺ, ǡǙ ǖǞǤǜǖǔǝǦǙ ǥǙǤǖǙǦǞǔǠǜ
ǔǕǢ ǣǢǘǹǕǡǜǠǜ ǣǤǙǘǠǙǦǔǠǜ, ǭǢ ǛǔǖǔǚǔDzǦǰ ǢǩǢǟǢǘǚǙǡǡDz.
• ǁǙ ǛǔǥǦǢǥǢǖǧǝǦǙ ǩǹǠǹǫǡǹ ǤǙǔǗǙǡǦǜ ǘǟdz ǫǜǭǙǡǡdz ƴDž, ǖǜǞǢǤǜǥǦǢǖǧǝǦǙ Ǡ’dzǞǧ ǥǧǩǧ ǦǞǔǡǜǡǧ.
.
LJǖǔǗǔ! LJǥǙǤǙǘǜǡǹ ǞǢǤǣǧǥǧ ǡǔ ǙǟǙǠǙǡǦǔǩ ǕǙǛ ǹǛǢǟdzǪǹǺ Ƿ ǖǜǥǢǞǔ
ǡǔǣǤǧǗǔ, ǭǢ ǠǢǚǙ ǖǜǞǟǜǞǔǦǜ ǧǤǔǚǙǡǡdz
ǙǟǙǞǦǤǜǫǡǜǠ ǥǦǤǧǠǢǠ.
ǖǹǘǞǤǜǦǢǗǢ ǣǢǟǧǠ’dz.
4.
džƹljǁƫNjǁƼƽ ǂǃƼDž
ƴǞǧǥǦǜǫǡǔ ǥǜǥǦǙǠǔ 5.1 (ƴDž) BTR5-10 Ǜ AM/FM-ǦDzǡǙǤǢǠ ǣǤǜǛǡǔǫǙǡǔ ǘǟdz ǥǦǖǢǤǙǡǡdz ǘǢǠǔǬǡǰǢǗǢ ǞǹǡǢǦǙǔǦǤǧ. ƻǔǖǘdzǞǜ ǖǠǢǡǦǢǖǔǡǢǠǧ ǖ ǥǔǕǖǧǨǙǤ ǣǹǘǥǜǟDzǖǔǫǧ ǣǢǦǧǚǡǢǥǦǹ ƴDž ǠǢǚǡǔ ǣǹǘǞǟDzǫǜǦǜ ǣǤǔǞǦǜǫǡǢ ǘǢ Ǖǧǘǰ-dzǞǜǩ ǘǚǙǤǙǟ ǔǧǘǹǢǥǜǗǡǔǟǧ. LJ ǞǢǠǣǟǙǞǦǹ ǣǧǟǰǦ ƸLJ. AM/FM-ǦDzǡǙǤ
ǖǜǞǢǤǜǥǦǢǖǧǷǦǰǥdz dzǞ ǤǔǘǹǢǣǤǜǝǠǔǫ.
14
Page 16

UKR
ƾǙǤǹǖǡǜǪǦǖǢ Ǜ ǙǞǥǣǟǧǔǦǔǪǹǺ
ǂǥǢǕǟǜǖǢǥǦǹ ƴDž
• ƶǠǢǡǦǢǖǔǡǜǝ 6-Ǟǔǡǔǟǰǡǜǝ ǣǹǘǥǜǟDzǖǔǫ
ǣǢǦǧǚǡǢǥǦǹ
• ƶǠǢǡǦǢǖǔǡǜǝ ǦDzǡǙǤ ƴM-FM
(ǤǔǘǹǢǣǤǜǝǠǔǫ)
• ƴǡǔǟǢǗǢǖǜǝ 5.1-ǖǩǹǘ, ǘǖǔ ǥǦǙǤǙǢǖǩǢǘǜ ǘǟdz
ǣǹǘǞǟDzǫǙǡǡdz ǘǚǙǤǙǟ ǛǖǧǞǧ
• ƹǟǙǞǦǤǢǡǡǜǝ ǞǢǠǧǦǔǦǢǤ ǣǙǤǙǠǜǞǔǡǡdz
ǔǧǘǹǢǖǩǢǘǹǖ
• ǃǢǖǡǢǨǧǡǞǪǹǢǡǔǟǰǡǜǝ ǣǧǟǰǦ ǘǜǥǦǔǡǪǹǝǡǢǗǢ ǧǣǤǔǖǟǹǡǡdz
• DŽǙǗǧǟDzǖǔǡǡdz Ǥǹǖǡdz ǛǔǗǔǟǰǡǢǺ ǗǧǫǡǢǥǦǹ
ǹ Ǥǹǖǡdz ǗǧǫǡǢǥǦǹ ǥǔǕǖǧǨǙǤǔ
• DŽǢǛǘǹǟǰǡǙ ǤǙǗǧǟDzǖǔǡǡdz Ǥǹǖǡdz ǗǧǫǡǢǥǦǹ
ǨǤǢǡǦǔǟǰǡǜǩ, ǦǜǟǢǖǜǩ ǹ ǪǙǡǦǤǔǟǰǡǢǺ ǞǢǟǢǡǢǞ
• ƫǡǨǢǤǠǔǪǹǝǡǜǝ ǘǜǥǣǟǙǝ
• ǀǔǗǡǹǦǡǙ ǙǞǤǔǡǧǖǔǡǡdz
• ǀǔǦǙǤǹǔǟ ǞǢǤǣǧǥǧ
ǥǔǕǖǧǨǙǤǔ
ǹ ǥǔǦǙǟǹǦǹǖ –
ǘǙǤǙǖǢ (MDF)
ƾǢǡǥǦǤǧǞǪǹdz ǥǔǕǖǧǨǙǤǔ
a ƹǞǤǔǡ ǘǜǥǣǟǙdz
b VOLUME: ǤǙǗǧǟdzǦǢǤ Ǥǹǖǡdz ǛǔǗǔǟǰǡǢǺ ǗǧǫǡǢǥǦǹ
c STANDBY: ǞǡǢǣǞǔ ǤǙǚǜǠǧ ǢǫǹǞǧǖǔǡǡdz
d INPUT: ǞǡǢǣǞǔ ǖǜǕǢǤǧ ǘǚǙǤǙǟǔ ǔǧǘǹǢǥǜǗǡǔǟǧ
e MODE: ǞǡǢǣǞǔ ǖǠǜǞǔǡǡdz ǤǙǚǜǠǧ ǢǕ’ǷǠǡǢǗǢ
Ǜǖǧǫǔǡǡdz
f MUTE: ǞǡǢǣǞǔ ǖǜǠǜǞǔǡǡdz ǛǖǧǞǧ
g SUB+: ǞǡǢǣǞǔ ǛǕǹǟǰǬǙǡǡdz ǗǧǫǡǢǥǦǹ ǥǔǕǖǧǨǙǤǔ
h SUB–: ǞǡǢǣǞǔ ǛǠǙǡǬǙǡǡdz ǗǧǫǡǢǥǦǹ
ǥǔǕǖǧǨǙǤǔ
i FM ANT: ǤǢǛ’ǷǠ ǘǟdz ǣǹǘǞǟDzǫǙǡǡdz Fǀ-ǔǡǦǙǡǜ
j AM GND/AM ANT: ǤǢǛ’ǷǠǜ ǘǟdz ǣǹǘǞǟDzǫǙǡǡdz
ƴM-ǔǡǦǙǡǜ
k 2CH INPUT: ǤǢǛ’ǷǠǜ ǖǩǢǘǹǖ ǘǚǙǤǙǟ ǥǦǙǤǙǢ-
ǥǜǗǡǔǟǧ PC Ǧǔ AUX
l DVD (5.1CH) INPUT: ǖǩǹǘǡǹ ǤǢǛ’ǷǠǜ ǘǟdz ǣǹǘǞǟDz-
ǫǙǡǡdz ǘǚǙǤǙǟǔ ǥǜǗǡǔǟǧ 5.1
m AUDIO OUTPUT: ǔǧǘǹǢǖǜǩǢǘǜ ǨǤǢǡǦǔǟǰǡǜǩ,
ǦǜǟǢǖǜǩ ǹ ǪǙǡǦǤǔǟǰǡǢǗǢ Ǟǔǡǔǟǹǖ
n POWER: ǖǜǠǜǞǔǫ ǚǜǖǟǙǡǡdz
o njǡǧǤ ǠǙǤǙǚǙǖǢǗǢ ǚǜǖǟǙǡǡdz
a
b
c
d
e
BTR5-10
ǁǕǠ. 1. DŽǕǢǚǠDZ ǨǤǥǕǗǠǺǢǢǴ ǦǕǖǗǨǩǚǥǕ
PC
AUX
FRFL
CEN
SWCEN
SRSL
DVD(5.1CH) INPUT 2CH INPUTAUDIO OUTPUT
FR
FL
CEN
SR
SL
f
g
h
i
j
k
l
m
n
o
ǁǕǠ. 2. ƼǕǙǢǴ ǤǕǢǚǠDZ ǦǕǖǗǨǩǚǥǕ
15
Page 17

UKR
ƴǞǦǜǖǡǔ ǔǞǧǥǦǜǫǡǔ ǥǜǥǦǙǠǔ 5.1
ǘǟdz ǘǢǠǔǬǡǰǢǗǢ ǞǹǡǢǦǙǔǦǤǧ
ǃǧǟǰǦ ǘǜǥǦǔǝǪǹǡǡǢǗǢ ǧǣǤǔǖǟǹǡǡdz
a STANDBY: ǞǡǢǣǞǔ ǤǙǚǜǠǧ ǢǫǹǞǧǖǔǡǡdz
b PC: ǞǡǢǣǞǔ ǖǜǕǢǤǧ ǘǚǙǤǙǟǔ ǥǦǙǤǙǢǥǜǗǡǔǟǧ PC
c DVD: ǞǡǢǣǞǔ ǖǜǕǢǤǧ ǘǚǙǤǙǟǔ ǔǧǘǹǢǥǜǗǡǔǟǧ DVD
(5.1CH)
d AUX: ǞǡǢǣǞǔ ǖǜǕǢǤǧ ǘǚǙǤǙǟǔ ǥǦǙǤǙǢǥǜǗǡǔǟǧ AUX
e SURROUND +/-: ǞǡǢǣǞǜ ǤǙǗǧǟDzǖǔǡǡdz ǗǧǫǡǢǥǦǹ
ǦǜǟǢǖǜǩ Ǟǔǡǔǟǹǖ
f FRONT+/-: ǞǡǢǣǞǜ ǤǙǗǧǟDzǖǔǡǡdz ǗǧǫǡǢǥǦǹ
ǨǤǢǡǦǔǟǰǡǜǩ Ǟǔǡǔǟǹǖ
g TREBLE+/-: ǞǡǢǣǞǜ ǤǙǗǧǟDzǖǔǡǡdz ǦǙǠǕǤǧ ƶNj
h 0 – 9: ǞǡǢǣǞǜ ǪǜǨǤǢǖǢǺ ǞǟǔǖǹǔǦǧǤǜ
i 10+: ǠǡǢǚǡǜǞ ǪǜǨǤǢǖǢǺ ǞǟǔǖǹǔǦǧǤǜ
j MUTE: ǞǡǢǣǞǔ ǖǜǠǜǞǔǡǡdz ǛǖǧǞǧ
k RESET: ǞǡǢǣǞǔ ǥǞǜǘǔǡǡdz ǡǔǥǦǤǢDzǖǔǡǰ ǘǢ
ǛǔǖǢǘǥǰǞǜǩ ǧǥǦǔǡǢǖǢǞ
l 2.1/5.1: ǞǡǢǣǞǔ ǖǠǜǞǔǡǡdz ǤǙǚǜǠǧ ǢǕ’ǷǠǡǢǗǢ
Ǜǖǧǫǔǡǡdz 2.1/5.1
m VOL+/-: ǞǡǢǣǞǜ ǤǙǗǧǟDzǖǔǡǡdz Ǥǹǖǡdz ǛǔǗǔǟǰǡǢǺ
ǗǧǫǡǢǥǦǹ ǥǜǥǦǙǠǜ
n CEN+/-: ǞǡǢǣǞǜ ǤǙǗǧǟDzǖǔǡǡdz ǗǧǫǡǢǥǦǹ
ǪǙǡǦǤǔǟǰǡǢǗǢ Ǟǔǡǔǟǧ
o SUB +/-: ǞǡǢǣǞǜ ǤǙǗǧǟDzǖǔǡǡdz ǗǧǫǡǢǥǦǹ Ǟǔǡǔǟǧ
ǥǔǕǖǧǨǙǤǔ
p BASS+/-: ǞǡǢǣǞǜ ǤǙǗǧǟDzǖǔǡǡdz ǦǙǠǕǤǧ ǁNj
q SCAN: ǞǡǢǣǞǔ ǔǖǦǢǠǔǦǜǫǡǢǗǢ ǣǢǬǧǞǧ
ǤǔǘǹǢǥǦǔǡǪǹǝ
r TUNE+/-: ǞǡǢǣǞǜ ǤǧǫǡǢǗǢ ǡǔǥǦǤǢDzǖǔǡǡdz
ǥǜǗǡǔǟǧ ǤǔǘǹǢǥǦǔǡǪǹǺ
s FM/AM: ǞǡǢǣǞǔ ǖǜǕǢǤǧ ǘǹǔǣǔǛǢǡǧ FM ǔǕǢ AM
t MEMORY: ǞǡǢǣǞǔ ǛǕǙǤǙǚǙǡǡdz ǖ ǣǔǠ’dzǦǹ
ǡǔǥǦǤǢDzǖǔǡǰ
ǦDzǡǙǤǔ
STANDBY
a
b
c
DVD PC AUX 2.1/5.1
RESET
d
e
VOL VOL
SURROUND
FRONT CEN SUB
f
SURROUND
FRONT
g
12
5
4
h
789
10
MEMORY
0
i
BTR5-10
ǁǕǠ. 3. DŽǨǠDZǧ ǙǝǦǧǕǢǫǺǞǢǣǘǣ
ǨǤǥǕǗǠǺǢǢǴ
j
k
l
+
m
n
o
SUBCEN
BASS BASSTREBLE TREBLE
p
SCAN
3
6
TUNE
q
r
TUNE
FM/AM
s
t
ƶǥǦǔǡǢǖǟǙǡǡdz ǕǔǦǔǤǙǝǞǜ ǧ ǣǧǟǰǦ ƸLJ
• ƶǹǘǞǤǜǝǦǙ ǖǹǘǥǹǞ ǘǟdz ǕǔǦǔǤǙǝǢǞ ǡǔ Ǜǔǘǡǹǝ ǥǦǢǤǢǡǹ ǣǧǟǰǦǔ ƸLJ.
• ƶǥǦǔǖǦǙ ǕǔǦǔǤǙǝǞǧ Ǧǜǣǧ CR2025 (Ǜ ǞǢǠǣǟǙǞǦǧ).
• ƻǔǞǤǜǝǦǙ ǖǹǘǥǹǞ ǘǟdz ǕǔǦǔǤǙǝǢǞ.
ǃǤǜǠǹǦǞǜ:
• ƶǜǞǢǤǜǥǦǢǖǧǝǦǙ ǃƸLJ ǣǹǘ ǞǧǦǢǠ, dzǞǜǝ ǡǙ ǣǙǤǙǖǜǭǧǷ 30° ǡǔ ǖǹǘǥǦǔǡǹ ǡǙ ǕǹǟǰǬǙ 7 ǠǙǦǤǹǖ.
• ǁǔǣǤǔǖǦǙ ǃƸLJ ǡǔ ǖǹǞǡǢ ƫNj-ǣǤǜǝǠǔǫǔ ǡǔ ǥǔǕǖǧǨǙǤǹ.
• ǓǞǭǢ ǃƸLJ ǡǙ ǣǤǔǪDzǷ,
ǣǙǤǙǖǹǤǦǙ ǡǔdzǖǡǹǥǦǰ ǕǔǦǔǤǙǝǞǜ ǔǕǢ ǛǔǠǹǡǹǦǰ ǤǢǛǤdzǘǚǙǡǧ ǡǔ ǡǢǖǧ.
• ƶǜǝǠǔǝǦǙ ǕǔǦǔǤǙǝǞǧ Ǜ ǣǧǟǰǦǔ, dzǞǭǢ ǡǙ ǛǕǜǤǔǷǦǙǥdz ǞǢǤǜǥǦǧǖǔǦǜǥdz ǡǜǠ ǣǤǢǦdzǗǢǠ ǦǤǜ-
ǖǔǟǢǗǢ ǫǔǥǧ (ǣǢǡǔǘ ǦǜǚǘǙǡǰ).
16
Page 18

UKR
ƾǙǤǹǖǡǜǪǦǖǢ Ǜ ǙǞǥǣǟǧǔǦǔǪǹǺ
5. ǃƫƸƷǂdžǂƶƾƴ ƫ ǃǂDŽǓƸǂƾ DŽǂƵǂdžƼ
DŽǢǛǦǔǬǧǖǔǡǡdz ƴDž
• Ƹǟdz ǢǦǤǜǠǔǡǡdz ǞǤǔǭǢǗǢ ǙǨǙǞǦǧ ǥǣǤǜǝǡdzǦǦdz ƴDž ǥǟǹǘ ǤǢǛǦǔǬǧǖǔǦǜ ǞǢǟǢǡǞǜ ǛǗǹǘǡǢ Ǜ Ǡǔǟ. 4.
NJǙǡǦǤ ǹ ǨǤǢǡǦǔǟǰǡǔ ǣǔǤǔ ǤǢǛǦǔǬǢǖǔǡǹ ǡǔ ǟǹǡǹǺ ǖǹǤǦǧǔǟǰǡǢǗǢ ǞǢǟǔ, ǤǔǘǹǧǥǢǠ dzǞǢǗǢ Ƿ ǖǹǘǥǦǔǡǰ ǖǹǘ
ǥǟǧǩǔǫǔ ǘǢ ǪǙǡǦǤǔǟǰǡǢǺ ǞǢǟǢǡǞǜ, ǔ ǪǙǡǦǤǢǠ ǞǢǟǔ – ǗǢǟǢǖǔ ǥǟǧǩǔǫǔ. ƶǹǘǥǦǔǡǰ ǖǹǘ ǥǟǧǩǔǫǔ ǘǢ
ǞǢǚǡǢǺ Ǜ ǨǤǢǡǦǔǟǰǡǜǩ ǞǢǟǢǡǢǞ ǹ ǪǙǡǦǤǔǟǰǡǢǺ ǞǢǟǢǡǞǜ Ǥǹǖǡǹ. ƶǹǘǥǦǔǡǰ Ǡǹǚ
ǞǢǟǢǡǞǔǠǜ ǘǢǤǹǖǡDzǷ ǖǹǘǥǦǔǡǹ ǖǹǘ ǥǟǧǩǔǫǔ ǘǢ ǞǢǚǡǢǺ Ǜ ǞǢǟǢǡǢǞ. džǜǟǢǖǹ Ǟǔǡǔǟǜ ǤǢǛǦǔǬǢǖǔǡǹ ǡǔ
Ǧǹǝ ǚǙ ǖǹǘǥǦǔǡǹ ǖǹǘ ǥǟǧǩǔǫǔ (ǦǔǞǢǚ ǡǔ ǟǹǡǹǺ ǖǹǤǦǧǔǟǰǡǢǗǢ ǞǢǟǔ) ǣǹǘ ǞǧǦǢǠ ǣǤǜǕǟǜǛǡǢ 110° ǘǢ Ǣǥǹ
«ǥǟǧǩǔǫ – ǙǞǤǔǡ».
• LJǡǜǞǔǝǦǙ ǖǥǦǔǡǢǖǟǙǡǡdz ǞǢǟǢǡǢǞ ǧ ǞǧǦǔǩ ǣǤǜǠǹǭǙǡǰ Ǧǔ ǕǙǛǣǢǥǙǤǙǘǡǰǢ Ǖǹǟdz ǥǦǹǡ, ǪǙ ǠǢǚǙ
ǣǤǜǛǖǙǥǦǜ ǘǢ ǖǜǡǜǞǡǙǡǡdz ǡǙǕǔǚǔǡǜǩ ǤǙǛǢǡǔǡǥǹǖ ǹ ǣǤǜǛǖǧǞǹǖ. ǓǞǭǢ ǪǙ ǠǢǚǟǜǖǢ, ǤǢǛǦǔǬǢǖǧǝǦǙ
ƴDž ǡǔ ǖǹǘǥǦǔǡǹ ǡǙ ǠǙǡǬǙ 20 ǥǠ ǖǹǘ ǥǦǹǡ.
• Ƹǟdz ǕǹǟǰǬ ǦǢǫǡǢǗǢ ǥǣǤǜǝǡdzǦǦdz ǕǔǚǔǡǢ, ǭǢǕ ǖǜǥǢǞǢǫǔǥǦǢǦǡǹ ǦǖǹǦǙǤǜ ǤǢǛǦǔǬǢǖǧǖǔǟǜǥdz ǡǔ
ǢǘǡǢǠǧ Ǥǹǖǡǹ Ǜ ǖǧǩǢǠ ǥǟǧǩǔǫǔ.
• ǁǙ ǤǙǞǢǠǙǡǘǧǷǦǰǥdz ǖǥǦǔǡǢǖǟDzǖǔǦǜ ǞǢǟǢǡǞǜ ǖ ǡǹǬǹ. džǔǞǙ ǤǢǛǠǹǭǙǡǡdz ǠǢǚǙ ǥǣǤǜǫǜǡǜǦǜ
ǖǣǟǜǖ ǡǔ ǖǹǘǦǖǢǤǙǡǡdz ǛǖǧǞǧ, ǢǥǢǕǟǜǖǢ ǧ ǡǜǛǰǞǢǫǔǥǦǢǦǡǢǠǧ ǘǹǔǣǔǛǢǡǹ.
• DžǔǕǖǧǨǙǤ ǖǜǣǤǢǠǹǡDzǷ ǡǙǡǔǣǤdzǠǟǙǡǜǝ
ǠǹǥǪǹ ǞǹǠǡǔǦǜ, ǖ dzǞǢǠǧ ǥǔǕǖǧǨǙǤ ǛǖǧǫǔǦǜǠǙ dzǞǡǔǝǞǤǔǭǙ.
NJǙǡǦǤǔǟǰǡǔ
ƿǹǖǔ ǨǤǢǡǦǔǟǰǡǔ
ǞǢǟǢǡǞǔ
ǛǖǧǞ, ǦǢǠǧ ǝǢǗǢ ǠǢǚǡǔ ǤǢǛǦǔǬǧǖǔǦǜ ǖ Ǖǧǘǰ-dzǞǢǠǧ
ǞǢǟǢǡǞǔ
BTR5-10
ǨǤǢǡǦǔǟǰǡǜǠǜ
ǃǤǔǖǔ ǨǤǢǡǦǔǟǰǡǔ
ǞǢǟǢǡǞǔ
A
A
30° 30°
DžǔǕǖǧǨǙǤ
A
A
ƿǹǖǔ ǦǜǟǢǖǔ
ǞǢǟǢǡǞǔ
110° ± 10° 110° ± 10°
AA
ǁǕǠ. 4. DžǣǜǧǕǭǨǗǕǢǢǴ Ƶdž
ǃǤǔǖǔ ǦǜǟǢǖǔ
ǞǢǟǢǡǞǔ
17
Page 19

UKR
ƴǞǦǜǖǡǔ ǔǞǧǥǦǜǫǡǔ ǥǜǥǦǙǠǔ 5.1
ǘǟdz ǘǢǠǔǬǡǰǢǗǢ ǞǹǡǢǦǙǔǦǤǧ
ǃǹǘǞǟDzǫǙǡǡdz ǞǢǟǢǡǢǞ ǘǢ ǥǔǕǖǧǨǙǤǔ
• ǃǙǤǙǘ ǣǹǘǞǟDzǫǙǡǡdzǠ ǞǢǟǢǡǢǞ ǣǙǤǙǞǢǡǔǝǦǙǥdz, ǭǢ ǙǟǙǞǦǤǢǚǜǖǟǙǡǡdz ǣǤǜǥǦǤǢDz ǖǹǘǞǟDzǫǙǡǢ ǖǹǘ
ǠǙǤǙǚǹ. ǃǹǘǞǟDzǫǹǦǰ Ǜ’Ƿǘǡǧǖǔǟǰǡǹ ǞǔǕǙǟǹ, dzǞ ǣǢǞǔǛǔǡǢ ǡǔ Ǡǔǟ. 5. ƻǖǙǤǡǹǦǰ ǧǖǔǗǧ, ǭǢ ǫǙǤǖǢǡǹ (ǣǟDzǥǢǖǹ) ǞǟǙǠǜ ǞǢǟǢǡǢǞ ǣǢǖǜǡǡǹ ǕǧǦǜ Ǜ’Ƿǘǡǔǡǹ Ǜ ǫǙǤǖǢǡǜǠǜ ǞǟǙǠǔǠǜ ǥǔǕǖǧǨǙǤǔ (+ о +), ǔ ǫǢǤǡǹ
(ǠǹǡǧǥǢǖǹ) ǞǟǙǠǜ ǞǢǟǢǡǢǞ — Ǜ ǫǢǤǡǜǠǜ ǞǟǙǠǔǠǜ ǥǔǕǖǧǨǙǤǔ (– о –).
• ǃǙǤǙǖǹǤǦǙ
ǕǢDz ǹ Ǜ ǠǙǦǔǟǙǖǜǠǜ ǫǔǥǦǜǡǔǠǜ ǔǣǔǤǔǦǧǤǜ.
ǖǹǘǣǢǖǹǘǡǹǥǦǰ ǣǢǟdzǤǡǢǥǦǹ ǣǹǘǞǟDzǫǙǡǡdz ǹ ǖǹǘǥǧǦǡǹǥǦǰ ǞǢǡǦǔǞǦǧ ǢǗǢǟǙǡǜǩ ǘǤǢǦǹǖ Ǡǹǚ ǥǢ-
NJǙǡǦǤǔǟǰǡǔ
ǞǢǟǢǡǞǔ
ƿǹǖǔ ǨǤǢǡǦǔǟǰǡǔ
ǞǢǟǢǡǞǔ
ƻǔǘǡdz ǣǔǡǙǟǰ
ǥǔǕǖǧǨǙǤǔ
CEN
DVD(5.1CH) INPUT 2CH INPUTAUDIO OUTPUT
PC
AUX
FRFL
SWCEN
SRSL
ǃǤǔǖǔ ǨǤǢǡǦǔǟǰǡǔ
ǞǢǟǢǡǞǔ
FR
FL
CEN
SR
ƿǹǖǔ ǦǜǟǢǖǔ
ǞǢǟǢǡǞǔ
SL
ǃǤǔǖǔ ǦǜǟǢǖǔ
ǞǢǟǢǡǞǔ
ǁǕǠ. 5. džǪǚǡǕ ǤǺǙǟǠdzǬǚǢǢǴ ǟǣǠǣǢǣǟ
ǃǹǘǞǟDzǫǙǡǡdz ƴDž ǘǢ ǘǚǙǤǙǟ ǔǧǘǹǢǥǜǗǡǔǟǧ
ƴǞǧǥǦǜǫǡǧ ǥǜǥǦǙǠǧ BTR5-10 ǠǢǚǡǔ ǣǹǘǞǟDzǫǜǦǜ ǣǤǔǞǦǜǫǡǢ ǘǢ Ǖǧǘǰ-dzǞǜǩ ǘǚǙǤǙǟ ǔǧǘǹǢǥǜǗǡǔǟǧ
(ǘǜǖ. ǥǩǙǠǧ ǡǔ Ǡǔǟ. 6).
• ǃǙǤǙǘ ǣǹǘǞǟDzǫǙǡǡdzǠ ǣǙǤǙǞǢǡǔǝǦǙǥdz, ǭǢ ƴDž ǖǹǘǞǟDzǫǙǡǔ ǖǹǘ ǠǙǤǙǚǹ.
• Ƹǟdz ǣǹǘǞǟDzǫǙǡǡdz ƴDž ǘǢ CD/DVD/AUX-ǣǤǢǗǤǔǖǔǫǹǖ, TV ǖǜǞǢǤǜǥǦǢǖǧǝǦǙ ǥǦǙǤǙǢǨǢǡǹǫǡǹ ǥǜǗ-
ǡǔǟǰǡǹ ǞǔǕǙǟǹ 2RCA ǘǢ 2RCA. Ƹǟdz ǣǹǘǞǟDzǫǙǡǡdz ƴDž ǘǢ ǛǖǧǞǢǖǢǺ ǞǔǤǦǜ ǃƾ, ǀDŽ3/CD-ǣǟǙǷǤǹǖ ǦǢǭǢ
ǡǙǢǕǩǹǘǡǢ ǤǔǛǢǠ
ǹǛ ǥǜǗǡǔǟǰǡǜǠ ǞǔǕǙǟǙǠ 2RCA ǘǢ 2RCA ǖǜǞǢǤǜǥǦǔǦǜ ǣǙǤǙǩǹǘǡǜǞ 2RCA ǘǢ mini-
jack (Ǜ ǞǢǠǣǟǙǞǦǧ). ǃǙǤǙǞǢǡǔǝǦǙǥdz ǖ ǣǤǔǖǜǟǰǡǢǥǦǹ ǣǹǘǞǟDzǫǙǡǡdz ǟǹǖǜǩ ǹ ǣǤǔǖǜǩ Ǟǔǡǔǟǹǖ. ƿǹǖǹ RCA-
18
Page 20

UKR
ƾǙǤǹǖǡǜǪǦǖǢ Ǜ ǙǞǥǣǟǧǔǦǔǪǹǺ
BTR5-10
ǘǚǙǞǜ ǣǢǦǤǹǕǡǢ Ǜ’ǷǘǡǔǦǜ Ǜ ǟǹǖǜǠǜ ǤǢǛ’ǷǠǔǠǜ ǣǹǘǥǜǟDzǖǔǫǔ (ǛǔǛǖǜǫǔǝ ǕǹǟǢǗǢ ǞǢǟǰǢǤǧ), ǔ ǣǤǔǖǹ
RCA-ǘǚǙǞǜ – Ǜ ǣǤǔǖǜǠǜ ǤǢǛ’ǷǠǔǠǜ ǣǹǘǥǜǟDzǖǔǫǔ (ǛǔǛǖǜǫǔǝ ǫǙǤǖǢǡǢǗǢ ǞǢǟǰǢǤǧ).
ǃǤǜǠǹǦǞǔ. ƶǹǘ ǣǤǔǖǜǟǰǡǢǥǦǹ ǹ ǡǔǘǹǝǡǢǥǦǹ ǣǹǘ’Ƿǘǡǔǡǡdz ǞǔǕǙǟǹǖ ǛǔǟǙǚǜǦǰ dzǞǹǥǦǰ ǛǖǧǞǧ. ǃǙǤǙǖǹǤǦǙ ǖǹǘǥǧǦǡǹǥǦǰ ǞǢǡǦǔǞǦǧ ǢǗǢǟǙǡǜǩ ǘǤǢǦǹǖ Ǡǹǚ ǥǢǕǢDz Ǧǔ Ǜ ǠǙǦǔǟǙǖǜǠǜ ǫǔǥǦǜǡǔǠǜ
ǔǣǔǤǔǦǧǤǜ.
ƾǂǀǃ’ǒdžƹDŽ
CD-ǣǤǢǗǤǔǖǔǫ
ǃǙǤǙǩǹǘǡǜǞ
2RCA ǘǢ
mini-jack
CǜǗǡǔǟǰǡǜǝ
ǞǔǕǙǟǰ
2RCA ǘǢ 2RCA
FM-ǔǡǦǙǡǔ
AM-ǔǡǦǙǡǔ
CEN
DVD(5.1CH) INPUT 2CH INPUTAUDIO OUTPUT
ƻǔǘǡdz ǣǔǡǙǟǰ
ǥǔǕǖǧǨǙǤǔ
PC
AUX
FRFL
SWCEN
SRSL
FR
FL
CEN
SR
SL
DVD-ǣǤǢǗǤǔǖǔǫ
5.1-Ǟǔǡǔǟǰǡǔ
ǛǖǧǞǢǖǔ ǞǔǤǦǔ
FR
SR
FL
SL
CESW
CǜǗǡǔǟǰǡǹ ǞǔǕǙǟǹ
2RCA ǘǢ mini-jack
ǁǕǠ. 6. džǪǚǡǕ ǤǺǙǟǠdzǬǚǢǢǴ Ǚǣ ǙǛǚǥǚǠ ǕǨǙǺǣǦǝǘǢǕǠǨ
njǡǧǤ ǚǜǖǟǙǡǡdz
19
Page 21

UKR
ƴǞǦǜǖǡǔ ǔǞǧǥǦǜǫǡǔ ǥǜǥǦǙǠǔ 5.1
ǘǟdz ǘǢǠǔǬǡǰǢǗǢ ǞǹǡǢǦǙǔǦǤǧ
ƶǥǦǔǡǢǖǟǙǡǡdz ǹ ǣǹǘǞǟDzǫǙǡǡdz ǔǡǦǙǡ
ǃǹǘǞǟDzǫǙǡǡdz FM-ǔǡǦǙǡǜ
• ƶǥǦǔǖǦǙ ǞǹǠǡǔǦǡǧ FM-ǔǡǦǙǡǧ Ǜ ǞǢǠǣǟǙǞǦǧ ǖ ǗǡǹǛǘǢ «FM ANT» ǡǔ Ǜǔǘǡǹǝ ǣǔǡǙǟǹ ǥǔǕǖǧǨǙǤǔ, dzǞ
ǣǢǞǔǛǔǡǢ ǡǔ Ǡǔǟ. 5. ƶǥǦǔǡǢǖǟDzǝǦǙ ǔǡǦǙǡǧ ǦǔǞ, ǭǢǕ dzǞǹǥǦǰ ǣǤǜǝǢǠǧ ǥǦǔǟǔ ǛǔǘǢǖǹǟǰǡǢDz, ǔ ǣǢǦǹǠ
ǛǔǞǤǹǣǹǦǰ ǔǡǦǙǡǧ ǖ ǪǰǢǠǧ ǣǢǟǢǚǙǡǡǹ.
ǃǤǜǠǹǦǞǔ. LJ ǕǧǘǜǡǞǔǩ Ǜǹ ǥǟǔǕǞǜǠ ǥǜǗǡǔǟǢǠ FM ǖǜǞǢǤǜǥǦǢǖǧǝǦǙ ǛǢǖǡǹǬǡDz ǔǡǦǙǡǧ FMǘǹǔǣǔǛǢǡǧ 75 ǂǠ
ǡǔǟǢǠ FM ǡǙǢǕǩǹǘǡǢ ǖǜǞǢǤǜǥǦǢǖǧǖǔǦǜ FM-ǔǡǦǙǡǧ Ǜ 5 ǹ ǕǹǟǰǬǙ ǙǟǙǠǙǡǦǔǠǜ.
ǃǹǘǞǟDzǫǙǡǡdz ƴM-ǔǡǦǙǡǜ
• ǍǢǕ ǖǥǦǔǡǢǖǜǦǜ ǤǔǠǞǢǖǧ ǔǡǦǙǡǧ, ǛǔǨǹǞǥǧǝǦǙ ǺǺ ǖ ǢǦǖǢǤǹ ǢǥǡǢǖǜ ǔǡǦǙǡǜ ǛǔǦǜǥǞǔǫǙǠ, dzǞ ǛǢǕǤǔǚǙǡǢ ǡǔ Ǡǔǟ. 7 (ǞǤǢǞ 1).
. ƻǔǛǖǜǫǔǝ 3-ǙǟǙǠǙǡǦǡǢǺ ǔǡǦǙǡǜ ǖǜǥǦǔǫǔǷ, ǔǟǙ ǖ ǛǢǡǔǩ ǹǛ ǥǟǔǕǞǜǠ ǥǜǗ-
12
ǁǕǠ. 7. džǪǚǡǕ ǤǺǙǟǠdzǬǚǢǢǴ Ƶǁ-ǕǢǧǚǢǝ
• ǃǢǖǙǤǡǹǦǰ ǞǢǛǜǤǢǞ AM-ǦǙǤǠǹǡǔǟǧ ǣǤǢǦǜ ǗǢǘǜǡǡǜǞǢǖǢǺ ǥǦǤǹǟǞǜ, ǭǢǕ ǦǤǢǩǜ ǢǥǟǔǕǜǦǜ ǝǢǗǢ,
ǖǥǦǔǖǦǙ ǬǡǧǤ ǔǡǦǙǡǜ-ǣǙǦǟǹ ǣǹǘ ǞǢǛǜǤǢǞ ǹ ǣǤǢǖǙǤǡǹǦǰ ǞǢǛǜǤǢǞ Ǜǔ ǗǢǘǜǡǡǜǞǢǖǢDz ǥǦǤǹǟǞǢDz, ǭǢǕ
ǭǹǟǰǡǢ ǛǔǦǜǥǡǧǦǜ ǬǡǧǤ (ǞǤǢǞ 2). ƻǟǙǗǞǔ ǣǢǦdzǗǡǹǦǰ Ǜǔ ǬǡǧǤ, ǭǢǕ ǣǙǤǙǞǢǡǔǦǜǥdz, ǭǢ ǖǹǡ ǡǔǘǹǝǡǢ
ǣǤǜǷǘǡǔǡǜǝ. ƶǥǦǔǡǢǖǹǦǰ ǔǡǦǙǡǧ ǖ ǡǹǬǧ ǔǕǢ ǛǔǞǤǹǣǹǦǰ ǺǺ ǡǔ ǖǹǞǢǡǡǹǝ ǤǔǠǹ, ǦǢǕǦǢ ǦǔǠ, ǘǙ ǣǤǜǝǢǠ
ǕǧǘǙ ǞǤǔǭǜǠ. DŽǢǛǠǹǥǦǹǦǰ ǧǥǹ ǹǡǬǹ ǞǔǕǙǟǹ (ǬǡǧǤ ǚǜǖǟǙǡǡdz, ǞǔǕǙǟǹ ǘǟdz ǞǢǟǢǡǢǞ
ǖǹǘ ǔǡǦǙǡǜ.
• ǃǹǥǟdz ǪǰǢǗǢ ǣǹǘ’ǷǘǡǔǝǦǙ ǤǔǠǞǢǖǧ ǔǡǦǙǡǧ ǘǢ ǞǟǙǠ «ƴǀ ANT» ǜ «AM GNT» ǡǔ Ǜǔǘǡǹǝ ǣǔǡǙǟǹ ǥǔǕǖǧǨǙǤǔ (ǘǜǖ. ǥǩǙǠǧ ǡǔ Ǡǔǟ. 6).
ǃǤǜǠǹǦǞǔ. ǓǞǭǢ ǣǤǜǝǢǠ ǡǔ ǖǡǧǦǤǹǬǡDz ǤǔǠǞǢǖǧ ǔǡǦǙǡǧ ƴǀ-ǘǹǔǣǔǛǢǡǧ ǣǢǗǔǡǜǝ, ǤǙǞǢǠǙǡǘǧǷǠǢ ǖǜǞǢǤǜǥǦǢǖǧǖǔǦǜ ǛǢǖǡǹǬǡDz ǔǡǦǙǡǧ ƴǀ-ǘǹǔǣǔǛǢǡǧ (ǖ ǞǢǠǣǟǙǞǦ ǡǙ ǖǩǢǘǜǦǰ)
ǖǜǤǢǕǡǜǫǢǗǢ ǛǤǔǛǞǔ.
9. LJǃDŽƴƶƿƫǁǁǓ
BǠǜǞǔǡǡdz
• Ƹǟdz ǧǖǹǠǞǡǙǡǡdz
ǤǙǖǙǘǹǦǰ ǖǜǠǜǞǔǫ n ǡǔ Ǜǔǘǡǹǝ ǣǔǡǙǟǹ ǖ ǣǢǟǢǚǙǡǡdz ON. ǁǔ ǣǙǤǙǘǡǹǝ ǣǔǡǙǟǹ ǥǔǕǖǧǨǙǤǔ ǛǔǥǖǹǦǜǦǰǥdz ǙǞǤǔǡ ǘǜǥǣǟǙDz (a, Ǡǔǟ. 1).
DŽǙǚǜǠ ǢǫǹǞǧǖǔǡǡdz (STANDBY)
• LjǧǡǞǪǹdz STANDBY ǣǤǜǛǡǔǫǙǡǔ ǘǟdz ǬǖǜǘǞǢǗǢ ǖǠǜǞǔǡǡdz ƴDž Ǧǔ ǙǞǢǡǢǠǹǺ ǥǣǢǚǜǖǔǡǡdz ǙǟǙǞǦǤǢǙǡǙǤǗǹǺ. ǁǔǦǜǥǡǹǦǰ ǞǡǢǣǞǧ STANDBY (a, Ǥǜǥ. 3) ǡǔ ǣǧǟǰǦǹ ƸLJ ǔǕǢ ǞǡǢǣǞǧ
ǥǔǕǖǧǨǙǤǔ ǣǹǘǞǟDzǫǹǦǰ ǬǡǧǤ ǚǜǖǟǙǡǡdz o ǘǢ ǠǙǤǙǚǙǖǢǺ ǤǢǛǙǦǞǜ, ǣǢǦǹǠ ǣǙ-
ǦǢǭǢ) dzǞǡǔǝǘǔǟǹ
STANDBY (c, Ǡǔǟ. 1)
20
Page 22

UKR
ƾǙǤǹǖǡǜǪǦǖǢ Ǜ ǙǞǥǣǟǧǔǦǔǪǹǺ
ǡǔ ǣǔǡǙǟǹ ǧǣǤǔǖǟǹǡǡdz ǥǔǕǖǧǨǙǤǔ, ǭǢǕ ǧǖǹǠǞǡǧǦǜ/ǖǜǠǞǡǧǦǜ ǪDz ǨǧǡǞǪǹDz. ǓǞǭǢ ǞǡǢǣǞǔ STANDBY
ǧǖǹǠǞǡǙǡǔ, ǡǔ ǘǜǥǣǟǙǺ ǥǔǕǖǧǨǙǤǔ ǕǧǘǧǦǰ ǖǹǘǢǕǤǔǚǔǦǜǥǰ ǘǖǹ ǠǜǗǜDzǫǹ ǥǠǧǚǞǜ. ǁǔǦǜǥǡǹǦǰ ǞǡǢǣǞǧ
ǛǡǢǖǧ ǹ ǥǜǥǦǙǠǔ ǣǢǖǙǤǡǙǦǰǥdz ǖ ǤǢǕǢǫǜǝ ǤǙǚǜǠ.
ƶǜǕǹǤ ǘǚǙǤǙǟ ǥǜǗǡǔǟǧ
• ƴDž ǠǔǷ 2 ǥǦǙǤǙǢǔǧǘǹǢǖǩǢǘǜ (DŽDž ǹ AUX) Ǧǔ Ǣǘǜǡ 5.1-Ǟǔǡǔǟǰǡǜǝ ǔǧǘǹǢǖǩǹǘ ǡǔ Ǜǔǘǡǹǝ ǣǔǡǙǟǹ ǥǔǕǖǧǨǙǤǔ. Ƹǟdz ǣǤǢǥǟǧǩǢǖǧǖǔǡǡdz ǘǚǙǤǙǟǔ ǥǦǙǤǙǢǥǜǗǡǔǟǧ ǣǹǘǞǟDzǫǹǦǰ
INPUT (k, Ǡǔǟ. 2) ƴDž, dzǞ ǣǢǞǔǛǔǡǢ ǡǔ Ǡǔǟ. 5. Ƹǟdz ǣǤǢǥǟǧǩǢǖǧǖǔǡǡdz ǥǜǗǡǔǟǧ ǘǚǙǤǙǟǔ ǕǔǗǔǦǢǞǔǡǔǟǰǡǢǗǢ ǛǖǧǞǧ ǣǹǘǞǟDzǫǹǦǰ ǝǢǗǢ ǖǜǩǹǘ ǘǢ ǤǢǛ’ǷǠǹǖ 5.1CH INPUT (l, Ǡǔǟ. 2) ƴDž (ǘǜǖ. ǥǩǙǠǧ ǡǔ
Ǡǔǟ. 5). ƻǔǟǙǚǡǢ ǖǹǘ ǡǙǢǕǩǹǘǡǢǗǢ ǣǹǘǞǟDzǫǙǡǡdz ǖǜǕǙǤǹǦǰ ǣǢǦǤǹǕǡǜǝ ǔǧǘǹǢǖǩǹǘ ǞǡǢǣǞǢDz INPUT ǡǔ
ǣǔǡǙǟǹ ǧǣǤǔǖǟǹǡǡdz ǥǔǕǖǧǨǙǤǔ (d, Ǡǔǟ. 1) ǫǜ ǞǡǢǣǞǔǠǜ DVD b, PC c ǔǕǢ
ǣǧǟǰǦǹ ƸLJ. ǁǔ ǘǜǥǣǟǙǺ ǥǔǕǖǧǨǙǤǔ ǖǜǥǖǹǦǜǦǰǥdz ǡǔǣǜǥ, ǭǢ ǖǹǘǣǢǖǹǘǔǷ ǢǕǤǔǡǢǠǧ ǔǧǘǹǢǖǩǢǘǧ.
ƶǠǜǞǔǡǡdz ǹ ǡǔǥǦǤǢDzǖǔǡǡdz ǦDzǡǙǤǔ
• ǁǔǦǜǥǞǔDzǫǜ ǣǢǥǟǹǘǢǖǡǢ ǞǡǢǣǞǜ SCAN q ǹ FM/AM s ǡǔ ǣǧǟǰǦǹ ƸLJ, ƶǜ ǖǠǜǞǔǷǦǙ ǦDzǡǙǤ ǹ ǢǕǜǤǔǷǦǙ ǡǙǢǕǩǹǘǡǜǝ ǘǹǔǣǔǛǢǡ FM ǔǕǢ AM.
• DŽǧǫǡǙ ǡǔǥǦǤǢDzǖǔǡǡdz. ǁǔǦǜǥǞǔDzǫǜ ǞǡǢǣǞǜ TUNE+ ǔǕǢ TUNE– r ǡǔ ǣǧǟǰǦǹ ƸLJ, ǠǢǚǡǔ ǦǢǫǡǹ-
ǬǙ ǡǔǥǦǤǢǺǦǜ
• ƴǖǦǢǠǔǦǜǫǡǜǝ ǣǢǬǧǞ. LJǦǤǜǠǧDzǫǜ ǞǡǢǣǞǧ SCAN q ǡǔ ǣǧǟǰǦǹ ƸLJ ǣǢǡǔǘ 1 ǥǙǞ, ƶǜ ǖǠǜǞǔǷǦǙ
ǥǞǔǡǧǖǔǡǡdz FM-ǘǹǔǣǔǛǢǡǧ (Ǜ ǫǔǥǦǢǦǜ 87 ǀǗǪ) Ǜ ǣǢǥǟǹǘǢǖǡǜǠ ǛǔǣǔǠ’dzǦǢǖǧǖǔǡǡdzǠ ǛǡǔǝǘǙǡǜǩ
ǥǦǔǡǪǹǝ: «Džǁ 01», «Džǁ 02», «Džǁ 03» ǦǢǭǢ. DžǞǔǡǧǖǔǡǡdz FM-ǘǹǔǣǔǛǢǡǧ ǦǤǜǖǔǦǜǠǙ ǘǢ ǫǔǥǦǢǦǜ 108 ǀǗǪ.
ǃǹǥǟdz ǥǞǔǡǧǖǔǡǡdz ǔǖǦǢǠǔǦǜǫǡǢ ǖǠǜǞǔǷǦǰǥdz ǣǙǤǬǔ ǛǡǔǝǘǙǡǔ ǥǦǔǡǪǹdz.
• ƾǤǹǠ ǦǢǗǢ, ǠǢǚǡǔ ǬǖǜǘǞǢ ǧǖǹǠǞǡǧǦǜ
(h ǹ i) ǡǔ ǣǧǟǰǦǹ ƸLJ, ǛǔǘǔǖǬǜ ǹ ǛǕǙǤǹǗǬǜ ǖ ǣǔǠ’dzǦǹ ǥǜǥǦǙǠǜ 20 ǤǔǘǹǢǥǦǔǡǪǹǝ FM ǹ 20 ǤǔǘǹǢ-
ǥǦǔǡǪǹǝ ƴM. Ƹǟdz ǪǰǢǗǢ, ǞǢǟǜ ǥǦǔǡǪǹdz ǛǡǔǝǘǙǡǔ, ǣǢǦǤǹǕǡǢ ǡǔǦǜǥǡǧǦǜ ǞǡǢǣǞǧ ǀƹǀORY t ǡǔ ǣǧǟǰǦǹ ƸLJ (ǡǔ ǘǜǥǣǟǙǺ ǥǖǹǦǜǦǜǠǙǦǰǥdz ǡǔǣǜǥ «Džǁ _ _»), ǣǢǦǹǠ ǞǡǢǣǞǔǠǜ ǪǜǨǤǢǖǢǺ ǞǟǔǖǹǔǦǧǤǜ (h ǹ i)
ǣǧǟǰǦǹ ƸLJ ǖǖǙǥǦǜ ǺǺ ǡǢǠǙǤ (ǖǹǘ 0 ǘǢ 19), dzǞǜǝ ǖǜǥǖǹǦǜǦǰǥdz ǡǔ ǘǜǥǣǟǙǺ, ǡǔǣǤǜǞǟǔǘ «Džǁ 09».
ǡǔ
ǃǹǥǟdz ǛǕǙǤǙǚǙǡǡdz ǡǢǠǙǤǹǖ ǤǔǘǹǢǥǦǔǡǪǹǝ ǖ ǣǔǠ’dzǦǹ ǠǢǚǡǔ ǬǖǜǘǞǢ ǡǔǕǤǔǦǜ Ǜǔ ǘǢǣǢǠǢǗǢDz
ǞǡǢǣǢǞ (h ǹ i) ǡǔ ǣǧǟǰǦǹ ƸLJ ǡǢǠǙǤ ǣǢǦǤǹǕǡǢǺ ǤǔǘǹǢǥǦǔǡǪǹǺ.
DŽǙǗǧǟDzǖǔǡǡdz Ǥǹǖǡdz ǛǔǗǔǟǰǡǢǺ ǗǧǫǡǢǥǦǹ
• ƾǡǢǣǞǔǠǜ VOL+ ǔǕǢ VOL– (m, Ǡǔǟ. 3) ǡǔ ǣǧǟǰǦǹ ƸLJ ǔǕǢ ǤǙǗǧǟdzǦǢǤǢǠ VOLUME (b, Ǡǔǟ. 1) ǡǔ
ǣǙǤǙǘǡǹǝ ǣǔǡǙǟǹ ǥǔǕǖǧǨǙǤǔ ǠǢǚǡǔ ǖǹǘǤǙǗǧǟDzǖǔǦǜ (ǛǕǹǟǰǬǜǦǜ/ ǛǠǙǡǬǜǦǜ) ǤǹǖǙǡǰ ǛǔǗǔǟǰǡǢǺ
ǗǧǫǡǢǥǦǹ ǥǜǥǦǙǠǜ.
LJǣǤǔǖǟǹǡǡdz ǤǹǖǡǙǠ ǗǧǫǡǢǥǦǹ ǞǢǟǢǡǢǞ ǹ ǥǔǕǖǧǨǙǤǔ
• DŽǹǖǙǡǰ ǗǧǫǡǢǥǦǹ ǨǤǢǡǦǔǟǰǡǜǩ, ǦǜǟǢǖǜǩ ǹ ǪǙǡǦǤǔǟǰǡǢDz ǞǢǟǢǡǢǞ ǠǢǚǡǔ ǖǹǘǤǙǗǧǟDzǖǔǦǜ ǞǡǢǣǞǔǠǜ
FRONT+/- f, SURROUND+/- e ǹ CEN+/- n ǡǔ ǣǧǟǰǦǹ ƸLJ. ƴ ǞǡǢǣǞǔǠǜ SUB+/– o ǡǔ ǃƸLJ ǔǕǢ
SUB+ g ǹ SUB– h ǡǔ ǣǔǡǙǟǹ ǧǣǤǔǖǟǹǡǡdz ǥǔǕǖǧǨǙǤǔ (ǘǜǖ. Ǡǔǟ. 1)
ǗǧǫǡǢǥǦǹ ǥǔǕǖǧǨǙǤǔ.
DŽǙǚǜǠ ǢǕ’ǷǠǡǢǗǢ Ǜǖǧǫǔǡǡdz
• ǁǔǦǜǥǞǔDzǫǜ ǞǡǢǣǞǧ 2.1/5.1 ǡǔ ǃƸLJ l ǔǕǢ ǡǔ ǣǔǡǙǟǹ ǧǣǤǔǖǟǹǡǡdz ǥǔǕǖǧǨǙǤǔ e ǣǤǜ ǧǖǹǠǞǡǙǡǢǠǧ ǘǚǙǤǙǟǹ ǛǖǧǞǧ, ƶǜ ǖǥǦǔǡǢǖǟDzǷǦǙ ǤǙǚǜǠ ǢǕ’ǷǠǡǢǗǢ Ǜǖǧǫǔǡǡdz. ƶ ǛǔǟǙǚǡǢǥǦǹ ǖǹǘ ǖǜǕǤǔǡǢǗǢ
ǤǙǚǜǠǧ (2.1/5.1) ǡǔ ǘǜǥǣǟǙǺ ǖǹǘǢǕǤǔǚǔǷǦǰǥdz ǖǹǘǣǢǖǹǘǡǜǝ ǡǔǣǜǥ 2.1 ǔǕǢ 5.1. ǓǞǭǢ ǚ ǣǹǘǞǟDzǫǙǡǙ Ǧǔ ǧǖǹǠǞǡǙǡǙ ǘǚǙǤǙǟǢ ǥǜǗǡǔǟǧ 5.1 (DVD), ǦǢ
ǥǦǧǣǡǙ.
ǦDzǡǙǤ ǡǔ ǫǔǥǦǢǦǧ ǤǔǘǹǢǥǦǔǡǪǹǺ.
ǣǢǦǤǹǕǡǧ ǤǔǘǹǢǣǙǤǙǘǔǫǧ ǞǡǢǣǞǔǠǜ ǪǜǨǤǢǖǢǺ ǞǟǔǖǹǔǦǧǤǜ
ǤǙǚǜǠ ǢǕ’ǷǠǡǢǗǢ Ǜǖǧǫǔǡǜdz (2.1/ 5.1) ǡǙǘǢ-
BTR5-10
ǝǢǗǢ ǘǢ ǤǢǛ’ǷǠǹǖ AUDIO
AUX d (Ǡǔǟ. 3) ǡǔ
ǠǢǚǡǔ ǖǹǘǤǙǗǧǟDzǖǔǦǜ ǤǹǖǙǡǰ
21
Page 23

UKR
ƴǞǦǜǖǡǔ ǔǞǧǥǦǜǫǡǔ ǥǜǥǦǙǠǔ 5.1
ǘǟdz ǘǢǠǔǬǡǰǢǗǢ ǞǹǡǢǦǙǔǦǤǧ
džǜǠǫǔǥǢǖǙ ǖǜǠǜǞǔǡǡdz ǛǖǧǞǧ
• ǁǔǦǜǥǡǹǦǰ ǞǡǢǣǞǧ MUTE j ǡǔ ǣǧǟǰǦǹ ƸLJ ǔǕǢ ǞǡǢǣǞǧ MUTE f ǡǔ ǣǔǡǙǟǹ ǧǣǤǔǖǟǹǡǡdz ǥǔǕǖǧǨǙǤǔ, ǭǢǕ ǦǜǠǫǔǥǢǖǢ ǖǜǠǞǡǧǦǜ ǛǖǧǞ. ǁǔǦǜǥǡǹǦǰ ǪDz ǞǡǢǣǞǧ ǣǢǖǦǢǤǡǢ, ǭǢǕ ǧǖǹǠǞǡǧǦǜ ǛǖǧǞ.
ǃǤǜǠǹǦǞǜ. ǓǞǭǢ ƶǜ ǦǤǜǖǔǟǜǝ ǫǔǥ ǡǙ ǖǜǞǢǤǜǥǦǢǖǧǷǦǙ ƴDž, ǡǙ ǛǔǕǧǘǰǦǙ ǖǜǠǞǡǧǦǜ ǣǤǜǥǦǤǹǝ
ǖǜǠǜǞǔǫǙǠ POWER Ǧǔ ǖǜǝǡdzǦǜ ǖǜǟǞǧ ǠǙǤǙǚǙǖǢǗǢ ǬǡǧǤǔ Ǜ
6. LJDžLJǁƹǁǁǓ ǁƹDžǃDŽƴƶǁǂCdžƹƽ
ǤǢǛǙǦǞǜ.
ǁǙǥǣǤǔǖǡǹǥǦǰ
ƴDž ǡǙ ǖǠǜǞǔǷǦǰǥdz.
ǁǙǠǔǷ ǛǖǧǞǧ.
LJ ǞǢǟǢǡǞǔǩ ƴDž
ǛǔǡǔǘǦǢ Ǧǜǩǜǝ ǛǖǧǞ.
DžǣǢǦǖǢǤǙǡǡdz ǛǖǧǞǧ.
ǁǙ ǨǧǡǞǪǹǢǡǧǷ
ǣǧǟǰǦ ƸLJ.
ǁǙ ǣǤǔǪDzǷ
FM/AM-ǦDzǡǙǤ.
ǓǞǭǢ ǚǢǘǙǡ Ǜǹ ǖǞǔǛǔǡǜǩ ǖǜǭǙ ǥǣǢǥǢǕǹǖ ǡǙ ǘǔǷ ǛǠǢǗǧ ǖǜǤǹǬǜǦǜ ǣǤǢǕǟǙǠǧ, Ǖǧǘǰ ǟǔǥǞǔ, ǛǖǙǤǡǹǦǰǥdz Ǜǔ ǣǤǢǨǙǥǹǝǡǢDz ǞǢǡǥǧǟǰǦǔǪǹǷDz ǘǢ ǡǔǝǕǟǜǚǫǢǗǢ ǘǢ ƶǔǥ ǥǙǤǖǹǥǡǢǗǢ ǪǙǡǦǤǧ. ǁǹǞǢǟǜ ǡǙ
ǡǔǠǔǗǔǝǦǙǥdz ǤǙǠǢǡǦǧǖǔǦǜ ƴDž ǥǔǠǢǥǦǹǝǡǢ.
ǃǤǜǫǜǡǔ
ǁǙ ǣǹǘǞǟDzǫǙǡǔ ǘǢ ǠǙǤǙǚǹ ǚǜǖǟǙǡǡdz.
ǁǙ ǧǖǹǠǞǡǙǡǢ ǠǙǤǙǚǙǖǜǝ ǖǜǠǜǞǔǫ.
DŽǙǗǧǟdzǦǢǤ ǗǧǫǡǢǥǦǹ ǖǥǦǔǡǢǖǟǙǡǢ
ǖ ǣǢǟǢǚǙǡǡdz ǡǔǝǠǙǡǬǢǺ ǗǧǫǡǢǥǦǹ.
ǁǙǣǤǔǖǜǟǰǡǢ ǣǹǘǞǟDzǫǙǡǢ ǘǚǙǤǙǟǢ
ǔǧǘǹǢǥǜǗǡǔǟǧ.
DŽǙǗǧǟdzǦǢǤ ǗǧǫǡǢǥǦǹ ǖǥǦǔǡǢǖǟǙǡǢ
ǖ ǣǢǟǢǚǙǡǡdz ǡǔǝǠǙǡǬǢǺ ǗǧǫǡǢǥǦǹ.
ƶǙǟǜǞǔ ǔǠǣǟǹǦǧǘǔ
ǥǜǗǡǔǟǧ.
DŽǢǛǤdzǘǚǙǡǔ ǕǔǦǔǤǙǝǞǔ.
Ƹǹdz ǣǤdzǠǜǩ ǥǢǡdzǫǡǜǩ ǣǤǢǠǙǡǹǖ.
ǃǙǤǙǬǞǢǘǔ Ǡǹǚ ǣǧǟǰǦǢǠ Ǧǔ
ǣǤǜǝǠǔǫǙǠ ǥǔǕǖǧǨǙǤǔ.
ǁǙ ǣǹǘǞǟDzǫǙǡǔ FM ǔǕǢ AM-ǔǡǦǙǡǔ.
ǃǢǗǔǡǜǝ ǣǤǜǝǢǠ ǔǡǦǙǡǜ.
ǖǩǹǘǡǢǗǢ
DžǣǢǥǹǕ ǧǥǧǡǙǡǡdz
ǃǙǤǙǖǹǤǦǙ ǣǤǔǖǜǟǰǡǹǥǦǰ
ǣǹǘǞǟDzǫǙǡǡdz.
LJǖǹǠǞǡǹǦǰ ǖǜǠǜǞǔǫ.
ǃǹǘǞǤǧǦǹǦǰ ǤǙǗǧǟdzǦǢǤ ǗǧǫǡǢǥǦǹ.
ǃǹǘǞǟDzǫǹǦǰ ǣǤǔǖǜǟǰǡǢ ǘǚǙǤǙǟǔ
ǥǜǗǡǔǟǧ.
ǃǹǘǞǤǧǦǹǦǰ ǤǙǗǧǟdzǦǢǤ ǗǧǫǡǢǥǦǹ.
DŽǙǗǧǟdzǦǢǤǔǠǜ ǗǧǫǡǢǥǦǹ ǘǚǙǤǙǟǔ
ǥǜǗǡǔǟǧ Ǧǔ ƴDž ǛǠǙǡǬǹǦǰ ǖǙǟǜǫǜǡǧ
ǖǩǹǘǡǢǗǢ ǥǜǗǡǔǟǧ.
ƻǔǠǹǡǹǦǰ ǕǔǦǔǤǙǝǞǧ ǡǔ ǡǢǖǧ
ƻǠǹǡǹǦǰ ǤǢǛǦǔǬǧǖǔǡǡdz ǥǔǕǖǧǨǙǤǔ
ǔǕǢ ǣǧǟǰǦǔ ƸLJ.
ƻǠǹǡǹǦǰ ǤǢǛǦǔǬǧǖǔǡǡdz ǥǔǕǖǧǨǙǤǔ
ǔǕǢ ǣǧǟǰǦǔ ƸLJ.
ǃǹǘǞǟDzǫǹǦǰ FM ǔǕǢ AM-ǔǡǦǙǡǧ.
ǃǹǘǞǟDzǫǹǦǰ ǛǢǖǡǹǬǡDz FM-ǔǡǦǙǡǧ
ǔǕǢ AM-ǔǡǦǙǡǧ.
.
22
Page 24

UKR
Керівництво з експлуатації
7. ТЕХНІЧНІ ХАРАКТЕРИСТИКИ
Характеристики та одиниці виміру Значення
Акустическая система
Вихідна потужність (RMS), Вт:
Номінальний опір навантаження (на кожний канал), Ом
Частотний діапазон, Гц
Співвідношення сигнал/шум, дБ
Діаметр динаміків, мм
Розміри (Ш × В × Г), мм
Напруга живлення, В/Гц
Вага, кг
Діапазони частот:
АМ (крок 9 кГц), кГц
FМ (крок 100 кГц), МГц
Відношення сигнал/шум:
AM, дБ
FМ, дБ
сабвуфер
сателіти
сабвуфер
сателіти
сабвуфера
центральної колонки
фронт. і тилових колонок
сабвуфера
центральної колонки
фронт. і тилових колонок
Тюнер
60
5 × 15
6
4
40 – 20 000
≥ 83
Ø 165
Ø 38 + 2 × Ø 100
Ø 38 + Ø 100
220 × 400 × 300
400 × 150 × 240
240 × 150 × 140
~230/50
21, 5
522 ~ 1611
87 ~ 108
> 45
> 45
BTR5-10
Примітки:
• Технічні характеристики, наведені в таблиці, довідкові і не можуть служити підста-
вою для претензій.
• Продукція торговельної марки SVEN постійно удосконалюється. З цієї причини технічні характеристики та комплектність можуть бути змінені без попереднього повідомлення.
23
Page 25

5.1 Active Home Theater
Speaker System
OPERATION
MANUAL
BTR5-10
www.sven.ѵ
Page 26

ENG
Operation Manual
Congratulations on your purchase of the Sven speaker system!
COPYRIGHT
© 2014. SVEN PTE. LTD. Version 1.0 (V 1.0).
This Manual and information contained in it are copyrighted. All rights reserved.
TRADEMARKS
All trademarks are the property of their legal holders.
NOTICE OF RESPONSIBILITY RESTRICTION
Despite the exerted eԚorts to make this Manual more exact, some discrepancies may occur. The
information in this Manual is given on «as is» terms. The author and the publisher do not bear any
liability to a person or an organization for loss or damage which has arisen from the information
contained in this Manual.
CONTENTS
RUS ...................................................................................................
UKR ..................................................................................................
ENG .................................................................................................
1. BUYER RECOMMENDATIONS ..................................................
2. PACKAGE CONTENTS.................................................. ...........
3. SAFETY PRECAUTIONS ..................................................
4. TECHNICAL DESCRIPTION ....................................................
5. PREPARATION AND OPERATION ..........................................
6. TROUBLESHOOTING...............................................................
7. TECHNICAL SPECIFICATIONS ....................................................
BTR5-10
12
24
.............
............
...................
................
......................
.................
...........
25
26
26
26
29
34
35
1
1. BUYER RECOMMENDATIONS
• Unpack the device carefully. Make sure there are no accessories left in the box. Check up the
device for damage; if the product was damaged during transportation, address the ԛrm which
carried out the delivery; if the product functions incorrectly, address the dealer at once.
• Check up the package contents and availability of the warranty card. Make sure the warranty card
has a shop stamp, a legible signature or the seller’s stamp and purchase date, and the number of
the wall mount corresponds to that in the warranty card. Remember: in case of warranty card loss
or discrepancy of numbers you forfeit the right for warranty repairs.
• Do not switch on the speaker system immediately after you bring it into a room from environment
with negative temperature! After unpacking, the speaker system should be kept in conditions of
room temperature for at least 4 hours.
• Before installing and using the speaker system, read this Manual carefully and keep it for future
reference.
Technical support is on www.sven.Н
25
Page 27

ENG
5.1 Active Home Theater
Speaker System
2. PACKAGE CONTENTS
• Subwoofer – 1 pc
• Satellite speakers – 5 pcs
• Audio cable – 5 pcs
• 2RCA to 2RCA signal cable – 3 pcs
• 2RCA to 3.5 mm mini-jack adapter – 3 pcs
• Remote control – 1 pc
• CR2025 battery – 1 pc
• FM antenna – 1 pc
• AM antenna – 1 pc
• Operation manual – 1 pc
• Warranty card – 1 pc
3. SAFETY PRECAUTIONS
Caution! High voltage inside! To avoid the risk of electric
shock do not open or touch elements inside.
• To avoid electric shock, do not open the MSS and do not perform repairs by yourself. Service and
repairs should be performed only by qualiԛed specialists in an authorized service center. The list of
authorized service centers is available on www.sven.Н
• Do not allow the circuit of wires (including the grounded ones) between the speakers, on the
power ampliԛer or the ground, for it causes damage to the power ampliԛer output stage.
• Do not touch the MSS power cord plug pins for 2 seconds after unplugging it from the mains.
• Disconnect the MSS from the mains system during a fuse replacement. Use fuses of the same
type and rated value. Do not use hand-made fuses.
• Do not put foreign objects inside the holes of the MSS.
• Protect the MSS from high humidity, water and dust.
• Protect the MSS from heating: do not place it closer than 1 m from a heat source. Do not expose
it to direct sunlight.
• Do not place any open Ԝame sources on or close to MSS.
• Do not place the MSS in poorly ventilated areas. Leave an air gap of 10 cm or more. When
operating the MSS, do not put any devices on it, do not cover it with cloth or other objects preventing it from cooling.
• Do not use any chemical agents for cleaning. Clean it with dry soft cloth only.
4. TECHNICAL DESCRIPTION
BTR5-10 5.1 Home Theater Speaker System (HTSS) equipped with AM/FM tuner is designed for
playing music and sounding games, movies, etc., as well as being used as radio tuner. The built-in
ampliԛer allows to connect the speaker system to virtually any audio source. Remote control is
included.
26
Page 28

ENG
Operation Manual
Special features
• Built-in 6-CH ampliԛer
• Built-in AM/FM tuner
• Analog 5.1 input, two stereo AV inputs for
connection to various audio devices
• Electronic audio input switch
• Full-function remote control
• Master volume and subwoofer volume
control
• Individual volume controls for front, rear
and center channel satellites
• LED display
• Magnetic shielding
• Wooden (MDF) cabinets of the subwoofer
and satellites
Subwoofer design
a Display screen
b VOLUME: master volume control knob
c STANDBY: standby mode button
d INPUT: audio source selection button
e 2.1/5.1: 2.1/5.1 mode switch button
f MUTE: MUTE button
g SUB+: subwoofer volume up
h SUB–: subwoofer volume down
i FM ANT: FM antenna terminal
j AM GND/AM ANT: AM antenna terminals
k 2CH INPUT: audio source inputs
l DVD (5.1CH) INPUT: 5.1 audio source
input
m AUDIO OUTPUT: audio outputs for front,
rear and center channels
n POWER: POWER ON/OFF switch
o Power cord
a
b
c
d
e
BTR5-10
Fig. 1. Subwoofer control panel
PC
AUX
FRFL
CEN
SWCEN
DVD(5.1CH) INPUT 2CH INPUTAUDIO OUTPUT
SRSL
FR
FL
CEN
SR
SL
f
g
h
i
j
k
l
m
Fig. 2. Subwoofer rear panel
n
o
27
Page 29

ENG
5.1 Active Home Theater
Speaker System
Remote control
a STANDBY: standby mode button
b PC: PC
c DVD: DVD (5.1CH)
d AUX: AUX
e SURROUND +/-:
f FRONT+/-:
signal source selection
signal source selection
signal source selection
rear channels volume control buttons
front channels volume control buttons
g TREBLE+/-: treble level control buttons
h 0 – 9:
i 10+:
numeric keypad
numeric keypad multiplier
j MUTE: sound oԚ button
k RESET: return to default settings
l 2.1/5.1: 2.1/5.1 mode switch button
m VOL+/-: master volume control buttons
n CEN+/-:
o SUB +/-:
center channel volume control buttons
subwoofer channel volume control buttons
p BASS+/-: bass level control buttons
q SCAN:
tuner auto scan
r TUNE+/-: tuner manual adjustment
s FM/AM: FM and AM band selection
t MEMORY: saving tuner settings
Remote control battery installation
• Open the battery compartment on the back of the
remote control.
• Insert the CR2025 battery (included).
• Close the battery compartment.
a
b
c
d
e
f
g
h
i
STANDBY
RESET
DVD PC AUX 2.1/5.1
+
VOL VOL
SURROUND
FRONT CEN SUB
SURROUND
FRONT
BASS BASSTREBLE TREBLE
5
10
BTR5-10
3
6
MEMORY
12
4
789
0
SUBCEN
SCAN
TUNE
TUNE
FM/AM
j
k
l
m
n
o
p
q
r
s
t
Notes:
• Use the remote control at an angle of no more
than 30°, no more than 7 meters away.
Fig. 3. Remote control
• Direct the remote control at the IR receiver
display on the subwoofer.
• If the remote control does not work, check the battery or replace the discharged battery
with a new one.
• Remove the battery from the remote control if you don’t intend to use it for a long time
(more than a week).
28
Page 30

ENG
Operation Manual
5. PREPARATION AND OPERATION
Speaker placement
• To achieve optimum sound, it’s recommended that you place the speakers according to Fig. 4.
The center and front speakers should be located along an imaginary circle with the distance
between the listener and the center channel speaker as a radius, and the listener’s head as the
center. Each of the three speakers should be placed at equal distance from the listener. The front
speakers and the listener make up an equilateral triangle. The rear speakers are placed at the same
distance from the listener (on the imaginary circle, too) at an angle of nearly 110° to the Listener –
Display axis.
• Avoid placing your speakers in the corners and close to walls, as this can lead to unwanted
resonance and distortions. If possible, place them at least 20 cm away from walls.
• For more accurate perception, the tweeters should be at the listener’s ear level.
• Do not locate the speakers in niches. Such placement can aԚect the sound badly, especially in
the lows.
• The subwoofer emits non-directional sound, therefore it can be located in any place of the room
where it sounds the best.
Center
speaker
Front left
speaker
BTR5-10
Front right
speaker
A
A
30° 30°
Subwoofer
A
A
Rear left
speaker
110° ± 10° 110° ± 10°
AA
Fig. 4. Speaker placement
Rear right
speaker
29
Page 31

ENG
5.1 Active Home Theater
Speaker System
Connecting the satellites to the subwoofer
• Before connecting, make sure that the device is unplugged. Join the connection cables as shown
in Fig. 5. Please note that the red (+) terminals of the satellites should be connected to the red
terminals of the subwoofer (+ о +), while the black (–) terminals of the satellites should be
connected to the black terminals of the subwoofer (– о –).
• Check for correctness of polarity connection and absence of contact between bared wires and
with metal parts of equipment.
Centrer channel
satellite
Front left satellite Front right satellite
Subwoofer
rear panel
PC
AUX
FRFL
SWCEN
CEN
SRSL
DVD(5.1CH) INPUT 2CH INPUTAUDIO OUTPUT
FR
FL
CEN
SR
Rear left satellite Rear right satellite
SL
Fig. 5. Speakers connection diagram
Connecting an audio source
BTR5-10 5.1 Home Theater Speaker System can be connected to virtually any audio source (see
connection diagram, Fig. 6).
• Before connecting, make sure that the device is unplugged.
• To connect the speakers to a CD/DVD/VHS-player or TV, use the 2RCA to 2RCA stereo signal
cables. To connect the HTSS to a PC sound card or an ǀDŽ3/CD player, use the 2RCA to 2RCA signal cable together with the included 2RCA to 3.5 mm mini-jack adapter.
30
Page 32

ENG
Operation Manual
BTR5-10
• Be sure to connect the left and right channels correctly. The left RCA jacks should be inserted into
the left ports of the ampliԛer (usually white), and the right RCA jacks should be inserted into the right
ports of the ampliԛer (usually red).
Note. Accuracy and reliability of the cables’ connection directly affects the sound quality.
Check for absence of contact between the bared wires and with metal parts of the equipment.
PC
CD player
2RCA to mini-
jack adapter
2RCA to 2RCA
signal cables
FM antenna
AM antenna
CEN
DVD(5.1CH) INPUT 2CH INPUTAUDIO OUTPUT
Subwoofer
rear panel
PC
AUX
FRFL
SWCEN
SRSL
FR
FL
CEN
SR
SL
DVD player
FR
SR
FL
SL
CESW
Signal cables
2RCA to mini-jack
Fig. 6. Audio source connection diagram
Power cord
5.1-channel
sound card
31
Page 33

ENG
5.1 Active Home Theater
Speaker System
Installation and Connection of Antennas
FM Antenna Connection
• Insert the included room FM antenna into the FM ANT terminal on the subwoofer rear panel, as
shown in Fig. 5. Install the FM antenna in such a way that reception quality is satisfactory, and then
ԛx the position of the antenna.
Note. In buildings with weak FM signal, use an external 75 Ohm FM antenna. Typically,
a three-element antenna is enough, but in areas with weak FM signal it is necessary to use
an FM antenna with 5 or more elements.
ƴM Antenna Connection
• To install the loop antenna (see the Fig. 7 below), ԛx the bracket to the hole at the bottom of the
antenna (step 1).
12
Fig. 7. ƵM antenna connection
• Turn the visor of the AM terminal counterclockwise to loosen it slightly, insert the cord of the loop
antenna under the visor and turn the visor clockwise to ԛrmly clamp the cord (step 2). Gently pull
the cord to make sure it is securely ԛxed. Install the antenna in a niche or hang it on the window
frame, so that the reception is better. Place all other cables (power cable, speaker cables or
connecting wires) far away from the antenna.
• After that, connect the loop antenna to the AM ANT and AM GNT terminals on the rear panel of the
subwoofer (see ƴM antenna connection, Fig. 6).
Note. When reception is poor in the inner AM loop antenna, it is recommended that an
external AM antenna (not included) be ised.
Operattion
Switching On
To switch on the subwoofer, plug the power cord (o, Fig. 1) into the mains outlet and shift POWER
On/OԚ switch (n, Fig. 1) on the rear panel into ON position. The display (a, Fig. 1) on the front
panel will illuminate.
Standby Mode
STANDBY function is designed for switching on the speaker system quickly and saving electricity
consumption. Press STANDBY (a, Fig. 3) on the remote control or STANDBY button (c, Fig. 1) on
the subwoofer control panel to activate/deactivate this function. If the STANDBY button is on,
32
Page 34

ENG
Operation Manual
two blinking stripes will illuminateon the display of the subwoofer. Press it again, and the speaker
system will return to operation mode.
Audio Source Selection
• There are two stereo inputs (DŽDž, AUX) and 5.1CH input in the Home Theatre Speaker System.
To listen to a stereo audio source, connect it to AUDIO INPUT (k, Fig. 2) of the speaker system, as
shown in Fig. 5. To listen to a multichannel sound source, connect its multichannel output to 5.1CH
INPUT (l, Fig. 2) of the speaker system (see connection diagram, Fig. 5). Depending on the required
connection, select the desired audio source with the INPUT button on the control panel of the
subwoofer (d, Fig. 1) or with the DVD b, PC c or AUX d buttons (Fig. 3) on the remote control.
The subwoofer display will illuminate with a corresponding inscription.
Turning on and Setting the Tuner
• Press the SCAN q and FM/AM s buttons on the remote control to turn on the tuner and select
the FM or AM band.
• Manual setting. Press the TUNE + or TUNE- buttons r on the remote control for ԛne-tuning the
frequency of the radio station.
• Auto search. By holding SCAN q on the remote control for more than 1 second, turn on the
scanning of the FM band starting with 87 MHz frequency, the found radio stations being memorized
sequentially: «CH 01», «CH 02», «CH 03», etc. Scanning of the FM band will continue until 108 MHz
frequency. After the scanning, the ԛrst found radio station turns on.
• Additionally, you can turn on the desired broadcast quickly with the numeric keypad buttons (h
and i) on the remote control, having saved systems of 20 FM radio stations and 20 AM radio
stations.To save the found radio station, press MEMORY t on the remote control (CH _ _ will
illuminate on the display), then enter its number (from 0 to 19) with the numeric keypad buttons (h
and i) on the remote control, which will illuminate on the display (for example, CH 09). After
saving the required quantity of radio stations, enter the number of your desired radio station on the
remote control with the numerical keypad buttons (h and i) for quick search.
Master Volume Control
• Press VOL+ or VOL– (m, Fig. 3) on the remote control or turn the VOLUME knob (b, Fig. 1) on the
front panel of the subwoofer to adjust (increase/decrease) the volume level.
Satellites and Subwoofer Volume Control
• The volume level of the front, rear and center channel satellites can be adjusted with FRONT+/- f,
SURROUND+/- e and CEN+/- n on the remote control. While SUB+/– o on the remote control or
SUB+ g and SUB– h on the control panel of the subwoofer (see Fig. 1) can adjust the subwoofer
volume level.
2D/3D sound
• To select between 2D and 3D sound modes, press the 2.1/5.1 button (l, Fig. 3) on the remote
control or the subwoofer control panel (e, Fig. 1), while your audio source is on. 3D or 2D mode
inscription will illuminate on the display according to the selected mode. If 5.1 audio source (DVD)
is connected and on, this feature is unavailable.
Mute feature
• Press MUTE j on remote control or button MUTE f on control panel of subwoofer to tempo-
rarily turn oԚ the sound. Press this button again to turn on the sound.
Note. If the speaker system is left unused for a long time, mind to switch off the device by
using POWER On/Off switch and unplug it.
BTR5-10
33
Page 35

ENG
6. TROUBLESHOOTING
5.1 Active Home Theater
Speaker System
Problem
The HTSS does
not turn on.
No sound.
There is too quiet
sound of speakers.
Distortion of
sound.
The remote control
is not working.
The FM/AM tuner
is not working.
If none of the above methods can solve the problem, please seek professional advice at your
nearest service center. Never attempt to repair the product yourself.
Cause
The HTSS isn’t connected to a mains
The power switch is oԚ.
Volume level is set at minimum value.
Improperly connected audio source.
Volume level is set at minimum value.
Large amplitude of the input signal.
The battery is discharged.
There is direct sunlight.
Obstacle between the remote control and
the subwoofer receiver.
The FM/AM tuner is not connected.
Poor reception of antennas.
outlet.
Solution
Check the connection.
Turn on the switch.
Adjust volume control knob.
Connect audio sources correctly.
Adjust the volume control knob.
Turn down the source volume
and the HTSS volume.
Replace the battery with a new one.
Change the subwoofer or remote
control location.
Change the subwoofer or remote
control location.
Connect the FM/AM antenna.
Connect an external FM antenna
or an AM antenna.
34
Page 36

ENG
Operation Manual
7. TECHNICAL SPECIFICATIONS
Parameter, measurement unit Value
Speaker system
Output power (RMS), W
Rated load resistance
(per channel), Ohm
Frequency response, Hz
S/N ratio, dB
Speaker diameters, mm
Dimensions (W × H × D), mm
Power supply, V/Hz
Weight, kg
Frequency bands:
АМ (at 9 kHz step), kHz
FМ (at 100 kHz step), MHz
S/N ratio:
AM, dB
FМ, dB
subwoofer
satellites
subwoofer
satellites
subwoofer
satellite (center)
satellites (front, rear)
subwoofer
satellite (center)
satellites (front, rear)
Tuner
BTR5-10
60
5 × 15
6
4
40 – 20 000
≥ 83
Ø 165
Ø 38 + 2 × Ø 100
Ø 38 + Ø 100
220 × 400 × 300
400 × 150 × 240
240 × 150 × 140
~230/50
21. 5
522 ~ 1611
87 ~ 108
> 45
> 45
Notes:
• Technical specifications given in this table are supplemental information and cannot give
occasion to claims.
• Technical specifications and package contents are subject to change without notice due
to the improvement of SVEN production.
35
Page 37

ƴǞǦǜǖǡǔdz ǔǞǧǥǦǜǫǙǥǞǔdz ǥǜǥǦǙǠǔ
5.1 ǘǟdz ǘǢǠǔǬǡǙǗǢ ǞǜǡǢǦǙǔǦǤǔ
DžǦǔǕǜǟǜǛǔǦǢǤ ǡǔǣǤdzǚǙǡǜdzDžǦǔǕǜǟǜǛǔǦǢǤ ǡǔǣǤdzǚǙǡǜdz
2.0 Multimedia Speaker System
2.0 Multimedia Speaker System 2.0 Multimedia Speaker System
Automatic Voltage Regulator
Automatic Voltage Regulator
ǀǢǘǙǟǰ:
ƼǠǣǢǤǦǙǤ ǖ DŽǢǥǥǜǜ: ǂǂǂ «DžƾƴǁƸƼdžDŽƹƿ», 111024,
DŽLj, Ǘ. ǀǢǥǞǖǔ, ǧǟ. ƴǖǜǔǠǢǦǢǤǡǔdz, ǘ. 65, ǥǦǤ. 1.
LJǣǢǟǡǢǠǢǫǙǡǡǔdz ǢǤǗǔǡǜǛǔǪǜdz ǖ DŽǢǥǥǜǜ: ǂǂǂ «DŽdž-Lj»,
105082, Ǘ. ǀǢǥǞǖǔ, ǧǟ. LjǤǜǘǤǜǩǔ ǑǡǗǙǟǰǥǔ, ǘ. 75, ǥǦǤ. 5.
LJǥǟǢǖǜdz ǗǔǤǔǡǦǜǝǡǢǗǢ ǢǕǥǟǧǚǜǖǔǡǜdz ǥǠǢǦǤǜǦǙ
ǖ ǗǔǤǔǡǦǜǝǡǢǠ ǦǔǟǢǡǙ ǜǟǜ ǡǔ ǥǔǝǦǙ www.sven.ѵ.
ƷǔǤǔǡǦǜǝǡǯǝ ǥǤǢǞ: 12 ǠǙǥ. DžǤǢǞ ǥǟǧǚǕǯ: 5 ǟǙǦ.
ǃǤǢǜǛǖǢǘǜǦǙǟǰ: «Džƶƹǁ ǃdžƹ. ƿǜǠǜǦǙǘ», 176
Ƹǚǧ NjǜǔǦ DŽǢǧǘ, д 02-02, DžǜǡǗǔǣǧǤ, 427447.
ǃǤǢǜǛǖǙǘǙǡǢ ǣǢǘ ǞǢǡǦǤǢǟǙǠ «DžǖǙǡ DžǞǔǡǘǜǡǔǖǜdz
ƿǜǠǜǦǙǘ», 48310, Ljǜǡǟdzǡǘǜdz, ƾǢǦǞǔ, ƾǢǦǢǟǔǩǘǙǡǦǜǙ, 15.
DžǘǙǟǔǡǢ ǖ ƾǜǦǔǙ.
ǀǢǘǙǟǰ: BTR5-10
ǃǢǥǦǔǫǔǟǰǡǜǞ/ǹǠǣǢǤǦǙǤ ǖ LJǞǤǔǺǡǹ: džǂƶ «Džƶƹǁ NJǙǡǦǤ»,
08400, ƾǜǺǖǥǰǞǔ ǢǕǟ., Ǡ. ǃǙǤǙdzǥǟǔǖ-ljǠǙǟǰǡǜǪǰǞǜǝ,
ǖǧǟ. ƷǙǤǢǺǖ ƸǡǹǣǤǔ, 31, ǦǙǟ. (044) 233-65-89/98.
ǃǤǜǛǡǔǫǙǡǡdz, ǥǣǢǚǜǖǫǹ ǖǟǔǥǦǜǖǢǥǦǹ Ǧǔ ǖǹǘǢǠǢǥǦǹ ǣǤǢ
ǕǙǛǣǙǞǧ ǦǢǖǔǤǧ ǘǜǖ. ǧ ƾǙǤǹǖǡǜǪǦǖǹ Ǜ ǙǞǥǣǟǧǔǦǔǪǹǺ.
LJǠǢǖǜ ǗǔǤǔǡǦǹǝǡǢǗǢ ǢǕǥǟǧǗǢǖǧǖǔǡǡdz ǘǜǖǹǦǰǥdz
ǖ ǗǔǤǔǡǦǹǝǡǢǠǧ ǦǔǟǢǡǹ ǔǕǢ ǡǔ ǥǔǝǦǹ www.sven.ѵ.
ƷǔǤǔǡǦǹǝǡǜǝ ǦǙǤǠǹǡ: 12 Ǡǹǥ. DžǦǤǢǞ ǥǟǧǚǕǜ: 5 ǤǢǞǹǖ.
džǢǖǔǤ ǥǙǤǦǜǨǹǞǢǖǔǡǢ/ǠǔǷ ǗǹǗǹǷǡǹǫǡǜǝ ǖǜǥǡǢǖǢǞ.
njǞǹǘǟǜǖǜǩ ǤǙǫǢǖǜǡ ǡǙ ǠǹǥǦǜǦǰ. ƻǕǙǤǹǗǔǦǜ ǖ ǥǧǩǢǠǧ
ǠǹǥǪǹ.
DŽǢǧǘ, д 02-02, DžǹǡǗǔǣǧǤ, 427447. ƶǜǗǢǦǢǖǟǙǡǢ ǣǹǘ
ǞǢǡǦǤǢǟǙǠ «DžǖǙǡ DžǞǔǡǘǜǡǔǖǹdz ƿǹǠǹǦǙǘ», 48310,
Ljǹǡǟdzǡǘǹdz, ƾǢǦǞǔ, ƾǢǦǢǟǔǩǘǙǡǦǹǷ, 15. ƻǤǢǕǟǙǡǢ
ǖ ƾǜǦǔǺ.
Manufacturer: SVEN PTE. LTD, 176 Joo Chiat Road,
д 02-02, Singapore, 427447. Produced under the
control of Oy Sven Scandinavia Ltd. 15, Kotolahdentie,
Kotka, Finland, 48310. Made in China.
® Registered Trademark of Oy SVEN
Scandinavia Ltd. Finland.
BTR5-10
ƶǜǤǢǕǡǜǞ: «Džƶƹǁ ǃdžƹ. ƿǹǠǹǦǙǘ», 176 Ƹǚǧ NjǹǔǦ
BTR5-10
SPS-619
 Loading...