

Page 1
ƼǗǤǢǖǢǝ ǠǔǡǜǣǧǟdzǦǢǤ
DŽLJƾǂƶǂƸDždžƶǂ
ǃǂ ǑƾDžǃƿLJƴdžƴNJƼƼ
Aggressor
www.sven.ѵ
Page 2

RUS
DŽǧǞǢǖǢǘǥǦǖǢ ǣǢ DZǞǥǣǟǧǔǦǔǪǜǜ
ƵǟǔǗǢǘǔǤǜǠ ƶǔǥ Ǜǔ ǣǢǞǧǣǞǧ ǜǛǘǙǟǜdz ǦǢǤǗǢǖǢǝ ǠǔǤǞǜ SVEN!
ǃǙǤǙǘ DZǞǥǣǟǧǔǦǔǪǜǙǝ ǧǥǦǤǢǝǥǦǖǔ ǖǡǜǠǔǦǙǟǰǡǢ ǢǛǡǔǞǢǠǰǦǙǥǰ ǥ ǡǔǥǦǢdzǭǜǠ DŽǧǞǢǖǢǘǥǦǖǢǠ ǜ ǥǢǩǤǔǡǜǦǙ ǙǗǢ ǡǔ ǖǙǥǰ ǣǙǤǜǢǘ ǜǥǣǢǟǰǛǢǖǔǡǜdz.
ƴƶdžǂDŽDžƾǂƹ ǃDŽƴƶǂ
© 2014. SVEN PTE. LTD. ƶǙǤǥǜdz 1.0 (V 1.0).
ƸǔǡǡǢǙ DŽǧǞǢǖǢǘǥǦǖǢ ǜ ǥǢǘǙǤǚǔǭǔdzǥdz ǖ ǡǙǠ ǜǡǨǢǤǠǔǪǜdz ǛǔǭǜǭǙǡǯ ǔǖǦǢǤǥǞǜǠ ǣǤǔǖǢǠ. ƶǥǙ
ǣǤǔǖǔ ǛǔǭǜǭǙǡǯ.
džǂDŽƷǂƶǏƹ ǀƴDŽƾƼ
ƶǥǙ ǦǢǤǗǢǖǯǙ ǠǔǤǞǜ dzǖǟdzDzǦǥdz ǥǢǕǥǦǖǙǡǡǢǥǦǰDz ǜǩ ǛǔǞǢǡǡǯǩ ǖǟǔǘǙǟǰǪǙǖ.
ǃDŽƹƸLJǃDŽƹƺƸƹǁƼƹ ǂƵ ǂƷDŽƴǁƼNjƹǁƼƼ ǂdžƶƹdžDždžƶƹǁǁǂDždžƼ
ǁǙǥǠǢǦǤdz ǡǔ ǣǤǜǟǢǚǙǡǡǯǙ ǧǥǜǟǜdz ǥǘǙǟǔǦǰ DŽǧǞǢǖǢǘǥǦǖǢ ǕǢǟǙǙ ǦǢǫǡǯǠ, ǖǢǛǠǢǚǡǯ ǡǙǞǢǦǢǤǯǙ
ǡǙǥǢǢǦǖǙǦǥǦǖǜdz. ƼǡǨǢǤǠǔǪǜdz ǘǔǡǡǢǗǢ DŽǧǞǢǖǢǘǥǦǖǔ ǣǤǙǘǢǥǦǔǖǟǙǡǔ ǡǔ ǧǥǟǢǖǜdzǩ «ǞǔǞ ǙǥǦǰ».
ƴǖǦǢǤ ǜ ǜǛǘǔǦǙǟǰ ǡǙ
ǜǟǜ ǣǢǖǤǙǚǘǙǡǜdz, ǣǤǢǜǛǢǬǙǘǬǜǙ ǢǦ ǜǡǨǢǤǠǔǪǜǜ, ǥǢǘǙǤǚǔǭǙǝǥdz ǖ ǘǔǡǡǢǠ DŽǧǞǢǖǢǘǥǦǖǙ.
DŽƴDžǃƴƾǂƶƾƴ
ƴǞǞǧǤǔǦǡǢ ǤǔǥǣǔǞǧǝǦǙ ǜǛǘǙǟǜǙ, ǣǤǢǥǟǙǘǜǦǙ Ǜǔ ǦǙǠ, ǫǦǢǕǯ ǖǡǧǦǤǜ ǞǢǤǢǕǞǜ ǡǙ ǢǥǦǔǟǜǥǰ ǞǔǞǜǙǟǜǕǢ ǣǤǜǡǔǘǟǙǚǡǢǥǦǜ. ǃǤǢǖǙǤǰǦǙ ǧǥǦǤǢǝǥǦǖǢ ǡǔ ǣǤǙǘǠǙǦ ǣǢǖǤǙǚǘǙǡǜǝ. ƹǥǟǜ ǜǛǘǙǟǜǙ ǣǢǖǤǙǚǘǙǡǢ ǣǤǜ ǦǤǔǡǥǣǢǤǦǜǤǢǖǞǙ, ǢǕǤǔǦǜǦǙǥǰ ǖ ǨǜǤǠǧ, ǢǥǧǭǙǥǦǖǟdzDzǭǧDz ǘǢǥǦǔǖǞǧ; Ǚǥǟǜ
ǜǛǘǙǟǜǙ
DžǂƸƹDŽƺƴǁƼƹ
RUS ...................................................................................................
UKR ..................................................................................................
ENG .................................................................................................
ǡǙ ǨǧǡǞǪǜǢǡǜǤǧǙǦ, ǥǤǔǛǧ ǚǙ ǢǕǤǔǦǜǦǙǥǰ Ǟ ǣǤǢǘǔǖǪǧ.
1. ǂǃƼDžƴǁƼƹ ....................................................................................
2. ǀƹDŽǏ ƵƹƻǂǃƴDžǁǂDždžƼ .....................................................................
3. ƾǂǀǃƿƹƾdžǁǂDždžǐ ...........................................................................
4. ǂDžǂƵƹǁǁǂDždžƼ ...............................................................................
5. DžƼDždžƹǀǁǏƹ džDŽƹƵǂƶƴǁƼǓ ................................................................
6. ǂǃƼDžƴǁƼƹ ƾǂǁDždžDŽLJƾNJƼƼ ................................................................
7. ǃǂƸƾƿǒNjƹǁƼƹ Ƽ ƼǁDždžƴƿƿǓNJƼǓ ......................................................
8. DŽƹnjƹǁƼƹ ƶǂƻǀǂƺǁǏlj ǃDŽǂƵƿƹǀ .....................................................
ǡǙǥǧǦ ǡǜǞǔǞǢǝ ǢǦǖǙǦǥǦǖǙǡǡǢǥǦǜ ǣǙǤǙǘ ǟǜǪǢǠ ǜǟǜ ǢǤǗǔǡǜǛǔǪǜǙǝ Ǜǔ ǧǭǙǤǕ
Aggressor
16
1
2
2
2
2
2
3
4
7
8
ƻǘǙǥǰ ǚǙ ƶǯ ǥǠǢǚǙǦǙ ǡǔǝǦǜ ǢǕǡǢǖǟǙǡǡǧDz ǖǙǤǥǜDz ǘǔǡǡǢǗǢ ǤǧǞǢǖǢǘǥǦǖǔ.
džǙǩǡǜǫǙǥǞǔdz ǣǢǘǘǙǤǚǞǔ ǤǔǛǠǙǭǙǡǔ ǡǔ ǥǔǝǦǙ www.sven.Н
1
Page 3

RUS
ƼǗǤǢǖǢǝ ǠǔǡǜǣǧǟdzǦǢǤ
1. ǂǃƼDžƴǁƼƹ
ƼǗǤǢǖǢǝ ǠǔǡǜǣǧǟdzǦǢǤ AGGRESSOR ǠǢǚǡǢ ǜǥǣǢǟǰǛǢǖǔǦǰ ǖ ǤǔǛǡǯǩ ǜǗǤǔǩ – ǥǜǠǧǟdzǦǢǤǔǩ, ǔǤǞǔǘǔǩ, ǬǧǦǙǤǔǩ ǜ Ǧ. ǣ. ǑǦǢ ǧǥǦǤǢǝǥǦǖǢ ǞǢǤǤǙǞǦǡǢ ǤǔǕǢǦǔǙǦ ǣǢǘ Windows XP/Vista/7/8 ǜ ǦǤǙǕǧǙǦ
DirectX 7.0 ǜ ǖǯǬǙ. Ƹǟdz ǤǔǕǢǦǯ ǧǥǦǤǢǝǥǦǖǔ ǘǤǔǝǖǙǤǯ ǡǙ ǡǧǚǡǯ, ǢǘǡǔǞǢ ǘǟdz ǔǞǦǜǖǜǛǔǪǜǜ
ǨǧǡǞǪǜǜ ǖǜǕǤǢǢǦǘǔǫǜ ǘǤǔǝǖǙǤǯ ǧǥǦǔǡǢǖǜǦǰ ǡǙǢǕǩǢǘǜǠǢ.
2. ǀƹDŽǏ ƵƹƻǂǃƴDžǁǂDždžƼ
• ǁǙ ǤǔǛǕǜǤǔǝǦǙ ǧǥǦǤǢǝǥǦǖǢ ǜ ǡǙ ǤǙǠǢǡǦǜǤǧǝǦǙ ǙǗǢ ǥǔǠǜ. ǂǕǥǟǧǚǜǖǔǡǜǙ
ǜǛǖǢǘǜǦǰ ǦǢǟǰǞǢ ǞǖǔǟǜǨǜǪǜǤǢǖǔǡǡǯǙ ǥǣǙǪǜǔǟǜǥǦǯ ǥǙǤǖǜǥǡǯǩ ǪǙǡǦǤǢǖ.
• ǂǕǙǤǙǗǔǝǦǙ ǧǥǦǤǢǝǥǦǖǢ ǢǦ ǖǢǛǘǙǝǥǦǖǜdz ǣǢǖǯǬǙǡǡǢǝ ǖǟǔǚǡǢǥǦǜ, ǣǯǟǜ, ǥǜǟǰǡǯǩ ǠǔǗǡǜǦǡǯǩ
ǣǢǟǙǝ, ǖǜǕǤǔǪǜǜ, ǖǯǥǢǞǜǩ ǦǙǠǣǙǤǔǦǧǤ, ǙǘǞǜǩ ǚǜǘǞǢǥǦǙǝ ǜ ǗǔǛǢǖ.
• LJǞǔǛǔǡǜdz ǣǢ ǧǩǢǘǧ: ǘǟdz ǢǫǜǥǦǞǜ ǞǢǤǣǧǥǔ ǜǥǣǢǟǰǛǧǝǦǙ ǫǜǥǦǧDz ǠdzǗǞǧDz ǦǞǔǡǰ. ǁǙ ǜǥǣǢǟǰǛǧǝǦǙ
ǘǟdz ǢǫǜǥǦǞǜ ǦǔǞǜǙ ǤǔǥǦǖǢǤǜǦǙǟǜ, ǞǔǞ ǕǙǡǛǜǡ ǜǟǜ ǥǣǜǤǦ, ǦǔǞ ǞǔǞ Ǣǡǜ
ǖǙǤǩǡǢǥǦǰ ǧǥǦǤǢǝǥǦǖǔ.
• ǁǙ ǤǢǡdzǝǦǙ ǧǥǦǤǢǝǥǦǖǢ, ǫǦǢǕǯ ǡǙ ǣǢǖǤǙǘǜǦǰ ǙǗǢ.
3. ƾǂǀǃƿƹƾdžǁǂDždžǐ
• ǀǔǡǜǣǧǟdzǦǢǤ — 1 ǬǦ.
• CD-ǘǜǥǞ ǥ ǘǤǔǝǖǙǤǔǠǜ — 1 ǬǦ.
• DŽǧǞǢǖǢǘǥǦǖǢ ǣǢ DZǞǥǣǟǧǔǦǔǪǜǜ — 1 ǬǦ.
• ƷǔǤǔǡǦǜǝǡǯǝ ǦǔǟǢǡ — 1 ǬǦ.
ǜ ǤǙǠǢǡǦ ǘǢǟǚǡǯ ǣǤǢ-
ǠǢǗǧǦ ǣǢǖǤǙǘǜǦǰ ǣǢ-
4. ǂDžǂƵƹǁǁǂDždžƼ
• ǑǤǗǢǡǢǠǜǫǡǯǝ ǘǜǛǔǝǡ
• ǃǢǘǘǙǤǚǞǔ: DirectX 7.0 ǜ ǖǯǬǙ, Windows XP/Vista/7/8
• ƼǡǦǙǤǨǙǝǥ USB
• LjǧǡǞǪǜdz ǖǜǕǤǢǢǦǘǔǫǜ ǘǟdz ǣǢǖǯǬǙǡǜdz ǤǙǔǟǜǥǦǜǫǡǢǥǦǜ
• 4 Ǣǥǜ, 8-ǣǢǛǜǪǜǢǡǡǯǝ ǘǚǢǝǥǦǜǞ ǜ 12
• ƾǔǕǙǟǰ USB ǘǟǜǡǢǝ 1,8 Ǡ
• DŽǙǛǜǡǢǖǯǙ ǖǥǦǔǖǞǜ ǘǟdz ǞǢǠǨǢǤǦǡǢǥǦǜ
• DŽǙǛǜǡǢǖǯǙ ǣǤǜǥǢǥǞǜ ǘǟdz ǡǔǘǙǚǡǢǝ ǨǜǞǥǔǪǜǜ Ǟ ǥǦǢǟǧ
5. DžƼDždžƹǀǁǏƹ džDŽƹƵǂƶƴǁƼǓ
• DžǖǢǕǢǘǡǯǝ USB-ǣǢǤǦ ǃƾ
• ǂǣǙǤǔǪǜǢǡǡǔdz ǥǜǥǦǙǠǔ Windows XP/Vista/7/8
• DirectX 7.0 ǜ ǖǯǬǙ
ǞǡǢǣǢǞ
2
Page 4

RUS
DŽǧǞǢǖǢǘǥǦǖǢ ǣǢ DZǞǥǣǟǧǔǦǔǪǜǜ
6. ǂǃƼDžƴǁƼƹ ƾǂǁDždžDŽLJƾNJƼƼ
a 8-ǣǢǛǜǪǜǢǡǡǯǝ Ǡǜǡǜ-ǘǚǢǝǥǦǜǞ
ǘǟdz ǣǙǤǙǞǟDzǫǙǡǜdz ǡǔǣǤǔǖǟǙǡǜǝ
b ƾǡǢǣǞǜ 3–6
c ƾǡǢǣǞǔ 2
d DŽǧǞǢdzǦǞǔ
e ƾǡǢǣǞǜ 7–12
f DŽǙǗǧǟdzǦǢǤ ǗǔǛǔ
g ƾǡǢǣǞǔ 1
h ƾǔǕǙǟǰ USB
i ƶǯǞǟDzǫǔǦǙǟǰ VIBRATION ǘǟdz
ǖǞǟDzǫǙǡǜdz/ǖǯǞǟDzǫǙǡǜdz ǨǧǡǞǪǜǜ
ǖǜǕǤǢǢǦǘǔǫǜ
j DŽǙǛǜǡǢǖǯǙ ǣǤǜǥǢǥǞǜ
g
1
Aggressor
a
b
c
d
ef
5
6
4
3
2
DžǝǦ. 1. ƷǝǙ ǦǤǚǥǚǙǝ
h
DžǝǦ. 2. ƷǝǙ ǦǜǕǙǝ
ON OF
VIBRATION
e
i
12
10
8
7
11
9
j
DžǝǦ. 3. ƷǝǙ ǦǢǝǜǨ
3
Page 5
RUS
7. ǃǂƸƾƿǒNjƹǁƼƹ Ƽ ƼǁDždžƴƿƿǓNJƼǓ
• LJǥǦǔǡǢǖǜǦǙ ǠǔǡǜǣǧǟdzǦǢǤ ǡǔ ǤǢǖǡǢǝ
ǣǢǖǙǤǩǡǢǥǦǜ ǡǔ ǣǤǜǥǢǥǞǜ j.
• ǃǢǘǞǟDzǫǜǦǙ ǧǥǦǤǢǝǥǦǖǢ Ǟ ǥǖǢǕǢǘǡǢǠǧ
ǣǢǤǦǧ USB ǃƾ ǥ ǣǢǠǢǭǰDz ǖǥǦǤǢǙǡǡǢǗǢ
ǞǔǕǙǟdz USB h. ǃǤǜ ǣǢǘǞǟDzǫǙǡǜǜ Ǟ ǃƾ
ǧǥǦǤǢǝǥǦǖǢ ǔǖǦǢǠǔǦǜǫǙǥǞǜ ǢǣǤǙǘǙǟdzǙǦǥdz ǞǔǞ ǜǗǤǢǖǢǙ ǧǥǦǤǢǝǥǦǖǢ ǜ ǣǢǟǡǢǥǦǰDz ǗǢǦǢǖǢ Ǟ ǤǔǕǢǦǙ. ǂǘǡǔǞǢ ǘǟdz ǖǞǟDzǫǙǡǜdz ǨǧǡǞǪǜǜ ǖǜǕǤǢǢǦǘǔǫǜ ǡǙǢǕǩǢǘǜǠǢ ǧǥǦǔǡǢǖǜǦǰ ǘǤǔǝǖǙǤǯ
• ƶǥǦǔǖǰǦǙ CD-ǘǜǥǞ ǥ ǘǤǔǝǖǙǤǔǠǜ ǖ ǘǜǥǞǢǖǢǘ ǃƾ ǜ ǛǔǣǧǥǦǜǦǙ ǣǤǢǗǤǔǠǠǧ «setup.
exe» ǘǟdz ǧǥǦǔǡǢǖǞǜ ǘǤǔǝǖǙǤǢǖ ǡǔ ǃƾ.
Ƹǟdz ǣǤǢǖǙǤǞǜ ǖǜǕǙǤǜǦǙ «Start» о «Control
Panel» о «Game Controller».
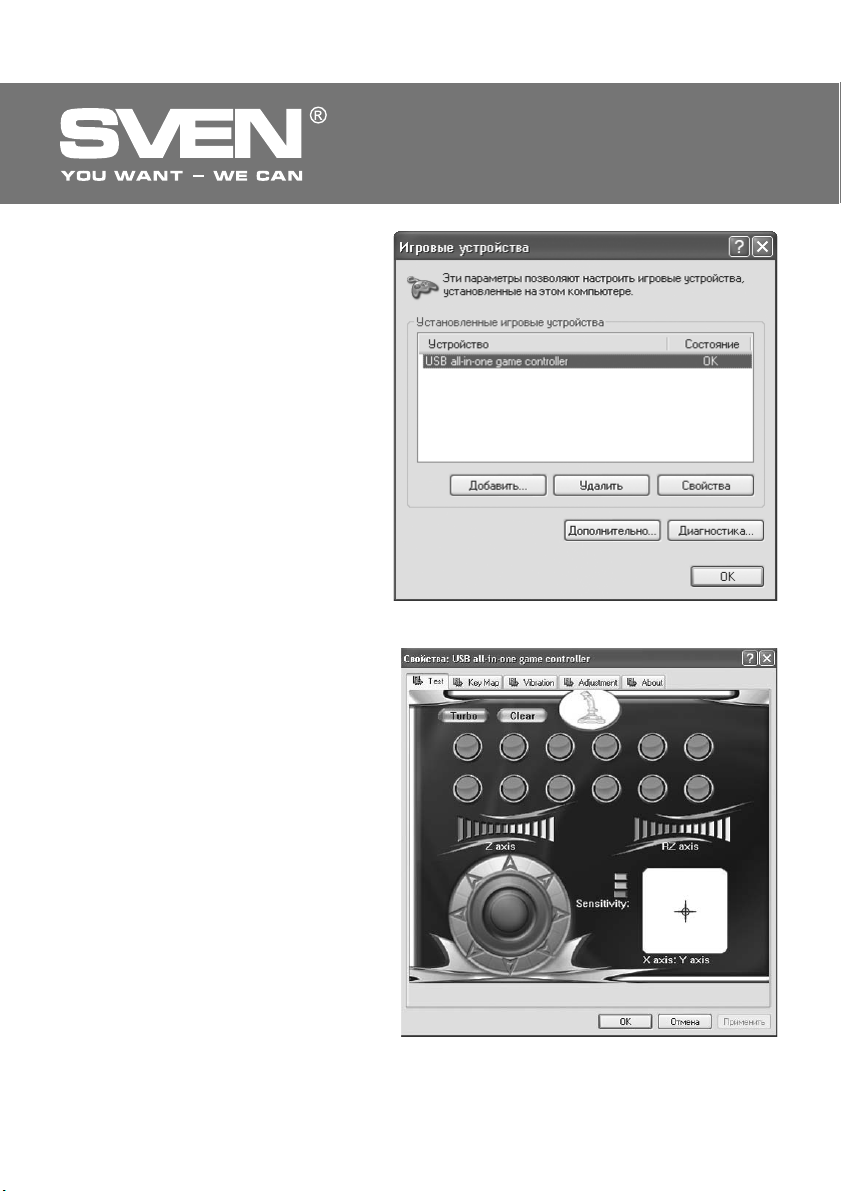
• ǃǢǥǟǙ ǣǢǘǞǟDzǫǙǡǜdz ǧǥǦǤǢǝǥǦǖǔ Ǟ ǞǢǠǣǰDzǦǙǤǧ ǡǔ Desktop (ǤǔǕǢǫǙǠ ǥǦǢǟǙ)
ǔǖǦǢǠǔǦǜǫǙǥǞǜ ǢǦǞǤǢǙǦǥdz ǢǞǡǢ «ƼǗǤǢǖǯǙ
ǧǥǦǤǢǝǥǦǖǔ», ǘǤǔǝǖǙǤ ǤǔǥǣǢǛǡǔǙǦ ǧǥǦǤǢǝǥǦǖǢ ǞǔǞ «USB all-in-one game controller» (Ǥǜǥ. 4).
• ǁǔǚǠǜǦǙ ǡǔ ǞǡǢǣǞǧ «DžǖǢǝǥǦǖǔ» ǘǟdz
ǦǢǗǢ, ǫǦǢǕǯ ǣǤǢǦǙǥǦǜǤǢǖǔǦǰ (ǣǤǢǖǙǤǜǦǰ)
ǨǧǡǞǪǜǢǡǜǤǢǖǔǡǜǙ ǖǥǙǩ ǨǧǡǞǪǜǝ ǜ DZǟǙǠǙǡǦǢǖ ǧǣǤǔǖǟǙǡǜdz ǧǥǦǤǢǝǥǦǖǔ. ǂǦǞǤǢǙǦǥdz ǢǞǡǢ «DžǖǢǝǥǦǖǔ: USB all-in-one game
controller» ǜ ǣǙǤǖǔdz ǛǔǞǟǔǘǞǔ «Test» (ǥǠ.
Ǥǜǥ. 5).
džǙǥǦǜǤǢǖǔǡǜǙ (ǣǤǢǖǙǤǞǔ) ǨǧǡǞǪǜǝ
ǘǚǢǝǥǦǜǞǔ
• ƾǡǢǣǞǜ 1–12. ǁǔǚǠǜǦǙ ǞǡǢǣǞǜ ǘǚǢǝǥǦǜǞǔ ǢǦ 1 ǘǢ 12: ǥǢǢǦǖǙǦǥǦǖǧDzǭǔdz ǫǜǥǟǢǖǔdz ǞǡǢǣǞǔ ǡǔ ǛǔǞǟǔǘǞǙ «Function Test»
ǜǡǦǙǤǨǙǝǥǔ ǖǔǬǙǗǢ ǃƾ ǘǢǟǚǡǔ ǛǔǥǖǙǦǜǦǰǥdz.
• LjǧǡǞǪǜdz Turbo. ƾǟǜǞǡǜǦǙ «Turbo» ǖ ǜǡ
ǦǙǤǨǙǝǥǙ ǃƾ (Ǥǜǥ. 5), ǛǔǥǖǙǦǜǦǥdz ǥǟǢǖǢ
«Turbo». ƾǟǜǞǡǜǦǙ ǥǢǢǦǖǙǦǥǦǖǧDzǭǧDz ǫǜǥǟǢǖǧDz ǞǡǢǣǞǧ, ǞǢǦǢǤǢǝ ǖǯ ǩǢǦǜǦǙ ǣǤǜǥǖǢǜǦǰ ǨǧǡǞǪǜDz Turbo, ǜ ǞǤǢǠǞǔ ǞǡǢǣǞǜ
ǥǦǔǡǙǦ ǕǙǟǢǝ. ƹǥǟǜ ǖǯ ǡǔǚǠǙǦǙ ǞǡǢǣǞǧ
ǡǔ ǘǚǢǝǥǦǜǞǙ, ǥǢǢǦǖǙǦǥǦǖǧDzǭǔdz ǞǡǢǣǞǔ
ǜǡǦǙǤǨǙǝǥǔ ǃƾ ǛǔǥǖǙǦǜǦǥdz, ǡǔǥǦǤǢǝǞǔ
.
ƼǗǤǢǖǢǝ ǠǔǡǜǣǧǟdzǦǢǤ
DžǝǦ. 4
-
DžǝǦ. 5
4
Page 6
RUS
DŽǧǞǢǖǢǘǥǦǖǢ ǣǢ DZǞǥǣǟǧǔǦǔǪǜǜ
ǨǧǡǞǪǜǜ Turbo DZǦǢǝ ǞǡǢǣǞǜ ǛǔǞǢǡǫǙǡǔ. NjǦǢǕǯ
ǢǦǠǙǡǜǦǰ ǡǔǥǦǤǢǝǞǧ ǨǧǡǞǪǜǜ, ǭǙǟǞǡǜǦǙ ǡǔ
ǞǡǢǣǞǧ «Clear».
• ǁǔǣǤǔǖǟǙǡǜdz ǘǖǜǚǙǡǜdz ǥ ǣǢǠǢǭǰDz ǠǜǡǜǘǚǢǝǥǦǜǞǔ. ǁǔǞǟǢǡdzdz ǤǧǞǢdzǦǞǧ ǠǔǡǜǣǧǟdzǦǢǤǔ
d ǣǤǜ ǡǔǚǔǦǢǝ ǞǡǢǣǞǙ 4-ǣǢǛǜǪǜǢǡǡǢǗǢ Ǡǜǡǜ-ǘǚǢǝǥǦǜǞǔ a ǖǣǙǤǙǘ, ǡǔǛǔǘ, ǖǟǙǖǢ ǜ
ǖǣǤǔǖǢ, ǥǢǢǦǖǙǦǥǦǖǧDzǭǜǝ ǕǟǢǞ Ǣǥǜ X/Y ǕǧǘǙǦ
ǥǜǡǩǤǢǡǡǢ ǜǛǠǙǡdzǦǰǥdz. ƾǤǙǥǦǜǞ ǖ ǣǤdzǠǢǧǗǢǟǰǡǜǞǙ «X axis; Y axis» ǕǧǘǙǦ ǣǙǤǙǠǙǭǔǦǰǥdz
ǖ ǥǢǢǦǖǙǦǥǦǖǜǜ ǥ ǡǔǞǟǢǡǔǠǜ
• LjǧǡǞǪǜdz ǖǤǔǭǙǡǜdz. ǃǤǜ ǖǤǔǭǙǡǜǜ ǤǧǞǢdzǦǞǜ ǠǔǡǜǣǧǟdzǦǢǤǔ ǖǟǙǖǢ ǜǟǜ ǖǣǤǔǖǢ ǥǢǢǦǖǙǦǥǦǖǧDzǭǜǝ ǕǟǢǞ Ǣǥǜ RZ ǕǧǘǙǦ ǥǜǡǩǤǢǡǡǢ
ǜǛǠǙǡdzǦǰǥdz. njǞǔǟǔ «RZ axis» ǣǢǥǦǙǣǙǡǡǢ,
ǘǙǟǙǡǜǙ Ǜǔ ǘǙǟǙǡǜǙǠ, ǕǧǘǙǦ ǛǔǞǤǔǬǜǖǔǦǰǥdz ǖ
ǛǙǟǙǡǯǝ ǪǖǙǦ.
• DŽǙǗǧǟdzǦǢǤ ǗǔǛǔ. ǃǤǜ ǣǢǖǢǤǢǦǙ ǤǙǗǧǟdzǦǢǤǔ
ǗǔǛǔ f ǖǟǙǖǢ ǜ ǖǣǤǔǖǢ ǥǢǢǦǖǙǦǥǦǖǧDzǭǜǝ
ǕǟǢǞ Ǣǥǜ Z ǕǧǘǙǦ ǥǜǡǩǤǢǡǡǢ ǜǛǠǙǡdzǦǰǥdz.
njǞǔǟǔ «Z axis» ǣǢǥǦǙǣǙǡǡǢ, ǘǙǟǙǡǜǙ Ǜǔ
ǡǜǙǠ, ǕǧǘǙǦ ǛǔǞǤǔǬǜǖǔǦǰǥdz ǖ ǛǙǟǙǡǯǝ ǪǖǙǦ.
• ǀǜǡǜ-ǘǚǢǝǥǦǜǞ. ƶǤǔǭǔǝǦǙ Ǡǜǡǜ-ǘǚǢǝǥǦǜǞ
a ǖ ǤǔǛǡǯǩ ǡǔǣǤǔǖǟǙǡǜdzǩ, ǫǦǢǕǯ ǣǤǢǖǙǤǜǦǰ
ǥǢǢǦǖǙǦǥǦǖǜǙ ǣǢǖǢǤǢǦǢǖ ǖ 8 ǡǔǣǤǔǖǟǙǡǜdzǩ,
ǫǦǢ ǕǧǘǙǦ ǢǦǢǕǤǔǚǔǦǰǥdz ǡǔ ǞǤǧǗǧ ǥ ǖǢǥǙǠǰDz
ǥǦǤǙǟǞǔǠǜ ǖ ǟǙǖǢǠ ǡǜǚǡǙǠ ǧǗǟǧ ǜǡǦǙǤǨǙǝǥǔ
ǃƾ (ǥǠ. Ǥǜǥ. 5).
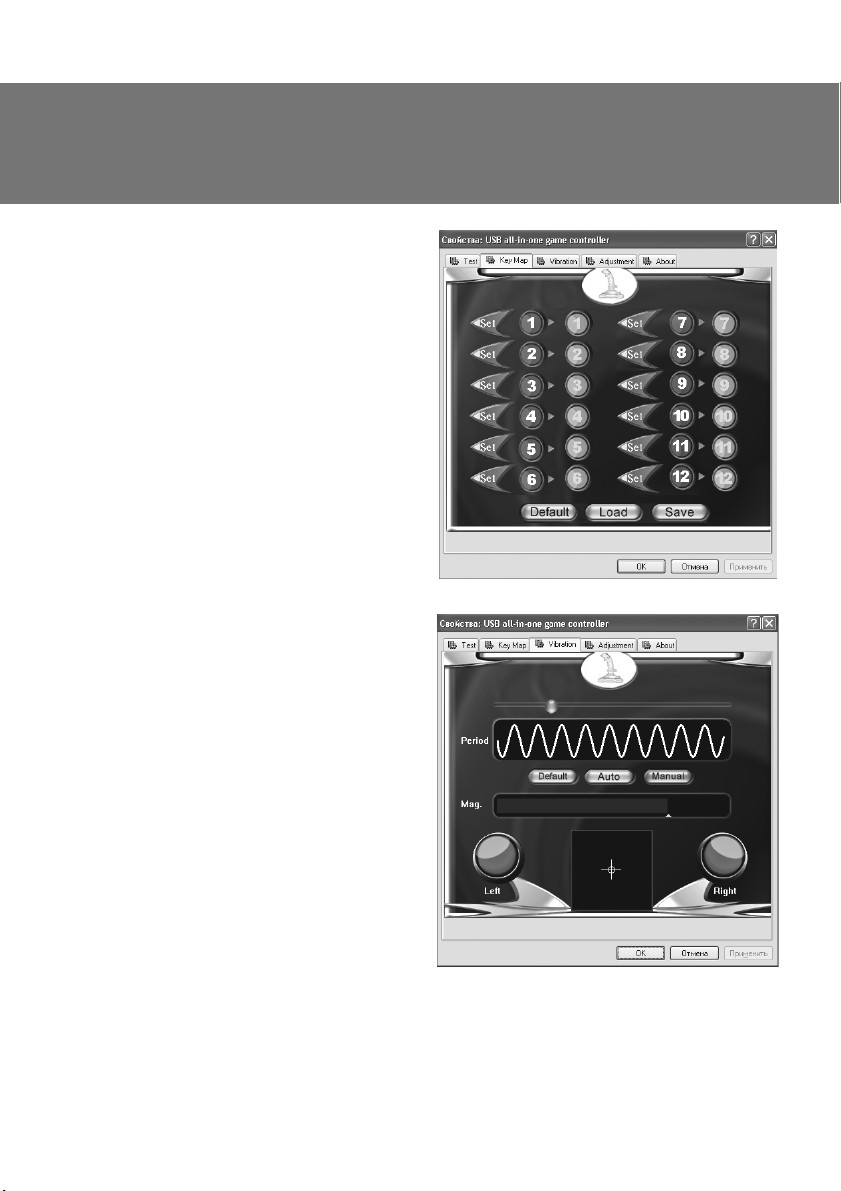
• ǃǙǤǙǣǤǢǗǤǔǠǠǜǤǢǖǔǡǜǙ ǞǟǔǖǜǬ. ƾǟǜǞǡǜǦǙ
ǞǡǢǣǞǧ ǠǙǡDz «Keyǀap» (Ǥǜǥ. 6) ǖ ǜǡǦǙǤǨǙǝǥǙ
ǃƾ ǘǟdz
ǦǢǗǢ, ǫǦǢǕǯ ǡǔǫǔǦǰ ǣǤǢǗǤǔǠǠǜǤǢǖǔǡǜǙ
ǞǡǢǣǢǞ ǖ ǢǞǡǙ ǡǔǥǦǤǢǙǞ; ǣǢǦǢǠ ǞǟǜǞǡǜǦǙ
ǞǡǢǣǞǧ «Set» ǣǙǤǙǘ ǪǜǨǤǢǖǢǝ ǞǡǢǣǞǢǝ, ǞǢǦǢǤǧDz ǖǯ ǩǢǦǜǦǙ ǣǙǤǙǣǤǢǗǤǔǠǠǜǤǢǖǔǦǰ,
ǣǢǦǢǠ ǡǔǚǠǜǦǙ Ǧǧ ǚǙ ǞǡǢǣǞǧ, ǫǦǢǕǯ ǣǢǘǦǖǙǤǘǜǦǰ ǣǙǤǙǣǤǢǗǤǔǠǠǜǤǢǖǔǡǜǙ.
ǃǤǜǠǙǤ: ǣǙǤǙǣǤǢǗǤǔǠǠǜǤǢǖǔǡǜǙ ǞǡǢǣǞǜ
3 ǡǔ ǞǡǢǣǞǧ 5. ƾǟǜǞǡǜǦǙ ǞǡǢǣǞǧ «Set» ǟǙ-
ǖǙǙ ǞǡǢǣǞǜ 3, ǞǡǢǣǞǔ «Set» ǛǔǥǖǙǦǜǦǥdz,
ǣǢǦǢǠ ǡǔǚǠǜǦǙ ǞǡǢǣǞǧ 5 ǡǔ ǘ ǚǢǝǥǦǜǞǙ,
ǪǜǨǤǔ ǖ ǦǤǙǦǰǙǠ ǛǙǟǙǡǢǠ ǞǢǟǰǪǙ
ǃǤǜǠǙǫǔǡǜǙ. ǃǢǥǟǙ ǣǤǢǗǤǔǠǠǜǤǢǤǢǖǔǡǜdz ǖǯ ǠǢǚǙǦǙ ǥǢǩǤǔǡǜǦǰ ǡǢǖǯǙ ǡǔǥǦǤǢǝǞǜ ǜǟǜ
ǢǦǠǙǡǜǦǰ ǜǩ. ƶǡǜǛǧ ǢǞǡǔ ǡǔǩǢǘdzǦǥdz ǦǤǜ ǞǡǢǣǞǜ: «Default», «Load» ǜ «Save». ǃǙǤǖǔdz
ǖǢǛǖǤǔǭǔǙǦ ǖǥǙ ǧǥǦǔǡǢǖǞǜ ǡǔǛǔǘ ǣǢ ǧǠǢǟǫǔǡǜDz, ǦǤǙǦǰdz ǣǢǛǖǢǟdzǙǦ ǥǢǩǤǔǡǜǦǰ ǧǥǦǔǡǢǖǟǙǡǡǧDz ǖǔǠǜ ǤǔǥǞǟǔǘǞǧ ǞǡǢǣǢǞ, ǔ ǖǦǢǤǔdz – ǛǔǗǤǧǛǜǦǰ ǥǢǩǤǔǡǙǡǡǧDz.
ǤǧǞǢdzǦǞǜ.
ǘǙǟǙ-
ǜǛǠǙǡǜǦǥdz ǥ 3 ǡǔ 5.
Aggressor
DžǝǦ. 6
DžǝǦ. 7
5
Page 7
RUS
ƼǗǤǢǖǢǝ ǠǔǡǜǣǧǟdzǦǢǤ
DžǝǦ. 8
• LjǧǡǞǪǜdz ǖǜǕǤǢǢǦǘǔǫǜ Vibration. ǂǦǞǤǢǝǦǙ ǛǔǞǟǔǘǞǧ «Vibration» (Ǥǜǥ. 7), ǫǦǢǕǯ ǣǤǢǖǙǤǜǦǰ
ǨǧǡǞǪǜDz ǖǜǕǤǢǢǦǘǔǫǜ. ƾǢǟǙǕǔǡǜǙ ǘǚǢǝǥǦǜǞǔ ǢǦǖǙǫǔǙǦ ǖǜǕǤǔǪǜǜ ǘǖǜǗǔǦǙǟdz; ǖǢ ǖǤǙǠdz ǣǤǢǖǙǤǞǜ ǠǢǚǡǢ ǢǦǤǙǗǧǟǜǤǢǖǔǦǰ ǣǙǤǜǢǘ (Period) ǜ ǔǠǣǟǜǦǧǘǧ (Mag.) ǖǜǕǤǔǪǜǜ. ƶ ǪǙǡǦǤǙ – ǣǢǟǙ
ǣǙǤǙǠǙǭǙǡǜdz ǤǧǞǢdzǦǜ ǘǚǢǝǥǦǜǞǔ ǥ ǖǜǕǤǔǪǜǙǝ. DžǟǙǖǔ ǜ ǥǣǤǔǖǔ – ǜǡǘǜǞǔǦǢǤǯ ǖǜǕǤǔǪǜǜ. ǃǤǜ
ǣǙǤǙǠǙǭǙǡǜǜ ǖǣǤǔǖǢ ǜ ǖǟǙǖǢ ǔǞǦǜǖǜǤǧǙǦǥdz ǟǙǖǯǝ ǜǡǘǜǞǔǦǢǤ Left, ǔ ǖǖǙǤǩ ǜ ǖǡǜǛ – Right. ƾǔǞ
ǔǟǰǦǙǤǡǔǦǜǖǔ, ƶǯ ǠǢǚǙǦǙ ǞǟǜǞǡǧǦǰ Auto ǘǟdz ǔǖǦǢǠǔǦǜǫǙǥǞǢǝ ǣǤǢǖǙǤǞǜ.
ǃǤǜǠǙǫǔǡǜǙ. LjǧǡǞǪǜdz ǖǜǕǤǢǢǦǘǔǫǜ ǖǞǟDzǫǔǙǦǥdz (ǣǢǟǢǚǙǡǜǙ ON) ǜ ǖǯǞǟDzǫǔǙǦǥdz (ǣǢǟǢǚǙǡǜǙ OFF) ǖǯǞǟDzǫǔǦǙǟǙǠ VIBRATION i ǡǔ ǘǚǢǝǥǦǜǞǙ.
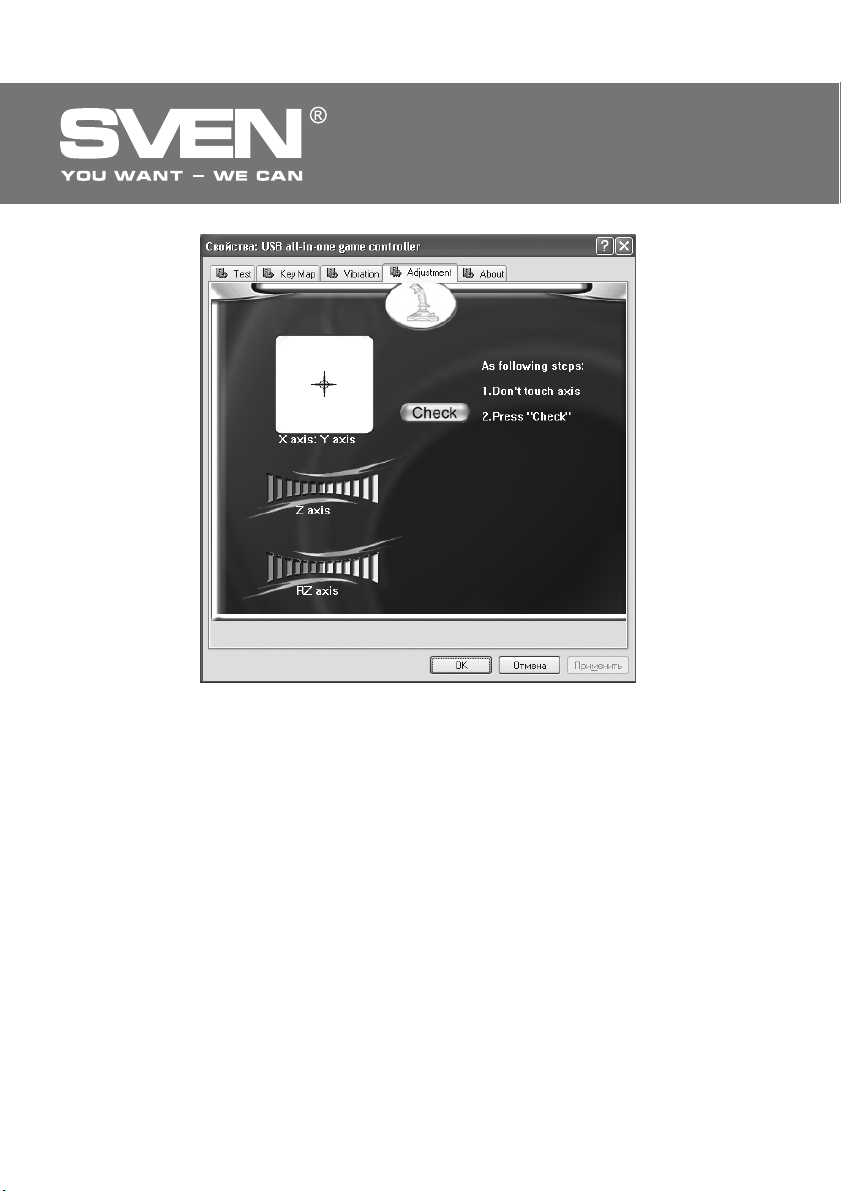
• ƾǔǟǜǕǤǢǖǞǔ ǘǚǢǝǥǦǜǞǔ. ƹǥǟǜ ǖǢ ǖǤǙǠdz ǦǙǥǦǜǤǢǖǔǡǜdz (ǣǤǢǖǙǤǞǜ) ǞǧǤǥǢǤ, ǞǢǦǢǤǯǝ ǧǞǔǛǯǖǔǙǦ ǡǔ ǞǔǚǘǧDz Ǣǥǰ, ǡǙ ǖǢǛǖǤǔǭǔǙǦǥdz ǖ ǪǙǡǦǤǔǟǰǡǧDz ǣǢǛǜǪǜDz ǜǟǜ ǡǙ ǨǜǞǥǜǤǧǙǦǥdz ǡǔ ǖǥǙǩ
ǫǙǦǯǤǙǩ ǥǦǢǤǢǡǔǩ, ǢǦǞǤǢǝǦǙ ǛǔǞǟǔǘǞǧ «Adjustment» (ǥǠ.
ǥǦǖǢ: «Check» о «Next» о «Check» о «Next» о «Save».
Ƹǟdz ǢǣǙǤǔǪǜǢǡǡǢǝ ǥǜǥǦǙǠǯ Vista
• ƸǤǔǝǖǙǤ ǘǟdz Vista ǢǕǡǢǖǟǙǡ ǘǟdz ǥǢǖǠǙǥǦǜǠǢǥǦǜ ǥ ǢǣǙǤǔǪǜǢǡǡǢǝ ǥǜǥǦǙǠǢǝ.
• ǃǢǥǞǢǟǰǞǧ Vista 32 bit ǜ Vista 64 bit ǡǙ ǥǢǖǠǙǥǦǜǠǯ ǘǤǧǗ ǥ ǘǤǧǗǢǠ, Ǟ ǘǚǢǝǥǦǜǞǧ ǣǤǜǟǔǗǔDzǦǥdz
ǘǖǔ ǘǤǔǝǖǙǤǔ ǡǔ ƶǔǬ ǖǯǕǢǤ.
Ǥǜǥ. 8), ǫǦǢǕǯ ǢǦǞǔǟǜǕǤǢǖǔǦǰ ǧǥǦǤǢǝ-
6
Page 8

RUS
DŽǧǞǢǖǢǘǥǦǖǢ ǣǢ DZǞǥǣǟǧǔǦǔǪǜǜ
8. DŽƹnjƹǁƼƹ ƶǂƻǀǂƺǁǏlj ǃDŽǂƵƿƹǀ
ǃǤǢǕǟǙǠǔ
ǃǢǥǟǙ ǣǢǘǞǟDzǫǙǡǜdz ǜ
ǧǥǦǔǡǢǖǞǜ ǃǂ ǘǚǢǝǥǦǜǞ ǡǙ
ǤǔǕǢǦǔǙǦ.
ƴǡǔǟǢǗǢǖǔdz Ǣǥǰ ǥǤǔǕǢǦǔǟǔ
ǔǖǦǢǠǔǦǜǫǙǥǞǜ ǕǙǛ ǖǠǙǬǔǦǙǟǰǥǦǖǔ ǜǗǤǢǞǔ.
ƸǚǢǝǥǦǜǞ ǡǙ ǤǔǕǢǦǔǙǦ ǖ
ǖǜǕǤǢǤǙǚǜǠǙ.
ǃǢǥǟǙ ǣǢǘǥǢǙǘǜǡǙǡǜdz
ǘǚǢǝǥǦǜǞǔ ǣǤǢǗǤǔǠǠǔ
ǘǤǔǝǖǙǤǔ ǡǙ ǡǔǝǘǙǡǔ.
ǃǢǥǟǙ ǛǔǣǧǥǞǔ ǜǗǤǯ ǨǧǡǞǪǜdz
ǖǜǕǤǢǢǦǘǔǫǜ ǖǞǟDzǫǔǙǦǥdz ǥǔǠǔ
ǕǙǛ ǖǠǙǬǔǦǙǟǰǥǦǖǔ ǜǗǤǢǞǔ.
ƶ ǣǤǢǪǙǥǥǙ ǜǗǤǯ ǨǧǡǞǪǜdz
ǖǜǕǤǢǢǦǘǔǫǜ ǡǙǘǢǥǦǔǦǢǫǡǔ.
DŽǙǬǙǡǜǙ
ƴ. ǃǤǢǖǙǤǰǦǙ, ǣǤǔǖǜǟǰǡǢ
Ƶ. LJǕǙǘǜǦǙǥǰ, ǫǦǢ ǖǯ ǣǤǔǖǜǟǰǡǢ ǢǥǧǭǙǥǦǖǜǟǜ ǜǡǥǦǔǟǟdzǪǜDz.
ƶ. LJǥǦǔǡǢǖǜǦǙ ǖǙǤǥǜDz DirectX 7.0 ǜǟǜ ǖǯǬǙ.
Ʒ. ǃǙǤǙǛǔǣǧǥǦǜǦǙ ǃƾ, Ǚǥǟǜ Ǥǧǟǰ ǙǭǙ ǡǙ ǤǔǕǢǦǔǙǦ.
ǂǦǤǙǗǧǟǜǤǧǝǦǙ ǜ ǣǢǘǦǖǙǤǘǜǦǙ ǣǢǥǟǙ ǤǙǗǧǟǜǤǢǖǞǜ
ǞǔǟǜǕǤǢǖǞǧ ǘǚǢǝǥǦǜǞǔ.
ƶǯǝǘǜǦǙ ǜǛ ǜǗǤǯ, ǢǦǞǟDzǫǜǦǙ ǠǔǡǜǣǧǟdzǦǢǤ ǜǛ ǣǢǤǦǔ USB, ǔ
ǣǢǦǢǠ ǥǡǢǖǔ ǖǞǟDzǫǜǦǙ. ƹǥǟǜ ǨǧǡǞǪǜdz ǖǜǕǤǢǢǦǘǔǫǜ ǣǢǥǟǙ
DZǦǢǗǢ ǡǙ ǖǞǟDzǫǜǟǔǥǰ,
LJǕǙǘǜǦǙǥǰ, ǫǦǢ ǣǤǙǘǯǘǧǭǔdz ǧǥǦǔǡǢǖǞǔ ǘǤǔǝǖǙǤǔ
ǢǥǧǭǙǥǦǖǟǙǡǔ ǣǤǔǖǜǟǰǡǢ. ƻǔǝǘǜǦǙ ǖ «ǀǢǝ ǞǢǠǣǰDzǦǙǤ» о
«DžǖǢǝǥǦǖǔ ǥǜǥǦǙǠǯ» о «ǂǕǢǤǧǘǢǖǔǡǜǙ» о «ƸǜǥǣǙǦǫǙǤ
ǧǥǦǤǢǝǥǦǖ» ǜ ǧǘǔǟǜǦǙ ǢǕǢǤǧǘǢǖǔǡǜǙ ǥ ǠǙǦǞǢǝ «!»,
ǢǦǥǢǙǘǜǡǜǦǙ, ǔ ǣǢǦǢǠ ǢǣdzǦǰ ǣǢǘǥǢǙǘǜǡǜǦǙ ǘǚǢǝǥǦǜǞ Ǟ ǃƾ.
ǃǢǥǟǙ DZǦǢǗǢ ǃƾ ǤǔǥǣǢǛǡǔǙǦ ǥǜǥǦǙǠǧ ǘǤǔǝǖǙǤǔ.
ƶǢǝǘǜǦǙ ǖ ǡǔǥǦǤǢǝǞǜ «Force Feedback» ǖ ǜǗǤǙ ǜ
ǢǦǞǔǟǜǕǤǧǝǦǙ ǨǧǡǞǪǜDz ǖǜǕǤǢǢǦǘǔǫǜ.
ƶǢǝǘǜǦǙ
ǥǜǟǧ ǖǜǕǤǢǢǦǘǔǫǜ.
ǖ ǡǔǥǦǤǢǝǞǜ «Force Feedback» ǖ ǜǗǤǙ ǜ ǡǔǥǦǤǢǝǦǙ
Aggressor
ǟǜ ǘǚǢǝǥǦǜǞ ǣǢǘǥǢǙǘǜǡǙǡ Ǟ ǃƾ.
ǣǙǤǙǛǔǗǤǧǛǜǦǙ ǃƾ.
ƹǥǟǜ ǡǜ Ǣǘǜǡ ǜǛ ǧǞǔǛǔǡǡǯǩ ǖǯǬǙ ǥǣǢǥǢǕǢǖ ǡǙ ǣǢǛǖǢǟdzǙǦ ǤǙǬǜǦǰ ǣǤǢǕǟǙǠǧ, ǣǢǚǔǟǧǝǥǦǔ, ǢǕǤǔǦǜǦǙǥǰ Ǜǔ ǣǤǢǨǙǥǥǜǢǡǔǟǰǡǢǝ ǞǢǡǥǧǟǰǦǔǪǜǙǝ ǖ ǕǟǜǚǔǝǬǜǝ Ǟ ƶǔǠ ǥǙǤǖǜǥǡǯǝ ǪǙǡǦǤ. ǁǜǞǢǗǘǔ
ǡǙ ǣǯǦǔǝǦǙǥǰ ǤǙǠǢǡǦǜǤǢǖǔǦǰ ǜǛǘǙǟǜǙ ǥǔǠǢǥǦǢdzǦǙǟǰǡǢ.
7
Page 9

ƫǗǤǢǖǜǝ ǠǔǡǹǣǧǟdzǦǢǤ
ƾƹDŽƫƶǁƼNJdžƶǂ
ƻ ƹƾDžǃƿLJƴdžƴNJƫƬ
Aggressor
www.sven.ѵ
Page 10

UKR
ƾǙǤǹǖǡǜǪǦǖǢ Ǜ ǙǞǥǣǟǧǔǦǔǪǹǺ
ƸdzǞǧǷǠǢ ƶǔǠ Ǜǔ ǞǧǣǹǖǟDz ǖǜǤǢǕǧ ǦǢǤǗǢǖǙǟǰǡǢǺ ǠǔǤǞǜ SVEN!
ǃǙǤǙǘ ǙǞǥǣǟǧǔǦǔǪǹǷDz ǣǤǜǥǦǤǢDz ǧǖǔǚǡǢ ǢǛǡǔǝǢǠǦǙǥdz Ǜ ǪǜǠ ƾǙǤǹǖǡǜǪǦǖǢǠ ǹ ǛǕǙǤǙǚǹǦǰ ǝǢǗǢ ǡǔ
ǖǙǥǰ ǣǙǤǹǢǘ ǞǢǤǜǥǦǧǖǔǡǡdz.
ƴƶdžǂDŽDžǐƾƹ ǃDŽƴƶǂ
© 2014. SVEN PTE. LTD.
NJǙ ƾǙǤǹǖǡǜǪǦǖǢ Ǧǔ ǹǡǨǢǤǠǔǪǹdz, ǭǢ ǠǹǥǦǜǦǰǥdz ǖ ǡǰǢǠǧ, ǛǔǩǜǭǙǡǢ ǔǖǦǢǤǥǰǞǜǠ ǣǤǔǖǢǠ. LJǥǹ ǣǤǔǖǔ
ǛǔǥǦǙǤǙǚǙǡǹ.
džǂDŽƷǂƶƹƿǐǁƫ ǀƴDŽƾƼ
LJǥǹ ǦǢǤǗǢǖǙǟǰǡǹ ǠǔǤǞǜ Ƿ ǖǟǔǥǡǹǥǦDz Ǻǩ ǛǔǞǢǡǡǜǩ ǖǟǔǥǡǜǞǹǖ.
ǃǂǃƹDŽƹƸƺƹǁǁǓ ǃDŽǂ ǂƵǀƹƺƹǁǁǓ ƶƫƸǃǂƶƫƸƴƿǐǁǂDždžƫ
ǁǙǛǖǔǚǔDzǫǜ ǡǔ ǘǢǞǟǔǘǙǡǹ Ǜǧǥǜǟǟdz ǛǤǢǕǜǦǜ ƾǙǤǹǖǡǜǪǦǖǢ ǦǢǫǡǹǬǜǠ, ǠǢǚǟǜǖǹ ǘǙdzǞǹ ǡǙǖǹǘǣǢǖǹǘǡǢǥǦǹ. ƫǡǨǢǤǠǔǪǹdz ǪǰǢǗǢ ƾǙǤǹǖǡǜǪǦǖǔ ǡǔǘǔǡǔ ǡǔ ǧǠǢǖǔǩ «dzǞ Ƿ». ƴǖǦǢǤ ǹ ǖǜǘǔǖǙǪǰ ǡǙ ǡǙǥǧǦǰ ǚǢǘǡǢǺ ǖǹǘǣǢǖǹǘǔǟǰǡǢǥǦǹ ǣǙǤǙǘ ǢǥǢǕǢDz ǔǕǢ ǢǤǗǔǡǹǛǔǪǹǷDz Ǜǔ ǛǕǜǦǞǜ ǔǕǢ ǧǬǞǢǘǚǙǡǡdz, Ǜǔǖǘǔǡǹ
ǹǡǨǢǤǠǔǪǹǷDz, ǭǢ ǠǹǥǦǜǦǰǥdz ǧ ǪǰǢǠǧ ƾǙǤǹǖǡǜǪǦǖǹ.
DŽǂƻǃƴƾǂƶLJƶƴǁǁǓ
ƴǞǧǤǔǦǡǢ ǤǢǛǣǔǞǧǝǦǙ ǖǜǤǹǕ, ǣǤǢǥǦǙǚǜǦǙ Ǜǔ ǦǜǠ, ǭǢǕ ǧǥǙǤǙǘǜǡǹ ǞǢǤǢǕǞǜ ǡǙ ǛǔǟǜǬǜǟǢǥdz dzǞǙǡǙǕǧǘǰ ǣǤǜǟǔǘǘdz. ǃǙǤǙǖǹǤǦǙ ǣǤǜǥǦǤǹǝ ǡǔ ǣǤǙǘǠǙǦ ǣǢǬǞǢǘǚǙǡǰ. ǓǞǭǢ ǖǜǤǹǕ ǣǢǬǞǢǘǚǙǡǢ ǣǤǜ
ǦǤǔǡǥǣǢǤǦǧǖǔǡǡǹ, ǛǖǙǤǡǹǦǰǥdz ǧ ǨǹǤǠǧ, ǭǢ ǛǘǹǝǥǡDzǷ ǘǢǥǦǔǖǞǧ; dzǞǭǢ ǖǜǤǹǕ ǡǙ ǨǧǡǞǪǹǢǡǧǷ, ǖǹǘǤǔǛǧ ǚ ǛǖǙǤǡǹǦǰǥdz ǘǢ ǣǤǢǘǔǖǪdz.
ƻǀƫDždž
RUS ..................................................................................................
UKR .................................................................................................
1. ǂǃƼDž ..........................................................................................
2. ƻƴljǂƸƼ ƵƹƻǃƹƾƼ ..........................................................................
3. ƾǂǀǃƿƹƾdžǁƫDždžǐ ...........................................................................
4. ǂDžǂƵƿƼƶǂDždžƫ ...............................................................................
5. DžƼDždžƹǀǁƫ ƶƼǀǂƷƼ .........................................................................
6. ǂǃƼDž ƾǂǁDždžDŽLJƾNJƫƬ .........................................................................
7. ǃƫƸƾƿǒNjƹǁǁǓ džƴ ƫǁDždžƴƿǓNJƫǓ .........................................................
8. ƶƼDŽƫnjƹǁǁǓ ǀǂƺƿƼƶƼlj ǃDŽǂƵƿƹǀ ..................................................
ENG ...............................................................................................
ƶǙǤǥi
dz 1.0 (V 1.0).
Aggressor
10
10
10
10
10
11
12
15
16
1
8
džǙǩǡǹǫǡǔ ǣǹǘǦǤǜǠǞǔ ǤǢǛǠǹǭǙǡǔ ǡǔ ǥǔǝǦi www.sven.Н
džǔǞǢǚ ǦǧǦ ƶǜ ǛǠǢǚǙǦǙ ǛǡǔǝǦǜ ǢǡǢǖǟǙǡǧ ǖǙǤǥǹDz ǪǰǢǗǢ ǞǙǤǹǖǡǜǪǦǖǔ.
9
Page 11

UKR
ƫǗǤǢǖǜǝ ǠǔǡǹǣǧǟdzǦǢǤ
1. ǂǃƼDž
ƫǗǤǢǖǜǝ ǠǔǡǹǣǧǟdzǦǢǤ AGGRESSOR ǠǢǚǡǔ ǖǜǞǢǤǜǥǦǢǖǧǖǔǦǜ ǖ ǤǹǛǡǜǩ ǹǗǤǔǩ – ǥǜǠǧǟdzǦǢǤǔǩ,
ǔǤǞǔǘǔǩ, ǬǧǦǙǤǔǩ ǦǢǭǢ. NJǙǝ ǣǤǜǥǦǤǹǝ ǞǢǤǙǞǦǡǢ ǣǤǔǪDzǷ ǣǹǘ Windows XP/Vista/7/8 ǹ ǖǜǠǔǗǔǷ
DirectX 7.0 ǹ ǖǜǭǙ. Ƹǟdz ǤǢǕǢǦǜ ǣǤǜǥǦǤǢDz ǘǤǔǝǖǙǤǜ ǡǙǣǢǦǤǹǕǡǹ, ǣǤǢǦǙ ǘǟdz ǔǞǦǜǖǹǛǔǪǹǺ ǨǧǡǞǪǹǺ
ǖǹǕǤǢǖǹǘǘǔǫǹ ǘǤǔǝǖǙǤǜ ǖǥǦǔǡǢǖǜǦǜ ǡǙǢǕǩǹǘǡǢ.
2. ƻƴljǂƸƼ ƵƹƻǃƹƾƼ
• ǁǙ ǤǢǛǕǜǤǔǝǦǙ ǣǤǜǥǦǤǹǝ ǹ ǡǙ ǤǙǠǢǡǦǧǝǦǙ ǝǢǗǢ ǥǔǠǢǥǦǹǝǡǢ. ǂǕǥǟǧǗǢǖǧǖǔǡǡdz ǹ ǤǙǠǢǡǦ ǣǢǖǜǡǡǹ
ǛǘǹǝǥǡDzǖǔǦǜ ǟǜǬǙ ǞǖǔǟǹǨǹǞǢǖǔǡǹ ǨǔǩǹǖǪǹ ǥǙǤǖǹǥǡǢǗǢ ǪǙǡǦǤǧ.
• ǂǕǙǤǹǗǔǝǦǙ ǣǤǜǥǦǤǹǝ ǖǹǘ ǖǣǟǜǖǧ ǣǹǘǖǜǭǙǡǢǺ ǖǢǟǢǗǢǥǦǹ, ǣǜǟǧ, ǥǜǟǰǡǜǩ ǠǔǗǡǹǦǡǜǩ ǣǢǟǹǖ, ǖǹǕǤǔǪǹǺ, ǘǹǺ ǖǜǥǢǞǜǩ ǦǙǠǣǙǤǔǦǧǤ, ǺǘǞǜǩ Ǥǹǘǜǡ ǹ ǗǔǛǹǖ.
• ƶǞǔǛǹǖǞǜ ǭǢǘǢ ǘǢǗǟdzǘǧ: ǘǟdz ǢǫǜǭǙǡǡdz ǞǢǤǣǧǥǧ ǖǜǞǢǤǜǥǦǢǖǧǝǦǙ ǫǜǥǦǧ Ǡ’dzǞǧ
ǖǜǞǢǤǜǥǦǢǖǧǝǦǙ ǘǟdz ǢǫǜǭǙǡǡdz ǦǔǞǹ ǤǢǛǫǜǡǡǜǞǜ, dzǞ ǕǙǡǛǜǡ ǔǕǢ ǥǣǜǤǦ, ǢǥǞǹǟǰǞǜ ǖǢǡǜ ǠǢǚǧǦǰ
ǣǢǬǞǢǘǜǦǜ ǣǢǖǙǤǩǡDz ǣǤǜǥǦǤǢDz.
• ǁǙ ǞǜǘǔǝǦǙ ǣǤǜǥǦǤǹǝ, ǭǢǕ ǡǙ ǣǢǬǞǢǘǜǦǜ ǝǢǗǢ.
3. ƾǂǀǃƿƹƾdžǁƫDždžǐ
• ǀǔǡǹǣǧǟdzǦǢǤ — 1 ǬǦ.
• CD-ǘǜǥǞ Ǜ ǘǤǔǝǖǙǤǔǠǜ — 1 ǬǦ.
• ƾǙǤǹǖǡǜǪǦǖǢ Ǜ ǙǞǥǣǟǧǔǦǔǪǹǺ — 1 ǬǦ.
• ƷǔǤǔǡǦǹǝǡǜǝ ǦǔǟǢǡ — 1 ǬǦ.
ǦǞǔǡǜǡǧ. ǁǙ
4. ǂDžǂƵƿƼƶǂDždžƫ
• ƹǤǗǢǡǢǠǹǫǡǜǝ ǘǜǛǔǝǡ
• ǃǹǘǦǤǜǠǞǔ: DirectX 7.0 ǹ ǖǜǭǙ, Windows XP/Vista/7/8
• ƫǡǦǙǤǨǙǝǥ USB
• LjǧǡǞǪǹdz ǖǹǕǤǢǖǹǘǘǔǫǹ ǘǟdz ǣǹǘǖǜǭǙǡǡdz ǤǙǔǟǹǥǦǜǫǡǢǥǦǹ
• 4 Ǣǥǹ, 8-ǣǢǛǜǪǹǝǡǜǝ ǘǚǢǝǥǦǜǞ ǹ 12 ǞǡǢǣǢǞ
• ƾǔǕǙǟǰ USB ǛǔǖǘǢǖǚǞǜ 1,8 Ǡ
• ƷǧǠǢǖǹ ǖǥǦǔǖǞǜ ǘǟdz ǞǢǠǨǢǤǦǡǢǥǦǹ
• ƷǧǠǢǖǹ ǣǤǜǥǢǥǞǜ ǘǟdz ǡǔǘǹǝǡǢǺ ǨǹǞǥǔǪǹǺ ǘǢ ǥǦǢǟǧ
5. DžƼDždžƹǀǁƫ ƶƼǀǂƷƼ
• ƶǹǟǰǡǜǝ USB-ǣǢǤǦ ǃƾ
• ǂǣǙǤǔǪǹǝǡǔ ǥǜǥǦǙǠǔ Windows XP/Vista/7/8
• DirectX 7.0 ǹ ǖǜǭǙ
10
Page 12

UKR
ƾǙǤǹǖǡǜǪǦǖǢ Ǜ ǙǞǥǣǟǧǔǦǔǪǹǺ
6. ǂǃƼDž ƾǂǁDždžDŽLJƾNJƫƬ
a 8-ǣǢǛǜǪǹǝǡǜǝ Ǡǹǡǹ-ǘǚǢǝǥǦǜǞ
ǘǟdz ǣǙǤǙǠǜǞǔǡǡdz ǡǔǣǤdzǠǞǹǖ
b ƾǡǢǣǞǜ 3–6
c ƾǡǢǣǞǔ 2
d DŽǧǞǢdzǦǞǔ
e ƾǡǢǣǞǜ 7–12
f DŽǙǗǧǟdzǦǢǤ ǗǔǛǧ
g ƾǡǢǣǞǔ 1
h ƾǔǕǙǟǰ USB
i ƶǜǠǜǞǔǫ VIBRATION ǘǟdz
ǖǠǜǞǔǡǡdz / ǖǜǠǜǞǔǡǡdz
ǨǧǡǞǪǹǺ ǖǹǕǤǢǖǹǘǘǔǫǹ
j ƷǧǠǢǖǹ ǣǤǜǥǢǥǞǜ
g
1
Aggressor
a
b
c
d
ef
5
6
4
3
2
ǁǕǠ. 1. ƷǝǘǠǴǙ ǦǤǚǥǚǙǨ
8
7
h
ǁǕǠ. 2. ƷǝǘǠǴǙ ǜǜǕǙǨ
ON OF
VIBRATION
e
i
12
10
11
9
j
ǁǕǠ. 3. ƷǝǘǠǴǙ ǜǢǝǜǨ
11
Page 13

UKR
7. ǃƫƸƾƿǒNjƹǁǁǓ džƴ ƫǁDždžƴƿǓNJƫǓ
• ƶǥǦǔǡǢǖǹǦǰ ǠǔǡǹǣǧǟdzǦǢǤ ǡǔ Ǥǹǖǡǹǝ ǣǢ-
ǖǙǤǩǡǹ ǡǔ ǣǤǜǥǢǥǞǜ j.
• ǃǹǘǞǟDzǫǹǦǰ ǣǤǜǥǦǤǹǝ ǘǢ ǖǹǟǰǡǢǗǢ ǣǢǤǦǧ
USB ǃƾ Ǜǔ ǘǢǣǢǠǢǗǢDz ǖǠǢǡǦǢǖǔǡǢǗǢ
ǞǔǕǙǟDz USB h. ǃǤǜ ǣǹǘǞǟDzǫǙǡǡǹ ǘǢ ǃƾ
ǣǤǜǥǦǤǹǝ ǔǖǦǢǠǔǦǜǫǡǢ ǖǜǛǡǔǫǔǷǦǰǥdz dzǞ
ǹǗǤǢǖǜǝ ǣǤǜǥǦǤǹǝ ǹ ǣǢǖǡǹǥǦDz ǗǢǦǢǖǜǝ ǘǢ
ǤǢǕǢǦǜ. ǃǤǢǦǙ ǘǟdz ǖǠǜǞǔǡǡdz ǨǧǡǞǪǹǺ
ǖǹǕǤǢǖǹǘǘǔǫǹ ǡǙǢǕǩǹǘǡǢ ǖǥǦǔǡǢǖǜǦǜ ǘǤǔǝǖǙǤǜ.
ƶǥǦǔǖǦǙ CD-ǘǜǥǞ Ǜ ǘǤǔǝǖǙǤǔǠǜ ǖ ǘǜǥ-
•
ǞǢǖǢǘ ǃƾ ǹ ǛǔǣǧǥǦǹǦǰ ǣǤǢǗǤǔǠǧ «setup.
exe» ǘǟdz ǖǥǦǔǡǢǖǟǙǡǡdz ǘǤǔǝǖǙǤǹǖ ǡǔ ǃƾ.
Ƹǟdz ǣǙǤǙǖǹǤǞǜ ǖǜǕǙǤǹǦǰ «Start» о «Control Panel» о «Game Controller».
• ǃǹǥǟdz ǣǹǘǞǟDzǫǙǡǡdz ǣǤǜǥǦǤǢDz ǘǢ ǃƾ ǡǔ
Desktop (ǤǢǕǢǫǢǠǧ ǥǦǢǟǹ) ǔǖǦǢǠǔǦǜǫǡǢ
ǖǹǘǞǤǜǷǦǰǥdz ǖǹǞǡǢ «ƼǗǤǢǖǯǙ ǧǥǦǤǢǝǥǦǖǔ»,
ǘǤǔǝǖǙǤ ǤǢǛǣǹǛǡǔǷ ǣǤǜǥǦǤǹǝ dzǞ «USB
all-in-one game controller» (Ǡǔǟ. 4).
• ǁǔǦǜǥǡǹǦǰ ǡǔ ǞǡǢǣǞǧ «DžǖǢǝǥǦǖǔ» ǘǟdz
ǦǢǗǢ, ǭǢǕ ǣǤǢǦǙǥǦǧǖǔǦǜ
ǨǧǡǞǪǹǢǡǧǖǔǡǡdz ǖǥǹǩ ǨǧǡǞǪǹǝ Ǧǔ ǙǟǙǠǙǡǦǹǖ ǧǣǤǔǖǟǹǡǡdz ǣǤǜǥǦǤǢDz. ƶǹǘǞǤǜǷǦǰǥdz
ǖǹǞǡǢ «DžǖǢǝǥǦǖǔ: USB all-in-one game
controller» ǹ ǣǙǤǬǔ ǛǔǞǟǔǘǞǔ «Test» (ǘǜǖ.
Ǡǔǟ. 5).
džǙǥǦǧǖǔǡǡdz (ǣǙǤǙǖǹǤǞǔ) ǨǧǡǞǪǹǝ
ǘǚǢǝǥǦǜǞǔ
• ƾǡǢǣǞǜ 1–12. ǁǔǦǜǥǡǹǦǰ ǞǡǢǣǞǜ ǘǚǢǝǥǦǜǞǔ ǖǹǘ 1 ǘǢ 12: ǖǹǘǣǢǖǹǘǡǔ ǫǜǥǟǢǖǔ
ǞǡǢǣǞǔ ǡǔ ǛǔǞǟǔǘǪǹ «Function Test» ǹǡǦǙǤǨǙǝǥǧ ƶǔǬǢǗǢ ǃƾ ǣǢǖǜǡǡǔ ǛǔǥǖǹǦǜǦǜǥdz.
• LjǧǡǞǪǹdz Turbo. ƾǟǹǞǡǹǦǰ «Turbo» ǖ ǹǡǦǙǤǨǙǝǥǹ ǃƾ (Ǡǔǟ. 5), ǛǔǥǖǹǦǜǦǰǥdz ǥǟǢǖǢ
«Turbo». ƾǟǹǞǡǹǦǰ ǖǹǘǣǢǖǹǘǡǧ ǫǜǥǟǢǖǧ
ǞǡǢǣǞǧ, dzǞǹǝ ƶǜ ǩǢǫǙǦǙ ǣǤǜǥǖǢǺǦǜ ǨǧǡǞǪǹDz Turbo, ǞǤǔǝ ǞǡǢǣǞǜ ǥǦǔǡǙ ǕǹǟǜǠ. ƾǢǟǜ
ƶǜ ǡǔǦǜǥǞǔǷǦǙ ǞǡǢǣǞǧ ǡǔ ǘǚǢǝǥǦǜǞǧ, ǖǹǘǣǢǖǹǘǡǔ ǞǡǢǣǞǔ ǹǡǦǙǤǨǙǝǥǧ ǃƾ ǣǢǫǜǡǔǷ
ǥǖǹǦǜǦǜǥdz, ǡǔǥǦǤǢDzǖǔǡǡdz ǨǧǡǞǪǹǺ Turbo
ǪǹǷǺ ǞǡǢǣǞǜ ǛǔǞǹǡǫǙǡǢ. ǍǢǕ ǖǹǘǠǹǡǜǦǜ
ǡǔǥǦǤǢǝǞǧ ǨǧǡǞǪǹǺ, ǞǟǔǪǡǹǦǰ ǡǔ ǞǡǢǣǞǧ
«Clear» ǣǢǤǧǫ.
(ǣǙǤǙǖǹǤǜǦǜ)
ƫǗǤǢǖǜǝ ǠǔǡǹǣǧǟdzǦǢǤ
ǁǕǠ. 4
ǁǕǠ. 5
12
Page 14

UKR
ƾǙǤǹǖǡǜǪǦǖǢ Ǜ ǙǞǥǣǟǧǔǦǔǪǹǺ
• ǁǔǣǤdzǠǞǜ Ǥǧǩǧ Ǜǔ ǘǢǣǢǠǢǗǢDz Ǡǹǡǹ-ǘǚǢǝ-
ǥǦǜǞǔ. ǁǔǩǜǟdzDzǫǜ ǤǧǞǢdzǦǞǧ ǠǔǡǹǣǧǟdzǦǢǤǔ d
ǣǤǜ ǡǔǦǜǥǡǧǦǹǝ ǞǡǢǣǪǹ 4-ǣǢǛǜǪǹǝǡǢǗǢ ǠǹǡǹǘǚǢǝǥǦǜǞǔ a ǖǣǙǤǙǘ, ǡǔǛǔǘ, ǖǟǹǖǢ ǹ ǖǣǤǔǖǢ,
ǖǹǘǣǢǖǹǘǡǜǝ ǕǟǢǞ Ǣǥǹ X/Y ǕǧǘǙ ǥǜǡǩǤǢǡǡǢ
ǛǠǹǡDzǖǔǦǜǥdz. ljǤǙǥǦǜǞ ǧ ǣǤdzǠǢǞǧǦǡǜǞǧ «X axis;
Y axis» ǕǧǘǙ ǣǙǤǙǠǹǭǔǦǜǥdz ǖǹǘǣǢǖǹǘǡǢ ǘǢ
ǡǔǩǜǟǹǖ ǤǧǞǢdzǦǞǜ.
• LjǧǡǞǪǹdz ǢǕǙǤǦǔǡǡdz. ǃǤǜ ǢǕǙǤǦǔǡǡǹ ǤǧǞǢdzǦǞǜ
ǠǔǡǹǣǧǟdzǦǢǤǔ ǖ ǟǹǖǜǝ ǔǕǢ ǣǤǔǖǜǝ
ǡǜǝ ǕǟǢǞ Ǣǥǹ RZ ǕǧǘǙ ǥǜǡǩǤǢǡǡǢ ǛǠǹǡDzǖǔǦǜǥdz.
njǞǔǟǔ «RZ axis» ǣǢǥǦǧǣǢǖǢ, ǣǢǘǹǟǞǔ Ǜǔ ǣǢǘǹǟǞǢDz, ǕǧǘǙ ǛǔǨǔǤǕǢǖǧǖǔǦǜǥdz ǖ ǛǙǟǙǡǜǝ ǞǢǟǹǤ.
• DŽǙǗǧǟdzǦǢǤ ǗǔǛǧ. ǃǤǜ ǣǢǖǢǤǢǦǹ ǤǙǗǧǟdzǦǢǤǔ
ǗǔǛǧ f ǖǟǹǖǢ ǹ ǖǣǤǔǖǢ ǖǹǘǣǢǖǹǘǡǜǝ ǕǟǢǞ Ǣǥǹ Z
ǕǧǘǙ ǥǜǡǩǤǢǡǡǢ ǛǠǹǡDzǖǔǦǜǥdz. njǞǔǟǔ «Z axis»
ǣǢǥǦǧǣǢǖǢ, ǣǢǘǹǟǞǔ Ǜǔ ǣǢǘǹǟǞǢDz, ǕǧǘǙ ǛǔǨǔǤǕǢǖǧǖǔǦǜǥdz ǖ ǛǙǟǙǡǜǝ ǞǢǟǹǤ.
• ǀǹǡǹ-ǘǚǢǝǥǦǜǞ. ǃǢǖǙǤǦǔǝǦǙ
a ǧ ǤǹǛǡǜǩ ǡǔǣǤdzǠǞǔǩ, ǭǢǕ ǣǙǤǙǖǹǤǜǦǜ ǖǹǘǣǢǖǹǘǡǹǥǦǰ ǣǢǖǢǤǢǦǹǖ ǧ 8 ǡǔǣǤdzǠǞǔǩ, ǭǢ ǖǹǘǢǕǤǔǚǔǦǜǠǙǦǰǥdz ǡǔ ǞǢǟǹ Ǜ ǖǹǥǰǠǢǠǔ ǥǦǤǹǟǞǔǠǜ ǧ
ǟǹǖǢǠǧ ǡǜǚǡǰǢǠǧ ǞǧǦǹ ǹǡǦǙǤǨǙǝǥǧ ǃƾ (ǘǜǖ.
Ǡǔǟ. 5).
• ǃǙǤǙǣǤǢǗǤǔǠǧǖǔǡǡdz ǞǟǔǖǹǬ. ƾǟǹǞǡǹǦǰ ǞǡǢǣǞǧ
ǠǙǡDz «Keyǀap» (Ǡǔǟ. 6) ǖ ǹǡǦǙǤǨǙǝǥǹ ǃƾ ǘǟdz
ǦǢǗǢ, ǭǢǕ ǤǢǛǣǢǫǔǦǜ ǣǤǢǗǤǔǠǧǖǔǡǡdz ǞǡǢǣǢǞ ǧ
ǖǹǞǡǹ ǡǔǥǦǤǢDzǖǔǡǰ; ǣǢǦǹǠ
ǣǙǤǙǘ ǪǜǨǤǢǖǢDz ǞǡǢǣǞǢDz, dzǞǧ ƶǜ ǩǢǫǙǦǙ
ǣǙǤǙǣǤǢǗǤǔǠǧǖǔǦǜ, ǣǢǦǹǠ ǡǔǦǜǥǡǹǦǰ Ǧǧ ǥǔǠǧ
ǞǡǢǣǞǧ, ǭǢǕ ǣǹǘǦǖǙǤǘǜǦǜ ǣǙǤǙǣǤǢǗǤǔǠǧǖǔǡǡdz.
ǃǤǜǞǟǔǘ: ǣǙǤǙǣǤǢǗǤǔǠǧǖǔǡǡdz ǞǡǢǣǞǜ 3 ǡǔ
ǞǡǢǣǞǧ 5. ƾǟǹǞǡǹǦǰ ǞǡǢǣǞǧ «Set», ǭǢ ǟǹǖǹǬǙ
ǖǹǘ ǞǡǢǣǞǜ 3, ǞǡǢǣǞǔ «Set» ǛǔǥǖǹǦǜǦǰǥdz,
ǣǢǦǹǠ ǡǔǦǜǥǡǹǦǰ ǞǡǢǣǞǧ 5 ǡǔ ǘǚǢǝǥǦǜǞǧ,
ǪǜǨǤǔ ǖ ǦǤǙǦǰǢǠǧ ǛǙǟǙǡǢǠǧ ǞǹǟǰǪǹ ǛǠǹǡǜǦǰǥdz Ǜ 3 ǡǔ 5.
ǃǤǜǠǹǦǞǔ. ǃǹǥǟdz ǣǤǢǗǤǔǠǧǖǔǡǡdz ƶǜ ǠǢǚǙǦǙ ǛǕǙǤǙǗǦǜ
ǖǔǦǜ Ǻǩ. ƶǡǜǛǧ ǖǹǞǡǔ ǛǡǔǩǢǘdzǦǰǥdz ǦǤǜ ǞǡǢǣǞǜ: «Default», «Load» ǹ «Save». ǃǙǤǬǔ ǣǢǖǙǤǦǔǷ ǧǥǹ ǧǥǦǔǡǢǖǞǜ ǡǔǛǔǘ Ǜǔ ǧǠǢǖǫǔǡǡdzǠ.
džǤǙǦdz ǘǔǷ ǛǠǢǗǧ ǛǕǙǤǙǗǦǜ ǖǥǦǔǡǢǖǟǙǡǧ ǖǔǠǜ ǤǢǛǞǟǔǘǞǧ ǞǡǢǣǢǞ, ǔ ǘǤǧǗǔ – ǛǔǖǔǡǦǔǚǜǦǜ
ǛǕǙǤǙǚǙǡǧ.
ǡǢǖǹ ǡǔǥǦǤǢǝǞǜ ǔǕǢ ǥǞǔǥǧ-
ǞǟǹǞǡǹǦǰ ǞǡǢǣǞǧ «Set»
ǕǹǞ ǖǹǘǣǢǖǹǘ-
Ǡǹǡǹ-ǘǚǢǝǥǦǜǞ
Aggressor
. 6
ǁǕǠ
ǁǕǠ. 7
13
Page 15

UKR
ƫǗǤǢǖǜǝ ǠǔǡǹǣǧǟdzǦǢǤ
ǁǕǠ. 8
• LjǧǡǞǪǹdz ǖǹǕǤǢǖǹǘǘǔǫǹ Vibration. ƶǹǘǞǤǜǝǦǙ ǛǔǞǟǔǘǞǧ «Vibration» (Ǡǔǟ. 7), ǭǢǕ ǣǙǤǙǖǹǤǜǦǜ
ǨǧǡǞǪǹDz ǖǹǕǤǢǖǹǘǘǔǫǹ. ƾǢǟǜǖǔǡǡdz ǘǚǢǝǥǦǜǞǔ ǖǹǘǣǢǖǹǘǔǷ ǖǹǕǤǔǪǹǺ ǘǖǜǗǧǡǔ; ǣǹǘ ǫǔǥ ǣǙǤǙǖǹǤǞǜ
ǠǢǚǡǔ ǖǹǘǤǙǗǧǟDzǖǔǦǜ ǣǙǤǹǢǘ (Period) ǹ ǔǠǣǟǹǦǧǘǧ (Mag.) ǖǹǕǤǔǪǹǺ. LJ ǪǙǡǦǤǹ – ǣǢǟǙ ǣǙǤǙǠǹǭǙǡǡdz
ǤǧǞǢdzǦǹ ǘǚǢǝǥǦǜǞǔ Ǜ ǖǹǕǤǔǪǹǷDz. ƿǹǖǢǤǧǫ ǹ ǥǣǤǔǖǔ – ǹǡǘǜǞǔǦǢǤǜ ǖǹǕǤǔǪǹǺ. ǃǤǜ ǣǙǤǙǠǹǭǙǡǡǹ
ǧǣǤǔǖǢ ǹ ǖǟǹǖǢ ǔǞǦǜǖǧǷǦǰǥdz ǟǹǖǜǝ ǹǡǘǜǞǔǦǢǤ Left, ǔ ǖǗǢǤǧ ǹ ǖǡǜǛ – Right. ǓǞ ǔǟǰǦǙǤǡǔǦǜǖǔ
ǠǢǚǙǦǙ ǞǟǹǞǡǧǦǜ Auto ǘǟdz ǔǖǦǢǠǔǦǜǫǡǢǺ ǣǙǤǙǖǹǤǞǜ.
ǃǤǜǠǹǦǞǔ. LjǧǡǞǪǹdz ǖǹǕǤǢǖǹǘǘǔǫǹ ǖǠǜǞǔǷǦǰǥdz (ǣǢǟǢǚǙǡǡdz ON) ǹ ǖǜǠǜǞǔǷǦǰǥdz (ǣǢǟǢǚǙǡǡdz OFF) ǖǜǠǜǞǔǫǙǠ VIBRATION i ǡǔ ǘǚǢǝǥǦǜǞǧ.
• ƾǔǟǹǕǤǧǖǔǡǡdz ǘǚǢǝǥǦǜǞǔ. ǓǞǭǢ ǣǹǘ ǫǔǥ ǦǙǥǦǧǖǔǡǡdz (ǣǙǤǙǖǹǤǞǜ) ǞǧǤǥǢǤ, ǭǢ ǖǞǔǛǧǷ ǡǔ ǞǢǚǡǧ
ǖǹǥǰ, ǡǙ ǣǢǖǙǤǦǔǷǦǰǥdz ǖ ǪǙǡǦǤǔǟǰǡǧ ǣǢǛǜǪǹDz ǔǕǢ ǡǙ ǨǹǞǥǧǷǦǰǥdz ǡǔ ǖǥǹǩ ǫǢǦǜǤǰǢǩ ǕǢǞǔǩ,
ǖǹǘǞǤǜǝǦǙ ǛǔǞǟǔǘǞǧ «Adjustment» (ǘǜǖ. Ǡǔǟ. 8), ǭǢǕ
о «Check» о «Next» о «Save».
Ƹǟdz ǢǣǙǤǔǪǹǝǡǢǺ ǥǜǥǦǙǠǜ Vista
• ƸǤǔǝǖǙǤ ǘǟdz Vista ǢǡǢǖǟǙǡǢ, ǭǢǕ ǖǹǡ Ǖǧǖ ǥǧǠǹǥǡǜǠ Ǜ ǢǣǙǤǔǪǹǝǡǢDz ǥǜǥǦǙǠǢDz.
• ǂǥǞǹǟǰǞǜ Vista 32 bit ǹ Vista 64 bit ǡǙ ǥǧǠǹǥǡǹ Ǣǘǡǔ Ǜ ǢǘǡǢDz, ǘǢ ǘǚǢǝǥǦǜǞǔ ǘǢǘǔDzǦǰǥdz ǘǖǔ
ǘǤǔǝǖǙǤǜ ǡǔ ƶǔǬ ǖǜǕǹǤ.
ǖǹǘǞǔǟǹǕǤǧǖǔǦǜ ǣǤǜǥǦǤǹǝ: «Check» о «Next»
, ƶǜ
14
Page 16

UKR
ƾǙǤǹǖǡǜǪǦǖǢ Ǜ ǙǞǥǣǟǧǔǦǔǪǹǺ
8. ƶƼDŽƫnjƹǁǁǓ ǀǂƺƿƼƶƼlj ǃDŽǂƵƿƹǀ
ǃǤǢǕǟǙǠǔ
ǃǹǥǟdz ǣǹǘǞǟDzǫǙǡǡdz Ǧǔ
ǖǥǦǔǡǢǖǟǙǡǡdz ǃƻ ǘǚǢǝǥǦǜǞ
ǡǙ ǣǤǔǪDzǷ.
ƴǡǔǟǢǗǢǖǔ ǖǹǥǰ ǥǣǤǔǪDzǖǔǟǔ
ǔǖǦǢǠǔǦǜǫǡǢ ǕǙǛ ǖǦǤǧǫǔǡǡdz
ǗǤǔǖǪdz.
ƸǚǢǝǥǦǜǞ ǡǙ ǣǤǔǪDzǷ ǧ
ǖǹǕǤǢǤǙǚǜǠǹ.
ǃǹǥǟdz ǣǹǘ’Ƿǘǡǔǡǡdz ǘǚǢǝǥǦǜǞǔ
ǣǤǢǗǤǔǠǧ ǘǤǔǝǖǙǤǔ ǡǙ
ǛǡǔǝǘǙǡǢ.
ǃǹǥǟdz ǛǔǣǧǥǞǧ ǗǤǜ ǨǧǡǞǪǹdz
ǖǹǕǤǢǖǹǘǘǔǫǹ ǖǠǜǞǔǷǦǰǥdz ǥǔǠǔ
ǕǙǛ ǖǦǤǧǫǔǡǡdz ǗǤǔǖǪdz.
LJ ǣǤǢǪǙǥǹ ǗǤǜ ǨǧǡǞǪǹdz
ǖǹǕǤǢǖǹǘǘǔǫǹ ǥǟǔǕǞǔ.
ƶǜǤǹǬǙǡǡdz
ƴ. ǃǙǤǙǖǹǤǦǙ, ǫǜ
ǘǢ ǃƾ.
Ƶ. ǃǙǤǙǞǢǡǔǝǦǙǥdz, ǭǢ ǖǜ ǣǤǔǖǜǟǰǡǢ Ǜǘǹǝǥǡǜǟǜ ǹǡǥǦǔǟdzǪǹDz.
ƶ. ƶǥǦǔǡǢǖǹǦǰ ǖǙǤǥǹDz Direct X 7.0 ǔǕǢ ǖǜǭǙ.
Ʒ. ǃǙǤǙǛǔǣǧǥǦǹǦǰ ǃƾ, dzǞǭǢ ǣǤǜǥǦǤǹǝ ǘǢǥǹ ǡǙ ǣǤǔǪDzǷ.
ƶǹǘǤǙǗǧǟDzǝǦǙ ǹ ǣǹǘǦǖǙǤǘǹǦǰ ǣǹǥǟdz ǤǙǗǧǟDzǖǔǡǡdz
ǞǔǟǹǕǤǧǖǔǡǡdz ǘǚǢǝǥǦǜǞǔ.
ƶǜǝǘǹǦǰ Ǜ ǗǤǜ, ǖǹǘǞǟDzǫǹǦǰ ǠǔǡǹǣǧǟdzǦǢǤ Ǜ ǣǢǤǦǧ USB, ǔ
ǣǢǦǹǠ ǛǡǢǖǧ ǣǹǘǞǟDzǫǹǦǰ. ǓǞǭǢ ǨǧǡǞǪǹdz ǖǹǕǤǢǖǹǘǘǔǫǹ ǣǹǥǟdz
ǡǙ ǧǖǹǠǞǡǧǟǔǥdz, ǣǙǤǙǛǔǖǔǡǦǔǚǦǙ ǃƾ.
ǪǰǢǗǢ
ǃǙǤǙǞǢǡǔǝǦǙǥdz, ǭǢ ǣǢǣǙǤǙǘǡDz ǧǥǦǔǡǢǖǞǧ ǘǤǔǝǖǙǤǔ
ǛǘǹǝǥǡǙǡǢ ǣǤǔǖǜǟǰǡǢ. ƻǔǝǘǹǦǰ ǖ «ǀǹǝ ǞǢǠǣ’DzǦǙǤ» о
«ƶǟǔǥǦǜǖǢǥǦǹ ǥǜǥǦǙǠǜ» о «ǂǕǟǔǘǡǔǡǡdz» о «ƸǜǥǣǙǦǫǙǤ
ǣǤǜǥǦǤǢǺǖ» ǹ ǖǜǘǔǟǹǦǰ ǢǕǟǔǘǡǔǡǡdz Ǜ ǣǢǛǡǔǫǞǢDz «!»,
ǖǹǘ’ǷǘǡǔǝǦǙ, ǔ ǣǢǦǹǠ ǛǡǢǖǧ ǣǹǘ’ǷǘǡǔǝǦǙ ǘǚǢǝǥǦǜǞ ǘǢ ǃƾ.
ǃǹǥǟdz ǪǰǢǗǢ ǃƾ ǤǢǛǣǹǛǡǔǷ ǥǜǥǦǙǠǧ ǘǤǔǝǖǙǤǔ.
LJǖǹǝǘǹǦǰ ǧ «Force Feedback» ǹ ǖǹǘǞǔǟǹǕǤǧǝǦǙ ǨǧǡǞǪǹDz
ǖǹǕǤǢǖǹǘǘǔǫǹ.
LJǖǹǝǘǹǦǰ ǧ «Force Feedback» ǹ ǡǔǟǔǬǦǧǝǦǙ ǥǜǟǧ ǖǹǕǤǢǖǹǘǘǔǫǹ.
Aggressor
ǡǔǟǙǚǡǜǠ ǫǜǡǢǠ ǘǚǢǝǥǦǜǞ ǣǹǘ’ǷǘǡǔǡǢ
ǓǞǭǢ ǚǢǘǙǡ Ǜǹ ǖǞǔǛǔǡǜǩ ǖǜǭǙ ǥǣǢǥǢǕǹǖ ǡǙ ǘǔǷ ǛǠǢǗǧ ǖǜǤǹǬǜǦǜ ǣǤǢǕǟǙǠǧ, Ǖǧǘǰ ǟǔǥǞǔ, ǛǖǙǤǡǹǦǰǥdz Ǜǔ ǣǤǢǨǙǥǹǝǡǢDz ǞǢǡǥǧǟǰǦǔǪǹǷDz ǘǢ ǡǔǝǕǟǜǚǫǢǗǢ ǘǢ ƶǔǥ ǥǙǤǖǹǥǡǢǗǢ ǪǙǡǦǤǧ. ǁǹǞǢǟǜ ǡǙ
ǡǔǠǔǗǔǝǦǙǥdz ǤǙǠǢǡǦǧǖǔǦǜ ǖǜǤǹǕ ǥǔǠǢǥǦǹǝǡǢ.
15
Page 17

Flight Joystick
OPERATION
MANUAL
Aggressor
www.sven.ѵ
Page 18

ENG
Operation Manual
Congratulations on the purchase of Sven product!
Please read this Operation Manual before using the unit and retain this Operation Manual in safe
place for future reference.
COPYRIGHT
© 2014. SVEN PTE. LTD. Version 1.0 (V 1.0).
This manual and information contained in it are copyrighted. All rights reserved.
TRADEMARKS
All trademarks are the property of their legal holders.
NOTICE OF RESPONSIBILITY RESTRICTION
Despite the exerted eԚorts to make this Manual more exact, some discrepancies may occur. The
information of this Manual is given on “as is” terms. The author and the publisher do not bear any
liability to a person or an organization for loss or damages which have arisen from the information,
contained in the given Manual.
UNPACKING
Unpack the device carefully. Make sure there are no accessories left in the box. Check up the
device for damages; if the product was damaged during transportation, address the ԛrm which
carried out the delivery; if the product functions incorrectly, address the dealer at once.
CONTENTS
RUS .......................................................................................................
UKR.......................................................................................... .............
ENG ................. ................................................................................
1. DESCRIPTION ..................................................................................
2. SAFETY PRECAUTIONS ......................................................................
3. PACKAGE CONTENTS .......................................................................
4. SPECIAL FEATURES ...........................................................................
5. SYSTEM REQUIREMENTS ....................................................................
6. DESCRIPTION OF THE DžONSTRUCTION ....................................................
7. CONNECTION AND INSTALLATION ............. .. ........... .. ........... .. .... ...........
8. TROUBLESHOOTING .......................................................................
Aggressor
1
8
16
18
18
18
18
18
19
20
22
Technical support is on www.sven.Н
17
Page 19

ENG
Flight Joystick
1. DESCRIPTION
Aggressor Flight Joystick can be used in diԚerent games such as simulators, arcades, shooter
games etc. This device supports Windows XP/Vista/7/8 and requires DirectX 7.0 and up. Drivers
are not needed for operating this device, however, their installation is necessary for activating
vibration feedback.
2. SAFETY PRECAUTIONS
• Do not disassemble or repair the device on your own. Maintenance and repairs should be carried out
by qualiԛed service centre staԚ only.
• Protect the device from direct impact of high humidity, dust, strong magnetic ԛelds, vibrations, high
temperatures, toxic liquids and gases.
• Instructions for device maintenance: for cleaning the case of the device please use clean soft
cloth. Do not use such solvents as gasoline or spirit for cleaning, since these solvents can damage
the surface of the device.
• Do not drop the device not to have it damaged.
3. PACKAGE CONTENTS
• Flight Joystick — 1 pc
• Software CD disk —1 pc
• Operation manual — 1 pc
• Warranty card — 1 pc
4. SPECIAL FEATURES
• Ergonomic design of the Flight Joystick
• Supports: DirectX 7.0 and higher, Windows XP/Vista/7/8
• USB Interface
• Vibration feedback for higher realistic eԚect
• 4 axes, D-Pad and 12 additional buttons
• USB cable length 1.8 m
• Rubber coating for superior comfort
• Rubber suction caps for secure ԛxation to the table
5. SYSTEM REQUIREMENTS
• USB port available
• Operational System Windows XP/Vista/7/8
• DirectX 7.0 Version and up
18
Page 20

ENG
Operation Manual
6. DESCRIPTION OF THE DžONSTRUCTION
a D-Pad
b Buttons 3–6
c Button 2
d Handle
e Buttons 7–12
f Hand throttle control
g Button 1
h USB cable
i On/OԚ VIBRATION switch
j Rubber suction caps
g
1
Aggressor
a
b
c
d
ef
5
6
4
3
2
Fig. 1. Front view
h
Fig. 2. Back view
ON OF
VIBRATION
e
i
12
10
8
7
11
9
j
Fig. 3. Bottom view
19
Page 21

ENG
Flight Joystick
7. CONNECTION AND INSTALLATION
• Install the device on an even surface on its suc-
tion caps j.
• Connect the device to an available USB port of
the PC via the built-in USB cable h. When connecting to your PC, the device is automatically
detected as a game controller and is fully ready
for use. However, for vibration feedback activation it is necessary to install drivers.
• Insert the Software CD disk into the drive of
your PC and launch setup.exe for installation of
drivers on your PC. For checking choose Start о
Control Panel о Game Controller.
• After connecting the controller to your PC,
Game Controllers window will automatically open
up on your desktop, the driver will detect the
device as USB all-in-one game controller (Fig. 4).
• Press Properties button in order to test functioning of all features and control elements of the
device. Properties: USB all-in-one game
controller window will open up with the ԛrst tab
Test (see Fig. 5).
Flight Joystick Test
• Buttons 1–12. Press buttons of the Ԝight joystick
from 1 to 12: a corresponding numerical button
on Function Test bookmark of your PC interface
will illuminate.
• Turbo function. Click Turbo on your PC interface
(Fig. 5), the word Turbo will illuminate. Click the
corresponding numerical button that you want to
set up with Turbo function, and the outline border
of this button will become white. If you press the
button on the joystick, the corresponding button
on the PC interface will light up. Turbo function
setup is ԛnished. To cancel this setup press Clear
button.
• Fluctuating. Turn the joystick handle d forward,
backward, left and right by pressing D-Pad a,
and the corresponding block of the X/Y axis will
shift simultaneously. The cross sign in the X axis;
Y axis ԛeld will shift according to the position of the joystick handle.
• Revolving function. Revolve the handle of the joystick to the left or right, and the corresponding
block of RZ axis will shift simultaneously. RZ axis scale will gradually ԛll with green color.
Fig. 4
Fig. 5
20
Page 22

ENG
Operation Manual
• Hand throttle control. Shift the hand throttle
control f to the left or right, the corresponding
block of Z axis will shift simultaneously. Z axis
scale will gradually ԛll with green color.
D-Pad. Revolve the D-pad a in diԚerent
•
directions to test 8-way direction inputs, which will
be displayed in an 8-arrow circle located in the
bottom left corner of the PC interface (Fig. 5).
•
Reprogramming of buttons. Click Keyǀap
button in the menu (Fig. 6) on your PC interface to
start programming keys in the setup window; then
click the Set button in front of the digital buttons
that need to be reprogrammed and press the
same button on the Ԝight joystick to conԛrm
reprogramming.
Example: reprogramming of button 3 to button 5. Click the Set button in front of button 3,
the Set button will Оash, then press button 5
on the Оight joystick and the button in the third
green circle will change from 3 to 5.
Note! After programming you can save new settings or cancel them. Below the setup
window there are three keys: Default, Load, and Save. The Нrst key returns back to initial
settings, the third key allows to save new settings to the key layout, while the second one
allows to download the saved settings.
Aggressor
Fig. 6
Fig. 7
Fig. 8
21
Page 23

ENG
Flight Joystick
• Vibration feedback function. Enter Vibration tab (Fig. 7) to test vibration feedback function.
Fluctuating and swaying action of the Ԝight joystick corresponds to motor vibration; period (Period)
and range (Mag.) of vibration can be adjusted during vibration test. In the center there is a ԛeld that
shows shifting of joystick handle with vibration. Vibration indicators are on the left and on the right.
Shifting to the left and right you activate Left indicator, while shifting up and down you activate
Right indicator. Alternatively, you can click Auto for auto-test.
Note! Vibration feedback function turns on and off by ON/OFF VIBRATION switch i on the
Оight joystick.
• D-pad calibration. If the indicating cursor of each axis does not return to the central position or
does not ԛx in all the four sides during tests, please click Adjustment menu (Fig. 8) for calibration:
Check о Next о Check о Next о Save.
Supplement for Vista operating system:
• The driver for Vista has been updated for compatibility with the operation system.
• As Vista 32bit and 64bit are not compatible with each other, so the Ԝight joystick is supplied with
two separate setup drivers for your choice.
8. TROUBLESHOOTING
Problem
After installation of the
software, the game controller
does not work normally.
Some analog axis goes into
eԚect automatically after
you enter the game.
The Ԝight joystick does not
operate in the vibration
mode.
After connecting the Ԝight
joystick, its driving program
can’t be found.
After entering the game,
vibration feedback operates
automatically.
During the game vibration
feedback is insuԝcient.
Solution
ƴ. Check whether the joystick is properly connected to your PC.
B. Make sure that the installation was carried out correctly.
C. Install DirectX 7.0 and up version.
D. Restart your PC, if the controller still doesn’t work .
Calibrate the Ԝight joystick and conԛrm the calibration.
After exiting the game, disconnect the controller from the USB
port and connect it again. If it still can’t work normally, please
restart the computer.
Check whether the previous installation of drivers was made
correctly. Enter My computer о Properties о Hardware о
Device manager and delete the corresponding equipment with
«!» mark and reconnect the Ԝight joystick to the PC. Then your
PC will ԛnd the driving system.
Enter Force Feedback and calibrate it.
Enter Force Feedback and set the force of feedback.
If none of the above mentioned solutions removes the problem, please refer to nearest authorized
service center for consultation by qualiԛed specialist. Never try to repair the device on your own.
22
Page 24

ƼǗǤǢǖǢǝ ǠǔǡǜǣǧǟdzǦǢǤ
DžǦǔǕǜǟǜǛǔǦǢǤ ǡǔǣǤdzǚǙǡǜdzDžǦǔǕǜǟǜǛǔǦǢǤ ǡǔǣǤdzǚǙǡǜdz
2.0 Multimedia Speaker System
2.0 Multimedia Speaker System 2.0 Multimedia Speaker System
Automatic Voltage Regulator
Automatic Voltage Regulator
ǀǢǘǙǟǰ:
ƼǠǣǢǤǦǙǤ ǖ DŽǢǥǥǜǜ: ǂǂǂ «DžƾƴǁƸƼdžDŽƹƿ»,
111024, DŽLj, Ǘ. ǀǢǥǞǖǔ, ǧǟ. ƴǖǜǔǠǢǦǢǤǡǔdz, ǘ. 65, ǥǦǤ. 1.
LJǣǢǟǡǢǠǢǫǙǡǡǔdz ǢǤǗǔǡǜǛǔǪǜdz ǖ DŽǢǥǥǜǜ: ǂǂǂ «DŽdž-Lj»,
105082, Ǘ. ǀǢǥǞǖǔ, ǧǟ. LjǤǜǘǤǜǩǔ ǑǡǗǙǟǰǥǔ, ǘ. 75, ǥǦǤ. 5.
LJǥǟǢǖǜdz ǗǔǤǔǡǦǜǝǡǢǗǢ ǢǕǥǟǧǚǜǖǔǡǜdz ǥǠǢǦǤǜǦǙ
ǖ ǗǔǤǔǡǦǜǝǡǢǠ ǦǔǟǢǡǙ ǜǟǜ ǡǔ ǥǔǝǦǙ www.sven.ѵ
ƷǔǤǔǡǦǜǝǡǯǝ ǥǤǢǞ: 12 ǠǙǥ. DžǤǢǞ ǥǟǧǚǕǯ: 2 ǗǢǘǔ.
ǃǤǢǜǛǖǢǘǜǦǙǟǰ: «Džƶƹǁ ǃdžƹ. ƿǜǠǜǦǙǘ»,
176 Ƹǚǧ NjǜǔǦ DŽǢǧǘ, д 02-02, DžǜǡǗǔǣǧǤ, 427447.
ǃǤǢǜǛǖǙǘǙǡǢ ǣǢǘ ǞǢǡǦǤǢǟǙǠ «DžǖǙǡ DžǞǔǡǘǜǡǔǖǜdz
ƿǜǠǜǦǙǘ», 48310, Ljǜǡǟdzǡǘǜdz, ƾǢǦǞǔ,
ƾǢǦǢǟǔǩǘǙǡǦǜǙ, 15. DžǘǙǟǔǡǢ ǖ ƾǜǦǔǙ.
ǀǢǘǙǟǰ:
ǃǢǥǦǔǫǔǟǰǡǜǞ/ǹǠǣǢǤǦǙǤ ǖ LJǞǤǔǺǡǹ:
džǂƶ «Džƶƹǁ NJǙǡǦǤ»,
Ǡ. ǃǙǤǙdzǥǟǔǖ-ljǠǙǟǰǡǜǪǰǞǜǝ,
ǦǙǟ. (044) 233-65-89/98.
ǖǟǔǥǦǜǖǢǥǦǹ Ǧǔ ǖǹǘǢǠǢǥǦǹ ǣǤǢ ǕǙǛǣǙǞǧ ǦǢǖǔǤǧ ǘǜǖǹǦǰǥdz
ǧ ƾǙǤǹǖǡǜǪǦǖǹ Ǜ ǙǞǥǣǟǧǔǦǔǪǹǺ. LJǠǢǖǜ ǗǔǤǔǡǦǹǝǡǢǗǢ
ǢǕǥǟǧǗǢǖǧǖǔǡǡdz ǘǜǖǹǦǰǥdz ǖ ǗǔǤǔǡǦǹǝǡǢǠǧ ǦǔǟǢǡǹ
ǔǕǢ ǡǔ ǥǔǝǦǹ www.sven.ѵ
ƷǔǤǔǡǦǹǝǡǜǝ ǦǙǤǠǹǡ: 12 Ǡǹǥ. DžǦǤǢǞ ǥǟǧǚǕǜ: 2 ǤǢǞǜ.
džǢǖǔǤ ǥǙǤǦǜǨǹǞǢǖǔǡǢ/ǠǔǷ ǗǹǗǹǷǡǹǫǡǜǝ ǖǜǥǡǢǖǢǞ.
njǞǹǘǟǜǖǜǩ ǤǙǫǢǖǜǡ ǡǙ ǠǹǥǦǜǦǰ. ƻǕǙǤǹǗǔǦǜ ǖ ǥǧǩǢǠǧ ǠǹǥǪǹ.
ƶǜǤǢǕǡǜǞ: «Džƶƹǁ ǃdžƹ. ƿǹǠǹǦǙǘ», 176 Ƹǚǧ NjǹǔǦ DŽǢǧǘ,
д 02-02, DžǹǡǗǔǣǧǤ, 427447. ƶǜǗǢǦǢǖǟǙǡǢ ǣǹǘ
ǞǢǡǦǤǢǟǙǠ «DžǖǙǡ DžǞǔǡǘǜǡǔǖǹdz ƿǹǠǹǦǙǘ», 48310,
Ljǹǡǟdzǡǘǹdz, ƾǢǦǞǔ, ƾǢǦǢǟǔǩǘǙǡǦǹǷ, 15. ƻǤǢǕǟǙǡǢ ǖ ƾǜǦǔǺ.
Manufacturer: SVEN PTE. LTD, 176 Joo Chiat Road,
д 02-02, Singapore, 427447. Produced under the
control of Oy Sven Scandinavia Ltd. 15, Kotolahdentie,
Kotka, Finland, 48310. Made in China.
® Registered Trademark of Oy SVEN
Scandinavia Ltd. Finland.
Aggressor
Aggressor
08400, ƾǜǺǖǥǰǞǔ ǢǕǟǔǥǦǰ,
ǖǧǟ. ƷǙǤǢǺǖ ƸǡǹǣǤǔ, 31,
ǃǤǜǛǡǔǫǙǡǡdz, ǥǣǢǚǜǖǫǹ
Aggressor
SPS-619
 Loading...