

Svea Flame Elipse Series, Elipse 1, Elipse 2, Elipse 5, Elipse 7 Instructions For Assembly And Use
...Page 1

Elipse 1 – Elipse 2 – Elipse 3 – Elipse 4 – Elipse 5 – Elipse 6 – Elipse 7 – Elipse 8
ELIPSE SERIES
Elipse 1
Elipse 2
Elipse 3
Elipse 4
Elipse 5
Elipse 6
Elipse 7
Elipse 8
Elipse 9
Elipse 10
Elipse Low Base
Instructions for assembly and use
Tisa Konstruktion HB
Utgåva 1.2015SF
Page 2

Elipse 1 – Elipse 2 – Elipse 3 – Elipse 4 – Elipse 5 – Elipse 6 – Elipse 7 – Elipse 8
Dear customer,
TISA Konstruktion only offer high quality products with pleasing design and reliable operation, For us,
safety and high manufacturing standards are the most important and we ensure a long life product with
high efficiency and good heating economy. Even the best stoves require good handling and regulare care,
based on information and know-how. Please read these instructions carefully before lighting your first
fire.Potential mistakes such as unsuitable fuels, excessive heat levels,and inadequate maintenance can
rapidly canse damage which is not covered by our guarantee Please pay particular attention to the safety
instructions on the final page, since they help you to avoid possible damage and identify potential risks
Yourssincerely
TISAKonstruktionHB
Bear in mind that certain parts of the fireplace
become extremely hot in the course of the
combustion process,and take suitable precautions
if there are children and/or pets in the vicinity
.
You should also take into account that a space of
at least 1000 mm must be allowed between the
front of
the hearth and combustible furnishings
Study the user instructions carefully
before using the stove and remember that
the installation must be first approved by
a chimney sweep
The stove and the chimney must
be arranged in a way that ensures
that they cannot
start a fire in
adjoining fixtures or parts of
the
building.The flue must be
installed in
a manner which
permits chimney-sweeping
for the
full flue length, and with ready
access to cleaning doors
.
2
Page 3

Elipse 1 – Elipse 2 – Elipse 3 – Elipse 4 – Elipse 5 – Elipse 6 – Elipse 7 – Elipse 8
CONTENS
General................................................pages 4-5
Assembly.............................................pages 6-7
Technical information........................ pages 8-9
Dimensions &con. heights…........pages 10-15
Instructions for use and maintenance..page 16
-manufacturer s assurance-planning
application
-inspektion
-guarantee
-chimney
-distance from combustible surfaces
-load-bearing structure
-fireplace base
-what is included
-envirinmental approval
-transportap attachments
-receipt of goods
-cool hands
-outdoor air connection
-fan
-the right location
-order of assembly for top connection
-ball/plummet stop
-connection to existing masonry
chimney
-cutting hole in masonry chimney
-design specifications
-data
-accessories/options
-distance from wall surfaces
-output controll
-how to open the door
-asc disposal and grate controls
-Elipse 1
-Elipse 2
-Elipse 3
-Elipse 4
-Elipse 5
-Elipse 6
-Elipse 7
-Elipse 8
-Elipse 9
-Elipse 10
-Elipse Low Base
3
Page 4

Elipse 1 – Elipse 2 – Elipse 3 – Elipse 4 – Elipse 5 – Elipse 6 – Elipse 7 – Elipse 8
GENERAL
Manufacturor’s assurance
This product has been manufactured in
accordance with the type approval
documentation, of which the instructions for
assembly, use and maintenance form an intrinsic
part.
Planning application
Before commencing a new installation of a stove
and chimney in an area covered by town
planning, you must notify the local planning
authority. The planning and building office in your
local municipality will provide further information.
Inspection
When installation has been completed, it must
always be inspected by a chimney sweep before
the stove is used, irrespective of whether it is
connected to a new or an existing chimney.
Guarantee
Before using your stove, you should read the
terms of the guarantee (see our website),
indicating the requirements that must be met. If
the guarantee undertakings are to apply.
Chimney
The diameter of the flue must be at least 150 mm,,
and we recommend a minimum flue height of 3,5
moires, measured from the stove flueconnectionpoint. Follow the chimney supplier’s
assembly instructions carefully. If you intend to fit
your stove to an existing masonry chimney, it
should first be inspected by a chimney sweep to
check that it is in good order. The stove can be
connected at 45’’ angle, or at a 90’’ angle, straightback with a cleaning door to a chimney approved
for a maximum flue gas temperature of 350C.
Distance to combustible wall
Theminimum distance from a combustible wall
surface is 500 mm at the sides and 100 mm at the
rear (see diagram at page 8). The minimum
distance from furnishings in front of the stove is
1000 mm. If the stove is placed against a masonry
chimney or a firewall installation, the space behind
the stove may be reduced to 50 mm.
Structural support
A stove with a chimney does not normally require
special foundations and can be placed on an
ordinary floor supported by wooden rafters. If you
are uncertain, contact a chimney sweep for
further advice and instructions.
Fireplacebase
The stove must be placed on a fireplacebase
consisting of concrete, natural stone, brick or
glass with a thickness of at least 50 mm, or sheet
metal with a thickness of 0,7 mm. The base must
cover the entire surface under the stove and
extend at least 300 mm in front of the stove and
100 mm at the sides. A fireplace base in sheet
metal or glass is available as an optional extra.
What’s included?
The delivery includes the stove and inserts
for a top or rear connection. Options include
a fireplace base and a connection kit for an
existing chimney. An outside airfeed
connection and a fan are also offered as
optional extras
Enviromental approval
These instructions are also valid for
product-type and enviromental approval
documentation purposes.
Transport
When delivered the baffle plate is
attached with a special glue to provide
from falling or breaking. The glue will
dispensary when the first fire is lit. If you
wish to remove the baffle before that,
perhaps as the chimney sweeper does
the inspection, just use a carpenter’s
knife to carefully loosen the two glue
dots, one on each side of the baffle.
4
Page 5
Elipse 1 – Elipse 2 – Elipse 3 – Elipse 4 – Elipse 5 – Elipse 6 – Elipse 7 – Elipse 8
Cool hands
The stove glove is supplied and equipped
with a practical magnetic attachment.
Always use the glove when you’re opening
the door to put on more logs, since the fire
do or handle may be hot. Don’t store the
glove on the stove while heated. Don’t use
the glove inside the stove.
Outdoor air connection
The air consumed in the combustion process has to
be replaced, particularly in well-insulated buildings.
The air feed to the hearth may be direct, via an
outdoor air connection, or indirect, via a vent in an
external wall. In the case of an outdoor air feed, the
stove connection point has a diameter of 60 mm. If
the air channel passes through a warm area it should
be insulated to pre-vent condensation. The minimum
mineral-wool insulation thickness is 30 mm, with
plastic foil on the outside. Anti-condensation lagging
may also be used.
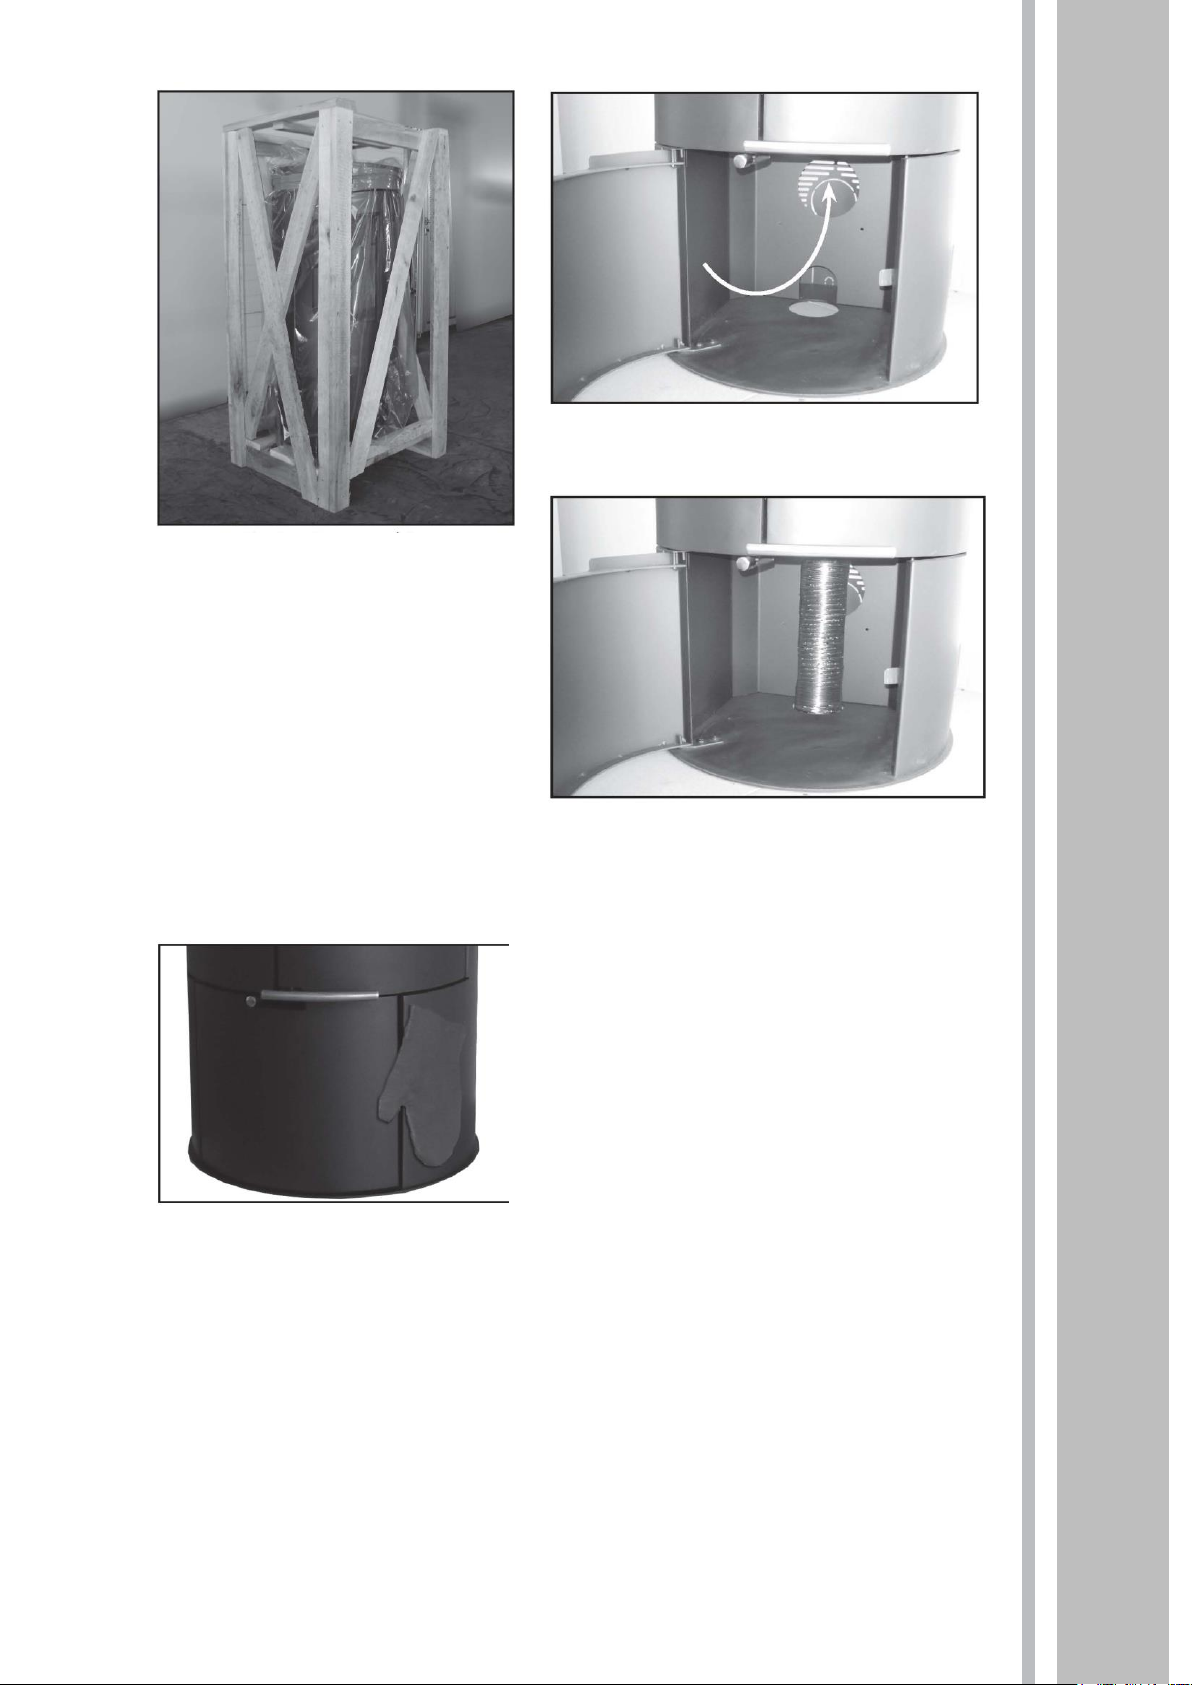
The outside air hose can be directed straight down
through the floor or directed through the lower hole at
the back of the stove and through the wall. See the
picture at the top of this page.
Fan (optional extras)
See seperate manual for fan assembly.
Stone base unit (optional extras)
The stone-base unit,, and the cast-iron base unit,
which are optional extras, increases the connection
height by 40 mm.
Receiving of goods
The product may have been damaged in
transport,
although this may not be
apparent from the external
packaging
. It is
important that you inspect the stove
carefully
and report any damage to the
transportcom
pany within seven days.You
should note visible dama
ge immediately on
the delivery note,in connection with receipt
of the goodson delivery, the stove is
attached to a pallet with screws,under a
wooden frame, and is
covered with sheet
plastic.Take precautions to avoid
damage
when unpacking and assembling the
stove.
The connection hose should be insulated.
5
Thestovewillbedeliveredlikethis
Find the collar to the outdoor air supply
inside the
log compartment.
A stove glove 'aka' cool hands
Page 6

Elipse 1 – Elipse 2 – Elipse 3 – Elipse 4 – Elipse 5 – Elipse 6 – Elipse 7 – Elipse 8
ASSEMBLY
The right location
When you are deciding where the stove is to be
placed, it is important to soled a central location in
your house in order to ensure even distribution of
heat. If you are also planning to install a chimney,
it is an ad-vantage if the chimney exit point is as
close to the roof ridge as possible, since this
entails both aesthetic and cost benefits If there is
a floorlevel above the stove, you should alsothink
about how the chimney is to pass through it. A
cupboard or a corner area is often a good location
for a flue shaft. The floor surface on which the
stove is to rest must be even and horizontal.
Order of assembly for top connection
Follow the chimney supplier’s instructions
carefully. Assembly is accomplished in the
following order:
1. Prepare air-feed to the hearth (if required).
2. Cut hole in ceiling.
3. Install the fireplace base.
4. Lift the stove into position.
5. Assemble the plummet stop (see image below)
and fit the top unit in place and grid when
applicable. .
6. Assemble the chimney (see images on the
right
Ball/plummet stop
If a top connection is employed, it is important to ensure
that the plummet stop is fitted inside the stove insert. The
plummet stop prevents damage to the flue baffle during
chimney-sweeping operations.
6
Step 5. Plummet stop at top connection.
Place the top on the stove before mounting the top
Start by fitting the adapter pipe,using stove sea
lant
(seephoto)
.The next stage is to fit the connection piece and the
flue modules,in accordance with the chimney manufacturer's
instructions
If there is a gap between the stove and the con-nection piece,
insulate it with carbolic, rock wool, or a similar material. Then insert
the flue pipes to achieve a tight fit against the stove.
Page 7

Elipse 1 – Elipse 2 – Elipse 3 – Elipse 4 – Elipse 5 – Elipse 6 – Elipse 7 – Elipse 8
Connection to an existing masonry
chimney
The stove is approved for a rear connection
to a chimney with a ½ brick connection point
which is approved for a 350°C flue-gas
temperature.
1. Measure where the hole is to be made in
the chimney. Mark the hole and chisel it out
so that it is slightly larger than the diameter
of the chimney insert, allowing sufficient
space to cement the insert in place, using
mortar. Cement the insert into the hole.
2. The stove is usually supplied for a top
connection. If you intend to employ a rear
connection, use the rear connection cover
plate instead to replace the insert on top of
the stove. Apply stove sealant to ensure a
good seal between the stove and the cover
plate. See pictures to the right. .
3. Place the door plate/fireplace base in
position.
4. Fit the connection pipe which is to be fitted
into the chimney insert over the stove
connection insert. Apply a thin layer of stove
sealant around the insert before fitting the
connection pipe.
5. Apply stove sealant to the stove insert and
push the flue pipe into position. The stove is
then placed in.
Elipse 2
in black ,top connected and ready
to be inspected by the chimney sweep.
FittheRuecollarfromthetoptothebackofthestove.
7
Locket tätas med tätningslist som är 8x3mm.
Remove the lid from the back of the stove.
Apply stove sealant to ensure a good seal between the
stove and the coverplate.
Place the lid on the top base unit.
Fit the Rue collar from the top to the back of the stove.
Page 8

Elipse 1 – Elipse 2 – Elipse 3 – Elipse 4 – Elipse 5 – Elipse 6 – Elipse 7 – Elipse 8
Design specifications
Color another
Glass, ceramic withstands 750°C
Door 4 - 5 mm steel sheet
Grate cast iron
Hearth base vermeculite
Hearth lining vermeculite
The hearth is approved for a chimney with a ½ brick
connection (350°C), and the stove is designed for a chimney
drought of at least 12 pa, as provided by a chimney with a
minimum length of 3.5 meters and a cross-section of 150-200
cm2 (diam. ø150 mm).
Data
Output 2-8 kW
Nominal output 5,0 kW
Efficiency SS-EN13240 upp to 78%
Weights
Elipse 1 105 kg
Elipse 2 107 kg
Elipse 3 109 kg
Elipse 4 175 kg
Elipse 5 105 kg
Elipse 6 107 kg
Elipse 7 109 kg
Elipse 8 175 kg
Elipse 9 177 kg
Elipse 10 177 kg
Flue pipe diameter ø150 mm
Logs 35 cm
Report of initial type test Kontrol 94
Optional extras
Outdoor air connection ø70 mm
Top stone 30 kg
Socket stone 30 kg
Floor protection straight or drop tempered glass
Floor protection straight or drop grey/black plate
DATA
8
Combustible wall, corner locations
Combustible wall, straight-wall
locations
Page 9

Elipse 1 – Elipse 2 – Elipse 3 – Elipse 4 – Elipse 5 – Elipse 6 – Elipse 7 – Elipse 8
När reglaget är i detta läge nås en
nominell effekt
When the control is in this
position, an economy output of 3-
4 kW is normally achieved.
When the ashtray is emptied, make sure that there are no
glowing embers. The ash must be stored in a fireproof
container for at least 24 hours before disposal.
The ash can advantageously be returned to the nature. It
can be sprinkled on the lawn and beds (not in the topsoil).
However, it is important that the ash does not spread in such
a way that it is disturbing to neighbors.
Output control
Ash disposal & grate control
The stove has a grate and an ash tray. Open the grate
by pulling the handle towards you and then push it back
again. Repeat. The ash falls down into the ash tray.
When the control is to the right, the
primary air feed is fully open.
When the control is to the left, the
primary air feed is closed.
9
How to open the door
Open the door by pulling the handle towards you
With the control in this position, a
nominal output of 5 kW will
normally be achieved (1,5 kg
birch wood in the form of 3 logs).
When the control is in this
position an economy output of
3-5 kW is normally achieved.
When the ash tray is emptied, make sure that
there are no glowing embers. The ash must be
stored in a fireproof container for at least 24
hours before disposal.
The ash can advantageously be returned to the
nature. It can be sprinkled on the lawn and in beds
(not in the top soil). However, it is important that the
ash does not spread in such a way that it is
disturbing to neighbors.
Page 10

Elipse 1 – Elipse 2 – Elipse 3 – Elipse 4 – Elipse 5 – Elipse 6 – Elipse 7 – Elipse 8
Svea Flame on Top Svea Flame aRound
10
Elipse 1
Height……………………………………….......1040 mm
Width……………………………………………...500 mm
Depth……………………………………………..415 mm
Weight……………………………………………...105 kg
Flue collar………..……………………………....150 mm
Logs…………………………………………………35 cm
Elipse 2
Height ………………………………………........1160 mm
Width………………………………………………..500 mm
Depth……………………………………………….415 mm
Weight………………………………………………..107 kg
Flue collar………...……………………………......150 mm
Logs…………………………………………………...35 cm
Page 11

Elipse 1 – Elipse 2 – Elipse 3 – Elipse 4 – Elipse 5 – Elipse 6 – Elipse 7 – Elipse 8
Elipse 3
Höjd………………………..1290 mm
Bredd………………………..500 mm
Djup…………………………415 mm
Vikt…………………………..109 kg
Rökrörsdiam………………..150 mm
Vedlängd……………………..35 cm
Elipse 4
Höjd…………………….......1505 mm
Bredd………………………...500 mm
Djup………………………….415 mm
Vikt…………………………...175 kg
Rökrörsdiam………………...150 mm
Vedlängd………………………35 cm
Värmelagrande sten................60 kg
11
Elipse 3
Height……………………………………….......1290 mm
Width………………………………………………500 mm
Depth……………………………………………...415 mm
Weight………………………………………………109 kg
Flue collar………...……………………………....150 mm
Logs………………………………………………….35 cm
Elipse 4
Height………………………………………....1505 mm
Width……………………………………………500 mm
Depth……………………………………………415 mm
Weight……………………………………………175 kg
Flue collar……………………………..............150 mm
Logs……………………………………………….35 cm
Heat stone.........................................................60 kg
Page 12

Elipse 1 – Elipse 2 – Elipse 3 – Elipse 4 –Elipse 5 – Elipse 6 – Elipse 7 – Elipse 8
Svea Flame in Qubic Svea Flame Step by Step
12
Elipse 5
Height……………………………………….1040 mm
Width……………………………………….…500 mm
Depth………………………………………....415 mm
Weight……………………………….....………105 kg
Flue collar...……………………………........150 mm
Logs…….……………………………………….35 cm
Elipse 6
Height…………………………….1160 mm
Width.………………………………500 mm
Depth………………………………415 mm
Weight………………………………107 kg
Flue collar....………………….......150 mm
Logs……..……………………………35 cm
Page 13

Elipse 1 – Elipse 2 – Elipse 3 – Elipse 4 – Elipse 5 – Elipse 6 – Elipse 7 – Elipse 8
Elipse 8
Height………………………………1505 mm
Width--………………………………500 mm
Depth………………………………..415 mm
Weight..……………………………….175 kg
Flue collar......………………….......150 mm
Logs……………………………………35 cm
Heat stone……………........................60 kg
Elipse 7
Height………………………………....1290 mm
Width.......………………………………500 mm
Depth....………………………………..415 mm
Weight---…………………………………120 kg
Flue collar..........………………….......150 mm
Logs………….……………………………35 cm
13
Page 14

Elipse 9, Elipse 10, Elipse Low Base
14
Elipse 9
Height.......…………………………1635 mm
Width...………………………………500 mm
Depth.………………………………..415 mm
Weight......…………………………….177 kg
Flue collar.......………………….......150 mm
Logs……….……………………………35 cm
Elipse 10
Height…….………………………1635 mm
Width.………………………………500 mm
Depth……..………………………..415 mm
Weight……………………………….177 kg
Flue collar....………………….......150 mm
Logs……..……………………………35 cm
Page 15

Elipse 1 – Elipse 2 – Elipse 3 – Elipse 4 – Elipse 5 – Elipse 6 – Elipse 7 – Elipse 8
15
Elipse Low Base
Height...............................................790 mm
Width................................................500 mm
Depth…………………………………..415 mm
Weight..............................................85 kg
Flue collar….....................................150 mm
Logs……...........................................35 mm
Page 16

Elipse 1 – Elipse 2 – Elipse 3 – Elipse 4 – Elipse 5 – Elipse 6 – Elipse 7 – Elipse 8
15
16
USE
The key factors for satisfactory operation of
your new stove are proper installation and
compliance with the user instructions. If you
use the stove in the right manner, it will last for
many years.
The best heating results are achieved if you use
split birch logs (or most other types of deciduous
wood), since they burn more steadily than
coniferous logs If you use oak, beech or other type
of logs with a high heat content, you should always
mix them with other types of wood to avoid
potential damage to the stove
The logs should be dry (approximately 20%
moisture con-tent) and of the right size (about 320
mm long with a diameter of 50-80 mm). In normal
use, 1.5 kg of wood per hour is appropriate with a
maximum permissible quantity of 1,8 kg per hour,
The Testing Institute has concluded that optimum
results are achieved at 1,3 kg of wood per 45
minutes In the economy setting an output of 3-4
kW is normally achieved when the stove is loaded
with 1.5 kg of wood in the form of 3 logs Please
note that this hearth is only designed for logs It is
not appropriate to use alternative fuels such as
pellets.
It should also be noted that it is forbidden to burn
timber containing preservatives, paint or adhesives,
chipboard, plastics, and coated paper such as color
brochures. During the combustion process, these
materials release substances which are hazardous
to health and may damage the stove. They can
also attack the steel in the flue pipe and the mortar
in a conventional masonry chimney.
Lighting a fire
Open the door and place the logs in a crosswise
horizontal position. Start with small, dry sticks, on a
layer of firelighters or screwed-up newspaper. The
grate should be in the closed position. Leave the
door slightly open for 5-10 minutes until the fire has
taken hold properly. This also ensures pre-warming
of the glass and helps to avoid soot formation.
When the fire has taken hold, close the door and
open the air-feed control fully to the right (see page
8).
Larger logs with a cross-section of 50-80 mm can
then be inserted.
After a while, when the fire has really got going it
may be necessary to reduce the heat.
Reduce the combustion rate using the air-feed
control (see page 9, Output control).
Thevolumeofcombustionairandtheheatoutputdep
endonthetypeofwoodused,themoisturecontent,thetypeofchimneyandtheflue-draught(chimneylengthinrelationtothenegativepressureinthebu
ilding),Itdoesnottakelongtolearnhowtouseyoursto
vetoachievemaximumbenefitandoptimumheatingresults
Fuel replenishment
When you put more logs on the fire, you should
open the door slowly to avoid smoke gusts. Level
out the embers before inserting new logs. This
makes it easier for the new logs to catch fire. Put on
2-3 logs, and do not reduce the air supply until the
logs have caught fire Never put on fresh logs when
the fire is already burning satisfactorily,
General information on fireplaces
- When the using the stove for the first time, a
slightly unpleasant smell may be noted This is due
to oil or paint residues in the hearth The smell will
disappear after the fire has been lit a few times.
-Check the door sealing gasket at regular intervals If
it is damaged, it should be replaced.
- Keep the hearth and the flue clean. If you use the
stove frequently, you should sweep the chimney in
the interval between regular visits by the chimney
sweep.
- If the outside temperature islow whenyou light a
fire, it is a good ideato set fire to some paper and
push it up into the chimney, Thiswarms up the flue
and improves the drought,.
- A coating of soot on the glass surfaces probably
means that the hearth has not reached the right
temperature. One reason may be damp wood
Wiping the glass with dry paper may be sufficient in
some cases If the soot deposit has been there for
some time, the best solution is to remove it with
detergent or a special soot-removal product
Alternatively, a normal oven...cleaning product can
also be used. Never use a cleansing agent that
contains an abrasive compound since this could
damage the glass.
- When the ash tray is emptied, make sure that there
are no glowing embers. The ash must be stored in a
fireproof container for at least 24 hours before
disposal.
- If a chimney-fire occurs, or if there is a risk of a
chimney-fire, close the air-feed control and the
door, If ne-cessary, contact the fire brigade to
have the fire exting-uished The chimney must
always be inspected by a chimney sweep after a
chimney-fire has occurred.
 Loading...