

Page 1

USER MANUAL
www.svb24.com
Rev. 2018
Electric Bike
with 4-level support and pushing aid
20”
Page 2

Electric Bike
with intuitive 4-level support
Your Seatec Blizzard Pro Electric Bike is equipped with four
support modes that will make pedaling easier depending on cyclist
type und intended use.
By using the display attached to the handlebar, you can quickly
switch between the different modes.
Modus Display Description
ZERO 0
No electric support, all display
functions are available
ECO 1
Efficient electric support at a high
performance for a high reach
TOUR 2
Balanced support for long tours
SPORT 3
Powerful support for city and mountain
rides
RACE 4
Maximum support for ambitious and
athletic cycling
Page 3

2 Copyright SVB-Spezialversand Bremen / www.svb.de / Rev. 2018
Preface
Dear customer,
thank you for choosing this Seatec Electric Folding Bike.
The electric drive was developed specifically for people who
want to combine simple operation, compact design and high
performance. Even with health impairments you don‘t have to
miss out on the mobility and fun of cycling.
We hope your new Pedelec brings you great joy and we wish you
a safe and accident-free trip !
Your SVB Team
Page 4

Rev. 2018 / www.svb.de / Copyright SVB-Spezialversand Bremen 3
Guarantee / Warranty
According to European law, you are rightfully entitled to a warranty of 24
months. The guarantee span for batteries is 6 months since they are wearing
parts. Regard the additional information concerning the battery in Chapter 4.
Should you not be satisfied and decide to return the bike, you have to regard the
following:
Sie sollten die Lackschutzhüllen noch nicht entfernt haben und nicht auf Wegen
gefahren sein, die Verschmutzungen an der Bereifung zur Folge hatten.
Bicycles with obvious signs of use cannot be returned. To return it, the bike has
to be in its original packaging.
Choose the bike according to your body size and weight. According to DIN EN
14764 the maximal load for bicycles for adults is limited to 100 kg. Damages that
suggest overload, like broken off pedals, bent seat posts, crooked handlebars,
etc., are not acknowledged as warranty damage.
Important notes
To avoid misuse, please thoroughly read this user manual before the electric
bike‘s first use.
We suggest that you familiarise yourself with your new bicycle without making
use of the motor support and to get used to functions like the brakes and gear
change.
This SEATEC Electric Bike is a bicycle with pedaling and pushing aid, according
to the european standard design prEN 15195 a so-called „EPAC“ (Electrically
Power Assisted Cycle) or Pedelec (Pedal Electric Cycle).
It is equipped with an electromotive support drive with a nominal capacity of 250
watts. The maximal speed is limited to 25 km/h and cannot be achieved through
use of the drive support alone but is directly related to the cyclist‘s legwork. For
this reason, Pedelecs do not require registration, insurance, driver‘s licence or
helmet and are not limited to a certain age. By using the gear change, you can
choose the pedaling speed in relation to the bicycle speed. The entirety of the
electric drive unit is very light and is completely separated from the impeller
when the motor is turned off due to a free wheel. Even without the use of the
electric drive, this bicycle is conveniently easy to use. The slight resistance when
pushing the bicycle backwards as well as the motor‘s slight humming are results
of the bicycle‘s construction and are no deficiency.
Keep this user manual for future reference.
Page 5

4 Copyright SVB-Spezialversand Bremen / www.svb.de / Rev. 2018
Your receive the electric bike in a pre-assembled state which is not in running
condition.
Before the first use, you need to examine/adjust all screws etc. and tighten them
if required! Brakes and hang-on parts are to be checked for flawless condition
and correct fitting. Also assure a tight and ergonomically correct placement of the
control panel on the handlebar.
ATTENTION: an inappropriate final assembly causes loss of warranty.
Complete the bike before first usage.
Check all screws and familiarise yourself with the folding mechanism. Careless,
hasty or inexperienced handling can lead to injuries.
Before stowing the bicycle in the valise and taking it on board, you should have
already checked all the bike‘s functions and familiarised yourself with the bike‘s
riding characteristics on a thorough test ride.
Before stowing the bike in the valise, the pedals need to be folded up.
Should the tyres be out of round laterally/radially, reduce the air pressure and
correctly position the mantle in the wheel rim. Afterwards, assure optimal tyre
pressure between 2,8 and 4,6 bar.
According to road traffic regulations, every bicycle is to be equipped with lights.
This user manual does not share the properties of repair / installation and setting
instructions. If you want to tune your bike yourself, you should have a certain
basic knowledge or leave the bike at a specialised company for service or repair.
Damages caused by an improper final assembly are not subject to guarantee/
warranty. Many of the bike‘s parts are standarised and available in specialised
trade. Should you not be able to acquire certain parts, we will of course do our
best to help you.
Please keep in mind that you bought an onboard fold-up bike and riding
behaviour as well as stability cannot be compared to those of a tour or mountain
bike. Limitations in resilience due to the folding mechanism and small size are
to be expected. Overstraining, e.g. emergency stops when riding down a slope,
heavy pedaling while standing or the transportation of heavy luaggage can lead
to damages or breakage with injury risk.
Before every ride, check the correct fit of all quick release fastener clamping
levers, the locking of the battery, the seat‘s height, the handlebar‘s height, the
handlebar‘s position and the folding joints.
If you have additional questions about our products, feel free to call us. We will
assist you immediately.
Page 6
Rev. 2018 / www.svb.de / Copyright SVB-Spezialversand Bremen 5
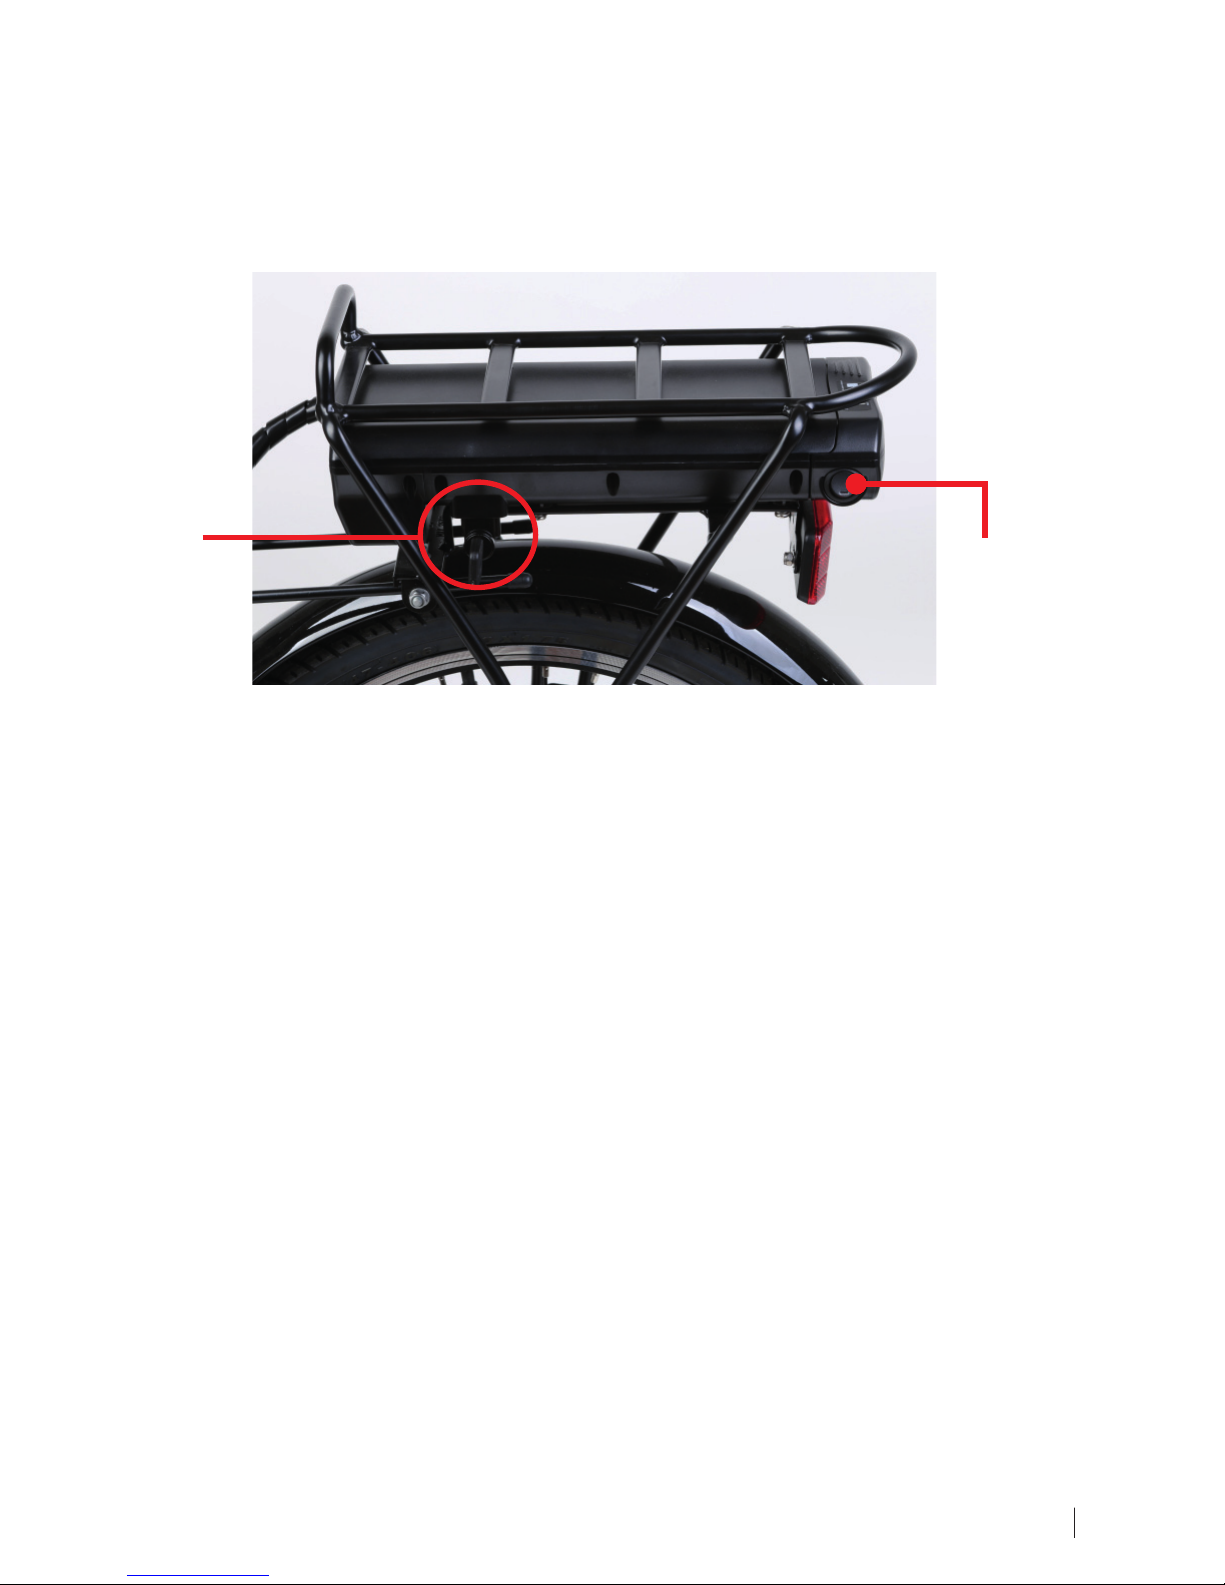
1. Lock Positions
On the left side of the bicycle rack there is a lock which locks the battery and
secures it from loss and theft. After unlocking, the battery can be removed from
the battery chamber, e.g. for charging.
key position:
Clockwise rotation – Battery is locked
Counterclockwise rotation – Battery is unlocked
Before every ride, make sure that the battery is locked.
2. During operation
Before every ride, check the correct fit of all quick release fastener clamping
levers.
Activation:
First, check if the battery is locked (see Chapter 1). Activate the main switch on
the battery (see ill. 1). This will simultaneously activate the control panel and the
lights.
If you want to start the ride, get on your bike, pedal lightly and choose a support
level by using the arrow buttons on the control panel.
The electric drive is only activated while pedaling and is immediately deactived
when the brake is applied.
Regularly check the tyre‘s air pressure. It should be between 2,8 and 4,6 bar. You
can only achieve maximal reach with a high enough air pressure.
ill. 1
battery main
switch
lock
Page 7

6 Copyright SVB-Spezialversand Bremen / www.svb.de / Rev. 2018
When riding with an electric drive, the optimal support range is around 50-60
pedal rotations per minute.
The bike is equipped with 3-gear hub gears (with backpedal brake).
Further instructions for an optimized use of the electric drive can be found in
Chapter 3.
The battery‘s current state of charge is displayed on the display on the handlebar
and can also be seen on the battery itself. You can find more information on this
topic in the following chapters.
It is recommended to recharge the battery no later than when the battery‘s state
of charge that is shown on the display starts to flash. Please note the information
on lithium batteries in Chapter 5.
You can also see the battery‘s state of charge on an LED display on the battery
itself. To activate it, push the “TEST“ button.
Page 8

Rev. 2018 / www.svb.de / Copyright SVB-Spezialversand Bremen 7
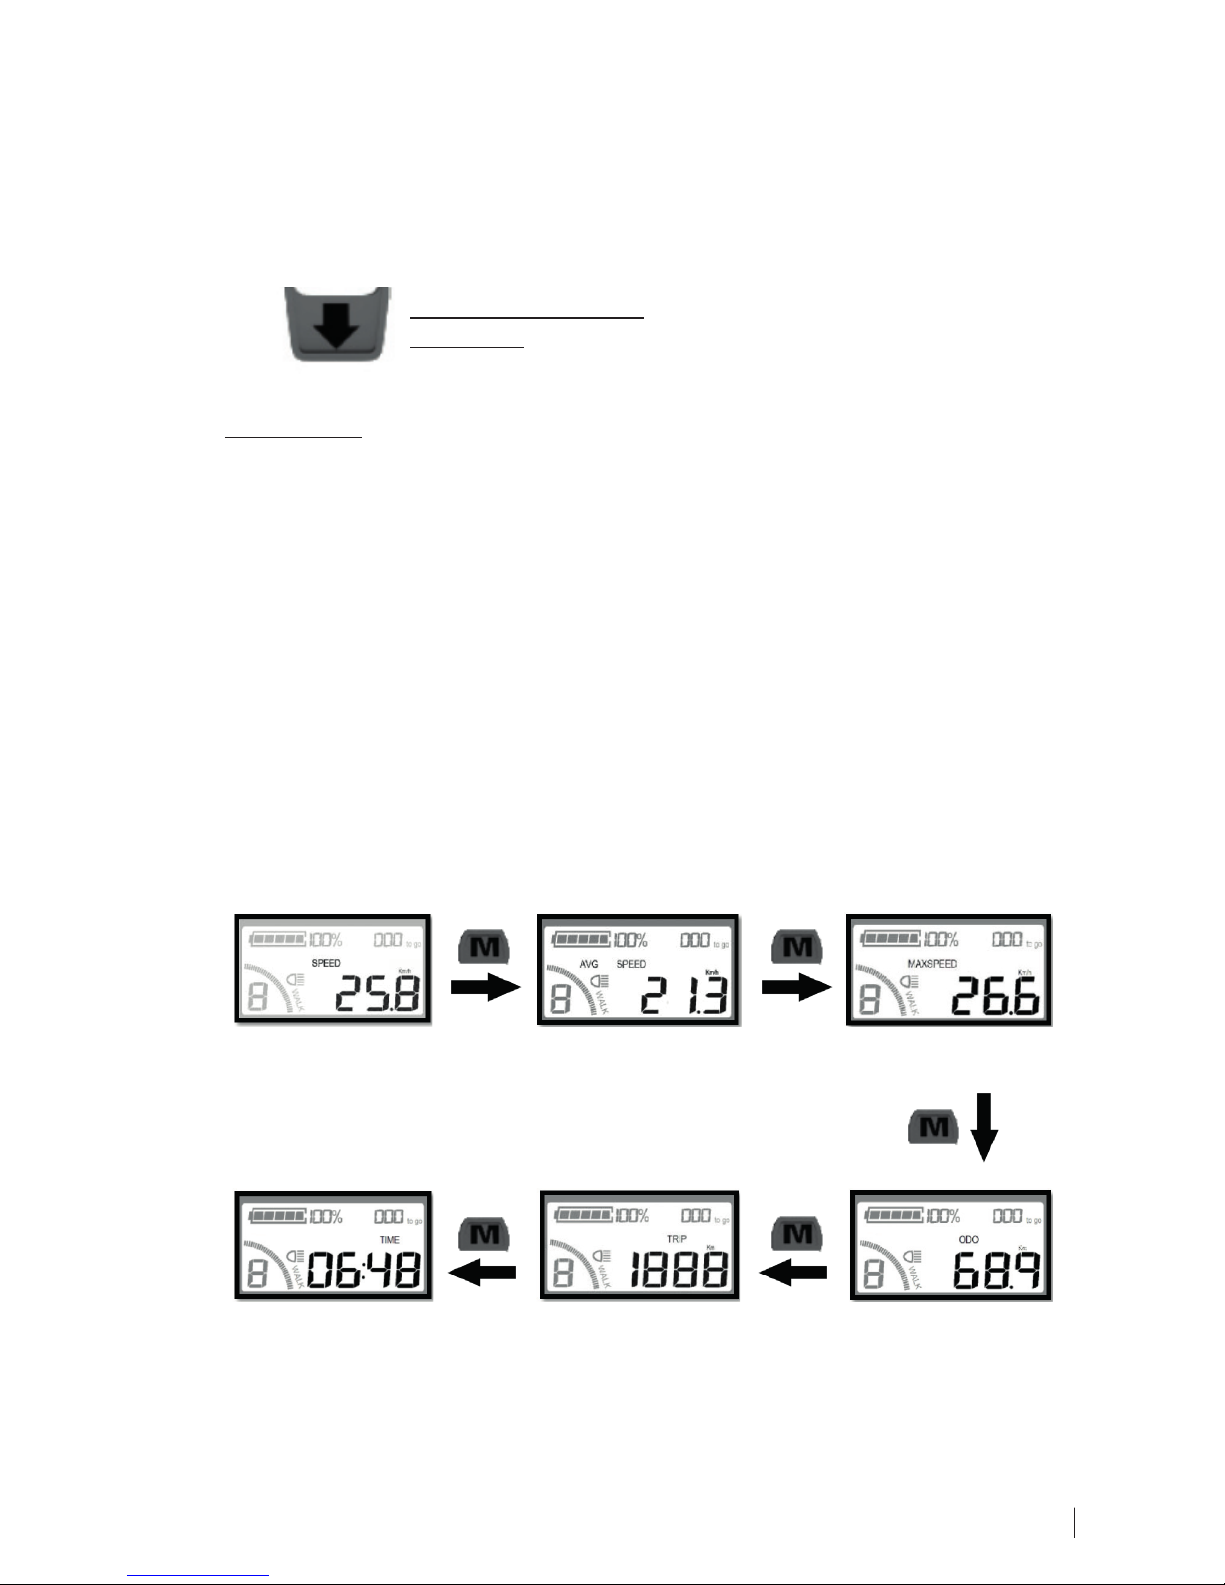
3. Display Operation
The display that is attached to the handlebar is one of the most important
operation elements of your eBikes. It offers the following options:
• Display of the battery‘s state of charge
• Switching between the electric support levels (0-4 levels)
• Speedometer (current, average and maximum speed)
• Trip display (trip distance and total distance)
• Duration of the current trip
• Battery drain (approximate) of a single trip
• Error display
• Display and setting parameters (only to be used by the manufacturer or
the service workshop)
MODE button ARROW buttons
measurements in mm
Page 9

8 Copyright SVB-Spezialversand Bremen / www.svb.de / Rev. 2018
3.1 User information
Before using the bike, you should check the display for stable fitting and adjust
the viewing angle according to your personal needs.
Be careful! When using the control panel and always pay attention to
traffic.
Do not separate any of the control panel‘s plug connections while the
battery is turned on.
Avoid jolts or collision. Always secure your bike from falling over.
Do not remove the protection film from the display. The film protects
the display from intruding fluids.
The display‘s default settings are set by the manufacturer to match your
bike optimally and require no further adjustments. Making alterations by
yourself can influence the handling and in the worst case lead to
the loss of the guarantee.
Should a malfunction occur, contact your trader immediately.
Page 10

Rev. 2018 / www.svb.de / Copyright SVB-Spezialversand Bremen 9
3.2 Display and operation
After turning on the battery, the control panel starts automatically.
Activating the display:
Push and hold the “MODE“ button for approx. 3 seconds.
The LCD display‘s layout:
1. Battery‘s state of charge
The battery‘s state of charge is presented in bars and in percent. If the
battery is completely drained, the battery symbol flashes and you need to
recharge the battery immediately.
>3 seconds pushing and holding - the display is activated
Flashing - the battery is empty.
Please recharge immediately.
1. Battery‘s state of
charge
2. Personal battery
drain
6. Speedometer &
daily / total kilometre count
4. Support level
(0-4)
5. Pushing
aid state
3. Light
7. Error Panel
Page 11

10 Copyright SVB-Spezialversand Bremen / www.svb.de / Rev. 2018
2. Personal battery drain
Displays the average battery drain. The display is reset automatically if the
bike is out of use for over 10 minutes.
3. Light
Shows whether the light is turned on or off.
Please note:
As you turn on the battery, the light is turned on automatically.
You can turn the light on and off manually by pushing and holding the
“up“ arrow button for more than 3 seconds.
4. Support mode
Shows the currently set support mode.
By using the arrow buttons you can choose between 4 support modes.
Please note:
support mode 0 = no electric engine support
>3 seconds pushing and holding - the light is
turned on / off.
Page 12
Rev. 2018 / www.svb.de / Copyright SVB-Spezialversand Bremen 11
5. Pushing aid state
Shows if pushing aid is active.
You can activate the pushing aid by pushing and holding the “down“
arrow button.
Please note:
The pushing aid accelerates the bicycle to approx. 6 km/h and thus enables
easy pushing, e.g. on hills.
Please note that this is a pushing aid, not a starting aid. Do not use the
pushing aid while riding the bike, as this can damage the motor.
6. Speed and trip display
By pushing the “Mode“ button, you can choose from the following
options.
Pushing and holding - pushing aid is activated
Letting go - pushing aid is deactivated (applying the
handbrake will also deactivate pushing
aid.)
Current speed
Ø Speed
Max. speed
Total ride distanceDay‘s ride distance
Current ride
duration
Page 13
12 Copyright SVB-Spezialversand Bremen / www.svb.de / Rev. 2018
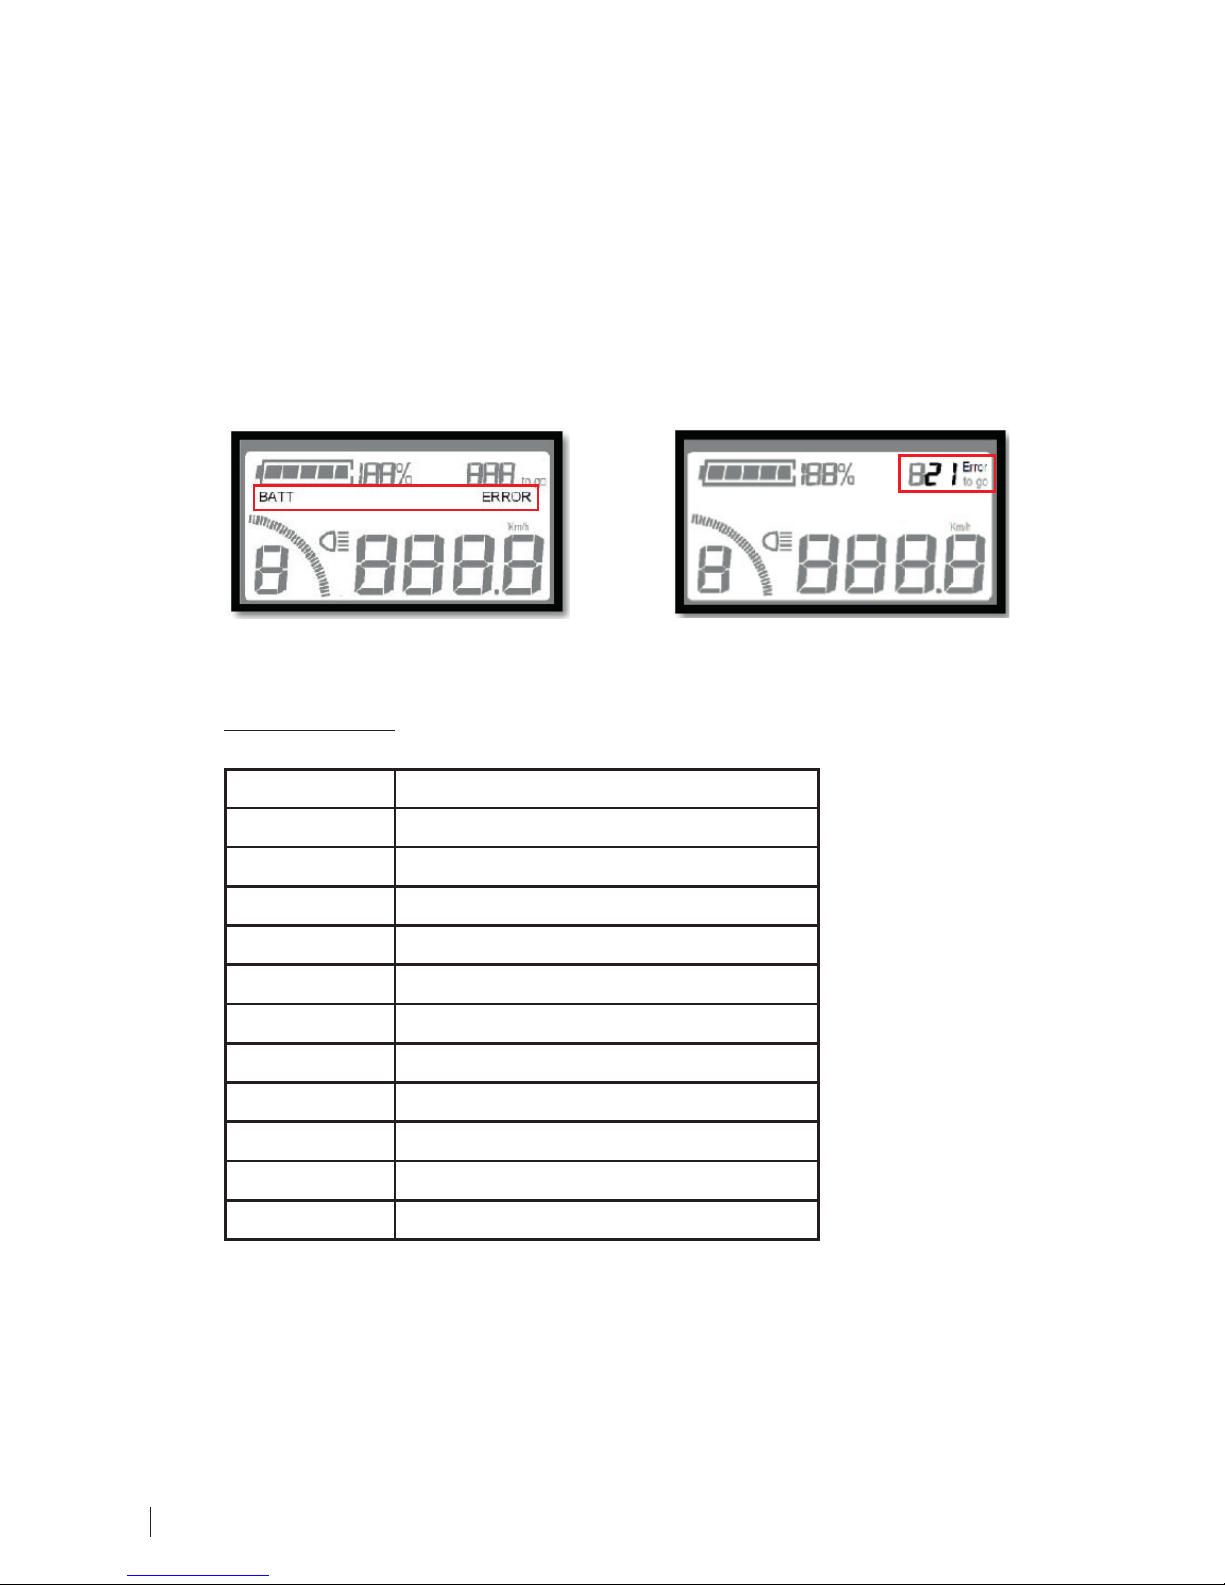
7. Error panel
Should there be a malfunction concerning the bike‘s electronics, an error
code representing the possible cause is displayed.
Should a malfunction occur, please examine the cause and contact your
trader if necessary.
The error code can be displayed numerically or alphanumerically.
Error code key:
Error Code Error Description
21 electricity/voltage supply
22 motor control
23 missing engine control voltage
24 motor Hall sensor
25 brake sensor
30 connection to the controller
BAT T battery
CONTROLLER controller
DISPLAY display
SENSOR sensor
MOTOR motor
numeric error code
alphanumeric error code
Page 14

Rev. 2018 / www.svb.de / Copyright SVB-Spezialversand Bremen 13
4. Folding mechanism
You receive your bike in a folded up state.
To unfold it, carry out the following steps.
To fold it up again after use, repeat the
steps in reverse order.
Fold out the handlebar and lock it using
the quick release fastener (ill. similar).
3.
4.
5. Fold out the pedals.
To fold them up again at a later time,
push them towards the bottom bracket.
Fold out the kickstand and unfold the
bike. Afterwards, lock the frame using the
quick release skewer and the locking lever,
which locks down automatically. Make
sure that there is a slight resistance when
locking the quick release skewer, if not,
you need to adjust it. Should the quick
release require a lot of strength to close or
should it not close at all, readjustment is
required.
Release the saddle tube‘s quick release
and adjust the seat‘s height. Afterwards,
fixate the quick release once more.
Keep in mind that the tube is made of
black anodised aluminium, and thus is
sensitive to scratches
*
.
2.
1.
*
Surface damages caused by use are not considered defects and are
excluded from warranty/guarantee.
1.
2.
3.
4.
5.
Page 15

14 Copyright SVB-Spezialversand Bremen / www.svb.de / Rev. 2018
5. Battery
You can see the battery‘s state of charge by looking either at the display on the
battery or that on the handlebar (see Chapter 2).
Make sure that no splash or rain water enters the switch, the charging socket or
the battery case over the battery holder. When the bike is placed in the rain, make
sure to place the bike so that water can only flow out of the battery holder and
not inside. Should this not be an option, remove the battery and keep it in a dry
environment.
5.1 Charging the battery
To charge the battery you may remove it from the bike.
1. Unlock the battery (see Chapter 1).
2. Remove the battery from the bracket.
3. Charge the battery.
4. After charging, place the battery back in the bracket and lock the battery
bracket.
Charge the battery after every use!
• Only use the provided charger when charging the battery.
• Ideally, charge the battery in room temparature, between 10°C and 45°C
in a dry and well ventilated surrounding. First, connect the charger to the
battery charging socket. Only after should you proceed to connect the
charger to the alternating mains voltage (230V AC). The state of charge
is displayed on the charger. When the battery is charged, separate the
connections in reverse order.
Trickle charging after a long time of non-usage, like it is commonly used
with lead acid batteries, should not be applied in this case (see also 5.2)
• Do not use the bike (for testing purposes) while the battery is
charging.
• Do not use the charger during thunderstorms.
battery‘s state of charge display
charging socket
Page 16

Rev. 2018 / www.svb.de / Copyright SVB-Spezialversand Bremen 15
5.2 Important information concerning the bike‘s
battery
As the owner of an Electric Bike you should know some things about the
properties of lithium batteries.
We have collected information and technical background knowledge for you.
Modern battery systems for electric bikes consist of lithium-ion round cells or
lithium-polymer flat cells.
To achieve the needed output voltage and capacity, the battery is equipped
with multiple cells that are arranged in parallel and series circuits. The lithium
batteries are equipped with control electronics which cause the cells‘ consistent
charging process.
Lithium batteries with small measurements and light weight have a very high
energy density. This causes the batteries to be sensitive. The construction of
the bicycle‘s batteries already follows important safety measures. Despite this,
you should handle the batteries with great care. Inappropriate use damages the
batteries and poses risks. We are not accountable for any damages caused by
wrong handling.
The battery‘s guarantee spans 6 months.
Note the following instructions. Disregard can lead to a shortened lifespan,
in an extreme case to uselessness after just a few uses and thus the loss of
entitlement to guarantee/warranty!
• Do not ride until the battery is completely empty but charge it every now
and then. Many small charging processes extend the lifespan. To see the
state of charge, check the display on the handlebar or on the battery.
• Avoid unnecessary strain on the battery. If you are using a bike without
electric drive, you will change to a low gear when starting, ascending
a slope or in strong headwind. If you choose a high gear, you will strain
yourself and have a hard time.
When starting, ascending or in strong headwind with electric drive,the
motor can do the required work even in higher gears, however, this strains
your battery.
Conclusion: use the gear change when starting, ascending and in strong
headwind.
Page 17

16 Copyright SVB-Spezialversand Bremen / www.svb.de / Rev. 2018
• The electric drive is most efficient at 50 to 60 pedal rotations per minute.
Only change to a higher gear when when you have exceeded this pedaling
frequency.
• Regularly examine the tyre pressure.
A somehwat “flat” tyre has a high rolling resistance and diminishes the
battery reach.
• The use within temparatures spanning between 0°C to approx. 40°C is
easiest on the battery.
• Charging is easy on the battery within temperatures of 20°C
(room temperature), never under 0°C.
• During longer breaks between uses (1 to 2 weeks) only stow the batteries
halfway charged and in approx. 20°C (+/-5°C) and at normal humidity.
After 2 months, it should be recharged for approx. 2-3 hours using the
corresponding charger.
Attention: just recharge, do not fully charge.
Maintenance, storage and transport
Storage:
Over extended periods of time, lithium batteries should be stored not fully
but halfway charged.
Procedure:
Charge the empty lithium battery approx. 2 - 3 hours using the
corresponding charger.
After charging, separate battery and charger from each other and store
them in a dry and well ventilated place.
Despite minor self-drain, this procedure should be repeated every 2 months.
Storage conditions for the lithium battery and charger:
Surrounding temperatures of - 5°C to 55°C and humidity from 5 % to 75%.
If the battery is out of use for more than a month (winter
break), the ideal storage temperature is approx. 20°C (+/-5°C).
If you want to store the battery in a garage or a basement, please
consider the humidity.
There should be no aggressive/corrosive liquids or objects within the
surroundings of the place of storage.
The place of storage needs to have sufficient distance from strong heat
sources or open fire.
Page 18

Rev. 2018 / www.svb.de / Copyright SVB-Spezialversand Bremen 17
Maintenance:
Clean the lithium battery with a damp cloth. Please regard the general safety
notes. Pay special attention to dusty/sticky stainings in the area of the electric
connectors. Here, current leaks can occur and lead to draining of the battery.
Make sure that no water can enter the switch and keep the battery chamber dry.
Transport:
Due to the low flashpoint* of the lithium part, lithium batteries are classified as
part of the category hazardous materials (flashpoint lithium = 170° C).
The transport of lithium batteries by land (car, bus, etc.) should be executed in a
stable container. The battery connectors are to be secured from possible short
circuits. During transport the container should protect the battery from vibrations,
heavy collisions or deformation. The container should be stored in a cool place in
the vehicle and be exposed to neither sun nore rain.
The transport of big lithium batteries* by air partly demands strict safety
precautions. You can get more information from your airline.
*
Batteries with more than 8 gramme of lithium count as “big“. Depending on
the battery‘s performance (watt-hours) it is possible to conclude the amount of
lithium. 100 Wh equate to approx. 8 gramme of lithium. You can calculate the
value of your lithium battery by multiplying the ampere-hour value with the
nominal voltage. (e.g. 8,7Ah x 36 V = 313 Wh; equates approx. 25 g lithium).
General safety notes
• Never short-circuit the PLUS and MINUS contacts on the charger or the
main contacts on the backside of the battery.
• Never discharge the battery over the charger‘s contacts.
• Do not charge the battery over the main contacts on the backside of the
battery.
• Keep sufficient distance from strong heat sources or open fire.
• Do not expose the batteries to strong vibrations, collisions or high pressure.
• Use the battery under mostly dry circumstances.
• Make sure that no rain or splash water can enter the switch or the
connector area.
• The main contacts on the backside of the battery should never be exposed
to rain or water of any kind.
• Intruding water, saltwater or similar liquids can lead to a wrong
charging current / a wrong charging voltage.
In the worst case the battery could overheat, catch fire or explode.
Page 19

18 Copyright SVB-Spezialversand Bremen / www.svb.de / Rev. 2018
• Use (drain) the battery in surrounding temperatures from - 20°C to 55°C and
humidity up to 75%.
• Always keep batteries and chargers out of the reach of children.
• During longer breaks from usage, remove the battery from the bike‘s
bracket and stow it separately as explained previously.
• Never open, deconstruct or modify the battery - there is a fire / explosion
risk.
• A defective fuse may only be replaced with one of the same value.
• Should outages occur continuously, please inform your specialized trader or
a qualified work shop.
• Do not use the battery if you notice corrosion, smells or excessive heat.
• Never use water or other liquids to cool an overly heated battery or to put it
out during a fire.
• Do not use damaged or deformed batteries (e.g. after an accident/fall).
An internal short-circuit may cause the battery to overheat after a few hours.
Remove the damaged battery from the bike and store it outside on fireproof
ground or in a fireproof container.
• Damaged / deformed batteries should not be used anymore but disposed of.
Please note that defective batteries do not count as domestic
waste and should instead be properly disposed of (redemption
by vendors, communal disposal of hazardous waste,etc.). Before
transport or dispoal, cover the battery connections with tape to
prevent accidental short-circuits.
Page 20

Rev. 2018 / www.svb.de / Copyright SVB-Spezialversand Bremen 19
6. Tyres
20“ x 2,125, tyre pressure: 2,8 - 4,6 bar
7. How to achieve the highest reach
•Fullychargethebatteryaftereverytrip.
•Avoidpermanentuseofhighsupportlevelswhenriding.
•Avoidstartingwhenthe3rdgearisengagedandahighsupportlevelis
selected.
The battery drain is highest that way.
•Usethegearchangeandadjustthesupportlevelaccordingtoyourneeds.
•Regularlycheckthetyrepressure.
•Oilthechainevery400km.
8. Care instructions
To guarantee a long lifespan for your electric bike, please keep some important
instructions in mind.
Make sure to dry your bike and wipe off dirt after use. If the bike has had contact
with salt water, immediately clean the electric bike with fresh water. Regularly
use proper care products to protect it from possible corrosion. If you plan on
stowing the bike in a valise, provide sufficient ventilation to prevent corrosion
damage.
Chain, motor and electric parts should be examined and maintained regularly.
For the protection of cables, electric plugs and electric contacts we recommend
„Wet.Protect“ Art. Nr. 68127.
For the mechanic parts „Marine-Spray“ Art. Nr. 16616. Douse the entire bike
without the spray trickling down. Be especially attentive when dousing the cracks
and joints. Prior to use, the bike should be cleaned once. Delicate parts like the
chain, the spokes‘ nuts and sire ropes can be protected with marine grease once.
The same preventive care is to be executed before the winter.
Stainless steel demands precautionary care as well. Without proper care, even
stainless steel can display flash rust or crevice corrosion within just a few weeks.
Insufficient care can lead to corrosion.
Complaints about corrosion are not acknowledged as a warranty case.
Reports on cycling accidents caused by material fatigue, etc. keep showing
up in the media. Regularly check the frame, handlebar and rims for possible
deformations or crackings.
Technical changes reserved.
Page 21

20 Copyright SVB-Spezialversand Bremen / www.svb.de / Rev. 2018
Notes
Page 22

Rev. 2018 / www.svb.de / Copyright SVB-Spezialversand Bremen 21
www.svb24.com
 Loading...