

Page 1
www.svat.com
now you can see
USER'S MANUAL
Manuel de l'utilisateur
VISS7500
Colour 5” TFT-LCD 2 Wire Video Intercom System
Page 2

www.svat.com
now you can see
IMPORTANT SAFETY PRECAUTIONS
PLEASE READ BEFORE INSTALLING
Congratulations on your purchase of the 5” Colour Video Monitoring System. Please read
these safety and operating instructions carefully before installing and using this system.
• Keep the camera, monitor and AC/DC adapter cords out of reach of children.
• Do not place the camera, monitor and AC/DC adapter cords in a crib or playpen.
• Do not use the camera near water or damp and wet environments, such as a bathtub,
laundry tub, kitchen sink, or wet basements.
• Locate the camera, monitor and AC/DC adapters where there is adequate ventilation.
Do not locate the camera in direct sunlight.
• Do not locate the camera, monitor and AC/DC adapters near heat sources such as heat
registers, radiators, ovens, furnaces or other appliances with high operating temperatures.
• Do not use with extension cords. Use only the AC/DC adapters provided with this system.
***Note: Use of other adapters may damage the units and void your warranty.
• Only plug components into standard household voltage outlets
(110VAC, or 60Hz).
• Do not place cords from the AC/DC adapters, camera or monitor where they can be
pinched or stepped on. Protect the cords by keeping them out of the way of children, pets
and routine household traffic. Do not place heavy objects on power cords or cover cords
with rugs or carpet.
• When cleaning, use a DRY, lint-free cloth. Unplug the camera, monitor and AC/DC
adapters before cleaning. NEVER immerse any components in water and do not spray
cleaners or solvents on the units. Doing so may damage the units or cause electrical shock.
• Unplug the AC/DC adapters from the wall outlet when the system is not in use.
• Mishandling, alterations or modifications not approved by the manufacturer will void
the warranty.
CAUTION!
• Connect this unit ONLY to other compatible units. Do not connect it to any other type of
alarm or auxiliary device. Connecting anything else to this unit may damage it or prevent it
from operating properly.
• Do not paint over the camera.
IMPORTANT!
ACCESSORIES- Do not place video monitor or equipment on an unstable cart, stand or table.
The video monitor or equipment may fall causing serious injury to a child or adult, and serious
damage to the equipment. Wall mounting should follow the manufacturer's instruction, and
should use a mounting kit approved by the manufacturer.
VENTILATION
Slots and openings in the monitor and the back or bottom are provided for ventilation and to
ensure reliable operation of the video monitor or equipment and to protect if from overheating. These openings must not be blocked or covered. The openings should never be blocked
by placing the video monitor on a bed, sofa, rug, or other similar surface. Video monitor
should never be placed near or over a radiator or heat register. Video monitor should not be
placed in a built-in installation such as a bookcase unless proper ventilation is provided.
Page 3
www.svat.com
now you can see
FEATURES:
• Sleek and ultra thin monitor design
• Two wire connection allows you to use the existing wire from
your door bell which makes installation easy
• Colour CMOS camera
• 5-inch TFT-LCD colour screen
• Two way communication
• 12-14V door strike capabilities (door strike not included)
• Warning alarm siren
• Monitor can be wall mounted or laid flat
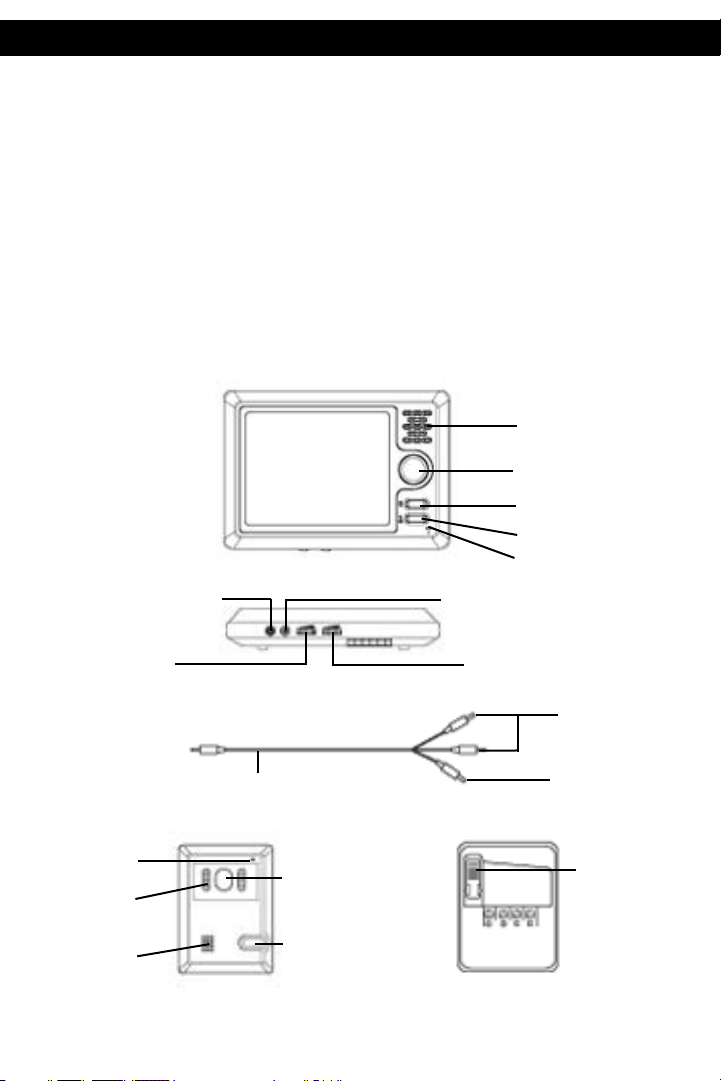
PARTS OF THE SYSTEM:
Loud Speaker
Talk/View Button
Warning Button
Microphone
Unlock Button
A/V Out
DC 16V
Volume
Contrast
Audio
(white and red)
Video
(yellow)
Audio/Video Wire
Microphone
IR LED’s
Loud Speaker
Camera Lens
Call Button
Vertical
Adjustment
for Camera
Angle
Page 4
www.svat.com
now you can see
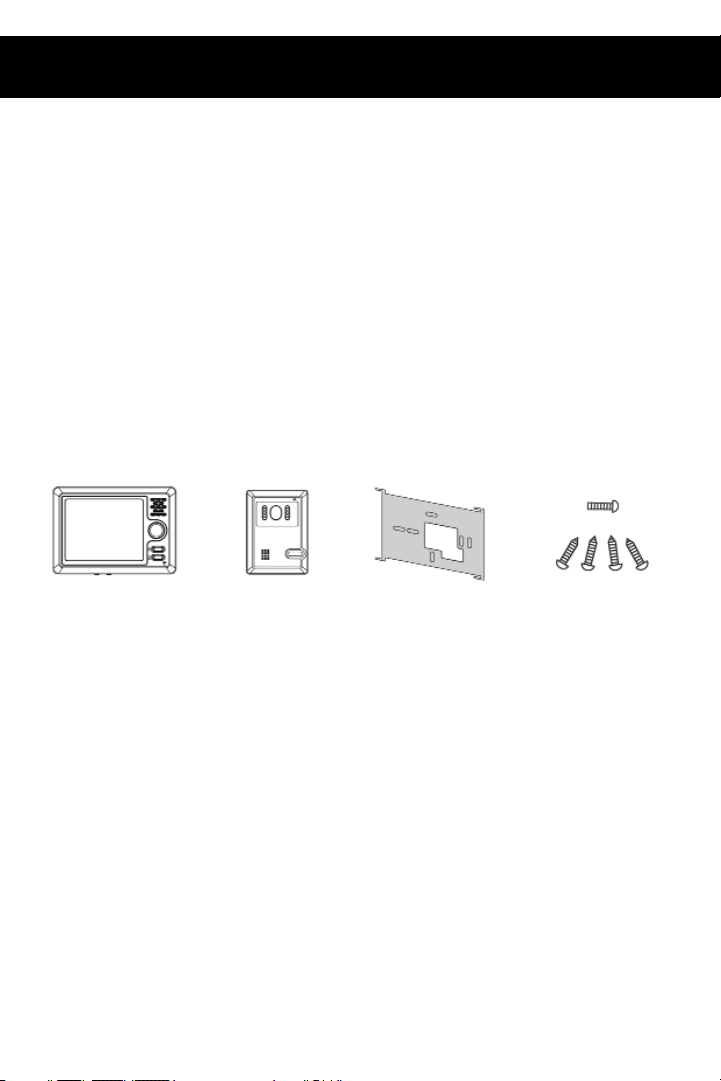
INCLUDED IN THIS SYSTEM:
• 1 Colour 5” TFT-LCD monitor
• 1 Colour outdoor camera
• 1 Wall mount bracket
• 1 A/V Output Cable
• 60’ Connection cable
• 1 AC/DC power adapter
• Mounting hardware
• Instruction Manual
• One year warranty
• Toll free tech support
• Window warning stickers
THINGS TO CONSIDER BEFORE INSTALLATION
• Do not place the intercom system near strong magnetic
fields, such as televisions and video recorders.
• Turn off the video intercom system power if not in use for long
periods of time.
• Do not spray water directly onto the video intercom system.
• Do not hammer or hit the video intercom system
• Do not place the video intercom system in direct sunlight.
• Do not disassemble this device freely, there are high voltage
flows inside the system that can cause bodily harm.
Monitor
Camera Wall Mount
Bracket
Mounting
hardware
Page 5

www.svat.com
now you can see
FUNCTIONS
VIDEO INTERCOM
• The device provides audio/video communication between the indoor
monitor and the outdoor camera. The picture of the visitor can be
seen clearly through the indoor monitor. It is artistically designed and
an ideal choice for a modern family.
HIGH
RESOLUTION PICTURE
•The high resolution camera and 5” TFT-LCD screen will provide clear
vivid images.
NIGHT
OPERATION
• The IR LEDs on the camera allows you to view your visitors at night in
near total darkness.
AUTOMATIC
IMAGE DISPLAY
• When the visitor presses the call button, the built-in bell in the monitor
will ring and the picture of the visitor will automatically display. To
engage in a conversation with the visitor simply press the Talk/View
button.
UNLOCK BUTTON
• With a simple press of a button you are able to open the door from the
monitor without going to the door directly. (Door strike not included)
SIMPLE
INSTALLATION
• The connection between the camera and the monitor is a simple 2
wire connection without polarity (wires can be reversed)
WIRING DIAGRAM:
Monitor
Camera
Lock
*Be sure to disconnect the power before connecting the wires*
Page 6
www.svat.com
now you can see
MONITOR INSTALLATION & OPERATION
USING THE MONITOR:
• When the monitor is in the OFF mode, pressing the Talk/View button
turns the monitor and outside camera ON. Monitor and camera will
automatically turn off after 1 minute.
*NOTE* The cameras CALL button must be pressed first by the visitor,
followed by the Talk/View button in order to speak with your visitor.
DETERRING UNWANTED VISITORS
• If you discover unwanted visitors, pressing the WARNING button on the
monitor will engage a loud siren in the outside camera in
order to deter the visitor.
ADJUSTING PICTURE/VOLUME
• Volume and Brightness control knobs are located at the bottom of
the monitor for fine tuning.
DOOR UNLOCK
• This system supports any door strike rated between 12-14V DC. The
door will remain unlocked for 10 seconds. Please refer to the wiring
diagram for installation instructions.
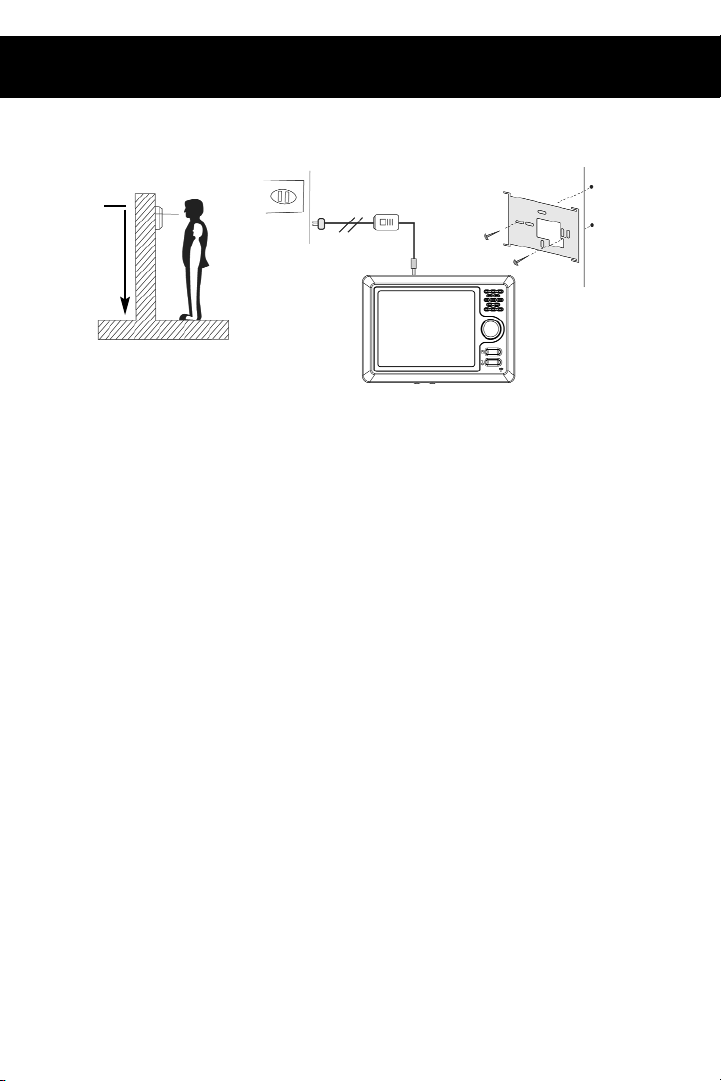
145cm ~ 160cm
AC: 110 ~ 240V
The optimum height of the
monitor for installation is
145cm ~160cm from the
center of the pick-up tube of
the monitor to the ground.
Take two screws and fix the support of the
wall-mount on the wall and then install the
monitor.
Page 7

CAMERA INSTALLATION & OPERATION
USING THE CAMERA:
• Press the CALL button on the camera
• Picture of the visitor is displayed on the indoor monitor
• In order to communicate with the visitor press the TALK/VIEW button
• By pressing the UNLOCK button, you can also open the doors for your
visitor without getting up. (this feature requires an installed door strike,
not included)
*NOTE* The cameras CALL button must be pressed first by the visitor,
followed by the Talk/View button in order to speak with your visitor.
Standard Height
of Camera
Move it up
Move it down
Horizontal angle
of the camera
LOCATION:
Keep the camera away from direct
sunlight or any other bright light sources.
POSITIONING
Page 8

www.svat.com
now you can see
INDOOR MONITOR
Power Supply. . . . . . . . . . . DC16V
Power Consumption. . . . . 10W in operation, 0.5W standby
Operation Temperature. . -15 C~+50 C
Conversation System. . . . . Bi-directional through receiver
Calling Tone. . . . . . . . . . . . "Ding Dong" chime
Conversation Time. . . . . . . Automatic cut off after 1 minute
Scanning Frequency. . . . . Horizontal: 15.625KHz Vertical: 50Hz
External dimension. . . . . . . 7.2(L)x5.1(w)x1(H)inch
Max Wiring Distance. . . . . 300ft (Monitor to the Camera)
Resolution. . . . . . . . . . . . . . 480 x 234 dpi
Door Strike Voltage. . . . . . 12 Volts for 5 seconds
CAMERA
Power Supply. . . . . . . . . . . DC12V, 0.25A (supplied by monitor)
Power Consumption. . . . . 2W in operation
Operation Temperature. . -15 C~+50 C
Picture Sensor. . . . . . . . . . .1/4" lens
Imagery Angle. . . . . . . . . . Diagonal: 53
Min. Lighting. . . . . . . . . . . . 0.1 lux at 30cm
Infrared LED’s. . . . . . . . . . . 6
External Dimension. . . . . . .4.7(L)x3.4(W)x1.3(H)inches
Max Wiring Distance. . . . . 300ft (Camera to the Monitor)
Camera Sensor. . . . . . . . . 1/4” CMOS Lens
Resolution. . . . . . . . . . . . . .380 TV Lines
SPECIFICATION & NOTES
NOTES
_________________________________________________________________________________________
_________________________________________________________________________________________
_________________________________________________________________________________________
_________________________________________________________________________________________
_________________________________________________________________________________________
_________________________________________________________________________________________
_________________________________________________________________________________________
_________________________________________________________________________________________
_________________________________________________________________________________________
_________________________________________________________________________________________
_________________________________________________________________________________________
_________________________________________________________________________________________
Page 9

www.svat.com
PRODUCT WARRANTY
We take quality very seriously. This is why all of our products come with a one year warranty from
the original purchase date against defects in workmanship and materials.
If you have warranty or support issues please contact us using any of the following methods:
SVAT Electronics USA SVAT Electronics Canada Phone: 866.946.7828
2315 Whirlpool St., Unit 333 4080 Montrose Road Fax: 888.771.1701
NIagara Falls, New York Niagara Falls, ON Email:
support@svat.com
USA 14305 Canada L2H 1J9 Website: www.svat.com
Warranty Terms
1. SVAT products are guaranteed for a period of one year from the date of purchase against defects in
workmanship and materials. This warranty is limited to the repair, replacement or refund of the pur
chase price at SVAT's option.
2. When service is required, the warranty is validated by the submission of a fully completed warranty
card.
3. This warranty becomes void if the product shows evidence of having been misused, mishandled or
tampered with contrary to the applicable instruction manual.
4. Routine cleaning, normal cosmetic and mechanical wear and tear are not covered under the terms of
this warranty.
5. The warranty expressly provided for herein is the sole warranty provided in connection with the prod
uct itself and no other warranty, expressed or implied is provided. SVAT assumes no responsibilities
for any other claims not specifically mentioned in this warranty.
6. This warranty does not cover the shipping cost, insurance or any other incidental charges.
7. You MUST call SVAT before sending any product back for repair. You will be given a Return Authorization number.
When returning the product for warranty service, please pack it carefully in the original box with all supplied access
sories, and enclose your original receipt or copy, and a brief explanation of the problem (include RA #).
8. This warranty is valid only in Canada and the U.S.A.
9. This warranty card cannot be re-issued.
10. Any product that is defective will be repaired or replaced with an equivalent or better component or a credit will be
issued at our option.
11. In the event of a dispute, the venue for litigation will be in St. Catharines, Ontario, Canada. In the event of
default, the prevailing party in the legal action is entitled to recover attorney fees and court costs incurred in
litigation of this matter.
CAUTION
RISK OF ELECTRIC SHOCK, DO NOT OPEN
Graphic Symbol Explanation:
The lightning flash with arrowhead symbol, within an equilateral triangle, is intended to alert the user to
the presence of uninsulated “dangerous voltage” within the product’s enclosure that may be of
sufficient magnitude to constitute a risk of electric shock to persons.
The exclamation point within an equilateral triangle is intended to alert the user to the presence of
important operating maintenance (servicing) instructions in the literature accompanying the appliance.
WARNING: TO PREVENT FIRE OR SHOCK HAZARDS, DO NOT EXPOSE THIS UNIT TO RAIN OR
MOISTURE
TO REDUCE THE RISK OF ELECTRIC SHOCK, DO NOT REMOVE THE COVER (BACK).
NO USER SERVICEABLE PARTS INSIDE. REFER SERVICING TO
QUALIFIED SERVICE PERSONNEL.
Disclaimer: SVAT does not endorse of any of SVAT products for any illegal activities.
SVAT is not responsible or liable in any way shape or form for any damage, vandalism,
theft or any other action that may occur while a SVAT product is in use by the purchaser.
Page 10

www.svat.com
now you can see
LES PRÉCAUTIONS IMPORTANTES DE SÛRETÉS'IL VOUS PLAÎT LIRE AVANT D'INSTALLER
Les félicitations sur votre achat du 5" Couleur TFT-LCD Vidéo Intercom Systèmel. S'il vous plaît lire ces instructions de sûreté et opération soigneusement avant d'installer et utilisation de ce système.
• Garder camera, le moniteur et les cordes d'adaptateur de CA/CC hors de portée d'enfants.
• Ne placer pas camera, le moniteur et les cordes d'adaptateur de CA/CC dans un berceau ou
un parc.
• N'utiliser pas camera près de l'eau ou étouffer et mouille des environnements, tels qu'une baig
noire, un baquet de lessive, l'évier de cuisine, ou mouiller des sous-sols.
• Localiser camera, les adaptateurs de moniteur et CA/CC où il y a la ventilation suffisante. Ne pas
localiser camera dans la lumière du soleil directe.
• Ne localiser pas camera, les adaptateurs de moniteur et CA/CC près des sources de chaleur
registres telles que de chaleur, les radiateurs, les fours, les fournaises ou les autres appareils avec les
hautes températures d'opération.
• N'utiliser pas avec les rallonges. Utiliser seulement les adaptateurs de CA/CC fournis avec ce
système.
***Note : l'Usage d'autres adaptateurs peut endommager les unités et annule votre garantie.
• Seulement boucher des composants dans les sorties de tension de ménage standard
(110V - 240V courant alternatif, 50Hz ou 60Hz).
• Pas les cordes d'endroit des adaptateurs de CA/CC, camera ou le moniteur où ils peuvent être
pincés ou peuvent être marché sur. Protéger les cordes en gardant les à l'écart d'enfants, les
animaux favoris et la circulation de ménage de routine. Ne pas placer d'objets lourds sur les
cordons d'alimentation ou couvrir des cordes avec les tapis ou la moquette.
• En nettoyant, utiliser un SEC, le tissu de bourre-libère. Débrancher camera, les adap tateurs de
moniteur et CA/CC avant de nettoyer. Ne JAMAIS immerger n'importe quels com posants dans
l'eau et pas les nettoyeurs de pulvérisation ou les dissolvants sur les unités. Pour ainsi faire peut
endommager les unités ou cause le choc électrique.
• Débrancher les adaptateurs de CA/CC de la prise murale quand le système n'est pas dans l'usage.
• Malmenant, les changements ou les modifications pas approuvé par le fabricant annuleront la
garantie.
PRUDENCE !
• Connecter cette unité SEULEMENT aux autres unités compatibles. Ne pas le connecter aucun autre
type d'alarme ou d'appareil auxiliaire. Connecter n'importe quoi d'autre à cette unité peut l'endom
mager ou l'empêche de l'opération convenablement.
• Ne peindre pas par-dessus camera.
• Ce système utilise des ondes hertziennes publiques pour l'opération sans fil. Le son et le vidéo
peuvent être diffusés à et a pris par autre 2,4 appareils de réception de GHz. Les conversa tions et
les images des autres pièces approchent de camera peut être diffusé et a pris. Pour protéger votre
intimité, toujours éteint camera quand pas dans l'usage.
IMPORTANT!
LES ACCESSOIRES- ne place pas le moniteur ou l'équipement sur une charrette instable, une position ou une
table. Le moniteur ou l'équipement peut tomber causant la blessure sérieuse à un enfant ou un adulte, et un
dommages sérieux à l'équipement. Monter de mur ou étagère doit suivre l'instruction du fabricant, et doit
utiliser une trousse montant approuvée par le fabricant.
• L'équipement de moniteur et les combinaisons de charrette devraient être déplacés avec soin.
• Les arrêts Rapides, force excessive, et les surfaces inégales peut causer la combinaison d'équipement et
charrette pour renverser.
VENTILATION
Les entailles et les ouvertures dans le cabinet et le dos ou le fond sont pourvu à la ventilation et assurer
l'opération fiable du moniteur ou l'équipement et protéger si de la surchauffe. Ces ouvertures ne doivent pas
être bloquées ou doivent être couvertes. Les ouvertures ne devraient jamais être bloquées en plaçant le
moniteur sur un lit, un divan, un tapis, ou une autre surface similaire. Le récepteur de moniteur ou équipement
ne devrait jamais être placé près de ou par-dessus un registre de radiateur ou chaleur. Le récepteur de moniteur ou équipement ne devrait pas être placé dans une installation incorporée telle qu'une bibliothèque à
moins que la ventilation correcte est fournie.
Page 11

DISPOSITIFS:
• Conception lisse et ultra mince de moniteur
• Le raccordement de deux fils peut employer le fil existant de
votre cloche de porte qui rend l'installation facile
• Camera de la couleur CMOS
• 5-inch TFT-LCD écran de couleur
• Appuyez sur le bouton d'"entretien" pour la communication
de manière de l'instant deux
• Possibilités de grève de porte (grève de porte non incluse)
• Fonction d'avertissement d'alarme
• Le moniteur peut être position montée et libre de mur ou s'est é
tendu à plat
PARTIES DU SYSTÈME:
Haut-parleur Fort
Bouton De Talk/View
Bouton D'avertissement
Microphone
Ouvrez Le Bouton
A/V Hors de
DC 16V
Volume
Contraste
Blanc et rouge
audio
Jaune de vidéo
Fil visuel audio
Microphone
IR LED
Haut-parleur Fort
Objectif Camera
Bouton D'Appel
Ajustement
vertical pour
l'angle Camera
Page 12

www.svat.com
INCLUS DANS CE SYSTÈME:
• 1 moniteur de la couleur 5"
• 1 camera extérieur de couleur
• 1 soutien de mur-montent
• 60’ Câble de raccordement
• AC/DC adapteur de puissance
• Matériel de support
• Manuel D'Insturction
• Une garantie d'an
• Appui de technologie libre de péage
• Autocollants d'avertissement de fenêtre
CHOSES À CONSIDÉRER AVANT INSTALLATION
• Ne placez pas le système d'intercome près des champs
magnétiques forts, tels que les magnétoscopes de télévision.
• Coupez le courant visuel d'interphone si pas en service
pendant de longues périodes.
• Ne pulvérisez pas l'eau directement sur l'interphone visuel.
• Ne martelez pas ou ne frappez pas l'interphone visuel
• Ne placez pas l'interphone visuel dans la lumière du soleil
directe.
• Ne démontez pas ce dispositif librement, là sont à haute ten
sion coule à l'intérieur du système qui peut causer le mal
corporel.
Moniteur
Camera Le soutien de
mur-montent
Page 13

FONCTIONS
INTERCOM VISUEL
• Le dispositif fournit la communication d'audio/video entre le moniteur
d'intérieur et l'appareil-photo extérieur. L'image du visiteur peut être
vue clairement par le moniteur d'intérieur. Elle est artistically conçue et
un choix idéal pour une famille moderne.
IMAGE DE HAUTE RÉSOLUTION
• Camera et l'écran de haute résolution de 5"TFT-LCD fourniront des
images vives claires.
OPÉRATION DE NUIT
• Les LED IRES sur l'appareil-photo vous permet de regarder vos visiteurs
la nuit dans l'obscurité totale proche.
AFFICHAGE AUTOMATIQUE D'IMAGE
• Quand le visiteur appuie sur le bouton d'appel, la cloche intégrée
dans le moniteur sonnera et l'image du visiteur montrera automatique
ment. Pour s'engager dans une conversation avec le visiteur appuyez
sur simplement le bouton de Talk/View.
OUVREZ LE BOUTON
• Avec une pression simple d'un bouton vous pouvez ouvrir la porte du
moniteur sans aller à la porte directement. (grève de porte non
incluse)
INSTALLATION SIMPLE
• Le raccordement entre l'appareil-photo et le moniteur est un rac-
cordement simple de 2 fils sans polarité (des fils peuvent être renversés)
DIAGRAMME DE CÂBLAGE:
Moniteur
Camera
Serrure
* Soyez sûr de débrancher la puissance en câblant *
www.svat.com
now you can see
Page 14

SURVEILLEZ L'INSTALLATION ET L'OPÉRATION
EMPLOYER LE MONITEUR :
• Quand le moniteur est éteint en mode, appuyer sur le bouton de
Talk/View allume l'appareil-photo de moniteur et d'extérieur. Le
moniteur et l'appareil-photo s'éteindront automatiquement après 1
minute.*NOTE * le bouton d'APPEL camera doit être appuyé
sur d'abord par le visiteur, suivi du bouton de Talk/View afin de parler
avec votre visiteur.
DÉCOURAGEMENT DES VISITEURS NON DÉSIRÉS
• Si vous découvrez les visiteurs non désirés, appuyer sur le bouton
D'AVERTISSEMENT sur le moniteur retentira et une sirène forte par
camera extérieur afin de décourager le visiteur.
AJUSTEMENT DE PICTURE/VOLUME
• Des boutons de contrôle de volume et de luminosité sont situés au
fond du moniteur pour l'accord fin.
LA PORTE OUVRENT
• Ce système soutient n'importe quelle grève de porte évaluée entre
C.C 12-14V. La porte restera débloquée pendant 10 secondes.
Veuillez se référer au diagramme de câblage pour des instructions
d'installation.
145cm ~ 160cm
AC: 110 ~ 240V
La taille optima du moniteur
pour l'installation est 145cm
~160cm du centre du tube
de ramassage du moniteur à
la terre
Prenez deux vis et fixez l'appui du murmontent sur le mur et puis installent le
moniteur.
now you can see
www.svat.com
Page 15

www.svat.com
now you can see
INSTALLATION ET OPÉRATION DE CAMERA
EMPLOYER CAMERA :
• Appuyez sur le bouton d'APPEL camera
• L'image du visiteur est montrée sur le moniteur d'intérieur
• Afin de communiquer avec le visiteur appuyez sur le bouton de
TALK/VIEW
• En appuyant sur le bouton d'OUVRIR, vous pouvez également ouvrir
les portes pour votre visiteur sans obtenir vers le haut (ce dispositif
exige une grève installée de porte, pas included)*NOTE * le bouton
d'APPEL d'appareils-photo doit être appuyé sur d'abord par le visiteur,
suivi du bouton de Talk/View afin de parler avec votre visiteur.
Standard Height
of Camera
Move it up
Move it down
Horizontal angle
of the camera
ENDROIT :
Maintenez l'appareil-photo parti de la
lumière du soleil directe ou de toutes les
autres sources lumineuses lumineuses.
POSITIONNEMENT
Page 16

www.svat.com
now you can see
MONITEUR D'INTÉRIEUR
Alimentation D'Énergie . . . . . .DC16V
Puissance D'Énergie . . . . . . . . .10W in operation, 0.5W standby
La Température D'Opération .-15 C~+50 C
Système De Conversation . . . .Bi-directional through receiver
Tonalité Appelante . . . . . . . . ."Ding Dong" chime
Temps De Conversation . . . . . .Automatic cut off after 1 minute
Fréquence De Balayage . . . . . . . . .Horizontal: 15.625KHz Vertical: 50Hz
Dimension externe . . . . . . . . .7.2(L)x5.1(w)x1(H)inch
CAMERA
Alimentation D'Énergie . . . . . . . . . . .DC12V, 0.25A (supplie de moniteur)
Puissance D'Énergie . . . . . . . . .2W de operation
La Température D'Opération . -15 C~+50 C
Minute. Éclairage . . . . . . . . .0.1 lux at 30cm
Sonde D'Image . . . . . . . . .1/4" lens
Angle de langage figuré. . . . . Diagonal: 53
Éclairage. . . . . . . . . . . . . . . . . . Infrared Illuminator
Dimension externe. . . . . . . . . . 4.7(L)x3.4(W)x1.3(H)inches
SPÉCIFICATIONS ET NOTES
NOTES
_________________________________________________________________________________________
_________________________________________________________________________________________
_________________________________________________________________________________________
_________________________________________________________________________________________
_________________________________________________________________________________________
_________________________________________________________________________________________
_________________________________________________________________________________________
_________________________________________________________________________________________
_________________________________________________________________________________________
_________________________________________________________________________________________
_________________________________________________________________________________________
_________________________________________________________________________________________
Page 17

Déni : SVAT n'approuve d'aucun de produits de SVAT pour aucun activities illégal. SVAT n'est pas
responsable ou responsable de quelque façon forme ou forme d'aucun dommage, de
vandalisme, de vol ou d'aucune autre action qui peuvent se produire tandis qu'un produit
de SVAT est en service par l'acheteur.
GARANTIE DE PRODUIT
Nous prenons la qualité très sérieusement. C'est pourquoi tous nos produits viennent avec une
garantie d'un an de la date originale d'achat contre des défauts en exécution et matériaux.
Si vous avez les issues de garantie ou de soutien satisfont nous contactent employant n'importe
laquelle des méthodes suivantes :
SVAT Electronics USA SVAT Electronics Canada Phone: 866.946.7828
2315 Whirlpool St., Unit 333 4080 Montrose Road Fax: 888.771.1701
NIagara Falls, New York Niagara Falls, ON Email:
support@svat.com
USA 14305 Canada L2H 1J9 Website: www.svat.com
Limites De Garantie
1. Les produits de SVAT sont garantis pour une période d'une année de la date d'achat contre défectu
osités l'exécution et défectuosité des matériels. Cette garantie est limitée à la réparation, le remplace
ment ou le remboursement du prix d'achat à l'option de SVAT.
2. Quand le service est exigé, la garantie est validée par la soumission d'une carte de garantie entière
ment complétée.
3. Cette garantie devient vide si le produit montre l'évidence d'ayant été employé improprement, mal
mené ou a altéré contraire au manuel d'instruction applicable.
4. Le nettoyage de routine, l'usure normale normal, cosmétique et mécanique n'est pas couverte sous les
termes de cette garantie.
5. La garantie a pourvu expressément à en ceci est la garantie seule fournie à propos du produit luimême e aucune autre garantie, exprimée ou suggérée est fournie. SVAT ne suppose pas de respons
abilités pour les autres réclamations pas en particulier mention né dans cette garantie.
6. Cette garantie ne couvre pas le coût expédiant, l'assurance ou les autres charges accessoires.
7. En retournant le produit pour le service de garantie, s'il vous plaît l'emballer soigneusement dans la
boîte originale avec tous accessoires fournis, et enclore votre carte de garantie, le reçu original ou la
copie, et une explication brève du problème.
8. Cette garantie est valide seulement dans le Canada et les ETATS-UNIS.
9. Cette carte de garantie ne peut pas être la réédition.
ATTENTION
LE RISQUE DE DÉCHARGE ÉLECTRIQUE, NE S'OUVRENT PAS
Explication Graphique De Symbole :
Le flash de foudre avec le symbole de pointe de flèche, dans une triangle equilateral, est prévu pour alerter l'utilisateur à la présence "de la tension dangereuse" non isolée dans la clôture du produit qui peut être de la
grandeur suffisante pour constituer un risque de décharge électrique aux personnes.
Le point d'exclamation dans une triangle equilateral est prévu pour alerter l'utilisateur à la présence des instructions de fonctionnement importantes d'entretien (entretien) dans la littérature accompagnant l'appareil.
AVERTISSEMENT : POUR EMPÊCHER DES RISQUES DU FEU OU DE CHOC, N'EXPOSEZ PAS CETTE
UNITÉ À LA PLUIE OU À L'HUMIDITÉ
POUR RÉDUIRE LE RISQUE DE DÉCHARGE ÉLECTRIQUE, N'ENLEVEZ PAS LA COUVER-
TURE (ARRIÈRE). AUCUNES PIÈCES DE L'UTILISATEUR SERVICEABLE À L'INTÉRIEUR.
RÉFÉREZ-VOUS L'ENTRETIEN AU PERSONNEL DE SERVICE QUALIFIÉ.
www.svat.com
Page 18

If you require more information on this product
or other SVAT products visit
Si vous exigez plus d'information sur ce produit ou ces
autres produits de SVAT visite
www.svat.com
 Loading...