

Page 1

User Manual
Model #: CVDVR200
www.svat.com
now you can see
Page 2

INTRODUCTION
Thank you for purchasing the SVAT DVR200 DVR system. To ensure that you are
getting the most out of this system please read this entire manual before you
install the system. Also, be sure to keep this manual for future reference in case
any problems or questions should arise. Enjoy your DVR200!
IMPORTANT SAFETY INFORMATION
When using your DVR equipment, basic safety precautions should always be followed to reduce the risk of fire, electric shock and personal injury. Please read
the followings before using your equipment:
1. Read and follow all instructions carefully.
2. Follow all warnings and instructions on the product.
3. Unplug the product from the power outlet before cleaning. Do not use liquid
cleaners or aerosol cleaners. Use a damp cloth for cleaning.
4. Do not use this product near water.
5. Do not place this product on an unstable cart, stand or table.
6. Do not allow anything to rest on the power cords. Do not place this product in
a location where the cords can be stepped on or where someone can trip over
them.
7. Do not use this product near an area where there is a potential of gas leaks or
near any explosive fumes.
8. Do not place this product near or over a radiator or any other heat source.
9. Use ONLY the power cord supplied with the system.
10. Do not overload the wall outlet or power cord where the power cord is
installed. This can result in fire or electric shock.
11. This equipment is to be opened by ONLY a qualified serviceperson. There are
no user serviceable parts inside. Opening this equipment may expose you to
dangerous voltage and other risks. Incorrect re-assembly of this equipment may
result in electric shock.
12. Avoid spilling liquid on this equipment and do not insert any objects through
the ventilation slots.
Page 3
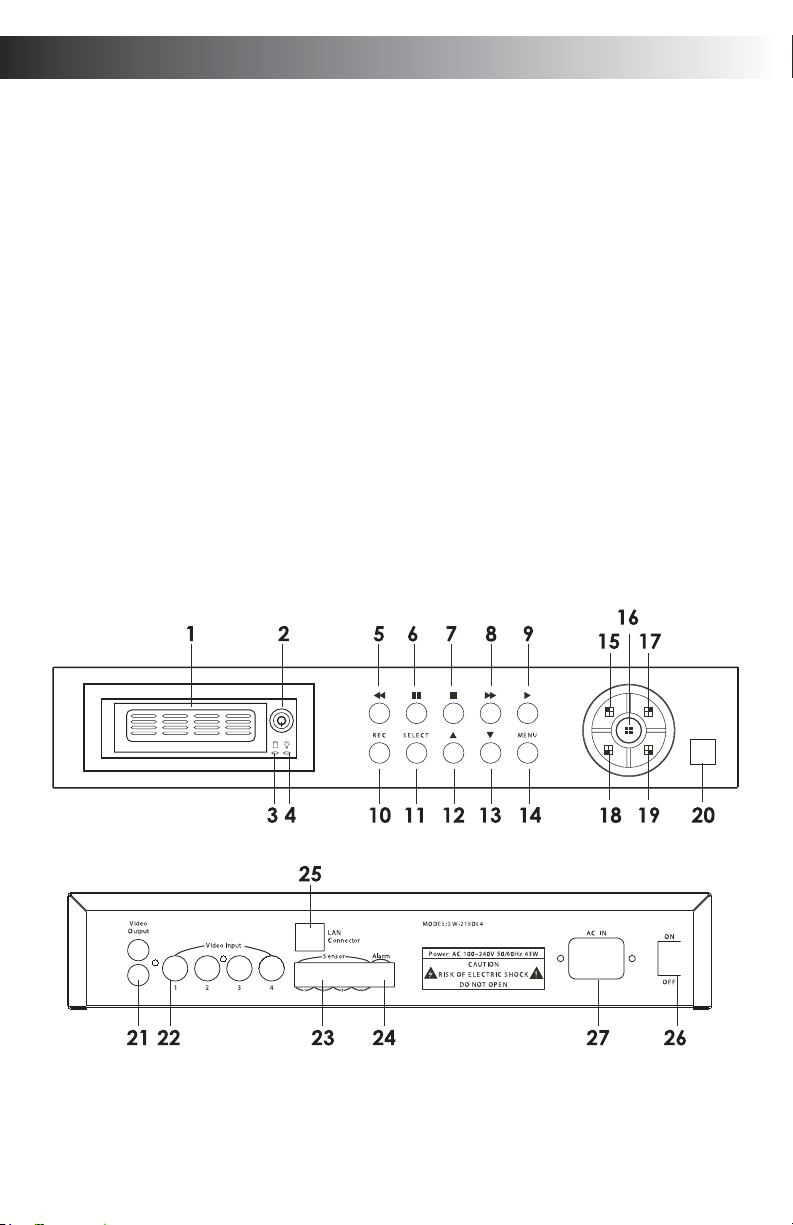
CONTROL PANEL AND FUNCTION
FRONT PANEL
1. Mobile Rack
2. Key Socket
3. Hard Disk in-use Indicator
4. Power Indicator
Playback Control Buttons
5. Rewind Playback button
6. Stop Button
7.
||Pause Button
8. Fast Forward and Skip Button
9. Play Button
Function Control Buttons
10. REC: Record Button
11. SELECT: Select Button
12 Move Up Button
13: Move Down Button
14. MENU: OSD Menu Button
View Control Buttons
15. View Full Screen from Camera 1
16. View Quad Screen and display
all cameras
17. View Full Screen from Camera 2
18. View Full Screen from Camera 3
19. View Full Screen from Camera 4
20. Remote Control Socket
REAR PANEL
21. Video Output Terminal
22. Video Input Terminal
23. Sensor Connecting Terminal
24. Alarm Connecting Terminal
25. LAN Connector Socket
26. Power ON/OFF Switch
27. AC Power Cord
Page 4
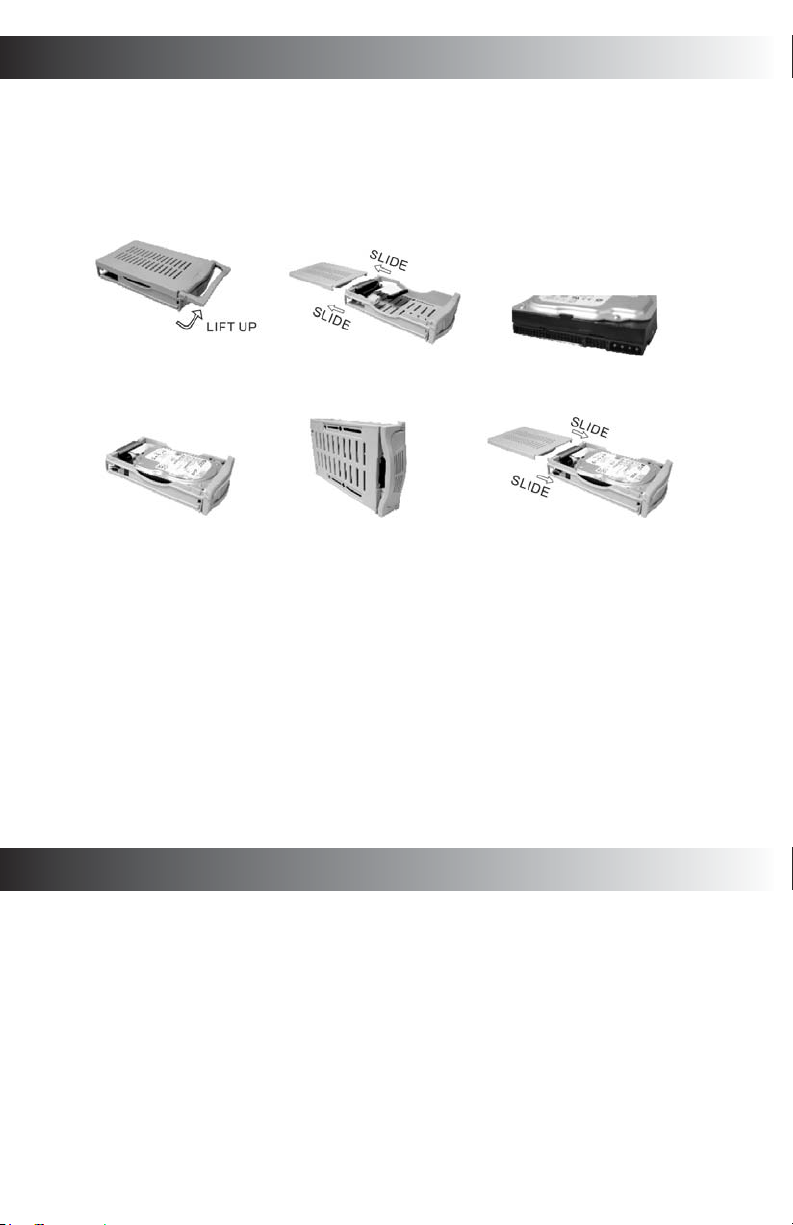
INSTALLATION
1. Hard Disk installation
The system supports Dual Hard Disk recording feature. Please carefully follow the
steps as below to install Hard Disk Driver. Install the Hard Disk into mobile rack
When the Hard Disk is installed, you have to lock the mobile rack so that the
DVR system can work.
Replace the Hard Disk from DVR
1. Press STOP button to stop recording.
2. Turn off the power of DVR.
3. Take out the Hard Disk from mobile rack and/or fixed hard disk rack.
4. Insert the new Hard Disk.
5. Lock the mobile rack again.
6. Turn on the power of mobile rack.
7. Press REC button for recording.
SENSOR & ALARM INSTALLATION
When you want to install the sensor and/or alarm to the DVR, please refer to the
following picture for installation.
1. Sensor
Connect the wire one end to sensor and the other end to the sensor terminal.
The adapter has to be inserted to the sensor when the wire is connected. If you
don t know positive or negative while installing sensor output wire, the cross test
can be done and see if it can work normally.
1. Take out the
mobile rack.
2. Take off the
top cover
3. If you decide to use two
Hard Disks in the colour
mintor with the DVR system.
you have to designate one
as a master and the other
as a slave.
4. Connect the cable
and power cord.
5. Screw the hard
disk on.
6. Close the top cover and
insert the mobile rack to
colour monitor with DVR.
Page 5

SENSOR & ALARM INSTALLATION
2. Alarm
Connect the wire of alarm one pin to alarm terminal, the other pin of the wire
connect to the DC power wire pin as the following picture showed. The other pin
of adapter (power) wire connect to the alarm terminal.
* If the sensor or alarm you purchased is different from above instruction, please
refer to the manual with the sensor/alarm.
OPERATION
The Factory has preset various functions as following list. If it can meet your usage
requirement, please just follow our instructions to use the unit. If you want to
change any pre-set function, please follow our instructions on next paragraph to
change the setting to meet your particular requirement.
The default setting on MAIN MENU
Main Menu
> CAMERA SELECT 1234
RECORD SELECT 1234
RECORD MODE EACH
RECORD FRAMERATE 30
VIDEO QUALITY NORMAL
RECORD SCHEDULE Default setting 0~24 record.
SUB MENU
HARD DRIVE SETUP
SENSOR SETUP
NETWORK SETUP
PRESS (< , >) THEN (SELECT)
PRESS (MENU) TO EXIT
VIDEO INPUT
Page 6

OPERATION
CONTINUED
The default setting on the SUB-MENU
The default setting on the HARD DRIVE SETUP
The default setting on the SENSOR SETUP
The default setting on the NETWORK SETUP
SUB MENU
> PASSWORD CHANGE (Default setting 111111)
TIME SET 2003/01/01 01:01:00
FULL SCREEN BY SENSOR OFF
SEQUENT VIEW TIME OFF
PRESS (< , >) THEN (SELECT)
PRESS (MENU) TO EXIT
HARD DRIVE SET UP
> OVERWRITE ENABLED YES
MASTER HDD SIZE (Depends on HDD you choose)
MASTER HDD USED MB %
MASTER HDD FORMAT (for format master HDD)
SLAVE HDD SIZE (Depends on HDD you choose)
SLAVE HDD USED MB %
SLAVE HDD FORMAT (for format master HDD)
PRESS (< , >) THEN (SELECT)
PRESS (MENU) TO EXIT
SENSOR SETUP
> SENSOR RECORD TIME 30
ALARM OUT TIME 00 (OFF)
CHANNEL - 1 Normal Open
CHANNEL - 2 Normal Open
CHANNEL - 3 Normal Open
CHANNEL - 4 Normal Open
PRESS (< , >) THEN (SELECT)
PRESS (MENU) TO EXIT
NETWORK SETUP
> ACCEPT CLIENT [YES]
MAC ADDRESS 30.22.24.23.25.26
IP ADDRESS 192.168.001.090
SUBNET MASK 255.255.255.000
GATEWAY 192.168.991.245
PRESS (< , >) THEN (SELECT)
PRESS (MENU) TO EXIT
Page 7

OPERATION
CONTINUED
Watch & View Control
1. This View button controls FULL SCREEN display from camera 1.
2. This View button controls FULL SCREEN display from camera 2.
3. This View button controls FULL SCREEN display from camera 3.
4. This View button controls FULL SCREEN display from camera 4.
5. This View button controls QUAD SCREEN, displays all cameras.
In the HARD DRIVE SETUP menu, the system will display the hard disk usage.
Record Control
1. When the red [RECORD] button is pressed, the recording process starts
immediately. The recording channel indicator next to CH1, CH2, CH3, CH4
will appear in the center of the screen to notify the user which camera is
running during the period of recording.
2. While the system is in recording mode, it will display the current writing hard
driver ID on the bottom line, [M] or [S] ([M] = MASTER, [S] = SLAVE), and will
show the percentage of hard disk recording capacity.
3. If the system has detected hard disk is going to end and the user presses
record button, the display will show warning message. During recording, if
the system has detected hard disk recording capacity is going to end, it will
notify the hard disk full warning by displaying the current hard disk ID in
blinking.
* Please make sure the Time is correct before recording. If no, please refer to
Time Set section to change the time.
Keylock Control
Press the red [RECORD] button and hold it for 2 seconds or longer, the recording
process starts immediately. But, the button has been locked. To stop the recording function, the user will be requested to key in the password.
Playback Control
The system allows the user select hard disk ID (Master or Slave), Event and
Start time to play contents in SEARCH TIME menu.
When the [] play button is pressed, the screen will display Hard driver ID
(Master or Slave) and all events recorded in this hard drive (Max. 95 events
will be recorded at each hard driver).
To select hard drive for playback
If you want to select hard drive other than shown on display for playback,
press [] button then the [>] select mark will skip to hard drive select section,
then press [SELECT] button to change hard drive ID, the screen will show
other driver ID and event list.
To playback the latest event
Press the [] play button again the screen will show last recorded event.
To select event for playback
Press [] key or [] key to select the event, then press the [ ] play button,
the screen will start to play the selected event till last event.
Page 8

OPERATION
CONTINUED
REMARK
The event logging maximum can record 95 events for each hard disk, but the
screen can only show 7 events. If the events are more than 7 and the select
mark stays on the 7th event, press [] key once will roll up the next event till the
last event is shown. If the events are more than 95, the old recorded information
will be stored in HDD too. The user can playback it by button in search time.
To select playback by SEARCH TIME
1. Press button to skip the select mark [>] to select hard driver section, then
press the and button to move the ? cursor below the number back
and forth. Then, use the SELECT button to change the numeric values of
date & time.
2. Press the [] play button the system will play the recorded video from the
selected start time.
3. You may use the View button (during playback) to select which camera you
want to be displayed on the monitor. Full screen playback is available only
when the camera record selection is in Each mode.
4. To pause playback, press the
|| key.
5. During playback, if the user presses button, the system will skip 1200KB
video data and decode one frame; the system repeats the skipping and
decoding one frame till it meets the end of event recorded.
6. Fast forward function will work in FFx2, FFx4, FFx8 cycle. During playback, if
the user presses button, the playback mode will be played at FFx2
(2 times speed) and if the user presses one more time, the playback mode
will be played at FFx4 (4 times speed). If pressing one more time, the mode
will be played at FFx8 (8 times speed). Press the play button will return to
normal speed.
7. After playback operation, press key for other function operation.
CAUTION:
A jumper setting on the main board may be used to convert the operation format to PAL or NTSC to match the system of the display. The factory will preset as
the importer s request. However, if you find that your color TV screen can t show
color video, please check whether the jumper setting is matchable with the system of your monitor or not.
MENU SETTING
MAIN MENU SETTING
Setting Operation Process
1. Press key to stop all functions in operation.
2. Press MENU key, the screen will display this menu.
3. In the main menu, the > indicator will be shown on the screen right next to
one of the ten different menu selections.
4. Press key or key to choose the function to be changed on the menu.
5. Press SELECT key to make changes in the selected option.
6. Press MENU key to exit menu setting.
Page 9

MENU SETTINGS
Main Menu Setting
Camera Select
1. When CAMERA SELECT option is selected, 4 different images from all
cameras are initially displayed. (The default setting is 1234 all cameras on.)
2. Use the view button on the front panel to select the camera for real-time
viewing on the TV screen. CH 1 (Camera 1), CH 2 (Camera 2),
CH 3 (Camera 3), CH 4 (Camera 4).
3. You can also use the SELECT button for different combinations of camera
viewing. For example,
a). When you choose [----], all cameras will be disabled.
b). When you choose [1234], all cameras will be activated.
c). When choose [---4], only camera 4 will be activated.
d). When you choose [12-4], camera 1,2 and 4 will be activated.
* There are 16 different combinations of camera view for your choice.
Record Select
1. When you select RECORD SELECT , you may turn on or turn off the recording
function of different channels (The default setting is 1234 all cameras on.).
2. The selected camera channel on RECORD SELECT menu is same as CAMERA
SELECT options.
3. Please be reminded that only selected camera will record real-time events
during the recording period.
Record Mode
1. There are two different record mode - EACH and QUAD to be selected.
2. When you set EACH mode, you can view each image display in a single full
screen by using the button on front panel of the DVR.
3. When you set QUAD mode, you can see the images from the cameras in
the quad screen which shows four sections on the single TV screen.
Main Menu
> CAMERA SELECT 1234
RECORD SELECT 1234
RECORD MODE EACH
RECORD FRAMERATE 30
VIDEO QUALITY NORMAL
RECORD SCHEDULE Default setting 0~24 record.
SUB MENU
HARD DRIVE SETUP
SENSOR SETUP
NETWORK SETUP
PRESS (< , >) THEN (SELECT)
PRESS (MENU) TO EXIT
Page 10

MENU SETTINGS
Record Frame Rate
1. When RECORD FRAME RATE is selected, you may choose the following
recording frame rate - 30, 15, 10, 7, 5, 4, 3, 2 or 1 fps for recording.
2. The higher the record frame rate is, the more natural the look will be
displayed on the screen when you playback. The lower the record frame
rate is, the more the capacity you can save on the hard disk driver.
Video Quality
When VIDEO QUALITY is selected, there are three different video quality
LOW, NORMAL or HIGH resolution for your setting.
The higher the video quality is, the more clear the image is when you
playback. The lower the video quality is, the more the capacity you can
save on the hard disk driver.
Record Schedule
You can change recording schedule during a day (24 hours period) by using this
option. If the sensor device is attached to the DVR, it will add additional function
to your recording.
1. Use SELECT button to change the record mode.
2. You may choose T for non-stop automatic recording.
3. The selection, S is for sensor recording. It means that DVR starts recording
only when sensor device is attached to the DVR and receive motion signal.
4. The selection, - , means nothing will be recorded during this period.
5. Press MENU button to return to the full Menu page.
Sub Menu Setting:
(When you select SUB MENU , the screen will display SUB MENU page.)
Password Change
1. When you select PASSWORD CHANGE , a password input menu will replace
the Sub Menu . (Initial Password: 111111)
2. You will, then, be asked to input the following information:
CURRENT PASSWORD: -----NEW PASSWORD: -----PASSWORD CONFIRM: ------
3. You can use the view control button on the front panel to input the number:
is 1, is 2, is 3, is 4, is 5.
SUB MENU
> PASSWORD CHANGE (Default setting 111111)
TIME SET 2003/01/01 01:01:00
FULL SCREEN BY SENSOR OFF
SEQUENT VIEW TIME OFF
PRESS (< , >) THEN (SELECT)
PRESS (MENU) TO EXIT
Page 11

MENU SETTINGS
4. When the new password is accepted, the system will flash the following
screen message: Password Change !!!
5. The message will flash 5 times.
6. Then, it will be back to the SUB MENU
If the password is not accepted, you will receive a message to inform you:
Password Incorrect , then return to the SUB MENU . You may try again by
repeating the same steps.
Time Set
1. Below is a screen shot of the Time Menu screen, you can change
time/date/hour/year by using TIME SET menu.
(This represents year/month/day and hour/minute/second)
2. Use the and button on the front panel to move the ? cursor below the
number back and forth. Then, use the SELECT button to change the numeric
values of date & time.
3. When you press the MENU button, your setting is memorized by the system.
Full Screen by Sensor
When FULL SCREEN BY SENSOR is selected, you can choose [ON] or OFF] this
function. If you choose [ON], when sensor device is attached to the DVR
and receive motion signal, the screen will display a single full screen of this
area.
Sequent View Time
When SEQUENT VIEW TIME is selected, you can select sequent view time by
02, 03, 04, 05, 06, 07, 08, 09, 10 seconds or [OFF] (= turn off the function).
Hard Drive Setup
(When you select HARD DRIVE SETUP , the screen will display HARD DRIVE
SETUP page.)
TIME
2005/01/01 01:01:00
PRESS (< , >) THEN (SELECT)
PRESS (MENU) TO EXIT
HARD DRIVE SET UP
> OVERWRITE ENABLED YES
MASTER HDD SIZE (Depends on HDD you choose)
MASTER HDD USED MB %
MASTER HDD FORMAT (for format master HDD)
SLAVE HDD SIZE (Depends on HDD you choose)
SLAVE HDD USED MB %
SLAVE HDD FORMAT (for format master HDD)
PRESS (< , >) THEN (SELECT)
PRESS (MENU) TO EXIT
Page 12

MENU SETTINGS
1. Overwrite Enabled
If you choose [YES], the recording will continue and overwrite previous
recording when all hard disk driver capacity is full.
If you choose [NO], the recording session stops when all hard disk driver
capacity is full.
2. Master HDD Size
It shows the size of the Master hard disk driver installed in the DVR.
3. Master HDD Used
It shows the capacity used on the Master hard disk driver for recording.
4. Master HDD Format
If you format the hard disk driver, it will crease all the data recorded on the
Master hard disk driver.
5. Slave HDD Size
It shows the size of the Slave hard disk driver installed in the DVR.
6. Slave HDD Used
It shows the capacity used on the Slave hard disk driver for recording.
7. Slave HDD Format
If you format the hard disk driver, it will crease all the data recorded on the
Slave hard disk drive r.
HDD Format
1. When you select HDD FORMAT ,a password input will be requested on the
screen: PASSWORD INPUT (6): - - - - - -
2. Then, you will be prompted to input a password.
3. When you key in the correct password, the message Password Correct will
flash 3 times. Otherwise, the error message Password Incorrect will be
displayed on the screen.
Sensor Setup
When you select Sensor Setup , the screen will display SENSOR SETUP page.)
Sensor Record Time
When you select SENSOR RECORD TIME , the number indicates how long the
recording lasts after the sensor detected the last motion in front of the
sensor.
SENSOR SETUP
> SENSOR RECORD TIME 30
ALARM OUT TIME 00 (OFF)
CHANNEL - 1 Normal Open
CHANNEL - 2 Normal Open
CHANNEL - 3 Normal Open
CHANNEL - 4 Normal Open
PRESS (< , >) THEN (SELECT)
PRESS (MENU) TO EXIT
Page 13

MENU SETTINGS
Alarm Out Time
When you select ALARM OUT TIME , the number indicates how long
(in seconds) the alarm lasts after the sensor detected the motion signal.
If you set CONT, the alarm will keep continuous when sensor detected the
motion signal.
If you set OFF , the alarm will not function when sensor detected the motion
signal.
Sensor Type Setup
When you select SENSOR TYPE SETUP, you can select NOT INSTALLED,
NORMAL OPEN type or NORMAL - CLOSE type sensor to make setting for
each channel.
In NORMAL-OPEN mode, if the connecting cable from sensor to DVR is cut
off by an intruder, the sensor recording will stop.
In NORMAL-CLOSE mode, if the cable connected to the sensor through DVR
is cut off by an intruder, the sensor recording will start.
NETWORK SETUP
(NOTE: THE NETWORK SETUP MENU IS USED ONLY FOR THE SYSTEM WITH OPTIONAL
LAN INTERFACE. IF YOUR SYSTEM WITH BUILT-IN LAN INTERFACE, PLEASE REFER TO
NETWORK MENU.)
CAUTION:
RESET (Initialization): To make the system reset, press ";" button 5 times in the normal view mode. Be aware that all the information (Including password) will be
lost. After resetting, the password will be set as the default value (111111).
*After above setting process, press [MENU] button to go back to [MAIN MENU],
then you can select other item for setting or press [MENU] button again to go
back to View screen for recording function or operate the other function.
NETWORK SETUP
> ACCEPT CLIENT [YES]
MAC ADDRESS 30.22.24.23.25.26
IP ADDRESS 192.168.001.090
SUBNET MASK 255.255.255.000
GATEWAY 192.168.991.245
PRESS (< , >) THEN (SELECT)
PRESS (MENU) TO EXIT
Page 14

TROUBLE SHOOTING
The power indicator is OFF on the DVR.
1. Check and see if the AC power cord is connected properly.
2. Check and see if the power outlet on the wall is working.
3. Is the power outlet on the wall controlled by a wall switch? If it is, make
sure the switch is on.
The DVR can not be turned on.
1. Check and see if the hard disk is correctly installed and properly locked.
2. Please note the power cannot be entered if the key socket is not locked.
Can not play the DVR
1. Check the Hard disk and see if it is not locked or damaged.
2. If the Hard Disk might be damaged, you can turn off the power of DVR and
turn on the power again, the DVR will check the Hard Disk automatically.
No Screen when TV or monitor is connected.
1. Check and see if the Video output cord is connected to the screen properly.
2. Check and see if two Hard Disks (HDD) setting (at the back of HDD) is
correct. Please note that one should be set to Master position and the other
one to Slave position.
3. Please use 40G~120G byte Hard Disk (HDD) for the DVR so that the DVR
can work properly.
No color display on screen (Only black and white)
1. Check whether the Camera and Display are working with color function.
2. Check whether the Camera and Display are using same specification
PAL or NTSC.
3. A jumper setting on the main board may be used to convert the operation
format to PAL or NTSC. Check whether the setting is matching the system of
your monitor.
The screen is unstable (jumping).
1. Check and see if the video input cord is normal or not. If the cord is
damaged or not connected properly, the screen will be unstable (jumping).
2. Check the DVR setting, TV(Monitor) and Camera and see if they are the
same type in PAL or NTSC. They must be same so that the DVR can
work stably.
Press [ MENU] button, but the MAIN MENU does not appear.
Check the system and see whether it is in Record or View operation, press button
to stop Record or View operation. Then, you can enter the MENU function.
The Screen can display, but there is no video output from camera.
1. Check and see if the camera wire is well connected, camera power is turn
on and the camera can work normally.
2. Check the MENU Setting list and see if the view camera is selected or not.
3. Check View control Button and see if one of the cameras is selected to
display full screen.
Page 15

TROUBLE SHOOTING
When Record does not work.
Check the system and see whether it is in Play Mode, press button to stop
Play Mode. Then, you can enter the RECORD function.
When you forgot the password
Please contact your distributor or engineer to solve this problem.
To avoid this, have your password stored in a secure place away from
the unit.
Can’t stop Record function.
The system is working with key lock function. If the system setting is with key
lock while recording, you are requested to key in password to release key
lock function. Then, it can stop recording.
SPECIFICATIONS
• Four channel video composite input (BNC conncoter) • Alarm output one channel
• Two channel video composite output RCA port • LAN connection interface (select)
• Wire remote control • Security: password protecion
• Data and time: real time clock (rtc) • Image compression and storage
• Recording mode : continue(t) sensor(s) not record(-) • Operating mode: quad/each
Page 16

For Further Assistance call:
1.866.946.7828
www.svat.com
now you can see
 Loading...