

Page 1
SVAT ELECTRONICS
now you can see
Web Ready 16 Channel H.264 DVR Security System
w/ iPhone & BlackBerry Access and 8 Hi-Res Indoor/Outdoor Night Vision Surveillance Cameras
COMPLETE SYSTEM
INSTRUCTION MANUAL
www.svat.com
V1.1
CV501 - 16CH
Page 2

NEED
HELP?
PLEASE DO NOT RETURN THIS PRODUCT TO THE STORE
Please contact a SVAT customer support representative rst regarding any additional information
on product features, specications or assistance with set-up. You can contact us via one of the
methods below:
Email:
support@svat.com
Online live web chat:
www.svat.com/support
Toll free fax:
1.888.771.1701
Note: This is manual version 1.1 for this product. You may nd updated versions by visiting our website at
www.svat.com
Toll free telephone:
1.866.946.7828
2CV501 - 16CH
Page 3

PRODUCT WARRANTY INFORMATION
Please visit our website at www.svat.com
for information about your product’s warranty.
We take quality very seriously. This is why all of our products come with a one year warranty from the original purchase date
against defects in workmanship and materials. If you have warranty or support issues please contact us using any of the
following methods:
Phone: 1.866.946.7828 SVAT CANADA SVAT USA
Fax: 1.888.771.1701 4080 Montrose Road 60 Industrial Parkway
Website: www.svat.com Niagara Falls, ON Cheektowaga NY 14227 St., Unit 333
Email: support@svat.com Canada L2H 1J9 USA 14305
Warranty Terms
1. SVAT products are guaranteed for a period of one year from the date of purchase against defects in workmanship and
materials. This warranty includes but is not limited to the repair, replacement or refund of the purchase price at
SVAT’s option.
2. This warranty becomes void if the product shows evidence of having been misused, mishandled or tampered with
contrary to the applicable instruction manual.
3. Routine cleaning, normal cosmetic and mechanical wear and tear are not covered under the terms of this warranty.
4. The warranty expressly provided for herein is the sole warranty provided in connection with the product itself and
no other warranty, expressed or implied is provided. SVAT assumes no responsibilities for any other claims not
specically mentioned in this warranty.
5. This warranty does not cover the shipping cost, insurance or any other incidental charges.
6. You MUST call SVAT before sending any product back for repair. You will be sent a Return Authorization form with complete
return instructions. When returning the product for warranty service, please pack it carefully in the original box with all
supplied accessories, and enclose a copy of your original receipt, the completed RA form, and a brief explanation of the
problem (include RA #).
7. This warranty is valid only in Canada and the continental U.S.
8. This warranty cannot be re-issued.
9. Tearing the tamper-proof sticker on the DVR case will void the product warranty.
3CV501 - 16CH
Page 4

TABLE OF CONTENTS
INTRODUCTION ..................................................................................... 7
WHAT IS INCLUDED ...............................................................................8
FEATURES .............................................................................................8
ADDITIONAL ACCESSORIES .................................................................... 10
BUTTONS & CONNECTIONS ................................................................... 10
Front Panel ..................................................................................................... 10
Back Panel ...................................................................................................... 11
Remote Control ............................................................................................... 11
PTZ Connection ................................................................................................ 12
Alarm Connection ............................................................................................ 12
THINGS TO CONSIDER BEFORE INSTALLATION .......................................... 13
CAMERA INSTALLATION ....................................................................... 13
Mounting ........................................................................................................ 13
Wiring ............................................................................................................. 13
CONNECTING ADDITIONAL DEVICES TO THE DVR ...................................... 14
USB Mouse ...................................................................................................... 14
RCA Monitor ................................................................................................... 15
VGA Monitor ................................................................................................... 15
Router ............................................................................................................ 16
CONNECTING AND POWERING ON ..........................................................16
GETTING STARTED ................................................................................ 17
Using the Mouse .............................................................................................. 17
Screen Viewing ................................................................................................ 17
Pop up Menu Bar ............................................................................................. 17
Pop up Menu Icons ........................................................................................... 17
MAIN MENU ........................................................................................ 18
CAMERA SETUP .........................................................................................19
Camera .................................................................................................................... 19
Video Adjust ............................................................................................................. 19
Camera Title ............................................................................................................. 19
Display..................................................................................................................... 20
Dwell Time ............................................................................................................... 20
4CV501 - 16CH
Page 5

TABLE OF CONTENTS...continued
PTZ SETUP ................................................................................................20
PTZ controls ............................................................................................................. 21
MOTION DETECTION ...................................................................................21
Setting Motion ......................................................................................................... 22
Motion Detect .......................................................................................................... 22
Buzzer ..................................................................................................................... 22
Sensitivity .............................................................................................................. 22
Motion Area ............................................................................................................ 22
RECORDING SETUP.....................................................................................23
Resolution ............................................................................................................... 23
PPS ......................................................................................................................... 23
Alarm Record ........................................................................................................... 24
Alarm Record Duration ............................................................................................. 24
Record Quality ......................................................................................................... 25
Alarm Record Quality ................................................................................................ 25
Record Mode ............................................................................................................ 25
Audio Record ........................................................................................................... 26
Schedule Setup ........................................................................................................ 26
ALARM SETUP ...........................................................................................27
External Alarm Mode ................................................................................................ 28
Alarm Display ........................................................................................................... 28
Video Loss Detect ..................................................................................................... 28
Event Log Setup ....................................................................................................... 28
Buzzer Time Setup ................................................................................................... 29
Relay Time Setup ..................................................................................................... 29
HARD DISK MANAGEMENT .........................................................................30
Overwrite Mode ....................................................................................................... 30
HDD Information ...................................................................................................... 31
HDD Format ............................................................................................................. 31
NETWORK SETUP ................................................................................. 32
Terms ..................................................................................................................... 32
PPPoE ...................................................................................................................... 33
DDNS Setup ............................................................................................................. 34
RTSP ........................................................................................................................ 34
Mail Function ........................................................................................................... 34
FTP .......................................................................................................................... 36
BACKUP SETUP ................................................................................... .37
USB Backup ............................................................................................................. 37
DVD/CD Backup ........................................................................................................ 38
SYSTEM SETUP .........................................................................................39
Date/Time ............................................................................................................... 39
System Type ............................................................................................................. 40
5CV501 - 16CH
Page 6

TABLE OF CONTENTS...continued
Key Board Lock ......................................................................................................... 40
ID Number ...............................................................................................................40
Display Setup ........................................................................................................... 40
Language ................................................................................................................ 41
Password ................................................................................................................. 41
Firmware Upgrade ................................................................................................... 41
Load Default ........................................................................................................... 41
Load Backup USB ...................................................................................................... 42
Daylight Savings Time .............................................................................................. 42
LIVE VIEWING...................................................................................... 43
HDD and USB Information ......................................................................................... 43
Call Up USB Information ........................................................................................... 43
Digital Zoom ............................................................................................................ 43
Audio ...................................................................................................................... 43
PLAYBACK ...........................................................................................44
CONTROLS ................................................................................................44
Time Search ............................................................................................................. 45
Event List Search ...................................................................................................... 45
BACKUP VIDEO PLAYBACK ..........................................................................46
Software ................................................................................................................. 46
Buttons and Connections .......................................................................................... 47
NETWORK GUIDE ................................................................................ 48
Requirements ......................................................................................................... 48
Finding IP Address ................................................................................................... 48
PREPARING YOUR COMPUTER TO VIEW YOUR DVR .........................................48
Method 1 ................................................................................................................. 49
Method 2 ................................................................................................................. 50
VIEWING YOUR DVR ON YOUR COMPUTER .....................................................50
Login ....................................................................................................................... 51
ActiveX Installation .................................................................................................. 51
VIEWING YOUR DVR OUTSIDE OF YOUR NETWORK ..........................................52
Port Forwarding ....................................................................................................... 52
Finding External IP Address ...................................................................................... 52
Testing .................................................................................................................... 53
Troubleshooting ...................................................................................................... 53
DDNS CONFIGURATION ...............................................................................54
DDNS.org ................................................................................................................. 54
DDNS Account Setup ................................................................................................. 55
6CV501 - 16CH
Page 7

TABLE OF CONTENTS...continued
NETWORK VIEWING AND PLAYBACK ....................................................... 56
SOFTWARE ...............................................................................................56
Online Software Icons ............................................................................................... 56
Time Point Backup ................................................................................................... 58
Record ..................................................................................................................... 58
Screen Information .................................................................................................. 58
DVR CONFIGURATION OPTIONS ...................................................................59
System Options ........................................................................................................ 59
Network Options ..................................................................................................... 60
Other Options .......................................................................................................... 62
3G MOBILE DEVICE PORT FORWARDING .................................................. 62
SETTING UP PORT FORWARDING ...........................................................................62
Troubleshooting .................................................................................... 63
MOBILE VIEWING INSTALLATION GUIDE .................................................. 64
Mobile Viewer Application ..................................................................... 64
SONY ERICSON K608i VIEWING .............................................................................65
iPHONE AND iTOUCH VIEWING ..............................................................................67
BLACKBERRY (BOLD) VIEWING ..............................................................................67
TROUBLESHOOTING GUIDE ................................................................... 70
SPECIFICATIONS .................................................................................. 72
CAMERA MANUAL ................................................................................ 75
INTRODUCTION
Congratulations on your purchase of the CV501 - 16CH! Using the most advanced video compression, H.264, your home or business will benet
from around the clock surveillance adding extra security to your valuables. H.264 compression allows you to record and store more footage using
less space, so you will never miss an important event. This manual was written to ensure that you get the most out of your CV501 - 16CH DVR.
7CV501 - 16CH
Page 8

WHAT IS INCLUDED
16CH DVR with
500 GB HDD
10 RCA to BNC
Connectors
• 10 ft Power Adapter for DVR
• 4 Window Warning Stickers
• 1 CR2025 Battery for Remote (installed)
• 4 x 60 ft. Camera Extension Cables
• 1 x 25 pin D-SUB adapter for Alarm Input
and Relay
FEATURES
8 Indoor/Outdoor Night
Vision CCD Cameras
Software CD 10ft RJ45
2 x Four to One Power
Supply for Cameras
Ethernet Cable
• 1 Power Adapter for DVR
• 24/7 Lifetime Live Customer Support
• Instruction Manual
• Quick Start Guide
• 1 Year Warranty
• 1 x 9 Pin D-SUB adapter for PTZ cameras
USB Mouse IR Remote Control
8 x 60ft 4 PIN DIN to RCA
(male)Video/Power Wires
iPhone & BlackBerry Compatible
Access live video footage directly from your iPhone or BlackBerry. This DVR uses 3G technology, which is specically designed to transmit high
quality video and audio on your smart phone. Your DVR can also be set up to email your hand-held whenever specic activity occurs, such as motion
detection.
View Video Online with No Service Fees2 (Supports DDNS)
Regardless of where you are in the world, you can view your DVR’s live or recorded video footage on any Internet accessible computer
Explorer. See what is happening on your property and check in on your employees or family members.
Record Over 2 Years of Video Footage
The 500GB hard drive can hold over 2 years of continuous video
designed for high capacity writing, which ensures long product life and accurate video data storage. Your DVR will alert you when your memory
space is full so that you can overwrite your old video, stop the unit from recording, or backup and transfer your video footage.
Cutting Edge H.264 Compression
The CV501-16CH-007 utilizes H.264 compression—the latest and most advanced compression level available for a DVR system. You will see an
amazing picture but save almost 50% on storage space versus DVRs with MPEG-4 compression! H.264 maximizes your hard drive space.
24/7 Lifetime Live Customer Support
Assistance is available whenever you need it. Simply visit www.defender-usa.com for video networking guides, simple tips on how to protect your
property, and instructional videos on topics such as camera placement. Our customer support team can be reached by phone 24/7, or by email and
live web chat services so that you will always have access to an expert.
1
3
with Internet
4
and is optimized for 24/7 surveillance. We only use hard drives that are specically
8CV501 - 16CH
Page 9

FEATURES..Continued
Stay Notied with Email Alerts
This system keeps you notied of events occurring in your monitoring location. You can set the unit to automatically send alerts to your email inbox
whenever motion is detected or when cameras lose power. Up to seven dierent email addresses can receive these alerts.
8 Professional Grade Weatherproof Cameras
Eight high resolution color cameras provide you with a clear and consistent picture at 420 TV lines of resolution. They allow you to better distinguish
facial features, which can help in the positive identication of individuals. The cameras can be used indoors and outdoors. Each one is built with
professional grade aluminum housing and a sunshade to help prevent glare, deterioration and rusting.
5
View in the Dark with Automatic Night Vision
6
The cameras come equipped with night vision, allowing you to see any monitored area (up to 15ft away!
) in total darkness. Each camera has 12
infrared LEDs that activate automatically when it becomes dark and deactivate during the day to save energy. You will always be able to see what is
happening in your yard or at your business after-hours.
Advanced Motion Activated Recording
You have the option to record video only when motion is detected. Finding important video footage using the playback feature is easy, and will also
save you time and conserve hard drive space. You can even set individual cameras to detect motion while the others continuously record. Advanced
motion detection settings ensure that false alarms are not triggered—the easy motion detection “mask” allows you to block out areas with constant movement, such as roads or blowing trees so that only suspicious activity is recorded.
Connect Easily to Your Computer Monitor
This DVR includes a VGA output which allows you to connect to a computer monitor for viewing purposes. This gives you another option when
viewing the activity captured by your cameras.
Multiple Easy Backup Options
You have several ways to backup your important video footage. A built-in USB port gives you the option of backing up and transferring your video
7
footage with a USB ash drive or external USB hard drive.
You can connect an external CD/DVD writer and burn your footage to disk. Another great
option is the ability to send your video footage to an FTP site. Your video footage then becomes portable for easy viewing and archiving on any PC.
Expandable System up to 16 Cameras
As your business grows, so can your security system. If you are looking to boost your security and monitor more areas, you can add up to eight
additional cameras for more robust monitoring. Any camera with a power supply and a RCA or BNC connection is compatible. Cameras in this
system have the model number VU301-C.
Included Mouse and Remote
Navigate the onscreen menu with ease using the USB mouse and IR remote control.
Password Protection
Ensure that only authorized users can change DVR settings or halt recording.
24/7 Scheduled Recording
You can fully customize a weekly recording schedule. You can choose which days of the week and hours of the day you want to continuously record,
motion record, alarm record, or not record at all. Each camera can be scheduled with dierent settings.
8
Customize Your Camera Display
Display 4 cameras in a quad screen, an individual camera in full screen, or see a 9, 13 or 16 channel split screen if you have additional cameras.
Zoom mode allows you to enlarge a portion of the camera’s view to get a closer look, and Sequence mode cycles through all camera views at preset
interval times.
Search by Date, Time, or Event
Simply choose the desired date and time range, and the requested video clips will appear. Clips are also labeled by event, which makes it easy to
nd footage that was captured by motion detection.
Endless Location Options with 4 Extra Extension Wires
We’ve included four extra 60ft extension wires so that you can maximize the distance between your cameras and the DVR. (Wire Model #: CVW62)
9CV501 - 16CH
Page 10
ADDITIONAL ACCESSORIES
• CLEARVU7 (LCD Monitor)
For more information or accessories please visit: www.svat.com
• CVW62 (60 ft. Camera Extension Cable)
BUTTONS & CONNECTIONS
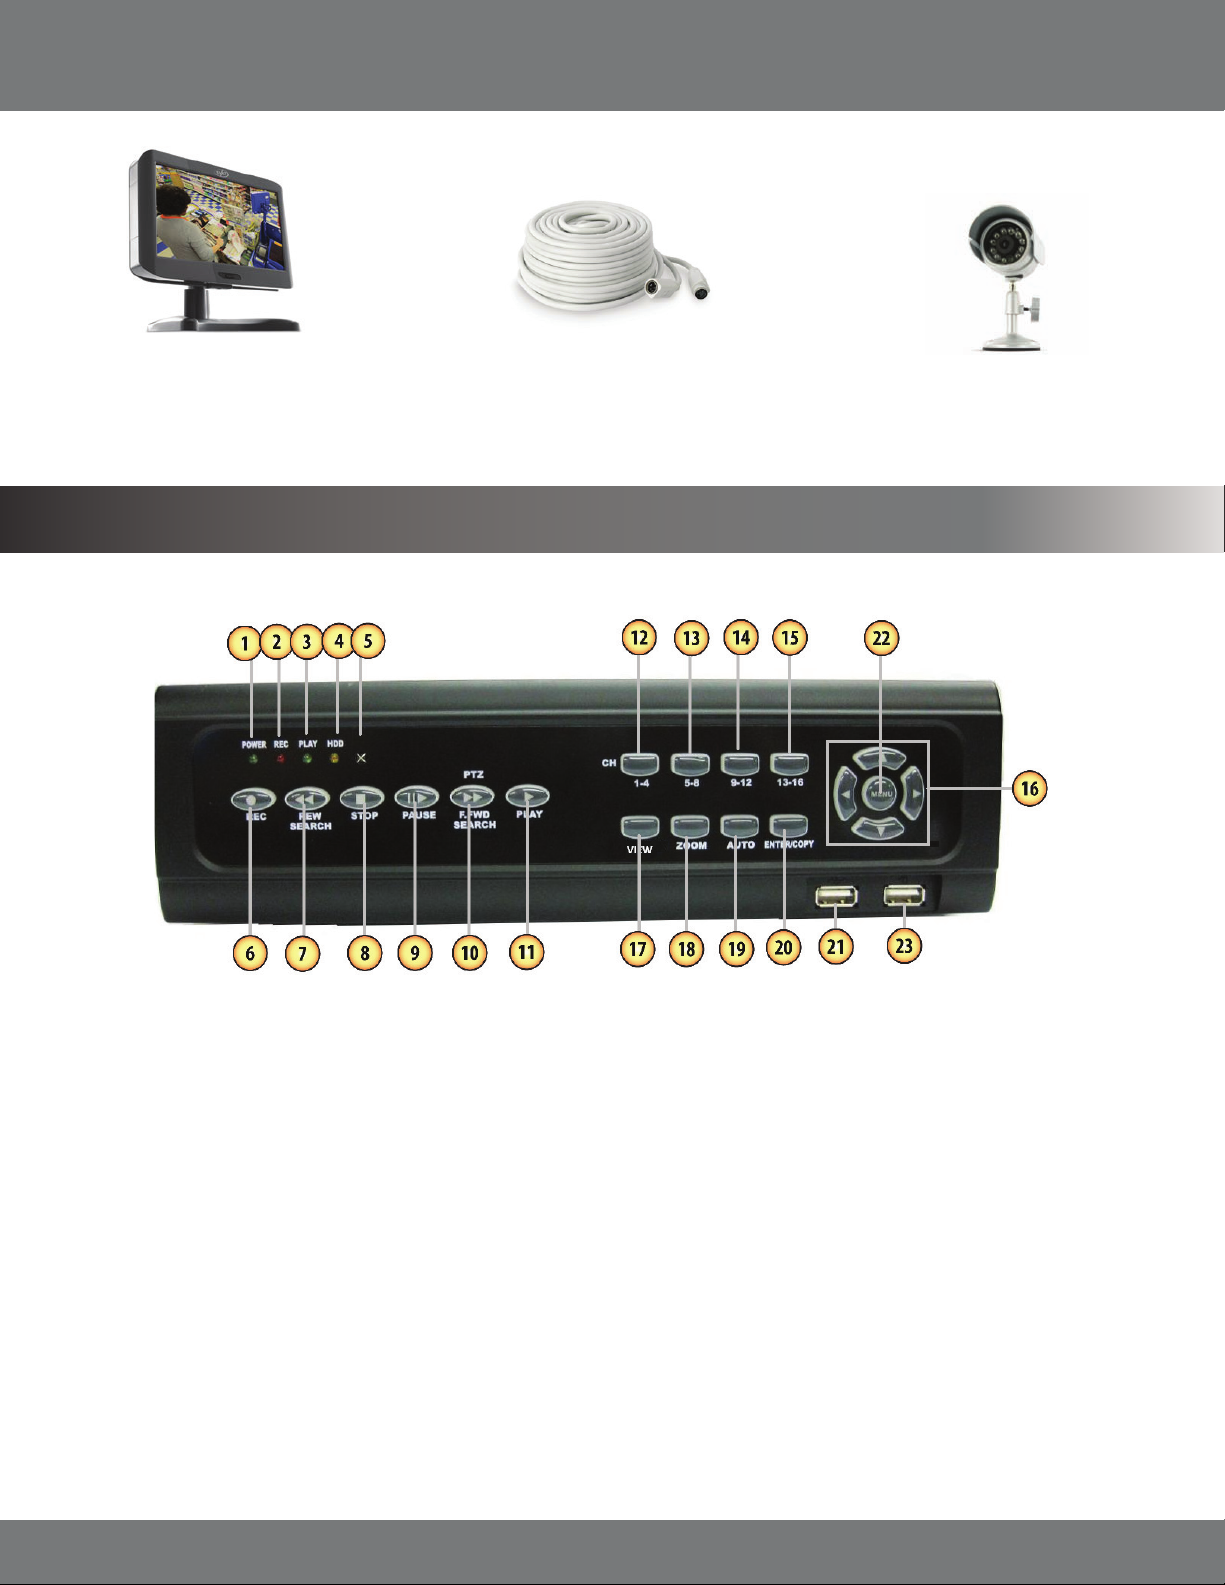
Front Panel
• VU301-C (Camera)
1. Power LED – Indicates the DVR is properly powered on
2. Rec LED – Indicates the DVR is in Recording mode
3. Play LED – Indicates the DVR is currently in Playback mode
4. HDD LED – Indicates there is harddrive activity. This could
indcate recording or playback
5. IR Sensor – Detects IR remote control
6. Record button – Pressing this button prompts DVR to record
according to the record schedule
7. Rewind/search – Rewinds playback footage and prompts
search menu to playback footage
8. Stop – Stops playback footage and recording
9. Pause – Pauses Playback footage
10. Fast Forward/search – Fast forwards playback footage.
Prompts PTZ controls in live view mode
11. Play – Prompts Playback/search menu to playback footage
12. 1-4 – Pressing this scrolls through channels (cameras) 1 – 4 one
at a time
13. 5-8 – Pressing this scrolls through cameras 5-8 one at a time
14. 9-12 – Pressing this scrolls through cameras 9-12 one at a time
15. 13-16 – Pressing this scrolls through cameras 13 – 16 one at
a time
16. Directional buttons – Moves the cursor up, down, left
and right
17. 4/9/13/16 – Pressing this button scrolls through dierent
display options (four cameras, nine cameras, thirteen cameras
and sixteen cameras)
18. Zoom – Pressing this turns the zoom function on
19. Auto – Pressing this prompts the DVR to sequence through
the cameras
20. Enter/copy – Select button, in playback mode copy starts and
stops backup
21. USB connection – Used to connect external CD burner or USB
drive for backup
22. Menu Button – Opens and exits the main menu
23. USB mouse connection – Connect USB mouse to
this connection
10CV501 - 16CH
Page 11

BUTTONS & CONNECTIONS...continued
Back Panel
1. Power Input– 12V 4. 16A
2. VGA OUT – Connection to a VGA monitor
3. Ethernet (LAN) connection – Connect to a router or modem
4. Alarm Input/Relay - Connects Alarm adapter
5. Audio Out - Connect to a speaker or amplier
6. RS-232/485 – Connects a PTZ (pan/tilt/zoom) adapter
Remote Control
7. Video Input – CH 1 to 16 – Camera connections
8. Audio In – Connects to an audio supported camera/
microphone (not included)
9. SPOT – Connects to a second monitor for camera viewing
purposes only (no menu access)
10. S-Video Monitor Connection
11. BNC Monitor output (Video Out)
1. Auto – Pressing this prompts the DVR to sequence through
the cameras
2. Record - Pressing this button prompts DVR to record
3. 1-16 – Camera buttons – Shows the individual camera
on screen
4. Menu Button – Opens and exits the main menu
5. Zoom – Pressing this turns the zoom function on
6. ID – Displays the DVR IR number on screen. Used to identify
the DVR if multiple DVR’s are used
7. Enter – Select button/Conrm Changes
8. Directional buttons – Moves the cursor up, down, left
and right
9. PTZ – Turns on PTZ (Pan tilt zoom) camera controls in live view
mode (PTZ camera not included)
10. VIEW – scrolls through the dierent camera views (4/9/13/16)
11. Rewind – Rewinds playback footage
12. Fast forward – Fast forwards playback footage
13. Play – Prompts and Playback/search menu to
playback footage
14. Stop – Stops playback footage and recording
15. Pause/Step Back – During playback, pressing this button will
pause the footage. Pressing it a second time will step back the
video footage a few minutes
16. Pause/Step Forward – Pauses playback footage and pressing
this button again will step forward the time by a few minutes
11CV501 - 16CH
Page 12

BUTTONS & CONNECTIONS...continued
PTZ CONNECTION
9 PIN D-SUB adapter for PTZ cameras:
1. 9 PIN D-SUB MALE Connection - Connects into RS 232/485
Port on the back of DVR
2. Connection for a RS 232 PTZ Camera
3. Connection for a RS 485 PTZ Camera - Using the “T” and “R”
connections
4. Connection for a RS485 PTZ Camera - Using the “D+” and
“D-” connections
For more information on how to setup and use the PTZ camera
with the DVR please see PTZ Setup. Refer to the PTZ camera
manufacturer instructional manual for the required connections
and settings.
ALARM CONNECTION
25 PIN D-SUB adapter for alarm input and relay:
1.
2.
1. 25 PIN D-SUB MALE Connection - Connects to alarm port on
the back of DVR
2. AONO - Alarm output normally open
3. AONC - Alarm output normally closed
4. AOCOM - Alarm Open Common
5. AlarmHI - Alarm reset connection
6. GND - Ground connections for alarm input
7. SW IN/SW IN12 - This function does not apply to this DVR
8. VCR SW - This function does not apply to this DVR
9. Alarm 1-13 - Connection for 13 dierent alarms
10. Alarm 14-16 - Connection for 3 more alarms
To connect a two wire alarm:
1. With a small object such as a at head screwdriver push the
orange tab back away from the circular opening.
2. Insert the wire into the hole below the orange tab while it is
3.
still pushed back.
3. Release the orange tab, which will lock the wire into place.
Pull lightly on the wire to make sure it is secure.
12CV501 - 16CH
Page 13
THINGS TO CONSIDER BEFORE INSTALLATION
CAMERA INSTALLATION
• The camera should be installed between 8 and 13ft above the area to be monitored
• Ensure there are no obstructions in the camera’s view, to maximize viewing area
• Ensure that the sunshade is positioned to avoid glare and position camera away from direct sunlight or indoor lighting
• Decide whether the camera will be wall-mounted, ceiling mounted or sit on a desk/table top. If you are mounting the camera on a wall or
ceiling, use the mounting hardware in the package. We recommend that the mounting bracket is secured using the included screws for all
installations
• Each camera comes with 60ft of video/power wire, and there are also four 60ft extension wires included. Please make sure that you mount
four cameras no more than 60ft from the TV/monitor/VCR/DVR and the other four no more than 120ft away from the TV/monitor/VCR/
DVR. If longer wiring distance is required for additional cameras, 60ft extensions can be purchased (DF10W) from your local re seller or at
www.svat.com
• We recommend using a surge protected power bar to protect the cameras internal circuitry
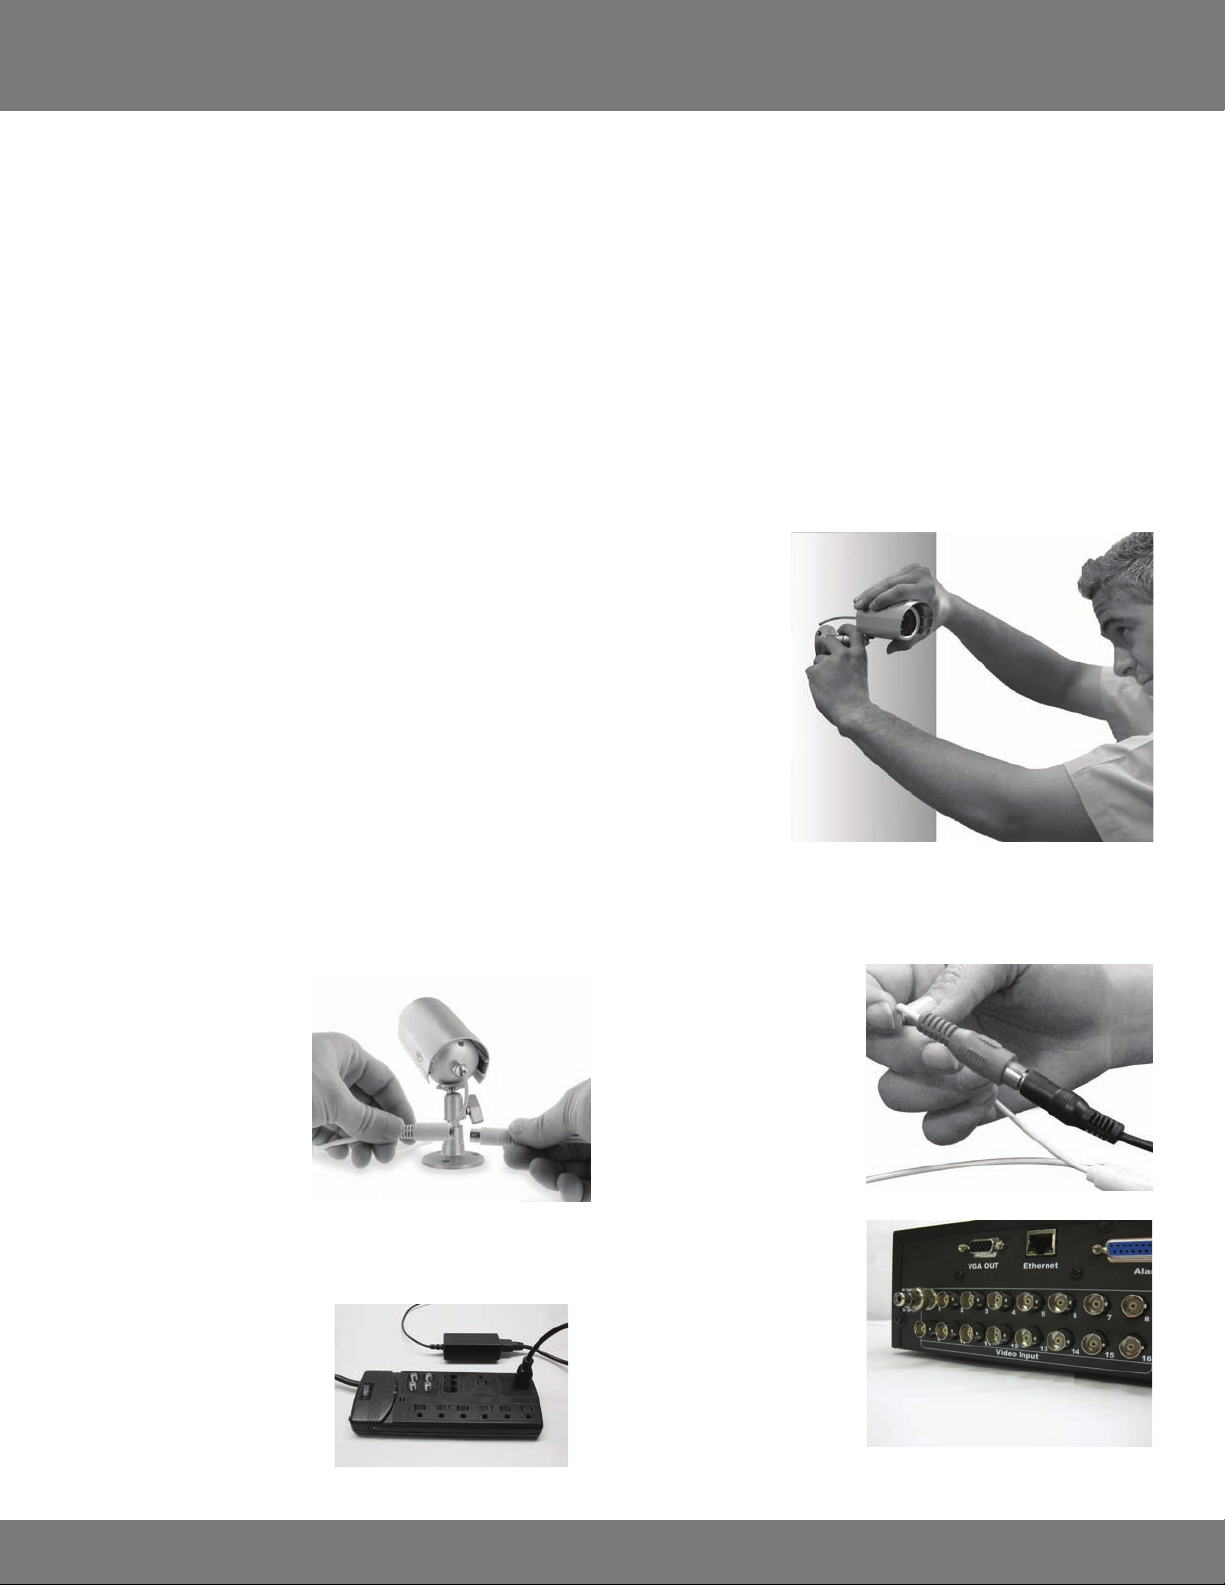
MOUNTING
1. Decide if the camera will be wall-mounted or sit on a desk/tabletop. The camera can be
adjusted for either mounting scenario by rotating it to the required position.
2. Screw the mounting bracket into the camera’s mounting hole, turning it clockwise.
3. Mount the camera in the desired location no more than 60 ft from the DVR unless you
have purchased additional wiring. You may wall, ceiling or desk mount these cameras.
4. Adjust cameras to the desired viewing angles.
WIRING
1. Plug the 4 PIN DIN
female connection on
the camera into the
4 PIN DIN male
connection on the 60ft
video/power wire.
3. Plug the camera’s
power adapter into an
AC outlet or
power bar.
For more information on camera location go to:
www.defendercollege.com
2. Plug the included four
to one power supply
into the camera power
adapter then into the
red power jack located
on the 60 ft video/
power wire.
4. Attach the BNC to
RCA connectors to
the video inputs on
the back of the DVR.
13CV501 - 16CH
Page 14
CAMERA INSTALLATION...continued
5. Connect the male RCA plug from the 60 ft cable to the BNC to RCA
connector.
6. Repeat the above steps for all of the included cameras
Note: For detailed instructions and information on the
cameras included with this system, please refer to the
Camera specications on Pg. 63.
.
CONNECTING ADDITIONAL DEVICES TO THE DVR
This DVR has multiple connections which allow you to integrate additional SVAT or third party devices to the system. Please note that there
are many makes and models of compatible devices and the instructions below may not be applicable to your device. Always refer to the device
instruction manual for proper setup and operation.
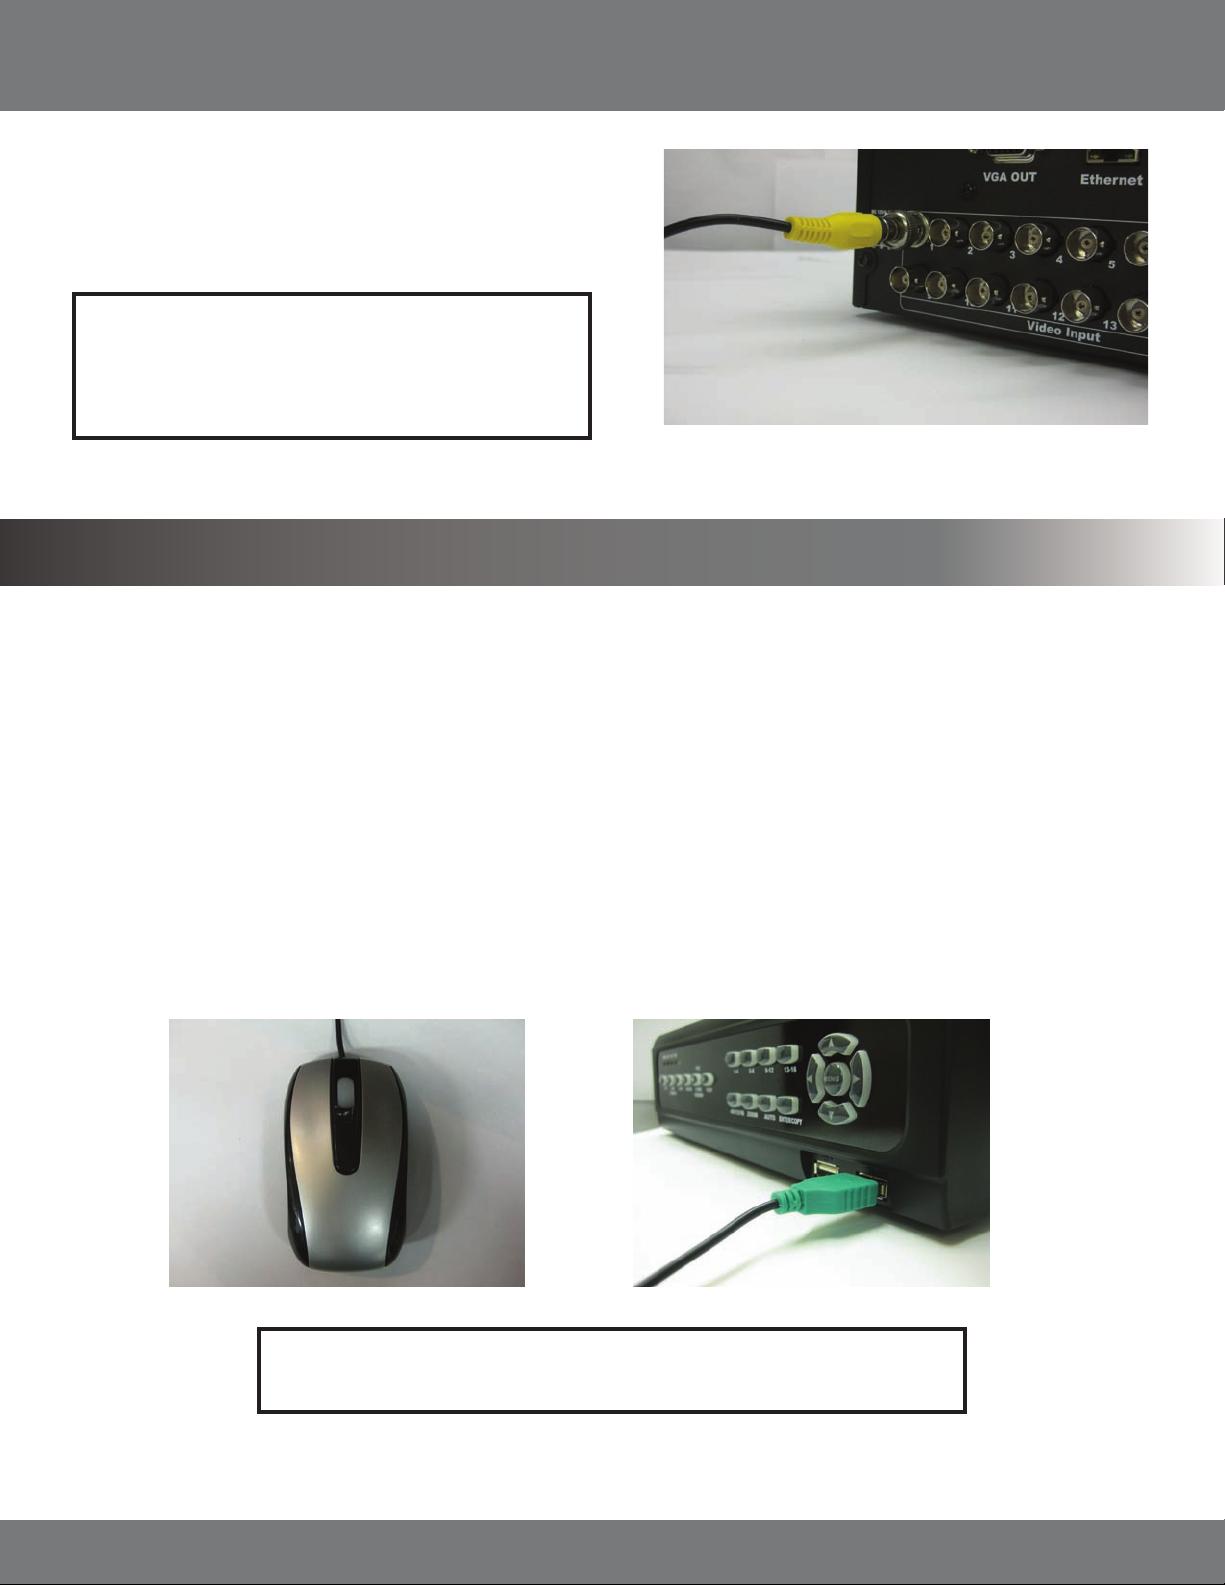
CONNECTING A USB MOUSE
It is recommended to connect the included USB mouse before powering on the DVR. This will speed up the initializing process as well as make the DVR easier
to use.
1.
Plug the USB c
onnection on the mouse into the USB connection on the front right of the DVR.
Note: This Manual was written with the mouse being the main tool for navigation.
14CV501 - 16CH
Page 15
CONNECTING ADDITIONAL DEVICES TO THE DVR...continued
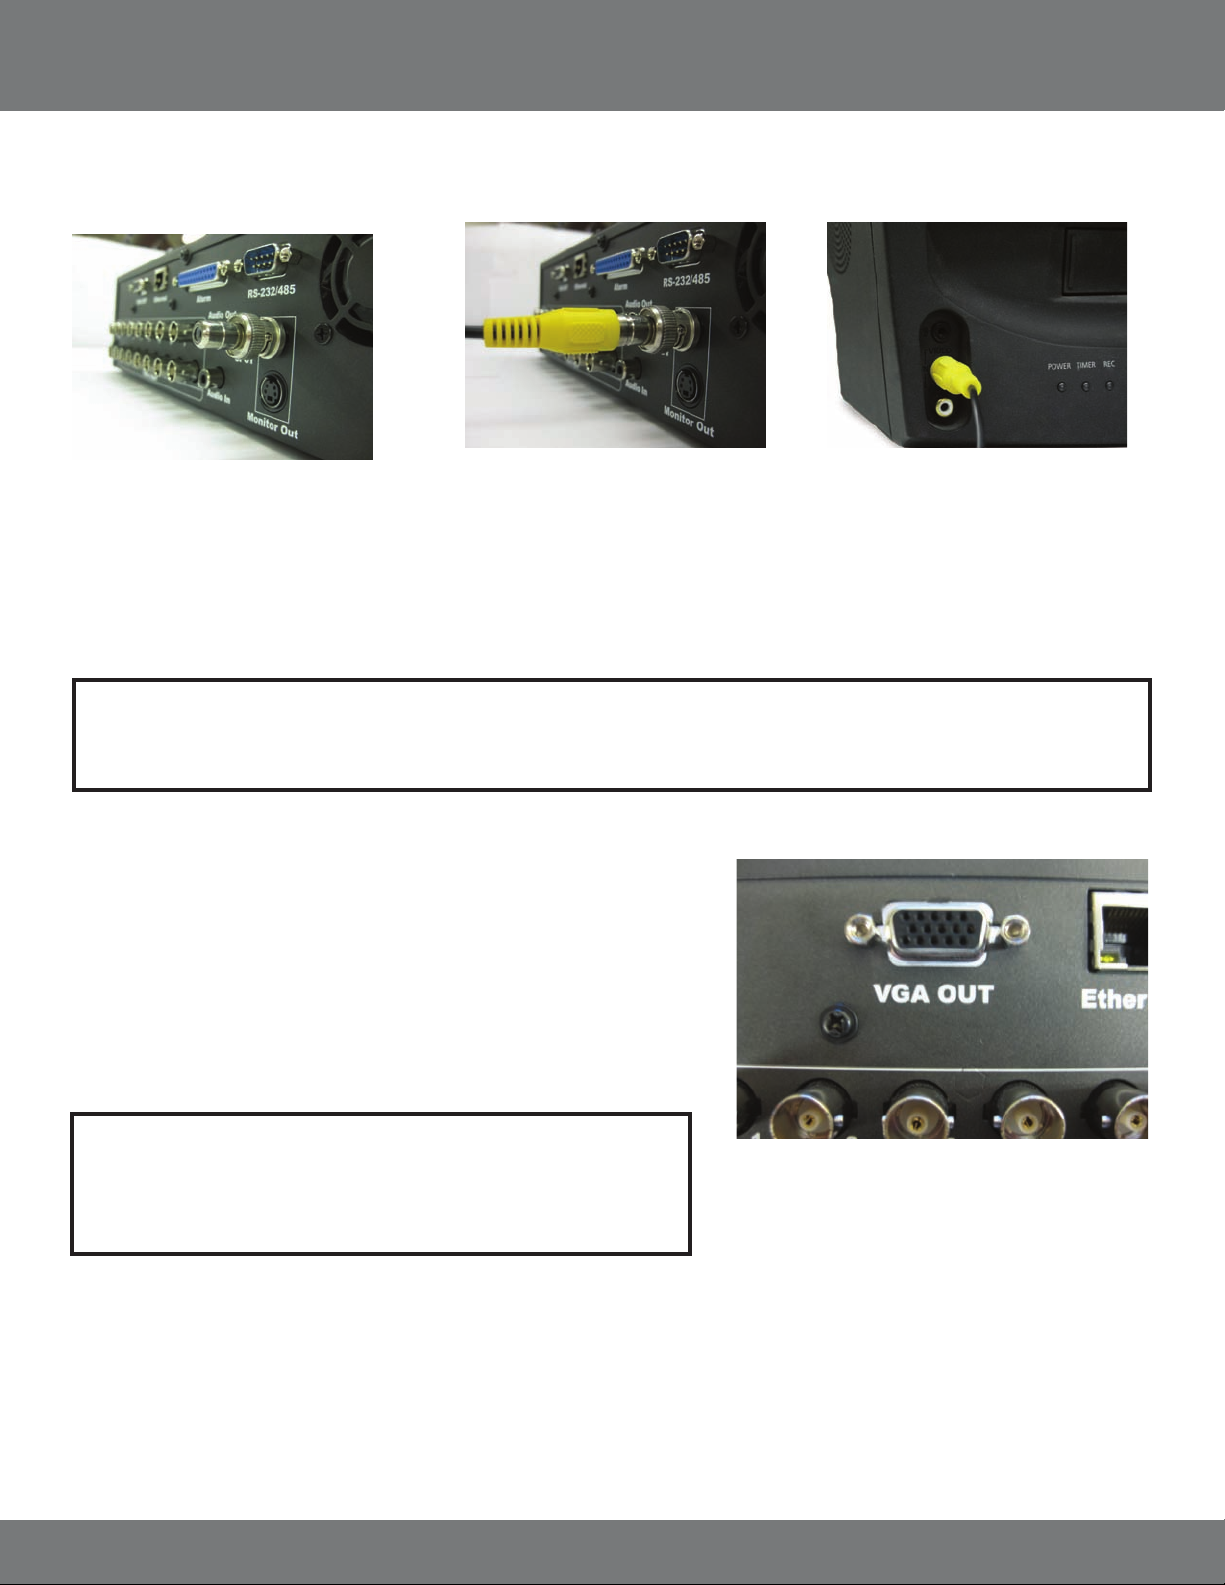
CONNECTING A MONITOR TO THE DVR (RCA COMPOSITE)
1. Connect a BNC to RCA connector to
the MONITOR OUT connection on the
back of the DVR.
4. Switch the TV/Monitor source to view the DVR.
Note: If the monitor has multiple video inputs then the video source will need to be switched to watch the DVR. Example: If the DVR is
connected to Video 2 then press the TV/Video, Input, or Source button on the TV/Monitor to switch to Video 2.
2. Plug the RCA cable into the BNC
connector.
3. Attach the other end of the RCA cable to a
yellow RCA video input on your monitor.
CONNECTING A MONITOR TO THE DVR (VGA)
1. Connect one end of a VGA cable (not included) to the VGA OUT connection on the
back of the DVR.
2. Plug the other end of the VGA cable to a VGA input on your TV/monitor.
3. Switch the TV/monitor source to view the DVR.
Note: If the monitor has multiple video inputs then the video source will
need to be switched to watch the DVR. Press the TV/Video, Input, or
Source button on the TV/Monitor to switch to VGA or PC input.
CONNECTING YOUR ALARM SYSTEM TO THE DVR
The CV501 - 16CH supports a 2 wire (normally open or normally closed) connection for up to sixteen external alarm devices simultaneously using
the included alarm adapter. For more information on setting up the DVR to work with these alarms please see “buttons and connections.” Please see
your alarm device manufacturer for further instructions on required connections and settings.
15CV501 - 16CH
Page 16
CONNECTING ADDITIONAL DEVICES TO THE DVR...continued
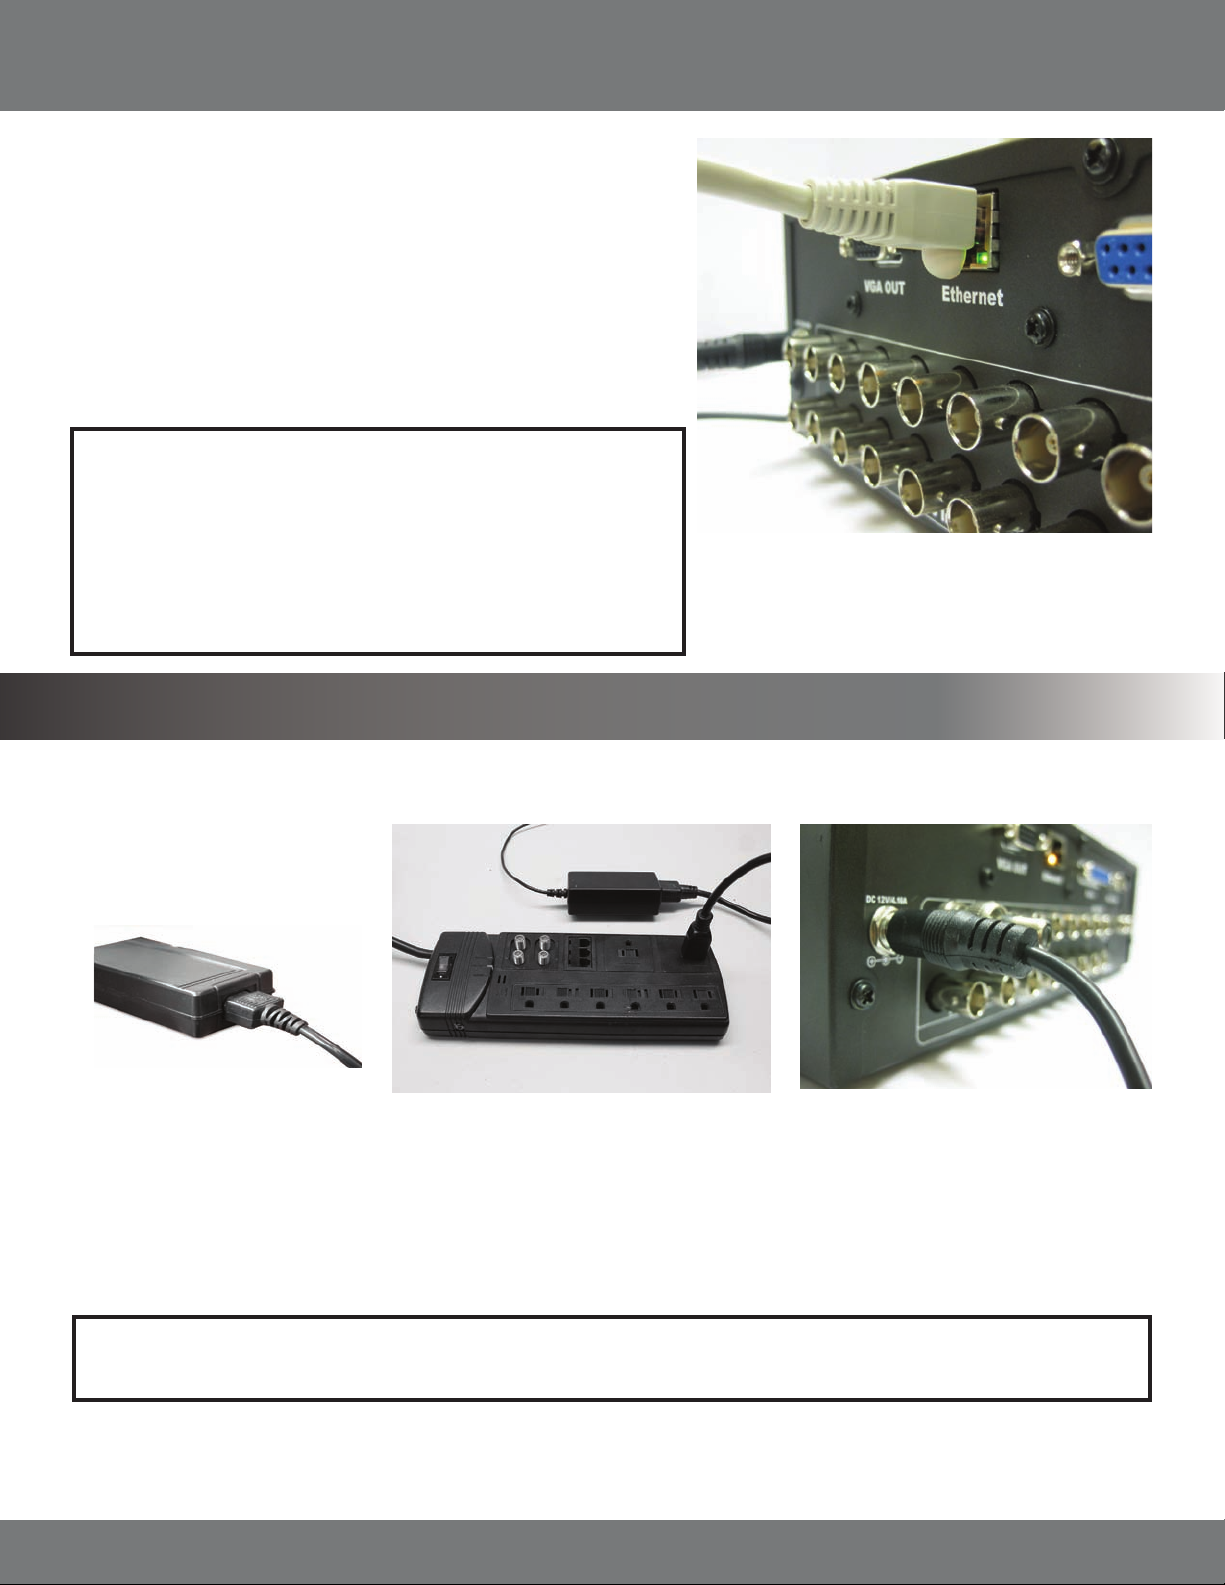
CONNECTING YOUR DVR TO THE ROUTER
1. Power o the DVR by removing the power cable from the back of the DVR.
2. Connect the included network cable to the back of the DVR in the “Ethernet”
port (LAN).
3. Connect the other end of the network cable to an available port on the
router. The ports should be labeled 1-4, or 1-8.
4. Power on the DVR by reconnecting the power cable on the back of the DVR.
Note: If you look at the router there should be a green “link” light
indicating that the DVR is properly connected to the port that it
was plugged into. There will also be an amber and green “link”
light to the right of the Ethernet connection on the back of the
DVR to indicate a proper connection to the router. If both “link”
lights are illuminated, the DVR is properly connected to the router
and you can proceed with the next step.
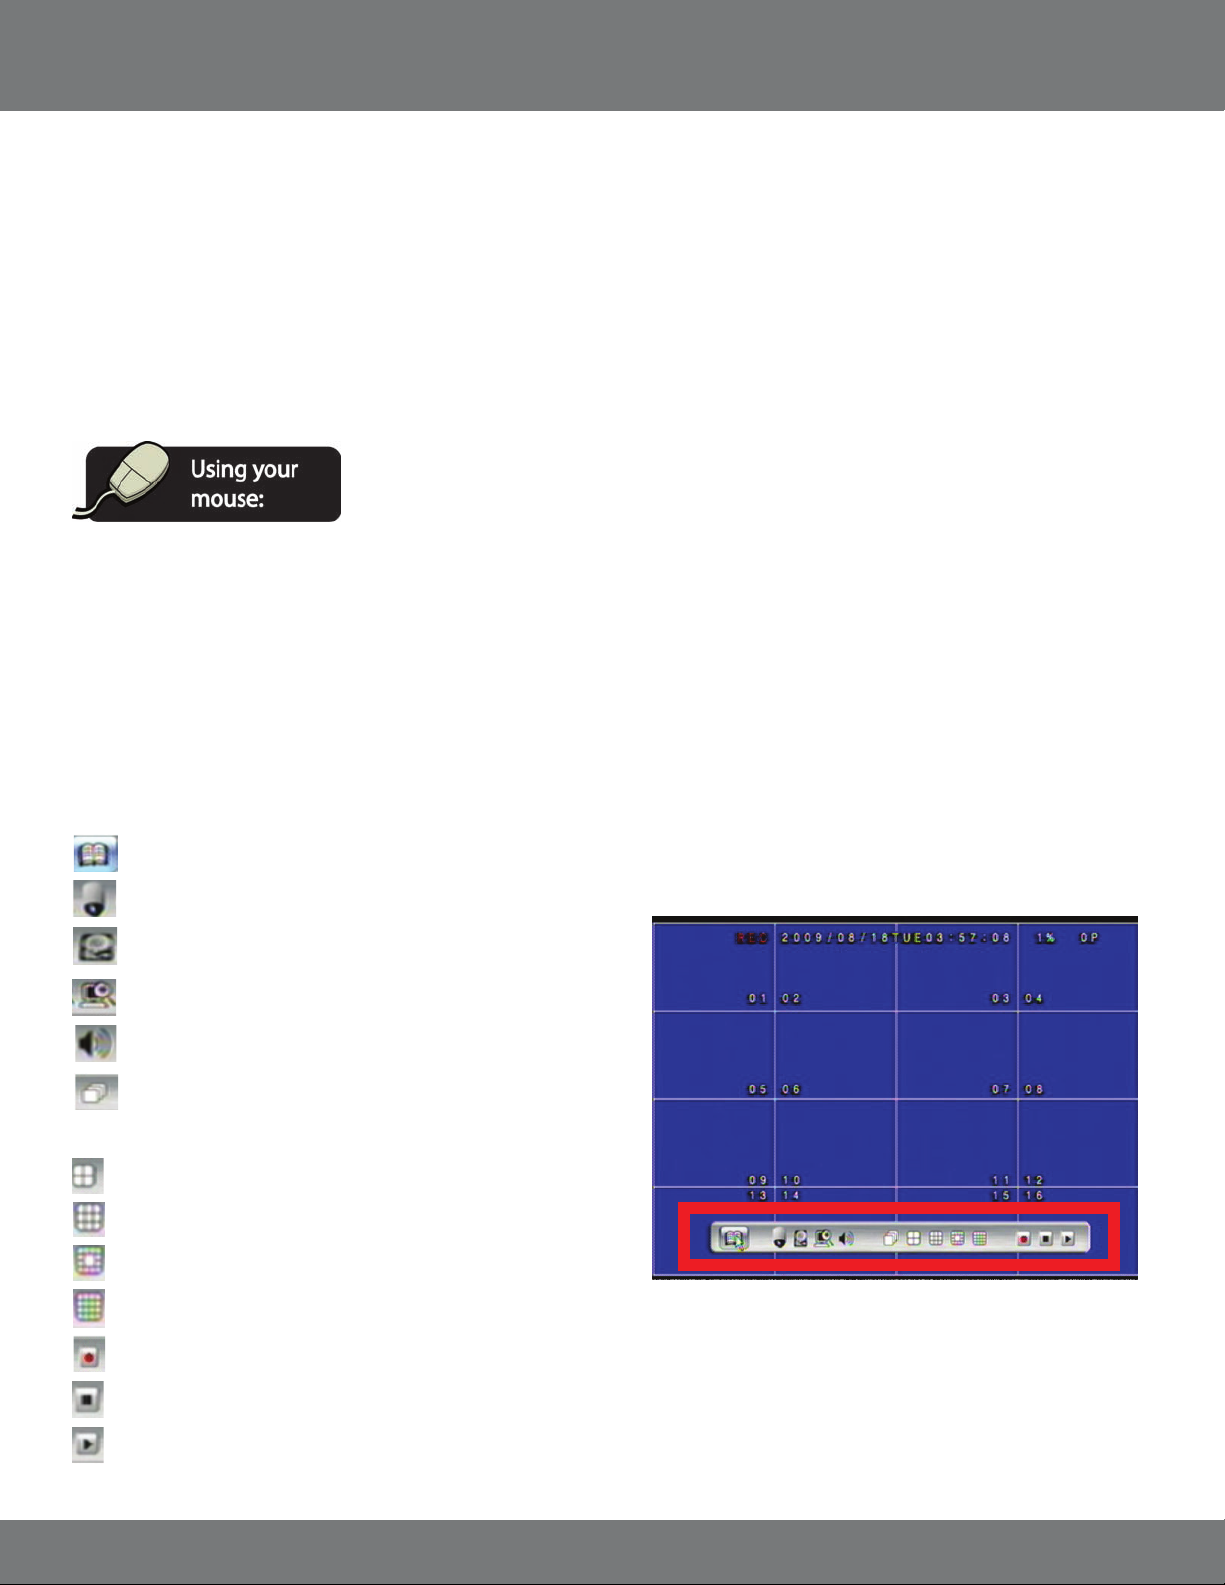
CONNECTING AND POWERING ON THE DVR
1. Insert the power cord into the
power supply.
4. The DVR will turn on and display the main viewing area after a few moments of initializing.
2. Plug the power cord into a power outlet. 3. Insert the power supply wire into the
rear DC 12V port on the DVR.
Note: We recommend using a surge protected power bar and/or Uninterrupted Power Supply (UPS) backup to prevent damage to
your DVR system.
16CV501 - 16CH
Page 17
GETTING STARTED
Now that you have powered up the DVR and properly connected to a TV or monitor you are ready to begin using and customizing the DVR for your
specic needs. The DVR will automatically begin recording once it has been powered on and initialized. Initializing the DVR is the normal start up
process and can take a few moments.
Using the Mouse
• The included USB mouse makes using the CV501 - 16CH simple and ecient. Make sure that the mouse is connected to the front right USB
port before powering on the DVR
• All functions of the mouse are applicable to this DVR, including using the wheel and right and left clicking
Screen Viewing
By double clicking on one the of the 16 cameras, the viewing mode will switch to full screen mode. When in full screen mode, scrolling the mouse
wheel up or down will move you from one camera to the next.
POP UP MENU BAR
Menu options will automatically appear on the bottom of the screen when you move the mouse cursor near the bottom of the screen. More
information can be found in the POP UP MENU BAR section.
The following menu options appear from left to right:
1. Menu – calls up the Main Menu
2. PTZ Control – controls the PTZ cameras (PTZ camera not included)
3. HDD & USB Information (total size, capacity remaining)
4. Digital Zoom – digitally zoom on a specic area
5. Audio Control – enables or disables the audio
6. Auto Sequence – automatically switches between camera
Channels in live viewing mode.
7. Quad screen viewing mode
8. 9 – Camera view
9. 13 – Camera view
10. 16 – Camera view
11. Manual Record
12. Stop - stops playback or manual record
13. Play Search – calls up the play search menu
17CV501 - 16CH
Page 18
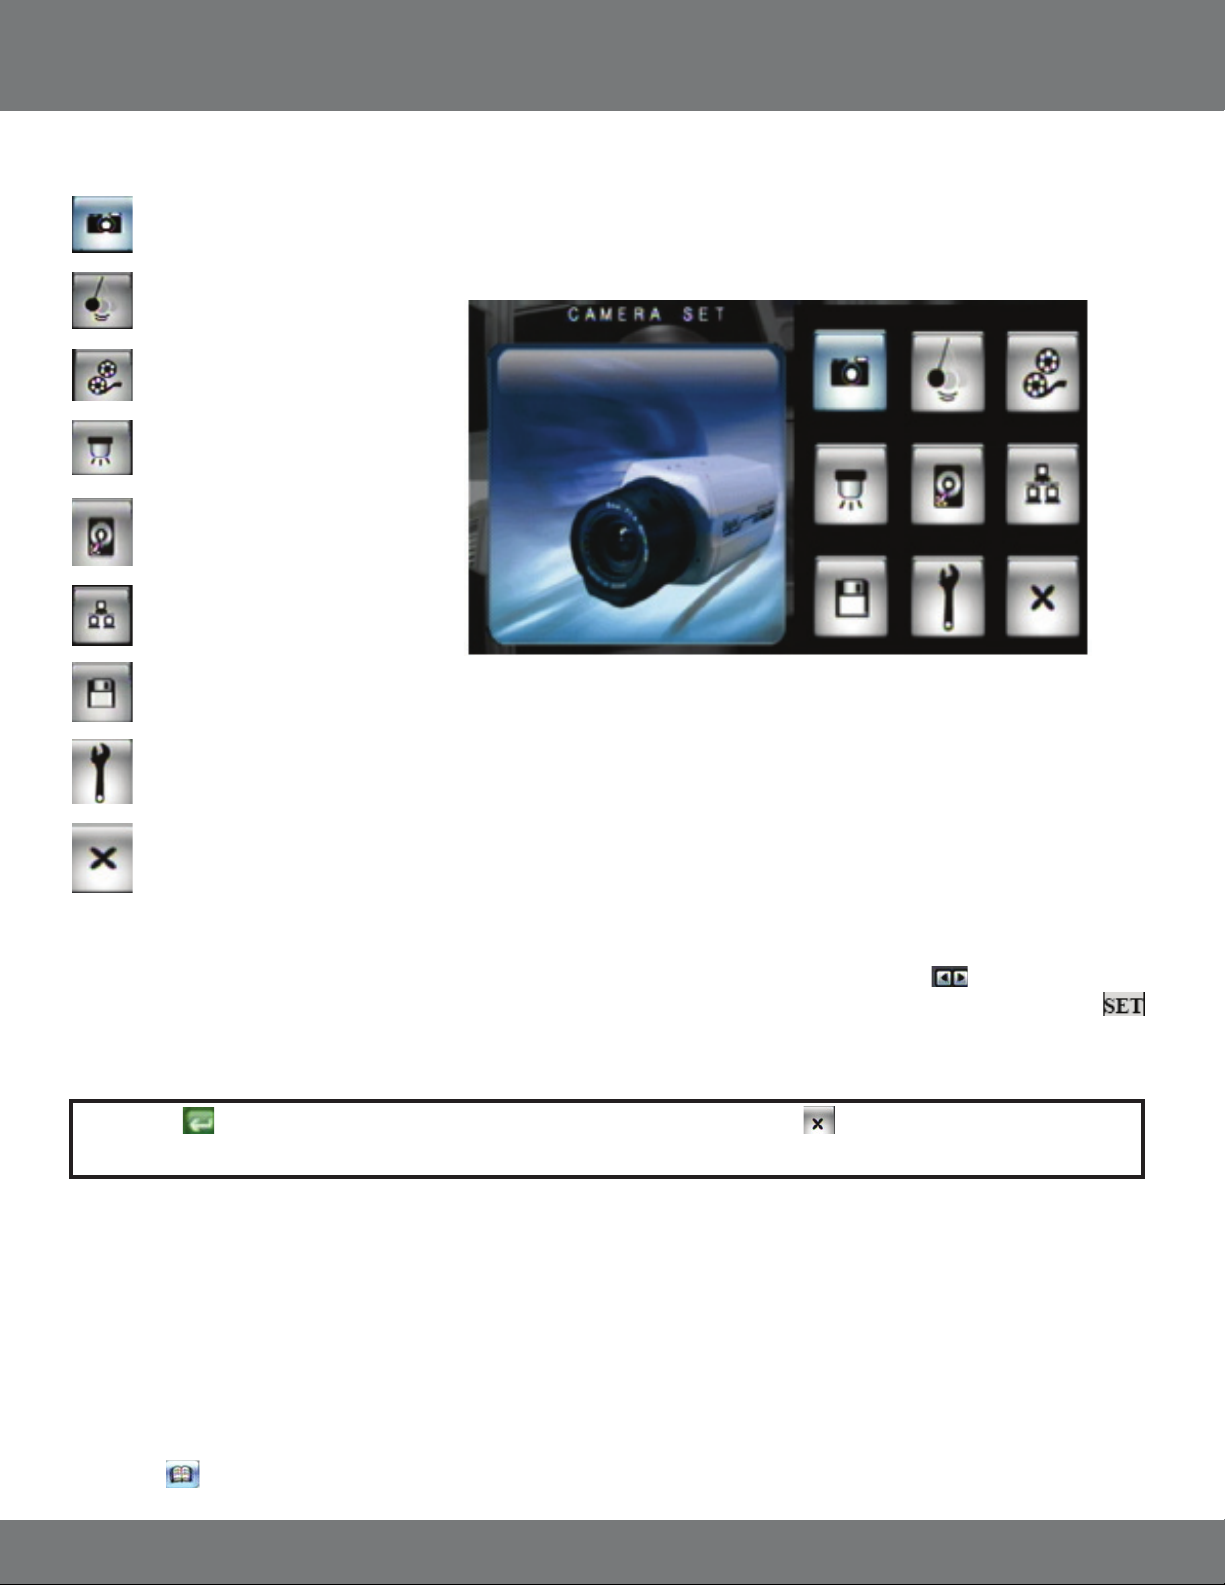
MAIN MENU
The main menu consists of nine options:
1. Camera Setup
2. Motion Setup
3. Record Setup
4. Alarm Setup
5. HDD Management
6. Network Setup
7. Backup Setup
8. System Setup
9. Exit
MAIN MENU
As you navigate through the Menu of the DVR, you will notice that most elds are adjustable. If the Menu setting has to the right of it, you can
adjust the value by either using the left and right directional buttons, or scrolling up or down with the mouse wheel. If the Menu setting has
next to it, you can select this button by pressing ENTER or by clicking on the SET button with the mouse. Clicking SET will enter a sub menu which
will allow you to adjust sub-settings for the DVR.
Note: The button works as the enter key. This must be pressed to save changes. The works as the escape button, and
when pressed will exit the screen and not save any changes.
To call up the Main Menu:
The Main Menu can be called by 2 dierent options:
Option 1:
1. Press the Menu button the DVR front panel or on the remote control.
Option 2:
1. Scroll the mouse to the bottom of the screen to reveal Pop Up Menu Bar.
2. Click the to call up the Main Menu.
18CV501 - 16CH
Page 19
MAIN MENU...continued
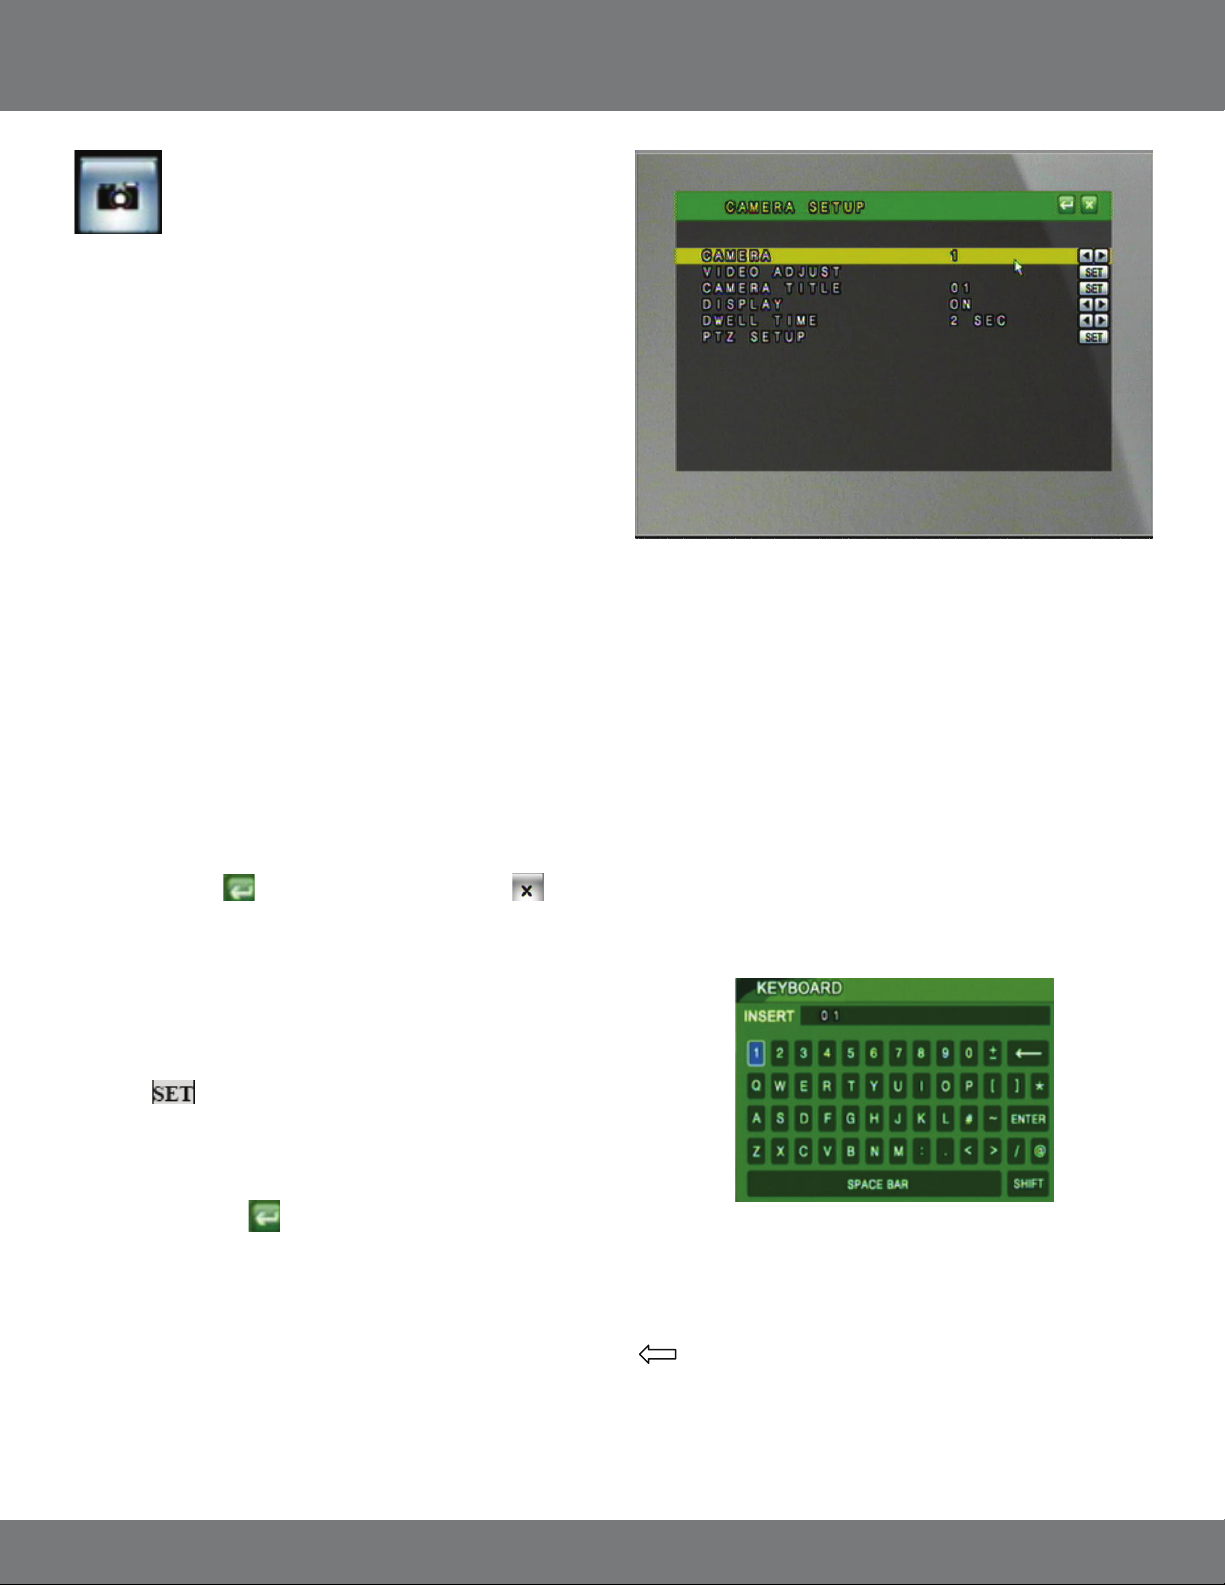
Camera setup allows you to make adjustments
to your cameras individually. A description of the
adjustable elds will be found below.
CAMERA
1. To choose which camera you want to work with highlight CAMERA so that the background is yellow and use the mouse wheel or directional
keys to scroll to the camera you wish to adjust.
• As you change cameras, the settings for each camera will be displayed along with it
VIDEO ADJUST
Video adjust allows you to control the contrast, brightness, hue, color, and sharpness of the your cameras. Use the arrow keys or scroll wheel to
adjust the desired settings. This is particular to only one camera at a time.
When you adjust the settings to your liking:
Press ENTER or Click
to save changes, and EXIT or Click to return to Menu without saving.
CAMERA TITLE
Allows you to name each camera/channel for easy identication.
1. When you have selected the correct camera you wish to adjust,
select to call up the virtual keyboard.
2. Use the keyboard to enter your new camera name. Note that
the camera title can be up to 8 characters long.
3. Select ENTER to conrm changes and exit the keyboard.
4. Press ENTER or Click to save. To exit without saving click the
X to exit or Press Menu.
What the buttons mean:
Mostly all of the characters you see on the virtual keyboard will display as
seen on the screen. Below are the functions of the special buttons that have
a dierent purpose.
Backspace
ENTER Conrms changes and exits keyboard
SHIFT Changes from lower case to upper case (allows you to
pick between the "+" and the "-")
SPACE BAR Puts a space between characters
19CV501 - 16CH
Page 20

MAIN MENU...continued
DISPLAY
You can choose whether or not to display any individual camera. By setting the display to OFF the camera will not be displayed in live viewing,
however the camera channel will continue to record as per the dened recording settings. The video will be displayed during playback.
DWELL TIME
Dwell time refers to the amount of time the footage from a particular camera will be displayed when you’re in auto sequence mode. You can set the
dwell time for each camera individually. The auto sequence mode can dwell on one camera from 0-99 seconds.
To Set Dwell Time:
1. Highlight the camera you wish to setup.
2. Highlight dwell time.
3. Use the mouse wheel or directional arrows to set the time (in seconds) that each particular camera will stay on the screen when in
auto sequence mode.
4. Repeat steps 1-3 for each camera.
5. Press Menu or Click
The DVR will take a few moments to save the settings.
to save settings and return to the Main Menu or press to exit to the Main Menu without saving.
To Enter Auto Switch Mode:
1. Scroll mouse to the bottom of the screen to reveal the pop up Menu.
2. Click the auto sequence icon.
The DVR will begin automatically switching between the active cameras according to your dwell time settings.
PTZ SETUP
This DVR supports Pan, Tilt, Zoom (PTZ) or “Dome” cameras, which are not included.
The PTZ camera must use RS-485 and one of the supported protocols (See Specications). For instructions on setting up your PTZ cameras please refer to
the instruction manual for the PTZ camera or contact the PTZ camera manufacturer.
Left-Right Speed: Controls the speed at which the DVR will move the PTZ camera horizontally:"#"is the slowest speed and "# # # # # #"
is the fastest.
Up-Down Speed: Controls the speed at which the DVR will move the PTZ camera vertically: "#" is the slowest speed and "# # # # # #" is the fastest.
Auto Speed: Can be used if the PTZ supports preset positions. Auto-speed will control the speed which the camera will move through the
preset positions.
Baud Rate: This is a camera specic setting dened by the manufacturer. Please consult your PTZ camera manual or manufacturer for
details on this setting.
Protocol: This is a camera specic setting dened by the manufacturer. Please consult your PTZ camera manual or manufacturer for
details on this setting. Supported protocols can be found in the specications.
20CV501 - 16CH
Page 21
MAIN MENU...continued
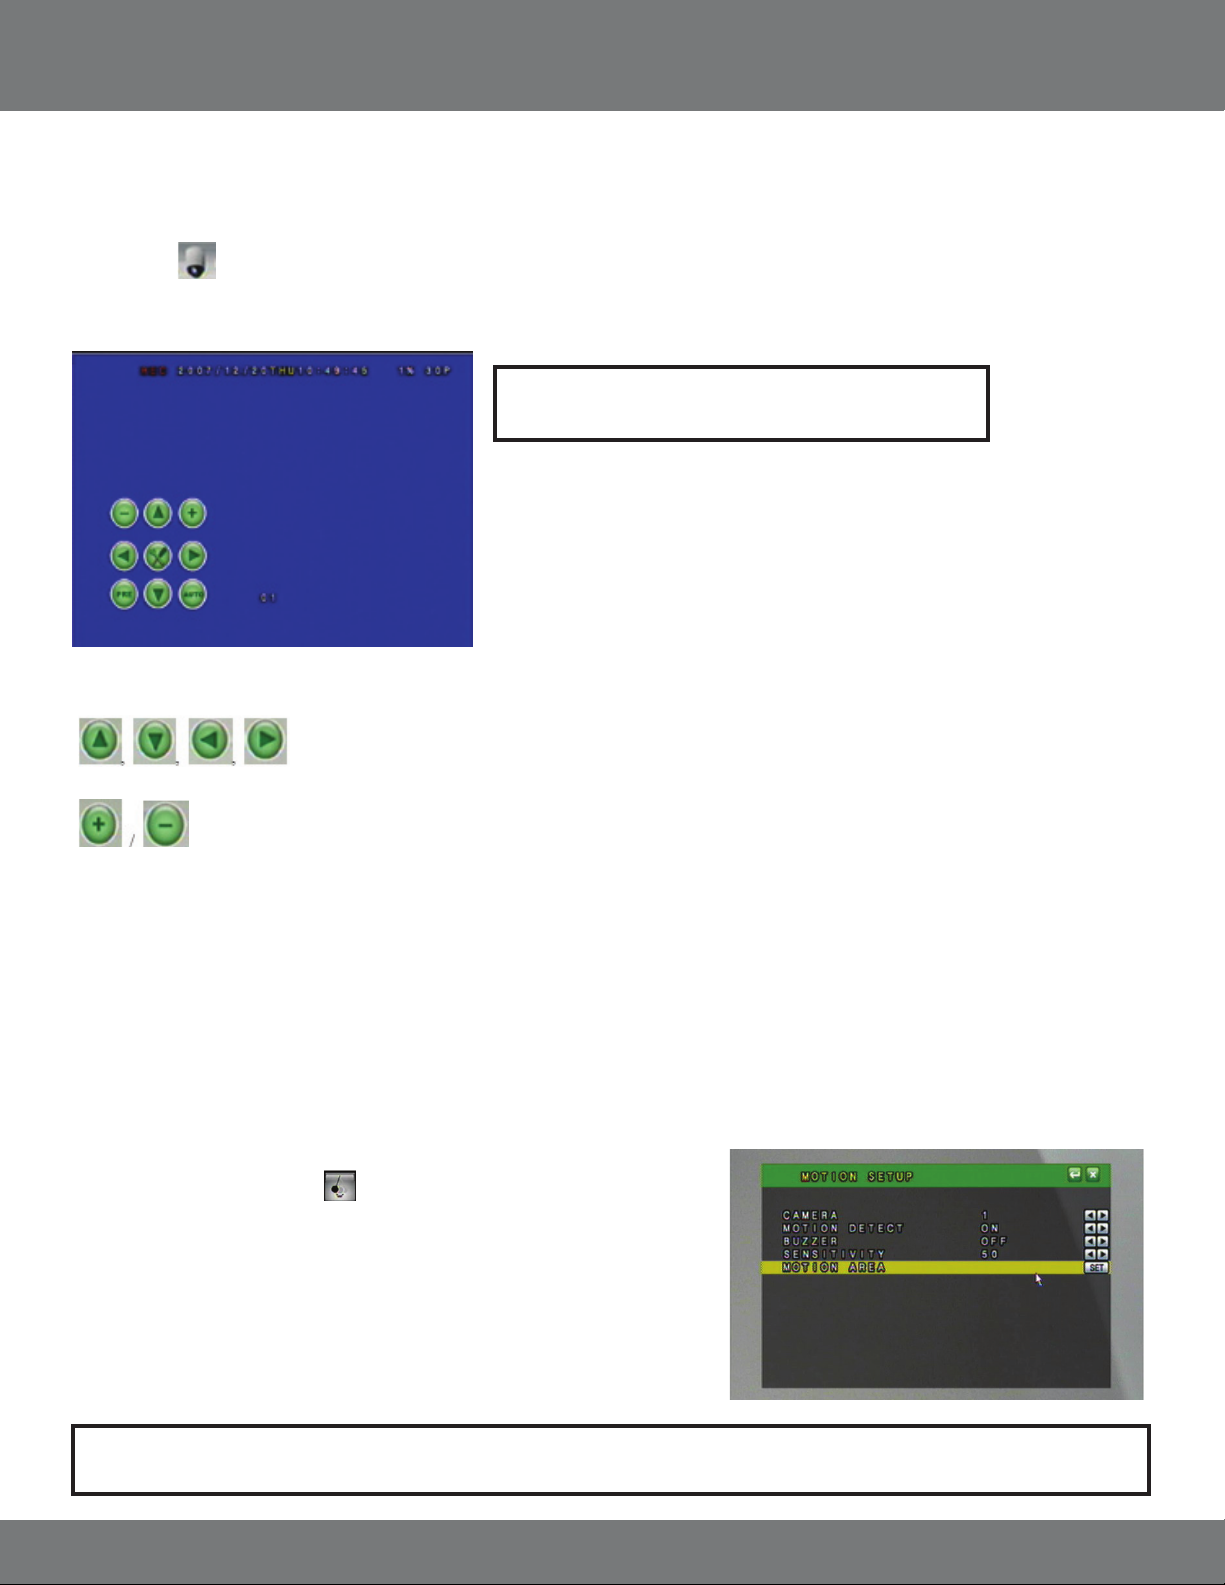
PTZ Control from Live Viewing Mode
To access the PTZ controls of the DVR you will need to use the mouse.
1. Move the mouse cursor to the bottom the screen for Pop Up Menu Bar to display.
2. Select the
The PTZ controls look like this:
Please review the following controls:
icon.
Direction Keys – move the camera up, down, left, or right
Zoom In/Zoom Out Keys
Note: To exit the PTZ control center, right click the mouse.
PRE: If the PTZ camera supports preset positions this option will allow you to save presets as well as go to one of the saved preset positions. Ex.
You can set Preset Number 1 to view a front door, Preset 2 for the camera to zoom in on the front door, Preset 3 to change the angle of the
camera to view the hall way by the front door, etc. This will save you from manually changing the position of the camera. A maximum of
128 Preset positions can be set.
Auto: Initiates the cameras auto sequence. This will usually consist of panning from side to side and tilting higher and lower.
MOTION DETECTION
1. Access the Main Menu.
2. Select the Motion Setup icon.
You can set the DVR to detect motion for one or all of your cameras. When one of the
cameras detects motion, the DVR will display an icon on screen indicating motion is
detected. The DVR can also be congured to begin recording, make an audible beep, or
send you an email notication when motion is detected. The event log will be updated
with the motion detection event.
Note: Every time motion is detected an icon will appear, and the camera name from which motion is detected will change from
white, to yellow.
21CV501 - 16CH
Page 22
MAIN MENU...continued
TO SET MOTION DETECTION
1. Select the camera you wish to congure the motion detection for.
2. Use the mouse wheel, or the directional arrow buttons to toggle between ON and OFF.
MOTION DETECT
Motion detection can be set to ON or OFF. When set to ON, the DVR will recognize and perform specic activities when motion is detected based on
your settings.
BUZZER
The Buzzer can be set to ON or OFF. When set to ON, an audible beep will be heard when motion is detected in this particular camera’s eld of view.
Please refer to the BUZZER TIME SETUP in the ALARM SETUP section for more buzzer settings.
SENSITIVITY
Determines how sensitive the motion detection is. Use the mouse wheel or arrow keys to change the sensitivity value from 1 (least sensitive) to 100
(most sensitive).
MOTION AREA (Motion Area Masking)
You can congure each camera so that there are certain areas to detect and other areas to ignore where motion is detected.
For example, if you are monitoring your home, and there is a fan in the room, you can set the motion area to detect motion everywhere but where the fan is. This way
motion detection will not accidentally be triggered and record insignicant movement.
Motion area is also helpful if you are monitoring outside near a street where there is a lot of trac driving by. You can set your DVR to not detect motion in the area
where the trac is but only when a vehicle turns into the driveway.
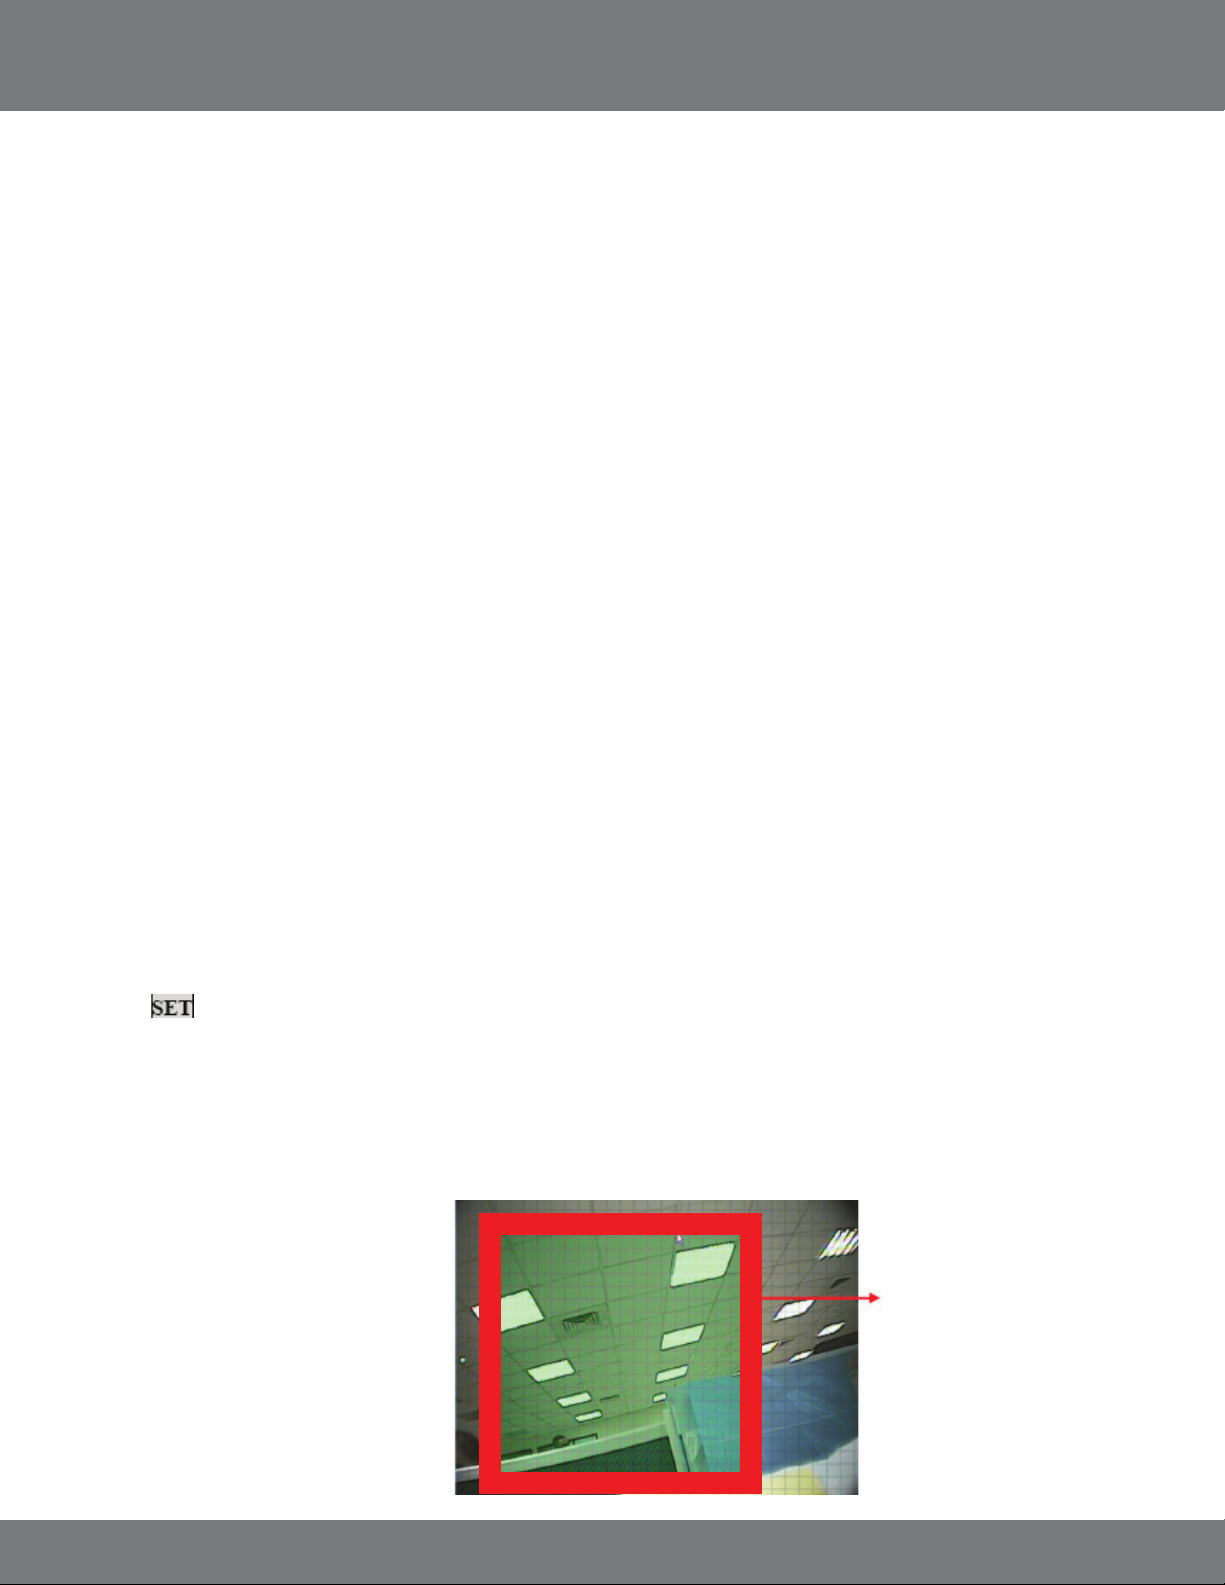
To Setup a Motion Area:
1. Choose which camera you wish to setup by using the mouse wheel or directional arrows.
2. Select for Motion Area.
By default the entire grid (30 x 24) is set to detect motion. Here you choose whether to select the motion detection area or to clear a section of the
grid to not detect motion. Sections of the grid that are shaded green will not trigger motion detection.
There are three Menu options while in the grid view which can be accessed by either right clicking the mouse or pressing the Menu button.
1. Select: Used to select areas you wish to
trigger motion detection.
2. Clear: Used to mask o certain areas you
do not want to trigger motion detection.
3. EXIT: Saves changes and exits the
MOTION DETECTION SETUP MENU.
The squared o area shows
the area with no detection
(would be shaded green)
22CV501 - 16CH
Page 23
MAIN MENU...continued
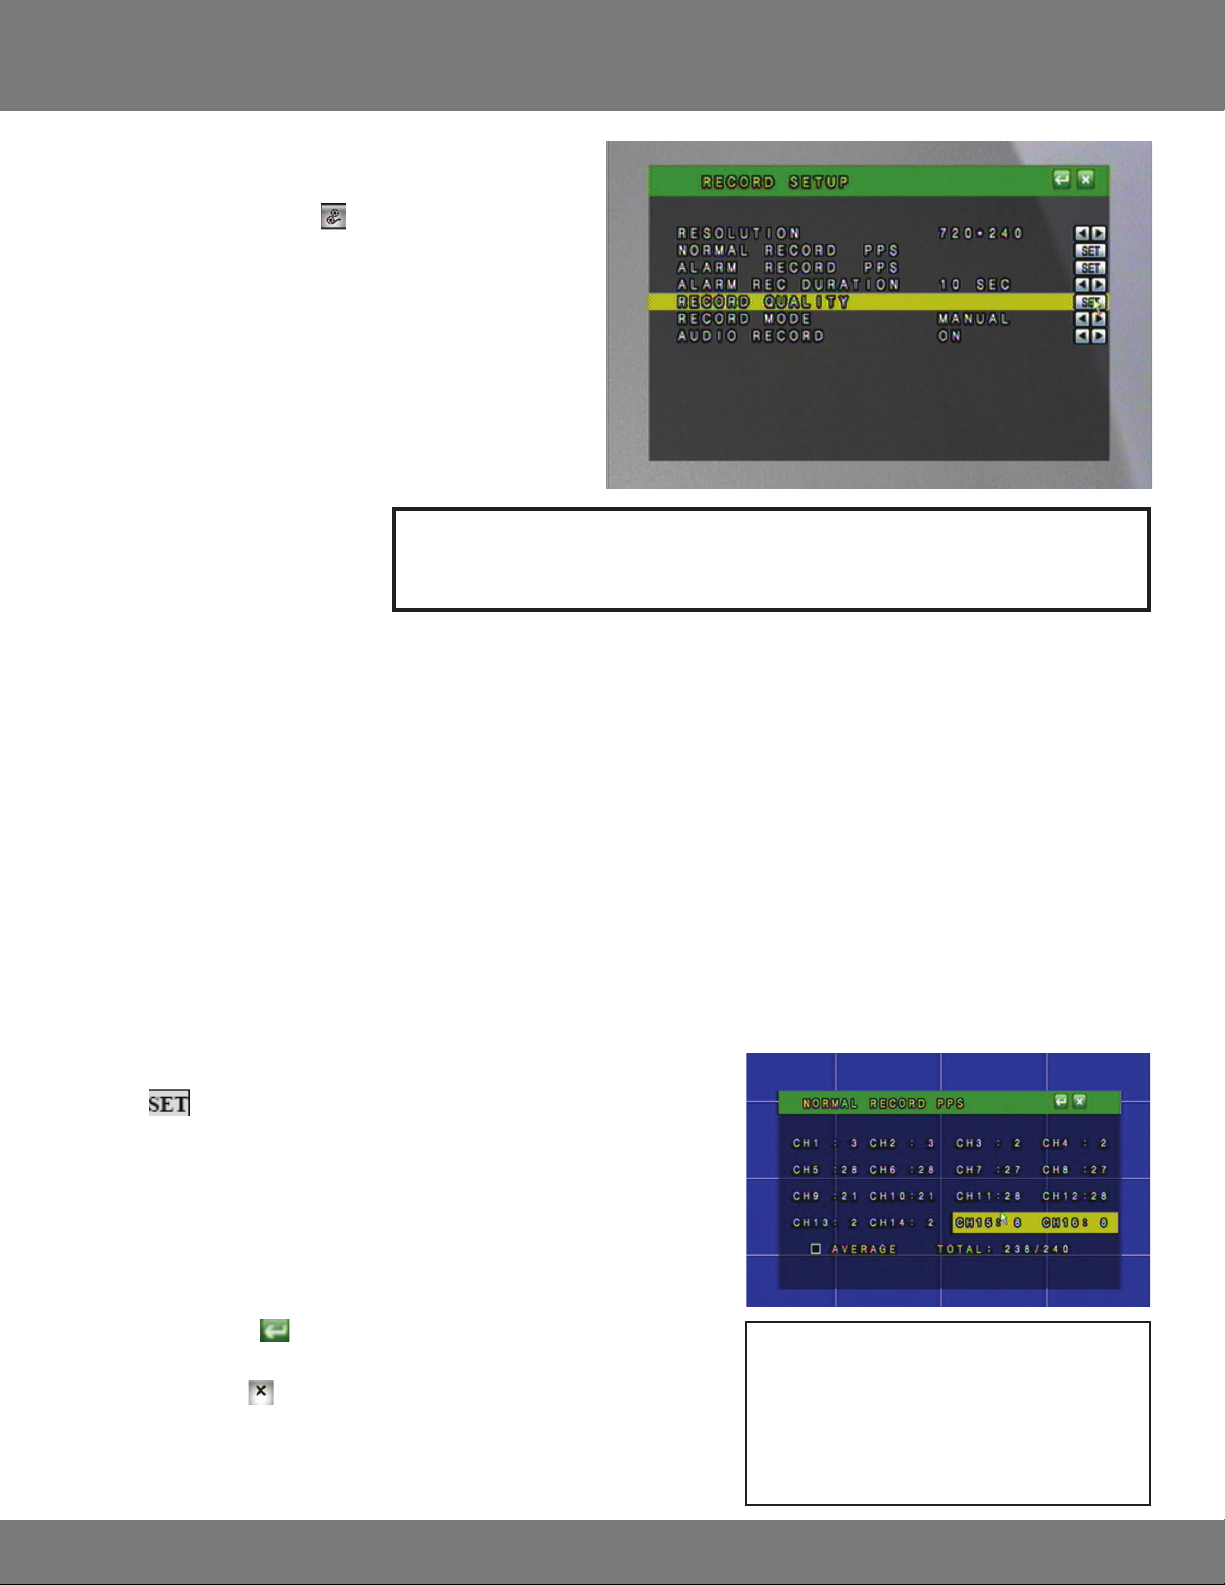
RECORDING SETUP
1. Access the Main Menu.
2. Select the Record Setup icon.
RESOLUTION
You can set the resolution to:
NTSC Mode
1. 720 x 240 (max 60 PPS)
2. 360 x 240 (max 120 PPS)
PAL Mode
1. 720 x 288 (max 50 PPS)
2. 360 x 288 (max 60 PPS)
Changing the resolution will aect the picture quality. A higher resolution will produce a better quality
picture; however, footage recorded in a higher resolution will take up more space on the hard drive. The
higher the resolution causes the maximum number of PPS (pictures per second) be lowered.
Note: NTSC is the video standard for North America. Europe and other countries use the PAL
video standard. NTSC videos or cameras will not work on PAL television sets
or monitors.
PPS
PPS stands for Pictures Per Second and refers to how many pictures will be captured in 1 second. The more PPS, the smoother the video, and the less
PPS the more choppy the video will appear.
Normal Record PPS will adjust the PPS for Full record and Manual Record mode.
Alarm Record PPS will adjust the PPS for motion detection and external alarm detection. Generally the normal record PPS will be lower to minimize
the amount of HDD space used when non-important events are happening and the alarm record PPS is higher to use smooth video recording when
motion or alarms are triggered.
To Change the Normal Record PPS:
1. Select to set the Normal Record PPS.
2. Use the mouse wheel or the directional buttons to adjust the PPS, the maximum PPS
per camera is 30 PPS.
3. When in 720 x 240, you can change each camera’s PPS individually, and you have 120
PPS to distribute between the attached cameras.
4. When in 360 x 240 the Normal PPS will change by two channels at a time (1 and 2, 3
and 4, 5 and 6 etc...) You will have a total of 240 PPS to distribute across the attached
cameras.
5. Press ENTER or Select
6. Exit the record setup menu to save changes.
7. Exit the main menu
to save settings and return to record setup menu.
. The DVR will take a few moments to load the settings.
Note: For each setting, you can also click the
‘Average’ box at the bottom of the menu
screen to divide the PPS evenly across all
of the attached cameras. If no cameras
are attached the average option will not
distribute the PPS to any camera.
23CV501 - 16CH
Page 24
MAIN MENU...continued
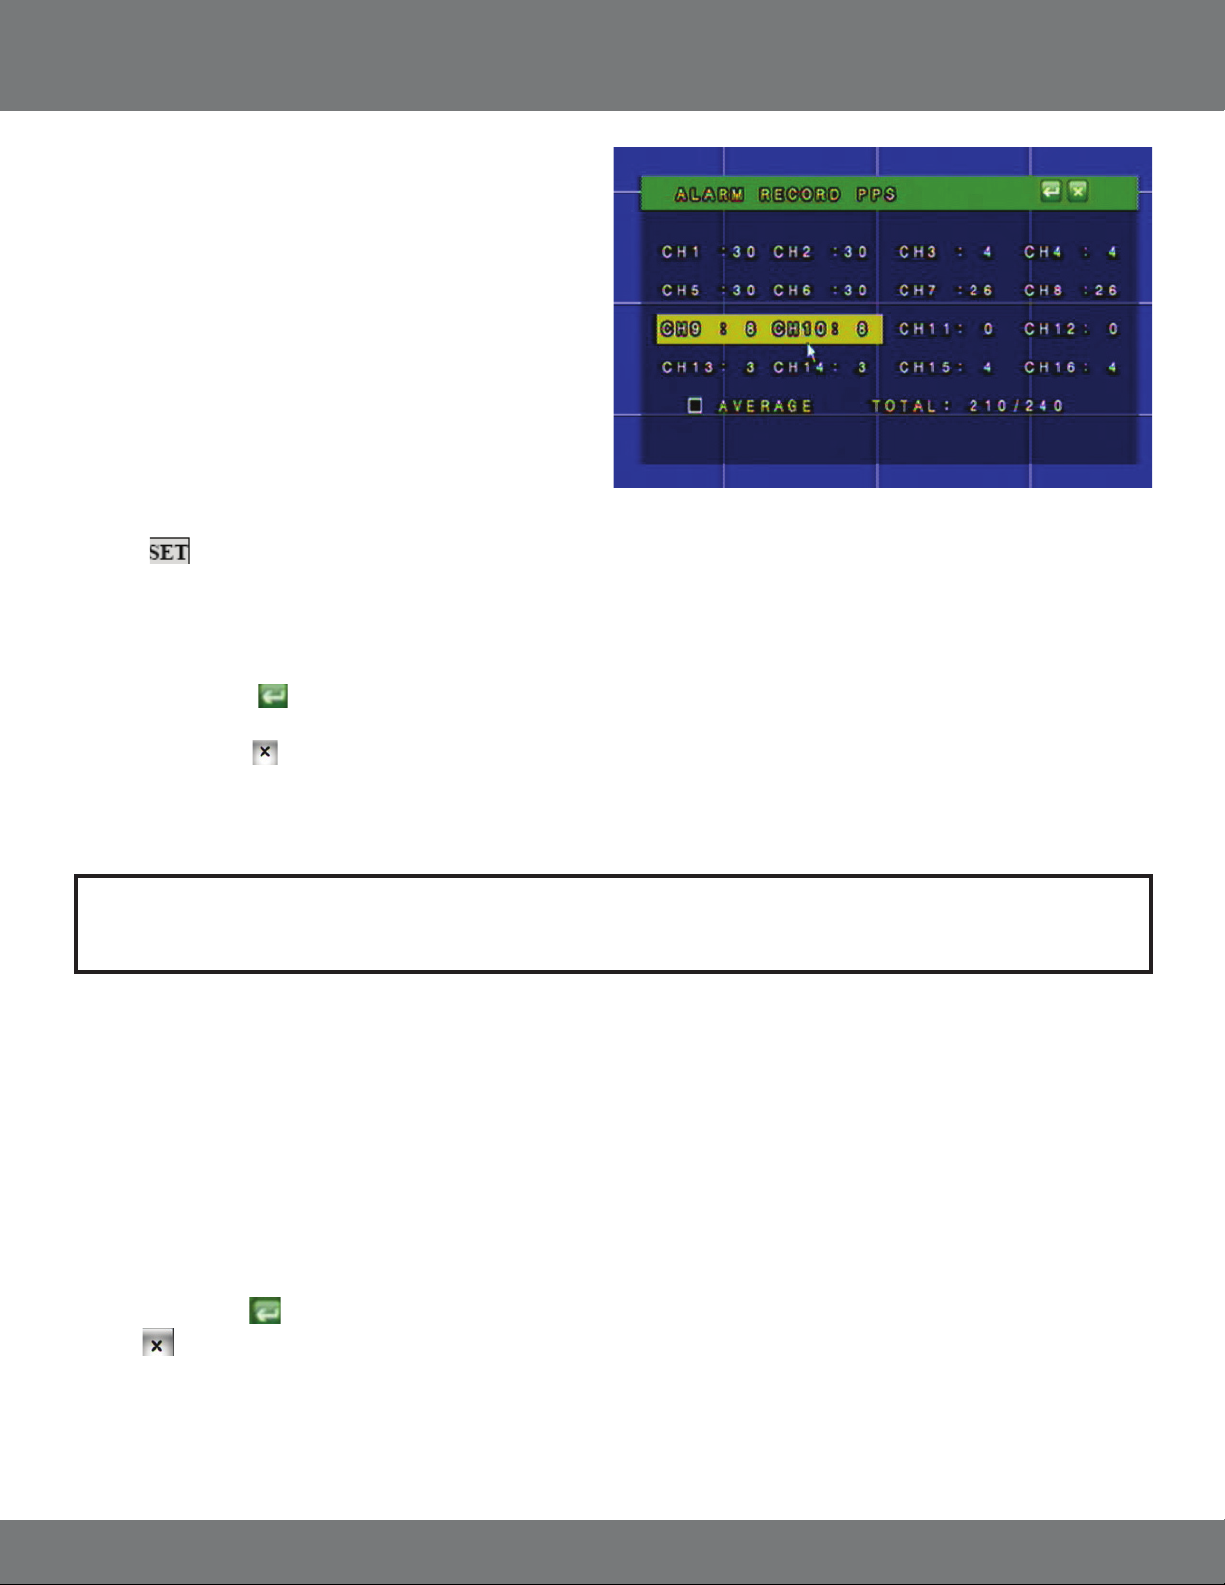
ALARM RECORD PPS
You can change the PPS for alarm record. You may wish to change
the alarm PPS so that there is a higher PPS for when an alarm (e.g.
motion) is detected by the DVR and a lower PPS for Normal Record.
To Change the Alarm Record PPS:
1. Select to adjust the Alarm Record PPS.
2. Use the mouse wheel or the directional buttons to adjust the PPS, the most PPS per camera is 30 PPS.
3. When in 720 x 240, you can change each camera’s PPS individually, and you have 120 PPS to distribute between the attached cameras.
4. When in 360 x 240 the Alarm PPS will change by two channels at a time (1 and 2, 3 and 4, 5 and 6 etc...) You will have a total of 240 PPS to
distribute across the attached cameras.
5. Press ENTER or select to save settings and return to record setup menu.
6. Exit the record setup menu to save changes.
7. Exit the main menu
• There is a total of 240 PPS (for 360 x 240) available to share between the 16 channels
• There is a total of 120 PPS (for 720 x 240) available to share between the 16 channels
to save changes. The DVR will take a few moments to load the settings.
Note: By clicking the box next to the word ‘AVERAGE’ you can evenly distribute the PPS to all connected cameras for Normal PPS and
Alarm Record PPS.
ALARM RECORD DURATION
Alarm Record Duration represents the length of time the DVR will record when it detects an alarm (motion, external alarm). You can set the Alarm
Record Duration anywhere from 5 seconds to 99 seconds.
To set the Alarm Record Duration:
1. Highlight the Alarm Rec Duration option.
2. Use the mouse wheel or directional keys to change how long you want the DVR to record when an alarm is detected.
3. Press ENTER or Click
4. Click
5. DVR may take a few moments to save the settings.
to exit.
to save changes.
24CV501 - 16CH
Page 25
MAIN MENU...continued
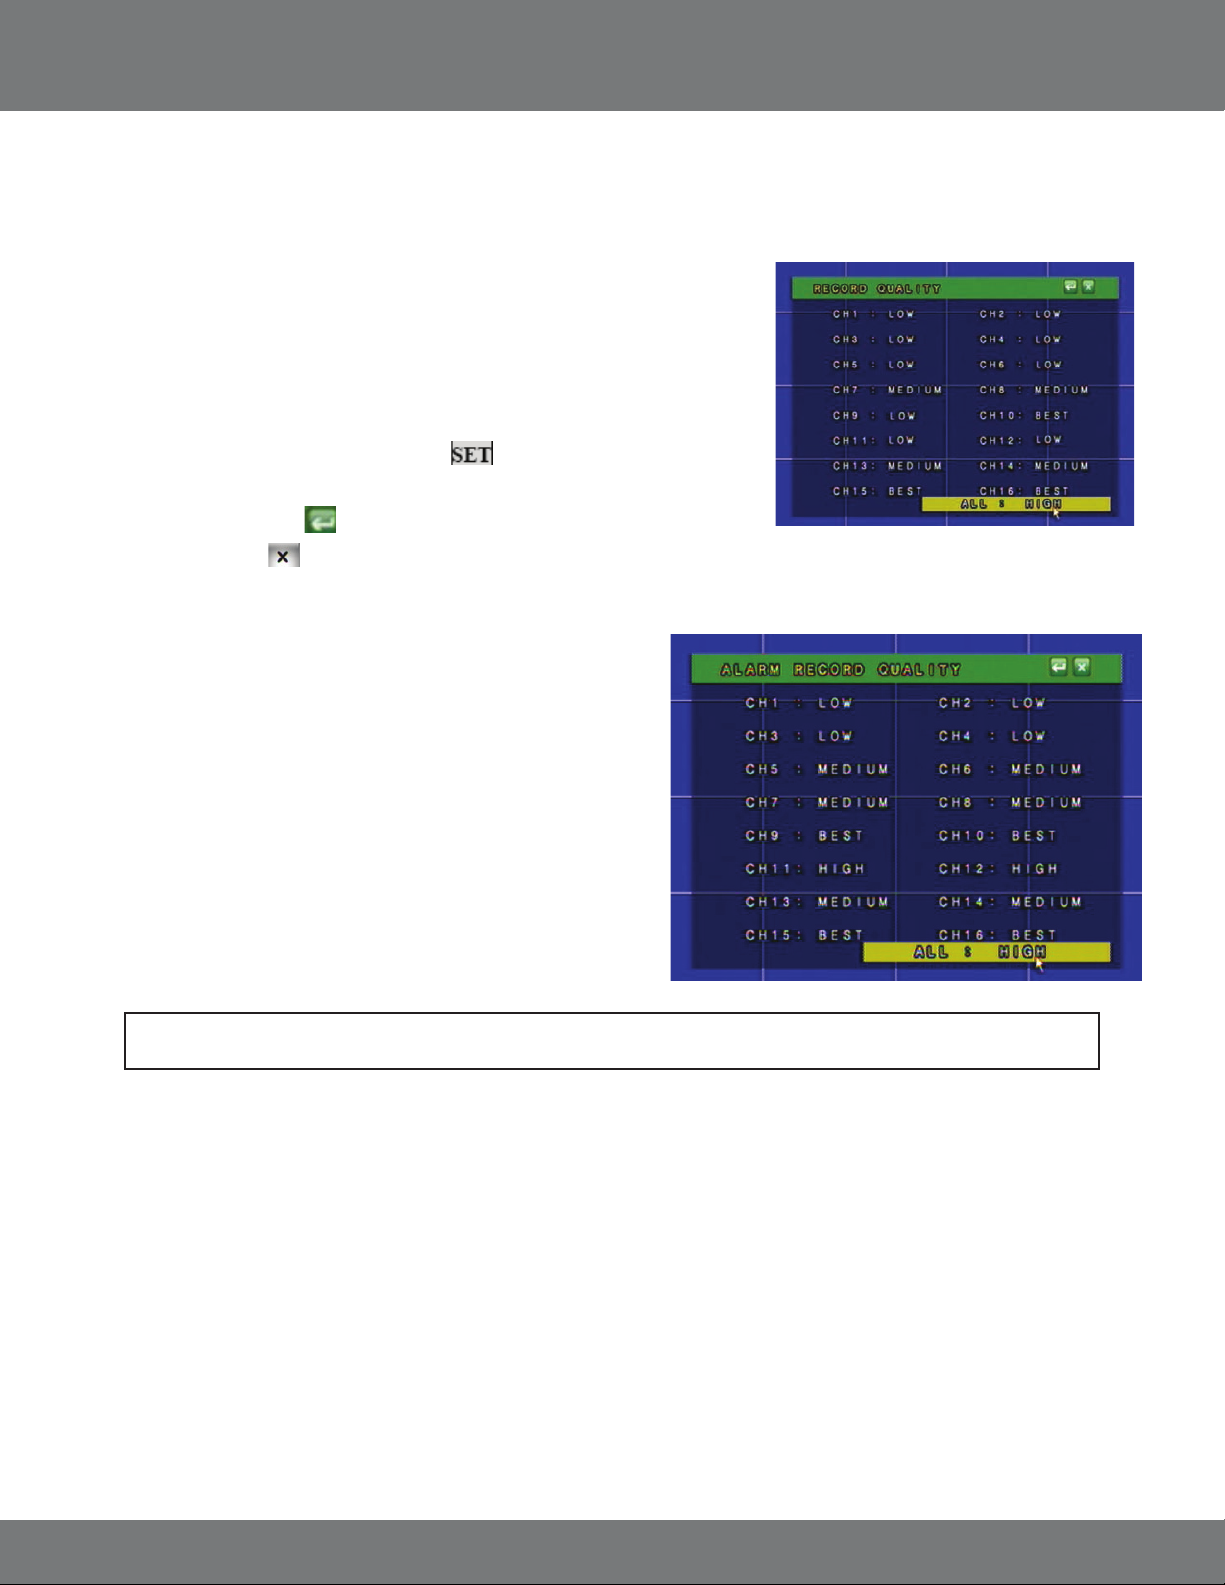
RECORD QUALITY
There are four levels of record quality you can choose from, and it is adjustable per camera if recording with 720 x 240 resolution. If using 360 x 240
resolution, cameras are adjusted in pairs (1 & 2, 3 & 4, 5 & 6 etc...):
1. Low
2. Medium
3. High
4. Best
To Change the Record Quality:
1. Highlight the record quality option and click to change the record quality.
2. Use the mouse wheel or directional keys to change the cameras record quality setting.
3. Press ENTER or Click the
4. Press Menu or Click
ALARM RECORD QUALITY
You can set the DVR to record with higher or lower picture quality when
motion/alarms are triggered. The instructions are the same as above for
adjusting normal record quality when adjusting alarm record quality. There
are four levels of record quality you can choose from for when the alarm the
is triggered, each quality is adjustable per camera.
to save changes and exit to Record Setup menu.
to exit the Record Setup Menu.
1. Low
2. Medium
3. High
4. Best
Note: You can also adjust all cameras at once by using the option at the bottom of the screen and scrolling through
RECORD MODE
You can set your DVR to record based on a preset schedule you have created or to manually record when you desire. By default, the schedule is set to
record 24/7 and will automatically start recording when powered up. You have a choice to congure up to 5 recording schedules. Only one recording
schedule can be active at any given time.
To choose a recording schedule:
In the record mode area, use the mouse wheel or directional buttons to scroll through various recording modes: Schedule 1, Schedule 2, Schedule 3,
Schedule 4, Schedule 5, or manual. The schedule that is displayed on the Record Setup Screen will be the active recording schedule.
See the directions on how to setup a schedule in the Schedule setup section.
25CV501 - 16CH
Page 26

MAIN MENU...continued
AUDIO RECORD
The DVR is capable of recording one channel of audio. You can connect a camera that has a built in microphone or connect an external microphone
into the RCA audio input to congure the DVR to record with audio.. The cameras that are included with the DVR do not support audio.
To record with audio:
1. Highlight the Audio Record option.
2. Use the mouse wheel or directional keys to change from OFF to ON.
3. Press ENTER or Click the
4. Exit the Main Menu
to save changes.
to save changes. The DVR may take a few moments to save the settings.
Using the Pop Up Menu Bar you can mute the audio from playing through the connected speaker or TV and still record by clicking
SCHEDULE SETUP
A schedule can be used to customize your recording modes by the hour for every
day of the week. This is benecial for business environments that have dierent
hours during weekdays and the weekend. For home use, you can set dierent
record modes for the days you have people over for housework, yard work, or even
baby sitters. By default, the DVR is set to automatically record a 24/7 schedule.
You have a choice to customize up to 5 dierent recording schedules.
The recording schedule is 24/7 and uses a 24 hour clock (e.g. on this screen 18 is
6:00 pm. In live or playback mode 17:00 is equal to 5:00 PM) Each square on the
24/7 schedule represents one hour.
There are 3 dierent recording options:
1. Full Record (red) – will record all the time using the Normal Record PPS.
2. Alarm Record (orange) – will record only when a specic action happens (video loss, motion, etc) using the Alarm Record PPS.
3. No Record (green) – the DVR will not record during the hour when this option is chosen.
.
You can now customize a recording schedule to meet your needs and specications.
There are several advantages of setting up a customized recording schedule. When the DVR is on FULL RECORD 24/7, your hard drive will ll up
quickly. To optimize your HDD space, you may wish to choose to record only when motion is detected at certain times, or to not record at all. You can
set up your recording schedule based on your own preferences.
There are 5 dierent options for schedules, so you can set a separate schedule for long weekends, holidays, when you are on vacation, or for the
days you will be away from your home/oce and have to leave others in charge. Once the schedules are set, it is easy to switch from one to
the other.
26CV501 - 16CH
Page 27

MAIN MENU...continued
To set the schedules:
1. Highlight SCHEDULE SETUP and select to enter the schedule
record Menu.
2. Select the type of recording you wish to use (Full, Alarm, No) from the
bottom of the Menu screen or use the fast forward button to toggle
between the type of recording.
3. In the calendar display, press ENTER or click on the hour and day you wish
this method of recording to happen.
4. Select the to save changes and return to the Record Setup Menu.
5. Press Menu or Click the to exit the Main Menu and save your settings.
The DVR may take a few moments to load the settings.
This is a sample schedule. This schedule may work well for a small
business, with dierent settings for weekday business hours, and with
more security over the weekend.
Note: To switch between schedules in this mode, scroll the wheel on the mouse, or press the CH1-CH4 button, Quad view buttons.
ALARM SETUP
1. Access the Main Menu by pressing Menu or move the mouse to the bottom of the display screen to reveal pop up Menu bar and click the Menu
icon.
2. Select the ALARM setup icon.
There are several dierent types of events that will trigger the Alarm Recording.
1. External Alarm – If you have a 2 wire Normally Open (NO),
or Normally Closed (NC) device, it can be connected to the
DVR to record when the alarm is triggered. For example, the
external alarm can also be connected to a motion sensor, or
audio sensor.
2. Video Loss – The DVR will archive the day and time it
detects video loss. This means it will log the time and take
whenever a camera is disconnected or tampered with.
3. Motion Detection – The DVR will archive and store the
footage when motion is detected on any of the 8 cameras
when set up.
27CV501 - 16CH
Page 28

MAIN MENU...continued
External Alarm Mode
You can adjust your external alarm for Normally Open (NO), or Normally Closed (NC). Please consult the external alarm manufacturer for details
regarding whether to set up the External Alarm Mode to Normally Open or Normally Closed.
1. Use the mouse wheel or directional buttons to change from Normally Open (NO), or Normally Closed (NC).
2. Press Menu or select the
3. Press Menu or select the
ALARM DISPLAY MODE
The DVR will allow you set congure your Alarm Display options. This will decide whether or not to change the viewing mode to focus on the
camera that is detecting the alarm. There are two choices:
1. Disable: No display changes will be made when an alarm is triggered (Motion Detection, External Alarm, Video Loss).
2. Single Mode: When active and in Live Viewing Mode, single mode will switch the camera view to a single camera in full screen for 10 seconds.
If another alarm is triggered while in Single Camera Mode, the view will switch to the new alarm triggered channel.
to return to the Menu.
to exit the Main Menu and save your settings. The DVR may take a few moments to load the settings.
Note: SVAT does not provide support for external alarm systems. Please contact the alarm manufacturer for instructions.
VIDEO LOSS DETECT
You can set the DVR to archive video footage when it detects video loss. Since video loss is a serious issue for camera surveillance, it is important to
be able to see what happened before the video loss occurs. When video loss detection is enabled, the DVR will display on the screen or in the event
log when video loss occurs. The DVR must be recording to update the event log. Please see Playback for more information on using the event log.
Review the normal recorded footage prior to the video loss occurred.
To Set the DVR to Detect Video Loss:
1. Move the mouse or directional keys to highlight VIDEO LOSS DETECT.
2. Use the mouse wheel or directional keys to change from DISABLE to ENABLE.
3. Press ENTER or select the
4. Press Menu or select the
to return to the Main Menu.
to exit the Main Menu and save your settings. The DVR may take a few moments to load the settings.
EVENT LOG SETUP
The event log holds the date and time, of the footage which is saved due to an alarm being detected by the DVR and other types of
events. The dierent types of events that are logged are:
1. External Alarm
2. Video Loss
3. Motion Detection
4. Manual Recording
5. Power On
28CV501 - 16CH
Page 29

MAIN MENU...continued
The event log setup allows you to choose which alarm triggers will be saved to your event log (maximum 3000 events). Setting up the event log
allows you to start playing recorded footage by specic events so that you do not have to fast forward through long periods of footage to see
when the alarm is detected. It also serves as a list with the important events that have occurred, so that you can easily trace them, and when they
happened.
To Setup the Event Log:
1. Highlight EVENT LOG SETUP.
2. Select to access the Event Log Setup Menu.
3. Highlight the type of alarm you want to enable or disable.
4. Use the mouse wheel or directional keys to change from ON to OFF.
5. Press Menu or select the to return to the Menu and save your settings.
6. Press Menu or select the
BUZZER TIME SETUP
The DVR can make an audible beep when a particular alarm is detected. This will alert the user that there is activity detected by the DVR. The DVR
can be set to give you this audio alert when there is external alarm activation, motion detection, and/or video loss. Buzzer Time setup will allow
you to choose how long after the alarm is detected, you want the beep to occur. The options are OFF and 5 sec – 99 sec. The buzzer for Motion
Detection can be set from 5 sec -99sec. To disable the motion detection buzzer, refer to the MOTION SETUP Menu).
to exit the Main Menu. The DVR may take a few moments to load the settings.
To Change the Buzzer Time:
1. Highlight BUZZER TIME SETUP.
2. Select to access the Buzzer Time Setup Menu.
3. Highlight the type of alarm you want to set.
4. Use the mouse wheel or directional keys to change the length of time the buzzer will sound when the alarm is detected.
5. Press Menu or select the
6. Press Menu or select the
to return to the Main Menu, or press the ENTER key.
to exit the Main Menu and save your settings. The DVR may take a few moments to load the settings.
RELAY TIME SETUP
The DVR has a connection for an alarm relay output. This allows you to connect a 2 wire Normally Open (NO), or Normally Closed (NC) connection to
an external alarm source like a siren, ashing lights, or an existing two wire security system.
Relay time setup allows you to adjust the length of time the DVR will send an electrical signal through the connected relay device. An external
power source is likely required. Please contact your alarm manufacturer for information and assistance with your alarm.
Note: SVAT does not provide support for external alarm systems. Please contact the alarm manufacturer for instructions.
29CV501 - 16CH
Page 30

MAIN MENU...continued
To Setup the Relay Time Setup:
1. Select RELAY TIME SETUP from the Alarm Setup Menu.
2. Select to access the Relay Time Setup Menu.
3. Highlight the type of alarm you want to set up.
4. Use the mouse wheel or directional keys to change the length of time. The 12V signal will be sent to your external alarm when an alarm is
detected.
5. Press Menu or select the
6. Press Menu or select the
HARD DISK MANAGEMENT SETUP
The DVR comes with a pre installed hard drive. The HDD (Hard Disk
Drive) Management Menu will allow you to display the space left in
the hard drive, clear saved footage and set other HDD related options.
1. Access the Main Menu by pressing Menu or from the Pop Up
Menu Bar.
to return to the Main Menu or press the Menu button.
to exit the Main Menu and save your settings. The DVR may take a few moments to load the settings.
2. Select the Main Menu icon .
3. In the Main Menu, select HDD Management
.
OVERWRITE MODE
The DVR provides you with the option to automatically overwrite the saved video and audio content on the HDD or to stop recording when the HDD
is full. The default setting is ON and will automatically overwrite old footage.
If the mode is set to OFF, you can set a warning to alert you when the HDD is nearing its full capacity. The Capacity Remaining Warning can be set to
5%, 10%, 15%, and 20% remaining. If this option is selected an onscreen message will appear, informing you that your HDD is getting full.
To Set the DVR to Warn You When the HDD is Getting Full:
1. Select OVERWRITE MODE .
2. Use the mouse wheel or directional keys to alternate the overwrite mode between ON and OFF.
3. When you choose OFF a new option will appear allowing you to set a warning level to inform you when the HDD is nearly full.
4. You can choose to set the DVR to warn you that the HDD is getting full when there is :
a) 5% HDD capacity remaining
b) 10% HDD capacity remaining
c) 15% HDD capacity remaining
d) 20% HDD capacity remaining
Use the mouse wheel or directional keys to change the capacity warning amount.
5. Press Menu or select the
6. Press Menu or select the
to return to the Main Menu.
to exit the Main Menu and save your settings. The DVR may take a few moments to load the settings.
30CV501 - 16CH
Page 31

MAIN MENU...continued
HDD INFORMATION
This option will allow you to view the total capacity of the connected hard drive as well as the percentage of remaining space. This Menu is only
used to display your HDD status, and no settings can be adjusted on this screen.
The HDD Information will Show You:
Disk – Name of HDD
Capacity - The size of your HDD
Left Ratio - The percentage of space left on the HDD
HDD FORMAT SETUP
In this menu you can format the HDD, as well as change security
settings for formatting the HDD. A password can be required to format
the HDD; even users who have access to all controls of the DVR will not
be able to format the hard drive unless they know this password.
Enabling HDD password protection is recommended, so that only the
right people can erase any footage you have captured and stored. This
password should be dierent from the password used to access the Menu
of the DVR. This setting will prompt a user to enter a password before
being able to enter the HDD Format Setup Menu.
To Setup the Password Protect:
1. Select HDD PASSWORD PROTECT.
2. Use the mouse wheel or directional keys to change from DISABLE to ENABLE. This will require the HDD password setup to be entered before
accessing the HDD Format Menu while enabled. The next step is to choose a password for the HDD format protection. The default password
is the same as the default password for the DVR: 1111. It is recommended that the DVR Menu password and the HDD password be changed and
dierent from the menu password. This way someone can access the DVR Menu, but not the HDD Menu.
3. Select
4. Highlight the number to change and use the mouse wheel or directional keys on each number to change to the new password.
5. Press Menu or select the
6. Press Menu or select the
7. Press Menu or select the
to enter the HDD password Setup Menu.
to exit the HDD Password Setup.
to exit the HDD Management Menu.
to exit the Main Menu and save your settings. The DVR may take a few moments to load the settings.
31CV501 - 16CH
Page 32
MAIN MENU...continued
To Format the HDD:
1. Select HDD FORMAT SETUP.
2. Select
3. Use the mouse wheel or directional keys to change from DISABLE to ENABLE.
4. Select to format your HDD.
5. You will be prompted to ensure that you really want to format the hard drive.
6. Select YES to format the hard drive, or NO to exit the Menu and not delete the stored footage. The selected button will looked as if it is
pressed in.
7. Press Menu or select the
8. Press Menu or select the
This will not erase any of your DVR settings.
to enter the HDD Format Setup Menu.
to exit the HDD Management Menu or press the Menu button.
to exit the Main Menu.
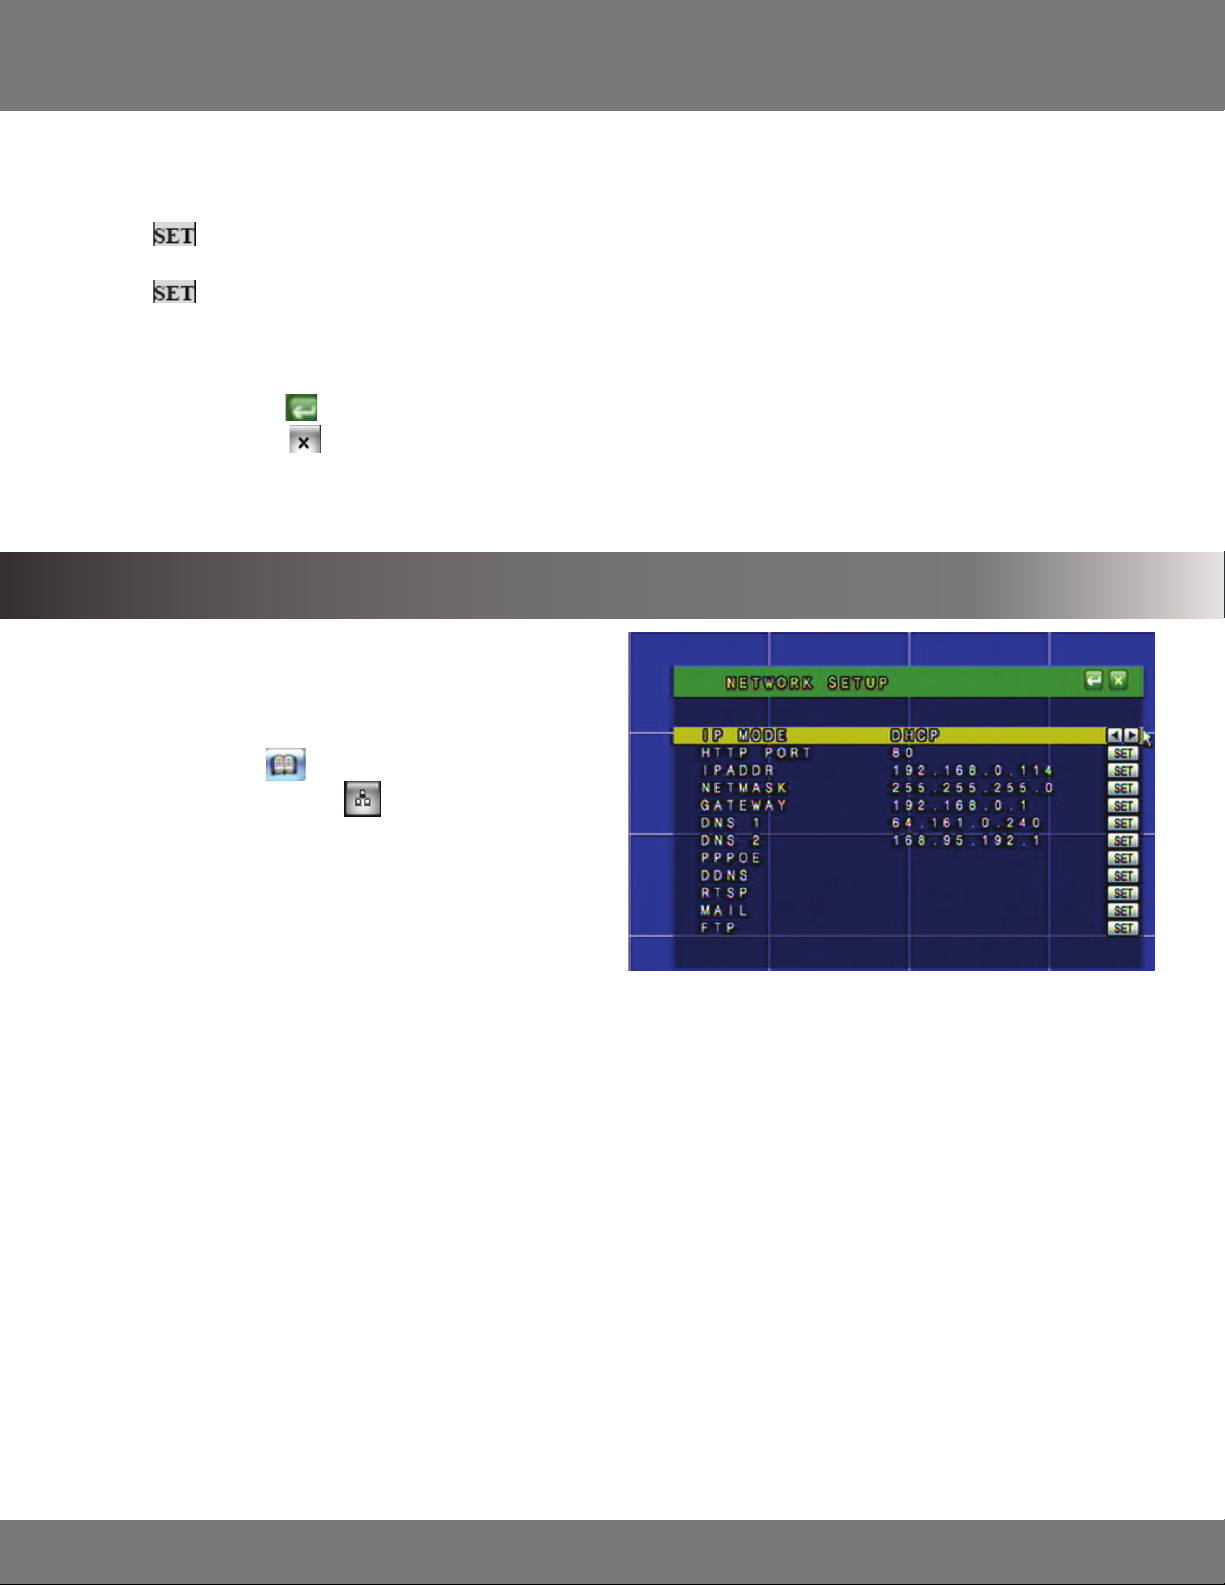
NETWORK SETUP
1. Access the Main Menu by pressing Menu or by using the Pop Up
Menu Bar. Move the mouse to the bottom of the display screen to
reveal the Pop Up Menu.
2. Select the Menu icon.
3. Select the NETWORK setup icon.
The network setup Menu is your gateway to viewing your footage
online. This Menu holds the information you need about your DVR to set
up on-line viewing. Note that for basic network setup, the values shown
on the screen are the values you will be using, and that you will not
need to set new values.
The Next Page has a quick description of the network setup menu items.
TERMS
IP Mode: Static vs. DHCP
DHCP: (Dynamic Host Conguration Protocol) address is the most common setup for home or oce networks. This allows the DVR to automatically
receive an IP address from the router. By default the IP MODE should be set to DHCP and this is acceptable in most situations.
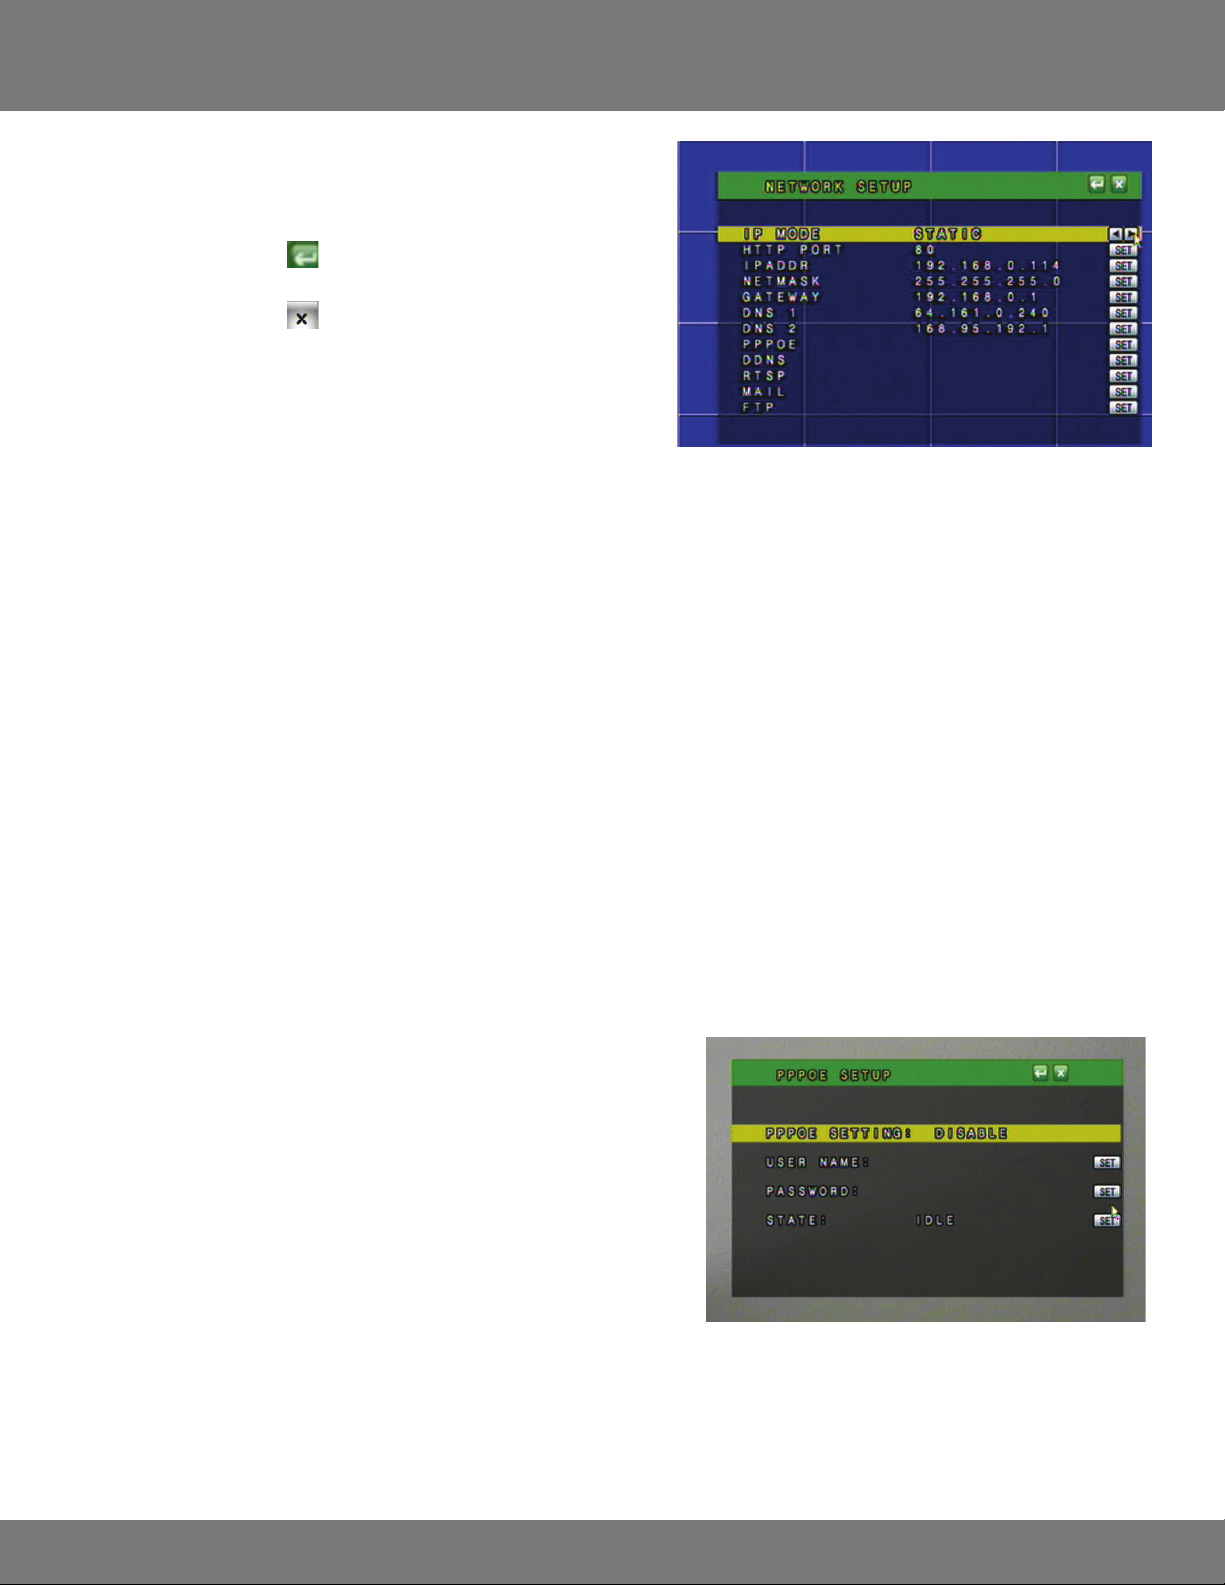
static IP: is one that does not change. Static IP addresses are manually assigned by an administrator. Most home or oce networks today do not
use static IP addresses. If you are unsure of whether you need a static or dynamic IP address, please contact the person who setup your network or
your internet service provider (ISP). A static IP address would be benecial if your internal IP address changes often.
32CV501 - 16CH
Page 33
NETWORK SETUP...continued
To Change from Static to DHCP Addresses:
1. Under IP Mode, use the mouse wheel or directional keys to change from
DHCP to STATIC.
2. Press Menu or select the
the Menu button.
3. Press Menu or select the
settings.
The DVR may take a few moments to load the settings.
HTTP Port: Refers to the port that your DVR will use to communicate with your network and the Internet. This port is required to be entered at
the end of the IP address to connect to the DVR. (Ex. If using port 2000 and the IP address is 192.168.1.103 you would type
http://192.168.1.103:2000 in the address bar of Internet Explorer) If using port 80 your Internet browser will automatically add it
in at the end of the address, even though it may not be visible.
IPADDR: (IP ADDRESS). The numbers here represent the internal IP address of your DVR. If your DVR is not properly connected to the router,
the address will appear as 0.0.0.0. To nd you DVR’s IP address, make sure that it is connected to your router and reset the power on
the DVR. The internal IP address is the most important number on the Network Setup Menu screen.
to exit the Network Setup Menu or press
to exit the Main Menu and save your
Netmask: (Subnet Mask): The subnet mask is used for identifying the subnetwork the DVR is connected to. There is no need to adjust this
number for general network setup. Usually the netmask is 255.255.255.0.
Gateway: (Default Gateway): In computer networking, a default gateway is the device that passes trac from the local subnet to devices on
other subnets. There is no need to adjust this number for general network setup. Generally this is the IP address of your router.
DNS 1: (Domain Name System): For advanced network setup. DNS is used to convert common names into website IP Addresses.
DNS2: For advanced network setup. DNS is used to convert common names into website IP Addresses.
PPPoE SETUP
PPPoE stands for Point-to-Point Protocol over Ethernet. PPPoE is used by (A)
DSL Internet connections. Usually the modem or router will store the PPPoE
information so that the DVR and other computers that are connected to the
network do not require a password to access the Internet. If you use DSL, please
contact your ISP for your PPPoE information if required.
To Setup PPPoE Settings:
1. Change PPPoE setting to ENABLE.
2. Enter the Username provided by your ISP.
3. Enter the Password provided by your ISP.
4. Press ENTER on State to update the status.
If properly connected, the State will display your connection status as
being connected.
33CV501 - 16CH
Page 34
NETWORK SETUP...continued
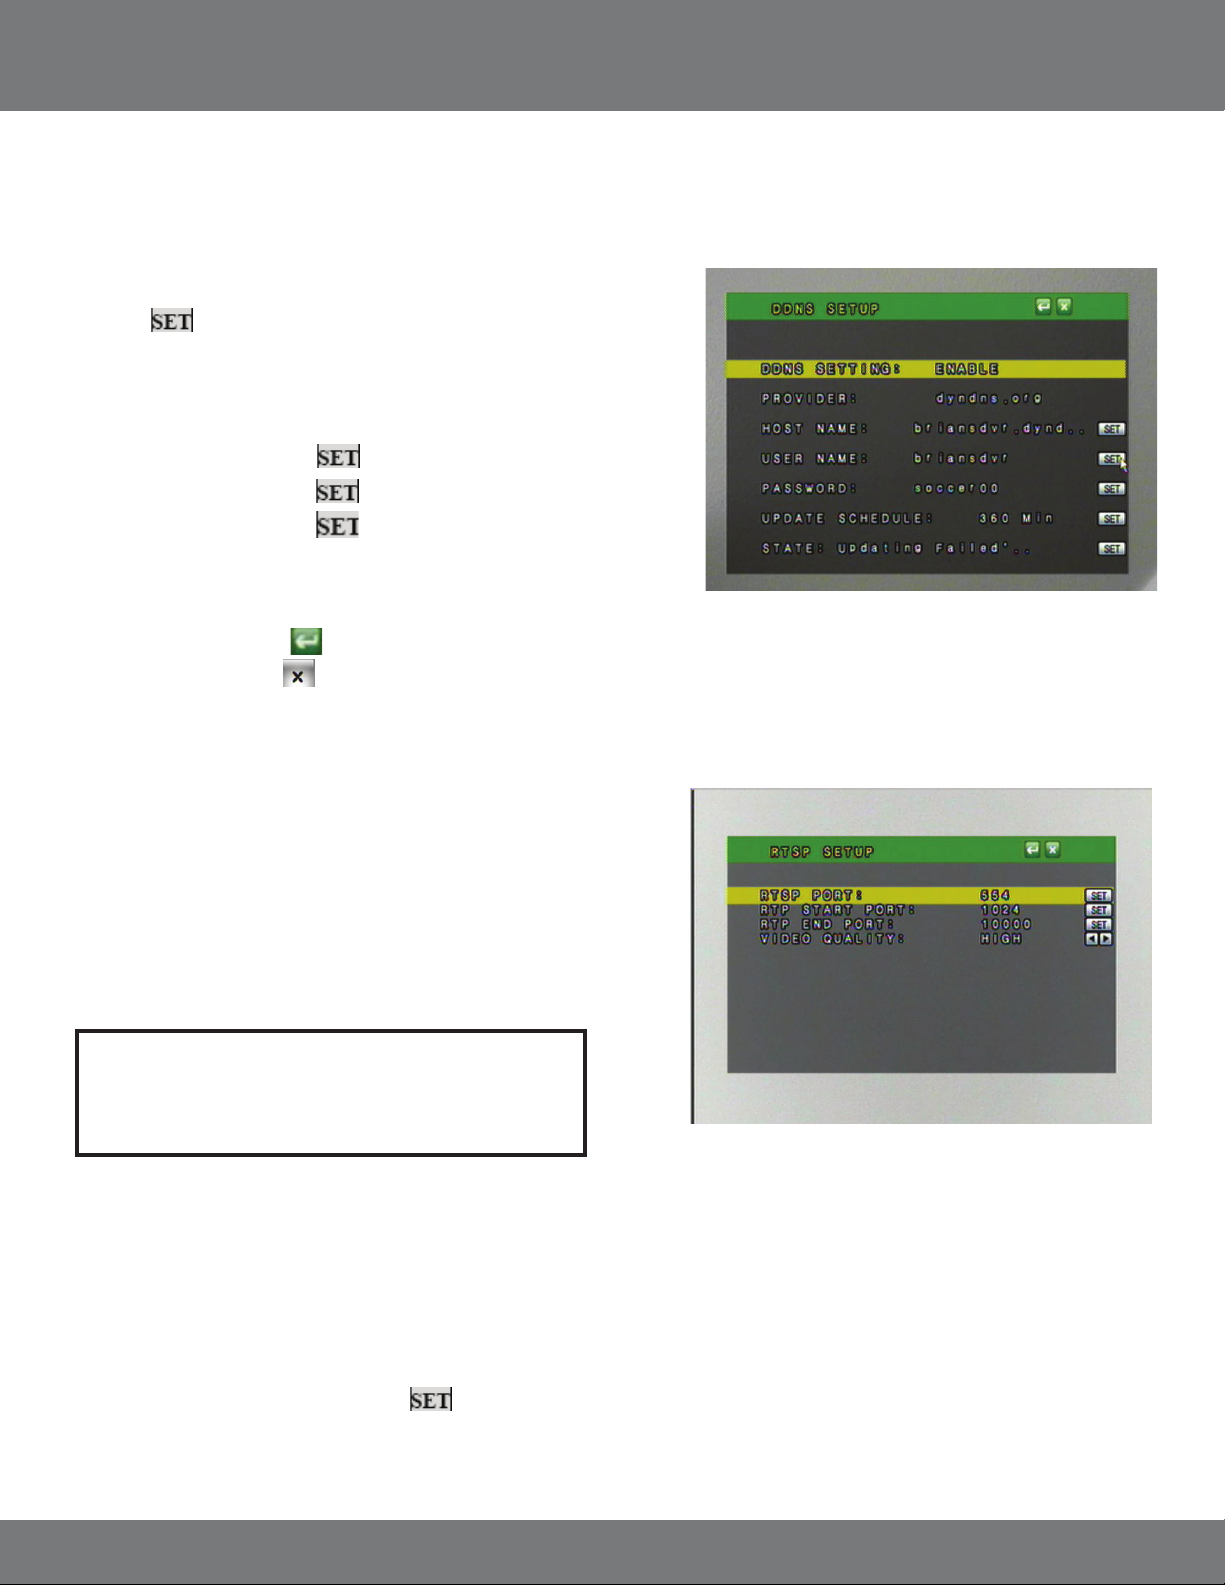
DDNS: (Dynamic Domain Name Service) This Menu option allows you to set up a common name for the DVR instead of an IP address. This feature is
used if you have a Dynamic IP address from your ISP and the IP address is constantly changing.
To Setup your DDNS:
1. Select to setup the DDNS.
2. Highlight DDNS Setting. Use the mouse wheel or directional keys to change
from DISABLE to ENABLE.
3. Highlight PROVIDER. Choose your DDNS provider from the list.
4. Highlight HOST NAME. select
5. Highlight USER NAME. select
6. Highlight PASSWORD. select
*See DDNS Setup for more information on the DDNS setting.
7. Press Menu or select the
8. Press Menu or select the
NETWORK SETUP Menu.
to input your host name.
to input your user name.
to input your password.
to exit the DDNS SETUP Menu.
to save your changes and exit the
RTSP
RTSP stands for Real Time Streaming Protocol and is used for streaming each
channel of video over the Internet.
The following will explain all of the settings that are seen on screen:
RTSP Port: Used by mobile devices to view a single camera.
RTP Start/End Port: Used in conjunction with the RTSP port to view the
steaming video footage on the mobile device.
Video Quality: The quality of footage being streamed to mobile device.
Note: You only need to change these settings if your
network or ISP is blocking the ports listed on
this screen.
MAIL FUNCTION AND SETUP
The mail option makes it so that your DVR sends you an email when there is motion detected and/or the alarm is triggered on the DVR.
To set your DVR to email you when motion and/or the alarm goes o:
1. Click on Menu.
2. Click on the Network setup.
3. Highlight ‘MAIL’ and select the set button
or press enter on the front of the DVR.
34CV501 - 16CH
Page 35
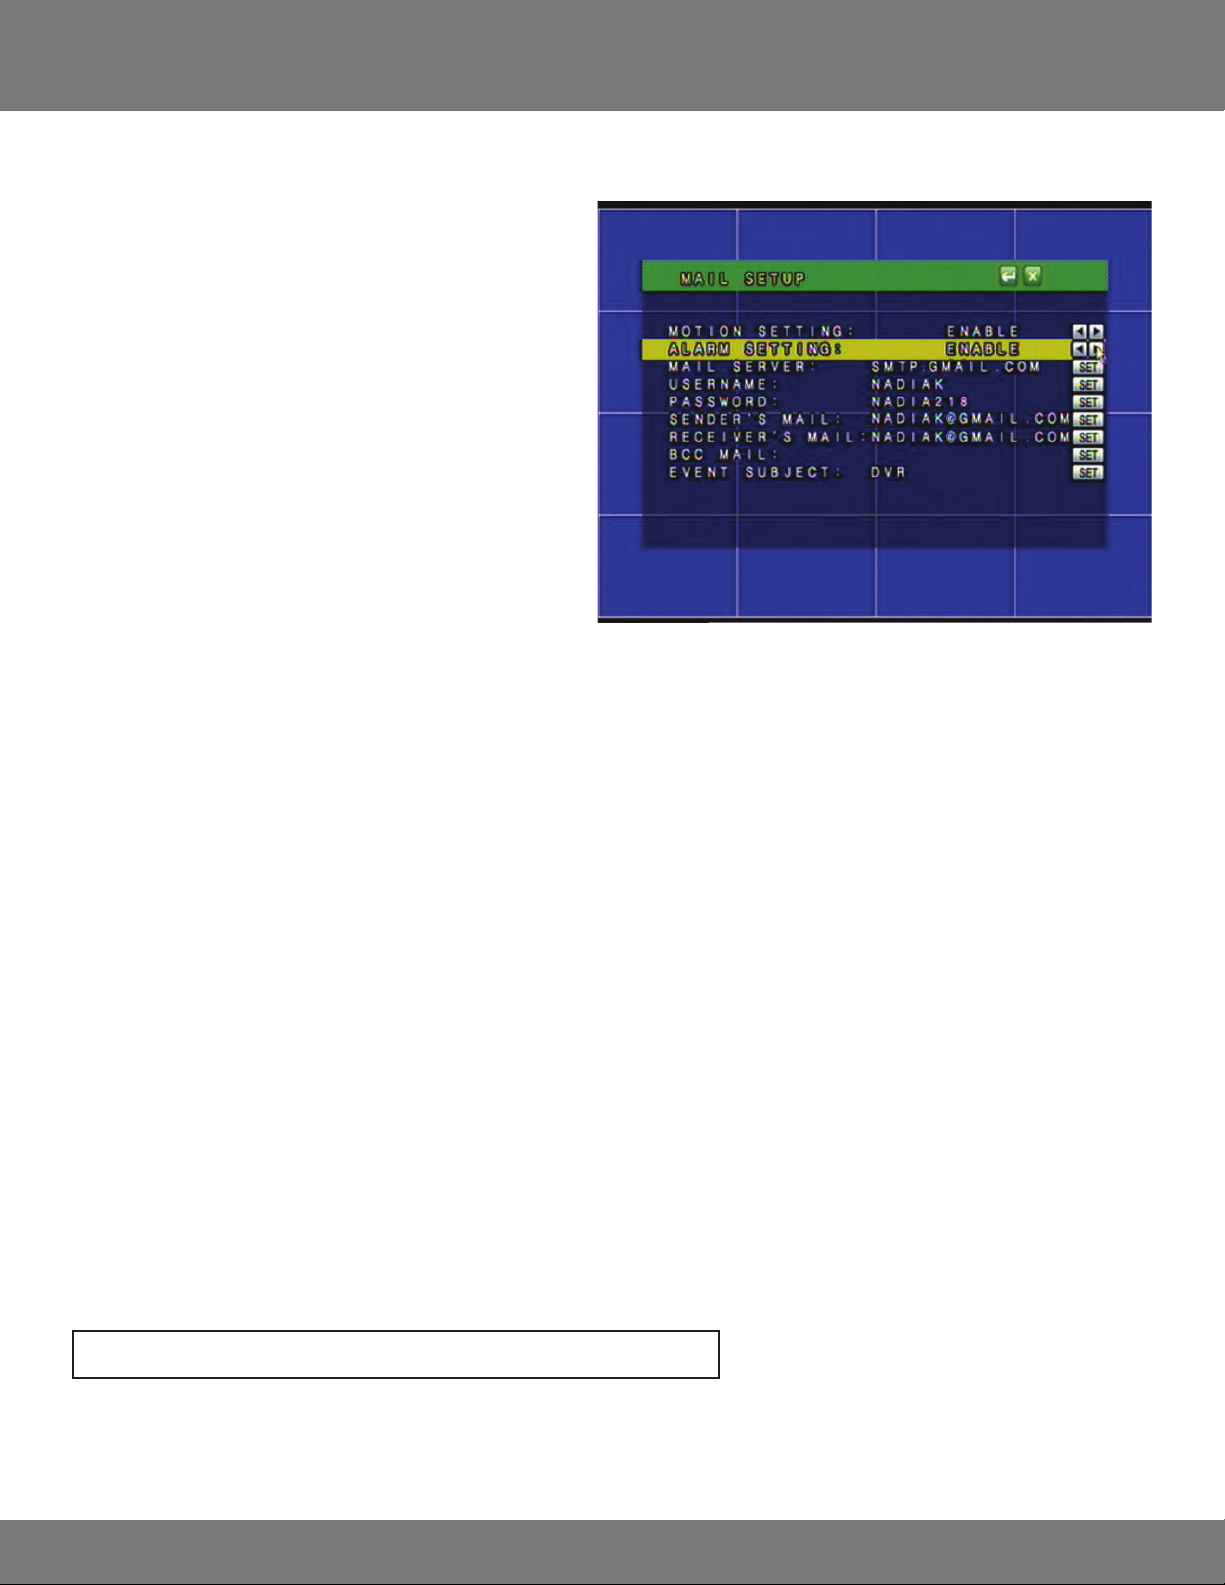
NETWORK SETUP...continued
The virtual keyboard will appear for you to insert the
following information:
Motion Setting: Enables the DVR to send you an email when
motion is detected by one of the cameras.
Alarm Setting: Enables the DVR to send you an email when
an external alarm is triggered by one of the
attached devices.
Mail Server: Set your SMTP mail server address. This is going
to be provided by your email service provider.
For example:
Google GMAIL: smtp.gmail.com
Yahoo! Email : smtp.mail.yahoo.com
AOL Mail : smtp.aol.com
Username: Put your email username in (example: If your
email is NadiaK@gmail.com) your username
would be NadiaK.
If when checking your email, your username is the entire email address, then you will enter the entire email address in the username
eld on the DVR. Your email service provider can provide you with the username to use.
Password: Put your email password in – this is the password you use to access your email account.
Sender’s mail: This is the email you that the DVR will use to send you the alert emails. The username and password must have permission to
send emails from this email account. Usually this will be the same email address as the username used to log on.
Reciever’s mail: This is the email that your DVR will send the alerts to. This can be the same as the sender’s email or a dierent email address.
BCC Mail: You can insert a second email for the DVR to send alerts to. The rst receiver will not be aware of the second email address as this
is a Blind Carbon Copy (BCC).
This can be the same as the sender’s email or a dierent email address.
Event Subject: This is what the subject of the email will be. Make sure the subject line is clear and can be easily recognized when received in
your inbox. Also make sure not to use words that will get ltered by spam checkers.
4. Highlight and enable motion and/or alarm setting by using the scroll wheel on your mouse or the up and down arrow keys on the front panel of
the DVR.
• When you enable motion the DVR will email your set email when motion is detected
• When you enable alarm the DVR will email your set email when the alarm is triggered (based on your alarm settings)
Note: Motion detection and/or alarm must be set to ON from the main menu.
35CV501 - 16CH
Page 36
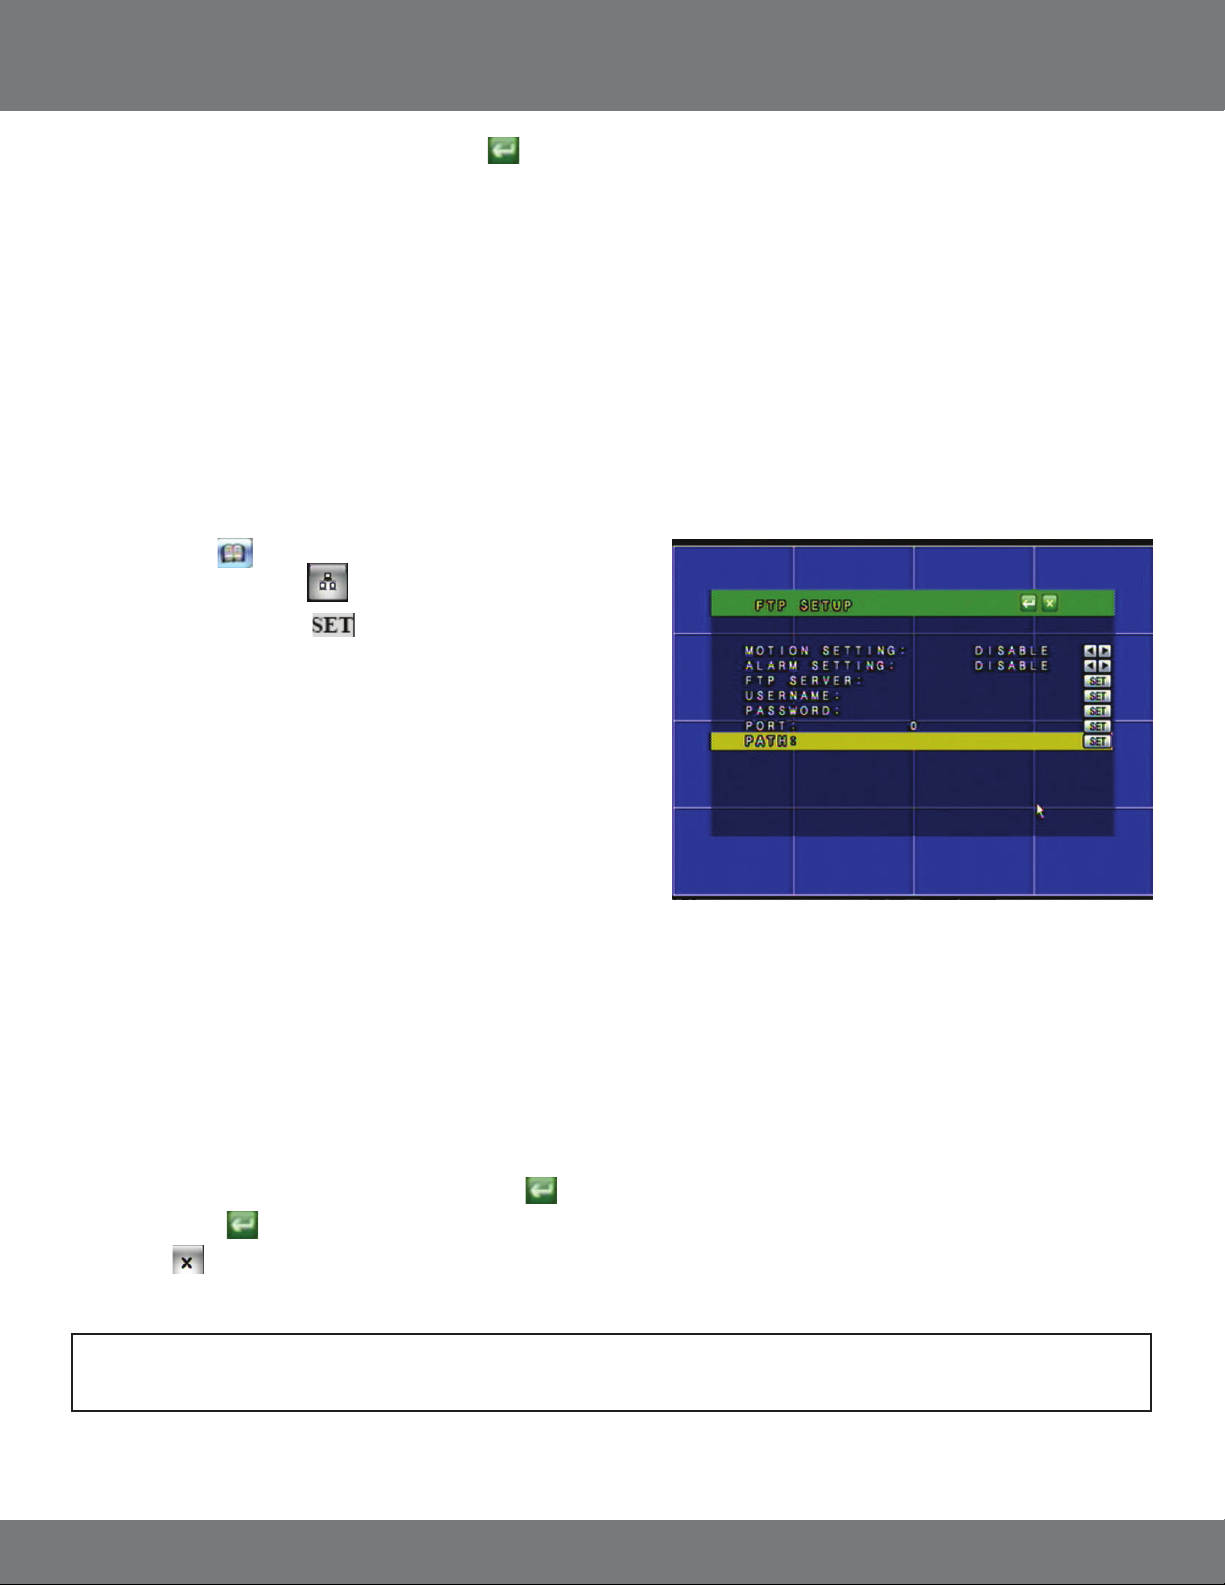
NETWORK SETUP...continued
5. After you have entered all the information select the
to load.
If you receive an email from the DVR it will include:
• The event subject you picked in the subject line of the email
• Warning Message: The date and time that the event took place
• NIC: The IP address of the DVR
• Player: The option to download the player software from the DVR
button to save changes and exit the menu. The DVR may take a few moments
FTP SETUP
You can enable the DVR to work with an FTP server so that motion or alarm triggered events will be automatically uploaded onto the server. To
congure the DVR to upload onto an FTP site you will need to have access to an FTP server (not provided by SVAT). Video clips will be uploaded in
.264 le format and will require the playback software to view the video clips.
To enable the DVR to send video clips to your FTP server when motion or alarm is detected:
1. Click on Menu.
2. Click on the Network setup.
3. Highlight FTP and select the button .
4. Highlight and enable Motion and/or Alarm settings by using the scroll
wheel on your mouse or the up and down arrow keys on the front panel
of the DVR.
When you click to set the following items the digital keyboard will pop
up for you to insert the following info:
5. FTP Server: The host name of your FTP server. This could be a full
hostname like ftp.svat.com or in IP address form,
216.12.36.244.
6. Username: The username you use to access the FTP server.
Most FTP usernames are case sensitive. Use the
Shift button to change the case of characters when
inputting the username.
7. Password: The password you use to access the FTP server. Most FTP passwords are case sensitive. Use the Shift button to change the
case of characters when inputting the password.
8. Port: The port being used by the FTP server. By default this is port 21 and is the commonly used port for FTP service.
9. Path: The path where you want the les to be placed on your FTP server. If you would like to change the le folder that the DVR
will upload the les to, enter the desired path name. The DVR will create a folder for each day that les are uploaded in the
following format: YYYYMMDD.
10. After you have input all the information select the ENTER
11. Press the ENTER
12. Click the
button again to save the overall network settings.
to exit the menu. The DVR make take a few moments to load.
button to save changes and exit the menu.
Note: Files need to be played back using the playback software. The player can be downloaded from the web interface, the
included CD, or from the DVR’s product webpage. See Playback Software for information on how to play back up les.
36CV501 - 16CH
Page 37
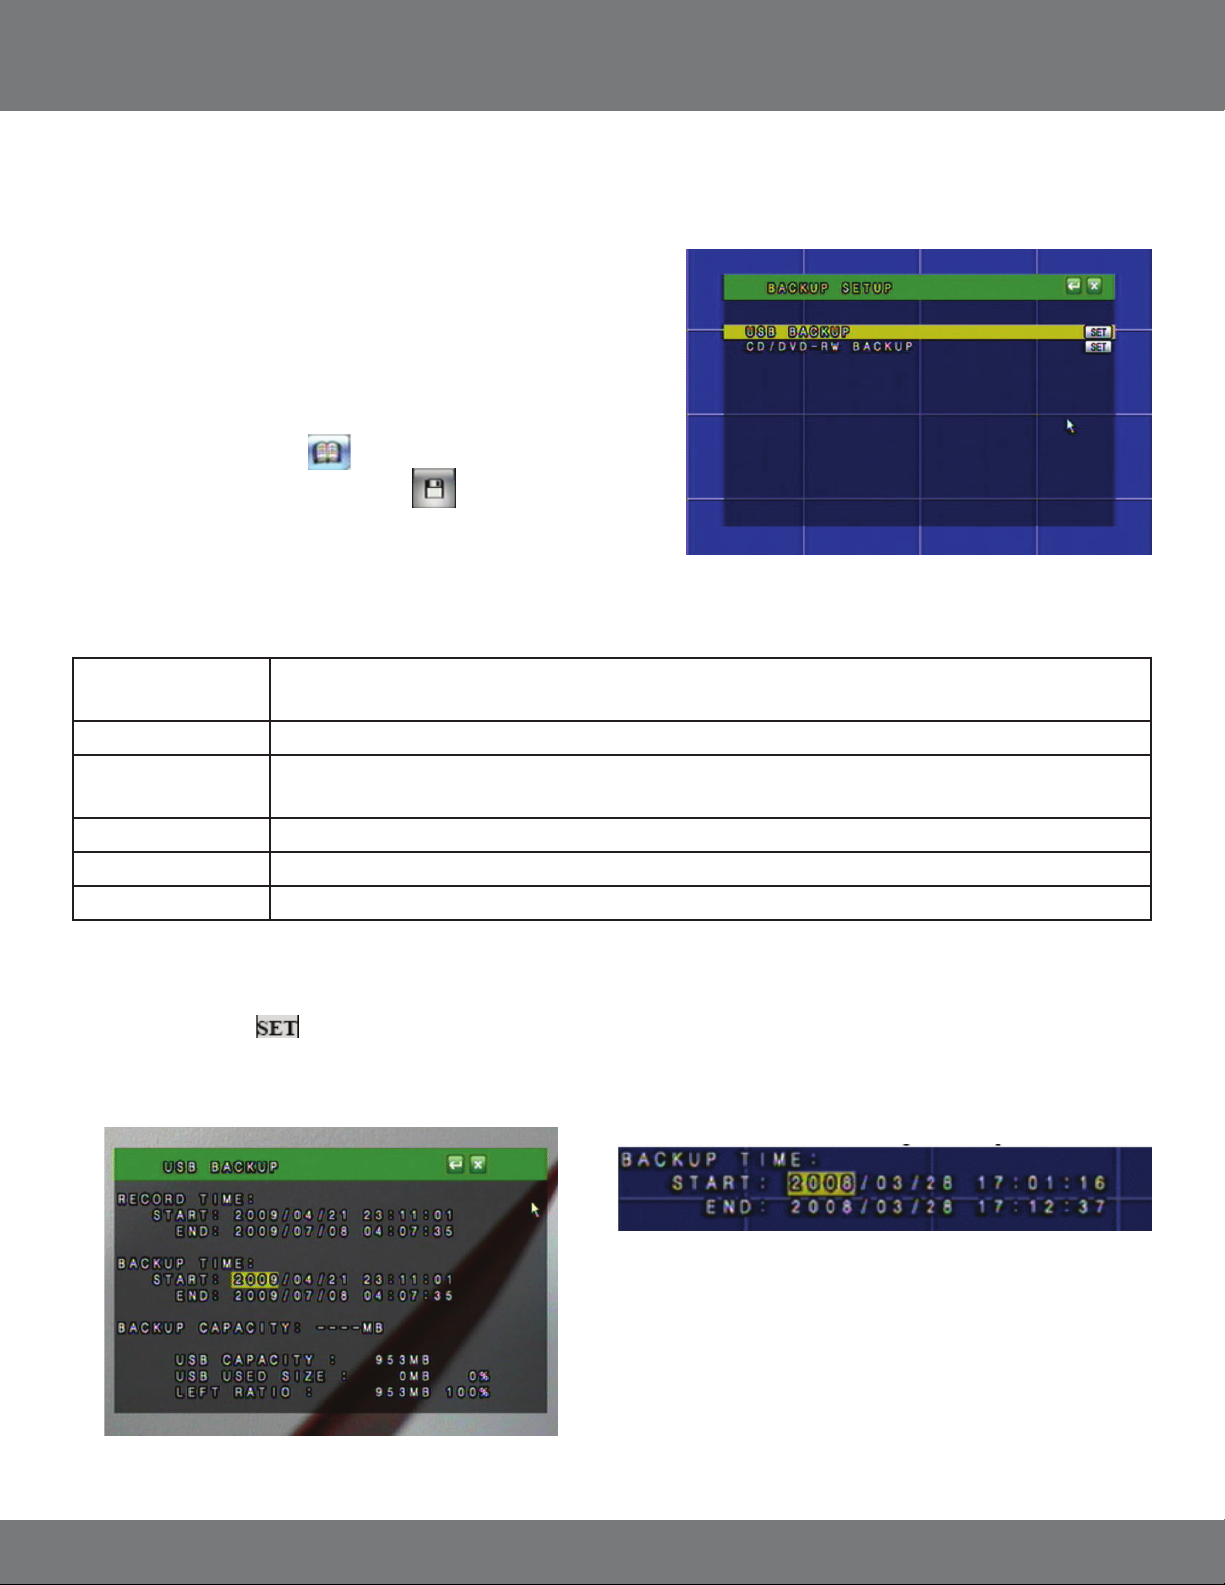
BACKUP SETUP
The DVR allows you to backup your recorded footage onto a separate and
portable USB ash drive as well as a CD/DVD.
USB BACKUP
To Setup Backup Recording:
1. Insert your USB ash drive into the USB port on front of the DVR.
2. Access the Main Menu by clicking Menu or move the mouse to the bottom of
the screen to reveal the pop up bar.
3. Select the Main Menu icon.
4. In the Main Menu, select Backup set icon.
Record Time: The start and end time is used to display the initial time and date when recording began and the nal date and time
when the recording nished (or the latest date and time when backup Menu was accessed).
Backup Time: The start and end time is used to choose the time frame of the video clip to be backed up onto the USB ash drive.
Backup Capacity: This displays the size of the desired backup footage time frame. The shorter the video clip the smaller the backup
capacity will be in size.
USB Capacity: Displays the maximum capacity of the USB drive.
USB Used Size: This displays how much memory on the USB drive is currently in use.
Left Ratio: This is the amount of memory that is currently available to be used for backup.
To Backup Saved Video Footage:
1. Press ENTER or click to setup the USB backup recording settings.
From this Menu you can choose the start and end time for the USB backup. This will transfer existing video footage in the backup time frame
onto the USB drive.
37CV501 - 16CH
Page 38
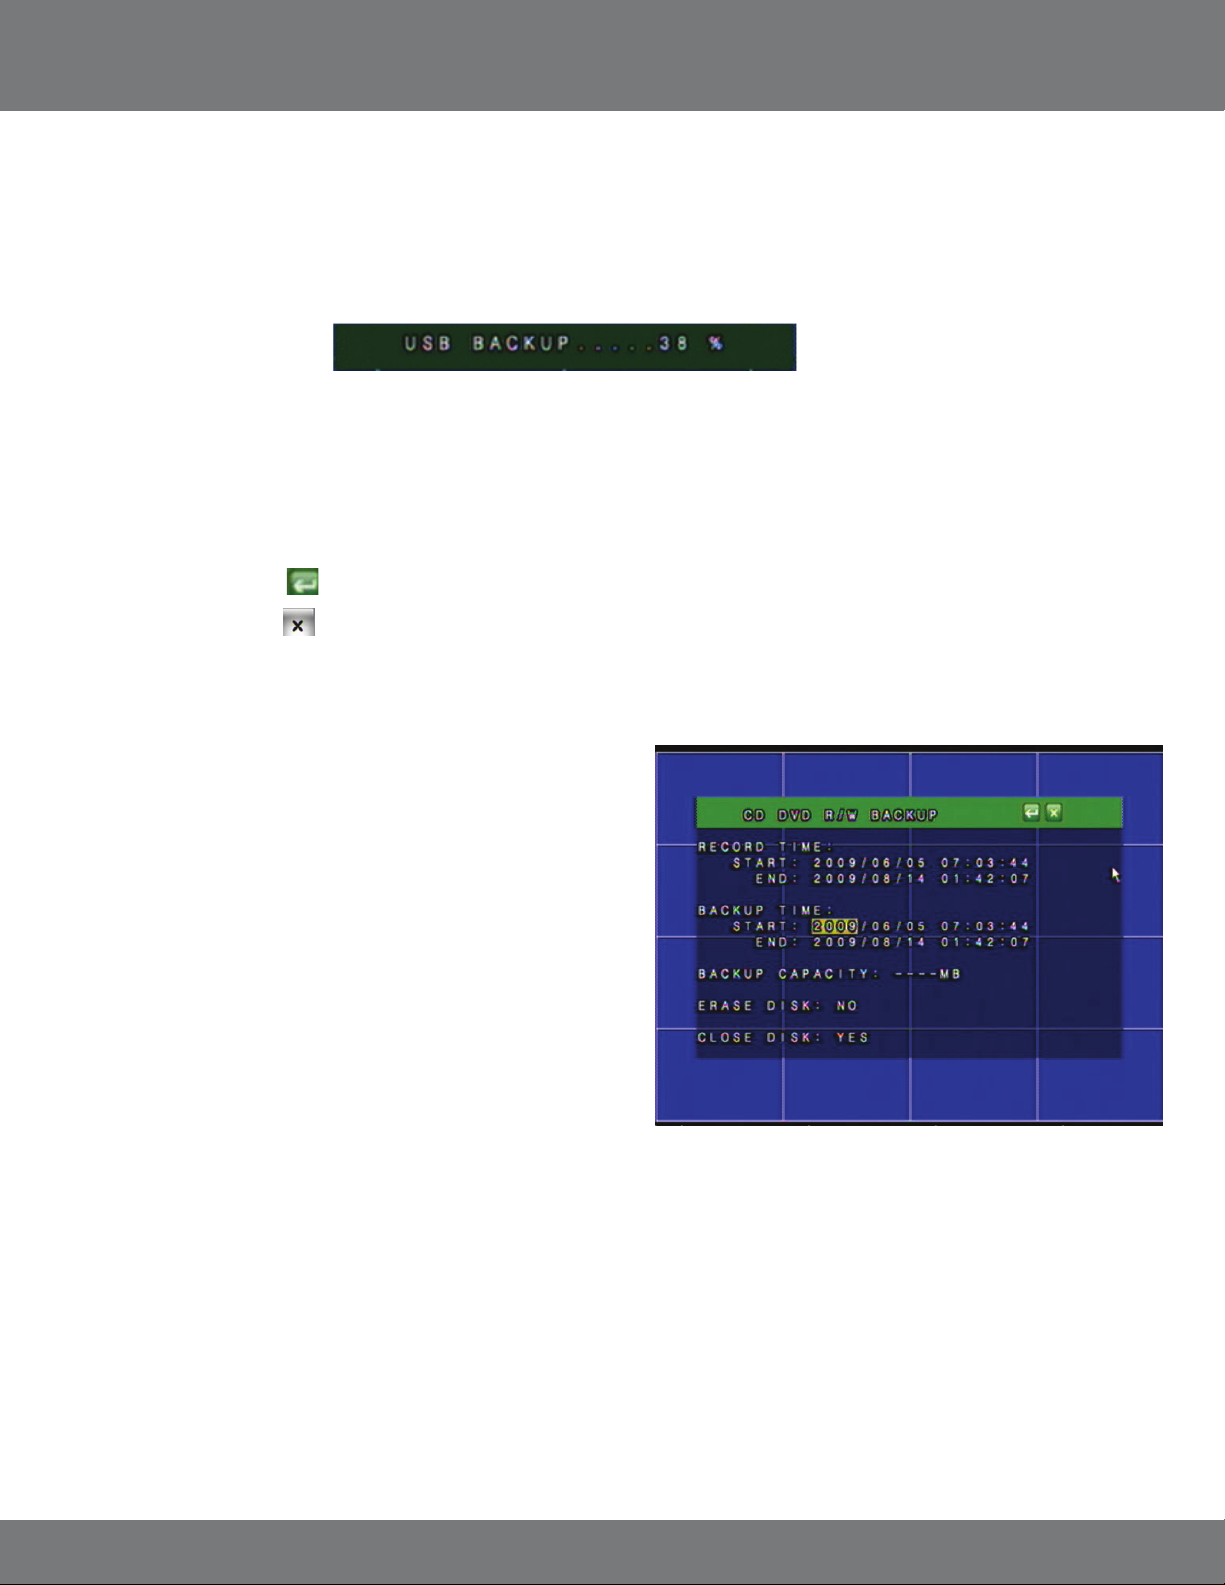
BACKUP SETUP...continued
2. Choose the starting date and time of when to transfer the video footage. Highlight the value you wish to change and use the directional keys
up and down or the mouse scroll wheel to adjust the value.
3. Choose the ending date and time of when to end the transfer of video footage. Highlight the value you wish to change and use the directional
keys up and down or the mouse scroll wheel to adjust the value. If the Backup Capacity (in MB) is larger then the LEFT RATIO (In MB) the
DVR will not allow you to backup the footage.
The DVR will take a few moments to complete the request since it will put the viewing software as well as video footage onto the USB ash drive. This
backup player is required to view the backup footage as the les are exported using H.264 compression. The backup player install le is 1.10MB in size.
4. If you want to check to see how much space is taken up on your USB drive, you can re-enter the USB backup Menu and it will tell you at the
bottom of the screen the USB capacity, USB used size and Left Ratio. This is also useful to see if the desired time range will t onto the USB
ash drive.
5. Press Menu or select the
6. Press Menu or select the
to exit the USB Backup Menu.
to exit the Main Menu and save your settings. The DVR may take a few moments to load the settings.
DVD/CD BACKUP
The following will explain all of the settings that are seen on screen.
Record Time: The start and end time is used to display the
initial time and date when recording began
and the nal date and time when the recording
nished (or the latest date and time when backup
menu was accessed).
Backup Time: The start and end time is used to choose the time
frame of the video clip to be burned onto a CD or
DVD. All elds can be adjusted to best suit your
backup time frame.
Backup Capacity: This displays the anticipated size of the backup le to be created.
• If it reads ‘OUT OF RANGE’ then there was no footage available in your chosen backup time
• If it reads o a number and a maximum number in brackets ex. 246Mb (2Gb Max), it is informing you of the le size you
want to burn and how much space you have to burn it
Erase Disk: If the CD/DVD is rewritable, it will erase the disk before backing up the footage on it.
Close Disk: Allows you to choose if the CD/DVD you backup the footage to can have more footage/information added to it in the future.
Some CD/DVD readers require that the disc is closed.
38CV501 - 16CH
Page 39

BACKUP SETUP...continued
To Backup Saved Video Footage with CD/DVD burner:
1. Power on your external CD/DVD burner according to the manufacturers directions.
2. Plug the external CD/DVD burner into the DVR through the left USB connection on the front of
your DVR.
3. Power cycle the DVR by disconnecting and re-connecting the power cable. Allow system to start
up and detect all connected devices.
4. Select the main menu icon
5. In the main menu, select Backup set icon
6. Insert a blank or rewritable CD/DVD into the external CD/DVD burner.
7. Choose if you would like the disk erased (if it is rewritable) or closed (unable to be written over or have more information put on it) by
highlighting the selection and choosing yes or no by using the wheel on the mouse to scroll through or the up and down arrows on the DVR
front panel.
8. Make sure that the Backup does not read ‘OUT OF RANGE ‘.
9. When all the settings are to your liking press the
the external burner.
Note: You will need an external USB CD/DVD burner. You cannot use
your computers CD/DVD burner.
.
.
button to save changes and burn the footage from the DVR onto the CD/DVD inserted into
SYSTEM SETUP
The system setup Menu allows you to set up the parameters of your DVR. It
holds the date/time setup, factory default settings, system password, and
many other options. The following list describes what each option does and
how to congure it.
1. Access the Main Menu by pressing Menu or move you mouse
to the bottom of the display screen to reveal pop up Menu bar.
2. Select the Menu icon.
3. Select the System setup icon.
DATE/TIME SETUP
Allows you to set up date and time on your DVR so that your recording
schedule will be accurate.
To Setup the Date and Time:
1. Select DATE/TIME SETUP from the System Setup Menu. Select
to setup the date and time.
2. Highlight the area you wish to change.
3. Date Format allows you to choose the syntax to display the Year, Month
and Date. This can be changed between YYYY/MM/DD, DD/MM/YYYY,
and MM/DD/YYYY depending on what you are most comfortable with.
39CV501 - 16CH
Page 40
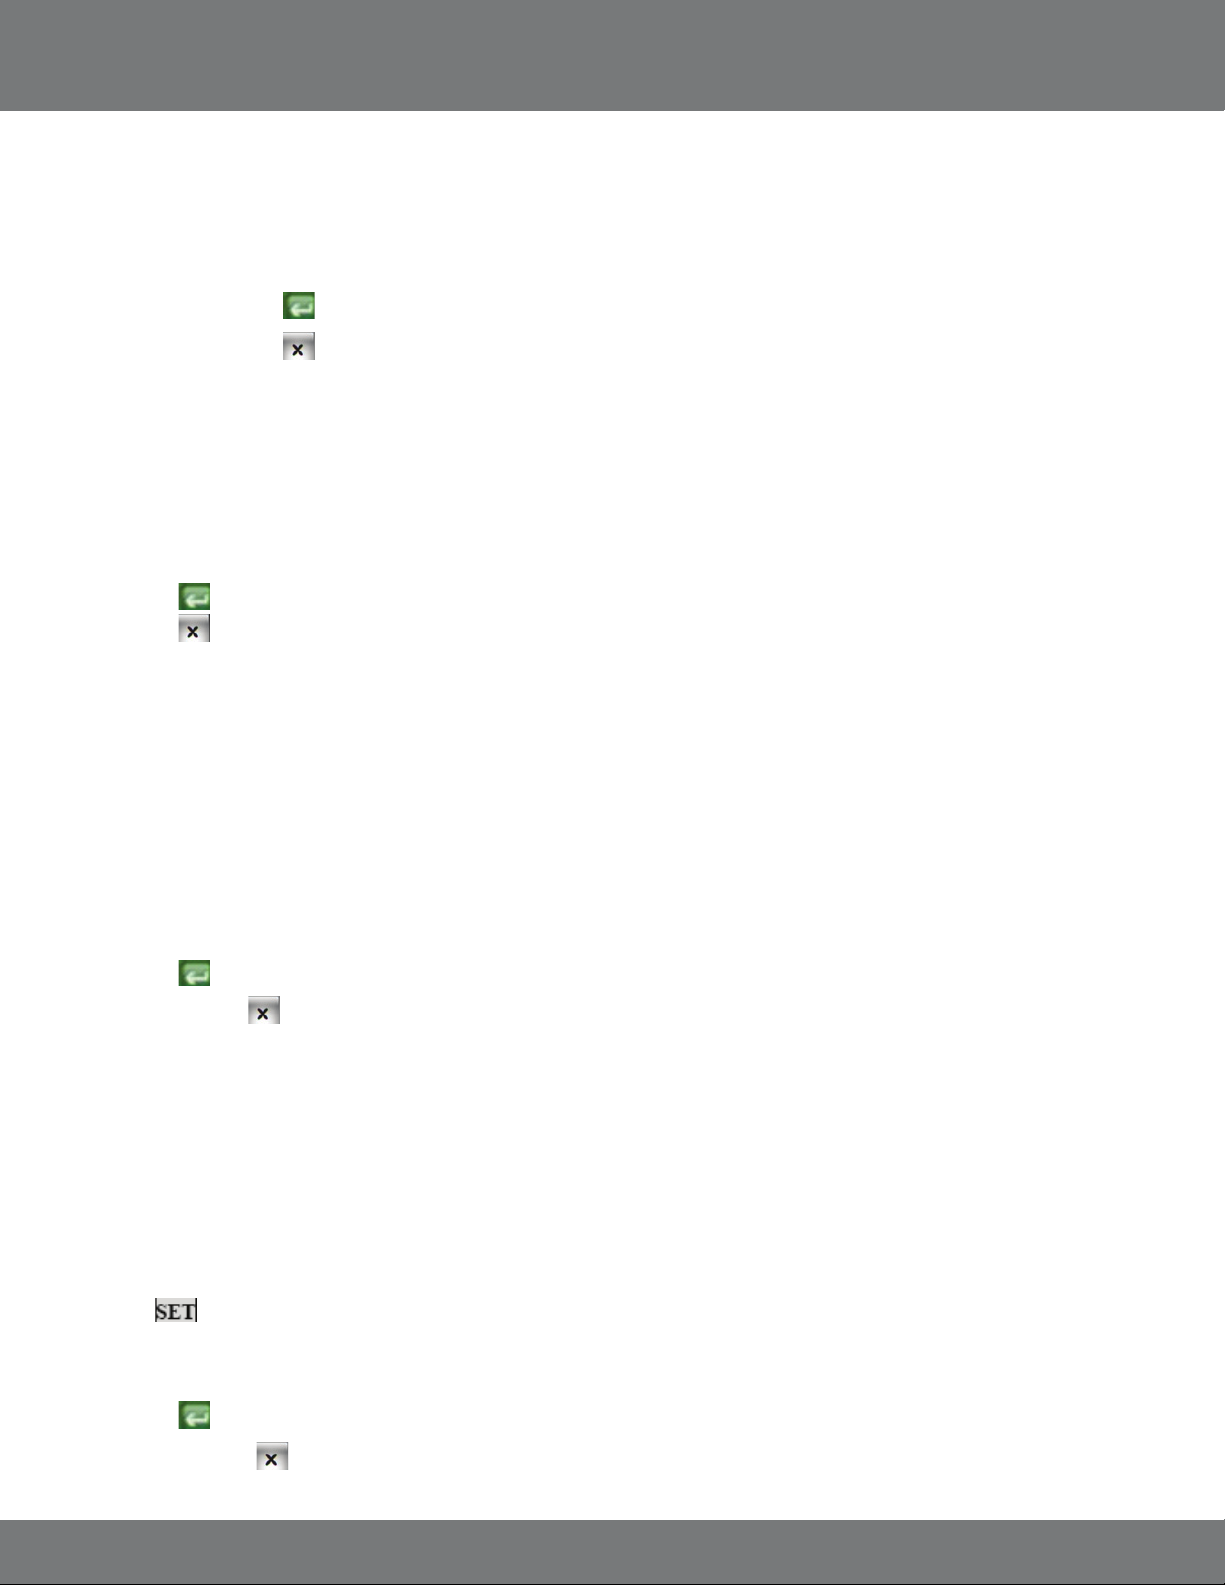
SYSTEM SETUP...continued
4. NTP (Network Time Protocol) Mode can be enabled or disabled to allow the DVR to synchronize the date and time with a NTP server. By default
the NTP server IP is set to 198.123.30.132.
5. Choose your GMT Time zone. Example: Central Time Zone = -06:00 GMT.
6. Update Time will be how often the DVR checks with the NTP server to update the system time with the current NTP server time. It can be set
from every 1 hour up to every 24 hours.
7. Press Menu or select the
8. Press Menu or select the
to exit the Date/Time Setup Menu.
to exit the Main Menu and save your settings. The DVR may take a few moments to load the settings.
System Type
The two system types that are available on this DVR are PAL and NTSC. The North American standard is NTSC and should only be set to PAL if the TV
or monitor that the DVR is connected to uses only PAL format.
To set the system type:
1. Highlight SYSTEM TYPE from the System Setup Menu. Use the mouse wheel or directional keys to change from NTSC to PAL.
2. Select the
3. Select the
to exit the SYSTEM TYPE menu.
to exit the Main Menu and save your settings. The DVR may take a few moments to load the settings.
Keyboard Lock
The keyboard lock option will prevent people from using the buttons on the front of your DVR without a password. This does not lock out the Menu.
Enable system password to protect the Menu from unauthorized change. There are two dierent Keyboard Lock options:
Type 1 – Allows a user to change monitor views, but requires a password to search and control playback.
Type 2 – Prevents unauthorized user from performing any action without a password. (System password prevents a user from accessing the Menu).
To set the keyboard lock:
1. Highlight KEYBOARD LOCK.
2. Use the mouse wheel or directional keys to choose between Type 1, Type 2 or OFF.
3. Select the
4. Exit the Main Menu
to save and or press ENTER.
to save these settings. It may take a few moments to save the changes.
DVR ID Number
Used to identify this DVR if using multiple DVRs. The ID value can be set from 0 – 31.
DISPLAY SETUP
Allows you to congure the on screen display of the DVR to show camera titles, the DVR’s status, and the date and time in live display mode.
To set the display parameters:
1. Highlight DISPLAY SETUP from the System Setup Menu.
2. Select to setup the date and time.
3. Use the mouse wheel or directional keys to enable CAMERA TITLE, DVR STATUS and DATE/TIME. By enabling these options, the camera title, the
status of the DVR and the date/time will appear on the viewing screen.
4. Select the
5. Exit the Main Menu.
to save.
It may take a few moments to save the changes.
40CV501 - 16CH
Page 41

SYSTEM SETUP...continued
LANGUAGE
This DVR allows for the following 13 languages:
English, Chinese, Italian, French, Japanese, Spanish, Polish, simplied Chinese, Greek, Hungarian, Dutch, Russian and Czech
To change the on screen display language:
1. Highlight LANGUAGE.
2. Use the mouse scroll wheel or directional keys to change to your desired language.
3. Press Menu or select the
4. Press Menu or click
few moments to save the changes.
to save and exit.
to exit the Main Menu and save these settings. It may take a
SYSTEM PASSWORD SETUP
The system password is used to authenticate users before being able to access all of the features of the DVR. By default the DVR Password Mode is
set to DISABLED. If set to ENABLED the user will be prompted to enter a password before accessing the Menu or control the DVR in certain Keyboard
Lock modes. It is recommended that you change the DVR from the default password.
To change the system password settings:
1. Highlight SYSTEM PASSWORD from the System Setup Menu.
2. Select
3. Use the mouse wheel or directional keys to alternate between "DISABLE" and "ENABLE".
4. Highlight PASSWORD. Select
5. Highlight the value to change and use the mouse scroll wheel or directional keys to navigate through the numbers.
6. Press Menu or select
7. Press Menu or select
to congure your password settings.
to choose a new password. Note passwords can only be 4 numeric characters.
to save settings and return to the System Setup menu.
to save settings and return to Main Menu.
FIRMWARE UPGRADE
The DVR checks for a connected USB device for a rmware update. Warning: Attempting to update the rmware with an invalid le could
potentially render the DVR inoperable. Only complete the rmware upgrade if directed by a SVAT technical support representative.
LOAD DEFAULT
The load default Menu allows you to restore your DVR back to the factory settings, backup current settings to a USB drive, and Load settings that are
saved on the USB drive.
To restore DVR to factory default settings:
1. Select LOAD DEFAULT from the System Setup Menu.
2. Select
3. Select “Load Setup From Default” and press ENTER or click .
A warning screen will appear saying: " SYSTEM SETUP WILL INITIALIZE. CONTINUE? YES/NO."
to enter the load default settings page.
41CV501 - 16CH
Page 42

SYSTEM SETUP...continued
4. Use the directional keys or the mouse to select either YES or NO. Select YES to load the factory default settings.
5. Click
6. Click
Load Setup From USB
This option can only be used if the DVR settings have been previously backed up to
USB. The DVR settings will be saved on the USB drive as DVR.cfg.
Backup Setup to USB
This will save the current DVR settings to a USB ash drive. This will not backup any
video footage to the USB drive. Use this function to save your current settings and
reload them at a later date or for setting up multiple DVRs.
DAYLIGHT SAVING TIME SETUP
This setting will allow you to set up the daylight saving times for your region.
This will be benecial so the DVR will always display the proper time even during the
daylight savings months.
to save settings and return to System Set.
to save settings and return to Main Menu.
Daylight Savings Mode can be set to O, Manual or Auto.
O: The DVR will not compensate for daylight savings time. No changes will be made
to the time automatically.
Auto: Use the default daylight savings days stored on the DVR. Make sure the date
and time are set to the proper daylight savings days.
Manual: Manually set the start and end date and time for daylight savings in your
area. The delay time will be the time dierence during the daylight savings month. Ex.
If the time changes 1 hour behind then the delay will be set to 1 hour.
Auto Mode:
1. Set the Daylight Mode to AUTO.
2. Choose the City or Time Zone that most accurately reects your daylight savings dates and times.
3. Press Menu or click the return button to save your settings.
Manual Mode:
1. Set the Daylight Mode to MANUAL.
2. Highlight the Start Date and press ENTER or click the button.
3. Highlight the desired eld to adjust and use the directional keys or the mouse scroll wheel to adjust to the proper value.
4. Press Menu or click on the Return button to save and return to the previous Menu.
5. Repeat steps 2-4 for the End Date.
6. Set the Delay time to accurately reect the time change during the daylight savings months.
Press Menu or click the Return button to save your settings and return to the previous Menu.
42CV501 - 16CH
Page 43

LIVE VIEWING
POP UP MENU BAR (operation) – Using the USB Mouse, the pop up menu bar allows you to view the following options.
PTZ control – Please refer to the PTZ control section.
HDD & USB INFORMATION
You can quickly access your HDD & USB information right from the Pop Up Menu on the live viewing screen. This will let you easily determine how
much space is left on your HDD and your USB drive.
Disk: The name of the connected hard drive.
Capacity: The maximum capacity of the hard drive. This should be approximately 500GB.
Left Ratio: Displays a percentage of the remaining hard drive memory.
USB Install: Displays whether the USB drive is properly connected and installed.
USB Capacity: Displays the maximum capacity of the USB drive.
USB Used Size: Displays how much memory of the USB drive is currently in use.
USB Left Ratio: Displays the remaining memory of the USB drive as well as a percentage of the free space remaining.
To Call up the HDD & USB Information:
1. Select the icon to call up the HDD & USB information page.
2. The page will reveal the capacity of your HDD and the percent of space left to record. It will also display any information regarding a connected USB
ash drive.
3. Click
or press Menu to exit the HDD & USB information Menu.
DIGITAL ZOOM
You can digitally zoom into a live image to reveal a close up of the area you chose. You must be in the full screen single-camera mode to access the
zoom options.
Please note that this is only digital zoom and will only enlarge the image, not focus in on a space.
To zoom in:
1. Select the icon to access the zoom controls. A message box will appear on screen that says Zoom On.
2. Click and hold the left mouse button down while you move the mouse so yellow tinted box will appear around the area you wish to zoom in on.
3. Left click to zoom back out, but stay in digital zoom mode.
4. To exit the digital zoom, click the right mouse button. A message box will appear on screen that says Zoom O.
AUDIO
This setting will enable volume or disable the volume (mute).
To Turn Audio O or On:
1. Left click the Audio Control icon
Note: The CV501 - 16CH does not include audio supported cameras, but it does support one audio input. If you have attached a
microphone, or have a camera that supports audio, you can choose to turn the sound on and o by clicking this button.
to toggle between audio on or audio o.
43CV501 - 16CH
Page 44

PLAYBACK
By clicking the Play button from the Pop Up Menu, front panel, or remote
control a Play Search window will pop up. The CV501 - 16CH allows you to
review your playback with two dierent search options:
1. Play Time Search – Allows you to view your recorded footage based on
the day and time you wish to preview. This option works best when
you know the approximate time/day that you want to view footage from.
2. Event List Search – Calls up an event list with many dierent types of
events. Some event types are Power On, Video Loss, Alarm and Motion. This
option works best to review the events on the DVR and select events
that were unexpected or peak your interest.
Press STOP to exit out of the playback or playback menu.
PLAYBACK CONTROLS
To enter the playback Menu, click the playback button on the Pop-Up Menu at the bottom of the screen.
The controls are as follows, from left to right:
1. HDD & USB INFORMATION – Calls up your HDD and USB drive information
2. COPY – Pressing this icon will back up the selected recorded footage to a USB drive. It will record until the copy button is
pressed a second time. USB drive must be connected to work.
3. AUDIO CONTROL – Pressing this icon will turn the audio on or o (mute)
4. VIEWING MODE – Switch between single camera (1-4) and quad screen
5. FAST REVERSE PLAYBACK – Rewinds footage, x2, x4, x8
6. REVERSE PLAYBACK – Plays back your footage in reverse
7. STEP BACK – Pauses the footage, and steps back
8. STOP – Stops playback and returns to Play Search Menu
9. STEP FORWARD – Pauses the footage, and moves playback a few frames each time it is pressed
10. PLAY – Resumes normal playback speed
11. FAST FORWARD – Fast forwards footage x2, x4, x8
44CV501 - 16CH
Page 45

PLAYBACK...continued
SEARCH BY TIME
1. Select the play button to call up the playback Menu or press PLAY
on the front of the DVR or the remote.
2. Highlight PLAY TIME SEARCH and select using the mouse or by pressing
enter on the DVR or remote.
3. Use the mouse wheel or directional keys to choose the date and time you
wish to view.
4. The total time you have been recording for is listed at the bottom of the play
time search. START TIME is when your DVR began recording and END TIME is
the last time your DVR was recording.
5. After you have chosen the date and time you want to view, select the
view the footage or press enter on DVR or remote control.
6. Please see above for playback controls.
7. To exit playback, press the stop button, either on the DVR or remote control,
or from the bottom Pop Up Menu if using the mouse.
to
EVENT LIST SEARCH
1. Select the play button to call up the playback Menu or press PLAY on the
front of DVR or remote control.
2. Highlight EVENT LIST SEARCH.
3. Press ENTER or double click the left mouse button to enter the Event Search
menu or press the enter button on the DVR or remote control.
4. Navigate through the event list by using the up and down directional buttons
or the mouse scroll wheel.
5. Highlight the event you want to view and press enter or double click the left
mouse button to view the video footage from the event.
6. Follow the playback controls listed earlier to view your footage.
7. To exit playback, press STOP or scroll mouse to bottom of screen and click the
stop button.
The Events are as follows:
POWER If the DVR experiences power loss, it will record the date and time of the rebooting.
RECORD
V. LOSS
ALARM When an external alarm is triggered, the DVR will record the date, time and corresponding channel. The DVR will also display
MOTION When the DVR detects motion, it will record the date, time, and corresponding channel. The DVR will also display the
When the recording starts, the DVR will record the date, time and corresponding channel, as well as the
on the channel.
When the signal from a camera is lost, the DVR will record the date, time and corresponding channel, as well as the
will appear on the channel. This could be caused by a bad connection or tampering with the camera.
the
icon on the channel which received the alarm until a button is pressed.
icon on the channel where motion was detected.
icon will appear
icon
45CV501 - 16CH
Page 46

PLAYBACK...continued
BACKUP VIDEO PLAYBACK
Once you have backup footage on your USB drive, you can archive that footage or view it on a computer.
How to View Backup Footage from USB:
1. Insert your USB drive into your Windows based PC or laptop.
2. Install the viewer application by opening R6VIEWER.EXE.
3. Use overlay mode when prompted.
4. Click "Open" under File Select.
5. Navigate the USB drive and select the *.264 le you wish to view. If you choose to rename the video clip make sure not to change the le
extension from .264.
6. Click "Open" on the le you wish to play.
Follow the playback controls explained in Backup Player – Playback Control.
BACKUP SOFTWARE
46CV501 - 16CH
Page 47

PLAYBACK...continued
To begin viewing playback click the play button.
BACKUP PLAYER – PLAYBACK CONTROL
The playback buttons are as follows from left to right:
STEP BACK: Pauses playback and reverses playback one frame each time it is clicked
REWIND: Rewinds playback
PAUSE: Pauses playback
STOP: Stops playback
PLAY: Begins playback
FAST FORWARD: Fast forwards playback
STEP FORWARD: Pauses playback and advances footage one frame each time it is clicked.
The backup buttons are as follows:
Channel Selected: Choose which camera you want to backup
Save AVI: Saves selected camera footage as a video
SnapShot: Saves selected camera footage as a still image
To backup your le to AVI:
1. Search for and nd the video footage to backup to your computer.
2. Choose the specic channel to backup (If in multi-camera mode) If in single camera mode the backup channel will be chosen automatically.
3. During playback mode, click the AVI button to start .
4. Make a lename and path then click the start button to start AVI backup.
5. Click the Stop AVI button to nish backup.
Searching for footage:
To search by time:
1. Enter the time and date of the footage you wish to review.
2. Click Time Search to playback all the footage during the time you selected.
SCREEN DISPLAY OPTIONS
Full Screen – Opens current viewing screen to full screen mode. To exit, right click the mouse. (Note: There are no playback controls on full screen)
1 – Single Camera mode will display only one channel.
4 – Quad Camera mode displays 4 channels.
9 – 9 channel mode displays 9 channels.
16 – 16 channel mode displays 16 channels.
Play Audio – Will play audio through computer if it was recorded onto the backup footage.
47CV501 - 16CH
Page 48

NETWORK GUIDE
REQUIREMENTS
You will need to have:
• The DVR connected to a router
• The router connected to the Internet
• A PC or laptop that is connected to the same router that the DVR is connected to. The PC can be connected by a wired or wireless connection
• Internet Explorer 6.0 or greater (to check the version of Internet explorer open I.E. In the top Menu bar select “Help” and then select About
Internet Explorer. The version of I.E. will be displayed.)
• A genuine and fully updated version of Windows XP or Vista
Note: The computer and DVR need to be connected to the same router for initial setup. A computer will not always
be necessary at the location to view the DVR.
Finding your DVR’s IP Address
By default, the DVR IP mode is set to DHCP. This means the DVR will
automatically retrieve an IP address from the router that it is connected to.
Unless your network requires a static IP address leave the DVR IP mode set as
DHCP.
1. Press Menu.
2. Enter password if prompted. The default password is “1111”.
3. Select NETWORK SETUP.
4. Make sure the “IP Mode” is set to DHCP. This setting is
acceptable for most users.
5. Write down your IP address, Subnet Mask, Default Gateway, and DNS. This
information will be used in the next few steps to view the DVR on
your computer as well viewing the DVR over the Internet.
If your router does not support DHCP, contact your network administrator to supply you with the proper IP information. If the DVR
needs to store PPPoE (DSL/ADSL) settings contact your ISP (Internet Service Provider) for the proper IP address settings.
Preparing Your Computer for Viewing the DVR:
Every computer that is accessing the DVR will need to be congured to download and run ActiveX controls. This change only needs to be made one
time on the computer that is accessing the DVR. This can be done by following either of the two methods below.
Method 1 only aects websites that you specically add to the trusted sites list. To change for all websites, use Method 2.
48CV501 - 16CH
Page 49
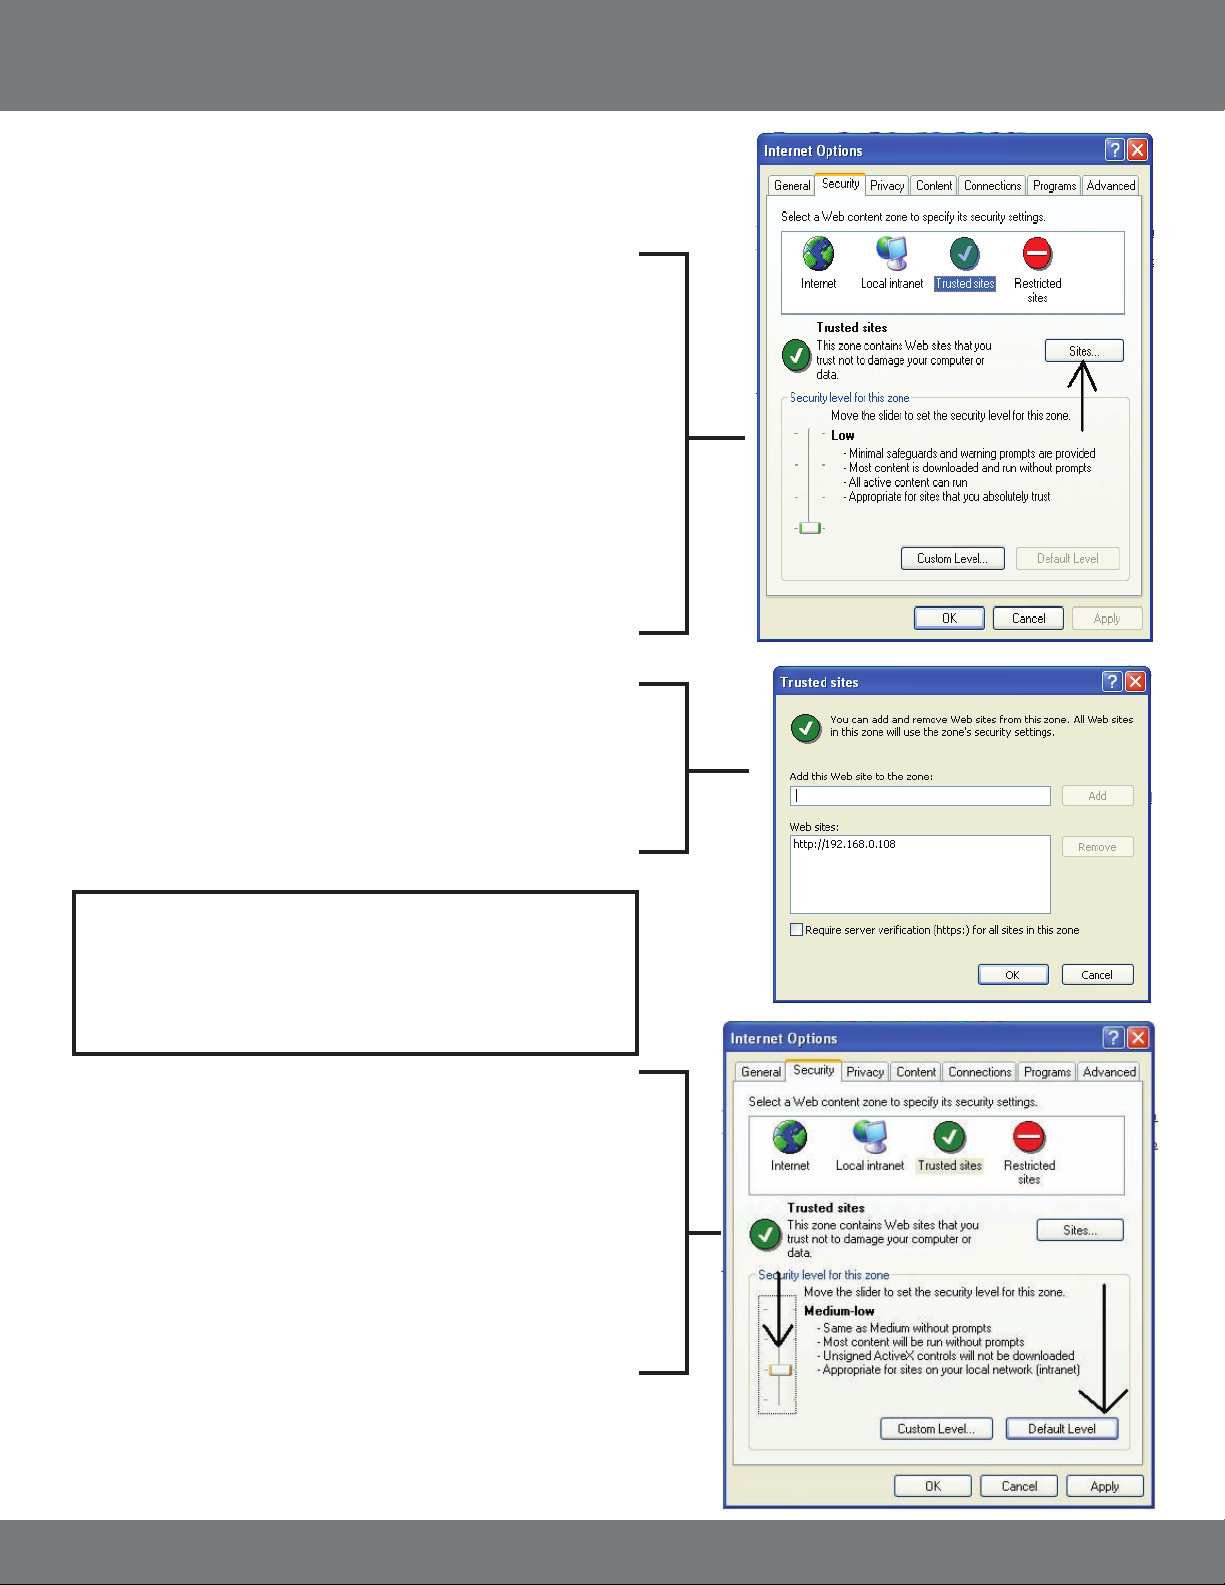
NETWORK GUIDE...continued
Method 1 (Recommended):
Add the DVR’s IP address to the Trusted Sites in Internet Explorer.
1. Open up Internet Explorer.
2. Click on TOOLS.
3. Click on INTERNET OPTIONS.
4. Click on the SECURITY Tab.
5. Click on TRUSTED SITES.
6. Click on the SITES button.
7. Type in the IP address of the DVR in the following format: http://192.168.0.108
and click ADD.
8. If Require server verication (https:) for all sites ...” is selected you will need to
uncheck the selection box.
The IP address used in the example above is for internal network viewing.
If you are trying to access the DVR from a remote location you will add the
“External IP Address” to the trusted sites list. See Finding your External IP
Address.
9. Change the default settings for the TRUSTED SITES zone to low. Click on
DEFAULT LEVEL and change the security level of the zone to “Low”. This can be
done by running the slider to the bottom. This will allow ActiveX controls from
the DVR to be downloaded and the DVR to be viewed on the computer.
10. Click Apply.
11. Click OK.
49CV501 - 16CH
Page 50
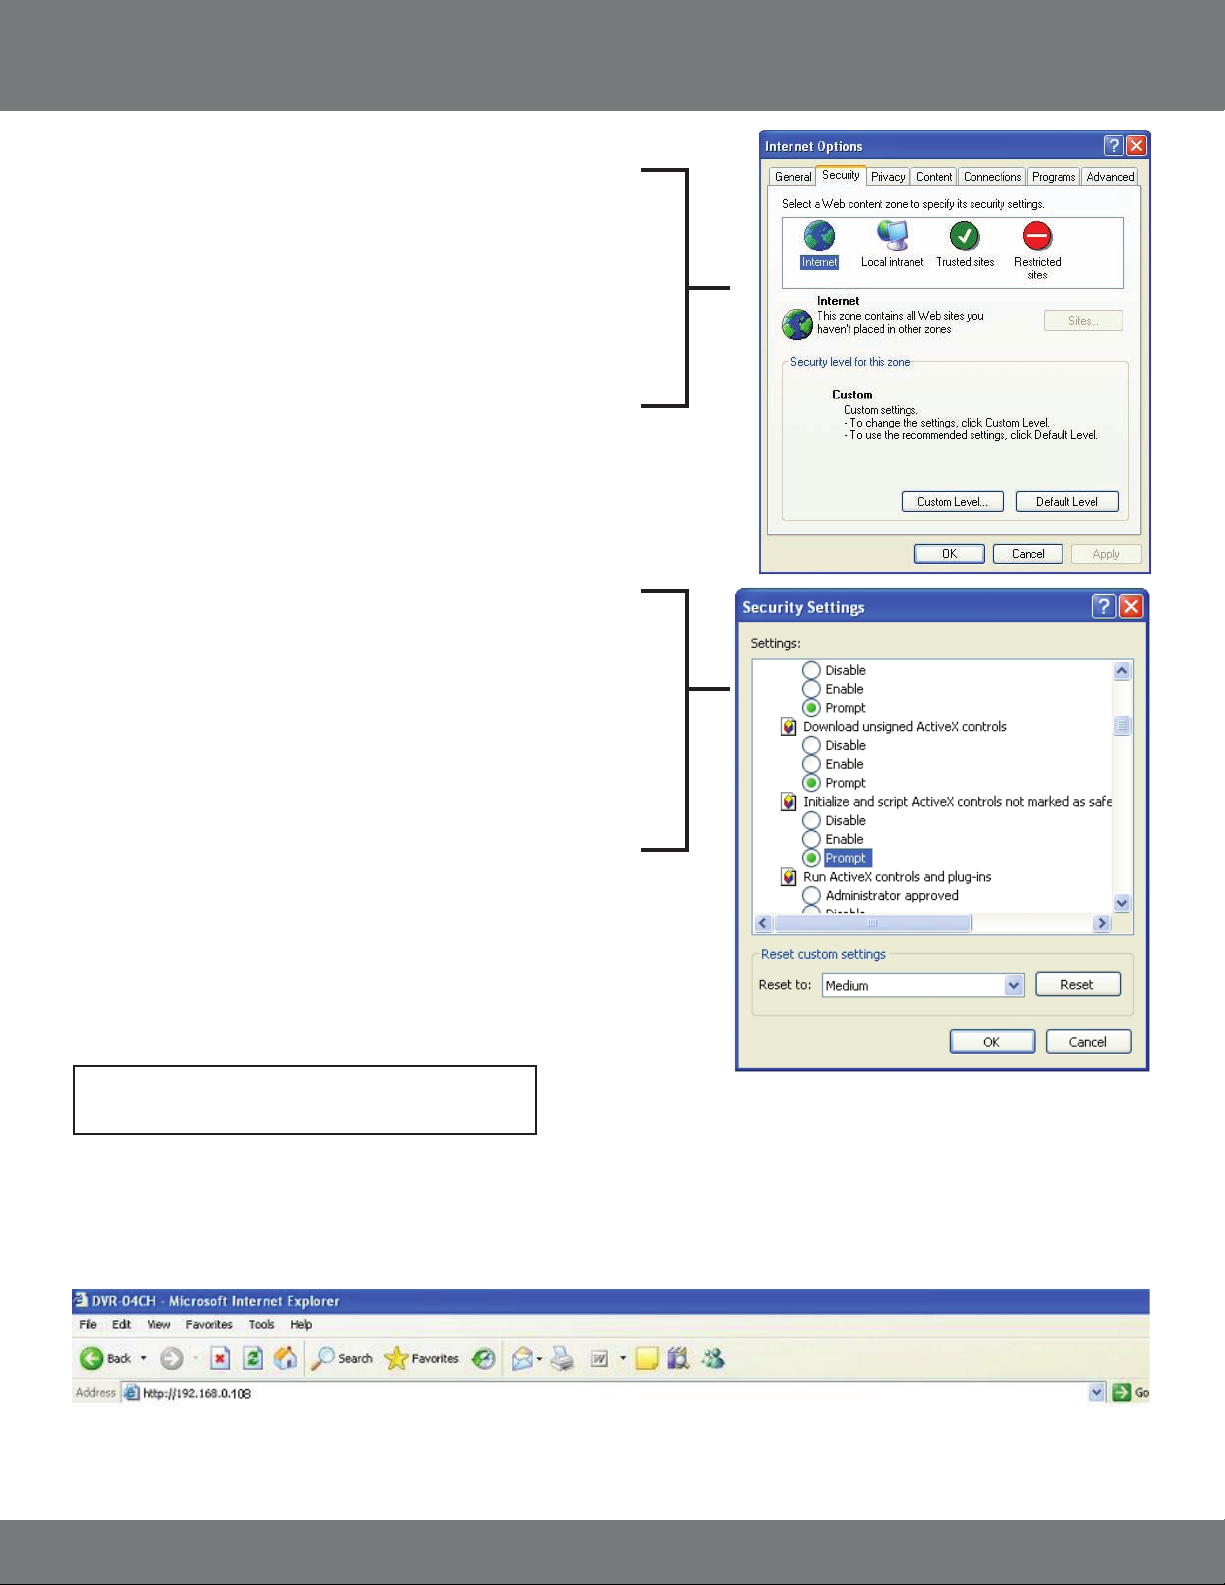
NETWORK GUIDE...continued
Method 2:
1. Open up Internet Explorer.
2. Click on TOOLS.
3. Click on INTERNET OPTIONS.
4. Click on the SECURITY Tab then the CUSTOM LEVEL button.
5. Change the ActiveX settings listed below.
• Download signed ActiveX controls: PROMPT or
ENABLED
• Download unsigned ActiveX controls: PROMPT
• Initialize and script ActiveX controls not marked
as safe: PROMPT
• Run ActiveX controls and plug-ins: ENABLE
• Script ActiveX controls marked as safe for
scripting: ENABLE
If this is an option:
• Allow automatic prompting for le and code
downloads: ENABLE
6. Press OK.
7. Press APPLY.
8. Close out of the Options window.
Note: This method needs to be done on every
computer you wish to view your DVR from.
Viewing Your DVR on Your Computer
Now that the computer is prepared to install the necessary ActiveX changes listed above you are ready to start viewing the DVR using your
computer. Using Internet Explorer, type the IP address of the DVR into the address bar using the following format: http://192.168.0.108 and
press ENTER.
If the computer and the DVR are connected to the same router you can use the internal IP address to view the DVR. If the computer is not connected
to the same router and is at a remote location you will need to use the external IP address for the DVR to view the DVR from that computer.
50CV501 - 16CH
Page 51
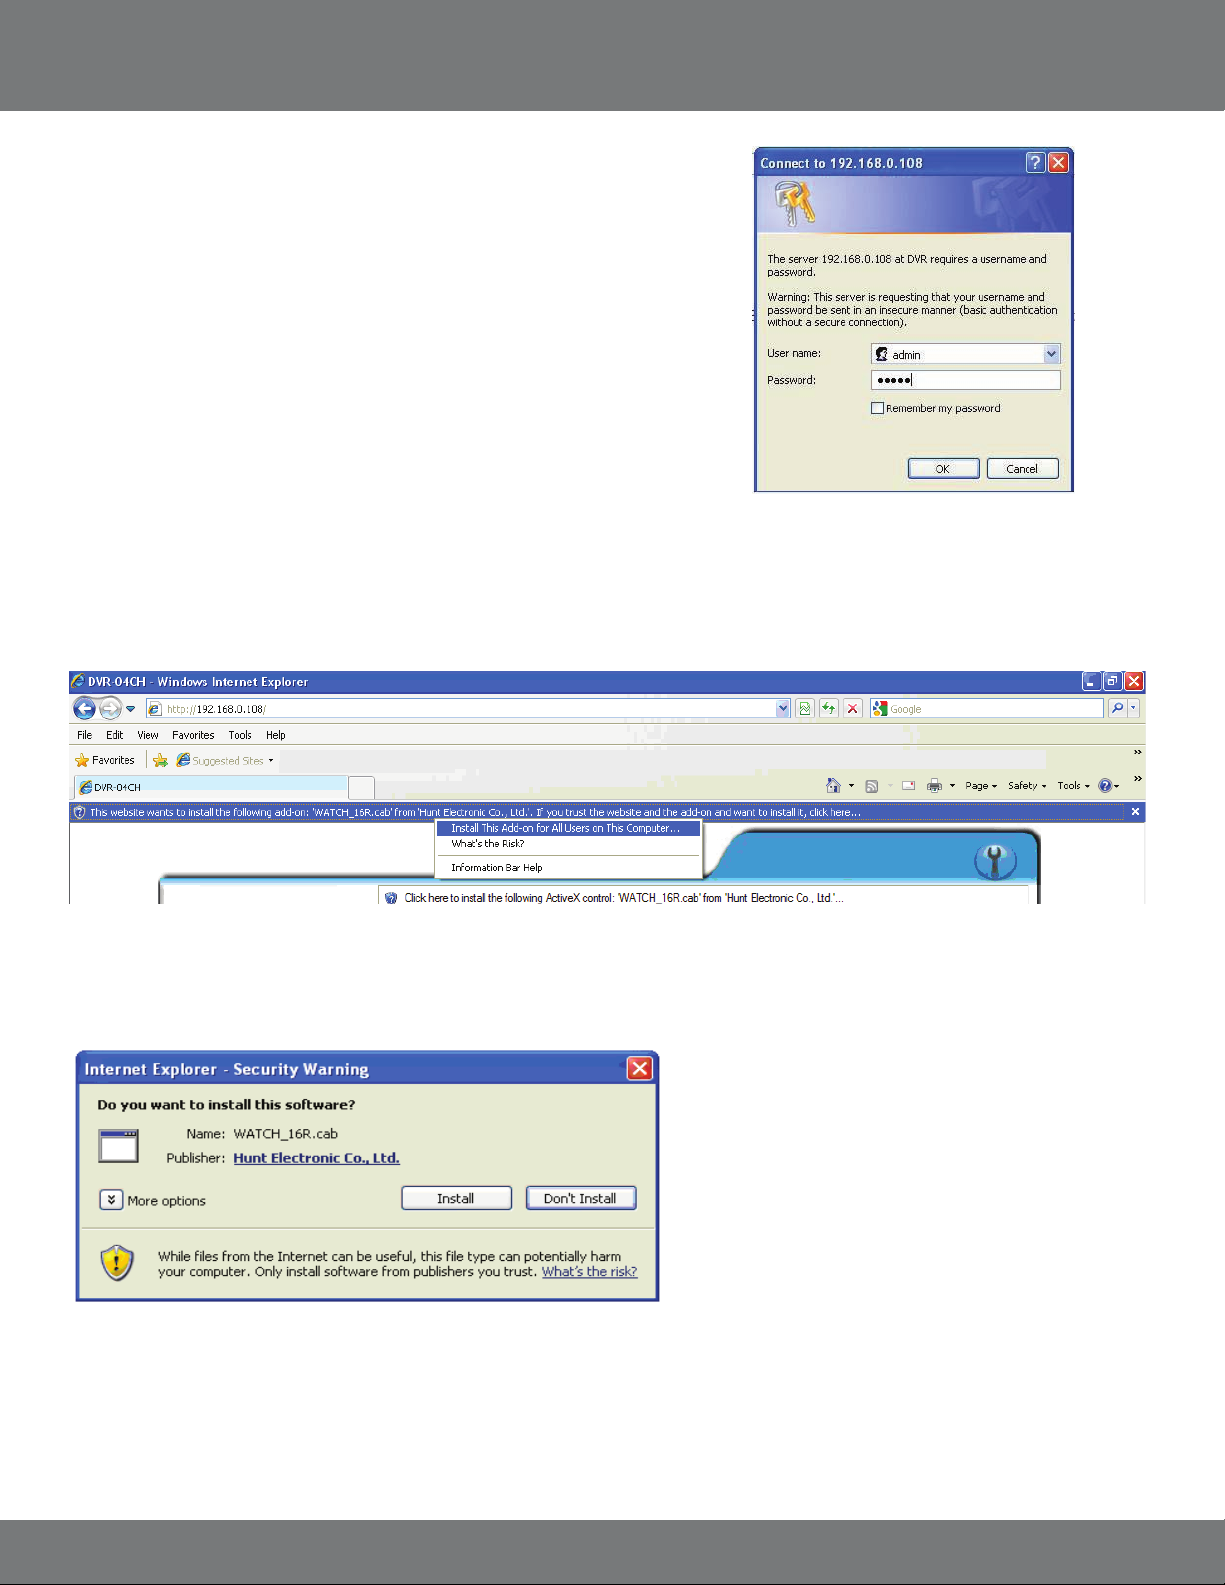
NETWORK GUIDE...continued
Log in to the DVR (Using Internet Explorer):
By default the DVR will require a user to input a username and password before
being able to view the DVR online. The default username and password for the web
interface of the DVR is:
Username: admin
Password: admin
To add a new user or enable Anonymous Login see User Management.
Installing the ActiveX controls:
There will be a yellow information bar that pops up below the address bar in Internet Explorer. Click on the yellow information bar and then select
“Install This Add-on for All Users on This Computer…”. Please be patient as the installation process can take 1-2 minutes.
If your ActiveX settings are set correctly you will see the following dialogue box.
Click Install.
You should now see the web player and the connected cameras.
51CV501 - 16CH
Page 52
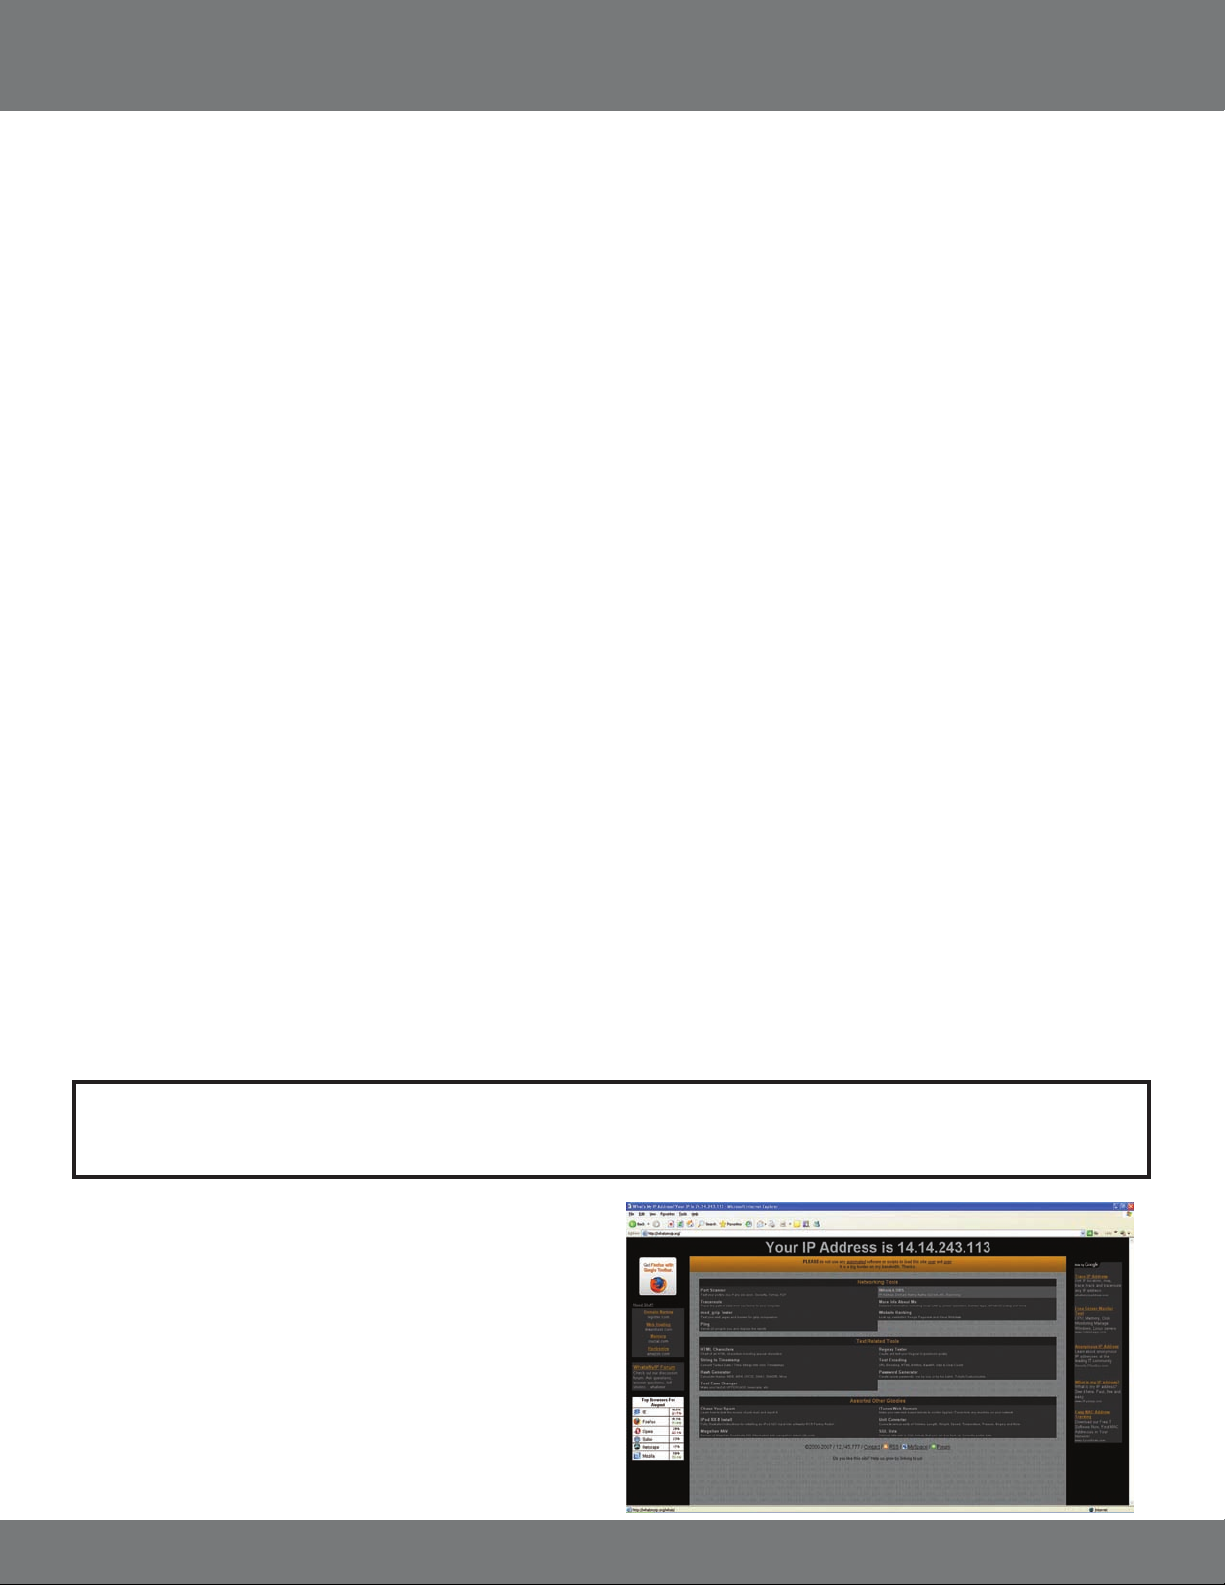
NETWORK GUIDE...continued
VIEWING YOUR DVR OUTSIDE OF YOUR NETWORK
Now that you have successfully viewed your DVR and cameras from a computer it is time to set up your router to view the DVR while at a remote
location. This process is called Port Forwarding and you can nd detailed instructions on how to complete the required steps at
http://www.portforward.com.
*Port forwarding is required if you want to view the DVR from a computer that is not connected to the same router.
Conguring your Router to view the DVR Externally (Port Forwarding):
Port forwarding is a necessary step that opens a path on your home/business network to allow you to view your DVR video feed from outside your
network (over the Internet).
There are hundreds of brands of routers on the market, you can nd step by step instructions on http://www.portforward.com.
Easy to follow Networking Video Guides are available under the support section of the company website (http://www.svat.com).
Once on http://www.portforward.com:
• Select your router make and model from the list of DVRs
• Skip any advertisements that may be seen by clicking “Click here to skip this advertisement…” in the top right hand corner
• You will see a list of various applications. Find a link for any DVR or IP camera and click on it. If you cannot nd a DVR of Camera link, you
can pick any application, the instructions are all very similar
• Follow the instructions using the HTTP port number assigned to the DVR
• By default the http port is 80 and can be veried by checking the NETWORK SETUP section in the Menu of the DVR
Once the port forwarding is complete you are ready to view your DVR from a remote location:
• If you are going to be viewing your cameras on your mobile device you will also need to port forward the RTSP port and RTP port range.
These ports are listed on the RTSP SETUP section of the DVR. By default port 554 and a port range of 1024-10000 need to be forwarded to
the Internal IP address of the DVR. See “3G MOBILE DEVICE SETUP” of the manual for more information
These instructions have been created without a stand alone rewall in place. If you have a rewall, please consult a computer systems technician to
congure the rewall to allow the required ports to pass through it.
Note: Your router may require a user name and password. If you do not know the username or password, contact the person who
setup your router. http://www.portforward.com will provide you with the router’s default user name and password.
FINDING YOUR EXTERNAL IP
The external IP address of the DVR is used to access the DVR from any
remote location with Internet access. To nd the external IP address of
the DVR go to www.whatsmyip.org or www.showmyip.com using a
computer that is connected to the same router as the DVR. The web sites
will display your external IP address in the top of the web page for your
reference.
52CV501 - 16CH
Page 53
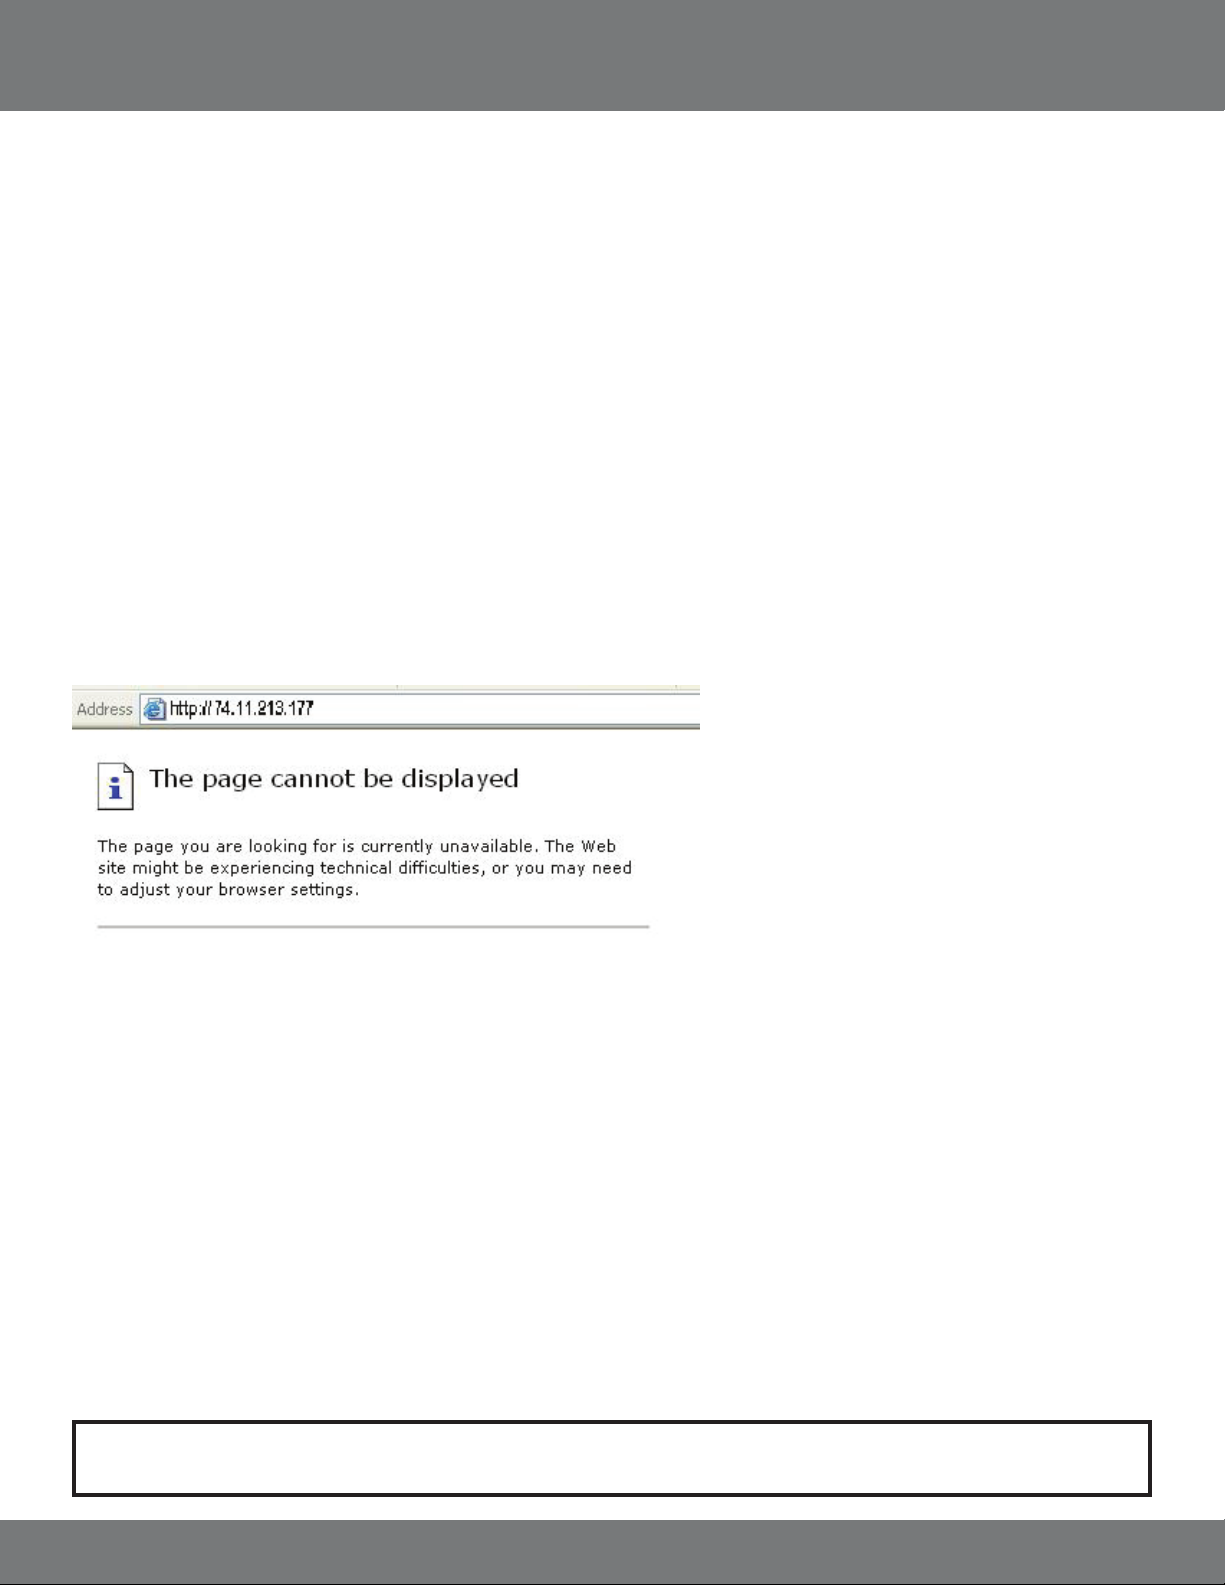
NETWORK GUIDE...continued
TESTING
Now that you know your external IP address, you can perform a test to ensure your DVR is accessible from outside your network (over the internet).
This test should be performed by a computer that is not on the same network as the DVR. Although, using the external IP on the same network will
sometimes work, it will not work in all cases and it is best to test from a remote location.
1. Open Internet Explorer, and in the address bar type in the external IP address you acquired from http://whatsmyip.org. It should be similar
to the following: http://74.11.213.177. If using a port other then the default port 80 it will need to be entered at the end of the IP address. Ex.
http://74.11.213.177:2000.
2. Press ENTER.
ONCE SUCCESSFUL
• You will be prompted to enter your username/password and install the ActiveX controls
• You are now able to view the DVR from anywhere in the world with Internet access and proper computer settings
IF YOU CANNOT CONNECT
If the Remote Viewing does NOT connect it could be caused by one of the following reasons:
• Make sure the browser is Internet Explorer 6.0 or later and is on a Windows PC
• Check all your network connections and go through the above steps again to make sure a conguration error was not made. You may have to
congure PPPoE settings to match the settings provided to you by your Internet Service Provider (ISP). Consult your ISP for more information
on your PPPoE settings
• Port forwarding is not set up correctly. Review the section “CONFIGURING YOUR ROUTER (PORT FORWARDING)” and www.portforward.
com for setup instructions
• A pop-up blocker is preventing the ActiveX controls from prompting you to install
• Your router is blocking your computer from using the external IP address from the same network as the DVR. Try connecting to the External IP
Address from a remote computer that is not connected to the same network
• Port 80 is being blocked by your ISP (Internet Service Provider). Try changing the HTTP port to 2000. Port forwarding will need to be setup for
the new port
• A DSL modem is preventing the connection because it is on a dierent sub-network. Contact your ISP to assist with bridging the modem and
router together
Note: SVAT technical support cannot troubleshoot modems, since changing these settings can potentially render your modem
inoperable. Bridging or any other modications to the modem will need to be completed by the ISP.
53CV501 - 16CH
Page 54
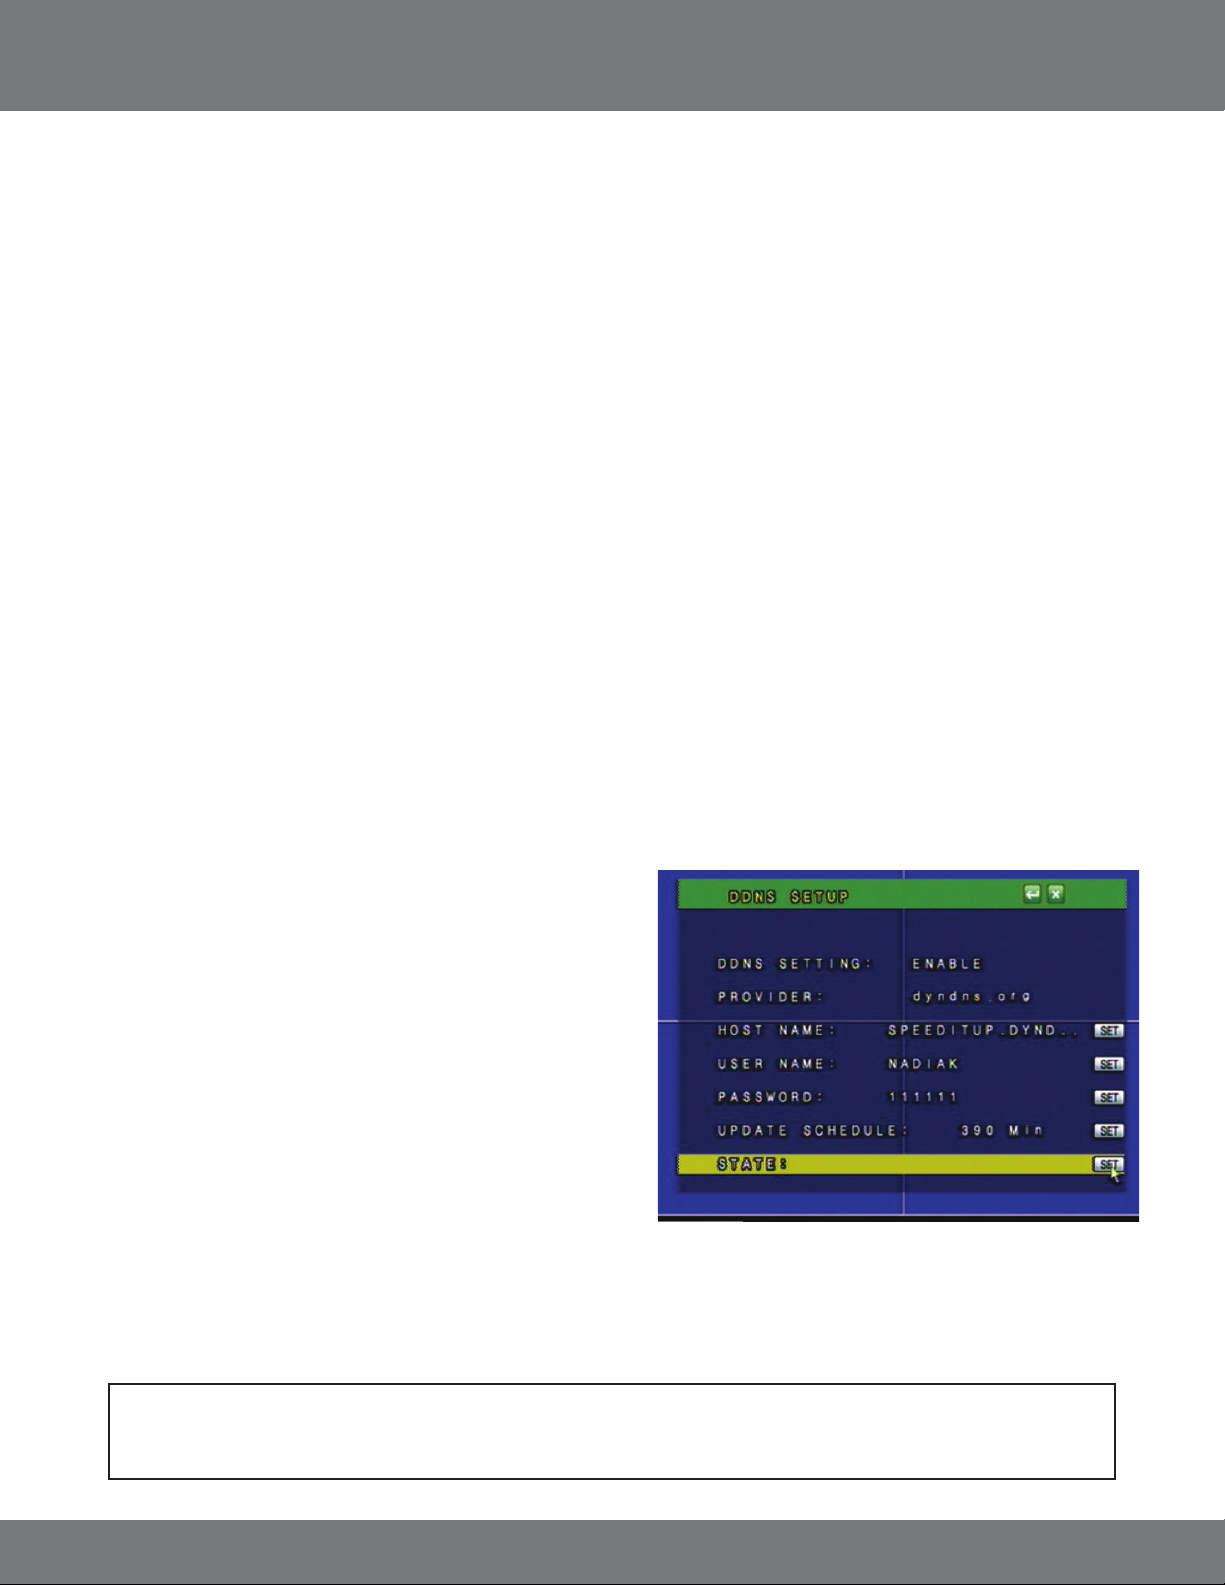
NETWORK GUIDE...continued
To Congure the DVR to Work with DDNS:
1. Press Menu and select NETWORK SETUP. Insert password if required. The default password is “1111”.
2. Navigate to DDNS and press ENTER.
3. Change DDNS SETTING to ENABLE.
DDNS (Dynamic DNS)
Instead of having to type in the IP address to access the DVR online you can use DDNS to create a easy to remember website name to access the DVR.
The DVR has many DDNS Provider web addresses built into it. The following instructions are for DYNDNS.org and DDNS.CAMDDNS.COM. The sites are
not owned nor operated by SVAT and therefore support for these services will be done through their website.
DDNS.CAMDDNS.COM
1. Set the provider to ddns.camddns.com.
2. Enter the username of the account you would like to create.
3. Update Schedule denes how often the DVR will connect to the DDNS web site and update the website with the most current external IP
information.
4. Navigate to STATE: and click SET or press ENTER to manually update the website. You will see the DDNS website name next to the STATE.
To access the DVR using the DDNS account type in the DDNS website name in an Internet Explorer browser. The syntax should be similar to
http://username.ddns.camddns.com. If updating fails, the DDNS name is already registered or the DVR may not be properly connected to
the Internet. Try updating again in about one minute or changing the username.
DYNDNS.ORG (requires a DYNDNS.ORG account)
The rest of the information for the setup screen will be acquired from the
DDNS account you have set up online.
1. On your DVR set the provider to dyndns.org.
2. Enter the hostname of your DDNS account. (ex. NadiasDVR.dyndns.org).
3. Enter the username of the DYNDNS account you created.
4. Enter the password of the DYNDNS account you created.
5. UPDATE SCHEDULE denes how often the DVR will connect to the DDNS
web site and update the website with the most current external IP
information.
6. Navigate to STATE: and click SET or press ENTER to manually update
the website.
Note: Before lling in the DYNDNS.com information on your DVR, you must create an account and a hostname for your DVR
through the DYNDNS website.
54CV501 - 16CH
Page 55

NETWORK GUIDE...continued
DYNDNS.ORG ACCOUNT SETUP
(required if using DYNDNS.ORG)
1. Open Internet Explorer and type http://www.dyndns.org in the address bar.
2. Create a new account by clicking the “Create Account” link in the top right hand
corner of the site.
3. Enter your preferred user name, email address, and password.
4. Optional information can be left blank, unless you would like to enter it.
5. Read and agree to the Acceptable Use Policy (AUP) by checking the box and click
“Create Account”.
6. An account verication email will be sent to the email address you supplied. You
need to follow instructions in order to complete the account activation.
Once the account has been conrmed you can log into the account and setup for
use with the DVR.
7. Enter the DYNDNS.org username and password you created and click login.
8. Click on the “Services” button located on the top Menu bar.
9. Click on the Dynamic DNS link.
10. Click on the “Get Started” link located on right side of the screen.
11. Type in a desired host name. We recommend you use your name, company name,
or something that is easy for you to remember.
12. Choose a domain name from the drop down Menu. We recommend using
dyndns.org.
13. In the IP address eld, type in the external IP address of the DVR. This will only
need to be done for the initial set up as the DVR will connect and update with its
current IP address according to the UPDATE SCHEDULE on the DVR.
14. Leave all of the other options as is, and click “Create New Host”.
15. Follow on screen instructions to activate and “Check out” your free DDNS
hostname.
16. Your dynamic DNS settings have been created.
TO VIEW DVR THROUGH HOSTNAME
1. Open up your Internet browser and type in your DVR’s hostname that you created on your
DYNDNS account.
2. You will be prompted for a Username and Password.
Username: admin
Password: admin
3. Click OK and the DVR software and footage will pop up.
Note: If using a port other then 80, the port must be specied after your hostname
55CV501 - 16CH
Page 56
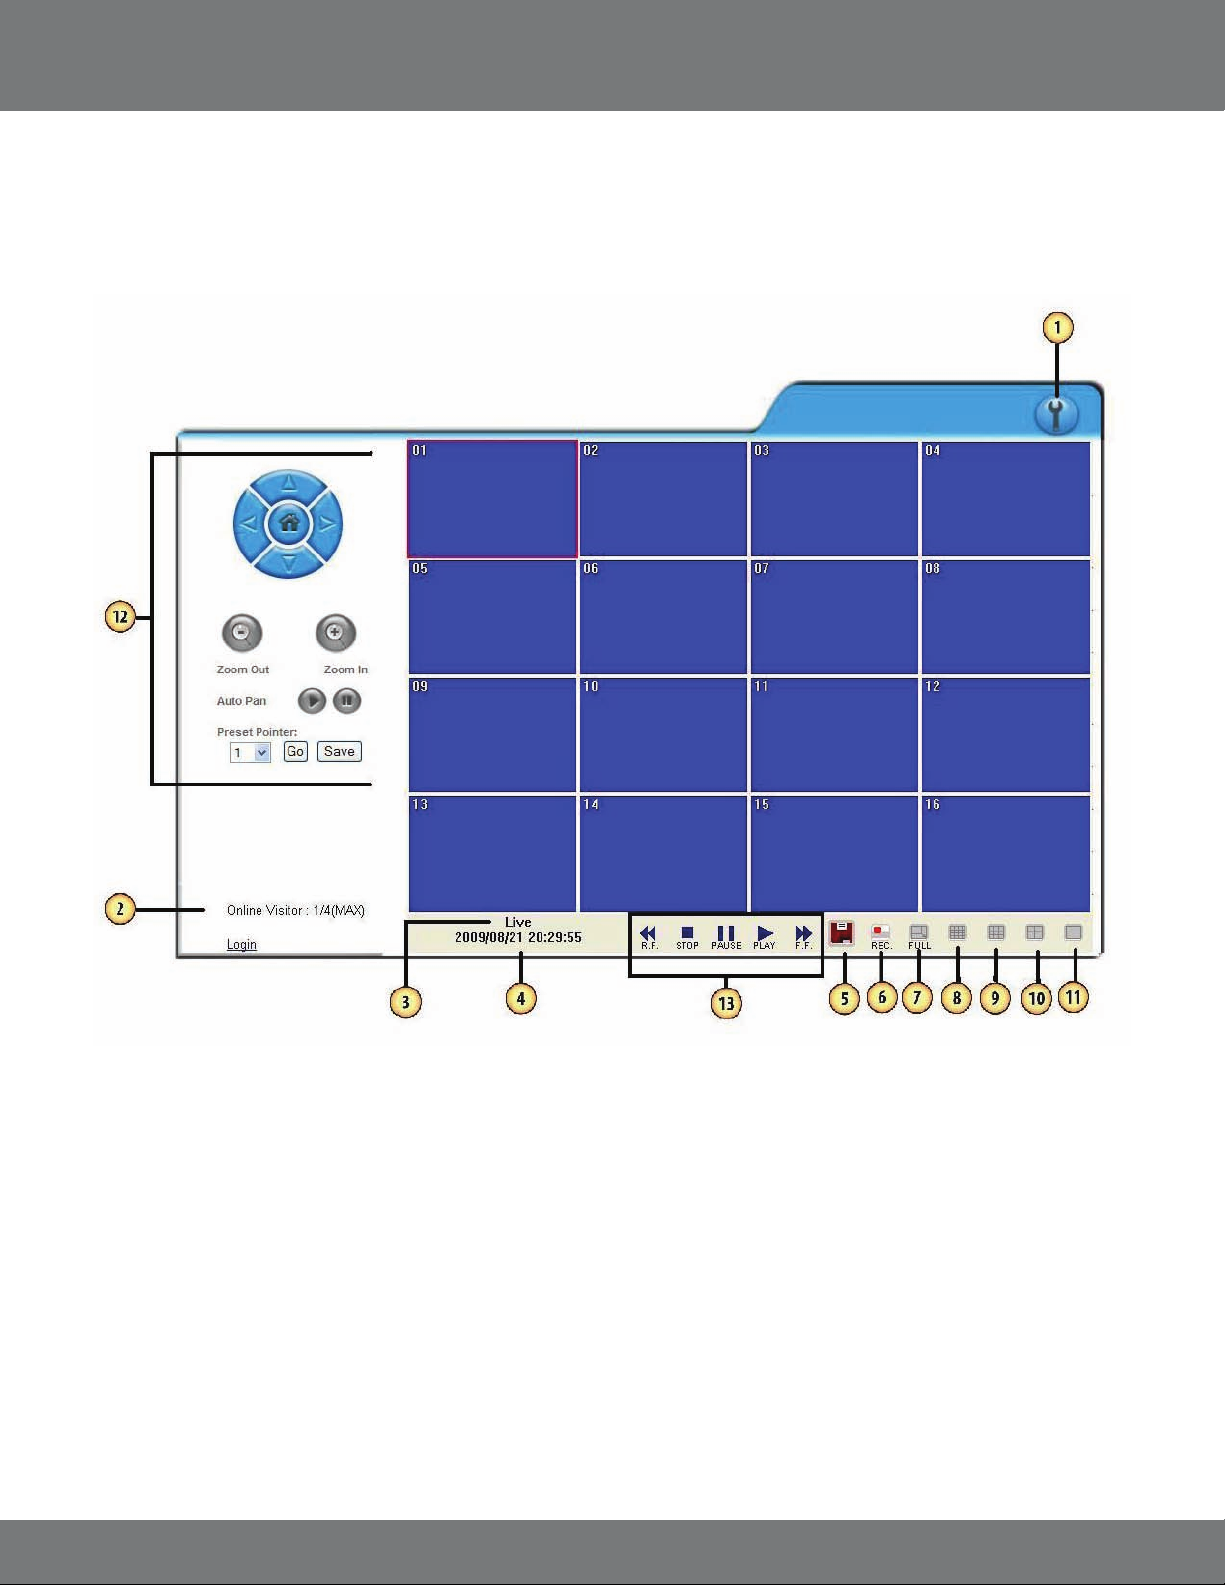
NETWORK VIEWING & PLAYBACK
Once you have your DVR set to view online, the software to view the footage diers from the software that is in the DVR. Please refer to the
following instructions when viewing live footage online.
This is what the online viewing software will look like:
1. DVR Conguration: When you click DVR conguration, it displays a Menu for you to change/review settings.
2. Online Visitors: Displays how many visitors are viewing your camera system. The maximum connected is 4.
3. Mode: Displays the current mode (Playback or Live). If in Playback mode the status will display the current playback
control in use. (ex. if paused the status will say PLAYBACK PAUSE).
4. Date/Time: Displays the date and time of the footage that is currently being displayed. If in Live mode the time will be the
current time of the DVR. If in playback mode the time will display when the footage was recorded.
5. Download: Use this to download backup footage onto your computer.
1. Choose the Start and End Time.
2. Press Save.
3. Choose the location to save the backup footage.
4. This will backup the footage in H.264 format to the desired location. Use the player to view the recorded footage.
56CV501 - 16CH
Page 57
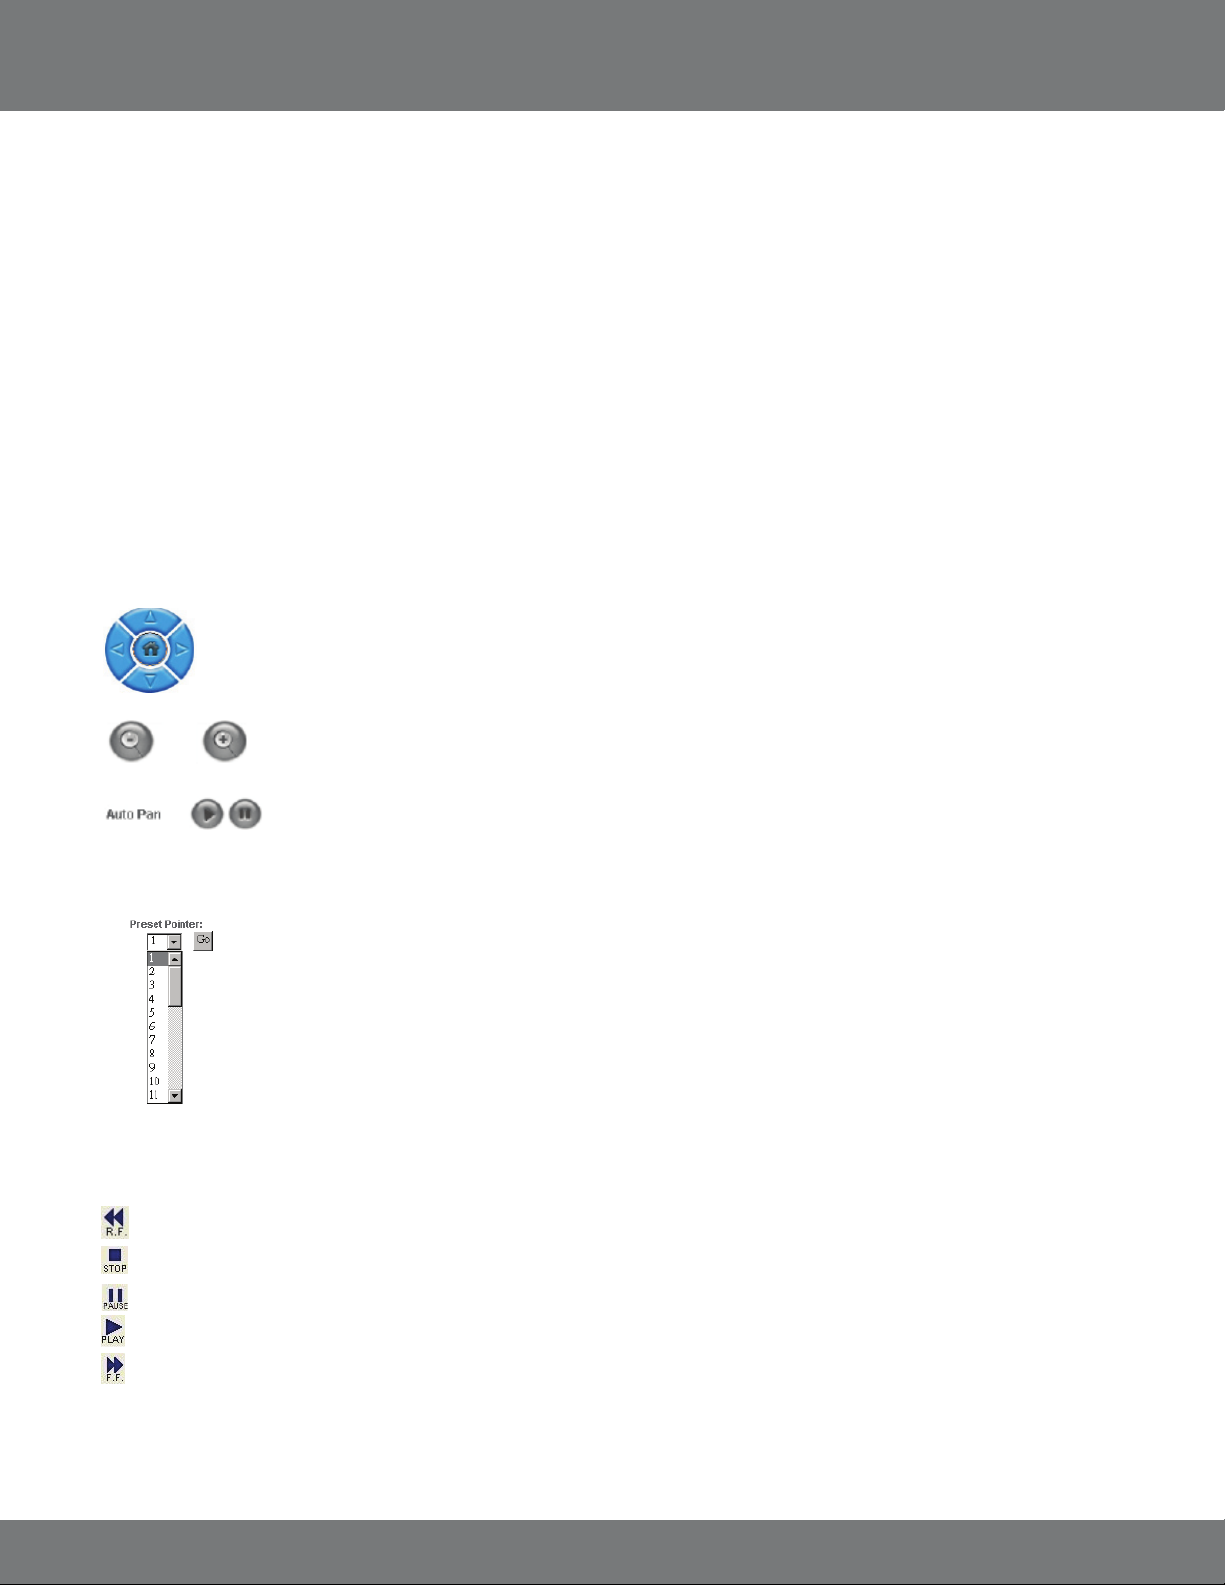
NETWORK VIEWING & PLAYBACK...continued
6. Rec: This will record the footage that is currently being displayed onto the desired save location on your computer.
This will work in live mode or in playback mode. Press STOP to terminate the recording and view the saved
footage. It will be saved in H.264 format and will require the player to view the recorded footage.
7. Full: Switch to full screen mode. In full screen mode you can switch between the single or quad screen mode, use
the single camera button and quad screen button to switch between the two modes. Playback controls are
not available in this mode. Full screen mode works for live footage and recorded footage. Press Esc on the
keyboard or press the full screen button again to exit full screen mode.
8. 16 Screen View: View all 16 Cameras at once.
9. 9 Screen view : View 9 Cameras.
10. Quad Screen Mode: Switch the viewing mode to quad screen (4 cameras).
11. Single Camera Mode: Switch the viewing mode to single camera viewing mode.
12. PTZ Control:
zoom out from the current eld of view.
Auto Pan – Most PTZ cameras can be congured to automatically Pan from left to right and back
again. Press the play button to begin this mode. Press the Stop button
to stop the auto pan.
13. Playback Controls
The playback controls are as follows from left to right:
Rewind – Rewinds playback
Directional Keys – Controls the direction of the PTZ camera. It can be moved Up, Down, Left, and Right. The
home button will return the camera to the default camera position.
Zoom in / Zoom Out – This will adjust the optical zoom of the camera to zoom in on the eld of view or to
Preset Pointer – If your PTZ camera supports Preset positions the DVR can select one of the 32 preset
positions and go directly to it. Save will save the preset position if supported.
Please consult your PTZ manufacturer for information on compatibility.
You can set up to 32 preset points.
Stop – Stops playback
Pause – Pauses Playback
Play – Plays footage
Fast Forward – Fast forwards playback
57CV501 - 16CH
Page 58

NETWORK VIEWING & PLAYBACK...continued
ADDITIONAL OPTIONS:
You can left click the mouse on the viewing windows to call up additional options. The extra options are described below:
1. Snapshot: Will allow you to save a single picture from the image.
2. Performance: You can select the image quality (high, medium, & low).
3. Use Overlay: Choosing this option allows you to speed up video display and reduce CPU loading time.
4. Play Audio: You can play audio by channel. (Note: The included cameras do not support audio).
Time Point Backup - Time point backup allows you to back up the footage you have recorded through online viewing.
To back up saved footage:
1. Click on the
2. Select the starting and ending time which you wish to back up.
3. Click the save icon.
4. It will take several minutes for the back up to be saved.
5. You will need to download the R6 Viewer software.
6. Click STOP to end the backup process.
icon.
RECORD
• To record the footage you are seeing click the record button
• You will be prompted to choose a le name and a folder to save the footage
• A small pop up screen will appear telling you that the footage is being recorded
• When you are done recording, click STOP in the small pop up screen
FULL SCREEN – Expands the viewing window to the full size of your monitor
SCREEN FORMAT – Change from quad, 9 camera, 16 camera and to single channel viewing.
58CV501 - 16CH
Page 59

NETWORK VIEWING & PLAYBACK...continued
DVR CONFIGURATION OPTIONS
SYSTEM OPTIONS
The system information, network information and other options are displayed when this option
is clicked.
System Information
Server Name: This is the name of your DVR. It will be displayed in the title of the web
browser and can be used to distinguish your DVR from another.
MAC Address: The MAC address is the physical address of the network card that is installed
in the DVR. This is a unique number and is used to identify the network
connection on the Internet.
Language: To adjust the web browser language settings choose one of the 5 languages
available under the server information tab.
Time Zone: This is set up using the DVR Menu. The eld is not adjustable using the web
interface. It should display the time zone that the DVR is located in.
NTP Server: This is the Network Time Protocol server IP address. By default this is
198.123.30.132. A dierent NTP server IP address can be used if desired.
Interval: The DVR will check and update the system time according to the NTP server.
Apply: Saves all your System Information settings.
User Management
Lists all the user accounts that have been added to the DVR and allows you to add more accounts onto the DVR.
Anonymous User Login : Determines whether or not the DVR will prompt the user to enter a username/password when connecting to the
DVR over the Internet.
To add a user:
Input the username, the password, conrm the password and select which user group they will be a part of. The information will be displayed in a
list below showing the following:
Username: Displays the user log on name.
User Group: Shows the user permissions on the DVR.
Modify: Can be used to change the password of the desired username.
Remote: Will remove the user account from the DVR web access.
These usernames and passwords are not the same as what is used to access the DVR locally. See Password Setup for information regarding local system
passwords.
System Update
Firmware Version: Displays the current version of rmware loaded onto the DVR.
New Firmware (Browse): Browses to the location that the rmware update is stored.
Upgrade: Apply the new rmware version.
59CV501 - 16CH
Page 60

NETWORK VIEWING & PLAYBACK...continued
NETWORK VIEWING & PLAYBACK...continued
Load Default
Load Setup From Default (Setting): Applies factory default settings. You will be prompted to conrm the restore.
Load Setup From: (Browse): Browse to the location where the system conguration settings are stored.
Load Setup From: (Setting): Applies the conguration settings from the backup le.
Backup Setup (Download): Prompts you to save the current conguration settings to your computer. Click save and choose
the location to save your settings.
NETWORK OPTIONS
IP Setting
DHCP/Static: Choose whether your network uses DHCP IP address or a Static IP address. Generally most networks user DHCP
automatically assigned IP addresses. See NETWORK SETUP for more information regarding DHCP/STATIC IP
addresses.
• If a DHCP IP address is congured is likely the IP address will change and require a port forwarding rule change
• Once assigned a DHCP address it is recommended to change the IP assignment to static to avoid this switch
The information regarding the Static IP address can be obtained from the person who set up your network.
Port Assignment
Web Page Port: The port that is used to access the DVR over the web. By default (without specifying) Internet browsers
automatically add :80 to the end of IP addresses. If using a web port other than 80 it will need to be specied when
typing in the IP address.
RTSP Port: (Real Time Steaming Protocol) Used by mobile devices to view a single camera. Type the following into the URL
search of your mobile device. The syntax for viewing the camera channels on a mobile device is RTSP://IPADDRESS/
CH0# . By default the RTSP port is 554.
RTP START/END Port: (Real-time Transfer Protocol) used in conjunction with the RTSP port to view the steaming video footage on the
mobile device. Each connected device using the RTSP port requires an additional 4 RTP ports. Please refer to the
PORT FORWARDING section of the manual for more details.
Apply: Used to apply all the IP settings.
PPPoE
Enabled/Disabled: If your DSL Internet Service Provider prompts you to enter a Username and Password to connect to the Internet then
this option needs to be set to enabled. Consult with your ISP if you are not sure if you need your PPPoE settings.
Username: Your PPPoE account username can be acquired from your ISP if required.
Password: Your PPPoE account password can be acquired from your ISP if required.
Send mail after dialed
Enabled: This will email the email address set up in the Mail & FTP section when the DVR dials in to the PPPoE server. Every
time the DVR dials in it will acquire a new external IP address (Unless statically assigned by your ISP). The email will
include the Subject: from the eld below as well as information regarding the new connection. This will include the
new IP address.
60CV501 - 16CH
Page 61

NETWORK VIEWING & PLAYBACK...continued
DDNS
Enabled/Disabled: This will enable the DVR to connect to the DDNS provider listed below. If disabled the DVR will not update the DDNS
website with the current information.
Provider: Choose the DDNS service provider for the DVR to connect to. See DDNS SETUP for more information on the
service providers.
Hostname: This is the hostname set up for your DVR. Used to connect to your DVR through a web browser.
Username: This is the username congured on the DDNS service provider’s website. This is usually dierent than
your hostname.
Schedule Update: Denes how often the DVR will update the DDNS website with it’s current IP address Information. This should not be
set to less then 60 minutes as some DDNS providers may temporarily block the DVR.
State: Displays the current state of the DVR. IDLE indicates the DVR is not currently updating the DDNS website.
Apply: Saves all changed DDNS settings.
Mail & FTP
Motion: Enables or disables the DVR to send email notications when motion is detected on one of the cameras. This
requires motion detection to be set up in the MOTION SETUP menu. The DVR will email based on the
parameters below.
Alarm: Enables or disables the DVR to send email notications when an external alarm is detected. This requires alarm
detection to be setup in the ALARM SETUP menu. The DVR will email based on the parameters below.
Mail Server: The name of a valid mail server. Contact your email provider or Internet Service Provider (ISP) for your mail
server information.
Username: The username used to log into the senders email account. Contact your email provider or Internet Service Provider
(ISP) for your mail server information.
Password: The password used to log into the senders email account. Contact your email provider or Internet Service Provider
(ISP) for your mail server information.
Sender’s Mail: The email address that the emails should originate from.
Receiver’s Mail: The email address that the emails should be delivered to.
BCC Mail: Use the Blind Carbon Copy to discretely email a second email address. The email address in the Receivers Mail will
not be informed of the BCC email address.
Event Subject: Enter the subject line to be included in all the emails that are sent regarding motion or alarm detection.
FTP Setting
Motion: Enables or disables the DVR to send email notications when motion is detected on one of the cameras. This
requires motion detection to be set up in the MOTION SETUP menu. The DVR will email based on the
parameters below.
Alarm: Enables or disables the DVR to send email notications when an external alarm is detected. This requires alarm
detection to be set up in the ALARM SETUP menu. The DVR will email based on the parameters below.
61CV501 - 16CH
Page 62

NETWORK VIEWING & PLAYBACK...continued
FTP Server: Enter the Hostname or IP address of the FTP server.
Username: A username that has the proper permissions on the FTP server to create directories and add les.
Password: Enter the password for the username listed above.
Port: Enter the port the FTP server uses. The default port for FTP sites is 21.
Path: Enter the path to save the H.264 format video les.
Apply: Saves your Mail and FTP settings.
Other Options
Player: Allows you to download the DVR player software for your computer.
Mobile Viewer: Allows you to set up and/or congure settings on the mobile online viewer.
DVR Setting: Allows you to change settings that your DVR player has – the Menu works the same way as the Main Menu
(instructions written above).
3G MOBILE DEVICE PORT FORWARDING
This DVR is capable of being viewed on Windows Mobile and Symbian OS cellular phones. The protocol that is used to view is RTSP (Real
Time Streaming Protocol). This will require additional port forwarding steps on your router.
• The ports that are required are listed on the RTSP SETUP section in the Menu of the DVR. By default the RTSP port 554 and an RTP port
range of 1024-10000 need to be forwarded to the Internal IP address of the DVR
SETTING UP PORT FORWARDING
• Follow the port forwarding instructions listed in “Conguring your Router (Port Forwarding) to view the DVR Externally Pg. 52” using the
proper RTSP and RTP ports
If using the default settings:
• Forward port 554 using TCP/UDP to the Internal IP address of the DVR
• Forward TCP and UDP port range 1024-10000 to the Internal IP address of the DVR
• If the router requires each port to be entered individually then set up port forwarding rules for 1024, 1025, 1026, 1027, etc… Each
connected mobile device requires 4 open RTP ports to the DVR
• To have three mobile phones connected to any of the DVR’s channel streams you will need to forward the rst 12 ports from the
RTP Port range (1024-1036) to the Internal IP address of the DVR
You can view an individual channel stream on your mobile device:
• To view a live video feed from one of the cameras connected to your DVR you will need to enter a specic URL. The syntax for viewing
channel 3 is rtsp://IPADDRESS/CH03
• Fill in the spot (above) called IPADDRESS with the external IP address of your DVR network found on http://www.whatsmyip.org
Note: Some phones do not require Port Forwarding for internal viewing over WiFi connection.
62CV501 - 16CH
Page 63

3G MOBILE DEVICE PORT FORWARDING...continued
From Your Mobile Device:
• Open up the web browser application
• Click Options and choose the option that will allow you to type in a URL
• Type in rtsp://74.11.213.177/CH03
This will pull up channel 3 of your DVR if port forwarding settings are set up correctly and your phone is compatible with this DVR.
MOBILE TROUBLESHOOTING
IF YOU CANNOT CONNECT
A great tool for testing to see if you have setup port forwarding correctly is by using the following website: http://canyouseeme.org. This website
can only be used from a computer that is connected to the same network as the DVR. Open up this webpage and next to “What Port?” type in the
port to test. It is important to test the HTTP port, RTSP port, and the start of the RTP ports.
If port forwarding is setup correctly you will see the following message:
If “Your ISP is not blocking” any of the required ports, your port forwarding and DVR are set up correctly. If the connection is refused or
the connection times out follow the instructions below.
If the Remote Viewing does NOT connect it could be caused by any one of the following reasons:
1. The computer trying to access the DVR is not a genuine Windows PC.
2. The browser trying to access the DVR is not Internet Explorer 6.0 or later. Make sure the browser is Internet Explorer 6.0 or later and on a
Windows PC.
3. Port forwarding is not setup correctly.
Review the section “CONFIGURING YOUR ROUTER (PORT FORWARDING)” and http://www.portforward.com for setup instructions.
4. A pop-up blocker is preventing the ActiveX controls from prompting you to install. Disable all pop-up blockers in Internet Explorer and try to
access the DVR again.
5. Your router is blocking your computer from using the external IP address from the same network as the DVR. Try connecting to the external IP
address from a remote computer that is not connected to the same network.
6. Port 80 is being blocked by your ISP (Internet Service Provider). Try changing the HTTP port to 2000. Port forwarding will need to be changed to
use the new port.
7. A DSL modem is preventing the connection because it is on a dierent sub-network.
63CV501 - 16CH
Page 64

3G MOBILE DEVICE PORT FORWARDING...continued
If additional port forwarding steps are required, contact your ISP (Internet service Provider) to assist with bridging the modem and
router together.
• Check all of your network connections and go through the above steps again to make sure a conguration error was not made
• You may have to congure PPPoE settings to match the settings provided to you by your Internet Service Provider (ISP). Consult your ISP for
more information on your PPPoE settings
Note: SVAT technical support cannot troubleshoot modems, since changing these settings can potentially render your modem
inoperable. Bridging or any other modications to the modem will need to be completed by the ISP.
MOBILE VIEWING INSTALLATION GUIDE
Mobile Viewer Application
If the browser or media player on your mobile is not compatible with the DVR you can install the Mobile Viewer application to view a single camera
on your mobile device.
The following instructions are loosely written for specic mobile devices and can be used as a guideline to install and operate the Mobile Viewer
software. The installation instructions will vary depending on the make and model of your mobile device.
Sony Ericsson K608i
Note: This service uses data on your mobile device which may incur data charges through your cell phone service provider. Contact
your cell phone provider to see if the cost for this type of data is covered.
iPhone and iTouch Viewing
BlackBerry (Bold)
64CV501 - 16CH
Page 65
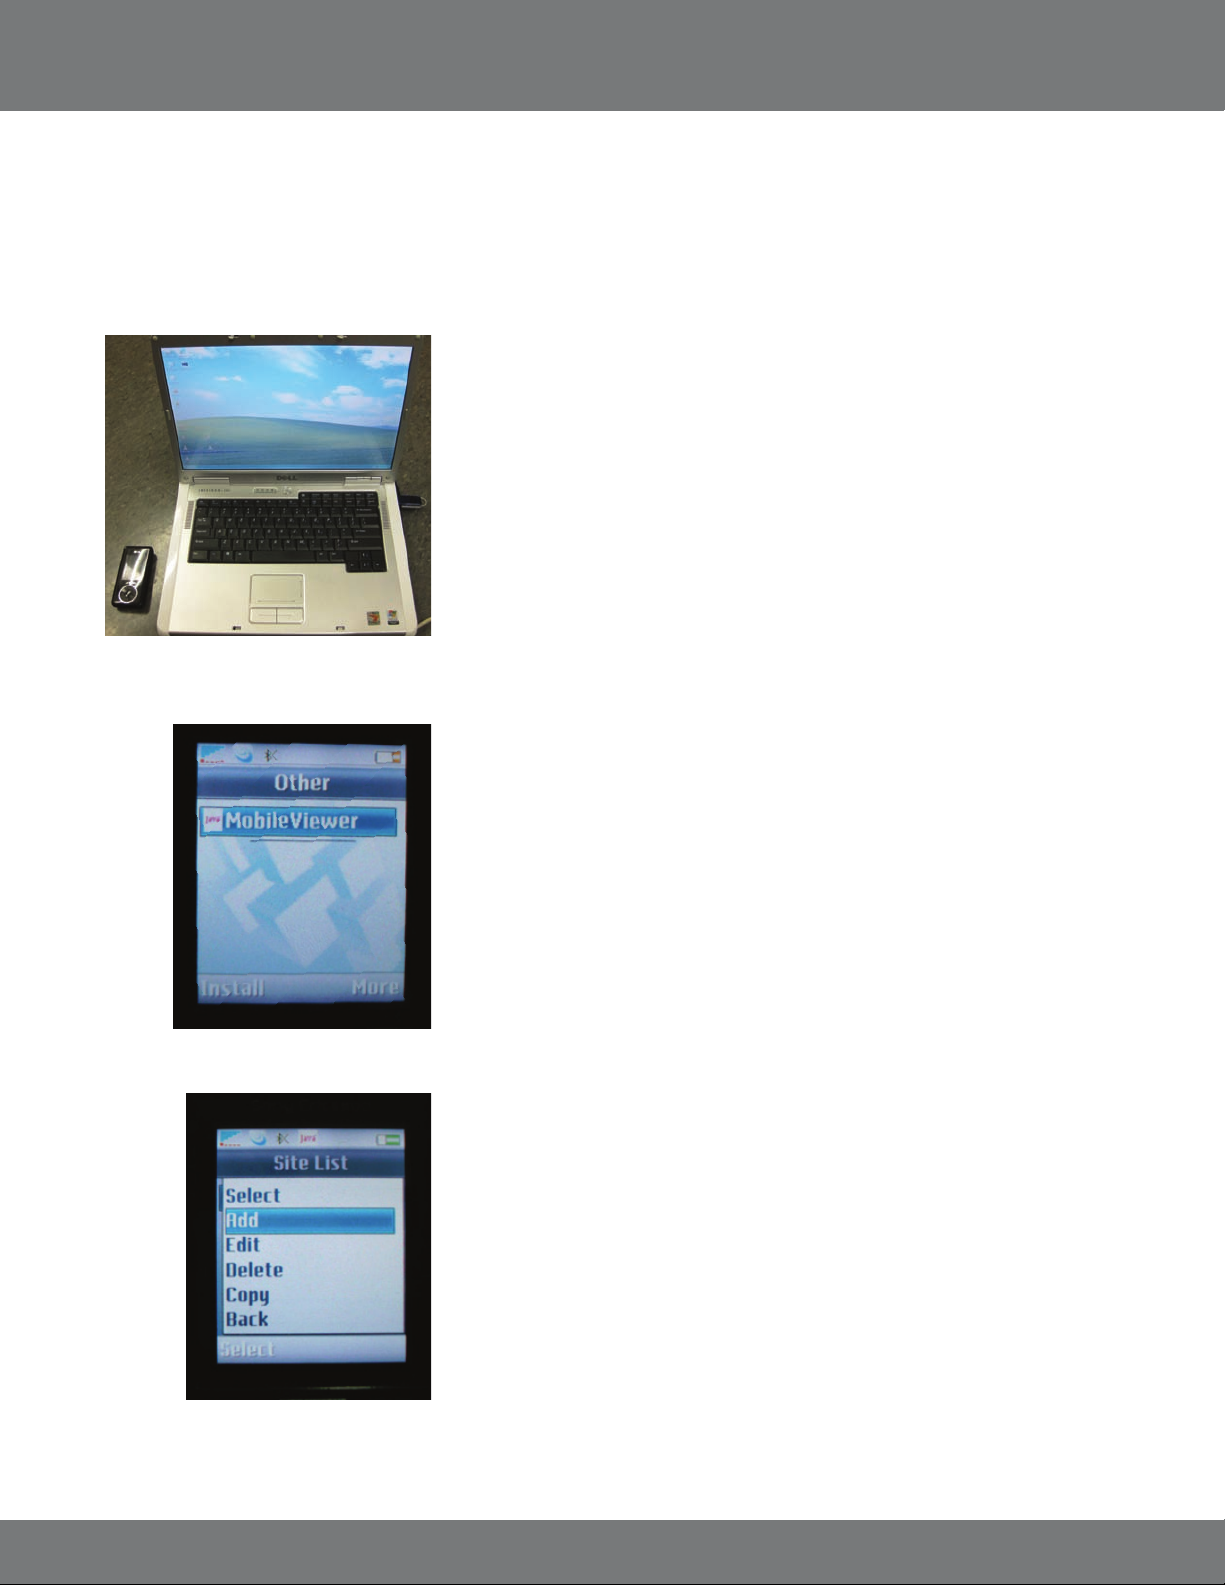
MOBILE VIEWING INSTALLATION GUIDE...continued
Sony Ericsson K608i
The rst step is to copy the MobileViewer.jar le to a storage location on your mobile that can be accessed using the le manager on the
mobile device.
1. Copy the MobileViewer.jar le from the CD or website onto the desktop.
2. Connect the mobile device to your PC to download the mobile software.
• Open up My Computer. You should see your mobile device listed as a
removable device
• Open up the File Manager (This may vary on the model of your device)
• Open up the Other folder (or another location that can be accessed using le
manager on the mobile)
• Copy the MobileViewer.jar from the desktop into this folder
• Disconnect your mobile device from the computer
3. On your mobile device:
• Open up the Menu
• Open up File Manager folder
• Open up the folder containing the MobileViewer.jar le. and click Install
• Press Yes to begin the installation process
• You will be prompted with a security warning message, this is expected
• Click Yes/Continue to continue the installation
4. Once successfully installed go back to File Manager.
• Go to Applications
• Select “Mobile Viewer” to launch the software on your phone
• Press Options
• Select Site List
• Click on Add
65CV501 - 16CH
Page 66

MOBILE VIEWING INSTALLATION GUIDE...continued
Name: This is arbitrary and can be named to your liking.
Host: This is the IP address for your DVR. If connecting using the 3G or other wireless
network, the proper ports must be forwarded on your router. See Port Forwarding
for instructions.
Ex. Host: 74.11.213.177.
Port: This is the http port used by the DVR. By default the port is 80.
User: The user account used to access the DVR. By default the user is “admin”.
Password: The password associated with the user entered in the line above. By default the
password for the “admin” account is “admin”.
Image Size: QCIF (176 x 144 pixels).
Channel: The Input Channel you wish to view (1-4).
Fit to Screen: Expands the image to t the screen, can be set to Yes or No.
Click OK To Save, or click Options > OK.
You will return to the site list.
5. Highlight the desired site you wish to connect to.
• Click Options
• Click Select
• You will return to the live viewer and the screen should display
“Current Site: NAME, Disconnected
• Click Options
• Click on Connect
• You should be prompted that the mobile device is trying to make a connection to the IP address
of the DVR
• Click Ok or Allow to allow the connection
If all your settings are correct you will view the channel of the DVR that you set in the site list settings.
66CV501 - 16CH
Page 67
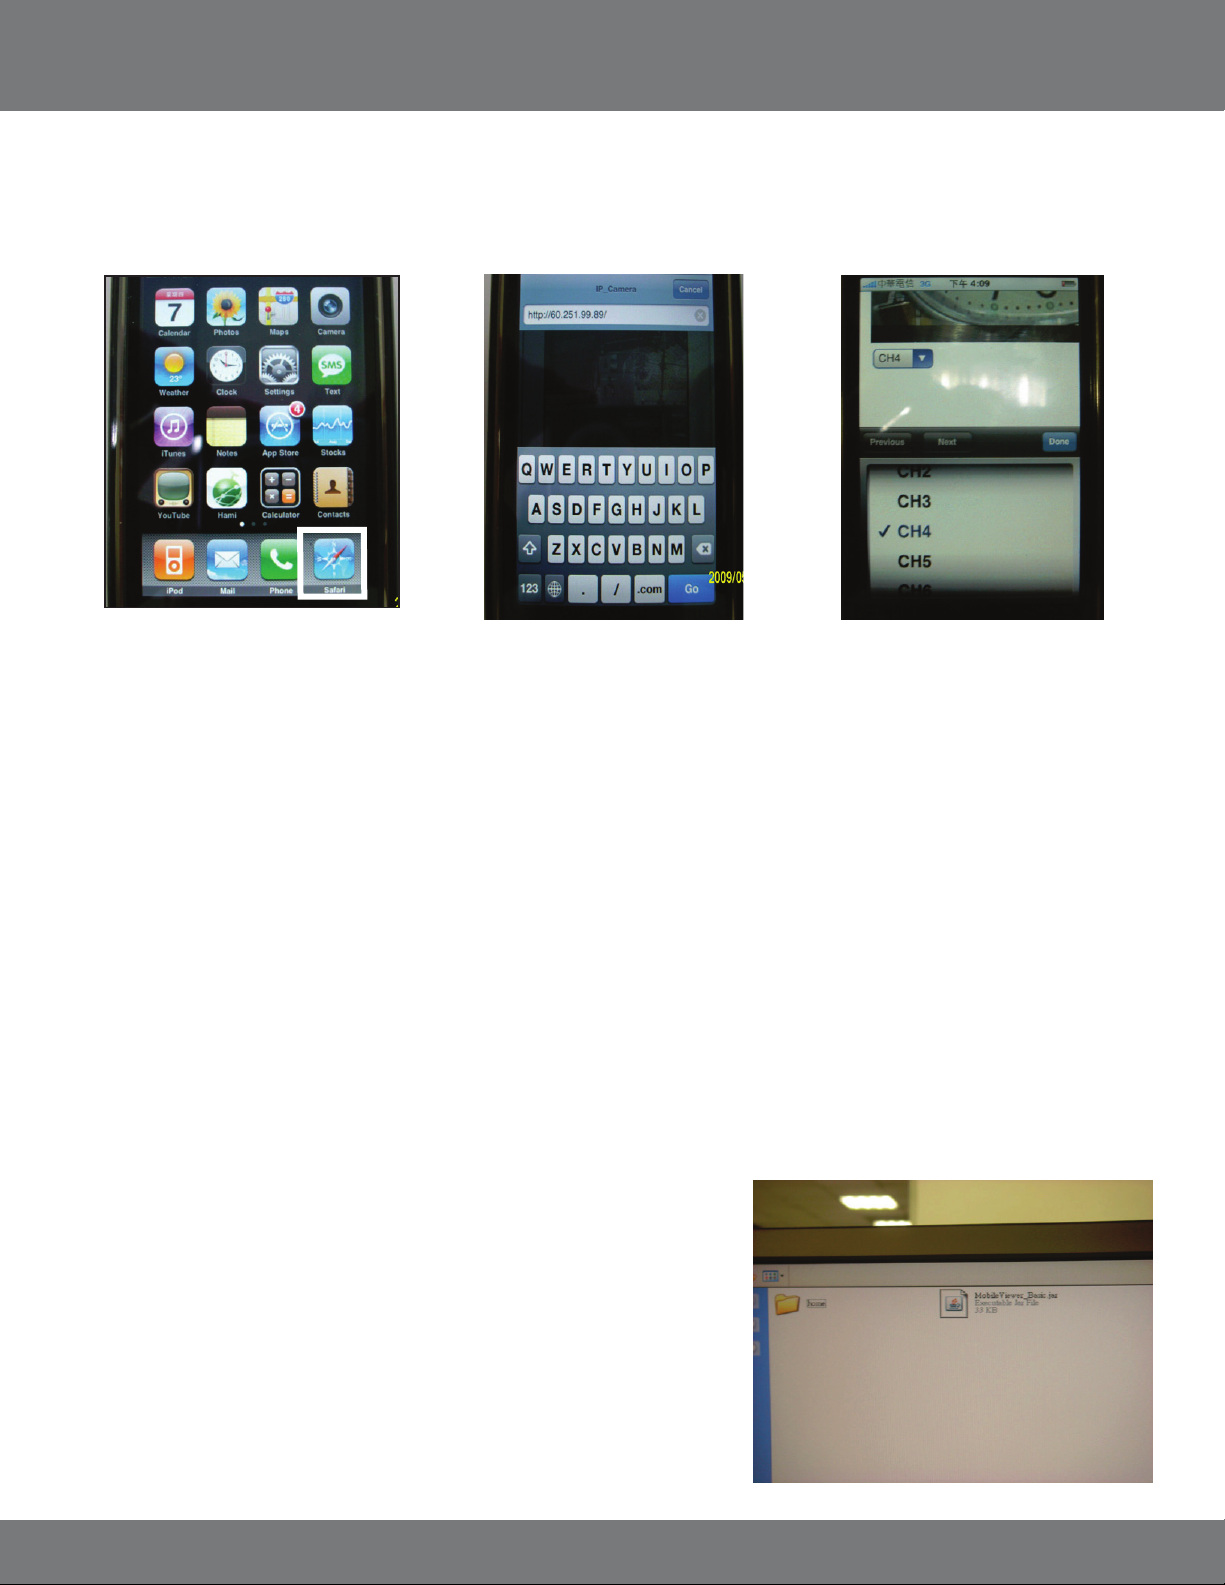
MOBILE VIEWING INSTALLATION GUIDE...continued
iPhone and iTouch Viewing (Safari)
Be sure that the mobile device that is connected can connect to the internet via cell phone network or Wi-Fi. If connected to the same Wi-Fi network as
the DVR the iPhone can access the DVR cameras via the LAN (internal) IP address or the WAN (external) IP address.
1. Open up Safari on the iPhone or iTouch.
2. In the address bar type in:
http://IPADDRESS/iphone.html.
Ex. http://74.11.213.177/iphone.html
You will be prompted to enter a
username and password. By default the
username/password is admin/admin.
3. You can change each single camera you
are viewing by selecting the active camera
fromthe drop down Menu below. Channels
1-16 are available.
BlackBerry (Bold)
The rst step is to copy the MobileViewer.jar le to a storage location on your mobile that can be accessed using the le manager on the
mobile device.
The following steps have been created with the BlackBerry Bold. Other models may result in dierent le locations or results.
Copy the MobileViewer.jar le from the CD or website onto the desktop.
1. Connect the BlackBerry to the computer using a USB cable.
• If prompted turn on Mass Storage Mode and enter the password
• Open My Computer
• You should see your mobile device listed as a removable device
• Open the removable device. Copy the MobileViewer.jar le from the desktop
onto the BlackBerry or one of the subfolders. (The folder needs to be accessible
on the BlackBerry)
• Disconnect the BlackBerry device from the computer
67CV501 - 16CH
Page 68
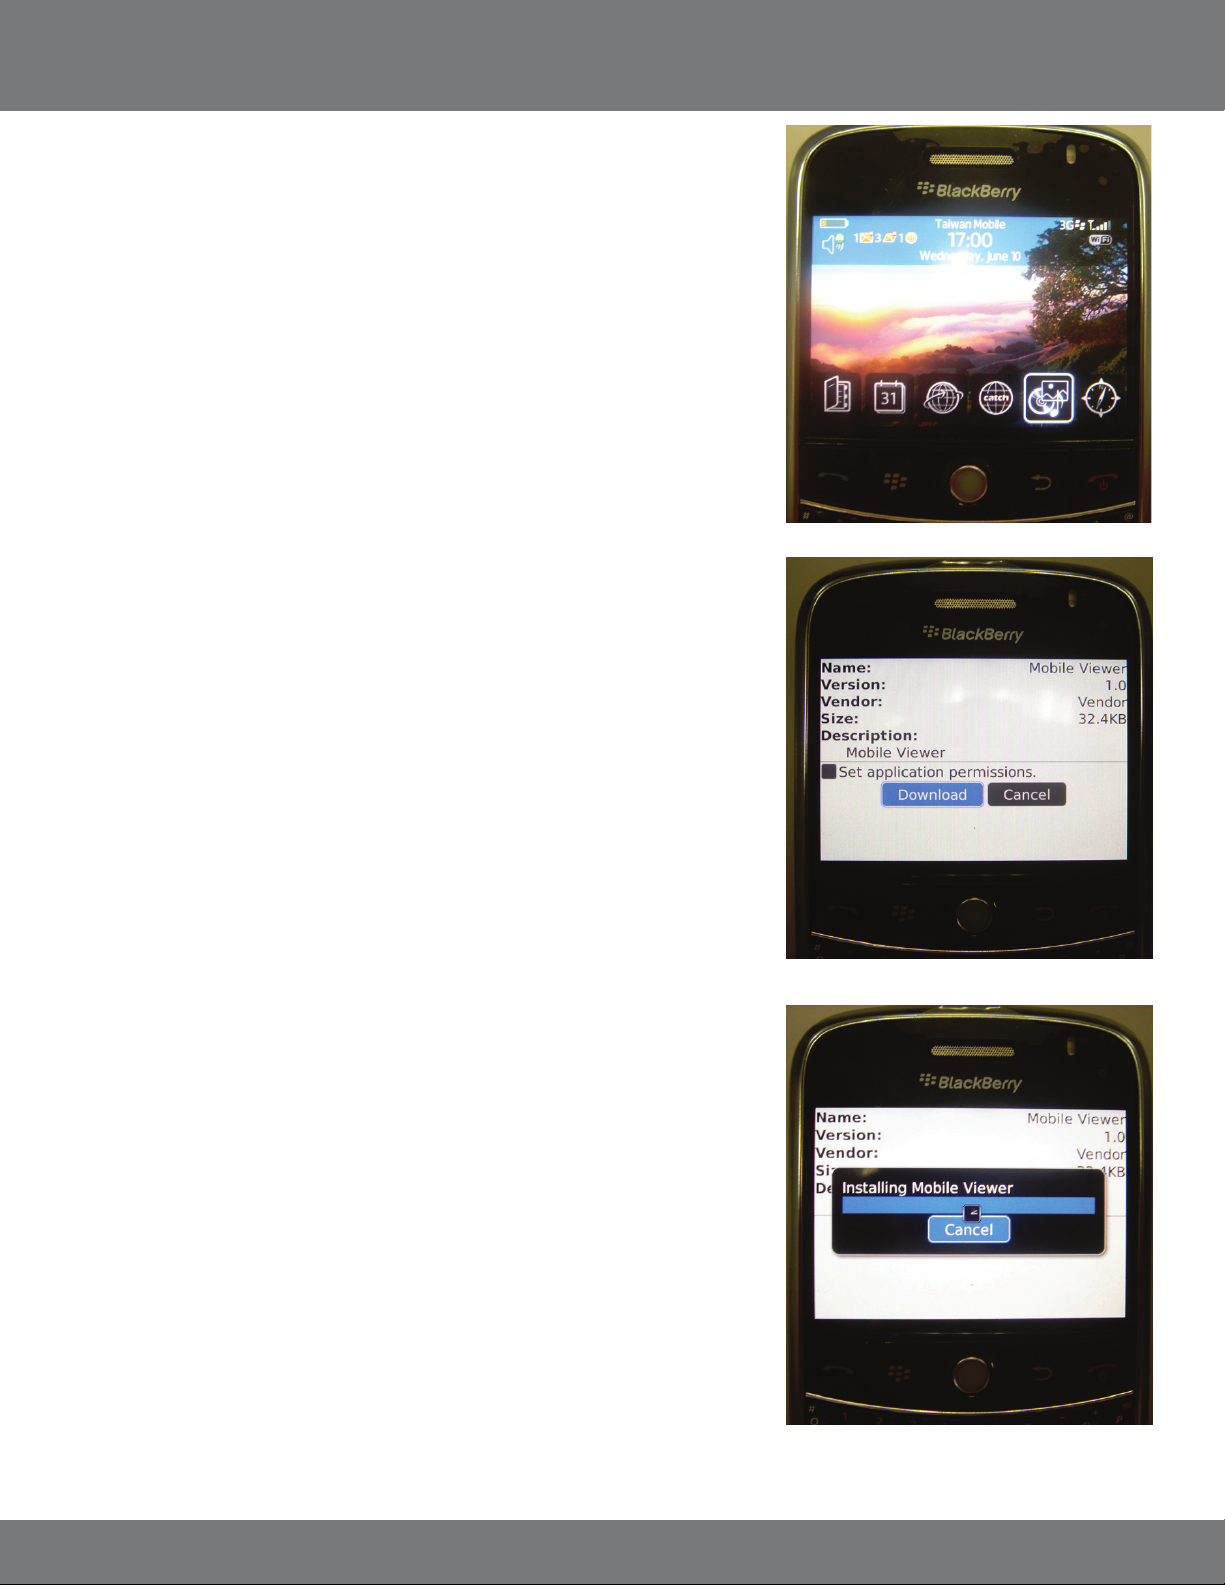
MOBILE VIEWING INSTALLATION GUIDE...continued
2. On the BlackBerry:
(Setting may not be available depending on cell phone service provider)
• Open up the Menu
• Open Options/Settings
• Open Advanced Options
• Click on TCP
• You must set your APN settings according to your specic Cell Phone Service Provider.
Contact your cell phone service provider for the APN, APN username, and APN
password
3. Open up Media:
• Click Options
• Click Explore
• Select Device Memory (if that is where the le was saved)
• Navigate to the folder containing the MobileViewer.jar le
• Click Download
• Press Yes to begin the installation process
You will be prompted with a security warning message. This is expected,
Click Yes/Continue to continue the installation
4. Once successfully installed click on “downloads.” Mobile Viewer should be listed along
with other downloaded programs.
• Select “Mobile Viewer” to launch the software on your phone
• If using a dierent model of BlackBerry, the Mobile Viewer may be listed with all of
the other applications on your phone. Check the Main Menu for Mobile Viewer
5. Once the software has loaded:
• Press Options
• Select Site List
• Click on Add
68CV501 - 16CH
Page 69
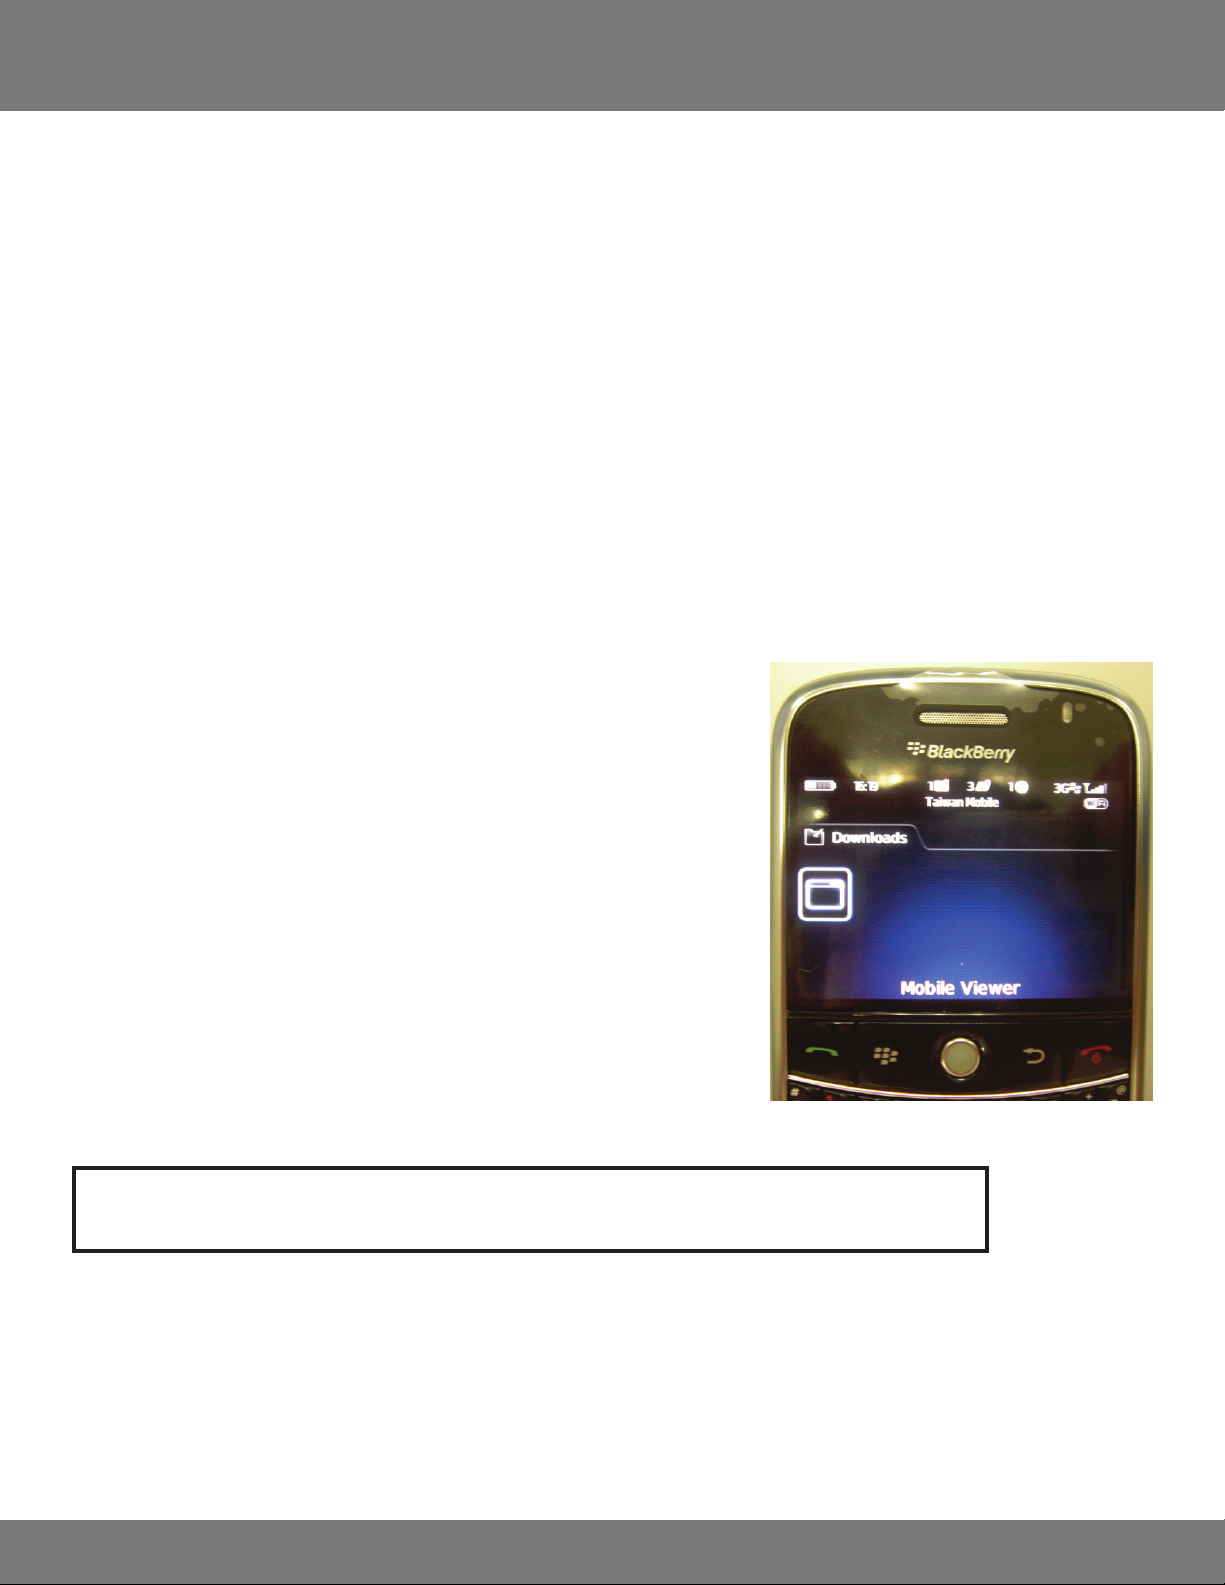
MOBILE VIEWING INSTALLATION GUIDE...continued
The following will be displayed:
Name: This is arbitrary and can be named to your liking.
Host: This is the IP address for your DVR. If connecting using the 3G or other wireless network the proper ports must be forwarded on
your router. See Port Forwarding for instructions. Ex. Host: 74.11.213.177.
Port: This is the http port used by the DVR. By default the port is 80.
User: The user account used to access the DVR. By default the user is “admin.”
Password: The password associated with the user entered in the line above. By default the password for the “admin” account is “admin.”
Image Size: QCIF (176 x 144 pixels).
Channel: The Input Channel you wish to view (1-4).
Fit to Screen: Will expand the image to t the screen. Can be set to Yes or No.
Click OK to save. Or click Options > OK > You will return to the site list.
6. Highlight the desired site you wish to connect to.
• Click Options
• Click Select
• You will return to the live viewer and the screen should display:
"Current -Site: 1NAME, Disconnected"
• Click Options
• Click on Connect
You should be prompted that the mobile device is trying to make a connection to the
IP address of the DVR.
• Click Ok or Allow to allow the connection.
Note: If all of your settings are correct you will view the channel of the DVR that you set in the Site List Settings.
69CV501 - 16CH
Page 70
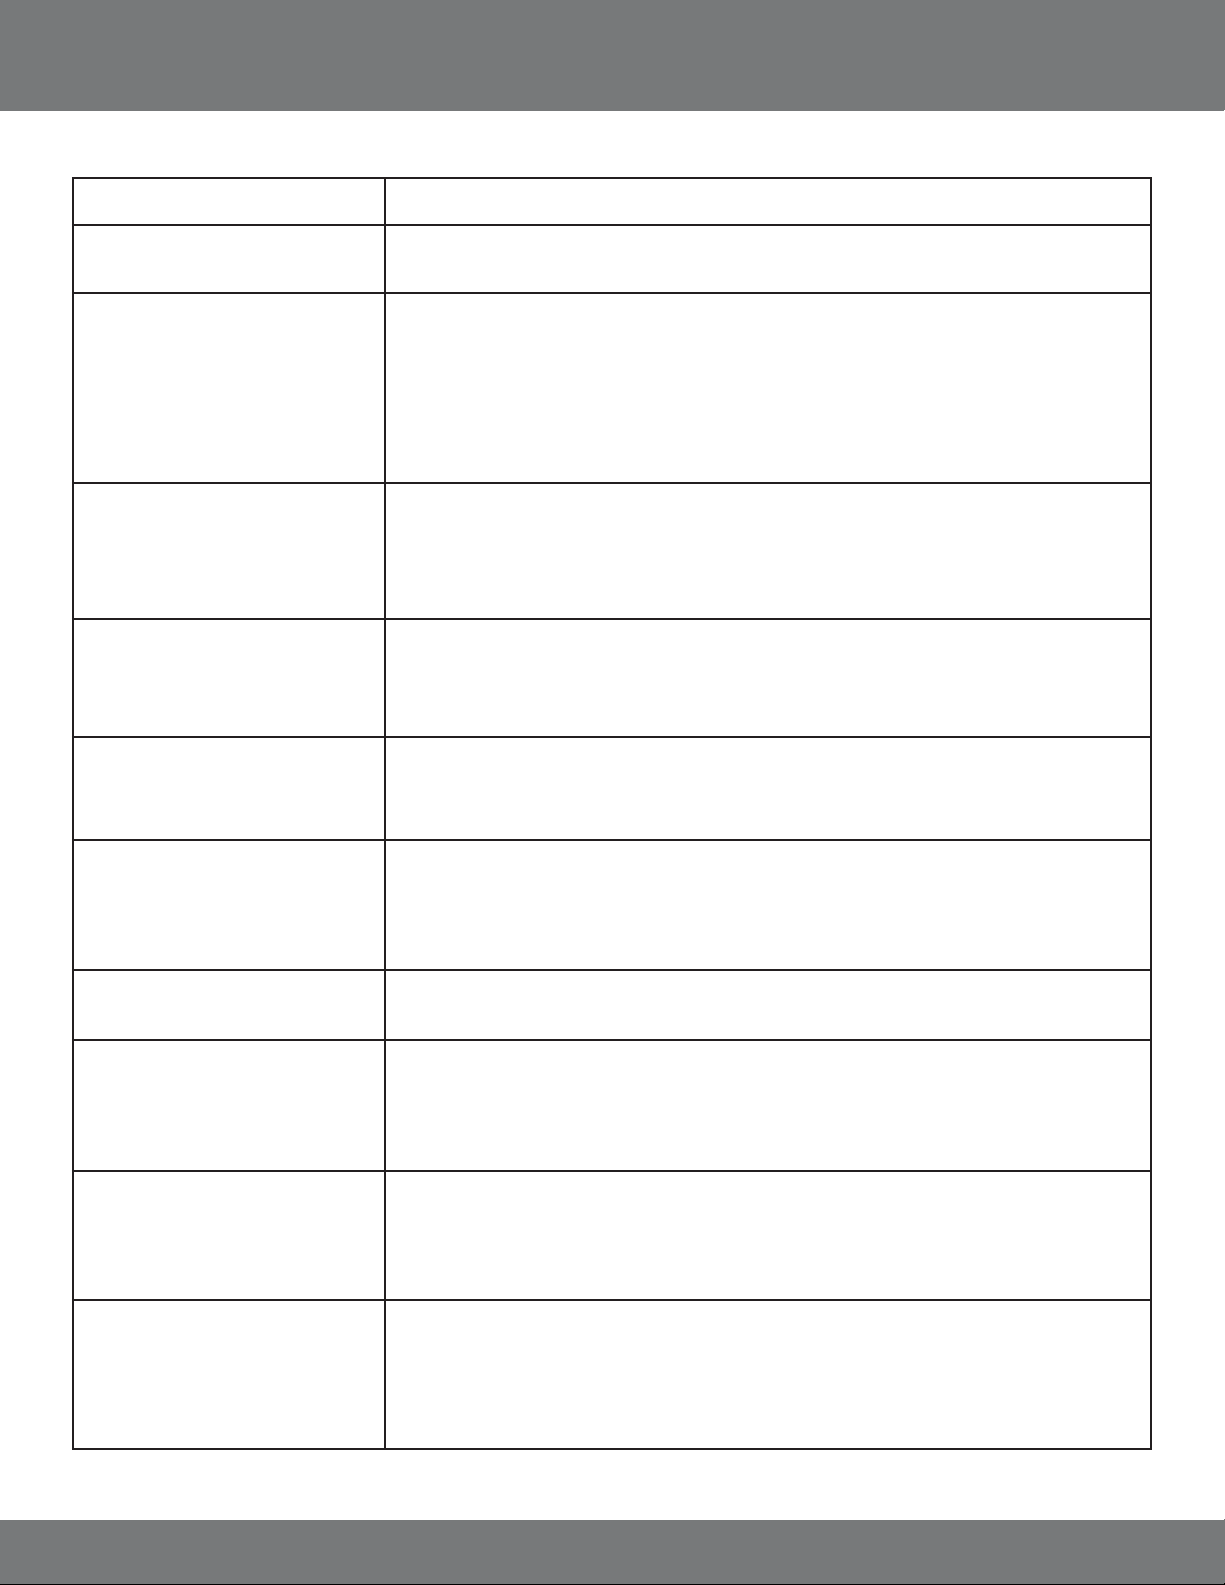
TROUBLESHOOTING GUIDE
My DVR has no power • Check the power cord connection to the DVR and the outlet and ensure that the DVR has power
There is no way to turn the DVR o • The DVR is set to run as long as it is plugged in, if you would like to turn it o you have to
unplug it
I cannot hear recorded audio when
playing back
Playback video is choppy • Check the FPS (Frames Per Second) rate for each camera that is recording choppy video.
Timer recording is not working
properly
My PTZ camera (not included) is not
working. The picture is displaying,
but I cannot control the camera
I have lost video footage • This could be from lost footage due to tampering of cameras, make sure to check all
• Are audio equipped cameras being used? Please note that audio equipped cameras are not
included with this DVR system
• Make sure that the audio cable is properly connected and inserted in the Audio IN and that the
other end is plugged into a microphone or audio supported camera. Please note that only one
channel can record audio
• Make sure the volume is turned up on your speaker/amp
Refer to your settings in the Record Menu. Cameras with a higher FPS (30 is the highest) will
record more uid video than cameras set to a lower FPS. For more information on making
changes to the Record Menu, see Pg. 63
• Check to see if you have the proper time set on your DVR. Refer to the instruction manual under
Time Setup
• Double check your schedule record times – you may have it set on the no record function
• Verify the channel, protocol, and baud rate with the PTZ camera’s instruction manual or the
manufacturer of the camera
• Verify the PTZ camera is connected to the proper PTZ inputs
connections are secure and set properly
I plugged a mouse into the USB
port but it’s not working
The Hard Drive is lling up too
quickly
The camera’s image appears on
screen, but nothing is recorded
Cannot view DVR remotely using
port 80
• The hard drive overwrite may be disabled, this will make the recording stop when the hard
drive is full. To change this go to the Hard Drive set up and turn Overwrite Enabled on
• The CV501 - 16CH’s mouse will only work when plugged into USB port on the right side
• Check your FPS that you are using, if you are using a high number of FPS then the hard drive
will ll up faster. Try lowering your FPS for some cameras
• Check the video quality you are using – If you are using a high video quality then the hard drive
will ll up quicker
• Check to see if the camera is in motion detection mode. If in motion detection move and there
is no movement happening no footage will be recorded
• If there is no symbols or icons in the in the top right corner, it means you have set your schedule
to have the camera cease recording
• Try using a dierent port other then 80. Make sure you change this port on the DVR settings as
well as port forwarding settings
• Try going to www.canyouseeme.org to nd available open ports that you can adjust for
your DVR
• View the Video Networking guides on www.svat.com
70CV501 - 16CH
Page 71
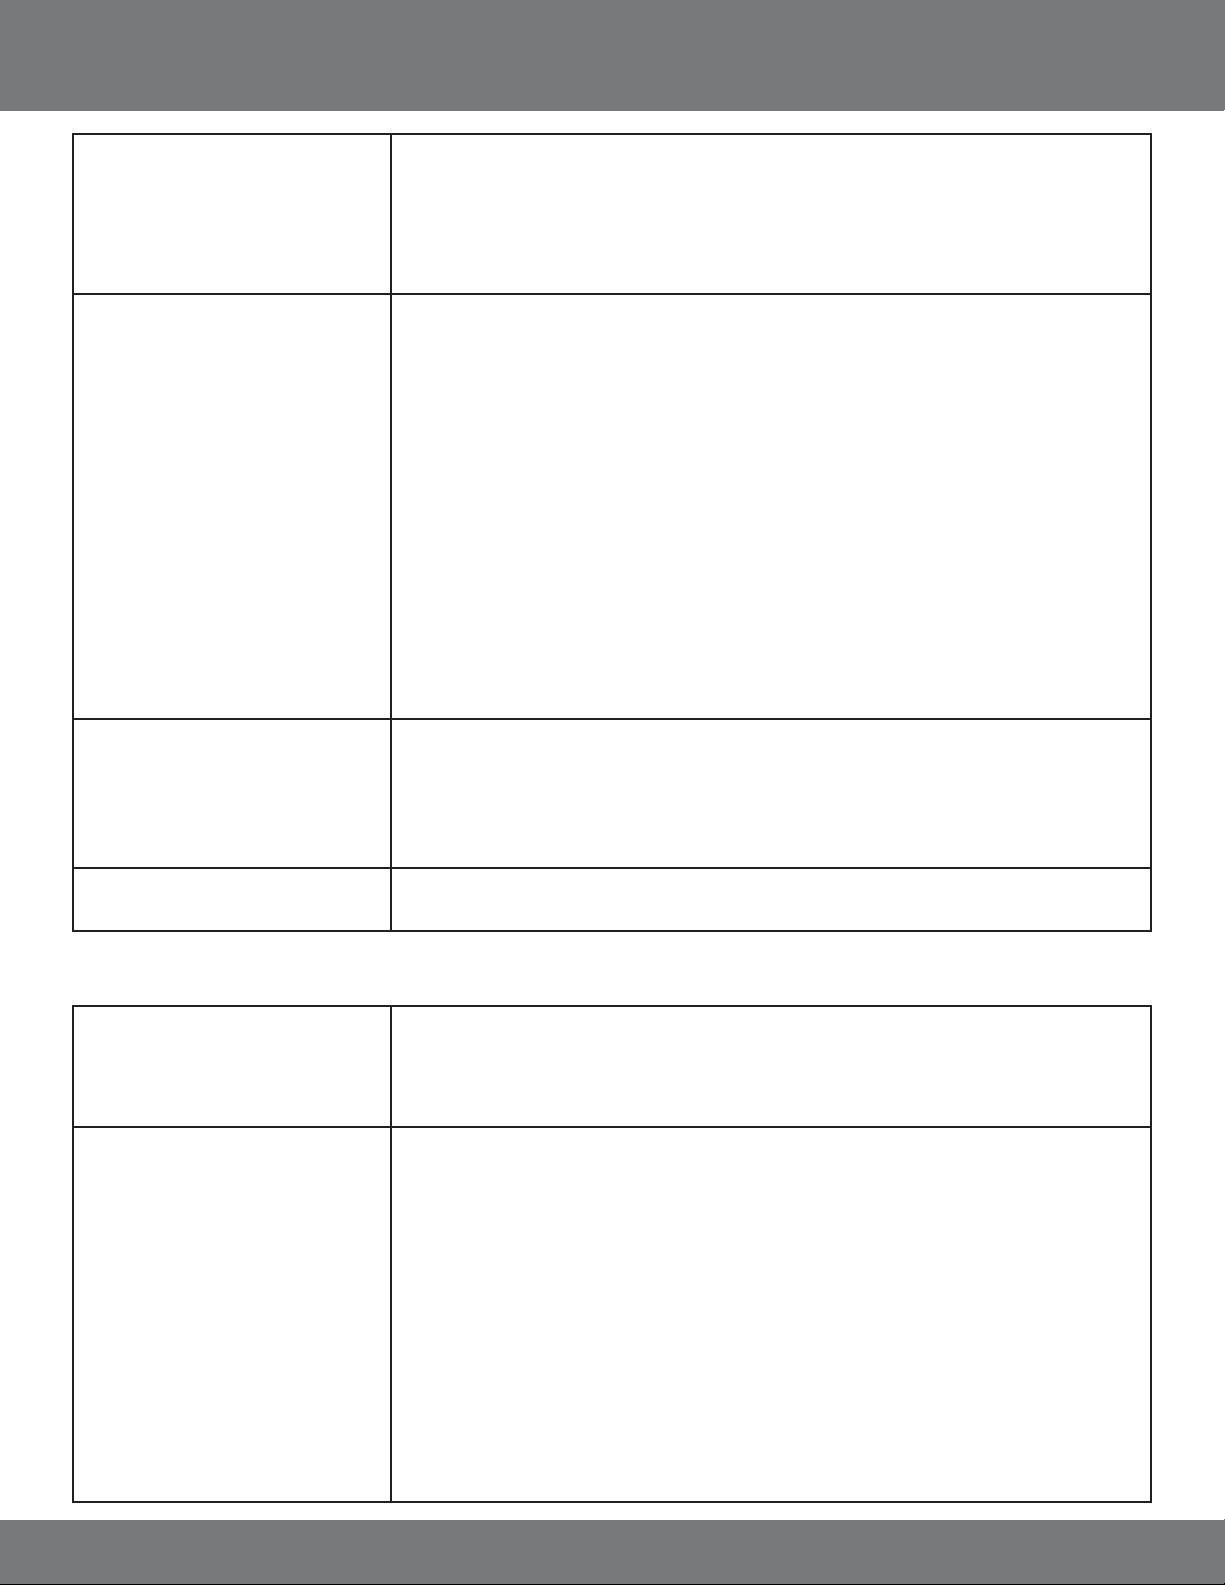
TROUBLESHOOTING GUIDE CONT...
Cannot view the DVR through a
remote Internet connection
Cannot view DVR on the computer • Verify the following while referring to the included networking guide
• Make sure the router is properly plugged in and setup
• Make sure the DVR is properly plugged into the router
• Repeat the steps in the networking guide to make sure everything was properly set up
• If none of the above steps try contacting your ISP to make sure they are not blocking port 80
• View the Video Networking guides on www.svat.com
• Make sure you are entering the proper IP address of the DVR. You will enter the Internal IP
address into the Internet Explorer address bar when the computer is connected to the same
router as the DVR
• You will enter the external IP address into the Internet Explorer address bar when the
computer trying to access the DVR is not connected to the same router. This will require an
Internet connection
• Port forwarding will need to have been setup according to the networking guide
• Follow the instructions found on www.portforward.com for detailed instructions or contact
your router manufacturer for assistance with port forwarding on your particular model
of router
• Make sure you are logged into the computer as an administrator to install the required
application and ActiveX controls
The color on the camera picture is
too purple, blue, etc
My browser keeps freezing • Make sure you have an up to date browser and that the proper ActiveX options are selected. If
• Try adjusting the settings in the camera setup screen to improve/change the image quality.
Unusual coloring can also be caused by the type of lighting that is used. The cameras do not
react well to halogen lighting. Try focusing the cameras away from these lights
• Make sure that the cameras are not pointing directly at a light source such as a lamp or a
sunny window
they are, you may need to re-install your browser. (Internet Explorer version 6 or higher)
Camera Troubleshooting
I cannot see at night with my IR
night vision cameras
My camera is not displaying
any image
• The night vision turns on automatically when light levels drop. Try the camera in a pitch black
setting. The areas that it is in may have too much light and may not activate the sensor
• The LEDs need to reect o an object to view it in the dark so make sure there is an object for
it to reect o within reasonable range
• Verify the connections are snug and tight tting. Disconnect and reconnect each connection.
4pin/4pin, power/power, RCA/RCA
• Make sure the power adapter is plugged in to an active electrical outlet
• If everything is connected, cup your hands around the camera lens and you should see the red
LEDs illuminate. Make sure it is dark enough to activate the light sensor
• If the LEDs do not illuminate, try switching the power adapter with a working camera’s power
adapter. This will indicate if it is the power adapter which needs to be replaced
• If no power/video signal even with the new power adapter, connect the camera that is
in question to a working cable. (Disconnect a working camera and connect the camera in
question to that cable set) The camera should function correctly. If the camera functions
correctly the test indicates that there is a bad cable
• Verify the pins on the 4PIN DIN connection are not bent and are being properly inserted to the
proper connector
71CV501 - 16CH
Page 72
TROUBLESHOOTING GUIDE CONT...
My camera is being displayed in
black and white
Lines displayed on screen / scrolling
lines / electrical noise / interference
The camera is not displayed on the
Live Display screen; it is just 4 blue
boxes
DVR SPECIFICATIONS
• Night vision mode displays in black and white. Make sure there is enough lighting in the room to check if
color is working
• Power cycle the DVR by unplugging the DVR with a camera still connected. Leave for 10 seconds and power
on again. If the cameras still display in black and white try replacing the power supply for the B/W camera
with a properly working camera’s power supply
• Try replacing the power supply with a properly working camera’s power supply
Test the camera out on a dierent 60ft cable set. The video signal could be getting disrupted by a dierent
•
power source. If the cables are being run parallel to electrical lines or near other electrical devices try and
reposition the camera (and cable) to avoid these sources
• Check all connections to make sure they are secure and properly connected
• Check your power supply to ensure that the camera is powered up
Factory Model# HDR-16RJ
Display 16CH DVR
Functionality Triplex
Video Compression H.264
Wireless Frequency N/A
Number of cameras
supported
File Format H.264
Resolution NTSC: 720 x 480 / PAL : 720 x 576
Recording Frame Rate 240FPS (Fully Adjustable)
Recording Time Max 8 Years with 500GB HDD
Recording Resolution (Half D1)NTSC : 720 x 240 up to 120 PPS
Recording Method Record as Each, Playback in MultiCamera
Recording Qualities Low, Medium, High, Best
Recording Modes Manual / Schedule/ Alarm (motion,
Recording Media HDD (Backup via USB, USB CD/DVD &
Storage Capacity 500 Gb (Max 1.5 Tb)
Autostart Recording Yes
Auto Resume Recording Yes (watch dog)
16
(Half D1) PAL : 720 x 288 up to 100 PPS
or Full Screen
alarm, video loss)
Ethernet)
HDD Type Internal SATA
Removable HDD No
Video Format NTSC/PAL
Video Loss Alarm Auto Detect Alarm
Video Inputs 16 CH Composite BNC
Video Display Output 1 CH Composite BNC(Monitor), S-Video, VGA
Audio Input 1 CH
Audio Output 1 CH
Live Resolution NTSC: 720 x 480 / PAL : 720 x 576
Audio Bitrate 32 kbps
Live Frame Rate 16 X 30 Frame / Sec
Live Viewing Full, 4, 9, 13, 16 ZOOM, SEQ
Network Protocol TCP/IP, DDNS, DHCP, PPPoE, SMTP, FTP, RTSP, RTP
Network LAN IP Static, Dynamic
Network Connection 10/100 BaseT Ethernet (RJ-45)
Back-up USB & Ethernet
Play Search Mode Time / Date, Event list
Play Speed X2 X4 X8
Pan/Tilt/Zoom Yes
Play Mode 1 (Full)/ 4 / 9 / 13 /16
OSD and System Menu
Display
Yes
72CV501 - 16CH
Page 73
DVR SPECIFICATIONS continued...
OSD Language
Display
Time and Date Stamp
Display
Password Protection Yes, Menu Password, Clear HDD Password,
Adjustable Screen
Settings
File Transfer Etherent, HDD, USB
Operating System Linux
Disk Full Warning Yes
Automatic Overwrite
Option
Playback Navigation Rewind, Play, Pause, Stop, Forward
LED Indicators Play, Power, HDD, REC
Housing Material Aluminum
Housing Color Grey
Cooling Fan Based
Power Input 12V DC 4.16A
Power Consumption 22W (Without HDD)
Power Adapter Input 100V 50/60Hz ~ 240V 50/60 Hz
Operating
Temperature
Alarm Sensor Inputs Yes, 16
Alarm Sensor
Connection
Dimensions 11" (w) x 3.15" (h) x 10.3" (d)
Weight 9 lbs
Other
USB Port For Firmware Upgrade, Backup, Mouse
Remote Control Yes
Supported
Peripherals
Alarm Sensor Inputs 16
Alarm Relay Outputs Yes
PTZ Protocols Pelco-D, Pelco-P, Hunt, Li-lin, Dynacolor,
Multi-Language
Yes
Network
Color, Brightness, Contrast, Hue
Yes
0°F~104°F
Terminal
USB Mouse, IR Remote Control, USB Flash
Drive, USB CD/DVD Burners
Eyeview, EP-Pelco-D, EP-Pelco-P
System Requirements
Mac Compatible? No
PC Requirements for
Software CD
CPU 1 GHz or above
RAM 256MB or above
OS Microsoft Windows 2000/ XP/Vista
IE broswer
73CV501 - 16CH
Page 74

CAMERA SPECIFICATIONS
CAMERA SPECIFICATIONS (MODEL#: VU301 - C )
Camera Type Weatherproof Color IR CCD Camera
Image Sensor 1/4" Color SHARP CCD
Resolution 420 TV Lines
Outdoor Use Yes
IP Rating IP65
Focal Length 3.6mm
Focus Type Fixed
Optimal Focal Distance 20 ft.
Night Vision Yes
Number of IR LEDs and
12, up to 15ft
Range
IR LED Control Automatic (CDS Sensor)
Min. Illumination 0 lux
IR Wavelength 850nm
Video Output 4 PIN DIN to RCA
TV System NTSC
Microphone No
Motion Detection No
Viewing Angle 60 Degrees buit into DVR
Electronic Shutter 1/60 ~ 1/100000 sec
BLC No
AGC Automatic
ELC Automatic
Line Lock No
Iris Control No
Gamma Correction >0.45
White Balance Automatic
Sun Shield Yes
IR Cut Filter No
Housing Material Anodized Aluminum
Housing Color Silver
Signal/Noise Ratio >48dB
Camera Bracket Yes
Lens Mount type M12
Pan/Tilt/Zoom No
Operating Temperature -10° ~ 60°C / Degrees
Operating Humidity 98%
Camera Power Input DC 12V 300mA
Power Adapter Input 120V 60Hz
LED Power Indicator No
Dimensions 4.7"(L) x 2.5"(W) x 2.5"(H)
Weight Around 325 g
Disclaimer:
The CV501 - 16CH has been designed to come equipped with VU301-C
cameras, depending on the product "kit " you have purchased, your
camera type or camera specications may vary.
Feature Notes
1. To see which other smart phone devices are compatible, please visit our website:
www.svat.com.
2. Requires broadband router and broadband Internet connection–not included. Internet
Explorer is required.
3. Video playback software is not Mac Compatible.
4. Recording capacity may vary based on recording resolution and quality, lighting conditions and movement in the scene. Based on a 500GB hard drive, using lowest quality
settings.
5. Not for use in direct exposure to water, rain or snow.
6. IR illumination range up to 15ft (4.5M) under ideal conditions. Objects at or beyond this
range may be partially or completely obscured, depending on the camera application.
7. USB ash drive and external hard drive not included.
8. Maximum 30 FPS (frames per second) per camera. Total 240 FPS for all cameras.
74CV501 - 16CH
Page 75

CAMERA MANUAL
VU301-C Camera
1. Sun Shield: Helps prevent glare from bright lights
2. Infrared (IR): LEDs Allows the camera to see in the dark up
to 15ft away.
3. CDS Sensor: Turns on the infrared LEDs when it gets dark
4. Camera Housing: Made of anodized aluminum to prevent rust
5. Camera Mount: Allows the camera to be desk or wall
mountable
6. 4 PIN DIN Female Connection
IMPORTANT INFORMATION
While this camera is weatherproof, it is not waterproof. Please do
not install it in areas that receive direct rain or under eaves trough
draining spots. Do not cut the DC power cable of this camera to t with
another power source. Do not cut the video connection wire to t with
a dierent video connection type. Any unauthorized modications will
void your warranty.
One to Four Power Supply Cable
1. Female 12V Connection
2. Camera Power Supply Ports
The One to Four power Supply Cable allows you to plug four cameras
into one power source, saving you time and space.
USING THE ONE TO FOUR PORT POWER SUPPLY WITH CAMERAS
Wiring Diagram
A
B
Wiring Instructions
C
D
D
D
D
H
G
F
E
1. Plug 12V adapter (A) into electrical wall outlet or surge protecting power bar.
2. Plug the single end (female 12 V connection) of the four to one power supply (C) into the male end of the 12V adapter (B).
3. Connect the 4PIN DIN female connection on the camera (E) into the 4PIN DIN male connection on the 60ft video/power wire (F).
4. Plug the red adapter from the 60ft video/power wire (G) into one of the ports of the four to one power supply (D).
5. Connect the RCA Video from the 60ft video/power wire (H) into the Channel/Camera inputs on your DVR or monitor.
6. Repeat for all cameras (using two, four to one power supply cables for all 8 included cameras).
75CV501 - 16CH
Page 76

CAMERA DRILLING TEMPLATE
To wall mount the camera, drill three holes using a 3/16" drill bit and the template below. Insert the supplied wall anchors into holes and secure
camera to wall with supplied screws.
DRILL HOLES IN
THESE POSITIONS
.......................................................................................................Tear Here..........................................................................................................
DRILL HOLES IN
THESE POSITIONS
DRILL HOLES IN
THESE POSITIONS
NETWORKING INFORMATION
DVR IP ADDRESS: ________________________________________(example) 127.0.0.1
GATEWAY (ROUTER IP): ____________________________________(example) 127.0.0.1
DDNS SERVER:__________________________________________ (example) DDNS.DVRLINK.NET
NET CLIENT PORT: ________________________________________(example) 6100
WEB SERVER PORT: _______________________________________(example) 80
MAC ADDRESS: __________________________________________(example) 00-12-3A-45-67-89
EXTERNAL IP ADDRESS: ____________________________________(example) 14.14.243.113
76CV501 - 16CH
Page 77

NOTES AREA
77CV501 - 16CH
Page 78

SVAT ELECTRONICS
now you can see
VISIT US ON THE WEB!
• Product Information
• User Manuals
• Quick Start Guides
• Networking Guides
• Specication Sheets
• Software Updates
• Firmware Upgrades
www.svat.com
Model#:
CV501-16CH
www.svat.com
 Loading...