

now you can see
www.svat.com
Instruction Manual
www.svat.com
PRECAUTIONS
Read the following precautions before using the digital voice recorder
• Do not disassemble and assemble the unit yourself.
• Do not drop the unit or give it a mechanical shock. When the unit is not used, safekeeping is
needed to avoid its damage.
• Do not use or place the unit in hot or humid condition. Be careful that the unit is not wet.
Wetting can cause critical damage that can make it impossible to repair the unit.
• Do not use the unit in places exposed to explosive or inflammable substances.
• Do not clean the unit with inflammable solvents like alcohol, benzine, thinner, etc.
• Avoid using while driving or walking. It may cause accidents.
• SVAT does not reimburse you for any loss from the use of the unit or any demand of indemnity
from the third person.
• SVAT does not take responsibility for any memory loss by reasons of breakdown, repair, and others.
• It could be illegal to use or duplicate the recordings beyond private purpose.
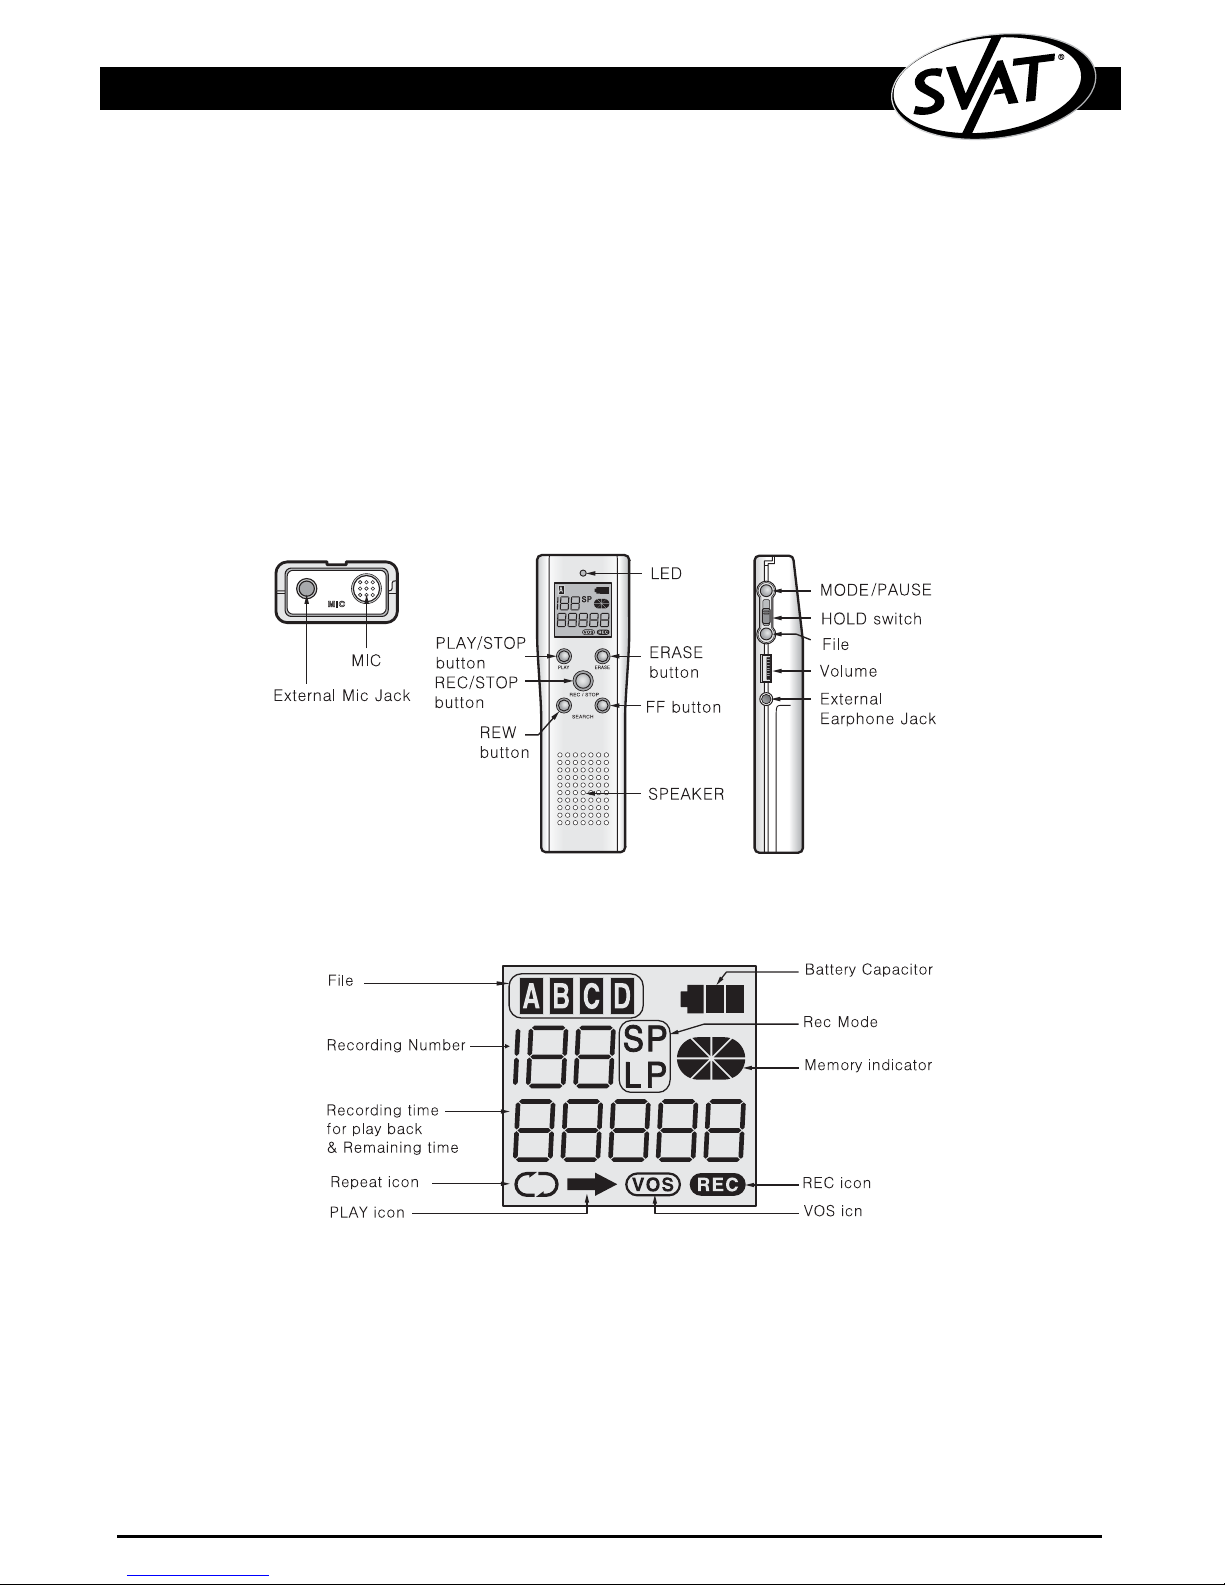
PARTS IDENTIFICATION
LCD DESCRIPTION
FEATURES
Handy design
• A tiny handy tool, which may come in useful in everyday life.
Automatic Power Off
• The unit is automatically turned off when it is not used for several minutes.
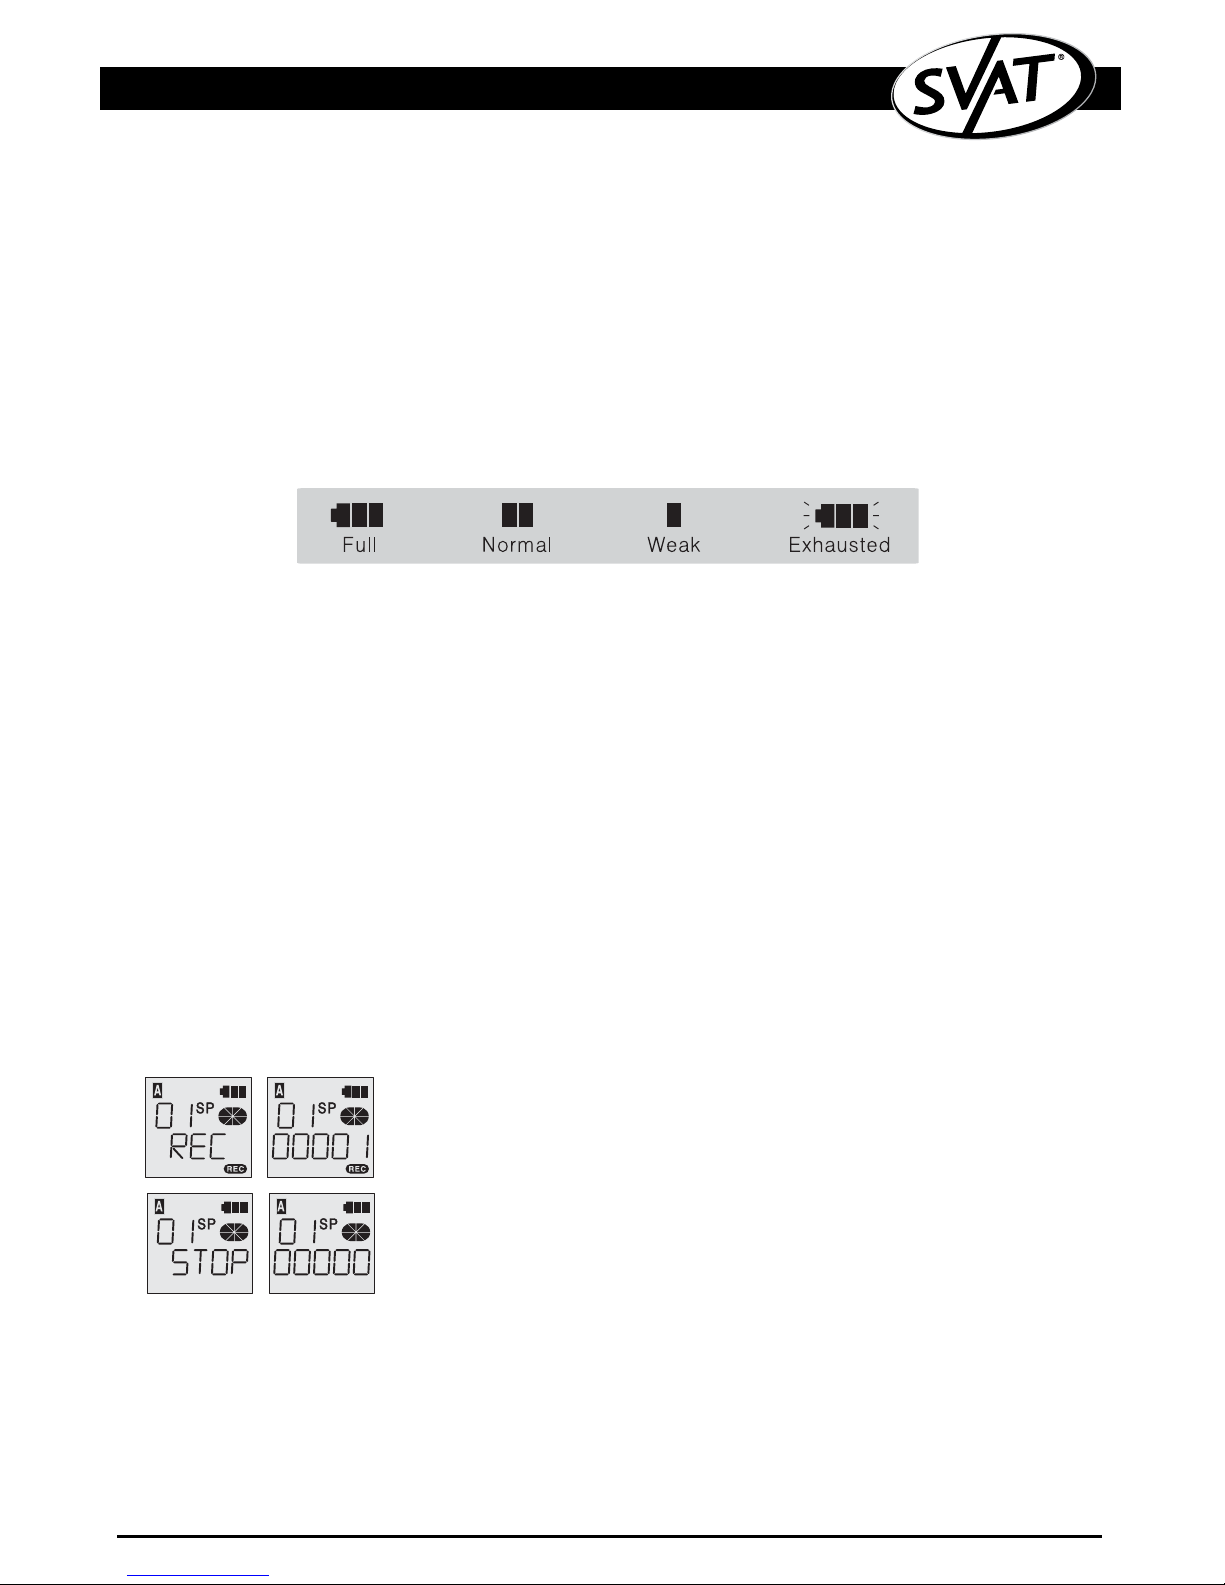
Battery Indicator
• The unit displays the level of batteries in three steps.
Scanning all recordings
• You can easily search all recordings with scanning.
www.svat.com
Hold prevents from a fault on operating the unit.
Automatic Voice Operated Recording System
Repeating playback function
• Enable to repeat a message 10 times
External Input/Output Jacks
• Interactive recording between the unit and other equipment.
Hearing aid facility
• You can listen to the conversation amplified by the unit using earphone.
Available for recording into 4 divided files.
• Available to record 100 messages in each file.
INSTALLING BATTERIES
1. Open the battery cover.
2. Insert two batteries (Size AAA alkaline batteries) with correct polarity, and slide the cover back
into place.
3. The battery indicator shows the battery consumption as a side figure. In exhausted condition, the
unit stops playing back in 20 seconds and stops recording in 2 minutes automatically. It prevents
malfunction from the low voltage.
4. In case of low battery the unit indicates LO BATT on LCD.
CAUTION
• Do not use different kinds of batteries together.
• When replacing batteries, be sure to replace both batteries with new ones
• When you are not going to use the unit for a long time, remove all the batteries.
RECORDING
You can record by using the built-in or an external microphone.
Getting Started
This unit is turned off automatically if there is no input after 1 minute. You can turn it on by pressing the
REC/STOP or PLAY button-we call it STOP MODE afterward. Before operating, make sure the unit is turned
on and the HOLD switch is switched off (to the left).
1. To start recording, press REC/STOP button after moving the microphone
towards the sound source.
• You can record up to 100 messages in each file.
• To avoid failure, perform a trial recording first.
• When the recording starts, the recording indicator will be lit, and the
recording number, recording icon, recording time will be displayed.
2. To stop recording, press the REC/STOP button once again.
NOTES
• If the recording time/number exceeds the maximum, a message FULL or END appears and the
recording process will not start. Try to record again after erasing some needless recordings.
• Do not take out batteries while recording otherwise it can cause a malfunction of the unit.
Take out batteries when the unit is turned off or in STOP MODE only.
• The recorded messages can be deleted due to breakdown. It is highly recommended that the
important messages be written down.
• Noise may be recorded if an object such as your finger accidentally rubs or scratches the
microphone.

www.svat.com
Selecting Recording Mode
To select the recording mode, press MODE/PAUSE button confirming mode icon
• While recording, you cannot change the mode.
This unit has the best sound quality in SP mode.
Available Recording Time
Selecting FILE
There are 4 different files (A, B, C, D) that can be used to store information.
Each file can hold up to 100 recordings. Press the FILE button on the side of the
unit to switch files.
PAUSING during the recording
To stop recording temporarily press the MODE/PAUSE button during the recording. If you
want to continue, then press the MODE/PAUSE button again.
Note: After 10 minutes in PAUSE MODE, the unit goes to STOP MODE automatically.
Increasing the recording number
If you want to increase the recording number, press the FF button, then the recording number will be
increased one by one. When you make a long recording such as a meeting, you can easily find a
message by dividing it into several recordings. Do this during pauses because you will loose approx. 1
second of audio when you change tracks.
Checking the amount of recording time left
You can check the amount of recording time left in the present recording mode by pressing the PLAY
button during the recording.
Monitoring the recording
You can listen to the recording messages using the earphone during the recording process.
Note: The recording level is not controlled with volume adjustment.
Recording using an external microphone
Record after connecting an external microphone to the microphone jack.
Automatic Voice Operated Recording System (VOS facility)
1. Press down REC/STOP button about 2 seconds.
2. AUTO will be displayed and then disappear there after on the LCD, and
the recording indicator will appear when recording takes place.
3. Recording starts when sound level is over the factory set standard level,
otherwise PAUSE is displayed and recording will be paused until the
proper level of sound will be detected.
4. To stop operation, just press REC/STOP button
www.svat.com
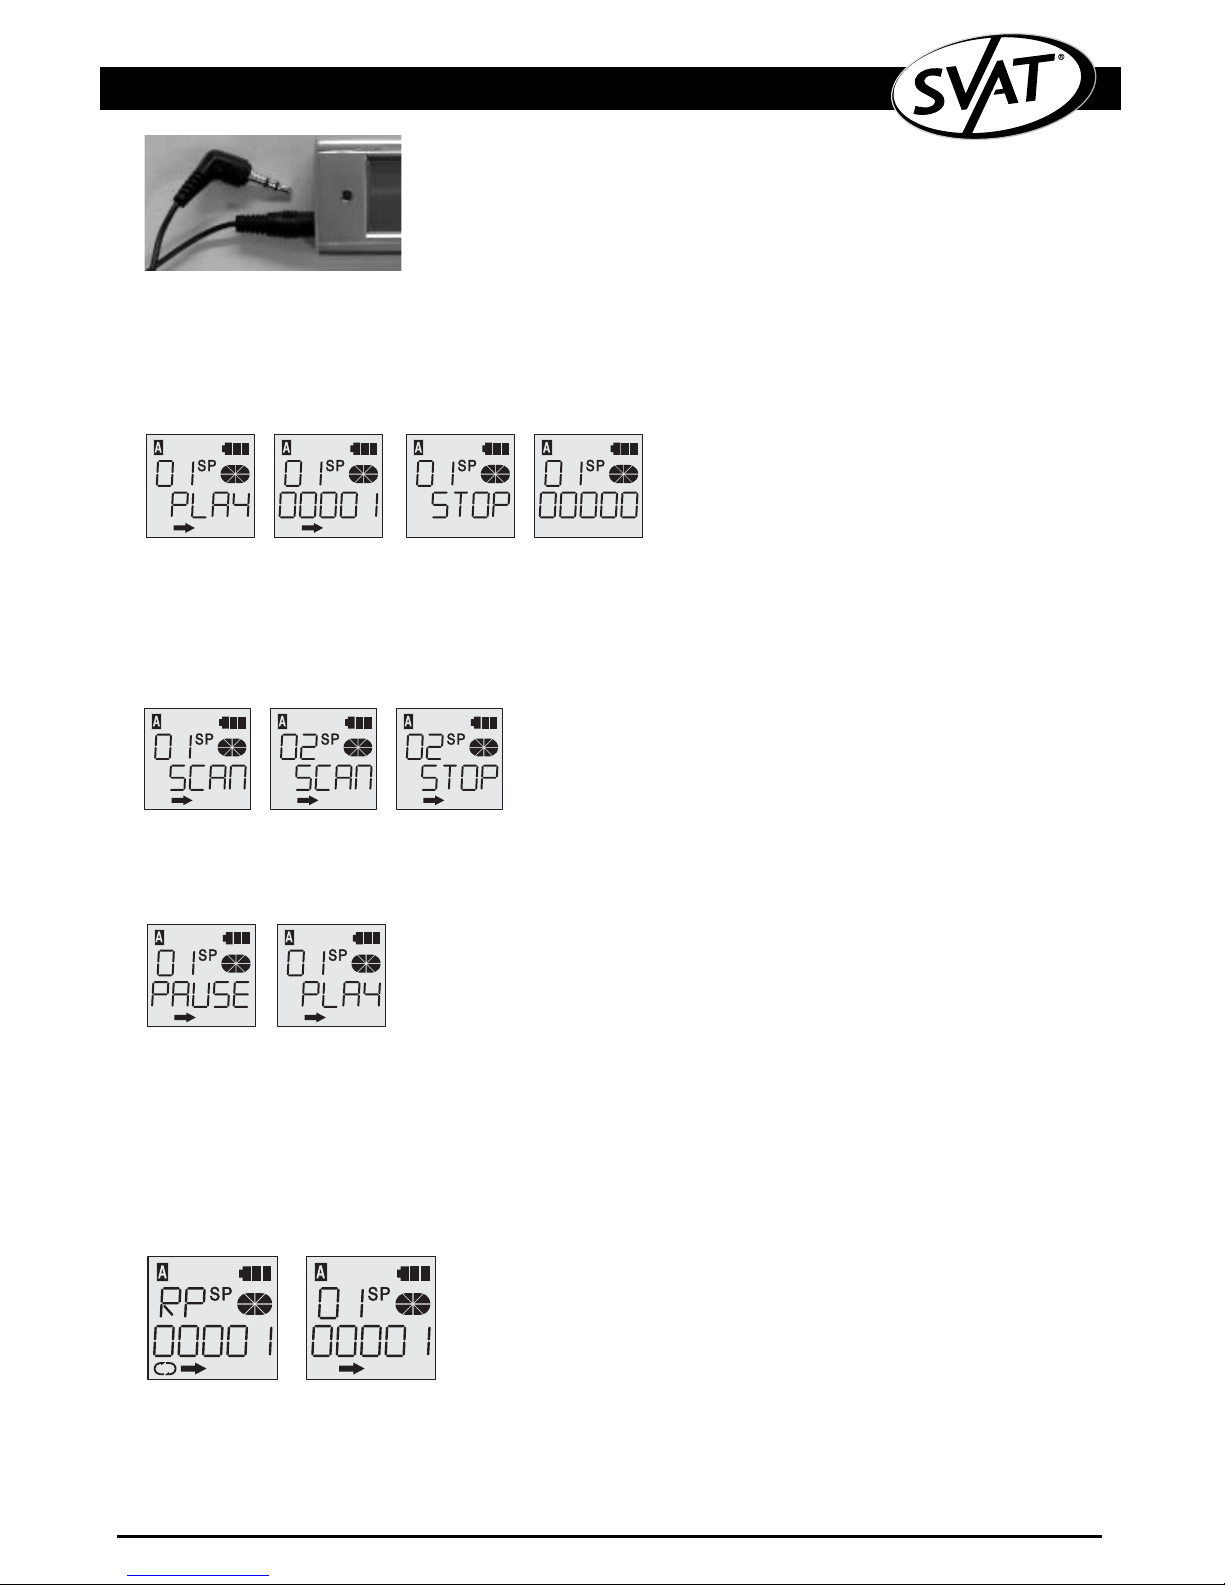
PLAYBACK
Press the PLAY button, then the unit plays the last recording back.
• You can select a recording number using the FF() or REW() button before pressing the PLAY
button. Adjust the volume switch to control the sound level.
• Use earphone if ther is a lot of noise.
Press the PLAY button again to stop playback.
Scanning all the recordings
• Press the PLAY button for more than 2 seconds, "SCAN" will be displayed and the first 5 seconds of
each message will be played back from the current recording number.
• When you find a desired message, press PLAY button. The selected message at that moment will
be played back.
• To stop playback, press the PLAY button again.
Pausing during the playback
To stop the playback temporarily, press the MODE/PAUSE button during the playback.
The maximum pause time is 10 minutes; if you want to continue, press the MODE/PAUSE button.
Fast forward and Rewind during the playback
During playback time, FF() and REW() button will either fast forward or fast rewind the recorded
message. Pressing the FF() or REW() button once will fast forward or fast rewind the recorded
message approximately 20 seconds.
Repeat playback
During playback, if you press down PLAY button for 2 seconds; a certain recorded message will be
played 10 times. To stop repeat playback and return to playback mode, Press PLAY button, then playback will be continued.
Searching for Message Number
• When you hold the FF()/REW() buttons for a long time in STOP MODE, the message number will
be increased/ decreased fast.
• When you hold the FF()/REW() buttons for a short time in STOP MODE, the message number will
be increased/ decreased one by one
CELL ADAPTER
Connect the “L” shaped connection to your head phone output on your
cell phone. While the Voice Recorder is turned off, connect the straight
connection to the MIC input on the voice recorder. You can now record
from your cell phone.

www.svat.com
ERASING
Erasing one recording in STOP MODE
1. Press the FF() or REW() button to select a recording number.
2. Press the ERASE button for more than 2 seconds.
• The message of the selected recording number will be played back automatically, and the
message ERASE appears and blinks.
3. Press the ERASE button again.
• The selected messages will be erased, and the number of the other messages after the erased
number will be decreased by one successively to fill up the vacant number.
If you press any other button while the message. ERASE is blinking; the
erasing process will be cancelled.
Erasing one recording in Playback Mode
1. Press the ERASE button and release, then the message ERASE appears and blinks for 10 seconds.
2. Press the ERASE button again.
The current message will be erased if the ERASE button is not pressed in 10 seconds, erasing process
will be cancelled and playback will resume.
Erasing all the recordings
1. While pressing the ERASE button, press the REC/STOP button for more than 3 seconds, then the
message AL ERASE appears and blinks for 10 seconds.
2. Press the ERASE button again.
Erasing will be cancelled with pressing any other button except ERASE.
Caution - The deleted recordings can never be recovered.
HOLD FUNCTION
1. Slide the HOLD switch in the direction of the arrow. HOLD will be displayed for a short period, and
all the function of the buttons will be locked.
2. To cancel the HOLD function, simply slide the HOLD switch in the opposite direction.
Notes -If you slide the HOLD switch while recording or playing back, it works so you cannot stop the current operation. If you want to stop recording or play back, Press the REC/STOP or PLAY first.
HEARING AID/EARPHONE
1. Connect the earphone to the earphone jack in STOP MODE. You cannot use the hearing aid
facility without connection of the earphone.
2. Press the MODE/PAUSE button for more than 2 seconds.
3. Confirm the LED was lit, and then check the sound level moving the earphone near to your ear.
4. Wear the earphone.
5. To stop, press the MODE/PAUSE button for more than 2 seconds again. Or you can directly play
back or record by pressing the PLAY or REC/STOP button.

www.svat.com
Caution -Hearing aid facility is only for the persons whose sense of hearing is weak. Before wearing the
earphone, do not forget to check the sound level.
CONNECTING EXTERNAL EQUIPMENT
You can have an interactive recording between the unit and external equipment by using external
cables.
Send messages from the unit to an external
equipment:
Connect an external cable between the earphone jack
and the external INPUT jack of the external equipment.
Then press the PLAY button of the unit and REC button
of the external equipment simultaneously.
Recording from an external equipment:
Adjust volume to make the signal out of the external
equipment small. Connect an external cable between
the MIC jack of the unit and the earphone jack of the
external equipment. Then press the REC/STOP button of
the unit and the PLAY button of the external equipment
simultaneously.
PHONE RECORDING
You can record the messages from a phone
(exception digital phones).
1. Connect external cable to both MIC jack
of unit and audio out jack of telephone
line adapter.
2. Connect the cord between telephone
adapter and telephone unit.
3. Connect the line to the remaining
telephone adapter.
4. Press the record button, and the message
from the phone will be recorded.
Protection of communication privacy -To
record phone conversation without counterparts consent may be against the related
laws.

www.svat.com
TROUBLESHOOTING
LCD window does not work!
Check 1: Are the batteries correct?
Replace with new batteries.
Check 2: Are the batteries installed correctly?
Match +/- ends of the batteries with the diagram inside the battery compartment
Recording does not work!
Check 1: Check the HOLD switch?
Release the HOLD switch
Check 2: Is there space for recording?
Erase unnecessary messages
Playback does not work!
Check 1: Check the HOLD switch?
Release the HOLD switch
Check 2: No messages recorded?
Check the recording number.
No sound output!
Check 1: Is the volume set to 0?
Adjust the volume.
Check 2: Is the earphone plugged?
Unplug the earphone.
Does not work correctly
Take out the batteries and insert them again.
SPECIFICATIONS

www.svat.com
PRECAUTIONS
Lisez les précautions suivantes avant d'utiliser l'enregistreur de voix numérique.
• Ne démontez pas et n'assemblez pas la baisse de l'unité yourself.
• Pas l'unité ou ne lui donnez pas un choc mécanique. Quand l'unité n'est pas employée, la bonne
garde est nécessaire pour éviter ses dommages.
• N'employez pas ou ne placez pas l'unité en état chaud ou humide.
• Faites attention que l'unité n'est pas humide. Le mouillage peut endommager critique qui peut la
rendre impossible de réparer l'unité.
• N'employez pas l'unité dans les endroits exposés aux substances explosives ou inflammables.
• Ne nettoyez pas l'unité avec des dissolvants inflammables comme l'alcool, la benzine, le diluant.
• Évitez d'employer tout en conduisant ou en marchant. Elle peut causer des accidents.
• SVAT ne vous rembourse pour aucune perte de l'utilisation de l'unité ou d'aucune demande d'in
demnité de la troisième personne.
• SVAT ne prend pas la responsabilité d'aucune perte de mémoire par des raisons de panne, de
réparation, et de d'autres. Il pourrait être illégal d'employer ou reproduire les enregistrements au
delà du but privé.
PARTS IDENTIFICATION
LCD DESCRIPTION

www.svat.com
INSTALLATION DES BATTERIES
1. Ouvrez la batterie cover.
2. Insérez deux batteries (accumulateurs alcalins de taille D.C.A.) avec la polarité correcte, et glissez
la couverture de nouveau dans des expositions d'indicateur de batterie de place.
3. The la consommation de batterie comme figure latérale. En état épuisé, l'unité cesse de jouer en
arrière dans 20 secondes et enregistrement d'arrêt en 2 minutes automatiquement. Elle empêche
le défaut de fonctionnement du bas voltage.
4. En cas de basse batterie l'unité indiquent la BASSE batterie sur l'affichage à cristaux liquides.
CAUTION
• N'employez pas les différents genres de batteries together.
• En remplaçant des batteries, soit sûr de remplacer les deux batteries avec le nouvel ones
• Quand vous n'allez pas employer l'unité pendant longtemps, enlèvent toutes les batteries.
RECORDING
Vous pouvez enregistrer en utilisant un microphone intégré ou externe.
Obtenir Commencé
Cette unité est arrêtée automatiquement s'il n'y a aucune entrée après 1 minute. Vous pouvez l'allumer
en serrant le REC/STOP ou NOUS JOUER bouton- l'appelons MODE d'ARRÊT après. Avant d'actionner l'unité, assurez-vous que l'unité est allumée et le commutateur de PRISE est coupé (vers la gauche).
1. Pour commencer à enregistrer, appuyez sur le bouton de REC/STOP après avoir déplacé le
microphone vers la source sonore.
• Vous pouvez enregistrer jusqu'à 100 messages chaque
• De dossier pour éviter l'échec, exécutez un premier
• D'enregistrement d'essai quand l'enregistrement commence, l'indicateur d'enregistrement serez
vous êtes allumé, et le nombre d'enregistrement, icône d'enregistrement, temps d'enregistrement
sera montré.
2. Pour cesser d'enregistrer, appuyez sur le bouton de REC/STOP de nouveau.
NOTES
• Si l'enregistrement time/number excède le maximum, un message
COMPLÈTEMENT ou l'EXTRÉMITÉ apparaît et le processus d'enregistrement
ne commencera pas. Essayez d'enregistrer encore après effacement
d'un certain recordings.
• Inutile ne sortent pas des batteries tandis que l'enregistrement autrement
de lui peut causer un défaut de fonctionnement de l'unité. Sortez les
batteries quand l'unité est tournée outre de ou en MODE d'ARRÊT only.
• Enregistré des messages peut être dû supprimé à la panne. On lui
recommande fortement que les messages importants soient écrits.
• Noise puissent être enregistrés si un objet tel que vos bandes de
frottement de doigt accidentellement ou rayent le microphone.

www.svat.com
Choix Du Mode D'Enregistrement
Pour choisir le mode d'enregistrement, serrez l'icône de confirmation de mode de bouton de MODE/PAUSE.
• Tout en enregistrant, vous ne pouvez pas changer le mode. Cette unité a la meilleure qualité de
son dans le mode de SP.
Temps D'Enregistrement Disponible
Choix du DOSSIER
Il y a 4 dossiers différents (A, B, C, D) qui peut être employé pour stocker l'information. Chaque dossier peut supporter à 100 enregistrements. Appuyez sur le bouton
de DOSSIER du côté de l'unité pour commuter des dossiers.
PAUSE pendant l'enregistrement
Pour cesser d'enregistrer temporairement la pression que les MODE/PAUSE se boutonnent pendant l'enregistrement. Si vous voulez continuer, appuyez sur alors le bouton de MODE/PAUSE
encore.
Note : Après 10 minutes en MODE de PAUSE, l'unité va ARRÊTER LE MODE automatiquement.
Augmentation du nombre d'enregistrement
Si vous voulez augmenter le nombre d'enregistrement, appuyez sur le bouton de FF, alors le nombre d'enregistrement sera augmenté un. Quand vous faites un long enregistrement tel qu'une réunion, vous pouvez
facilement trouver un message en le divisant en plusieurs enregistrements. Faites ceci pendant les pauses
parce que vous desserrerez approximativement. 1 seconde d'acoustique quand vous changez des voies.
La vérification de la quantité de temps d'enregistrement est partie
Vous pouvez vérifier la quantité de temps d'enregistrement à gauche en mode d'enregistrement appuyez
sur près le bouton de JEU pendant l'enregistrement.
Surveillance de l'enregistrement
Vous pouvez écouter les messages d'enregistrement à l'aide de l'écouteur pendant le processus d'enregistrement. Note : Le niveau d'enregistrement n'est pas commandé avec l'ajustement de volume.
Enregistrement à l'aide d'un microphone externe
Disque après avoir relié un microphone externe au cric de microphone.
Système d'enregistrement actionné par voix automatique (service de VOS)
1. Appuyez sur vers le bas le bouton de REC/STOP environ 2 secondes
2. L'AUTOMOBILE sera montrée et disparue bientôt sur l'affichage à cristaux
liquides, et l'indicateur d'enregistrement
3. L'enregistrement commence quand le niveau sonore est au-dessus du
niveau standard réglé d'usine, autrement la PAUSE est montrée et
l'enregistrement sera fait une pause jusqu'à ce que le niveau approprié du
bruit soit détecté.
4. TPour arrêter l'opération, bouton juste de la pression REC/STOP

www.svat.com
PLAYBACK
Appuyez sur le bouton de JEU, puis les jeux d'unité le dernier enregistrement en arrière.
• Vous pouvez choisir un nombre d'enregistrement en utilisant le FF() ou REW() bouton avant
d'appuyer sur le bouton de JEU. Ajustez le commutateur de volume pour commander le niveau sonore.
• Utilisez l'écouteur si beaucoup de bruit existe.
Appuyez sur le bouton de JEU encore pour arrêter le playback.
Balayage de tous les enregistrements
• Appuyez sur le bouton de JEU pendant plus de 2 en second lieu, le "BALAYAGE" sera montré et les
5 premières secondes de chaque message seront jouées en arrière du nombre courant d'enreg
istrement.
• Quand vous trouvez un message désiré, appuyez sur le bouton de JEU. Le message choisi à ce
moment sera repassé.
• Pour arrêter le playback, appuyez sur le bouton de JEU encore.
Pause pendant le playback
Pour arrêter le playback temporairement, appuyez sur le bouton de MODE/PAUSE pendant le temps
maximum de pause de playback.The est de 10 minutes ; si vous voulez continuer, appuyez sur le bouton
de MODE/PAUSE.
Vers l'avant rapide et rebobinage pendant le playback
Pendant le temps, FF() et REW() de playback le bouton l'un ou l'autre vers l'avant rapide ou rebobiner rapidement le message enregistré. Serrant le FF() ou REW() le bouton une fois jeûnera vers l'avant
ou rebobinera rapidement le message enregistré approximativement 20 secondes.
Répétez le playback
Pendant le playback, si vous appuyez sur vers le bas le bouton de JEU pendant 2 secondes ; un certain
message enregistré sera joué 10 fois. Pour arrêter le playback de répétition et retourner au mode de
playback, le bouton de JEU de pression, alors playback sera continué.
Recherche le nombre de message
• Quand vous FF()/REW() se boutonne pendant longtemps en MODE d'ARRÊT, le nombre de
message sera augmenté a diminué rapidement.
• Quand vous FF()/REW() se boutonne pendant une courte période en MODE d'ARRÊT, le
nombre de message sera augmenté a diminué un.
ADAPTEUR DE CELLULES
Reliez l'"L" raccordement formé à votre téléphone principal produit à votre
téléphone de cellules. Tandis que l'enregistreur de voix est arrêté, reliez le
raccordement droit au MIC entré sur l'enregistreur de voix. Vous pouvez
maintenant enregistrer de votre téléphone de cellules.

www.svat.com
EFFACEMENT
Effacement d'un enregistrement en MODE d'ARRÊT
1. Serrez le FF() ou REW() bouton pour choisir un nombre d'enregistrement.
2. Appuyez sur le bouton d'EFFACEMENT pendant plus de 2 secondes.
• Le message du nombre d'enregistrement choisi sera repassé automatiquement, et le message
S'EFFACENT apparaît et clignote.
3. Appuyez sur le bouton d'EFFACEMENT encore.
• Les messages choisis seront effacés, et le nombre des autres messages après que le nombre
effacé soit diminué d'on successivement à remplissent le nombre vide.
Si vous appuyez sur n'importe quel autre bouton tandis que le message. EFFACEZ clignote ; le processus d'effacement sera décommandé.
Effacement d'un enregistrement en mode de playback
1. Serrez le bouton et le dégagement d'EFFACEMENT, puis le message S'EFFACENT apparaissent et
des clignotements pendant 10 secondes.
2. Appuyez sur le bouton d'EFFACEMENT encore. Le message courant sera effacé. Si le bouton
d'EFFACEMENT n'est pas enfoncé 10 en second lieu, l'effacement du processus sera décommandé
et le playback reprendra.
Effacement de tout l'enregistrement
1. Tout en appuyant sur le bouton d'EFFACEMENT, appuyez sur le bouton de REC/STOP pendant plus
de 3 en second lieu, alors AL de message S'EFFACENT apparaît et clignote pendant 10 secondes.
2. Appuyez sur le bouton d'EFFACEMENT encore. L'effacement sera décommandé avec appuyer
sur n'importe quel autre bouton excepté S'EFFACENT.
Attention - les enregistrements supprimés peuvent ne jamais être récupérés.
TENEZ LA FONCTION
1. Glissez le commutateur de PRISE dans la direction de la flèche. La PRISE sera montrée pendant
une période courte, et toute la fonction des boutons sera verrouillée.
2. Pour décommander la fonction de PRISE, glissez simplement le commutateur de PRISE dans la
direction opposée.
Notes - si vous glissez le commutateur de PRISE tout en enregistrant ou jouant en arrière, cela fonctionne
ainsi vous ne pouvez pas arrêter l'opération courante. Si vous voulez cesser d'enregistrer ou jouer en
arrière, serrez le REC/STOP ou le JEU d'abord.
PROTHÈSE AUDITIVE/ÉCOUTEUR
1. Reliez l'écouteur au cric d'écouteur en MODE d'ARRÊT. Vous ne pouvez pas employer le service
de prothèse auditive sans raccordement de l'écouteur.
2. Appuyez sur le bouton de MODE/PAUSE pendant plus de 2 secondes.
3. Confirmez la LED était a allumé, et puis vérifie le niveau sonore presque déplaçant l'écouteur à votre oreille.
4. Portez l'écouteur.
5. Pour s'arrêter, appuyez sur le bouton de MODE/PAUSE pendant plus de 2 secondes encore. Ou vous pouvez
directement jouer en arrière ou disque en appuyant sur le bouton de JEU ou de REC/STOP.

www.svat.com
Attention - le service de prothèse auditive est seulement pour les personnes dont le sens de l'audition est
faible. Avant de porter l'écouteur, n'oubliez pas de vérifier le niveau sonore qui est parfois assez fort pour
blesser le sens d'entendre en cas d'être aigu.
ÉQUIPEMENT EXTERNE SE RELIANT
Vous pouvez avoir un enregistrement interactif entre l'unité et l'équipement externe en employant les
câbles externes.
Envoyez les messages à partir de l'unité à un
équipement externe:
Reliez un câble externe entre le cric d'écouteur et le
cric externe d'ENTRÉE de l'équipement externe. Appuyez
sur alors le bouton de JEU de l'unité et du bouton de
REC de l'équipement externe simultanément.
Enregistrement d'un équipement externe:
Ajustez le volume pour fabriquer le signal à partir de
l'équipement externe petit. Reliez un câble externe
entre le cric MIC de l'unité et le cric d'écouteur de
l'équipement externe. Appuyez sur alors le bouton de
REC/STOP de l'unité et le bouton de JEU de
l'équipement externe simultanément.
ENREGISTREMENT DE TÉLÉPHONE
Vous pouvez enregistrer les messages d'un
téléphone (téléphones numériques d'exception).
1. Reliez le câble externe aux les deux le cric
MIC de l'unité et de l'acoustique hors du
cric de la ligne téléphonique adapteur.
2. Reliez la corde entre l'adapteur de télé
phone et l'unité de téléphone.
3. Reliez la ligne à l'adapteur restant de
téléphone.
4. Appuyez sur le bouton record, et le
message du téléphone sera enregistré.
Protection d'intimité de communication enregistrer la conversation téléphonique sans
consentement de contre-parties peut être
contre les lois relatives.

www.svat.com
DÉPANNAGE
La fenêtre d'affichage à LCD ne fonctionne pas !
Check 1: Les batteries sont-elles correctes ?
Remplacez avec de nouvelles batteries.
Check 2: Sont les batteries installées correctement?
Allumette +/- extrémités des batteries avec le diagramme à l'intérieur
du compartiment de batterie
L'enregistrement ne fonctionne pas!
Check 1: Vérifiez le commutateur de PRISE?
Libérez le commutateur de PRISE
Check 2: Il l'espace pour l'enregistrement?
Effacez les messages inutiles
Le dos de jeu ne fonctionne pas!
Check 1: Vérifiez le commutateur de PRISE?
Libérez le commutateur de PRISE
Check 2: Message n'a pas enregistré?
Vérifiez le nombre d'enregistrement.
Aucun rendement sain!
Check 1: Est le volume réglé à 0?
Ajustez le volume.
Check 2: Est l'écouteur branché?
Débranchez l'écouteur.
Ne travaille pas correctement
Sortez les batteries et insérez-les encore.
SPECIFICATIONS

PRODUCT WARRANTY
We take quality very seriously. This is why all of our products come with a one year warranty from the
original purchase date against defects in workmanship and materials.
If you have warranty or support issues please contact us using any of the following methods:
SVAT Electronics USA SVAT Electronics Canada Phone: 866.946.7828
2315 Whirlpool St., Unit 333 4080 Montrose Road Fax: 888.771.1701
NIagara Falls, New York Niagara Falls, ON Email: support@svat.com
USA 14305 Canada L2H 1J9 Website: www.svat.com
Warranty Terms
1. SVAT products are guaranteed for a period of one year from the date of purchase against defects
in workmanship and materials. This warranty is limited to the repair, replacement or refund of the
purchase price at SVAT's option.
2. When service is required, the warranty is validated by the submission of a fully completed
warranty card.
3. This warranty becomes void if the product shows evidence of having been misused, mishandled or
tampered with contrary to the applicable instruction manual.
4. Routine cleaning, normal cosmetic and mechanical wear and tear are not covered under the
terms of this warranty.
5. The warranty expressly provided for herein is the sole warranty provided in connection with the
product itself and no other warranty, expressed or implied is provided. SVAT assumes no
responsibilities for any other claims not specifically mentioned in this warranty.
6. This warranty does not cover the shipping cost, insurance or any other incidental charges.
7. You MUST call SVAT before sending any product back for repair. You will be given a Return
Authorization number. When returning the product for warranty service, please pack it carefully in
the original box with all supplied accessories, and enclose your original receipt or copy, and a brief
explanation of the problem (include RA #).
8. This warranty is valid only in Canada and the U.S.A.
9. This warranty card cannot be re-issued.
GARANTIE DE PRODUIT
Nous prenons la qualité très sérieusement. C'est pourquoi tous nos produits viennent avec une garantie
d'un an de la date originale d'achat contre des défauts en exécution et matériaux.
Si vous avez les issues de garantie ou de soutien satisfont nous contactent employant n'importe laquelle
des méthodes suivantes :
SVAT Electronics USA SVAT Electronics Canada Phone: 866.946.7828
2315 Whirlpool St., Unit 333 4080 Montrose Road Fax: 888.771.1701
NIagara Falls, New York Niagara Falls, ON Email: support@svat.com
USA 14305 Canada L2H 1J9 Website: www.svat.com
Limites De Garantie
1. Les produits de SVAT sont garantis pour une période d'une année de la date d'achat contre défectuosités
l'exécution et défectuosité des matériels. Cette garantie est limitée à la réparation, le remplacement ou le
remboursement du prix d'achat à l'option de SVAT.
2. Quand le service est exigé, la garantie est validée par la soumission d'une carte de garantie entièrement
complétée.
3. Cette garantie devient vide si le produit montre l'évidence d'ayant été employé improprement, malmené ou a
altéré contraire au manuel d'instruction applicable.
4. Le nettoyage de routine, l'usure normale normal, cosmétique et mécanique n'est pas couverte sous les ter
mes de cette garantie.
5. La garantie a pourvu expressément à en ceci est la garantie seule fournie à propos du produit lui-même e
aucune autre garantie, exprimée ou suggérée est fournie. SVAT ne suppose pas de responsabilités pour les
autres réclamations pas en particulier mention né dans cette garantie.
6. Cette garantie ne couvre pas le coût expédiant, l'assurance ou les autres charges accessoires.
7. En retournant le produit pour le service de garantie, s'il vous plaît l'emballer soigneusement dans la boîte
originale avec tous accessoires fournis, et enclore votre carte de garantie, le reçu original ou la copie, et une
explication brève du problème.
8. Cette garantie est valide seulement dans le Canada et les ETATS-UNIS.
9. Cette carte de garantie ne peut pas être la réédition.
 Loading...