

Page 1
SE UC1200
Radio Alarm Clock Hidden Camera System
Le Réveille-matin de radio Système d'Appareil-photo Caché
User's Manual
Manuel de l'utilisateur
*This product transmits its signal using public air waves.
The signal may be intercepted without your consent by a third party.
*Ce produit transmet son signal utilisant des vagues d'air publiques. Le signal
peut être intercepté sans votre consentement par un tiers.
www.svat.com
Page 2

www.svat.com
IMPORTANT SAFETY PRECAUTIONS
PLEASE READ BEFORE INSTALLING
Congratulations on your purchase of the 2.4GHz Wireless Radio Alarm Clock Monitoring System.
Please read these safety and operating instructions carefully before installing and using this system.
• Keep the camera, monitor and AC/DC adapter cords out of reach of children.
• Do not place the camera, monitor and AC/DC adapter cords in a crib or playpen.
• Do not use the camera near water or damp and wet environments, such as a bathtub,
laundry tub, kitchen sink, or wet basements.
• Locate the camera, monitor and AC/DC adapters where there is adequate ventilation.
Do not locate the camera in direct sunlight.
• Do not locate the camera, monitor and AC/DC adapters near heat sources such as heat
registers, radiators, ovens, furnaces or other appliances with high operating temperatures.
• Do not use with extension cords. Use only the AC/DC adapters provided with this system.
***Note: Use of other adapters may damage the units and void your warranty.
• Only plug components into standard household voltage outlets (110V - 240V AC, 50Hz or 60Hz).
• Do not place cords from the AC/DC adapters, camera or monitor where they can be
pinched or stepped on. Protect the cords by keeping them out of the way of children, pets
and routine household traffic. Do not place heavy objects on power cords or cover cords
with rugs or carpet.
• When cleaning, use a DRY, lint-free cloth. Unplug the camera, monitor and AC/DC adapters
before cleaning. NEVER immerse any components in water and do not spray cleaners or
solvents on the units. Doing so may damage the units or cause electrical shock.
• Unplug the AC/DC adapters from the wall outlet when the system is not in use.
• Mishandling, alterations or modifications not approved by the manufacturer will void
the warranty.
CAUTION!
• Connect this unit ONLY to other compatible units. Do not connect it to any other type of
alarm or auxiliary device. Connecting anything else to this unit may damage it or prevent it
from operating properly.
• Do not paint over the camera.
• This system uses public airwaves for wireless operation. The sound and video may be
broadcast to and picked up by other 2.4 GHz receiving devices. Conversations and images
from other rooms near the camera may be broadcast and picked up. To protect your
privacy, always turn the camera off when not in use.
IMPORTANT!
ACCESSORIES- Do not place video monitor or equipment on an unstable cart, stand or table.
The video monitor or equipment may fall causing serious injury to a child or adult, and serious
damage to the equipment. Wall or shelf mounting should follow the manufacturer's instruction,
and should use a mounting kit approved by the manufacturer.
• Video monitor equipment and cart combinations should be moved with care.
• Quick stops, excessive force, and uneven surfaces may cause the equipment and cart
combination to overturn.
VENTILATION- Slots and openings in the cabinet and the back or bottom are provided for
ventilation and to ensure reliable operation of the video monitor or equipment and to protect if
from overheating. These openings must not be blocked or covered. The openings should never
be blocked by placing the video monitor on a bed, sofa, rug, or other similar surface. Video
monitor or equipment receiver should never be placed near or over a radiator or heat register.
Video monitor or equipment receiver should not be placed in a built-in installation such as a
bookcase unless proper ventilation is provided.
Page 3
www.svat.com
INCLUDED IN THIS SYSTEM:
• 2.4GHz Camera inside an alarm clock 1pc
• 2.4GHz Receiver 1pc
• DC Power for Receiver 1pc
• DC Power for Camera 1pc
• A/V Cable 1pc
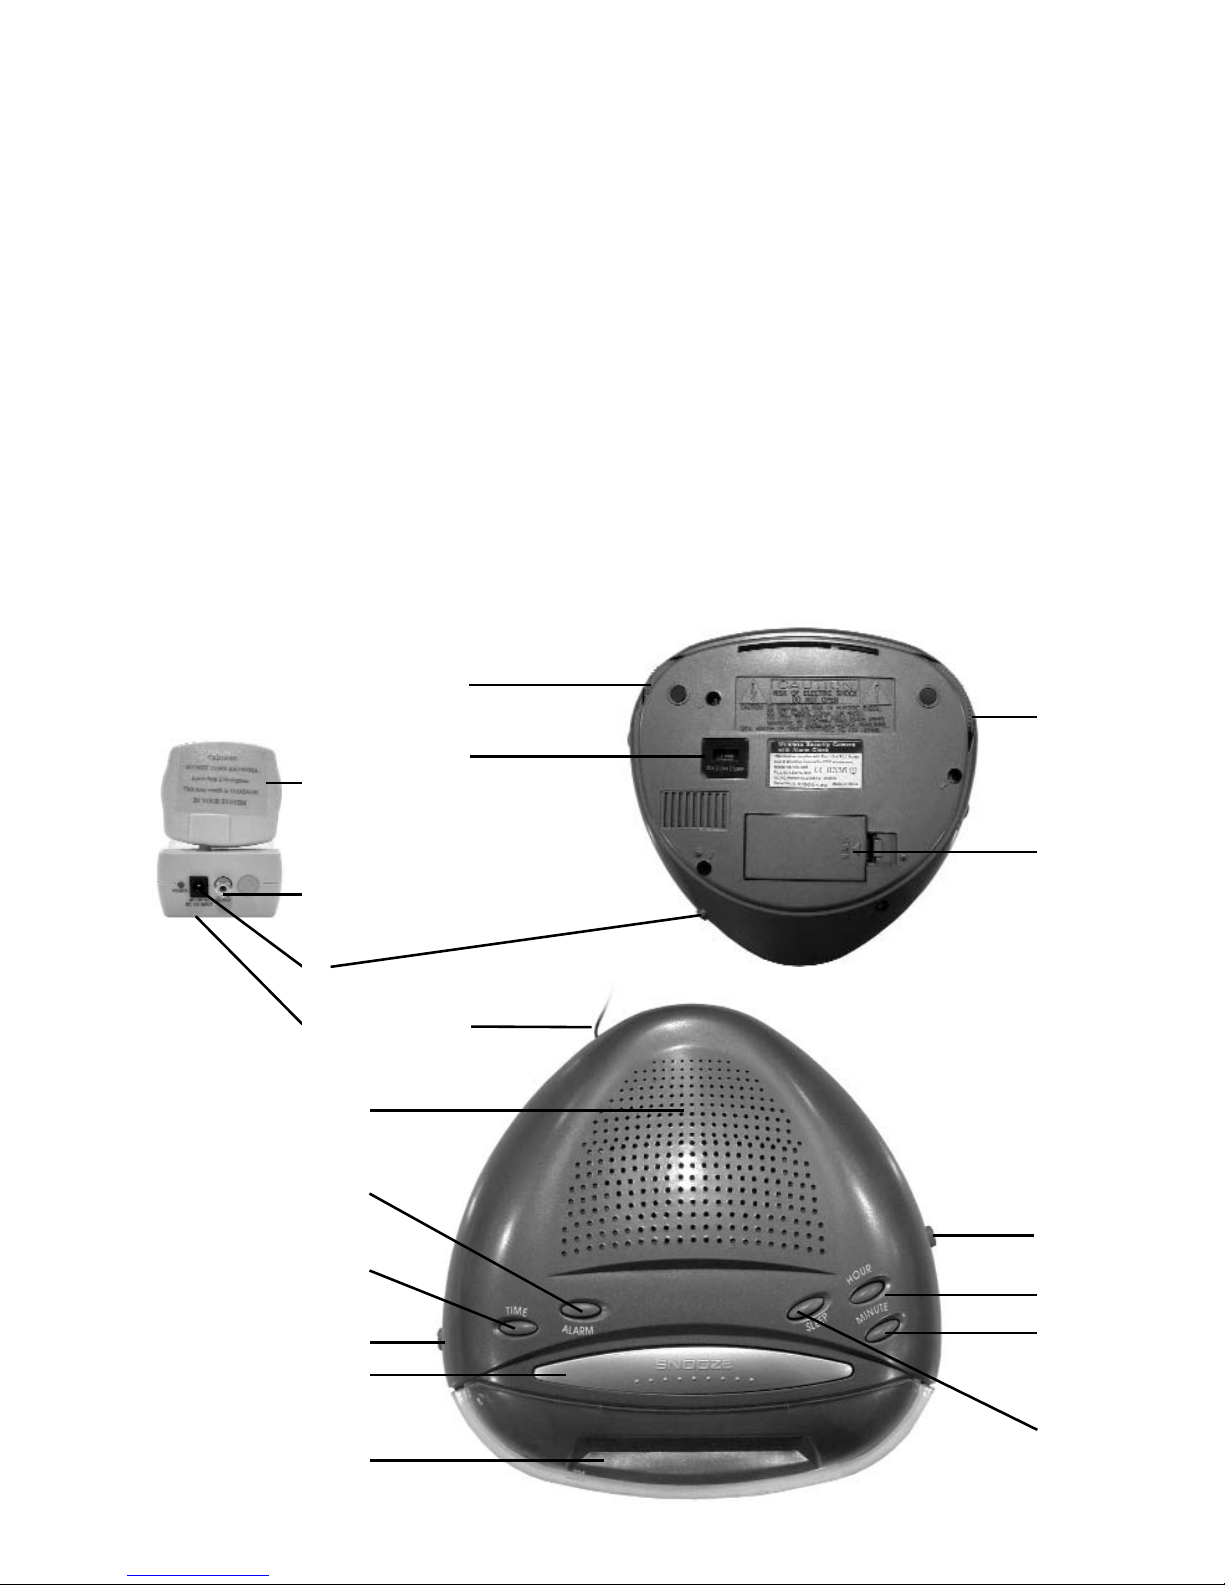
PARTS OF THE SYSTEM
1. Receiver Antenna 12. Time set button
2. Video out to TV or VCR 13. Auto-on-off alarm/radio switcher
3. Power adapter input 14. Snooze button
4. Receiver channel select 15. Display
5. Radio volume 16.AM/FM radio selecter
6. Camera channel select 17. Hour change button
7. Radio tuner 18. Minute change button
8. Battery compartment 19. Sleep button
9. FM radio antenna
10. Speaker
11. Alarm set button
1
2
3
5
6
7
8
9
10
11
12
13
14
15
16
17
18
19
4
Page 4

General Installation
INSTALLING THE RECEIVER
1. Connect the video output on the receiver to a video input (yellow) RCA
connection on your TV or VCR.
2. Connect the 12V power adaptor to the receiver.
3. Using the channel selector, select a desired channel and flip it to the “ON”
position. *Only one channel can be in the ON position
INSTALLING THE ALARM CLOCK CAMERA
1. Place the alarm clock camera in an appropriate location, connect it to the
supplied adaptor and plug in the adaptor to your wall outlet.
2. Using the channel selector, select the same channel as chosen on the receiver
and flip it to the “ON” position. *Only one channel can be in the ON position
IN ORDER TO VIEW THE IMAGE ON YOUR TELEVISION OR VCR, IT MUST BE ON THE
APPROPRIATE INPUT (A/V) CHANNEL.
SETTING THE TIME AND ALARM ON THE CLOCK
1. Hold the [TIME] button down and press the [HOUR] and [MINUTE] button until
you reach the correct time.
2. Hold the [ALARM] button down and press the [HOUR] and [MINUTE] button until
you reach the desired alarm time.
3. To activate the alarm, set the [AUTO-ON-OFF] switch to AUTO.
Sliding the switch to the ON position will turn the radio on.
www.svat.com
TROUBLESHOOTING
You should...
1. Check that the power cord(s) is properly connected.
2. Check that the monitor is turned ON.
3. Wrong AC/DC adapter used. Check that the adapter
labeled OUTPUT: 10.2V ACx2 is connected to the clock camera, and adaptor labled OUTPUT: 12V DC is connected to the
receiver.
1. Check the channel switch settings on the camera and
receiver. Make sure the channels match on both units.
2. Signal interference from a microwave oven. Check if a
micro-wave oven is in use or located in the path between the
camera and monitor. If so, turn it off or move it out of the
path.
3. Signal interference from other signal producing devices.
(a) Identify and eliminate the source of the interference.
(b) Relocate the camera and/or monitor closer to each other.
(c) Change the channel setting on both camera and receiver.
4. Camera and receiver are too far apart. Relocate the
camera and/or receiver.
If the Camera
and/or Monitor
No Power
No picture.
Distorted picture
Page 5

Receiver:
Video Out ......................1 Vp-o 75 Ohm
Audio Out ......................1 Vp-o 600 Ohm
Power Supply..................10V DC, 600mA
Operating Temp ............32
o
F - 122oF (0-50oC)
Dimensions......................3.7” x 1.8” x 2.5”
Weight ............................0.5lb (210 g)
Clock Radio Camera:
Image Sensor..................1/3” CMOS Image Sensor
Resolution........................330 TV lines (H)
Lens..................................6mm
Power Supply..................10.2V DC x 2, 250 mA
DC Backup Power ........DC 9V battery (not included)
Frequency ......................AM 530-1600 KHz
FM 88 - 108 MHz
Operating Temp ............32
o
F - 122oF (0-50oC)
Dimensions......................2.1” x 1.6” x 6.2”
Weight ............................0.2lb (100 g)
Antenna ..........................FM with 1m wire antenna
AM with built-in ferrite bar antenna
Speaker ..........................1/4” 8 Ohm Dynamic Loudspeaker
Product Specifications
NOTES
_______________________________________________________________________________________________________
_______________________________________________________________________________________________________
_______________________________________________________________________________________________________
_______________________________________________________________________________________________________
_______________________________________________________________________________________________________
_______________________________________________________________________________________________________
_______________________________________________________________________________________________________
_______________________________________________________________________________________________________
_______________________________________________________________________________________________________
_______________________________________________________________________________________________________
_______________________________________________________________________________________________________
_______________________________________________________________________________________________________
_______________________________________________________________________________________________________
_______________________________________________________________________________________________________
_______________________________________________________________________________________________________
_______________________________________________________________________________________________________
www.svat.com
Page 6

www.svat.com
PRODUCT WARRANTY
We take quality very seriously. This is why all of our products
come with a one year warranty from the original purchase date
against defects in workmanship and materials.
If you have warranty or support issues please contact us using any of the following methods:
SVAT Electronics USA SVAT Electronics Canada Phone: 866.946.7828
2315 Whirlpool St., Unit 333 4080 Montrose Road Fax: 888.771.1701
NIagara Falls, New York Niagara Falls, ON Email: support@svat.com
USA 14305 Canada L2H 1J9 Website: www.svat.com
Warranty Terms
1. SVAT products are guaranteed for a period of one year from the date of purchase against defects in
workmanship and materials. This warranty is limited to the repair, replacement or refund of the purchase price
at SVAT's option.
2. When service is required, the warranty is validated by the submission of a fully completed warranty card.
3. This warranty becomes void if the product shows evidence of having been misused, mishandled or tampered
with contrary to the applicable instruction manual.
4. Routine cleaning, normal cosmetic and mechanical wear and tear are not covered under the terms of this
warranty.
5. The warranty expressly provided for herein is the sole warranty provided in connection with the product itself
and no other warranty, expressed or implied is provided. SVAT assumes no responsibilities for any other
claims not specifically mentioned in this warranty.
6. This warranty does not cover the shipping cost, insurance or any other incidental charges.
7. You MUST call SVAT before sending any product back for repair. You will be given a Return Authorization
number. When returning the product for warranty service, please pack it carefully in the original box with all
supplied accessories, and enclose your original receipt or copy, and a brief explanation of the problem
(include RA #).
8. This warranty is valid only in Canada and the U.S.A.
9. This warranty card cannot be re-issued.
CAUTION
RISK OF ELECTRIC SHOCK, DO NOT OPEN
Graphic Symbol Explanation:
The lightning flash with arrowhead symbol, within an equilateral triangle, is intended to alert the user to
the presence of uninsulated “dangerous voltage” within the product’s enclosure that may be of sufficient magnitude to constitute a risk of electric shock to persons.
The exclamation point within an equilateral triangle is intended to alert the user to the presence of
important operating maintenance (servicing) instructions in the literature accompanying the appliance.
WARNING: TO PREVENT FIRE OR SHOCK HAZARDS, DO NOT EXPOSE THIS UNIT TO RAIN OR
MOISTURE
TO REDUCE THE RISK OF ELECTRIC SHOCK, DO NOT REMOVE THE COVER (BACK).
NO USER SERVICEABLE PARTS INSIDE. REFER SERVICING TO
QUALIFIED SERVICE PERSONNEL.
Disclaimer: SVAT does not endorse of any of SVAT products for any illegal activites.
SVAT is not responsible or liable in any way shape or form for any damage, vandalism,
theft or any other action that may occur while a SVAT product is in use by the purchaser.
Page 7

www.svat.com
LES PRÉCAUTIONS IMPORTANTES DE SÛRETÉ
S'IL VOUS PLAÎT LIRE AVANT D'INSTALLER
Les félicitations sur votre achat du 2.4GHz Système d'Interception de Réveille-matin de Radio sans fil. S'il
vous plaît lire ces instructions de sûreté et opération soigneusement avant d'installer et utilisation de ce système.
• Garder l'appareil-photo, le moniteur et les cordes d'adaptateur de CA/CC hors de portée d'enfants.
• Ne placer pas l'appareil-photo, le moniteur et les cordes d'adaptateur de CA/CC dans un berceau ou
un parc.
• N'utiliser pas l'appareil-photo près de l'eau ou étouffer et mouille des environnements, tels qu'une baig
noire, un baquet de lessive, l'évier de cuisine, ou mouiller des sous-sols.
• Localiser
l'appareil-photo, les adaptateurs de moniteur et CA/CC où il y a la ventilation suffisante. Ne pas localis
er l'appareil-photo dans la lumière du soleil directe.
• Ne localiser pas l'appareil-photo, les adaptateurs de moniteur et CA/CC près des sources de chaleur
registres telles que de chaleur, les radiateurs, les fours, les fournaises ou les autres appareils
avec les hautes températures d'opération.
• N'utiliser pas avec les rallonges. Utiliser seulement les adaptateurs de CA/CC fournis avec ce système.
***Note : l'Usage d'autres adaptateurs peut endommager les unités et annule votre garantie.
• Seulement boucher des composants dans les sorties de tension de ménage standard (110V - 240V
courant alternatif, 50Hz ou 60Hz).
• Pas les cordes d'endroit des adaptateurs de CA/CC, l'appareil-photo ou le moniteur où ils peuvent être
pincés ou peuvent être marché sur. Protéger les cordes en gardant les à l'écart d'enfants, les animaux
favoris et la circulation de ménage de routine. Ne pas placer d'objets lourds sur les cordons
d'alimentation ou couvrir des cordes avec les tapis ou la moquette.
• En nettoyant, utiliser un SEC, le tissu de bourre-libère. Débrancher l'appareil-photo, les adap tateurs de
moniteur et CA/CC avant de nettoyer. Ne JAMAIS immerger n'importe quels com posants dans l'eau et
pas les nettoyeurs de pulvérisation ou les dissolvants sur les unités. Pour ainsi faire peut endommager les
unités ou cause le choc électrique.
• Débrancher les adaptateurs de CA/CC de la prise murale quand le système n'est pas dans l'usage.
• Malmenant, les changements ou les modifications pas approuvé par le fabricant annuleront la
garantie.
PRUDENCE !
• Connecter cette unité SEULEMENT aux autres unités compatibles. Ne pas le connecter aucun autre
type d'alarme ou d'appareil auxiliaire. Connecter n'importe quoi d'autre à cette unité peut l'endom
mager ou l'empêche de l'opération convenablement.
• Ne peindre pas par-dessus l'appareil-photo.
• Ce système utilise des ondes hertziennes publiques pour l'opération sans fil. Le son et le vidéo peuvent
être diffusés à et a pris par autre 2,4 appareils de réception de GHz. Les conversa tions et les images
des autres pièces approchent de l'appareil-photo peut être diffusé et a pris. Pour protéger votre intim
ité, toujours éteint l'appareil-photo quand pas dans l'usage.
IMPORTANT!
LES ACCESSOIRES- ne place pas le moniteur ou l'équipement sur une charrette instable, une position ou
une table. Le moniteur ou l'équipement peut tomber causant la blessure sérieuse à un enfant ou un
adulte, et un dommages sérieux à l'équipement. Monter de mur ou étagère doit suivre l'instruction du fabricant, et doit utiliser une trousse montant approuvée par le fabricant.
• L'équipement de moniteur et les combinaisons de charrette devraient être déplacés avec soin.
• Les arrêts Rapides, force excessive, et les surfaces inégales peut causer la combinaison d'équipement
et charrette pour renverser.
VENTILATION
Les entailles et les ouvertures dans le cabinet et le dos ou le fond sont pourvu à la ventilation et assurer
l'opération fiable du moniteur ou l'équipement et protéger si de la surchauffe. Ces ouvertures ne doivent
pas être bloquées ou doivent être couvertes. Les ouvertures ne devraient jamais être bloquées en plaçant
le moniteur sur un lit, un divan, un tapis, ou une autre surface similaire. Le récepteur de moniteur ou
équipement ne devrait jamais être placé près de ou par-dessus un registre de radiateur ou chaleur. Le
récepteur de moniteur ou équipement ne devrait pas être placé dans une installation incorporée telle
qu'une bibliothèque à moins que la ventilation correcte est fournie.
Page 8

www.svat.com
INCLUS DANS CE SYSTÈME :
• 2.4GHz Appareil-photo dans un réveille-matin 1pc
• 2.4GHz Récepteur 1pc
• Le Pouvoir de DC pour le Récepteur 1pc
• Le Pouvoir de DC pour l'Appareil-photo 1pc
• Câble d'un/V 1pc
PARTS OF THE SYSTEM
1. Antenne de récepteur 12. Chronométrer le bouton de série
2.
Le vidéo hors télé ou le magnétoscope 13. L'auto-sur-de switcher d'alarme/radio
3. Alimenter les données d'adaptateur 14. Fait un petit somme le bouton
4. La chaîne de récepteur choisit 15. L'exposition
5. Le volume de radio 16. Le radio de SUIS/FM plus privilégié
6. La chaîne d'appareil-photo choisit 17. Le bouton de changement d'heure
7. L'acccordeur de radio 18. Le changement minutieux boutonne
8. Le compartiment de pile 19. Dormir le bouton
9. FM radio antenna
10. Le haut-parleur
11. Alarmer le bouton de série
1
2
3
5
6
7
8
9
10
11
12
13
14
15
16
17
18
19
4
Page 9

Installation générale
L'INSTALLATION DU RÉCEPTEUR
1. Connecter la production vidéo sur le récepteur à une données vidéo (le jaune) la
connexion de RCA sur votre télé ou votre magnétoscope.
2. Connecter le 12V adapteur de pouvoir au récepteur.
3. L'utilisation du sélecteur de canal, choisir une chaîne désirée et l'inverse au
“SUR” la position. *Seulement une chaîne peut être dans le SUR la position
L'INSTALLATION DE L'APPAREIL-PHOTO DE RÉVEILLE-MATIN
1. Placer l'appareil-photo de réveille-matin dans un emplacement approprié, le con
necter à l'adapteur et au bouchon fournis dans l'adapteur votre emprison ner la sor
tie.
2. L'utilisation du sélecteur de canal, choisir la chaîne pareille comme choisi sur le
récepteur et l'inverse au “SUR” la position. *Seulement une chaîne peut être dans le
SUR la position
AFIN DE REGARDER L'IMAGE À LA TÉLÉVISION OU VCR, CE DOIT ÊTRE SUR LES DONNÉES
APPROPRIÉES (L'UN/V) LA CHAÎNE.
LE CADRE LE TEMPS ET ALARME SUR L'HORLOGE
1. Tenir le [le TEMPS] le bouton et appuie en bas le [l'HEURE] et [la MINUTE] le
bouton jusqu'à ce que vous atteignez le temps correct.
2. Tenir le [l'ALARME] le bouton et appuie en bas le [l'HEURE] et [la MINUTE] le
bouton jusqu'à ce que vous atteignez le temps d'alarme désiré.
3. Pour activer l'alarme, régler le [AUTO-ON-OFF] le commutateur à l'AUTO. Le
glissement du commutateur au SUR la position tournera le radio sur.
www.svat.com
DEPANNAGE
Vous devriez..
1. Vérifier que le cordon d'alimentation (les cordes) est convenable-
ment connecté.
2. Vérifier que le moniteur est allumé.
3. Le mauvais adaptateur de CA/CC a utilisé. Vérifier que l'adapta-
teur la PRODUCTION étiquetée : 10.2V ACx2 est connecté à l'appareil-photo d'horloge, et la PRODUCTION de labled d'adapteur :
12V DC est connecté au récepteur.
1. Vérifier les cadres de commutateur de chaîne sur l'appareil-photo
et le récepteur. Assure l'allumette de chaînes sur les deux unités.
2. Signaler l'intervention d'un four de micro-onde. Le contrôle si un
four de micro-onde est dans l'usage ou localisé dans le chemin entre
l'appareil-photo et le moniteur. Si oui, le tourner de ou sortir il du
chemin.
3. Signaler l'intervention de l'autre signal produit des appareils.
(a) Identifier et éliminer la source de l'intervention.
(b) Reloge le moniteur de et/ou d'appareil-photo plus près à chaque
autre.
(c) Change la chaîne réglant sur l'appareil-photo et le récepteur.
4. L'appareil-photo et le récepteur sont aussi loin à part. Reloger le
récepteur de et/ou d'appareil-photo.
Si le et/ou d'Appareilphoto Contrôle
Aucun Pouvoir
Aucune image.
Image déformée
Page 10

Récepteur :
Le vidéo Hors..................1 Vp-o 75 Ohm
L'audio Hors ....................1 Vp-o 600 Ohm
Alimenter la Provision ....10V DC, 600mA
Temp d'opération ..........32
o
F - 122oF (0-50oC)
Dimensions......................3.7” x 1.8” x 2.5”
Poids ................................0.5lb (210 g)
Appareil-photo de Radio-réveil :
Détecteur d'image........1/3” CMOS Détecteur d'image
Résolution........................330 LE télé revêt (H)
Lentille ............................6mm
Alimenter la Provision ....10.2V DC x 2, 250 mA
Sauvegarder le Pouvoir ....DC 9V la pile (n'a pas inclus)
Fréquence ......................AM 530-1600 KHz
FM 88 - 108 MHz
Temp d'opération ..........32
o
F - 122oF (0-50oC)
Dimensions......................2.1” x 1.6” x 6.2”
Poids ................................0.2lb (100 g)
Antenne ..........................FM avec 1m télégraphie l'antenne
AM avec l'antenne incorporée de barre
Haut-parleur ..................1/4” 8 Ohm Haut-parleur
Spécifications de produit
NOTES
_______________________________________________________________________________________________________
_______________________________________________________________________________________________________
_______________________________________________________________________________________________________
_______________________________________________________________________________________________________
_______________________________________________________________________________________________________
_______________________________________________________________________________________________________
_______________________________________________________________________________________________________
_______________________________________________________________________________________________________
_______________________________________________________________________________________________________
_______________________________________________________________________________________________________
_______________________________________________________________________________________________________
_______________________________________________________________________________________________________
_______________________________________________________________________________________________________
_______________________________________________________________________________________________________
_______________________________________________________________________________________________________
_______________________________________________________________________________________________________
www.svat.com
Page 11

www.svat.com
Déni : SVAT n'approuve d'aucun de produits de SVAT pour aucun activites illégal. SVAT n'est pas
responsable ou responsable de quelque façon forme ou forme d'aucun dommage, de
vandalisme, de vol ou d'aucune autre action qui peuvent se produire tandis qu'un produit
de SVAT est en service par l'acheteur.
GARANTIE DE PRODUIT
Nous prenons la qualité très sérieusement. C'est pourquoi tous
nos produits viennent avec une garantie d'un an de la date originale d'achat contre des défauts en exécution et matériaux.
Si vous avez les issues de garantie ou de soutien satisfont nous contactent employant n'importe laquelle
des méthodes suivantes :
SVAT Electronics USA SVAT Electronics Canada Phone: 866.946.7828
2315 Whirlpool St., Unit 333 4080 Montrose Road Fax: 888.771.1701
NIagara Falls, New York Niagara Falls, ON Email: support@svat.com
USA 14305 Canada L2H 1J9 Website: www.svat.com
Limites De Garantie
1. Les produits de SVAT sont garantis pour une période d'une année de la date d'achat contre défectuosités
l'exécution et défectuosité des matériels. Cette garantie est limitée à la réparation, le remplacement ou le
remboursement du prix d'achat à l'option de SVAT.
2. Quand le service est exigé, la garantie est validée par la soumission d'une carte de garantie entièrement
complétée.
3. Cette garantie devient vide si le produit montre l'évidence d'ayant été employé improprement, malmené ou a
altéré contraire au manuel d'instruction applicable.
4. Le nettoyage de routine, l'usure normale normal, cosmétique et mécanique n'est pas couverte sous les ter
mes de cette garantie.
5. La garantie a pourvu expressément à en ceci est la garantie seule fournie à propos du produit lui-même e
aucune autre garantie, exprimée ou suggérée est fournie. SVAT ne suppose pas de responsabilités pour les
autres réclamations pas en particulier mention né dans cette garantie.
6. Cette garantie ne couvre pas le coût expédiant, l'assurance ou les autres charges accessoires.
7. En retournant le produit pour le service de garantie, s'il vous plaît l'emballer soigneusement dans la boîte
originale avec tous accessoires fournis, et enclore votre carte de garantie, le reçu original ou la copie, et une
explication brève du problème.
8. Cette garantie est valide seulement dans le Canada et les ETATS-UNIS.
9. Cette carte de garantie ne peut pas être la réédition.
ATTENTION
LE RISQUE DE DÉCHARGE ÉLECTRIQUE, NE S'OUVRENT PAS
Explication Graphique De Symbole :
Le flash de foudre avec le symbole de pointe de flèche, dans une triangle equilateral, est prévu pour
alerter l'utilisateur à la présence "de la tension dangereuse" non isolée dans la clôture du produit qui
peut être de la grandeur suffisante pour constituer un risque de décharge électrique aux personnes.
Le point d'exclamation dans une triangle equilateral est prévu pour alerter l'utilisateur à la présence
des instructions de fonctionnement importantes d'entretien (entretien) dans la littérature accompagnant
l'appareil.
AVERTISSEMENT : POUR EMPÊCHER DES RISQUES DU FEU OU DE CHOC, N'EXPOSEZ PAS
CETTE UNITÉ À LA PLUIE OU À L'HUMIDITÉ
POUR RÉDUIRE LE RISQUE DE DÉCHARGE ÉLECTRIQUE, N'ENLEVEZ PAS LA COUVER-
TURE (ARRIÈRE). AUCUNES PIÈCES DE L'UTILISATEUR SERVICEABLE À L'INTÉRIEUR.
RÉFÉREZ-VOUS L'ENTRETIEN AU PERSONNEL DE SERVICE QUALIFIÉ.
Page 12

If you require more information on this product
or other SVAT products visit
Si vous exigez plus d'information sur ce produit ou ces
autres produits de SVAT visite
www.svat.com
__________________________________________________________________________________________________________________
FCC STATEMENT:
This equipment has been tested and found to comply with the limits of a Class B digital device, pursuant to Part 15 of
the FCC Rules. These limits are designed to provide reasonable protection against harmful interference in a residential installation. This equipment generates, uses and can radiate radio frequency energy and, if not installed and
used in accordance with the instructions,may cause harmful interference to radio communications. However, there is
no guarantee that interference will not occur in a particular installation. If this equipment does cause harmful interference to radio or television reception, which can be determined by turning the equipment off and on, the user is
encouraged to try to correct the interference by one or more of the following measures:
• Reorient or relocate the receiving antenna.
• Increase the separation between the equipment and receiver.
• Connect the equipment into an outlet on a circuit different from that to which the receiver is connected.
• Consult the dealer or an experienced radio/TV technician for help.
FCC LABEL COMPLIANCE STATEMENT:
This device complies with Part 15 of the FCC Rules. Operation is subject to the following two conditions:
1. This device may not cause harmful interference.
2. This device must accept any interference received, including interference that may cause undesired operation.
IC STATEMENT:
This equipment has been tested and found to comply with IC RSS 210 Standards.
__________________________________________________________________________________________________________________
FCC DECLARATION :
Cet équipement a été essayé et a été trouvé pour se conformer aux limites d'un B de Classe appareil numérique,
conformément Séparer 15 des Règles de FCC. Ces limites sont conçues pour fournir la protection raisonnable contre
l'intervention nuisible dans une installation résidentielle. Cet équipement produit, les usages et peut rayonner l'énergie de radiofréquence et, si pas installé et utilisé conformément aux instructions, peut causer l'intervention nuisible
aux communications de radio. Cependant, il n'y a pas de garantie que cette intervention n'arrivera pas dans une
installation particulière. Si cette cause d'équipement intervention nuisible à la réception de radio ou télévision, qui
peut être déterminée par éteindre l'équipement et sur, l'utilisateur est encouragé à essayer de corriger l'intervention
par un ou plus des mesures suivantes :
• Reorient ou reloge l'antenne de réception.
• Augmenter la séparation entre l'équipement et le récepteur.
• Connecter l'équipement dans une sortie sur un circuit différent de qu'à que le récepteur est connecté.
• Consulter le négociant ou un technicien de radio/télé expérimenté pour l'aide.
LA DECLARATION DE CONFORMITE D'ETIQUETTE DE FCC :
Cet appareil se conforme à la Partie 15 des Règles de FCC. L'opération est sujette au suivre deux conditions :
1. Cet appareil ne peut pas causer l'intervention nuisible.
2. Cet appareil doit accepter n'importe quelle intervention reçue, y compris l'intervention qui peut causer l'opération
non désirée.
IC DECLARATION :
Cet équipement a été essayé et a été trouvé pour se conformer à IC RSS 210 Normes.
 Loading...