

Page 1
with Built-In Color Camera
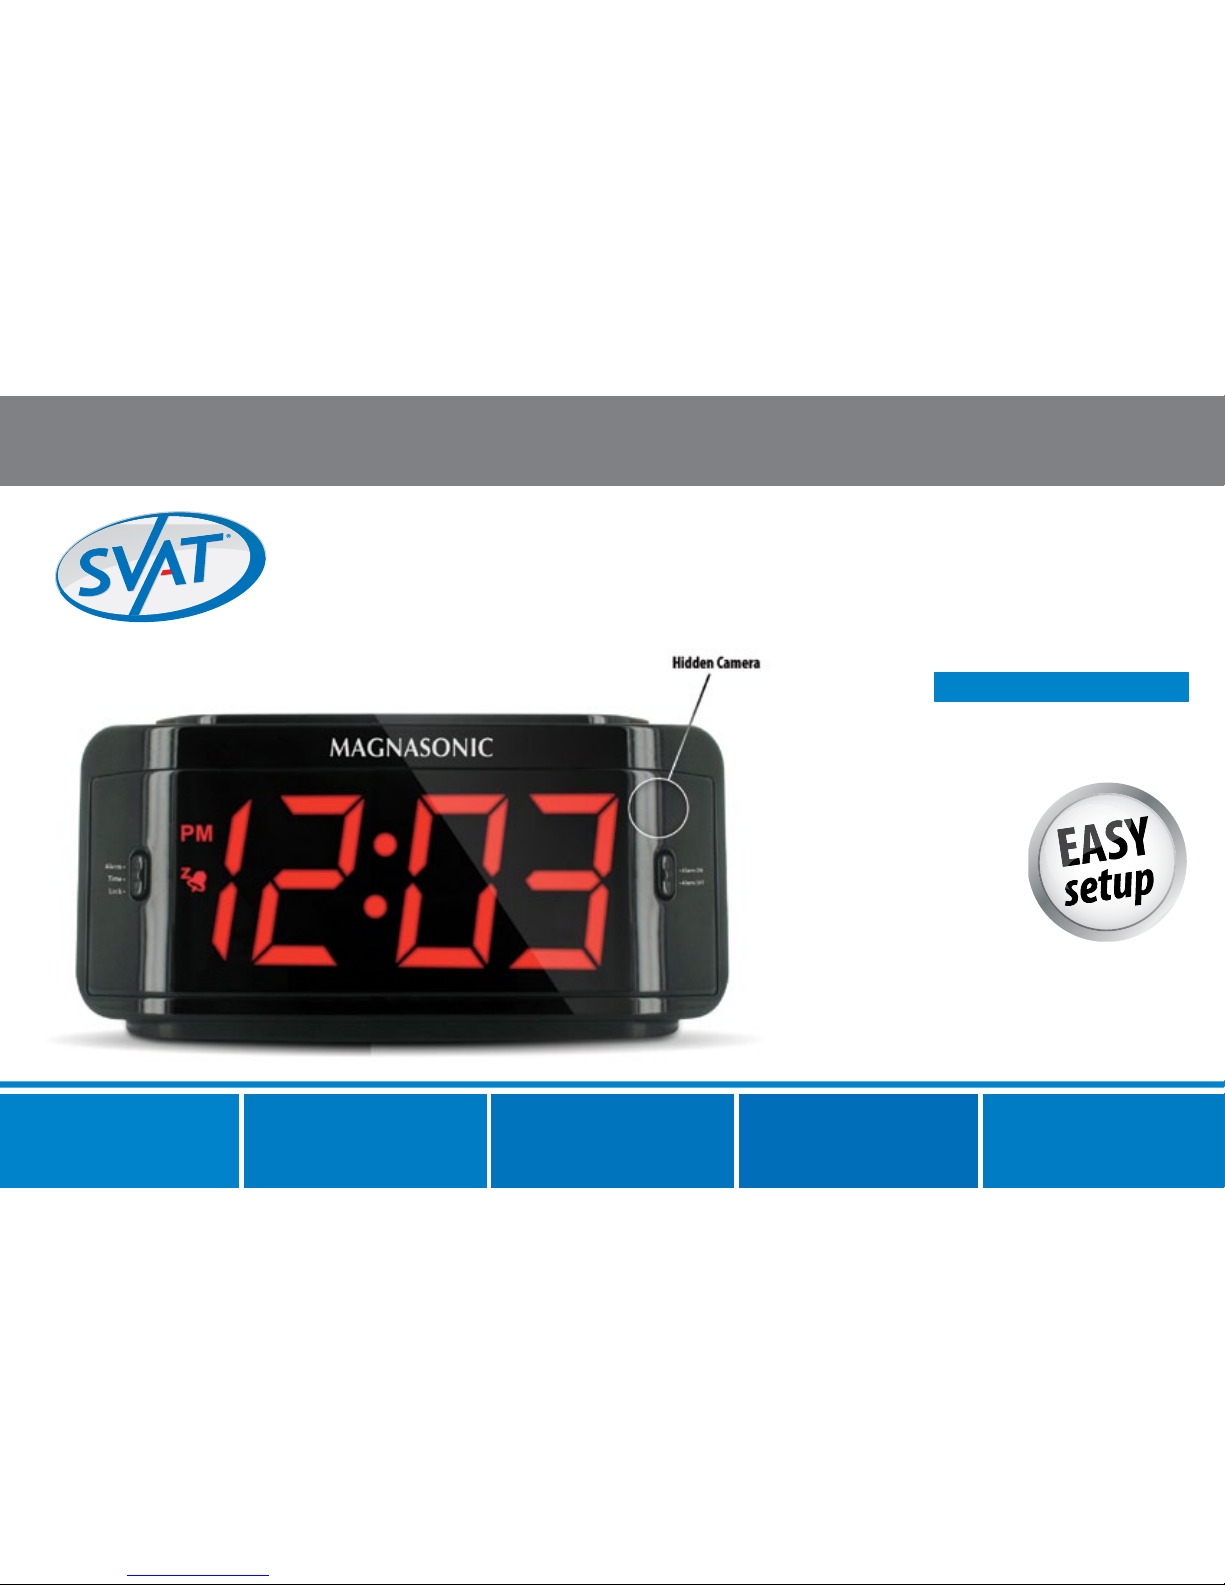
Covert Alarm Clock DVR
MODEL #: PI300-SD
USER MANUAL
COVERT SYSTEM
Page 2
PI300-SD
1
Please contact a SVAT customer support representative rst regarding additional
information on product features, specications or assistance with setup.
For more product information visit www.svat.com
Note: This is manual version 2.0 for this product,
you may nd updated versions by visiting
our website.
IMPORTANT! PLEASE READ
NEED HELP?
DO NOT RETURN THIS
PRODUCT TO THE STORE
Support:
www.svat.com/support
Online live web chat:
Visit www.svat.com
Page 3
PI300-SD
2
Warranty Terms
1. SVAT products are guaranteed for a period of one year from the date of purchase
against defects in workmanship and materials. This warranty is limited to the
repair, replacement or refund of the purchase price at SVAT’s option.
2. This warranty becomes void if the product shows evidence of having been mis
used, mishandled or tampered with contrary to the applicable instruction manual.
3. Routine cleaning, normal cosmetic and mechanical wear and tear are not covered
under the terms of this warranty.
4. The warranty expressly provided for herein is the sole warranty provided in
connection with the product itself and no other warranty, expressed or implied
is provided. SVAT assumes no responsibilities for any other claims not specically
Mentioned in this warranty.
5. This warranty does not cover shipping costs, insurance, or any other charges.
6. You MUST call SVAT before sending any product back for repair. You will be sent
a Return Authorization number with return instructions. When returning the
product for warranty service, please pack it carefully in the original box with
all supplied accessories, and enclose your original receipt or copy, and a brief
explanation of the problem and RA#.
7. This warranty is valid only in Canada and the continental U.S.
8. this warranty cannot be re-issued.
TO REDUCE THE RISK OF ELECTRIC SHOCK, DO NOT REMOVE THE COVER (BACK).
NO USER SERVICEABLE PARTS INSIDE. REFER SERVICING TO QUALIFIED SERVICE PERSONNEL.
CAUTION
RISK OF ELECTRIC SHOCK, DO NOT OPEN MONITOR
SVAT USA
60 Industrial Parkway #Z64
Cheektowaga, NY
USA 14227
SVAT CANADA
4080 Montrose Road
Niagara Falls, ON
Canada L2H 1J9
IMPORTANT! PLEASE READ
PRODUCT WARRANTY
INFORMATION
We take quality very seriously. That is why all of our products come
with a one year warranty from the original purchase date against
defects in workmanship and materials. If you have warranty or support
issues please contact us using any of the following methods:
Support: www.svat.com/support
Website: www.svat.com
Page 4

PI300-SD
3
FEATURES
Covert DVR Disguised as an Alarm Clock
Hidden in a fully functional, Magnasonic LED alarm clock, you can privately monitor your oce, employees, valuables or nanny with this unit’s conventional appearance.
Record Over a Month of Footage with the Included 2GB SD Card
1
Capture over a month of high quality video when you record with the included 2 GB SD card. Easily remove the SD card to backup your footage to a computer.
Motion Activated Recording
Choose to record only when motion is detected and capture just the important events while conserving space on your SD card.
Easily Connect to a TV or Monitor
Review recorded footage easily by connecting the DVR to a television or monitor.
Fully Functional Alarm Clock
This unit also operates as a fully functional LCD alarm clock with alarm and snooze functions.
High Quality MPEG-4 Compression
MPEG-4 compressed recording allows for hours and hours of capturing footage without sacricing video quality to conserve space.
Compatible With High Capacity SD Memory Cards up to 32 GB
The PI300 comes with an included 2 GB SD card, if you should require more memory for your system, you can install a SD card up to 32 GB.
Lifetime Customer Support
Our customer support team can be reached on our website at www.svat.com/support or via live web chat. Our experts will be happy to assist you in English, French
and Spanish.
Disclaimers:
1. Recording capacity may vary based on recording resolution and quality, lighting conditions and movement in the scene. Based on a 2GB SD card, using lowest quality settings.
2. Product may not be exactly as shown on the package. Some images are used for illustration purposes only.
3. SVAT does not endorse any SVAT products for illegal activities. SVAT is not responsible or liable in any way for any damage, vandalism, theft or any other action that may occur while an SVAT product is in use by the purchaser.
Page 5
PI300-SD
4
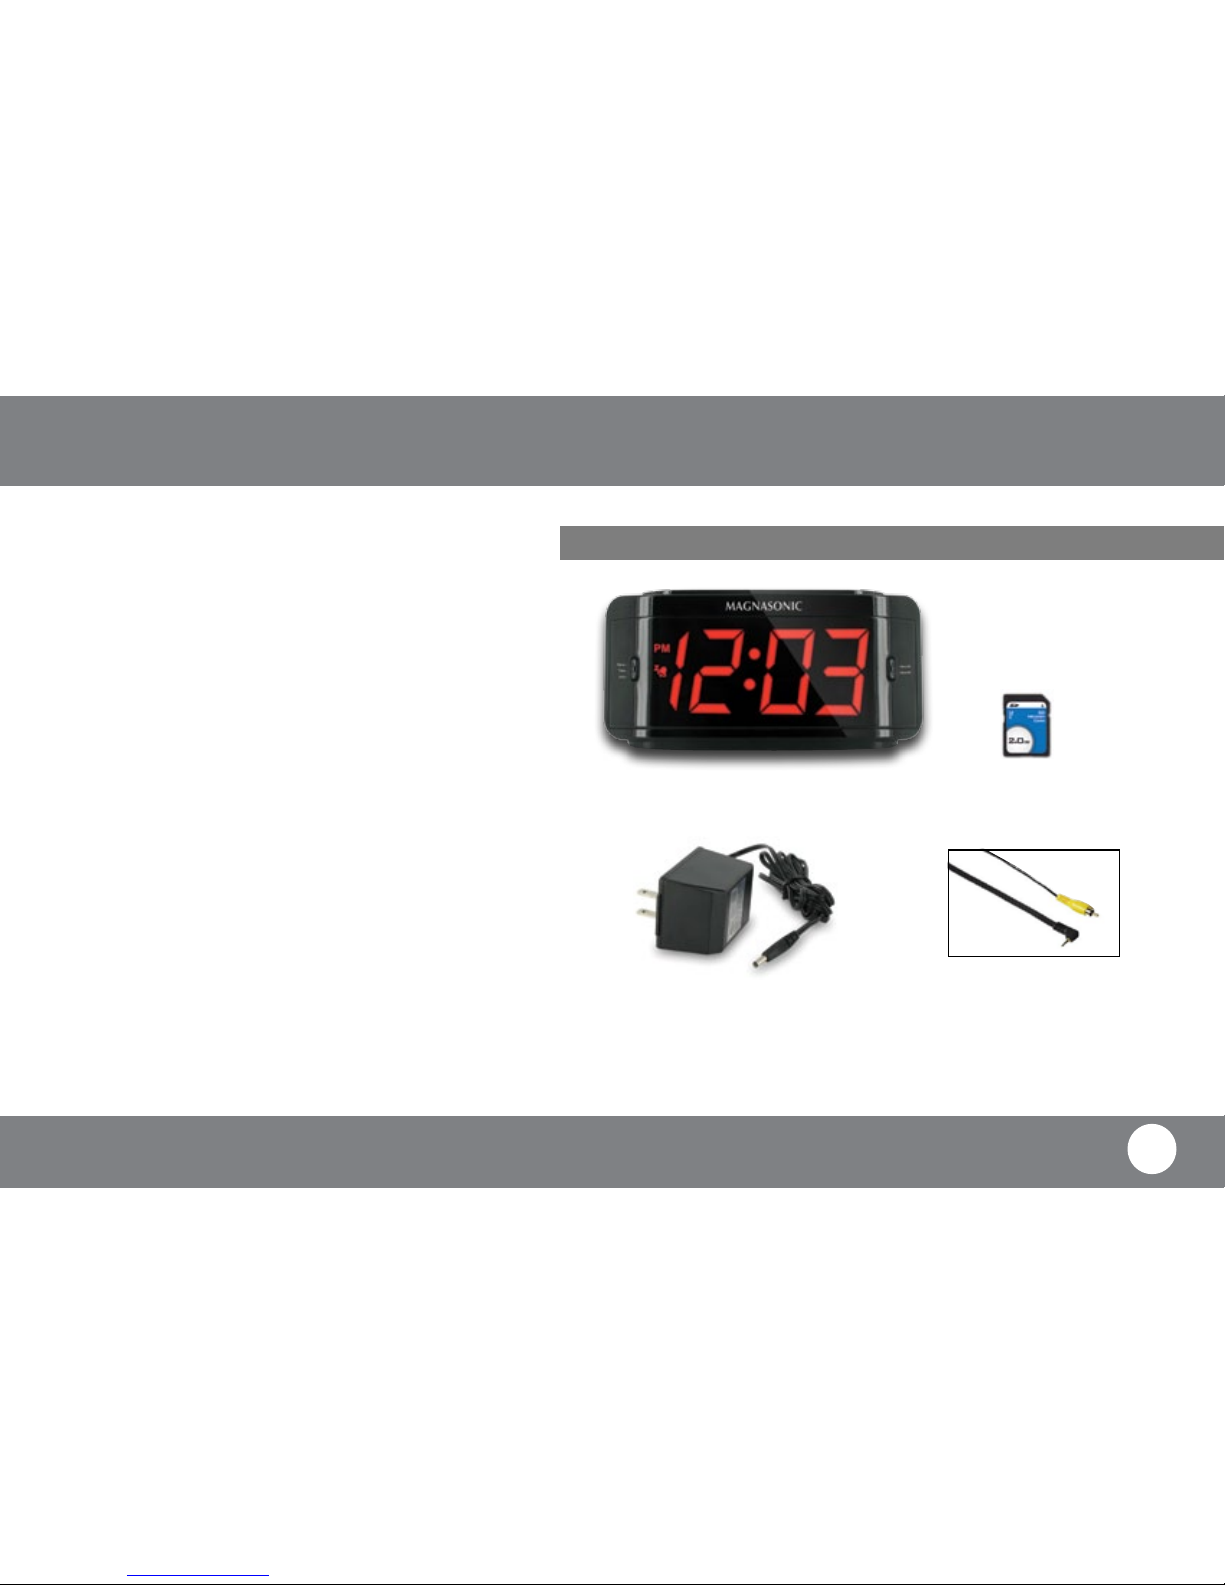
WHAT’S INCLUDED
Covert DVR Alarm Clock 2GB SD Card
Power Adapter RCA Cable
Need Help Page .............................................................. 1
Warranty Information ..................................................... 2
Features ......................................................................... 3
Table of Contents ............................................................ 4
What’s Included .............................................................. 4
Buttons and Connections ................................................. 5
Installation .................................................................... 6
Introduction ................................................................... 7
Setting the LCD Alarm Clock ............................................. 8
Main Menu ..................................................................... 9
DVR Settings ................................................................... 10
Search and Play ........................................................................... 10
Set Date/Time ............................................................................. 10
Set Motion Detection .................................................................. 11
Motion Detection Sensitivity ....................................................... 11
Manual Record ............................................................................ 12
Schedule Record .......................................................................... 12
Motion Record ............................................................................. 13
Continuous Record ...................................................................... 13
SD Card Status ............................................................................. 14
System Status ............................................................................. 15
Power ON Setup .......................................................................... 15
Factory Default ............................................................... 16
Camera Specications ..................................................... 16
DVR Specications ........................................................... 17
TABLE OF CONTENTS
• User Manual • Lifetime Live
Customer Support
Page 6
PI300-SD
5
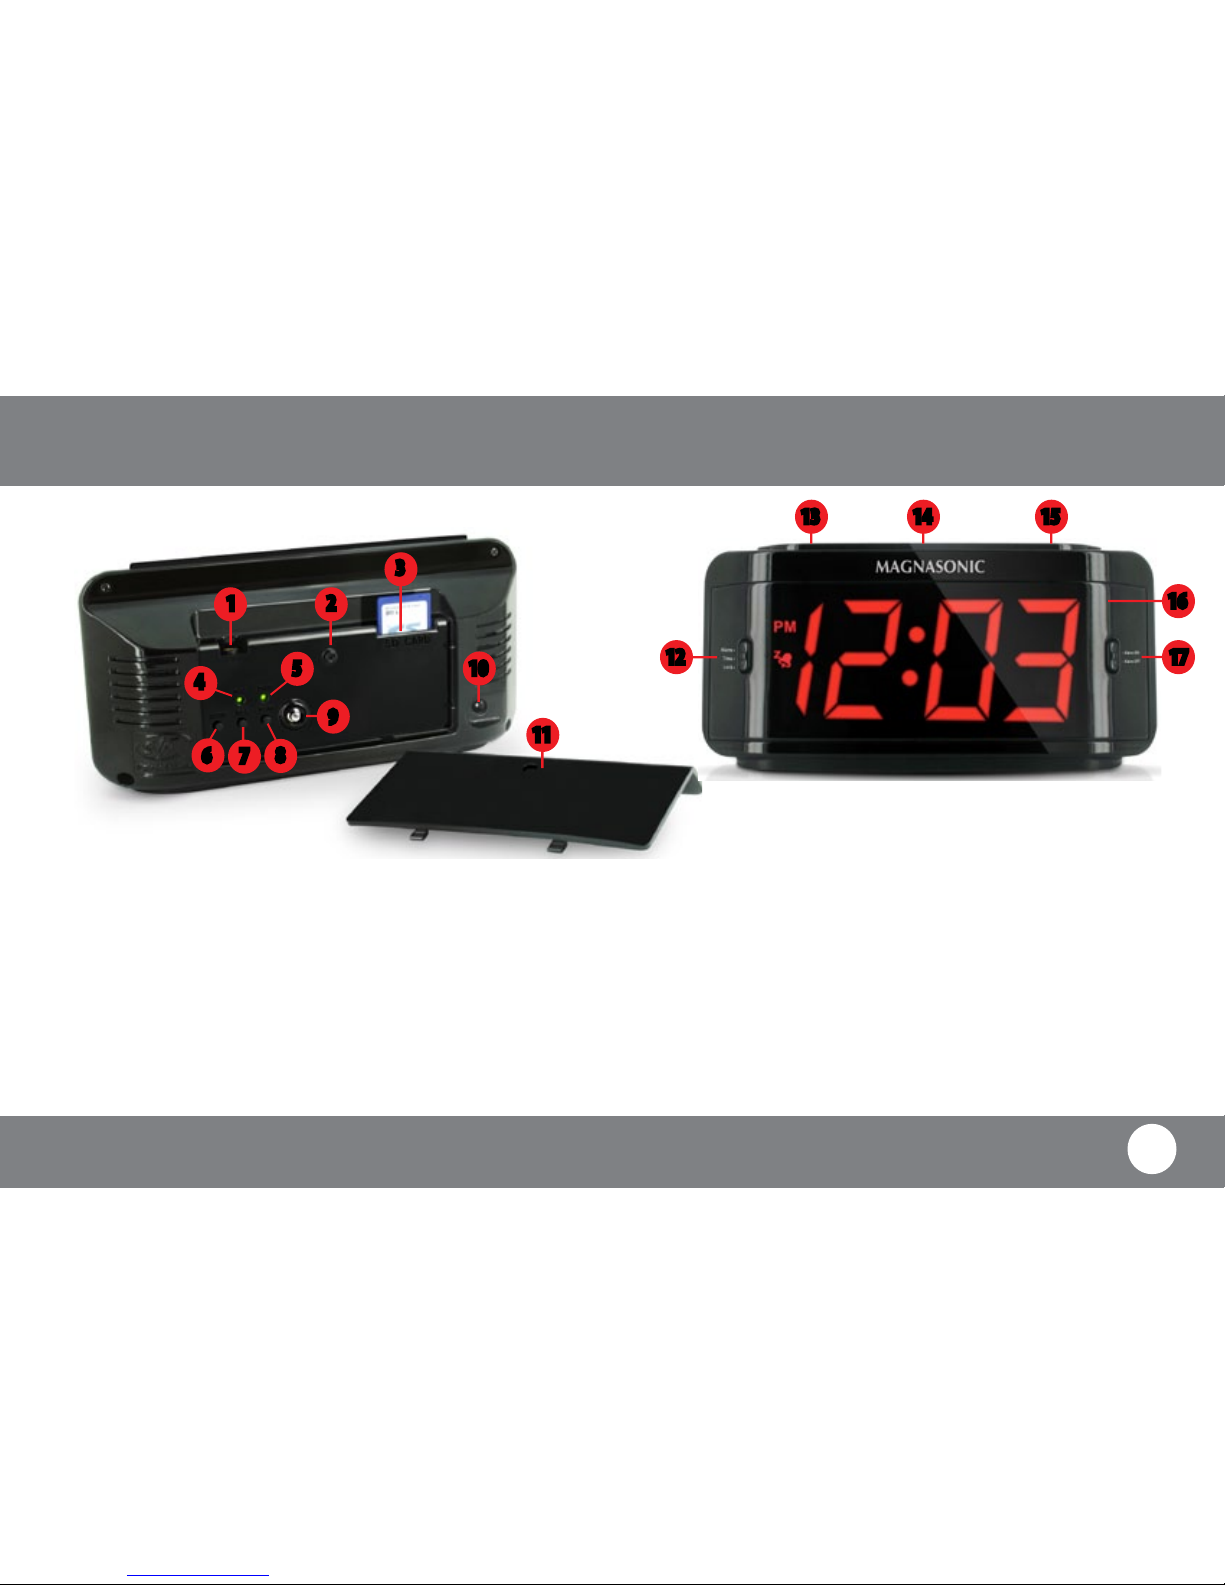
1. 1/4” RCA Jack: Connect RCA video cable to this location
2. Release Screw: Remove using provided Allen Key to remove back of alarm clock
3. SD Card Slot: Insert SD Card in this slot
4. Record LED: Indicates recording
5. Power LED: Indicates unit is connected to power source
6. Stop: Stop manual recording / stop playback / navigate back in menu
7. Record: Start manual recording
8. Play: Prompts playback / plays video
9. Joystick: Operate the menu by moving up, down, left, right and select
menu options
10. AC Jack: Connect AC Adapter to this location
11. Rear Panel: Serves to disguise and limit access to the control panel
12. Time Switch: Select to adjust time, alarm or set to be locked
Up Alarm Set
Mid Time Set
Down Time Lock
13. Hour: Increase hour by one
14. Snooze: Snooze button, delays alarm for 9 minutes
15. Minute: Increase minute by one
16. Camera: Covert pinhole camera
17. Alarm Switch:
Up Alarm On
Down Alarm O
1
2
3
4
5
6
7
8
9
10
11
13 14 15
12 17
16
Page 7
PI300-SD
6
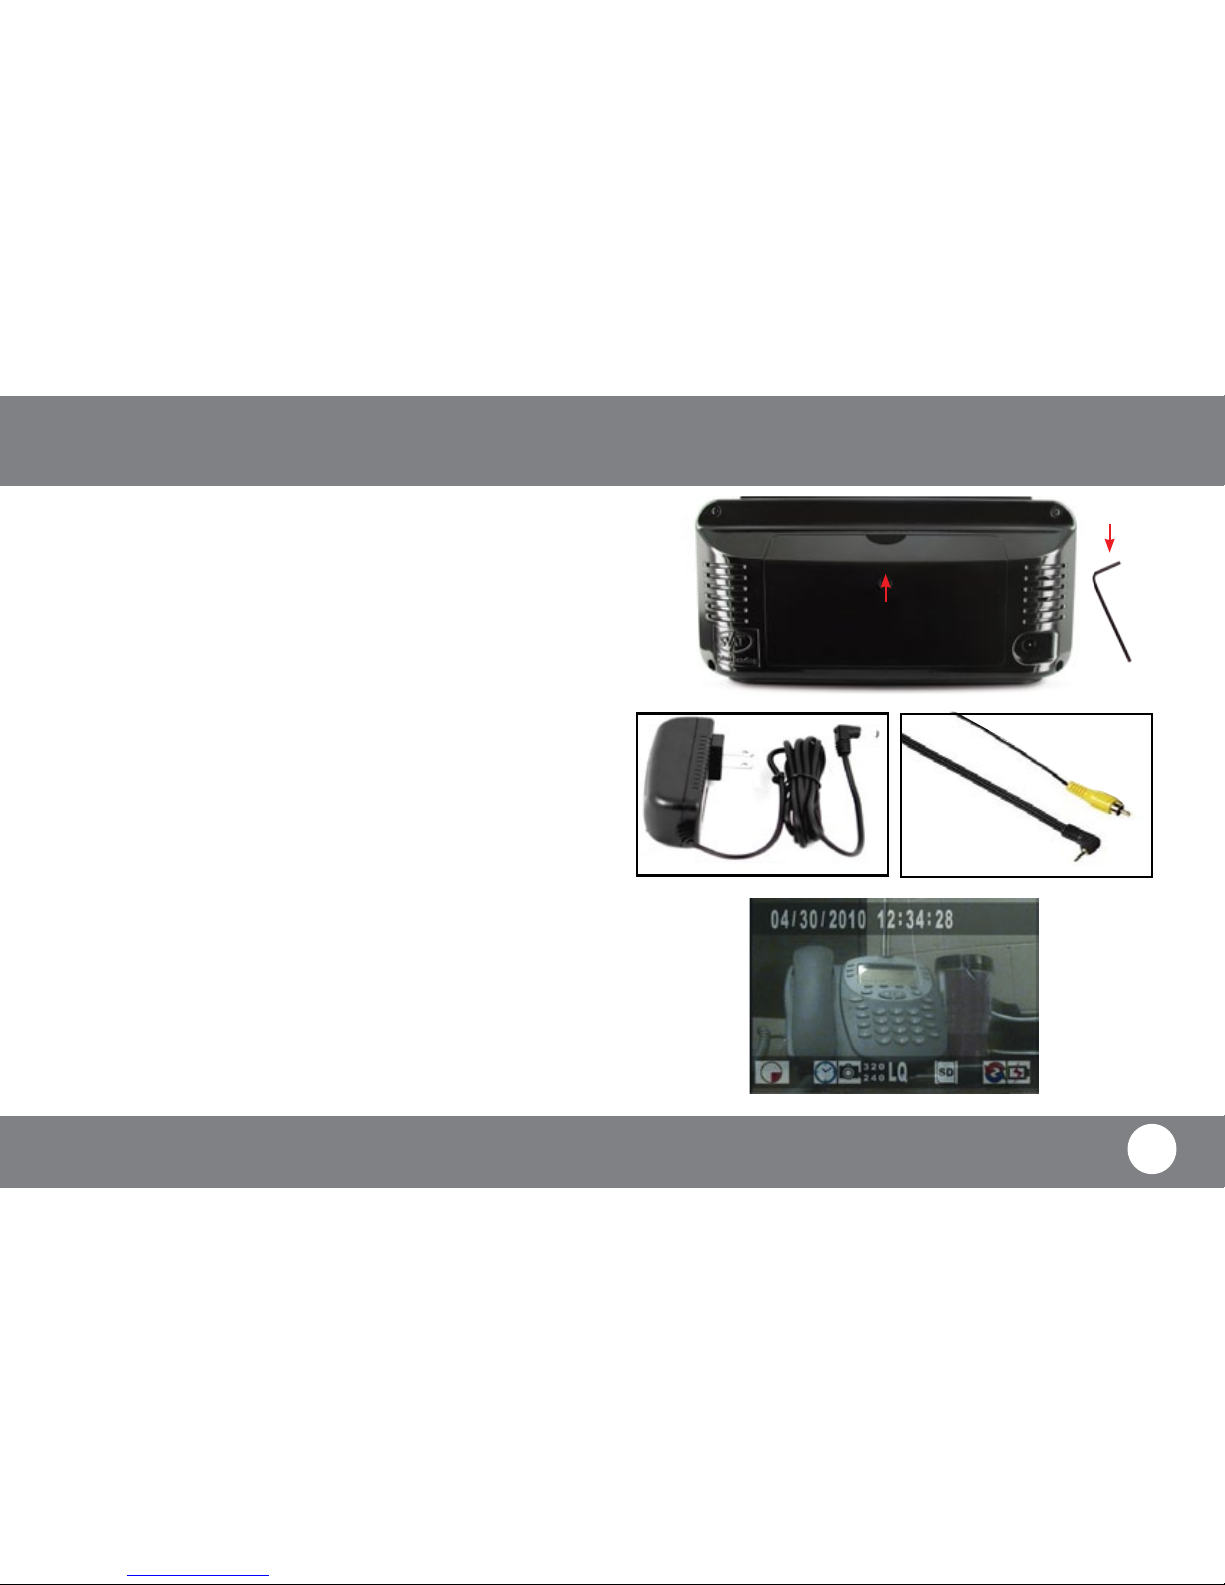
INSTALLATION
RELEASE SCREW
ALLEN KEY
PI300-SD was designed to be quick and easy to set up and to use. Please follow these
simple instructions to get your covert DVR up and running in just a matter of minutes.
Powering your PI300
1. Connect the included AC adapter to conventional AC outlet.
2. Connect AC adapter to AC Jack (10) on the back side of PI300.
Remove the rear panel
1. Using the included Allen Key, remove the Release Screw.
2. Use your thumb to pull the rear panel away from the main unit.
Connect your PI300 to a TV
1. Connect the included RCA cable to the RCA Jack (1) on the back of the PI300.
2. Connect the RCA cable to the Yellow RCA Composite Video Input Jack of
your television.
View your PI300 on a TV
1. Once you have connected your PI300 to your TV, power both units on.
2. Set your TV’s input source to VIDEO, AUX or whichever source is required for
viewing your connected devices.
Page 8

PI300-SD
7
Monitoring Mode
PI300-SD ICONS
Manual Record
Indicates manual record is on
Motion Record
Indicates motion record is on
Scheduled Record
Indicates scheduled continuous
record is on
Recording
This circle will appear on your display while
your covert DVR is rrecording
Quality Level
Indicates quality level: low (LQ) medium (MQ)
and high (HQ)
Resolution
Indicates the resolution being recorded
320x240 or 640x480
Power
Indicates covert DVR is
connected to power source
Overwrite
Indicates overwrite is enabled
SD Card
Indicates SD card is installed
GETTING STARTED
As soon as you power on your PI300 you will automatically be brought to Monitoring Mode.
From here you will be able to access the main menu, trigger manual recording or view
previously recorded footage.
The top bar of your screen will display the date and time of your covert DVR. The bottom bar
will feature icons indicating what actions are taking place on your PI300.
Please, take the time to read through this manual in its entirety to get the most out of your
covert recording experience with the PI300-SD.
INTRODUCTION
Page 9

PI300-SD
8
PI300 is a covert DVR hidden inside of a fully functional Magnasonic LCD alarm
clock. Follow these basic steps to setup the external alarm clock portion of
your covert DVR:
To set the time:
1. Adjust the Time Switch to the mid position, this will enable time set.
2. Press the hour button to increase the time, in hours, by one.
3. Press the minute button to increase the time, in minutes, by one.
4. When you have nished setting the time, adjust the Time Switch to the
down position to prevent any adjustments.
To set the alarm:
1. Adjust the Time Switch to the up position, this will enable alarm set.
2. Press the hour button to increase the alarm time, in hours, by one.
3. Press the minute button to increase the alarm time, in minutes, by one.
4. When you have nished setting the alarm time, adjust the Time Switch
to the down position to prevent any accidental adjustments.
To enable the alarm:
1. Adjust the Alarm Switch to the up position to enable alarm.
2. Adjust the Alarm Switch to the down position to disable alarm.
To turn o the alarm / use the snooze button:
When the alarm is set and enabled, an audible buzzer will sound at the set
time.
1. To turn o activated alarm, move the Alarm Switch down to disable
alarm.
2. While alarm is activated, press the snooze button to disable the alarm
for 9 minutes. After 9 minutes, the alarm will sound again and you
will again be prompted to either press the snooze button or turn o
the alarm.
NOTE: The time displayed on the LCD Alarm Clock must set
independently from the time setting on the covert DVR.
SETTING THE LCD ALARM CLOCK
Page 10
PI300-SD
9
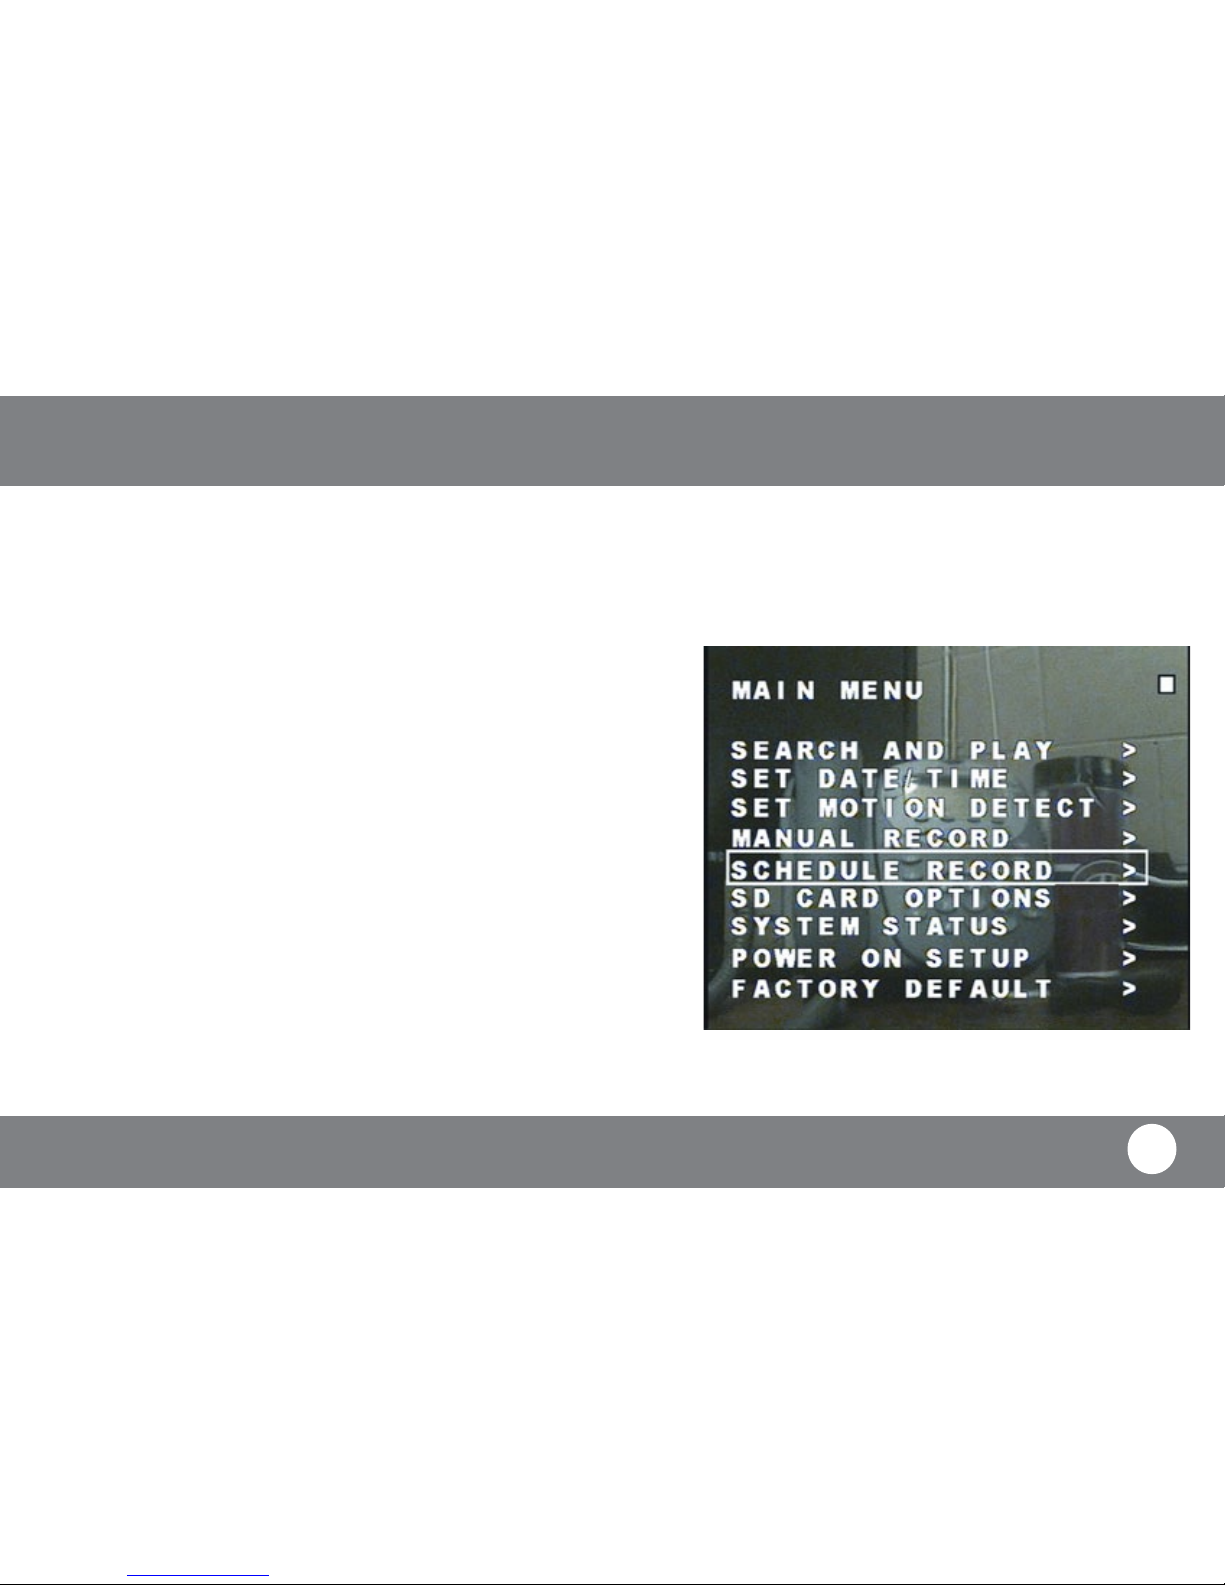
To access the main menu, press the joystick button. Navigation throughout the main menu is made easy with the directional joystick: move it up or down to
navigate the menu, left or right to adjust settings and use the “STOP” button to go back a screen.
The following options are available in the main menu:
Search and Play: This option prompts the le list, view all of your recorded footage here
Set Date / Time: Congure the date, date format and time for your PI300
Set Motion Detect: Set a customized area for motion detection and adjust the camera’s
sensitivity to picking up movement
Manual Record: Congure the resolution, frame rate and quality of manual recordings
Schedule Record: Set up a 24 hour recording schedule and adjust the resolution, frame rate
and quality for each of your scheduled recording types
SD Card Options: This option displays the size of your SD Card as well as how much space is
available. Additionally, you can specify the size of recorded les and set
automatic overwriting
System Status: Dispalys all of the current settings of your PI300
Power On Setup: Set your OSD language and video format
Factory Default: Return the settings of your PI300 to its original factory defaults
Main Menu Screen
MAIN MENU
Page 11
PI300-SD
10
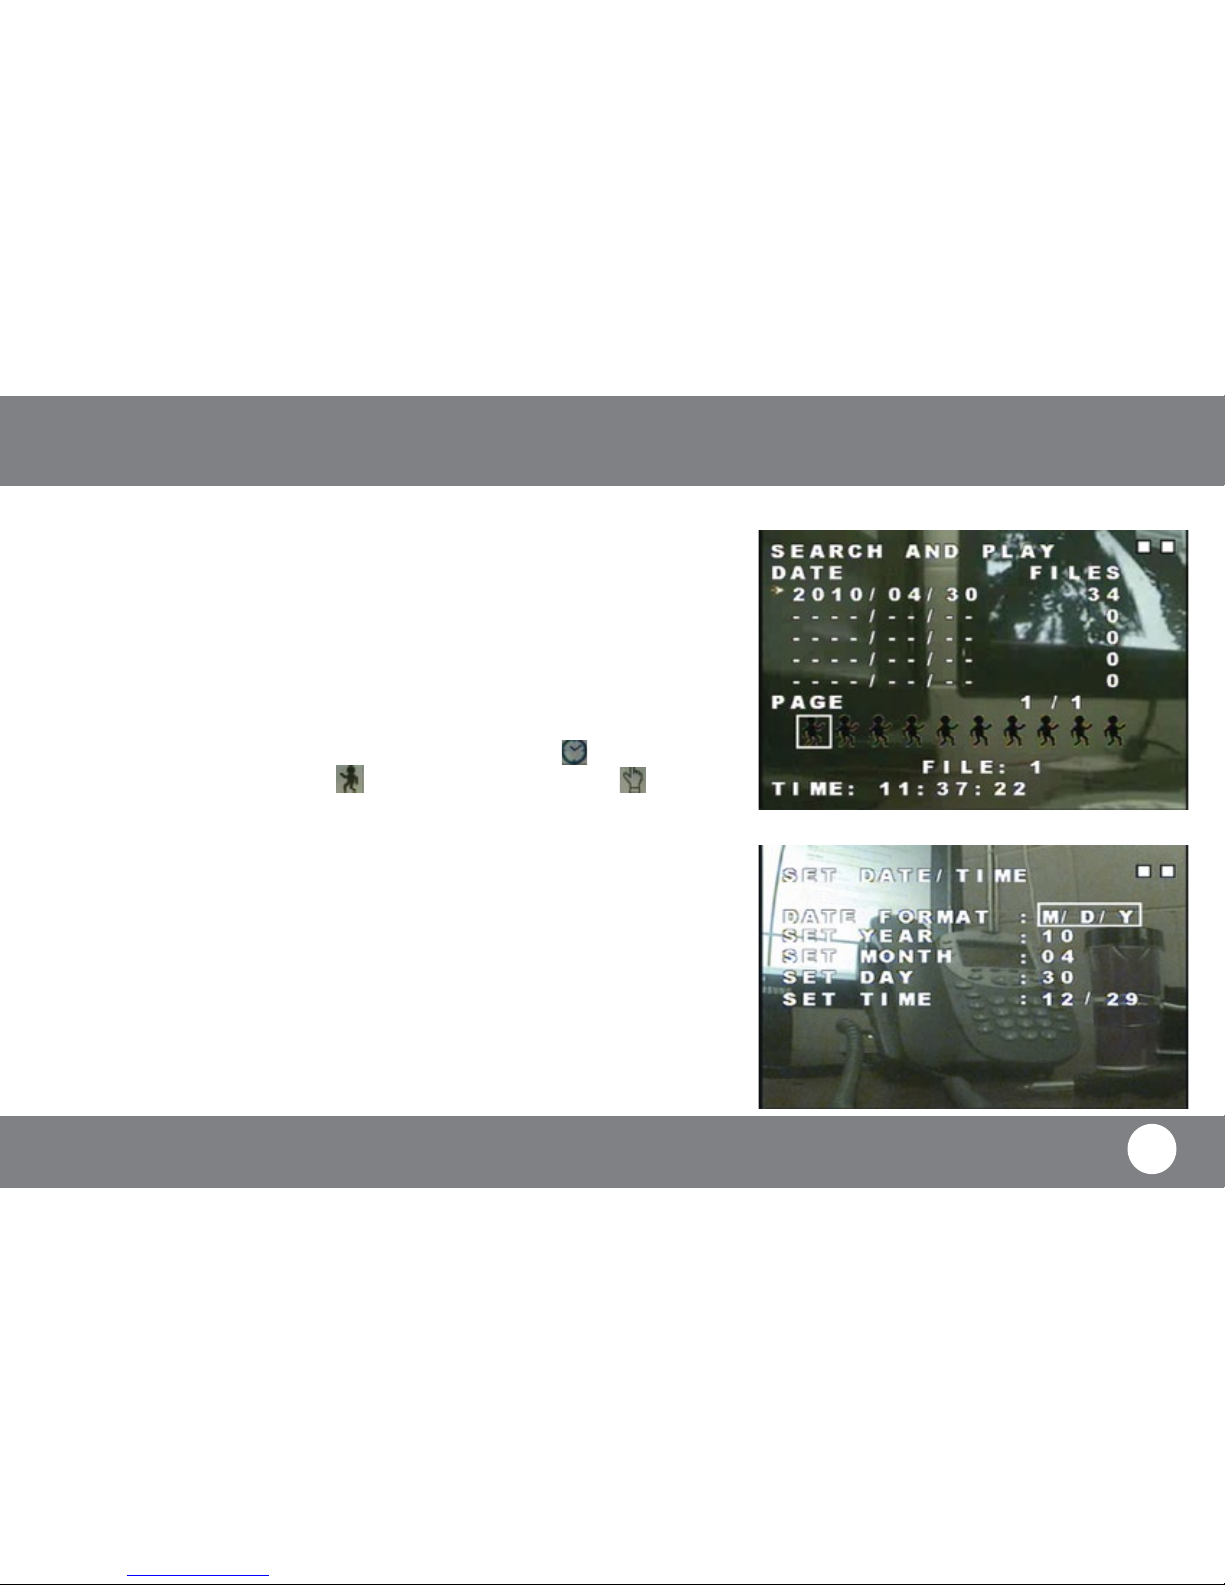
Search and Play
The Search and Play menu lets you view all of your previously recorded footage. Navigate this
menu by moving the joystick up and down to scroll through the dates that footage was recorded
on. Once the date has been selected, use the joystick left and right to toggle through the recorded
les. The recorded les are located towards the bottom of the screen, a white cursor will highlight
your selection. Press the joystick button to playback the desired footage.
Date: Details the date in which the video les were recorded on
Files: The number of les that were recorded that day
Page: Identies the event type that triggered the recording. A icon indicates a
scheduled recording, a icon indicates motion recording and a icon
indicates manual recording
Time: Displays the start time of recorded video
Set Date / Time
Date Format: Toggle the date to be displayed in either year/month/day, month/day/year
or day/month/year
Set Year: Set the year of your covert DVR
Set Month: Set the month of your PI300
Set Day: Set the day
Set Time: Adjust the time
Search and Play Menu
Set Date / Time Menu
DVR SETTINGS
Page 12
PI300-SD
11
DVR SETTINGS
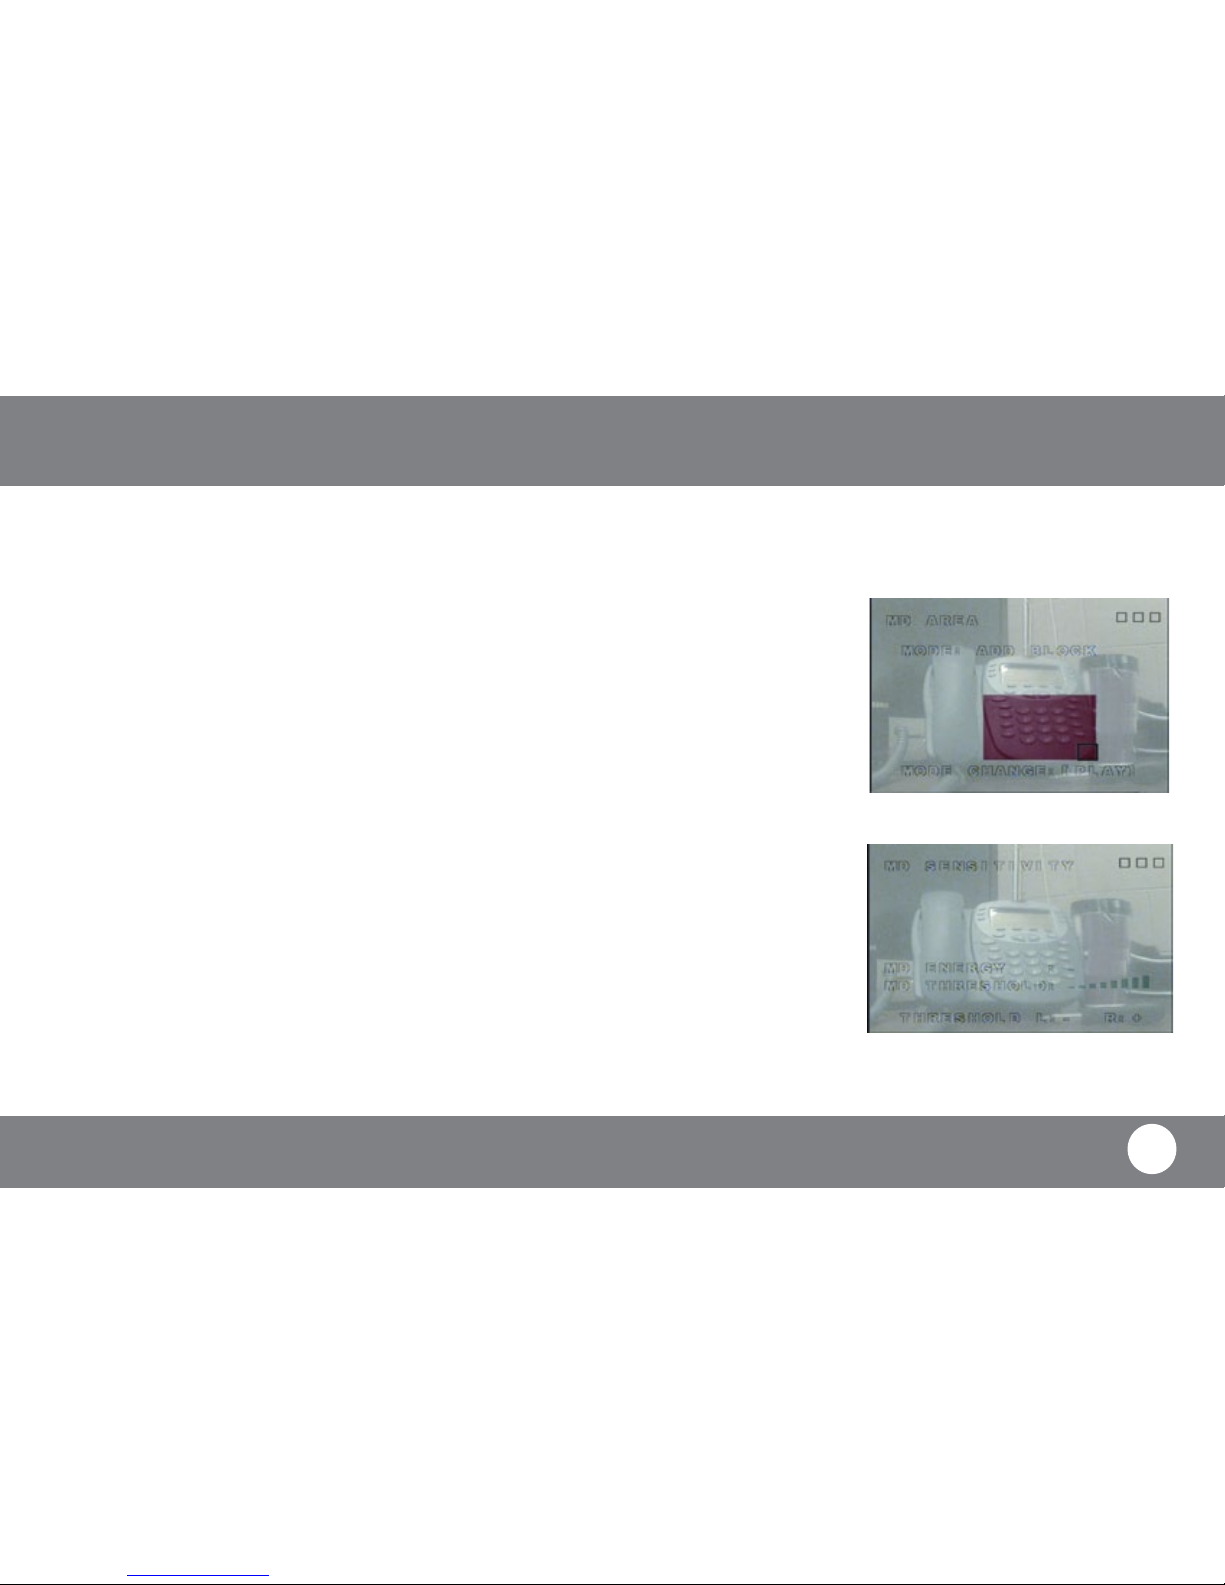
Set Motion Detection
Adjusting the motion detection area is a convenient feature for you to customize your cover recording experience. This option
allows you to eliminate unwanted items that would trigger motion recording, for example, a fan or television screen, allowing
you to record only what is important to you.
To adjust motion detection area:
Change the edit mode by pressing the “PLAY” button on the PI300. Navigate the screen moving up, down, left and right then
select by pressing the joystick. A red square indicates motion will be detected while a white square indicates no motion will
be detected.
Cell Edit: Choose a single area to turn on or o motion activated recording
Add Block: Select the areas of the camera that you want motion recording
Add All: This selects motion recording for the whole screen
Delete Block: Toggle to an area where you do not want motion detection recording
Delete All: This turns o motion recording for the whole screen
Motion Detection Sensitivity
MD Energy
Gauges how much motion is detected on screen so you can set your desired sensitivity level with the Motion Detection Threshold.
Motion Detection Threshold
Alter the degree of motion required to trigger motion activated recording. By decresing the reshold, the motion detection
becomes more sensitive. Likewise, increasing the threshold desensitizes motion detection.
Set Motion Detection Area
Motion Detection Sensitivy Menu
Page 13

PI300-SD
12
Manual Record Menu
Schedule Record Menu
Manual Record
Video Size: Select the resolution you wish to record while using Manual Record Mode.
Choose between either 320x240 or 640x480
Frame Rate: Select how many frames per second (FPS) you wish to record. When using the
resolution 320x240 you can select 1/2/10/15/20/30 FPS. When using the resolution
640x480 choose between 1/2/10/12 FPS.
Quality: Select the desired quality level of footage recorded in Manual Record Mode.
Choose from low, medium or high quality.
Schedule Record
The Schedule Record Menu allows you to setup a 24 hour recording schedule permitting you to set each
hour of the day: choose to record continually, record when motion is detected or not to record at all. As well,
it allows you to customize the recording quality for both motion recording and continuous recording that
occurs in the scheduling period.
To set the schedule:
1. Navigate to the “SCHEDULE SETUP” icon.
2. Set the schedule recording mode on or o.
3. Each hour of the 24 hour clock is displayed next to an icon indicating a recording type. Scroll through
the schedule by moving the joystick up or down to navigate to desired hour.
4. Move joystick left or right to adjust the recording type. A indicates motion detection, a indicates
constant recording and an indicates no recording.
5. When you have nished setting your recording schedule, press “STOP” to exit.
DVR SETTINGS
Page 14

PI300-SD
13
Schedule Record Menu
Adjusting Scheduled Recording Video Settings
Motion Record
From this menu, congure the settings for motion detection recording that occurs in your 24 hour
recording schedule.
Video Size: Select the resolution you wish to record while using Motion Record Mode.
Choose between either 320x240 or 640x480
Frame Rate: Select how many frames per second (FPS) you wish to record. When using the
resolution 320x240 you can select 1/2/10/15/20/30 FPS. When using
the resolution 640x480 choose between 1/2/10/12 FPS.
Quality: Select the desired quality level of footage recorded in Motion Record Mode.
You can select from low, medium and high quality.
Duration: Select how long you want recording to last once motion is detected. Choose
between 5 seconds up to 1 minutes and 30 seconds.
Continuous Record
Congure the settings for the continuous recording that occurs in your 24 hour recording schedule.
Video Size: Select the resolution to record while using Continuous Record Mode. Select
between 320x240 or 640x480
Frame Rate: Select how many frames per second (FPS) you wish to record. When using the
resolution 320x240 you can select 1/2/10/15/20/30 FPS. When using
the resolution 640x480 choose between 1/2/10/12 FPS.
Quality: Select the desired quality level of footage recorded in Continuous Record Mode.
You can select from low, medium and high quality.
DVR SETTINGS
Page 15

PI300-SD
14
SD Card Options Menu
SD Card Format Screen
SD Card Options
This menu displays the size of your SD card and how much space is available. As well, you can set the
size of les to be recorded, set automatic overwriting and format your SD card from this menu.
Disk Total: Informs you of the max storage size of your SD Card.
Disk Remain: This is the amount of storage space you have left on your SD Card.
Max File Size: Congure the size of your recorded les. Choose anywhere from
3MB up to 100MB per le.
Card Full: Adjust this setting to dene what action happens when the SD Card is full.
Select “OVERWRITE” to enable automatic overwriting which means that, when
your SD Card is full, the PI300 will automatically begin recording over the oldest
footage. You can also select “STOP” to have your covert DVR stop recording when
the SD Card is full.
Format: If you wish to erase all of the contents on your SD Card, select this option. You
will be prompted: “WARNING! DATA ON SD CARD WILL BE CLEANED!”
Press the joystick button to format your SD Card. If you choose not to format your
SD Card, simply press the “STOP” button to cancel.
NOTE: Once you have formatted your SD Card, you cannot cancel this process. All of your
saved information, whether it be recorded footage or other les, will be erased.
DVR SETTINGS
Page 16

PI300-SD
15
System Status Menu
Power On Setup Menu
System Status
The System Status Menu displays all of your PI300’s current settings but features no adjustable values.
Use this screen to quickly review all of your covert DVR’s current settings.
Version: The current rmware version of your PI300
SD Full: Indicates what action is taken when the SD Card is full
: Displays the resolution, frame rate and quality level of manual record mode
: Displays the resolution, frame rate and quality level of motion record mode
: Displays the resolution, frame rate and quality level of scheduled continue
record mode
Power On Setup
From this menu, adjust the language of your PI300’s On-Screen Display (OSD) and set your covert DVR for
NTSC or PAL video standards.
Language: Select the language for your OSD. You can select from English, Chinese, Spanish,
German, Danish, Dutch, Italian and French
Composite: Select the video format for your PI300. Choose from NTSC or PAL standards.
If you are using this device in North America, you will want to leave this set
to NTSC for it to be compatible with your TV or monitor. Use PAL if you are
using this in Europe or Asia
DVR SETTINGS
Page 17

PI300-SD
16
CAMERA SPECIFICATIONS
Image Sensor 1/6" Color CMOS Sensor
Resolution 640 x 480
Outdoor Use No
Focal Length Board Lens f3.62mm / F2.8
Focus Type Fixed
Min. Illumination 2 lux
System Status Menu
Motion Detection Yes
Viewing Angle 66 Degrees
BLC Auto
AGC Auto
White Balance Auto
Signal Noise 46 dB
DVR SETTINGS
Factory Default
This option allows you to set your PI300 back to its factory default settings, precisely the way the
unit came out of the box.
To set factory default:
1. Select the factory default option from the main menu. You will be prompted: “RECALL DEFAULT
NOW?”
2. To restore your PI300 to factory default press the joystick button to signal yes.
3. To cancel resetting your PI300 to factory defaults, press the “STOP” button to cancel.
Reinstall the rear panel
1. To disguise and limit access to the control panel, reinstall the rear panel.
2. Using the included Allen Key, tighten the Release Screw to secure the rear panel.
Page 18

PI300-SD
17
Functionality Simplex
Video Compression MPEG-4
Resolution 640 x 480, 320 x 240
Recording Frame Rate 320x240: 1~30FPS, 640 x 480: 1~15FPS
Recording Resolution VGA (640x480)/ QVGA (320x240)
Recording Qualities High, Medium, Low
Recording Modes Manual/ Schedule/ Motion Detection
Recording Media SD1.1/1.0 SD/SDHC Card, Max 32GB
Video Format NTSC/PAL
Video Display Output 1 CH RCA Composite
Live Viewing Single Screen
Live Resolution 640 x 480
Live Frame Rate 30 FPS
Play Search Mode By Date, Time, Record Type
Play Speed Forward/Rewind: x1/x2/x4/x8/x16/x32
Play Mode Single Screen
OSD and System Menu Display English
OSD Language Display Selectable
Time and Date Stamp Display Yes
Automatic Overwrite Option Yes
LED Indicators Power, Record
Housing Material ABS Plastic
Housing Color Midnight Black
Battery Backup (for DVR settings
only)
Yes. Internal
Contents Backed Up DVR settings only
Power Adapter Input AC 110-240V (switching mode)
Operating Temperature 41°F ~ 113°F
Operating Humidity 80%
Dimensions 8” x 4” x 2”
Weight 1.2 lbs.
Disk Full Warning Full Stop / Overwrite (Selectable)
DVR SPECIFICATIONS
Page 19

PI300-SD
18
NOTES
Page 20

PI300-SD
Disclaimer
SVAT does not endorse any of SVAT products for any illegal activities. SVAT is not responsible or liable in any way shape or form for any damage, vandalism, theft or any other
action that may occur while a SVAT product is in use by the purchaser.
VISIT US ON THE WEB!
► Product Information
► User Manuals
► Quick Start Guides
► Specication Sheets
► Software Updates
► Firmware Upgrades
www.svat.com
Page 21

PI300-SD
www.svat.com
Avertissement
SVAT n’approuve pas l’usage de produits SVAT pour les activités illégales. SVAT n’est pas responsable en aucune manière que ce soit pour tout
dommage, vandalisme, de vol ou de toute autre action qui peut se produire pendant qu’un produit SVAT est en cours d’utilisation par l’acheteur.
VISITEZ-NOUS SUR LE WEB!
► Informations de produits
► Manuels d’utilisateurs
► Fiches techniques
► Mises à jour de logicielles
► Mises à jour Firmware
► Guides de mise en réseau
Page 22

PI300-SD
18
NOTES
Page 23

PI300-SD
17
Fonctionnalité Simplex
Compression vidéo MPEG-4
Résolution 640 x 480, 320 x 240
Fréquence d’images enregistrées 320x240: 1~30FPS, 640 x 480: 1~15FPS
Résolution VGA (640x480)/ QVGA (320x240)
d’enregistrement VGA (640x480)/ QVGA (320x240)
Qualités Manual/ Schedule/ Motion Detection
d’enregistrement Haute, moyenne ou faible
Modes d’enregistrement Manuel/ Horaire/Détection de mouvement
Support d’enregistrement SD1.1/1.0 SD/Carte SDHC, Max 32GB
Format vidéo NTSC/PAL
Sortie d’achage vidéo 1canal RCA Composite
Achage en temps réel Écran unique
Résolution en temps réel 640 x 480
Fréquence d’images en temps réel 30 FPS
Mode joue/recherche Par date, heure, type d’enregistrement
Vitesse de lecture Avance/recule: x1/x2/x4/x8/x16/x32
Écran d’achage et menu Anglais
Langue d’achage Sélectionnables
Achage de la date et de l’heure Oui
Option d’écrasement automatique Oui
Indicateurs LED Alimentation, enregistrement
Matériaux du boîtier Plastique ABS
Couleur du boîtier Noire foncé
Support de batterie (pour les
paramètres DVR seulement)
Oui. Interne
Contenu sauvegardé Paramètres DVR seulement
Prise d’alimentation AC 110-240V (mode de commutation)
Température de fonctionnement 41°F ~ 113°F
Humidité de fonctionnement 80%
Dimensions 8" x 4" x 2"
Poids 1.2 lbs
Avertissement de disque Arrêt / Écraser (Sélectionnable)
SPÉCIFICATIONS DU DVR
Page 24

PI300-SD
16
SPÉCIFICATIONS DE LA CAMÉRA
Détecteur d'image Détecteur CMOS couleur 1/6"
Résolution 640 x 480
Utilisation à l'extérieur Non
Longueur focale Board Lens f3.62mm / F2.8
Type de mise au point Fixe
Illumination min. 2 lux
Menu pour l’état du système
Détection de mouvement Oui
Angle de vision 66 Degrées
BLC Auto
AGC Auto
Balance des blancs Auto
Bruit du Signal 46 dB
RÉGLAGES DU DVR
Paramètres par défaut
Cette option vous permet de retourner les paramètres du PI300 aux réglages en usine. Le retour
aux réglages en usine eace tous vos paramètres en cours.
Retour aux réglages en usine
:
1. Sélectionnez l’option de réglages en usine dans le menu principal. Une invite apparaîtra : « LE
RAPPEL DEFAUT MAINTENANT? ».
2. Sélectionnez «YES» (oui) pour accepter le retour aux réglages en usine; «No» (non) ou appuyez
sur le bouton « Arrêt » (STOP) pour annuler.
Réinstaller le panneau arrière
1. Pour déguiser et limiter l’accès au panneau de contrôle, réinstallez le panneau arrière.
2. Utilisant la clé Allen incluse, serrez la vis pour xer le panneau arrière.
Page 25

PI300-SD
15
État du système
Le menu pour l’état du système ache tous les paramètres actuels de votre PI300 mais n’a aucune
valeur réglable. Utilisez cet écran pour réviser rapidement tous les paramètres actuels de votre DVR
dissimulé.
Version : La version courante du micro logiciel pour le PI300
SD pleine : Indique quelles mesures sont prises lorsque la carte SD est pleine
: Ache la résolution, la fréquence d’images et le niveau de qualité du mode
d’enregistrement manuel
: Ache la résolution, la fréquence d’images et le niveau de qualité du mode
d’enregistrement de mouvement
: Ache la résolution, la fréquence d’images et le niveau de qualité du mode
horaire d’enregistrement continu
Menu pour l’état du système
Menu de conguration de l’alimentation
Conguration de l’alimentation
Dans ce menu, réglez la langue de votre PI300 à l’écran d’achage et a réglé votre DVR dissimulé
pour les normes vidéo NTSC ou PAL.
Langage : Sélectionnez la langue de votre l’écran d’achage. Vous pouvez choisir parmi l’anglais, le chinois,
l’espagnol, l’allemand, le danois, le néerlandais, l’italien et le français.
Composite : Sélectionnez le format vidéo de votre PI300. Choisissez parmi les normes PAL ou NTSC. Si vous
utilisez votre PI300 en Amérique du Nord, vous voudrez laisser le mode en NTSC pour
qu’il soit compatible avec votre téléviseur ou moniteur. Utilisez le mode PAL si vous utilisez cet
appareil en Europe ou en Asie
RÉGLAGES DU DVR
Page 26

PI300-SD
14
Options pour carte SD
Ce menu ache la taille de votre carte SD et le montant d’espace qui est disponible. Vous pouvez aussi choisir la
taille de la che que vous voulez enregistrer, xer en écraser automatique et formater votre carte SD à partir de ce
menu.
Disque total : Vous informe de la taille de stockage maximale de votre carte SD.
Disque subsistant : Indique la quantité d’espace de stockage que vous avez laissé sur votre carte SD.
Taille du chier max : Congurer la taille de vos chiers enregistrés. Choisissez n’importe où à partir de 3 MB
jusqu’à 100 MB par chier.
Carte pleine : Réglez ce paramètre pour dénir ce quel action qui se passe lorsque la carte SD est
pleine. Sélectionner « Écraser » (OVERWRITE)pour permettre à l’écrasement automatique
qui signieque, lorsque votre carte SD est pleine, le PI300 commence à en registrer au dessus de images les plus anciennes. Vous pouvez également sélectionner « Arrêt »(STOP)
pour que votre DVR arrête d’enregistrer lorsque la carte SD est pleine.
Format : Si vous souhaitez eacer tout le contenu sur votre carte SD, sélectionnez cette option. Vous
serez invité: « Attention! Données sur la carte SD seront perdus! Appuyez sur le bouton de
la manette pour formater votre carte SD. Si vous choisissez de ne pas formater votre carte
SD, appuyez simplement sur le bouton « Arrêt »(STOP) pour annuler.
Menu d’options pour carte SD
Écran pour formater la carte SD
RÉGLAGES DU DVR
NOTE: Une fois que vous avez formaté votre carte SD, vous ne pouvez pas annuler ce processus.
Toutes vos données sauvegardées, que ce soit des images enregistré ou d’autres chiers,
seront eacés.
Page 27

PI300-SD
13
Enregistrement du mouvement
Dans ce menu, congurer les paramètres pour l’enregistrement de détection de mouvement qui se produit dans votre
programme d’enregistrement 24 heures.
Taille de vidéo : Choisir la résolution que vous souhaitez enregistrer en utilisant le mode d’enregistrement du
mouvement. Choisir entre 320x240 ou 640x480.
Fréquence d’images :Sélectionnez le nombre d’images par seconde (FPS) que vous souhaitez enregistrer. Lorsque
vous utilisez la résolution 320x240, vous pouvez sélectionner 1/2/10/15/20/30 FPS. Lorsque
vous utilisez la résolution 640x480 choisir entre 1/2/10/12 FPS.
Qualit é: Sélectionnez le niveau de qualité désiré de séquences enregistrées dans le mode
d’enregistrement du mouvement. Choisissez entre faible, moyenne ou haute qualité.
Durée: Sélectionnez la durée que vous souhaitez enregistrer lorsque le mouvement est détecté.
Choisir de 5 secondes jusqu’à 1 minute et 30 secondes.
Menu Horaire d’enregistrement
Réglage des paramètres d’enregistrement vidéo programmés
Enregistrement continu
Congurer les paramètres pour l’enregistrement continu qui se produit dans votre programme d’enregistrement 24
heures.
Taille de vidéo : Choisir la résolution que vous souhaitez enregistrer en utilisant le mode d’enregistrement
continu. Choisir entre 320x240 ou 640x480.
Fréquence d’images :Sélectionnez le nombre d’images par seconde (FPS) que vous souhaitez enregistrer. Lorsque
vous utilisez la résolution 320x240, vous pouvez sélectionner 1/2/10/15/20/30 FPS.
Lorsque vous utilisez la résolution 640x480 choisir entre 1/2/10/12 FPS.
Qualité: Sélectionnez le niveau de qualité désiré de séquences enregistrées dans le mode
d’enregistrement continu. Choisissez entre faible, moyenne ou haute qualité.
RÉGLAGES DU DVR
Page 28

PI300-SD
12
Enregistrement manuel
Taille de vidéo : Choisir la résolution que vous souhaitez enregistrer en utilisant le mode
d’enregistrement manuel. Choisir entre 320x240 ou 640x480.
Fréquence d’images: Sélectionnez le nombre d’images par seconde (FPS) que vous souhaitez
enregistrer. Lorsque vous utilisez la résolution 320x240, vous pouvez sélectionner
1/2/10/15/20/30 FPS. Lorsque vous utilisez la résolution 640x480 choisir
entre 1/2/10/12 FPS.
Qualité: Sélectionnez le niveau de qualité désiré de séquences enregistrées dans le mode
d’enregistrement manuel. Choisissez entre faible, moyenne ou haute qualité.
Menu d’Enregistrement manuel
Menu Horaire d’enregistrement
Horaire d’enregistrement
Le menu Horaire d’enregistrement vous permet de congurer un horaire de 24 heures d’enregistrement vous permettant
de xer chaque heure de la journée: choisir d’enregistrer continuellement, enregistrer quand le mouvement est détecté
ou ne pas enregistrer du tout. De plus, il vous permet de personnaliser la qualité d’enregistrement pour l’enregistrement
de mouvement et l’enregistrement continu qui se produit dans la période de planication horaire.
Pour régler l’horaire :
1. Naviguer à l’icône «Conguration de l’horaire ».
2. Régler le mode d’enregistrement soit allumé ou éteint.
3. Chaque heure de l’horloge de 24 heures à côté d’un icône indiquant un type d’enregistrement. Faites
déler la liste en déplaçant la manette vers le haut ou vers le bas pour naviguer vers l’heure désirée.
4. Déplacez la manette de gauche à droite pour régler le type d’enregistrement. Un icône indique un
enregistrement de mouvement, un icône indique un enregistrement constant et un indique
aucun enregistrement.
5. Lorsque vous avez terminé de dénir votre programme d’enregistrement, appuyez sur Arrêt (STOP)
pour quitter.
RÉGLAGES DU DVR
Page 29

PI300-SD
11
Régler la détection du mouvement
L’ajustement de la détection du mouvement est une fonctionnalité pratique pour vous de personnaliser votre
expérience d’enregistrement secrète. Cette option vous permet d’éliminer des articles superus qui déclencheraient
l’enregistrement de mouvement, par exemple, un ventilateur ou un écran de télévision, vous permettant d’enregistrer
seulement ce qui est important pour vous.
Pour ajuster la zone de détection de mouvement:
Changer le mode d’édition en appuyant sur la touche « Lecture » (PLAY) sur le PI300. Naviguer l’écran de haut, en
bas, de gauche et à la droite ensuite appuyez sur la manette pour faire votre sélection. Un carré rouge indique que le
mouvement sera détectée tandis qu’ un carré blanc indique que le mouvement ne sera pas détectée.
Édition d’une cellule: Choisissez un secteur unique pour activer ou désactiver l’enregistrement de mouvement activé.
Ajouter un bloc : Sélectionnez les secteurs de la caméra vous voulez enregistrer du mouvement.
Ajouter tout: Ceci enregistre le mouvement pour la totalité de l’écran.
Supprimer un block: Supprimez un domaine où vous ne souhaitez pas enregistrer la détection de Mouvement.
Supprimer tout : Ceci arrête l’enregistrement de mouvement pour la totalité de l’écran.
Sensibilité de détection de mouvement
Énergie MD
Jauges de la quantité de mouvement est détecté sur l’écran de sorte que vous pouvez congurer votre niveau de
sensibilité désiré avec le seuil de détection de mouvement.
Seuil de détection du mouvement
Modier le degré de mouvement requis pour déclencher le mouvement d’enregistrement activé. En diminuant le seuil,
la détection de mouvement devient plus sensible. De même, l’augmentation du seuil désensibilise la détection du
mouvement.
Régler la zone de détection du mouvement
Menu sensibilité de détection de mouvement
RÉGLAGES DU DVR
Page 30

PI300-SD
10
Chercher et jouer
Le menu « chercher et jouer » vous permet de visualiser toutes vos images déjà enregistrées. Naviguez ce
menu en déplaçant la manette vers le haut et vers le bas pour faire déler les dates que les images ont été
enregistré. Une fois que la date est choisie, utilisez la manette vers la gauche et vers la droite pour faire déler
les chiers enregistrés. Les chiers enregistrés sont vers le bas de l’écran, un curseur blanc soulignera votre
sélection. Appuyez sur la manette pour jouer les images choisies.
Date : Indique la date que le chier a été enregistré
Fichiers : Le nombre de chiers qui ont été enregistré cette journée
Page : Identie le genre d’évènement qui a déclenché l’enregistrement. Un icône
indique un enregistrement programmé, un icône indique un enregistrement
de mouvement et un icône un enregistrement manuel.
Temps : Ache l’heure que le l’enregistrement a débuté
Régler la date et l’heure
Format de date : Basculer la date qui sera achée en année/mois/jour, mois/jour/année ou jour/
mois/année
Régler l’année : Régler l’année de votre DVR dissimulé
Régler le mois : Régler le mois de votre PI300
Régler le jour : Régler le jour
Régler le l’heure : Ajustez l’heure
Menu « chercher et jouer »
Menu « régler la date et l’heure »
RÉGLAGES DU DVR
Page 31

PI300-SD
9
Pour accéder au menu principal, appuyez sur le bouton de la manette. Navigation dans le menu principal est facilité par la manette directionnelle: déplacez-le vers le haut ou vers
le bas pour naviguer dans le menu, à gauche ou à droite pour ajuster les réglages et le bouton « ARRÊT » pour revenir à un écran. Les options suivantes sont disponibles dans le
menu principal:
Chercher et jouer : Cette option invite la liste des chiers, visionnez toutes vos
images enregistrées ici.
Régler la date et l’heure: Congurez la date, le format de date et l’heure de votre
PI300
Régler la détection du mouvement: Dénit une zone pour la détection de mouvement et ajuste
la sensibilité de la caméra à capter le mouvement.
Enregistrement manuel: Congurez la résolution, la fréquence d’images et la qualité
de vos enregistrements manuels
Horaire d’enregistrements : Congurez un horaire d’enregistrement de 24 heures
et réglez la résolution, la fréquence d’images et la qualité
pour chacun de types enregistrement programmé.
Options pour carte SD : Cette option ache la taille de votre carte SD ainsi que la
quantité d’espace disponible. En outre, vous pouvez spécier
la taille des chiers enregistrés et le mettre en écrasant
automatique.
État du système: Ache tous les paramètres actuels de votre PI300
Conguration de l’alimentation: Régler votre langue d’OSD (écran d’achage) et le format
vidéo.
Paramètres par défaut : Rétablissez les paramètres de votre PI300 à sa conguration
originale.
Écran du menu principal
MENU PRINCIPAL
Page 32

PI300-SD
8
RÉGLER LE REVEILLE-MATIN LCD
Le PI300 est un DVR dissimulé caché dans un réveille-matin LCD Magnasonic
complètement fonctionnel. Suivez ces étapes de base pour congurer l’alarme et
l’horloge externe de votre DVR dissimulé :
Pour régler le temps:
1. Ajuster la touche de réglage de l’horloge à la position médiane, qui vous
permettra de régler l’heure.
2. Appuyez sur le bouton heure pour augmenter le temps, en heures, par un.
3. Appuyez sur le bouton minute pour augmenter le temps, en minutes, par un.
4. Lorsque vous avez terminé le réglage de l’heure, ajustez la touche de réglage
de l’horloge à la position vers le bas pour éviter tout ajustement.
Pour régler l’alarme:
1. Ajuster la touche de réglage de l’horloge à la position en haut, qui vous
permettra de régler l’alarme.
2. Appuyez sur le bouton heure pour augmenter le temps d’alarme, en heures,
par un.
3. Appuyez sur le bouton minute pour augmenter le temps d’alarme, en minutes,
par un.
4. Lorsque vous avez terminé le réglage de l’alarme, ajustez la touche de réglage
de l’horloge à la position vers le bas pour éviter tout ajustement.
Pour activer l’alarme:
1. Ajustez la touche de réglage de l’alarme à la position en haut pour activer
l’alarme.
2. Ajustez la touche de réglage de l’alarme à la position en bas pour désactiver
l’alarme.
Pour désactiver l’alarme et utiliser la touche somnolence:
Lorsque l’alarme est réglée et activée, le signal sonore sonnera à l’heure xée.
1. Pour éteindre l’alarme, ajuste la touche de réglage de l’alarme à la position en
bas pour désactiver l’alarme.
2. Lorsque l’alarme est activée, appuyez sur la touche somnolence pour
désactiver l’alarme pendant 9 minutes. Après 9 minutes, l’alarme retentit à
nouveau et vous serez encore invité à appuyez sur la touche somnolence ou à
désactiver l’alarme.
NOTE: L’heure affichée sur le réveille-matin LCD doit être réglé
indépendamment du réglage de l’heure sur le DVR dissimulé.
Page 33

PI300-SD
7
ICÔNES PI300-SD
INTRODUCTION
MODE DE SURVEILLANCE
Enregistrement manuel
Indique que l’enregistrement manuel
est activé
Enregistrement du mouvement
Indique que l’enregistrement du
mouvement est activé
Horaire d’enregistrement
Indique que l’horaire d’enregistrement
continu est activé
Niveau de qualité
Indique le niveau de qualité: faible (LQ) moyenne
(MQ) et haute (HQ)
Résolution
Indique la résolution en cours d’enregistrement
320x240 ou 640x480
Alimentation
Indique que DVR dissimulé est
connecté à la source d’alimentation
Écraser
Indique que le mode écrasement
est activé
Carte SD
Indique que la carte SD est installée
POUR COMMENCER
Dès que vous allumez votre PI300 vous serez automatiquement mis en mode de surveillance. De
là, vous pourrez accéder au menu principal, de déclencher un enregistrement manuel ou un vidéo
préenregistré.
La barre en haut de votre écran achera la date et l’heure de votre DVR dissimulé. La barre du bas
présentera des icônes qui indiquent les actions qui se déroulent sur votre PI300.
S’il vous plaît, prendre le temps pour lire ce manuel en totalité pour obtenir pour obtenir le
maximum de votre expérience d’enregistrements secrets avec le PI300-SD.
Enregistrement en cours
Ce cercle apparaît sur votre écran pendant que
votre DVR dissimulé enregistre
Page 34

PI300-SD
6
INSTALLATION
Le PI300-SD a été conçu pour être facile à utiliser et à congurer rapidement. Veuillez
suivre ces instructions simples pour commencer à enregistrer en seulement
quelques minutes.
Alimenter votre PI300
1. Connectez l’adaptateur inclus à la prise de courant conventionnelle.
2. Connectez l’adaptateur à la prise CA (10) à l’arrière du PI300.
Retirez le panneau arrière
1. À l’aide de la clé Allen incluse, retirez le raccord à vis.
2. Utilisez votre pouce pour tirer sur le panneau arrière de l’appareil principal.
Connecter votre PI300 à un téléviseur
1. Branchez le câble RCA à la prise RCA (1) sur le panneau arrière.
2. Branchez le câble RCA à l’entrée vidéo composée jaune RCA de votre télévision.
Regarder votre PI300 sur un téléviseur
1. Une fois que vous avez connecté votre PI300 à votre téléviseur, allumez les deux appareils.
2. Réglez la source d’entrée de votre téléviseur à VIDEO, AUX ou n’importe quelle source exigée
pour regarder vos appareils connectés.
RACCORD À VIS
CLÉ ALLEN
Page 35

PI300-SD
5
TOUCHES ET CONNEXIONS
1
2
3
4
5
6
7
8
9
10
11
13 14 15
12 17
16
1. Prise RCA 1/4po: Connectez le câble vidéo RCA à cette prise
2. Raccord à vis: Enlevez utilisant la clé Allen fournie pour retirer le
panneau arrière
3. Fente de carte SD: Insérez la carte SD dans cette entaille
4. DEL d’enregistrement (REC): Indique l’enregistrement
5. DEL d’alimentation (PWR): Indique que l’appareil est connecté à la source d’alimentation
6. Arrêt (STOP): Arrête l’enregistrement manuel ou la lecture / navigue le
retour au menu
7. Enregistrement (REC): Commence l’enregistrement manuel
8. Lecture (PLAY): Lecture de la vidéo
9. Manche à balai: Navigue le menu haut/bas, gauche /droite et sélection
d’options du menu
10. Prise CA: Raccordez l’adaptateur à cet entrée
11. Panneau arrière: Sert à déguiser et limiter l’accès au panneau de contrôle
12. Commutateur horaire: Permet de régler l’alarme, l’heure ou de verrouiller
Haut Fixe l’alarme
Millieu FIxe l’heure
Bas Verrouillage
13. Heure (HR): Augmente l’heure
14. Somnolence (SNOOZE): Pause l’alarme pour 9 minutes
15. Minute: Augmente les minutes
16. Caméra: Caméra cachée
17. Commutateur alarme:
Haut Alarme activée
Bas Alarme désactivée
Page 36

PI300-SD
4
TABLE DES MATIÈRES
Page besoin d’aide ...............................................................1
Informations de garantie .....................................................2
Traits ..................................................................................3
Table des matières ...............................................................4
Ce qui est inclus ................................................................... 4
Touches et connexions .........................................................5
Installation .........................................................................6
Introduction ........................................................................ 7
Réglage du réveille-matin LCD ..............................................8
Menu principal ....................................................................9
Réglages du DVR .................................................................. 10
Chercher et jouer ......................................................................... 10
Régler la date et l’heure ...............................................................10
Régler la détection du mouvement ............................................. 11
Sensibilité de la détection du mouvement................................... 11
Enregistrement manuel ............................................................... 12
Horaire d’enregistrement ............................................................. 12
Enregistrement du mouvement ................................................... 13
Enregistrement continuel ............................................................ 13
État de la carte SD ........................................................................ 14
État du système ........................................................................... 15
Conguration de l’alimentation ................................................... 15
Paramètres par défaut .........................................................16
Spécications de la caméra ..................................................16
Spécications du DVR ........................................................... 17
CE QUI EST INCLUS
Réveille-matin DVR dissimulé
Carte SD 2GB
Adaptateur Câble RCA
• Manuel d’utilisateur • Service de soutien
technique en direct 24/7
pour la vie
Clé Allen
Page 37

PI300-SD
3
CARACTERISTIQUES
DVR dissimulé déguisé comme un réveille-matin
Caché dans un réveille-matin DEL Magnasonic totalement fonctionnel, vous pouvez surveiller voter bureau privé, les employés, les objets de valeur ou la gardienne avec
l’aspect traditionnel de cet appareil.
Enregistre plus d’un mois de vidéo sur la carte SD de 2GB inclus
Saisissez plus d’un mois de vidéo haute qualité lorsque vous enregistrez avec la carte SD 2GB incluse. Retirez facilement la carte SD pour sauvegarder vos images à un
ordinateur.
Enregistrement activé par le mouvement
Choisissez d’enregistrer seulement lorsqu’un mouvement est détecté et saisissez seulement les événements importants en préservant l’espace sur voter carte de SD.
Se connecte facilement à un téléviseur ou un moniteur
Vériez des séquences enregistrées facilement en connectant le DVR à un téléviseur ou un moniteur.
Réveille-matin totalement fonctionnel
Cet appareil fonctionne également comme réveille-matin LCD complètement fonctionnel avec fonctions d’alarme et touche somnolence.
Compression MPEG-4 de haute qualité
L’enregistrement MPEG-4 comprimé permet pendant des heures et des heures de capturer des images sans sacrier la qualité vidéo pour économiser de l’espace.
Compatible avec des cartes mémoire SD de haute capacité jusqu’à 32GB
Le PI300 est fourni avec une carte SD 2GB, si vous avez besoin de plus de mémoire pour votre système, vous pouvez installer une carte SD jusqu’à 32 GB.
Soutien à la clientèle en direct pour la vie
Notre équipe de soutien à la clientèle est joignable sur not site web à www.svat.com/support et par clavardage en direct. Nos experts se feront un plaisir de vous aider en
anglais, en français et en espagnol.
Page 38

PI300-SD
2
SVAT USA
60 Industrial Parkway #Z64
Cheektowaga, NY
USA 14227
SVAT CANADA
4080 Montrose Road
Niagara Falls, ON
Canada L2H 1J9
IMPORTANT ! VEUILLEZ LIRE
INFORMATIONS DE LA GARANTIE DU PRODUIT
Nous prenons la qualité très sérieusement. C’est pourquoi tous nos produits ont une
garantie d’un an à partir de la date originale d’achat contre les défauts de fabrication
et de matériaux. Si vous avez des questions concernant la garantie ou le soutien,
veuillez nous contacter en utilisant l’une des méthodes suivantes:
Soutien: www.svat.com/support
Site Web: www.svat.com
Conditions de garantie
1. Les produits de SVAT sont garantis pour une période d’un an de la date d’achat
originale contre les défauts de fabrication et de matériaux. Cette garantie est
limitée à la réparation, le remplacement ou le remboursement du prix d’achat à
l’option de SVAT.
2. Cette garantie est nulle si le produit présente des signes de mauvais usage,
d’avoir été malmené ou altéré contraire au manuel d’instruction applicable.
3. Le nettoyage de routine, l’usure normale, cosmétique et mécanique n’est pas
couverte sous les termes de cette garantie.
4. La garantie est expressément prévu par le présent contrat est la seule garantie
fournie à propos du produit lui-même et aucune autre garantie, exprimée
ou implicite est fournie. SVAT n’assume aucune responsabilité pour toute
réclamation qui n’est pas spéciquement mentionné dans cette garantie.
5. Cette garantie ne couvre pas les frais de livraison, d’assurance, ou toutes autres
charges.
6. Vous DEVEZ contacter SVAT avant d’envoyer un produit en réparation. Vous
recevrez un numéro d’autorisation de retour avec les instructions de retour. Lors
du retour du produit pour le service de garantie,veuillez emballer le produit
soigneusement dans la boîte originale avec tous les accessoires fournis, inclure
votre reçu original ou une copie, une brève explication du problème et le numéro
d’autorisation de retour.
7. Cette garantie est valable uniquement au Canada et aux États-Unis continentaux.
8. Cette garantie ne peut être transférée.
POUR RÉDUIRE LE RISQUE DE CHOC ÉLECTRIQUE, NE PAS RETIRER LE COUVERCLE (ENDOS). AUCUNE PIÈCE RÉPARABLE PAR L’UTILISATEUR. VEUILLEZ CONSULTER LE PERSONNEL DE SERVICE QUALIFIÉ.
AVERTISSEMENT
RISQUE DE CHOC ÉLECTRIQUE, NE PAS OUVRIR LE MONITEUR
Page 39

PI300-SD
38
PI300-SD
1
BESOIN D’AIDE? CONTACTEZ-NOUS!
Note: Ceci est la version 2.0 du manuel pour ce produit,
vous pouvez trouver des versions mises à jour en
visitant notre site Web.
ARRÊT
BESOIN D’AIDE?
NE RETOURNEZ PAS CE
PRODUIT AU MAGASIN
Soutien:
www.svat.com/support
Clavardage en direct:
Visitez www.svat.com
Pour des informations supplémentaires sur nos produits, visitez www.svat.com
Veuillez contacter d’abord un représentant du service de support à la clientèle de SVAT pour toute information supplémentaire sur les fonctionnalités du
produit, les caractéristiques techniques ou toute assistance pour la conguration.
Page 40

avec camera intégrée
RÉVEILLE-MATIN DVR DISSIMULÉ
MODÉLE #:
PI300-SD
Caméra caché
GUIDE D’UTILISATEUR
SYSTÈME DISSIMULÉ
 Loading...