

SVAT GX5150, GIGAXTREME 5150 User Manual
USER'S MANUAL
Manuel de l'utilisateur
GIGAXTREME 5150
2.4 GHz Wireless Colour Handheld Video Monitoring System
Système De Surveillance Sans fil De Vidéo De Couleur 2.4GHz
This product transmits its signal using public air waves.
The signal can be intercepted by a thrid party without your consent.
Ce produit transmet son signal utilisant des vagues d'air publiques.
Le signal peut être intercepté sans votre consentement par un tiers.
www.svat.com
GX5150

www.svat.com
IMPORTANT SAFETY PRECAUTIONS
PLEASE READ BEFORE INSTALLING
Congratulations on your purchase of the 2.4GHz Wireless Colour Handheld Video Monitoring
System. Please read these safety and operating instructions carefully before installing and
using this system.
• Keep the camera, monitor and AC/DC adapter cords out of reach of children.
• Do not place the camera, monitor and AC/DC adapter cords in a crib or playpen.
• Do not use the camera near water or damp and wet environments, such as a bathtub,
laundry tub, kitchen sink, or wet basements.
• Locate the camera, monitor and AC/DC adapters where there is adequate ventilation.
Do not locate the camera in direct sunlight.
• Do not locate the camera, monitor and AC/DC adapters near heat sources such as heat
registers, radiators, ovens, furnaces or other appliances with high operating temperatures.
• Do not use with extension cords. Use only the AC/DC adapters provided with this system.
***Note: Use of other adapters may damage the units and void your warranty.
• Only plug components into standard household voltage outlets
(110VAC, or 60Hz).
• Do not place cords from the AC/DC adapters, camera or monitor where they can be
pinched or stepped on. Protect the cords by keeping them out of the way of children, pets
and routine household traffic. Do not place heavy objects on power cords or cover cords
with rugs or carpet.
• When cleaning, use a DRY, lint-free cloth. Unplug the camera, monitor and AC/DC
adapters before cleaning. NEVER immerse any components in water and do not spray
cleaners or solvents on the units. Doing so may damage the units or cause electrical shock.
• Unplug the AC/DC adapters from the wall outlet when the system is not in use.
• Mishandling, alterations or modifications not approved by the manufacturer will void
the warranty.
CAUTION!
• Connect this unit ONLY to other compatible units. Do not connect it to any other type of
alarm or auxiliary device. Connecting anything else to this unit may damage it or prevent it
from operating properly.
• Do not paint over the camera.
• This system uses public airwaves for wireless operation. The sound and video may be
broadcast to and picked up by other 2.4 GHz receiving devices. Conversations and
images from other rooms near the camera may be broadcast and picked up. To protect
your privacy, always turn the camera off when not in use.
IMPORTANT!
ACCESSORIES- Do not place video monitor or equipment on an unstable cart, stand or table.
The video monitor or equipment may fall causing serious injury to a child or adult, and serious
damage to the equipment. Wall or shelf mounting should follow the manufacturer's instruction, and should use a mounting kit approved by the manufacturer.
• Video monitor equipment and cart combinations should be moved with care.
• Quick stops, excessive force, and uneven surfaces may cause the equipment and cart
combination to overturn.
VENTILATION
Slots and openings in the monitor and the back or bottom are provided for ventilation and to
ensure reliable operation of the video monitor or equipment and to protect if from overheating. These openings must not be blocked or covered. The openings should never be blocked
by placing the video monitor on a bed, sofa, rug, or other similar surface. Video monitor or
equipment receiver should never be placed near or over a radiator or heat register. Video
monitor or equipment receiver should not be placed in a built-in installation such as a bookcase unless proper ventilation is provided.
www.svat.com
PARTS OF THE SYSTEM:
FEATURES:
• 2.4GHz wireless technology
• Monitor supports up to 3 cameras
• Cameras can be viewed in 3 modes: Scan, Auto & Manual
• Adjustable cycle time between cameras in Auto mode
• Rotatable LCD screen panel for better viewing angle
• Adjustable brightness, colour, contrast, alarm/audio volume
• Audio/Video output to TV or VCR
• Plug and play installation
• Monitor and camera can be wall or table mounted
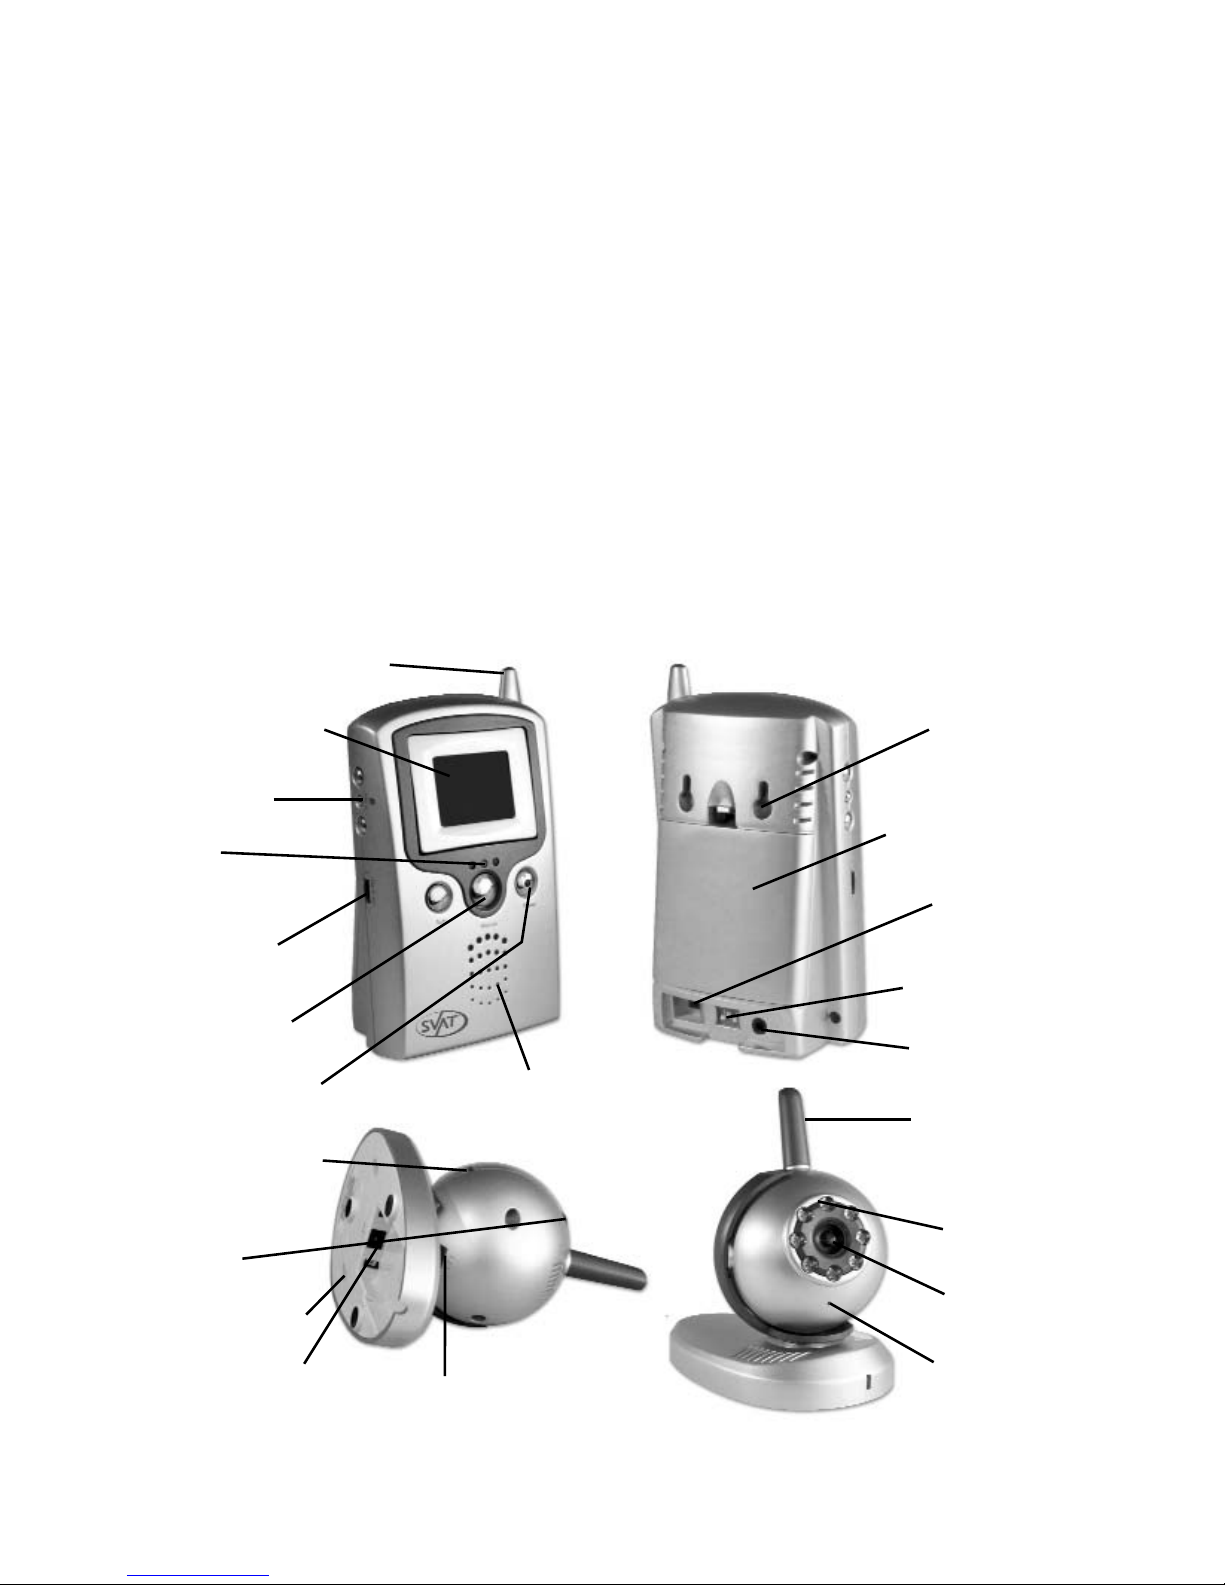
Antenna
1.5” TFT-LCD Screen
Menu Select
Active
Camera Indicator
Alarm Volume
Adjustment
Manual
Camera Switch
Monitor Power Button
Speaker
Wall Mount Holes
Battery Compartment
AC Power Input
Camera Activation
AV Out
Antenna
Infrared LEDs
Camera Lens
Microphone
Channel Selector
Wall mount holes
AC Power Input
Voice Activation
Sensitivity
Day/Night Viewing
Switch
www.svat.com
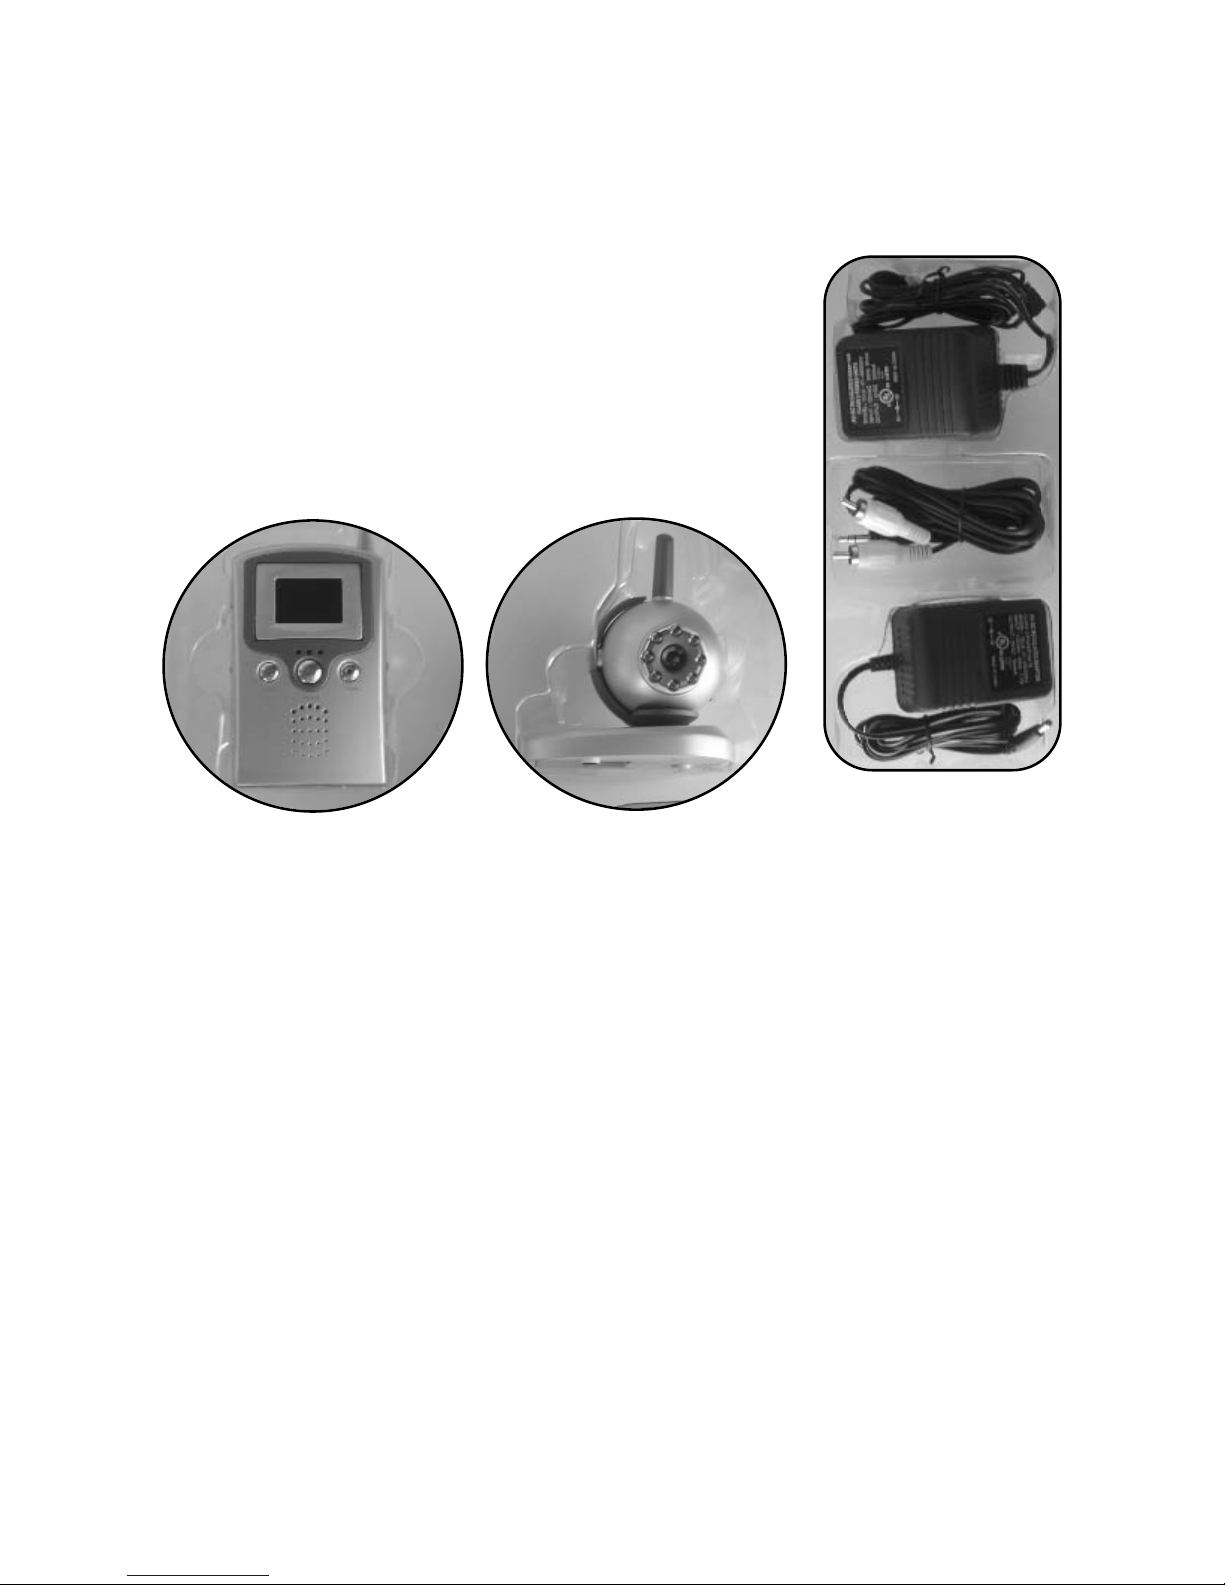
INCLUDED IN THIS SYSTEM:
*Please identify all parts before proceeding with installation*
• One Monitor
• One Camera
• One Monitor Wall Mount
• Mounting Hardware
• 1 Monitor Adapter
• 1 Camera Adapter
• RCA Cable
Monitor
Camera
Monitor & Camera
Adapters and 1
RCA Cable
THINGS TO CONSIDER BEFORE INSTALLATION:
The 2.4 GHz video signal passes easily through your home’s interior
walls, however the signal may be reflected by power wire or plumbing
inside the walls. The most common sources of interference are
microwave ovens and wireless networks. Try to avoid mounting the
palm monitor near a microwave oven or wireless network or other
sources of RF interference such as cordless phones.
www.svat.com
INSTALLING THE CAMERA (TANSMITTER)
1. Unpack the camera.
2. For optimal performance please follow these steps accordingly.
Mount the camera between 8-13 feet above the area to be monitored.
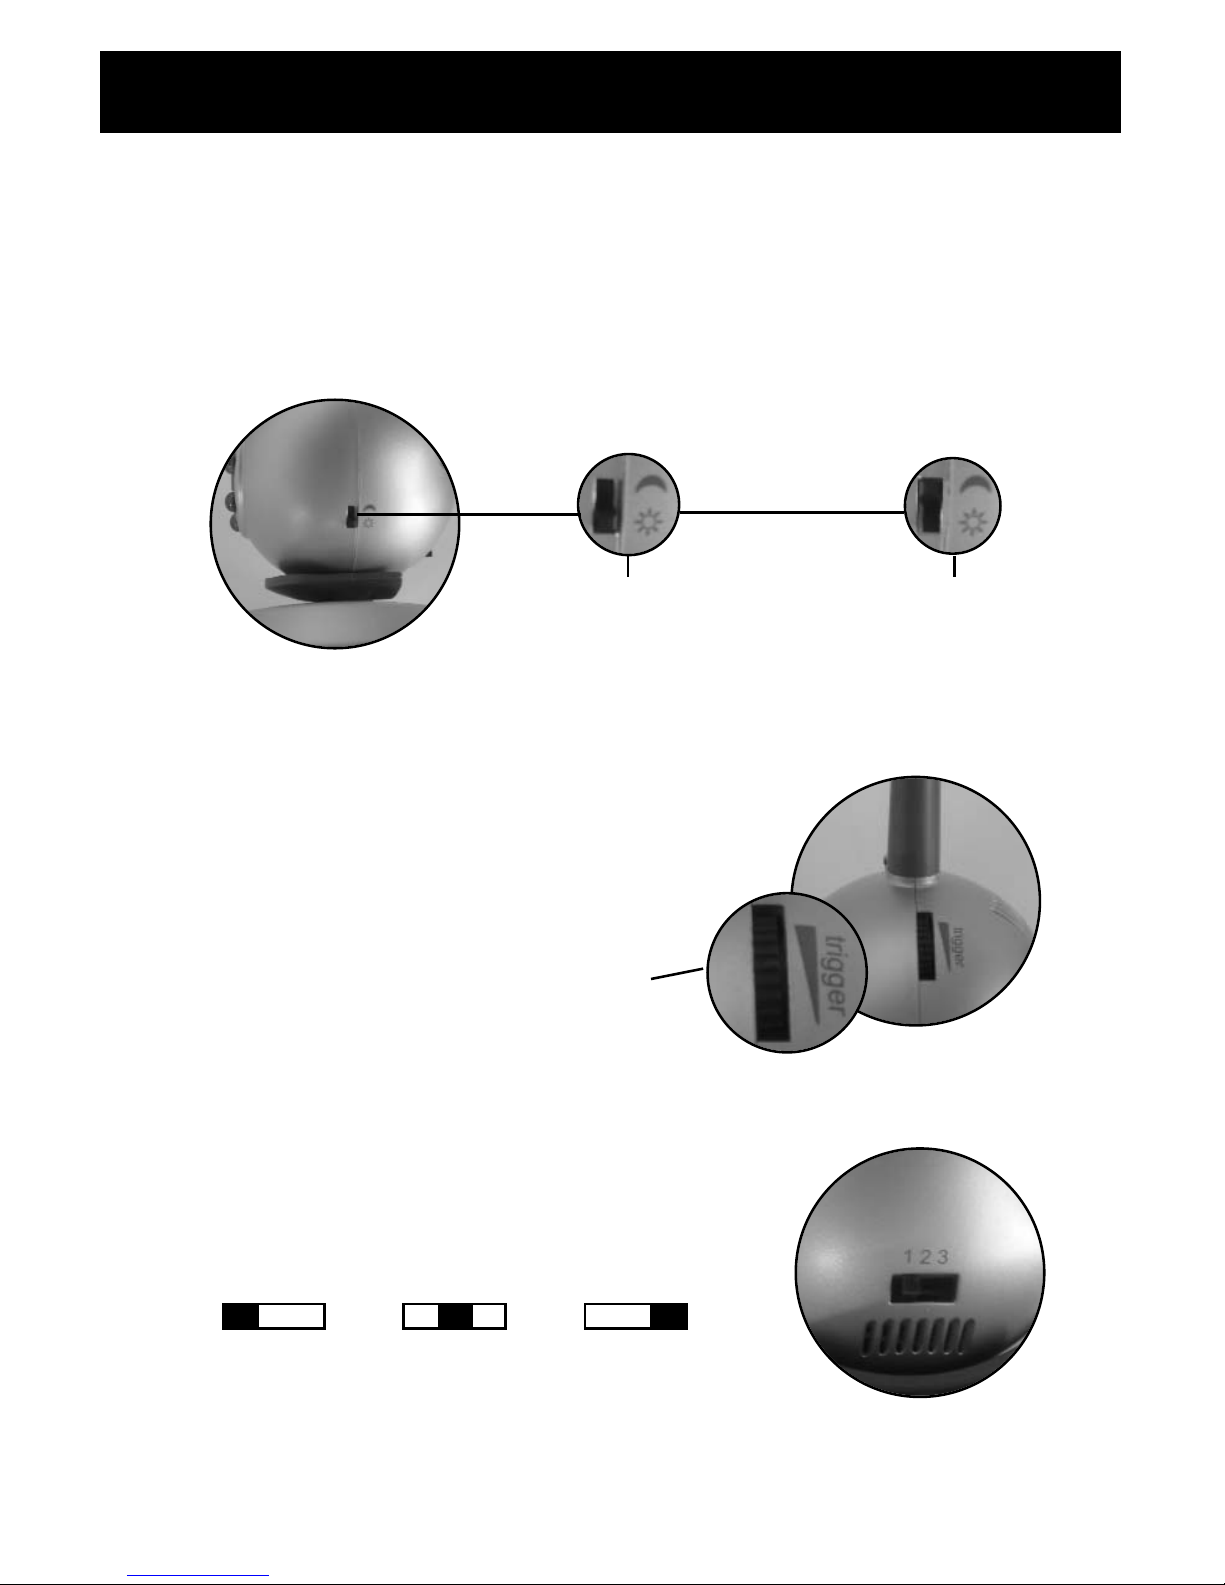
The camera has 8 IR LEDs, for day use turn off the LEDs by sliding the night
vision switch (on the right side of the camera head) to the OFF position.
SUN for day and MOON for night vision.
3. Connect the supplied 9V power adapter to the camera.
*WARNING: USE OF ANY OTHER ADAPTOR MAY CAUSE DAMAGE TO THE SYSTEM*
NOTE: Camera is also battery operable (rechargeable battery pack is sold seperatley GX515B)
4. To avoid problems with false sound trigger, adjust
the sound trigger level by tuning the TRIGGER
LEVEL TUNER (on the top right hand side of the
camera head)
5. Select the transmission channel found on the bottom
of the camera head by sliding switch to position
1,2 or 3. * When using more than one camera
ensure that each camera is set to a different
channel.*
6. The camera (transmitter) installation is now complete.
SLIDE SWITCH
SET TO NIGHT
VISION ON
SLIDE SWITCH
SET TO NIGHT
VISION OFF
TRIGGER TUNER
SET TO TRIGGER LEVEL
RIGHT SIDE VIEW
OF THE CAMERA
1 2 3
1 2 3 1 2 3
Set channel 1
position
Set channel 2
position
Set channel 3
position

www.svat.com
INSTALLING THE MONITOR (RECEIVER)
1. Unpack the monitor.
2. Connect the supplied 6V power adapter to the back
of the monitor (adapter marked “FOR MONITOR”.
*WARNING: USE OF ANY OTHER ADAPTOR MAY CAUSE DAMAGE
TO THE SYSTEM*NOTE: Monitor is also battery operable using
4 AA type batteries (not included)
3. Turn on the monitor by pressing the power button.
4. The monitor can be connected directly to any
TV/VCR (optional) using the supplied cable
connect the 3.5” jack to the rear of the GX5150
monitor. Next connect the yellow RCA cable to
your VIDEO IN and the white RCA cable to the
AUDIO IN jack on your TV or VCR.
Viewing on TV: Tune your TV to a VIDEO/AUX
channel (refer to your TV user manual)
Recording to a VCR: Tune your VCR to a Video/AUX channel, tune your TV
to the proper input channel or Channel 3 or 4. You are now ready to record.
5. The monitor is wall or desk mountable. For wall installation, install the
bracket onto the wall and mount the monitor on to the bracket.
6. The monitor (receiver) installation is now complete!
MULTI -CAMERA OPERATION
The GX5150 system is designed to work with up to 3 cameras (GX515).
Additional cameras are sold seperatley.
1. Designate a selected channel for each camera. Simply adjust the channel
switch (located at the bottom of the camera head) to the desired position
1,2 or 3. Refer to step 5 in the camera installation section of this manual.
2. Adjust the dip switches found on the back of the monitor to reflect the
channels in use.
Back of Monitor and Adapter
shown to the right.
Camera 1
in use
Cameras
1&2 in use
All Cameras
in use

www.svat.com
MONITOR FUNCTIONS
1. POWER BUTTON: this button allows you to turn the monitor on/off by simply
pressing the POWER button. The built-in LED of the power button may flash
from time to time indicating a low battery when batteries are used.
2. MANUAL BUTTON: this button allows you to select a specific camera to be
shown on the monitor. The monitor will switch to a different camera each
time the Manual button is pressed. To avoid viewing channels that do not
have cameras assigned, set the DIP switches (located on the rear panel of
the monitor) on the unused channels up to the OFF position.
(refer to step 2 under the multi-camera section of this manual)
3. AUTO BUTTON: this button allows your system to automatically scan
through all active cameras. When sound is detected on the pre-set
sound trigger level on the camera, the monitor will display the picture from
the camera for a few seconds and the beeper alarm will sound.
The dwell time (time taken to switch between cameras) is pre-set to 4
second intervals and can be adjusted between 2-30 second intervals.
To adjust the dwell time, press both the auto & manual buttons
simultaneously. Each flash of the LED increases the dwell time by one
second.
4. SCAN BUTTON: pressing this button places the system in scan mode. The
monitor screen turns blank and the system continuously scans active
cameras for sound. If sound is detecteted through the camera that is
above the pre-set trigger level, the monitor will display the active camera
picture and the beeper will sound. Two minutes after the last detection,
the screen returns to standby/scan mode and the monitor resumes
scanning.
*NOTE: Pressing the Manual or Auto button will cancel this mode*
5. VOLUME: the audio volume of the palm monitor can be adjusted by
tuning the volume tuner on the right side of the monitor.
6. ALARM VOLUME: the alarm volume of the monitor can be adjusted by
tuning the alarm volume tuner on the left side of the monitor.
7. MENU BUTTON: Pressing the menu button on the left side of the monitor:
• LED ON, adjust BRIGHTNESS +/-
• LED Flashing, adjust COLOUR +/-
• LED Off, adjust CONTRAST +/-
Menu
Auto
Manual
Power
Scan
 Loading...