

SVAT Do-It-Yourself Compact DVR Security System CLEARVU2 Instruction Manual
INSTRUCTION MANUAL
COMPLETE SYSTEM
Do-It-Yourself Compact DVR Security System
w/ 4 Hi-Res Indoor/Outdoor Night Vision CCD Surveillance Camera
SVAT ELECTRONICS
now you can see
Model#
CLEARVU2
www.svat.com
Version 1.0
SVAT ELECTRONICS
now you can see
2
!IMPORTANT! PLEASE READ!
NEED
HELP?
PLEASE DO NOT RETURN THIS
PRODUCT TO THE STORE
Please contact a DEFENDER customer support representative rst regarding any additional information on
product features, specications or help with set-up.
Please contact us via one of the methods below:
Toll free telephone:
1.866.946.7828
For more product information visit www.svat.com
Email:
support@svat.com
Toll free fax:
1.888.771.1701
Having problems with this DVR?
Before calling technical support, please attempt to reset your DVR to factory default settings. This
will not erase your recorded footage.
Press
if your DVR is recording, then press . If the DVR password is enabled, enter
your password (Default: 111111). Select “LOAD DEFAULT” and press ►/4 twice to conrm. After the
reset is complete, power o the DVR and power on again.
If you have forgotten your DVR password, please email customer support at: support@svat.com.
Online live web chat:
www.svat.com/support

PRODUCT WARRANTY & REGISTRATION
Please visit our website at www.svat.com to
apply for your product’s warranty registration.
We take quality very seriously. This is why all of our products come with a one year warranty from the original purchase date
against defects in workmanship and materials.
If you have warranty or support issues please contact us using any of the following methods:
Phone: 866.946.7828 SVAT Electronics Canada SVAT Electronics USA
Fax: 888.771.1701 4080 Montrose Road 2315 Whirlpool St., Unit 333
Email: support@svat.com Niagara Falls, ON Niagara Falls, New York
Website: www.svat.com Canada L2H 1J9 USA 14305
1. SVAT products are guaranteed for a period of one year from the date of purchase against defects in workmanship and materials. This warranty
is limited to the repair, replacement or refund of the purchase price at SVAT’s option.
2. This warranty becomes void if the product shows evidence of having been misused, mishandled or tampered with contrary to the applicable
instruction manual.
3. Routine cleaning, normal cosmetic and mechanical wear and tear are not covered under the terms of this warranty.
4. The warranty expressly provided for herein is the sole warranty provided in connection with the product itself and no other warranty,
expressed or implied is provided. SVAT assumes no responsibilities for any other claims not specically mentioned in this warranty.
5. This warranty does not cover the shipping cost, insurance or any other incidental charges.
6. You MUST call Defender before sending any product back for repair. You will be sent a Return Authorization form with return instructions.
When returning the product for warranty service, please pack it carefully in the original box with all supplied accessories, and enclose your
original receipt or copy, and a brief explanation of the problem (include RA #).
7. This warranty is valid only in Canada and the continental U.S.
8. This warranty cannot be re-issued.
9. Tearing the tamper-proof sticker on the DVR case will void the product warranty.
Graphic Symbol Explanation
The lightning ash with arrowhead symbol, within an equilateral triangle, is intended to alert the user to the presence of
insinuated “dangerous voltage” within the product’s enclosure that may be of sucient magnitude to constitute a risk of
electric shock to persons.
The exclamation point within an equilateral triangle is intended to alert the user to the presence of important operating
maintenance (servicing) instructions in the literature accompanying the appliance.
TO REDUCE THE RISK OF ELECTRIC SHOCK, DO NOT REMOVE THE COVER (BACK).
NO USER SERVICEABLE PARTS INSIDE. REFER SERVICING TO QUALIFIED SERVICE PERSONNEL.
CAUTION
RISK OF ELECTRIC SHOCK, DO NOT OPEN
SVAT ELECTRONICS
now you can see
CLEARVU2 www.svat.com

SVAT ELECTRONICS
now you can see
CLEARVU2 1
INTRODUCTION ............................................................... 2
PRODUCT FEATURES ......................................................... 3
WHAT’S INCLUDED ........................................................... 4
BUTTONS & CONNECTIONS ................................................ 4
INSTALLATIONS ............................................................... 5
Camera Installation Tips ........................................ 5
Mounting ............................................................. 5
Wiring The Cameras .............................................. 6
CONNECTiON DIAGRAM .................................................... 7
Connecting the DVR to a TV/Monitor ....................... 7
Powering On ......................................................... 8
DVR OPERATION .............................................................. 8
Basic Operation .................................................... 8
Record Mode......................................................... 9
Playback Mode ..................................................... 9
MAIN MENU .................................................................. 10
System Setup ......................................................10
Time Setup ................................................................................11
Password Setup .........................................................................11
Load Default .............................................................................12
Language Setup ........................................................................12
Version .....................................................................................12
Camera Setup ......................................................13
Camera Enable ..........................................................................13
Camera Title ..............................................................................13
Camera Setting .........................................................................13
CH1-CH4 Title ............................................................................14
Record Setup .......................................................14
Record Type ...............................................................................14
Video Quality.............................................................................15
Timer Rec Frame Rate ................................................................15
Motion Rec Frame Rate ..............................................................15
Motion Rec Time ........................................................................15
Record Mode .............................................................................15
Time Recording [T] .....................................................................16
Motion Recording [A] .................................................................16
Time Motion (Mixed) [M] ............................................................16
Disable Recording [–] .................................................................16
TABLE OF CONTENTS

SVAT ELECTRONICS
now you can see
CLEARVU2 2
INTRODUCTION
Thank-you for purchasing the CLEARVU2 DVR system. Correct installation and use of this system will greatly increase
the security in your home or business. Please read through this manual and carefully follow the instructions to get the
most out of your CLEARVU2 DVR system.
Buzzer Setup ..................................................... 16
Motion Alert ............................................................................ 16
Video Loss Alert .......................................................................16
HDD Full Alert .......................................................................... 16
Buzzer Time ............................................................................ 17
Event List .......................................................... 17
Time Search ............................................................................ 17
Event Search ........................................................................... 17
USB Device Setting ............................................. 17
Format .................................................................................... 18
Copy ....................................................................................... 18
Erase Video Data ...................................................................... 19
Hard Drive Setup ................................................ 19
Disk Full ..................................................................................19
HDD Size ................................................................................. 20
HDD Used ................................................................................ 20
HDD Format ............................................................................. 20
DVR PLAYER SOFTWARE ................................................ 20
Software Installation ......................................... 21
Operation .......................................................... 21
Capturing Images/Video to your Computer ........... 22
Settings ............................................................ 22
DVR PLAYER TROUBLESHOOTING .................................... 23
SPECIFICATIONS ........................................................... 24
4 Channel DVR ................................................... 24
CCD Color Camera ............................................... 25
SVAT ELECTRONICS
now you can see
CLEARVU2 3
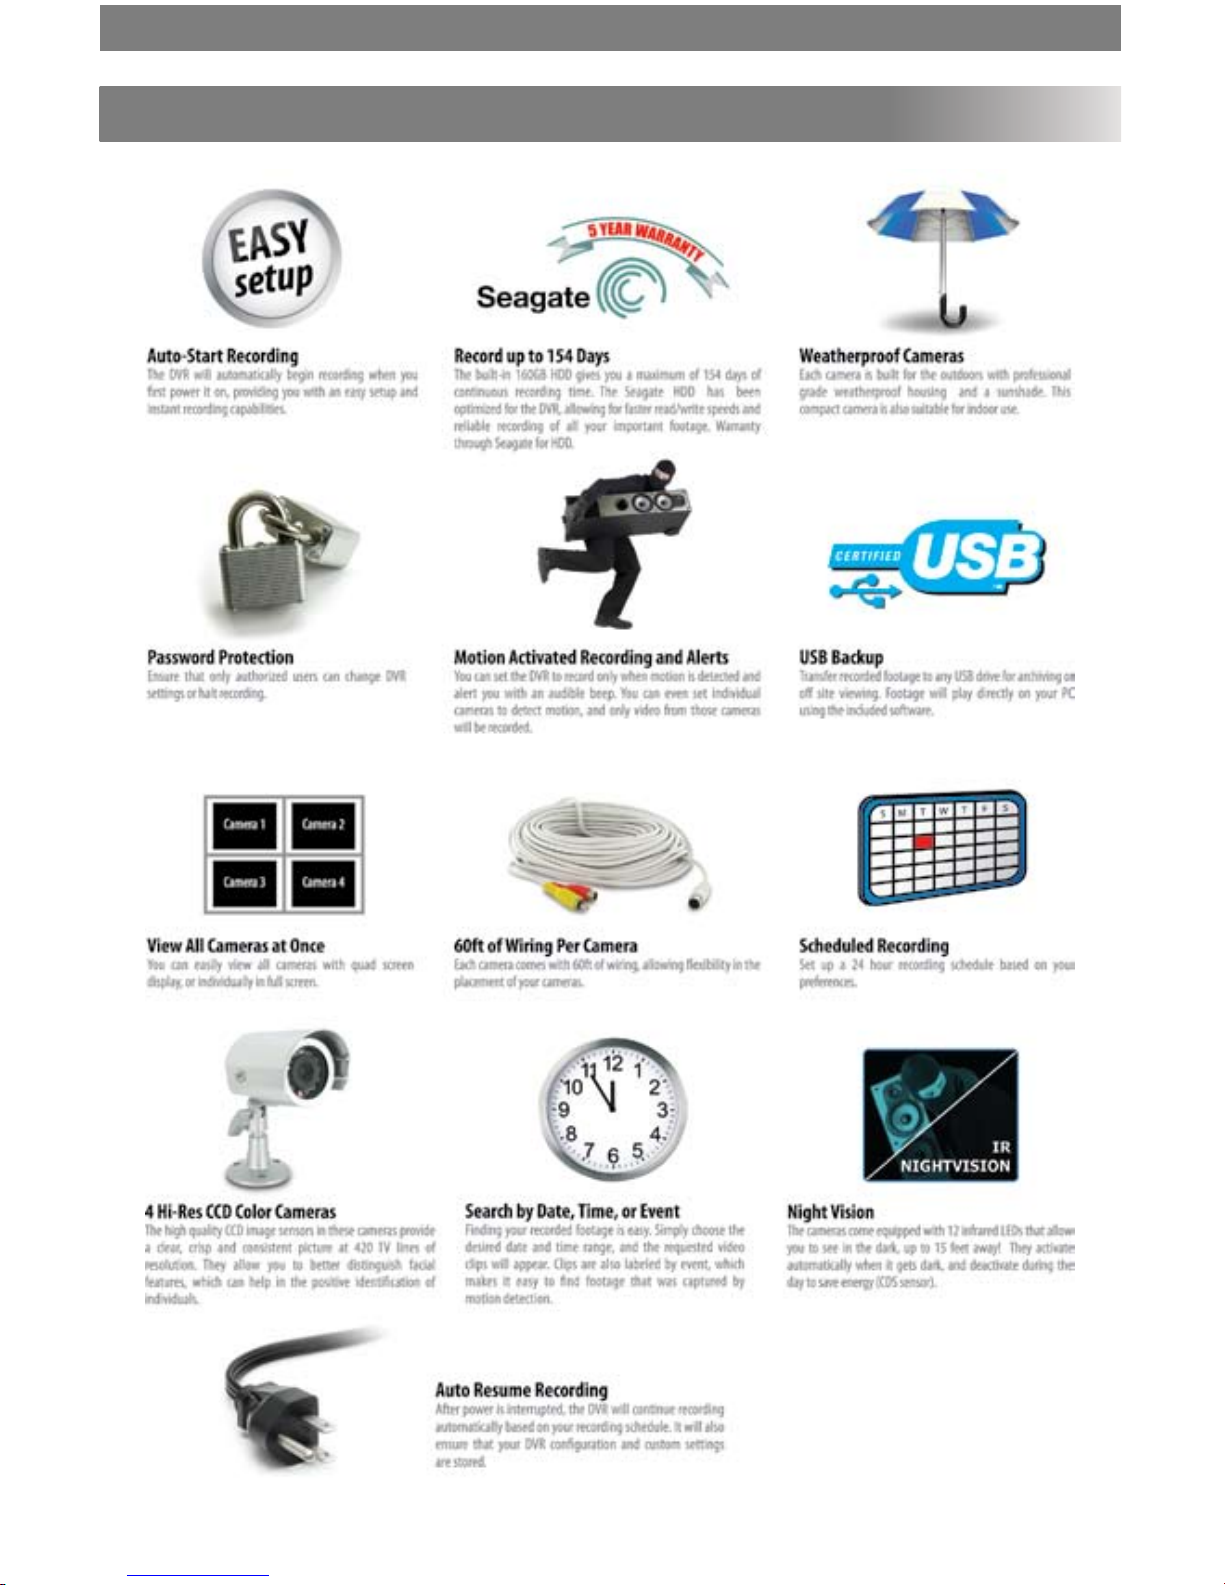
PRODUCT FEATURES
SVAT ELECTRONICS
now you can see
CLEARVU2 4
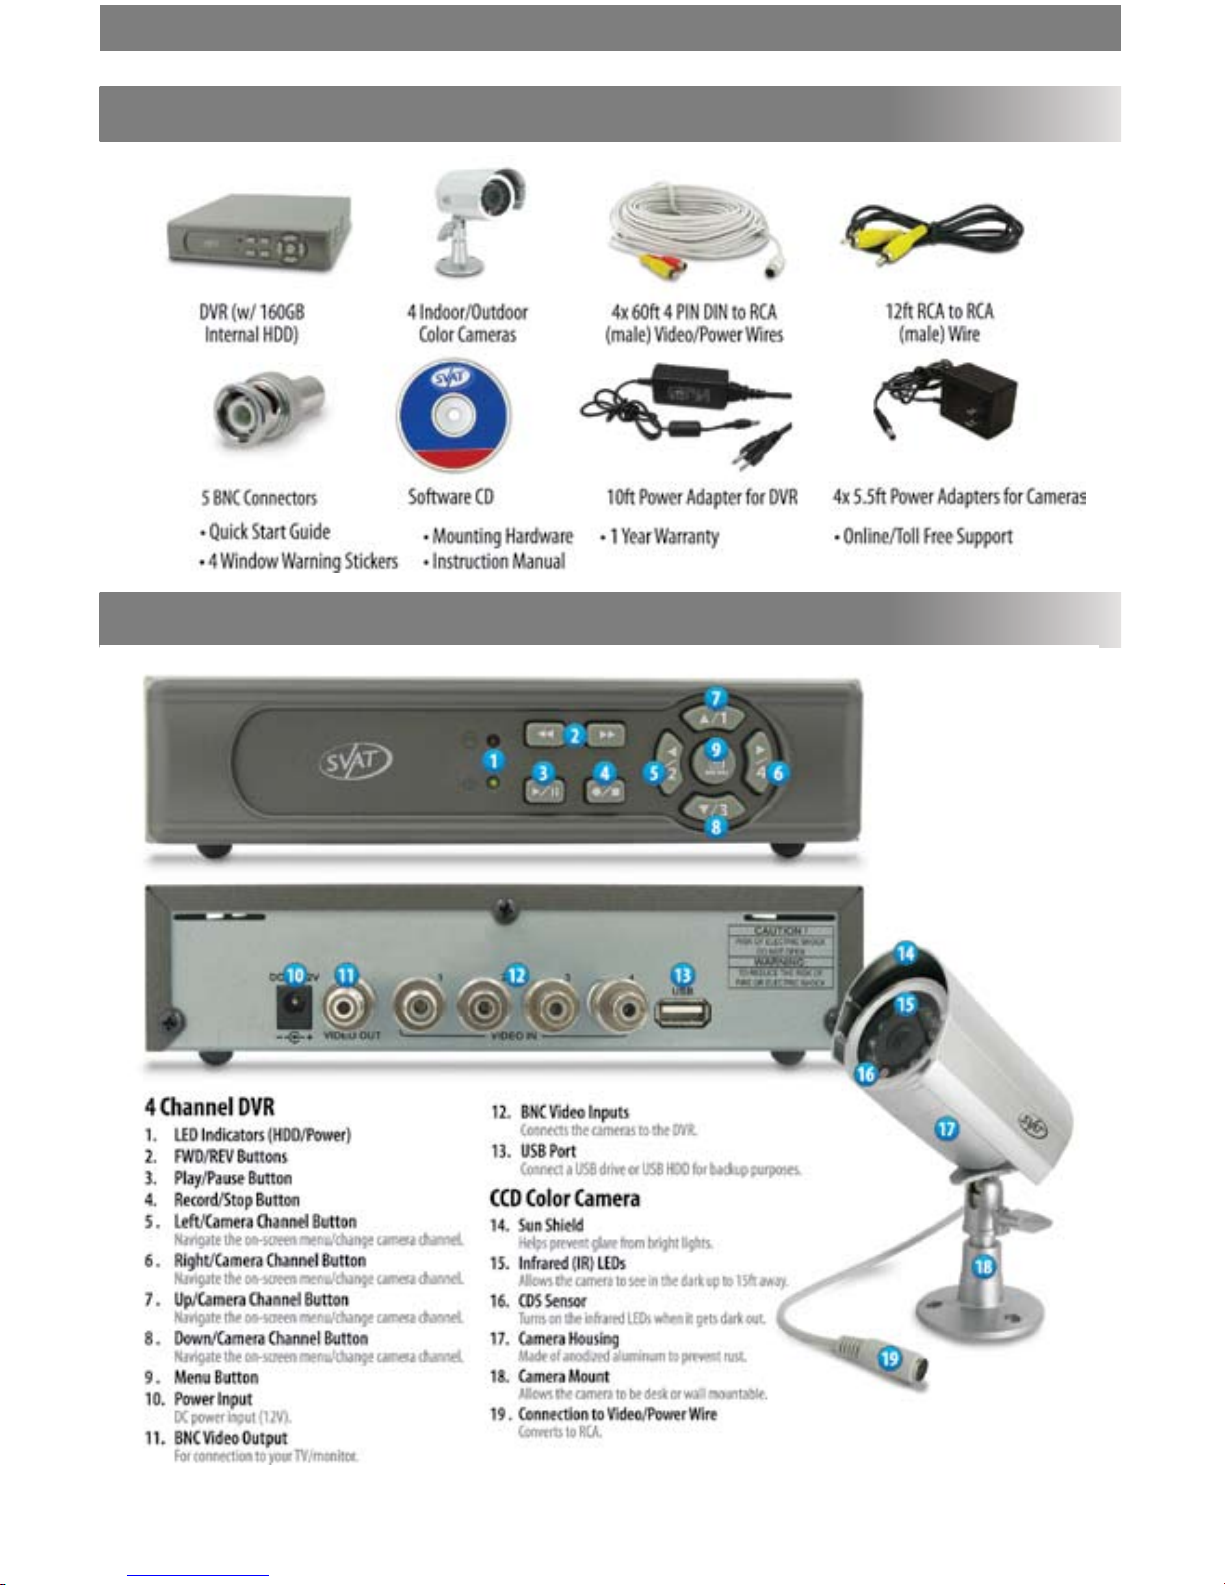
WHAT’S INCLUDED
BUTTONS & CONNECTIONS

SVAT ELECTRONICS
now you can see
CLEARVU2 5
INSTALLATIONS
Camera Installation Tips
• Camera(s) should be installed between 8 and 13 feet above the area to be monitored.
• Ensure there are no obstructions in the camera’s view, to maximize viewing area.
• Ensure that the sunshade is positioned to avoid glare and position cameras away from direct sunlight.
• Decide whether the camera will be wall-mounted or if it will sit on a desk/table top.
Note: If wall mounting, use the mounting hardware included in the package.
• Each camera comes with 60 feet of wire. Please make sure you mount the cameras no more than 60 feet from the DVR (unless
you have purchased additional wiring).
• We strongly recommend using a surge protected power bar and/or an Uninterrupted Power Supply (UPS) to power
the DVR and camera system.
Mounting
1. Mount each camera in the desired location no more than 60 feet from the DVR )unless you have purchased
additional wiring). You may wall mount or desk mount these cameras.
Wall Mounted Desk Mounted
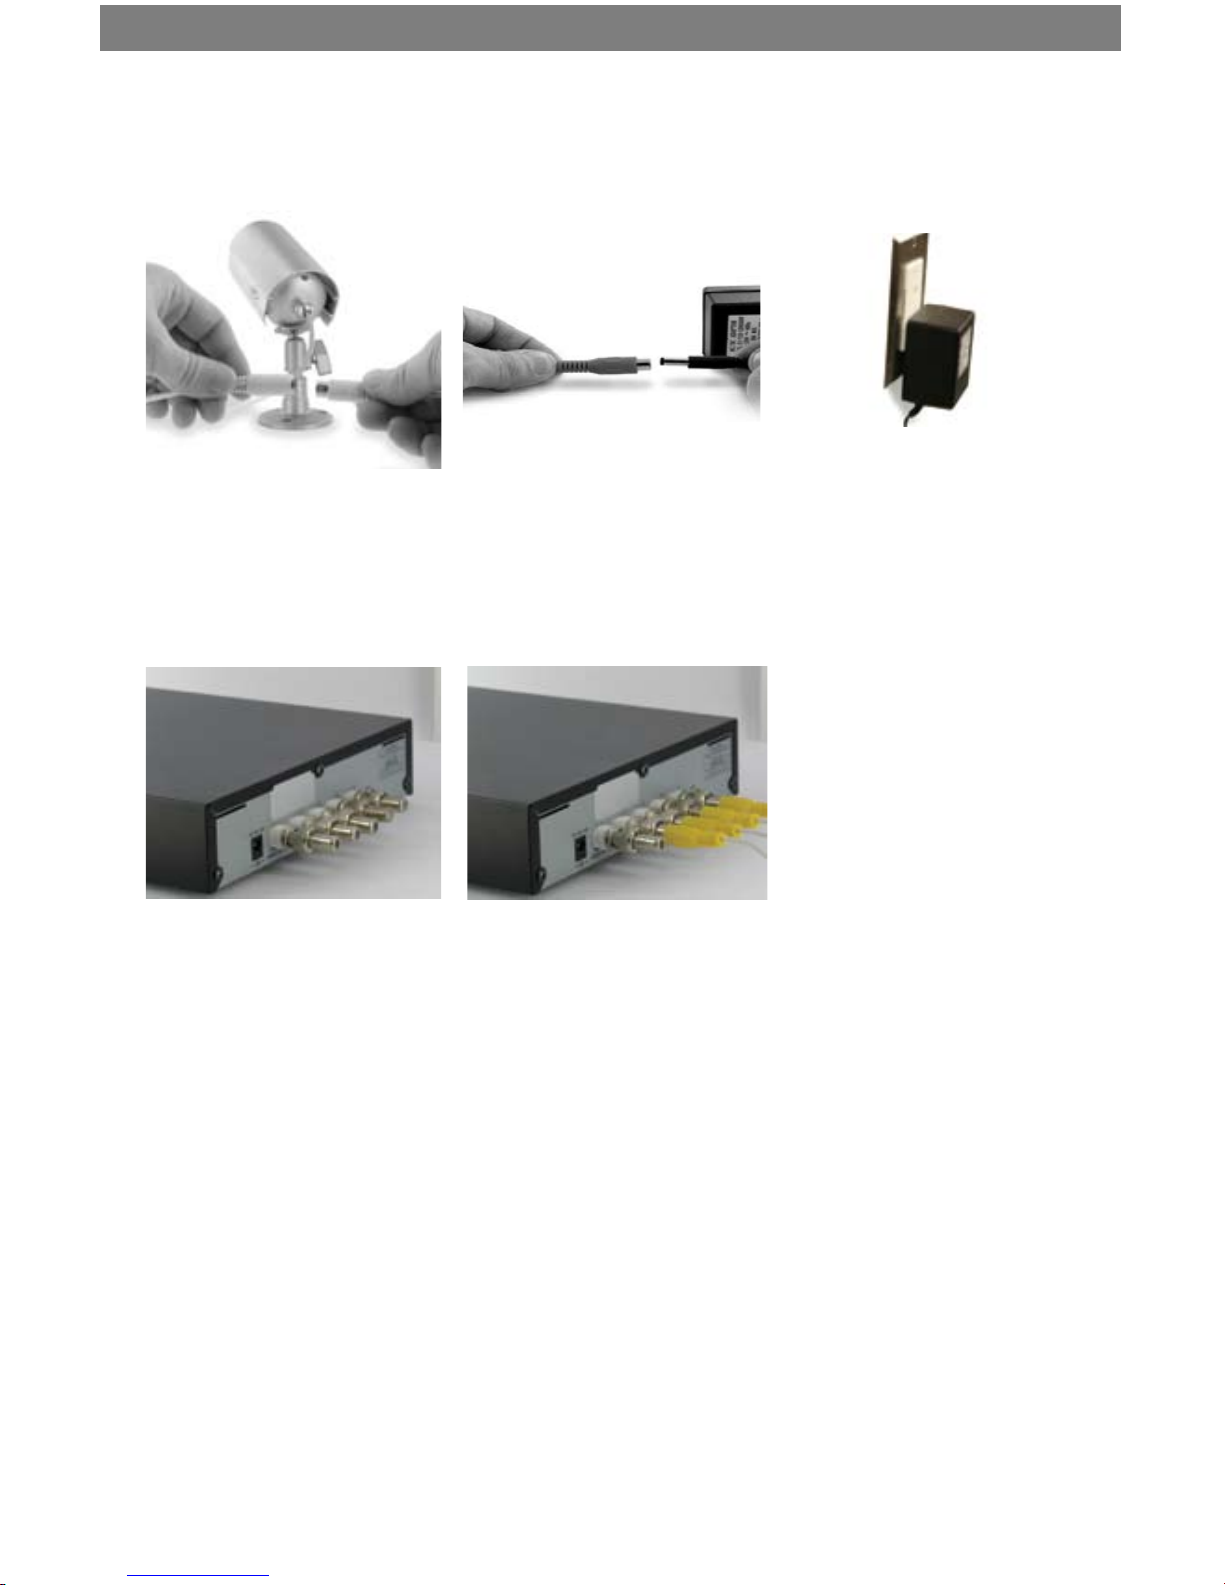
2. Adjust cameras to the desired viewing angles.
Please refer to the CV67 manual for a drilling template for your camera
SVAT ELECTRONICS
now you can see
CLEARVU2 6
5. Connect the 60ft video/power
wire’s male RCA plug to the VIDEO
IN port for channels 1~4.
Wiring The Cameras
1. Plug the 4 PIN DIN female
connection on the camera into the
4 PIN DIN male connection on the
60 ft video/power wire.
2. Plug the camera’s power supply
into the power jack located on the
60 ft video/power wire.
3. Plug the camera’s power adapter
into an AC outlet.
4. Attach the BNC connectors to the
VIDEO IN ports and VIDEO OUT
port on the back of the DVR.
NOTE: For detailed instructions on camera features and functions, please refer to the CV67 camera guide included in
the package.

SVAT ELECTRONICS
now you can see
CLEARVU2 7
CONNECTiON DIAGRAM
Connecting the DVR to a TV/Monitor
1. Connect one end of the RCA (male) wire to the VIDEO OUT port on the DVR.
2. Attach the other end of the RCA (male) wire to the VIDEO IN port on your TV/monitor.
3. Ensure that your TV/monitor is set to the proper VIDEO INPUT channel.
Note: Refer to the TVs remote control user manual if you cannot change the input
 Loading...